“Is this the year I finally get into bikepacking?” That’s the question I asked myself as the flaming you-know-what storm of 2020 lurched to a close and the equally as terrible first quarter of 2021 began. As it turns out, this was the year I got into bikepacking, and it’s improved my year considerably. My long-suffering feet and knees are enjoying the change of pace, as is my brain, though my rear end is not at all amused.
Bikepacking is, somehow, even more filthy than backpacking.
As a bonus, bikepacking has given me a new lens through which to examine my ultralight backpacking philosophy. I’m not sure I learned anything new, per se, but my reflections have led me to correct some drift and recommit to the ideas that keep the contents of my pack light and functional and enjoyable.
Bringing Less Stuff is Easier than Bringing Lighter Stuff (Generally)
I ended up with about 30 liters of space on my bikepacking rig. My smallest regular-use, multi-day backpacking pack is 40 liters. When I first began backpacking with a 40-liter pack I was pretty good about keeping things small and simple but my gear has grown to fit my space like a goldfish. So bikepacking provided me a chance to reexamine my regular gear choices and do a much-needed volumetric downsize.
I also ran into two more volume-related issues.
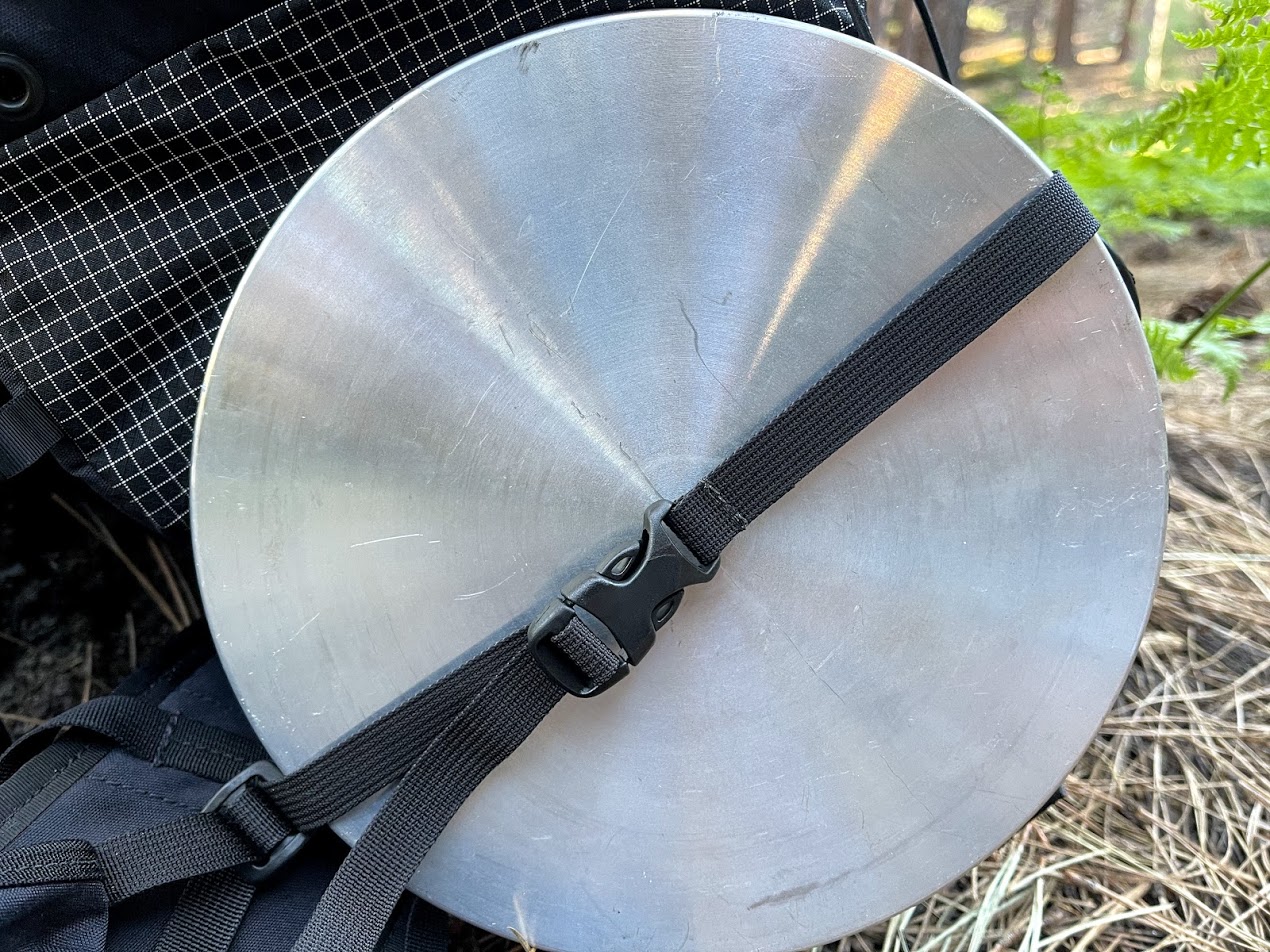
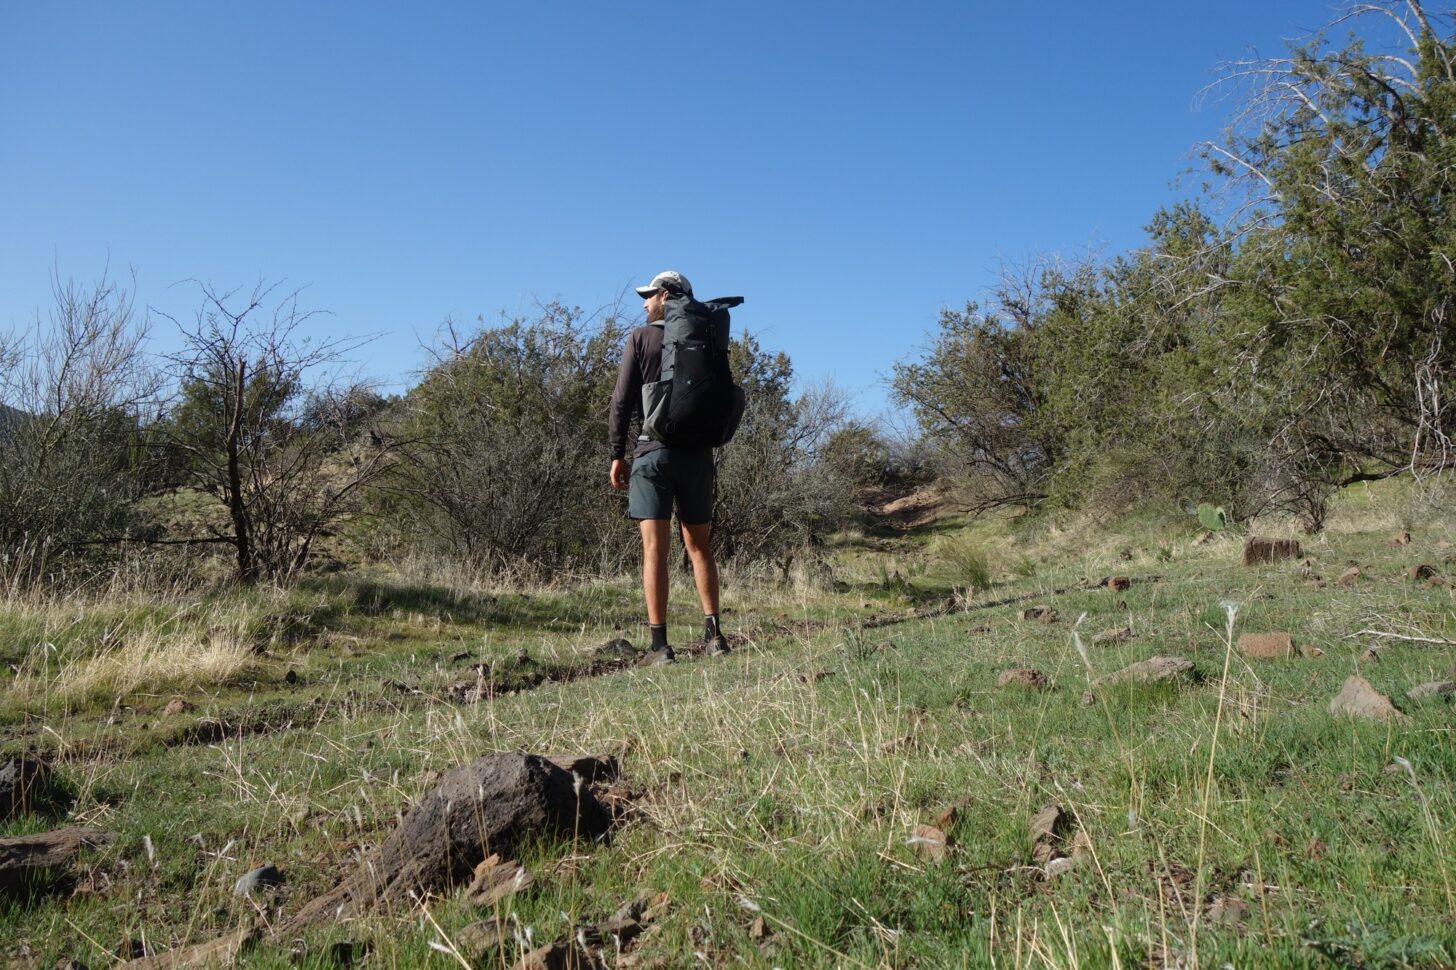
The first is this: I learned pretty quickly that I don’t like strapping items to the outside of my bikepacking rig like I might while backpacking if I overshoot my pack’s internal or external pocket volume. It’s a quick-fix with backpacking that doesn’t necessarily apply to bikepacking (especially if you are doing the kind of bikepacking that involves singletrack), and it’s made me recommit to working within the confines of the pack I choose for any given trip.
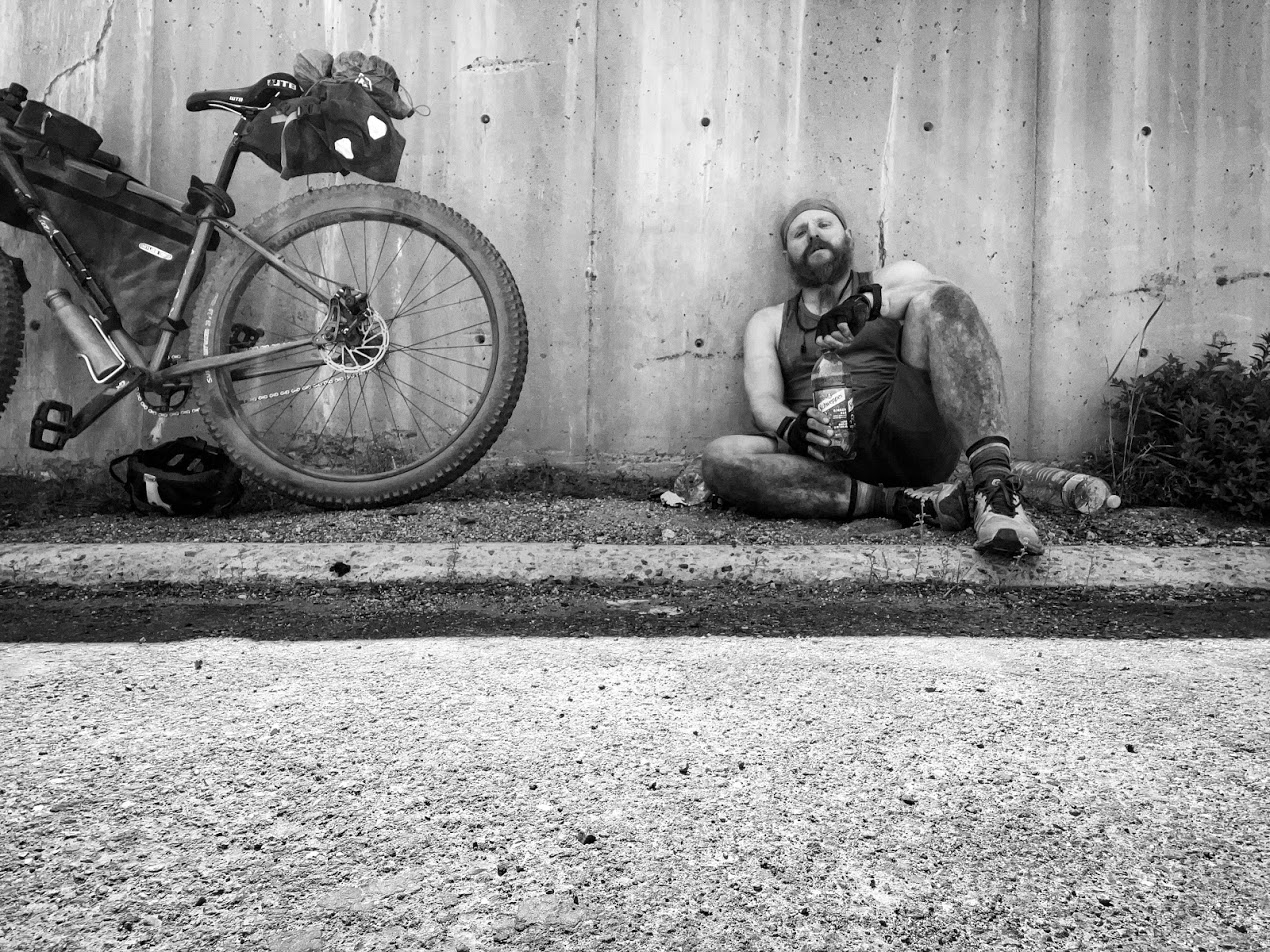
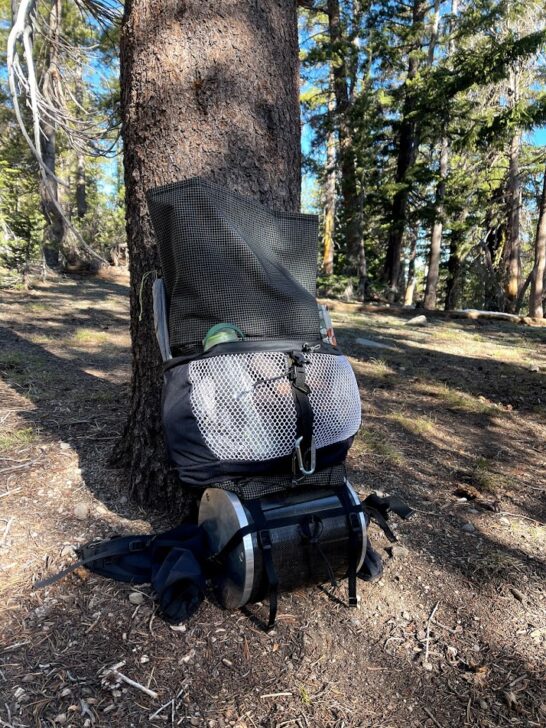
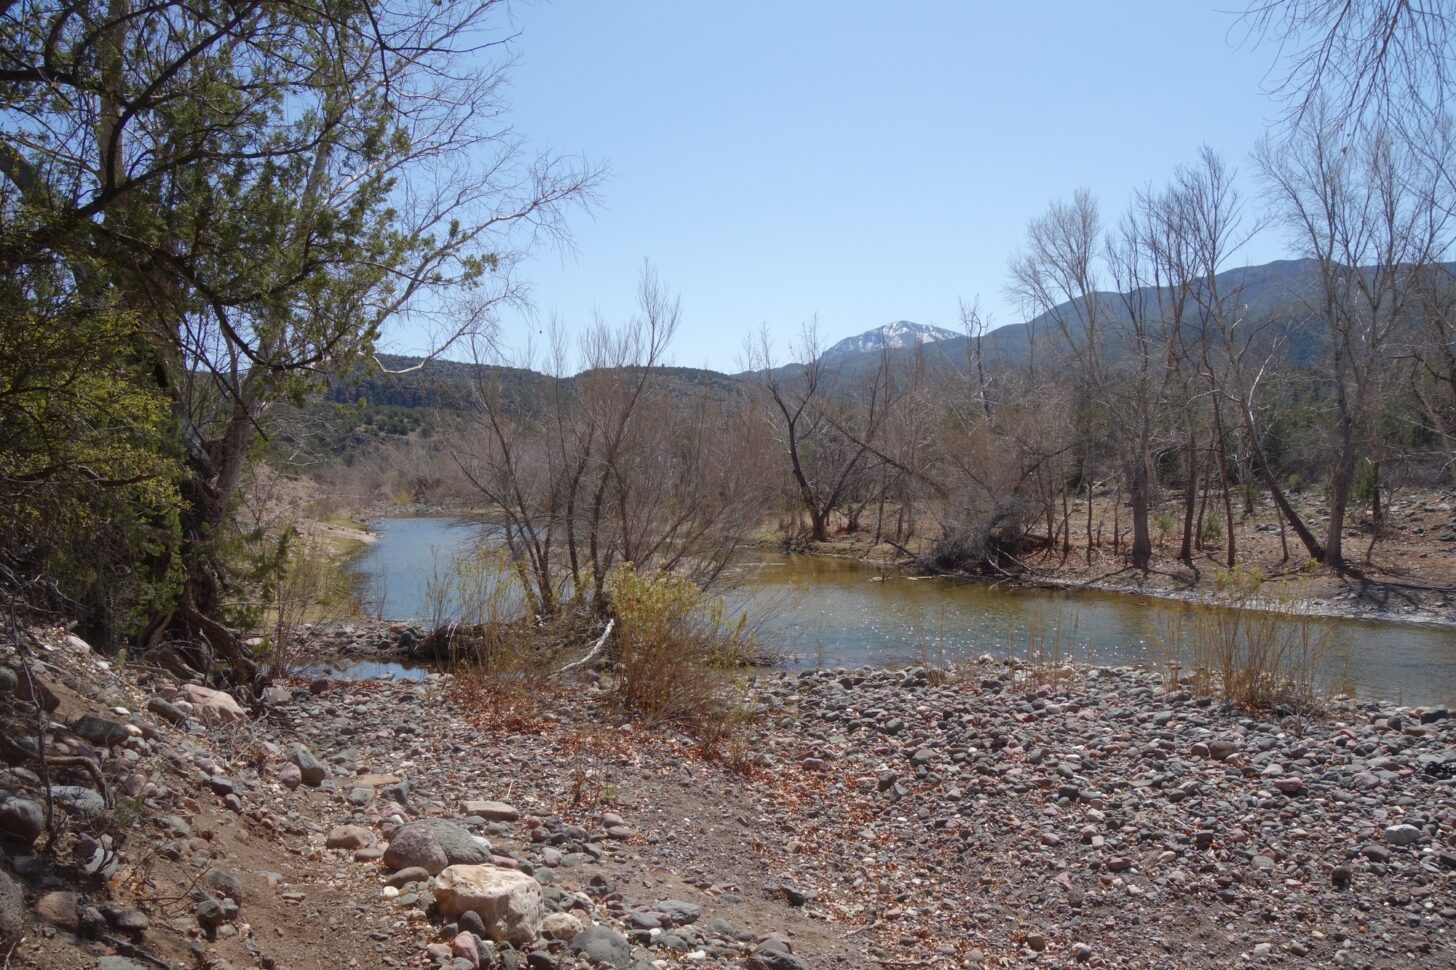
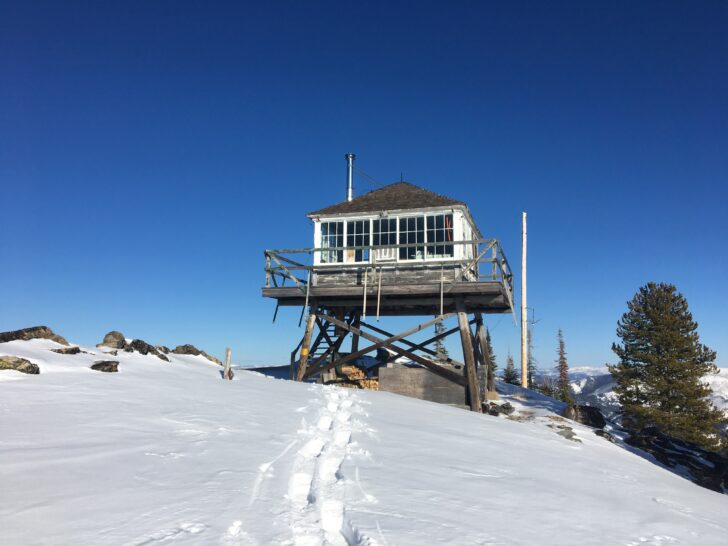
Setting out on a five-day bikepacking trip. I hadn’t yet learned that strapping my cook kit to the top of my seat bag was a bad idea for bouncy single-track.
The second issue is that with bikepacking you aren’t working with a single large cylindrical pack with three or four pockets. Instead, you have, at minimum, three entirely separate packs (probably more) all with different shapes and weight capacities. This necessitates a major packing re-think, and it also means things are harder to find when you need them fast (at least for me.) Having fewer things to find in the first place is a major win here.
I’ll Take Functionality and Reasonable Cost Over Expensive Incremental Weight Savings (Almost Always)
Something that weighs 10 ounces (283 g), works the way it is supposed to, and doesn’t break under stress is better than something that weighs 5 ounces (142 g), is hard to use, fragile, and prone to failure. If the 10-ounce thing is cheaper – and it almost always is – even better.
The Big Agnes shelter pictured here is light, expensive, has poor livability, and is somewhat fragile. The Salsa Deadwood pictured here was inexpensive, somewhat heavy (compared to more expensive options), and is virtually indestructible.
I consider the above paragraph a core component of my ultralight backpacking philosophy, but it’s easy to lose sight of in the midst of some of the more negative sides of ultralight culture and the continuing trend of gear manufacturers to win a weight race at the expense of usability.
I realized pretty quickly that I’d be more than happy to buy a bike that was four or five years old, weighed 30 pounds (14 kg), and was constructed of durable steel over a brand new, 20 pound (9 kg) relatively fragile carbon ride, mostly because there was simply no way I could afford the latter while the former was within my price range. I couldn’t be happier with the bike I got – it does exactly what I need it to do and it didn’t cost me the equivalent of a well-cared-for but aging Subaru Outback.
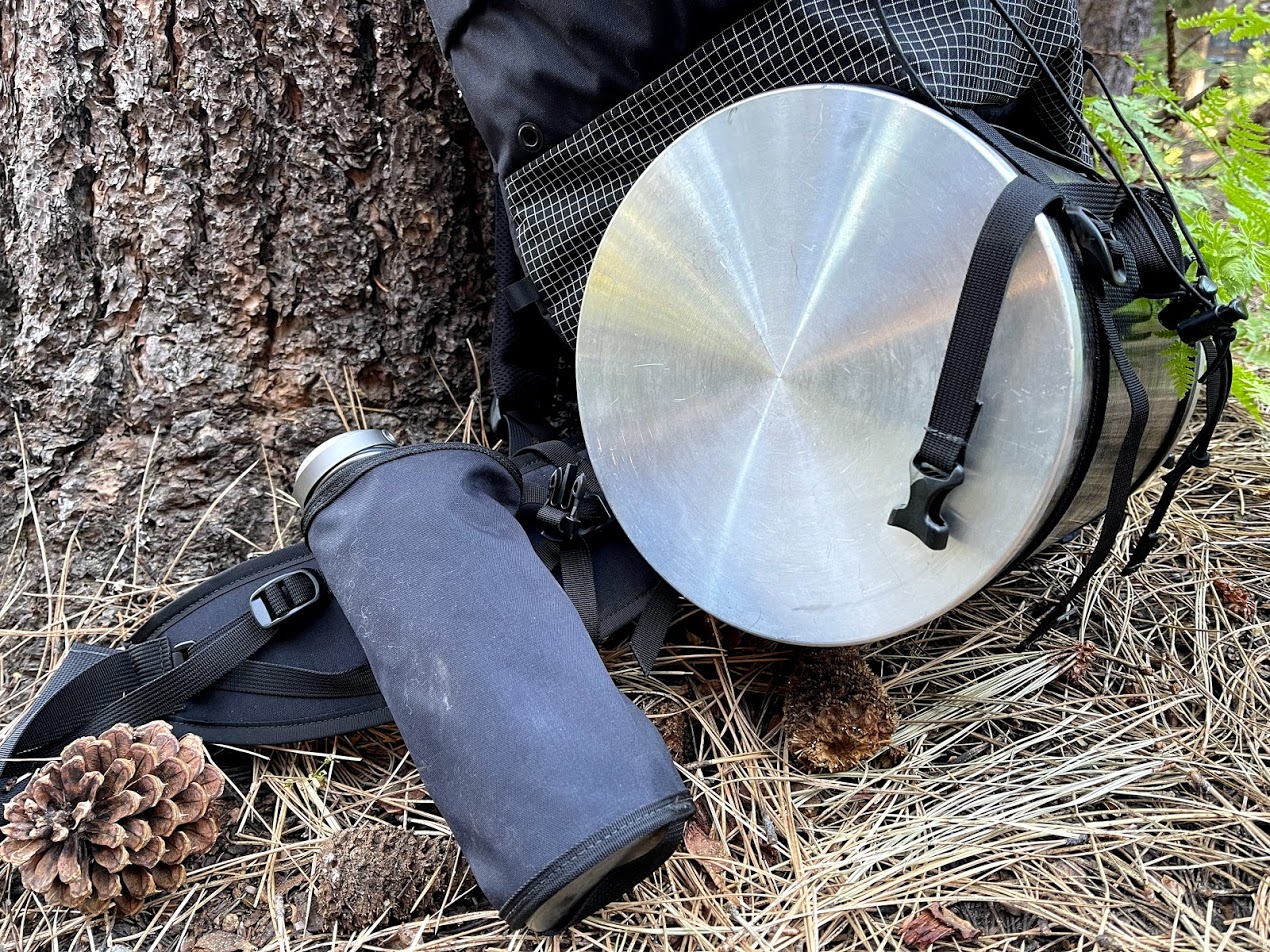
My rig. A steel-framed Salsa Deadwood modified for single-speed. I’d later change my packing system so my cook kit (bungied to the top of my seat bag) would be inside my frame bag.
Sometimes I have to suffer through occasional well-meaning but annoying conversations along the lines of “you wouldn’t be pushing your bike up this hill right now if it had a carbon frame/the latest geometry/the newest cog-set/etc.” But I find this a small price to pay for the, well, small price I had to pay for a durable and functional piece of gear.
I’ll Take Functionality Over Maximum Comfort (Sometimes)
My recent bikepacking trip in the Sierra Nevada was about 40% singletrack and involved multiple several-thousand-foot climbs. I’d be lying if I told you I didn’t spend the bulk of my trip seconding guessing my decision to use a rigid front suspension and swap out the rear derailer/11-speed cog set for a single-speed setup. I suffered on this trip in ways that I wouldn’t have suffered if I’d had front shocks and a derailleur. But – and this is crucial – I didn’t suffer past the point of enjoyment. And by the time the trip ended I was utterly sold on the single-speed life.
The peace of mind I got from knowing I wouldn’t end my trip early by accidentally bending my derailleur (say, by leaning it up against a tree, or brushing against it with a feather, or exposing it to a gentle gust of wind) added considerably to my fun and made the occasional suffer-fests worthwhile.
Big tires and rigid suspension means I don’t have to spend hundreds of dollars getting my bike serviced regularly. And field repairs on tires are much easier than field repairs on suspension systems.
Apply this lesson to backpacking and the first thing that sticks out to me is my sleep system.
On my two most recent 5+ day backpacking trips, I’ve experienced un-field-reparable pressure loss with my oh-so-comfortable and expensive inflatable air mattress. Did I offend the air mattress gods in some way? One of those trips was a thousand miles away from the nearest cactus.
Sleeping on the right air mattress > sleeping on closed-cell foam (CCF), but sleeping on closed-cell foam > sleeping on the ground. I can’t believe these words are going to leave my mouth, but I’m considering switching back to a CCF system simply because it gives me one less thing to worry about. My ongoing struggles with mental health mean I worry a lot anyway, so removing even one major anxiety point is a significant win. It does mean that I need to be pretty exhausted to get a good night’s sleep, so I guess that’s where that single-speed cog comes in.
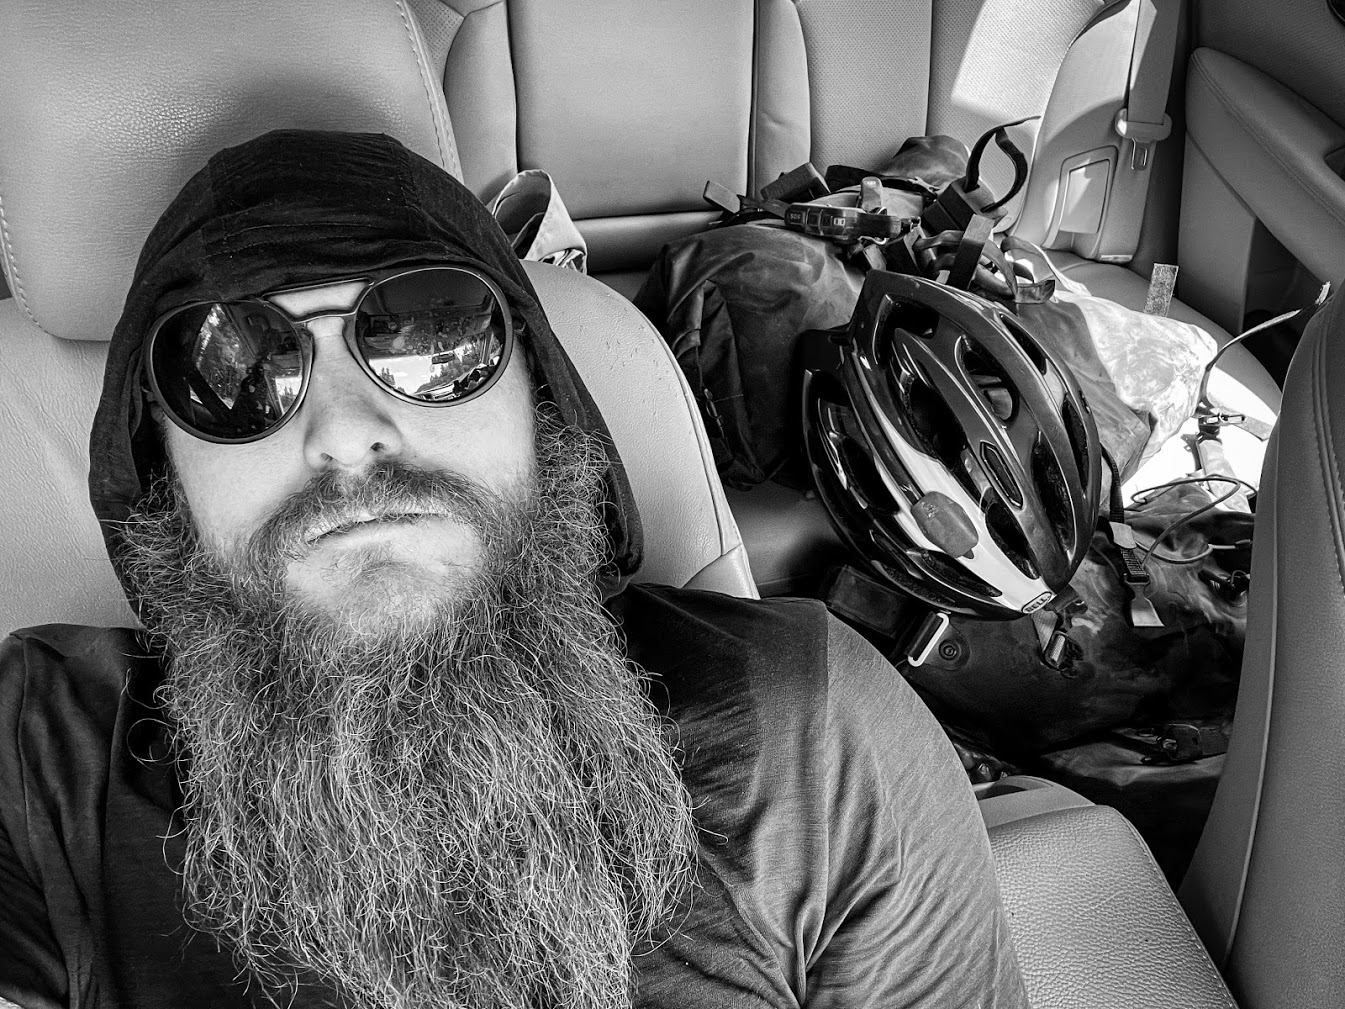
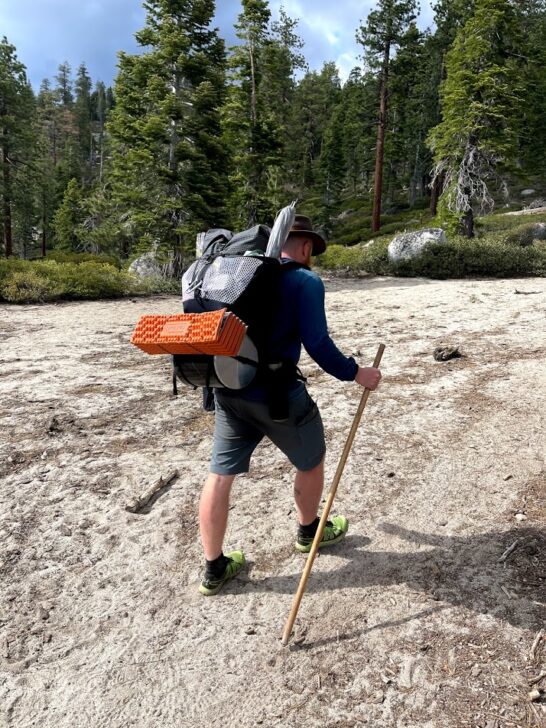
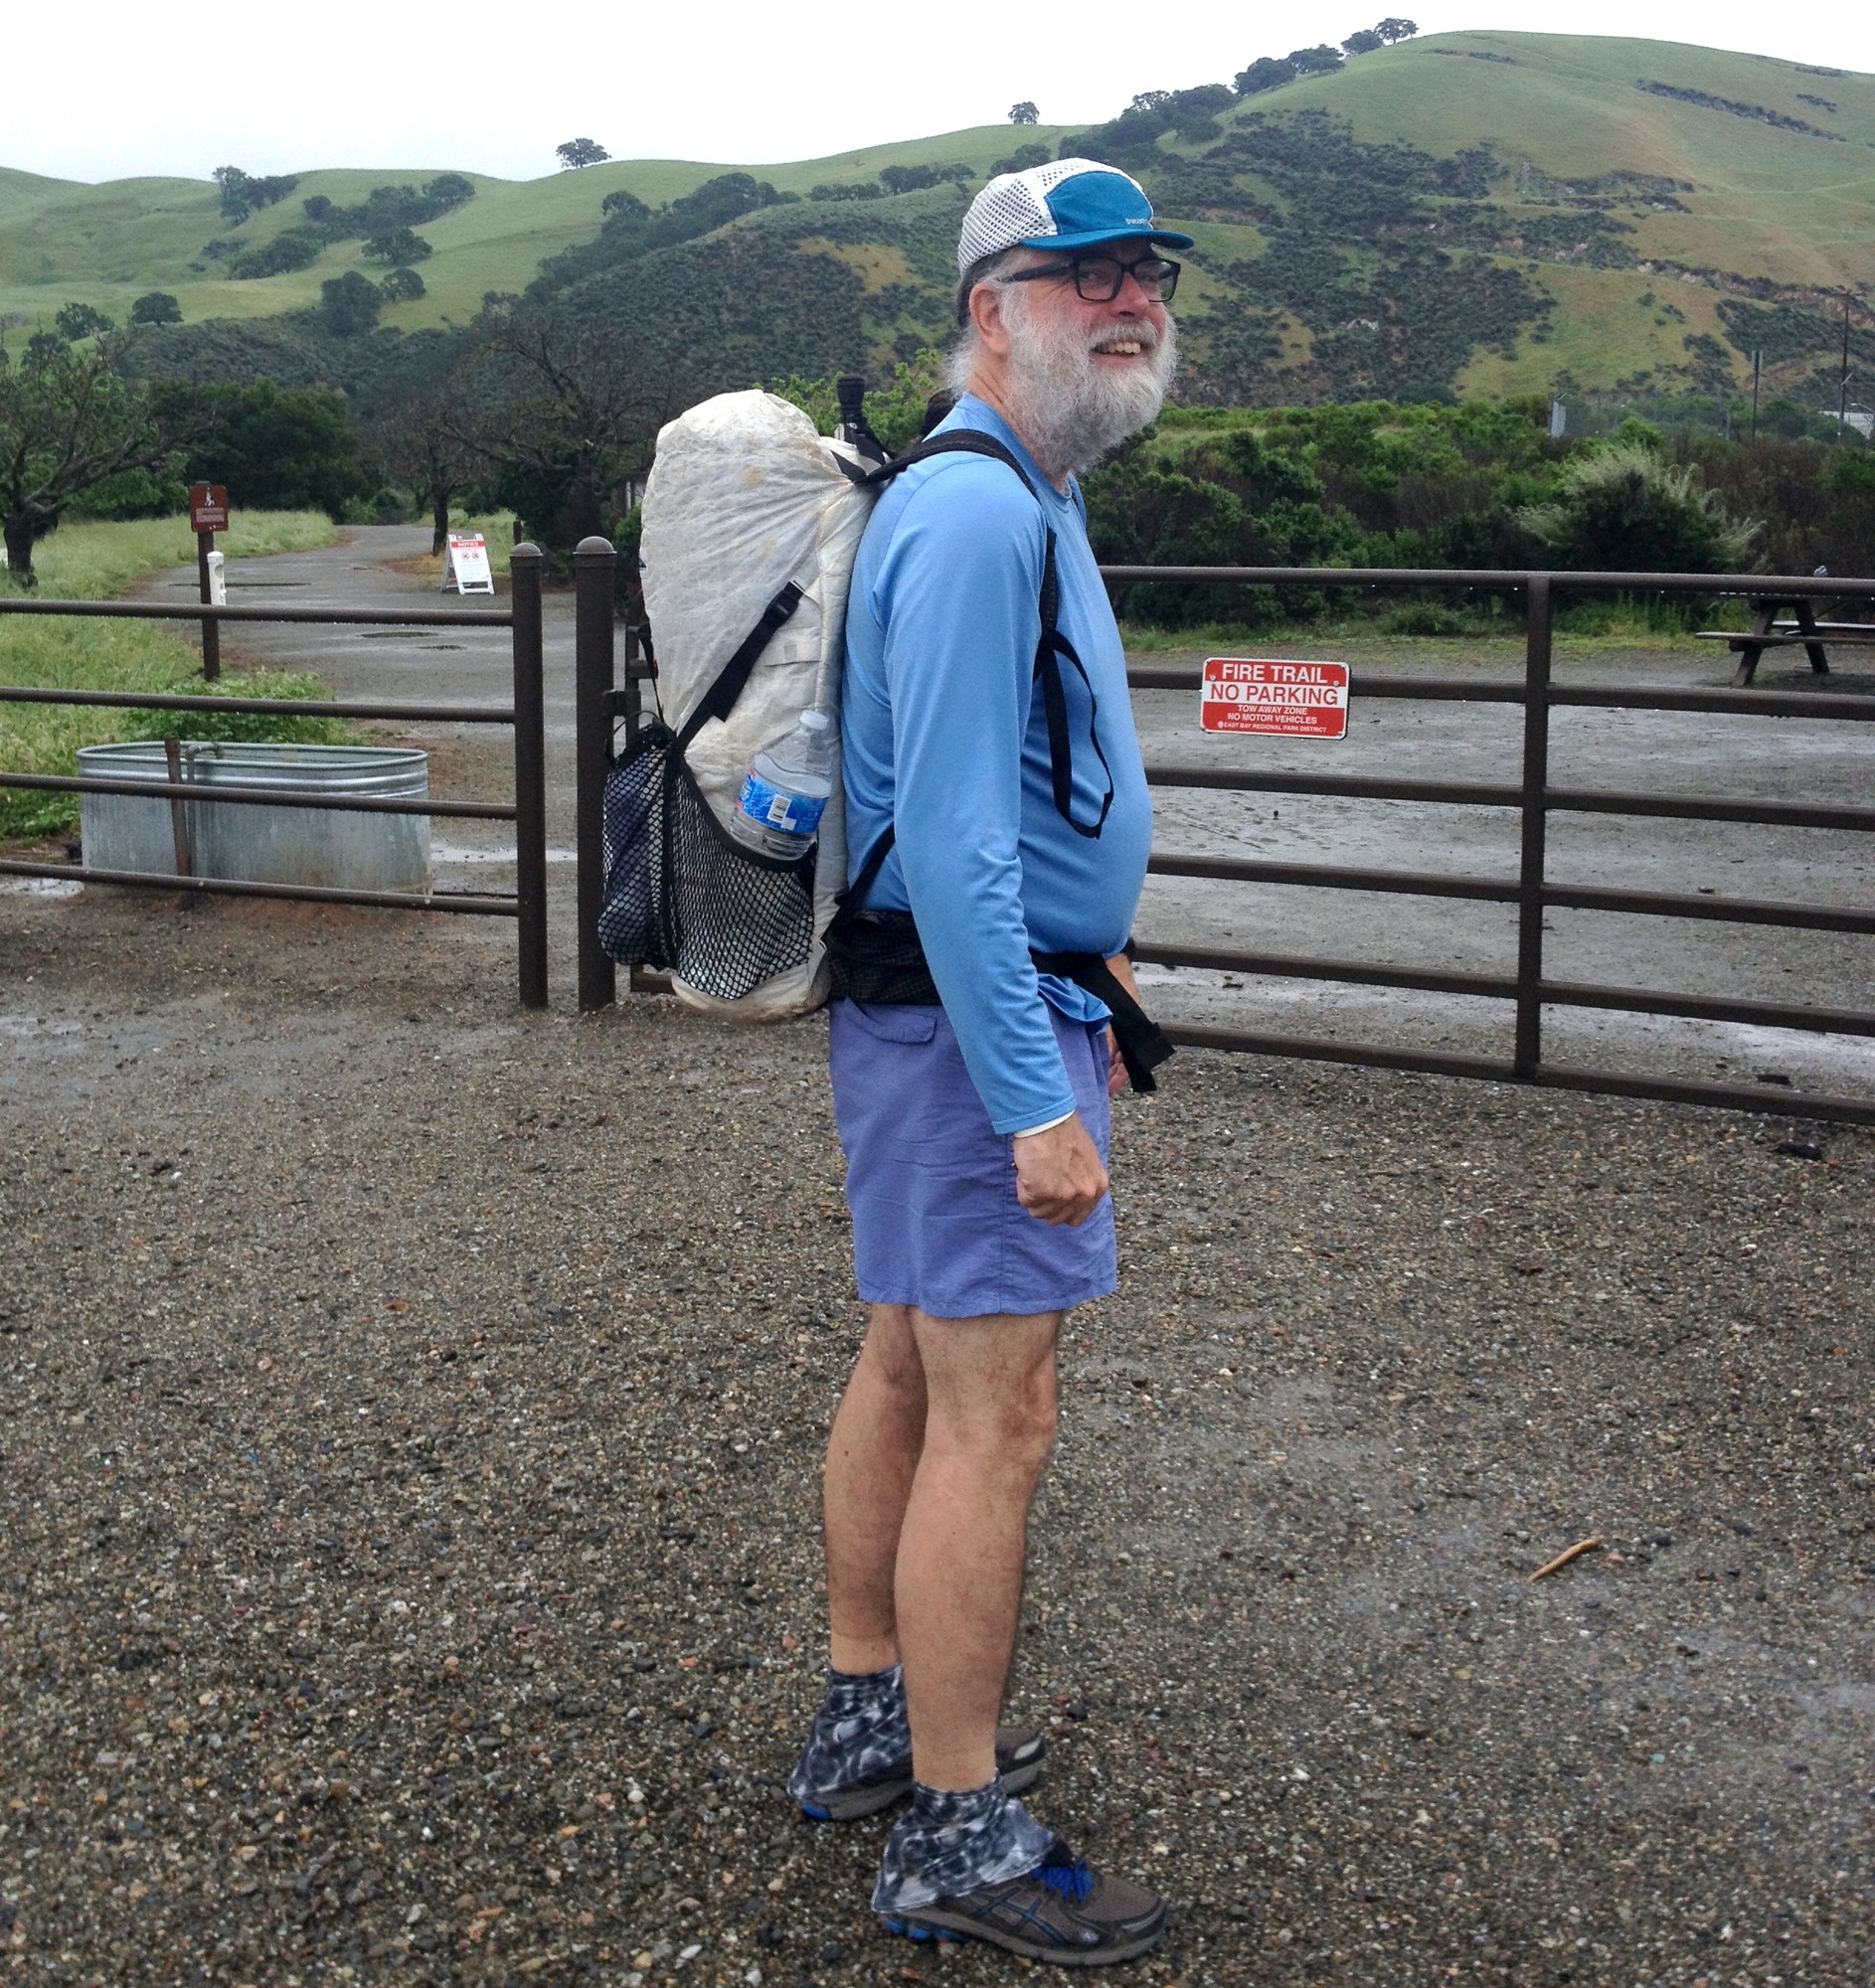
Your author at the end of a recent bikepacking trip, feeling happy he’s headed for a night of sleep on a real mattress.
In Closing
You can, of course, just enjoy a new pastime without relating it back to backpacking in some way. In fact, I’d recommend it. But if you’ve found yourself in a backpacking rut and need a way to course-correct that’s a little more philosophical and a little less spreadsheety, consider bikepacking or some other tangental long-distance pastime. Fastpacking? Maybe it’s for you. Packrafting? Seems awfully wet but go for it. Alpacapacking? Adorable and fun to say. Extreme off-road unicycling? Your mileage may vary, but I bet you’d learn a thing or two.
Backpacking Light does not accept compensation or donated/discounted products in exchange for product mentions or placements in editorial coverage.
Some (but not all) of the links in this review may be affiliate links. If you click on one of these links and visit one of our affiliate partners (usually a retailer site), and subsequently place an order with that retailer, we receive a commission on your entire order, which varies between 3% and 15% of the purchase price. Affiliate commissions represent less than 15% of Backpacking Light's gross revenue. More than 70% of our revenue comes from Membership Fees. So if you'd really like to support our work, don't buy gear you don't need - support our consumer advocacy work and become a Member instead.
Learn more about affiliate commissions, influencer marketing, and our consumer advocacy work by reading our article Stop wasting money on gear.
From first-come, first-served to limited lotteries and everywhere in between, permits are increasingly becoming a fact of life for backcountry adventures
Backpack, sleeping bag and pad, shelter – check. Assorted other essentials and accessories – check. Food for the duration of the trip – check. Transportation to and from the trailhead – check. In addition to these simple but not inexpensive items, a permit is becoming another essential – and sometimes frustratingly difficult to obtain – necessity depending on where you’re headed.
Permits are almost always required in national park units. Some can be easy to get on a first-come, first-serve basis and others must be booked months in advance.
And in wilderness areas managed by the US Forest Services that have had permits for decades, like the Enchantments area of the Alpine Lakes Wilderness, the increased demand for permits has left backpackers with a less than 2% chance of being able to camp in the most desirable locations. However, in some wilderness areas permits are more or less nominal and have been in place for years, like the Pasayten Wilderness in Washington and the Anaconda-Pintler Wilderness in Montana, where an unlimited amount are supplied at the trailhead for users to fill out on their own, and no quotas on visitor numbers are placed or reservations required. These permits are in place more as a means of tracking use and gathering statistical data than of limiting where people can camp.
As permits and crowded backcountry campsites become as common as Bluetooth speakers on once-quiet trails, backpackers rightfully wonder what might be done to slow the spread of this often necessary – but almost always inconvenient – way to manage use. One of the most popular ideas has been to be more mindful about the impact that geotagging and site-specific social media posts can have. The Washington Trails Association suggested this in 2015 and The Leave No Trace Center for Outdoor Ethics endorsed this practice in 2018. Since then, this idea has caught on among many in the outdoors community who would prefer to not risk contributing to the overuse of areas with limited recreational carrying capacity.
Located far away from population centers and lacking much social media fame, there are currently no permits required for backpacking anywhere in the 1.3 million acre Selway-Bitterroot Wilderness in Idaho and Montana.
Amusingly enough, many of the places people want to protect through obscurity really aren’t that obscure at all – they’ve been featured in guidebooks or magazine articles over the years, not to mention being clearly marked on USGS topographical maps for over a century (and, it must not be overlooked, were visited and stewarded by indigenous inhabitants for millennia before they were forcibly removed from their ancestral homelands). The information is out there for those who want to make a modicum of effort to research all the wonderful places to go on their public lands.
In addition, there are plenty of excellent free resources and articles on how to successfully use that information and how to plan a backpacking trip in general. The benefit to doing that research, at least historically, was being exposed to information about minimal-impact camping, environmental issues facing those public lands, and contact information for the advocacy groups and land management agencies that work to protect them.
An absolutely stunning subalpine basin in one of Montana’s wilderness areas – no permit required, yet.
This notion of community self-regulation as an attempt to reduce the need for official regulation via permits has resulted in significant handwringing in the Extremely Online Outdoors Ecosystem about whether such a practice is gatekeeping. Most notably, Leave No Trace reversed their stance on geotagging, without any explanation or evidence to support this change, in 2020. While it is certainly important to be concerned about inadvertently creating additional barriers to outdoor recreation, particularly if such barriers demonstrably and disproportionately impact groups of people who are already underrepresented and don’t feel welcome on their public lands, nearly the entirety of the discourse about alleged gatekeeping lacks much intellectual or ethical rigor and fails to use an evidence-based approach to understanding and mitigating the complex issues created by increased use of public lands.
The ideas put forth – keep geotagging and hyping up areas on social media despite the inability of their infrastructure to handle increased visitation – almost inevitability result in land managers implementing permits when areas become overcrowded and negatively impacted, creating a classic case of unintended and adverse consequences brought about by good intentions.
Requiring permits as a way to manage increased visitation creates an additional and actual barrier to accessing the outdoors, not just a digital one. And this actual barrier typically costs money to overcome (i.e. permit fees) and is ultimately enforced by People With Guns (i.e. park rangers or other agency law enforcement personnel.) This makes someone being a bit vague about the location in their Instagram photo or in the trip report they posted on Reddit, or Backpacking Light for that matter, seem quaint or even downright silly by comparison. Especially when there is an abundance of information available, for free, to allow even the newest backpacker to successfully plan a trip once they have the inspiration to get outdoors.
And such inspiration is inescapable in even the most banal mainstream media these days, where even a credit card commercial might evoke alpine imagery, much less in the social media subgroups specifically focused on outdoor recreation. There is more information, and free ease of access to such information, than ever before to allow hikers and backpackers to disperse themselves, but social media has indisputably had a concentrating effect.
Without permits to limit entry, Aravaipa Canyon – one of the few perennial streams in the Sonoran Desert – – would almost certainly be crowded to the point of absurdity.
When viewed through the lens of another outdoor activity – rock climbing – a hyper-specific approach to information sharing is not just unhelpful, it’s poor form and denies people the opportunity to figure things out for themselves and the sense of achievement that comes from doing so. Part of the beauty of rock climbing is figuring out each route on your own – of solving the physical and mental puzzle nature created. When climbing a route and pausing to figure out the next move, it can be maddening to have some overly helpful bystander who previously climbed the route shout up “Just match your left foot with your left hand, and then throw with your right hand to the flake that’s left of the pocket up there, it’s a huge undercling and you can stand up and clip from there, then match both hands until you get your feet up and then put your left hand onto the jug above the bolt, then you’re done with the crux and it’s easy climbing to the top . . .”
By the time they’re done spraying you down with unrequested information, much of the mystery of the route is gone and, for most people, the magic and joy of the experience is greatly diminished. That’s why the ethic in climbing is to wait until someone asks for help before offering advice, rather than just assuming that others are incapable of accomplishing what they set out to do without receiving your unsolicited instructions.
Encouraging a similar ethic for backpacking in wilderness areas, which are explicitly managed for solitude as well as other values listed in the Wilderness Act, seems to be appropriate. As amazing as a good backpacking trip can be when done step-by-step from a guidebook description or with information from social media, it pales in comparison to pulling off a trip that you planned largely on your own. Stumbling across an unexpected waterfall on a cross-country jaunt taken on a whim from a basecamp, spotting a pictograph in a remote canyon during a spur-of-the-moment side trip, or finding a route from one lake basin to another that looked impassable on a map are joys that can rarely be planned – they manifest themselves through curiosity, sweat, and determination.
The Anaconda-Pintler Wilderness requires permits, but these can be self-issued at the trailhead and are intended to help track usage.
Given the current trend towards permits, and the sobering fact that once they’re instituted by a land management agency they have almost never been removed, I think one of the best skills new hikers can develop in regard to backpacking is learning how to spread out and discover the beautiful and uncrowded places you can go without needing a permit. Check out guidebooks from the library (free!), browse CalTopo online (also free!), flip through magazines like Backpacker, TrailGroove, or Backpacking Light or browse their websites, strike up a conversation at the trailhead with another backpacker and see what ideas for trips you can glean, and call ranger stations for ideas. Look at trip reports online or on social media for inspiration, but not with an entitled mentality that just because someone posts a picture of a delightful campsite that is on public land that they are obligated to send you a GPX track or provide any additional information. Learn to be OK with participating in a community where people might be happy to help get you in the ballpark – naming the national park or national forest – but not willing to assign you a seat by telling you the exact lake or meadow they camped at.
And then, once you have honed that skill and have found places off-the-beaten-path to form indelible memories of sunsets and forests and peaks and streams, consider exercising some discretion in how far and wide you broadcast detailed information about such places. Being more general in regard to a location, or even not posting at all, since Outdoors Social Media can be a bit toxic once you take a step back and reflect on it, certainly isn’t a panacea to the problems impacting our lands.
Volunteering your time doing trail work, advocating for increased funding for public lands, or donating to organizations that advocate for more wilderness or other important causes (like reducing equipment and financial barriers to outdoor recreation for groups historically disenfranchised from enjoying their public lands) are much better ways to make a difference than merely adjusting your habits on social media.
But if thinking critically before you post on social media can prevent or delay even just a few places from being impacted by overuse and having permits implemented, it seems worth it to allow those who visit them – now and in the future – to have a high-quality experience that they don’t have to book months in advance on recreation.gov and help enrich government contractors. There’s enough public land for all of us to have the indescribable and soul-lifting feeling that comes from experiencing true solitude in stunning natural landscapes. We can’t all have solitude in the same place at the same time, but protecting the solitude of the places we cherish – so that others can find and experience it as well – is a responsibility we can each choose to practice.
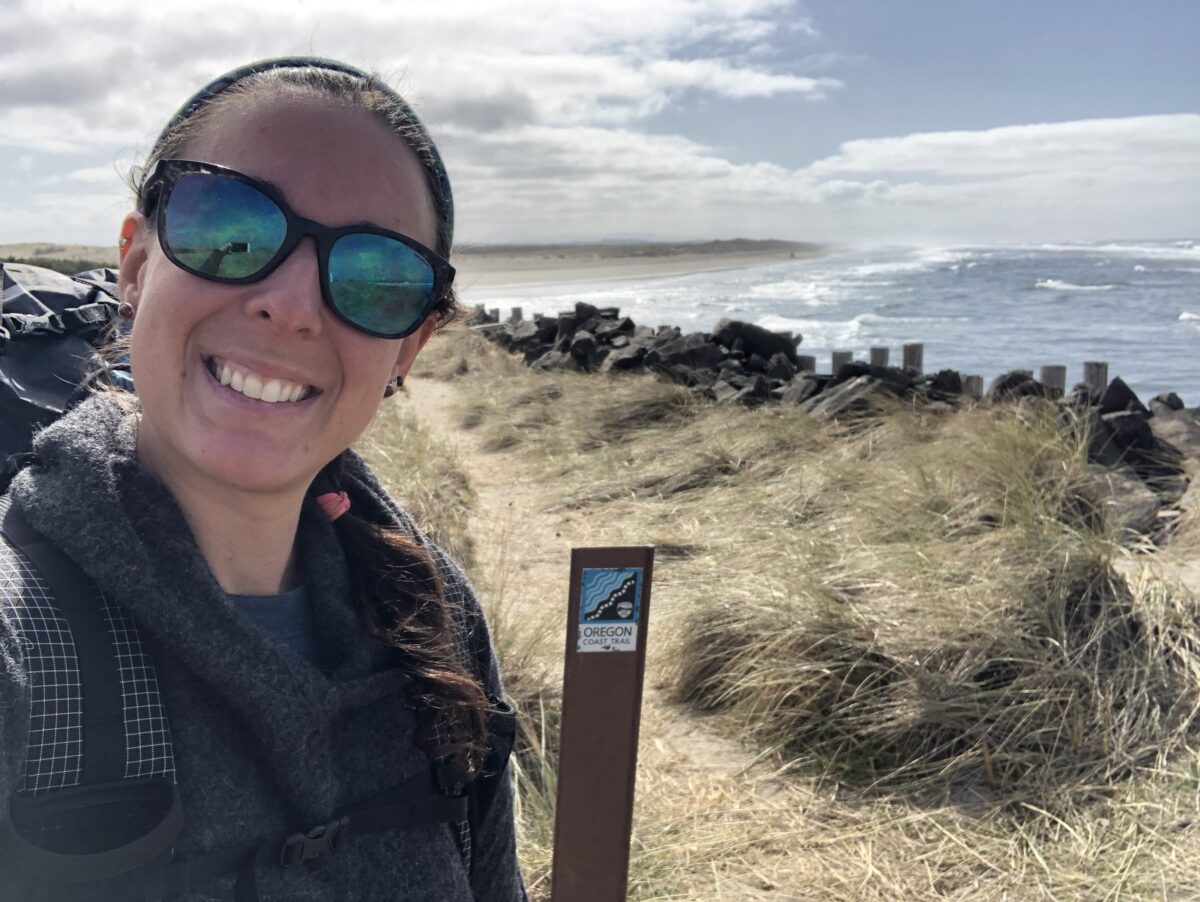
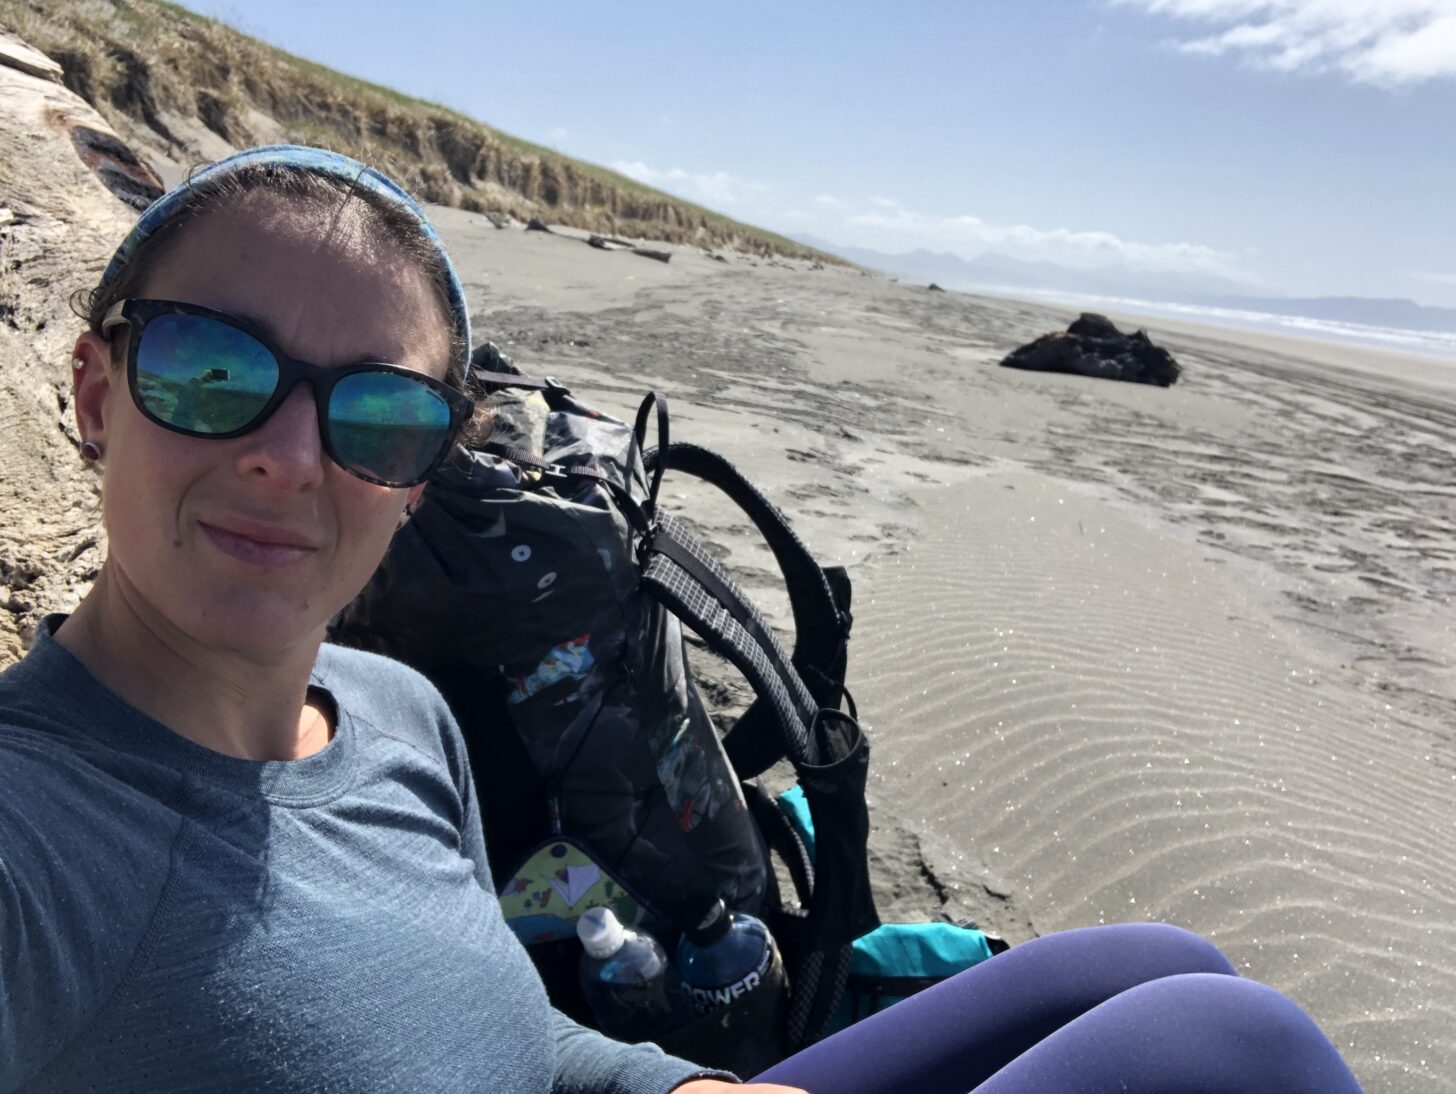
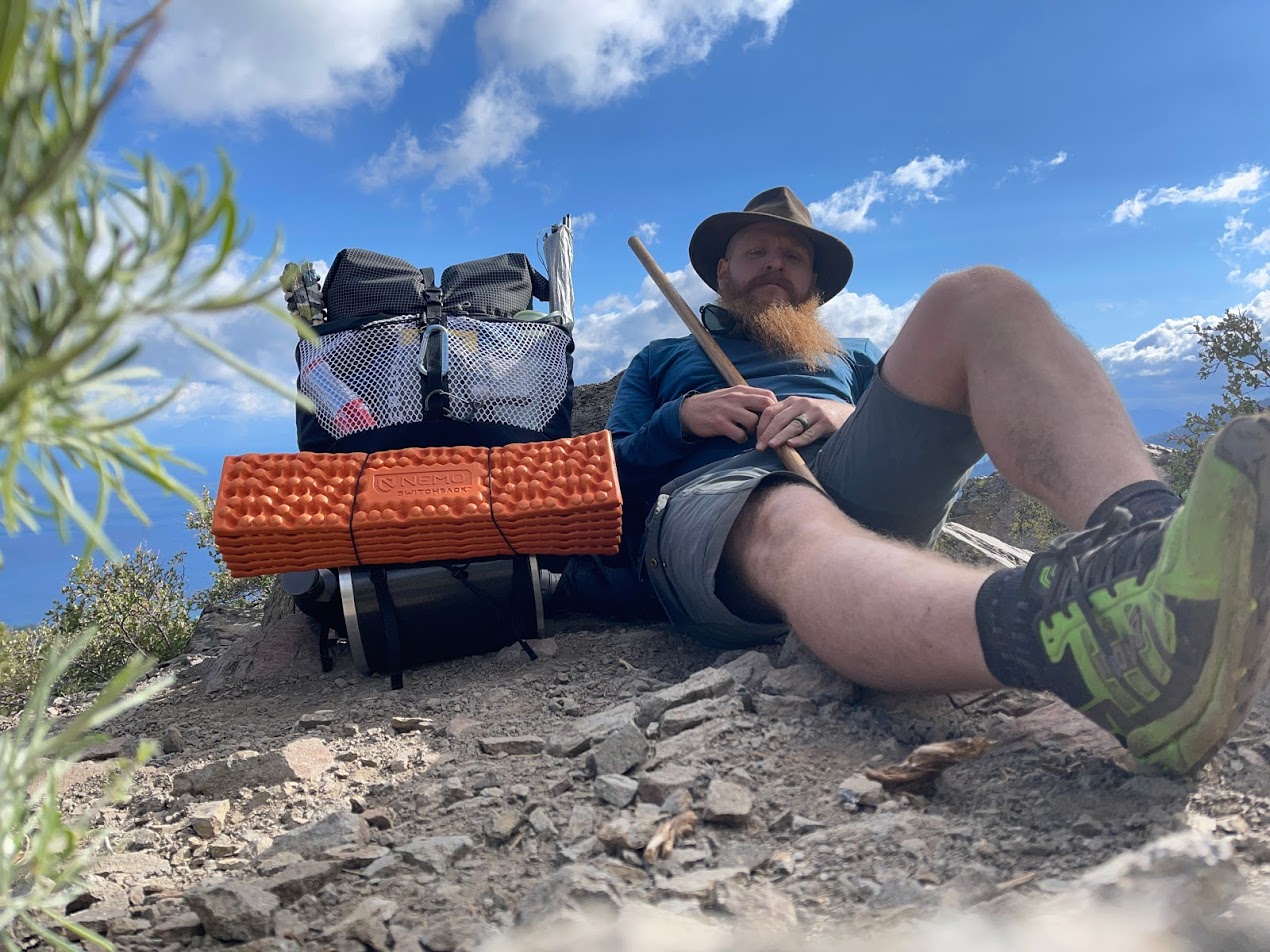
I’m a big planner at home, but not so much with backpacking. On my last OCT solo section, I actually had to do all of the planning myself.
Over the past six months, I’ve been slowly picking away at the 330-mile Oregon Coast Trail. This is my first section hiking experience, and one of the most non-linear trails I’ve ever hiked. My first section was with two hiking friends, and for the most recent section I was on my own.
While I love the companionship of hiking with partners, solo trips are one of my favorite ways to backpack, and I’ve done plenty of peak-bagging trips, camping excursions, and overnights by myself. But those past solo outings were either in familiar areas or on straightforward trails. All I needed was a reliable GPS track and to remember all of my gear.
When you’re solo, you can stop whenever you feel like it.
Doing this section of the Oregon Coast Trail by myself didn’t seem like too big a deal. It was a little over 50 miles and I figured on two-and-a-half days end to end. But this section required one aspect that is simply not my strong suit: planning.
I’m a highly detailed planner at home. Everything is on a list, and sometimes I make lists of my lists to keep track of what lists I’ve written. As a full-time writer and solo homeowner, planning keeps me sane and ensures I don’t drop the ball on anything from overdue invoices to draft deadlines to calling the sprinkler guy. Backpacking is my escape from this – literally and figuratively. I get out of my house and away from my routine, which also means I strive to ditch the shackles of my structured, planned existence when I hit the trail.
So yes, sometimes this means the planning falls to other people. Other times it means no one planned the trip and we’re just going to wing it. In my defense, I’ve found backpackers sometimes have the tendency to over plan before realizing they’re at the mercy of the trail, and itineraries are often set free within the first few days. As long as I know how I’m getting to the trail and the location of my first resupply, I’m all set. I don’t look at the elevation profile, I don’t obsess over the forecast, and I’m not super concerned with how I’m getting off the trail.
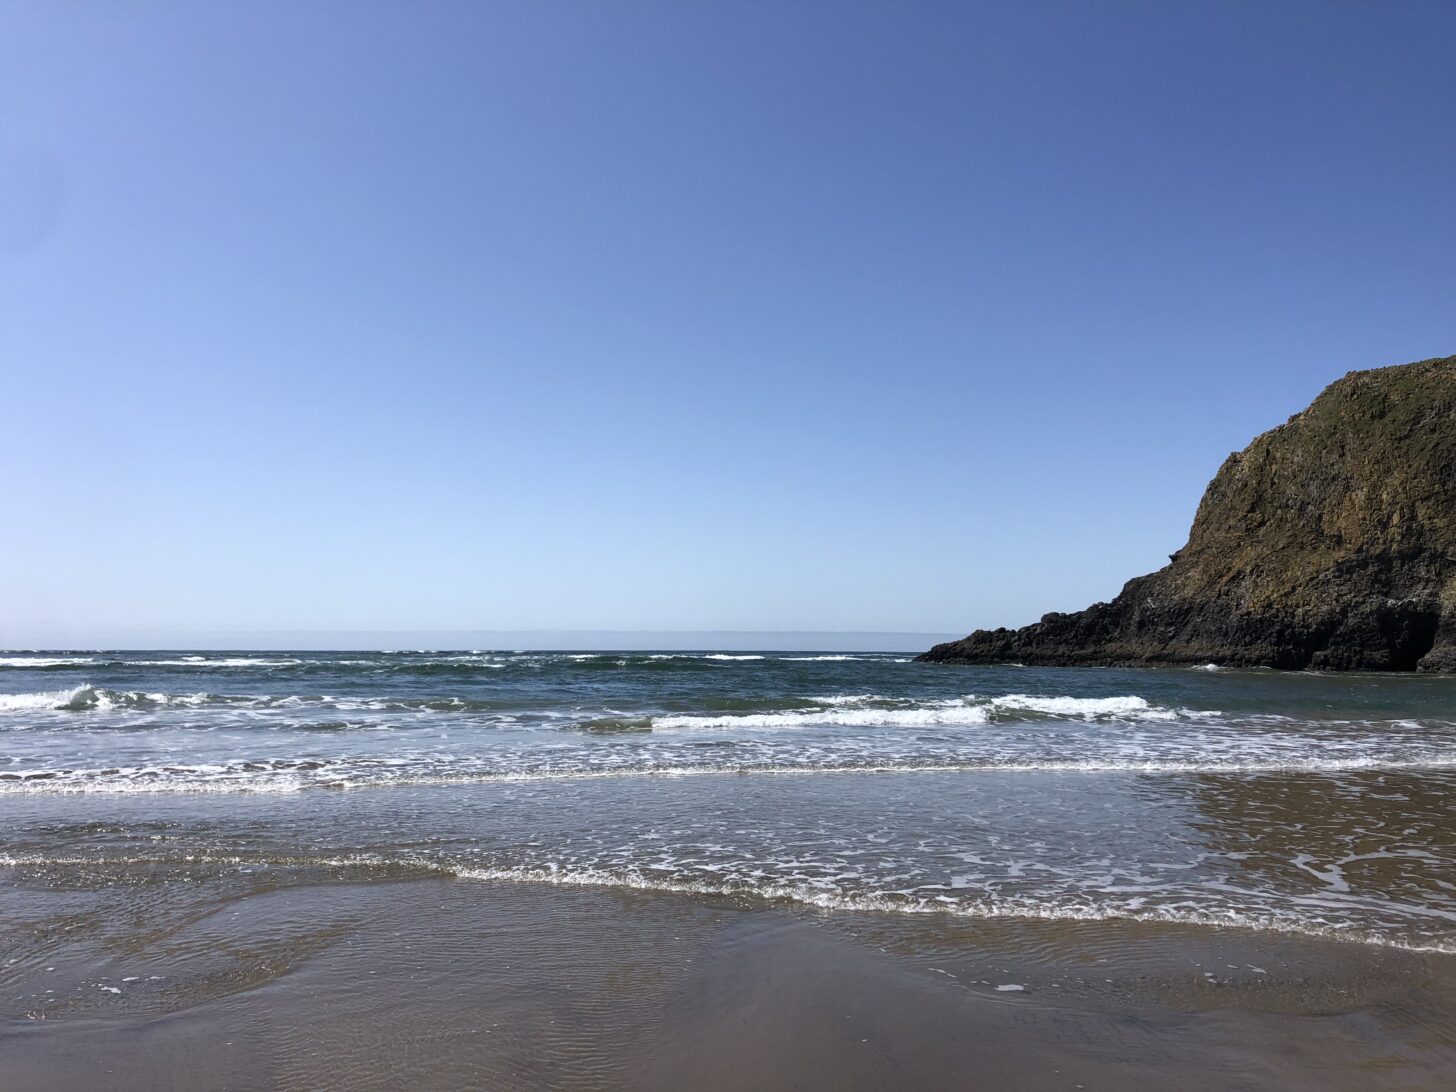
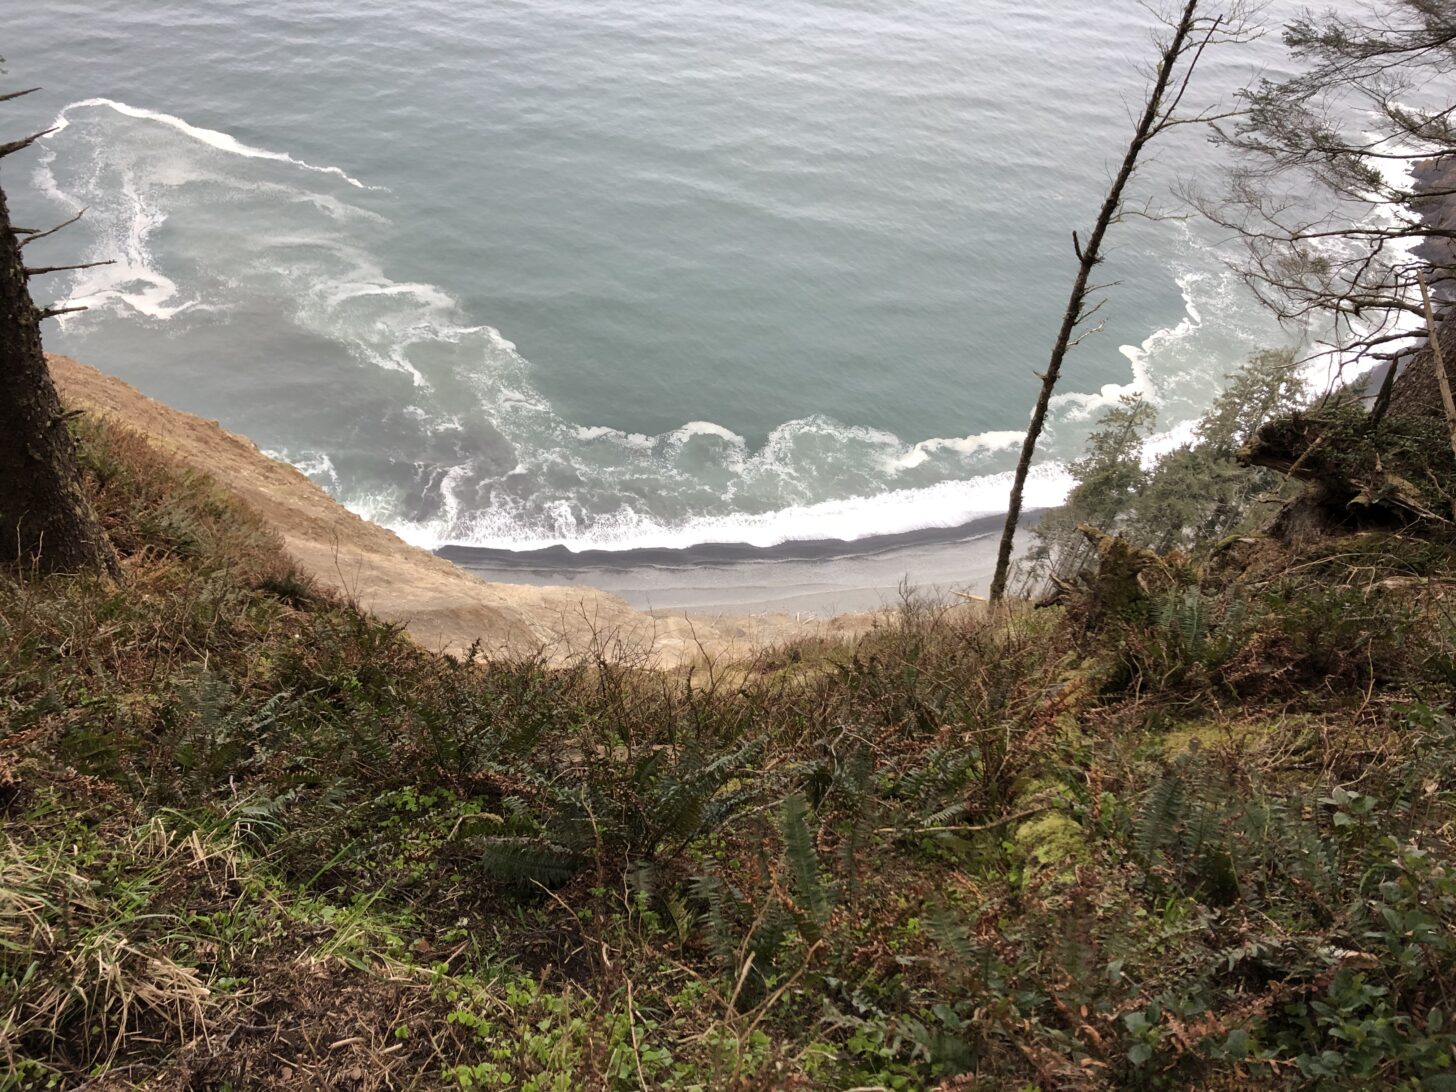
Past Cannon Beach… i.e. the Goonies Beach to everyone except me, the only person in the world who has never seen the Goonies. Photo credit: Maggie Slepian
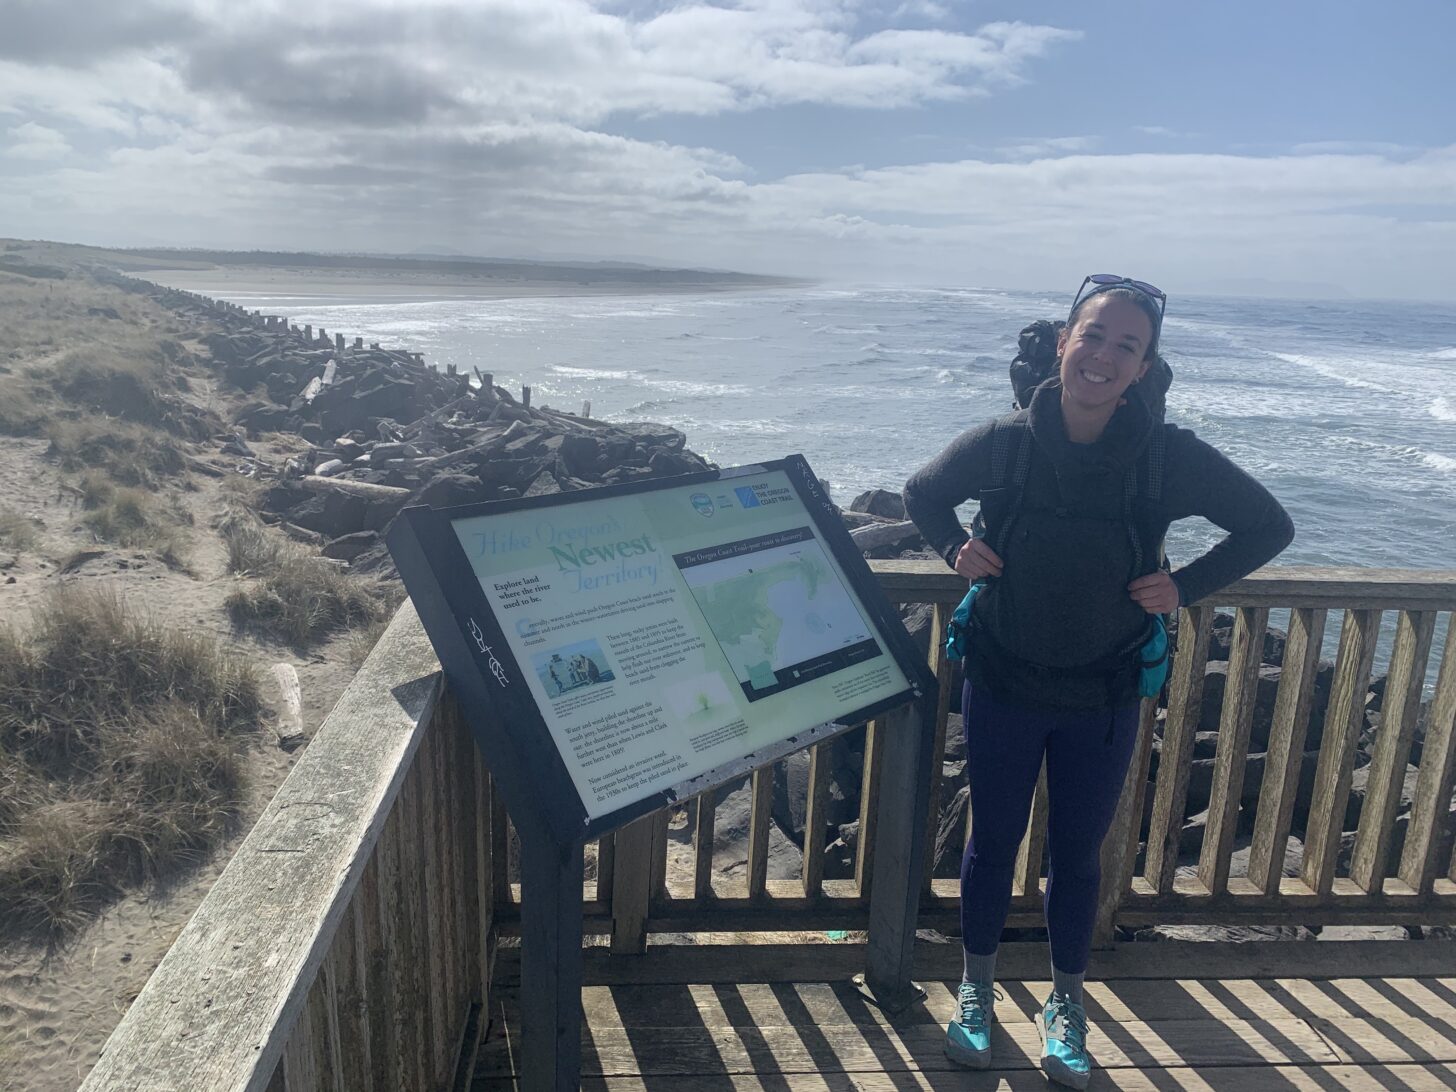
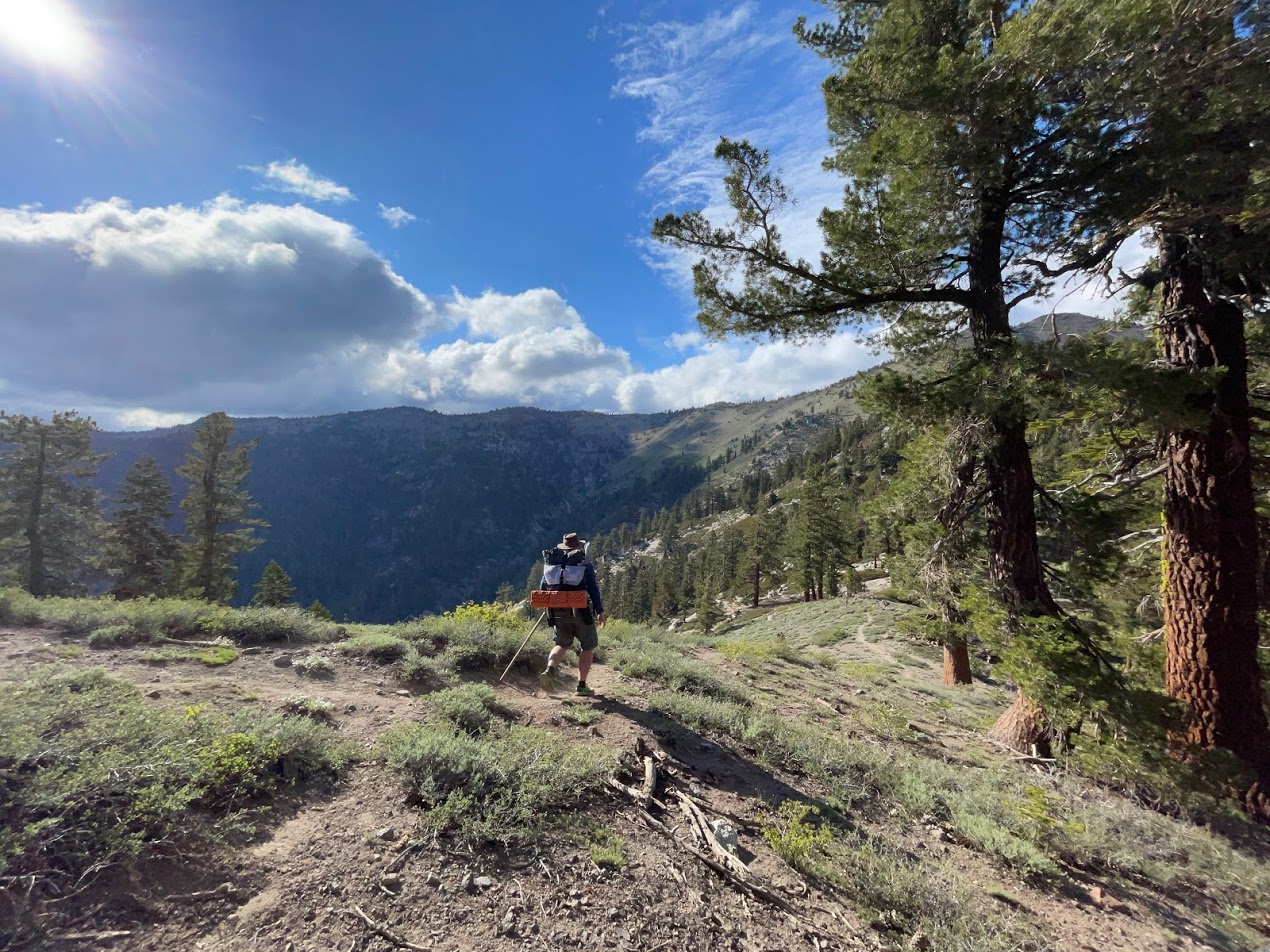
I had to put some thought into this section of the Oregon Coast Trail. The OCT is odd from start to finish. You definitely need a GPS track, as the trail wanders on and off the beach, darting through towns and into neighborhoods before picking up a few miles of trail, then back onto the beach and exiting at another seemingly random point. There are also points along the beach sections that can only be crossed at low tide, which means having a tide chart or app. Additionally, some parts of the trail are closed from a massive storm last fall that resulted in large swaths of impassable blowdowns. All in all, for a short section, there was kind of a lot to consider, at least for me.
In typical fashion, I had a work commitment right before I was supposed to get dropped off at the Northern Terminus, and didn’t pack or plan anything beforehand. I threw my standard gear into my screaming cat pack and took screenshots of the trail description page from the Oregon Coast Trail website so I wouldn’t have to try to access it with spotty service. I’d had the foresight to get a membership to the Hiiker app the day before, which is one of the only apps with a track of the OCT. As we drove in and out of service along the Oregon Coast towards Astoria, I downloaded a tides app and made sure I understood the interface. It might have been last minute, but it was more planning than I’d done for any other trip.
This section had beach walking and cliffs. Simply amazing. Photo credit: Maggie Slepian
There isn’t a ton of cohesive information about the OCT – you have to piece it together from different sources. For this reason, the northern 50 miles of the OCT was good practice for me to be in charge of my own planning without risking major consequences like I would with a more remote trail. There was some navigation, some timing, and some understanding of closures and regulations, but nothing critical – and always some room for error.
I thought about the last time I was on the OCT. My friend Julia had discovered and downloaded Hiiker. I’d never downloaded the app, rather let her be in charge of telling us where to get on and off the beach. The other member of our party, Becca, had the tides app, and she kept track of when we were safe to cross certain sections of beach.
The Oregon Coast Trail is not remote – at least the northern half isn’t. But because of the afore-mentioned tides and unmarked trail sections, the OCT takes a different type of planning than a more traditional trail. You might not need to plan the timing of resupplies, as the trail hits a town at least every other day, but you do need to time certain sections based on the tides, and know where camping is or isn’t allowed.
My partner Jeff shuttled me, and he waited for me to direct him to the Northern Terminus instead of mapping it himself. He is well aware of how much I drag my feet with backpacking planning, and wanted me to do the whole thing. To be quite honest, I did feel a twinge of pride at actually having located the sign on the jetty at Fort Stevens State Park. I waved goodbye as he drove away, then punched through some bushes to find an official trail marker heading towards the beach. Even these first steps are usually done by my hiking companions, so even the first half-mile of my solo trek was a good confidence boost that showed I can at least find my way onto a trail.
Successfully located the Northern Terminus of the Oregon Coast Trail. Photo credit: Maggie Slepian
Most of the next several days were easy. I was glad I’d downloaded the tides app, and the Hiiker GPS track was incredibly useful. Being by myself is always a joy, and I reveled in being able to throw my pack down whenever I wanted, or keep going when I felt good. I got turned around a few times, and had some trouble figuring out where the trail picked up after unmarked intersections. With no one to confer with, I was even more proud when I figured it out each time. I did get mildly frustrated trying to figure out how to tell Jeff where I was going to end (mapping skills are not my strong suit) and then frustrated again when a trail closure stymied my last night of camping. I was able to wing it, though, and also wound up feeling confident with my abilities to adapt on the fly.
The northern section of the Oregon Coast Trail was a success, and boosted my confidence for my Colorado Trail solo later this summer. I picked the CO Trail partly for the majestic scenery and ideal distance, but also because it’s a good next step in my solo planning skills. Now that I’ve gotten the bug and am not quite so resistant to planning, there will definitely be more solo trips between now and then.
Learn More: LiteAF Curve Backpack
Maggie mentioned her screaming cat pack. Read her write-up of Lite AF’s unique Dyneema Composite Fabric dying process here.
Backpacking Light does not accept compensation or donated/discounted products in exchange for product mentions or placements in editorial coverage.
Some (but not all) of the links in this review may be affiliate links. If you click on one of these links and visit one of our affiliate partners (usually a retailer site), and subsequently place an order with that retailer, we receive a commission on your entire order, which varies between 3% and 15% of the purchase price. Affiliate commissions represent less than 15% of Backpacking Light's gross revenue. More than 70% of our revenue comes from Membership Fees. So if you'd really like to support our work, don't buy gear you don't need - support our consumer advocacy work and become a Member instead.
Learn more about affiliate commissions, influencer marketing, and our consumer advocacy work by reading our article Stop wasting money on gear.
In today’s podcast, we are joined once again by Matt Mason for part two of our ongoing bikepacking conversation. This conversation digs a little more deeply into the nuances and logistical questions of bikepacking.
Stream
Summary
In today’s podcast, we are joined once again by Matt Mason for part two of our ongoing bikepacking conversation. This conversation digs a little more deeply into the nuances and logistical questions of bikepacking.
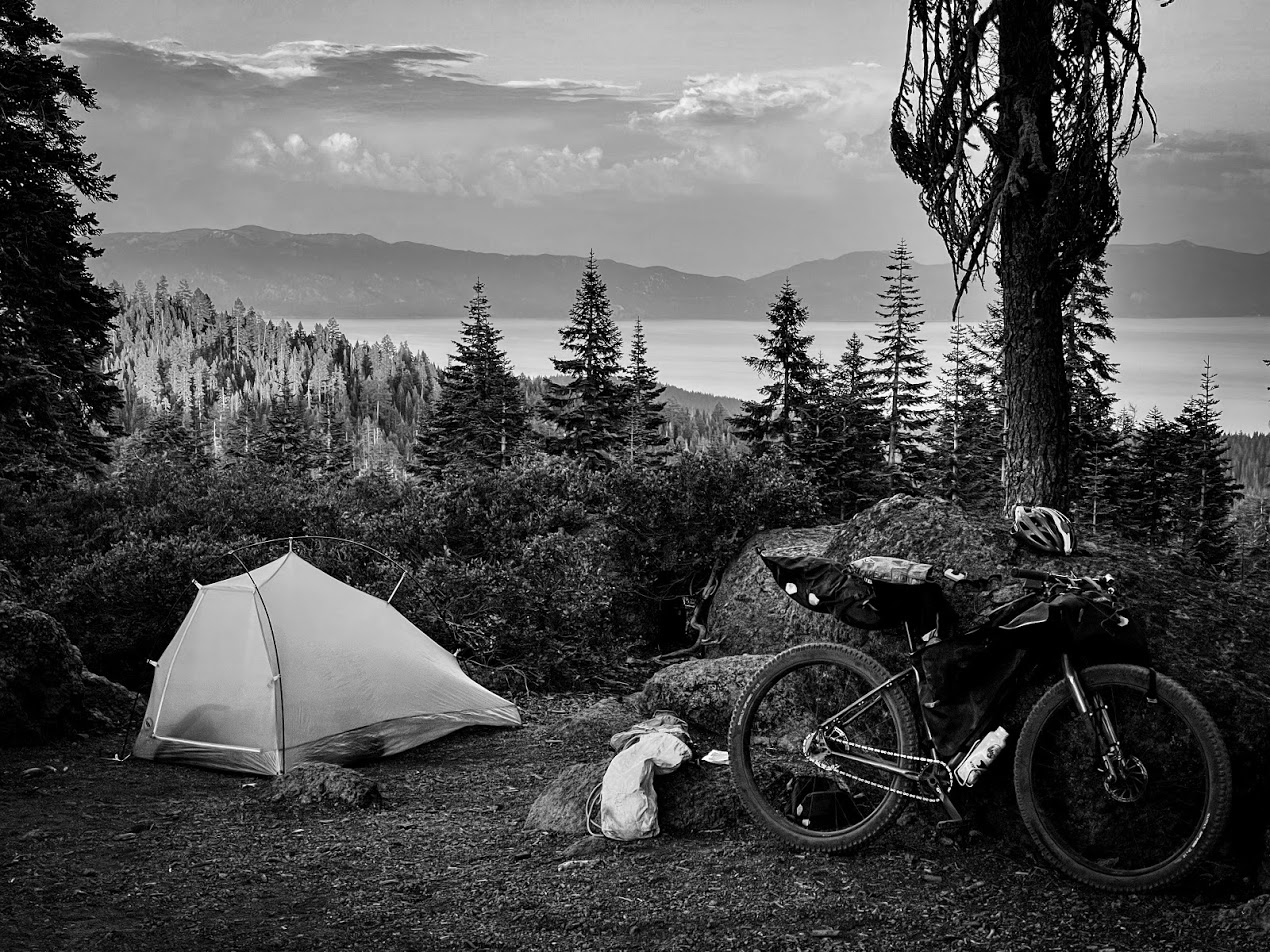
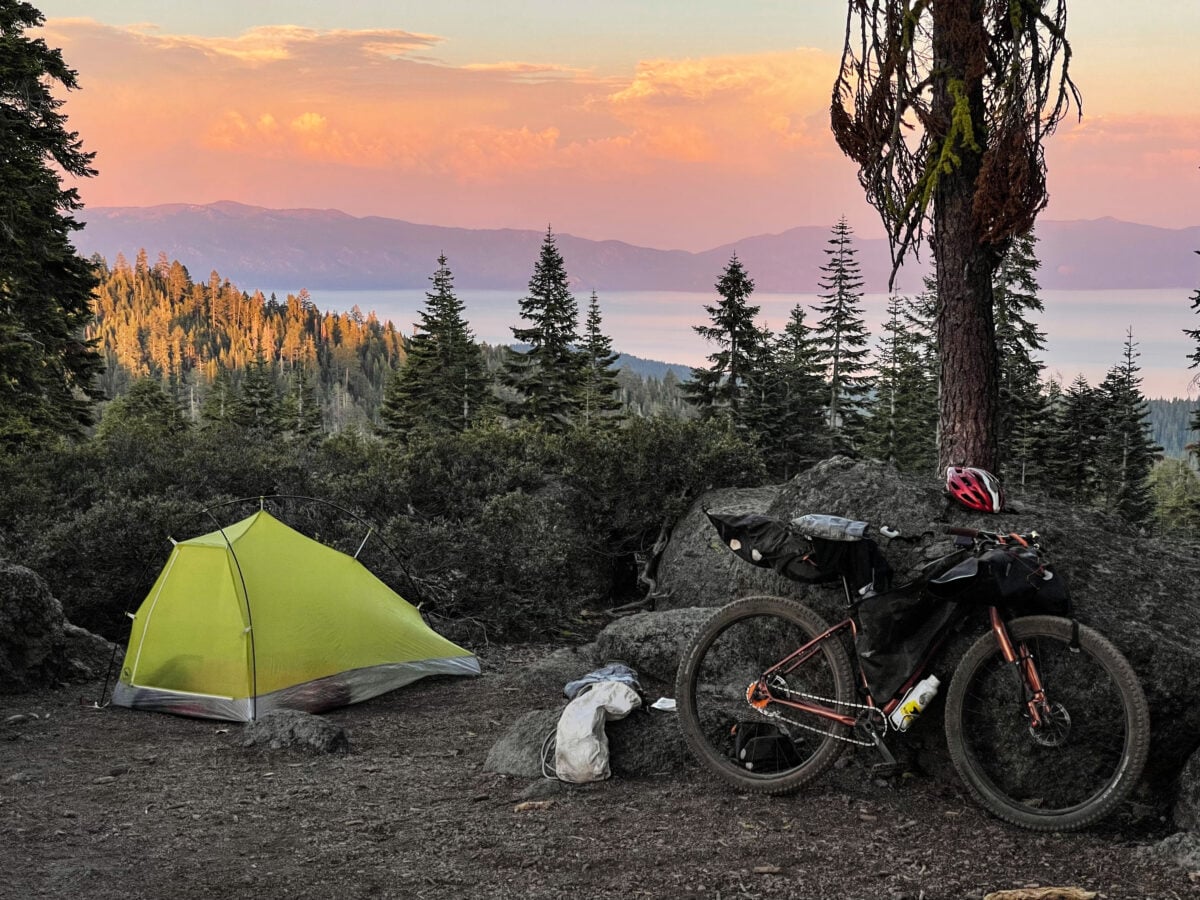
Bikepacking above Lake Tahoe
Also in this episode: an app that helps you determine how much fuel is left in fuel canisters, a windscreen to improve the efficiency of your stove, the new Backpacking Light website, and more.
Executive Producer - Backpacking Light; Show Director and Host - Ryan Jordan; Producer - Chase Jordan; Theme music: Look for Me in the Mountains written by Chris Cunningham and Ryan Jordan, performed by Chris Cunningham (acoustic guitar, lead and harmony vocals, harmonica), Chad Langford (upright bass), and Tom Murphy (mandolin), produced by Basecamp Studios in Bozeman, Montana.
Sponsorship Policy: Backpacking Light does not accept compensation or donated/discounted products in exchange for product mentions or placements in editorial coverage, including any podcast episode content not excplicitly identified as sponsored content. Some (but not all) of the links in these show notes may be affiliate links. Learn more about affiliate commissions, influencer marketing, and our consumer advocacy work by reading our article Stop wasting money on gear.
The Nunatak Gear Bears Ears 50 Backpack (MSRP: $330, ~28 ounces / 794 g) is an innovative frameless pack designed specifically to accommodate bear canisters. It features a unique water bottle storage system, optional shoulder-strap pockets, a removable foam back panel, a floating hipbelt, a large wrap-around exterior pocket, and a closed-cell foam pad attachment system.
The Nunatak Gear Bears Ears 50 Backpack (MSRP: $330, ~28 ounces / 794 g) is an innovative frameless pack designed specifically to accommodate bear canisters. It features a unique water bottle storage system, optional shoulder-strap pockets, a removable foam back panel, a floating hipbelt, a large wrap-around exterior pocket, and a closed-cell foam (CCF) pad attachment system.
This is a good angle to see that the heavy and bulky items (especially water and bear canister) are stored down low near the center of gravity.
Highlights
curved space under the main compartment externally accommodates a bear canister at the hiker’s center of gravity
waterbottle holders attach to hipbelt for easy access
roll-top closure cinches down with single strap
35 L claimed capacity (main compartment)
35 pound (16 kg) maximum weight capacity
padded hipbelt
large wrap-around rear pocket is fabric on the sides and non-stretch mesh on back
daisy chains along the central line of rear pocket
daisy chains on shoulder straps
dedicated ice-axe storage system
dedicated CCF pad storage system
210 d Gridstop / 330 d Cordura fabric
Testing Context
Moving to the Sierra Nevada from the southeast three years ago was an exercise in bear canister discovery – namely how terrible and cumbersome they are. My backpacking system simply wasn’t designed to accommodate a bear canister. As it turns out, none of the packs I’ve tested since then – several of them quite excellent – really shone when it came to bear canisters either.
The Nunatak Gear Bears Ears 50 immediately caught my eye for this reason. It’s designed specifically to:
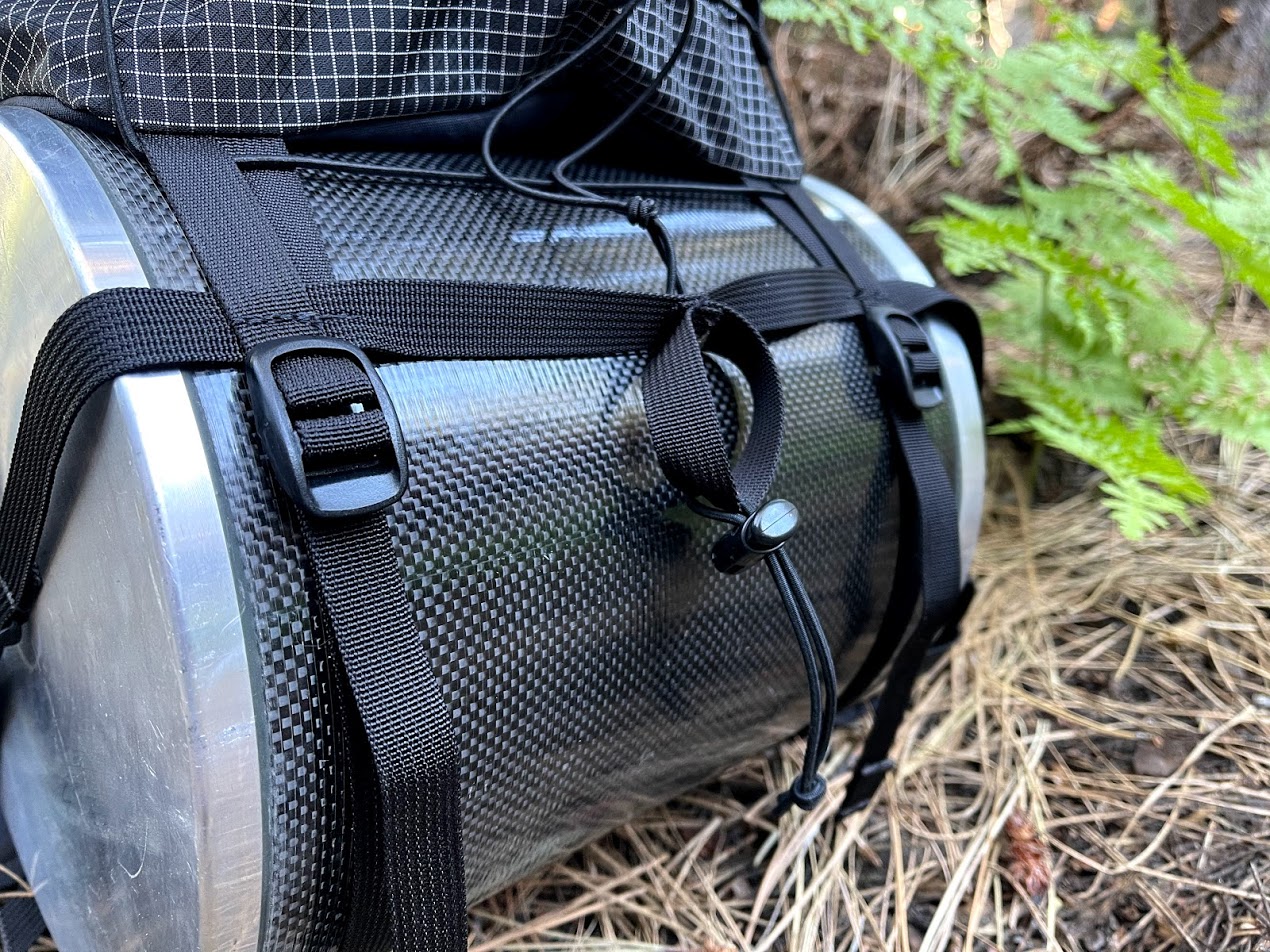
Accommodate a bear canister at the bottom of the pack to maximize comfort and stability and,
do it on the outside of the pack, allowing for ease of access during the day without having to unstrap the canister.
Taking a break after scrambling up some talus. The Nunatak Bears Ears 50 is very stable in such situations.
I took the Bears Ears 50 out for a quick two-day, one-night excursion in my home turf around Lake Tahoe to gather my initial thoughts. The Bears Ears 50 will be my pack on a two-week Sierra High Route trip later in the summer of 2021 – a trip that will provide me with the testing experience to file a Performance Review at a later date.
This is a first look at new gear that recently entered our review pipeline, and hasn't yet been subjected to rigorous field use. Learn more about the types of product reviews we publish.
First Impressions
Stability
I loaded up the Nunatak Gear Bears Ears 50 with about 30 pounds (14 kg) for my short testing trip. That’s way more than I would typically take on an overnight, but I wanted to see how the pack faired as it crept up on its maximum weight capacity – particularly as my trip involved steep climbs and descents, talus, scrambling, and sandy, unstable footing. A few cans of beer provided the extra weight I needed.
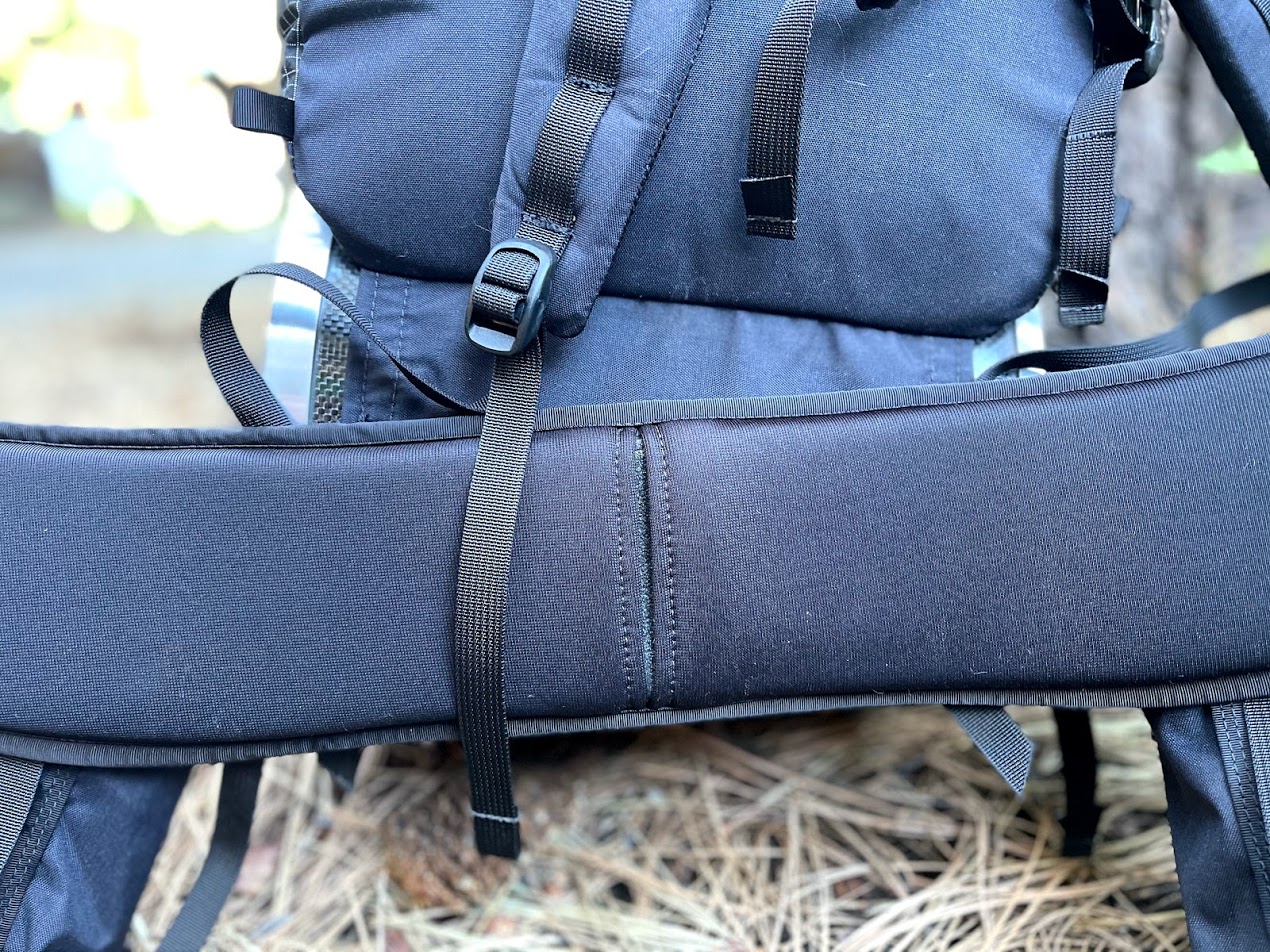
It’s worth noting that the water bottle holders on this pack hang off the hipbelt. This design has practical application for usability (i.e. no contorting around to fish bottles out of side pockets) but it also means the next heaviest thing in the user’s pack after food – water – is also at the user’s center of gravity along with the bear canister.
The combination of floating hipbelt and water/bear canister positioning created a lot of confidence as I scrambled up and over a talus field to reach my destination, and even felt steady as I navigated the downhill the next day.
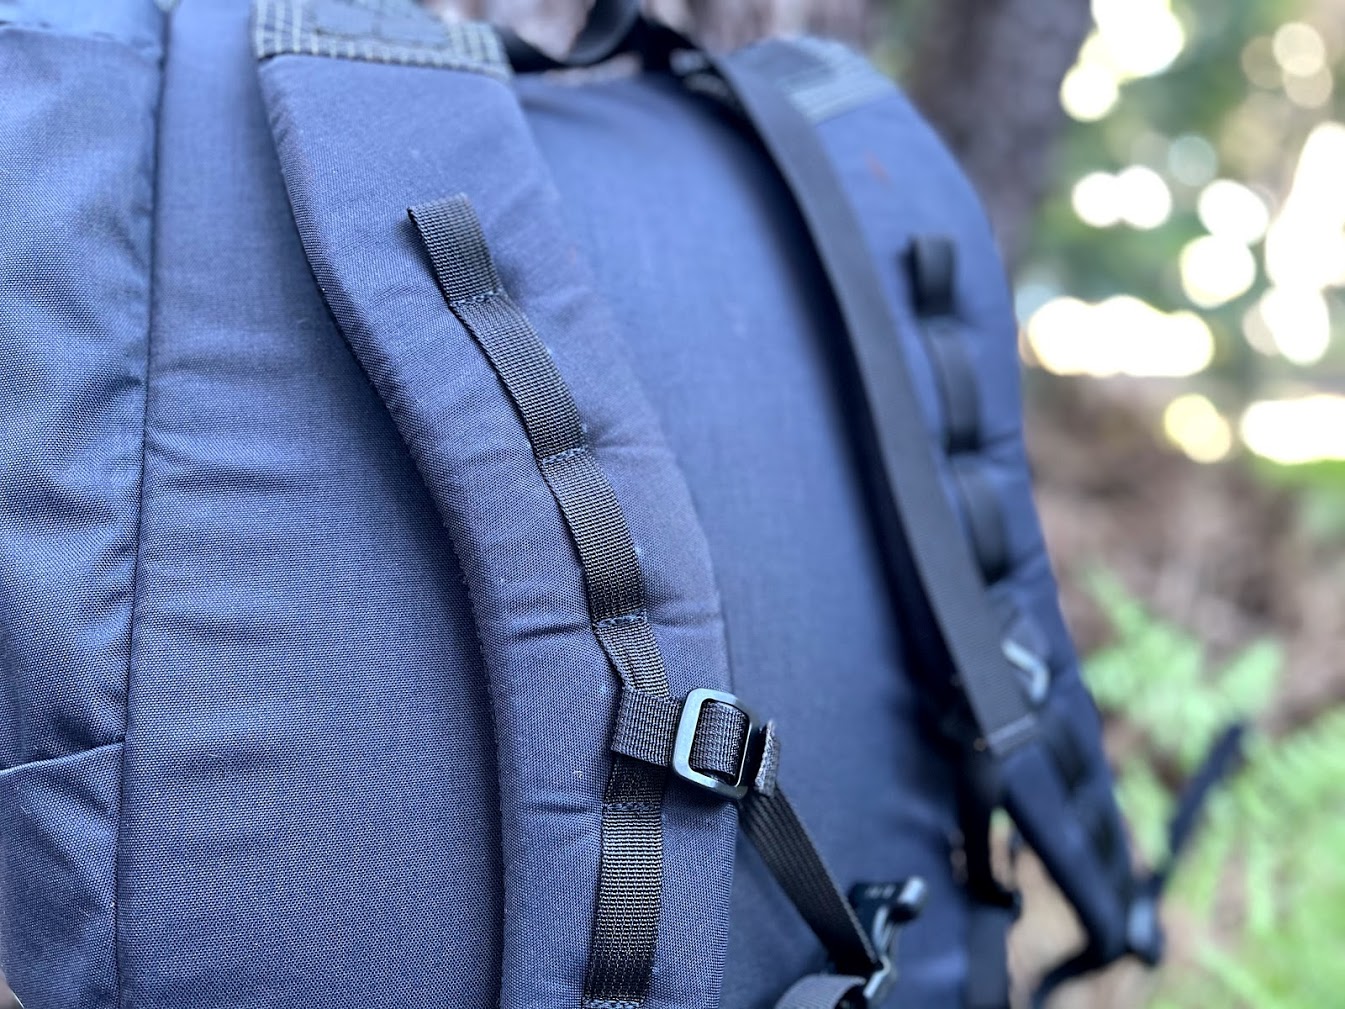
Comfort
The Nunatak Gear Bears Ears 50 carried my 30 pound (14 kg) load easily. The J-shape shoulder straps are .75 inches (2 cm) thick and just shy of 3 inches (8 cm) wide where they meet the shoulder. The removable foam back panel is .25 inch (1 cm) thick. The Bears Ears 50 necessitates careful packing (you don’t want anything hard pressing up against your bear canister or your back) but once a user has her packing strategy dialed in, it’s easy to achieve a comfortable carry with this pack. The floating hipbelt (with .5 inches / 1 cm of foam padding) and attention towards weight distribution in the pack design also help out in this regard.
My upcoming Sierra High Route trip will almost certainly see me pushing this pack right up to the 35 pound (16 kg) mark, but I don’t estimate that additional five pounds (2 kg) will be enough to take this pack from comfortable to not.
Usability
The externally stored bear canister and hipbelt water bottle holders both give the Nunatak Gear Bears Ears 50 high marks in usability, allowing for water access on the go and food access without rummaging around in the pack, respectively.
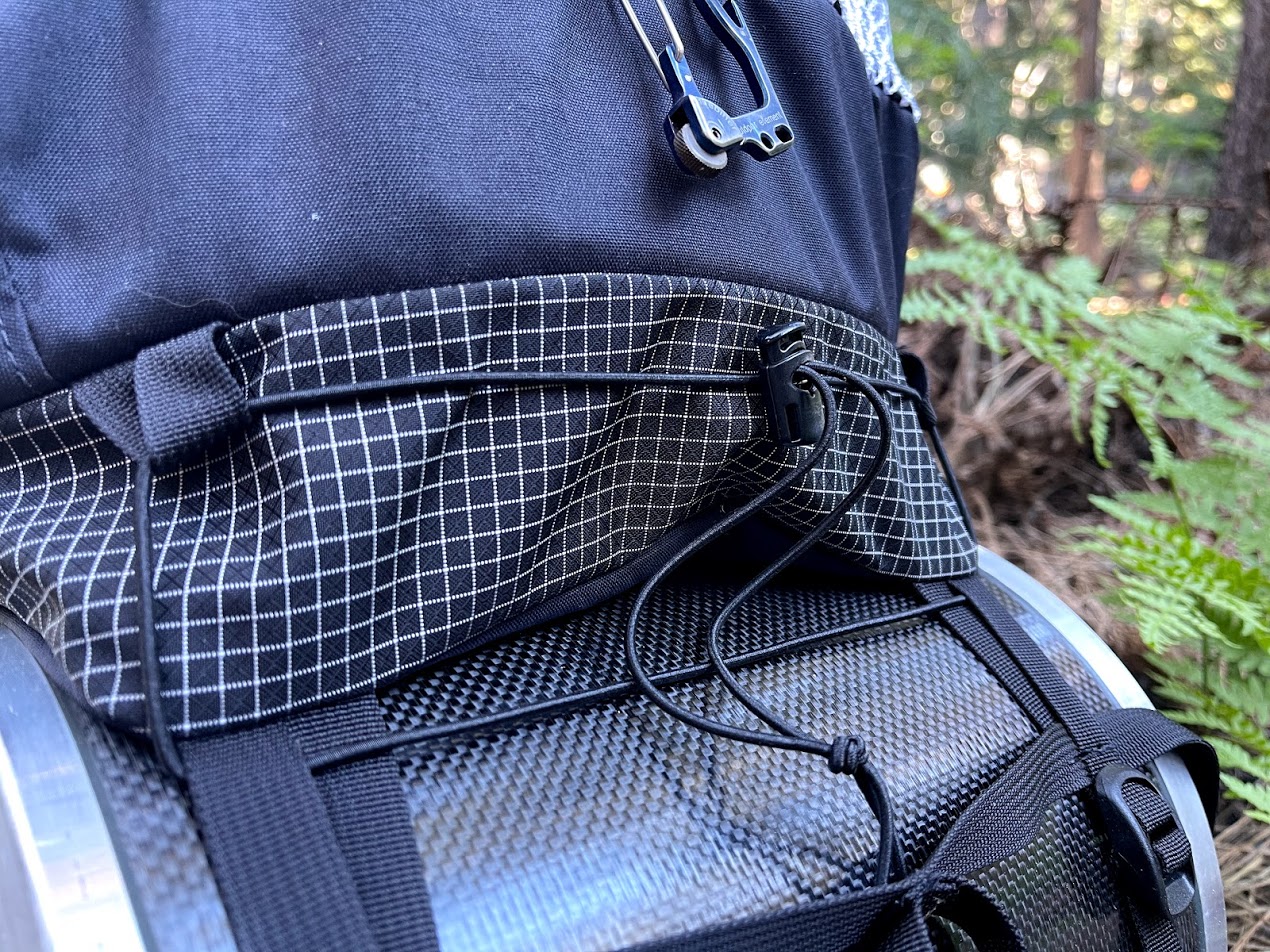
But there are a few other features worth noting. A length of shockcord running in a loop directly above the bear canister storage area provides storage for a CCF pad, while a shock-cord and webbing system along the central spine of the pack provides better-than-average trekking pole/ice-axe storage.
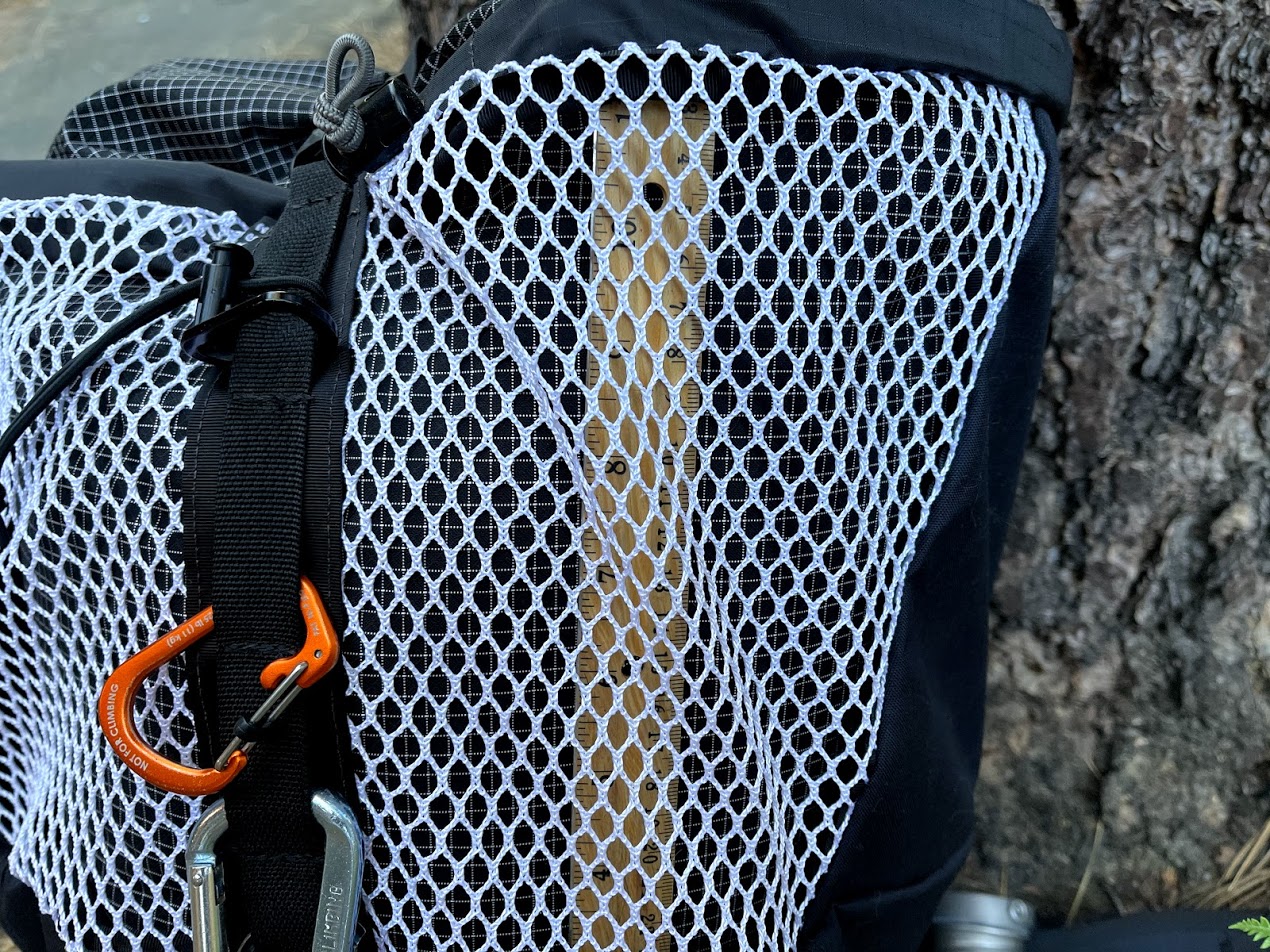
The rear external pocket is voluminous and wraps entirely around the pack from one side of the back panel to the other. The sides of the pocket are 310 denier Cordura, while the outside panel is non-stretchy, open mesh.
Between the exterior pocket and the expandable main compartment (the roll-top closure extends a solid 12 inches / 30 cm above the shoulders), it would be easy to overload this pack, so users who depend on a lack of volume to manage their pack weight should beware.
A glut of daisy chains run up and down both shoulder straps as well as along a central strip of fabric attached to the exterior rear pocket. I’m a fan of clipping on-the-go items to daisy chains, so I appreciate this touch.
As a final nod towards usability, Nuntak Gear notes that the bear canister storage area can be used to hold any number of large, bulky items like packrafts, winter gear, Ursacks, or Nunatak’s Cargo Sack (essentially just a cylindrical stuff sack). I’ve yet to try this function, but will likely test it out on Colorado’s Collegiate Loop with an Ursack later this summer.
Photos
Testing the Nunatak Gear Bears Ears 50 in the Sierra Nevada.There are tons of daisy chains on the J-shaped shoulder straps.The floating hipbelt is padded and attached directly to the bear canister storage area on the rear exterior of the pack. In other words, the structure of the bear canister provides a little rigidity to the pack.The exterior rear pocket is plenty deep, and wraps all the way around the pack from one side of the back panel to the other. That’s a 1 foot (30 cm) ruller resting inside the pocket. There’s also a string of daisy chains running down the central line of the pocket.From this angle, you can see the bear canister attachment system as well as the lower half of the ice axe/trekking pole attachment system (shockcord and webbing).The CCF attachment shock cord.The lateral stabilizing straps for the bear canister attachment system. One of the great things about this pack is how easy it is to access the canister without removing it.The water bottle storage system hangs off the hipbelts. You can order something to fit a 1 L Smartwater (or in this case a 650 L bottle), or a Nalgene-sized bottle.The wrap-around pocket is voluminous, and the accordion-style closure extends well above the shoulder straps if needed.From this angle you can really see that the pack is designed to rely on the bear canister to provide support for the upper internal storage compartment.It would be easy to over-stuff this pack. Users should use caution, it has more volume than it’s recommended maximum carrying capacity could support.Another angle that illustrates how things are stored externally on the pack.
The Takeaway
The Nunatak Bears Ears 50 seems like a unique and versatile pack. It combines a rich feature set, thoughtful design, and bulky-item carrying capacity (complete with floating hipbelt) with a 35-pound (16 kg) load capacity and minimalist removable foam back panel. The water and bear canister storage areas are well-situated for a stable carry, even over talus or while scrambling.
I’d prefer to see this pack rendered in X-Pac or Dyneema Composite Fiber for some waterproof capability, but also understand that this pack is aimed primarily at western hikers operating in ranges without a lot of all-day rainstorms.
How the Nunatek Bears Ears 50 fairs under the maximum recommended loads for extended carries remains to be seen, but my initial impression of the pack is overwhelmingly favorable.
Product mentions in this article are made by the author with no compensation in return. In addition, Backpacking Light does not accept compensation or donated/discounted products in exchange for product mentions or placements in editorial coverage.
Some (but not all) of the links in this review may be affiliate links. If you click on one of these links and visit one of our affiliate partners (usually a retailer site), and subsequently place an order with that retailer, we receive a commission on your entire order, which varies between 3% and 15% of the purchase price. Affiliate commissions represent less than 15% of Backpacking Light's gross revenue. More than 70% of our revenue comes from Membership Fees. So if you'd really like to support our work, don't buy gear you don't need - support our consumer advocacy work and become a Member instead.
Learn more about affiliate commissions, influencer marketing, and our consumer advocacy work by reading our article Stop wasting money on gear.
What’s the perfect pack? One that stays off your mind.
There were big, round, gray stones in the East Verde River and I stepped carefully from one to the next, planting my trekking poles in the shallow water for stability. On the other side, I unclipped my hipbelt and sternum strap and swung my pack to the ground, leaning it against a round, gray rock. I looked up-canyon wondering where the water originated, for I couldn’t remember what Google Earth had told me earlier that week. Then I looked down-canyon where the water hit a brown, rocky wall, detoured around it, and then disappeared into sycamores and a long, mysterious canyon I wished I had time to explore.
The East Verde River.
Then my attention turned to the pack I was wearing. I was 11 miles into the first day of testing the YAR Gear Mountain Drifter 38 Liter pack and needed to pay attention to whether or not it was working. Suddenly aware I hadn’t spent all that much time thinking about it during those first 11 miles, I promised myself I would try and pay better attention from then on out. I hadn’t noticed undue pressure on my shoulders, hips, or back. All I really did remember from the last 11 miles were the large volcanic stones in the trail, prickly pear, agave, alligator juniper, piñon, yuccas, and countless birds. I remember the looming blue triangle of the Mazatzal Mountains dusted lightly in snow creeping slowly closer to me like one of the pyramids of Giza chained to a winch and cranked heavily across the ground. Is that how they were built? With that thought came a flood of associations. “When the great – pyramids – dragged themselves out to this spot – sickness sank into the little one’s heart,” I sang loudly, remembering the beautiful and dark Jason Molina song.
The blue pyramid of the Mazatzal Mountains.
But then I realized that if the pack wasn’t stealing my attention, maybe it was doing exactly what it was supposed to be doing, just simply working, so that my attention could be freed up to experience other things, the world around me, and the associations it prompts. That’s what I think good gear should do. It should remain in the background so that we can have the experience of just being out there.
With my next source of water eight miles away and uncertain at best, I filled up my bottles from the slimy creek. I threw the pack on and with that extra weight it became noticeable, feeling like a toddler had crawled into it when I wasn’t looking. I passed several other hikers, each of them either section-hiking or thru-hiking the Arizona Trail. “Am I almost to Pine?” a young man with tan-colored everything, buzzed hair, and a roll of quadrangles in his hand jokingly moaned. “Not far!” I said enthusiastically. “I’m dying,” he responded and plodded on. He seemed to be very aware of his pack, unnoteworthy though it looked to me.
The climb was hot, and at the top I sat down in the shade of a juniper, listening to my heart pulse in my ears and feeling my temples throb. After a few minutes, I stood again and left the Arizona Trail, going west on a different, clearly unmaintained trail. After drinking some water the pack soon faded again into the background of my experience, while birdsong, sunlight, agave, manzanita, and my body moving through it all came to the fore. “There is no future – no promise of more,” I starting singing. It must have been a subconscious wish to be purely present, an incantation to banish the past, future, and the desire for something more than whatis.
The real reason I go backpacking.
At some point, if I walk long enough, some ill-fitting, poorly designed, heavy backpacks become less noticeable. Conversely, most ill-fitting packs fill me with rage by mile 35 or so. A rage that instigates an obsessive problem-solving state of mind. One that tends to block out all other experiences. Over the last few years, I’ve spent more hours in this state of mind while on the trail than I’d like to admit to myself, much less to an audience.
And it’s a catch-22 as well because I need to experience different packs to find out what works, but I simply want the problem to be solved so that I can just be there. I could name all the backpacks I’ve tried and why they didn’t work, or almost worked, or mostly worked but were missing that special something that made me excited to wear them, but it’s all beside the point.
In a sense, and to sort of quote Voltaire, the perfect backpack has become the enemy of the good backpack. By which I mean, the theoretical existence of the perfect backpack has made me so aware of the good backpack that the good backpack has sometimes distracted me from the experience of backpacking.
I don’t mind this distraction to some degree, after all, it’s a part of my job, but this tension has reminded me that it is not the main reason I go backpacking. There are many reasons, too many to fully articulate here, but most can be boiled down to a reconnection with the land. So if it is the land and myself in communion that is one of the primary goals, then all I want my backpack to do is hold everything I need to facilitate that connection and to do so unobtrusively.
I descended gradually into a red granite arroyo late in the afternoon and could feel my quads. They were telling me the day should have been over by then. I stopped, leaned my trekking poles against a limber juniper bow, and pulled the map out of my shoulder strap pocket. I could see the possibility of flatness just 200 feet above me. I looked up from the map at the hill in front of me. I folded the map and stowed it away and took up my poles and began plodding slowly up the hill. This hill, though still pretty high in elevation, had the first ocotillos I had seen on this trip. I passed them panting and soon emerged on top in a beautiful grove of piñons and junipers. There was a view, a flat spot, and trees. It was perfect.
I dumped out the contents of my pack carelessly and pulled my tent from the stuff sack. When I had it set up I stepped back to take a picture. I suddenly realized that this tent is probably the only piece of gear I own that almost never steals my attention aside from the times that its clean aesthetic prompts me to take photos of it. If you must know, it’s a Mountain Laurel Designs DCF DuoMid.
The only piece of gear I have that I hardly ever think about.
I have never put much thought into my DuoMid. In my pack, it’s small enough, unobtrusive. The weight with an inner and stakes and really long guylines is just over two pounds, which is fine with me. When I’m in it I feel at home. No amount of rain or wind has really bothered me. I feel safe. Because it’s half vestibule I can spread everything out and organize it. It’s comfortable. It works. I don’t find myself pining for something else. Of course, this experience is subjective, but the point is that I found something that works for me.
My last morning in the Mazatzal Wilderness I opened both sides of the door and rolled them back and then sat with tea watching the light creep across the land from the western mountains towards me. I didn’t think about the tent, it was doing exactly what it was supposed to be doing on a morning like that: staying out of the way.
Mountain Laurel Designs DuoMid on the last day of my trip.
After loading everything back in my Yar Gear Mountain Drifter 38 in preparation for a 12-mile, 3500-foot climb to the trailhead, I set it against some rocks to take a few photos. The pack was still ridiculously full for the last day of the trip, I had packed at least two more days of food than I needed, and I have no idea why. “Oh well,” I thought. “It was a good test.” I set the timer on my camera, placed it on a rock, stepped back a few paces with the pack on my back, and struck a comically fake pose. My mind was not on the crisp spring morning on the edge of the Sonoran, it was on the world of the internet, where an audience would be viewing me, reading my words. I found it funny, though, suddenly laughing at myself for bringing these thoughts to this place. These worlds are so separate, and yet weirdly connected. I turned off the camera and stowed it in my shoulder strap pocket and walked away from my now vacant campsite towards the trail.
The Yar Gear Mountain Drifter 38 stealing my attention for this photoshoot but then fading into the back of my mind due to exceptional comfort.
On the one hand, I want everything I own to function as well as my DuoMid so I don’t have to dissociate repeatedly from the land every time I notice an imperfection in my kit. After all, this modern dissociation from the land is the reason I return to it over and over to reconnect. But on the other hand, I want to be alright with the fact that much of my gear will never be perfect. I will have rainjackets that will fail, and sporks that are too short. I will have sleeping pads that will deflate, and, I’m sure, plenty more backpacks that will leave me wanting.
But somewhere in there, I think I can find a balance where most of my gear works so well that it doesn’t interfere with experience, and when imperfect items steal my attention I am not bothered by them. I’ll keep searching for this balance. How do you find it?
Backpacking Light does not accept compensation or donated/discounted products in exchange for product mentions or placements in editorial coverage.
Some (but not all) of the links in this review may be affiliate links. If you click on one of these links and visit one of our affiliate partners (usually a retailer site), and subsequently place an order with that retailer, we receive a commission on your entire order, which varies between 3% and 15% of the purchase price. Affiliate commissions represent less than 15% of Backpacking Light's gross revenue. More than 70% of our revenue comes from Membership Fees. So if you'd really like to support our work, don't buy gear you don't need - support our consumer advocacy work and become a Member instead.
Learn more about affiliate commissions, influencer marketing, and our consumer advocacy work by reading our article Stop wasting money on gear.
Who or what makes a trail? This is the question Backpacking Light author Ben Kilbourne asks himself (and us) as he reads his essay The Anthropology of a Trail.
Stream
Summary
Who or what makes a trail? This is the question Backpacking Light author Ben Kilbourne asks himself (and us) as he reads his essay The Anthropology of a Trail.
A well-worn trail and a shadow of one of its many walkers in the foothills above Salt Lake City. Photo credit: Ben Kilbourne
If you enjoyed this podcast and would like to read or share the written version, check it out here.
Executive Producer - Backpacking Light; Show Director and Host - Ryan Jordan; Producer - Chase Jordan; Theme music: Look for Me in the Mountains written by Chris Cunningham and Ryan Jordan, performed by Chris Cunningham (acoustic guitar, lead and harmony vocals, harmonica), Chad Langford (upright bass), and Tom Murphy (mandolin), produced by Basecamp Studios in Bozeman, Montana.
Sponsorship Policy: Backpacking Light does not accept compensation or donated/discounted products in exchange for product mentions or placements in editorial coverage, including any podcast episode content not excplicitly identified as sponsored content. Some (but not all) of the links in these show notes may be affiliate links. Learn more about affiliate commissions, influencer marketing, and our consumer advocacy work by reading our article Stop wasting money on gear.
Rex Sanders examines the arcs and stages that backpackers take as years and mileage start to add up.
Introduction
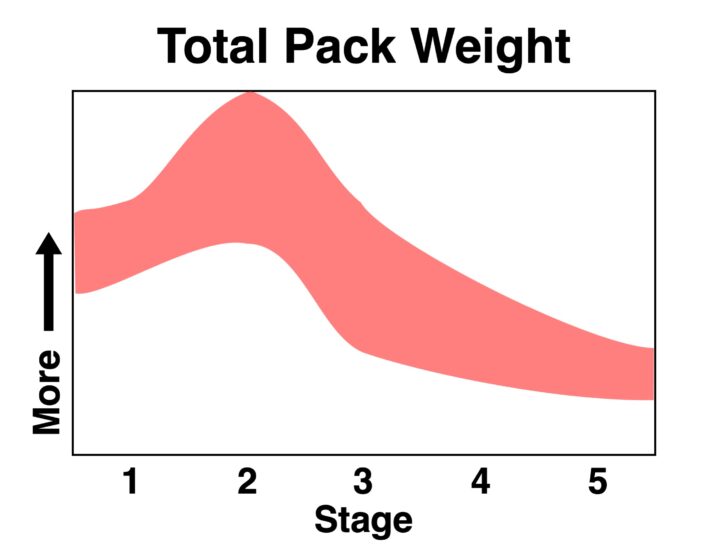
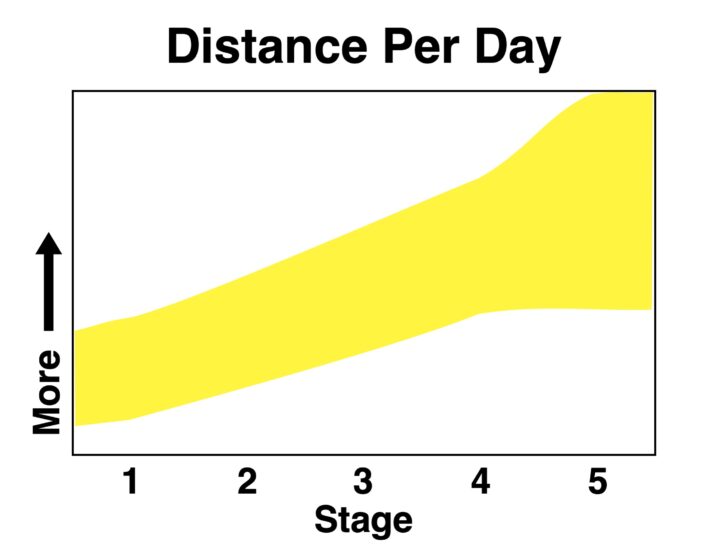
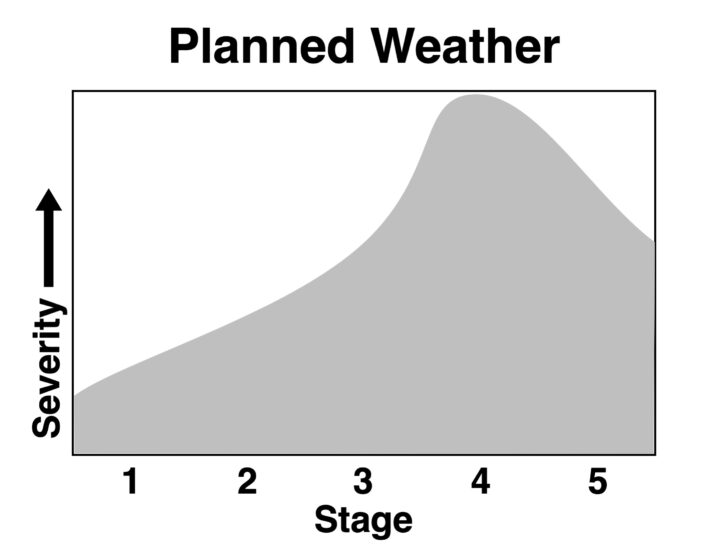
Most backpackers improve their skills, pack weight, distance hiked per day, and other factors as they move through progressive stages of their passion. This story describes, in broad terms, seven arcs and five stages that we might have in common.
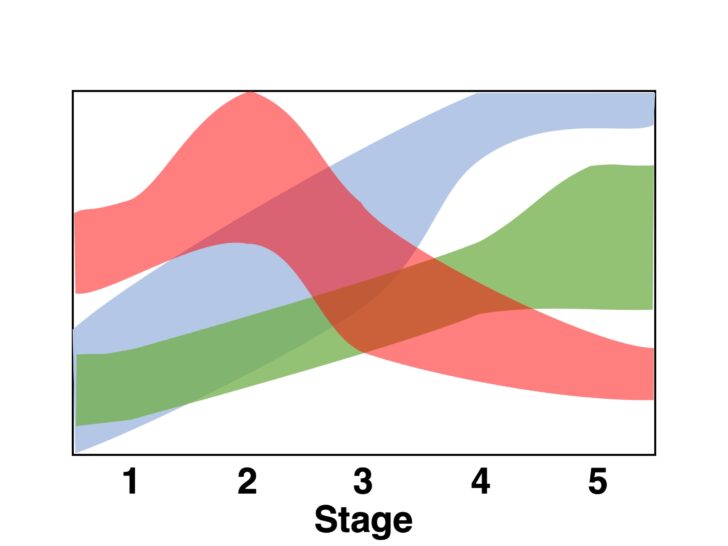
Some of the arcs across several stages of our backpacking journey. Photo credit: Rex Sanders
The seven arcs are:
skills
total pack weight
gear complexity
distance per day
planned weather
luxuries
suffering
I could describe many other arcs; these seem to be common and illuminating.
Our five shared stages might be called:
New Weekend Warriors
Aspiring Thru-Hikers
Lightweight Backpackers
Gram Weenies
Ultralighters
Some backpackers stop at a given stage, having reached their goals. Or they might “exit,” and choose to emphasize other factors besides pack weight or distance.
For many people, backpacking supports more significant activities like hunting, fishing, mountaineering, photography, and more. Striving for the lowest carried weight or the longest day’s hike is not that important to these people.
Stage 1: New Weekend Warriors
These backpackers carry a heavy pack on shorter trips while tolerating some suffering as they hike and camp. Their ranks are mostly younger people just starting out, often with borrowed gear. They typically go on weekend backpacking trips of one or two nights.
Backpacking skills and experience are usually slim to non-existent. They plan most trips for fair weather and often cut trips short when conditions turn bad.
Backpackers in this stage might slowly add weight, as they learn from sometimes painful experiences or good marketing, that they need a better first aid kit or party lights for their tent.
Often these trekkers struggle with taking too much or too little food, fuel, and water. If they run out on one trip, they almost always take too much on future trips. What some call luxuries, these trekkers consider necessities.
Total pack weight ranges from 25 to 35 lb (11 to 16 kg), with a base pack weight from 20 to 30 lb (9 to 14 kg). Most trips are 5 to 15 mi (8 to 24 km) per day.
Many backpackers stop at this stage, because their suffering is tolerable, and they are happy to be outdoors a few times every year. Gear is simply a means to an end.
Stage 2: Aspiring Thru-hikers
Rex carrying about 50 pounds (23 kg) on the Pacific Crest Trail in Southern California several decades ago. Credit: Gordon Masor.
Some backpackers get more ambitious and want to tackle longer trips, getting deeper into wild areas, or spending several days at a favorite camping spot. A common pattern is to add more food and fuel to the gear they used for Stage 1. But they might also add more gear for birdwatching or taking kids along. Many become aspiring thru-hikers.
These backpackers often have some skills and experience – but not much. They plan trips for fair weather, though many push into the so-called shoulder seasons (spring and fall) by adding more or heavier gear. Sometimes, bad weather shortens their trip.
Because they are carrying more weight, these trekkers suffer more while hiking, though they might have a better time in camp or at that favorite trout stream.
At this stage, most backpackers have food, fuel, and water sorted out for shorter trips. But the learning curve restarts for longer trips, often with some hard-won lessons. They might add new luxuries like pillows and coffee makers.
Total pack weight often ranges from 30 to 50 lb (14 to 23 kg), with a base pack weight from 20 to 40 lb (9 to 18 kg). They might hike 15 to 20 mi (24 to 32 km) per day on some days during some trips.
A few people stop here, willing to suffer more for other benefits, but unwilling to dive into gear geekery. Many suffer so much that they go back to the shorter trips of Stage 1, while some give up backpacking entirely.
Stage 3: Lightweight Backpackers
Some Stage 1 and Stage 2 backpackers figure out that excess total pack weight is at the core of their suffering, or limits their adventures. These backpackers usually start by reducing the weight of their big three items – backpack, sleep system, and shelter. Yet after spending several hundred dollars replacing those items, they realize that carrying a 2 lb (1 kg) cook system or wearing heavy boots no longer makes sense.
This can lead to a sustained research-and-buying frenzy, pursuing lighter versions of everything they currently carry. They quickly reach diminishing returns on the amount of weight they can save per additional dollar spent. Yet backpackers in this stage frequently develop a kind of tunnel vision, focused on base pack weight while almost ignoring consumables like food, water, and fuel.
Their skills are roughly intermediate. Backpackers in this stage want to expand their trip repertoire to other regions and seasons, including early spring and late fall. Some add cross-country skiing, packrafting, or vlogging to their trips – with additional weight and new skill sets. The added mass of their passions encourages them to further reduce base pack weight.
Rather than buying all their gear from big box stores, they often start purchasing items directly over the Internet from smaller gear makers.
Total pack weight ranges from 15 to 35 lb (7 to 16 kg), depending on trip length. Base pack weight, usually tracked using complex spreadsheets, might range from 10 to 15 lb (4.5 to 7 kg). Daily distances over 20 mi (32 km) become much more realistic.
A lot of people stop here, content to suffer less while enjoying the outdoors.
Stage 4: Gram Weenies
Some Stage 3 backpackers choose to go further and overhaul their kit. Occasionally aspiring Stage 2 trekkers cruise through Stage 3 and into Stage 4 without pausing.
Rather than relying exclusively on marketing, reviews, and advice from others, backpackers in this stage often start experimenting. They swap tents for tarps and bivy sacks. Quilts might replace sleeping bags. They spend many hours contemplating frameless packs. But they can’t quite make the leap to stoveless trips after trying a few no-cook dinners.
New jargon like “EN ratings,” “hydraulic head,” and “CFM” peppers many conversations. Online they debate the pros and cons of DCF, silnylon, and silpoly. Gear storage and display take over entire rooms at home. Trip planning frequently involves agonizing decisions over which of several backpacks, tents, or sleeping bags to take. Non-backpacking friends and loved ones start rolling their eyes and avoiding certain topics.
Their skills are pretty good by now, and tackling winter trips, remote environments, and higher altitudes becomes possible.
A few become modders. They start by trimming excess bits and pieces from their gear to save weight and graduate to adding missing features after many hours of research and sketching. For a few, shedding weight becomes almost an obsession, removing clothing tags and extra inches (centimeters) of straps without mercy.
Some backpackers at this stage start making their own gear, out of frustration from not finding their idea of the perfect item, or out of fiscal necessity.
They analyze food for calories-per-ounce or kilojoules-per-gram, frequently at the expense of edibility or good nutrition. Stove fuel gets a similar treatment, followed by a flurry of stove buying, making, and testing. They still view water as a critical necessity, but usually, skip a detailed needs analysis.
Eliminating luxuries becomes a passion, often at the expense of a good night’s sleep or other necessities. They believe this added suffering is required to hit certain base pack weight goals.
Total pack weight might range from 10 to 25 lb (5 to 11 kg), depending on trip length. Base pack weight can start below 10 lb (5 kg). These trekkers may plan trips assuming 20 to 25 mi (32 to 40 km) per day, and occasionally might even hit 30 mi (48 km) per day.
Many backpackers stay in this level, with a constantly evolving gear selection, and frequent trips to the Backpacking Light gear swap forum.
Stage 5: Ultralighters
In this very small club, concepts like SUL (super-ultra-light) and XUL (extreme-ultra-light) become part of their online discussions. Arguments might break out over what counts as worn weight or carried weight. They discuss the latest fastest known times (always abbreviated FKT) on famous trails, including subtle distinctions between supported and unsupported trips.
The equipment they use often becomes a mix of MYOG (make your own gear), plus near-custom items purchased from very small cottage makers with delivery times measured in months.
Backpackers at this stage require a deep set of skills to use their gear safely, often honed over many years and long thru-hikes. They are usually comfortable hiking in all seasons, off-trail, and sometimes pioneering new routes. When carrying minimal loads, these trekkers might avoid the most severe weather.
Food and fuel weights are pretty dialed-in by now. At water breaks, cameling up (drinking a lot) and making large meals becomes the norm to reduce carried water weight. Backpackers in this level might allow themselves one luxury item, and highlight that in gear lists or social media posts.
Total pack weight rarely exceeds 15 lb (7 kg). Base pack weight varies, but for most trips rarely exceeds 10 lb (5 kg). Daily hiking distance is usually over 20 mi (32 km), often reaching 30 or 40 mi (40 or 64 km).
Other Observations
Most first-time thru-hikers on the Appalachian Trail or Pacific Crest Trail seem to be in Stages 1 or 2. With luck, early in their journeys, they get gear shakedowns from more skilled and experienced backpackers, so they can suffer less and be much more likely to finish. Much gear gets mailed home and new gear purchased or scrounged from hiker boxes. Successful thru-hikers usually end their trip in Stage 3 or higher.
Somewhere around Stage 3, many backpackers start realizing that what works well for others doesn’t always work well for them. But there’s often a phase marked by relentlessly searching for the perfect backpack, tent, sleeping bag, stove, etc. Most of these trekkers ultimately understand that there’s no such thing.
According to studies done by gear creator Michael Glavin, once people reach a sweet spot for total pack weight, further weight reduction brings many fewer benefits. A few backpackers figure that out for themselves and stop pursuing ever-lower pack weights.
Rex near his sweet spot, carrying about 30 pounds (14 kg) at the start of a 6-day trip. Credit: Judith Witt-Sanders.
At almost any stage, many backpackers stop obsessing over ounces or grams and realize that for just a little extra weight they can dramatically improve comfort, performance, safety, and other factors. Or they become content with good enough gear and focus on getting outside more often.
It’s important to understand that skills and experience are not directly linked. You can brush your teeth wrong for 25 years if you don’t know any better. Operating a complex stove might be easy in favorable conditions, but could be a major struggle the first time you try it while cold, wet, tired, and hungry.
The Arcs
Now that we’ve set the stage, these backpacking arcs should make sense. I’ve omitted units on the vertical axis; the shape of each arc is more important than the precise values. Besides, everyone’s actual arcs will be different.
These arcs are graded on a curve: the range from bottom to top is not absolute, but relative to this discussion.
Skills rise as backpackers progress through the stages. Photo credit: Rex Sanders
Most backpackers gradually acquire skills from a variety of sources, including the school of hard knocks.
Total pack weight peaks in Stage 2 and then continues to decline. Photo credit: Rex Sanders
While many books and online resources emphasize reducing base pack weight, it’s total pack weight that directly impacts your suffering and other goals. Near the end of a long trail day, your body doesn’t care if the load you were hauling was mostly gear or mostly consumables.
Gear complexity drops dramatically as the stages progress. Photo credit: Rex Sanders
Gear complexity is the opposite of simplicity and refers to the number ofbits and pieces carried, as well as how hard they are to use. Complex gear increases your mental burden and usually is less reliable. Yet some people enjoy using complicated gear and nuanced skills for their elaborate setups.
As you might expect, possible distances increase as backpackers move through the stages. Photo credit: Rex Sanders
The distance hiked per day is usually tied to other goals. Most backpackers reaching for bigger objectives such as thru-hikes also need to travel farther each day on average.
The severity of weather that backpackers can handle increases as the stages progress, but drops slightly as gear becomes more ultralight. Photo credit: Rex Sanders
Beginning backpackers often aim for the best weather; as they build skills and refine their gear, they can take on more challenging weather. By the time someone reaches Stage 5, they often avoid trips in the most severe weather so they can keep their pack weight as low as possible.
Luxuries peak as beginning backpackers add items to their pack, and then decrease dramatically. Photo credit: Rex Sanders
Luxuries are in the eye of the beholder. But our gaze often changes as we move to higher stages. Many who exit at Stage 3 or higher add back selected luxuries in pursuit of other goals. Some add luxuries hoping to reduce suffering, but that often backfires.
Suffering rises dramatically as Stage 2 backpackers add more weight but then decreases for the rest of the stages. Photo credit: Rex Sanders
How much you suffer while backpacking is very subjective. Tolerance for suffering varies tremendously between people and over time. Plus, some people choose to suffer more in pursuit of bigger goals. But this arc seems to reflect many people’s journeys.
Conclusion
Not everyone will go through exactly these stages and arcs exactly this way. But what I’ve described seems to be a common experience, based on decades of reading stories, forums, and trail journals.
Again, you don’t need to aspire to a higher stage. Many backpackers are happy enough at Stage 1 or 2. Almost no one can jump straight to Stage 5 without years of focused skill-building and experience. Most people need to go through the earlier stages to gain a real appreciation for the later stages.
You might choose to blend pieces of several stages or arcs to HYOH (Hike Your Own Hike). Some of us step off this treadmill after realizing that fewer grams are not everything and that good enough gear is just that.
Backpacking Light does not accept compensation or donated/discounted products in exchange for product mentions or placements in editorial coverage.
Some (but not all) of the links in this review may be affiliate links. If you click on one of these links and visit one of our affiliate partners (usually a retailer site), and subsequently place an order with that retailer, we receive a commission on your entire order, which varies between 3% and 15% of the purchase price. Affiliate commissions represent less than 15% of Backpacking Light's gross revenue. More than 70% of our revenue comes from Membership Fees. So if you'd really like to support our work, don't buy gear you don't need - support our consumer advocacy work and become a Member instead.
Learn more about affiliate commissions, influencer marketing, and our consumer advocacy work by reading our article Stop wasting money on gear.
The Enlightened Equipment Uprising Underquilt is a tapered, somewhat customizable underquilt aimed at experienced hammock users. It incorporates a number of performance features differentiating itself from the majority of available offerings, such as strategically placed insulation and a unique suspension system.
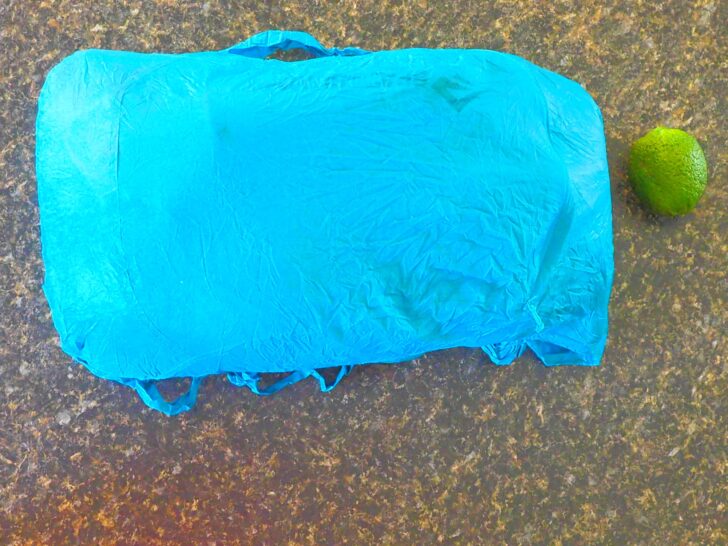
The Sea to Summit Ultra-Sil Nano Travel Day Pack (MSRP: $29.95, 1 oz / 30g) is an 18 L summiting daypack that can be compressed to the size of an egg and tucked into a multiday pack for peak-bagging on longer trips.
Introduction
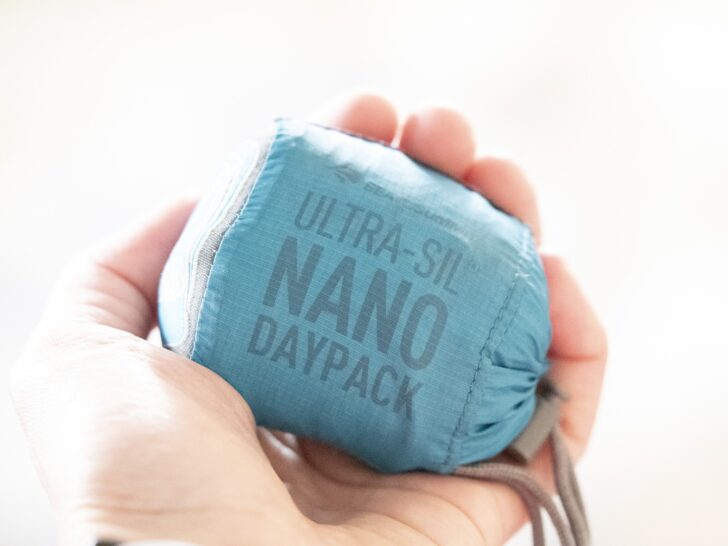
The Sea to Summit Ultra-Sil Nano Travel Day Pack (MSRP: $29.95, 1 oz / 30 g) is an 18 L (1100 cubic inches) summiting daypack that can be compressed to the size of an egg and tucked into a multiday pack for peak-bagging on longer trips.
The Sea to Summit Ultra-Sil Nano Travel Day Pack. Photo: Sea to Summit
Highlights
18 L capacity
MSRP: $29.95
weight: 1 oz / 30 g
compresses to roughly egg size
10 lb (5 kg) recommended load capacity
15 denier siliconized nylon fabric
asymmetrical zipper to reduce pack size
bar-tacks at stress points for added strength
Testing Context
An ultralight summiting pack is a piece of kit that has appealed to me for a while. I’m not usually a big peak bagger on multi-day trips, but the occasion has come up when one would be useful.
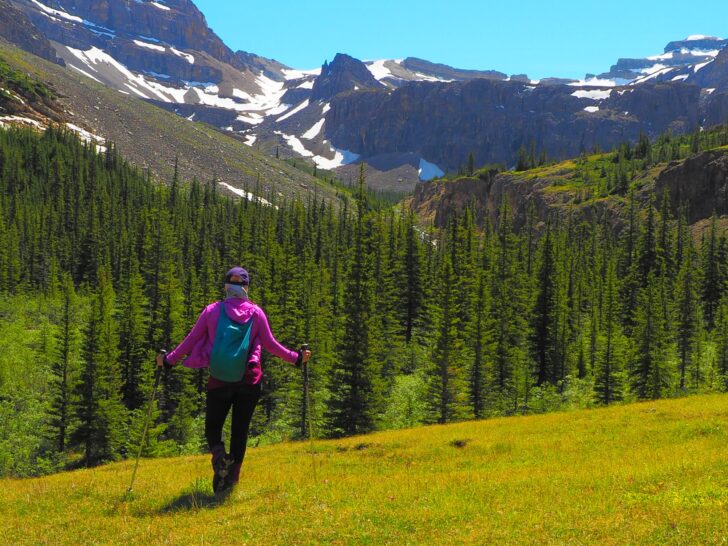
I knew I’d be spending a day camped as part of my Corona Ridge adventure, and I wanted to explore the upper reaches of Corona Canyon. The smallest and lightest pocket pack (in one of my preferred brands) is the Sea to Summit Ultra-Sil Nano Day Pack. I was instinctively drawn to this pack’s little lime-sized package. It’s light, compact, and I could picture tossing it into my kit on any trip where I might need a summiting pack. I made the purchase and took it out into the field on a summer excursion deep into a canyon off the North Saskatchewan River’s southern banks. This review is based on my experiences on that trip (and a few others throughout 2020)
This is a first look at new gear that recently entered our review pipeline, and hasn't yet been subjected to rigorous field use. Learn more about the types of product reviews we publish.
First Impressions
Storage Capacity
The Sea to Summit Ultra-Sil Nano Travel Day Pack impressed me with how truly tiny it packed and how much space there was in the pack once unfurled.
I stuff my wishlist of summit supplies into the Sea to Summit Ultra-Sil Nano Daypack and it’s pretty crowded but it all fits.
I could easily fit two down insulating layers (a vest and a sleeved hoodie), a rain/wind shell, a hard-sided Nalgene 1 L bottle, a pair of gloves, a toque (Candian for beanie hat), a Buff, a sun hat, small bottle of sunscreen, my mirrorless camera, and room for snacks.
The Sea to Summit Ultra-Sil Nano Daypack stuffed with my supplies and compared to the original lime.
I will note here I wear kid’s size large or women’s extra small so my clothes aren’t as voluminous as those found in many packs.
Usability
The Sea to Summit Ultra-Sil Nano Travel Day Pack is a one-compartment pack with a relatively small opening. The more I stuff into the Nano, the less likely it is that I can find anything. I will also note the zipper is light-duty – similar to what you would find on a windbreaker – so stuff with caution my friends.
Sea to Summit made the most of the opening by making it a diagonal slash opening across the top of the pack.
Fit and Comfort
Putting on my well-stuffed Sea to Summit Ultra-Sil Nano Travel Day Pack Nano is comfortable enough, but not something I want to wear for longer than about an hour or two continuously (which is also about as long as most mid-trip peak bags take.) As with any frameless pack, care in packing is crucial.
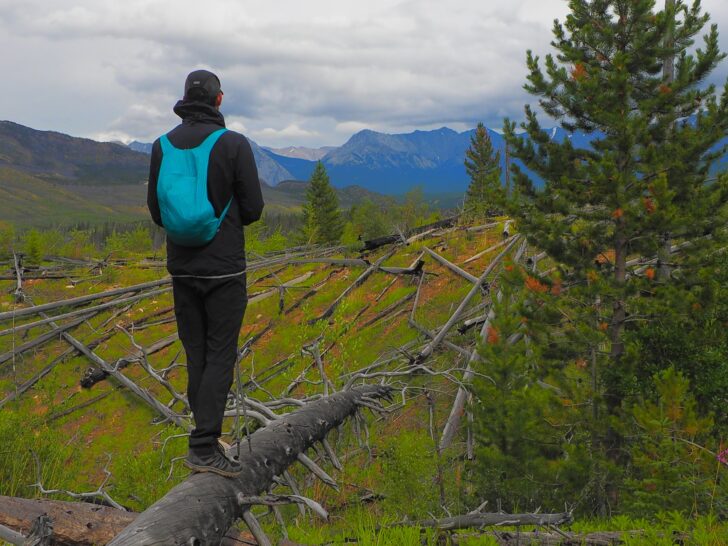
I’ve also loaned it to other hiking partners while I was off taking photos or doing other things and the rather formless pack fits men about 6 ft (2 m) tall about like it fits me – not perfectly, but functionally.
Photos
My foray to the Corona Creek headwaters was an ideal testing ground for the Sea to Summit Ultra-Sil Nano Daypack.The compressed Sea to Summit Ultra-Sil Nano Day Pack as compared to a chicken egg and a lime.Testing the Sea to Summit Ultra-Sil Nano Travel Day Pack.Sea to Summit Ultra-Sil Nano Travel Day Pack is easy to throw in a pack when it compresses this small.My partner Michael borrowed the Sea to Summit Ultra-Sil Nano Travel Day Pack for an afternoon of adventuring. The fit is functional.
The Takeaway
The Sea to Summit Ultra-Sil Nano Day Pack is handy to have around, but I do find it uncomfortable after an hour or two. This isn’t unexpected for what is essentially a formless sack of nylon.
I modify the shoulder straps by adding an elastic clip cord (the pad-strap from my Enlightened Equipment Revelation quilt). I also will note that the fabric is light duty and I did manage to puncture a small hole in the ripstop fabric. The hole was easily patched with some Tenacious Tape on the inside and outside of the pack fabric.
I took the Sea to Summit Ultra-Sil Nano Day Pack on my Corona Creek adventure and (a few others throughout 2020) and ten-out-of-ten would bring it again. I’ve started throwing it in my pack if any kind of potential off-piste adventure is expected.
Learn More: Sea to Summit Ultra-Sil Nano Travel Day Pack
Product mentions in this article are made by the author with no compensation in return. In addition, Backpacking Light does not accept compensation or donated/discounted products in exchange for product mentions or placements in editorial coverage.
Some (but not all) of the links in this review may be affiliate links. If you click on one of these links and visit one of our affiliate partners (usually a retailer site), and subsequently place an order with that retailer, we receive a commission on your entire order, which varies between 3% and 15% of the purchase price. Affiliate commissions represent less than 15% of Backpacking Light's gross revenue. More than 70% of our revenue comes from Membership Fees. So if you'd really like to support our work, don't buy gear you don't need - support our consumer advocacy work and become a Member instead.
Learn more about affiliate commissions, influencer marketing, and our consumer advocacy work by reading our article Stop wasting money on gear.
Andrew interviews backpacker turned bikepacker Matt Mason in a Bikepacking 101 conversation.
Stream
Summary
In today’s podcast, we are joined by Matt Mason. Matt is a multi-hyphenate adventurer and backpacker turned bikepacker. Our chat functions as kind of a Bikepacking 101 class, so if you’ve been thinking of taking up the sport but don’t know where to start, this is a great entry point. We also talk about Matt’s efforts at public land advocacy in the Organ Mountains-Desert Peaks National Monument.
Outline
the superiority of long beards
from backpacking to bikepacking
the similarities between the two sports
bike riding is just fun!
how to avoid feeling overwhelmed as you start bikepacking
Executive Producer - Backpacking Light; Show Director and Host - Ryan Jordan; Producer - Chase Jordan; Theme music: Look for Me in the Mountains written by Chris Cunningham and Ryan Jordan, performed by Chris Cunningham (acoustic guitar, lead and harmony vocals, harmonica), Chad Langford (upright bass), and Tom Murphy (mandolin), produced by Basecamp Studios in Bozeman, Montana.
Sponsorship Policy: Backpacking Light does not accept compensation or donated/discounted products in exchange for product mentions or placements in editorial coverage, including any podcast episode content not excplicitly identified as sponsored content. Some (but not all) of the links in these show notes may be affiliate links. Learn more about affiliate commissions, influencer marketing, and our consumer advocacy work by reading our article Stop wasting money on gear.
It takes a close call for Maggie Slepian to dial in her risk assessment skills.
I’ve written before about being an average athlete, suffering for the sake of the sport, and learning to turn around. As I saw each of these articles publish, I realized how connected they were. Because I have always felt like an average athlete, I felt like I should be suffering more. With this suffering comes the realization that at some point you have to turn around.
The fourth part of this connected web is risk assessment. Risk assessment is closely tied with learning to turn around, and for most people, is often the deciding factor in doing so.
As you likely guessed, this is easier said than done for many people, myself included. When you feel like you need to be constantly pushing yourself to prove your worth, you ignore red flags in reaching your objective.
Ideally, risk assessment should be the idea that prefaces a discussion about abandoning the endeavor. For me, these crucial steps have historically been bowled over in the desire to prove my worth.
I’m slow on the ascent, fast on the descent.
I’d been hiking and backpacking for years and was consistently the slowest person up the hill, the clumsiest person stumbling through boulder fields, and the person dragging by the end of the day, looking for camp. By the time I started getting more into mountain sports like climbing, mountain biking, and kayaking, I was sick of being the slowest person in the group. Starting new sports was a chance to leapfrog over what I viewed as subpar athletic skills by upping my mental game.
Maybe I was the last person in the group still struggling up the mountain bike climb, but I’d be at the front of the line for the descent, knowing I was faster and willing to take more risks than the rest of the group. I took huge falls, including losing massive swaths of skin on both elbows and knees in one agonizing day of wrecks, but I was determined to push those fears out of my head in pursuit of being above average at something. Climbing was similar – I’d push myself past the point of intimidation, forcing my head into the game and faking confidence even when it wasn’t there.
The result of a nasty day of falls mountain biking.
Headspace is an important factor in success with extended or stressful endurance endeavors. Physical ability, while important, is not the only deciding factor in whether or not you reach your goal. Headspace is where I excelled. If I got into a stressful situation, I would imagine a dial in my head. I would picture myself turning down the dial, and I’d feel myself relax. Whatever was stressing me out didn’t go away, but my ability to push it aside enabled me to keep moving forward. While this can be a hugely beneficial mental skill to deploy in high-stress circumstances, it meant I was able to ignore elements of a situation that might have been warning signs telling me to turn around.
In the spring of 2019, I went kayaking with a friend I was trying to impress. We were going morel hunting on an island only accessible by boat, and while he warned me the rapids were faster than anything I’d boated before, and there were hazardous sections of deadfall, I brushed his warnings aside. I felt a twinge of anxiety as we unloaded the boats, but I turned my stress dial down and pushed off the riverbank.
Ten minutes from our put-in, I fumbled my boat and wound up heading down the wrong channel. Unable to maneuver my boat in faster water than I was accustomed to, I collided with a tree, flipping underwater instantly. In my panic, I forgot everything I knew about rolling and wet exits. I couldn’t even pull the skirt. I managed to roll enough to get a water-logged gulp of air, but was unable to get out of the boat or roll all the way up. By the time my partner beached his boat and swam the rapid to reach me, I was unconscious.
Near the put-in from the kayaking trip where I almost drowned because of poor risk assessment.
It took this brush with drowning to make me take a step back and reevaluate my risk assessment.
Granted, there are personality traits that go along with a lowered risk perception other than just trying to impress people. Many people who exhibit reduced risk perception also have lower trait anxiety, which means it takes a more intense situation for them to feel things strongly. In other words, someone like me might be considered a type of thrill seeker.
My risk-assessment learning curve was less of a curve and more of a flat line followed by a vertical spike. I was aware that I ignored red flags in my objectives, and had always been pretty determined to plow forward regardless of warning signs. But being trapped upside down, careening underwater through the current was the reality check I needed.
Some people have finely tuned risk-assessment radars from the time they set foot on their first backpacking outing. Then there are people who grow with their experiences and take some calculated risks while acknowledging other scenarios aren’t worth the trouble. Still, others need to be caught in a bad backcountry situation to rattle loose the stubbornness and desire to prove themselves, as well as overriding natural lowered risk perceptions.
Backpacking was the first backcountry sport I started. Still, slow on the ascent.
This concept is less about being a beginner and more about understanding our own individual learning curves. I wasn’t a beginner backcountry athlete when I finally stopped to reassess my relationship with risk. By the time I understood the dangers of my lowered risk perception, changing my decision-making was a fast process. Sometimes our learning processes aren’t linear, and they don’t match up with people around us.
I am still working to understand my own connections between lowered inhibition and smart decision making, and I still don’t like to let fear get in the way of continuing up a peak, navigating a scramble, or finishing a climb. But now, I give more agency to the voice in my head that reminds me the twinge of anxiety is there for a reason, and it’s ok to stop and listen to it.
Have you had a close call because of poor risk assessment? Tell us about it in the comments.
DISCLOSURE (Updated April 9, 2024)
Backpacking Light does not accept compensation or donated/discounted products in exchange for product mentions or placements in editorial coverage.
Some (but not all) of the links in this review may be affiliate links. If you click on one of these links and visit one of our affiliate partners (usually a retailer site), and subsequently place an order with that retailer, we receive a commission on your entire order, which varies between 3% and 15% of the purchase price. Affiliate commissions represent less than 15% of Backpacking Light's gross revenue. More than 70% of our revenue comes from Membership Fees. So if you'd really like to support our work, don't buy gear you don't need - support our consumer advocacy work and become a Member instead.
Learn more about affiliate commissions, influencer marketing, and our consumer advocacy work by reading our article Stop wasting money on gear.
Dan Durston is a gear designer, wilderness guide, and biologist. In this interview with Rex Sanders, he talks about the process and philosophy of shelter design.
Greek philosophy says you can’t step in the same river twice, but what about backpacking the same trail?
Tent or tarp? Quilt or sleeping bag? Down puffy or synthetic puffy?
These questions of equipment tend to vex backpackers and often lead to lengthy discussions. After the fourth or fifth time reading these discussions (or, against my better judgment, actually participating in them) I’ve found that they’re almost painfully boring. I’ve found that the question of which experienceto have – hiking a new trail or returning to an old favorite – is a much more interesting quandary to reflect upon. Thinking about how to use the limited time we have to spend in undeveloped landscapes is much more fulfilling than simply pondering another product to buy.
One of my favorite lakes which I’ve visited at least twice per year for the last five years.
I’m an incorrigible Returner. Although I did venture to a handful of new places in 2020, I found myself returning to no less than a dozen trails I’d previously backpacked on. In one particularly odd instance, I hiked up to a subalpine basin filled with golden larch for an overnight trip with my friend Doug. I then returned the next day with my girlfriend, Andrea, to share the majestic experience with her on a separate overnight trip. I felt a bit self-conscious that the squirrels might notice me and say to each other, “This guy, again?”
Some of my repetition is borne of convenience. For one subalpine lake that I visited twice last year, once in August and once in October, the total time spent in transit – both hiking and driving – was just over two hours one-way from my house. With scenery and solitude (both times I had the lake to myself) that easy to obtain, and with my schedule sometimes more crunched than I’d like it to be, it makes perfect sense to go for the low-hanging, but exceedingly delicious, fruit rather than drive further and hike longer just to see a new place – then frustratingly have less time to spend there.
I did two separate overnight trips, with two separate people, in a four-day span to this autumn wonderland in the Bitterroot Mountains.
For another lake which I visited for the third time in five years, I was aiming to settle some unfinished business. My previous visits had all been when the lake was still too iced-up to provide good fishing. So I timed my third visit when I knew it would be melted out and I’d finally get a fair shake at matching wits with the “thriving cutthroat fishery” that the guidebook mentioned was present in its waters. I succeeded and caught some nice fish. Since snow wasn’t an issue, I was able to loop back cross-country and pass through a basin filled with lovely tarns and magnificent mountain views.
Other places draw me back because I find the familiarity to be deeply, almost primally, comforting. I recognize rocks, pools of water, and tiny pocket meadows and feel an affinity with them in a way that just isn’t possible when passing by them for the first time. Certain vistas, like the one from an abandoned fire lookout where I’ve spent over 20 nights the last few years, seem to allow me to gaze not just at the landscape but back at life itself as I contemplate the subtle – or drastic – seasonal changes before me and compare them with years past.
An abandoned lookout has provided a mountaintop hermitage for contemplation over the years and is one of my most-visited overnight destination in the mountains near my home.Another view from my abandoned fire lookout retreat.
When going on a trip with other backpackers whose levels of expertise and ability differ from mine, I find that traipsing along on trails that I’m already familiar with offers a sense of comfort for all of us. I know the alternate campsites that we can stop at if we don’t reach the intended destination. I know which artificial flies usually guarantee strikes from hungry trout in mid-September. I know which shortcuts to take if we need to bail out on a trip early. It takes a bit of the stress of the unknown out of the trip which, if you’re just out there to relax in a beautiful place with friends who you don’t see nearly enough, is a lovely way to spend time. And it is almost always more enjoyable than frequently poring over a map and looking confusedly at junctions and worrying about making the miles to the next campsite.
One of my favorite backpacking trips passes by this lake. I’ve done this trip three times in two years. It is a route I’ve perfected for taking novice backpackers on a memorable and uncrowded trip in Montana’s Pioneer Mountains.
As self-righteous as I might be about the benefits of revisiting old hikes and haunts, I must admit that I find myself inspired by those who constantly seek out new trails and spots on the map. My friend Doug is one of them. As an avid backpacker and the author of numerous guidebooks to hiking in the Pacific Northwest, Doug has hiked tens of thousands of miles – but he rarely hikes in the same place twice. His reasoning is simple – life’s short and he’d rather see new places than spend his time going back to places he’s already seen.
That’s a hard position to argue with, and while I agree in theory, I rarely seem to let it be my guiding principle when deciding where to go. I’ve never regretted going somewhere new instead of returning to an old favorite – but I’ve also never regretted the reverse of that either.
Humans tend to crave novelty and relish in the sense of experiencing the unknown or finally seeing in person the places we’ve read about online or seen in guidebooks. We are also undeniably creatures of habit. I’ve been lucky enough to have a life where I’ve been able to make backpacking a habit, not just a hobby I can only indulge in once or twice a year due to logistical, domestic, or financial barriers, and I suppose this habit is part of what leads me to return to the same places again and again.
However, there’s also a virtue in breaking, or at least bending, habits and expanding one’s horizons. There’s a wisdom in moderation, including when it applies to repetition. I’m planning to make a concerted effort to visit some new destinations in 2021, although I’ve also already got a handful of repeat trips on the calendar.
I’ve found the notion from Heraclitus that “you cannot step in the same river twice” rings true. Despite it being the same place, the experience is always different. Updated for the modern backpacker, it might be rephrased as “you can’t camp at the same lake twice.”
Related Content
Mark mentions his love of fishing. Check out his recently published tenkara Gear List.
Got a favorite repeat trip or backcountry experience? Share it with us in the comments below.
DISCLOSURE (Updated April 9, 2024)
Backpacking Light does not accept compensation or donated/discounted products in exchange for product mentions or placements in editorial coverage.
Some (but not all) of the links in this review may be affiliate links. If you click on one of these links and visit one of our affiliate partners (usually a retailer site), and subsequently place an order with that retailer, we receive a commission on your entire order, which varies between 3% and 15% of the purchase price. Affiliate commissions represent less than 15% of Backpacking Light's gross revenue. More than 70% of our revenue comes from Membership Fees. So if you'd really like to support our work, don't buy gear you don't need - support our consumer advocacy work and become a Member instead.
Learn more about affiliate commissions, influencer marketing, and our consumer advocacy work by reading our article Stop wasting money on gear.
Membership Required
This feature requires an active Backpacking Light Membership.
Premium Articles
You're currently viewing a free preview of a member exclusive premium article. Our premium articles include in depth journalism and insights from the Backpacking Light editorial team.
Get full article access by subscribing to a Premium or Unlimited Backpacking Light membership!