R-values alone are not enough for many consumers choosing new sleeping pads, and much of the current guidance is inconsistent.
Overview
Lightweight backpackers have long complained about how hard it is to compare the warmth of different sleeping pads. Recently, three pad makers and retailers announced that they would use a new standard for measuring sleeping pad insulation. And in 2020, REI and MEC will require all their suppliers to report those values. At first glance, this looks great. But the devil is in the details.
For many years, pad makers like Nemo and Big Agnes have advertised temperature ranges without describing how they came up with those numbers. Others promoted R-values using different protocols. This made it almost impossible to reliably compare sleeping pads between manufacturers.
Then late last year, MEC, REI, and Therm-a-Rest announced that they would use a new sleeping pad R-value standard to measure their own products. And starting in 2020, REI and MEC will only sell pads furnished with standard R-values. Many people were glad that they could soon compare sleeping pads across manufacturers, like the EN/ISO 13537 temperature ratings for sleeping bags. But knowing the R-values of sleeping pads raises new questions.
What’s an R-value and how is it measured?
An R-value measures resistance to heat transfer through an insulating layer. An R 3 sleeping pad provides three times more insulation than an R 1 pad. But as one part of a sleeping system, you won’t sleep three times warmer.
R-values started as a way to measure building insulation. In this post, I’m using United States R-values; the rest of the world uses metric units sometimes called RSI. To convert from the metric values found in many scientific papers to US R-values, multiply by 5.68.
US R-Value
Metric RSI (K·m2/W)
1
0.18
2
0.35
3
0.53
4
0.70
5
0.88
While the new R-value standard is behind a paywall, Outside described the basic testing setup: two plates at constant temperatures of 95 F (35 C) and 41 F (5 C) squeeze a pad to simulate human weight. Many other factors are under control, including pad inflation, ambient temperature, wind, and humidity. At the time of their announcement, only MEC, REI, and Therm-a-Rest owned the $50,000 machines required to measure sleeping pads using the new standard.
Many BPL readers understand R-values to some extent, but most consumers don’t. And they certainly won’t know what R-value of sleeping pad they need.
What R-value should I look for in a new sleeping pad?
If you know the R-value of your existing sleeping pad, soon you can decide if your next pad should be warmer, cooler, or about the same across many brands. But you’ll need more information if you don’t know the R-value of your current pad or you’re new to shopping for sleeping pads.
Unfortunately, the guidance from pad makers, retailers, and gear reviewers is inconsistent and prone to misinterpretation. For example, see:
“Thicker pads generally offer higher R-values and the average summer camping pad should be around 3 or higher. Campers who sleep cold, often women, may want to choose a pad with an R-value of at least 4.”
4. REI in-store sign next to sleeping pads:
This sign in the REI Marina, California store compares R-values to seasons, with more detailed explanations of seasonal conditions. Photo credit: Rex Sanders.
“We have found that pads with R-values between 2.0 and 3.0 generally work well for three-season use but should be supplemented with a foam pad for use in the winter where an R-value of around 5 or above is ideal. Pads with R-values lower than 2.0 are great for summer, but you may want to supplement them with a closed cell foam pad on colder nights in the spring and fall.”
All this advice shares two serious shortcomings:
Seasons in coastal Hawaii are very different from northern Minnesota, so “winter” low temperatures could be anywhere from +40 F (4 C) to -40 F (-40 C).
Poorly-defined seasons don’t match up with sleeping bag EN ratings by temperature, which is where most people start their shopping.
But in one important way, all this guidance is wrong.
How do sleeping bag temperature ratings relate to R-values?
Most people want their entire sleep system – clothing, sleeping bag, sleeping pad, and shelter – to keep them reasonably warm at night. And many consumers focus on sleeping bag temperature ratings. For example, a warm sleeper might decide that for a trip with forecast low temperatures in the 40-50 F (4-10 C) range, a sleeping bag with an EN/ISO lower limit rating of 40 F (4 C) should work well. The EN/ISO testing protocol requires a zipped up sleeping bag with the hood cinched along with several other requirements including using an R 4.8 sleeping pad.
If your sleeping pad is substantially less than R 4.8, you’ll lose more heat to the ground, and you might not be warm enough in an EN 40 F (4 C) sleeping bag on a 45 F (7 C) night. I wrote “might not” because how warm you sleep on any given night depends on many other variables. One paper claims (PDF) that using an R 1.3 or lower pad could cut 10 F (6 C) from the effective rating of a sleeping bag.
Relying on EN/ISO sleeping bag temperature ratings argues for always using an approximately R 5 pad. This is more-or-less the approach taken by Zenbivy, who states: “only mattresses with R value 5 or greater will deliver full temperature rating performance from EN rated sleeping bags.”
Conclusion
R-values alone are not enough for many consumers choosing new sleeping pads, and much of the current guidance is inconsistent. Manufacturers and retailers who suggest lower R value pads for a wide range of temperatures could be seriously misleading buyers.
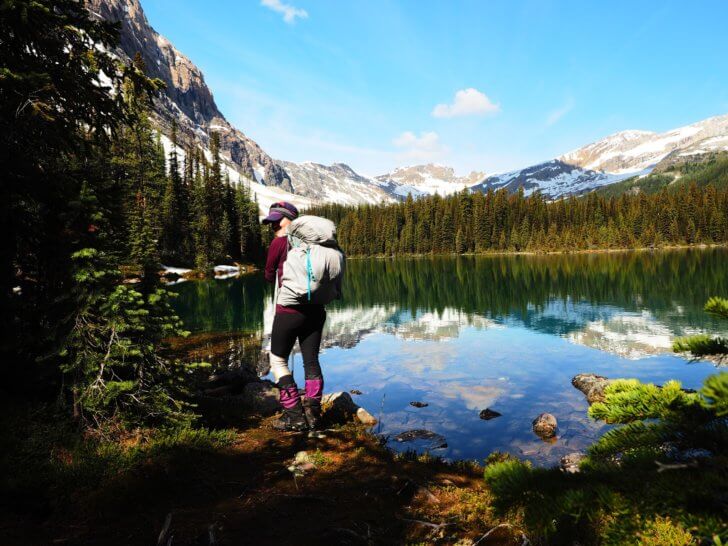
You can’t look at a sleeping pad’s R-value in a bubble. Consider your pad part of an integrated system that includes the clothing you wear to bed, your sleeping bag or quilt, the type of shelter you’re in, the nature of the ground surface (snow, moisture, etc.), ambient temperatures, and of course, your own physiology. Photo: Ryan Jordan
This REI Flash 55 Backpack review features a user-configurable, lightweight, internal-frame, roll-top pack.
Introduction
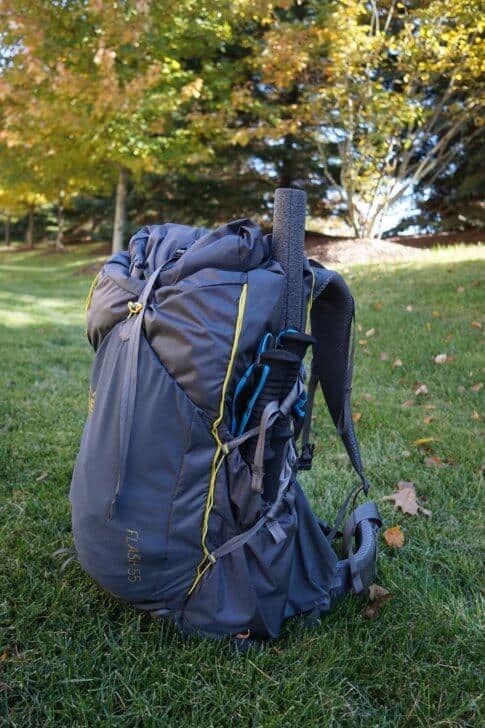
The REI Flash 55 backpack (women’s version here) is a user-configurable, lightweight, internal-frame, roll-top pack.
It is designed to be an all day pack that, according to REI, “…strikes the perfect balance between lightweight comfort and high performance…” with readily accessible water bottle pockets and a ventilated back panel. The Flash 55 sports REI’s Packmod Custom Carry System – a set of removable accessory pockets, compression straps, and tie-downs that allow for different pack setups, giving hikers the opportunity to modify their pack to suit their particular style and conditions.
Photo: REI. The Flash 55’s standard setup.Photo: REI. The minimalist setup.Photo: REI. Packmod accessories
Features
Internal-frame design
Packmod compression straps
Packmod pockets on the shoulder straps and hipbelt
Roll-top closure
Seam-taped lining in the top lid and shoulder-strap pocket
3D contoured hipbelt
Ventilated back panel
Forward-positioned water-bottle pockets with snap closures
Exterior side pockets
Breathable mesh front pocket
Attachment loops on the front
Removable top lid
Hydration-compatible design
Removing all Packmod accessories saves 7 oz (198 g).
Specifications
Dimensions
S: 14 x 29 x 12 in (36 x 74 x 30 cm)
M: 14 x 30 x 12 in (36 x 76 x 30 cm)
L: 14 x 31 x 12 in (36 x 79 x 30 cm)
Volume
S: 53 liters
M: 53 liters
L: 53 liters
Weight (Minimum)
S: 2 lbs. 2oz. (0.96 kg)
M: 2 lbs. 3 oz. (0.99 kg)
L: 2 lbs. 4 oz. (1.02 kg)
Weight (Maximum)
S: 2 lbs. 9 oz. (1.16 kg)
M: 2 lbs. 10 oz. (1.19 kg)
L: 2 lbs. 11 oz. (1.22 kg)
Fits Torso
S: 18 in (46 cm)
M: 19 in (48 cm)
L: 20 in (51 cm)
Fits Waist/Hips
S: 30-40 in (76-102 cm)
M: 32-42 in (81-107 cm)
L: 34-46 in (86-117 cm)
Recommended Load: 15 to 30 lbs (6.80 to 13.61 kg)
Materials: 100-denier ripstop nylon main body; 420-denier nylon bottom
Frame Material: Steel
Hydration Compatible: Yes
Gender: Men’s tested (Women’s specific fit and sizing also available)
*Editor’s Note: Unless otherwise specified, all future weights and measurements will be for Men’s size medium.
Review Context
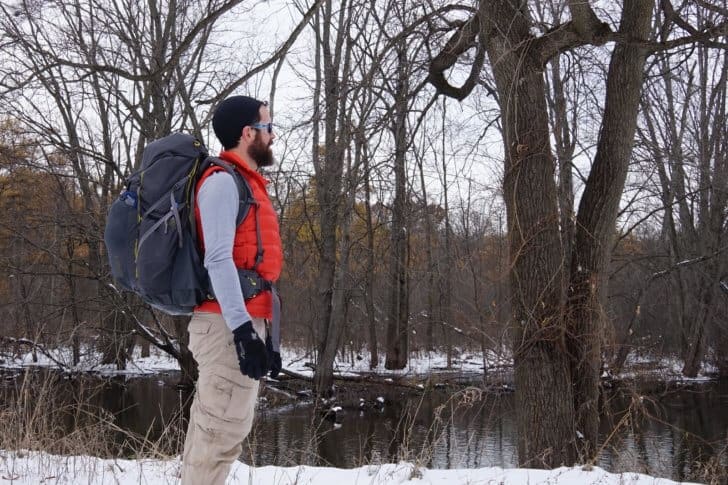
Early fall shakedown hike.
REI designed the Flash 55 for adaptability and versatility. The most unique feature of the pack is the Packmod Custom Carry System, REI’s modular selection of pockets and straps that allows the hiker to customize the backpack to suit their needs. The pack also has a roll-top closure, allowing for internal pack volumes from approximately 35 liters to 60 liters (Men’s medium). Much of my time with the pack was spent trying out different configurations with the Packmod accessories. I was curious if this could be a pack with multiple uses – from long, loaded day-hikes to overnights to multi-day treks.
Description of Field Testing
I used the Flash 55 exclusively from July through October of 2019. To test the versatility of the pack, I settled on three configurations. I used the Flash 55 in a “long-hauler” configuration on multi-day trips in Vermont and Michigan. Daily mileage on these trips peaked at 16 miles (26 km) and was generally in the seven-to-eight-mile range (11-to-13 km). When hiking, I tend to move fast and stop frequently. The longest time the Flash 55 was on my back in a given day was a total of 6 hours. Generally, the pack saw three-to-four hours of use on a given day of hiking. The pack saw use in a “weekender” configuration in Ontario, New York, and Michigan. Finally, I used the pack in a “bare-bones” setup for long-day and overnight birding and fishing trips in Michigan.
Testing weather ranged from the 90 F (32 C) heat of an August day to cool October evenings with generally fair conditions.
Performance Assessment
I based my performance assessment of the REI Flash 55 on the following criteria:
Accessibility and Organization
Adaptability
Fit
Comfort
Weight
Accessibility and Organization
The REI Flash 55 has five permanent external pockets and the capacity to add four more – the included Packmod accessory pockets – for a total of nine external pockets. There are two permanent pockets on each side of the pack, one permanent pocket on the front, two Packmod hipbelt pockets, one Packmod top lid, and one Packmod shoulder strap pocket.
The side bottle-pockets, as well as the Packmod hipbelt and shoulder pockets, are all readily accessible while wearing the pack. The Flash 55 comes with removable/reconfigurable compression and tie-down straps as well as a tool keeper that works in tandem with daisy chain loops on the front and sides of the pack.
Permanent External Pockets
Bottle Side-Pockets
Front Side-Pockets
Front Pocket
Bottle Side Pockets
The Flash 55’s bottle side-pockets are forward-positioned, making it easy to hydrate while on the move. They both come equipped with a snap closure that allows for securing water bottles of smaller diameters. The bottle-pockets are constructed of stretch mesh with an elastic top.
Snap closure holding a 750ml Smartwater bottle securely.
Snapped, I found the pockets able to hold a single 700mL Smartwater bottle easily. Unsnapped, my 1180mL Klean Canteen fit well. I did try using more than one Smartwater bottle per side, but the angle of the pocket had the forward bottle top digging into my side as I hiked. The pockets held the bottles well; at no point was I worried that the bottles would slip out while scrambling, bushwacking, or carelessly taking the pack off after a day of hiking.
Not very comfortable with two bottles on one side, even unsnapped.
In actual field use, I usually ended up using one of the bottle pockets for hydration and the other for a bag of snacks and my cooking fuel. Both pockets were readily accessible while hiking, both with the pack fully loaded and with it in a long day hike configuration. It’s worth noting that the compression straps did not hinder access to the bottle side pockets. Even with the straps cinched to the maximum, I was able to grab a drink on the go. It was nice not having to struggle to hydrate while hiking.
Front Side Pockets
If I had to use one word to describe the front side pockets, that word would be deep. At their shallowest, they are 9 in (23 cm) deep. At their deepest, the pockets are 11.5 in (29 cm). The pockets are constructed of ripstop nylon, topped with elastic. They are well-designed for holding those awkward bits that do not fit easily into the main compartment of a pack.
A cut-down Thermarest shoved into the side pocket, secured with compression straps.
Generally, I used one of these pockets to carry my rolled-up sleeping pad. The other I relegated to hold accessories I like having close at hand, such as my water filter and coffee setup. When in fishing mode, I slipped a tenkara rod into the pocket. When in birding mode, binoculars. On the infrequent occasions that I carry a tent, the poles fit securely in a front side-pocket. The Packmod compression straps helped secure the longer items.
Deep side pockets holding a tenkara rod and trekking poles.
Front Pocket
The front pocket of the REI Flash 55 is constructed of stretch mesh with an elastic top. The pocket runs from 10 to 12 in (25 to 30 cm) deep, and at its widest, is 10 in (25 cm). It closes with a simple hook and loop system. The pocket is cavernous.
Airing out a bivy and a damp jacket in the front pocket.
On multi-day treks, I found that the pocket is best used for air-drying items like a damp bivy or tarp. It also makes a handy stash pocket for a rain layer. With nothing loaded into the front pocket, the hook and loop closure had the annoying tendency to come undone. I usually had at least my rain shell in the pocket, so this wasn’t a huge issue.
Packmod Accessories
The Packmod elements.
Packmod Top Lid
Packmod Shoulder-Strap Pocket
Packmod Hipbelt Pockets
Packmod Compression Straps
Tool Keeper
Packmod Top Lid
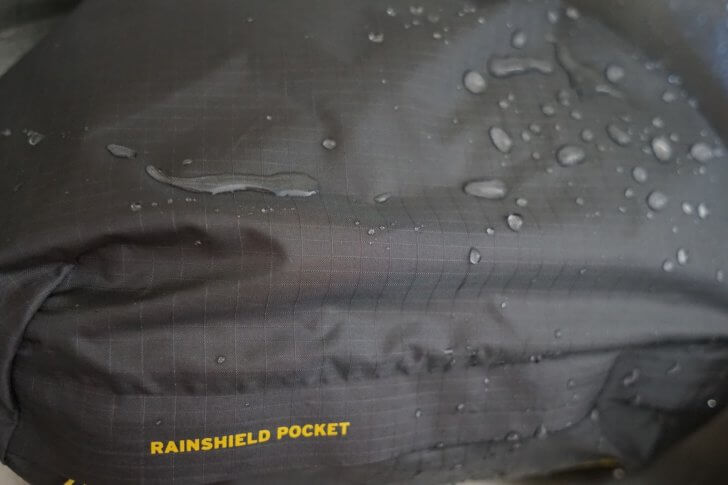
The Flash 55 top lid is a seam-taped ripstop nylon shell with a water repellent finish, lined with REI’s Rainshield coating. The top lid has a covered, zippered closure and measures approximately 10 x 9 x 3 in (25 x 23 x 8 cm) with a capacity of approximately 5 liters. It is the heaviest of the Packmod accessories, weighing in at 2.0 oz (57g) and necessitating the use of the 0.6 oz (17 g) tie-down straps.
Impressive waterproofing on the top lid.
I found the top lid to be most useful when used on trips of three or more nights. The waterproofing was impressive, keeping contents dry during short bouts of rain as well as morning dew. It attaches easily using the four included tie-down straps. I found it handy for carrying clothing I wanted to keep dry yet accessible, such as a light pair of gloves, beanie, and down jacket. It also doubled as a pillow.
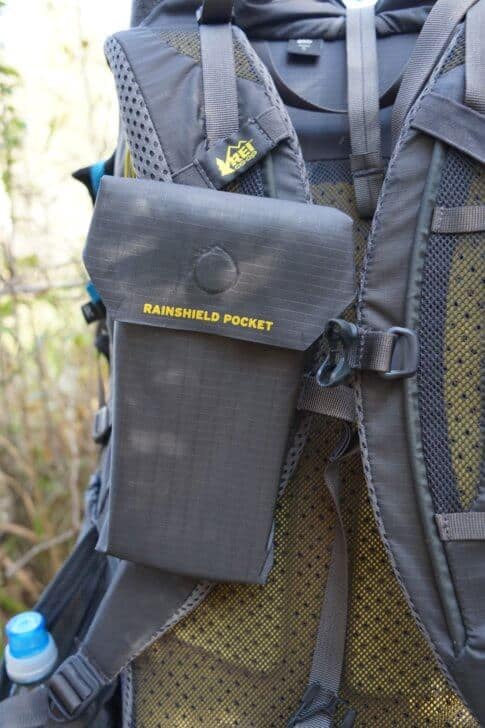
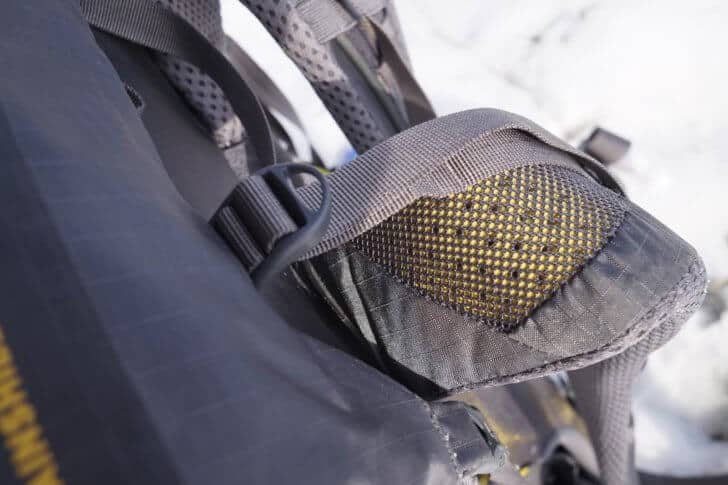
Packmod Shoulder Strap Pocket
The shoulder strap pocket was cumbersome.
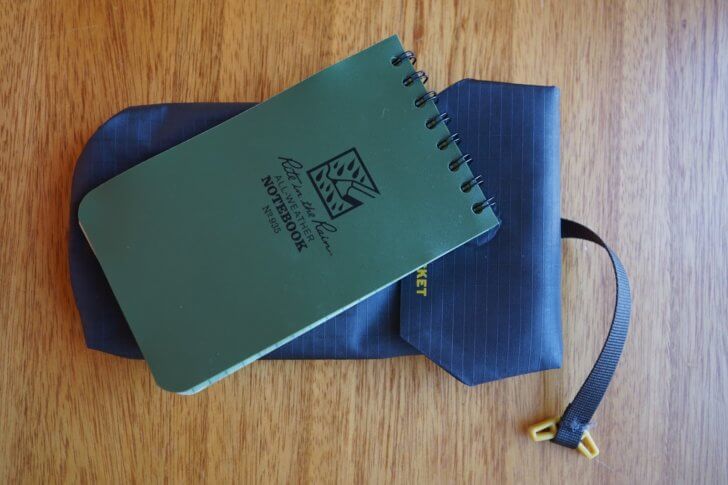
The shoulder strap pocket is a seam-taped ripstop nylon shell with a water repellent finish lined with REI’s Rainshield waterproof coated nylon. It’s equipped with a magnetic closure and is designed for electronics that a traveler might want readily available, such as a phone or small GPS device. The pocket has a claimed capacity of 0.5 liters and measures 6.25 x 3.5 in x 1.5 in (16 x 9 x 4 cm). The weight of the pocket is 0.8 (23 g) oz.
The shoulder strap pocket easily held a field notebook.
I found this pocket to be the least useful. It attaches with one thin strap, so the pocket was prone to snagging and flopping about. It also made getting the pack on and off after rests more difficult. When mounting the Flash 55 to my back, the pouch inevitably twisted the shoulder strap around, necessitating additional adjustment. The magnetic closure is very weak. On more than one occasion, my phone slipped out of the pocket while removing the pack. I quickly set this pocket aside.
Fortunately, attachment loops on the shoulder straps exist so your favorite aftermarket shoulder strap pouches can be easily added.
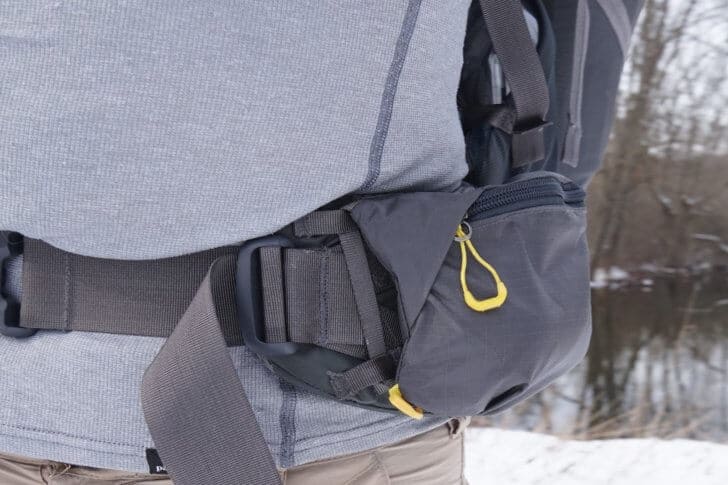
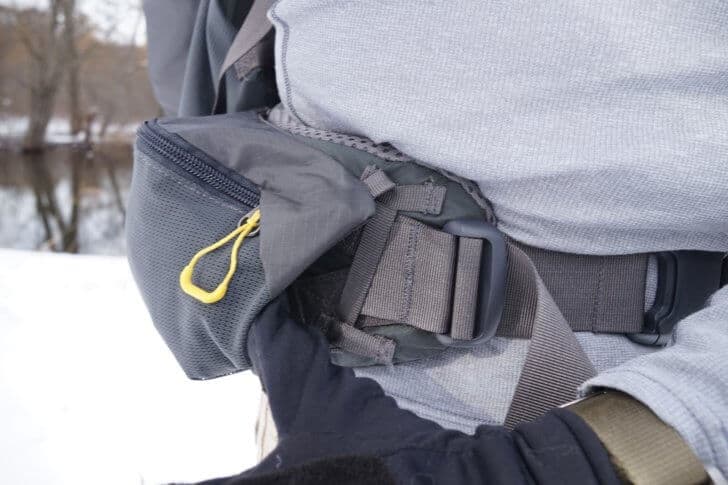
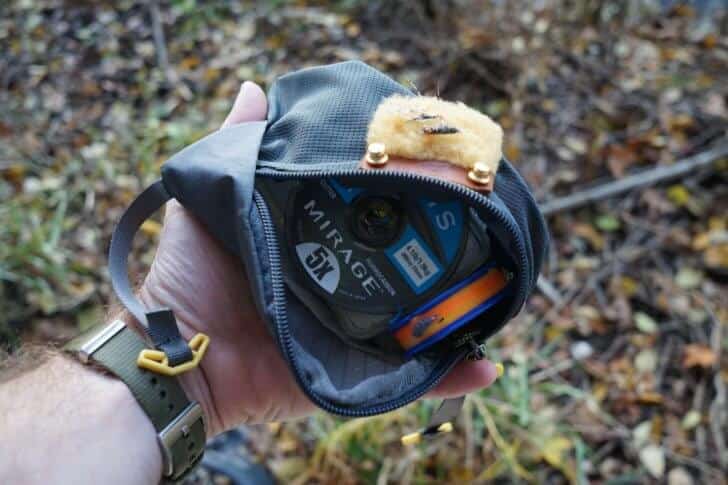
Packmod Hipbelt Pockets
The REI Flash 55 comes with two detachable hipbelt pockets – one fine mesh and one ripstop nylon. The mesh pocket weighs 1.0 oz (28 g), and the ripstop nylon pocket weighs 0.8 oz (23 g). REI lists the capacity of both as 1 liter, and the dimensions are 6.6 x 4.3 in (17 x 11 cm). Both have zippered closures.
Attachment of the hipbelt pockets is straightforward.Useful pockets, but prone to snagging on brush.
I found these pockets very practical. My regular setup has no hip belt pockets, so on my first use, I found myself at a loss as to what to pack in them. Initially, they ended up carrying what usually would go in my pockets; small knife, map, a couple of bars, and my cellphone. Then they also started to carry things that would typically get lost in a side pocket; lip balm, hand sanitizer, bug deterrent, and purification tabs. If I was on a quick fishing trip, I tossed a small box of flies, some tippet, nippers, level lines, and hemostats into the mesh pocket. If I was out for a long bird day or weekend, my notebook and pen ended up making their way into one.
A day’s worth of fishing gear fit easily into a side pocket.
The Packmod hip belt pockets saw a lot of use and held up well. My only minor gripe is that they would occasionally catch when going through thick brush. This is the price to be paid for a modular system. Having the pockets not sewn directly to the belt means corners and flaps that snag.
Packmod Compression Straps
The REI Flash 55 comes with four removable and repositionable compression straps. Fully extended, they are 17 in long (43 cm), and all four together weigh in at 0.9 oz (26 g). They are designed to be placed where the hiker needs them along the daisy chain straps on the front and sides of the pack.
Side compression straps in action.
While, in theory, these straps can be removed, saving nearly an ounce (28 g) in weight, I feel that they are a required part of the pack. The Flash 55 is a large volume pack, designed with multi-day treks in mind. On my longer treks with the Flash 55, as the days went on, my consumables burden became less and less. Using the compression straps kept my loads from becoming unwieldy, cinching them down closer to my center of gravity. They are also helpful for keeping longer items secured in the side pockets.
For short overnights and long day-hikes, the compression straps make the pack feel more like a 35-liter pack. They keep everything snug. I did find them a bit too long. I have struggled to come up with a three-season scenario where I would need the full 17 inches (43 cm) of strap length. In winter, I could see using them to lash snowshoes or skis to the Flash 55.
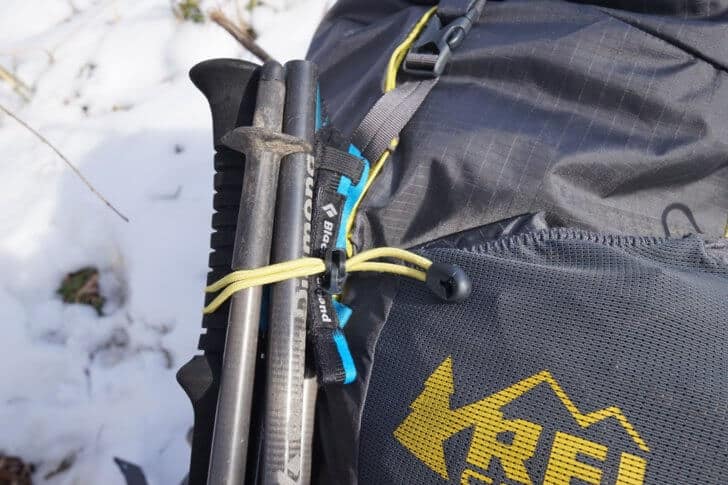
Tool Keeper
The tool keeper is a small, removable, elastic loop-and-hook closure for strapping trekking poles, an ice ax, or other tools to the pack. It weighs 0.1 oz (3 g). I used it occasionally when I got sick of carrying my poles. It held the poles well, even when moving through the brush. I could see this getting a lot more use on a winter trip.
Tool keeper securing trekking poles.
Main Pack Body
The REI Flash 55 has a stated capacity of 55 liters (3,356 cubic inches – Men’s medium) with the roll-top cinched down and the Packmod top lid in place. With the roll-top fully extended and no Packmod lid, I estimate the capacity to be approaching 60 liters. With the roll-top in the down position, I estimate the capacity to be around 50 liters. With all of the available Packmod storage and cavernous side and back pockets, I had no problems fitting all of the gear needed for a five-day trek.
The pack is easy to load due to the stout foam back-panel and lightweight steel frame. The foam back-panel is not stiff enough for careless packing, however. Any hard or angular items should be packed away from the back-panel to avoid an uncomfortable day.
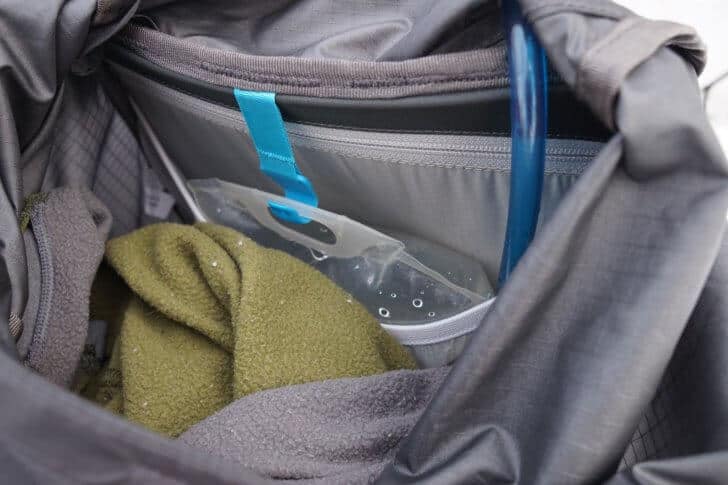
The pack has a hydration sleeve with an elastic top, a stout hook for hanging a hydration bladder, and ports for the hose on both the left and right shoulder. I found the hydration sleeve to be a snug fit with a 3-liter system. Loading the full bladder into the pack was more of a chore than I expected. I would have appreciated a slightly larger sleeve.
The hydration sleeve works, but I found it a bit snug.
Adaptability
During my time with the pack, I primarily used three different configurations: a “bare-bones” setup for long day hikes/single night trips, a “weekender” setup for a couple of nights out, and a “long hauler” that covered a full kit for five testing-days in the field.
The “bare bones” setup is the most minimal setup I would recommend with the Flash 55. Besides the base pack, I used one tie-down strap to cinch down the roll-top and four compression straps to keep the volume in check.
If fishing was part of the trip, I added the mesh Packmod hipbelt pocket (holding a small tenkara tackle kit) to the mix. The weight of this setup was 2 lbs 4 oz (1.02 kg). Fully compressed, the pack carried with stability similar to 35-liter packs that I’ve tried. The addition of the 1 oz (28 g) mesh hipbelt pocket brings the weight to 2 lbs 5 oz (1.05 kg). Generally, I carried 12 lbs (5.44 kg) at a volume of approximately 25 liters with this setup.
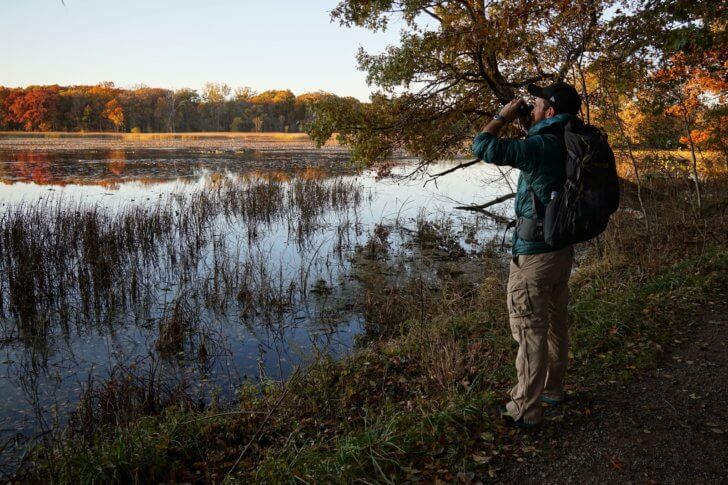
As a day pack, the Flash 55 is overkill, but it does the job. Photo: Amy Beaulac
My “weekender” setup extended the pack’s capacity to a couple of days. I used the barebones setup with the addition of the second Pakmod hipbelt pocket and the second set of tie-down straps. The additions were more for convenience and load management than for additional volume. The weight of this setup was 2 lbs 6 oz (1.08 kg). A typical load in this configuration was 18 lbs (8.16 kg), with a compressed volume of about 35 liters.
Finally, the ‘long hauler’ setup added the Packmod top lid into the mix. All told, this setup used four compression straps, four tie-down straps, the top lid, and the tool loop. The only Packmod accessory that didn’t get used regularly with this setup was the shoulder-strap pocket. The weight of this setup was 2 lbs 8 oz (1.13 kg). The maximum load I hauled in this configuration was 32 lbs (14.5 kg). I feel that by utilizing the top lid and fully extending the roll-top, the Flash 55’s volume can exceed 60 L.
The REI Flash 55 is a highly adaptable backpack. The Packmod Custom Carry System extends the utility of the pack. It served very well both as a weekender pack and as a multi-day trekking pack. The Flash 55 is overkill for a long day-or-single-night setup, but that isn’t the intention of the pack.
Fit
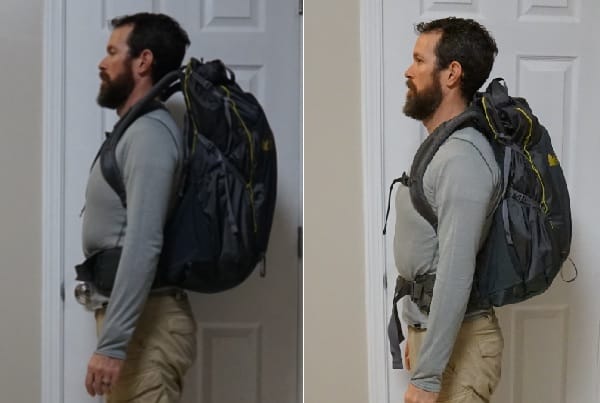
The Flash 55 comes in three sizes for both the men’s and women’s models. Unfortunately, I found the men’s sizing to be “three sizes fit most.” The reviewer pack I received was a size large, which fits a torso length of 20 in (51 cm) and a waist of 34-46 in (86 – 117 cm). In my experience with frameless packs, I’ve been able to make do with less than ideal fits. This kind of forgiveness was not the case with the Flash 55. One weekend out with the large was enough to send me to the store to grab a better fit.
Size matters, large on left, small on right.
At 5’8” (172 cm) tall with a 30-inch (76 cm) waist, I was sized to a small. That put me right at the bottom end of the size-range for the hipbelt, published at 30 in (76 cm) to 40 in (102 cm). The fit was a nagging issue throughout the review. Summer hikes with the pack had me struggling with the hipbelt, particularly under load. I frequently had to hike the Flash 55 back up onto my hips to take the load off of my shoulders. Thankfully my longer treks with the pack occurred in the fall when layers of clothing made the pack fit better at the hips.
Comfort
Comfort was evaluated specifically for the back panel, shoulder straps, and hip belt.
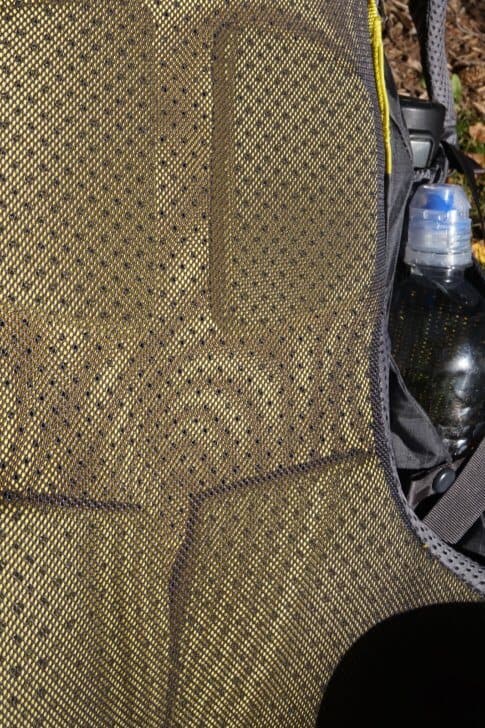
Back Panel
The back panel is constructed of a molded, perforated foam that allows for some ventilation. It is comfortable and not overly thick. August hikes tend to be hot in Michigan, and I appreciated the slight ventilation afforded by the back panel..
Ventilated back panel with mesh covering.
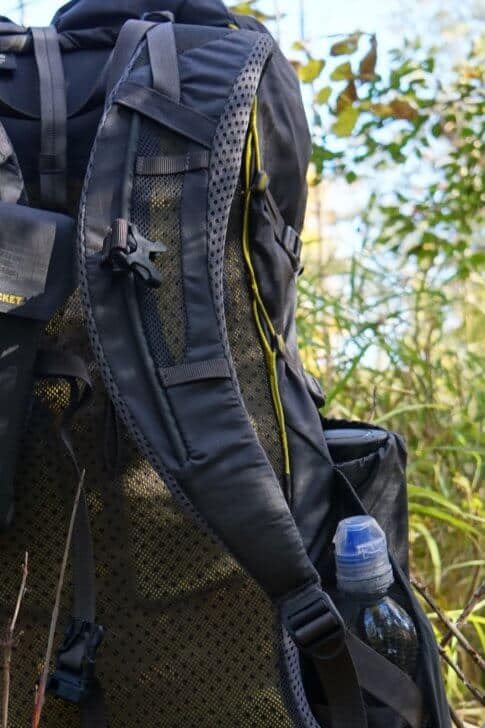
Shoulder Straps
The shoulder straps on the Flash 55 are 3/4 in (1.9 cm) thick foam with a ventilated mesh cover. They are equipped with two attachment loops on both straps, as well as a hydration tube loops. The attachment loops are spaced to fit the Packmod shoulder strap pocket. The Flash 55 also comes with a chest strap that is adjustable both in length and vertically (for optimal sternum positioning).
Load lifters worked well without slippage.
Adjustment of all the straps was easy. The webbing held its position through the buckles without any issue, including when wet or when I was moving vigorously. The same is true with the load lifters. They were set and forget.
Webbing and attachment loops on the shoulder strap.Ample padding for a 30 lb (13.6 kg) load.
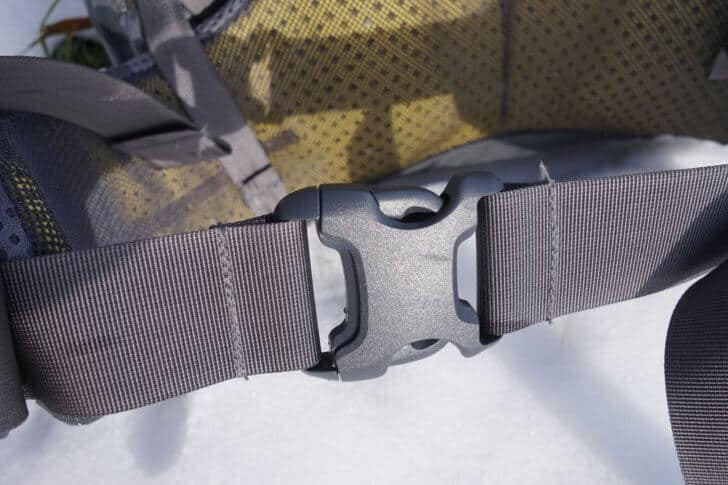
Hip Belt
The hip belt is an integrated part of the pack. The foam of the back panel and the hip belt are one solid piece. Like the back panel, the hip belt is lined with a lightweight, breathable mesh. My fit issues aside, I found the hip belt to be comfortable. The webbing held well through the buckle with no noticeable slipping.
Hip belt webbing and buckle.The back panel and hip belt are molded from one piece of foam.
Load Bearing Ability
The Flash 55 handles loads well. 30 lbs (13.61 kg) is the maximum weight that REI recommends for the Flash 55. I was comfortable hiking all day with 25 lbs (11.34 kg) in the pack. Loaded with 30 lbs (13.61 kg), I found myself a bit sore on the contact points after a day out, but I have never liked carrying that much weight. It is not a pack issue so much as a general fitness and preference issue. The compression straps keep the unused volume well contained.
Weight
The Flash 55 weighs between 35 and 42 oz (1.00 to 1.19 kg), depending on which, if any, Packmod accessories you use. I would not recommend using the pack without the compression straps in any configuration, so in reality, I found the minimum weight of the pack to be 37 oz (1.05 kg). That’s a competitive weight, particularly given the modular nature of the pack. See the comparison chart below for some examples.
Product Strengths and Limitations
Strengths
Adaptability – The Flash 55 is highly compressible and the Packmod accessories make it possible to set up the pack for different trip types.
Comfort – Below the recommended maximum load of 30 lbs (13.61 kg), I found the pack to be comfortable thanks to the ample padding and well-designed suspension.
Cost – At $199.00, the Flash 55 is highly price-competitive.
Bottle-pockets – The forward-mounted bottle-pockets worked very well. The combination of the stretch mesh and the snap-fit allows for different sized bottles to be easily accessed and securely carried.
Limitations
Sizing/Fit – With only three available combinations of torso and hip measurements, the Flash 55 won’t fit everyone – but it may fit most folks.
Shoulder-Strap Pocket (Packmod) – A poor design that could easily be improved upon with better attachments and a stronger magnetic closure.
Overly-tight hydration sleeve – A minor complaint, but if a hiker uses a hydration bladder, it’s worth keeping in mind.
Snagging of Packmod accessories – The price to pay for a modular system.
Compared To…
My last framed backpack was a Gregory Shasta, a circa 1996 behemoth of approximately 6 lbs (2.72 kg). I did a complete 360-degree turn and went frameless, now using a well-loved, lightly modded Granite Gear Virga 2. The Virga 2 is also a roll-top pack with a volume of approximately 55 liters, though it is frameless. That switch saved me 5 lbs (2.27 kg) in base weight, easily the most significant drop in weight I’ve made during my time backpacking. Since then, materials and designs have progressed, and while I am quite happy with my current setup, I was curious about what the current generation of framed packs had to offer.
The Flash 55 beats the Virga 2 on almost every count. The Flash 55 has greater accessibility and is much more adaptable. It is also much more comfortable; the Virga 2 really caps out at a load of about 20 lbs (9.07 kg) – where I was able to easily carry 25+ lbs (11.40 + kg) all day with the Flash 55. The Virga is over a pound lighter, however. It also happens to fit me better, though that is more of an individual trait.
Among currently available packs, the REI Flash 55 has a lot of competition in this weight, price, and volume market segment. Some of these options are shown in the table below, for comparison.
The specifications for all the packs are similar; framed, top-loading packs with a carrying capacity of about 55 liters weighing in around two-and-a-half pounds and costing about $200 to $220. REI is clearly trying to make the Flash 55 stand out from the herd with the Packmod system. The Flash 55 is easily the most adaptable and configurable pack on the list.
The Granite Gear Crown2 60 is likely the most competitive pack in the table above. Both packs are framed, roll-top bags that are marketed towards backpackers looking to save weight on their gear. The Crown2 and the Flash 55 both offer a removable top lid. Both are priced at just under $200.00. The REI Flash 55 has more configurable storage, as the Crown2’s hip pockets are permanently attached. The Crown2 offers much greater versatility in fit, though. The hip belt sizes down to 26 in (66 cm) and, if wanted, is totally removable. It comes down to whether a hiker values configurable fit or configurable storage.
Commentary
Fully loaded for a snowy weekend.
The REI Flash 55 isn’t a one-trick pony. It can do the job of multiple packs. The adjustable compression system is excellent. I didn’t feel as if I was using too much pack for the job when taking the Flash 55 out for a weekend. The capacity of this pack for multi-day treks is impressive. I found it a breeze to pack five days worth of kit with room to spare. While I tend not to pack bulky gear or food, I do almost always pack a tarp, sleeping bag, and small cook setup. Even on the rare occasions when I brought a tent along, I never felt like I was pushing the volume limits of the pack. The side and front pockets are immense, and with just a bit of consideration when selecting consumables, the Flash 55 could handle a three-season week-long journey with no concern.
As a long day-or-single-night pack, even in its most stripped-down configuration, I always felt a little “underloaded”. The Flash 55 did the job, but it was overkill. This isn’t meant to be a criticism of the Flash 55; day-pack use is a borderline proposition for a pack this size. But one of the questions I set out to answer was if this could be a pack for multiple trip-types. The Flash 55 isn’t a “quiver killer,” but it does fill multiple roles in your gear closet.
The Packmod system is a lot more useful than I thought it was going to be when I started the review. I’ve always been a “less is more” sort of guy, and at first glance, all the Packmod straps and pockets seemed gimmicky. I had done quite well without top lids, hip pockets, and cell phone shoulder holsters for years, thank you very much. But as I cycled through different configurations of the Flash 55, I found practical uses for most of the accessories.
I also found the pack to be supremely comfortable. Switching over for the summer from my frameless Granite Gear Virga 2 was game-changing. Had the REI Flash 55 actually fit me, I would continue to use it. Next season I’ll be rethinking my current setup.
Review Rating
My own personal fit issues and the disappointing shoulder strap pocket aside, I do recommend the REI Flash 55.
At $199.00, the Flash 55 is a good deal, so much so that I plan on purchasing the women’s version of this pack for my wife during the next REI member’s sale. She is a great example of someone who will get a ton of use out of this pack – a backpacker interested in transitioning from traditional backpacking to an ultralight setup, but who is not certain what she’ll like regarding pockets and pack organization. The combination of the pack and the Packmod accessories make for a versatile setup that allows for trying out a bunch of configurations without breaking the bank.
The Flash 55 carries a load of up to 30 lbs (13.6 kg) comfortably. As a transitioning hiker gets her kit further dialed in, the large volume and ample exterior storage will increase her range with the pack. The Flash 55 easily does the job of a weekend and a long-haul pack. If the Flash 55 fits your particular body type, it’s well worth a look.
Where to Buy
Buy the Flash 55 at REI in both Men’s and Women’s versions.
Related Content
Are you digging external pack organization? Read Andrew’s review of the Mountainsmith Zerk 40, or Dan’s review of the Atom.
If you are interested in exploring modular exterior storage, check out Ryan’s recent blog post.
Disclosure
Updated November 7, 2019
Product(s) discussed in this article may have been purchased by the author(s) from a retailer or direct from a manufacturer, or by Backpacking Light for the author. The purchase price may have been discounted as a result of our industry professional status with the seller. However, these discounts came with no obligation to provide media coverage or a product review. Backpacking Light does not accept compensation or donated/discounted products in exchange for guaranteed media placement or product review coverage.
Some (but not all) of the links in this review may be “affiliate” links. If you click on one of these links and visit one of our affiliate partners (usually a retailer site), and subsequently place an order with that retailer, we receive a small commission. These commissions help us provide authors with honoraria, fund our editorial projects, podcasts, instructional webinars, and more, and we appreciate it a lot! Thank you for supporting Backpacking Light!
Introducing children to the world of backpacking can be an amazing, uplifting experience. It can also go totally sideways. In this SKILLS SHORT Ryan and Andrew talk about best practices for family backpacking: route planning, trip types, gear, type one vs type two fun (kid edition!), safety, communication, and more.
Outline
Topic introduction and Ryan and Andrew’s first trips
Introducing kids to backpacking – all about transitions
Learning to let go
Starting in the backyard – an open invitation
Introducing adults to backpacking – all about remote environments
Activities for kids
How much weight can kids handle comfortably on trail, moderate elevation gain
Start here: age x 1.5 pounds
reduce weight 15-25% for ages 2-10 if child is overweight or obese
reduce weight 25% to 35% for ages 11-17 if child is overweight or obese
reduce weight 10% to 20% for girls, esp. if underweight for their height
Managing differing skill sets and desires in group situations
Sponsors: Help us Keep the Podcast ADVERTISING-FREE!
This episode of the Backpacking Light Podcast is supported and kept advertising-free by Backpacking Light membership fees. Please consider becoming a member which helps support projects like this podcast, in addition to a whole slew of other benefits!
This episode of the Backpacking Light podcast is also brought to you by Douglas Fir trees. Douglas Firs: they make it smell like Christmas!
In addition, some of the links on this page may be affiliate links that refer to our partner merchant retailers. If you follow a link and then make a purchase, we receive a small commission which goes a long way towards helping us pay for podcast production, hosting, and bandwidth fees! Thanks for supporting us in this way!
This episode is
Contact
You can contact us at podcast@backpackinglight.com, or follow us on social media –
We do not accept money or in-kind compensation for guaranteed media coverage: Backpacking Light does not accept compensation or donated products in exchange for guaranteed media placement or product review coverage.
Affiliate links: Some (but not all) of the links in this review may be “affiliate” links, which means if you click on a link to one of our affiliate partners (usually a retailer site), and subsequently make a purchase with that retailer, we receive a small commission. This helps us fund our editorial projects, podcasts, instructional webinars, and more, and we appreciate it a lot! Thank you for supporting Backpacking Light!
The biggest REI sale of the year is going on right now – November 15 through 25, 2019. It’s called the GUGO sale – “Gear Up, Get Out”. Here are some resources to help you save money on decent gear.
I have to be honest with you – I’m not super interested in helping you spend money and rack up credit card debt on gear you don’t need or doesn’t fit with your style of outdoor adventure. My own personal values are focused on minimalism and intentional consumerism.
That’s why we all need to be cautious as we go into the holiday/black (really black) friday season, which happens to feature:
These don’t go on sale very often – Garmin exercises strict price control over these devices. Don’t expect the inventory to last at REI. Hey, maybe vote for Bernie or Elizabeth – inReach for all!
Why?
The inReach Mini is the smallest, lightest, and most reliable satellite communicator on the market.
It’s an essential tool for wilderness travel and gives your friends and family back home tremendous peace of mind.
Now, seriously – do you really absolutely need it?
No.
But at least ask your loved ones if they’d like you to carry one – it’s actually for them, after all. If they say “Nah, we’re good. Go do your thing and leave us alone…” and you’re OK with the risk, then skip it. I can support that.
But if they’re stressed about you hiking in the wilds, get an inReach Mini – for them, and don’t be a selfish jerk just because you need your “me” time. This isn’t a silly social media exercise. Relationships matter, don’t screw them up.
Specifics
REI Members – save 20% on one full-priced item and an extra 20% on one REI Outlet item. Use CODE: GEARUP2019
20% Off All Thailand Adventure Travel Trips. Save 20% on any remaining 2020 departures when you book November 15–25. Hey, here’s a cool idea: buy a slot on one of these trips for Stephanie and me, and we’ll join you! No, I’m serious. we’ve always wanted to hike in Thailand. Stephanie’s allergic to peanuts tho, so we’ll just bring clif shots for her 😂 that will save us $!
Recommendations
I don’t want you to waste money on gear you don’t need, or on gear that you’re tempted to buy just because it’s on sale. Read more about my desire to be an ethical steward of consumerism in my recent disclosure letter.
And for goodness sakes, if you have credit card debt, close this window now and go make some money to pay it off. Do not buy gear.
That said, there’s a fine line between being a consumer and saving money by taking advantage of good deals, so here are a few of my specific recommendations for the 2019 REI Gear Up, Go Out sale:
The Garmin inReach Mini is one of the very few pieces of gear that I recommend for all hikers, for two reasons: safety/rescue, and peace of mind for loved ones back home. I’ve had mine since its launch, and have had zero issues with it. Read my review here or buy it now at REI for $75 off.
SL Series Tents: The REI Quarter Dome SL 1 and REI Quarter Dome SL 2 are pretty special tents. They are wind-stable, roomy, and light – and offer what I believe to be the best value (best quality, performance, and weight for the price) on the market right now for double-wall tents. Reviews here (SL 1) and here (SL 2).
Kahtoola Microspikes – we use these every day in the winter. I can’t imagine living here (Laramie), and not being able to hike every day. Absolutely essential for our sanity when the trails are covered in snow and ice.
GoPro Hero 8 Black – this is my favorite camera for filming in the outdoors. I film my YouTube “Field Notes” videos with a Hero 7 Black, and am excited to upgrade to the new Hero 8.
George Harris just reviewed the REI Flash 55 Backpack, which I wore for a few trips before I sent it on to George for review. I liked the pack, and found it to be very comfortable. Its modular design really started to grow on me, and packs that don’t offer some modularity (so I can configure them for different types of trips) seem pretty confining. I like gear that is versatile, because that means I can own less gear for the trips I do. Best of all, the REI Flash 55 is already priced well at $200 MSRP, but during the sale, it is only $140 – that seems to be a great deal on a lightweight, good-quality, versatile pack. Available in a Women’s version too.
I may add more to this list during the next two weeks, but these are the ones that are on my mind today.
Brands on sale that *might* interest the lightweight hiker
I’m not much of a brand loyalist (I am a fanboy of a few brands…), but through the years, there have been a couple of companies who make products that I purchase on a recurring basis. Here are some of my favorites, and they will have a ton of products on sale at REI during this sale:
Patagonia – there will be 1,886 Patagonia sku’s on sale at REI during this sale – it’s a gold mine…look for Nano Puffs for starters – they’re only $139.
Several different models of Salomon shoes and “trail running boots” are going to be on sale, including lots of XA, X-Mission, and Speedcross models. These two are very popular among lightweight backpackers. I’m a big fan of these for winter hiking, they have enough stiffness to power a snowshoe and are warm enough for cold days.
Arc’teryx – love the dinosaur or hate its pretentiousness, nobody will be able to argue that Arc’teryx has become one of the most iconic premium brands in the industry. During this sale, look for one of the best active insulation pieces around – the Proton LT Hoodie. I’ve been experimenting with this trail running shoe lately and they are very impressive – because they are both lightanddurable. All deadbird goods are 20% off at REI until the 25th…
Garmin just announced their fancy new 6-series Fenix watches (the 6x Pro is neat because it’s solar-powered), which granted, are awesome but horrendously expensive. I have the Fenix 5x+ which has become an indispensable tool for training and tracking. During this sale, the 5x+ is going to be a great deal ($150 off), so nab one while you can and avoid early-adopter-retire-late syndrome.
Lots of good deals on Nemo gear – especially tents and sleeping pads. As I talk about in the Masterclass, the wide Nemo Tensor has pretty much changed my life when it comes to sleeping on the ground :)
I’ll update this list as the sale goes on, so check back – and subscribe to the newsletter for even more info and recommendations.
More Backpacking Light resources to help you shop the REI sale:
Backpacking Light does not accept compensation or donated/discounted products in exchange for guaranteed media placement or product review coverage.
Some (but not all) of the links in this review may be “affiliate” links. If you click on one of these links and visit one of our affiliate partners (usually a retailer site), and subsequently place an order with that retailer, we receive a small commission. These commissions help us provide authors with honoraria, fund our editorial projects, podcasts, instructional webinars, and more, and we appreciate it a lot! Thank you for supporting Backpacking Light!
This REI Quarter Dome SL 2 Review features a 2-person, double-wall, double-entrance, double-vestibule tent that weighs about 3 lbs.
SUMMARY
REI Quarter Dome SL 2 Review
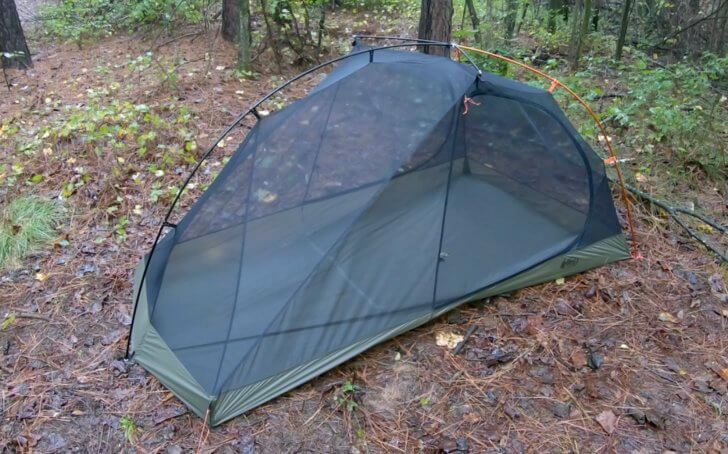
This REI Quarter Dome SL 2 review features a three-season, two-person, two-door, dual-vestibule, mesh inner, semi-freestanding tent. It weighs 47 oz (1522 g) and retails for $319.
Photo: REI
Highlights
Very good value (quality, performance, and weight) for the money
Light enough for solo use, resulting in a very roomy dual-entrance/dual-vestibule solo shelter.
In this article, I’ll walk you through what the REI Quarter Dome SL 2 has to offer by way of features and specs as well as the quality of materials and build. Plus, I’ll throw in my two cents about what I like about the tent and what its strengths (and limitations) are for someone like me.
Now…who is someone like me? I’ve gotten into camping over the last six or so years and have gone from car camping to walk-in tent sites, and then progressed to a couple of solo trips and multi-day hikes. I’m looking for a tent that is light, durable, affordable, and fits both myself and my daughter (age 6), who is excited to join me on my adventures.
Features and Specifications
Features
Vertical sidewalls and trapezoidal floor plan
Color-coded hub-and-pole assembly
V-shaped horizontal space-expander poles
Dual-entry fly and canopy
Dual stake-out vestibules
Fly roof-vent for airflow and condensation control
Four guyout loops on the fly and one rainfly rollback loop on each of the two doors
Four interior pockets: two at the corners and two on ceiling
Two hang loops in the ceiling for organization
Reflective stake loops and guylines
Fly/footprint minimalist pitch option lets you leave the tent at home and use the fly, poles, and footprint (sold separately) as a lightweight shelter
Includes a stuff sack, stakes, guylines, and tighteners, as well as a pole-repair tube, a pole bag, and a stake bag
Specifications
Weights (Measured)
Rainfly: 15.3 oz (435 g)
Tent Body: 15.5 oz (441 g)
Pole-set Sack: 11.1 oz (314 g)
Pole Set: 10.5 oz (298 g)
Stuff Sack: 0.6 oz (16 g)
Stake Sack (10 stakes, 3 guylines, 1 pole repair): 5.2 oz (150 g)
(1) Stake: 0.4 oz (11 g)
(10) Stakes: 3.9 oz (112 g)
(3) Guylines: 0.6 oz (18 g)
(1) Pole Repair: .4 oz (11 g)
(1) Stuff Sack: 1.2 oz (35 g)
Footprint: 6.4 oz (182 g)
Packaged Weights
Minimalist (rainfly, poles, footprint, 5 stakes, no sacks): 2 lbs 2.2 oz (970 g)
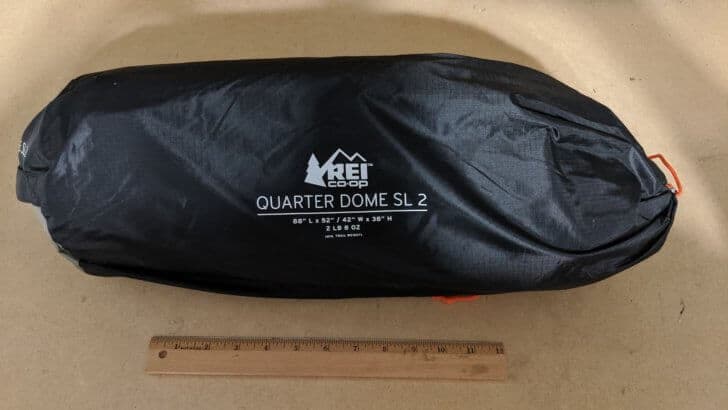
Packed Size (L x Diameter): 20 in x 5.5 (51 cm x 13.97 cm)
Floor Dimensions (L x W head/foot): 88 in x 52/42 in (224 cm x 132/107 cm)
Floor Area: 28.7 ft² (9 m²)
Vestibule Area: 21.5 ft2
Peak Height: 38 in (97 cm)
Pole Material: Aluminum
Fabrics
Canopy: Nylon
Floor: Ripstop nylon
Rainfly: Ripstop nylon
Review Context
I’ve mainly used one-person tents during my backpacking travels here in the southeast US and over the last couple of trips have decided I want to upgrade to a two-person tent. My reasoning was that I wanted more interior space for both gear and people.
Gear space: I occasionally suffer from back pain when sleeping on the ground, so I wanted the option to use an overall larger (thicker, wider) sleeping pad while still having a spacious feel inside my shelter.
More people: My daughter, age six, is wanting to come with me on some of my backpacking adventures. I wanted a shelter that could accommodate us both without adding too much weight since I will be hauling both our gear.
I was also looking for a reasonably-priced tent that was equally at home in the backcountry and frontcountry. I don’t need a top-of-the line Dyneema shelter – I just wanted something functional, reasonable, simple, and spacious.
Description of Field Testing
Mesh body provides good ventilation on stuffy nights.
I tested the REI Quarter Dome SL 2 on several multi-day trips in Georgia as well as walk-in tent sites at a local state park. All of the trips occurred in the summer months in both dry and wet conditions. I used a standard-sized rectangular inflatable sleeping pad and a mummy sleeping bag. I also used a standard inflatable twin air mattress for one trip with my daughter to a walk-in campsite at Chattahoochee Bend State Park.
Performance Analysis
My performance analysis of the REI Quarter Dome SL 2 will consist of:
Quality
Transportability
Adaptability
Ventilation and Condensation Management
Space & Storage
Quality
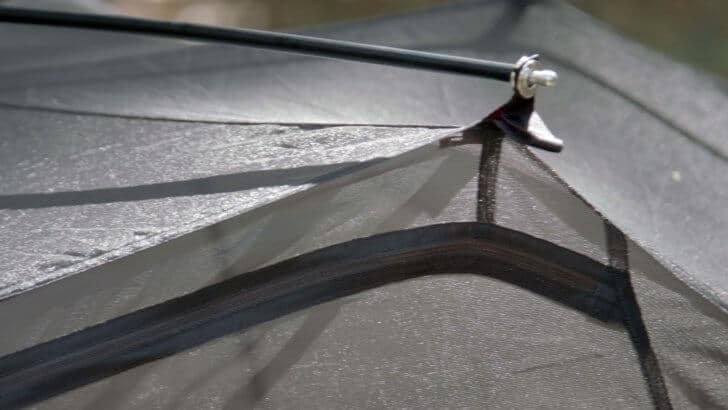
The mesh is tight with no scrapes, runs, or tears, and the seams have no loose or unraveling threads.Tight stitching on all the mesh.Top-stitching with interior loop hang. All tight, no runs.
All the seams are tight with double-stitching and there are no loose threads or unraveling parts. The mesh has no scrapes, runs, or tears. I will say, upon my initial contact with the ripstop nylon that makes up the rain fly and floor portions of this tent, I was skeptical; however, after using the tent and playing with the materials, it’s definitely tougher than I surmised it would be*.
*Editor’s Note: REI does not provide the denier of the fabrics used in this shelter.
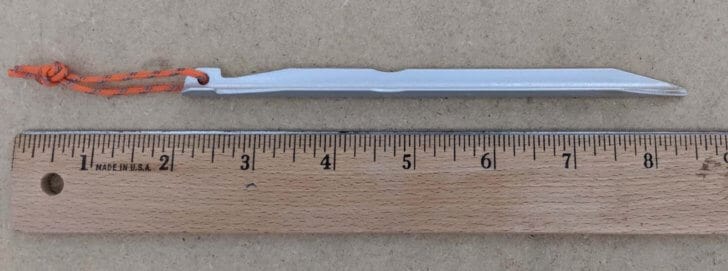
The tent stakes are light as well – they weigh in at 11 grams each. They are made with high quality and lightweight DAC aluminum. Upon handling them, it seems as if squeezing them too hard will result in the deflection of the material, but they are just as tough as any of the heavier stakes you’d find at a sporting goods store. Even driving them into the rocky ground here in southwest Atlanta didn’t damage them at all.
Tent stake.
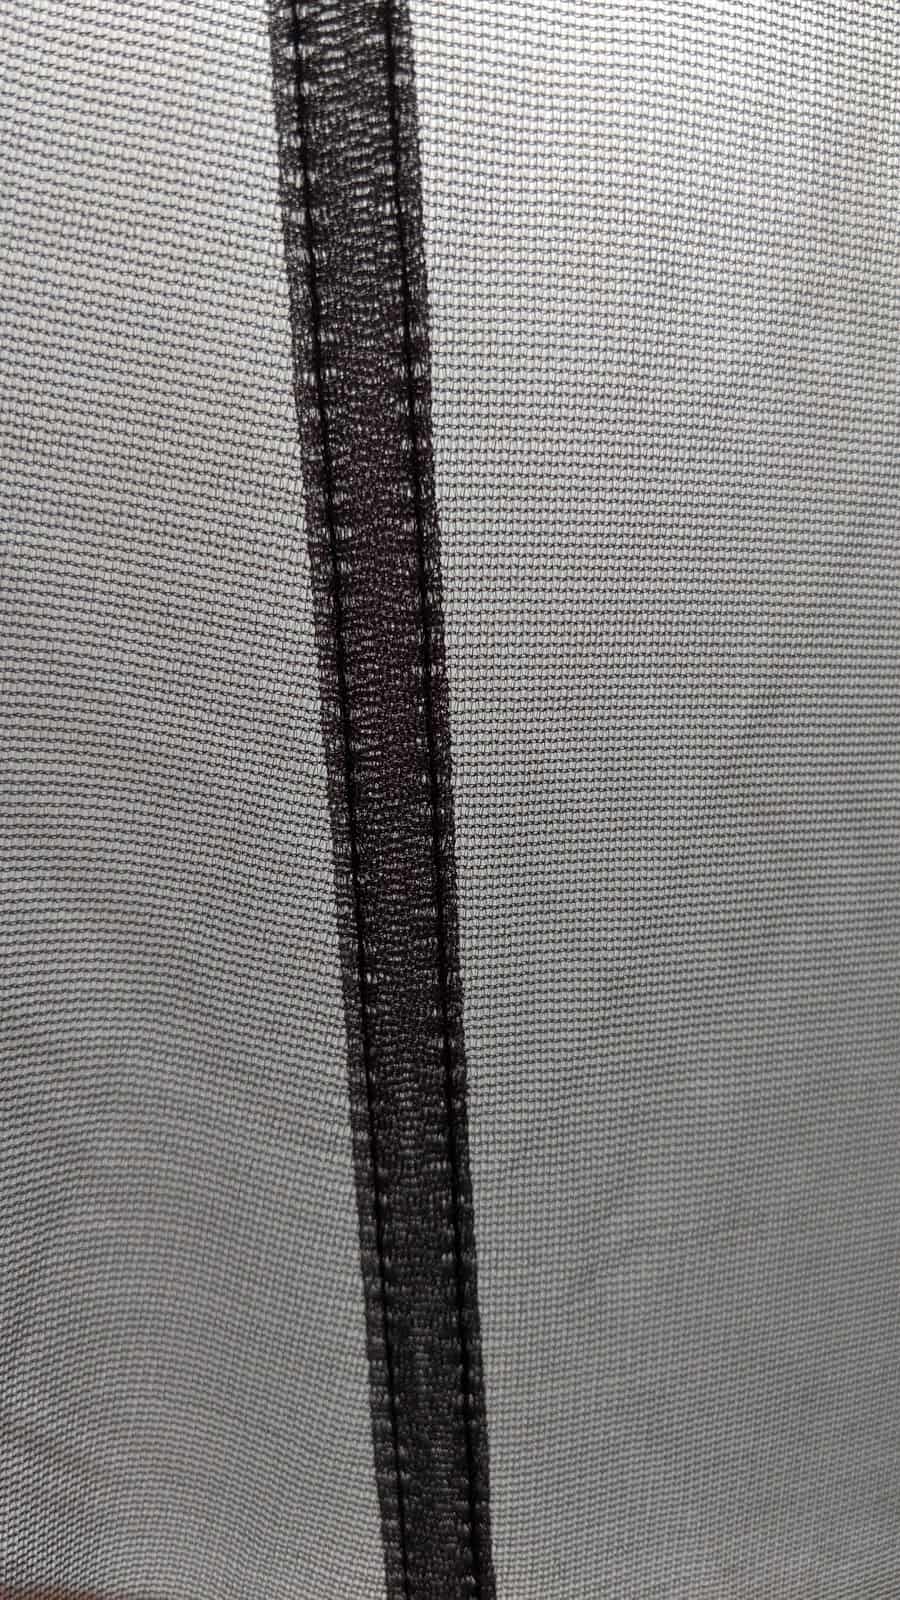
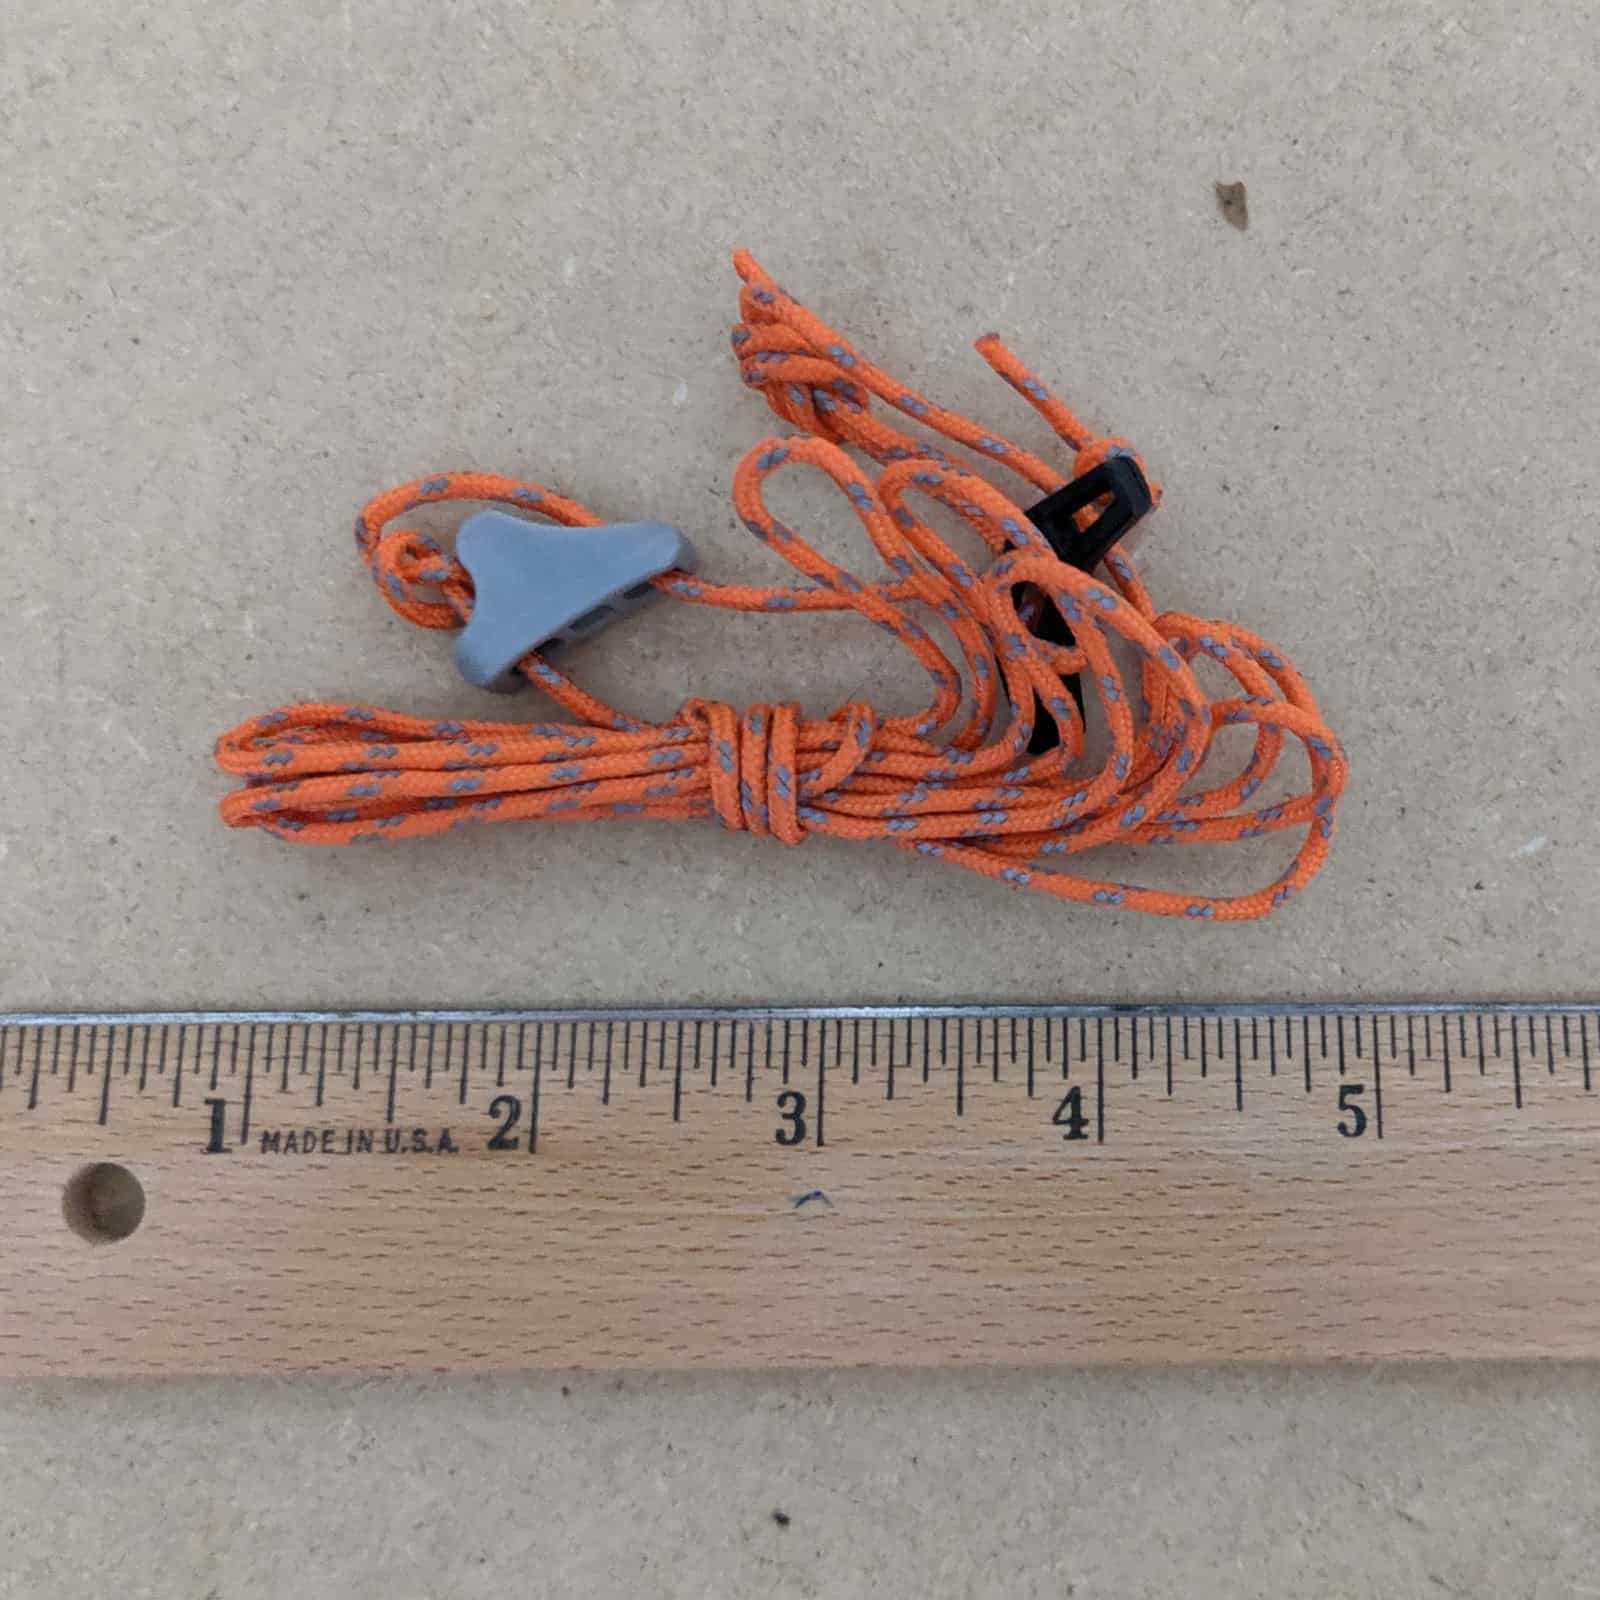
The guylines and cordage are all fluorescent orange with reflective strips woven throughout. They are easy to see in the underbrush and reflect well during the night.
Guyline with reflective thread.
Transportability
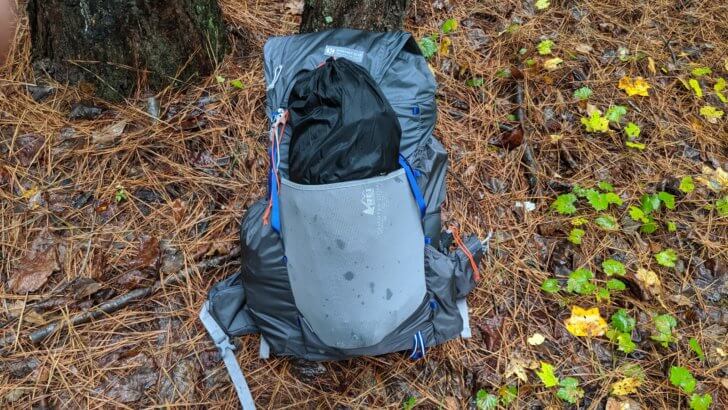
All materials rolled into a stuff sack measure about 20 in (51 cm) long and 5 ½ in (14 cm) in diameter.Tent rolled into stuff sack is somewhat bulky under the lid of my Gossamer Gear Mariposa 60L.The tent also fits snugly in the front mesh compartment of my pack – a little less bulky.
When rolled up in its stuff sack (with all components), The Quarter Dome SL 2 measures about 20 in long (51 cm) and 5½ in (14 cm) in diameter – weighing in just shy of three pounds. I have the Gossamer Gear Mariposa 60L pack, and the Quarter Dome SL 2 fits under the top lid or in the front mesh pocket. The components separate easily for group carry.
If you wanted to try and go as light as possible, the fair-weather option is to leave the tent at home and only bring the mesh canopy, pole set, and stakes. That will weigh in at only 29.8 oz (845 g). Granted, that is still heavier than most of the high-end ultralight two-person options on the market today – particularly single-wall DCF models. But it is on the lighter end of similarly designed double-wall, two-person, hub-and-pole supported structures (see our two tables in the Compared To…” section)
Adaptability
One of the neat features of the REI Quarter Dome SL 2 is the Fast Fly option. Unfortunately, you’ll need to purchase the additional footprint for this. I did not test this feature, since (at this point) I don’t have the additional footprint. But I like this shelter enough to consider purchasing it for the added set-up flexibility it offers.
For instance; if you’re in inclement weather, you can layout the footprint, connect the pole set to the footprint, and connect the rainfly. That will allow you to set up the tent inside the fly, allowing you to keep the tent itself dry (see Ryan’s video of the SL 1 starting at 12:04 to see how this is done). Aside from inclement weather, this is a nice setup if it’s a nice night and you just want some basic (non-bug) protection.
Ventilation
One fly vent at the foot-end of the fly for airflow and condensation control.
I’m a fan of the mostly mesh construction. In southwest Atlanta, I tested the Quarter Dome SL 2 in mid-September with afternoon temperatures reaching 95 F (35 C) and overnight lows hitting 75 F (24 C) in high humidity. Mesh is a must for airflow. Of course, whenever the rainfly is up around the tent, the mesh airflow is defeated. There is a 5 in (13 cm) vent at the top of the rainfly that will allow some airflow to continue, but it’s not much.
I have not experienced any major condensation inside the tent, but also, I did not test this tent outside the summer season. In conditions likely to form condensation the Quarter Dome SL 2 will most certainly suffer from it. But the double-wall mesh design should keep you dry for the most part.
It was muggy in the tent with the rainfly on, but that is expected with the combination of the rainfly and hot weather. Still, ventilation is not this shelter’s strong suit.
Space & Storage
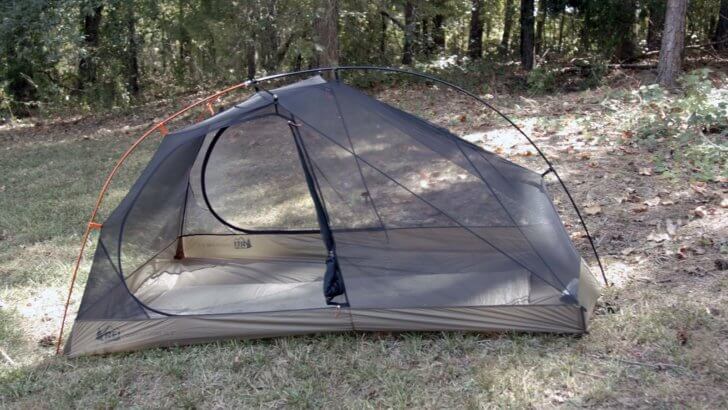
Full tent setup without rainfly.Full tent setup with rainfly attached.Gratuitous leg shot. Plenty of room for my sleeping pad and stowing my gear inside the tent.
The Quarter Dome SL 2 can fit two people, but it’s a bit snug (in my opinion) for two large adults. I believe that two smaller people or one larger and one smaller would be fine. I’m 5’11” (180 cm) and weigh about 160 lbs (73 kg). I have plenty of room to move or stash extra gear I want inside, especially at the head and foot of the shelter. Widthwise, you have 52 in (132 cm) at the head and only 42 in (106 cm) at the foot of the tent. Which is plenty of space for a single adult my size, but I think it would be a bit too snug for two adults my size.
The ceiling of the tent is 38 in (97 cm) at its peak height. While sitting up in the tent, my head did not brush the top of the tent. I had room to move and rearrange my gear and change without touching any of the sidewall mesh or ceiling.
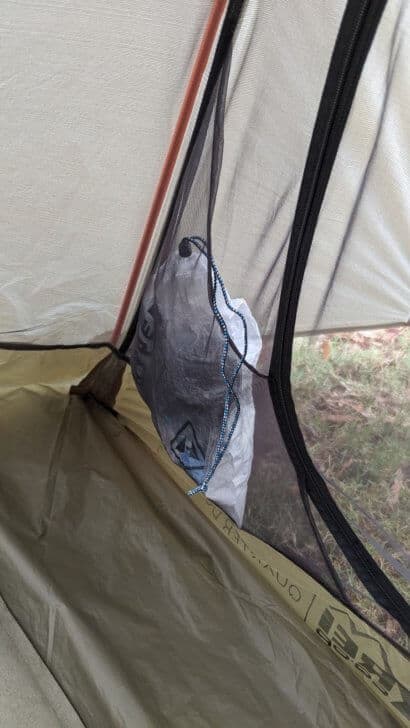
Corner pocket storage.Overhead pocket storage.
There were also four pockets inside the tent to stow additional gear. There are two at the head of the tent in the corners by the door and two overhead. Both pockets at the head of the tent held all the gear I would need at arms reach throughout the night. The ceiling pockets were convenient to place a headlamp, as is shown in the picture above. I wouldn’t want to put too much weight in the overhead pockets to prevent any additional stress on seams.
Mariposa 60L Pack fits nicely under the vestibule with room to spare.
In addition to the pockets, there are two stake-out vestibules at each door when the fly is in place. You get plenty of space to place your pack, shoes, or any additional gear you may have for each person. As you can see from the photo (above), my 60L pack fits easily with room to spare.
As I stated above, I was looking for something I could use with myself and my small daughter – or something that would be equally at home car camping with an air mattress as it would be in the backcountry with a sleeping pad. This tent met those space requirements. I was even able to fit a standard twin air mattress inside the Quarter Dome SL 2 and still had a few inches of space at the base of the tent.
Storm Resistance
While the SL 2 kept me snug and dry during gentle summer showers, I did not have the opportunity to test it in a serious storm. Thus I can’t speak to its ability to weather serious gales. I would imagine that the fly would be difficult to attach to the hub-and-pole frame during high winds (a common problem with this class of shelter). For more on the storm resistance of this design, see Ryan Jordan’s review of the REI Quarter Dome SL1. Because we don’t have enough experience in stormy weather with the REI Quarter Dome SL 2, we won’t be assigning a product review rating to it.
Product Strengths and Limitations
Strengths
One of the lighter shelters in its class (and the lightest in our first comparison table)
Quality construction
Flexible set-up options
Spacious (but not huge) interior – perfect for camping with children or a big dog
Large enough for extra-large sleeping pad (makes for a luxurious, if heavy, solo shelter)
Good value when compared to the competition
Limitations
Heavy compared to more expensive high-end cottage-industry designs (the heaviest shelter in our second comparison table)
Won’t fit two large people comfortably
Somewhat bulky when packed
Compared To…
In the first table, I compared the REI Co-op Quarter Dome SL 2 to three other two-person, hub-and-pole supported, double-wall, two-door, side-entry, dual-vestibule three-season shelters.
While the Quarter Dome SL 2 is a little less spacious inside than some of its competition, it holds its own in the weight department – it’s the lightest shelter in this table. The materials might be perceived as slightly less premium (i.e., they lack the marketing cred of trademarked fabric brand names) but the build quality is comparable. The vestibule area of the Quarter Dome SL 2 is the largest in our range of compared products.
The MSR Hubba Hubba NX 2 may be the best choice in this table for inclement weather – there’s more solid fabric on the lower part of the inner tent for wind resistance and blowing snow. The Nemo Dragonfly 2 offers the least amount of interior volume. The REI Quarter Dome SL 2 offers the most mesh, and thus, the best ventilation for summer conditions.
In the second table, I compare the SL 2 to two popular two-person, dual-entrance, dual-vestibule, side-entry trekking pole supported shelters – the Zpacks Duplex and the Tarptent Stratospire 2.
Area not provided - depth of 20.75 in (55 cm) on each side
Area not provided depth of 33 in (84 cm) on each side
Apex
38 in (97 cm)
48 in (122 cm)
50 in (127 cm)
Packed Size
20 in x 7 in (51 cm x 18 cm)
13 in x 7 in (33 cm x 18 cm)
16 in x 5 in x 5 in (41 cm x 18 cm x 18 cm)
Special Features
V-shaped horizontal space expander pole
DCF construction - no seam sealing or groundsheet required
PitchLoc corners for expanded living space, double wall, interior can set up independently of fly
Here we see how the REI Quarter Dome SL 2 fares when compared to cottage industry design and materials. The Duplex is constructed of DCF fabric and is supported by trekking poles – thus it is 28 oz (794 g) lighter than the Quarter Dome SL 2. These factors combine to make the Duplex one of the more popular two-person shelters in the ultralight world. But DCF comes at a cost – a $600 shelter is likely out of the question for a backpacker seriously considering the Quarter Dome SL 2.
The Tarptent Stratospire 2, by contrast, is much closer in price to the Quarter Dome SL 2 at $359. It sports a double-wall, trekking pole-supported design, and is only 3 oz (85 g) lighter than the Quarter Dome SL 2. It is considerably more spacious – its headroom, livable area, and vestibules are all larger than what the Quarter Dome SL 2 can offer. One advantage of the SL 2 over the Stratospire 2 is that the geodesic pole structure of the SL 2 will stabilize fabrics better and make it a more wind-worthy alternative than the Stratospire 2. This is discussed in more detail in Ryan’s review of the smaller REI Quarter Dome SL 1.
It’s worth noting that a 26 oz (737 g) DCF version of the Stratospire 2 is available (the Tarptent Stratospire Li), which is a closer direct competitor to the ZPacks Duplex.
Commentary
So overall, I like the REI Quarter Dome SL 2. It met all my criteria for what I was looking for in a tent. It’s not the lightest option in the two-person market, but it is one of the lightest options in its price class.
I was looking for something comfortable, stable, relatively inexpensive, and easy to set-up – while remaining spacious enough to fit me, my daughter, and an extra-large sleeping pad. The Quarter Dome SL 2 met those criteria.
The mostly-mesh interior is great to ensure good breathability (with the fly off) during the hot summer months of Georgia, where I primarily do my backpacking. With the fly on, it’s going to get muggy in the summer and have some condensation in the shoulder-seasons. Finally, the shelter was light enough for me to carry comfortably – it’s one of the lightest shelters available in the silnylon, hub-and-pole, two-person class.
I also like the fast fly feature, for use in setting up the tent either in inclement weather (fly first) or on nice nights where just some basic shelter is needed. That does require the purchase of the footprint ($49.99 on REI.com), but I believe the cost is worth the value of those additional options.
I’d recommend the REI Quarter Dome SL 2 for backpackers looking for an all-around comfortable backcountry shelter that blends reasonable price and reasonable performance.
Product(s) discussed in this article may have been purchased by the author(s) from a retailer or direct from a manufacturer, or by Backpacking Light for the author. The purchase price may have been discounted as a result of our industry professional status with the seller. However, these discounts came with no obligation to provide media coverage or a product review. Backpacking Light does not accept compensation or donated/discounted products in exchange for guaranteed media placement or product review coverage.
Some (but not all) of the links in this review may be “affiliate” links. If you click on one of these links and visit one of our affiliate partners (usually a retailer site), and subsequently place an order with that retailer, we receive a small commission. These commissions help us provide authors with honoraria, fund our editorial projects, podcasts, instructional webinars, and more, and we appreciate it a lot! Thank you for supporting Backpacking Light!
In the summer of 2019, Jeff Garmire achieved the fastest known time on Vermont’s iconic Long Trail, clocking all 272 miles in five days, twenty- three hours, and forty-eight minutes. Here’s the interview.
Today’s guest is Jeff Garmire (trail name Legend). In the summer of 2019 Jeff achieved the fastest known time on Vermont’s iconic Long Trail, clocking all 272 miles in five days, twenty- three hours, and forty-eight minutes. Prior to that he set unsupported and over-all FKT on the Arizona Trail, completed the Great Western Loop, and completed a Calendar Year Triple crown, among other accomplishments.
When he isn’t hiking, Jeff is a public speaker and hiking coach / mentor. He also just released a book called “Free Outside: A Trek Against Time and Distance,” which chronicles his Calendar Year Triple Crown.
Ryan and Andrew talk to Jeff about the nuts and bolts of his Long Trail FKT before transitioning into a conversation about mental health, relationships, and the philosophy of speed records.
Sponsors: Help us Keep the Podcast ADVERTISING-FREE!
This episode of the Backpacking Light Podcast is supported and kept advertising-free by Backpacking Light membership fees. Please considerbecoming a member which helps support projects like this podcast, in addition to a whole slew of other benefits!
This episode of the Backpacking Light podcast iis also brought to you by Douglas Fir trees. Douglas Firs: they make it smell like Christmas!
In addition, some of the links on this page may be affiliate links that refer to our partner merchant retailers. If you follow a link and then make a purchase, we receive a small commission which goes a long way towards helping us pay for podcast production, hosting, and bandwidth fees! Thanks for supporting us in this way!
This episode is
Contact
You can contact us at podcast@backpackinglight.com, or follow us on social media –
We do not accept money or in-kind compensation for guaranteed media coverage: Backpacking Light does not accept compensation or donated product in exchange for guaranteed media placement or product review coverage.
Affiliate links: Some (but not all) of the links in this review may be “affiliate” links, which means if you click on a link to one of our affiliate partners (usually a retailer site), and subsequently make a purchase with that retailer, we receive a small commission. This helps us fund our editorial projects, podcasts, instructional webinars, and more, and we appreciate it a lot! Thank you for supporting Backpacking Light!
This post is available for Unlimited Members only. As of today (October 30, 2019), we’ve turned off all network banner advertising for Unlimited Members, providing a faster, less cluttered, and less intrusive browsing experience – this post provides the details.
In this REI Magma 30 Sleeping Bag review, Mark Wetherington analyzes its cut, yoke, insulation and quality of construction.
Introduction
Photo: REI
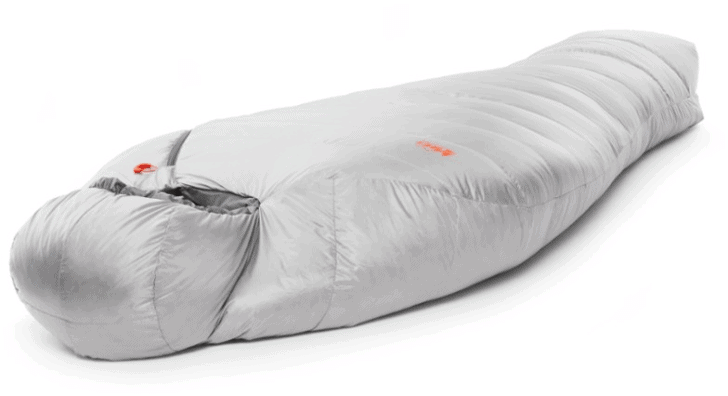
The REI Co-op Magma 30 Sleeping Bag is a comfortable and warm mummy-style bag ideal for three-season use in much of the Lower 48. The Magma 30 utilizes 15D Pertex Quantum fabrics, 850 fill power water-resistant down, an anti-snag zipper, an insulated yoke, and a trapezoidal footbox.
Weighing in at 20 oz (567 g) and priced at $319.00, this bag provides value for backpackers looking to acquire a lightweight sleeping bag without breaking the bank.
Fill type: 850-fill-power goose down, with hydrophobic treatment
Fill weight: 8.5 oz (241 g)
Dimensions: 80 in x 27 in (fits 72 in long sleeper) (203 cm x 69 cm)
Compressed dimensions: 6 in x 13 in (15 cm x 33 cm)
Shell fabric: 15d ripstop nylon (Pertex Quantum)
Lining fabric: 15d ripstop nylon
Shoulders: 63 in (160 cm)
Hips: 57 in (145 cm)
*Available in long length
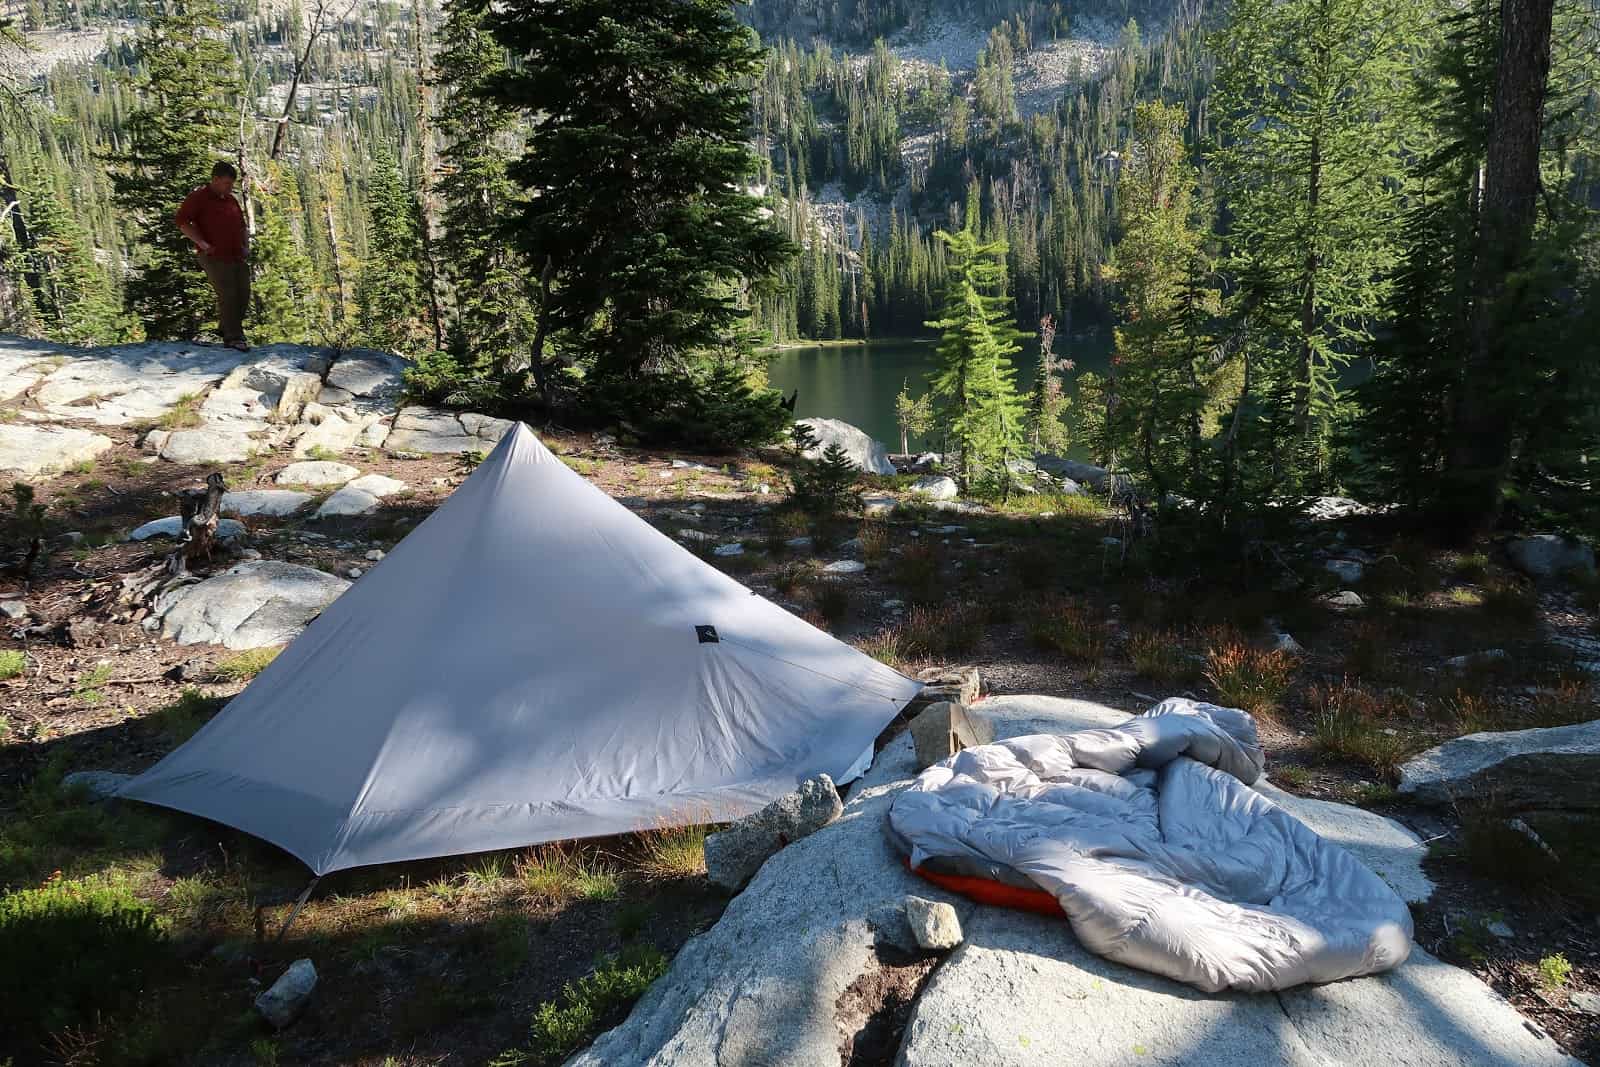
The REI Magma 30 in the Bitterroot National Forest, Montana.
I’ve spent hundreds of nights in lightweight sleeping bags in the 15 F to 30 F (-9 C to -1 C) range, from the Appalachians to the Cascades. The Marmot Plasma 30, Feathered Friends Hummingbird UL20, and Marmot Pinnacle 15 are the bags I’ve used the most. Depending on conditions, I use a short Therm-A-Rest NeoAir XLite or a regular Therm-A-Rest NeoAir AllSeason for my sleeping pad. I often pair these with a short Therm-A-Rest ZLite or RidgeRest for puncture protection and additional insulation. During the shoulder seasons, I wear thicker base layers (200 weight) and a down jacket when temperatures are forecast to drop below the rating of the sleeping bag I’m using.
I prefer down bags because of their weight-to-warmth ratio and their longevity. As a backpacker with an athletic build, I don’t need much extra room in my bags. But I do toss and turn some and appreciate not feeling like I’m in a straitjacket. I also appreciate the extra space when drying out damp clothes, warming up clothing items before putting them on in the morning, or keeping a water filter from freezing.
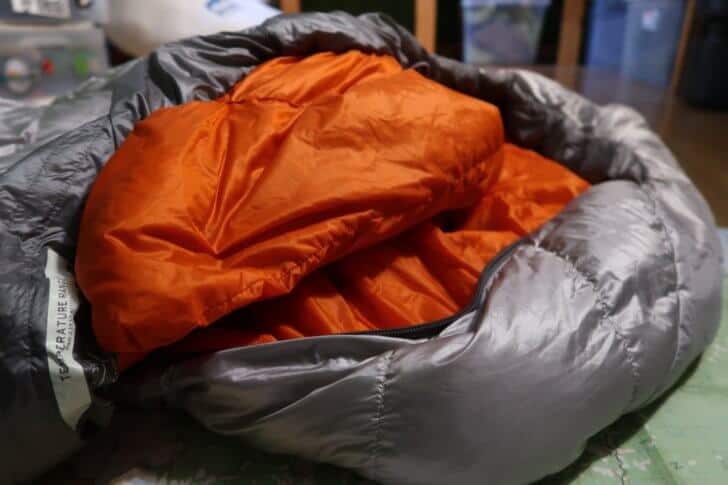
Airing the REI Magma 30 out and allowing some damp spots from tent condensation to dry before packing up camp.
I tested the REI Co-op Magma 30 Sleeping Bag on several backpacking trips in August and September in Wyoming and Montana. The coldest temperature was 26 F (-3 C) and the warmest 44 F. I encountered no significant amounts of precipitation or high relative humidity when testing this sleeping bag. I tested this sleeping bag inside of a Six Moon Designs Lunar Solo shelter, an MSR Hubba tent, and in the back of my vehicle at trailheads.
Performance Assessment
I assessed this bag by noting how its design and features performed when used during overnight trips. I visually inspected the Magma 30 with an eye towards performance and construction quality before use and after the testing period concluded. My performance assessment addresses:
Cut
Insulated yoke
Fabric
Manufacturing quality
Baffles
Storage
Warmth
Cut
It is almost an understatement to call the Magma 30 “roomy,” despite it being a mummy-style bag. It features one of the amplest cuts of any mummy bag I’ve experienced. It was easy to change socks without stressing the fabric, something that has not been the case with other sleeping bags I’ve used. The cut also allowed plenty of room for me to dry slightly damp clothes during the night and warm clothes before putting them on in the morning.
There was also plenty of room in the trapezoidal footbox. The trapezoidal shape allows for the natural splay and positioning of feet when back sleeping. There was adequate room in the footbox to store my water filter at night to keep it from freezing. Despite having such a roomy cut, this bag did not seem to suffer from any notable cold spots.
Insulated yoke
The REI Magma 30’s hood and insulated yoke.
Most of the sleeping bags I’ve used either employ a dedicated draft collar with a cinch cord or an overstuffed baffle (i.e., a passive collar) in the shoulder area. Both have positives and negatives. Draft collars can feel somewhat strangling at times and add another set of cords to have to adjust when entering and exiting the bag. Passive collars can often be less effective than desired when pushing the limits of a bag. The insulated yoke on the REI Co-op Magma 30 blends the best of both. There are no additional cords to fiddle with. Instead, there is a tube of down-filled fabric that drapes across your collarbone and prevents heat from escaping the bag and cold drafts from entering.
Fabrics
Although I never used this bag without a shelter, I employed it on several nights in windy conditions (10 to 15 mph steady wind, gusts 25 to 30 mph). At the time, I was also testing the Six Moon Designs Lunar Solo, a shelter with mesh ventilation panels through which the wind easily entered. I found the Pertex Quantum fabric blocked wind adequately to prevent any heat loss and that no cold chills penetrated the seams.
The Lunar Solo’s single-wall design gathered condensation overnight. The Magma’s fabric resisted this moisture (for the most part) when brushing up against the shelter’s wall. It became slightly damp on relatively humid and still mornings from this contact, but never seemed to wet out. I noticed no impact on the bag’s loft in these conditions.
Less than a half-hour in the sun seemed to dry the fabric completely. The 15 denier nylon was comfortable against the skin when it was warm enough to forego baselayers. It did not feel clammy, even early in the night, when temperatures were only in the low 50s.
Manufacturing quality
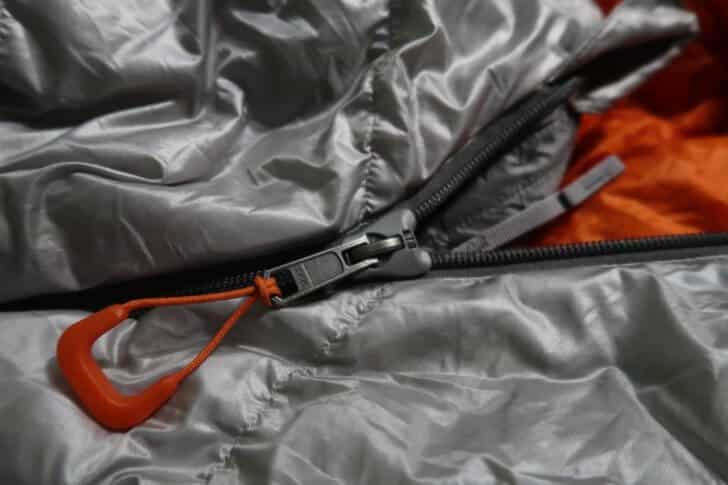
I encountered no noticeable issues with the quality of this bag’s components or assembly. I noticed no down leakage during my testing. The zipper, zipper pulls, fabric, and cords are durable and well-balanced between lightweight and sturdy. The main zipper pull has an easy to grab plastic pull attached with a thin cord via a girth hitch on the outside. The inside has a 2.5 in (6 cm) piece of webbing to use when zipping or unzipping from inside the bag.
Zipper close-up; another zipper at the bottom allows for venting at the footbox.
The primary zipper is covered with a plastic piece that separates the teeth from the fabric, and the result is smooth zipping. During my testing, I did not experience any snagging at all.
An additional zipper pull at the footbox allows for ventilation.
Baffles
This bag utilizes traditional horizontal baffles of variable sizes to maximize warmth and keep the down located where it is needed. Near the chest and torso, the baffles are approximately 5 in (13 cm) wide and progressively widen to around 7 in (18 cm) at the footbox. Baffle loft was consistent throughout at approximately 3.25 in (8 cm).
In my experience, this resulted in no cold spots during the night despite the roomy cut.
Storage
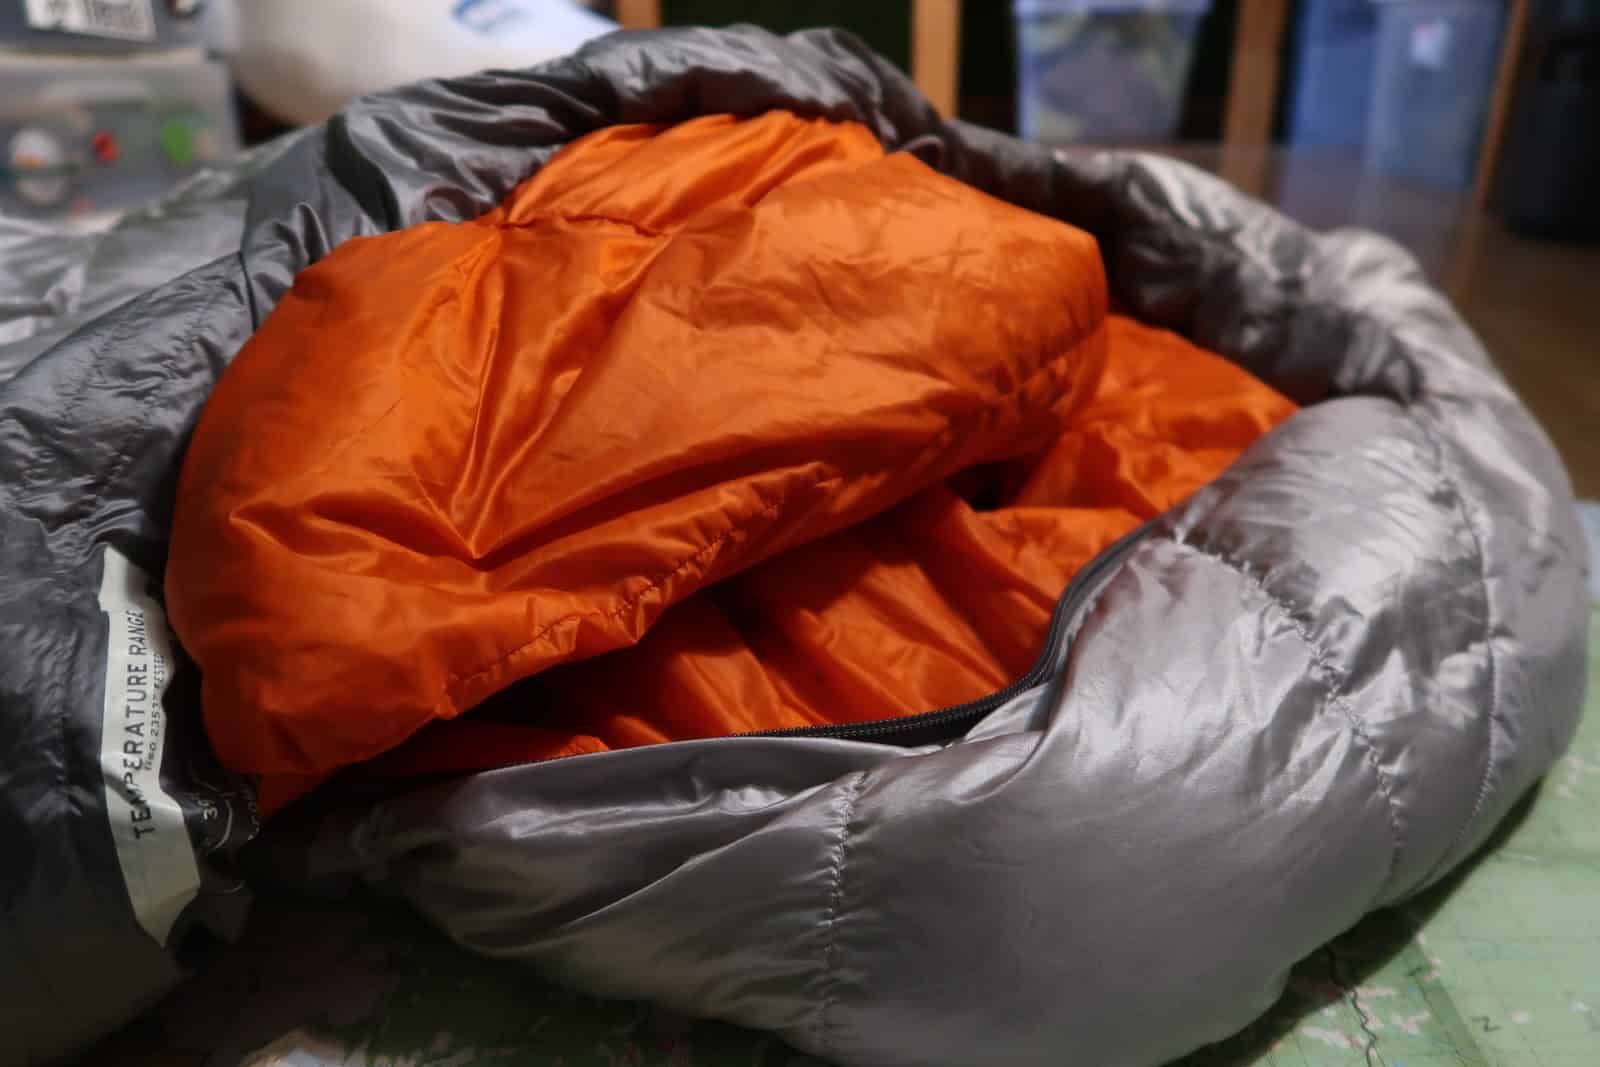
REI Magma 30 in the included stuff sack; one-liter Nalgene bottle for scale.
The REI Magma 30 comes with a small stuff sack for backpacking as well as a mesh storage sack for long-term storage. The included stuff sack is slightly too small to make for easy stuffing. The sack is water-resistant, but not waterproof. When compressed in the included stuff sack, the Magma 30’s dimensions are approximately 6 in x 13 in (15 x 33 cm).
For these reasons, I opted to use a Sea to Summit eVent Compression Dry Sack during my testing. Several of the trails I hiked included river fords, and I wanted to ensure my sleeping bag stayed dry in case I took an unexpected swim.
Warmth
I found the Magma 30 was true to its temperature rating – when used with lightweight base layers, head covering, socks, and a full-length sleeping pad with an R-value greater than 2.5.
I wore midweight base layers when pushing this bag below its limit and found it to be comfortable. When using a three-quarter length sleeping pad with my backpack under my feet, I was – as expected – not quite as warm at similar temperatures as when using a full-length pad. If you typically use a three-quarter length pad, you will likely find yourself limited to within a few degrees of the Magma 30’s comfort rating of 39 F (4 C).
Overall, I found this bag to be adequate to the lower limit of 30 deg F (-1 deg C) for backpackers who sleep on the warmer side and use a full-length sleeping pad.
Product Strengths and Limitations
Strengths
This zipper is one of the best I’ve used on a sleeping bag – the design was snag free during my testing.
Hydrophobic down provides peace-of-mind in extended damp conditions.
Fabric is comfortable against the skin and sheds moisture effectively .
Cut is roomy without cold spots.
Insulated yoke is effective at preventing heat loss, but not as cumbersome as a full-wrap draft collar.
Good value.
Limitations
Provided stuff sack is too small and offers minimal water resistance.
Rating is optimistic for cold sleepers unless paired with a full-length pad with R-value of 3 or higher.
Compared To…
The REI Co-op Magma 30 Sleeping Bag compares favorably to other sleeping bags in the 30 F (-1 C) category and is the most competitively priced. Despite having a lower fill weight than other bags in this category, the Magma 30 still performed well at the lower limits of its temperature rating. This performance is the result of features (such as the insulated yoke and variable baffles) that focus on thermal efficiency without added weight.
Shaped to maximize thermal efficiency, waterproof and breathable fabric to protect against tent condensation
Ergonomic
Liner and Shell Fabric
15d ripstop nylon and Pertex Quantum 15d ripstop nylon
Flite 15d ripstop nylon and Pertex Endurance UL
30d nylon taffeta and 20d ripstop nylon
30d nylon taffeta and 20d ripstop nylon
Special Features
Insulated yoke, footbox zipper
None
Thermo Gills allow venting to regulate temperature without drafts
Insotect Flow in baffles to distribute heat
Commentary
This sleeping bag performed as expected based on the temperature ratings provided by the manufacturer. Despite having considerably less down fill than some other bags in this category, it was still true to its rating when used in lightweight base layers and with midweight socks.
When midweight base layers were used, and the bag was on a pad with 4.0 R-Value, this bag was comfortable several degrees below its rating. The features and fabrics used in this bag are well-designed (the zipper and insulated draft yoke in particular), high-quality, and result in a sleeping bag that meets expectations and provides excellent value. The Magma 30 will suit the needs of many backpackers in summer or three-season conditions (depending on the region).
Review Rating: Recommended
For backpackers looking for an affordable lightweight sleeping bag that doesn’t skimp on features and delivers on its temperature rating, the REI Co-op Magma 30 Sleeping Bag is an appealing choice. With quality components and user-friendly features, this sleeping bag – boasting the best warmth-to-weight ratio of the bags made by REI – is less expensive than other comparable bags without cutting corners.
While not attempting to offer a radically innovative product or compete down to the last gram in the ultralight market, REI has begun offering high-performing pieces of gear. Many of these products are ideal for those looking to save weight on major items such as tents and sleeping bags while staying within a modest budget. This sleeping bag is an example of their success in this endeavor. I recommend it without hesitation.
REI also offers the Magma Trail Quilt 30 for those who prefer a quilt rather than a traditional sleeping bag. See our review here.
Product Review Disclosure
Updated October 18, 2019
Product(s) discussed in this review were either acquired by the author from a retailer or otherwise provided by the manufacturer at a discount/donation with no obligation to provide media coverage or a product review.
Backpacking Light does not accept compensation or donated products in exchange for guaranteed media placement or product review coverage.
Some (but not all) of the links in this review may be “affiliate” links. If you click on one of these links and visit one of our affiliate partners (usually a retailer site), and subsequently place an order with that retailer, we receive a small commission. These commissions help us provide authors with honoraria, fund our editorial projects, podcasts, instructional webinars, and more, and we appreciate it a lot! Thank you for supporting Backpacking Light!
Submit them to podcast@backpackinglight.com orTwitter and get featured on our next podcast!
Credits
Backpacking Light – Executive Producer
Ryan Jordan – Director and Host
Andrew Marshall – Producer, Host, and Editor
Sponsors: Help us Keep the Podcast ADVERTISING-FREE!
This episode of the Backpacking Light Podcast is supported and kept advertising-free by Backpacking Light membership fees. Please considerbecoming a member which helps support projects like this podcast, in addition to a whole slew of other benefits!
In addition, some of the links on this page may be affiliate links that refer to our partner merchant retailers. If you follow a link and then make a purchase, we receive a small commission which goes a long way towards helping us pay for podcast production, hosting, and bandwidth fees! Thanks for supporting us in this way!
Contact
You can contact us at podcast@backpackinglight.com, or follow us on social media –
We do not accept money or in-kind compensation for guaranteed media coverage: Backpacking Light does not accept compensation or donated product in exchange for guaranteed media placement or product review coverage.
Affiliate links: Some (but not all) of the links in this review may be “affiliate” links, which means if you click on a link to one of our affiliate partners (usually a retailer site), and subsequently make a purchase with that retailer, we receive a small commission. This helps us fund our editorial projects, podcasts, instructional webinars, and more, and we appreciate it a lot! Thank you for supporting Backpacking Light!
How to create a lightweight sunscreen strategy by using your backpacking apparel and supplies.
Introduction
Though not everyone gets the blistering, itching, inflammation effects of sunburn, skin conditions (including skin cancer and premature aging) are a real possibility for anyone who loves the outdoors. This article considers the gear and supplies you use for lightweight sunscreen protection.
Backpackers who spend extended periods of time in the elements including sunshine are at a higher risk of consequences. Sun protection is crucial to prevent painful sunburn and skin disorders and diseases.
I am melanin challenged – fair-haired, light-eyed, and my skin is a lovely shade of glow-in-the-dark (I have my red-headed mother’s fair complexion). Even if I wasn’t inclined to burn crispy, sun protection should (and would) be a priority for my health.
Do I wear sunscreen every day? No, but I do wear it most days, even when not backpacking. I also cover up most of my exposed skin. I face dire and almost immediate consequences if I don’t protect myself from the sun.
If you get a lovely shade of tan in response to sun exposure, it’s easy to be complacent about sun protection. However, having known a few people under thirty who have lived through skin cancer treatment, I have no desire to join the club and I’m willing to bet that you melanin-challenged readers out there don’t either.
When you face the burning, blistering, and inflammation of a sunburn after an hour or less of sun exposure like I do, you learn a few techniques for saving weight and space while packing sun protection. I will preface by saying that not carrying sun protection is a lighter (but more damaging) option. No dermatologist would recommend anyone skip sun protection and I certainly won’t either.
Cover Up: Lightweight Sunscreen Using the Gear You’re Already Carrying
Perhaps the lightest option is to leverage the clothing you wear as sun protection. When picking layers for backpacking, consider purchasing gear with built-in sun protection or UPF (ultraviolet protection factor). Most outdoor clothing lines have a UPF rating and picking a UPF 50 rated item over a non-rated item rarely costs an extra dime or ounce. Stay away from open-mesh and open-weave fabrics that allow UV light to penetrate through the fabric and onto the skin surface.
Head and Neck
A Buff scarf or tube scarf is worth its weight in versatility and sun protection. A Buff serves as my warm head layer, and my neck, head, chest, and face sun protection in a high UV context. A tube scarf is a light, multi-purpose item every backpacker should consider adding to their pack. Many companies (Outdoor Research UberTubes is my current favorite) offer a cooling fabric with UV blocking tech.
A hat should be obvious, but in case it isn’t, a wide-brimmed hat provides the most shade. A baseball-style cap (front brim only) is not a bad option either, especially in combination with a lightweight hooded shirt or tube scarf.
It is also worth noting, ball caps with sun protection capes around the neck also exist and can be used in place of a tube scarf or hooded scarf. I should note though, a caped ball cap cannot replace the purpose of a tube scarf or a hood in a layering system for inclement weather.
Even in summer conditions, I can be found with my buff, hat, long pants, and long sleeves.
Upper Body
My favorite option is an ultralight wool long-sleeve hoody. Wool doesn’t stink after many days of wear and makes an ideal sun protection layer. I recommend long sleeves and if possible a 3/4 zip with a hood. Summer weight merino (e.g., 150 gsm) is a light-enough option.
Occasionally, in the heat, I find merino a bit itchy, though not itchy enough for me to switch back to synthetic fibers. Whether wool or synthetic, the 3/4-zip, long sleeve, hooded lightweight shirt is my layer of choice for ultralight backpacking because of its multipurpose uses including sun protection.
Lower Body
Shorts and skirts are great for ventilation in the heat, but a lightweight pair of pants in a lighter color is worth the sun, insect, and tick protection during the summer. Vented versions, which provide more cooling and sun protection are probably the best middle ground for those who run hot.
Emylene’s Personal Twist
My final point in sun protection layering is using an umbrella as a parasol. The humble bumbershoot also serves as a cooking shelter and rain layer. It makes a fantastic multipurpose addition to an ultralight pack. In addition to keeping the sun off, I have found an umbrella to be one of the driest, lightest, best vented, and effective rain layers. While rain jackets and pants tend to either saturate or ‘wet out’ (this should really be called a ‘sweat in’) over time during warm rain, umbrellas do not. Obviously, umbrella’s are not ideal for windy conditions, and they provide limited warmth in cold temperatures, but they are an excellent multipurpose item for summer use.
Rain or shine I find a use for an umbrella when needed.
Lightweight Sunscreen Options: Balms, Salves, and Lotions
People always ask about sunscreen lotions. I immensely dislike sunscreen lotions. Sunscreen tends to get everywhere including in my mouth and makes my skin feel terrible. In short, sunscreen tastes, smells, and feels bad. For me, however, sunscreen is a necessary evil. When it comes to sunscreen, I find you generally pick between light, comfortable, or cheap. I am also going to assume readers know about, and have tried normal spray-on and liquid sunscreens and know the ins and outs there.
SPF
Before we dive into lightweight sunscreen options though, let’s chat SPF. What is SPF and what is the ideal SPF?
SPF = Sun Protection Factor
Heather Brannon, MD explains SPF this way: “an SPF rating tells you how long you can stay in the sun without getting burned while wearing that sunscreen, compared with how long you can stay in the sun before you burn without wearing that sunscreen. For example, if it typically takes you 15 minutes to burn without sunscreen and you apply an SPF 10, it will take 10 times longer (2.5 hours) to burn in the sun.”
SPF is not an indication of the effectiveness of sunscreen! It only indicates the length of time it that it’s effective. Medically-recommended sunscreen generally provides 30+ SPF, broad-spectrum (UVA and UVB) protection. Regardless of SPF number, reapplication every 1-2 hours or after sweating or exposure to water is an important best practice.
Lightweight Sunscreen Sticks
One of the most convenient, lightweight sunscreen options is a small stick of solid sunscreen. A lightweight sunscreen stick is usually about the size of a glue stick or about 1/4 to 1/3 the size of a deodorant stick. I find the smell tolerable, the taste intolerable, and the price expensive. Solid sunscreen sticks can usually be purchased for $5 to $15, depending on size. Smaller and lighter sticks can sometimes be found where travel-size toiletries are organized in a store.
My only issue with the sunscreen stick is you cannot measure the exact right amount of the stick and only take the amount you need. The stick is smaller and lighter than liquid but has limitations and because the stick is more viscous (sticky) it does not spread as far as a liquid. My favorite use for sunscreen sticks is during paddling or winter adventures as it conveniently packs into a pocket for on-the-fly application.
Cosmetic Grade Liquid Sunscreen
The most comfortable option for me is a high-end cosmetic cream with sunscreen included as a component. Generally, higher-end cosmetic sunscreens smell pretty good, don’t taste as bad, and absorb into the skin more easily.
Cosmetic sunscreen bottles (often glass) tend to be heavy and breakable. Cosmetic sunscreens can be expensive ($15-$90). When used with proper layering to keep the sun off the price may not be of great concern and the absorption rate means you use much less (and can, therefore, pack less on a trip = weight savings).
Of all the options, a small container (usually not the original container) of higher quality cosmetic grade facial cream with sunscreen built-in is my preference because it’s multipurpose in hydrating windburned skin (without clogging pores and causing breakouts) and acting as a sunscreen. Most of the ladies out there probably have a small and lightweight container of cosmetic sunscreen and have been religiously told to apply it to prevent age spots and wrinkles.
Another tip I can offer here is to use a small, wide mouth, screw off lid container to store the lotion. When you put the lotion in the container put a small piece of plastic wrap over the mouth of the container and screw on the cap. This makes the bottle more leak proof. Keep using the same piece of plastic wrap, it takes quite a while to wear out. As a heads up, this tip works well when airplane traveling with liquids as well.
Sunscreen Wipes
Sunscreen Wipes are like facial cleaning or baby wipes but they have sunscreen built-in. They are easy to apply, don’t count as a liquid during flights and are flammable to use as fire starting material. They are reasonably lightweight and highly packable compared to a liquid solution. However, they also have additional waste associated with their use.
I like sunscreen wipes for when I am flying into my trail location and don’t want to take liquid sunscreen through security or have the bottle leak in my checked gear. Wipes allow you to take exactly the right amount of sunscreen for each day and pack it into meal supplies for applications when you stop to eat.
Foil Packed Liquid Sunscreen
Another sunscreen option (that allows you to pack exactly the right amount of sunscreen): individual foil-packed liquid sunscreen tubes. These are lighter and smaller than a bottle of sunscreen but come with a penalty of a foil package you are stuck with. Foil-packed sunscreen is perfect for getting the exact right amount of sunscreen for a trip and having them easily accessible.
I like the foil packs for precisely dosing my sunscreen on short trips. The foil packs are still lighter than an equivalent bottle (up to a certain point).
Sunscreen Active Ingredients
Sunscreens contain certain ingredients (called active ingredients) that actually do the work of protecting your skin from UV damage. It’s generally accepted (and confirmed by both the American Academy of Dermatology and the Food and Drug Administration) that titanium dioxide and zinc oxide are the safest active ingredients found in sunscreen.
Para-aminobenzoic acid (PABA) and tolamine salicylate are two ingredients that have been deemed unsafe by the FDA. These ingredients are not found in sunscreens legally sold in the US, but you may find them in sunscreens sold elsewhere (especially in developing countries).
Other active ingredients you will commonly find in sunscreens include:
ensulizole
octisalate
homosalate
octocrylene
octinoxate
oxybenzone
avobenzone
and less commonly:
cinoxate
dioxybenzone
meradimate
padimate O
sulisobenzone
It’s important to note that the FDA has not deemed these ingredients safe (nor have they deemed them unsafe!) and FDA has called upon further safety studies to investigate them before providing further public health endorsements (or warnings) about them. The reason for this indecision: some research does exist that poses questions about some of these chemicals…
Even the New Zealand sun managed to burn me to a crisp even when using sun protection. Don’t take the power of the sun’s UV light for granted!
The Takeaway
Sun protection matters. If you tan or don’t, sun exposure can cause cancer and protecting your skin is worthwhile for preventing premature aging, disease and discomfort. Even if you decide to keep going without sunscreen, at least consider some of the layering sun protection options which don’t add anything to pack weight. Sun protection takes very little time out of a day and has lifelong benefits.
Related Content:
To read about how the Backpacking Light community deals with sun protection, read this forum thread.
Are your hands constantly burning? Check out this forum thread on sun gloves.
Jimmy Carter created the Arctic National Wildlife Refuge (ANWR) in 1980, and it’s been a contentious subject ever since. A bonanza of biodiversity, the ANWR also potentially sits atop one of America’s last untapped oil reserves. In this episode, Andrew talks to Adam Federman, a journalist covering the recent push by the Trump administration to lease oil and gas rights in the refuge. Adam is a reporting fellow with Type Investigations, where he’s spent the last few years covering energy, public land, and the Trump administration’s environmental policies.
Jimmy Carter created the Arctic National Wildlife Refuge (ANWR) in 1980, and it’s been a contentious subject ever since. A bonanza of biodiversity, the ANWR also potentially sits atop one of America’s last untapped oil reserves. In this episode, Andrew talks to Adam Federman, a journalist covering the recent push by the Trump administration to lease oil and gas rights in the refuge. Adam is a reporting fellow with Type Investigations, where he’s spent the last few years covering energy, public land, and the Trump administration’s environmental policies.
**NOTE** At the end of the podcast Adam mentions that the public comment period is still open. That was a misstatement – Adam followed up later via email. He says, “There’s a 30 day window between the release of the final EIS and the Record of Decision. During that time DOI can make additional changes to the document.” As of publication, we are currently in that 30 day window. If you care about this issue, talk to your Congress people!
Sponsors: Help us Keep the Podcast ADVERTISING-FREE!
This episode of the Backpacking Light Podcast is supported and kept advertising-free by Backpacking Light membership fees. Please considerbecoming a member which helps support projects like this podcast, in addition to a whole slew of other benefits!
In addition, some of the links on this page may be affiliate links that refer to our partner merchant retailers. If you follow a link and then make a purchase, we receive a small commission which goes a long way towards helping us pay for podcast production, hosting, and bandwidth fees! Thanks for supporting us in this way!
Contact
You can contact us at podcast@backpackinglight.com, or follow us on social media –
We do not accept money or in-kind compensation for guaranteed media coverage: Backpacking Light does not accept compensation or donated product in exchange for guaranteed media placement or product review coverage.
Affiliate links: Some (but not all) of the links in this review may be “affiliate” links, which means if you click on a link to one of our affiliate partners (usually a retailer site), and subsequently make a purchase with that retailer, we receive a small commission. This helps us fund our editorial projects, podcasts, instructional webinars, and more, and we appreciate it a lot! Thank you for supporting Backpacking Light!
As backpackers, we spend a lot of time thinking about and managing our feet. One problem that crops up a lot (especially for those of us who choose to utilize ultralight footwear, hike in damp or snowy environments, or both) is wet feet. Feet that get wet and stay wet can cause all kinds of nasty issues – starting with maceration (wrinkly, pale, soft skin) and progressing through to immersion foot diseases like trench foot, tropical immersion foot, and warm water immersion foot.
In this SKILLS SHORT, Ryan and Andrew break down the causes, symptoms, and results of immersion foot diseases. After a fairly exhaustive and somewhat nasty primer (you’ll hear the phrase “sloughing skin” more than once) the guys discuss strategies to prevent and manage immersion foot diseases and their symptoms. The pod wraps up with a discussion on when you should get off the trail (blackened skin = big trouble), and Ryan shares some of his favorite resources and further reading on foot care.
Outline
Definition of immersion foot diseases
What is maceration?
Trench foot
Tropical immersion foot
Warm water immersion foot
What symptoms do the three diseases share in common?
Extreme maceration
Dermal layer separation
Redness
Tenderness
Swelling
Blisters
Sloughing skin
Open sores
What is the difference between the three?
Pathology
TF – cold induced vasoconstriction
TIF / WWIF maceration-induced separation of dermal layers
Variations in speed of disease progress?
How can these diseases be prevented?
Maceration vs immersion foot disease – a warning sign that needs to be addressed.
How much water can the skin absorb?
Preventing and managing maceration should be the PRIMARY FOCUS. If you handle that, you won’t get immersion foot.
Discoloration and dying skin – or, just for safety sake, if you have any of the symptoms listed in “when do I need to get off the trail.”
References and Resources
Ryan’s favorite book on foot care
Fixing Your Feet (John Vonhof) – the bible of foot care for runners and hikers. The new 6th edition is expanded, and an essential upgrade.
Further Reading
Immersion Foot Syndromes (Wikipedia) – not a terrific summary, but I suppose it’s worth starting somewhere if you don’t have the patience to dig into medical writing.
A Microbiological Cause for Trench Foot (Microbiology Society) – discusses the relationship between immersion foot and microbiological activity; it’s interesting to me that we still don’t understand exactly what’s going on here – are immersion foot diseases caused by microbial activity, or does the onset of immersion foot disease simply predispose the foot to an increase in microbial activity?
Maceration (Blister Prevention) – a good discussion about what is happening at the cellular level.
Feedback, Questions, Tips?
Submit them to podcast@backpackinglight.com or Twitter and get featured on our next podcast!
Sponsors: Help us Keep the Podcast ADVERTISING-FREE!
This episode of the Backpacking Light Podcast is supported and kept advertising-free by Backpacking Light membership fees. Please considerbecoming a member which helps support projects like this podcast, in addition to a whole slew of other benefits!
In addition, some of the links on this page may be affiliate links that refer to our partner merchant retailers. If you follow a link and then make a purchase, we receive a small commission which goes a long way towards helping us pay for podcast production, hosting, and bandwidth fees! Thanks for supporting us in this way!
Contact
You can contact us at podcast@backpackinglight.com, or follow us on social media –
We do not accept money or in-kind compensation for guaranteed media coverage: Backpacking Light does not accept compensation or donated product in exchange for guaranteed media placement or product review coverage.
Affiliate links: Some (but not all) of the links in this review may be “affiliate” links, which means if you click on a link to one of our affiliate partners (usually a retailer site), and subsequently make a purchase with that retailer, we receive a small commission. This helps us fund our editorial projects, podcasts, instructional webinars, and more, and we appreciate it a lot! Thank you for supporting Backpacking Light!
Membership Required
This feature requires an active Backpacking Light Membership.
Premium Articles
You're currently viewing a free preview of a member exclusive premium article. Our premium articles include in depth journalism and insights from the Backpacking Light editorial team.
Get full article access by subscribing to a Premium or Unlimited Backpacking Light membership!
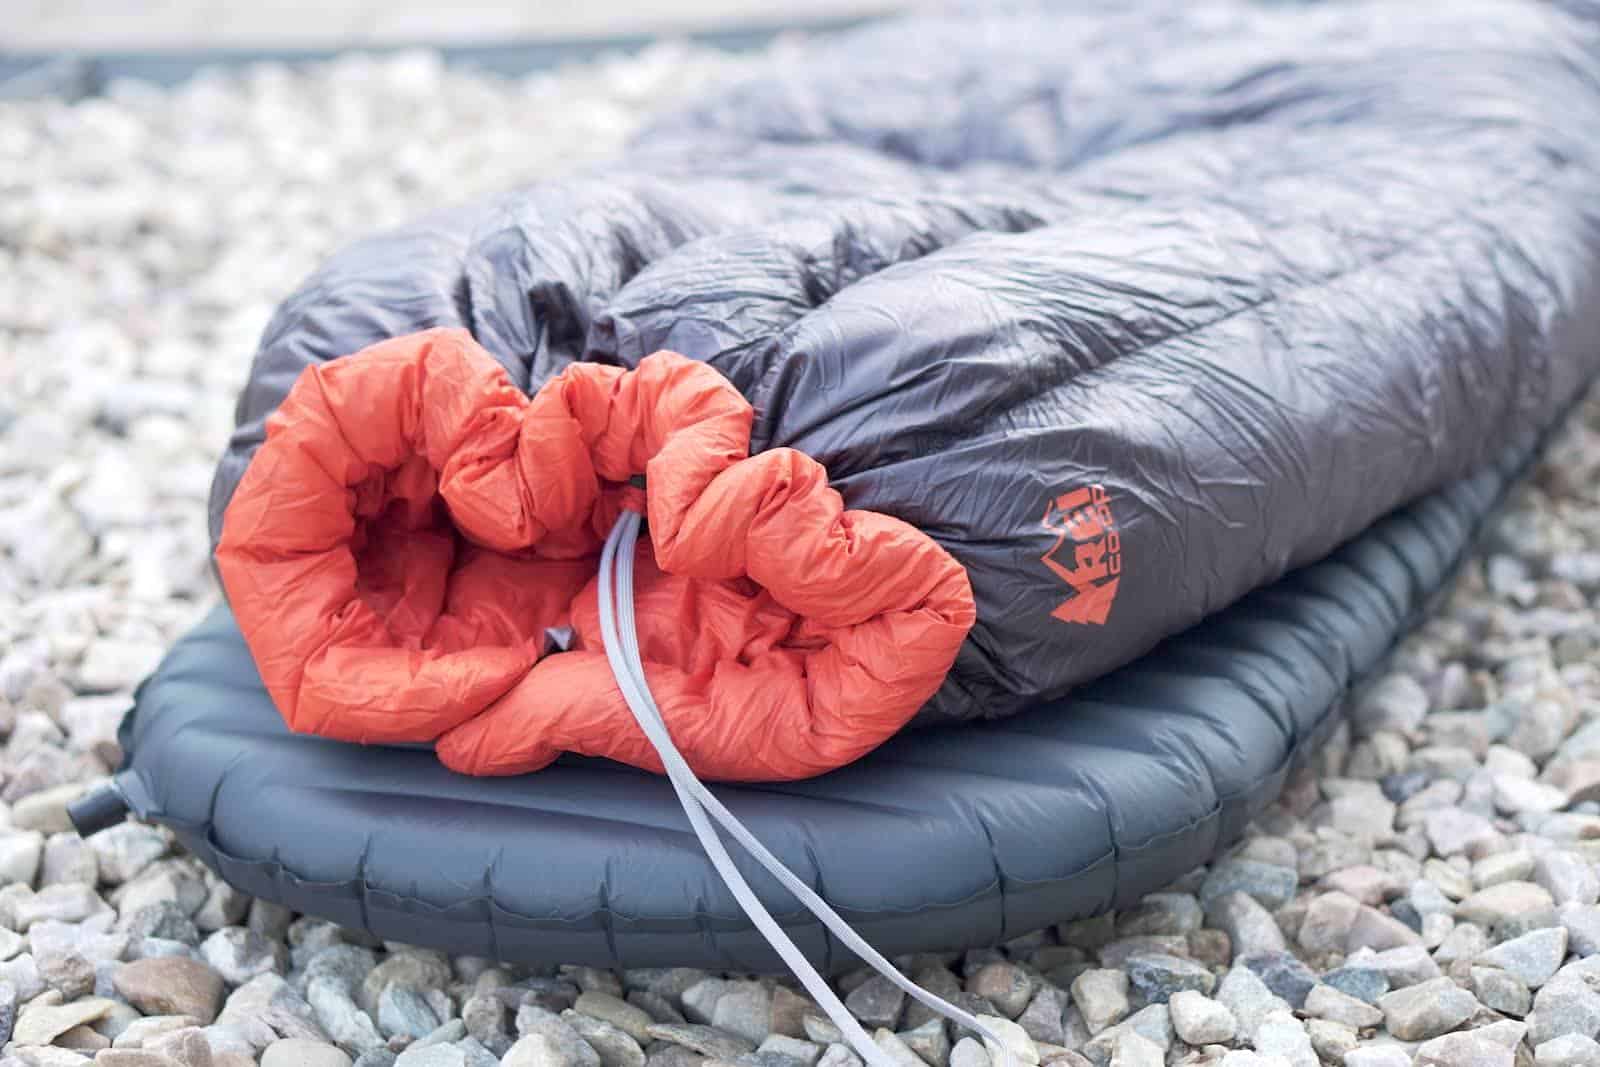
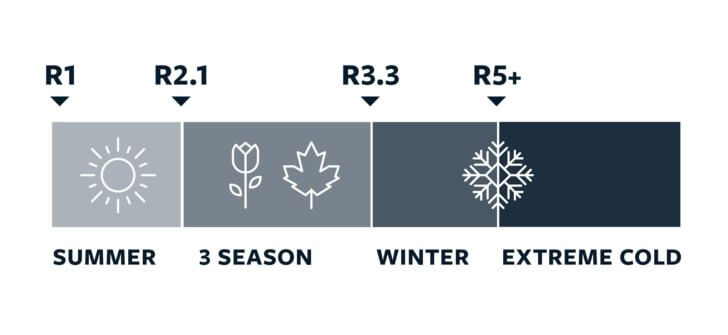
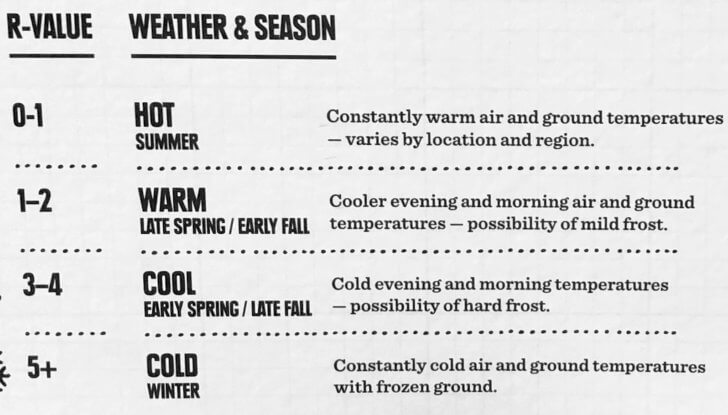


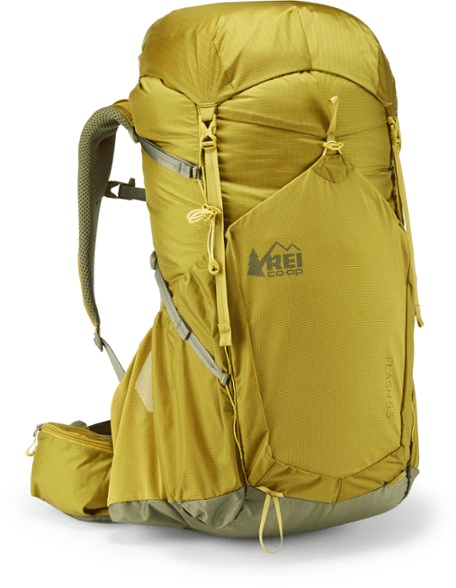


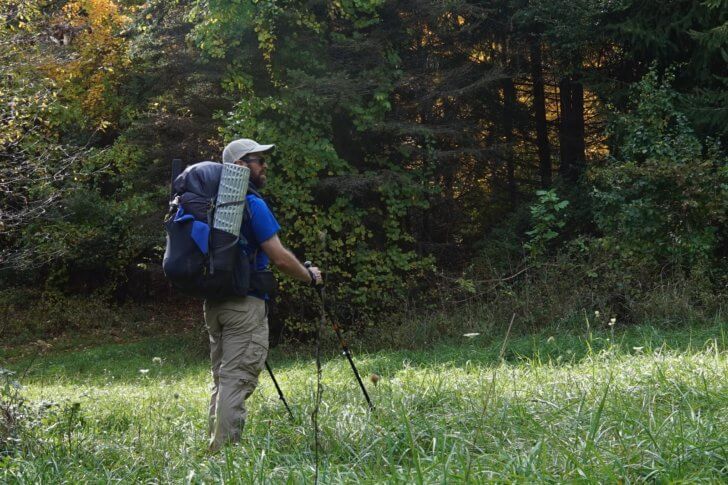

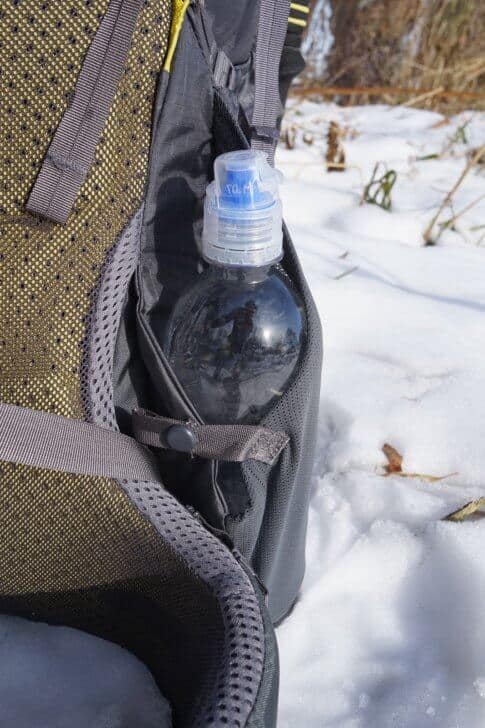
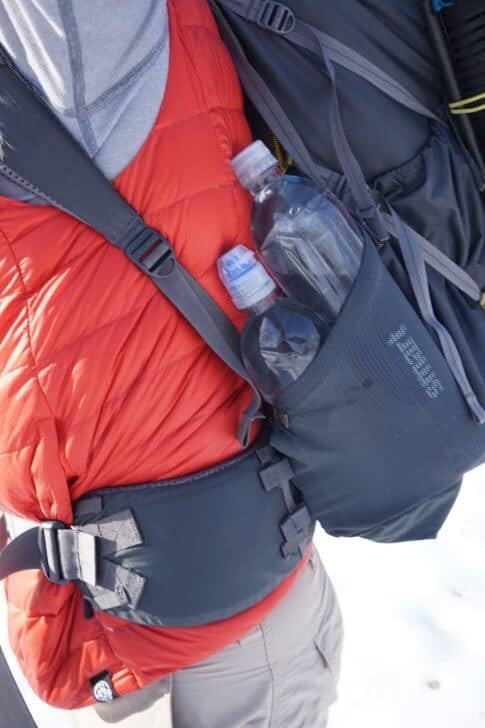
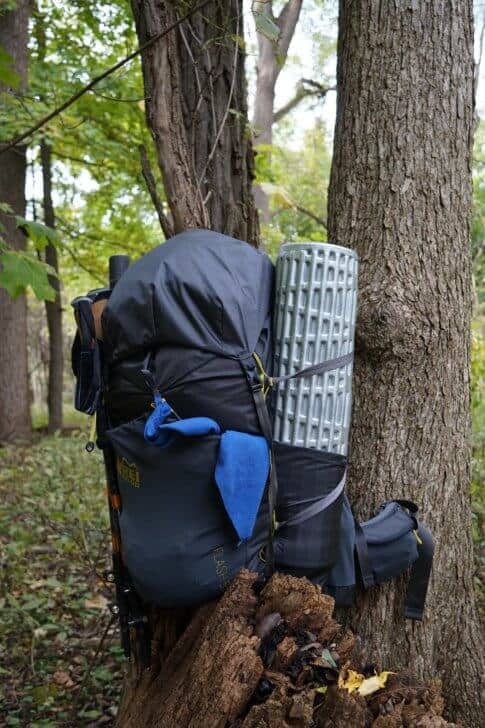

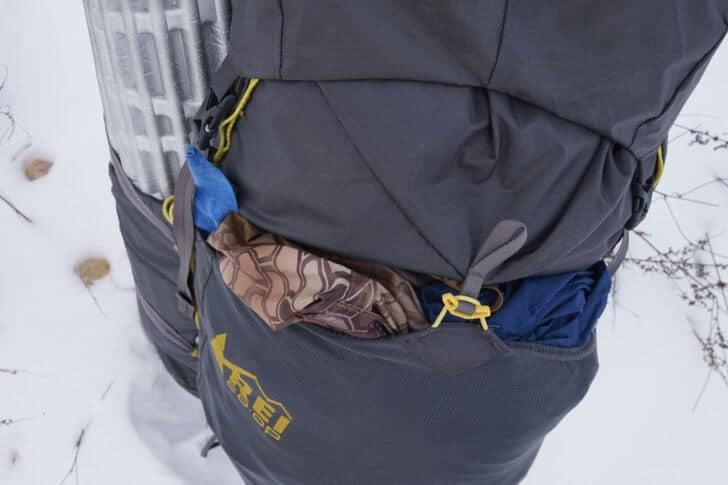
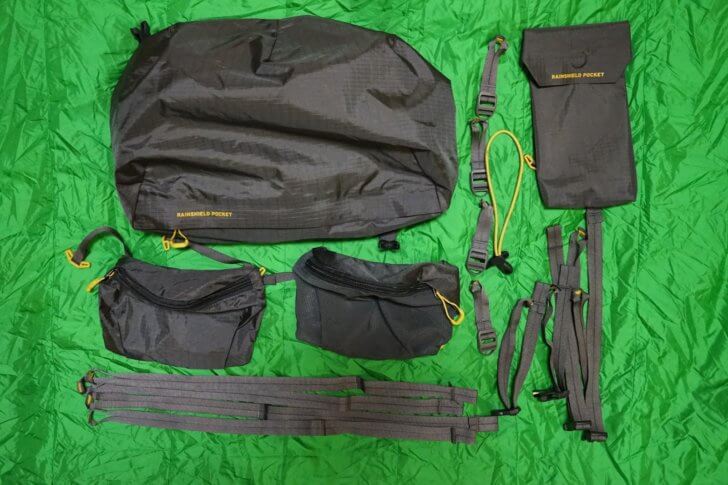 The Packmod elements.