You don’t have access to view this content.
Calendar / Updates (Unlimited Members Only)
Unlimited-members-only updates: editorial calendar, podcast, new Unlimited Members benefits, the new webinar series, and Guide’s Training course in Montana.
Unlimited-members-only updates: editorial calendar, podcast, new Unlimited Members benefits, the new webinar series, and Guide’s Training course in Montana.
You don’t have access to view this content.
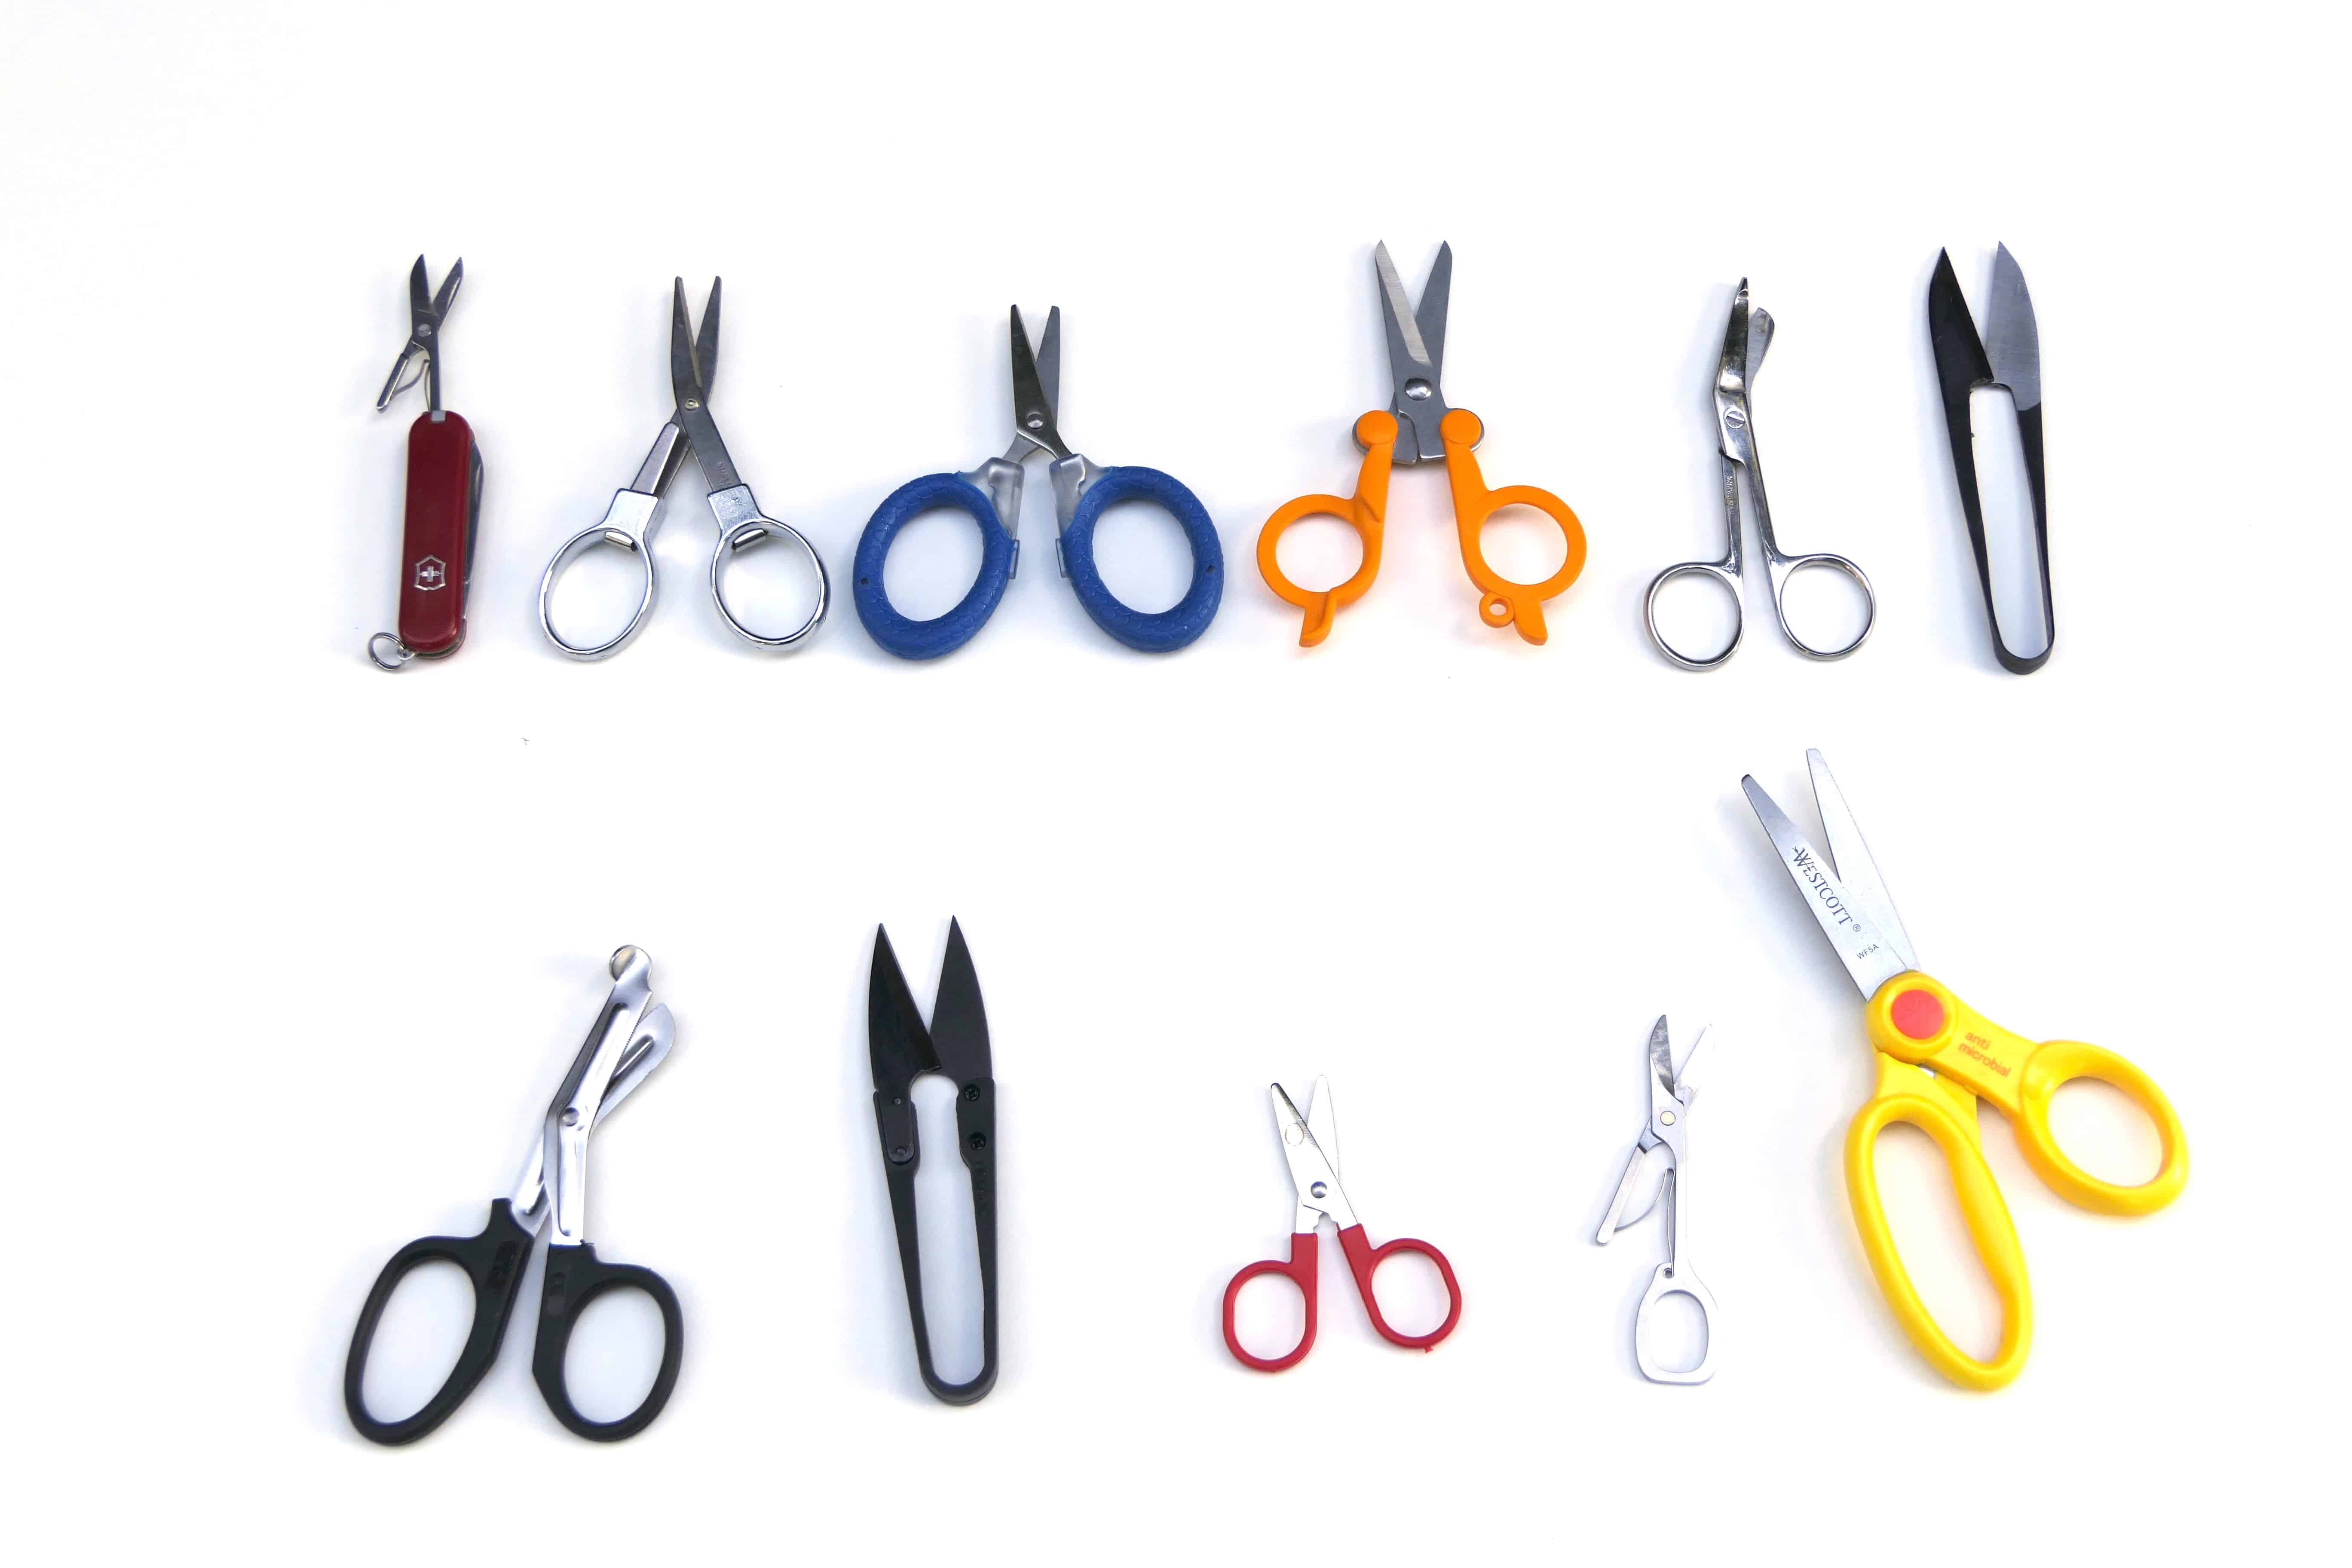
The most comprehensive review of backpacking scissors for ultralight hiking and camping: 11 models compared in 13 tests! You just may leave your knife at home.
You don’t have access to view this content.
This Enlightened Equipment Revelation Apex Quilt Review features one of the most customizable and lightest weight synthetic quilts ever made.
You don’t have access to view this content.
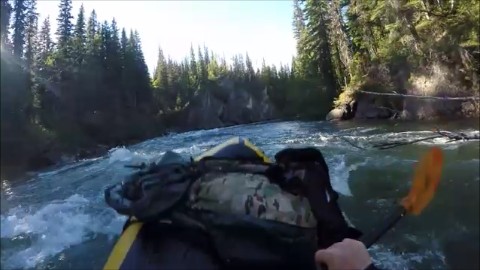
2018 Packraft Reviews and State of the Market Report providing a comprehensive overview of solo river packrafts.
You don’t have access to view this content.
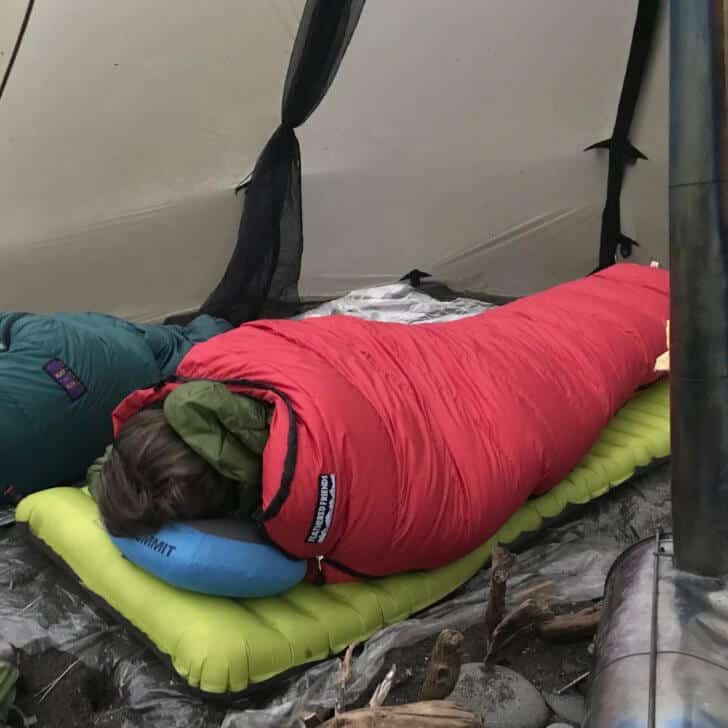
This Good To-Go Herbed Mushroom Risotto review features one of the best packaged backpacking meals I’ve ever eaten.
This Good To-Go Herbed Mushroom Risotto review features one of the best packaged backpacking meals I’ve ever eaten.
I recently spent a few winter nights in Moraine Park (Rocky Mountain National Park, Colorado) in my camper, and experimented with this Good To-Go meal. (Aside: My camper was winterized and had limited supplies in it. Seems the lighter went missing, so I had to rely on what I had in my backpacking gear (sparker) to light the camper stove. I needed three hands, because the gas valve needs to be depressed in order for the stove to light!)
I’m not a serious DIY connoisseur of backpacking foods. I own and use a terrific dehydrator, but it’s not a passionate hobby or anything. (That said, I would get pretty excited about owning a lyophilizer!) I used to be an ultralight backpacking foodie-type, but I’ve decided to give up that lifestyle for one that is simpler, easier, and faster.
However, I do care about food quality, so backpacking nutrition is something that I study a lot and it intrigues me. I’m not known to write too many packaged backpacking meal reviews. However, I recently tried Good To-Go Herbed Mushroom Risotto, which is a packaged backpacking meal worth writing a food review about.

Interestingly: I can pronounce all of these ingredients.
 In the video, I reported the nutrition facts on a per-serving basis. There are two “servings” in one 6.6-oz package. I never found “serving sizes” very useful, so I’ll report nutrition facts as per package here:
In the video, I add a 4-oz filet of smoked sockeye salmon. This added an additional 180 Cal, 8 g of fat (2 g saturated), 75 mg of cholesterol, 1210 mg of sodium (!), and 26 g of protein.
Twenty minutes is too long for me, especially on a cold winter night. By the time 20 minutes goes by, even in the Reflectix {link} insulating cozy that I made for my packaged meals, my food is no longer hot. I like hot food.
This isn’t necessary a recommendation for improvement, because high quality dehydrated ingredients require longer reconstitution times. But it does change the way I choose to cook.
Instead of boiling water and adding it to the bag, I prefer to add the package contents to my cook pot and simmer the meal. For the Good To-Go Herbed Mushroom Risotto, the meal was ready to eat after about 12 minutes of simmering on very low heat at an elevation of 8,000 feet.
This product was purchased by the author and has no affiliation with Good To-Go. This review may contain affiliate links to a retailer that carries this product. If you follow one of those links and end up making a purchase, we make a small commission on the sale, which helps us maintain the site for our community – and we appreciate that a lot!
The Backpacking Light Staff Picks Gear Guide offers what we consider to be our personal recommendations for high-quality, high-performance, lightweight backpacking gear that we’ve actually used this year.
The Backpacking Light Staff Picks Gear Guide offers what we consider to be our personal recommendations for high-quality, high-performance, lightweight backpacking gear that we’ve actually used this year. When I invite our staff to participate in this exercise, I simply ask for “recommendations for three pieces of gear that you have used, and loved over the past year of outdoor activity.”

Participating this year:
Join us below in the forums, we’d like to hear about your top three picks for this year as well!
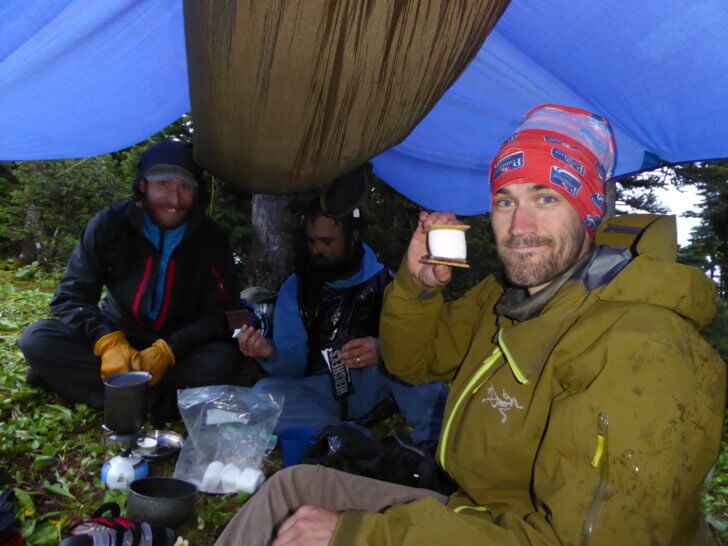
18oz After lots of gear churn I have accepted that the lightest possible tarp is not necessarily the best one for me. I’ve been enjoying a bright orange silnylon Duomid since last spring. It stays in my pack most nights because I prefer the simplicity of sleeping in a bivy, but this tarp provides 360° coverage from the wind and rain for myself and a guest (either my son or my dog). I have an MLD Innernet that seems like a good addition to the setup but I’ve yet to sleep in it.
– Matthew King
5.5ozUsing solid fabric liners in a few of Seek Outside’s larger tents this past winter made me wonder why they’re not standard equipment in all mids. Condensation is one of the most frequent complaints with pyramids, and a problem which is to a large degree inherent to the design itself. Turning at least half of your mid into a true double wall tent manages this issue very well, and adds little weight. The half liner pictured here, for a Seek Outside Little Bug Out, weighs 5.5 ounces in basic 1.1 ounce nylon ripstop, and has been in my mid all year.
Ripstop by the Roll carries a good selection of high quality 1.1 osy ripstop nylons at affordable prices for MYOGers.
– Dave Chenault
30ozI used this bag guiding this fall in the Montana Beartooth Range in wet, cold, and snowy conditions. It kept me warm even when temperatures dipped down into the low teens. It stuffs small and at 1 lb 14 oz it was not a burden to carry!
Ryan discusses the REI Magma 10 in more detail in the recent Holiday Gear Guide as well, noting that it’s one of the best values on the market for a very high quality and warm down bag. I agree!
– Kevin Fletcher

6.4oz There are plenty of hammocks on the market these days, but the Weight Weenie is something special. It weighs just 6.4 ounces and fits my 6’1″ just fine in the 52″ width and 11′ length. I prefer a wider hammock for overnight use, but this size is perfect for relaxing in camp and my son slept 14 nights in this hammock last summer! It has a fixed ridgeline which makes it easy to have perfect sag every time, and the camo fabric is soft, durable, and comfortable against the skin. These hamocks are handmade by Shane Waits in Tennessee, and you can choose a variety of options, suspensions, and accessories to make it exactly what you want. Besides that, the base price is only $49.95 which is amazing considering the excellent quality. I have two BIAS hammocks and they are my absolute favorites; if I had some advice it would be to get your Butt in a Sling too!
– Doug Johnson
23oz Many people feel they have truly arrived when they sleep on a NeoAir pad. Sure, I love mine too, but I’m starting to think that maybe it was just a gateway drug for the real deal- the Nemo Astro Insulated Lite. This pad blows the NeoAir away; it is 3.5 inches thick (40% thicker than a NeoAir), has a built-in pillow baffle for extra head support, it’s warm in sub-freezing conditions, and the 25″ x 76″ size means you can spread out and roll around without ever hitting the ground. Sure, 1 lb 7 oz is not ultralight, but it’s only 7 ounces more than a long/wide NeoAir and it is WAY more comfortable. These days I want a good night’s sleep, even when sleeping under a tarp, and the Nemo pad gives some luxury that helps me sleep well all night and wake up refreshed. The Nemo Astro is in my pack more often than not lately and I’d have a hard time going back.
– Doug Johnson
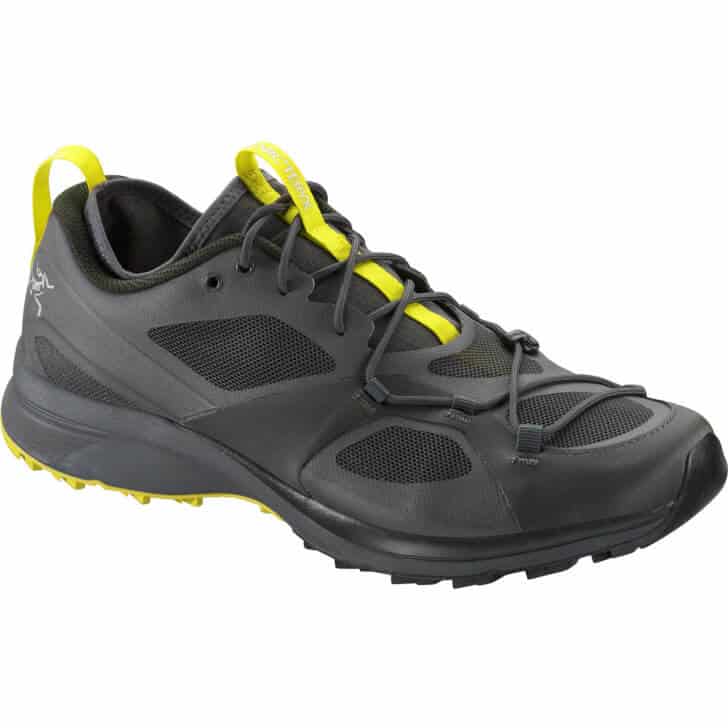
11.0oz A lightweight shoe with exceptional performance in technical terrain, this has been a dream come true for me. I use it on hiking and mountain running day trips and with light overnight packs (< 40 lb).
Unique features: on-the-fly lacing system to change fit quickly to suit terrain, Vibram soles, technical (low-volume) fit, 9mm drop, narrow last.
– Max Neale

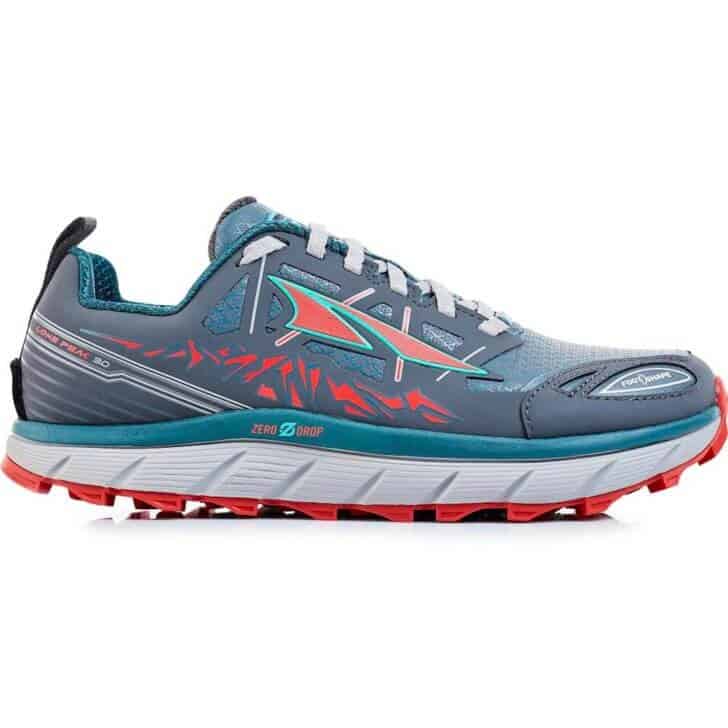
10.4oz This shoe ticks a lot of boxes for the lightweight backpacker. It’s light weight but not too minimalist, provides enough cushioning from terrain, has a simple but effective gaiter interface, has good drainage, and the tread gives decent traction. But, it’s the fit that sets it apart from its competitors for me with its snug heel pocket and very roomy toe box. – Mike Martin
I’ve been hiking in Version 1.0 Altra Lone Peaks since I completed my first 50-mile trek across the Beartooths when I was 12. The new 3.5s are the best rendition of the shoes that I have ever owned, solving both structural problems (sloppy fit) and durability issues (toecap and upper fabric). These are my shoes of choice for just about everything, including the trails, tundra, talus, and granite slabs of the places I hike the most: the Rockies of CO, WY, and MT, and the High Sierra. – Chase Jordan
10.0oz I’ve worn Altra shoes for several years. This upgrade from the (non-Neoshell) Superior 3.0 gives me a significant cushioning boost for backpacking, and warmer feet for winter hiking. We hike almost every day during the winter, and my feet have remained warm and dry in Wyoming’s snowy conditions. The toe box remains comfortable even as I add thicker wool socks for more winter warmth.
I’m loving how my Dirty Girl Gaiters attach perfectly to the front eye hook and velcro on the back heels of the Lone Peaks. My Kahtoola Micro spikes easily slip on and off and I finally feel like I have the optimal winter footwear system. Not having to worry about cold, wet feet while winter hiking and snowshoeing keeps me doing what I love throughout the winter season, which is to walk outside in the mountains.
– Stephanie Jordan

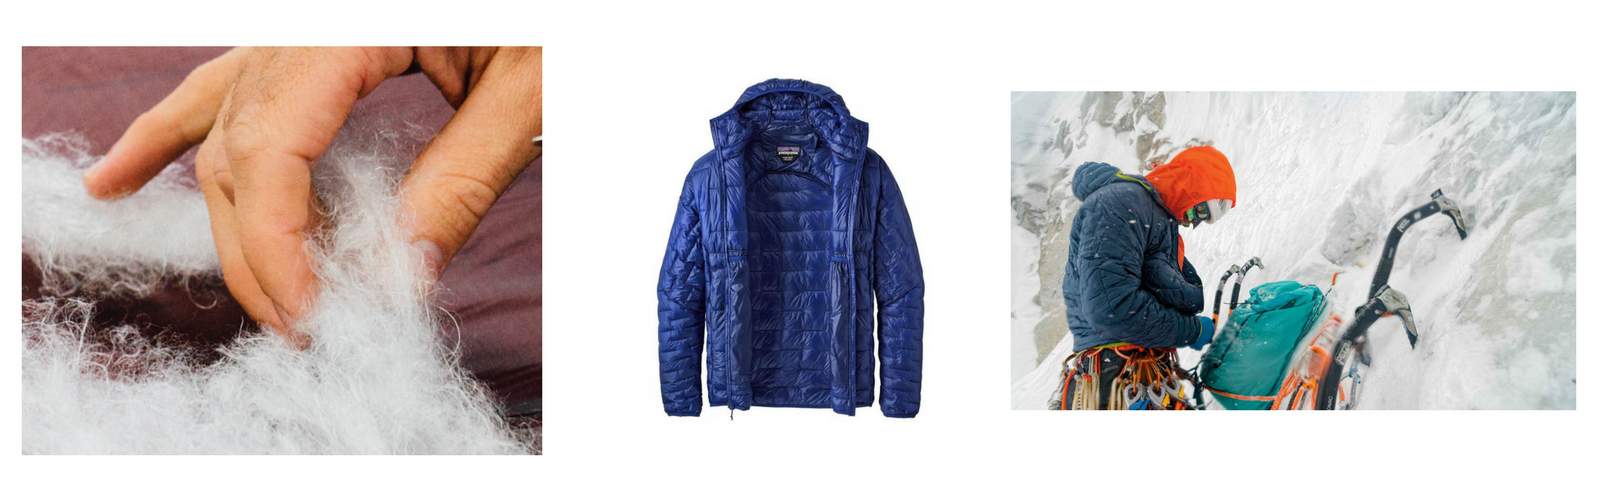
9.3ozI’ve worn the Patagonia Micro Puff Hoody almost every day since the beginning of September. It’s cozy enough for a three-season insulating layer while being light enough to wear on the move while day hiking in the extremely cold temperatures of my Wyoming winter.
I’m a fan of its fit, durability, giant handwarmer and inside stash pockets, hood, hem length, and of course at just a shade over 9 oz, its weight. While there are lighter synthetic garments available, they probably can’t match the performance and features of the Patagonia Micro Puff Hoody at this weight. (I discussed it in more depth in my recent Holiday Gear Guide.)
– Ryan Jordan

10.9ozThe Patagonia Nano Air Light Hoody doesn’t pencil out well, and before I wore it on a rainy September trip I wouldn’t have believed how versatile and functional it is. This hoody is 50% midlayer, 30% soft shell, and 20% windshirt, and outperforms all three of those things shockingly often. Most significantly, as a midlayer under a rain jacket it outperforms fleece in every respect in multiday rain storms, something I would not have thought possible.
Learn more about the Patagonia Nano Air Light Hoody in Ryan Jordan’s review.
– Dave Chenault
10.0oz I used this for mountaineering, ski mountaineering, and hiking expeditions this year. Few other synthetic insulated jackets can match its warmth-to-weight ratio.
The Nunatak Skaha Apex can be customized with respect to fabrics, insulation weights, and features. Weights for the lightest and simplest versions start at about 10 oz for a typical “M/L” size and go up from there.
– Max Neale

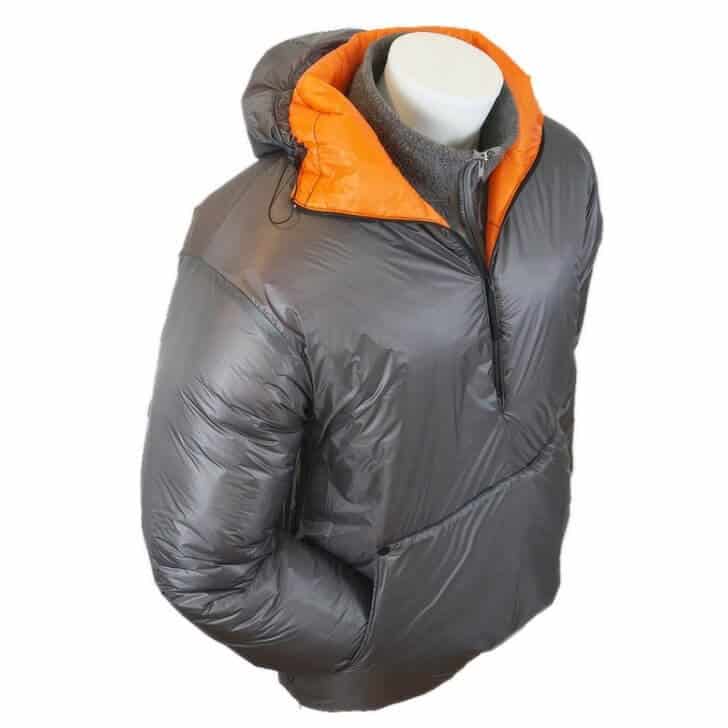
6.2oz Despite advances in “water resistant” goose down, and various synthetic insulations, I’m still pretty old-school when when it comes to insulation. Yes, you have to keep it dry, but I still like the loft, warmth per weight, drape, and durability of high fill-power down. The EX Light Down Anorak has exactly the feature set I want for 3-season hiking: nothing extraneous, integrated hood, quality down, lightweight notions, and the pièce de résistance: a handwarmer tunnel pocket that is worth the entire weight of the garment by itself.
– Mike Martin

10.3ozI love this soft shell fabric – it protects me from wind and cooler temperatures (our family just returned from winter hiking in Rocky Mountain National Park where we experienced wind gusts up to 60 mph in exposed alpine terrain and I remained comfortable and warm!). A wide waist band and stretchy fabric makes them among the more comfortable outdoor pants I’ve worn, when I’m climbing over deadfall, scrambling in rock, or just stair-climbing up steep trails. The seat is protected by the more water repellent fabric, which means I can sit briefly on snow to adjust my snowshoes or trail crampons and not get a wet behind. More breathable side, back, and mid panels maintain comfort when exertion levels are high.
I was apprehensive to buy these because of the price, but they have found a regular home in my fringe- and winter-season outdoor kit. Why? Fit, quality, and performance / versatility of the hybrid construction in a wide range of conditions.
– Stephanie Jordan
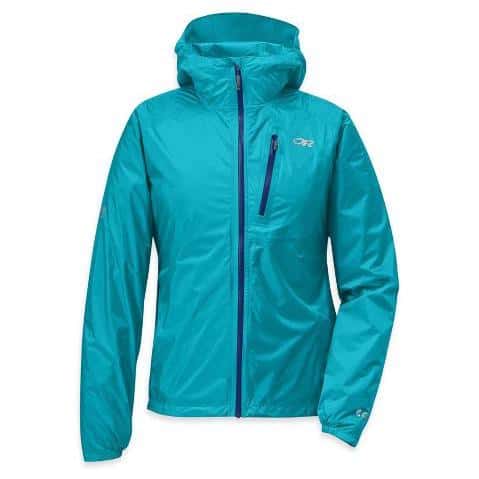
5.5oz I picked the Outdoor Research Womens Helium II Jacket up to replace an old Pertex jacket which was delaminating. I had decided against getting a jacket using older versions of Pertex Shield – I was tired of “wetting out.”
The Pertex Shield+ is a marked improvement to the original Pertex fabric. The Outdoor Research Womens Helium II is a minimalist design which is compact to pack, lightweight and relatively stylish. Aside from how small it packs up, my favourite feature is the stiffened hood brim, which keeps the rain out of the neck of the jacket.
– Emylene VanderVelden

1.9oz I’ve used the ZPacks Ventum Wind Shell Jacket backpacking in the desert Southwest and the Montana Beartooths, and backcountry skiing in Utah’s Wasatch. I know there are lots of sub-5 oz wind shirts on the market, but at 1.9 oz for the Ventum, it just seems like a no-brainer to bring along.
– Kevin Fletcher
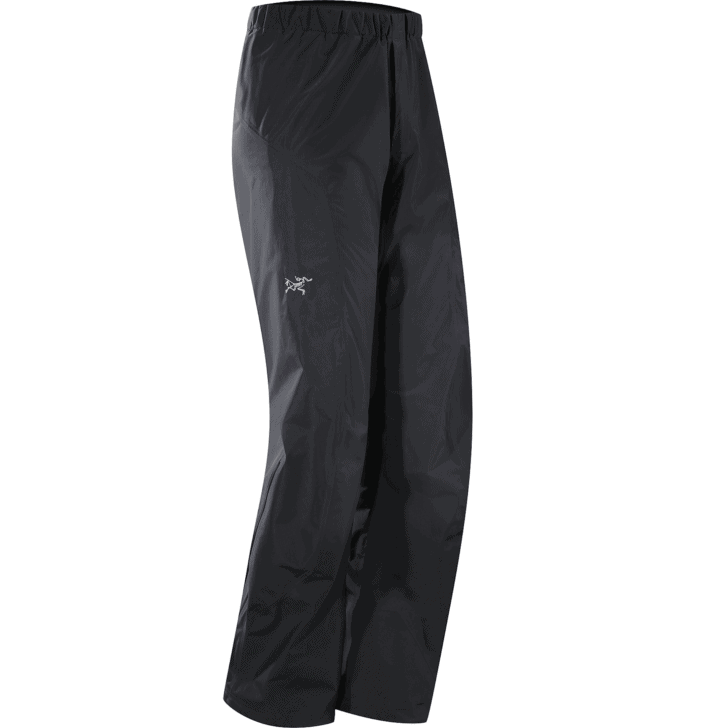
9.2oz Most lightweight rain pants get shredded by brush or have fragile coatings or membranes that aren’t durably waterproof. I used these for eight weeks of off-trail backpacking and mountaineering trips. They are both waterproof and durable!
– Max Neale

3.6ozThe Patagonia Houdini Wind Jacket is my favorite piece of clothing for spring, summer, and fall hiking and backpacking; it is also my most used piece of “auxiliary” clothing (i.e., clothing that is added to my trekking clothes for stormy or cold conditions).
The Houdini is lightweight and breathable and provides uncompromised comfort when battered by the incessant gales that rip through the high alpine here in Wyoming. There are a lot of wind shirts on the market, but the Houdini has proven its construction quality and durability over the course of hundreds of days’ worth of expeditions that involved rock scrambling and bushwhacking. My Houdini has no holes, and no unraveling stitches – not bad for a garment that has been used hard for several years.
– Chase Jordan

4.2oz I have been using Outdoor Research Womens Verglas Gaiters for over a decade. Usually, I favour a full leg gaiter, but this past spring I switched to the Outdoor Research Womens Wrapid Gaitor.
They are smaller, lighter, and cooler relative to the Verglas. The Wrapids have stood up well against mud and snow during the shoulder season. The Outdoor Research Wrapid Gaitor packed smaller than full leg gaiters when I didn’t need them and are a breeze to take on and off thanks to the convenient velcro closure.
– Emylene VanderVelden

0.7-2.9ozI’ve worn Buffs off and on for many years, but now I take one on every trip. I can’t say this about any other piece of equipment I own – the Buff is that versatile and valuable. During the winter my Buff is a facemask and neck gaiter under my fleece hat for cold temps and brisk winds. During the summer, it provides sun protection for my neck and face and I use it packrafting, fly fishing, glacier mountaineering – i.e., my snow-and-water-sports.
Buff weights vary a bit, depending on fabrics and model. My UV Half Buff ($14.95 from Backcountry.com) weighs less than 0.7 oz and makes a great bandana or headband for summer use.
– Ryan Jordan
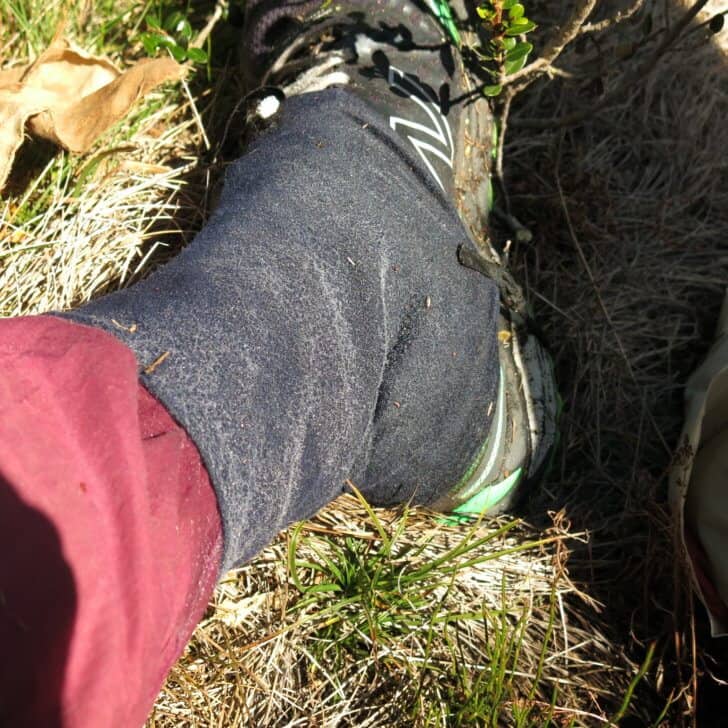
2.5oz My gaiters were made using a fairly heavy-weight Lycra (stretch nylon) fabric. The heavier weights are more durable. A benefit to Lycra is that it’s very breathable. The photo shows an early morning in an alpine region, wearing the gaiters over wet socks, with condensation droplets appearing on the outside of the gaiter fabric.
– Roger Caffin

3.2ozI hate wearing hoods on my raincoats. This waterproof-breathable hat solves that problem. In lighter rain I wear the hat and get better ventilation and better visibility. If it really starts to pour I put the Sombrero on top of my hood. That really seals things up to keep me dry. As a side benefit the Sombrero is great if you have a decent raincoat with a poorly fitting hood (a fairly common problem).
– Luke Schmidt
25oz I have used both versions of the Superior Wilderness Designs 35L packs – with and without the suspension. I love both of them – they are simple, lightweight designs that carry weight well. I am now experimenting with them for backcountry skiing, which places special demands on a pack’s ability to stabilize a load with a user’s center of gravity moving around so much. It’s early in the ski season, but so far, so good!
– Kevin Fletcher

19ozSadly discontinued, this trail running pack from Osprey is the closest thing I’ve seen to a genuinely functional and ultralight daypack. With plenty of pockets, all easily accessible on the go, and intelligently light materials throughout (a double bottom, for instance), it is hard to find fat to trim, and harder still to find something it doesn’t do well. Day hiking, mountain biking, and skiing are all things it does equally well.
– Dave Chenault

20ozThis backpack has become my primary option for day hiking and 24-hour excursions during the summer and pre-snow shoulder seasons. I can fit my essentials in the pack and not have to feel like I am sacrificing safety or comfort while on the trail. Angled side pockets allow easy access to snacks, water, and more while on the move.
As Dave noted above, the Rev line has been discontinued by Osprey. #SAD!
– Chase Jordan

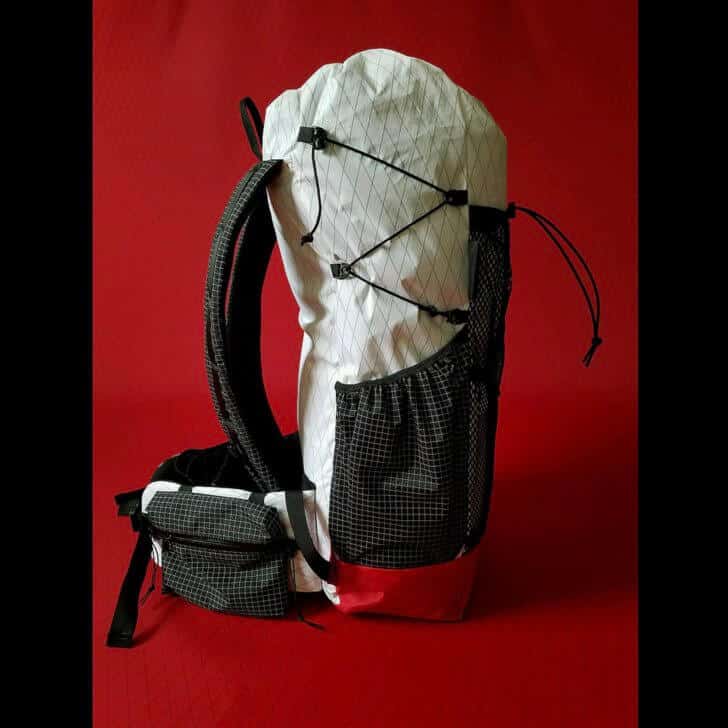
3.5lb This is hands down the best pack I’ve used for packrafting. The shape of the pack allows me to carry a lot of the weight and bulk of a big load low down. This is very nice when I have to bushwhack and duck under trees. When I’m looking at carrying two weeks of food, packrafting gear, and mountaineering gear this is the pack I grab. Seek Outside now makes smaller and lighter versions of the same pack like the Gila and the Divide.
– Luke Schmidt

0.9oz Over the years, I’ve cultivated an embarrassingly large collection of stoves of different types. They all now sit in storage bins. The light weight and simplicity of the BRS 3000t Stove, coupled with a protocol to refill fuel canisters, and a set of techniques to use it in very cold weather has made my various solid fuel, alcohol, inverted canister, “integrated” canister, and white gas stoves obsolete. Whether for a quick summertime overnight hike, or a sub-zero winter expedition, I use this stove. (Disclaimer: Refilling canisters and sub-freezing upright stove use require special techniques. Failures can be dangerous.)
– Mike Martin
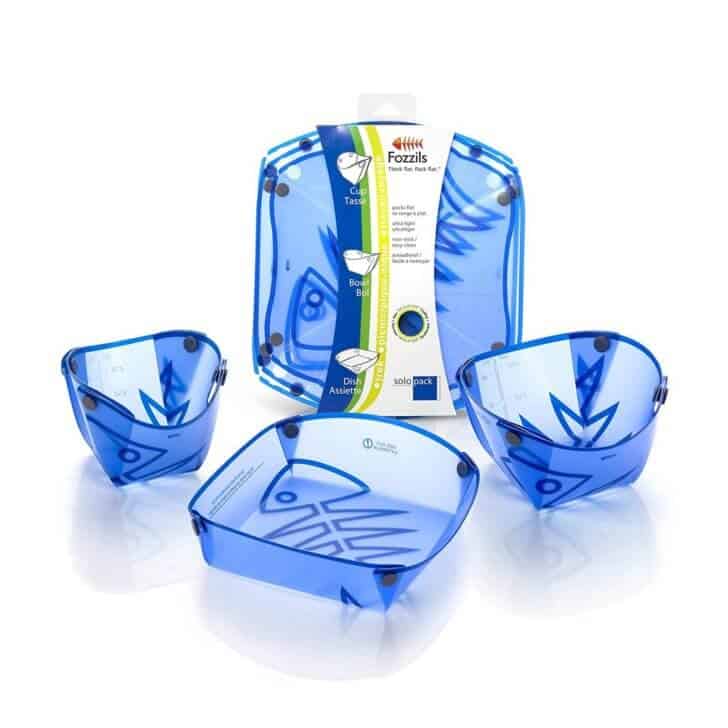
4.0ozI impulsively picked up the Fozzils Solo Pack dishware out of curiosity. The cup, plate and bowl together weigh about four ounces (113g) and pack completely flat. I have not packed much more than a cup and a spork for dishware in years, but these seemed like a neat idea.
When I tested them, they are a great idea. The Fozzils Cup and Bowl feature measuring lines, the plate features a generous lip which keeps food in it. When I was finished eating, I undid the snaps and poured some water over the dish at the grey water disposal site and every bit of food residue rinsed off with no effort. I wish the cup and bowl had built-in handles, and I’m not sure how long the snaps will stand up, those will need further testing, but so far I’m impressed.
– Emylene VanderVelden
2.8ozI’ve gone no-cook on every trip this year but I still bring a small cookset (for incidental tea and coffee) that I’ve assembled using parts from various suppliers. Zelph rolls a sweet bead onto a Toaks 550 titanium cookpot so that you don’t have to use stakes or a silicone band to suspend the pot over the Sidewinder Cone.
Mine has no handle, a Four Dog lid, a DIY Ti foil stove sized for 4 gram Esbit tablets and weighs 102 grams in the stuffsack including a lighter. This is a luxury item I don’t mind carrying.
– Matthew King
3.2oz Inverted canister operation delivers liquid fuel feed (more power / sustained burn for cold temperatures). Remote canister design allows for the use of a tight-fitting windscreen for maximum efficiency. Photo: Alpine region, very early morning, -7 C, warm milk and tea/coffee for breakfast.
– Roger Caffin

2.3ozI first reviewed the BeFree here back in July. Since then, I’ve taken it on every trip since and it’s been my primary water treatment strategy.
The BeFree filter delivers potable water faster than any device I’ve ever used, is very light, and is compatible with my favorite water bottles (HydraPak).
– Ryan Jordan
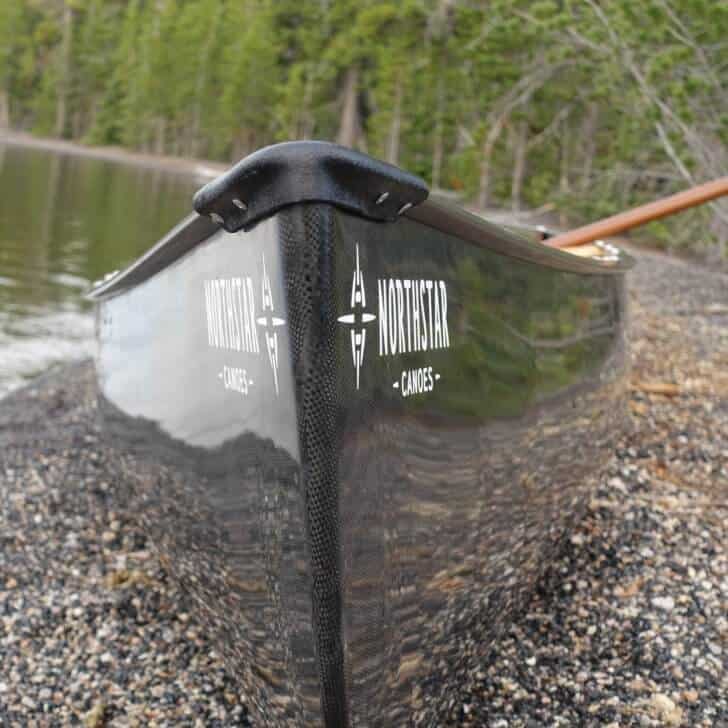
48lb This summer, my family completed an 11 day canoe/backpacking adventure in Yellowstone National Park. It was a perfect opportunity for us to try out our new Northstar Canoe, and the boat was incredible! Our Blacklite version has an exterior carbon fiber layer for stiffness and an Aramid (kevlar) inner layer for tensile strength. This makes a 48 pound canoe that swallows our family of four and gear for an extended adventure. It paddled extremely well in significant waves, was surprisingly maneuverable on the river, and it glides SO well. It is a thing of beauty and a pleasure to portage, such as when I one-trip carried it and my gear on a tough trail to Ross Lake in North Cascades National Park. These boats are handmade in Minnesota by the legendary Ted Bell himself and I cant wait to get it back to its home state when we visit the Boundary Waters this summer!
– Doug Johnson

12ozWhen I wanted to do some light mountaineering I needed crampons that would be light and pack small. These held up well to a traverse across Mt. Edziza in British Columbia. – Luke Schmidt
These are the lightest, and best, general mountaineering (snow) crampons on the market today. I verified the weight of mine at 6.1 oz apiece – which makes them nearly as light as my Kahtoola Microspikes, and far more effective for steep snow and glacier travel. – Ryan Jordan
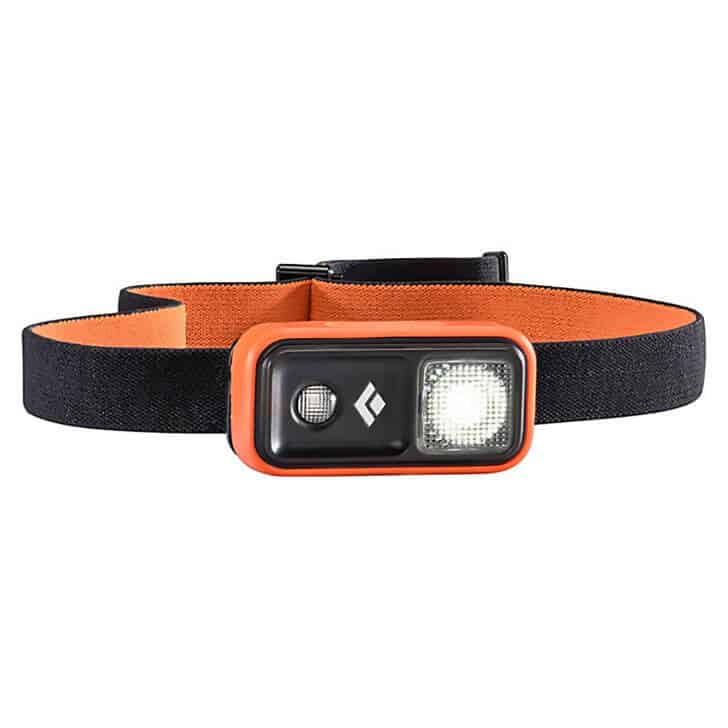
1.6oz This was an “upgrade gift” for a backpacking trip in the Idaho Sawtooths I took with Ryan this summer (it’s replacing an old Spot that Chase gave me for Mother’s Day years ago). Ryan wrote more details about the new Ion in our Holiday Gear Guide.
This new (2017) model Ion was a huge step up in comfort for me. I hardly know it’s on my head and sometimes walk around wearing it while looking for it. I love to night hike and the Ion burns for several hours even in chilly weather (use Li batteries to get the weight down to 1.6 oz and increase cold weather performance). I use it at home for a reading light when I can’t sleep – sometimes, when I know I have to face real life and responsibilities in the morning, it’s nice to pretend I’m in my tent at a remote spot!
– Stephanie Jordan
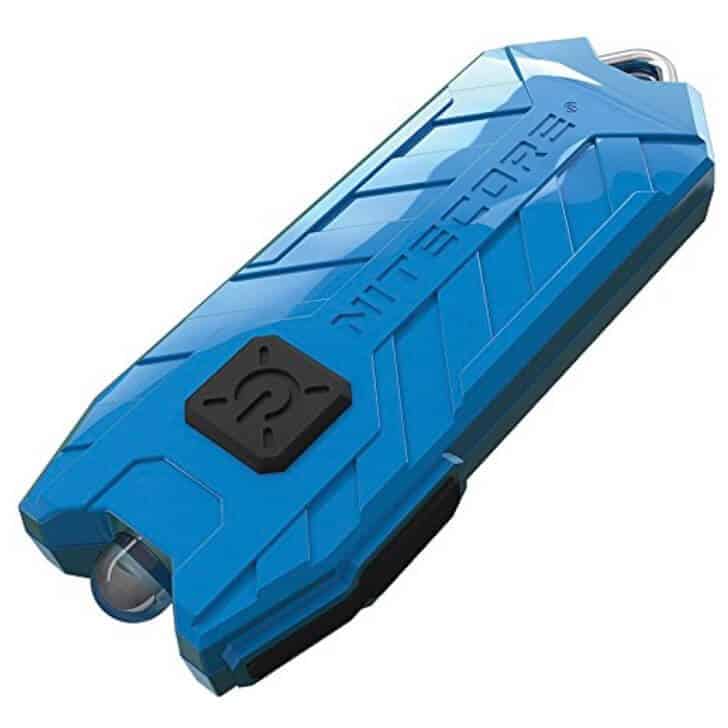
0.3ozThis $10 LED keychain flashlight is all I use on most trips. My “backup” light is a larger AAA flashlight with a reversible clip that I can put on my hat but I rarely feel the need for more light than the Nitecore Tube.
It’s rechargeable so I always head out with a full battery and I’ve got it tied to a small loop of shockcord which allows me to attach it to whatever is convenient. Mine is bright pink which makes it hard to lose.
– Matthew King

1.3ozThis watch originally came with a ridiculously heavy wrist strap that was uncomfortable and binding, so I cut it off and added a string loop to hang it around my neck. Its “digital compass”, which I tested extensively, was utterly useless and unreliable (as 2-axis compasses tend to be). So the most redeeming quality of this instrument is its altimeter – which is very useful when ascending or descending mountains with a topo map. (Note: when I got this it was just a Silva product, but they have since split the Tech4o range of watches off into a separate brand/product line – refer to Tech4o.com for more info.)
– Roger Caffin
Check out:
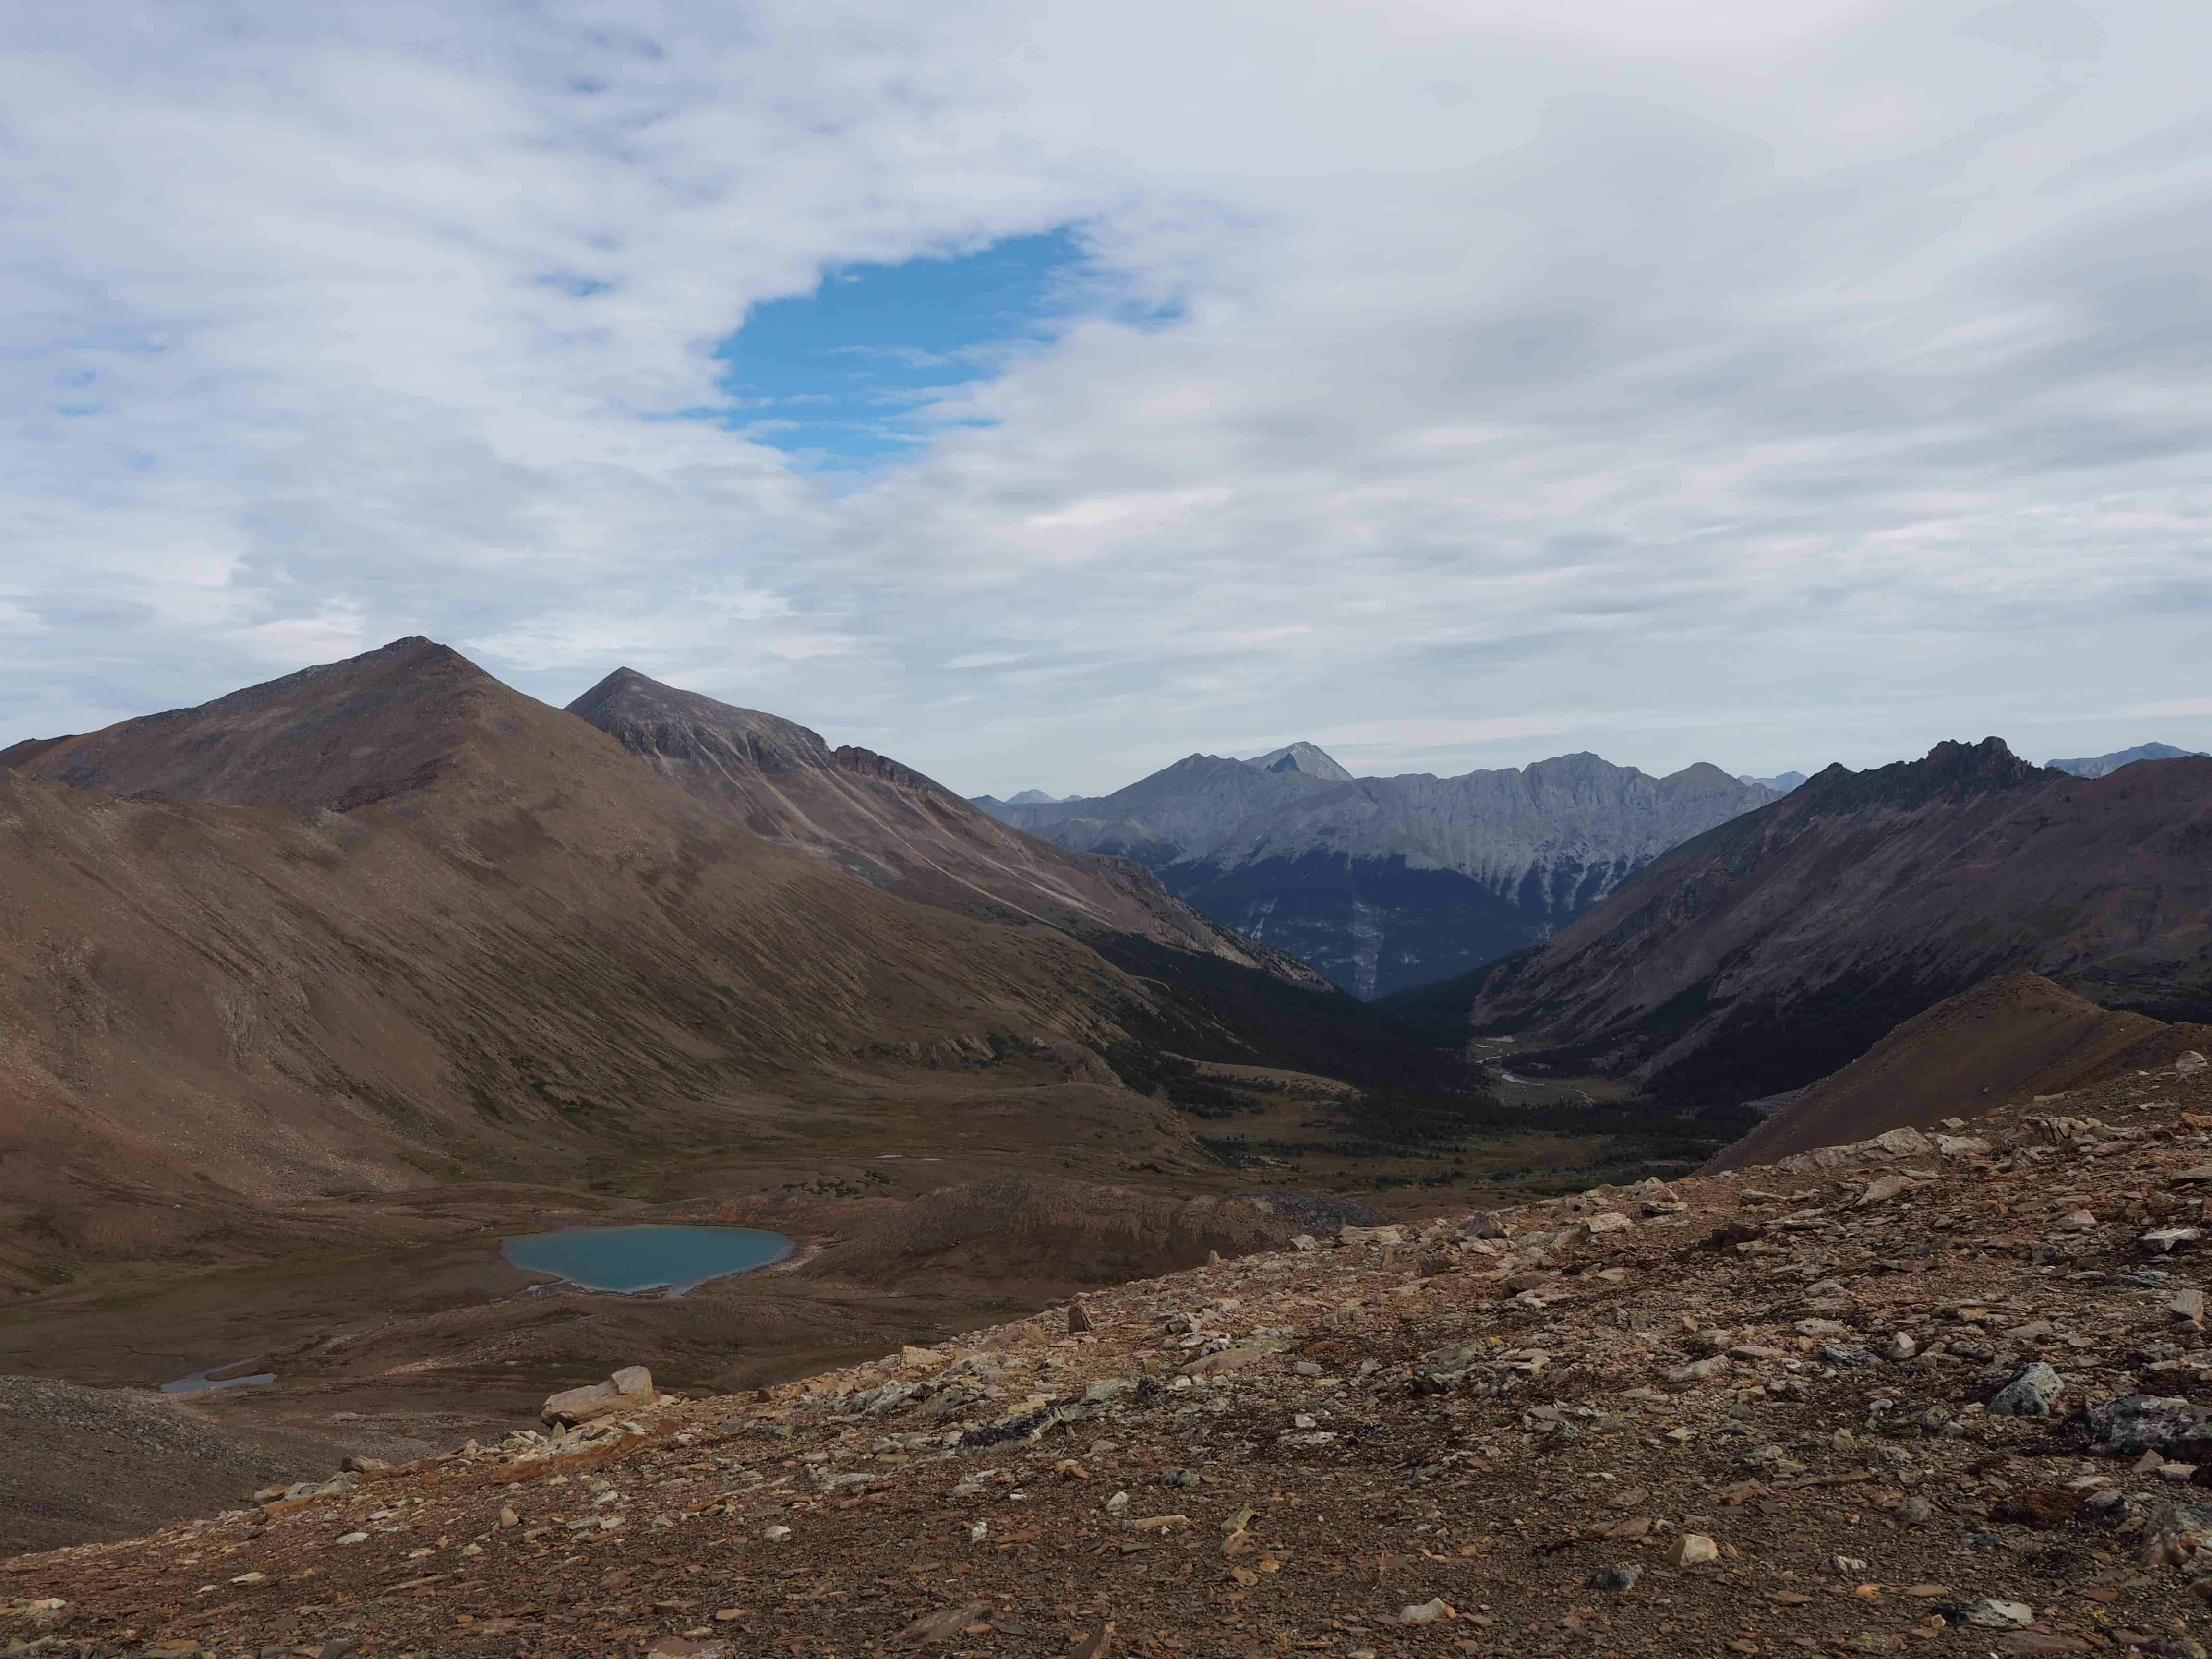
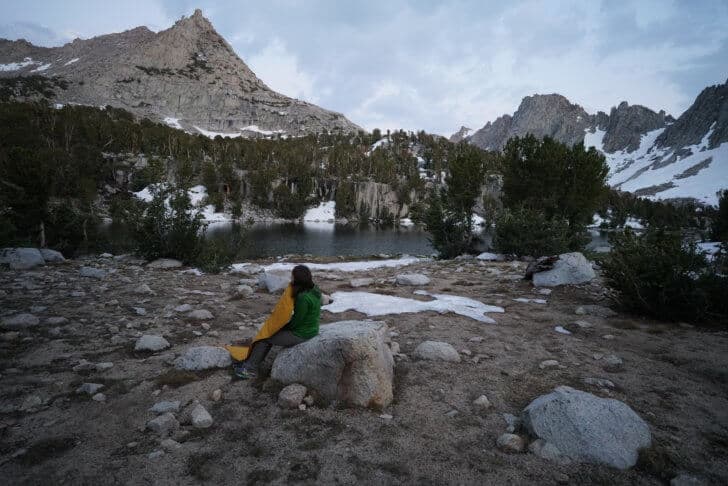
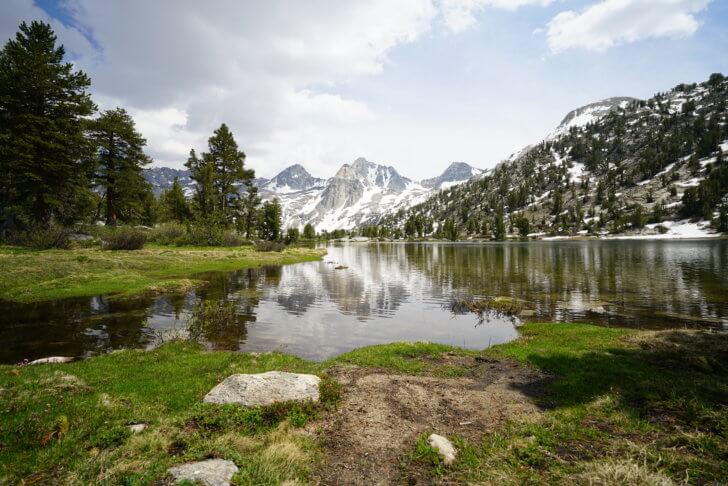
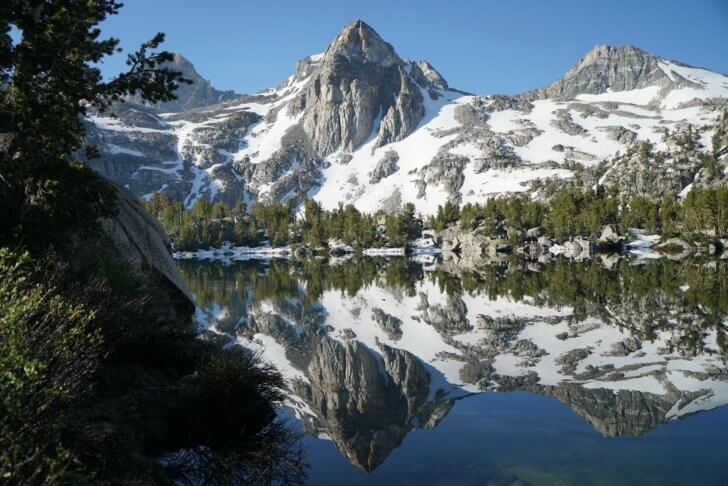
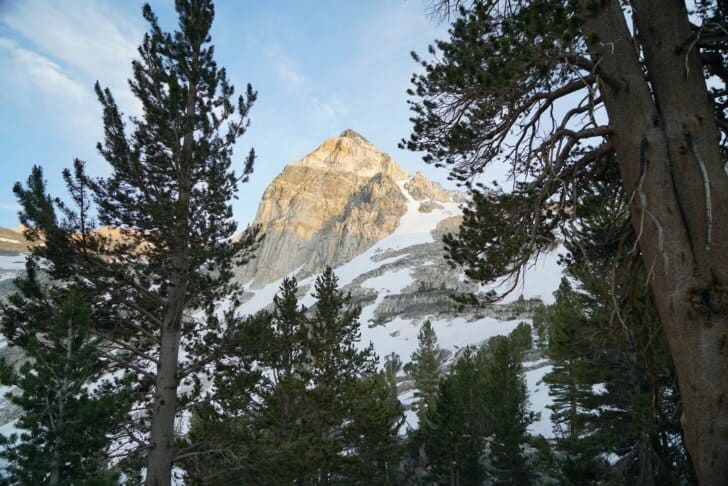
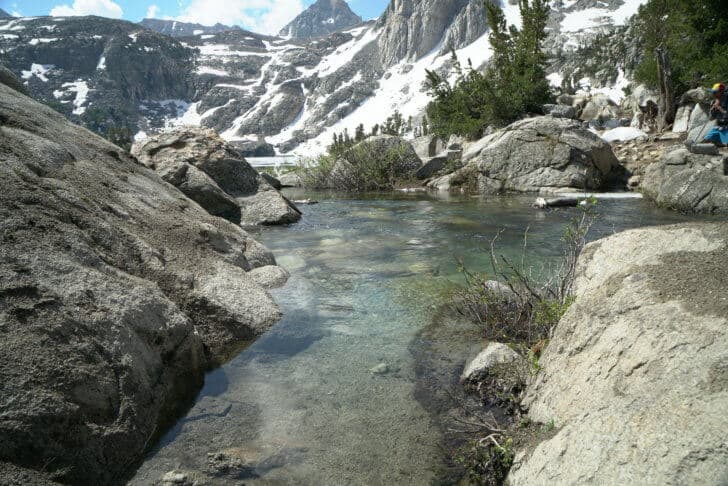
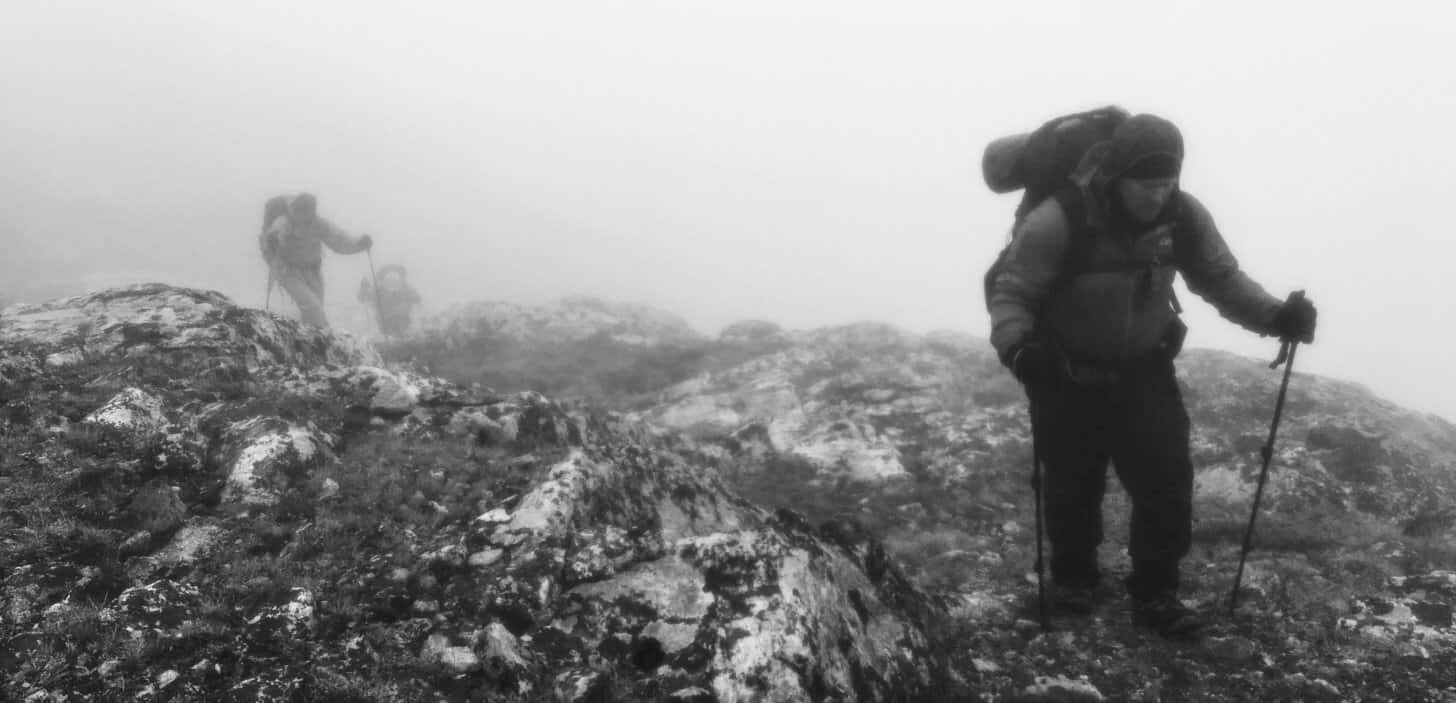
The Canadian Rockies are full of backpacking opportunities which are well-traveled but secluded. One scenic route is the Skyline Trail in Jasper National Park, Alberta, Canada. I have had the benefit of backpacking many of the trails in the Canadian Rockies. However, I have never managed to make it out to the Skyline Trail. Also, the limited number of backpackers permitted on the trail at one time ensures a relatively private trip, and the elevation of the trail provides unparalleled views.
You don’t have access to view this content.
Over the last 12 months, Jessica has received a “Great” rating from 92% of our customers who have filed support issues and decided to write a review.
You don’t have access to view this content.
Initial home page mockup of BPL-v5, with some vision behind what we’re planning to do with the site menu, ads, and more.
You don’t have access to view this content.
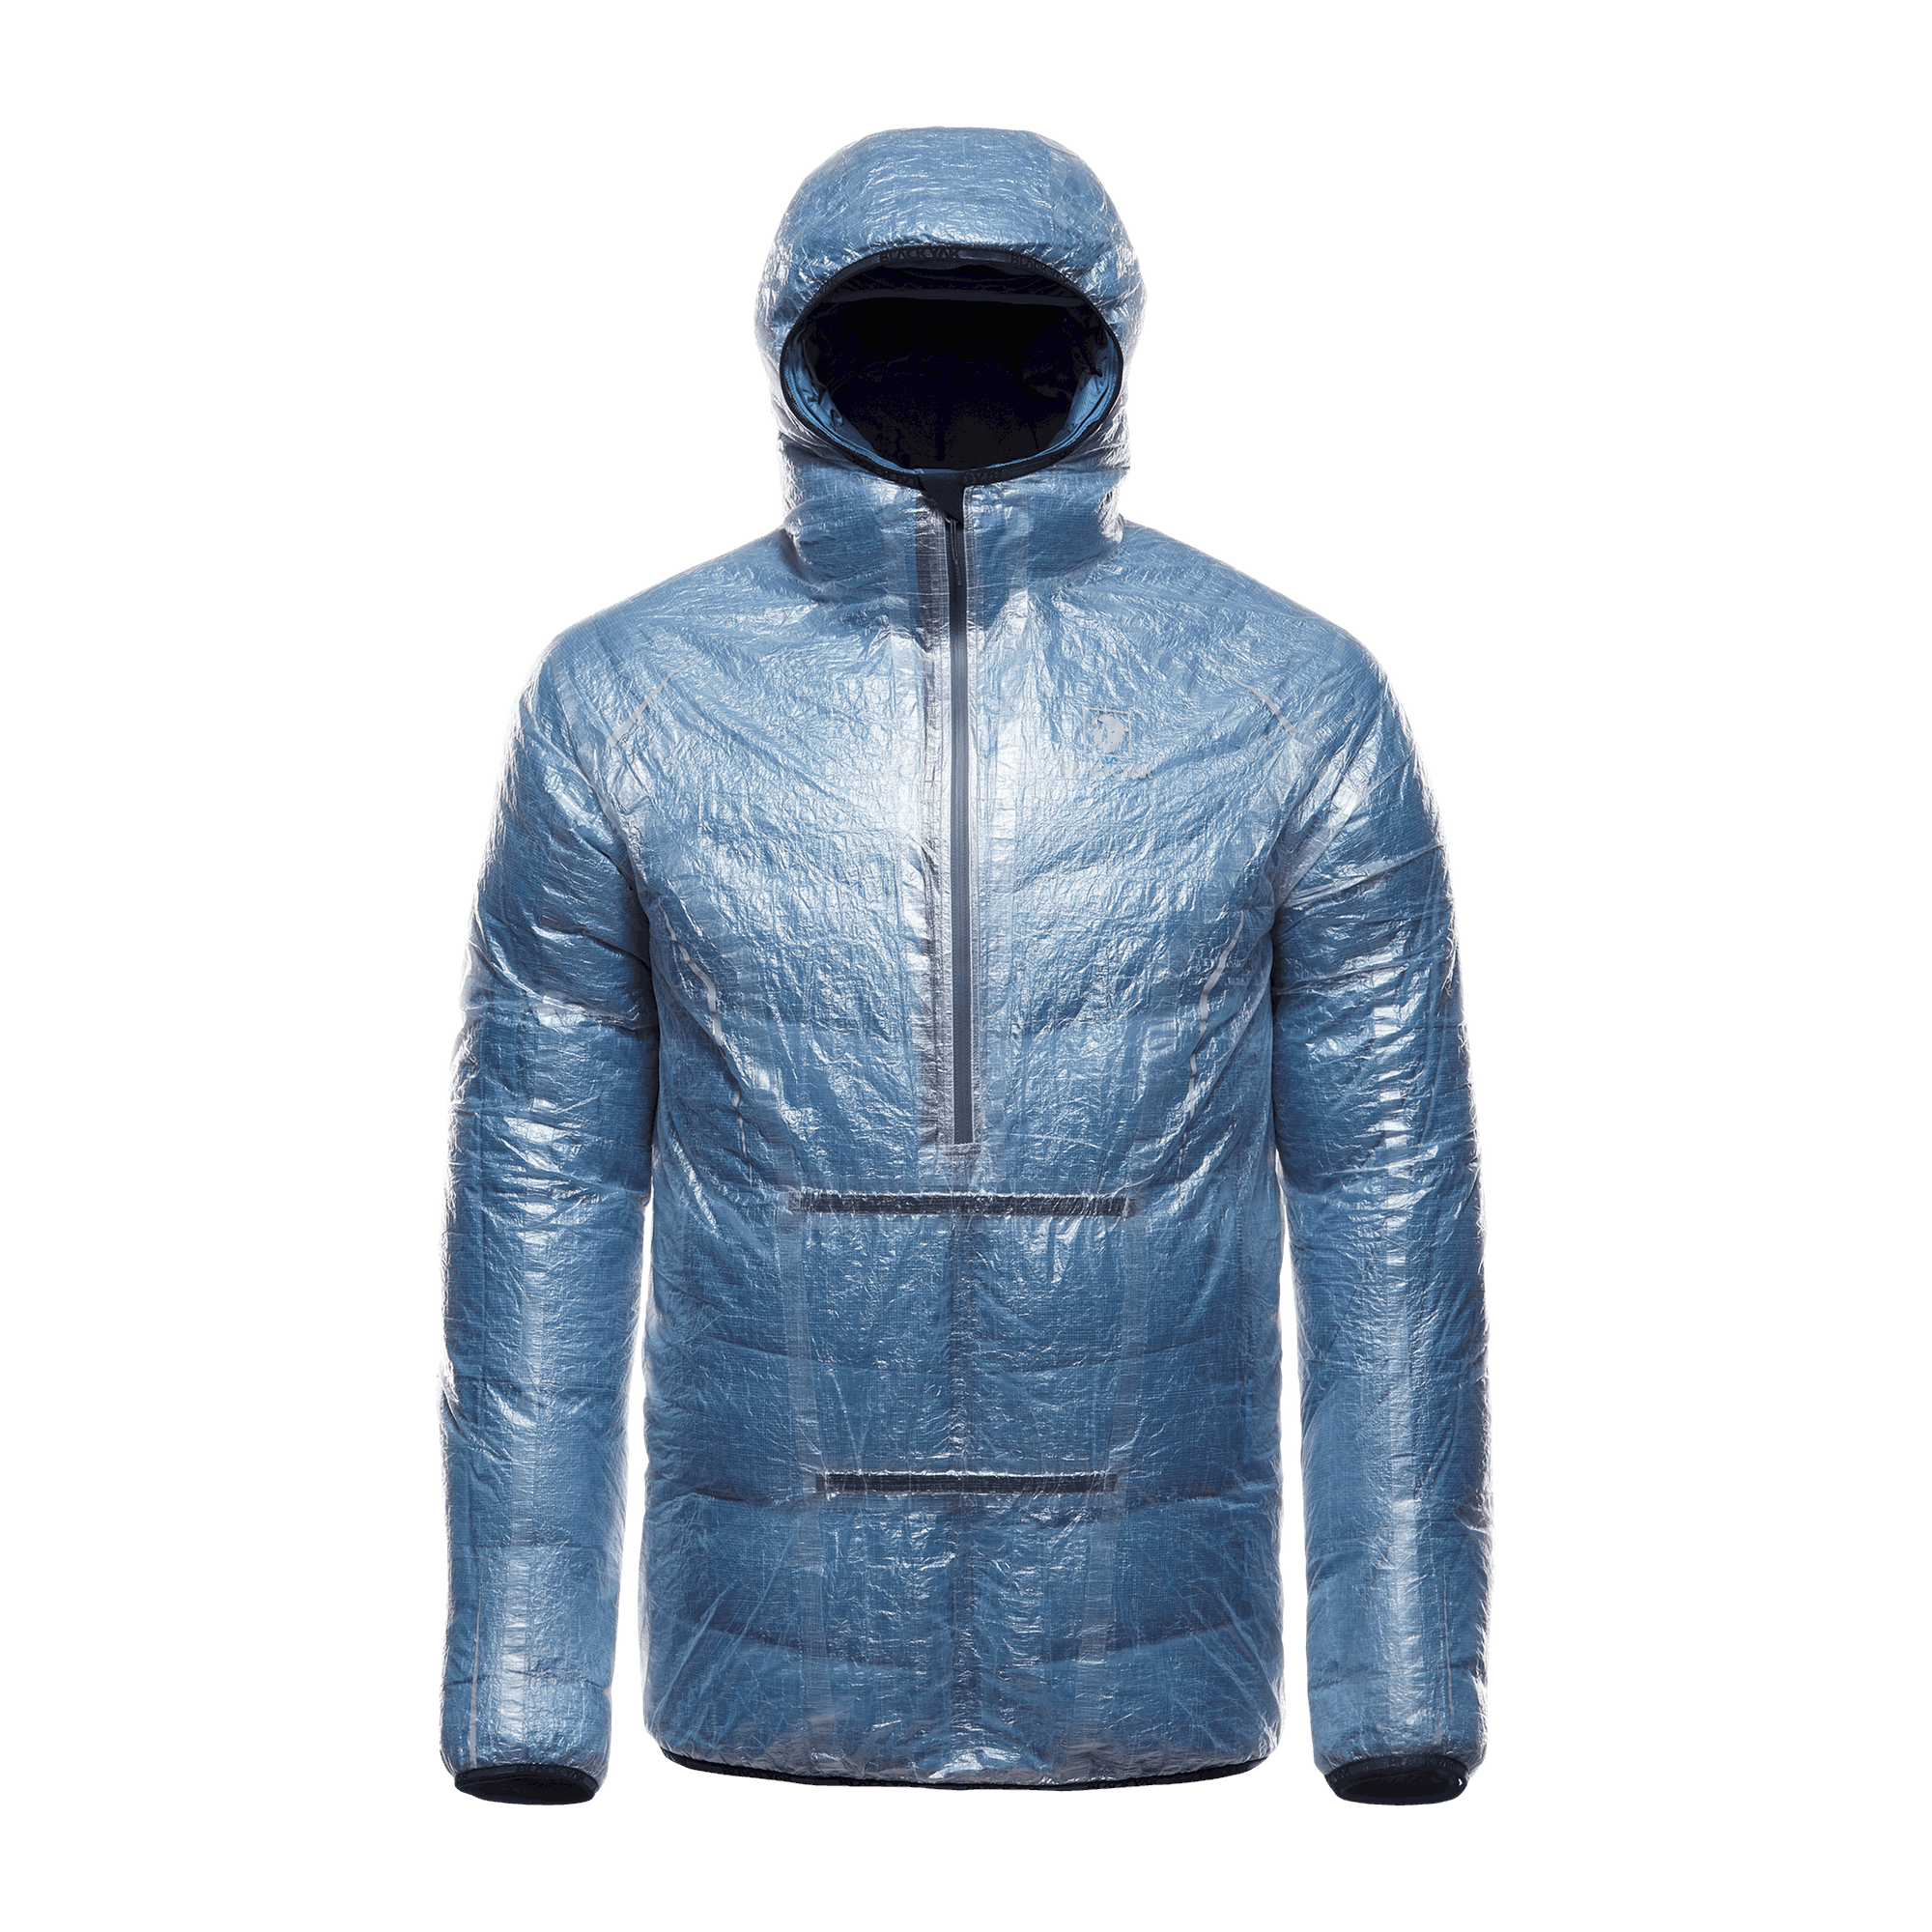
The BlackYak Emergency Jacket is a waterproof shell that weighs 71 g (2.5 oz), is made with DSM, and probably costs a fortune.
The outdoor brand BlackYak isn’t well known (yet) outside the international high-altitude mountaineering community. However, BlackYak has a long history dating back to its humble beginnings in South Korea in the early 1970s.
The brand has gained widespread attention in Europe over the past few years. It’s known for garment design aesthetics that focus on attention to design detail, state-of-the-art textile construction techniques, and use of premium materials.
The BlackYak Emergency Jacket has been in their line for the past two years and represents the lightest end of the spectrum for waterproof jackets.
Although BlackYak touts the garment’s capabilities for “emergency use,” SUL fastpackers and gram-counting ultralighters who spend their time in drier environments may appreciate a rain shell that will spend most of its time at the bottom of their pack.
BlackYak is distributed in the USA by Backcountry. Otherwise, its US distribution is limited to a small number of specialty outdoor retailers. Finding the BlackYak Emergency Jacket may be a bit tricky. BlackYak Global is based in Germany, so your best bet is to find a German specialty outdoor retailer who stocks the BlackYak brand.
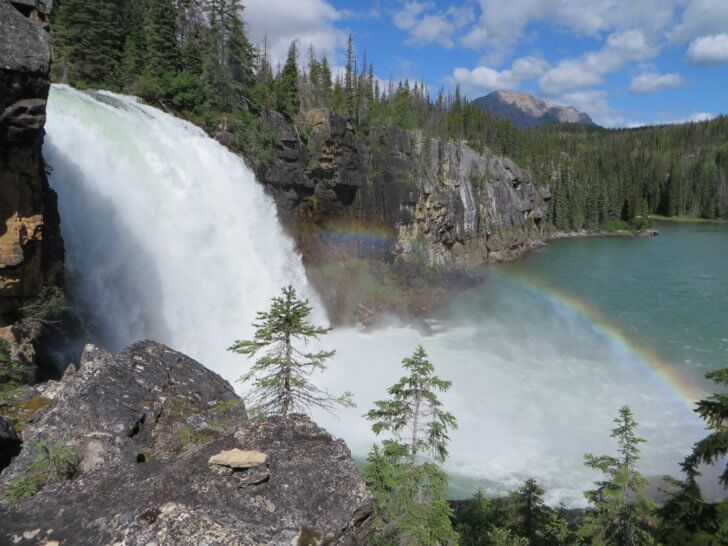
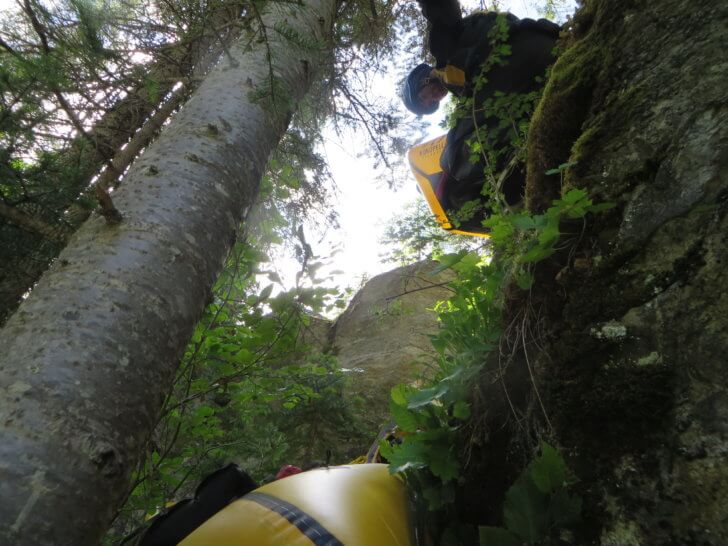
So when Ben texted me that he and two other guys had lined up a brand new “epic” trip in Monkman Provincial Park, British Columbia, I probably should have thought about what I was getting into. But I was up for some excitement so I joined the trip.
My friend Ben Brochu and I have had some “interesting” trips together. Most notably our “5-day” Wood River Expedition turned into an 11-day survival trek. After that experience, we went home and spent the winter scheming on Facebook for the 2016 summer. Usually Ben, the optimist, would suggest a route. As the realist (or pessimist if you ask Ben) I would look at Google Earth and raise concerns about miles of Devil’s Club or killer rapids. So when Ben texted me that he and two other guys had lined up a brand new “epic” trip in Monkman Provincial Park, British Columbia, I probably should have thought about what I was getting into. But I was up for some excitement so I joined the trip.
Day 1 was more of an evening hike. Ben and I carpooled and met Ben Scholten and Tim Siemens in the town of Tumbler Ridge. We threw our gear into Ben Scholten’s truck and began the drive to the trailhead.

The plan for Day 2 was to get up to Monkman Lake and leave our rafts there. After that, we hoped to get as close to the base of Paxton Peak as possible before we camped.


Our goal for Day 3 was to summit Paxton Peak. We weren’t sure if there was an ideal route to the summit or how we’d deal with the unmelted snow. Adding to the complication was the fact that clouds were covering Paxton Peak so we couldn’t visually plan a route. We planned to just wing it using Ben Scholten’s route finding skills and Ben Brochu’s GPS topo maps. Tim woke up feeling bad, so he decided to backtrack down to Monkman Lake and wait for us there. About halfway up Paxton Peak, I wondered if I should have gone with him. The climb would end up being the most difficult part of the trip.


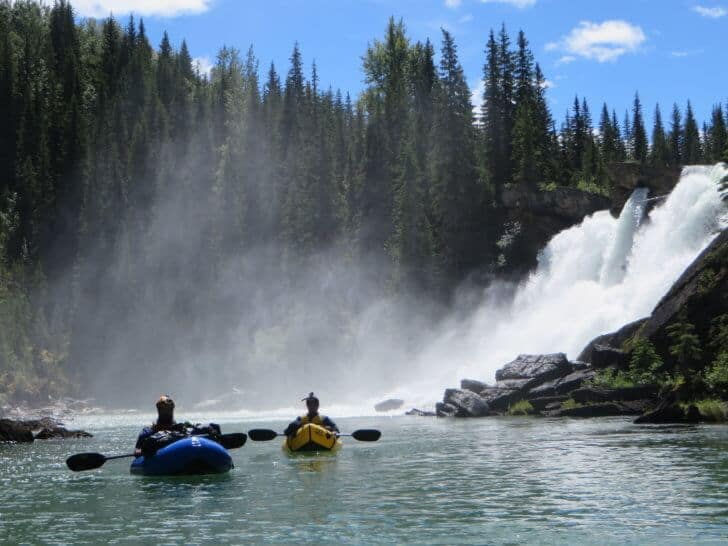
The plan for Day 4 and 5 was to packraft down Monkman Creek to a spot close to where we’d left Ben Scholten’s truck. Ben B. thought it looked fairly beginner friendly with the exception of some waterfalls. Tim and Ben S. had experience in canoes but neither had used a packraft so we were hoping there wasn’t a ton of whitewater on the way out. I was hoping there would be at least some water to try my new Kokopelli raft out in.


Ben S. and Tim used old MEC Packs. Ben B. used a Seek Outside Unaweep 6300. My pack was a MYOG design that used the Unaweep frame and hipbelt. I liked it okay, but I liked the look of Ben’s Unaweep even better. The Unaweep was a few inches wider at the bottom. All other things being equal that allowed Ben to have more of his weight and bulk a bit lower down. After this trip, I ordered a Unaweep 6300 pack bag to go on my frame.
We all used a variety of dry bags. Since I was putting my stuff in the packraft’s tubes I didn’t need to worry as much about totally waterproofing my stuff. I used two large dry bags to organize my stuff into roughly equal loads so it would be balanced on either side of the raft.
I tried out an Enlightened Equipment quilt with water-resistant down for the first time. It seemed to work a lot better than my old quilt. The sizing was a bit more generous so I was able to go without a bivy.
I also tried out my Six Moons Designs Deschutes Tarp for the first time on this trip. On that rainy night at Hugh Lake I would have preferred a bit more space but other than that I was happy with it.
Ben S. used a hammock and a really long tarp he’d picked up at a garage sale. The extra length made it a nice place for us to eat dinner when it rained. Ben B. used a hammock and an Arrowhead Silnylon Tarp. If I recall he told me the hammock and tarp combo weighed about 20 oz. (not counting the underquilt), so it was heavier than my 7oz tarp plus 8oz pad but he said it was very comfortable. Tim used an old Gore-Tex bivy and no sleeping pad. He figured his -20 sleeping bag put enough insulation between him and the ground.
I decided I really, really did not like my Altra Lone Peak 2.5s on this trip. I liked them even less when the began to fall apart on another short trip in Wyoming. The issue was that the sole didn’t grip rocks well and the shoes had such a sloppy fit my feet would twist around in them at bad times. I had much better luck later on with the Lone Peak 3.0s, but they were not available on this trip. On my next trip with Ben B., I used a pair of Asolo Plasmic hiking shoes with a sticky Vibram sole and a more secure fit. The difference was huge. I felt way more confident on slippery scree slopes and rocks.
Normally I wear a thin button up long sleeve shirt for buggy places like the northern Rockies. On this trip, I experimented with a Patagonia Midweight baselayer and was pretty happy with it. Bugs could bite through it so a few times I wore a wind shirt. That was hot however so I often just sprayed my shoulders with a bit of 100% DEET and that solved the problem.
I also used a fleece instead of a puffy jacket with a synthetic puffy vest in case I needed additional warmth. I don’t recall ever needing the vest on this trip. With the sun up till around 10 PM, I was usually in my sleeping bag before it cooled down. On the other hand, the fleece was nice and warm to put on over my damp clothes after a day of paddling.
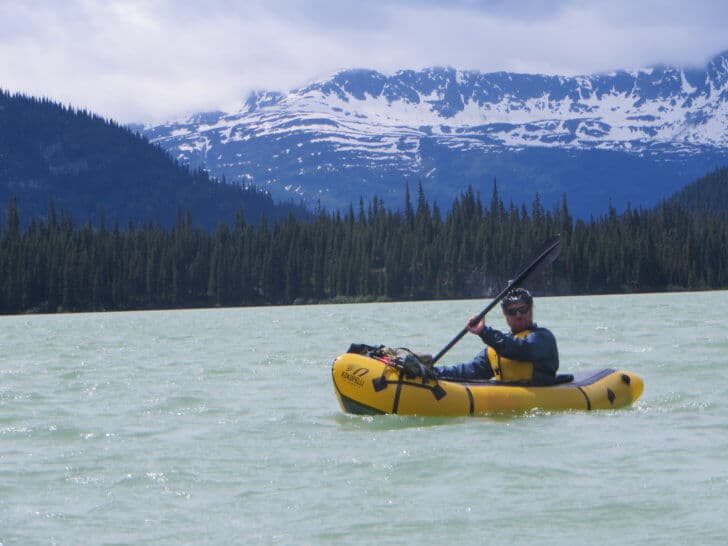
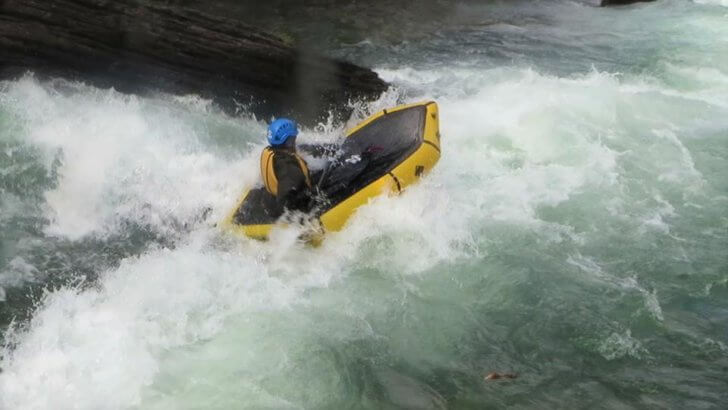
Ben S. and I used decked Kokepelli Nirvana rafts. They are bit heavier than other rafts but the whitewater performance is excellent. I’m also a fan of the double chamber design. Ben B. used a prototype self-bailing Nirvana. Tim used a Feathercraft BayLee. Everyone except Tim was using a raft with a cargo zipper. This improved performance in whitewater and it also made portaging easier. We could just throw the rafts over our shoulders and go. With no cargo zipper, it is typically necessary to take your pack off the front for a long portage. The downside is putting all that weight inside a raft makes it easier to puncture it if you drop your raft something sharp.
With the exception of the one rapid where I swam the rafts didn’t get a real whitewater work out. It would have been possible to do this trip with lighter, less capable rafts. But I prefer “too much” raft to “not enough” raft in situations like that. As far as we knew Monkman Creek had not been run so there was plenty of uncertainty even with detailed maps and Google Earth images.
My little swim was more embarrassing than dangerous because there was a nice lake below the rapid where I could catch all my stuff and get organized again. As a general rule though Ben and I both recommend caution in such situations. It only takes one mistake to turn a fun rapid into a dangerous situation.
A summary of gear that I’ve used in 2017, and enthusiastically recommend for lightweight backpackers this holiday season.
It’s the offspring borne from the marriage of a holiday gift guide to some practical, real-world experience. Here is some of the gear featured in this article: 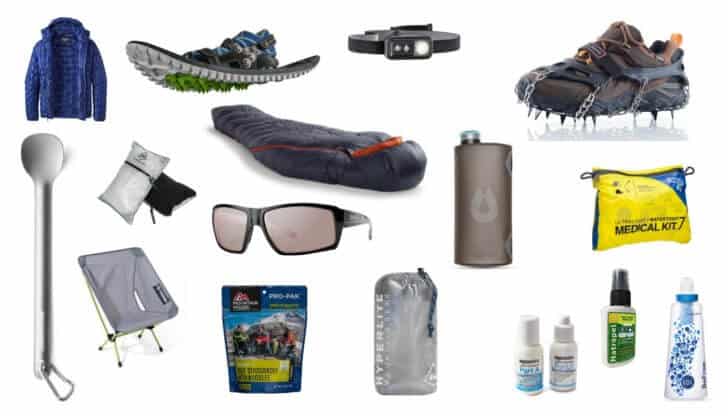 Don’t worry, it’s not one of those holiday gift guides where the author writes words like “best” and “indispensable” and “must-have” and recites bullet points from press releases and specifications tables. My hope is that if you’re reading this, you get something a little more than that out of what you’re about to read. Hopefully, you’ll find some valuable product info, some education, and some tidbits on how to shop for and select gear. I’ve actually used every item we recommend in this article extensively in 2017, and I’m going to share my own perspectives on why I selected this gear and why I think it’s good stuff. It’s as much a consolidation of a bunch of summary product reviews as it is my list of recommendations for backpacking gear gifts for this holiday season.
This holiday backpacking gear gift guide might be of interest to you if:
This review specifically identifies gear that meets all of the following criteria:
Weight: 1.6 oz (with lithium batteries) / 1.9 oz (alkaline)
Context: For many years, I’ve used a variety of headlamps from Petzl, Fenix, Zebra, Princeton Tec, and Black Diamond. As LED technology improves, manufacturers continue to push the limits by packing more features and performance into smaller and lighter packages. However, so many headlamps I’ve used are either one-trick ponies (e.g., extremely bright but with poor battery life) or fail to sufficiently “tick” the performance boxes that I want.
Why you should consider the Black Diamond Ion Headlamp: After reviewing this year’s headlamp market to purchase one as a gift for my wife, I finally settled on the new model* Black Diamond Ion Headlamp for its weight (1.9 oz durability (including a rubberized housing), waterproof housing design (IPX8), comfortable headband, power (100 lumens), efficiency (up to 180 hours of battery life), dual LED (white and red), dimmability, a weather-sealed / glove-friendly switch, easy-to-change battery compartment, easy-to-find batteries (2xAAA), and compact form factor.
*Important – don’t buy the wrong model of the Ion! Before 2017, the Black Diamond Ion Headlamp had only one lens, wasn’t as water-resistant as claimed, had a less durable housing, a finicky switch, and boxy lines. I can’t recommend the old ones – don’t even buy them if they’re on clearance. The new (2017-) model is a much better performer. 
Don’t Buy This Headlamp If:
 Smith Polarchromic Sunglasses
Weight: 1.3 oz
Context: I used to wear “sports-fashion” wrap-style sunglasses with plastic lenses where polarization, lens clarity, and hinge durability seemed like afterthoughts. Inevitably, I would lament the expense of dropping a bunch of cash on sunglasses that would be all but worn out after a season of fishing, hiking, backpacking, packrafting, snowshoeing, skiing, and Sierra-walking. Having spent the better part of my adult life analyzing backpacking and mountaineering gear performance, I figured it was time to allocate some of my analytical energy to the sunglasses market. My criteria were simple: find a well-built frame that housed a lens that made few compromises in performance. This search led me to the Smith Challis Techlite Polarchromic Sunglasses.
Why you should consider the Smith Challis Techlite Polarchromic Sunglasses:
Some shopping tips: The sunglass market changes rapidly, and on a dime’s notice, a sunglass brand may discontinue one model only to “re-invent it” next year under a different name. Be prepared to save loads of money and get closeouts for 50% off or more. Also, what I’m really reviewing here is the Smith Techlite glass lens combined with its Polarchromic (polarized, photochromic) treatment. The Challis is just the frame model I like personally and fits my face. YMMV, so be sure to check out other frame styles, and if you find one you really like that doesn’t offer both Techlite glass and Polarchromic treatment, opt for the Polarchromic – that’s really where the performance of Smith optics shines. REI offers a good selection of Smith Polarchromic sunglass styles. 
Don’t Buy These Sunglasses If:
Weight: 16 oz
Context: I broke my back in 2005. Since then, sitting on a low rock, log, or bare ground after a long day on the trail instills emotions that range from “uncomfortable” to “abusive”. A camp chair that provides some lower back support is critical for my comfort. I’ve tried Crazy Creek Chairs, Therma-Rest Chairs, Big Agnes Chairs, Sling Chairs, little tiny collapsible stools, and even my backpack filled with an inflated, rolled-up Neo-Air pad. None of these worked well for me.
Then I discovered Helinox Chairs and I fell in love. I’ve owned the Helinox Ground Chair (read the review), the Chair One, and the new Chair Zero model. The new Helinox Chair Zero raises the distance off the ground and shaves five ounces of the Ground Chair. While I personally prefer the reclining position of the Ground Chair, the Chair Zero is going to be a more comfortable and popular (lighter!) option for most hikers.
Why you should consider the Helinox Chair Zero:
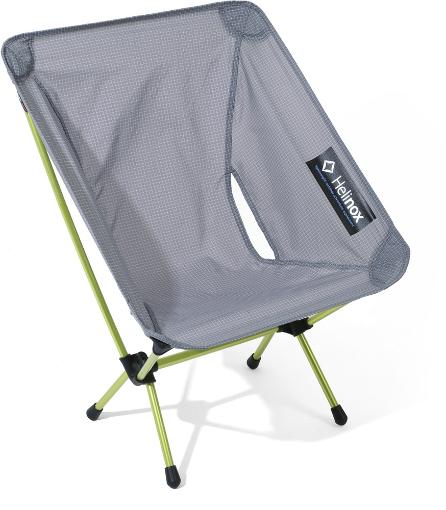
Don’t Buy This Chair If:
 Crescent Moon EVA Snowshoes
Weight: 3.5 lb
Context: Having lived in the northern US Rocky Mountains (Montana, and now Wyoming) for the past 23 years, snowshoeing is a staple of my winter outdoor activity. I’m really only interested in snowshoes that are lightweight, small, and have a binding nimble enough to work with trail running shoes. For extreme cold, I add a pair of ultralight neoprene overboots. My snowshoes of choice through the years have included Atlas Race, Northern Lights, MSR Lightning Ascent, and most recently, Crescent Moon EVA Snowshoes. I recently wrote a review of the Crescent Moon EVA Snowshoes and revealed the benefits of their foam deck and fixed binding. Read the review for more details.
Why You Should Consider the Crescent Moon EVA Snowshoes:
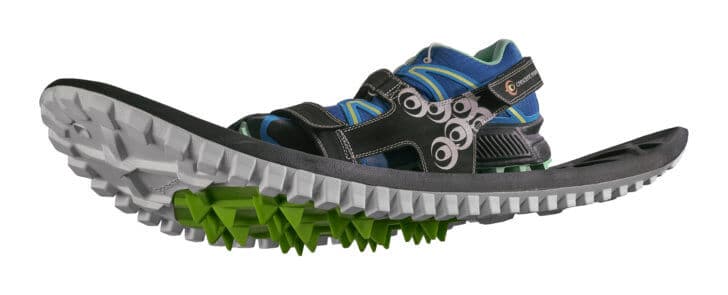
Don’t Buy These Snowshoes If:
Weight: 15.7 oz
Context: I came to ultralight backpacking from a Pacific Northwest mountaineering background. Coming of age in Seattle, I spent my summers in the Olympic Range and my weekends on the glaciated peaks and volcanos of Washington State. I owned an ice ax and crampons and a headlamp long before I purchased my first sleeping bag and tent. I still own “at least” (no, I’m not going to divulge the exact number) four pair of crampons – one pair for water ice climbing, one pair for alpine ice climbing, one pair for steep glacier trekking, and one pair for terrain where the others are overkill. For the past decade, this fourth pair has been (primarily) Kahtoola Microspikes, which have served this purpose well enough. But they aren’t without their limitations, and that’s where the Hillsound Trail Crampons come in.
Why You Should Consider Hillsound Trail Crampons Over Kahtoola Microspikes:
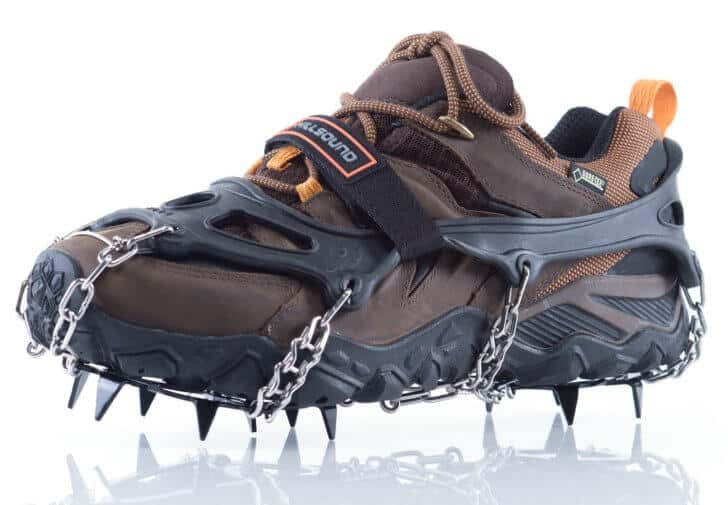
Don’t Buy These Crampons If:
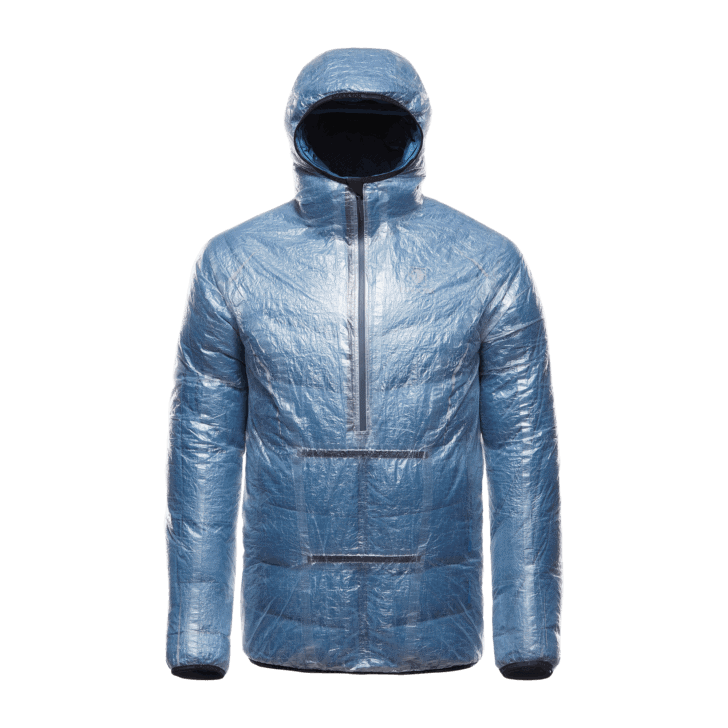
 Patagonia Micro Puff Hoody
Weight: 9.3 oz
Context: I’ve long been a proponent of ultralight down jackets. For the past several years, my go-to down jacket for summertime ultralight backpacking in dry climates has been the Goosefeet Down Jacket. Here’s how I incorporate that down jacket in a bad weather clothing system. However, I spend a lot of time hiking in conditions where a down jacket isn’t a great option, and after my last Cocoon UL 60 Hoody bit the dust, I’ve been experimenting again with synthetic insulation from other manufacturers, including most recently, the Patagonia Airshed (link to review) and Micro Puff Jackets. I’ve been wearing the new Patagonia Micro Puff Hoody since September as an insulation layer and can say without reservation that it’s warmer than my old Cocoon UL 60 Hoody, which at the time (2007-2009) had a higher warmth:weight ratio than any synthetic on the market. My most positive experience so far with the Patagonia Micro Puff Hoody came while guiding in blizzard conditions up in Montana. I wore it under a shell while hiking down from an 11,000-foot pass, late in the day as temperatures were dropping into the teens. I also wore it during the frigid mornings and evenings in our snowy camps. To my surprise, when integrated with the rest of my clothing system, it performed much better than I expected, and I stayed warm and comfortable.
Why You Should Consider the Patagonia Micro Puff Hoody:
Don’t Buy This Jacket If:

Weight: 1 lb 14 oz
Context: I’m a quilt user, even during the fringe seasons. I’m so enamored with quilts that I even like experimenting with them as it gets chilly, and have slept in a winter-weight quilt down to minus 25 F during the winter. However, my experiences have led me to believe that at some point, the warmth:weight ratio of a high end (ultralight shell, high FP down) hooded mummy sleeping bag starts to outweigh the benefits of a quilt. This happens somewhere in between “fall” and “winter” for me, when low temperatures start dropping into the teens. My favorite down sleeping bags have always been made by Western Mountaineering, Nunatak, and Feathered Friends, with a particular nod to the FF Lark Nano ($479), which is my recommendation for a fringe-season sleeping bag for its construction quality, warmth:weight ratio, ease of use, and fabric performance (balance of DWR with breathability). The WM VersaLite 10 ($560) is a close second but suffers from heavily calendered fabrics that retain a lot of condensation. Did you notice the price of these bags? Quality doesn’t come cheap, and that’s where the REI Magma 10 should be considered. I’ve been using the bag this year since September, camping, and hiking in temperatures down to the single digits. I don’t believe it’s quite as warm as either the Lark Nano or the VersaLite 10, but it is a little lighter, a lot cheaper, and a pretty incredible value.
You Should Consider the REI Magma 10 Down Sleeping Bag If:

Don’t Buy This Sleeping Bag If:
Here’s a list of little things that I recommend. In order to make the cut, these items had to meet a few key criteria:
Other Stocking Stuffer Ideas:
Backpackinglight.com works with retail merchant partners to maintain a live database of outdoor gear. Use this search engine to discover current sales. Disclosure: if you click on a link and make a purchase, we receive a small commission, which helps support the site – thank you.
No manufacturer paid for any type of “product placement” in this gear guide. These selections are my own, based on my own personal experience with them. I’ve used all of these products extensively and have enjoyed generally positive experiences with this gear. YMMV. Some links are affiliate links, which means if you click through and make a purchase, Backpacking Light gets a small commission on the sale. This comes at no extra cost to you and helps support Backpacking Light’s efforts to publish authoritative and valuable information about lightweight backpacking gear and techniques, inspiring stories and film festivals, and remain an active member of the outdoor industry to promote and protect opportunities for public outdoor recreation.
I’m inspired by Derek’s Now concept, and I think it may provide some value to you. Here’s what we’re doing now.
You don’t have access to view this content.
This Crescent Moon EVA Snowshoes review addresses the use of foam as a snowshoe material, combined with a fixed shoe binding.
You don’t have access to view this content.
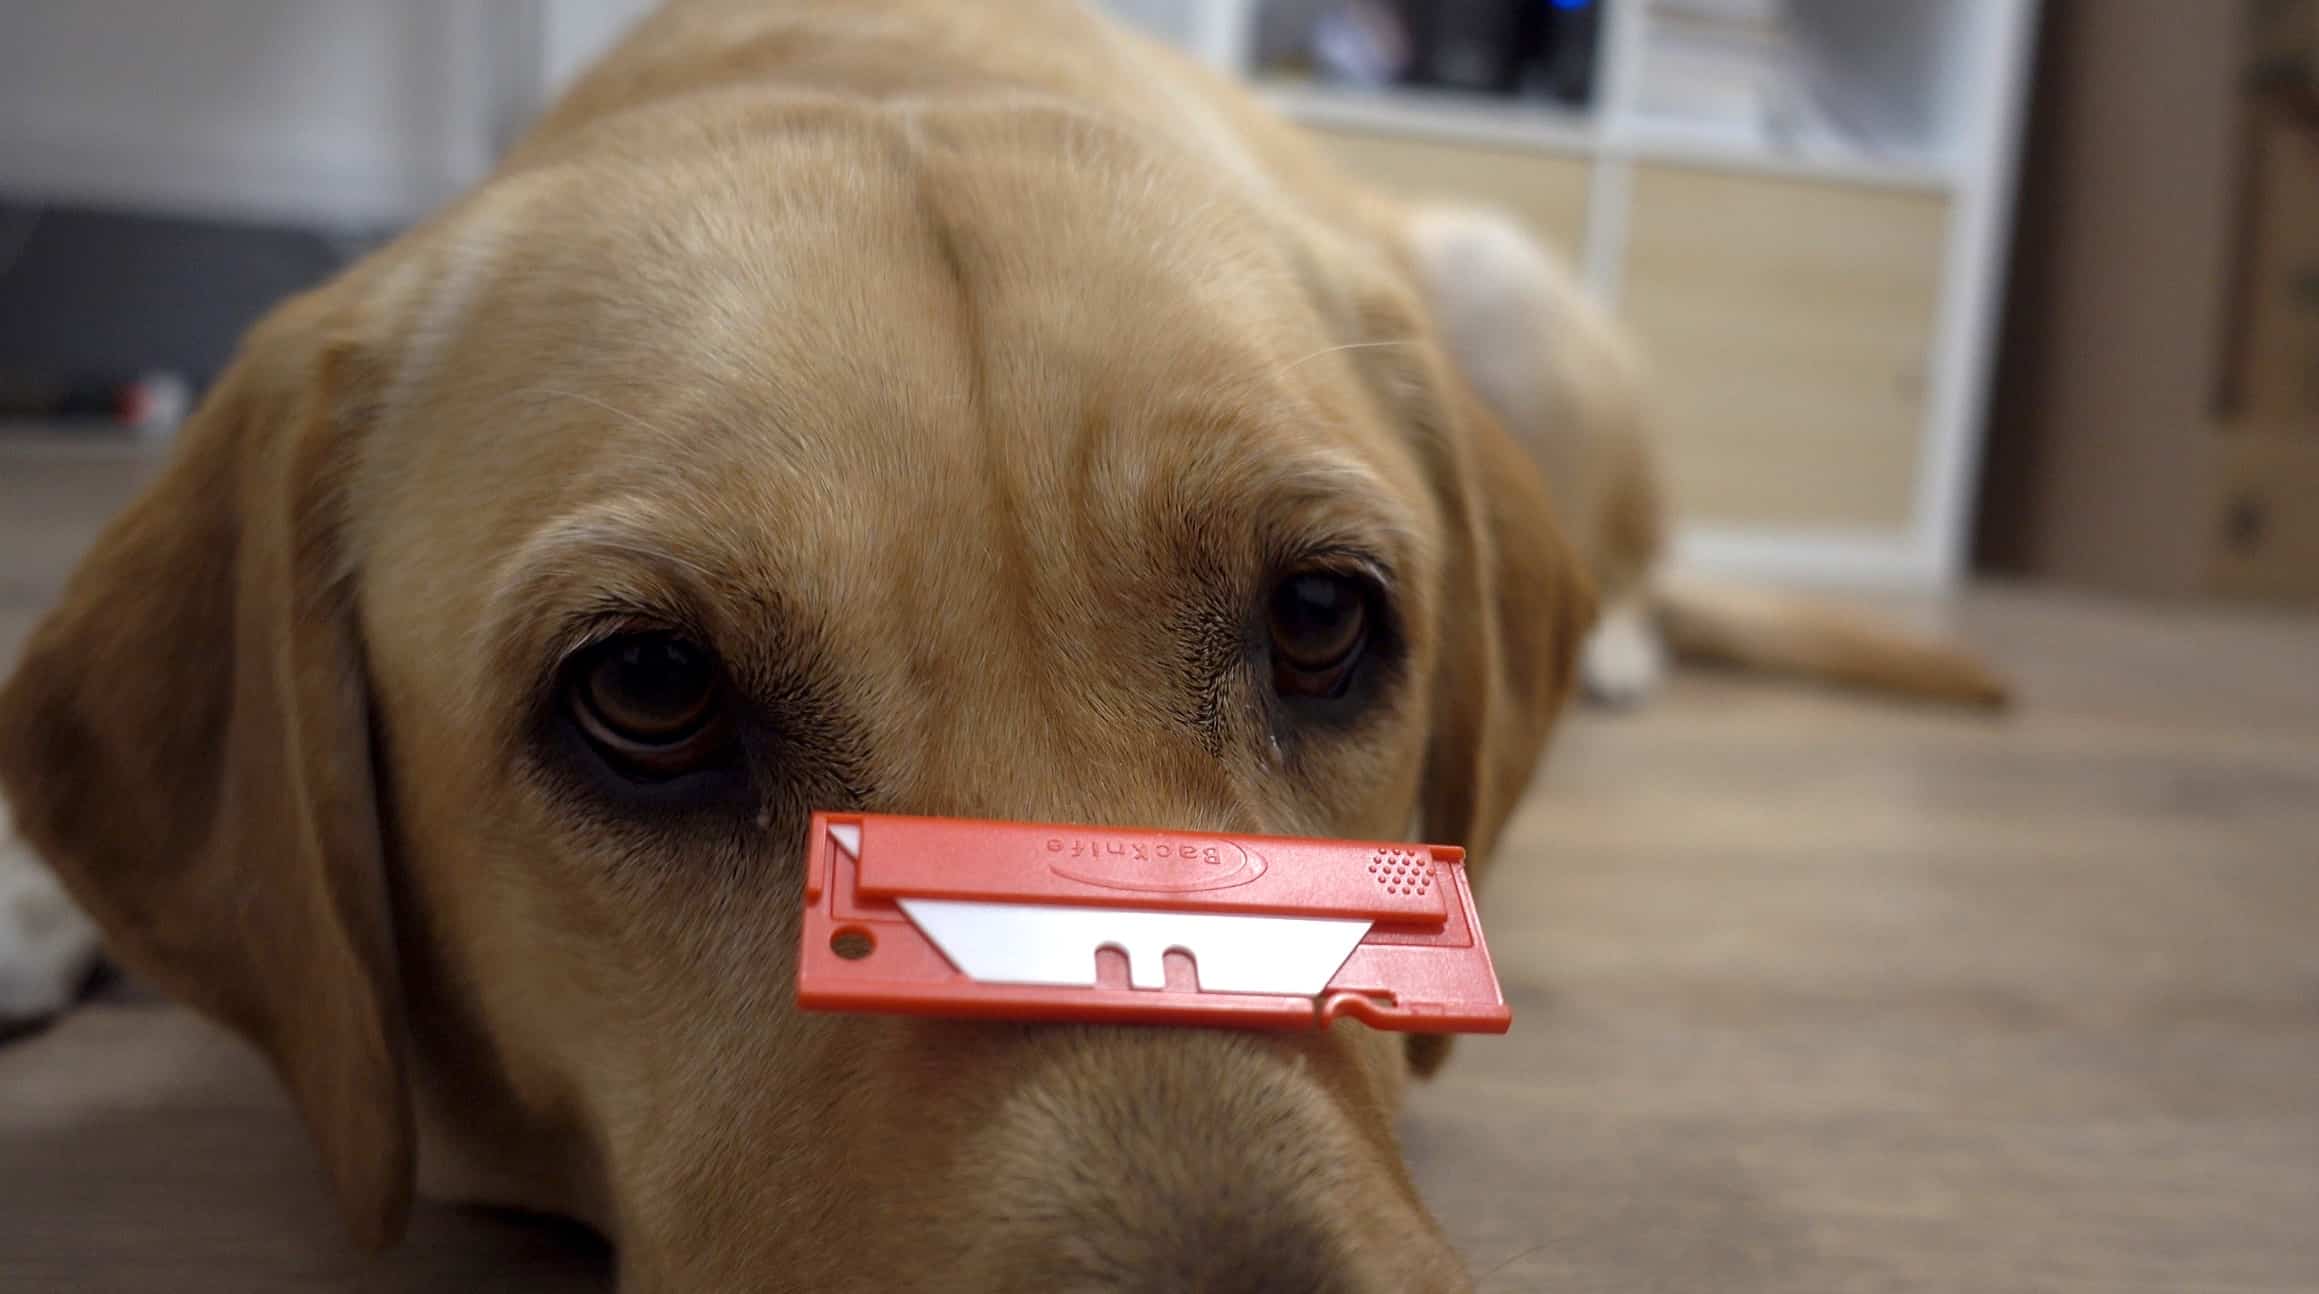
In this Backnife Review, we focus on the comprehensive (sic) blade technology in this detailed analysis of a cutting tool ;)

Not all ultralight backpackers carry a knife on a routine basis (myself included). Carrying a knife seems extraneous to me. I seldom need one unless I’m cutting guylines, cleaning fish, repairing gear, striking a fire-starting flint, shaping first aid tape, opening a food package, slicing cheese, or whittling up a pile of dry wood shavings.
Oh, wait. That actually seems like quite a bit of utility, actually (sic).
OK, so I may actually find a knife to be useful after all.
But I’m not a knife guy.
Which is code for I have zero interest in spending exorbitant amounts of money on a knife I’ll probably lose.
My criteria for a good knife are simple:
Guess what, y’all – I found the perfect knife for me!
Imagine a cutting tool that slices through Spectra cord like an as-seen-on-TV-tomato knife plowing through a pop can.
This is the idealized micro-Utopian vision of every ultralight backpacking enthusiast, and it’s the promise made by the Backnife Micro-Utility Knife.


This is the extent of my performance review:
I cut up a bunch of stuff.
First, paper #FTW!
Then, tape, cardboard, aluminum cans, and on to fabrics (silnylon, then spinnaker, then DCF pack fabric, then pure Spectra). By the time I reached the fabrics, the Backnife was still making clean cuts.
But then the real test: pure Spectra cord, which isn’t handled well by most steel knives. Plus, Spectra dulls steel like you wouldn’t believe. After about one hundred cuts of Spectra cord between 2 and 4 mm in diameter, the knife was still making clean cuts.
Maybe there’s something to this white blade and its ceramic nature.

Visit their website.
I didn’t ask for this knife. I didn’t even realize I wanted it until I got it.
It wasn’t on my Christmas list, nobody bought it for me, and I’m not making (much) of a fortune by writing a good or bad review for it! In fact, if you end up buying a knife as a result of reading this review, Phil’s gonna get all the money. That’s pretty awesome for Phil.
I received the knife as an unsolicited package from knife-maker Phil Cressman, a Canadian. It was in a Tyvek envelope, which I thought was cool because it was Tyvek.
In a way, you could say it was a donation I suppose. But I had no obligation to review it.
I did think it was a really cool product because it weighs a quarter of an ounce and was designed with a lot of thought.
So there. Go buy one. Support Phil. He seems like a decent guy with a great beard. Also, he’s Canadian, and that has to count for a lot! Go Phil!
*Phil is not a family member, and he does not have any tight, loose, medium, or undisclosed financial interest in Backpackinglight.com, or Russia. (As far as we / Jeff / Robert can tell.)
Chris and Muzzy go to Rae Lakes (film!) during the High Sierra’s most biggest snow season on record! Arg! What about their marriage?
[Muzzy] My husband is an avid backpacker. For years, he has been asking me to go with him to see the breathtaking views of Kings Canyon he could never quite capture in a picture. I don’t consider myself a backpacker, or even outdoorsy. I’m not sure if I agreed so much as I finally gave in.
The plan was to hike to Rae Lakes in July 2017. Several years into a drought in California, a record-setting wet winter rolled through. We were thankful for the much-needed rain and filled with anticipation as to what this would mean for our upcoming trip.
What this meant was record snowfall in the Sierra, ice-axes, micro-spikes, and a new route.
Watch the film:

[Chris] I had intended on a documentary about the Rae Lakes loop starting from the western Sierra. However, the heavy snow took out a vital bridge at Upper Paradise Valley earlier that season, making that loop impossible. Instead, we started from the eastern Sierra at the Onion Valley trailhead, which honestly, was more exciting.Day 0: The Westin Hotel in Mammoth. (A rugged acclimation camp where only the toughest of the tough can survive.)
[Chris] Making this documentary required 11 lbs of camera and audio gear. Conditions also required us to carry ice axes, microspikes, and Goretex socks which added another 23oz for each of us. This forced us to go as light as possible everywhere else. Luckily, through the miracles of UL philosophy and technique, we were able to keep our packs reasonable. My Zpacks Arc haul peaked at 32lbs, and my wife’s Zimmerbuilt pack was 27lbs.
For a complete list of camera gear Chris used on this project:
http://www.chrisisawesomeproductions.com/the-camera-gear-i-used-for-making-my-rae-lakes-documentary/
[Muzzy] The hike was beautiful from the start. A few miles in we escaped the heat and started to encounter snow. New to me, I was nervous but excited. We marched on to Kearsarge Pass and down into the gorgeous lakes below. We saw a California Black Bear: our welcoming ambassador to the wilderness. It was a perfect first day.
Day 2, we hiked along Bullfrog Lake toward the JMT. I got a little nervous when we had to grab our ice-axes, and again when we were on our hands and knees scaling over snowy boulders. But then I saw the south side of Glen Pass. There were snow covered mountainsides and scree to my left, and icy lakes and rocks to my right down below. I’m not confident or competitive. This didn’t motivate me. It terrified me. I was imagining a wrong step and tumbling.
[Chris] I planned out the shots pretty well for this project and had my camera ready when she got to the top of Glen. Her elated facial expression with the Rae Lakes basin visible below was supposed to serve as the opener for the documentary. Her reaction was quite different. The conditions didn’t seem that bad to me, but I forgot how new she was to snow travel. She was… eh….not displaying elation. I thought she was going to punch me in the face, but eventually, she pulled it together.
[Muzzy] At the top of Glen Pass, I looked ahead to the descent before us. A steep, snow blanketed mountainside, and a small path stomped down by hikers who passed before us. The sun was setting. The temperature was dropping. And there was nowhere to go but forward.
As if to make sure I received the full experience, we had to complete a waist deep, cold water crossing, in the dark, just before getting to our campsite. I was so thankful when the day was done. Thankful for our tent and dry socks. Thankful for our sat phone and hearing our kiddos on the other end.
We spent two nights in the Rae Lakes area enjoying the beauty of it all. Chris showed me his favorite spots. We enjoyed views of Painted Lady and Fin Dome, beautiful flowers, sun, hail, and an hour-long thunderstorm: a smorgasbord of Sierra Nevada experiences.
[Chris] In addition to the fairly lighthearted storyline, there’s obviously some serious messages about backcountry safety. These were influenced by the NPS during the film permit process, but I honestly agree with them. I think the most dangerous backpacker demographic is the 10-20 trip backpackers. That’s the range where I thought I knew everything. After ~60 trips I’ve been humbled so many times that I’ve learned to treat wilderness safety with more respect. I think overconfidence is a killer out there. So yeah, if I have to interrupt my little video project and put in a safety message, sure, why not. Maybe it’ll save someone’s life someday. I’d say that’s more important than the “flow” of an amateur film.
[Muzzy] By day 4, the snow had melted some over the last few days, and my familiarity with the path was reassuring. I may have even enjoyed my view from the top of Glen Pass this time.
Back at beautiful Kearsarge Lakes, it was our last night in the Sierras. We were stinky and sore and missed our kids.
[Muzzy] In the car, we headed up highway 395 reminiscing about the trip we had just taken on the other side of the mountains we were driving so quickly past. I was reminded that it’s good to get outside of your comfort zone every now and again, to share an experience, and to push yourself.
I was happy to be headed home, but also happy I’d finally experienced Rae Lakes. A different experience than my husband had had so many times before. But this time we’d created new memories, together.


Supported in part by friends at:
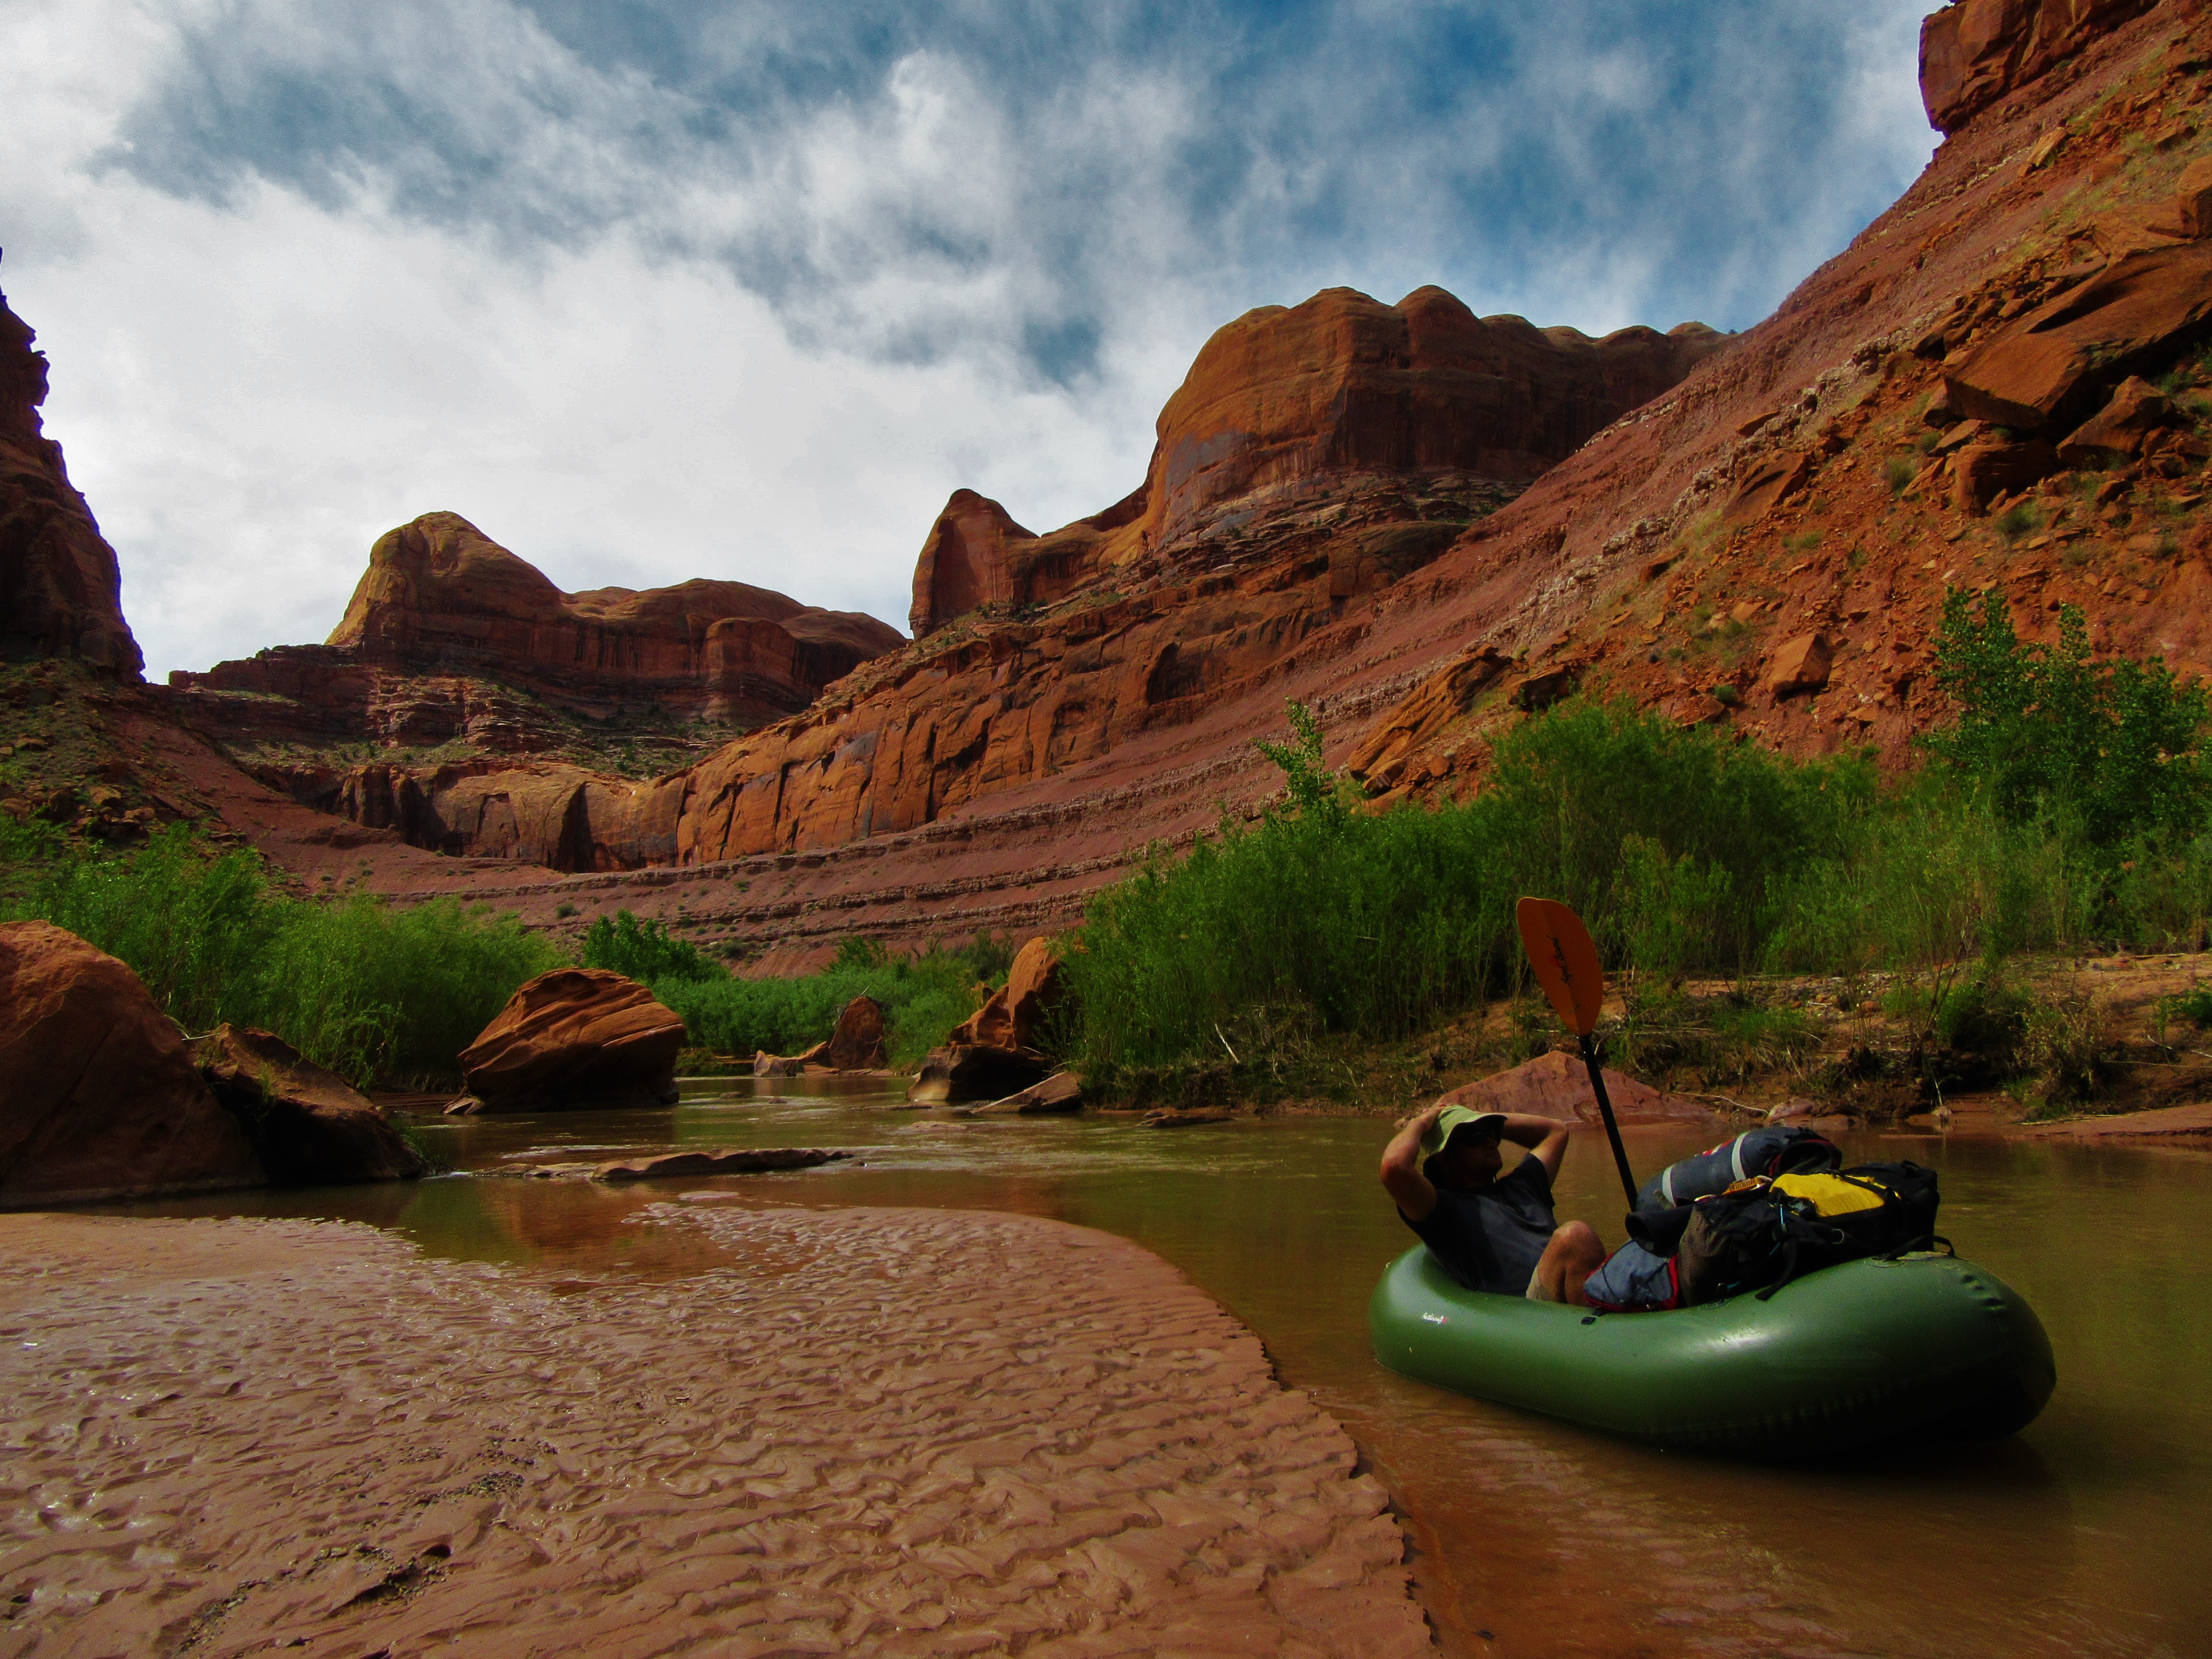
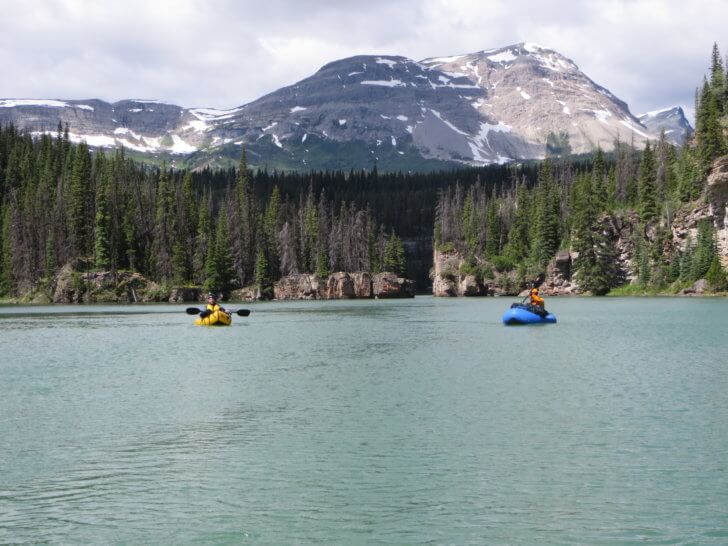
Packrafting and canyoneering in Escalante multiple activities on the same expedition.
You don’t have access to view this content.
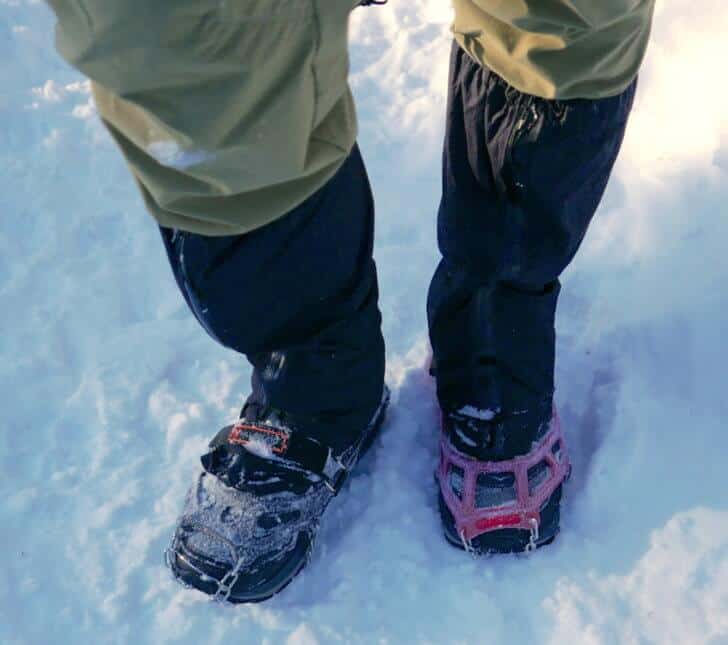
Keep feet warm and dry by using a carefully designed system that involves different types of socks, shoes, and gaiters.
As winter approaches we face new and unique challenges with ultralight gear. In particular, cold and wet conditions reveals the limitations of ultralight footwear in acute ways. Flitting through the forest wearing 8 oz mesh sneakers and thin wool socks while carrying a light pack is one of the joys of ultralight backpacking. However, this joy can turn to discomfort as temperatures approach the freezing point and precipitation begins to fall. Avoiding wet, cold feet when backpacking requires skill in implementing a process, as well as carefully selecting gear. Both process and equipment are addressed in this article.
In a previous article I wrote about inclement conditions gear, I discussed a cold/wet weather footwear system that provides the basis for additional detail and rationale outlined in the article you’re now reading.

You know the routine.
You’ve been hiking all day, perhaps fording streams, and your feet, shoes, and socks are wet. Stormy conditions unfold, with the prospect of cold temperatures and freezing rain or snow for the next few days, and you realize that the prospect of drying out gear anytime soon has vaporized.
Things go OK as long as your moving along the trail, but as soon as you get into camp, your body’s internal combustion engine starts idling. The first place you feel the uncomfortable cold: your feet.
You may find it very hard to recover from cold feet. It’s not uncommon for ultralight backpackers to experience cold feet during their entire time in camp, with no hope of warming up until after they’ve been on the trail for an hour or two the next day…
Sounds fun, doesn’t it?
I can assure you that it’s not.
Add snow to the mix, and low temperatures below freezing, and you not only have a recipe for cold feet, you get to enjoy some meaningful pain as well.
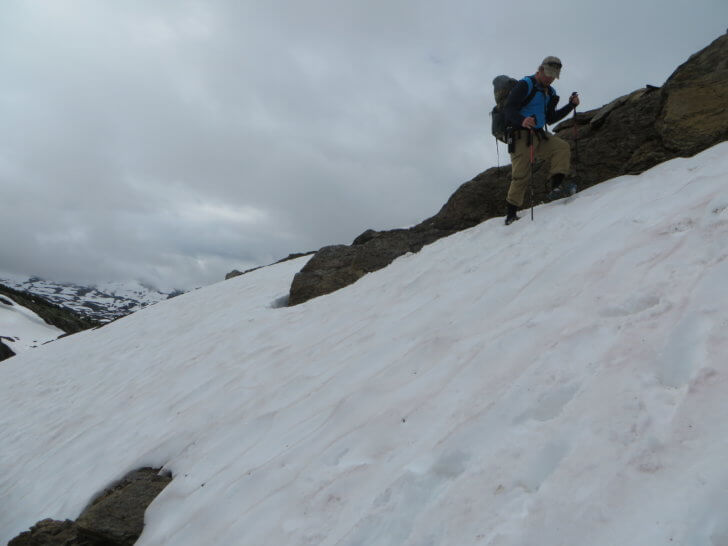
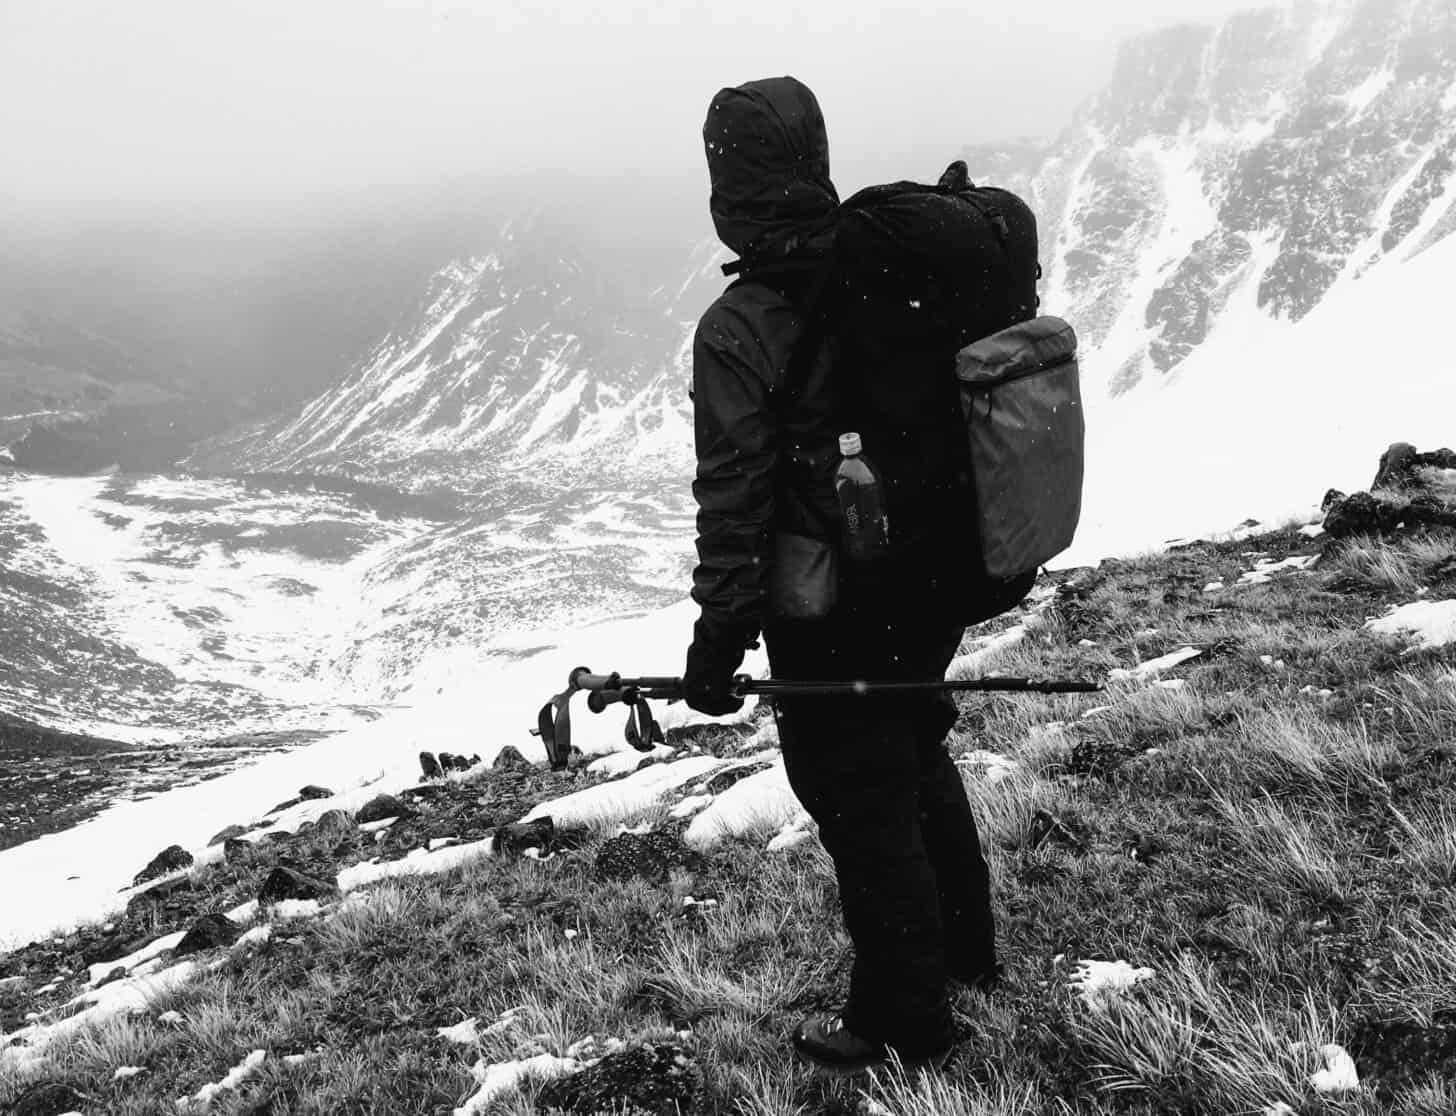
On our Wilderness Adventures Trek in Montana’s Absaroka-Beartooth Wilderness a few weeks ago, we experienced the full gamut of nature’s emotions: warm and sunny at our starting trailhead, and then four days of sustained cold, rain, and snow. We crossed the mountain passes. By the time we crested the last one at 11,000 feet, we were trudging through two feet of snow. That night, the low temperatures dipped into the teens.
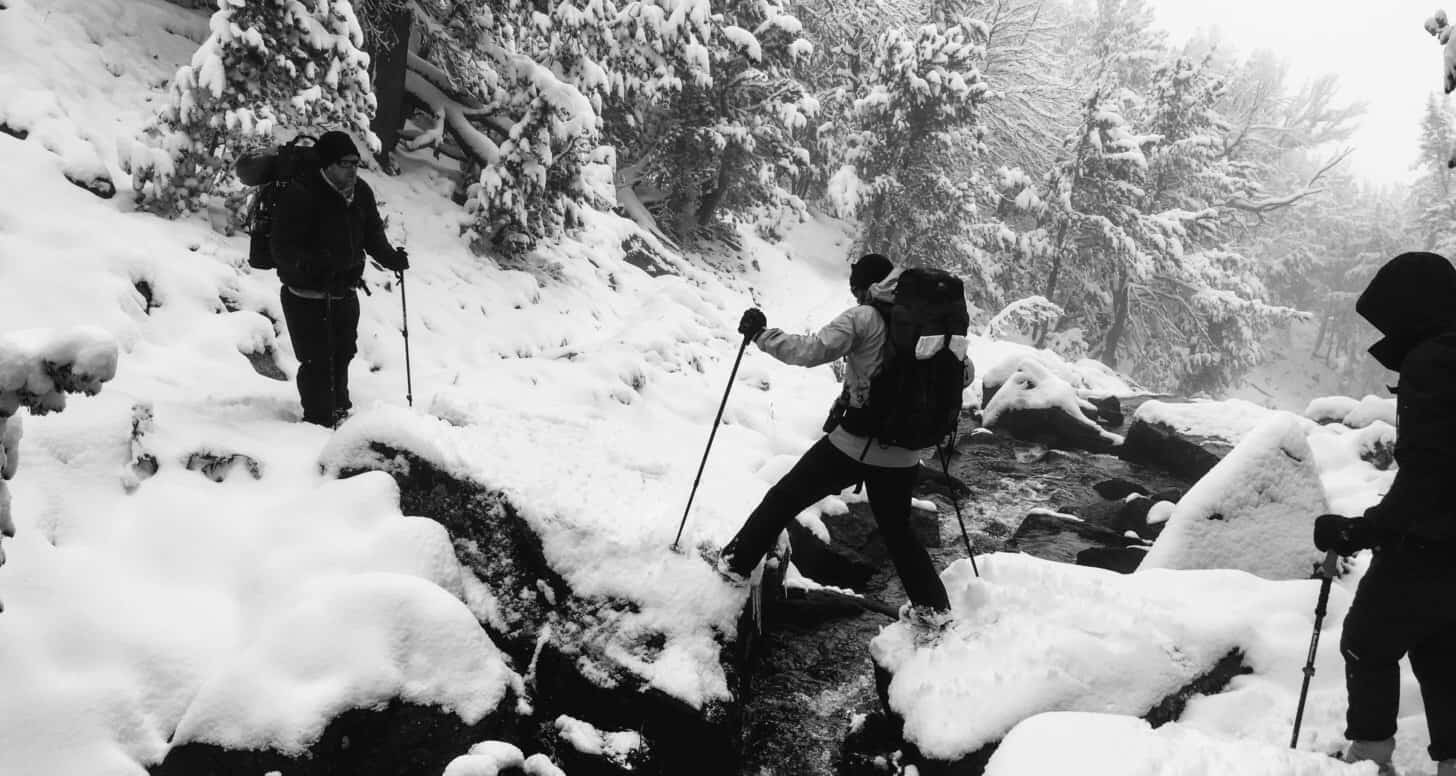
These are extremely challenging conditions for ultralight footwear.
Here’s how I mitigate these challenges with a carefully selected footwear “system” for inclement, cold conditions:
Normally I’m not a fan of waterproof-breathable membranes in my shoes because they create a hot, humid environment while trekking in mild weather that leads to maceration and blisters. However, if I know my feet are going to be exposed to perpetually wet, cold conditions, a shoe with a waterproof-breathable membrane helps keep feet warm(er) and dry(er) than meshy shoes that leak at every pore.
For snowy weather, a “mid” height shoe (with a cuff rising to just below the ankle) helps keep a gaiter seal intact without compromising the mobility of the foot-and-ankle joint.
I’ve mostly been wearing the Hoka One One Tor Tech Mid WP for most of my inclement-conditions treks for the past 12 months. It’s a solid shoe, and I value (primarily) its cushioning when carrying a heavy(ish) backpack. It lacks an aggressive outsole, and its durability isn’t great (I’ve worn holes in the toebox mesh as a result of some rowdy bushwhacking), so while it remains my favorite for on trail use, its stack height and trail sole limit its sidehilling comfort off-trail.
A more technical option that I like very much that seems to offer a good balance between cushioning for packed trails and a technical-enough sole for bushwhacking and snow is the Altra Lone Peak NeoShell Mid. I’ve had the chance to test them briefly and they seem to tick all the right boxes for an inclement conditions off-trail shoe.
My other recommendation is the Salomon X Ultra Mid 2 GTX, a shoe that I have many years of experience with. This is a more durable option than the other two, and in my experience, maintains the integrity of the waterproof membrane better over time due to a more durable sandwich protecting the membrane. Caveat: if you have wide feet, you may struggle fitting this shoe once you add heavy and/or waterproof socks in it.
One important part of this system is the gaiter. I prefer calf-height gaiters to ankle gaiters – especially when snow is in the forecast and I know I may be trudging through six or eight or twelve inches of the fluffy stuff here and there.
There are a few cottage companies that make ultralight calf-high gaiters, including Mountain Laurel Designs and ZPacks, but after having gone through several pair of them (they are delicate, and easily suffer tears if you are spending any amount of time off trail in the bush), I prefer something more durable. In addition, these ultralight gaiters are fine for a rainy trail, but they fail to create a good seal at the gaiter-foot interface that effectively keeps snow out of your shoe.
My recommendation for a light-enough, very durable, calf-height gaiter that mates well with ultralight shoes:
For trail use and non-snowy conditions, I like the ZPacks Challenger gaiters.
For everything else (which seems like most of the time for me), I opt for the more durable and better-sealing ORRMH’s.
During the summer or otherwise mild weather, I don’t think twice about getting my feet wet at a stream crossing. It’s faster, easier, and safer simply to wade through a stream rather than try to find (often slick) rocks or logs to walk across. And I know my shoes and socks will dry rapidly in warm temperatures, and I know my feet won’t get painfully cold at night if they are a bit wet.
But in the near-freezing temperatures associated with many spring and fall trips I take, this isn’t always a great strategy.
So the final recommendation I have for keeping moisture out of the inside of your shoes is to avoid submerging them in stream crossings.
Take the time to scout for a dry place to cross.
Of course, sometimes this isn’t possible, and you’re going to get wet feet. Shoes with a waterproof membrane won’t drain, so consider spending some time on the other side of the creek taking off your shoes to pour the water out, and ringing out your socks. It’s worth it!
Another option for shallow(ish) stream crossings that I’ve found works well is to integrate a waterproof sock (durable plastic bags work great, I like these: ) between your warm socks and shoes. More on waterproof socks later.

Thin, ultralight socks are fine for summer, but their limitations become painfully clear as soon as the temperature drops.
For cold, wet weather, consider upgrading to a mid- or even heavy-weight sock for more insulation. The primary disadvantage is that heavier socks dry more slowly. However, we’re not really counting on things to dry out, we’re instead trying to design a system that keeps you warm when it does get wet (and it will get wet).
Pure merino sock fabrics are warm but hold a lot of water and dry slowly. Pure synthetic sock fabrics dry fast(er) and are more durable (socks are expensive) but are clammy. Strike a balance and look for a sock with a merino content of at least 65% for warmth, and a synthetic content (usually polyester) of at least 25% for some durability and faster dry time.
Arteries that deliver warm blood to your feet run alongside both the inside and outside of your ankles. Keeping this region warm helps maintain warm feet in cold temperatures. I use a higher sock while hiking in cold weather than I do while hiking in the summer.
I use a 66/34 (% merino / % synthetic) blend full-height, full-cushion sock in a heavier weight made by Darn Tough that provides a meaningful amount of warmth and loft even when soaking wet.
While I like the durablity of Darn Tough socks, I’ve also used a similarly spec’d model from Smartwool which seems to have a softer feel and better fit (less sagging when wet).
In spite of their differences, I’ve been happy with both and find them to be durable, warm, and comfortable.
I usually arrive in camp in the evening – an hour before dusk or right at dusk is a common arrival time. That means I’m getting to camp when I’m pretty tired, cold, wet, and right when temperatures are starting to plummet for the night.
My camp setup routine usually involves setting up my shelter and then finding a dry(ish) place to cook. By the time I settle down to make dinner, my feet start getting pretty cold.
So before I do that, I take an important precaution – I change my footwear system a bit.
Now, I’m not enthused about putting dry socks into wet shoes. That’s where a waterproof sock comes in handy. So, I take off my wet shoes, take off my wet socks, put on dry socks, put on waterproof socks, and then put my wet shoes back on.
This has a dramatic impact on my foot comfort for the rest of the evening, and I can’t recommend enough the need to incorporate this into your evening routine.
1–2 mil plastic bags (small garbage can liners are ideal) and seam-sealed silnylon stuff sacks are my favorite waterproof sock options. I’ve also used Gore-Tex socks with great success – just be sure to size them up so they can be pulled over your heavy wool socks – and don’t buy the kind that are “heavy” or “insulated” or have “fuzzy or wicking fabric linings” – they absorb too much water. Examples of socks to avoid are made by companies like SealSkinz, Showers Pass, and Stryde (it’s not that these types of socks are bad products, they just may not be the most appropriate for this context). Note that there’s some merit to neoprene socks, but they’re thick and heavy, and you may not be able to get your feet in your shoes with them on!

My favorite waterproof socks are Rocky Gore-Tex Socks. Size up at least 2 sizes larger than your normal foot size so they layer easily. Rocky Socks are difficult to find, so you may have to search for them at more obscure retailers. I buy mine online here.
I’m also a big fan of so-called “launch socks”, which are used by kayakers to launch their boats in shallow water. Kokatat makes a pair (they are available at OutdoorPlay or direct from Kokatat via Amazon), and they are excellent. They are only a little a bit heavier than the shorter Rocky Socks, but because they are calf-height, provide a very warm microenvironment for your lower legs, and can be used for deeper stream crossings.
Heavier still, but warmer, and more difficult to dry out, would be a pair of seam-sealed neoprene “dry socks”. These ones are tall (18″) and would be a good choice if you were facing lots of stream crossings.
In addition to in-camp use, waterproof socks offer some on-trail advantages as well. They can prevent soaking your hiking socks at shallow stream crossings, and they provide some much-needed warmth during the first hour or two of trekking on a cold, wet morning.
Shelter is pitched, dinner cooked, bear bag hung – now it’s bedtime.
Remove your wet shoes, damp waterproof socks, and (probably a little damp) “camp socks” and swap out for cozy, puffy warmth with some ultralight insulated booties.
My pick for an ultralight bootie is made by a friend and former employee of mine who runs a little cottage company. Wearing a very thin merino liner inside of the bootie adds a lot of comfort (better next-to-skin feel) and some warmth as well.

You’re going to have some “wet stuff” (shoes, socks) and if the temperatures fall to much below freezing at night, you’re going to run the risk of having that wet stuff freeze. That’s going to make for a very uncomfortable routine in the morning when you try to put it all on, leading to cold feet and cold fingers as you try to manipulate frozen gear onto your warm feet.
The traditional “winter mountaineering” method for preventing this is to store wet gear (boots, socks, gaiters, etc.) in a plastic garbage bag and stow that inside your sleeping bag. This may be necessary for mid-winter conditions, when temperatures drop to the single digits or lower, but for fringe season backpacking, it’s probably not necessary. Temperatures may only drop to 15 or 20 degrees (F), and usually, it’s enough to keep your wet gear stowed “near you”. I stow mine in a plastic garbage bag or extra waterproof stow sack, and usually keep it right next to my sleeping bag and pad, where body heat has warmed that space to temperatures above freezing. Even on nights when I have frost in my shelter, sleeping in “close enough” proximity to my wet gear keeps it thawed well enough.
Shoe Sizing – With thick socks and perhaps a waterproof sock layer, conventionally-sized shoes are not likely to be large enough to accomodate the extra bulk without compromising circulation in your feet. So be sure to size up your trail shoes to accomodate the added bulk. I usually size up one to one and a half full sizes (or more, depending on the brand).
Sock Rotation – Trail socks, camp socks, sleep socks? My goodness, how many pair of socks do I need?! I’ve accepted the idea that it’s OK to hike in wet socks. They’re going to get wet within minutes anyways, if the weather is pretty bad. So on a typical weekend outing, one pair of hiking socks is plenty. I’ll then keep one dry(ish) camp sock in reserve (also a hiking sock) and reserve completely dry merino sock liners for sleeping inside my down booties. For longer trips in sustained wet conditions, I may add an additional trail sock, but more likely, I’ll stick with one pair and wash them clean every few days.
Keep feet warm(er) and dry(er) in wet (rain and snow) and cold (temperatures near and below freezing) conditions with the following system:
Read the full article if you want to learn how to use this equipment system while on the trail, in camp, and in your shelter.
Disclosure: Some links in this article are links to affiliate merchant partners – if you click one of these links and complete a purchase, we receive a small commission, which helps support our website – thank you very much for this support, we greatly appreciate it!
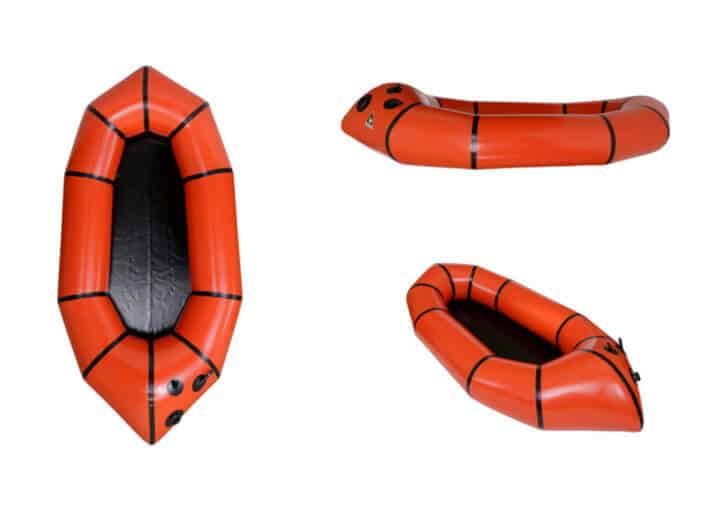
This archived article and video feature the 2017 model Scout.
See the updated review (2022)
See the updated Alpacka Scout Packraft Review (2022 model) for a comprehensive look at a major update to the 2017 and 2019 models.
Packrafts commonly fall into one of two categories:
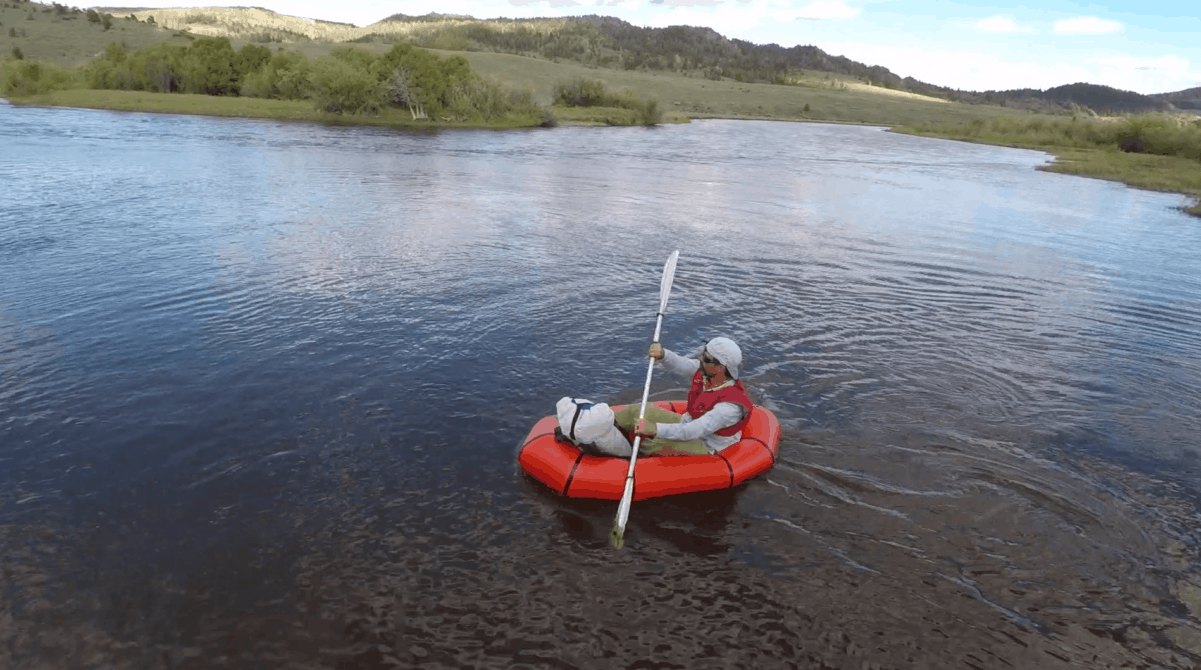
This review features the Alpacka Scout Packraft – a “bridge” boat that perhaps spans the gap between these two categories.
The Alpacka Scout Packraft offers the simplicity of the typical ultralight flatwater packraft (fewer features), but adds weight back in its tube (stern) design and fabric durability, allowing it to be an attractive option to those of us interested in a lighter and simpler boat for trips where we don’t need a whitewater packraft.
I’m reviewing this boat in the following context:
For an additional 0.5 to 1.0 pounds of weight vs. ultralight flatwater packrafts (e.g., boats from Klymit and Supai), what does the Alpacka Scout offer that these boats do not in terms of gear-hauling ability, stability in moving water, and durability?
Likewise, although well outside the scope of the manufacturer’s intentions, I was, shall we say, curious about the Alpacka Scout Packraft’s performance in whitewater.
During the course of this review, I used the Alpacka Scout on the following water types:
In addition, I paddled the Scout with and without a backpack. When I used it with a pack, I simply stowed the pack in the bow of the boat (no tie-downs). Pack weight ranged from 15 to 30 pounds.
A complete performance assessment, including the strengths and limitations and a final commentary about the Alpacka Scout, are outlined in the following review video.

Alpacka Raft LLC provided a product sample on a temporary loan for the purpose of this review.
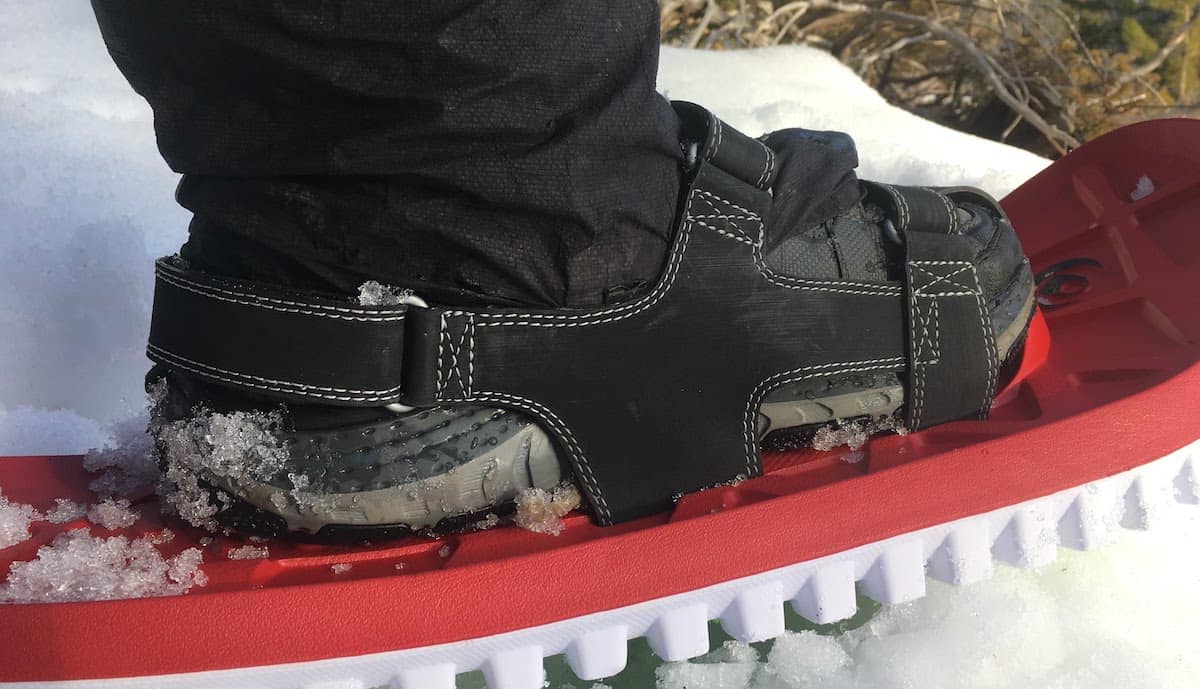
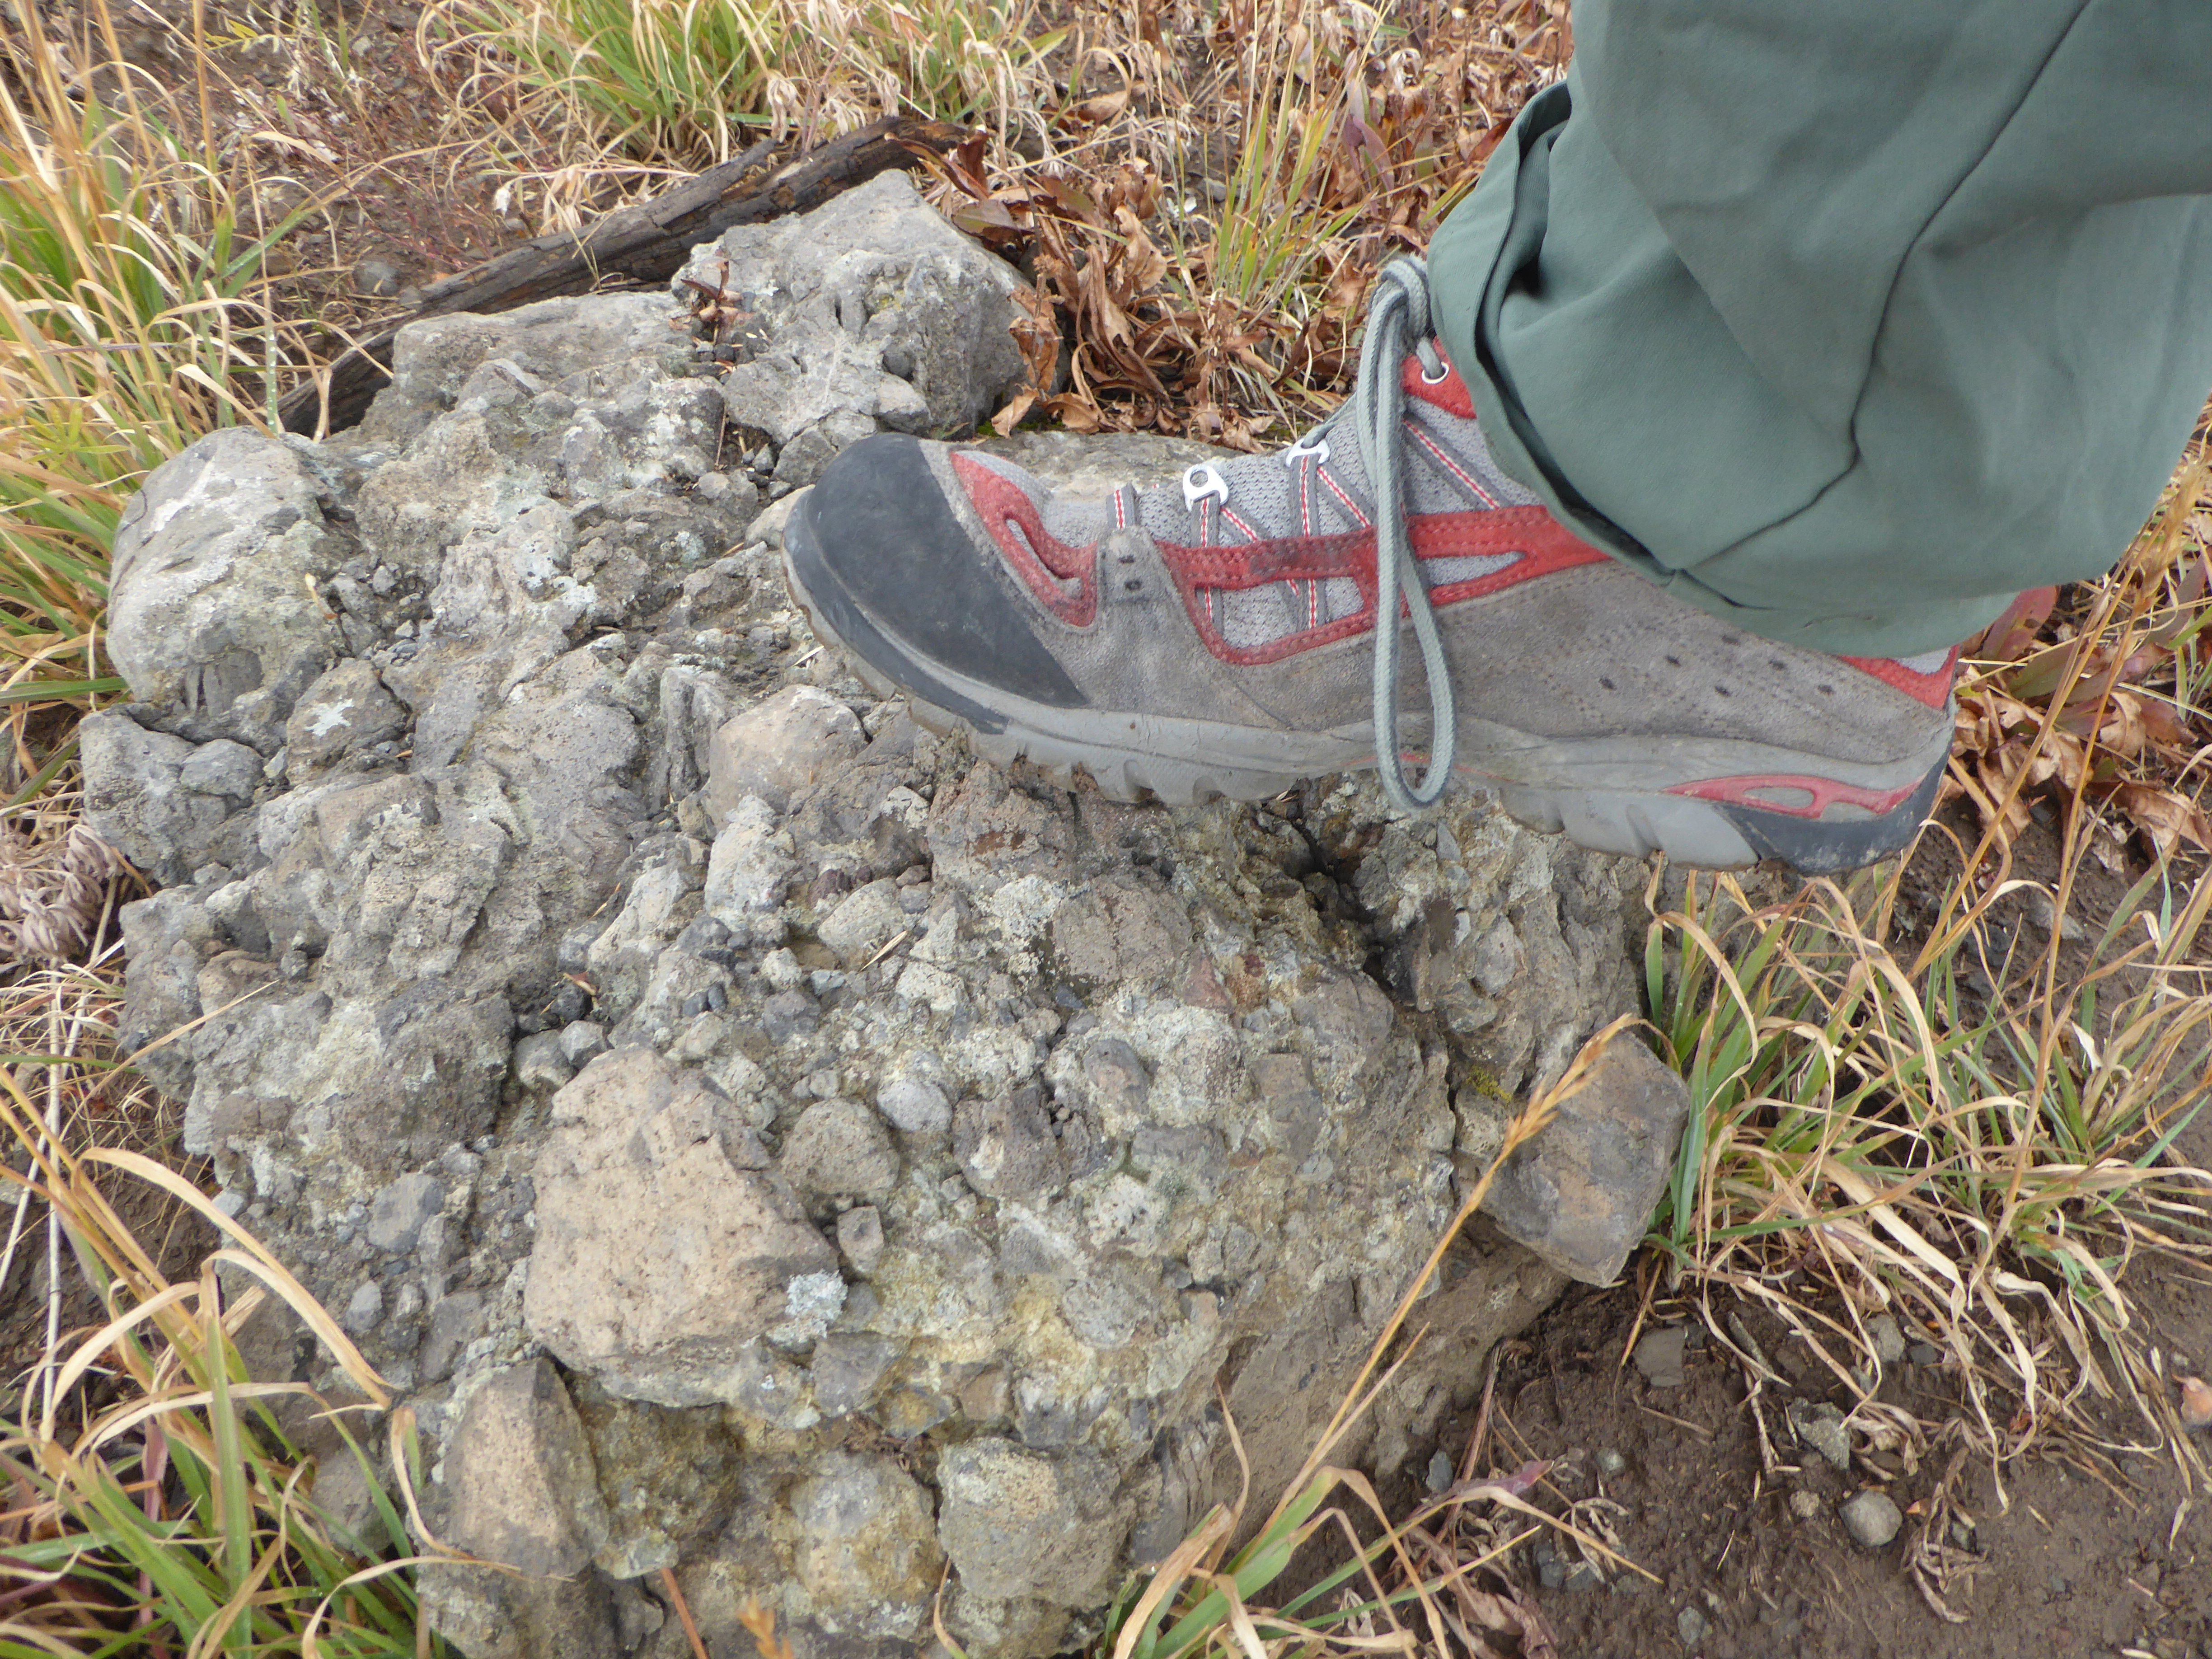
This Asolo Plasmic Shoe Review identifies how this shoe performs. Our take is that it performs well in boulders, scree, and in the forest.
You don’t have access to view this content.
 Loading...