Overview

The Mountain Hardwear EV2 is loaded with high tech materials and design: strong Atlas Scandium SL pole set with new floating connectors, low-stretch VX-O2 panels follow pole lines and reinforce side panel tie outs. The idea is that together they create a strong truss-like system to support the tent in high winds and heavy snow loads. The main canopy is a waterproof/breathable, fire-retardant (nice!), pre-stretched polyester.
The EV2 may be the lightest two-person, three-pole mountaineering/expedition tent on the market. Many new high tech (and expensive) materials contribute to weight savings. The EV2, even with its few flaws, is our first choice for a fast and light ascent tent. The Atlas Scandium SL poles and low-stretch reinforcing panels on the canopy create a surprisingly solid structure for the weight. Five vents and the waterproof/breathable, fire retardant canopy fabric do a credible job of managing condensation. The EV2 is one of the easiest tents we’ve pitched, mountain or otherwise. With the built-in vestibule, we found the tent had more than enough room for us and our gear to comfortably wait out a day long Patagonian storm of high winds with horizontal rain, sleet, and snow.
In Brief
- Just over 5 lbs with vestibule – possibly the lightest tent in its class
- Roomy for a two-person mountaineering tent with good area to weight ratio
- Easy and extremely fast to pitch with exoskeleton poles and clip attachments
- Strong, light Atlas Scandium SL poles with field serviceable floating connectors
- High tech fabric/design: low stretch structural panels follow pole/stress lines. Fire retardant waterproof/breathable canopy fabric of pre-stretched polyester (meets fire resistant code for tents!)
- Five vents and waterproof/breathable canopy fabric provide good condensation resistance for a single walled tent
- We were unable to get a completely taut canopy pitch
- Less resistant to heavy snow loads than heavier four-pole mountaineering tents (especially true with the older Easton pole set)
Specifications
|
• Tent Type |
Single wall, three-pole, mountaineering/expedition tent with built-in vestibule | ||||||||||||||||||
|
• Fabric Description |
|
||||||||||||||||||
|
• Weight Full Package |
|
||||||||||||||||||
|
• Weight Minimum Package |
|
||||||||||||||||||
|
• Floor/ Vestibule Area |
|
||||||||||||||||||
|
• Floor Area/Backpacking Light Minimum Weight ratio (including internal vestibule) |
0.36 ft2/oz (1.2 m2/kg) | ||||||||||||||||||
|
• Dimensions |
|
||||||||||||||||||
|
• Model Year |
2004 body tested with 2004 Easton and a stronger 2005 Atlas pole set | ||||||||||||||||||
|
• MSRP |
$625.00 USD |
Usable Features / Ease of Use

Pitched in the Patagonian Andes. The Mountain Hardwear EV2 was strong enough to withstand the legendary Patagonian winds. It was 3 or more pounds lighter than most tents venturing out in the area, and the envy of other parties.
With external poles and clips, and no fly, the Mountain Hardwear EV2 is easier and faster to pitch than most mountaineering tents, including those that use internal poles attached with Velcro straps. The EV2 vestibule goes up easily – a welcome change from some tents where attaching an external vestibule takes more time than pitching the tent body itself. While it is easy to pitch, getting a taut canopy on the EV2 is difficult. I will discuss this further later in the review.
The EV2 has:
- Five vents with mosquito netting, storm flaps, and built in struts to prop them open. The vents zipper completely closed to keep wind-blown precipitation out, or open to reduce condensation
- New, and strong, Atlas pole set with floating connectors
- Special clips at pole intersections are supposed to increase strength
- External poles that generate no condensation on the inside of the tent
- Two small, non-yellowing, non-clouding, clear UVX film side windows
- Large stake out loops that accept both skis and snow pickets
- Four mesh storage pockets for things like cameras, headlamps, glasses, etc.
- Eight, buckle adjustable webbing tie outs for the floor and vestibule.
- A narrow (but longish) floor design accommodates pitching on narrow ledges and snow platforms commonly encountered in climbing
- The usual stuff sacks, Y stakes, manual (not very useful), and seam sealer, etc.
Weight / Sizing
The EV2 may be the lightest tent in its class. Although it has a slightly lower total area to weight ratio than the Crux X2, it is important to remember that the vestibule of the EV2 is completely enclosed and floored. No other two-person, three-or-more pole mountaineering tents can claim the floored area to weight ratio of the Mountain Hardware EV2.
Usable Space
For a five-pound, three-pole mountaineering tent the EV2 has a lot of room. The built in vestibule contributes to this. My wife and I slept in the rear of the tent and found enough room in the vestibule for all our gear. We easily weathered a day of high winds, rain, sleet, and snow in the EV2 without going crazy. The tent seems much larger than other tents in the 31 to 33 square foot size range. The roof line is almost horizontal front to back making it easy for two to sit-up and face each other. For a mountaineering tent it is fairly bright and cheery. The VX-02 panel reinforcements are semi-clear and let light in. There are two small side UVX film windows and the orange waterproof/breathable canopy fabric lets pleasantly colored light in as well. Even the vents let light in. The pseudo-bathtub floor, which has edges raised 3 inches above the ground, reduces the level floor area a bit. It took a little getting used to, but we did not find this a significant problem for usable area or gear storage.
Wind Stability
I found the Mountain Hardwear EV2 plenty stable in the winds in Patagonia which is, without question, the windiest place I’ve ever been. It seems like the closer you get to the crest of the Patagonian Andes and the huge southern ice field, Hielo Sur, the stronger the winds blow. The most severe test for the EV2 was a campsite below Paso Viento. Viento means wind in Spanish and if they have to mention wind in Patagonia… The wind was so strong that my wife and I were unable to walk or stand up. We retreated to a semi-sheltered site and pitched the EV2 to wait out the wind. The EV2 was stable with little deflection even during the hardest gusts that day and night. Our only gripe was the noise from flapping panels on the not completely taut tent canopy. Good side tie outs were essential to reduce the panel flapping and stabilize the large and otherwise unsupported side panels of the tent. The raised edges of the tent floor occasionally allowed some wind underneath the tent – a strange experience. The 41 inch peak height, while tall enough for both of us to sit up, was low enough to reasonably shed wind.
Contributing to the strength of the tent is the new Atlas Scandium SL pole set. This pole replaces the standard Easton 7172 poles on previous EV2’s and adds a few ounces to the total weight. Much of this weight increase comes from a stronger and larger diameter vestibule pole. Atlas Scandium SL poles use floating connectors which they claim make the poles stronger, lighter, and more durable than standard fixed connector inserts or swaged end poles. The floating connectors allow more even pole flex, are 13% stronger than traditional fixed insert poles like the Easton 7172, and are 30% stronger than swaged end poles like the DAC FeatherLite. The floating connectors also make the poles more easily field repairable.
The EV2 has panels of low-stretch VX-02 fabric panels in high stress areas – under the tent poles and crossing the side panels of the tent where the side tie outs attach. The theory is that these panels form a strong, non-stretching network that interlocks with the poles for a super stable pitch structure between the tent canopy and poles. We found this only partially successful.
Storm Protection (Wind and Rain)
 The built-in vestibule offers seamless protection. No extra weight and nothing extra to pitch. The downside is that the vestibule is not protected from the rain when entering and exiting the tent (move fast), nor can you cook inside the tent with the vestibule partially open. The side and ceiling vents work OK when cooking in the tent but not as well as a partially opened, side entry vestibule as used on many mountain tents. When tent-bound in a severe storm, there is a zippered hole in the vestibule floor to get snow in and dirt and other stuff out (like emptying your pee bottle) without having to open the tent door. Make sure you don’t mix clean snow with the stuff you put out!
The Mountain Hardwear EV2 does quite well with wind, rain, and moderate snow. The front door and all five vents zipper shut to keep wind and precipitation out. The built-in vestibule works to store all your gear away from precipitation and keeps it readily available as you wait out a storm. You can seal down the EV2, even more than a double walled shelter, which usually has a gap between the floor and the fly. I found this a blessing at the end of a day of windy hiking and bad weather in Patagonia. There was nothing more I wanted than to crawl into a place where there wasn’t wind, dust, and grit swirling around, or horizontal rain, sleet, and snow, and where the whooshing and howling quieted down. The EV2 is easy and fast to pitch, so I was under shelter sooner than with most other shelters I’ve used. The five vents worked well to let in fresh air, hold down condensation, and keep precipitation out. The side windows and vents were also nice to peek out and see what the weather was doing.
Storm Protection (Heavy Snow Loads)
Note: The following discussion involves testing done prior to receiving the newer and stronger Atlas pole set. The EV2 that deflected under snow loading used the older and more flexible Easton poles. We believe that the stronger Atlas pole set should reduce the EV2’s deflection under snow loads. In particular, the vestibule pole is much stiffer, with an increased pole diameter from 0.350 to 0.390 inch.
Our major gripe with the EV2 is deflection with heavy snow loading. One of our testers used the EV2 (older Easton poles) on a winter ski trip. During a night with around 16 inches of snow, the ceiling of the EV2 deflected 6 to 8 inches and the walls closed in by a foot or more. After a day of skiing and more heavy snow, the EV2 had deflected to a height of around 24 inches or almost half of its original 41 inch peak height. The tent did spring back undamaged after shoveling out. A Mountain Hardwear Trango 2 tent pitched in the same campsite did not significantly deflect under the same snow load. On the other hand, the Trango 2 is a four pole, double-walled tent, that weighs nearly twice the weight of the EV2.
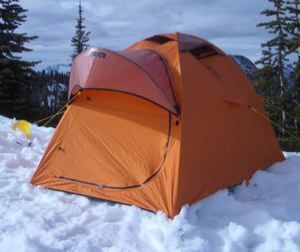
 I found the Mountain Hardwear EV2 plenty stable in the wind but a bit noisy due to some of the canopy panels flapping. This is about as taut a pitch as I could achieve in the field. Notice that some of the canopy panels are under-tensioned and wrinkled. A good side tie out anchored into the crossing VX-02 structure stabilizing seam strips helps but does not completely solve the problem. The less-than-taut canopy may well contribute to tent deflection under heavy snow loads. Not visible in the picture is the super taut tent floor.
A few of our staff engineers (also the testers) discussed the snow load deflection. Here’s our best guess at possible factors contributing to this and some possible solutions (in addition to the stronger Atlas pole set already mentioned above):
1. While the exoskeleton and clip pole attachment is a breeze to pitch, it may not lock the poles solidly in relation to each other or connect them solidly to the VX-02 reinforcement panels on the tent canopy. Thus, under heavy loads the poles have the freedom to shift from a strong structural configuration to a weaker one (i.e. they get crooked and start to flatten out) allowing significant deflection of the tent body. Also, and possibly more important, the three-pole design leaves a large and relatively unsupported rear panel on the tent as well as lacks the structure and rigidity of a four-pole tent.
Solution?: An interlocked four-pole structure may do much better as evidenced by the performance of the Trango 2. There may be something special about the rigidity and structural integrity of four pole design. As such, taking a pole out of a four-pole tent may not be the best approach to saving weight. A better approach might be sticking with four-pole design and looking for weight savings elsewhere. We’d guess that a fourth pole on the EV2 would add about 5 to 8 ounces. Even with the additional weight, the EV2 would still be the lightest tent in its class. (It may not be a coincidence that a new Mountain Hardwear tent, the ‘EV3,’ uses a four-pole design. This upcoming tent is featured at the end of this review; we can’t wait to get our hands on one.) Other possibilities include better stabilizing the poles to each other and/or the canopy so they can’t shift as much under load. In this way they may better utilize the structure and support of the VX-02 reinforcement panels on the tent canopy, the original design goal of the tent. Our tent was showing some wear at the pole junctions after substantial Patagonian winds, indicating that they were shifting under load.
2. The lack of tension in the canopy of the EV2 may also contribute to snow load deflections as well as allowing tent panels to flap in the wind. The floor of the EV2 is under much greater tension than the tent canopy. When we first pitched the tent, the floor was so tight and the canopy still not taut, that we were sure that we had done something wrong. But all testers found the floor very tight and could not get a taut-canopy pitch on the EV2.
Solution?: The EV2 is a complex structure and we can suggest no immediate solution other than that Mountain Hardwear needs to find a way to better distribute the tension in the tent. More tension should go to the canopy and less to the floor. Again a four-pole design may help with this.
It is important to note that our reviewers did not use an optional ‘internal guy’ system described in the EV2 User Manual. This system, while taking extra time and effort to set up, may have improved the EV2’s snow loading performance. The Trango 2 also did not use the internal guy system and did well with snow load.
Ventilation / Condensation resistance
 This is a pitch done in a hurry. No apologies. It was windy and sleeting when we pitched the tent and we wanted to get under shelter ASAP! Rocky ground also prevented perfect stake placement. With some fiddling this pitch could be improved. Note also the raised edges of the pseudo-bathtub floor. It takes a bit of getting used to, but it is normal for the floor edges to pitch 2 to 3 inches above the ground. Mountain Hardwear claims that this is much stronger than a true bathtub floor.
The critical factor for managing condensation in the Mountain Hardwear EV2 is wind. With wind the EV2 is almost condensation free due to its five vents with struts to prop them open. Without wind, the EV2 with its waterproof breathable fabric, does better than non-breathable single walled tents but still condenses at moderate levels*. In calm conditions the vents are not large enough to make convective (chimney) ventilation work. To be fair, vents large enough for this are inappropriate on a mountaineering shelter. In calm, bug free conditions, the vents can be completely opened without mosquito netting for improved air movement.
Patagonia has an excessive amount of damp and foul weather that can make the best single wall tent look pretty bad. One of the techies at Mountain Hardwear was a bit skeptical of how the EV2 would do with condensation there. He shouldn’t have been. Even waiting out a very cold day of constant rain we had no problems with condensation in the tent. What contributed most to this were the vents and that there was wind. With the vents open, the wind created enough air exchange to keep condensation at bay. The vents are thankfully located in areas of the tent that keep drafts away from the occupants. The waterproof/breathable shell fabric helped as well with condensation. In addition, having the poles outside the tent keeps them from condensing and dripping on you, which can be a problem in tents with internal pole attachments as found on many mountaineering tents. On another night without rain, we slept with the front door open. The vestibule was deep enough and protective enough that sleeping in the rear of the tent we were protected from the wind. Without rain and bugs this is a very pleasant way to sleep and an excellent way to keep condensation down.
Our other tester used the tent on an overnight backcountry ski trip. With two people damp from skiing, no wind, and temperatures just below freezing, the tent had moderate condensation. In his opinion the tent did significantly better than non-breathable single walled tents but not as well as some of the eVENT single walled tents he has used under similar conditions. The eVENT tents do not use fire retardant fabric, while the EV2 does.
* Note: All tents/shelters will condense given the right conditions – even uncoated nylon with no fly over it. I’ve had condensation inside a large nylon tent with a substantial mosquito netting roof vent, no fly, and the tent was even protected by a large roof. If it’s humid enough with little air movement, anything will condense.
Insect Protection
The EV2 provides complete insect protection. There are five vents on the tent with mosquito netting and no other way for bugs to get in. That being said, this is a mountaineering tent and not a camping tent. If you want a tent with bug protection and a nice view buy a Coleman. The EV2 front door does not have a mosquito netting backing and there are no large panels of mosquito netting anywhere else on the tent. Under heavy bug pressure, your ventilation, and more importantly, viewing options are limited. Although the tent is fairly bright and cheery inside, it may not be the happiest place to wait out a swarm of mosquitoes.
Durability
The strong and field serviceable Atlas Scandium SL pole set, strong UV resistant VX-O2 panel reinforcements, and the pre-stretched polyester canopy fabric (polyester is also UV resistant) should go a long way to making the EV2 a durable tent. The durable taffeta polyether coated tent floor should be durable enough on most ground that you can skip the footprint and save yourself some weight.
Value
The Mountain Hardwear EV2 is arguably the lightest and most innovative tent in its class. For $625 you get a lot of high tech design and materials. The EV2 is a great tent. Even with its design blemishes, it would be our testers’ first choice for a two-person fast and light ascent. With a few structural improvements EV2 could be an exceptional tent and an excellent value. But the current design falls a bit short of its goal due to the snow load deflection and not-so-taut canopy. The EV2 is a good if not stellar value. We eagerly await the next generation EV2.
Recommendations for Improvement
See possible structural improvements discussed in the “Heavy Snow Loads” section above. A side entry option on the vestibule would be a nice addition.
Tips
The raised floor edges are supposed to be that way! Remember to follow the pitching instructions and leave the tie out webbing at an initial 3-inch length. Don’t cinch the straps more to make the canopy tighter. You’ll only increase floor tension without improving the canopy tension. Make solid side tie outs to stabilize the sided panels and you should obtain a reasonably taut pitch. It takes a bit of practice to get things just so and achieve the best pitch possible (which will likely include a few less than taut tent panels).
Special feature: sneak peak at the upcoming Mountain Hardware EV3

Mountain Hardwear EV3: If you look closely you can see that it has a four pole design. It also has a side entry vestibule (not shown). This tent was built for Ed Viesturs. He will use the EV3 in his attempt to climb Annapurna, the final peak in his bid to be the first American to climb all fourteen 8,000 meter peaks without supplemental oxygen. Note: EV in the tent name stands for Ed’s initials. He tested the EV2 before introduction of the tent. Photo courtesy of Mountain Hardware<

Mountain Hardwear EV3: It’s a little blurry, but this front view shows the improved vestibule. It has a side entry, which protects the vestibule from precipitation while entering and exiting the tent and gives more options for ventilation, especially when cooking in the vestibule. You can just make out the four pole design if you stare hard. Photo courtesy of Mountain Hardware<