In high places: Crew 613-K on the summit of Mt. Phillips (11,736 ft). Mt. Baldy in the background.
A long time ago, at a Scout ranch far far away…
In the summer of 1972, when I was 16, my father put me on the Greyhound bus that would take me from Lewiston, Idaho to Cimarron, New Mexico, home of Philmont Scout Ranch, a place about which I knew almost nothing, my attendance owing only to an unclaimed scholarship offered by our local Scout council. I didn’t really want to go. I was traveling by myself, dressed in the full Scout uniform my father insisted that I wear for the duration of the bus trip. In 1972 the Vietnam War was still raging, and my generation, or part of it, was still raging against authority. Anyone in a uniform was suspect, and dressed as I was, I could only be taken as someone whose allegiance was to The Man. Talk about being self conscious. The bus trip was to take almost three days, with stops at almost every wide spot in the road. Forward progress was hard to discern, and at some point I began to feel, as one sometimes does on long unpleasant trips, that my entire life had been spent on this interminable voyage.
When I finally did arrive at Philmont, any embarrassment about being seen in a Scout uniform was quickly dispelled. Everyone, and there were a lot of people milling about camp headquarters, was in uniform, all wearing neckerchiefs and patches that advertised their home council. It was a flurry of activity and color, and above this scene were the Sangre de Cristo Mountains, and the Tooth of Time. I met my Ranger and the rest of my crew. The scholarship I had claimed was for a program called Kit Carson Men, a precursor to the current Rayado program. We would trek for sixteen days and cover Philmont south to north. The highlight would be a side trip into the Latirs where we would climb Wheeler Peak, and try, unsuccessfully, to signal to the Scouts we imagined to be on the summit of Mt. Baldy, the high point on the Ranch. In all we hiked about 135 miles, a modest trek by KCM standards. However, to that point in my life it was the hardest thing I had ever done. I was always hungry, my equipment was inadequate, and I was, at times, almost overcome by self doubt. Completing my trek and successfully shouldering my share of our crew’s responsibilities were among the proudest moments of my young life, and in time I came to realize that those brief weeks were as important a formative experience as I have had.
I arrived without a backpack, but did bring a kapok sleeping bag from the Lewiston Army Navy store, a heavy Scout issue jacket in bright red wool, a pair of department store “wafflestompers," a plastic poncho, and a steel GI mess kit. I also brought one of my prized possessions, a Buck knife, the Folding Hunter, in a black leather sheath. At my father’s insistence, I wore a Scout issue campaign hat in dark green felt, like the one Smokey The Bear wears. I suppose that such a ridiculous thing may find a place in a Scout’s ceremonial wardrobe, but it proved wholly unsuitable as a backpacking hat. It was unwearable while carrying a pack, owing to the fact that the flat circumferential brim continuously bumped into the back of my pack, forcing my head down, and denying me a view of the terrain ahead. In the end I carried the thing in my hands most of the length of our trek. At the trading post I purchased a Philmont belt, along with the iconic bronze Philmont buckle. At that time, there was a tradition that you were supposed to wear the belt and buckle upside down until you had climbed the Tooth of Time. I bought a belt that was a little too long, but that was a choice that proved foresighted in the long run since I can still (barely) wear it today.
In Tent City: crew members make final preparations for their trek.
There was other paraphernalia, but that’s what jumps out at me these many years later. I had as yet no notion that backpacking could be anything but uncomfortable. I had never used a hip belt or a Nalgene bottle, steel canteens being de rigueur in my experience. I was vaguely aware of a book called The Complete Walker, written by a man named Colin Fletcher, which advocated Kelty Packs, and walking sticks that would “convert an insecure biped into a confident triped.” But for that, the backpacking revolution in my neck of the woods had gotten no further than the Lewiston public library.
Back in the Day
My Ranger chose for me a canvas Camp Trails frame pack from camp stores and advised me to outfit it with a hip belt, an unpadded version of which was available for purchase at the Philmont trading post. For his part, my Ranger was equipped with a dark green Kelty D4, a nylon mummy bag stuffed with goose down, and a pair of svelte Pivetta hiking shoes. Even now, it is hard to call them boots. They reminded me of nothing so much as hiking slippers. Instead of a water bottle he favored a leather bota bag. His name was Jeff Dias, and I suppose he was then in his early twenties.
I had never used a backpacking stove, and, indeed, during that portion of our trek which was on Ranch property we cooked over open fires, after first rubbing down the outside of our pots with a paste made from powdered soap and water to prevent soot from sticking. I believe the brand of soap used for this and all other cleaning purposes was “Tetrox," and there was a running (pardon me) joke about the “Tetrox trots,” which you would contract if you did not rinse your cookware thoroughly enough. (Although Tetrox appears to be long gone, the condition it sometimes caused yet abides, now known to one Philmont Ranger as the “butt pees.” Our Scouts loved this expression. Excretory humor is never wasted on a 15-year-old. ) However, when we ventured into the Latirs, my crew used what was then called a “bluet” stove, later rebranded as “gaz.” I had never seen anything like it and was amazed that a heat source so small and light could accommodate a crew of seven people.
Coming Full Circle
After returning from Philmont, I was anxious to apply all I had learned about backpacking and to equip myself in a fashion that would allow me to travel comfortably in the wild. Among my first purchases was a red Kelty B4 pack, a purchase which I have never regretted. Thirty-eight years later, I am still carrying that red pack, although the packsack is now so sun rotted as to make me reluctant to pack it too tightly. Backpacking became a passion and ultimately came to include a summer hiking the Washington and Oregon sections of the PCT.
My partners in crime, Joe and Todd, take a break at Rayado.
However, marriage, small children and the demands of my profession caused me to take a break from backpacking until my son, now 15, joined Scouts. I, in turn, joined the Troop committee and participated in planning activities for the boys including backpacking trips into the Sawtooths and Owyhees. I began to sense that during my hiatus from backpacking, things had again changed. I didn’t pay much attention to the lightweight movement, still satisfied with my Kelty and an MSR Hubba, which I had acquired for Scout outings. As an aside, I found that as I reached middle age, I no longer desired to have a tent mate, particularly one of the same gender. My sleep was much more restful if I slept in a solo tent, using earplugs to drown out the snoring neighbors situated around me.
About a year ago, a fellow Scouter suggested that the Troop apply for a Philmont trek. She had staffed at Philmont in the 80s and had the same halcyon memories of her time there as I did. We applied for a trek and were told by those in the know that it might take as long as three years to get a slot. However, the Great Recession evidently tempered demand, and in the fall of 2009 we were contacted by Philmont and asked if we would be interested in a trek for 6/12/10 – 6/25/10. We accepted and began planning. Our roster filled quickly, our crew consisting of three adult Scouters – Todd Swanstrom, Joe Williams and myself – and nine Scouts. I accepted the responsibility to be adult advisor for our crew and began to obsess about how to make this as great an experience for our Scouts as my Philmont trek had been for me.
Rules & Regs
Where to start? My cursory searches on the internet about Philmont suggested something rather ominous, later confirmed by the first mailings we received from the Ranch in the fall of 2009; Philmont has become a place of rules, adherence to which is not optional. I know my temperament, and I recognized that it might prove difficult for me to accede to regulations that ran counter to my own experience. The best advice I received about returning to Philmont was from one of Doug Prosser’s articles. He advocated going with the flow, even though the rule in question might seem arbitrary, or even slightly ridiculous. Months in advance, I got my mind right and resolved that I would flow like water. (After arriving at our first campsite, and after our Ranger had watched me erect the thing, I was asked to move my tent eight (eight!) paces so that all crew tents would fit within some radius visible only to him. I smiled and did as I was asked.) To anyone contemplating a Philmont trip, especially experienced backpackers who think they know a thing or two, I cannot emphasize enough the importance of Doug’s advice. You will have a lot more fun if you knuckle under and do it their way, because there really isn’t any other way. By the way, their way works!
They like things cozy here: Scouts, tents, and Ranger huddling within the invisible radius.
Early in my preparations I stumbled on the Backpacking Light website and discovered that a number of Scouters have given a good deal of thought to how to do Philmont in a lightweight style that accommodates the constraints of established trek architecture. I am particularly indebted to Doug Prosser and Al Geist for their tested insights on gear and practices that made our Philmont trek more enjoyable. After reviewing these and other materials, I personally resolved to go as light as possible and to craft gear lists that would lighten the packs of all our Scouts. Particular attention was devoted to selecting crew gear.
Troop Gear
My gear list was disseminated to Scouts and their parents several months before our departure date. With total Philmont costs and associated travel expenses hovering around $875 per Scout, I recognized that it was not reasonable to ask Scouts to replace their current equipment with lightweight gear as I planned on doing, so I focused on getting them to select from their current gear, and when in doubt leave it out. Here my list is reprinted, unchanged from my original email:
- Backpack with hip belt. You all have one of these.
- Rain cover for backpack.
- Sleeping bag. Light summer bag is better. Light summer down bag is best.
- Sleeping clothes; synthetic t-shirt, boxer shorts or light (Capilene) long john bottom.
- Sleeping pad.
- Rain jacket. Philmont will not allow a poncho for some reason.
- Rain pants.
- Hiking shoes. Many recent trekkers recommend lightweight breathable hikers or trail running shoes. Avoid heavy leather boots. I’m told that most of the Philmont trails are smooth and there isn’t a lot of off trail scrambling required. Some may also want to bring pair of low gaiters.
- Two or maybe three pairs of mid-weight synthetic or wool socks, inclusive of the pair you start hiking in. Some may also want to use a liner sock. Wear one pair of socks and wash the other for the next day. Repeat.
- One set of underwear, i.e., the set you’re wearing.
- One pair nylon pants and one pair hiking shorts, or one pair of zip off pants (best).
- One short-sleeve wicking t shirt, or one long-sleeve nylon trekking shirt, such as the ones we used for Kandersteg last summer.
- Hat with brim.
- Insulating layer, e.g., fleece jacket, lightweight down sweater. Avoid heavy windproof fleece. The idea is to take a pure insulating garment, one whose only purpose is to create dead air space. Any wind blocking that needs to be done can be done by donning your rain jacket over your insulating layer.
- Bowl.
The Phillips brand.
- Cup.
- Spoon.
- Container(s) in which to carry 3 L of water.
- Sunglasses.
- Lip balm.
- Small knife.
- Flashlight (LED headlamp is best).
- Butane lighter.
- $10-$20 in small bills for the trail.
- Bandanna (trip neckerchief being created by Dr. Williams may substitute for this).
- Compass.
- (very) Small synthetic towel.
- Philmont map, available at trading post.
- Toothbrush and baking soda, dental floss.
- Small container biodegradable soap, e.g., Campsuds.
- Stuff sacks and two or three one-gallon Ziploc bags.
- Tent. Philmont requires that two- or three-person tents be used. One-man tents are not allowed. We will use Troop tents, footprints, and stakes.
- Trekking poles, if you use them.
- Camera, if you are so inclined.
- Class A shirt for travel and first day at Base Camp.
- Compass.
- Any medications you need.
- Lightweight beanie if you sleep cold, or to wear on chilly morning.
Prior to our departure, I required all Scouts to produce their packs for inspection and announced that a prize would be awarded to the lightest pack that met all of the above requirements. It was an interesting exercise in winnowing, and I’m glad we did it, or all kinds of unnecessary gear would have been lugged from Idaho to New Mexico. As I remember, the prize went to the son of the Scouter responsible for reinvigorating our Troop as a backpacking Troop. His pack weighed in at 17 pounds exclusive of food, water, and crew gear.
Out of the fiery furnace; crew members play around with wrought iron at Rayado.
My Gear
Backpack
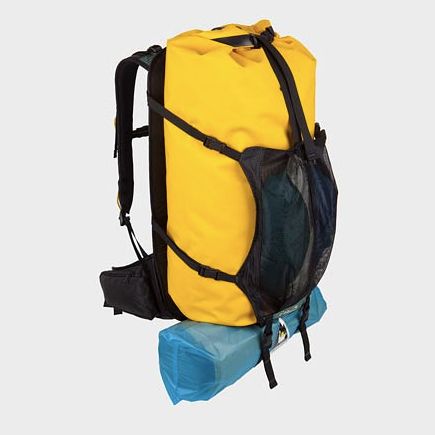
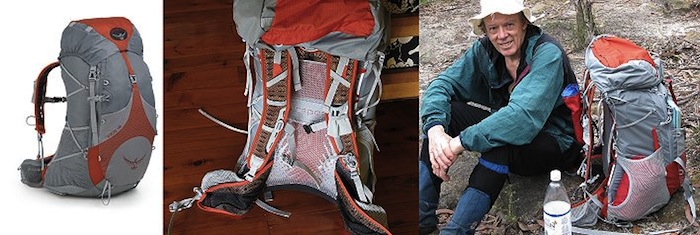
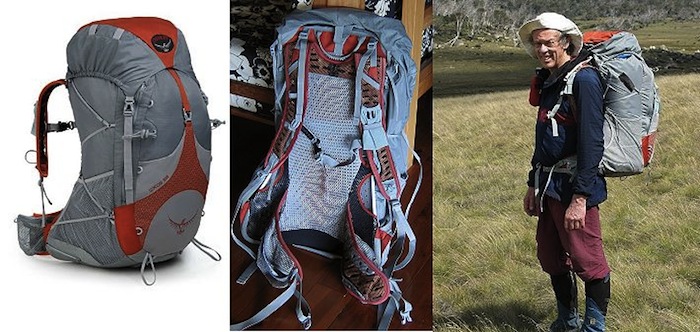
For my part, although I seriously considered taking my Kelty as a kind of homage to another era, the thought of having to sew the thing up with dental floss and duct tape should it fail left me with an excuse to acquire another pack. I considered several packs, including a GoLite Jam, a Granite Gear Vapor Trail, and an REI Flash 65 before finally settling on a Granite Gear Meridian Nimbus, at 3800 cubic inches, slightly smaller than my Kelty. This is the first internal frame pack I have owned, and it proved very comfortable, but really not any more comfortable than my Kelty. I did not find it to be any hotter than my frame pack, and I appreciated the expandability afforded by the extension collar. Without this, I would never have been able to accommodate my share of Philfood following our two resupplies. Water bottle pockets were nice and deep, but accessible without taking off the pack. I purchased a Granite Gear shoulder strap pocket in which I carried a small Zeiss monocular, and on the other strap I mounted my camera case, which kept my Canon G10 close at hand.
The floating lid provided good access to small items, although I did begin to tire of readjusting it as my load shrank or grew. Since this was my first experience with an internal frame pack, I did have a couple of head scratching moments that probably seem funny to anyone who is a longtime internal frame pack user. For example, what do you do with the thing when you take it off? When I take off my external frame pack, I stand it upright on the frame ends, and prop it up with a trekking pole. The packsack, shoulder straps and hip belt never come close to touching the ground. The internal frame pack is not so handy. Since Philmont does not want you to tie or hang anything from a tree, you have to throw your pack down in the dust. I decided that I should have brought a 3 x 4-foot sheet of Tyvek that I could lay on the ground before lowering my brand new pack. Alas, I made do with a garbage bag.
Sleeping Bag & Pad
I took a Feathered Friends sleeping bag, the Swift model, rated by the manufacturer as a 20 degree F bag. At 34 oz, it proved more than adequate for conditions in early June. My coldest night was at Carson Meadows, where the temperature briefly dipped below freezing. Even so, this was the only night I had to zip the bag all the way up.
Descending Mt. Phillips towards Cypher’s Mine camp.
Philmont requires that all crew members bring separate sleep clothes to be worn nowhere except inside the tent. The logic is that the clothes a Scout wears during the day will inevitably carry traces of food, Gatorade, or suntan lotion, all of which might cause a bear to investigate the sleeping Scout’s tent. I took a Patagonia Capilene t-shirt (4.3 oz) and a pair of Patagonia Capilene boxers (4 oz) for this purpose.
Like many middle aged backpackers, the ground feels much harder to me now than it did twenty years ago. A few years ago I purchased an Exped Downmat pad and have slept soundly ever since. However, at 41 ounces, I deemed it too heavy and too bulky to bring on this trip. Instead, I opted for a Therm-A-Rest NeoAir, at 14 ounces. This mattress is just as long as the Exped (72 in), but only 20 inches wide. When inflated, it is 2.5 inches thick, versus 2.8 for the Exped. It looked extremely fragile though, and I very carefully prepared my sleeping surface every night before laying down on the thing. However, it worked as advertised, and I experienced no leaks during our trek. I found it pretty easy to inflate, and very comfortable, though it was easy to roll off the 20-inch-wide pad in the night.
Shelter
As I have explained, it is my preference to use a solo tent on Scout outings. This view was shared by Joe and Todd, each of whom brought a solo tent on our trek. I had planned to take my Tarptent Contrail on this trip. At 24.5 ounces, it provides a great deal of space for a single adult, along with excellent bug protection and ventilation. It erects with a single trekking pole which can be angled to give unobstructed access to the tent. However, as I studied the materials sent by Philmont, I noted that Philmont does not allow single person tents, just as it does not allow clotheslines or hammocks.
These restrictions puzzled me for awhile, until I learned that in the course of a summer Philmont will run up to 30,000 Scouts through the Ranch. Yet Philmont looks just as lovely today as it did thirty-eight years ago. The Scouts have taken good care of the generous gift made by Waite Phillips in 1938. Every Scout who visits the Ranch is instructed in Leave No Trace practices and is expected to apply these rules during his trek. These rules receive reinforcement during the first three days of a trek while each crew is accompanied by a Philmont Ranger.
Philmont looks so good because use has been concentrated. Travel is limited to existing trails, and camping is restricted to designated campsites containing a fire ring and a grey water sump. Tents must be pitched in a tight group, on durable surfaces. In practice, the area in which a group of tents may be located at a particular campsite is limited, and owing to the heavy traffic at Philmont, these areas are pretty quickly reduced to mineral soil. After a few days without rain, the campsites become quite dusty. However inconvenient this may be for the individual, it has proven to be a necessary tradeoff if the natural beauty of the Ranch is to be preserved.
Strange colors in the sky portend more good weather.
Getting back to our tent issue, several months before we left I decided that if Philmont could be expected to insist that only multi-person tents could be used, I needed to have a fallback position for the three adult Scouters on our trek. I eventually settled on a Mountain Laurel Designs Super Mid, in silnylon, which I ordered in March, and received (as promised) just a week before our intended departure date. It is a pyramidal tent without a floor and is billed as cozy for four. It weighs just 24 ounces. If the rule against solo tents was not negotiable, the three adults would share the Super Mid.
On the day of our arrival at Philmont, we were met by our assigned Ranger, a great young man on loan to Philmont for the summer by the U.S. Naval Academy. He possessed the kind of quiet self assurance that you would hope to see in a future naval officer, and in him Philmont’s expectations of visitors were fully internalized. I took a deep breath and told him that the three adults on our trek were prepared to sleep in one tent, but would probably be at each other’s throats within a week. Did he want to be responsible for that? He considered this for a moment and told me that it would be OK if all adults slept solo. This was no small kindness, and it left me with palatial quarters in the Super Mid, which I did not have to share with anyone. The Super Mid weighed less than my Tarptent, and allowed me to stand up inside. I should also say that the workmanship on the Super Mid is impeccable. You can tell that it is lovingly put together by a small shop and that product quality is of paramount importance.
Still, if I had it to do over again, I might have taken the Tarptent, only because it was difficult to keep gear and clothes clean in the Super Mid, due to omnipresent dust in combination with a floorless shelter. I used a mylar space blanket for a ground cloth, and I had to be very careful about how I laid it out in order to avoid kicking up the fine powder. Of course, the Super Mid did not provide 100% bug protection. However, as I thought back on my trip thirty-eight years ago, I did not remember bugs being a significant problem. Even so, I took along a head net which would protect my exposed face once I was fully cocooned in my bag. As it turned out, we were troubled by mosquitoes on only one night, and even then, I had pitched the Super Mid low enough to the ground that I had no problems. In all I recommend the Super Mid very highly to anyone in need of elbow room.
Nowhere to go but up: a crew member pushes the limits at Cimarroncito.
The Super Mid can be erected with one trekking pole, so long as one uses the MLD supplied pole extender. Since I use two trekking poles, I elected to leave the extender at home and figure out some way of joining my poles together to achieve the necessary height. My solution, though not particularly elegant, worked very well for the twelve days of our trek, even during a windy night at Carson Meadows. I joined the poles tip to tip with about a foot and a half of overlap. To handle the vertical load I wound a two-foot length of Kelty Triptease line around the poles where they overlapped. Each end of the line had a small loop tied in it, which I slipped over the tip of each pole. To keep the poles bound together, I employed two six-inch lengths of double sided Velcro tape, which proved sufficiently strong and durable to keep the poles rigidly in line for the duration of our trek. Every morning, as I prepared to get on the trail, I separated the poles and wound both the Velcro tape and the line around one of the poles for use again that evening.
Clothing
I took one pair of Mountain Hardwear Matterhorn convertible pants at 14 ounces, a pant that I have used for several years and like a great deal. I did not take any other pants or shorts. We had showers available to us on days two and eight of our trek. I rinsed the pants out during my shower, and they were dry in thirty minutes. I chose a long-sleeve Cloudveil Classic Cool nylon shirt for my one top. I liked the shirt for its two deep zippered chest pockets, which I could get to easily even while wearing my pack. Any time we had water in a camp, I would rinse it out and put it back on. It, too, was dry in thirty minutes. If you are disciplined to take advantage of opportunities to wash your clothes, there is no reason to be burdened with extras in the dry Philmont climate
I took a pair of Salomon XT Wing trail running shoes and was generally pleased with their performance, although the toe cap of one shoe began to delaminate during our trek. A little more ankle support would have been appreciated, the trails being slightly less buffed than I had been led to believe, particularly,the ascent of Mt. Phillips and the descent from Shaefers Peak to the Tooth of Time. My most significant complaint about the shoes was, strangely enough, their breathability, or, to be more precise, their porosity. The uppers are constructed of a nylon mesh which is porous enough to admit the fines that are kicked up on the trail. At the end of the day my feet and socks were black. This could have been ameliorated by staying well in front of, or behind, our gaggle of foot dragging 15-year-olds, but for another Philmont regulation.
Working on the dirt tan. Fastidious they were not.
To keep crews from getting separated, to lessen the chances of bear and mountain lion encounters, and to make passing other groups somewhat less problematic, Philmont requires that a crew hike as a group. During the first part of our trek, our Ranger took us through a little exercise to demonstrate the appropriate interval between crew members while hiking. It turns out to be about eight to ten feet, and they are pretty serious about it too; on day five of our trek, we spent an hour at Crooked Creek camp, which is staffed by Rangers who play the part of a family of 1840s homesteaders. It’s a pretty good show, and the staff has it down to a T, affecting period attire, accents, and mannerisms. As we left Crooked Creek, a few of us who were low on water backtracked several hundred yards to a spring. The rest soldiered on, leaving a quarter mile gap in our midst. The manner of our departure was evidently noted by at least one keen-eyed staffer, who radioed ahead to Clear Creek camp, our next staffed camp, with a tale of our misdeeds. The next day, as Todd, Joe, and I were walking past the Clear Creek staff cabin, we were surprised to be stopped by several Rangers who gently chided us for allowing our crew to become separated. Lesson learned: the woods have eyes. Thereafter, we stuck together.
On a recommendation from Backpacking Light, I took two pairs of Darn Tough Vermont socks. I also used a Coolmax liner sock. The Darn Toughs were great, and I would recommend them without reservation. I had to wash a pair every day, but once you get into this routine, it is not a hassle. In keeping with Philmont protocol, I did my wash in a Ziploc bag at the end of the day, and poured wash water down our campsite sump. Our Scouts, as well, were encouraged to wash their clothes and socks when the opportunity arose. Of course, they would not do this without some prodding. Left alone, I do not doubt that they would have been most content to ignore soap and water for the duration of our trek.
I have always used gaiters on backpack trips, mostly to keep pebbles out of my shoes and trail dust off my socks. On this trip I took a pair of Integral Designs Shortie gaiters in eVent fabric, weighing in at 2.5 oz. They work well with low top shoes and are equipped with a replaceable instep cord. The most notable thing about these gaiters is the lack of a zipper. You pull them on before you put your boots on, and then snug them down on your boot using the elastic instep cord and the front hook. I took them off only once during our descent from Mt. Phillips to Cypher’s Mine camp, when mid-day temperatures were high enough to cause me to want a little more air flowing around my feet.
Waite Phillips’ favorite view: a crew member on Window Rock.
For an insulating layer I took a Patagonia Nano Puff pullover. If I hadn’t taken this on a shakedown trip into southern Idaho’s Owyhee mountains in May, I would never have believed that this silky, bulkless garment could offer significant warmth. However, it was all I needed and more on chilly mornings. At 10.2 ounces, it disappeared in my pack. Under a shell, I am sure that it would have kept me comfortable in any conditions we might reasonably have expected to encounter at Philmont in the month of June.
The funny thing was that June was as nice as June can be. In twelve days of trekking we saw nary a drop of rain. Only at Zastrow did we hear distant thunder one evening, though the next day was clear and cloudless. Against the chance of Philmont weather at its worst (I remember the August monsoon from my 1972 trek), I took a Mountain Hardware Cohesion jacket in Conduit fabric (14 oz), and a pair of Marmot PreCip rain pants at 11 ounces. Both of these were a little bit of overkill, and I could have gone lighter with a Mountain Hardwear Quark jacket at 10 ounces. The Cohesion jacket has a nice slim fit and mated well with the Nano Puff jacket. At any rate, it never left the bottom of my pack.
For headwear, I took a Patagonia Bimini cap, a baseball style cap with a wrap around cape to protect the back and sides of the neck. Others have complained about the fact that the cape is not detachable, but I did not find this to be a problem. The fabric is so sheer that the cape can easily be tucked inside the hat when not wanted. I thought this was a great piece of gear, and I felt like a French Legionnaire while wearing it. With a little sunscreen on my nose and cheeks, I was good to go.
AWOL from the French Foreign Legion: the author and his son atop the Tooth of Time.
Miscellaneous
I took prescription sunglasses along with my regular specs. I considered taking a Photon Micro-Light II as a backup flashlight to my Petzl headlamp until I used the Photon on a shakedown trip, decided to make it my only light, and found it filled this role admirably. Especially useful was the clip attachment for the brim of my hat, which made night time reading/writing very easy. I highly recommend this light as your only light for around camp activities after dark.
Shortly after we arrived at Philmont, our crew leader and I reviewed our itinerary with an Itinerary Planner from Logistic Services. This was very informative, and we learned a great deal about the current conditions at each of our camps, the location of our two resupply points, and how we would have to arrange our hiking schedule to accommodate the programs we hoped to take in. We learned that we had no dry camps, though we did have two stretches of trail that would probably require humping some extra water. With this in mind we made sure that each Scout took at least two Nalgene bottles, or the equivalent, down from the three I originally recommended. A lot of our Scouts prefer two- or three-liter bladders. For my part, I took a one-liter bottle and also carried a three-liter MSR Dromedary, which I would usually fill with about half a liter of water. Our last day was a thirteen-mile hike including the obligatory hike down Tooth Ridge, all of which is dry. As chance would have it, this was also our hottest day. I filled the Dromedary and my bottle at the spring at Shaefers pass and was glad to have done so. This was the only day I had to dispense water to a few Scouts who underestimated the distance remaining to Headquarters.
I was prepared to use Philmont-supplied water purification tabs every time I filled up. However, the use of these tablets turned out to be the exception, rather than the rule. Most of the camps we stayed at had potable water on tap. When we did use the tablets, I was pleasantly surprised to find that they did not impart a terribly disagreeable chemical taste. I was happy to have left my filter at headquarters.
Of course, I suffer from doodad creep as much as any backpacker. There is always a shiny gadget that serves no vital purpose, yet demands to be taken. I was able to restrict myself to bringing only my Kindle, with some summertime reading on board. All I usually need to send me into a sound slumber is a few pages of words in a row, and my reading for this trip was Justin Cronin’s thriller, The Passage. It must have made an impression on me, since one night I had a dream about vampire bears hanging from the trees surrounding our tents.
Crew Gear
At Wild Horse camp crew members busy themselves with cooking.
Philmont will provide all crew gear you may require. However, as others have noted, it is heavy and somewhat battered. I saw some bear bag ropes at Philmont that should have been retired long ago, and I don’t even want to think about the stuff I saw stuck to the Frisbee filter that I was offered at camp stores. Of the myriad items that Philmont is prepared to lend a crew, we took only the Philmont bear bags. All other crew gear we brought with us after considering the advice of those who have given careful thought reducing weight.
Stove and Cookware
I read that butane canisters are now offered for sale at trail commissaries. We had three opportunities to obtain butane canisters after we started our trek. This led us to forego white gas stoves in favor of butane stoves. I also read that good luck had been reported with MSR WindPro stoves. We elected to carry one of these and one MSR Pocket Rocket. Of the two, I much preferred the WindPro, at 6.5 ounces. The Pocket Rocket burner sits on top of the fuel canister and makes balancing a pot on top of this set-up somewhat precarious, and we lost at least one pot of boiling water to an errant foot while using this stove. It is also hard to come up with an effective wind screen, the height of the burner again making things somewhat difficult. The remote burner of the WindPro sits on the ground, connected to the canister by a flexible fuel line. Others have reported that crews of twelve have gotten away with using only six cartridges during their twelve-day trek. Knowing that we could resupply en route made us a little lazy about being as efficient as possible in our daily water heating. We used seven eight-ounce canisters, and we had plenty of hot water for cooking, cleaning, and coffee.
We brought two three-liter aluminum pots with lids and found these entirely adequate for our needs. We also brought one hot pot lifter. We took neither crew spoons nor spatulas. A plastic measuring cup was used to dip hot water from the pot. The real trick was to get the Scouts not to set it down in the dust after having used it to measure and dispense hot water.
Todd demonstrates our rehydration technique, complete with cozy.
Grey Water Treatment
As part of its bear protocol and also in furtherance of its Leave No Trace policy, Philmont has equipped all campsites with grey water sumps. These are lengths of PVC pipe, approximately 5 to 6 inches in diameter, which are driven into the ground to an undetermined depth such that only 8 or 9 inches of the pipe protrudes from the ground. A coarse wire screen is affixed to the open end of the pipe with a hose clamp. In addition, every crew is issued the dreaded Frisbee, which turns out to be an actual Frisbee, into which a number of small holes have been drilled. This is the first stage filter that is to be used when getting rid of grey water. It is placed over the sump, concave side up, and waste water is strained through it. At the end of the process, anything that has not made it through the filter is picked off the Frisbee and put in the crew “yuck” sack for transport with the rest of the Troop’s packaging waste.
In doing things this way, very little is left above ground that might attract bears, and grey water is disposed of in a way that does not contaminate surface water. All very laudable, if a little unsavory, particularly if you are the one carrying the Frisbee. Others have given thought as to how this process might be improved. At Doug Prosser’s recommendation we took four one-gallon paint strainer bags, purchased at Home Depot for a few cents and weighing next to nothing. On arrival at a campsite, we simply stretched the elasticized bottom of one of these bags over the sump and poured all waste water through it for the duration of our stay. The weave of the paint strainer bag is much finer than the holes drilled in the frisbie, but since the bag is a mesh, you can actually move a higher volume of water through it than you can the frisbie. Because of the cooking method we used, we did not generate a significant amount of suspended food in our cleaning and rinse water, but we nevertheless switched out the paint strainer bags every three days. The use of paint strainer bags met with the approval of our Ranger and is a great improvement over the status quo. My advice is to come equipped to (politely) decline the Frisbee.
The Question of Rehydration
Of all the things that caused me to scratch my head during our months of preparation, none caused more perplexity than cooking, or to be more precise, rehydration, lest real cooking be given a bad name. I read with great interest about all of the methods devised by inventive Scouters to deal with this task. Every method had its champion, and I saw a few of these demonstrated during our trek. At Clear Creek camp, I caught a glimpse of a turkey bag from which a dinner entrée had been incompletely decanted several days before. There were things growing in it! I suppressed a shiver and moved on. During our planning we considered rehydrating via turkey bag, until I read an article by Al Geist which discussed a rehydration procedure that struck me as being very much in the spirit of Leave No Trace. Geist advocated conducting rehydration in a way that made use of resources at hand and generated neither dirty dishes nor grey water for the sump. This procedure is familiar to anyone who has used Mountain House, Packit Gourmet or Backpackers Pantry products: in-the-pouch cooking means all you dirty is a spoon. Since all of the Philfood we saw called only for rehydration with hot water, pouch cooking would seem much the preferable route to go. The devil, as they say, is in the details.
All Philfood meals come packaged for two people. However, some of the individual meal items are individual servings and some, such as the dinner entrees, are packaged to serve two people. If one were to rehydrate the dinner entrée in the pouch in which it was packaged, you would still have to split the entrée up so each Scout could have a serving. What do you put the other half of the entrée into if you are striving not to dirty a bowl? Geist advocated mining the packaging debris from other meal components for foil pouches that can be reused to rehydrate a portion of an entrée and serve as a simple bowl. For example, one of our dinners included one two-person serving of Mountain House Chili Mac. In that same meal one finds two foil packages of “Kreamy” crackers. Geist proposed that the cracker bags be carefully slit along their long dimension and the crackers put into a Ziploc bag for later consumption. Next he proposed that the contents of the Chili Mac pouch be equally distributed between the two empty cracker pouches. Boiling water would then be carefully measured and introduced into the cracker bags to rehydrate the entrée. Because the cracker bags are somewhat flimsy, the wonderfully obsessive Geist made little foam “cozies” for his crew, which would provide both support and insulation for the foil cracker pouches that were never intended to be used in this fashion.
Joe samples a canned meat product.
You can make this work, although it requires practice and a certain amount of forethought not normally found in a 15-year-old. We elected to try it out. We made cozies out of an aluminized bubble wrap that I think is used in HVAC applications. This material provided rigidity and insulation. As the Scouts tried to make this method work, they discovered a hybrid approach that seemed to satisfy everyone. The entrée pouch was put in the cozy and rehydrated. After enough time had passed, half of the entrée would be poured/spooned into an empty foil pouch resting in a cozy. One Scout would eat directly from the entrée pouch and one Scout would eat from the salvaged foil pouch. We also used an alternate method, which was preferred by some of the Scouts. Because our itinerary called for a chuckwagon dinner at Clark’s Fork camp, each Scout carried a 16-ounce Tupperware container with a snap lid. Some Scouts preferred to use this as the container in which to pour their half of the rehydrated entrée. At the very most then, we had only six containers and twelve spoons to clean after the evening meal.
My mess mate Todd Swanstrom and I did not dirty anything but a spoon apiece during our entire trek, and we became pretty adept at Geist’s process after awhile. However, we remarked more than once how all this agonizing about food and cooking could be avoided if Philmont would simply mandate of its suppliers that all foods requiring rehydration be individually packaged. That way each Scout has his own pouch in which to rehydrate his food and out of which to eat. Although this would generate a little more packaging waste, fuel would be saved, and the tedious necessity of cleaning dishes and filtering grey water avoided.
As to the quality of the food itself, any adult with a modestly refined palate will find a lot to complain about in Philfood. (Again, get your mind right! Whose trip is this anyway, yours or your Scouts’?) However, I think the boys in our crew were generally pretty happy with the fare. It’s nice to get Oreos and Nutter Butter cookies in your meal, particularly when you can wash them down with limitless volumes of Gatorade! They did not want for sugar. The breakfasts and lunches are “bar heavy," but Philmont seems to try to mix things up so the food does not become too monotonous. Ritz and Saltine crackers and canned and pouched meat products all figure prominently in the lunch menu. For the peanut averse, Philmont has substituted sunflower butter in squeeze packets. Oatmeal and granola are well represented in the breakfast menu. Gatorade powder makes up a surprisingly large percentage, by weight, of the meals. Of all the food, the dinner entrees were probably the least offensive to me. This year, Mountain House and Richmoor products were found in the dinner bags, and they seemed to be of the same quality that you would find at REI, albeit in cheaper packaging. One treat that I was particularly fond of was the freeze dried cherries that appeared in one meal. They were extremely tart and crunchy, sort of like an organic SweetTart. Fortunately, these did not seem too popular; I found all I wanted in the swap box at Cypher’s Mine camp.
Coffee
Finally, I consider the vexing problem of caffeine delivery to have been solved once and for all with the introduction of Starbucks Via instant coffee. Each adult took 24 packets, which provided each of us with two cups of coffee per day. If you have just a few quiet moments in the morning to contemplate what the day might bring over a cup of decent coffee, you can get through about anything.
Bear Bag Hanging
The crew hoists the first bear bags of the trek at Olympia camp.
Our Ranger advised that 200 bears and an undetermined number of mountain lions make Philmont their home on any given day. That makes roughly one bear per square mile. Philmont has devoted a great deal of energy to preventing or minimizing the chances for Scout/bear interactions. In addition to Leave No Trace, this is one of the main drivers of Philmont regulations. Every camp is equipped with a number of bear bag cables strung between two trees. The cables are, on average, about 25 feet off the ground. It is over these steel cables that Scouts are expected to hoist their crew bear bags with rope that each crew carries. Philmont will supply a crew with two 150-foot lengths of heavy, typically quite worn, nylon rope for this purpose. In lieu thereof, we took two 150-foot lengths of Amsteel Blue rope with a diameter of 7/64 inch and a breaking strength of 1600 pounds, made of Dyneema SK75 fiber. The best price I could find was $.20/foot, or $60.00 for 300 feet. Its small diameter also makes it somewhat hard to hold onto while hoisting bear bags, particularly after a resupply. After it gets a little dirty, it becomes less slippery. Three hundred feet of this rope, plus two carabiners, two mini carabiners, and two small stuff sacks weighed 21.6 ounces.
The first of the two ropes is for the main bear bags, and these items should be hoisted as soon as the crew arrives in camp. To prepare this rope, a loop is tied in the rope at its midpoint using a butterfly knot. A carabiner is clipped to this loop. With the carabiner clipped to the belt of the thrower, the two ends of the rope are coiled and thrown over the bear cable. Snarls are inevitable. My solution, and the only refinement I can offer to Al Geist’s treatment of this issue, is to employ a rescue bag, something that has been a safety mainstay in whitewater rafting and kayaking for some years: Find a small stuff sack that will hold all 150 feet of the rope. It needs to have a small loop sewn into the bottom of the bag. Into this loop clip a mini carabiner. Tie loops in both ends of the rope and clip these ends into the mini carabiner. Then, stuff all the rope into the bag, leaving only the midpoint carabiner sticking out of the sack. It can be clipped onto the stuff sack drawstring to keep it outside the sack.
When you are ready to hoist the bear bags, clip the midpoint carabiner to your belt, loosen the drawstring of the stuff sack and pull out eight or nine feet of slack. Throw the sack over the bear cable. Because of the way you have loaded the sack, the rope will spool out without snarls. The rope ends can then be unclipped from the stuff sack, and the bear bags tied to the rope using lark’s head hitches. Next, the second rope, which has been similarly prepared, is threaded through the midpoint carabiner of the main rope. Finally the bear bags are hoisted and each end of the rope is tied off to a separate tree, per Philmont protocol. The second rope, which has been threaded through the first, is dangling within reach. When you are ready to put up the “oops” bag later in the evening, it will be attached to the midpoint carabiner of the oops bag rope and hoisted up to join the other bags, using the bear bag rope carabiner as a pulley. This worked very well for us, and I know that other crews were envious of our minimalist setup. After hoisting bags for two weeks, the Amsteel Blue showed no noticeable wear.
A remembered landscape; Lower ‘Cito, Hidden Valley, Window Rock, Cathedral Rock and Mt. Baldy as viewed from Shaefers Peak.
Dining Fly
Philmont requires that each crew take a dining fly and offers to supply a 12 x 12-foot tarp and poles. The crew is expected to bring its own guy lines. Packs and other gear are stored under the fly at night, and the fly serves as a kitchen or group refuge in inclement weather. Interestingly, Philmont will not let Scouts sleep under this or any other tarp. A tent is required. I don’t know whether this requirement is related to bear safety or privacy issues. The Philmont fly is made of coated nylon and weighs about four pounds. I did not get a look at the poles. In lieu of the Philmont tarp we took a Granite Gear 10 x 12-foot silnylon tarp, weighing in at 23 ounces. Instead of dedicated poles, we erected it in a variety of configurations using two, four, or six trekking poles. It worked really well and pitched very taut, owing to its slight catenary cut. However, because we did not encounter any foul weather, I can’t comment on its storm worthiness.
Miscellaneous
Aside from TP, a scrub pad, hand sanitizer, and liquid soap, we took no other Philmont gear. We took no extra accessory cord since all our tents and tarp were pre-strung, as it were. We left the spade at Headquarters, since all camps we were to stay at were equipped with scenic Philmont latrines. We took one communal 8-ounce tube of 30 SPF sunscreen, which we used religiously. It was still about one quarter full when we got home, and we had no cases of sunburn. We also took a communal tube of Ultrathon insect repellent at 2 ounces, and I don’t think we got into it except for one night at Wild Horse camp.
Preparatory to our trek, Todd Swanstrom and I took the 16-hour wilderness first aid training course offered to Scouters by the Red Cross. Philmont now requires that each crew have at least one, and preferably two, adults with this training. However, Todd and I didn’t have to worry ourselves with things medical since Joe Williams, our third companion, is a Boise M.D. Joe graciously offered to oversee the collection and safekeeping of the all important medical forms, without which you do not pass go. We had one Scout with us who has a strong allergy to all things equine. There was a possibility that he would go into anaphylactic shock should we camp or hike around horses, so we were all instructed in the use of the Epi-Pens Joe brought. This issue ultimately informed our choice of itineraries, and we were able to avoid all horse activities with the exception of the chuckwagon dinner at Clark’s Fork camp. Joe assembled our medical kit and dutifully tended to the boys as needed, but drew the line at working on their feet. He would, however, talk them through a blister repair from a safe distance. Fortunately, we had no significant blister problems, although we came equipped with tincture of benzoin and Leukotape P.
Leaving ‘Cito for greener pastures.
In all, I was very pleased with the equipment choices we made as a group, although these choices were not tested by bad weather. We were all happier for having parsed the over-inclusive Philmont equipment lists, bringing only what was essential, and making appropriate substitutions where there was a superior and lighter alternative. For myself, were I to leave tomorrow for another trek, I would bring a pair of briefs in lieu of the Capilene boxers I wore, and I might opt for a slightly sturdier shoe. I would leave the 16-ounce Tupperware bowl at home and make do with something else for our chuckwagon dinner, like a gallon Ziploc bag. Although I was pleased with the comfort of my new pack, I can’t say that it performed any better than my Kelty, and in some areas the external frame pack clearly excels, such as ease of loading. They weigh nearly the same, at 4.2 pounds for the Granite Gear and 4.4 pounds for the Kelty. To my mind, and I appreciate that mine is a minority view, the modest improvements offered by internal frame packs don’t seem to justify the extinction of the external frame pack.
Redux
Thirty-eight years ago I stood on the summit of Mt. Baldy and concentrated on fixing the 360-degree view in my mind, confident that I would never return to the spot, and I haven’t yet. To the south I could make out Mt. Phillips, the second highest peak on the Ranch. This summer my son and I stood on the summit of Mt. Phillips and contemplated the not-too-distant summit of Mt. Baldy away to the north. I suggested that he, too, should take a good look around since this might be the last time he would ever visit this particular vantage point. He considered this for about two seconds before busying himself with lunch on the windswept summit, lunch including, among other things, yet another squeeze packet of the (by now) much reviled “Sunbutter.” I suppose that it’s asking too much of a 15-year-old to imagine that there will ever come a time when opportunity is foreclosed by age or infirmity. When you are 15, there is always another day.
We finished our trek on the afternoon of 6/24/10. We turned in our bear bags, which ended up being the only bit of Philmont-issued gear we carried, and the boys quickly repaired to the snack bar and trading post. I showered and completed my last journal entry before getting ready for the closing campfire, at which we would receive our arrowhead patches for successfully completing our trek. As I review that journal now, I am struck by one wish I expressed while we were at Cimarroncito, a large staffed camp northwest of the Tooth of Time, and adjacent to Hidden Valley, a place that I had visited in 1972 and still remembered. There were a lot of crews at ‘cito, and the dust was roiling. I briefly longed for a landscape vacant of Scouts, vacant of people. Philmont is no longer a wilderness, notwithstanding that the BSA has been a good steward of the property. There are just too many people using the small portion of the Ranch designated as durable surface. So be it. The activities at the staffed camps are great, the staffers are friendly, knowledgeable, and engaged, and at Philmont the Scout Oath and the Scout Law are taken seriously. Philmont’s experience and dedication to making everything click is visible everywhere. Thirty-eight years after last setting foot on the Ranch, Philmont still strikes me as the embodiment of Scouting at its very best.
Last rest stop of the trek. Headquarters and snack bar in view.