Articles (2020)

One Planet Shadow Pack (Australia)

Mini-review for the 2010 State of the Market Report on Internal Frame Backpacks.

There are quite a lot of bushwalkers in Australia, the terrain and weather are a bit different from other countries, and Australia is a long way from all other major gear making countries (with the notable exception of New Zealand). What all this means is that Australia does have its own gear culture and quite a few local gear manufacturers. Basically, traditional Australian gear is made rugged, to cope with our bush and our weather. I can have a nice hot day with a hailstorm in the afternoon.

Unfortunately the Australian gear culture seems to be frozen in a time warp these days, with a strong focus on heavy canvas packs being a well-known example. The local shops are terrified of returns and simply won’t stock modern UL (or even lightweight) gear (the American idea of buying two with the intent of returning one would be regarded with horror and rejection here by the retailers). This makes it hard for local manufacturers to move into the lightweight space. However, one company – One Planet – has been cautiously testing the water, spurred on in part by the author nagging away at the company owner, who he has known for years.

In addition to making bushwalking gear, One Planet also makes gear for adventure organisations (eg schools), government departments (eg Post Office workers), and for the Australian and New Zealand Antarctic research organisations. The latter is rather impressive: the tents and outerwear have to withstand full-on Antarctic weather. But that gear is not UL!

One Planet Shadow Pack

Pack Rating Qualifications
Shadow UM Above average Very robust for scrub
Shadow W Above average Very robust for scrub

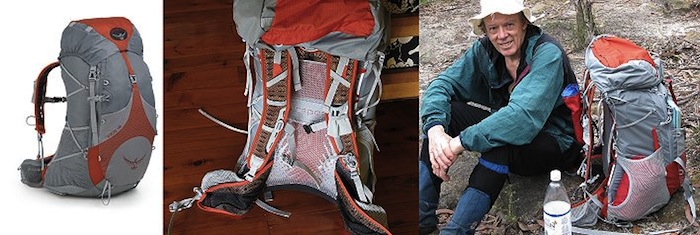
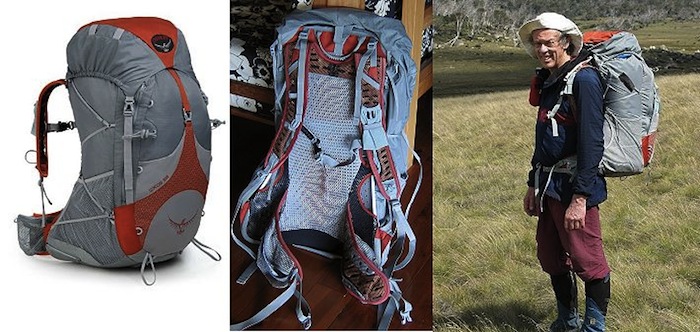
The Men’s and Women’s models are very similar, with the Women’s version being essentially a Small size. For this reason only one photo assembly is shown: you can’t tell the difference between them.

Despite my urgings, according to the manufacturer, the Shadow is pretty rugged: “constructed of 420 denier and 500 denier nylon with a 1000 denier base.” Actually, I am not sure that the fabric is pure nylon: it looks and feels more like a nylon/cotton blend to me, but I can be fooled. Well, given the nature of our scrub and the historical emphasis on 12-ounce canvas here, that is at least a step forward. More surprising is that the Shadow actually is not all that heavy, despite the fabric. Indeed, the volume/weight ratio is certainly not at the bottom of the table. This does place some emphasis on the fact that the weight of the fabric making up the main bag is not that large a fraction of the overall pack weight.

One Planet (Australia) - 1
One Planet Shadow (M), 1.51 kg (3.33 lb), 53 L (3200 cuin), M. One Planet Shadow (W), 1.45 kg (3.20 lb), 51 L (3100 cuin), S.

Where these packs score very well is in the fully-adjustable harness: the torso length can be finely controlled by buckle hidden behind the lumbar pad. I can attest that this adjustment does make a significant difference in comfort, at least to both myself and my wife. I tried the packs with the torso length too long and too short, and those settings were definitely not as comfortable as the correct torso length. The hip belt and the lumbar pad are definitely well-padded. Curiously, there is no slab of continuous foam padding all the way up the back: just a single aluminium rail which carries the (adjustable length) shoulder straps. The bit of the shoulder straps against the harness face is well padded. I expected that we would notice the lack of padding up our backs, but apart from the observation that it did feel different, I have to say the design works well and is comfortable.

The webbing on the hip belt is a solid 50 mm wide. I challenged this, but the owner replied that the wide webbing was an important part of the hip-belt design. Well, the extra weight of the wide webbing is very small. The adjustable parts of the shoulder straps are 25 mm and the compression straps are 20 mm. The shiny ‘buckles’ on the compression straps and the lid strap are not plastic: they are stamped aluminium adjustable hooks! Yes, that makes them heavier than the typical plastic side-release buckle, but they are indestructible. The extra weight incurred by the use of aluminium for the whole pack is only 25 grams. Hum… The sternum strap was fine and did not have a whistle.

The design of the Shadow pack is still evolving as some ‘American’ ideas get tested – not always successfully. A recent addition to the design of the pack is the provision of holders for PET 1.25 L water bottles at the bottom corners. One of these can be seen in the photos, with a PET water bottle in the right hand one. The bottle had the unfortunate habit of working its way up and out of this pocket, pushed by the hip belt side strap. It was doing this in the right hand photo. This was discussed with the owner of the company who could see the problem and undertook to fix it. Of course, if you are like me, you could just ignore the pocket and not use it. A more serious problem was the length of the throat: way too short. How this happened we are not sure, but the problem will be fixed according to the owner. The haulage loop was far too narrow (see the middle photo): this is being rectified in the design. There was no security pocket inside the lid pocket, but that too will be fixed. (Us reviewers do earn our keep…)

The main side pockets are very short: made to support the bottom end of a bundle of tent poles and nothing more. There is a little loop on the side at the bottom: this can be adapted to hold an ice axe by adding a short loop of cord. There are not many places in Australia where you need an ice axe after all. I thought the loop was too far forward and said so: it is now being moved a bit more towards the back face. Evolution!

The main bag held the Test Gear quite easily. The seams have been bound with tape in the conventional manner. There is a single strap under the lid, which can be used to hold a tent as well, and the design of the lid should add considerable security to that. While the main bag held only fifty-odd litres, they were very usable litres as the bag was wide enough.

Otherwise, the design is remarkably free of all the little marketing frills and add-ons and can survive considerable bashing through the bush with no visible damage.

This is a mini-review in the 2010 Lightweight Internal Frame Pack State of the Market Report. The articles in this series are as follows (mini-reviews can be found in Part 2), and a subscription to our site is needed to read them.
  • Part 1A covers the very basics and lists all the packs in the survey.
  • Part 1B covers the frame and harness which carry the pack itself.
  • Part 1C covers the main bag and all the other pockets, plus the all-important question of comfort.
  • Part 2 in this series covers the individual packs tested.

Hiking The Diablo Trail: A Conservation Success Story

In 1993, Save Mount Diablo, a charity that works to acquire and preserve land on and around the San Francisco Bay Area’s Mount Diablo, proposed a multi-use recreation trail to showcase the region’s cooperation efforts to preserve area land. In 2007, they produced the first map highlighting the thirty-mile trail.

You don’t have access to view this content.

Westcomb Chilko Down Sweater Review

The Chilko is cutting-edge, as you would expect from Westcomb, and “heats up” the competition in the already “hot” ultralight multi-purpose down jacket category.

Introduction

Westcomb Chilko Down Sweater Review - 1

This separate review provides additional descriptive and performance information on the Westcomb Chilko Down Sweater. Read our article Ultralight Three-Season Down Jackets State of the Market Report 2010 for a state of the market analysis and comparative specifications and performance for a range of ultralight down jackets.

The new Westcomb Chilko Down Sweater is cutting-edge, as you would expect from Westcomb. The Chilko combines the best components and construction methods available to create a really warm and lightweight down sweater. How suitable is it for backpacking?

Description

New for fall 2010, the Westcomb Chilko Down Sweater is insulated with 850 fill power down and weighs just 11.8 ounces (335 g), measured weight for size Medium.

The Chilko’s shell and lining are the new 0.8 oz/yd2 (27 g/m2) Pertex Quantum ripstop nylon with DWR, which is 20% lighter and has the same tear strength as the “old” Quantum. The insulation is 850 EU fill power (884 fill-power by the US measurement method) Canadian Hutterite down, which is claimed to be 100% down (less than 1% feathers). Down fill is 3.25 ounces (92 g), giving the jacket a measured single-layer loft of 0.9 inch (2.3 cm), which is on the high end for multi-purpose jackets.

Westcomb Chilko Down Sweater Review - 2
Front and rear views of the new Westcomb Chilko Down Sweater.

Westcomb Chilko Down Sweater Review - 3
The jacket has a total of three pockets: two zippered fleece-lined hand pockets (left) and one large zippered stretch mesh pocket on the inside (right). The pocket zippers are welded on and are not the water-resistant type.

Westcomb Chilko Down Sweater Review - 4
The cuffs (and hem) are Polartec Powershield fabric, which is stretchy, durable, and water-resistant.

Westcomb Chilko Down Sweater Review - 5
Also new for fall 2010, the Kokanee Hoody is a hooded cousin of the Chilko. It has a little more down fill than the Chilko, and the target weight is 17.6 ounces (500 g) for men’s size Medium.

Performance

Westcomb Chilko Down Sweater Review - 6
I wore the Chilko on several high elevation early spring snowshoeing trips.

The Chilko seems to have an average fit. With a heavy baselayer on, the Medium just fit me, with no room left for additional layering inside. The sleeves are long enough, but the jacket is snug and barely long enough. From this, I would say the sizing is normal and a size Large would fit me with adequate room inside for more layering.

The feature set on the Chilko is minimal, fairly lightweight, and very functional. There is a little extra weight in the hem drawcord; it could be made lighter with smaller elastic cord and cordlocks, or just eliminated. The front Ri Ri zipper is heavier than a #3 zipper, but it operates smoothly and will last a long time. Overall, the jacket is designed to be both lightweight and functional.

This jacket seals up well. The neck and wrists are snug and there is a drawcord on the hem to close the bottom of the jacket.

In the comparative warmth tests we performed for our state-of-the-market report on ultralight multi-purpose down jackets referenced below, the Chilko Down Sweater was among the warmest in the group.

Westcomb Chilko Down Sweater Review - 7
I wore the Chilko on several high elevation early spring snowshoeing trips and found it to be very wind and weather-resistant (left). In my one-hour indoor “puddle test” (right), quite a bit of water leaked through the seams, which was a bit of a surprise.

Comparisons

Our article Ultralight Three-Season Down Jackets State of the Market Report 2010 provides complete specifications and ratings for the Westcomb Chilko Down Sweater in comparison to a range of other lightweight down jackets. The jacket most similar is the Salomon Minim Down Sweater.

Assessment

The new Westcomb Chilko Down Sweater is indeed impressive. This is a jacket you admire once you get it, and others will admire it too. It has cutting-edge materials and construction, it’s well insulated, and the feature set is minimal, lightweight, and functional.

The closest comparison to the Chilko is the Salomon Minim Down Sweater. The shell on both jackets is the new 0.8-ounce Pertex Quantum, which is impressive. The Chilko weighs one ounce less and costs $10 more than the Minim. I would personally choose the Chilko because I like the design, fit, construction, and features a little better. The hand pockets are larger and fleece-lined, and zippers are welded on and easy to operate. The Salomon has a larger zippered chest pocket while the Westcomb has an inside stretch mesh pocket, which are about equivalent in usefulness.

Although both jackets mentioned are standouts in the group, they are both more expensive as well. For about the same money you can purchase a Western Mountaineering Flight Jacket which weighs about the same, or a Feathered Friends Hyperion Jacket which costs $50 less. Now, that’s a tough decision…

Specifications and Features

Manufacturer Westcomb (http://www.westcomb.com/)
Year/Model Fall 2010 Chilko Down Sweater
Style Hoodless jacket with full front zipper (hooded version available)
Fabrics Shell and lining are 0.8 oz/yd2 (27 g/m2) Pertex Quantum ripstop nylon with DWR
Cuffs and hem are Polartec Powershield Light-Weight fabric
Insulation 850 fill power down, 3.25 oz (92 g)
Construction Sewn through with 2.25-in (5.7-cm) horizontal quilting, set-in sleeves
Loft Measured two-layer loft is 1.75 in (4.5 cm), single-layer loft is 0.9 in (2.3 cm)
Features Down-filled stand up collar, full height Ri Ri zipper with one slider and storm flap under zipper and beard guard, two welded on zippered fleece-lined side pockets, zippered inside stretch mesh pocket, stretch fabric cuffs, drawcord hem with two adjustors
Weight Size Medium tested.
Measured Weight: 11.8 oz (335 g)
Manufacturer Specified Average Weight: 12.2 oz (345 g)
MSRP US$250

Disclosure: The manufacturer provided this product to the author and/or Backpacking Light at no charge, and it is owned by the author/BPL. The author/Backpacking Light has no obligation to review this product to the manufacturer under the terms of this agreement.

Sierra Designs LT Strike 2 Tent Review

The Sierra Designs LT Strike 2 uses a radical pole design to make a roomy two-person tent, but does condensation leave us all wet?

Introduction

Sierra Designs LT Strike 2 Tent Review - 1

The Sierra Designs LT Strike 2 uses a radical pole design to make a roomy two-person tent. The Strike is listed as the company’s lightest two-person tent and has the space to actually be usable for two to hang out in. I used it as a solo tent as well as with another sleeper in both three- and four-season conditions.

Design and Features

The Sierra Designs LT Strike 2 is a non-freestanding tent that is the newest addition to the company’s Ultralight Series of backpacking shelters. While they list it as being their lightest two-person tent, I found the actual weight to take it over their Vapor Light 2. As far as I can tell, my version is a retail unit, not a prototype, so maybe they just haven’t updated the website.

The most distinctive aspect of the Strike is the new Eye Pole design employed. It drew comments every time I set it up. When the two poles are connected by way of hubs, they make an ellipse with two legs. Those legs go into Jake’s Feet attachment points in two corners, leaving the ellipse above the tent. The opposite corners of the tent must be staked, and the 22.5-ounce (638-g) inner tent clips to the poles by means of eight Ultralight Clips. The result is a very spacious interior.

As may be seen in the pictures, the space is asymmetrical with high ends at opposite corners. This lets two people share the same head room without being forced to sit cheek-by-jowl. The fact that the two mesh gear storage pockets are also at opposite corners makes it obvious that SD expects the tent to be used to sleep two foot-to-head.

Sierra Designs LT Strike 2 Tent Review - 2
Top: The 3.51-pound (1.59-kg) trail weight Strike 2 uses an Eye Pole design to pull the side walls to nearly vertical in areas, making for a very nice two-person abode. The stated 50-inch (127-cm) width is accurate. Bottom: The rain fly fully encloses the tent and has two vestibules to provide plenty of covered storage.

Sierra Designs LT Strike 2 Tent Review - 3
Top: The rain fly has two very spacious vestibules that allow plenty of storage while still allowing easy access to the tent. Bottom left: The poles go into Jake’s Feet anchoring systems, which also hold the fly. The fly tensions with a strap. Bottom right: On the non-pole corners, a stake pulls the tent out and anchors it. Fastex clips hold the fly to the corners and tension with nylon cord.

The 19.9-ounce (5640g) rain fly goes over the poles and attaches at the Jake’s Feet with a clipping hook. The other corners use good old Fastex clips. The two spacious vestibules are formed by pulling the fly away from the dual doors. Waterproof zippers sit in “parking garages” when zipped to the top to keep drips out. This is needed, as the top of the vestibule openings meet right at the top of the inner tent. The only way to get high/low air movement is by opening the top of the vestibule doors since there are no high vents in the fly.

Sierra Designs LT Strike 2 Tent Review - 4
Sierra Designs send just enough DAC J stakes to peg down the corners and pull out the vestibules. To further guy out the tent, more stakes need to be buyer-supplied. They do send plenty of storage sacks. We get a large stuff sack that weighs 1.8 ounces (51 g), a 0.3-ounce (9-g) stake sack and an over-kill 0.7-ounce (20-g), 31-inch (79-cm) long sack to hold the 14-inch (36-cm) long poles. I never used this sack.

Performance

I was able to use the LT Strike 2 in California in great three-season conditions as well as at the end of winter in Minnesota. My son (who lives in Minnesota and spends a week with me each month) wanted to try spending a night in a tent in the snow. His twin sister had no such desire (must have got mom’s smarts…), so I set up the Strike right outside the living room window where Emma could see us. I set up on top of about eight inches (20 cm) of melting snow pack. Soon after we turned in that night, it started hailing, later turning to rain, forcing me to button up the vestibule I had left open to see the window. There was a pretty good wind blowing, but once I shut the doors there was nothing much making it inside. We experienced some severe condensation.

In California the rains were finally over, and I was able to use the Strike in my favorite manner: that of inner mesh tent alone. I spent a night solo at Fisherman’s Camp in the San Mateo Canyon Wilderness.

I was able to use it with another BackpackingLight member in the Sespe Wilderness. We stayed at Willet Camp at 2,600 feet (792 m) elevation where it got down to just above freezing. There was no wind on the night above the banks of Sespe Creek. I lost my camera (most likely during one of the twenty stream crossings we had), so have no pictures from this trip.

Sierra Designs LT Strike 2 Tent Review - 5
Top: The Strike set up on rapidly melting snow at the end of winter. Bottom: Even with warm, puffy down bags, Raymond and I had plenty of room in the tent. Heavy rain with moderate wind never broached the Strike’s defenses, but the condensation did get quite heavy.

Assessment

I found the LT Strike 2 to be a pretty nice tent for two people. The pole design really works well to give a lot of interior room. In the Sespe Wilderness one of our group retired early, leaving the other two of us to sit up talking. The mosquitoes got pretty bad, so we decided to move the discussion inside the Strike. It had plenty of room for us both to sit up without crowding the other, and we were able to laugh at the frustrated whining horde on the other side of the mesh.

The actual 50-inch (127-cm) width of it let us sleep later without encroaching on the other’s space. In fact the Strike has room to use two large pads, should you need it. I would like to see Sierra Designs put a high vent or two on the fly. This would help a lot to move moisture out of the tent when the weather forces the vestibule doors to remain closed.

As a solo tent, this was a palace. With my little quilt inside, the Strike still looked empty. At Fisherman’s Creek I brought a book and some Scotch and read inside away from the numerous bugs, enjoying the afternoon in my spacious tent.

One thing that needs to be remembered is that this tent needs to be staked well. I have used rocks to hold stake points when above tree-line in the rocky Sierra Nevada, but the Strike’s design makes it hard to get the kind of support it needs in this fashion. Without the two pole-less corners secured well, any wind will cause the Eye Pole (and attached tent) to flip on its side.

While I used the Strike on snow, I would be hesitant to use it any time I expected snow to fall. The large flat area of the fly created by the Eye just begs to be overloaded by collecting snow, possibly leading to collapse. Heavy rain was not a problem at all though.

Sierra Designs LT Strike 2 Tent Review - 6
The LT Strike 2 as a solo palace on a beautiful spring day in Cleveland National Forest. It just doesn’t get any better than this (and then the Swedish Bikini Team dropped in…).

Dare to Compare

Trying to compare tents with like attributes, I would say that the Strike stacks up to the Big Agnes Copper Spur UL2 and the Big Sky International Evolution 2. The Strike has more livable space than either with its steep sides, but it weighs more too. Both other tents use high vents to help control condensation, and I know from personal experience that the Copper Spur will handle all but the worst snow storms. With it carbon fiber pole option, the Evolution wins in the weight category, although that comes with added expense.

What’s Good

  • Light weight.
  • Good floor space.
  • Great interior volume.
  • Large vestibules.

What’s Not So Good

  • Vestibule doors don’t protect the inner if open at the top during inclement weather.
  • Because of same, condensation is more of a problem than it could be.
  • Flat area above Eye Pole will collect snow if surprised by a snow storm.

Specifications

Year/Manufacturer/Model 2010 Sierra Designs LT Strike 2 Two Person Tent
Style Three-season, two-person, double-wall tent.
Fabrics Body: 20D nylon mesh
Floor
: 3000mm 70D nylon polyurethane coated
Fly: 1500mm 40D HT nylon
Poles and Stakes Poles: 8.5 mm DAC Featherlite NSL poles, total weight 13 oz (369 g)
Stakes
: 6 ea 6.25 in (15.9 cm) DAC aluminum J stakes, total weight 2.4 oz (68 g)
Dimensions Length Listed: 83 in (211 cm)
Width Listed: 50 In (127 cm)
Inside Height Listed: 37 in (94 cm)
BPL Verified Accurate
Packed Size 6 x 18 in (15 x 46 cm)
Total Weight Listed Weight: 3.69 lb (1.67 kg)
BPL Measured Weight
: 3.85 lb (1.75 kg)
BPL Trail Weight 3.51 lb (1.59 kg)
Protected Area Floor Area: 29 ft2 (2.7 m2)
Vestibule Area
: 18 ft2 (1.67 m2)
Protected Area/Trail Weight Ratio 13.39 ft2/lb (2.79 m2/kg)
MSRP US $379.95
Options Footprint
Website www.sierradesigns.com

Disclosure: The manufacturer provided this product to the author and/or Backpacking Light at no charge, and it is owned by the author/BPL. The author/Backpacking Light has no obligation to review this product to the manufacturer under the terms of this agreement.

Peace Pilgrim: Minimalist Trekker for World Peace

Mildred Norman Ryder intentionally transformed herself from a middle class homemaker to a virtually penniless promoter of peace. She called herself “Peace Pilgrim,” and for almost thirty years she wandered North America on foot on a pilgrimage, carrying her only possessions in her pockets.

You don’t have access to view this content.

The Beautiful Cup: Backcountry Coffee for the Ultralight Backpacker

Techniques and gear for the lightweight backcountry coffee connoisseur, because under no circumstances should you let a non-coffee drinker brew your bliss.

Editor’s Note: This article first appeared in Issue 6 of the BackpackingLight print magazine (now out of print).

If my years as a backcountry traveler have taught me anything, it’s this: backpacking should never EVER be attempted without coffee. If this statement does NOT ring true as a fundamental fact in alignment with the laws of the universe, then don’t bother reading any further.

Okay, lets review the statement above. If backpacking equals coffee, then ultra-light backpacking must somehow equal ultra-light coffee, right? Right.

As a seasoned backpacker and a coffee drinker, the act of field-brewing the perfect cup is something I have taken to heart and, as a result, I’ve experimented with all-manner of systems and techniques. Over the years I’ve found that there are plenty of ways to make a fabulous cup of coffee in the backcountry, but some systems are decidedly NOT lightweight.

This is serious business and there’s a lot to juggle in deciding how best to approach the coffee conundrum for a given backcountry trip. Factors such as group size, cooking systems, and the extent to which you will ultimately favor weight savings over the aesthetics of the perfect coffee experience will all have an impact on which approach is most appropriate.

As you may have gathered, I’ve got some opinions about this whole coffee thing. So, before we go any further, and in the interest of full disclosure, here are a few of my personal prejudices:

  1. Strong coffee is good coffee.
  2. Except for a very few companions, I don’t trust anyone to make coffee for me.
  3. Adding sugar to coffee is criminal.
  4. Sometimes I add a little milk in my coffee, but black is just fine.
  5. Adding flavors (like hazelnut and almandine) to an already perfect drink is sinful.
  6. Picking grounds out of my teeth is a serious buzz kill.
  7. Coffee equals joy.

The Methods

FRENCH PRESS

The Beautiful Cup - 1

Outdoor boutique shelves are overflowing with every conceivable variation on the humble French press. Some make very good coffee, and some seem designed to simply look good. French press systems becomes a good choice when you find yourself in a group. The more coffee you need (a liter or more), the more the press becomes a preferred option.

There are one-cup French press systems out there (and I even have a few), which make very good coffee, but they are NOT a lightweight solution. For a single cup at a time, the small filters are superior and much lighter.

For obvious reasons, glass (or, more correctly, Pyrex) ain’t an option. There are several Lexan versions. There is a robust 33-ounce (1.4-liter) sized Lexan press made by a company called GSI (they also make other sizes), and it costs about $20. As soon as I took mine out of the box, I used a hacksaw and cut off the handle, then ditched the rubber base and the Velcro insulating wrap. I got the thing down to a reasonable 9.1 ounces – a behemoth by ultralight standards, but a good tool for big groups.

Snow Peak makes a titanium French press (6.5 oz), but – alas – it only holds 24 ounces of liquid, making it just a one-cup (albeit a big one) apparatus.

There are a multitude of stainless steel versions of every conceivable size and design. These are for home use and car-camping applications ONLY.

I typically spend thirty days each summer working on massive glaciers in Alaska with big groups (sometimes fifteen expedition members!), and coffee time is an essential part of the experience. Our success as a well-run expedition is absolutely dependent on a well-orchestrated coffee routine. The French press is the glue that binds our teams together.

SMALL FILTERS

The Beautiful Cup - 2

There are at least two small filter systems on the market that function well. The MSR MUG MATE, which weighs .98 ounce, and THE PEOPLE’S BREW BASKET from The Republic of Tea. The Brew Basket is actually a little lighter than the MSR, weighing in at an amazing 0.1 ounce! The Brew Basket is a small plastic mesh filter shaped like a cup. It is a simple tool and works great.

The Beautiful Cup - 3

There are two ways to effectively use small filters to make good coffee – first, as a filter through which you pour already steeped coffee to keep grounds from ending up in your mug (and teeth), or second, as a way of containing grounds while they steep in your mug or bowl.

Actually POURING already steeped coffee through a filter makes better coffee, and it’s easier, but it requires using a two-pot system – one to hold the hot water and steep coffee in, and a second to drink from. Here’s how it works:

  1. Make a pot of boiling water with the desired volume.
  2. Shut off the stove and add finely ground coffee to the water.
  3. Stir with a little stick and then let this mixture sit for a while. (How long? How impatient are you? Some purists say four minutes, but I’m way too anxious for that; it would be an eternity. Let’s just say about a minute.)
  4. Then pour this mixture through your filter into your cup.

Dang, I can barely write this without getting all excited

For the second approach, using only one vessel, here’s the low-down:

  1. Boil the water in your drinking cup.
  2. Shut off the stove and take it off the heat.
  3. Prep the FILTER with the coffee grounds – a fine grind is essential.
  4. Carefully set the loaded FILTER right in the cup. This may take some time because the grounds will float (using the MSR with the lid will help here).
  5. Actively swish the FILTER around in the cup, then let it sit for a few minutes.
  6. Remove the filter and drink.

The Beautiful Cup - 4

SMALL FILTER 2.0

You can take the Republic of Tea BASKET and cut it (and then sew it up again) so it fits PERFECTLY into a 500ml baby Nalgene bottle! This solves some of the hassle factor, and reduces the filter’s weight below its already wispy 0.1 ounce! Scizzor, sewing needle and unwaxed, unflavored dental floss required.

The Beautiful Cup - 5

JAVA JUICE

Java Juice is the answer to the ultralight backpacker’s prayers.

For the super zealot, these little packets are the hands down winner for the lightest way to make, drink, and enjoy coffee.

Each packet weighs just 0.5 ounce and makes one 12-ounce cup of strong coffee. Vary the water (and the number of packets!) to find your strength preference.

How do you use Java Juice? Heat up water in a mug. Add contents of Java Juice packet and stir. That’s it! To make sure your hot drink tastes fantastic, heat your liquid before adding Java Juice.

Alas, even Java Juice is not quite perfect.

Pros & Cons(+) The lightest!

(+) The easiest!

(+) Pretty darned good taste.

(+) Single vessel.

(+) After careful instruction, even non-coffee drinkers can make it for you.

(-) Not quite as good as fresh brewed, but close.

Where Java Juice truly shines is when it’s served cold during afternoon coffee time on the trail with no need to pull out the stove. Dipping my humble mug in an ice-cold mountain spring, adding two packs of Java Juice and a pinch of powdered milk… oh my goodness, I’m getting all teary-eyed just thinkin’ about it!

COLD PREPACKAGED COFFEE IN CANS

The Beautiful Cup - 6

Austin Powers stumbled on Dr. Evil’s plans for global domination, and it was being masterminded out of the corporate tentacles of Starbucks. This was not just some Hollywood scriptwriters idea of a joke – this is TRUE! So, read on with extreme trepidation.

The Darth Vader of coffee exploitation does plenty of stuff that I worry about, but dang if they don’t make a really good coffee in a can.

Search your local grocery store (or gas station) and you’ll find little 6.5-ounce cans called DOUBLE SHOT. Espresso, cream, and sugar. This may sound terrible, but it is actually a distillation of the three most vital food groups: Caffeine, fat, and simple carbs.

I use these as a caffeine delivery system on short stoveless overnights trips. Two cans per morning are enough to screw my head on plenty tight.

Starbucks also sells an 11-ounce canned product called ICED COFFEE made with Italian roast, and (gratefully) this has less milk and sugar. Also very good.

The obvious drawback of these products is that you end up carrying actual containers of liquid into the backcountry, and then of course shuttle the empty cans around with you once you’ve used them.

COWBOY COFFEE

Cowboy Coffee is an art, but it requires a little patience. And, honestly, patience is not one of my virtues. Nonetheless, Cowboy Coffee can be very good, and here’s what I’ve learned:

The Beautiful Cup - 7

  1. Heat water in a pot.
  2. Let the water achieve a boil and take it OFF the stove.
  3. Add the grounds, and stir ‘em in. The grounds will float and won’t even begin to sink until they are fully saturated, so keep stirring. A little stick works fine.

You need to get the grounds to the bottom of the pot before you can pour the coffee into a cup. This is where patience is a virtue. Now it’s a race against time: if you wait an hour all the grounds will settle out beautifully – but the coffee will be cold. And if you don’t wait long enough, you’ll end up chewing your coffee instead of drinking it. It’s surface tension keeping the grounds afloat, and you’ll need to break this with some simple techniques.

Here’s where everybody has a little trick to get the grounds to settle. These all work fine:

  1. Tapping the side of the pot.
  2. Adding a tiny bit of cold water.
  3. Add a pinch of snow (difficult in Arizona in July).
  4. Drop a few pebbles into the pot (my favorite).
  5. Continue to stir with a tiny stick.

Even the best Cowboy Coffee usually leaves a few grounds in the first cup out of the pot, so find out who on your team won’t complain and pour theirs first.

*Important note: You can easily avoid this whole rigmarole by pouring the cowboy brew through a filter and into your cup. This is quick and solves the issue of getting any grounds in your cup. (See “Small Filters” above).

TURKISH GROUNDS

The Beautiful Cup - 8

Traditional Turkish coffee is made with a combination of a specialized little cup, called an ibriks or cezve and very finely ground beans. For true Turkish coffee, beans are ground to a dusty powder – a consistency that might be difficult to achieve at home with a counter top “propeller” grinder. A better option would be to use the grinder in your local grocery store (or better yet, ask at your local coffee shop). If you don’t achieve a fine enough grind, the process won’t work. Your ground coffee needs to be as fine as cake flour!

If you are in a café in downtown Istanbul, your artisan host will put a small amount (usually less than you think) in your ibriks and then carefully bring the mixture to a boil. He’ll even let you use a special spoon to stir it. The ibriks has a bell shape, it’s wider at the bottom. This wide area traps the inky black stuff (affectionately called the “sludge”) as it settles, so you don’t end up drinking it. Simple and elegant. The humble backpacker can use a 500ml Lexan Nalgene bottle as a stand-in ibriks. This vessel has a similarly shaped wide rim, and it functions very nicely.

So, mix some Turkish ground coffee with boiling water right in your Baby-Nalgene, no stirring – just put on the lid and shake. Now let it sit for a few minutes so the sludge can all settle. Then drink it carefully! It’s a beautiful thing as long as there is no disruption of the tar at the bottom.

TURKISH COWBOY

The Beautiful Cup - 10

You can combine the best of Cowboy Coffee and Turkish coffee approaches for 1-liter volumes. The standard 1-liter soft-sided Nalgene water bottle (6.1 oz) is a solution that is lighter than the French press and less time consuming than the Cowboy in-the-pot system. It also keeps the pot from making the next meal taste like coffee.

Put a very fine Turkish grind in the Nalgene bottle. Add boiling water, put the lid on, and shake it up. Wait a while (maybe three minutes), tapping the bottle periodically. Allow the grounds to settle to the bottom and decant the mixture into waiting cups. The shape of the “rim” on the bottle effectively traps the sediment, but pour SLOWLY. The last few drops will NOT be drinkable.

Sadly, the Nalgene bottle serves only one purpose, it will hold odors and will not make a very good water bottle – unless you don’t mind the strong leftover taste.

(+) A fairly light way to make coffee for two people (a half a liter each).

(+) Makes VERY GOOD coffee!

(+) Keeps the pot clean of coffee taste.

(-) The water bottle will be unusable as a water bottle.

Condiments

POWDERED MILK

If you can’t handle your coffee black, you’ll need to add some milk. The powdered stuff is actually pretty good (and there is even some organic milk available).

However, creating high quality milk from a powder isn’t as easy as you might think. Powdered milk is a finicky substance. Don’t be lazy and simply shovel the stuff into your brew. If you add powdered milk to hot water it’ll become a thick glop similar to a full hanky during allergy season and about as appealing.

To make proper milk you MUST USE COLD WATER. When combined with cold water, the powder is transformed into a glop-free concoction. That said, you can make it pretty thick so the mixture doesn’t get your final coffee too cold.

The 500 ml Nalgene is a milk frother’s dream tool! Add powdered milk and a tiny amount of cold water. Put the lid on and shake aggressively. You can achieve a powerfully creamy addition to the coffee experience.

SUGAR

Now, I would NEVER put this stuff in my coffee. But, in an effort to inform those who do, here are some tips.

Sugar is a tricky thing to carry in a backpack. It is granular and difficult to pour out of a plastic bag, but dipping a spoon in the bag is an unsanitary solution. Sugar packs poorly in a Zip-loc bag, because the grains clog the zipper, and spilled sugar is a disaster, especially in the rain. Oh Jeeez – the stuff gets sticky!

Brown sugar packs a little better – it stays in clumps for easier travel and serving. It sounds counterintuitive, but actually helps.

The easiest solution is to steal some of those little packets from a diner. Figure out how much you’ll need and count ‘em out exactly before leaving the trailhead.

Alternative Caffeine Delivery System

Jolt Gum

Jolt Gum is not coffee; it’s a caffeine delivery system completely devoid of the ritual involving the mug and the heartfelt “Ahhhh!” after the first sip. But it does have its place in the true caffeine addict’s backpack.

Here’s a story: I got up early in southern Utah in the rain, it was cold, and we had a lot of miles to finish up before the end of the day. We didn’t light the stove, we just chewed Jolt gum. While hiking I thought to myself, “What a nice morning!” (and this was in the rain!) This was the opposite of a non-coffee morning where my thoughts would be a frenetic spiral of, “Gotta brew up – Gotta brew up – Gotta brew up!”

This stuff works. Two little pieces have about the same caffeine as one cup of coffee. So, this actually IS a viable substitute to bringing coffee into the field.

A Backcountry Coffee Code of Conduct

Here’s an ethical can of worms.

Coffee grounds are trash, and we can’t be adding trash to the pristine backcountry.

I’ve shared a tent with some very devoted and morally pure backcountry travelers. They have watched me carefully disperse coffee grounds in the morning, and they were extremely clear at communicating their disapproval. Fortunately, I had already jacked my brain on the good-bean, so my debating skills were white hot. Unfortunately, they are right. Coffee grounds are actually trash. But, they are a trash that I can justify leaving in the topsoil in a pretty meadow out in the great wild.

The third Leave-No-Trace principle is “Dispose of Waste Properly,” and used coffee grounds are waste. If you feel you need to carry them out to the road-head and throw them in a trash can, then more power to you. I am of the opinion that with just a little forethought, used coffee grounds can be appropriately left behind. Coffee is a boiled and ground up bean (and hopefully you purchase organic beans!), and they will decompose in healthy topsoil.

For what it’s worth here’s my own “ethical” checklist:

  1. Scatter used coffee grounds in an appropriate area – bushes or brushy areas work wonderfully.
  2. Do NOT scatter used grounds on rocks or rocky areas. If you are above tree line, pack used grounds with you until you get to a zone with living flora.
  3. If you are in an impacted campsite, walk a long way from the site before scattering.
  4. Never dispose of used grounds in a river or pond!
  5. Don’t be lazy. Do the very best you can when you scatter your used coffee grounds.

The Beautiful Cup - 11

Lightweight Internal Frame Packs: a State of the Market Report – Part 1A: Testing Overview and List of Packs Tested

We survey light-weight internal frame packs with a maximum weight of 1.6 kg (3.5 lb) and a volume generally in the range 50 L to 75 L.

You don’t have access to view this content.

Montane Anti-Freeze Jacket Review

A lightweight three-plus season down insulated jacket that excels in blustery conditions.

Introduction

Montane Anti-Freeze Jacket Review - 1
The Montane Anti-Freeze Jacket is a lightweight, full-featured, very weather-resistant three-season down jacket weighing just 14.5 ounces (manufacturer specification) for size Medium. It’s available in men’s and women’s versions.

This separate review provides additional descriptive and performance information on the Montane Anti-Freeze Jacket. Read our article Ultralight Three-Season Down Jackets State of the Market Report 2010 for a state of the market analysis and comparative specifications and performance for a range of ultralight down jackets.

Although the Montane Anti-Freeze Jacket’s weight is slightly over our 14-ounce (397-g) weight limit for our state-of-the-market article, we decided to include it because we know garments from Montane are designed to be as lightweight and functional as possible. The Anti-Freeze falls into our Multi-Purpose Three-Season Down Jacket category, covered in Part 3 of the article cited above, because of its many features. How does it compare with other lightweight three-season jackets in our roundup, and how useful is it for backpacking?

Description

As we would expect from Montane, the Anti-Freeze is designed to be both lightweight and functional. The shell is 0.9 oz/yd2 (31 g/m2) Freeflow Ultra Lite ripstop nylon with a DWR finish, and the lining is 0.88 oz/yd2 (30 g/m²) PEAQ Down ultra soft nylon plain weave. The shell fabric has a waterproof rating of 800 millimeters and MVTR breathability of 4000 g/m²/24 hours.

Insulation is 5.1 ounces (145 g) of 800 fill power goose down, yielding a measured single-layer loft of 1.3 inches (3.2 cm). It has the highest loft in the group of multi-purpose down jackets we evaluated in Part 3 of the cited state-of-the-market article, but it’s not as lofty as several jackets in the group of seriously lightweight three-season down jackets we evaluated in Part 2 of the same article.

Montane Anti-Freeze Jacket Review - 2
Front and rear views of the Montane Anti-Freeze Jacket, outside of my igloo at 9,500 feet elevation.

Montane Anti-Freeze Jacket Review - 3
The jacket has a total of three pockets: two zippered hand pockets (left), containing the waist drawcord adjustors, and a zippered chest pocket (right) that’s large enough to hold a folded map. The adjustable cuffs have Velcro tabs. There are no pockets on the inside of the jacket.

Montane Anti-Freeze Jacket Review - 4
The Montane Anti-Freeze jacket has drawcords on the waist and hem (left) and on the back of the collar (right), so it really seals up tightly in cold/windy conditions.

Montane Anti-Freeze Jacket Review - 5
The jacket’s dropped tail and vertical tail quilting is designed to draw up and completely cover the butt.

Performance

Montane Anti-Freeze Jacket Review - 6
I wore the Anti-Freeze Jacket on breaks while backcountry skiing and snowshoeing, on one igloo camping trip (left), while hiking in Southeastern Alaska in late spring (right, Mendenhall Glacier in background), and on high altitude spring backpacking trips where I camped between snow drifts and wore it in some spring snow showers.

The jacket’s fit in size large is spot on for me (6 ft/1.83 m tall, 167 lb/76 kg, 39 in/99 cm chest, 34 in/86 cm sleeves). The sleeves are adequately long and the body has extra room to layer over an insulated vest or lightly insulated jacket. It’s roomy but not too roomy. As shown in the photos above, the jacket covers the butt very well.

With all its features, the Montane Anti-Freeze Jacket is definitely multi-purpose, and its warmth/protection is on the upper end of the group of jackets we classify as three-season – it has more down insulation than the other jackets in this category (multi-purpose three-season down jackets), plus it’s more sealable and weather-resistant – so we might call it a three-season+ down jacket. It does not have enough insulation to be considered a true four-season jacket, and it does not have any inside pockets (like drop pockets) for keeping items warm, as many four-season jackets do.

Montane Anti-Freeze Jacket Review - 7
The Freeflow shell on the Anti-Freeze Jacket is exceptionally water-repellent (left). In my one-hour indoor “puddle test,” no water penetrated the jacket’s shell or seams.

Several readers have expressed the opinion that an insulated jacket must be capable of sealing all of its openings to hold heat inside, which is especially needed for really cold conditions and for windy conditions. With three drawcords (neck, waist, and hem), the Montane Anti-Freeze jacket seals exceptionally well. Three drawcords in combination with its Freeflow Ultra Lite shell make this jacket exceptionally weather resistant.

I found the Anti-Freeze Jacket to be most appropriate and useful for more blustery weather and shoulder season conditions where the weather can be any combination of cold, wet, and windy. It’s excellent for igloo camping, where temperatures can drop down to about 20 F (-7 C) with high humidity. For active backcountry skiing and snowshoeing I found it to be too warm to wear on the go, but it was welcome on breaks and when it became windy. It was perfect on the Alaska Ferry where the temperature was 40 F with a 20 mph (32 kph) wind, and light drizzle, and it provided the extra insulation and weather resistance I needed when spring camping at 12,000 feet (3,658 m) among snowdrifts in the southern Rockies.

Comparisons

Our article Ultralight Three-Season Down Jackets State of the Market Report 2010 provides complete specifications and ratings for the Montane Anti-Freeze Jacket in comparison to a range of other lightweight down jackets. The multi-purpose jackets most similar are the EMS Ascent Sector Down Sweater, The North Face Thunder Jacket, MontBell Permafrost Light Down Jacket, and Western Mountaineering Flash XR Jacket. It is also similar (but more featured) compared to the MontBell Alpine Light Down Jacket, Feathered Friends Hyperion Jacket, and Western Mountaineering Flight Jacket in our seriously lightweight group of down jackets.

Assessment

With 1.6 inches/4.1 cm of measured single-layer loft, the Anti Freeze is lofty, but not as lofty as the Brooks Range Alpini Mountain Anorak (1.6 inches/4.1 cm), Feathered Friends Hyperion Jacket (1.5 inches/3.8 cm), Nunatak Skaha Anorak (2.1 inches/5.3 cm), and Western Mountaineering Flight Jacket (1.6 inches/4.1 cm). The Anti-Freeze Jacket is unique among the group of jackets we tested in that it combines a lightweight full feature set, good insulation, and high weather-resistance. That combination adds a few ounces, but the result is pure performance.

In my opinion, the Montane Anti-Freeze is a jacket not for bitter cold, but for merely “adverse” conditions. It performs very well in those conditions, and there are many places throughout the world where this jacket is a good match. It is indeed multi-purpose, but for harsher conditions. For lightweight backpacking, the Anti-Freeze is appropriate for the shoulder seasons in the mountains where the nighttime temperature can drop well below freezing and the weather can turn blustery anytime. However, it’s overkill for summer mountain backpacking where the extra features and protection are not really needed and a minimally featured jacket with a high warmth to weight ratio is a better choice.

Specifications and Features

Manufacturer Montane (http://www.montane.co.uk/)
Year/Model 2010 Anti-Freeze Jacket
Style Hoodless insulated jacket with full front zipper
Fabrics Shell is 0.9 oz/yd2 (31 g/m2) Freeflow Ultra Lite ripstop nylon with DWR finish, lining is 0.88 oz/yd2 (30 g/m²) PEAQ Down ultra soft nylon plain weave
Insulation 800 fill power down, 5.1 oz (145 g)
Construction Sewn-through with 3.6-in (9-cm) horizontal quilting, set-in sleeves, and vertical tail quilting
Loft Measured two-layer loft is 2.5 in (6.4 cm), 1.3-in (3.3-cm) single-layer loft
Features Down-filled stand up collar; full height reversed #5CN YKK zipper with two sliders and storm flap under zipper; fleece chin guard and backing on inside of storm flap; two zippered hand pockets (not fleece lined); one zippered chest pocket; adjustable cuffs with Velcro tabs; drawcord waist, hem, and neck; dry bag stuff sack included
Weight Size Large tested
Measured Weight: 16.3 oz (434 g)
Manufacturer Specified Average Weight: 14.5 oz (411 g)
MSRP £160 (Approx. US$240)

Disclosure: The manufacturer provided this product to the author and/or Backpacking Light at no charge, and it is owned by the author/BPL. The author/Backpacking Light has no obligation to review this product to the manufacturer under the terms of this agreement.

Hand Sanitizers: My Journey Towards Discovering Best Practices for Wilderness Hygiene

Facilitating the transportation of fecal hitchhikers from your exhaust pipe orifice to your fuel filler neck orifice is one of the biggest backcountry threats. Stop these illegal immigrants en route, because we all know you can’t close the border!

Introduction

Backcountry travelers have a long list of things to fear. Here are my ten favorites:

  1. Animal attacks by mosquitoes, bears, snakes, ticks, wolves, or locusts.
  2. Drinking water poisoned with giardia, crypto, amoeba, typhoid, or the bird flu.
  3. Running out of toilet paper and having to wipe with snow, rocks, pine cones, or spruce sprigs.
  4. Having to build a fire when it really counts.
  5. Having to push the 911 button on their SPOT because they failed to build a fire when it really counted.
  6. Getting their feet wet, and then having them fall off after a progression of suprahydration, maceration, epidermal separation, fissurization, staphylococcal infestation, gangrene, and rot.
  7. Accidentally leaving something behind, or having to justify to everyone on the Internet (in the lightweight backpacking community, at least) why they can’t leave something behind, like their Sling-light, Crocs, Frisbee, iPod, Newcons, or box of E&J.
  8. Hiking with other people.
  9. Hiking solo.
  10. Running out of coffee.

Of course, only #10 is a justified fear.

For the rest of you, you may be fearing the wrong things.

What you should be fearing is facilitating the transportation of fecal hitchhikers from your exhaust pipe orifice to your fuel filler neck orifice.

This article discusses how to stop these illegal immigrants en route, because we all know you can’t close the border.

The Relationship Between Hand Sanitation and GI Illnesses

The problem is an age old one: minimize gastrointestinal (GI) illness that results from backcountry activities.

The two most commonly perceived GI illnesses are (1) those acquired by drinking contaminated water, and (2) those acquired as a result of poor hygiene. This article addresses the hygiene issue, and specifically, hand sanitation.

Tod Schimelpfenig, Curriculum Director at the Wilderness Medicine Institute of the National Outdoor Leadership School (NOLS), believes that hand sanitation may play a more important role in illness transmission than drinking untreated water. “Hand washing is very important but poorly and infrequently done,” says Schimelpfenig. “It’s inconvenient and must be a disciplined habit.” Over a period of several years, NOLS made intentional changes to their hand sanitation practices and curriculum which resulted in significant reductions in GI illnesses (Leemon and Schimelpfenig, 2003). Currently, NOLS uses alcohol gel hand sanitizers because they are readily available and inexpensive – key decision factors for sizable programs like NOLS.

My own personal experiences are deeply rooted in a desire to keep my hands clean in the wilderness.

When I was an institutional wilderness guide in the 1980s, we cared very little about and had no policies regarding wilderness hygiene. Some of our practices included:

  1. Everyone eating out of the same pot, with the same spoon (to save weight, increase simplicity, and… to improve camaraderie perhaps?!)
  2. Leaving soap out of our kits and believing that simply washing hands and scrubbing vigorously with water was enough.
  3. Never washing cookware, and believing the probable lie propagated by some “lightweight backpacking enthusiasts” that it will sterilize itself the next time you boil water in it.

If these are some of your practices, a careful read of Boulware (2006) might be a wise investment of your time.

What I thought I learned during my years of institutional guiding was that we really needed better water treatment technologies, because almost all of the guides, and many of the students, experienced GI illnesses at some point during or shortly after their treks.

What I really learned, looking back, is that our poor hygiene was probably a far greater contributor to our GI distress than contaminated water, and that specifically, I can look back and be genuinely horrified at our hand sanitation practices.

Upon reviewing much of the research that began to emerge about this topic in the late 1990s and early 2000s, I realized that especially with groups of people sharing cooking and other gear, hand sanitation would be an important part of staying healthy in the wilderness.

Alcohol-Based Hand Sanitizers

I’ve been an aficionado of using alcohol-based (EtOH) sanitizers for years, for the same reason that Tod Schimelpfenig stated above: they are cheap and easy to find. However, I’ve also discovered the nasty unspoken risk of using them: the dehydration of hand skin that leads to cracking. Some companies add moisturizers into these mixes, but I’ve found them to be marginally effective and to leave greasy residues.

Some ultralight backpackers like EtOH-based sanitizers because they can serve double duty (by disinfecting the skin around wounds for first aid treatment, or as a firestarting aid). However, I never found the weight savings to be worth it, and I’ve always preferred the more robust disinfecting potential of a sterile alcohol wipe, and more efficacious methods of firestarting using dedicated supplies.

In response to skin cracking, I’ve tried a number of reactive measures to control it, including hand lotions, Hydropel, those thin fingerless “sun gloves” that saltwater fly fishermen wear, using less sanitizer, and rubbing oils from my own forehead into the skin! I wasn’t happy with any of these solutions and instead found myself caught in the vicious downward spiral of pain and discomfort by successively applying stinging alcohol gels to my cracked hands.

In addition, while I was working in the area of biofilm research in the 1990s, we discovered that cracks in the skin served as protective environments for bacterial growth, with the resulting colonies of pathogens remaining more resistant to disinfection than bacteria attached to the outside surfaces of the skin. Dyer et al. (1998) also suggest that the organic-solvent properties of EtOH strip away skin chemicals (e.g., sebum and lipids) that play a role in impeding bacterial infection.

My solution in 2008, after one particularly cold and windy spring trek with bleeding cracks on my hands, was to finally bag alcohol hand sanitizers altogether and simply use soap and water, even if it had to come from my water bottle if I wasn’t near a water source.

Alternatives to Alcohol Based Hand Sanitizers

After reviewing a variety of research discussing various hand washing methods, I’ve reverted back to the time honored practice of good old soap and water. I carry a MiniVial containing highly concentrated castile soap (my favorite is Dr. Bronner’s), and always wash my hands after bowel movements and upon arrival into camp prior to preparing the evening meal.

The efficacy of vigorous handwashing with soap relative to other methods cannot be underestimated (Simonne, 2008).

However, sometimes, washing hands with soap and water is simply inconvenient, so I do carry a benzalkonium (BAK) chloride-based hand sanitizer that is easy on the hands and has shown good efficacy in sanitization relative to alcohol-based products (Dyer et al., 1998).

A number of companies market BAK hand sanitizers, but finding them in a form useful for the ultralight backpacker has been problematic, until Adventure Medical Kits’ recent introduction of a 0.5 fl. oz. pump bottle. The form factor is small (pocketable), simple to use (just pump to spray, no lids or caps to fiddle with), and lightweight (a full bottle weighs an ounce). The manufacturer claims that the bottle holds “150 Sprays” and that it should be “applied liberally”. This latter point is important with any hand sanitizer, be it soap, EtOH, or BAK: if you don’t coat and scrub the entire surface of your hands, it’s not going to be effective.

In practice, I find that six sprays deliver enough liquid for me to wash the entire surfaces of both hands, which suggests that I can get 150 / 6 = 25 full hand washings out of the bottle. If I wash with soap and water twice a day, and use hand sanitizer 3X / day (my normal routine), then the Adventure Medical Kits 0.5 fl. oz. pump bottle is enough for an eight-day trek for me. Plus, and my wife will agree, my hands aren’t “all scratchy” when I come home.

Conclusion

Washing with soap and water is still my preferred method of hand sanitization. It leaves my hands feeling cleaner than with any other method, and science has shown repeatedly that it remains the most effective method. I’d be awfully nervous if I saw my surgeon grab a scalpel after only a quick application of a dollop of EtOH onto the palm of his hand!

While a variety of non-soap (waterless) methods of hand sanitization exist, few of them are accessible or easy to use by wilderness backpackers. EtOH and BAK are the two primary methods available in small, light, and simple to dispense form factors. Between the two, I prefer BAK for its ability to preserve the health of my skin when used over a long period of time, and of the BAK products, I’ve found the Adventure Medical Kits 0.5 fl. oz. pump spray bottle to be an ideal product that fits in with my own philosophy of “simple, light, and effective.”

References

  • Wilderness Injury, Illness, and Evacuation: National Outdoor Leadership School’s Incident Profiles, 1999–2002, by Drew Leemon and Tod Schimelpfenig, Wilderness and Environmental Medicine, 14, (pp. 174-182), 2003.
  • Influence of Hygiene on Gastrointestinal Illness among Wilderness Backpackers, by David R. Boulware. Journal of Travel Medicine, 11:1 (pp. 27-33), 2006.
  • Hand Hygiene and Hand Sanitizers, by Amy Simonne, University of Florida IFAS Extension, http://edis.ifas.ufl.edu/pdffiles/FY/FY73200.pdf.
  • Testing a New Alcohol-Free Hand Sanitizer to Combat Infection, by David L. Dyer, Kenneth B. Gerenraich, and Peter S. Wadhams, AORN Journal, 68:2 (pp. 239-251), 1998.

Sierra Designs Vapor 15 Sleeping Bag Review

850 fill power down, 15 F temperature rating, 30 ounces – the lightest 15-degree mummy style sleeping bag to be found.

Introduction

Sierra Designs Vapor 15 Sleeping Bag Review - 1
The new Vapor 15 sleeping bag raises the bar (for Sierra Designs) to 850 fill power down, and has a new 15 denier nylon shell and lining fabric. The unisex bag is available in sizes Short, Regular, and Long.

For the shoulder seasons and for some winter camping situations, many hikers prefer to use a sleeping bag with a temperature rating of 10-20 F (-12 to -7 C). Others may prefer a warmer bag like this for summer backpacking in the mountains, simply to ensure they don’t get cold. While the latter group could benefit from our lightweight philosophy, as explained for sleeping bags in our article: Ultralight Three-Season Down Mummy-Style Sleeping Bags: State of the Market Report 2010, both groups can save weight by carrying an ultralight sleeping bag.

Sierra Designs claims their Vapor 15 is the lightest 15 degree down mummy-style sleeping bag on the market (we will check that out in this review). The Vapor 15 sets another landmark for Sierra Designs – their first bag featuring 850 fill power down – rivaling bags from Marmot, Feathered Friends, and Western Mountaineering. What is there to like and dislike about the new Vapor 15, and how does it stack up, by the numbers, to comparable bags?

Description

As a departure from other bags in Sierra Designs Ultralight Series, the Vapor 15 raises the bar to 850 fill power down. It has the same Jacket Hood and half-length (25 in/64 cm) zipper as other bags in this series, but it does not have the Sierra Designs Flex Technology used in the other bags. Also missing is a footbox zipper – I guess they assume that most users will want to retain heat in a 15 F (-9.4 C) rated bag.

Sierra Designs Vapor 15 Sleeping Bag Review - 2
The unisex Vapor 15 is a member of the Sierra Designs Ultralight Series of bags that feature a unique jacket-style hood and a half-length zipper.

The 15 denier nylon shell and lining fabric used in the Vapor 15 are lighter and more durable than the 22 denier ripstop polyester used in other bags in the Sierra Designs Ultralight Series.

Although the Vapor 15 does not have a women’s version, it does come in a size Short that fits people to 5 feet 6 inches (1.7 m). It also comes in size Regular that fits people to 6 feet (1.6 m), and Long that fits to 6 feet 6 inches (2 m) (read my issue on sizing in the Performance section).

Sierra Designs Vapor 15 Sleeping Bag Review - 3
All Sierra Designs bags feature a Snag-Free Zipper Track to prevent zipper snags. The key component is a stiff piping on both sides of the zipper that creates a barrier between the bag’s lining and the zipper track. The bag also has a large down-filled draft tube on the bottom side of the zipper to prevent cold spots.

Sierra Designs Vapor 15 Sleeping Bag Review - 4
The Vapor 15 has Sierra Designs unique Jacket Hood (left), which is exactly what it says – it looks and fits like the hood on a down parka, and it’s well insulated. The bag’s zipper angles from the side to the base of the hood. The hood draws down like a sleeping bag hood to expose only your nose and mouth (right).

Sierra Designs Vapor 15 Sleeping Bag Review - 5
The Vapor 15’s footbox is anatomically shaped to provide extra room for big feet like mine, or for wearing down booties inside the bag. There are two removable Pad Locks (thin straps that pass through loops on the bag) to attach the bag to a sleeping pad (right) to prevent slide off.

Performance

Sierra Designs Vapor 15 Sleeping Bag Review - 6
Winter camping using the Vapor 15 bag inside an igloo at 9,500 feet (2,896 m) elevation on a cold February night.

For convenience, in February and March I tested the Vapor 15 in a single-wall tent set up in my back yard in an area where I shoveled away the 2-foot (61 cm) snowpack. Temperatures during seven nights of testing ranged from 27 to 12 F (-3 to -11 C). I also tested the bag in my igloo at 9,500 feet (2,896 m) on one late February night where the temperate got down to 23 F (-5 C). In the spring I used it on an April six-day backpacking trip in southern Utah where the nighttime temperatures ranged from 25 to 52 F (-4 to 11 C), and one late spring alpine backpacking trip where I slept between snowdrifts and the temperature dropped down to 18 F (-10 C).

The amount of 850 down fill in the Vapor 15 is 16, 18, and 20 ounces (454, 510, 567 g), respectively, for the Short, Regular, and Long lengths. I tested the Vapor 15 in a size Long, and measured the two-layer loft at 6 inches/15 centimeters (single-layer loft is 3 in/7.6 cm). Additionally, the bag has continuous baffles, so it’s possible to shift more of the down to the topside, if desired. According to our table of estimated temperature ratings based on measured loft (read our Backpacking Light Position Statement on Sleeping Bag Temperature Ratings, 3 inches (7.6 cm) of single-layer loft translates to a 0 F (-18 C) rating, so on a loft basis it appears that the Vapor 15 is conservatively rated. Please read the referenced article and Ryan Jordan’s article entitled Sleeping by Faith: Bag Temperature Ratings and realize that sleeping bag warmth depends on a number of factors.

Sierra Designs Vapor 15 Sleeping Bag Review - 7
Verification that the Vapor 15’s double-layer loft (left) measures 6 inches (15 cm). A lightweight (0.6 ounce/17 g) stuff sack is provided with the Vapor 15 that is properly sized to stuff the bag without over-compressing it. Actually, it’s a little extra roomy, which I don’t mind a bit.

One important issue is sizing: Sierra Designs bags apparently run short. In my previous review of the Sierra Designs Nitro 30 sleeping bag, I found that size Regular did not fit a person up to 6 feet (1.8 m) as claimed. I found it too short, and my height is exactly 6 feet (1.8 m). Size Regular will fit people up to 5 feet 10 inches (1.8 m) at the most. In testing the Vapor 15, I wisely opted for the Long length and found it much more to my liking in terms of length as well as girth. In fact, size Long is just right for my height; it can accommodate a person up to 6 feet 2 inches (1.9 m), but it would be too short for anyone taller than that. The bag has adequate girth in the shoulder and hip areas to wear a puffy down jacket and down pants inside without being too tight.

It’s hard to design a sleeping bag zipper track that is lightweight and snag-free. Sierra Designs Snag-Free Zipper Track does minimize snagging, but it adds significant weight to the bag. The heavy-duty zipper track is apparently needed because the zipper curves across the chest area to the base of the Jacket Hood. I personally did not mind the half-length (25 in/64 cm) zipper on the Vapor 15. It makes it a little more cumbersome to get into and out of the bag, but I found it easy to adjust. However, the short zipper excludes the option to zip two bags together or to open the bag up and use it as a blanket on warmer nights.

So, how warm is the Vapor 15? In my testing, I wore only a microfleece top, bottom, and cap inside the bag so I could determine the bag’s actual warmth. I kept a down jacket and pants next to me that I could put on if I got cold. That happened only once, when the temperature dropped down to 12 F (-11 C). After I donned the extra clothing, I stayed nice and warm the rest of the night. On another night when the temperature dropped to 18 F (-10 C), I started getting a little chilly, but not enough to add clothing. I didn’t have the opportunity to test the bag in serious winter camping conditions, but from my testing experience I believe I can extend the warmth of the Vapor 15 down into the single digits by wearing a down jacket, pants, and booties inside. Overall, in my opinion the Vapor 15’s temperature rating is slightly optimistic, which is typical in U.S. made sleeping bags.

The bag’s draft tube along the zipper is on the bottom side, rather than the top side on most bags. It seems logical to place it on the top side so gravity will help hold it in place. During my testing, I specifically checked the draft tube to see if it was sealing the zipper, and found that it was. The curved zipper design seems to necessitate putting the draft tube on the bottomside to avoid snagging, and the curved zipper does keep the draft tube in its proper place. It should also be noted that the Vapor 15 does not have a neck baffle at the base of the hood, as do many bags in this temperature range.

I tested the bag’s water resistance with my “puddle test,” where I put 1/8-cup of water on a seam and allowed it to stand for one hour. No water soaked through the seam or fabric, indicating the fabric is very water resistant and the seams are tight.

The bag’s pad attachment straps are useful for a back sleeper or hammock sleeper. But I’m a side sleeper, so I had no use for the straps because I want the bag to turn with me. The pad straps are easy to remove and reduce bag weight by 0.5 ounce (14 g), down to 30.4 ounces (862 g) for size Long.

Comparisons

The following table compares the Sierra Designs Vapor 15 with some popular 10-20 F (-12 to -7 C) rated ultralight mummy style down sleeping bags. All of the bags have continuous baffles, and all data are manufacturer specifications for a size Regular bag.

Manufacturer Model Temperature Rating (F/C) Single-Layer Loft (in/cm) Fill Weight (oz/cm) Fill Power Total Weight (oz/g) Cost US$
Sierra Designs Vapor 15 15/-9.4 3.0/7.6 18/510 850 30/850 440
Western Mountaineering Versalite 10/-12 3.0/7.6 20/567 850 32/907 440
Feathered Friends Raven 10/-12 3.0/7.6 20/567 850 37/1049 420
Marmot Helium 15/-9.4 na 19.5/553 850 34/964 369
MontBell UL Spiral Down Hugger #1 15/-9.4 na 20/567 800 32/907 329

As you can see from the data, Sierra Designs can reasonably claim that their Vapor 15 is, in fact, the lightest 15 degree bag to be found. However, the comparison is complicated by the different temperature ratings assigned to the bags. The Marmot Helium bag has 1.5 ounces (43 g) more down than the Vapor 15, and has an EN tested temperature rating of 15 F (-9.4 C), which further supports my observation that the Vapor 15’s temperature rating is a bit optimistic. The Marmot Helium is a better value than the other bags listed, and it has a full-length zipper, but its shell fabric is heavier and not as water resistant as the other bags. The MontBell UL Spiral Down Hugger #1 has 800 fill power down, is almost as light as the Vapor 15, and costs $91 less. It has a 2/3-length zipper, soft 12 denier shell and lining fabric, and its Polkatex DWR is superb.

Assessment

I have not personally tested any of the other 10-20 F (-12 to -7 C) rated bags in the table above, so I can’t compare them other than by the numbers. One main difference is the Vapor 15 has a half-length zipper, while the others all have a full-length zipper. Many hikers would not have a bag that doesn’t have a full-length zipper, but personally the half-length zipper is no problem for me. I need the warmth on most of the trips where I would take a 15-degree bag, so I rarely have the problem of overheating. Another reason for the half-length zipper is the bag’s Jacket Hood, which necessitates the curve in the zipper to the base of the hood, which in turn necessitates the heavy-duty zipper track for smooth operation and minimal snagging. A full-length zipper of that design would add too much weight.

Overall, I really like the Vapor 15. It provides plenty of warmth for its sub-2-pound (907 g) weight. It weighs about the same as many bags rated at 20-25 F (-7 to -4 C) and is significantly warmer. Its just right for mountain backpacking in the shoulder seasons (late spring and fall), certain winter camping situations by wearing extra clothing inside the bag as needed, and for cold sleepers who want to ensure they stay warm.

When choosing a Sierra Designs bag, it’s very important to know that the sizing runs short, at least that is my experience from the two bags I have recently tested. A size Regular bag from most manufacturers, sized to fit a 6 foot (1.8 m) tall person, normally fits me just fine, and I am 6 feet tall. Not so with a Sierra Designs bag. I found a size Regular to be uncomfortably short, but a size Long fits great. I don’t have any information on the sizing of the size Short bag, but I note that getting a size Short sleeping bag is a good approach for a shorter person to reduce pack weight.

Other than the length issue, I did not find any problems with the Vapor 15. It’s simple, lightweight, and warm – just the way I like it.

Specifications and Features

Manufacturer Sierra Designs (https://www.sierradesigns.com/)
Year/Model 2010 Vapor 15
Style Hooded mummy with ½-length left side zipper
What’s Included Sleeping bag, stuff sack, cotton storage bag
Fill 850 fill power down, 16 oz (454 g) size Short, 18 oz (510 g) size Regular, 20 oz (567 g) size Long
Construction 5.5 in (14 cm) straight wall continuous baffles, ergonomically shaped footbox, six chamber jacket hood
Measured Loft 6 in (15 cm) average double-layer loft, 3 in (7.6 cm) single-layer loft
Manufacturer specification not available
Manufacturer Claimed Temperature Rating 15 F (-9.4 C)
Stuffed Size 18 x 8 in (46 x 20 cm)
Weight Size Long tested
Measured Weight: 1 lb 14.9 oz (876 g)
Manufacturer Specification: 1 lb 14 oz (850 g) size Regular
Dimensions Shoulder/hip/foot
Short: 54/48/35 in (137/122/89 cm)
Regular: 57/50/37 in (145/127/94 cm)
Long: 60/52/39 in (152/132/99 cm)
Sizes Short fits to 5 ft 6 in (178 cm)
Regular fits to 6 ft (183 cm)
Long fits to 6 ft 6 in (188 cm)
See my comments in the review.
Fabrics Shell and lining are 15 denier 0.76 oz/yd2 (26 g/m2) ripstop nylon with DWR
Features ½-length zipper with 1 pull, snag-free zipper track, anatomical footbox, continuous baffles, large down-filled draft tube, jacket hood, 2 pad straps
MSRP Short US$420, Regular US$440, Long US$460

Disclosure: The manufacturer provided this product to the author and/or Backpacking Light at no charge, and it is owned by the author/BPL. The author/Backpacking Light has no obligation to review this product to the manufacturer under the terms of this agreement.

Aconcagua Photo Essay and Gear List

Tackling big mountains with lightweight gear is becoming our trademark, and it never gets dull!

Lightweight at 7,000 Meters

After fine tuning our lightweight techniques for big mountains on two ascents of Denali (6,194 meters) in the Alaska Range, we thought it time to take our show on the road. Cerro Aconcagua has been on our ‘to do’ list for many years. At 6,962 meters, Aconcagua is the highest peak in the Andes, and thus South America. It is also a great mountain to test yourself camping at 6,000 meters. The mountain is an enormous stratovolcano at 32 degrees below the equator. We expected much milder conditions high in the central Andes than we are used to in our home sub-arctic ranges. During the peak climbing season of January/February, normal low temperatures are slightly below freezing and permanent snow on the route is rare. The mountain has a trail system that allows climbers to quickly move between camps solo, unroped and often in trail running shoes. Aconcagua seemed like the perfect test for going light on our first 7,000-meter peak.

The only similarity between an ascent of Denali’s West Buttress and one of the standard routes on Aconcagua is that you are moving a camp up mountain. Going big in the Andes was a completely different experience. First off, Aconcagua lacks the deep, glacial snow pack of the Alaska Range. This drastically affects the way you move and camp on route. Without the need to use floatation and with an extensive trail network, we wore old trail runners for most of the route. The shoes were originally just for the approach hike into the mountain and then for around camp. But warm temps and dry trail conditions allowed us to hike in shoes all the way to our high camp at 5,980 meters. Plastic mountain boots were worn on days we moved camp so as to keep them out of our packs.

Taking Shelter

Along with how we traveled between camps, the lack of snow forced us to think differently about how we would make camps. The flanks of Aconcagua are a fantastic wonderland of volcanic rock and rubble. There is little natural protection from any weather events that may arise off the Pacific Ocean just to the west. Tales of El Viento Blanco, The White Wind, smashing camps on the upper mountain are the stuff of legend. Snow is a great construction material, allowing Alaska climbers to ‘dig in’ and surround their camps with thick walls of quarried blocks, which is key to using an ultralight shelter on big mountains. On the volcanic slopes of the Andes, not so much. Another consideration is the speed that volcanic rock eats through sil-nylon, a lesson learned from using our 2.5-pound sil-nylon tent on a previous volcanic trek. For this adventure, we finally decided on a more traditional double-wall mountaineering tent with bomber guylines that attached to the tent body.

Cache and Carry

We embarked on our just-over-two-week (seventeen days) trek in mid-January, peak season for ascents of Aconcagua. Our route would take us on a three-day hike up the Vacas Valley into Plaza Argentina (4,100 meters), basecamp for routes on the north side of the mountain. We enjoyed mule support to this point with most of our food, gas, and mountain gear packed into two barrels. We spent three days for acclimatization and made a carry to our next camp at 5,000 meters. Snow storms kept us tent-bound for one day at each camp, but they never left any accumulation. Our next carry was to our high camp at Colera (5,980 meters) where we cached four days of food and fuel. The next day we moved to Guanacos Camp at 5,500 meters for a couple more nights to acclimatize. This officially began our traverse of the mountain as we moved to the western side.

A building weather front kept us at camp two for three days, as we preferred to wait out storm events at lower, more protected camps. With what looked to be a sign that the storm was abating, we moved to our high camp just in time to catch the front’s full fury. Four days of wind and snow ensued. Our camp at Colera was positioned above the normal area and protected by wild volcanic formations; a Godsend for the strong winds. We emerged on January 26 to a winter wonderland. After a long morning of digging out and preparations, we headed out for the summit at a leisurely ten o’clock in the morning. Turned out the snowstorm was pure luck, as it was much easier to kick steps in the foot of fresh snow than it would have been to hike scree in plastic boots. Our hike landed us on the summit of Aconcagua five hours after leaving camp. The top was an international scene like we’ve never encountered in the mountains. Several different languages filled the air and a cross-cultural camera exchange took place (take my picture?). After a couple oxygen-starved hours on top, we descended back to high camp. Thanks to the new snow, we were having our first round of dinner two hours later.

Porters, Porters Everywhere

There is another aspect of trekking on Aconcagua that caught us by surprise. This was our first head on collision with serious commercial mountaineering. There are no reliable figures kept for climbing Aconcagua, but the number of non-guided people on the mountain could be counted on both hands. Given that we do also see more guided climbers than independent on Denali’s Washburn Route, the flavor of these groups differed greatly from what we’ve experienced in Alaska. Aconcagua guided trips are more expensive. Support by mule teams and porters (yes, people do hire porters on Aconcagua) make it possible to trek to the summit carrying only a water bottle. Many people around us happily paid full price to have their packs carried for them. And the porters were only too happy to oblige. How this affects being on the mountain as a non-guided party is that the talk around camp follows two genres: Ed Viesturs (the famous mountaineer) and CEO/CFO jargon. As always, making sure you have a compatible partner is the best piece of gear you can bring.

Matt’s Gear List
Function Item Worn
(oz)
Packed
(oz)
Clothing Worn      
Trekking Shorts MontBell Stretch Light Shorts 10  
Trekking Shirt MontBell Wickron T-Shirt 5.1  
Trekking Socks SmartWool PhD Running Ultra Socks 1.6  
Trekking Shoes Salomon XT Wings 2 Trail 27.2  
Sun Hat Patagonia Velocity Cap 2  
Eye Protection Julbo Nomad 1.4  
Top Layers      
Top Shell Layer MontBell Peak Shell   11.2
Top Insulating Layer Patagonia Micro Puff Pullover   12
Top Mid Layer Patagonia R1 Pullover   11.6
Top Mid Layer SmartWool Crew   8.4
Top Base Layer Patagonia Biostretch Crew   5.6
Bottom Layers      
Trekking Pants Patagonia Alpine Guide Pants   20.7
Bottom Mid Layer SmartWool Bottoms   7.4
Bottom Base Layer Patagonia Biostretch Tights   4.4
*Bottom Insulating Layer MontBell UL Inner Down Pants   7.2
*Bottom Shell Layer MontBell Alpine Pants   15.4
Footwear      
*Shell Boots Lowa Denali Plastic Boots   65.2
*Insulating Boots Intuition Denali Liners   10.8
*Socks (2) SmartWool Socks   6.4
*Sock Liners (2) Under Armour Liner Socks   5.2
Other Clothing      
Warm Hat Patagonia Stocking Hat   2.6
Shell Gloves BD Shell Gloves   3.4
Liner Gloves (2) Patagonia Liner Gloves   2.4
*Insulating Gloves BD Gloves   11.6
*Face Protection MH Balaclava   1.4
*Face Protection Columbia Neck Gaiter   1.5
Sleeping System      
Sleeping Bag Mountain Hardwear Phantom 0   42
Sleeping Pad Therm-a-Rest NeoAir (S)   9
Insulating Pad Blue Foam Pad   8.4
Shelter      
Tent MontBell StellaRidge 2   72.7
Cooking System      
Bowls 32oz Nalgene Container   8.3
Water Bottle Insulation (1) OR Bottle Parka   9.2
Water Bottle (1) Nalgene   7.8
Hydration Bladder MSR Cloudliner Hydration (3L)   5
Fuel Bottle 33 oz MSR   15.6
Eating Utensil Lite My Fire All Purpose Utensil   2.5
Water Bladders (2) Platypus Platy Bottle (2L)   2.6
Packing System      
Backpack GoLite Gust Pack (M) 20  
Pack Liner Sea to Summit 35L   2.4
Pack Cover Sea to Summit Rain Cover (S)   3.2
Technical Gear      
Trekking Poles Black Diamond Trail Trekking Poles 18  
*Ice Axe 70cm Camp USA XLA 210   10
*Crampons BD Sabretooth   33.8
Other Essentials      
Repair Kit Duct Tape, Nylon Patches, Sewing Kit,
Therm-a-Rest Repair Kit, Clamps
  5.8
Pee Bottle Nalgene Canteen   2.2
Reading Material Reading Book   5.8
Camera Canon G10 w/ battery and cards   14.2
Pack Towel MSR Nano Towel (S)   0.4
Consumables      
Food (2) days   59.8
Water (1) liter   32
*Food (14) days   418.6
*Fuel (1) Gallon Container   128
Total Weight   oz lbs
Total Weight (Worn/Carried)   85.3 5.3
Total Base Pack Weight   292.6 18.3
Total Weight Consumables   91.8 5.7
Total Initial Weight (Base + Consumable)   384.4 24.0
Total Weight Carried by Mules   715.1 44.7
Full Skin Out Weight   469.7 29.4
* Carried by mules to Plaza Argentina (basecamp) at 4,100 meters   

Ags’ Gear List
Function Item Worn
(oz)
Pack
(oz)
Clothing Worn      
Top Base Layer MontBell Wickron T-Shirt 3.7  
Trekking Shorts ExOfficio Nio Amphi Shorts 4.2  
Trekking Socks SmartWool PhD Running Ultra Socks 1.2  
Trekking Shoes Salomon XT Wings 2 Trail 26  
Sun Hat Patagonia Velocity Cap 2  
Eye Protection Julbo Nomad 1.4  
Top Layers      
Top Shell Layer MontBell Peak Shell   9.8
Top Insulating Layer U.L.Thermawrap Jacket   7.5
Top Insulating Layer Patagonia R1 Pullover   9.1
Top Mid Layer Patagonia Capilene 3 Zip Neck   6.4
Top Mid Layer SmartWool Crew   6.2
Top Base Layer Patagonia Biostretch Crew   4.2
Bottom Layers      
Trekking Pants MontBell Trail Pants   8.6
Bottom Mid Layer Patagonia R1 Bottoms   7
Bottom Base Layer Patagonia Biostretch Bottoms   4
*Bottom Insulating Layer MontBelll UL Inner Down Pants   5.8
*Bottom Shell Pants MontBell Alpine Pants   15.4
Footwear      
*Shell Boots Koflach Degres Boots   60.6
*Insulating Boots Intuition Denali Liners   7.6
*Socks (2) SmartWool Socks   6.4
*Sock Liners (2) SmartWool Liner Socks   5.2
Other Clothing      
Warm Hat SmartWool Hat   2.9
Shell Gloves BD Shell Gloves   3.4
Liner Gloves (2) Patagonia Liner Gloves   2.4
*Insulating Gloves MH Subzero Down Mittens   11
*Face Protection Seirus Balaclava   2.6
*Face Protection Comfort Skins Neck Gaiter   1.2
Sleeping System      
Sleeping Bag U.L.Super Spiral Down Hugger #0   40
Sleeping Pad Therm-a-Rest NeoAir (S)   9
Insulating Pad Blue Foam Pad   7.8
Shelter      
Stakes (8) Snow Stacks   9.6
Cooking System      
Stove MSR XGK w/ Kit   20
Bowl 32oz Nalgene Container   8.3
Water Bottle Insulation (1) OR Bottle Parka   9.2
Water Bottle (1) Nalgene   7.8
Hydration Bladder Platypus Big Zip SL (2L)   5.5
Fuel Bottle 33 oz MSR   15.6
Cooking Pot Open Country 4L   11.4
Eating Utensil Lite My Fire All Purpose Utensil   2.5
Packing System      
Backpack GoLite Gust w/ straps (S) 20  
Dry Bag Sea to Summit S   2.8
Pack Liner Sea to Summit 20L   1.8
Pack Cover Sea to Summit Rain Cover (S)   3.2
Technical Gear      
Self Arrest Ski Poles (1) BD Whippet Pole and BD Ski Pole 20.6  
*Ice Axe 60cm Camp USA XLA 210   8.8
*Crampons BD Sabretooth   36.2
Other Essentials      
First Aid Kit Homemade Kit   6.2
Toiletries Dr Bronner Soap, Toothbrushes, Toothpaste   10
Pee Funnel Freshette   1
Reading Material Reading Book   5
GPS Garmin Foretrex 410 3  
Consumables      
Food (2) days   59.8
Water (1) liter   32
*Food (14) days   418.6
*Fuel (1) Gallon Container   128
Total Weight   oz lbs
Total Weight (Worn/Carried)   82.1 5.1
Total Base Pack Weight   248.6 15.5
Total Weight Consumables   91.8 5.7
Total Initial Weight (Base + Consumable)   340.4 21.3
Total Weight Carried by Mules   707.4 44.2
Full Skin Out Weight   422.5 26.4
*Carried by mules to Plaza Argentina (basecamp) at 4,100 meters  

Please click on a thumbnail to view the full gallery.

Aconcagua Photo Essay and Gear List - 1
Agnes ready to roll at Casa de Piedra (3,200 meters), our second approach-camp in the Rio de las Vacas Valley. Here, muleteers prepare their loads for the final haul to the Plaza Argentina (4,200 meters), base camp on the north side of Aconcagua (6,962 meters) in the Andes of Argentina.

Aconcagua Photo Essay and Gear List - 2
Mule supported ultralight! Agnes gets a lift across the Rio de las Vacas enroute to Plaza Argentina.

Aconcagua Photo Essay and Gear List - 3
The start of our three-day approach hike up the Rio de Vacas Valley to our basecamp at Plaza Argentina.

Aconcagua Photo Essay and Gear List - 4
Plaza Argentina. This is the usual basecamp for climbers who approach the mountain from the east side. Our route took us on a traverse of the mountain from Plaza Argentina to Summit to Plaza de Mulas (4,230 meters).

Aconcagua Photo Essay and Gear List - 5
Climbers gather in “the bar” at Plaza de Mulas. Plaza de Mulas is the basecamp for those climbers wishing to climb the Normal Route.

Aconcagua Photo Essay and Gear List - 6
Heading out of Plaza de Mulas for a two-day hike out the Horcones Valley.

Aconcagua Photo Essay and Gear List - 7
Agnes crosses the final bridge over the Horcones River with Aconcagua in the background.

Aconcagua Photo Essay and Gear List - 8
The Polish Glacier and East Face of Aconcagua (6,962 meters) on our move to Camp One (5,000 meters) on Aconcagua.

Aconcagua Photo Essay and Gear List - 9
Agnes navigates through a field of penitentes enroute to Camp One.

Aconcagua Photo Essay and Gear List - 10
Agnes crawls in the tent at Camp One during our two-week expedition. For this mountain trip, we used a more traditional double-wall tent.

Aconcagua Photo Essay and Gear List - 11
Camp One with the Rio de las Vacas valley below. The third day, our approach traveled the valley below.

Aconcagua Photo Essay and Gear List - 12
Snow and ice melt during the heat of the day provided flowing water at most of our camps. Agnes fills up from a field of penitentes at Camp One.

Aconcagua Photo Essay and Gear List - 13
Agnes moves our camp to what will be our high camp at Colera (5,980 meters) on Aconcagua.

Aconcagua Photo Essay and Gear List - 14
Gran Acarreo on Aconcagua in the Andes of Argentina.

Aconcagua Photo Essay and Gear List - 15
Climbers on the Cresta del Viento (Windy Crest) above Independencia Hut (6,400 meters).

Aconcagua Photo Essay and Gear List - 16
Matt Hage makes his way up the Canaleta to the summit.

Aconcagua Photo Essay and Gear List - 17
Matt and Agnes Hage on the summit of Aconcagua in the Andes of Argentina. Our route took us on a traverse of the mountain from Plaza Argentina to Summit to Plaza de Mulas. Aconcagua is the highest peak in South America and is one of the Seven Summits.

Aconcagua Photo Essay and Gear List - 18
Our high camp at Colera. Agnes packs up camp for our descent the day after reaching the summit.

Aconcagua Photo Essay and Gear List - 19
Plaza de Mulas, base camp for the western side of Aconcagua, marks the end of our descent.

Aconcagua Photo Essay and Gear List - 20
One of the many restaurants at Plaza de Mulas that offer pizza and a soda after our descent.

Matt and Agnes Hage scheme up ultralight adventures from their home in Anchorage, Alaska.

Eastern Mountain Sports Ascent Sector Down Sweater Review

If you’re looking for a good, lightweight, multi-purpose, fully-featured and warm down jacket at a reasonable cost, this one deserves your consideration.

Introduction

Eastern Mountain Sports Ascent Sector Down Sweater Review - 1
The EMS Ascent Sector Down Sweater (women’s is the Ascent Meridian). Considering its features, the weight is surprisingly low at 12.7 ounces (360 g, men’s size Large), and it’s a great value at $169.

This separate review provides additional descriptive and performance information on the Eastern Mountain Sports Ascent Sector Down Sweater. Read our article Ultralight Three-Season Down Jackets State of the Market Report 2010 for a state of the market analysis and comparative specifications and performance for a range of ultralight down jackets.

The EMS Ascent Sector Down Sweater did not stand out when I discovered it on their website. The photo of the jacket is unflattering, and the listed weight is 13.96 ounces (397 g) for size Medium, which barely squeaks under our weight limit. I opted to include it in our down jacket roundup because it meets our criteria. The jacket was a pleasant surprise when it arrived. It’s attractive, full-featured, puffy and warm, a great value, and significantly lighter than specified.

Description

For starters, the Ascent Sector Sweater has one of the lightest shell fabrics in our down jacket roundup: 10 denier 0.77 oz/yd2 (26 g/m2) ripstop nylon with DWR. The only lighter shell fabric currently used is on the MontBell Ex Light Jacket (7 denier 0.74 oz/yd2 (25 g/m2) Ballistic Airlight ripstop nylon with DWR). The EMS fabric is highly calendered and quite shiny. I notice that some buyers of this jacket have posted they do not like the shiny appearance, but I personally like it. See for yourself in the photos below.

The jacket is insulated with 4.5 ounces (128 g) of 800 fill power down, giving it a measured single-layer loft of 1.2 inches (3.1 cm), which is quite good. The jacket has a half ounce more insulation than similar jackets and is distinctly puffy.

Eastern Mountain Sports Ascent Sector Down Sweater Review - 2
Front and rear views of the EMS Ascent Sector Down Sweater.

Eastern Mountain Sports Ascent Sector Down Sweater Review - 3
The Ascent Sector Sweater is feature-rich. There are a total of four zippered pockets: two hand pockets (left), a chest pocket (center), and an inside pocket (right). All are a generous size.

Eastern Mountain Sports Ascent Sector Down Sweater Review - 4
The jacket has three attachments (two at the cuffs and one on the back of the collar) that allow it to be snapped into an EMS SYNC shell, which creates an insulated waterproof/breathable shelled jacket.

Performance

Eastern Mountain Sports Ascent Sector Down Sweater Review - 5
I wore the EMS Ascent Sector Down Sweater while igloo camping, backcountry skiing, and snowshoeing.

A size Large jacket fits me (6 ft/1.83 m tall, 167 lb/76 kg, 39 in/99 cm chest) quite well, and I found the Ascent Sector’s fit to be roomy. There is enough room inside to layer over an insulated vest, sweater, or thin jacket. The sleeves are plenty long, and the jacket’s back length is 28.5 inches (72 cm), so it covers the butt well.

In my field testing I found the Ascent Sector Sweater to be quite warm. Morning temperatures in an igloo are in the mid-20’s F/-4 C, and I found the jacket to be comfortable. On several nights I wore it in a 30 F/-1 C rated sleeping bag and stayed warm down into the upper teens F (-9 to -6 C).

The jacket seals up fairly well, but is not totally snug. The collar is snug if I wear it over my chin, the cuffs are slightly loose, and the hem draws up with a drawcord.

On snowy days, the jacket’s shell fabric easily shed snow and water while staying dry inside. The shell is also wind-resistant and quite durable with reasonable care. I swiped some dead tree branches while backcountry skiing with no damage.

Eastern Mountain Sports Ascent Sector Down Sweater Review - 6
I wore the jacket in a spring shower (left) and found its shell to be water-resistant. I followed up my field observations with a one-hour indoor “puddle test” (right). No water soaked through either the fabric or the seams.

Comparisons

Our article Ultralight Three-Season Down Jackets State of the Market Report 2010 provides complete specifications and ratings for the EMS Ascent Sector Down Sweater in comparison to a range of other lightweight down jackets. The jackets most similar to the EMS Ascent Sector Down Sweater are the Eddie Bauer First Ascent Downlight Sweater, Marmot Venus/Zeus Jacket, Salomon Minim Jacket, Sherpa Pangboche Sweater, and The North Face Thunder Jacket.

Assessment

In my opinion, the EMS Ascent Sector Down Sweater is a sleeper in a very competitive field of three-season down jackets. Its 4.5 ounces (128 g) of down insulation is above average, and its shell fabric is one of the lightest to be found; it’s sized well for layering, fits well, is puffy and warm, is fully featured, and is a good value. Overall it achieves a good balance of all these factors, more so than many similar jackets. The measured weight of 12.7 ounces (360 g) is very reasonable considering the jacket’s features.

Granted, there are multi-purpose down jackets available that are an ounce or two lighter, but considering what you get, the EMS Ascent Sector is hard to beat. My only suggestion is to use #3 zippers rather than #5 to shave a little weight.

Specifications and Features

Manufacturer Eastern Mountain Sports (http://ems.com/)
Year/Model 2010 Ascent Sector Down Sweater
Style Hoodless insulated jacket with full height front zipper
Fabrics Shell and lining are 10d 0.77 oz/yd2 (26 g/m2) micro-ripstop nylon with DWR
Insulation 800 fill power down, 4.5 oz (128 g)
Construction Sewn-through with 1.75 in (4.5 cm) and 3.25 in (8.3 cm) horizontal quilting, raglan sleeves
Loft Measured double-layer loft is 2.4 in (6.1 cm), single-layer loft is 1.2 in (3.1 cm)
Features Down-filled stand up collar, full height reversed #5C YKK zipper with one slider and storm flap under zipper, two zippered side pockets (not fleece lined), one zippered chest pocket, one zippered inside pocket, elastic cuffs, micro-chamois chin guard, drawcord hem with two adjusters, dropped tail, snaps into an EMS SYNC shell
Weight Size Large tested, measured weight 12.7 oz (360 g), manufacturer specified average weight 14 oz (397 g)
MSRP US$169

Disclosure: The manufacturer provided this product to the author and/or Backpacking Light at no charge, and it is owned by the author/BPL. The author/Backpacking Light has no obligation to review this product to the manufacturer under the terms of this agreement.

MYOG Goes to the Mountains

To test his latest creation, a sub-5-ounce pack, Jamie filled it with the rest of his MYOG kit and took to the Great Smoky Mountains.

MYOG Goes to the Mountains - 1

Overview

Over the past year I have put a lot of time into designing and making my own lightweight backpacking gear. I recently took a 2.5-day trip using many Make Your Own Gear (MYOG) items to cover 60 miles in the Great Smoky Mountains National Park.

Trip Planning

The trip began in my head nearly a month before the first trail day. I usually start by pondering what I want to accomplish. This might be something like explore a new backcountry area, set a new daily distance record, achieve a new lower base weight, take fantastic pictures, test out new gear, or try out a new technique. The objective for this trip would be to see a new region of the Great Smoky Mountains using my own MYOG big three (shelter, sleeping bag, and pack). After several canceled trips because of work, I finally had firm dates of May 5 through 7, 2010.

The Great Smoky Mountains National Park is a gem in the southeast U.S. It contains over 800 miles of hiking trails, including long sections of the Appalachian Trail (AT), Mountain to Sea Trail, and Benton MacKaye Trail. Some of the East’s highest peaks are located within the park, like Mount Le Conte and Clingmans Dome, both over 6,500 feet in elevation. My favorite reason for visiting the park is the incredible variety of mountain streams and waterfalls.

Backpacking is a popular activity within the park, and with many visitors come rules. First, a backpacking permit is required. These permits and entry into the park are free. Self registration stations can be found at any Ranger station and can be used twenty-four/seven. Camping is only allowed in designated locations. These sites are typically flat areas near water, though some are trail shelters. Fires are only allowed in fire rings. Each site also has at least one bear bag pulley system, allowing backpackers to easily store their food out of the reach of the park’s many bears. Trail shelters and some camp sites require reservations to control overcrowding. Reservations can be made by calling (865) 436-1231.

For planning a trip, I recommend getting the National Geographic Trails Illustrated Map #229 ($12) and the book Hiking Trails of the Smokies ($20), also known as the “little brown book.” The map shows trails, waterfalls, and the location of all camp sites, indicating which ones require reservations. The book provides a detailed description of each trail and campsite found within the park. Lastly, current park conditions can be found here.

As my trip date neared, I purchased my food, planned my route, checked my gear, and called for reservations. I had planned to camp at site #37, but the reservation desk said the site had been closed due to aggressive bear activity. I made some quick changes and asked for campsite #38 at Mount Sterling, not my first choice, but it would have to do. The change also required me to increase the hiking distance to my second day’s camp at site #34 (non-reservation site). Going lightweight certainly provides advantages, like the flexibility of being able to cover long distances when needed.

After a couple of tough days at work, Wednesday couldn’t come quickly enough. I packed everything up and set out my clothes, ready to make a quick getaway. This trip was different than most, as base weight was not my primary concern. Instead I wanted to test out my MYOG setup. Most important would be the first-time use of my new 4.95-ounce pack. Other MYOG items (that had seen previous use) were my 13-ounce mini tent, 21-ounce down quilt, and my V8 can stove. I tallied up my pack, and the final base weight came just under 6.3 pounds. Loaded with consumables (fuel, water, and food), the pack weighed less than 12 pounds. Though I could have easily swapped out some items given the warm weather, I decided the list was ideal for testing my set of self-made gear.

Jamie’s Gear List

Item: Weight (oz)
Clothing Worn: 22.20

BPL LS Merino Wool T-shirt (medium)

5.10

REI Sahara Convertible Shorts

8.30

BPL Merino Wool Shorts (medium)

3.70

SmartWool PHD Mini Crew

2.35

Columbia Boonie Hat

2.75
Other Items Worn/Carried: 39.00

Timex Watch

0.90

TiGoat AGP Hiking Poles

7.00

Generic Bandana (in pocket or worn)

1.05

Olympus Camera – F-20 w/battery & card (in pocket)

4.35

Photocopy of Map (in pocket)

0.25

Montrail Masochist Trail Runners Size 11

25.45
Packed Clothing: 30.95

Marmot Essence Jacket (large)

6.80

Golite Reed Pants (medium)

4.65

MYOG Thru-Hiker Minimus Vest

5.30

BPL Beartooth Hoody

8.40

SmartWool PHD Mini Crew

2.35

GG 3/8” Thin Light Sleeping pad – 38″ trimmed

3.45
Packing: 7.05

MYOG Pack

4.95

MYOG Medium Silnylon Stuff Sack (Clothes and Kitchen)

0.40

MYOG Medium Silnylon Stuff Sack (Food)

0.40

BPL Medium Pack Liner

1.30
Shelter & Sleeping: 39.55

MYOG Down Quilt

21.05

GG 3/8” Thin Light Sleeping pad – 38″ trimmed

3.45

MYOG Mini Tent w/MYOG Small stuff sack

13.25

BPL Lazr Ti Stakes (x8) in MYOG Stake Sack

1.80
Cooking & Hydration: 7.60

Platypus 2.5L Water Bottle

1.30

Platypus 1L Bottle

0.90

Katadyn Micropur, Purification Tabs (6/day x 3 = 18)

0.45

Scout Cup

0.80

Bear Hang (Trip Tease 35’+MYOG Silnylon Rock Sack+Biner)

1.00

Fuel Bottle (5 oz cap.)

0.70

MYOG Heiny Pot

1.20

MYOG V8 Can Stove

0.30

Measuring Cup for Fuel

0.05

MYOG Foil Wind Screen

0.20

Dr Bronner’s Camp Soap (micro-dropper)

0.10

Bic Mini Lighter

0.40

Disposable Spoon

0.20
Essentials: 15.25

REI Keychain Thermometer/Compass (attached to pack)

0.30

Fox 40 Safety Whistle (attached to pack)

0.20

Garmin eTrex Venture HC GPS

5.35

Cell Phone

2.35

Extra Camera Battery

0.55

Car Key

0.90

Petzl eLite

0.95

Spare Contacts in Case

0.50

Eye Glasses

1.10

Sunscreen

0.50

Pen w/Duct Tape

0.25

Infant Toothbrush

0.20

Tooth Paste Dots & Floss

0.10

First Aid Kit: Gauze Pads x2, Antibiotic Ointment, Needle

0.20

Matchbook

0.15

Dermatone Stick

0.25

Meds (2x Immodium, 2x Benadryl, 4x Sudafed, 16x Ibuprofen)

0.35

Micro Bottle of Deet

0.10

Rx Pills (6 pills)

0.20

Swiss Army Classic

0.75
Consumables: 84.00

Total Food (2.5 days)

48.00

Fuel – 4 oz

4.00

Water – 1 Liter

32.00
1 – Total Items Worn/Carried (lb) 3.83
2 – Total Base Weight (lb) 6.28
3 – Total Weight of Consumables (lb) 5.25
4 – Total Gear Weight Worn+Packed (1)+(2) 10.10
5 – Total Carried Pack Weight (2)+(3) 11.53
6 – Total Skin Out Weight (1)+(2)+(3) 15.35

I left my home near Raleigh, NC at 5:30 a.m. and arrived at the Big Creek Ranger station close to 10:30, which wasn’t too bad as it included stops for breakfast and gas. I surveyed the area, lent my phone to an AT thru-hiker, filled out my registration form and hit the trail just short of 11:30 a.m.

I would take the long route to Mount Sterling: Big Creek Trail to Swallow Fork Trail, then finally Sterling Ridge Trail to campsite #38. Big Creek was an incredible stream, flowing high, it kept me entertained for hours. I even took a quick dip in cold waters at Midnight Hole.

MYOG Goes to the Mountains - 2
Rushing waters of Big Creek.

MYOG Goes to the Mountains - 3
A quick swim in Midnight Hole.

MYOG Goes to the Mountains - 4
MYOG pack sitting on a rock while I grab a snack.

Although the Big Creek trail has a near continuous incline, it is a relatively easy trail for the Appalachians. I reached my original desired campsite, #37 by early afternoon. It was a large camping area with a number of fire rings, a big stream, and plenty of bear bag riggings. Warning signs were posted that the site was closed due to aggressive bear activity. The area was empty except for a lone tent that appeared to have been abandoned. Though I would have liked to see a bear, I have no desire to see an aggressive one, and thankfully the area was quiet.

From the campsite I picked up the Swallow Fork Trail. The gradual Big Creek hike had lowered my guard, and now I found myself on one steep trail that climbed for many miles. My progress slowed, but I reached the Mount Sterling Ridge Trail and continued my climb to finish at the top of Mount Sterling near 6:30 p.m. The total elevation gained was close to 4,000 feet, and my GPS odometer logged seventeen miles.

At the top of Mount Sterling (5,820 ft) lies campsite #38, one of the highest camps in the park. Though not my first choice, this site did not disappoint. There were a number of fairly flat areas for camping; a spring located 700 feet down the mountain and a couple of fire rings interwoven within a spruce fir forest. The highlight of the site is an old fire tower that was erected back in 1933. This fire tower is still climbable and offers a spectacular 360-degree view of North Carolina and Tennessee. I will admit that my first solo attempt to climb it ended mid-way as the height got the best of me.

MYOG Goes to the Mountains - 5
Mount Sterling fire tower, elevation 5,842 feet.

When I arrived at the campsite, I met two fellow backpackers. It was nice to see they had already started a fire. Later they would give me the courage to get to the top of the tower. I settled into camp by pitching my mini tent and getting my quilt uncompressed. I started up the V8 can stove by the fire and talked with a third backpacker that had joined the group. Dinner was a tasty freezer bag meal of instant rice, dehydrated hamburger, dehydrated black beans, and spices.

MYOG Goes to the Mountains - 6
MYOG mini tent and down quilt ready for the night.

After dinner, my new friends decided to get me up the tower to watch the sun set. With me in between the two of them and constant commands of “Just don’t look down,” I climbed the old wooden steps. At the top, I pulled myself into the windowed room that sat perched on the steel structure. The view was incredible. The spectacular site of the changing sky as the sun dropped below the mountainous horizon left me speechless.

MYOG Goes to the Mountains - 7
Sunset viewed from the Mount Sterling fire tower.

The evening was one of those great times when the hustle of being an everyday 42-year-old father of two starts to settle down a bit. Watching the coals of the fire die and talking with fellow hikers as a chill set into the air brought a welcome moment of peace. As darkness settled in, the night opened up a sky full of stars like none seen from my suburban home.

We decided to make one more trip up the tower to view the mountains in the dark. I clung to the rails as the wind picked up and climbed the dark staircase. From the observation room, I could see speckles of light from the inhabitants beyond the park’s boundaries. If you get a chance to camp at this location, I really recommend climbing the tower after dark.

After saying good night I tucked myself into my quilt and slept peacefully. The temperature dropped to 45 degrees, which was cool, but I slept extremely warm in my 20-degree quilt. I woke up a bit before sunrise, heated water on my V8 can stove and ate some breakfast of oatmeal and coffee. As sunrise approached, I woke my companions for one more trip up the tower (they had asked me to do this). The few clouds hanging in the air only added to the view of the day’s first light

I packed up and hit the trail, backtracking a short distance over the Mount Sterling Ridge Trail, then continuing down the trail past the junction with Swallow Fork. My favorite time to hike is in the morning. I enjoyed the cool air and was charged for a big day. I had planned to hike at least 24 miles to get to my next campsite.

At the end of the Mount Sterling Ridge Trail, I reached the southernmost point of my trip and picked up the Balsam Ridge Trail heading northwest. This trail took me to the AT, where I made my way north. The hiking was composed of short ups and downs along mountain ridges. Though not entirely flat hiking, it was much easier then the previous day’s incline. At many locations the forest would open up and provide a nice view of the valleys below.

I continued along the AT around Mount Guyot, the fourth highest peak in the East (6,621 ft.). This peak is distinguished as being the highest peak in the East with no road or trail to its summit. I continued to Old Black (6,370 ft) as the sun warmed the day. By mid-afternoon the temperature approached a hot 85 degrees. About a mile and a half past Old Black I reached Snake Den Trail, where I came across the wreckage of an F-4 Phantom fighter that had crashed in 1984.

MYOG Goes to the Mountains - 8
Wreckage of an F-4 Phantom that crashed into the mountains.

After a short distance down the Snake Den Trail I picked up the Gabes Mountain Trail. This trail dropped in elevation through beautiful, stream-filled forests. Campsite #29 is found not far down the trail, and I rested here, picked up water from a crystal clear stream, and set my sights on campsite #34.

MYOG Goes to the Mountains - 9
Lush forest along the Gabes Mountain Trail.


Scaredy Bear

It wasn’t far past the campsite that I started seeing bear dung. Though this is common in the Southern Appalachians, seeing an actual bear along the trail has always eluded me. I quieted my step and continued another half mile where fifty feet ahead, I spotted a black bear. He was digging for grubs at the base of a rotted tree beside the trail. I stood still and reached for my camera. The bear spotted me and took off crashing through the rhododendron. I was able to get a picture of the bear in the distance, but you have to look mighty hard to see him.

MYOG Goes to the Mountains - 10
The spooked bear, looking over at me. Can you find it?

Excited about seeing the bear, I hardly noticed my tired legs that had moved me 35 miles over the last 24 hours. Less than a mile later, I spotted my second bear as I rounded a sharp bend, this one was much closer: only about 15 feet separated us. It jumped instantly down a steep incline, traveling a hundred feet in a quick moment. I was amazed by how fast these awkward looking animals could travel. I was also relieved by how avidly they avoided humans.

Being Doubted and Envied

The trail now headed towards the east. As the time approached 6:00 p.m., I arrived at campsite #34 in Sugar Cove. Exhausted, I planted myself down on a log in the midst of many small tents and asked the only awake hiker if it was okay if I rested a bit. He asked me how many miles I had come, I glanced down at the GPS, and the day’s mileage showed 27.2. I told him 27 miles. He asked how many days that took; I answered that it was since this morning. The young hiker appeared doubtful.

Campsite #34 was a beautiful spot nestled in the woods beside a crashing stream. Further downstream from the large group, I found a spot near two hikers, they welcomed me. These guys were state of the art backpackers that knew the Smokies well. We spent the night comparing my homemade gear to their high tech items. These guys probably had some of the lightest base weights possible for traditional backpackers, likely fewer than 20 pounds. They still had all the comforts like double wall tents, Osprey packs, full-length air mats, and Jetboil stoves. There was an appreciation for both techniques.

We ate dinner together without a fire, but the stream provided wonderful background noise. I pitched my mini tent, removed my sleeping gear, and they watched as my packed collapsed into thin air without the sleeping pad to give it shape. As the night wound down, we hoisted up our food bags and climbed into our respective tents, falling asleep to the sounds of the rushing water.

I woke up around 6:00 and ate a quick breakfast of grits and coffee. I packed up and hit the trail at 6:30 while most of the other campers slept. The sun was just beginning to bring light to the wonderful cove of hardwoods. I continued down the Gabes Mountain trail with a 15+ mile day ahead of me to get to my truck. I made a nice stop at Hen Wallow Falls to take a few pictures.

MYOG Goes to the Mountains - 11
Hen Wallow Falls along the Gabes Mountain Trail.

The trail continues completing the decline, dropping hikers into the Cosby camp ground at approximately 2,200 feet of elevation. This would be the first and only road I would cross over the 60 miles. My tired legs were not looking forward to the next section of trail, but I had my heart set on seeing the Mount Cammerer Fire Tower. The original tower was built in the 1930s and modeled after the Yosemite towers found in the western U.S. The tower was reconstructed in the 1970s and considered a must see. It sits at approximately 4,900 feet in elevation, nearly 3,000 feet higher then where I was standing.

MYOG Goes to the Mountains - 12
Hardwood canopy in the lower elevations.

I found the Low Gap Trail at the southern end of the camp ground. Initially the trail was gradual through lush forests and streams, but over a short 3 miles the trail climbs 2,500 feet before it intersects with the AT. I traveled north along the AT as the temperature began push 90 degrees. I hiked the next two miles shirtless in the surprising hot spring day before I reached the side trail to Mount Cammerer. This 0.6-mile trail was fairly flat and ended at the famed fire tower. Though the hiking was uncomfortably hot, the tower made up for it. The fire tower was a beautiful piece of architecture constructed of squared stone with a shake roof and wooden decking surrounding all sides. From the deck a full 360 degree unobstructed view was available.

MYOG Goes to the Mountains - 13
Mount Cammerer Fire Tower sitting at 4,928 feet in elevation.

MYOG Goes to the Mountains - 14
View from the wooden deck of the Mount Cammerer fire tower.

Enjoying the incredible view, I finished the last drops of water and ate a quick trail snack seated on the steps of the tower. I took pictures and headed back down the side trail to return to the AT. Just shy of the Davenport shelter I found the Chestnut Branch trail: the last leg of my trip. The path was steep, luckily in a direction that was down. At times I found it easier to run at near sprint speeds, allowing gravity to pull me down the mountain and eat up distance.

Approaching the end of the trail, I decided to take a quick dip in Chestnut Branch Creek. The icy water felt like electricity against my hot skin at first, but minutes later it provided a great relief from the hot day and cleaned off two days of salty sweat. Refreshed I hiked the last minutes of the trail to my truck.

Conclusion

Being a husband and father makes time a dear and scarce commodity. Although the trip was only a few days and nights, I was grateful to my family for giving me the time that was so needed. When I reflect back it was a perfect trip. I experienced the outdoors by swimming in icy waters, watching the sun set and rise over the Appalachians, stumbling onto black bears, talking with fellow backpackers over a fire, and hiking full days with a light pack.

This trip gave me an extra level of satisfaction knowing I had completed it with gear that I had made. The gear performed beyond my expectations and for that I owe thanks to the BackpackingLight community for input and guidance with each piece. If interested in making your own gear, I highly recommend the BPL article series Make Your Own Gear: Five Yards to SuperUltraLight by Jay Ham and the BPL article Make Your Own Gear – Down Quilt or Sleeping Bag by Roger Caffin. Although I hiked alone I could not have done it alone. If you would like more information about me or my gear, please visit my website.

Sherpa Pangboche Down Sweater Review

A very attractive multi-purpose down jacket suited for a wide variety of outdoor activities… does that include backpacking?

Introduction

Sherpa Pangboche Down Sweater Review - 1
The Sherpa Adventure Gear Pangboche Down Sweater is available in men’s and women’s versions. The manufacturer weight is 14 ounces (397 g) for size Large.

This separate review provides additional descriptive and performance information on the Sherpa Pangboche Down Sweater. Read our article Ultralight Three-Season Down Jackets State of the Market Report 2010 for a state-of-the-market analysis and comparative specifications and performance for a range of ultralight down jackets.

This is the first time I have worked with Sherpa Adventure Gear, and the name of the owners is (you guessed it) Sherpa. The Sherpas are one of the original mountain people of Nepal. Part of Sherpa Adventure Gear’s mission is to recognize and honor the Sherpa people. Their new for fall 2010 Pangboche Down Sweater is named after Pangboche, the oldest Sherpa village in Nepal, estimated to have been built over 300 years ago. The jacket is elegantly designed and warm, but how suited is it for lightweight backpacking?

Description

The Pangboche is elegantly designed and constructed, with lots of attention to details. It looks sharp. It’s almost too nice to use on outdoor adventures, where it can get snagged or dirty.

The Pangboche’s shell is 1.3 oz/yd2 (45 g/m2) ripstop polyester with DWR, with a taffeta lining. It has a very soft hand, which is typical for a polyester shell. The jacket is insulated with 4 ounces (113 g) of 800 fill power down, giving it a measured single-layer loft of 1 inch (2.5 cm), which is very good for the multi-purpose group of jackets.

Sherpa Pangboche Down Sweater Review - 2
Front and rear views of the Sherpa Pangboche Down Sweater.

Sherpa Pangboche Down Sweater Review - 3
There are three pockets on the Pangboche: two zippered fleece-lined hand pockets (left), and one concealed zippered chest pocket (right). Note the accents on the jacket.

Performance

I wore the Pangboche Down Sweater while backcountry skiing and snowshoeing in all kinds of weather.

The Pangboche has a roomy fit. Size Large fits me (6 ft/1.83 m tall, 167 lb/76 kg, 39 in/99 cm chest) with room to spare, enough to layer over a vest or a fleece top. The sleeves are plenty long and the back is 28 inches (71 cm) long, enough to cover the butt. The elastic cuffs are snug, as is the collar if you wear it over your chin. The hem has a drawcord to snug it up when needed.

The Pangboche is a mixed bag as far as lightweight construction. On the one hand, its feature set is very lightweight, using #3 zippers and limiting the number of pockets, but its shell and lining fabrics are on the heavy end compared to other jackets.

In our comparative warmth tests, the Pangboche ranked in the middle of the field, meaning it’s warmer than lesser insulated jackets but not among the warmest in the multi-purpose jacket group.

Sherpa Pangboche Down Sweater Review - 4
While skiing on a snowy day I found the Pangboche’s shell to be very wind- and water-resistant (left). Same for a rainy March day (center). My indoor one-hour “puddle test” (right) confirmed my field observations, as no water penetrated the shell or seams of the jacket.

Comparisons

Our article Ultralight Three-Season Down Jackets State of the Market Report 2010 provides complete specifications and ratings for the Sherpa Pangboche Down Sweater in comparison to a range of other lightweight down jackets. The jackets most similar are the EMS Ascent Sector Down Sweater, Eddie Bauer First Ascent Downlight Sweater, Marmot Zeus Jacket, Salomon Minim Down Sweater, and TNF Thunder Jacket.

Assessment

Sherpa Adventure Gear is apparently reading the market well; in the growing market for multi-purpose three-season down jackets, many people purchase these jackets on the basis of fit, styling, warmth, and versatility. They use the jacket for a wide range of activities, outdoor recreation being just one of them. The Pangboche is perfectly targeted to that market. It is very attractive and will draw a lot of compliments. At the same time it is warm and will serve the user well in a variety of activities.

The Pangboche is not our first choice for backpacking, it’s a little on the heavy side for that, and perhaps a little too elegant. However, it’s a great jacket for day trips, adventure travel, eco tourism and the like. The Pangboche will likely appeal most to the person who likes to travel, participates in a wide variety of outdoor activities, and wants to use the jacket for just about anything in cooler weather.

Specifications and Features

Manufacturer Sherpa Adventure Gear (http://sherpaadventuregear.com/)
Year/Model Fall 2010 Pangboche Down Sweater
Style Hoodless insulated jacket with full front zipper
Fabrics Shell is 1.3 oz/yd2 (45 g/m2) ripstop polyester with DWR, taffeta lining
Insulation 800 fill power down, 4 oz (113 g)
Construction Sewn through with 2.25-inch (5.7 cm) angled quilting, set-in sleeves
Loft Measured two-layer loft is 2 inch (5 cm), single-layer loft is 1 in (2.5 cm)
Features Down-filled stand up collar, full height reversed #3 YKK zipper with one slider and storm flap under zipper, microchamois chin guard, two fleece-lined zippered side pockets, concealed zippered chest pocket, elastic cuffs, drawcord hem with one adjustor, stuff sack included
Weight Size Large tested
Measured Weight: 14.8 oz (420 g)
Manufacturer Specified Weight: size Large 14 oz (397 g)
MSRP US$180

Disclosure: The manufacturer provided this product to the author and/or Backpacking Light at no charge, and it is owned by the author/BPL. The author/Backpacking Light has no obligation to review this product to the manufacturer under the terms of this agreement.

Outdoor Retailer Summer Market 2010: The Morning After – Reflections on OR and the State of the Market

The dust has settled, sleep has been snatched, and I’ve processed the more intriguing themes of the Show.

Sum It Up

If I had to summarize OR with one word, I think that word would be “encouraging.”

“Encouraging” because of many things, but particularly because one major trend I noticed at the show was a shift toward lighter gear. Hard goods (packs, tents, sleeping bags, etc) are tending toward lighter materials and construction, and soft goods (clothing) are becoming lighter weight across the board. More people are realizing that lighter weight doesn’t necessarily mean a practical increase in fragility. With the exception of one vendor (who showed me a 1-pound propane cylinder fueled coffee maker), most vendors knew immediately who Backpacking Light is and what we’re trying to do. The vast majority of them had quite a bit of respect for BPL and were legitimately interested in our feedback… we represent the shifting trend in the market that seems obvious to nearly everyone.

I found it encouraging that manufacturers do listen to our comments and use that feedback in product development… there are still companies who try to exist almost in their own world, darn the torpedos. For what it’s worth, vendors regularly made positive comments about how BPLers are pretty much the only ones who ask the kinds of questions we do or get as into fabrics and materials as we do. Basically, I found a relatively high degree of mutual respect in our interactions.

Plays Well With Others

It was also great to see the degree of interaction between vendors. On one hand everyone’s amped up a little and getting their promo on, but on the other hand everyone’s a bit more laid-back and talking between companies about product development, trends, and how to improve things in the industry. Very good to see the community spirit!

Before flying out to OR I had been forewarned by a number of people to watch out for extreme marketing hype, but I encountered very little. I think the secret is to not let people pitch you while you’re there… get them to just talk to you as a co-conspirator, because in the end that’s what we really are. We’re all trying to improve the industry. If I sensed someone launching into a bit of spin I smiled, made a joke about the spin, and tried to get people to just talk as, well, people. I think my personal Spin Filter is set to a pretty high level of protection, anyway, and I just ignore whatever hype might come out. I’ve found that if you can talk knowledgeably about the materials and construction of a product, vendors are much more likely to talk to you as the industry pro you are. Overall I think we sorted through the hype and brought you the good stuff.

I was also encouraged by behind-the-scenes trends I noticed between companies in product development arenas. It was honestly kind of surprising to see so many people headed in so many of the same directions with ideas, but good for us since so many of those ideas are aimed toward minimizing weight and maximizing function.

The overall level of passion, intelligence, consideration, exploration and pushing of limits within the industry as a whole is also quite encouraging. As I’ve said in a dispatch or two, the people we encountered are really into what they do in the industry. I’d call it amazing dedication, but it runs far deeper than that. It’s much more than just dedication when a pursuit is really the best expression of your life.

Long-Term Trends

There were at least four vendors on the show floor with products made of Cubic Tech materials! (Terra Nova, Brooks-Range, Granite Gear, Cilo Gear… and Big Sky at the show, Hyperlite Mountain Gear, etc.) I wouldn’t go so far as to say Cuben is mainstream yet, but it’s getting a solid toehold. I ran into a surprising array of people who had interests in different applications of Cubic Tech material.

A lot of companies you’re familiar with were in the OIA/ASTM standardization meeting we covered. Great ideas and thought processes abounded, and the companies are communicating regularly online, but the next whole-group meeting is planned for next year’s summer OR (perhaps a more limited winter OR meet, too). I know the reality is that we all have demanding jobs and limited time, but I would like to see more regular meetings to really get through some of the protocols we need to develop. A sort of standardization mini-lobby, if you will. A pipe dream I’m sure, but it would be great if the OIA or some other organization could have a small group dedicated to making these things happen. The end results will benefit vendors, consumers, and other industry pros.

I’m also encouraged by the increasing degree of social and corporate responsibility I encountered. Now, yes, I’m just cynical enough to say that some of it could just be feel-good marketing spin. But frankly, some of the companies we met are doing things far, far beyond the level of marketing spin. Practices are built into every level of corporate practice. One of my big interests in college and personal education has been in developing greater consciousness within corporate practices, and I think it’s safe to say that the industry is headed progressively further in that direction.

The barefoot trend is impossible to miss. I don’t want to step on Damien’s toes (wait for it), but did want to throw out a few observations. Lotsa companies are tossing their own toed shoes into the ring. But many companies are also putting shoes on the market that are designed to get the shoe out of the way of your feet. I’m a little fuzzy on the details, but it seems like Inov-8, for example, started out taking the minimalist approach to footwear seven to eight years ago. For those interested in switching over to a barefoot/minimalist approach, the Shok-Zone system of the Inov-8s might be a good way to step yourself down in support. Many other companies and shoes we’re looking at are offering minimalist options, and I think those options are impossible to ignore. The quantity of Five Fingers we sell at retail is mind-boggling; it seems like the trend will have to taper off in the next couple years (as most trends do), but that tapering back isn’t visible right now.

Future Coverage

In other news, readers might find it encouraging that Will and I were able to develop a number of future project ideas for BPL. We’ll continue with the same great depth and breadth that Will, Roger and others have pursued in their evaluation of the equipment we all love to use. I don’t want to go spoil the surprises, but I think you’ll be pleased with the continued evaluations you’ll see on the BPL pages.

It’s been fun! I hope you enjoyed our coverage.

Outdoor Retailer Summer Market 2010: Day 4 – Cool Finds and Sleep Deprivation

The daily perspective: NEED. MORE. ESPRESSO.

It’s an interesting frame of mind at this point: on one hand my mind keeps stumbling, on the other I could easily spend another week cruising around. Perhaps it’s best to call it a show and leave on an exhausted but exhilarated note.

Today’s products will focus more on those familiar lightweight to ultralight territory, but I’ll keep a random thing or two in the mix.

Evernew America

ORSM2010 Day 4 Cool Finds - 1
Evernew will be launching a new "Mug Pot" series of pots. The Mug Pot 900 is a narrower, taller version of their standard 900 ml pot. Aspects of the design are strikingly familiar to the MSR Titan kettle, but this struck me as being a deeper pot. The handles are just big enough (in a positive way I think), and the bottom is specifically designed to loosely interlock with the DX Stove set to eliminate sideways slip. The Mug Pot 900 only weighs 3.5 ounces. They’ll also be introducing the Appalachian set, which is the DX Stove set that nests neatly into a 500 ml pot. Like the 900, the 500 is designed to nestle into place on the stove stand. However, the 900 has a small groove up into the bottom and the 500 has a notch around the lower perimeter that allows the pot to drop a little into the stand.

I’ve been using the Evernew Ti alcohol stove since its release and have generally been pleased with its performance. It is a very strong, durable design, and I’ve found the stove to be equally as efficient in my Tri Ti as the 12-10 stove. However, after having burn tested five different Ti alcohol stoves in multiple configurations, I’ve found that the top row of jets never light. I’ve tested them on the bench, with a pot on stand above, and in my Tri Ti. Never has the top row of jets lit. Like I said, the stove has still worked well, but it really bothers me that the stove has a row of jets that appear to be nonfunctional. I’m told there is a fuel wick that should get fuel up there, but I’m pretty confident that it’s not working if that’s the case. Evernew swears that the stoves are fine and working properly, but I don’t know how it could be considered to be working properly if half the burner doesn’t light. Maybe there’s some weird thing going on with the top row of jets actually being for air intake and mix? I don’t know.

CAMP

ORSM2010 Day 4 Cool Finds - 2
The lightest-weight mass market trekking poles usually come in around 6.5 to 8.5 ounces per pole, or 13 to 17 ounces per pair. Enter CAMP: Their Xenon 4 trekking poles only weigh 9.9 ounces per pair. Not only are they very light, but they break down into four sections using avalanche probe technology at the joints. There’s a Dyneema cord in the middle of the pole; pull it up through the handle and just pull down to lock. Packed down, the poles are only 12.6 inches long. CAMP claims that their poles are the lightest trekking poles in the world, but they must not be familiar with Gossamer Gear LT4s (6.6 ounces per pair). Regardless, I’m really impressed with these poles and am anxious to test them. Talk about ease of packing! MSRP is $69.95. CAMP also makes a sturdier, much less flexy pair, the Xenon Trek, that weighs 12.7 ounces per pair for $79.95. (Pictured is the Xenon Trek, not the 4.)

It seems like forum questions come up somewhat regularly about ultralight ice axes or crampons. Though not new, I wanted to mention Camp’s Corsa ice axe that weighs only 7.2 ounces. MSRP is $119.95. They also make a twelve-point aluminum crampon, the XLC 390, that only weighs 13.8 ounces. MSRP is $149.95.

La Sportiva

ORSM2010 Day 4 Cool Finds - 3
La Sportiva introduced two new models in their Mountain Running line, the Electron and Quantum. What’s great is that they’ve adopted a more ergonomic last, slip-lasted and a softer midsole that cushions impact and should adapt better to trail surfaces. In more real-world terms, they had me try on a pair and walk around on a few large sharp-ish objects; the shoe conformed to the chunky stuff, let me keep a pretty flat pace by not rocker-ing on the objects, and were soft but not squishy or unsupportive. The tread is also pretty unique, looking kind of like wave-rippled sand. La Sportiva describes the 11.95-ounce Electrons as dynamic, highly cushioned, with excellent grip and a terrain adapting sole. MSRP on the Electron will be $120.

Hennessy Hammock

I recently tried spending a night in a different company’s ultralight hammock, but was so uncomfortable and verging on unexpected egress that I spent the last half of the night on the ground. When I stopped by the Hennessy booth I jumped in one and tried it out… really comfortable, really stable. I’m psyched. Hennessy Hammock has long been known for their bottom entry velcro, euphemistically referred to as the “birth canal,” but the company has some new developments. They’re now introducing zippered versions in their most popular models. One thing I like about the side-zippered mesh is that it easily flips over the suspension line for the mesh, so you can sit in the hammock without undoing or reconfiguring anything.

ORSM2010 Day 4 Cool Finds - 4
My favorite model is the new Hyperlite Backpacker A-Sym Zip. It’s a complete shelter (hammock, net, fly, lines) for 1 pound 10 ounces! The hammock body fabric is crazy stuff. It looks kind of like a sil ripstop, but the ripstop squares are made of Dyneema. I bought one and will start testing as soon as possible! Price is $229.95.

Zuke’s

ORSM2010 Day 4 Cool Finds - 5
A lot of us have dogs who travel the backcountry by our sides (at least, when they’re not chasing random scents). I think many outdoor people have some tendencies toward organics and more nutritious food, and I’ve noticed that the trend in pet supply stores is increasingly toward natural pet foods. Zuke’s is no newcomer to the party, but I wanted to bring some attention their way for a great line of dog treats and supplements. (My pup Java, pictured, resoundingly supports the company despite giving the camera the cold shoulder!)

What’s so special? First of all, the ingredients are all fit for human consumption and meet USDA standards. They don’t add random junk or filler to the treats… no corn, no artificial colors or flavors, no added fat or by-products. One example, ingredients in Z-Filets Prime Venison strips: Venison, rice flour, maple syrup, garlic powder, salt, phosphoric acid, sorbic acid (as preservative), mixed tocopherols (i.e. vitamin E). Chicken ‘n Cherryz basically has oats, rice, chicken, cherries, potatoes, and molasses.

The company puts a lot of effort into making the world a better place, too. Their biscuits are made in the U.S. with 100% wind energy, the box is 100% recycled and smaller/more full than competitors, the offices are powered with 100% green energy, and employees are paid to bike commute. A portion of all sales goes to the dog and cat cancer fund. I mean, this company really takes their commitment seriously. Let your four-legged kids give ’em a try! (Honestly, they sound so good I might have to start eating them.)

Metro Magic Air

ORSM2010 Day 4 Cool Finds - 6
Packrafters rejoice! There’s a great option out there for getting plenty of air into your boat in very little time. Meet the Metro Vac Deluxe, a 110 Volt Inflator/Deflator that features all-steel construction. The inflator includes a power unit and is compact, portable, and easy to use. It has a one-gallon tank for the 1.17 horsepower motor. Best of all the inflator only weighs 6 pounds. Widely available for $159.

Inov-8

ORSM2010 Day 4 Cool Finds - 7
As passionate about this company as so many of our readers are, I’m almost embarrassed to admit that I’d never actually seen one of the shoes in person before. What an experience! For those wanting to make the switch from boots to trail runners, the Roclite 319 (replaces the 320) is a great option. It’s one of their most supportive shoes and is a softer ride than their mega-stripped down options. In my notes on the 319 after walking around in them I wrote "backpack boot," but the shoe is very low-bulk and unencumbering. Inov-8 slots the 319 as a supportive distance trail shoe. Weight is 11.3 ounces.

If you’re not familiar, it helps to know that Inov-8 rates the support of their shoes with a "Shoc-Zone" rating of zero to four (they’re little arrows on the heel). I tried out a couple of their spring 2011 road shoes, too, and felt that both the Road-X 255 (S.Z. 3, 9.5 oz) and the Road-X 222 (S.Z. 1, 6.7 oz) had pretty good potential as uberlight trail shoes. Now, understand that I’m pretty much the last standing boot hold-out. But on a hike last year my feet hurt enough that I ended up backpacking around ten miles in Crocs, no problems. The Inov-8s provide much better but completely unobtrusive support. One of many points of construction interest: many of the shoes (not the 222) feature a Fascia Band that mimics the ligaments on the bottom of your feet (think fingers spreading from heel to toe) to provide biomechanically correct support and maximized natural proprioception.

Nite Ize

Nite Ize makes a ton of great little accessories. Many people I know use the stainless S-Biners to hang food bags. (I use the #1, although its weight rating is for much less than I hang. I haven’t had any problems, but if you try it, it’ll probably break just as a bear wanders through camp.)

ORSM2010 Day 4 Cool Finds - 8
I found a couple of cool little random accessories at the Nite Ize booth, including the Ziplit LED Zipper pull, a mini micro (not much larger than a zipper tab) LED zipper pull with switch (two-pack for $5.49). They also had the Spokelit ($7.99), oddly enough a bike commuter’s spoke-fit wheel light. I liked the Spotlit, too, which might be for Spot, or Rover, or whatever you call your canine friend. It’s a red or white LED with a stainless steel spring clip for the pup’s collar ($6.99).

Bodyglide

Many of you are familiar with Bodyglide Anti-Chafe. They’re also introducing versions of the same product to better reach other markets, Bodyglide For Her and Chamois Glide. Same product, different marketing… which I think is fine, because it helps consumers realize that the product can be used in different applications.

ORSM2010 Day 4 Cool Finds - 9
The news from Bodyglide, though, is the Liquified Powder. The cream dries after applied and becomes a “smooth, silky shield.” Bodyglide says it not only contains moisturizers and is great for application to feet (ever tried getting the mini deodorant stick between your toes?), but that the Powder is “effective, if not magical.” Liquified Powder will be available in single-use pouches and tubes.

bluesign technologies

ORSM2010 Day 4 Cool Finds - 10
bluesign (the "b" isn’t supposed to be capitalized) is another example of social consciousness, higher industry standards, and better business practices that not only reduce our impact on the world but can significantly reduce costs of business. Sounds like pretty heady stuff, eh? As I started learning about bluesign, the first thought through my head was “This sounds like something Yvon Chouinard might have started.” bluesign recognizes that many contemporary consumers “want to know everything about origin, production, and quality” of products. The CEO of bluesign postulates “If you don’t know, you don’t care.” And although it’s good (or nice) to be socially and environmentally conscious, businesses have to remain (or become more) competitive.

What bluesign has done is develop standards that cover all stages of textile production. In other words, they don’t just evaluate a final product. They consider all inputs from raw materials, water, energy, and chemicals. bluesign also works with products at the chemical/materials suppliers, the textile manufacturers, and the retailers and brands to make sure the standards are upheld throughout product development and sale. From bluesign materials: “The bluesign standard is built around five principles: resource productivity, consumer safety, air emission, water emission, and occupational health and safety.”

They’re trying to increase awareness of the varied types of cost of business. Quotes from bluesign promotional material: “We have to re-learn that quality is more important than quantity… With the help of bluesign technologies, we were able to reduce the cost for electric energy by 1.44 million USD per year… Bring more transparency into the supply chain.” Some little companies involved with bluesign: Patagonia, The North Face, REI, and Deuter, just to name a few.

TrekSta

The company’s motto is “Always Light.” Ya gotta love that! But what do they do? They’ve been around in the Asian market for years, but are just launching in the U.S. with a great line of trail shoes. Most of the time when I see a shoe line and hear reps talking about all of a company’s innovation I think, “Yeah, right.” But TrekSta has a couple of armloads of innovation to share, despite having a pretty small line.

ORSM2010 Day 4 Cool Finds - 11
First and foremost is their landmark last. (A “last” is the form that companies use to shape their footwear.) Nearly everyone on the market uses a last that looks kind of like an aerodynamic, futuristic, stylized artistic interpretation of a foot. (That’d be the one in the foreground.) TrekSta has a truly anatomical last based on scans of 20,000 feet. If you look at the last in the background, it’s easy to see that it actually looks like a foot (even more so in person). TrekSta uses the last all the way through the manufacturing of the shoe… the inside of the outsole gets actual foot shape, the midsole does, and the insole does. The upper follows actual contact points, from the leading edge of the big toe, following the curve back along the toes, and the indentations of arch and instep.

ORSM2010 Day 4 Cool Finds - 12
They’ve even incorporated glass fibers (oriented vertically) into the outsole to increase traction on slippery surfaces, including ice. Actually, that was their demo… big hunks of ice on the show floor for people to try to skitter around. They didn’t have much success slipping in the TrekSta shoes. The Evolution II looks to be right up our alley (foreground, weight unknown). The Nemesis also looks like a great option and is a bit lighter weight (350g). The mid-high in back is the Kobra II Gore-tex. Check out the Boa system placement on this shoe… off-centered from the tongue and onto the outside of the shoe. Really nice placement, great look, and functional. They also have a pretty great-looking amphibious sandal, the Kisatchie II, that has the side-mounted Boa system. I think this company has some great potential for us. (Prices range from $110 to $150.)

Brooks-Range

ORSM2010 Day 4 Cool Finds - 13
The Brooks-Range Elephant Foot Sleeping Bag.

These guys have some really killer stuff, especially if you’re into the search and rescue or backcountry EMS kind of thing. But, as Will has noted, they make some awesome down pieces, too. One that caught my attention in a big way is their Elephant Foot Sleeping Bag. This bad boy is made with a 15 denier mini ripstop and (finally, a company that says it this way) “800 power hypoallergenic Canadian goose down.” The elephant foot style is meant to supplement a down parka, so… the bag is 5 feet 1 inch long. As a really tall guy (5’6") I can just squeeze my shoulders under the opening of a 5-foot bag (toes a little crammed, but ah well). The gold beauty weighs 16 ounces and is rated to 15 degrees Fahrenheit. MSRP $249.

Bluewater Kayak Works

You know I’ve gotta get something paddle-related in! As someone who used to kayak paddle, surf, and train on Lake Superior most days of the week, bilge pumps can occasionally be important devices. The problem is, if you need a bilge pump the water’s probably bad enough that you want your hands on the paddle, not on a bilge pump. Years ago I installed a bulkhead-mounted foot-operated bilge on my boat, but the problem with that is I can’t use my feet to brace when, all things considered, I’m using the bilge because the waves are nasty. Enter Bluewater and their electrical bilge pump! This little sucker will pump at a rate of 500 gallons per hour. It uses a 12 volt rechargeable NiMH battery that’s well-protected in a waterproof box; the battery’s good for 1.5 hours. The switch is magnet operated, with a magnetic slider that runs on your deck bungee cord. You can easily start the pump before re-entry, or just slide it on once you’re in and have the skirt sealed. The system works smoothly and remarkably well… it’ll really shoot the water out! It weighs about 3 pounds, which isn’t bad for something like this.

ORSM2010 Day 4 Cool Finds - 14
No good press photos, but upper arrow is his hand on the switch, the lower arrow is the water shooting out as the pump starts to engage. Cool beans!

Day to Day Bottles

ORSM2010 Day 4 Cool Finds - 15
Yep, more water bottles. But I’ve only shared maybe 3.67% of them with you? Left to right: The wood-grain looking bottle is a stainless model from Polar Bottle. They’re using the same lid as the mustard-ish Polar Bottle on the far right. It basically has a sippy lid; if you rotate it a quarter turn or so, you can drink, then just twist it back to seal. It’s a pretty convenient system since you don’t have to remove the lid. The mustard bottle weighs 3.9 ounces and the stainless one weighs a pretty standard 8.9 ounces.

The bottle in the middle has a really great feel in hand and is a very distinctive, stylized and functional bottle. It’s sort of squared off like an old milk bottle, but more rounded, if you’ll allow me the license. The top is big and rubbery and fits perfectly into the hand. The Waterbox crew did some really, really nice work developing their line. They also have a line of double-walled glass bottles coming out.

Tomorrow: tune in for our closing remarks on a remarkable Outdoor Retailer Show!

Outdoor Retailer Summer Market 2010: New Fabric Technologies Are the Driving Force For Many New Products

Columbia Thermal Reflective, Pertex Quantum GL, Polartec Power Shield Pro, Polartec Yarn applications, and a case against wool for hiking socks.

Introduction

Emerging new fabric technologies are the engines of innovation in the outdoor industry to a large extent. The fabric manufacturers constantly interact with gear and apparel manufacturers to understand their needs. In many cases, a new fabric construction is created to meet a manufacturer’s specifications; in other instances, a fabric manufacturer will develop a new technology then work with manufacturers to utilize it in one form or another. Often, a particular fabric technology will be translated into dozens of individual fabric constructions. Examples are different face fabrics laminated to a particular membrane, and specific yarn blends and weaving types. What can be confusing is each manufacturer usually comes up with a proprietary name for their particular construction using the technology, so we end up with a lot of different product names for the same technology.

In this article I describe some of the more interesting fabric stories we encountered at this Outdoor Retailer Show.

Columbia Thermal Reflective and Thermal Insulative

This is a technique that bonds an aluminized layer to a fabric. Columbia’s Thermal Reflective technology covers only 30% of the inside surface of a fabric, like in a softshell jacket. The aluminum reflects body heat back, making the garment 20% warmer without adding any additional insulation. And it actively draws heat away during periods of high exertion. Other properties of the fabric, like breathability, are retained.

ORSM2010 New Fabric Technologies - 1
Columbia’s Thermal Reflective technology is an aluminized layer applied to the inside of a fabric so it reflects body heat back to the wearer.

Thermal Insulative is the same technology applied to the lining in an insulated garment, like a synthetic insulated jacket. Columbia will be introducing a variety of garments using this fabric beginning in fall 2010. Perhaps we will eventually see baselayers with this technology?

Pertex Quantum GL

GL stands for “Gossamer Light.” This is sometimes referred to as the “new Quantum,” as distinguished from the “original Quantum.” It is essentially Pertex’s state-of-the-art in small denier fabrics. It is claimed to be softer, stronger, and less restrictive of garment loft compared to regular Quantum. Quantum GL is double calendared to make it downproof, yet it is fairly breathable because it is so thin.

The rule of thumb to distinguish the two Quantums is: Quantum is fabrics listed as15-20 denier with weights of about 27 g/m2, while Quantum GL is 10 denier fabric weighing less than 25 g/m2. Currently there are three constructions of Quantum GL: 10d x 7d (24 g/m2), 10d x 10d (25 g/m2), and 10d x 7d double ripstop (23.5 g/m2).

ORSM2010 New Fabric Technologies - 2
The new The North Face Diaz Down Jacket for fall 2010 uses 10d x 10d Pertex Quantum GL shell fabric.

So, why is there still a lot of use of regular Quantum? One reason is that it’s really not the “old” Quantum; Pertex representatives explained that fabrics are continually “refreshed” as new manufacturing processes are adopted. The other reason is Quantum costs about US$2 less than Quantum GL, so manufacturers will tend to use Quantum GL in a jacket shell which uses less fabric, but opt for Quantum in a sleeping bag which uses a lot more fabric.

Polartec Power Shield Pro Fabric

This membrane enables the fabric to block 99% of the wind and creates real water resistance; the remaining 1% circulates within the fabric to greatly enhance moisture vapor transmission. Power Shield Pro also delivers an initial 5000 mm hydrostatic head and remains durably water resistant to a minimum of 3000 mm for lift. Softshell jackets are the ideal application, so Power Shield Pro delivers a highly water-resistant softshell that breathes.

ORSM2010 New Fabric Technologies - 3
Polartec Power Shield Pro Fabrics work best for softshells. The fabric has a smooth tightly woven face for good abrasion resistance, and a polyester back for a high warmth to weight ratio. The membrane is in the middle of the fabric. Softshells made of this fabric are claimed to have 30% to 50% more breathability.

Primaloft Yarn

Following the successful launch of Primaloft Yarn in hiking socks, Primaloft is looking for additional applications. Primaloft fibers are very fine and soft, resulting in a warm and breathable garment. The hydrophobic properties of 100% Primaloft yarn enhance the transfer of moisture away from the skin to keep the wearer dry. When 100% Primaloft is paired with a hydrophilic yarn, like wool, the combination works together to transfer moisture away from the skin to the outside surface of the fabric, keeping the skin warm, dry, and comfortable.

ORSM2010 New Fabric Technologies - 4
Primaloft is now working with certain manufacturers to blend 100% Primaloft Yarn with other yarns (with a focus on wool) to create superior performing fabrics, like this sweater. Additional performance features can also be integrated, like density gradient weaving.

Polarmax Introduces TransDry Moisture Management Technology for Cotton

ORSM2010 New Fabric Technologies - 5
Yes, cotton. We typically avoid cotton fabrics because they absorb a lot of moisture and are slow to dry. Polarmax TransDry is the first technical wicking cotton fabric that transports moisture from the inside to the outside. According to their test data, TransDry cotton can be engineered to show a 2000% improvement in moisture transport and has less water absorbent capacity compared to untreated cotton or popular synthetic fabrics. These are bold claims, and we will just have to test it out to see how well it performs. I have been wearing a long sleeve TransDry “T” for a few days and find that it readily absorbs water and sweat, but it dries quite quickly. The sample I received is a heavier fabric weight (10.2 ounces/289 g for size Large long sleeve) compared to polyester baselayers, and it is not cool to wear in hot weather. However, they do have a lighter weight fabric for hot weather.

Thorlo Engineered Variable Density Pad

While merino wool hogs our attention, especially for socks and baselayers, the folks at Thorlo remain committed to acrylic fibers, specifically Thor-Lon. Years ago, the mantra was to wear wool socks in colder temperatures and synthetic socks in warmer temperatures. Now, it seems like the latter has been forgotten.

Thorlo maintains that foot protection is the root cause of comfort. Terry loops in the padding of socks need to absorb impact and shearing forces, basically a back and forth motion. Thick cushioned socks are the best for hiking in rougher conditions.

Cotton, wool, and silk (all natural fabrics) are hydrophilic, meaning they absorb and retain moisture. When socks made of these fabrics retain moisture, the fabric collapses and becomes ineffectual as far as foot protection.

Acrylic yarns are hydrophobic, meaning they repel water, and retain their resiliency for absorbing shock and shear. The condition of your feet and type of activity determine the amount of need for cushioning.

This agrees with my long-term experiences with hiking socks. For long hiking days in warmer temperatures, I much prefer highly cushioned synthetic socks. My feet feel much better at the end of the day.

Conclusion

We look forward to reporting further on these fabric developments and how they perform compared to their claims.