Introduction
In previous installments of this series, we’ve talked about the benefits of freeze-drying food for backpacking: flavor, nutrition, convenience, and shelf-life. But every benefit has a cost, and now it’s time to talk about that also.
In this article, I hope to give you the information needed to decide whether to get into home freeze-drying yourself. I’ll break the costs into three components: food, operations, and capital costs.
Every decision requires an alternative, and I will use the most straight-up, obvious one: buying pre-packaged freeze-dried meals. We are all familiar with Mountain House. It is the market leader and a fine product, but there are plenty of alternatives.
With a diversity of suppliers comes a diversity of package sizes and serving definitions, complicating our analysis. We need to straighten that situation out first.
In our Archives: Catch up on the rest of Drew’s freeze-drying articles here:
- Harvest Right Home Freeze Dryer Review
- Freeze-Drying Your Own Backpacking Meals: How to Eat Your Favorite Town Food on the Trail
- How Does Freeze-Drying Work? (The Physics of Making Freeze-Dried Backpacking Food)
- Why Freeze-Dried Food Retains Taste and Nutrition
- Why is it Hard to Freeze-Dry Liquids?
- How to Store Freeze-Dried Food
Food costs
Over the years, I’ve found that a Mountain House two-serving package is just about right for one dinner for one backpacker (me). They define a serving as 2 ounces (55 g).
I’ve also found that 3.5 to 4.2 ounces (100 to 120 g) of food that I’ve freeze-dried constitutes a good dinner. So that checks out. We’ll call 4 ounces (110 g) a meal and use that as a base unit.
The exact number doesn’t matter so long as we are consistent.
The table below summarizes package sizes and costs from a variety of freeze-dried food suppliers, including a number of cottage outfits:
| brand | meal | cost/package | grams/package | cost/4 ounce meal |
|---|---|---|---|---|
| Mountain House | Classic Beef Stroganoff | $15 | 165 | $10 |
| Mountain House | Pasta Primavera | $9 | 108 | $9.42 |
| Backpacker's Panry | Pad Thai | $10 | 176 | $6.22 |
| Trailtopia | Pesto Chicken Pasta | $11 | 196 | $6.17 |
| Pinnacle | Sticky Teriyaki Chicken | $16 | 122 | $14.43 |
| Good to Go | Mushroom Risotto | $14 | 180 | $8.71 |
| Food for the Sole | Coconut Rice and Beans | $15 | 146 | $11.26 |
| Farm to Summit | Garden Mac and Cheese | $13 | 170 | $8.73 |
| PackitGourmet | Austintacious Tortilla Soup | $13 | 99 | $14.44 |
Averaged together, costs look like this:
| meal type | average amount of food per package | average cost per 4-ounce ( 110 g) meal |
|---|---|---|
| omnivore | 5.3 ounces (151 g) | $9.93 |
| vegetarian | 5.1 ounches (147 g) | $9.80 |
I’ve broken out the average cost per meal for all meals listed (omnivore) and for just the vegetarian meals. The reason why will soon become apparent. The most surprising pattern in this table is that there is no pattern. The big dog Mountain House is not cheaper than the little guys, and vegetarian meals are not necessarily cheaper than meals containing chicken or beef.
We can also break costs out by calories rather than weight. The FDA recommends a daily intake of 2000-2400 calories/day for active women and 2600-3200 for active men (but see Backpacking Light’s How much food should I pack? article). Let’s call 500 calories a meal, as most backpackers snack several times a day on high-calorie foods like nuts and chocolate, and energy bars. That calorie level gives us these results:
| brand | meal | cost/package | calories/package | cost/500 calorie meal |
|---|---|---|---|---|
| Mountain House | Classic Beef Stroganoff | $15 | 750 | $10 |
| Mountain House | Pasta Primavera | $9 | 440 | $10.51 |
| Backpacker's Panry | Pad Thai | $10 | 730 | $6.82 |
| Trailtopia | Pesto Chicken Pasta | $11 | 740 | $7.43 |
| Pinnacle | Sticky Teriyaki Chicken | $16 | 700 | $11.43 |
| Good to Go | Mushroom Risotto | $14 | 820 | $6.89 |
| Food for the Sole | Coconut Rice and Beans | $15 | 670 | $11.16 |
| Farm to Summit | Garden Mac and Cheese | $13 | 850 | $7.94 |
| PackitGourmet | Austintacious Tortilla Soup | $13 | 370 | $17.57 |
Averaged together, costs look like this:
| meal type | average calories per package | average cost per 500 calorie meal |
|---|---|---|
| omnivore | 674 | $10.17 |
| vegetarian | 630 | $10.45 |
These tables set our baseline: it costs about $10 per meal for store-bought freeze-dried food, probably more like $11 if you account for taxes and shipping. But $10 is a nice round number, so we’ll go with that.
To estimate the food portion of the cost of making your own freeze-dried food, I looked up the prices of a number of staples at the local Whole Foods. This gives us an estimate that is at the high end:
| food | cost/pound | cost/110 g (dry) | cost/110 g (wet) |
|---|---|---|---|
| beef - top sirlion | $12 | $2.91 | $8.72 |
| chicken breast | $8 | $1.94 | $5.81 |
| pasta | $1.39 | $0.34 | |
| tomato | $2.29 | $.0.55 | $2.22 |
| beans | $1 | $0.24 | |
| corn | $1.50 | $0.36 | $1.45 |
| rice | $1.85 | $0.45 | |
| potato | $1.19 | $0.29 | $1.15 |
Averaged together, costs for dry weight look like this:
| meal type | average cost per 100 g of dry food |
|---|---|
| omnivore | $2.55 |
| vegetarian | $0.98 |
Most foods lose about 3/4ths of their weight when freeze-dried, so to get the dry weight of the wet foods, I divided by four and converted pounds to grams.
Unlike prepared meals, adding meat incurs a substantial food cost. Because the cost of eating vegetarian is so much lower, I will track omnivore and vegetarian costs separately.
Of course, we don’t eat plain meat and vegetables. There are additional food costs for spices, herbs, sauces, etc. So let’s round up the food costs per meal to $3.00 for omnivores and $1.25 for vegetarians.
An additional conclusion from this analysis is that food costs are a minor component of prepared meal costs. I assume the commercial preparers buy in bulk at a discount, so their food costs will be even lower than what I presented above.
Operational costs
After nearly a year of freeze-drying, I have identified only two operational costs: electricity and pump oil. A quart of pump oil cost me $16 at the local hardware store. I’m still on the first quart as it can be filtered and reused. Its cost is a few pennies per meal at most and not worth including in our calculations.
The other operational cost is electricity. This cost is a good deal less than I expected. I used a Kill A Watt P3 meter to track electric power usage on several runs, summarized below.
Power consumption varies with ambient temperature and load size, but 20 kWh per run seems like a good estimate. The national average cost per kWh is $0.104, giving us a cost of $2.03 per run for electricity.
The nominal max capacity of the HarvestRight Home Freeze-Dryer is 7 to 10 pounds (3.2 -to 4.5 kg). A typical run for me has been more like 6 to 7 lbs (3 kg). The yield of dried food from a 6-7 pound run is about 2 pounds (0.9 kg). At 4 ounces (110 g) per meal, that’s eight meals per run, using the same parameters as we used for packaged food. Electricity costs then work out to just about $0.25 per meal.
For omnivore meal costs, we are thus at $3.00 (food) + $0.25 (operations) = $3.25 per meal.
For vegetarians, it is $1.25 (food) + $0.25 (operations) = $1.50 per meal.
That’s a lot less than prepared meals, but we have not yet addressed the biggest and most problematic cost.
Capital costs
Food is cheap, electricity is cheap, but freeze-dryers are expensive. If they were not expensive, you probably already would have one.
The HarvestRight Home Freeze Dryer model I have been using (the medium one) currently lists for $2900, up about $300 from a year ago. Trays, pump, and shipping are included in this price.
From above, the average cost for food and operation is $3.25 per meal for omnivores and $1.50 for vegetarians. At $10.00/meal to buy, this means the capital costs have to get below $6.75 or $8.50 per meal, respectively, before one starts to save money.
The math is simple then: $2900/$6.75 = 430 omnivore meals, or $2900/$8.75 = 330 vegetarian meals. At eight meals per run, that translates to 54 and 41 runs, respectively.
I don’t think that’s a problem from an equipment lifetime standpoint. I have done about 50 runs in the last year (I seem to have become very popular with my backpacking friends), and the HarvestRight shows no signs of wear or malfunction. I would be surprised if it didn’t last at least a hundred runs and could see its mean time-to-failure being several hundred or even a thousand. Good-quality vacuum pumps and compressors (the only moving parts) will last for over a decade of heavy use.
So the affordability question comes down to your consumption level and time horizon. If you think that you (and the new friends you will acquire) will eat more than 300-400 freeze-dried meals in the next decade or so, then buying your own freeze-dryer is a reasonable choice.
There are plenty of other factors and scenarios that affect the desirability of becoming a freeze-dryer owner. But I hope you find these cost calculations useful in making a decision.
Freeze-dried recipe: posole
Posole is a classic Mexican stew made with hominy in adobo sauce. It is a bit involved to make, but it scales easily, so you don’t have to make it often. It has become one of my trail favorites, especially in cold weather.
For a roughly 2-quart batch, you’ll need about 6 ounces (170 g) of dried peppers and 4 15 oz (425 g) cans of hominy. Both are available at your local carneceria. For peppers, I recommend guajillos and anchos. Throw in some chipotles (smoked anchos) if you want a smoky flavor.
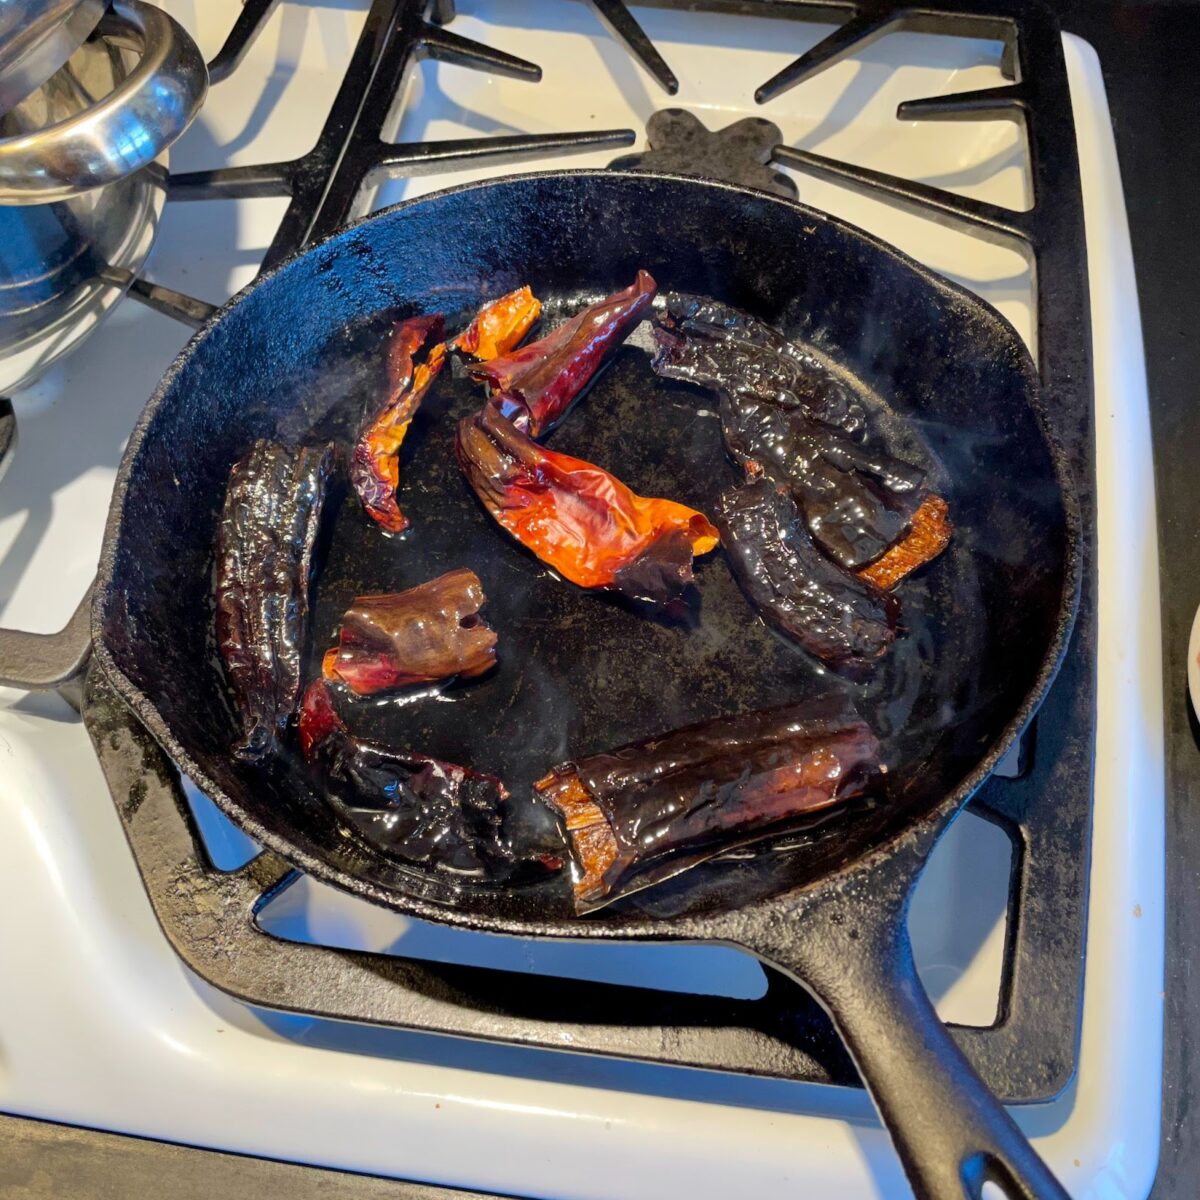
Start by searing the peppers. Cover the bottom of a cast iron skillet with oil, and heat it medium-high until it just begins to smoke. While it’s heating, break or cut off the tops of the peppers, removing the stems and seeds.

Lay the peppers in the hot oil, searing them until they turn brown (and not too black), about 20 seconds per side. Put them in a mixing bowl of warm water, cover with a dish (to press them under the water), and let them soak for about 20 minutes.
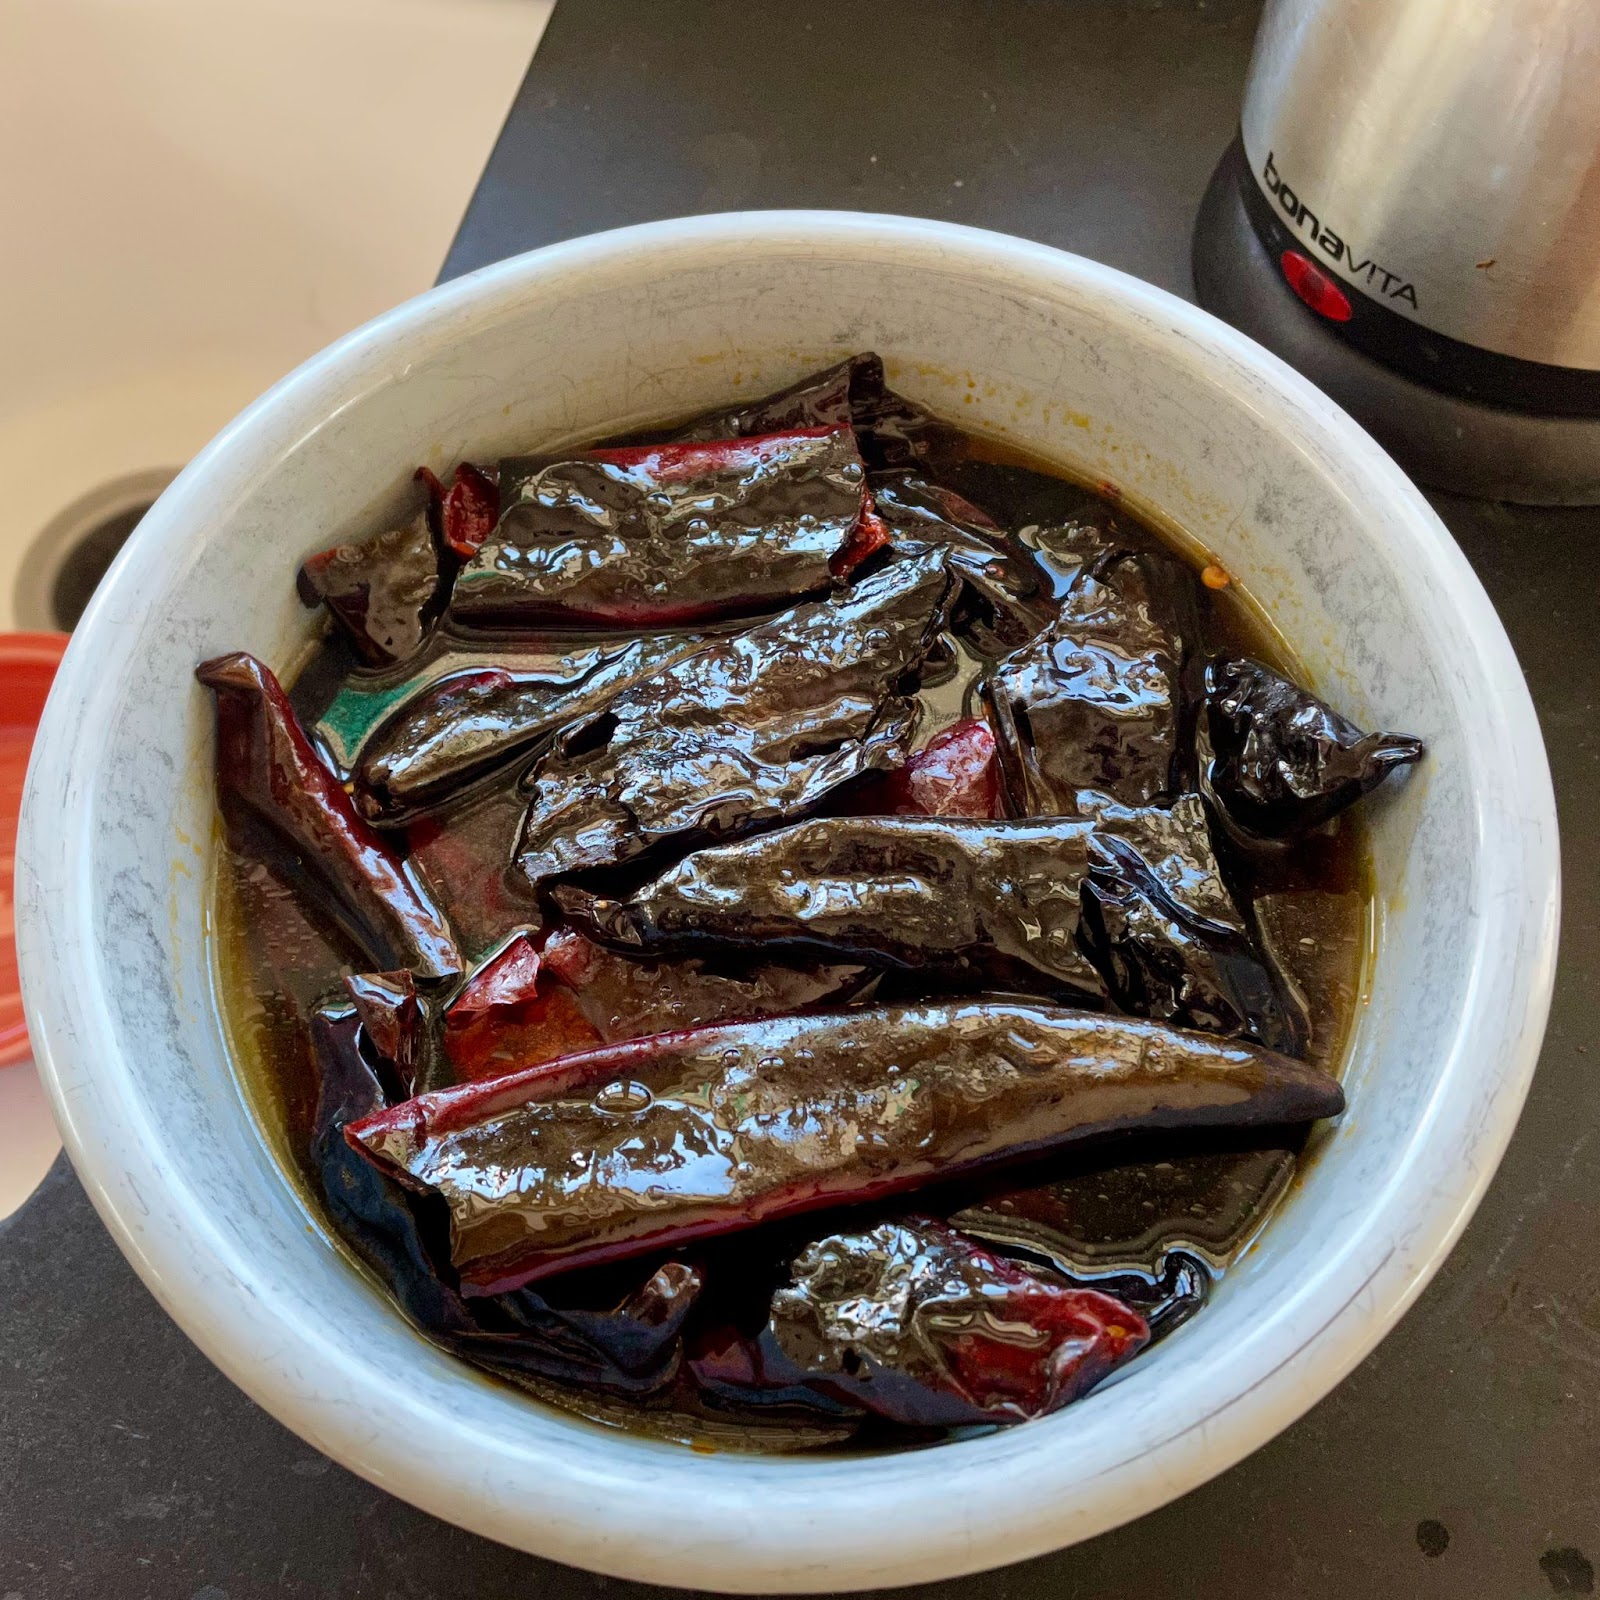
Pour the peppers and about half the water into a blender and whir it up very fine. Add more water if needed to get a good consistency. Rick Bayless (whose recipe I am adapting here) suggests straining through a cheesecloth, but I prefer a chunkier texture myself.
Cut up some white onion, drain the hominy, and add both ingredients to the adobo sauce. Sprinkle in some Mexican oregano to taste and simmer for a couple of hours.
Add pork or chicken if desired.
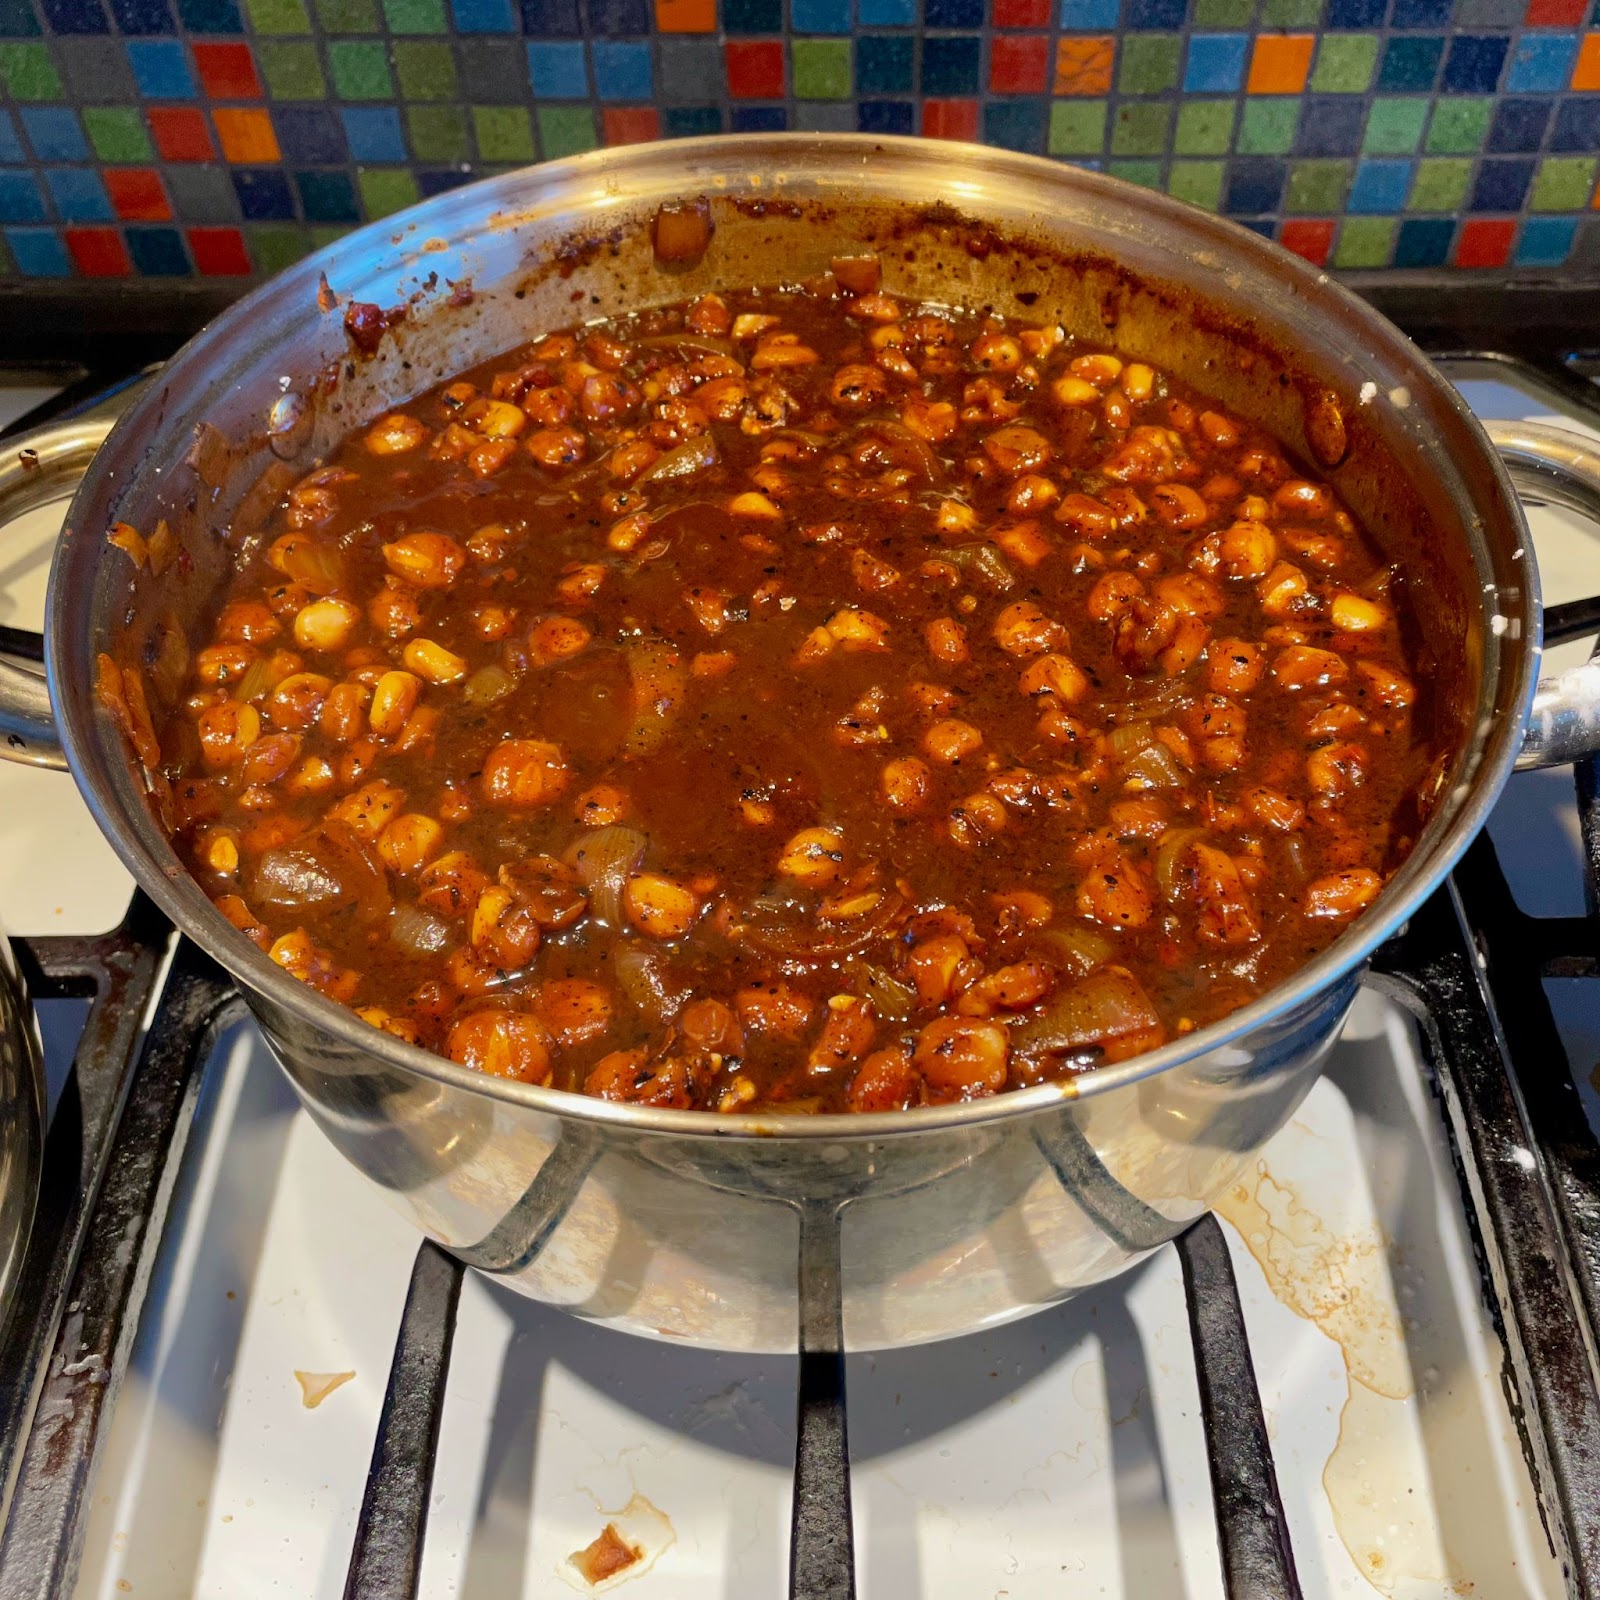
Radishes and cabbage are the traditional garnishes, but I usually top with dried flour tortillas strips and some cheese.
You can save some of the adobo sauce to dry separately. It makes an excellent sauce for other meals – adobo mac and cheese is a fantastic trail meal.
This recipe works for both freeze-drying and heat-assisted dehydration. The hominy doesn’t rehydrate as well if dehydrated and remains a bit chewy. It is still pretty darn good. Give posole a try if you are ready to move beyond burritos.
Learn More
Browse our curated recommendations in the Backpacking Light Gear Shop – a product research & discovery tool where you can find Member gear reviews, Gear Swap (used gear) listings, and more info about specific products recommended by our staff and members.
Gear Shop » Food Preparation and Packaging
Related Content
- Read more by Drew Smith.
- Don’t miss our podcast interview with Drew.
- For more actionable food storage tips, check out our Backpacking Food Trailhead.
DISCLOSURE (Updated April 9, 2024)
- Backpacking Light does not accept compensation or donated/discounted products in exchange for product mentions or placements in editorial coverage. Some (but not all) of the links in this review may be affiliate links. If you click on one of these links and visit one of our affiliate partners (usually a retailer site), and subsequently place an order with that retailer, we receive a commission on your entire order, which varies between 3% and 15% of the purchase price. Affiliate commissions represent less than 15% of Backpacking Light's gross revenue. More than 70% of our revenue comes from Membership Fees. So if you'd really like to support our work, don't buy gear you don't need - support our consumer advocacy work and become a Member instead. Learn more about affiliate commissions, influencer marketing, and our consumer advocacy work by reading our article Stop wasting money on gear.

Discussion
Become a member to post in the forums.
Companion forum thread to: Is Buying a Home Freeze-Dryer Worth the Money?
Home Freeze-dryers are handy but expensive. Are they worth the cost? We show you how to find out.
Thank you very much for these great articles, Drew. I quite enjoy them.
About 3 yrs ago we purchased med. size freeze dryer with oil free pump and don’t regret it. Still using it and thinking of more foods to preserve. We’re enjoying backpacking meals and lighter packs much more now, too.
Some might want to also consider value of freeze dried food for non-backpacking uses. One that I can think of is snacks (such as freeze dried fruit, veg, cheese, ice cream) for home, school, work, travel, or gifts. Another use is as a preservation method for seasonal produce. Of course the excess backpacking meals produced are also emergency food.
But there are also other costs to consider like the space occupied by the machine and accessories, and space for storage of the preserved food, the noise produced as it runs, and the heat produced by the compressor. I suspect we’re paying more for A/C when running freeze dryer. Also, there is time involved in preparation and storage of food food pre & post drying. We are retired though so don’t mind the time cost either.
Over all, we are very pleased with our Harvest Right Freeze Dryer and think it was a very worthwhile investment.
Thanks Drew for the great series on freeze drying, they have been informative reading.
I have been running a HarvestRight medium since 2019 and could not be happier with the investment.
One thing to add in to the cost is the storage materials for the final product. For example I may use two 1-gallon size mylar bags to store the bulk dry product, and then break into meal sized mylar zipper pouches based on trip and if it is for my wife and I or our two kids. While this adds a little cost, it still comes in well under the pre-packaged cost and you have so many more options to tailor the size. For example a typical full dryer load will yield 2 meals for the adults and 2 meals for my kids.
2x 1 gallon for bulk storage $0.70ea. total $1.40
2 double size zipper pouches (1 meal per bag for 2 adults) $0.61 ea. $1.22 total
2 single size zipper pouches (1 meal per bag for 2 kids) $0.70 ea. $1.40 total
In grand total then the packaging is $1.40+$1.22+$1.40=$4.02 which is for 2 kids 2 meals each and 2 adults 2 meals each or 8 meals total. So divide by 8 and you get packaging cost of $0.50 per meal. And you could drive that down by purchasing mylar bags in larger quantities or using thinner bags than the 7mil ones I use.
As Patti mentioned above, I also have found many other uses that could be said to add value to the investment.
– A big one, freeze dried coffee, (well for coffee drinkers). How great it has been to take fresh brewed coffee on a trip into the wilderness. I pull espresso shots with fresh roasted coffee, pool them, freeze into blocks and then off to the dryer. Usually I put 40 shots in a dryer run. I take clear vacuum sealer bags and cut down to single serving size and heatseal the cut edges, then add 1 portion of dried coffee. Then in the field you dump into your mug and add however much water you like, from a few oz. for an espresso like drink or 6+ oz. for more of a drip brew. AlpineStart is good stuff, but expensive and to me can’t hold a candle to this kind of fresh brew. (tip don’t do milk based drinks like lattes or capps, the milk is gritty when you reconstitute in the field.)
– Snacks and fruit for the wilderness and around the house. I have dried bananas, kiwi, strawberries and apples, some of which have lasted long enough to go on a trip, but many times get eaten as snacks at home. My kids love giving these to their friends who don’t know what freeze dried foods are. Grab a few boxes of ice cream sandwiches from Costco and pop them in the dryer, ice cream on the trail.
– Lunches for those impromptu day trips. I have gone on many day hikes, where instead of making sandwiches at home, I grab the stove and a couple bags of freeze dried food and we quickly hit the trail. It adds a bit of time in the field to cook, but I would rather sit and cook in the woods than stand in my kitchen making sandwiches. :)
– Lunches if you’re work from home these days. Many times over the past covid years, I have pulled out a meal bag for lunch when the fridge was low or I was tight on time.
– Leftovers, waste no more. What to do with that extra spaghetti from dinner or maybe extra beef stew, run it through the dryer instead of dumping it in the trash.
– Experiment, get creative, try some freeze dried Skittles or gummy bears (use the Haribo brand).
Just a few things I have found that add to the utility of having a freeze dryer in the house.
Adventure on,
Nate
Hey, thanks for this final piece. The question of economics was all that held me back from buying a freeze dryer for use by my family and friends.
The question of packaging in non trivial and economically significant. Good quality vacuum bags are not cheap. A good machine is expensive but will last a long time.
One last expense is time. The imagination is a wonderful thing so I can imagine the great meals I’d prepare and package but when I look around at everything else that consumes the time I have to attend to… life; adding work just eats into time I could spend outdoors.
It is a tempting project but for now I’ll just purchase what I need and use the time saved to wear the rubber off my boots.
Thanks for the help!
LOWER SODIUM CONTENT:
Most commercial freeze-dried foods are SALT BOMBS with horrifically high sodium content.
Making your own freeze-dried food can avoid this health problem,
Not to argue that fact about sodium content, but under some circumstances, hi sodium is warranted and maybe beneficial.
Agreed…and I have to watch my salt intake pretty carefully. I would like it if more companies offered lower-salt options, but when you start figuring in the normal effects of altitude, average salt loss, etc, lower-sodium offerings probably aren’t profitable or useful to most consumers, across the board.
Now, preservatives, on the other hand… that’ll cause me to buy my own freeze-dryer, eventually. My hiking partner is allergic to them, so almost every option on the shelf isn’t actually an option.
Any commentary from the BPL community on the reliability of these machines, or regarding troubleshooting support from Harvest Right?
I’ve considered buying one, but the horror stories on reddit are discouraging. They include shipping damage, failed components, mystery errors, etc., often accompanied by poor customer support from Harvest Right.
Example of a specific thread.
Here’s a subreddit dedicated to Harvest Right machines.
All products from all manufacturers have some percentage of quality issues, but in this case (a device that weighs several hundred lbs), its hard to return a lemon for a refund.
The math presented in this article assumes that a machine works for a long period of time without major issues or repairs. If you start replacing vacuum pumps or paying for out of warranty repairs, the return on investment will be much less.
When you google info on Harvest Right in general, you are bombarded by blogs with obvious influence from affiliate marketing programs. Its clear that Harvest Right pays a lot of bloggers for exposure, and few of those bloggers acknowledge any downsides to investing $$$$ in one of these machines. It can be hard to find information you can trust.
I generally like BPL’s stance and disclosure about affiliate marketing. The sentiments in the 12/22/2021 founders journal email really hit home for me (be careful who you trust, only buy what you need). However, the series of articles on Harvest Right could use some acknowledgement of the potential risks of investing in a Harvest Right, to avoid looking like just another affiliate blog post.
In reply to Ben’s question on reliability, I can offer the experiences I have had.
In the 3 years I had had mine, I have contacted HarvestRight support on two occasions. In both cases I found their support to be helpful and they resolved my issues.
– The first case was when I noticed the cycles running for an extended amount of time and the temperature display showing higher than expected readings. At this time the unit was under warranty. I ran some requested tests and sent log files to HarvestRight and after a live phone troubleshooting session the tech determined my system board was bad. They shipped out a new part with instructions how to replace it. I was able to replace the part easily, the internals of the dryer are not all that complex, just take your time. With the new system board in my dryer was back to normal operation. There was no cost to me and the tech I worked with was knowledgeable, and quick to respond.
– The second case was opened due to a vacuum error on the display during a drying run. This time my unit was outside of warranty, and I needed to pay a $45 diagnostic fee to have HarvestRight troubleshoot my problem. I exchanged several emails with the tech who reviewed my logs and asked for some additional tests. After this it was determined the hardware was good, the error was not reproducible, and a software upgrade was available with improved error handling. The tech supplied me with the software upgrade package and after installation my dryer has been operating without any issues. Again the tech was knowledgeable, answered all my questions, and provided a reasonable solution to my problem.
Now a few points to be aware of,
-The unit is large, heavy and arrives via LTL freight. Take HarvestRight seriously when they say open the box and inspect everything before signing the delivery receipt. If any damage, refuse the shipment. Mine arrived well packed and without damage.
-Since it comes via freight you will need to be home and schedule a delivery day with the freight company when the unit makes it to your local area. Also, they will only unload it from the truck, they will not bring it inside your house. I asked the driver and he kindly wheeled it into my garage with the pallet dolly.
-If you have any issues with the refrigeration system, you will need to find a local HVAC shop to work on it for you. It would not be reasonable to try shipping the unit back to HarvestRight for repair.
-If you have issues of any sort you will need to be comfortable working on the unit yourself with the guidance of HarvestRight tech support.
I too, saw many complaints on the Internet when I was considering the purchase and they did concern me. But I also could see many people discussing how they were enjoying their units and in the end I decided to take leap. At this point I have no regrets making the investment.
I hope this can be helpful to others who may be deciding to make the investment or not. Please feel free to ask any other questions you have.
Become a member to post in the forums.