
In previous installments in this series, we’ve talked about the hows and whys of freeze-drying food for backpacking. With a consumer-oriented freeze-dryer like the Harvest Right, the hows are pretty simple: push a couple of buttons and walk away. The whys we have covered in a bit more detail: freeze-dried food is much lighter without all that water weight, and it retains its flavor and nutrition.
But there is one more why to cover: freeze-dried food keeps for a long time. Mountain House claims that its products have a shelf-life of over 30 years. It is unlikely that backpackers freeze-drying foods at home can obtain multi-decade shelf lives. It is also unlikely that we would want or need to do so. After all, we are preparing for hiking trips, not the end times. For our purposes, we want to keep our food flavorful and nutritious for several months or maybe a couple of years. This article will outline the best practices that will let you do that. We’ll start by talking about what causes food to go bad.
In our Archives: Catch up on the rest of Drew’s freeze-drying articles here:
What causes backpacking food to go bad?
Moisture, heat, and oxygen are the key contributors to food decay. This is just as true for storage as it is in the initial freeze-drying process. Light can also cause the breakdown of some vitamins and flavor molecules (which, as you recall, have similar chemistries). Minimizing food exposure to these factors is the key to retaining food quality.
Temperature
The rate of chemical reactions (with some non-entropic exceptions) usually increases with increases in temperature. A food degradation reaction is the very definition of an entropic process, and so this rule holds for loss of food quality. We all know this – it is why we have refrigerators. But what may not be so obvious is how a few degrees of temperature can make a substantial difference in shelf life.
Different food molecules have different temperature-dependent rates of decay, but a good rule of thumb for biochemical reactions is that rates double with every 18 °F (10 °C) increase in temperature. The upshot of this temperature dependence is that storing your dried food in a spot that is 8 °F (5 °C) cooler will increase shelf life by about 1.4 times. Finding a spot that is 18 °F (10 °C) cooler will double your shelf life.
Moisture
Water is the universal solvent and will eventually break down just about every kind of food molecule. Degradative enzymes present in foods will accelerate this process. Freeze-drying removes >95% of food water, and you want to keep it this way. Storing your food in moisture-impermeable containers (more on this below) is essential, especially if you live in a humid region.
Oxygen
Oxygen strips the electrons from nutrient and flavor molecules, which happen to mostly be electron-rich. You want to keep oxygen away from your stored food, maybe even more than you want to keep water out.
In Our Forums: Check out what the Backpacking Light membership is talking about with regard to food:
How to store your freeze-dried food: keep it flavorful and nutritious
Let’s start with what doesn’t work: storing food in freezer bags. These are made of linear low-density polyethylene (LDPE), and this type of plastic is highly permeable to oxygen and moderately permeable to moisture. They are fine for storing your food for a few days or even weeks, but you will be disappointed if you keep dried food in them for longer than that.
Your best options for storing freeze-dried foods are mylar bags or glass jars. There are metal can systems available, but once opened, they are not readily resealable and so are best suited for multi-year storage.
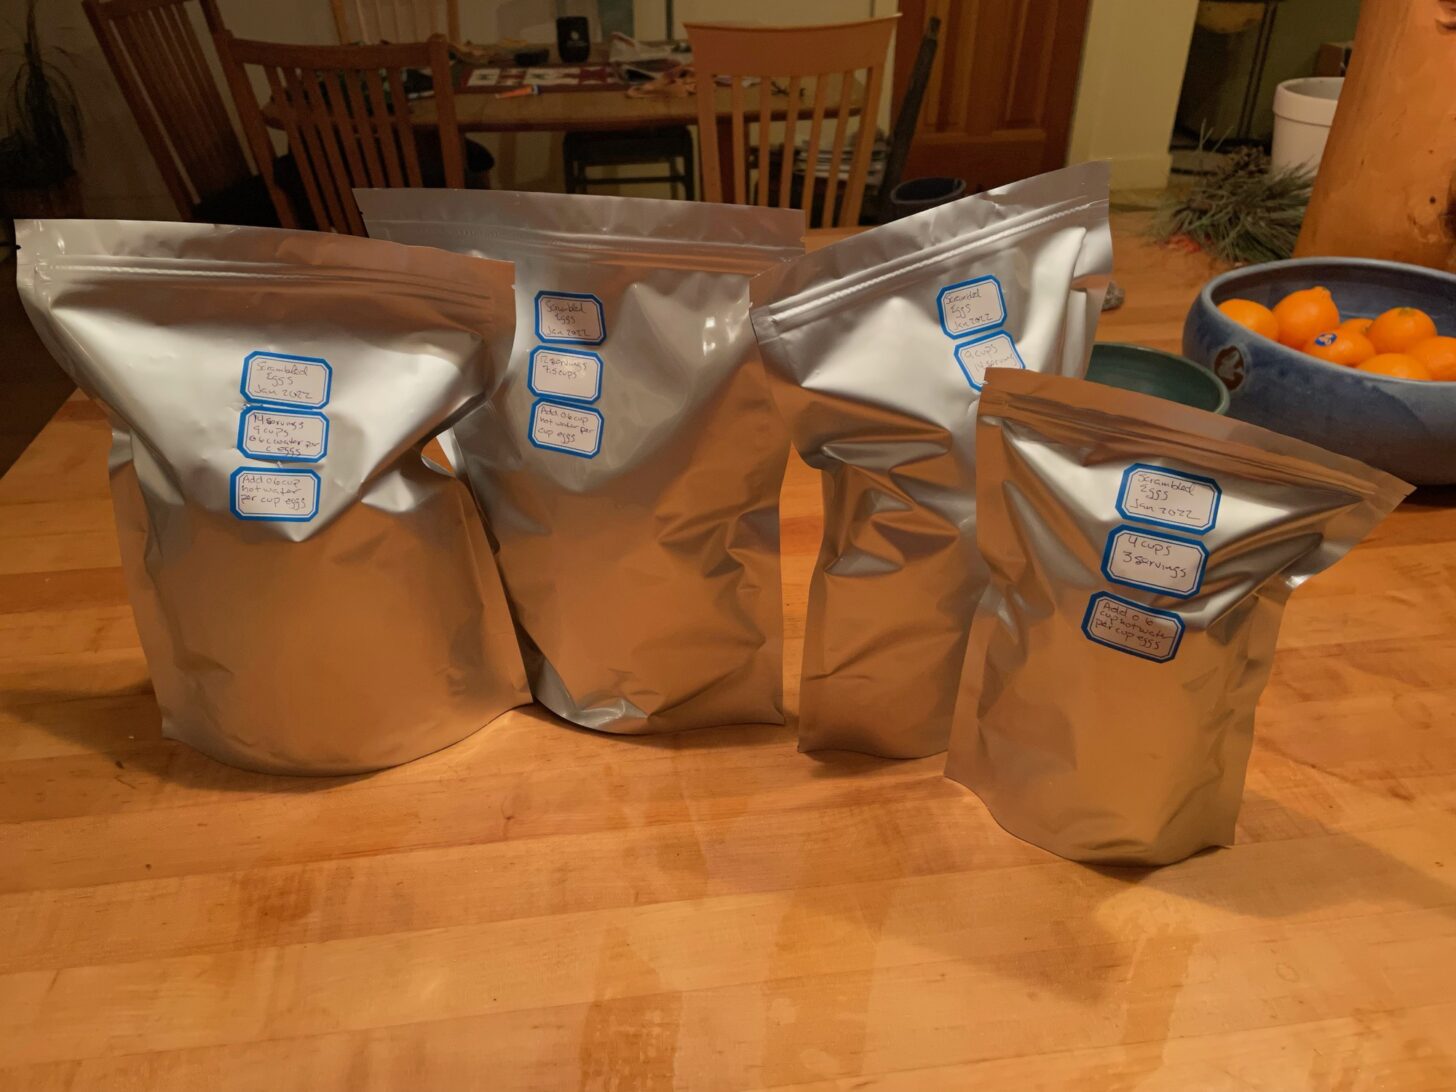
Mylar bags are made of polyester terephthalate (PET), which is approximately 60-fold less permeable to oxygen than a low-density polyethylene film of the same thickness. PET has the same moisture permeability as LDPE, so mylar food storage bags are typically coated with a metallic film. Metalized mylar is nearly 300-fold less permeable to oxygen than uncoated mylar, and moisture permeability is reduced more than 40-fold.
The permeabilities of plastics are inversely proportional to their thickness, and so a 7-mil bag will be less than half as permeable as a 3-mil bag. But given the effectiveness of metallization, the additional reduction in permeability due to plastic thickness is probably superfluous except for very long-term storage. Metalized 3-mil bags should work well enough.
Glass canning jars (Mason jars) are completely impermeable to oxygen and moisture when properly sealed. I have used these jars extensively for storing heat-dehydrated foods. Paired with a vacuum attachment, they keep dried food fresh for months to years.
However, they do not work so well for storing freeze-dried food. The problem is not performance, it’s bulkiness. Unlike dehydrated foods, freeze-dried foods don’t collapse and therefore stay at their original volume. Where I could fit slices from a dozen dehydrated peaches in a single quart jar, I needed three to four jars to store the same amount of freeze-dried peaches. Already faced with wifely complaints about the amount of pantry space taken up by backpacking food, I’ve been using resealable mylar bags for freeze-dried food. I can stuff these discretely in closets and corners and never have to hear a word about the pantry.
Mylar bags keep oxygen out, but you also need to get rid of the oxygen already inside the bag. Heat-sealable mylar vacuum bags are available. Their drawback is that you cannot reseal them more than once or twice. Rather than evacuate oxygen, I instead deplete it with oxygen-absorbing packets. These are basically packets of iron filings that absorb oxygen by rusting. A 100cc packet is generally adequate for a quart storage bag. These packets enable long-term storage in zip-seal mylar bags. And because zip-seal bags can be reused many times, they reduce your contribution to the plastic waste stream.
An online search for mylar bags and oxygen absorbers will yield dozens of hits, all with very similar-sounding products. I haven’t done any comparison testing of different bags or absorbers, so my advice is generic: don’t buy the cheapest product; that rarely works out well.
In summary, here is what has been working for me:
- Put food in a zip-seal mylar bag.
- Add one to two oxygen-absorber packets.
- Squeeze out the excess air.
- Zip seal.
- Store in a cool place until it is time to hit the trail.
Recipe: freeze-dried chiles rellenos
Along with tomatoes, peppers are a food that is far better home-grown than store-bought. There is perhaps no finer aroma in the world than the smell of fresh-roasted chile peppers. When harvest time comes around, we enjoy roasted peppers in various meals a couple of times a week, and their flavor never wears out its welcome.
Stuffed roasted peppers (chiles rellenos) are a true measure of any Mexican restaurant and one of my favorite dishes of all time. Enjoying them on the trail would be the fulfillment of a dream
Rellenos are structurally complicated, and so are a demanding test of a freeze-dryer. It’s not that they would taste terrible if they came out in a hash, but they would not be as fun. And we are all about the fun here at Backpacking Light.
To roast the peppers:
- Put them on a grill at medium heat (350 °F).
- Heat them until they begin to blister (about 5 minutes) and then turn frequently. You don’t want them blackened, just browned.
- Put the peppers in a bowl, cover with a dish towel and let them cool off, about 20 minutes.
- Peel off the blistered skins.
- You then want to remove the seeds. The easiest way is to cut off the top, remove the placenta, and then ream out the remaining seeds with a knife.
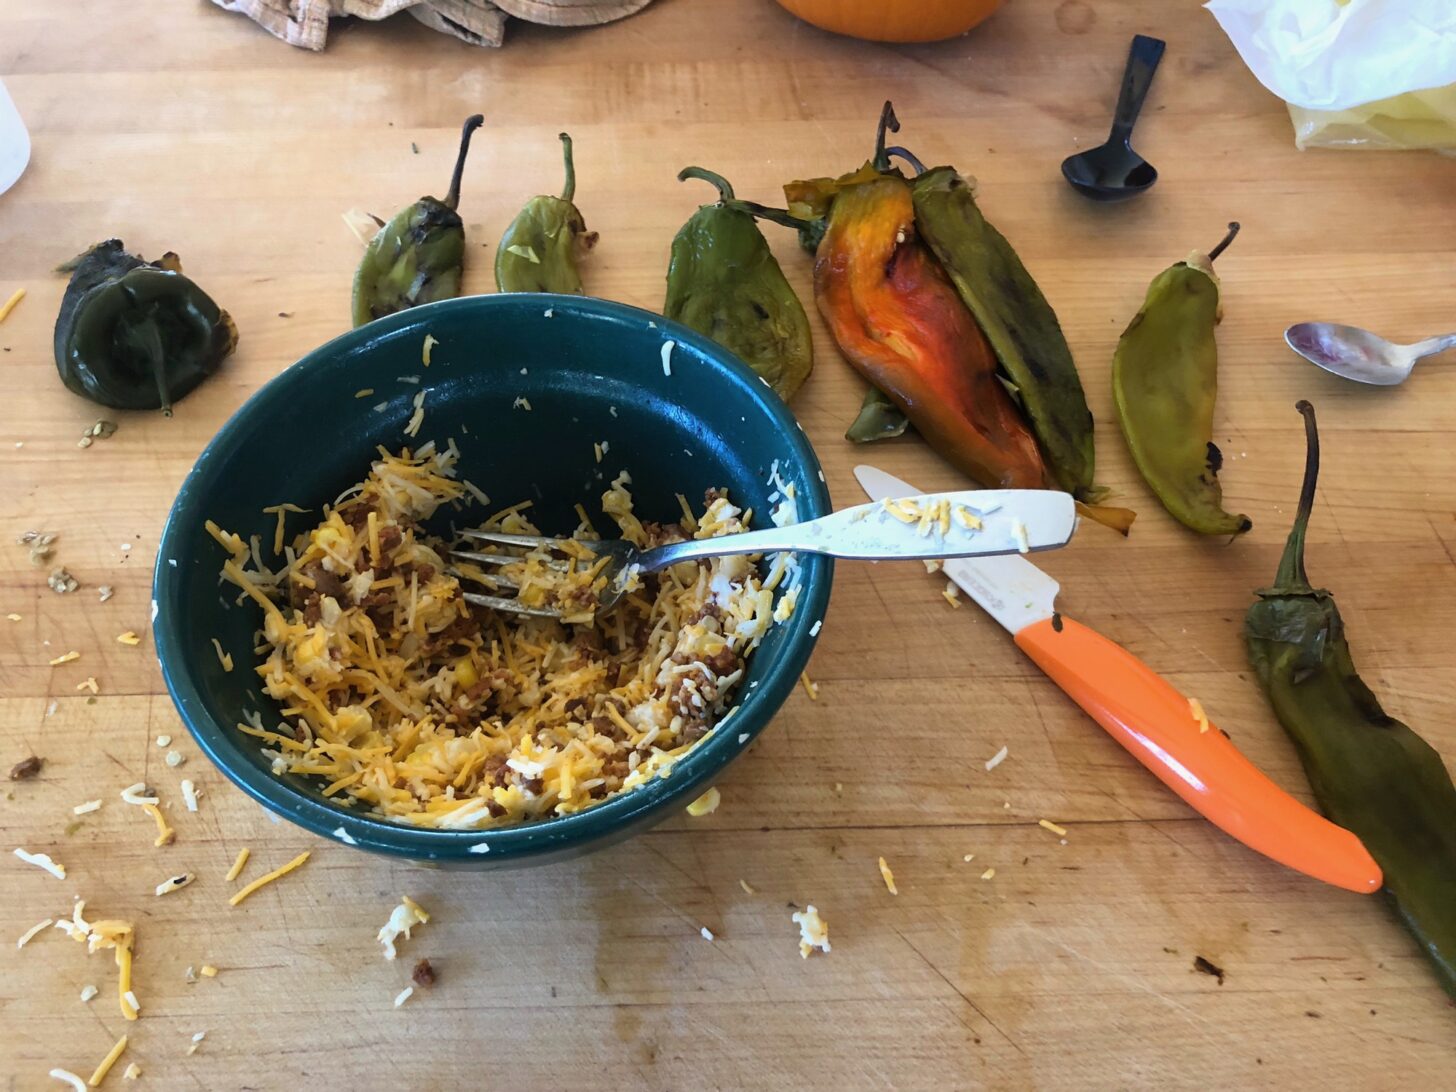
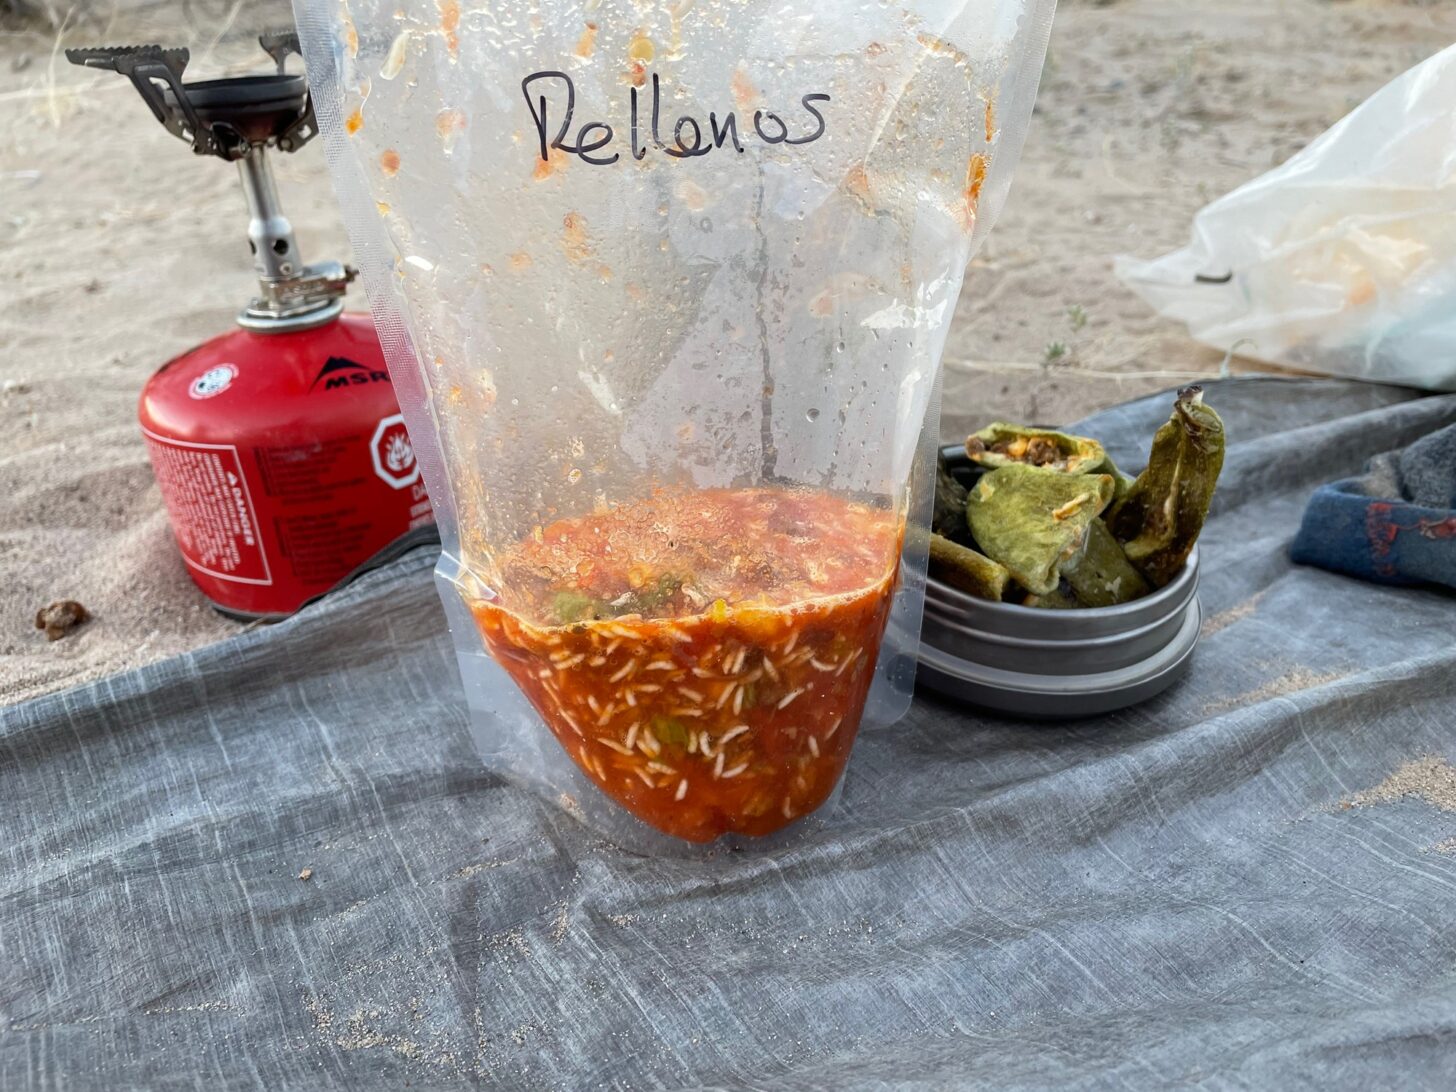
Classic chiles rellenos are then stuffed, dipped in batter, and fried in oil or poached in sauce. I didn’t think this would turn out well for freeze-drying, and also, it’s a lot of work. Instead, I just stuffed them – you still get all the roasted pepper flavor this way.
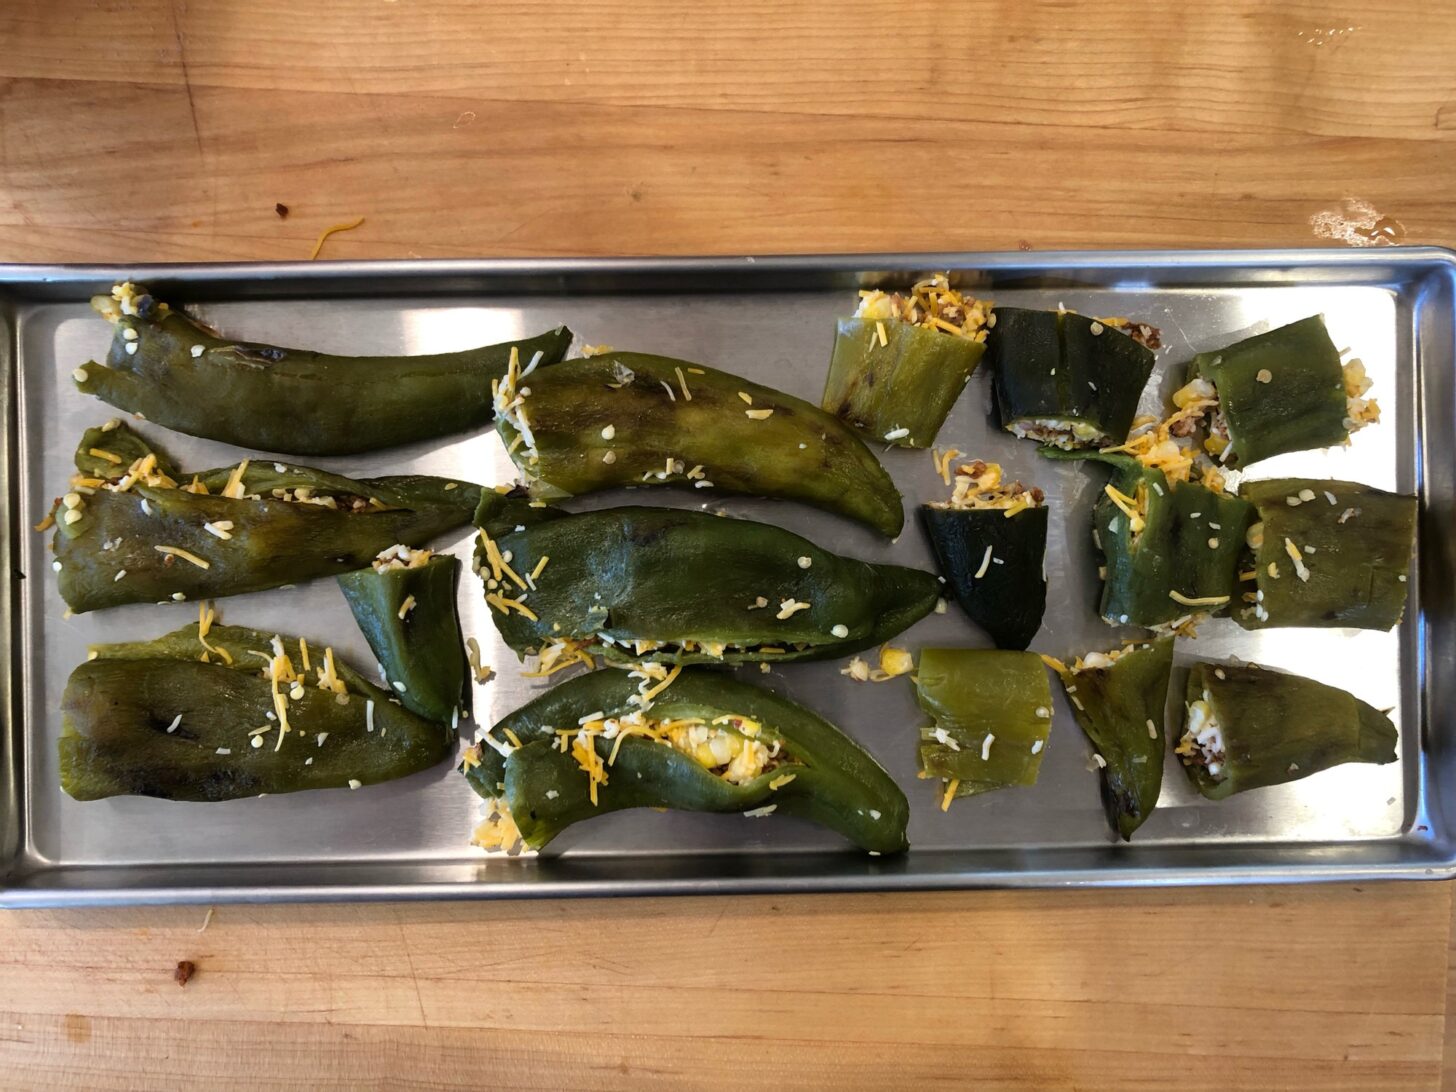
The principal ingredient of the stuffing is cheese. You can add whatever other embellishments suit your taste. For this batch, I mixed cheese with fresh-roasted corn and a bit of mayonnaise as a binder. I tried both stuffing from the open top, and also slitting the sides. I carefully cut the top-stuffed peppers into sections, thinking that the smaller chunks would better survive a few days in a backpack. Both methods seemed to freeze-dry up just fine.
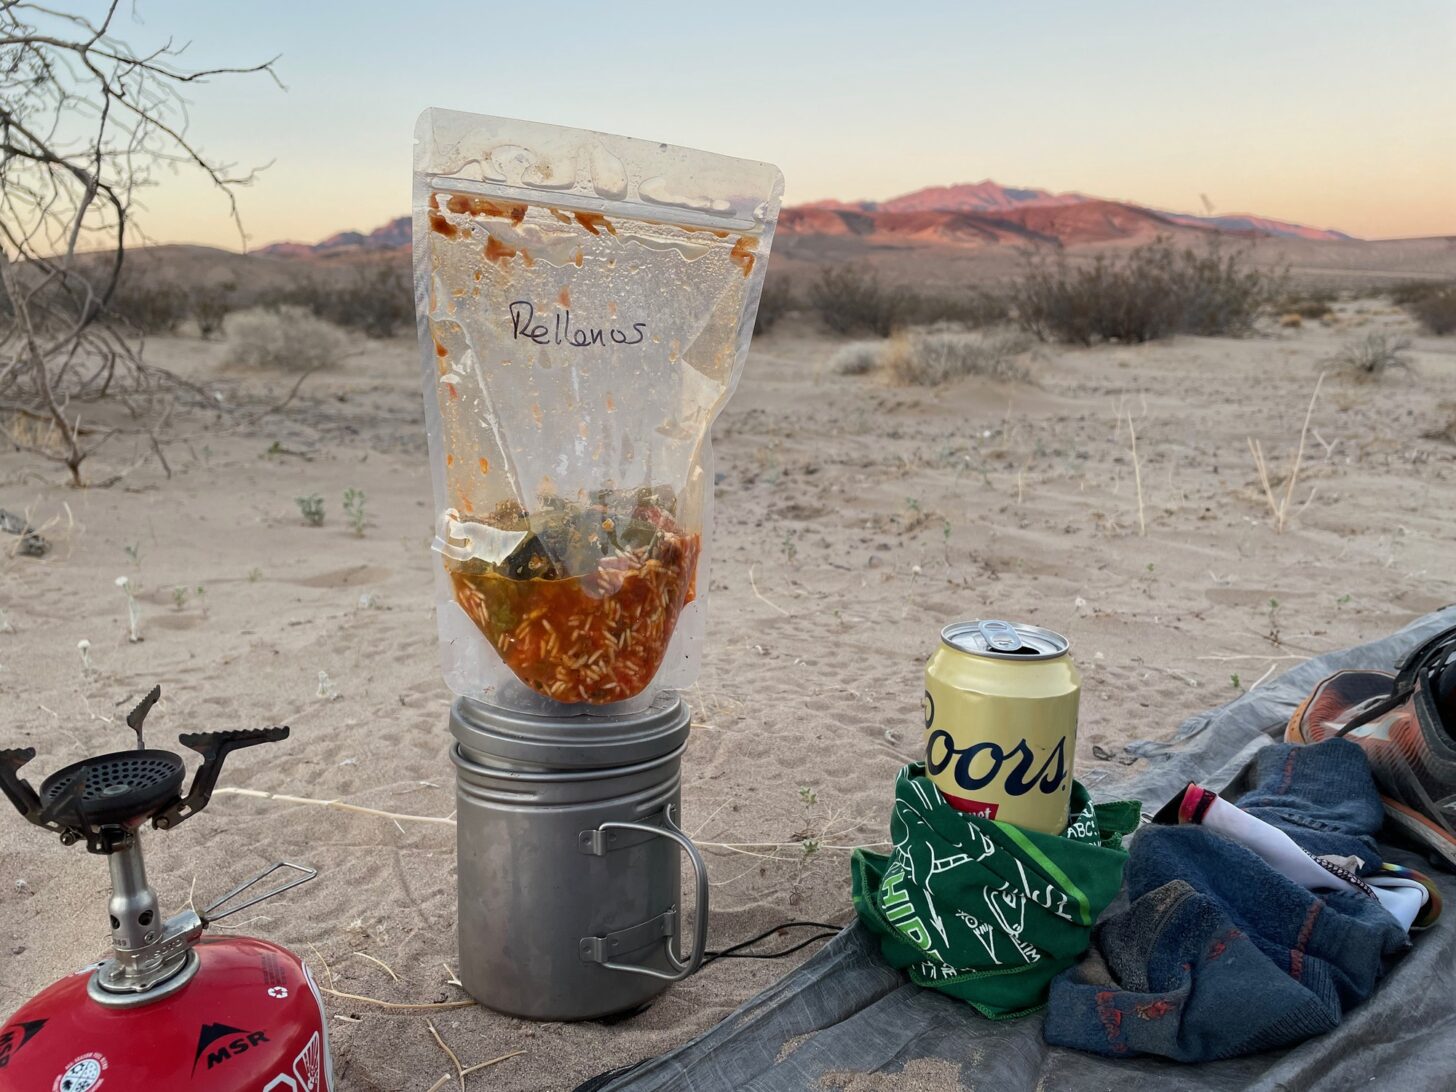
For trail testing, I packed the peppers along with some freeze-dried rice and homemade freeze-dried tomato sauce with a bit of Mexican oregano sprinkled in. They were still intact after a couple of days on the trail.
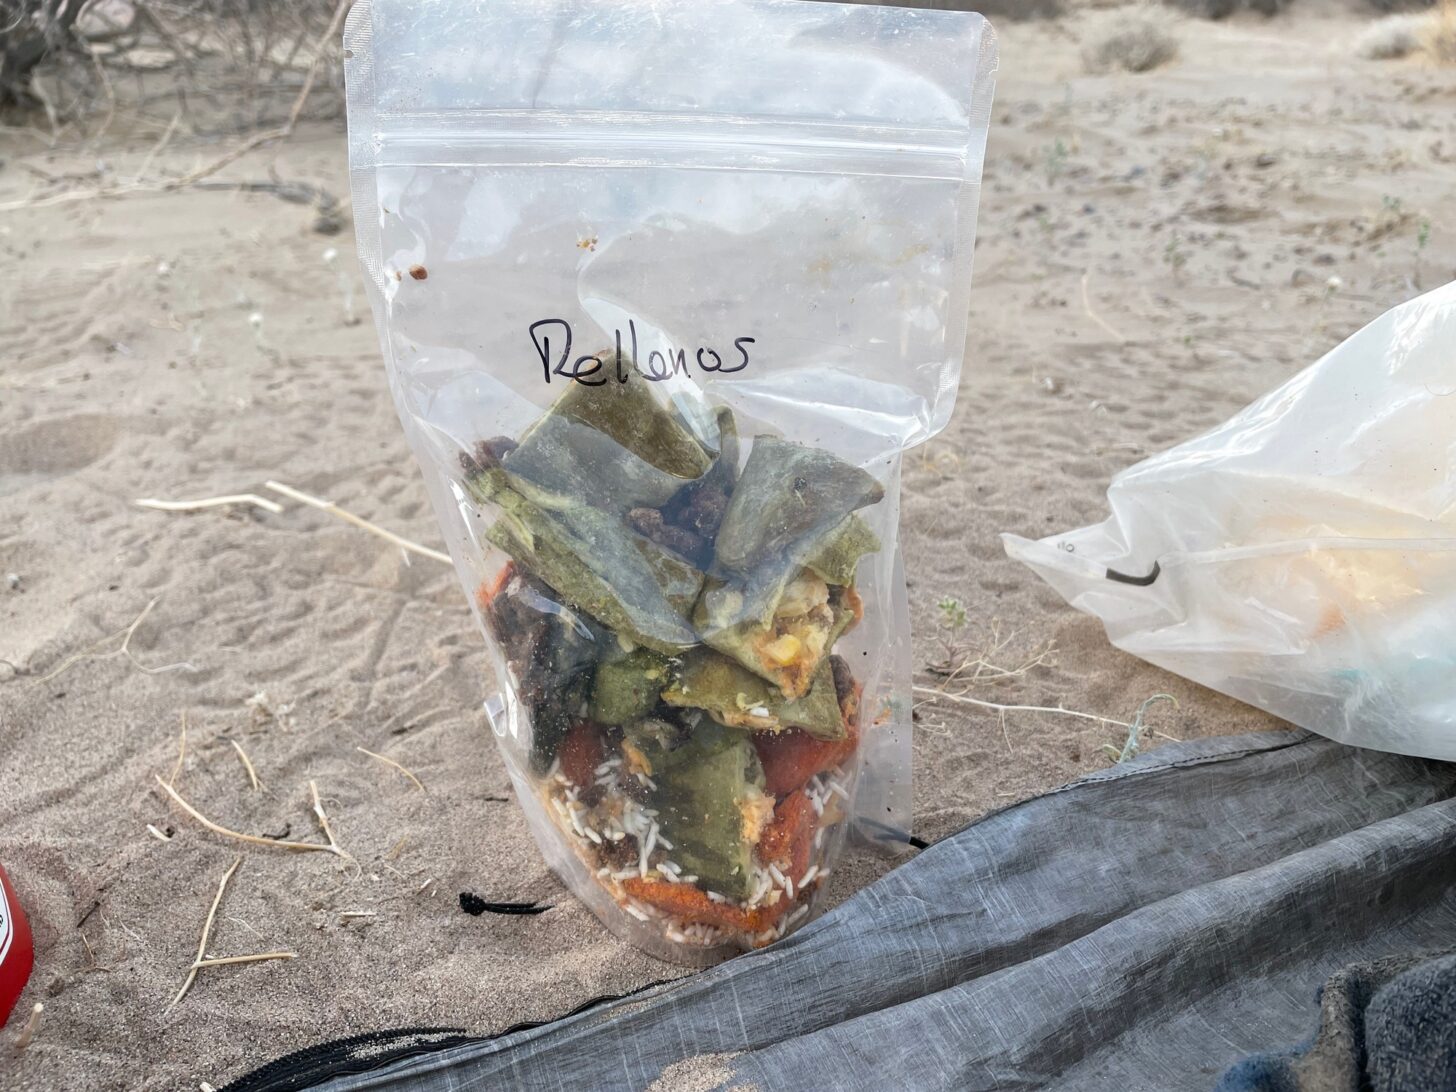
Not wanting the peppers to get mangled and mushy, I removed them before adding hot water to the rice and tomato sauce. I let these rehydrate for a few minutes, added the peppers, mixed gently, and let sit for another five minutes.
The results? I’d be lying if I said it was as good as fresh picked and roasted peppers. But it was pretty darn good. Especially when washed down by a beer I had stashed in my water cache. A lonesome trail, hot chiles rellenos, and a cold (well ok, slightly cool) beer – hiking doesn’t get much better than that.
Learn More
Browse our curated recommendations in the Backpacking Light Gear Shop – a product research & discovery tool where you can find Member gear reviews, Gear Swap (used gear) listings, and more info about specific products recommended by our staff and members.
Gear Shop » Food Preparation and Packaging
Related Content
- Read more by Drew Smith.
- Don’t miss our podcast interview with Drew.
- For more actionable food storage tips, check out our Backpacking Food Trailhead.
DISCLOSURE (Updated April 9, 2024)
- Backpacking Light does not accept compensation or donated/discounted products in exchange for product mentions or placements in editorial coverage. Some (but not all) of the links in this review may be affiliate links. If you click on one of these links and visit one of our affiliate partners (usually a retailer site), and subsequently place an order with that retailer, we receive a commission on your entire order, which varies between 3% and 15% of the purchase price. Affiliate commissions represent less than 15% of Backpacking Light's gross revenue. More than 70% of our revenue comes from Membership Fees. So if you'd really like to support our work, don't buy gear you don't need - support our consumer advocacy work and become a Member instead. Learn more about affiliate commissions, influencer marketing, and our consumer advocacy work by reading our article Stop wasting money on gear.

Discussion
Become a member to post in the forums.
Companion forum thread to: How to Store Freeze-dried Food
Best practices for storing your freeze-dried food (plus one killer chiles rellenos recipe).
can you store freeze dried (or heat dried) food in the freezer?
Great series of articles on freeze drying. What is your “formula” as to how much water to add to a given quantity of freeze dried food? Thanks.
Thanks for this much-needed article.
Just yesterday I took a bunch of freeze-dried and “freezer bag” food out of my garage refrigerator in preparation for an antelope hunt. The freezer bag food was stored in ZipLoc plastic bags and it’s so old (years) that I’ll have to toss it and go to the store for some new stuff. Oxygen has gotten through the ZipLoc plastic bags and made it unuseable.
All the freeze dried food is packaged in aluminum lined pouches so it is still good.
Lesson learned. If you aren’t eating all your freezer bag food in a season of backpacking then eat it at home to avoid wasting it.
@Jerry – I don’t see why you couldn’t store FD food frozen. The main risk of freezing anything is that ice crystals will form and cause structural breakdown resulting in a slimy mess when reconstituted. With so little water in FD food, the risk of this is small. Plus, it is frozen during the final cycle of freeze-drying. So re-freezing seems pretty safe.
@Andrew – I weigh food before and after, and calculate what percentage of mass was loss. I then calculate how many mL of water to add per 100g (a typical meal size) of food. That’s at home when I have nothing better to do.
But when I am in the field I generally just eyeball it. Most foods take up water pretty quickly, so I slowly add hot water until there is just a little bit of excess free water remaining. I’ll check on it after a few minutes and add more water if needed.
More generally, most foods lose 65-85% of their mass in the form of water. Meats and pasta are at the low end of the scale, fruits are at the high end. So adding 300 mL of water to 100g of food usually comes out about right.
I’ve taken the unused portion of a big can of Mountain House FD chicken and put it into double freezer bags with the moisture absorber that came in the can. I put this in my freezer. It seems ok a year later. YMMV.
Have you anything to say about clear plastic freezer bags, heat sealing, that work with a vacuum machine like the FoodSaver. There are many versions of these machines marketed to hunters and people preserving abundance of garden goodies.
I use these bags to store (in the freezer) all the venison not eaten immediately. Although not intentionally, I’ve “discovered” packages dating back years (I put dates on all packages). The oldest yet was 10 years in the freezer. When cooked I could not tell any difference between that and venison just months old.
Although not metalized, you can pour boiling water into them without distorting the plastic. Since I probably would not store freeze dried food in the freezer, the absorbent packages make sense.
Jeez Drew, if you’re going to go to the trouble of carrying a beer all day long to your campsite, you should at least choose a good local craft brew! 😁
Hi @Drew. I just bought a used Harvest Right. Before I dive into freeze drying, I’m trying to sort out the best storage system for backpacking food.
I like the idea of resealable mylar bags. But the ones I’ve been able to find for single-meal size seem a bit hefty (the thinnest ones I’ve seen are 7 mil).
Are you using the resealable mylar bags for individual meals? Or are you using them for bulk long-term storage, then repackaging single servings in some other package just before you hit the trail?
I’m wondering if the lightest approach is to use mylar resealable for bulk, then fill single-serve ziploc bags with individual meals just before a 2-3 week trip and toss an oxygen absorber into each meal bag.
Do you think the standard ziploc bags will seal things “well enough” to keep freeze dried food in good shape for a couple weeks? Or do you recommend a different system for on the trail?
Thanks.
@Warren – Your proposed approach is the one I use. I’ve had good results storing FD meals in freezer bags, vacuum-seal bags and cook-in bags for up to a month. For storage times greater than 2 weeks I usually toss in an oxygen-absorbing packet. The Mylar bags are heavy and clunky as you note. They are best used for long term storage.
I’ve been storing opened, and repackaged, freeze dried food in my freezer for years. For example I have some freeze dried shredded cheese, and some FD shredded pork. I add some to each of the meals I take backpacking to add calories. There isn’t much flavor in freeze dried ingredients anyway, so I’ve never noticed a flavor loss. I add lots of spices and sauce mixtures to everything anyway.
This is an older post, but I came across it. So guys…you do NOT need to freeze FD food. Really. Look, I keep cans, bags and jars in my pantry – that have been opened. Like any dried food, it’s good to shake it periodically, so the food doesn’t ball up due to moisture that gets in. Your nose, if it works, will tell you if it has gotten funky. Of course, if you live in Florida, the humidity can cause issues. As always, YMMV.
But for long term storage, mason jars and mylar bags, with oxygen absorbers added, and proper sealing, works perfectly. We have an Avid Armor sealer, which will seal all of it, pulling all air out.
But back to the top, those items, when opened up, I mark the date. Even 9 months out nearly everything smells and tastes fine, with no humidity issues.
This applies to commercial FD and FD I do at home.
So, I say you are not eating the right FD foods. We FD a lot at home. You get what you put into it. Commercial FD ingredients? You have no idea what ripeness is used for it or its quality.
But when you FD items that are perfect ripeness, they taste amazing.
Become a member to post in the forums.