
Introduction
Preserving food is another attempt by humans to stop time. Or at least slow it down a bit.
Time is defined by decay. Water and oxygen cause food to decay. Liquid water provides a medium for microbes to degrade complex food molecules. The bacteria break food down into the building blocks needed to grow more microbes, pursuing the dream of every cell (i.e., to become two cells). Oxygen steals electrons to become carbon dioxide and water. Together or separately, water and oxygen turn delicious food into useless mush and ash. Worthless to us anyway.
Heat-assisted dehydration removes water, resulting in a product (especially if kept away from oxygen) that lasts for months or even years. But heating food in the presence of oxygen for 6 to 18 hours inevitably results in some loss of taste and nutrition. Furthermore, as liquid water is removed from plant and animal tissues, those tissues collapse. The result is a product that can be leathery and hard to rehydrate. Several hacks, such as adding polenta to scrambled eggs, or breadcrumbs to ground beef, have been developed to aid rehydration. However, they add time and complexity to the food preparation process and are only partly successful.
That’s where freeze-drying comes in. Freeze-drying preserves taste, nutrition, and texture – welcome attributes for backpacking food. This article explores the physics of freeze-drying and closes with a hash brown recipe.
A Harvest Right Freeze-Dryer was used in all recipes and experiments in this article series.
The Physics of Freeze-Drying
Freeze-drying preserves nutrients and taste by removing oxygen from food as it dehydrates. Moreover, it solves the collapse problem by cooling foods below their collapse temperature (which is just what it sounds like, the temperature above which foods collapse) as they dehydrate. However, cold temperature is not enough. Foods kept in the freezer will dehydrate (this is where the frost on the inside of containers comes from), but it takes weeks and months, and even then, it doesn’t remove much of the water.
The critical component of the freeze-drying process is low pressure. Or, if you prefer, high vacuum. Water will evaporate directly from its solid form (ice) at sufficiently low pressure without melting into its liquid form. The diagram below illustrates the thermodynamics of this process and compares the paths that water takes during a freeze-dry run to the path taken during heat-assisted dehydration.
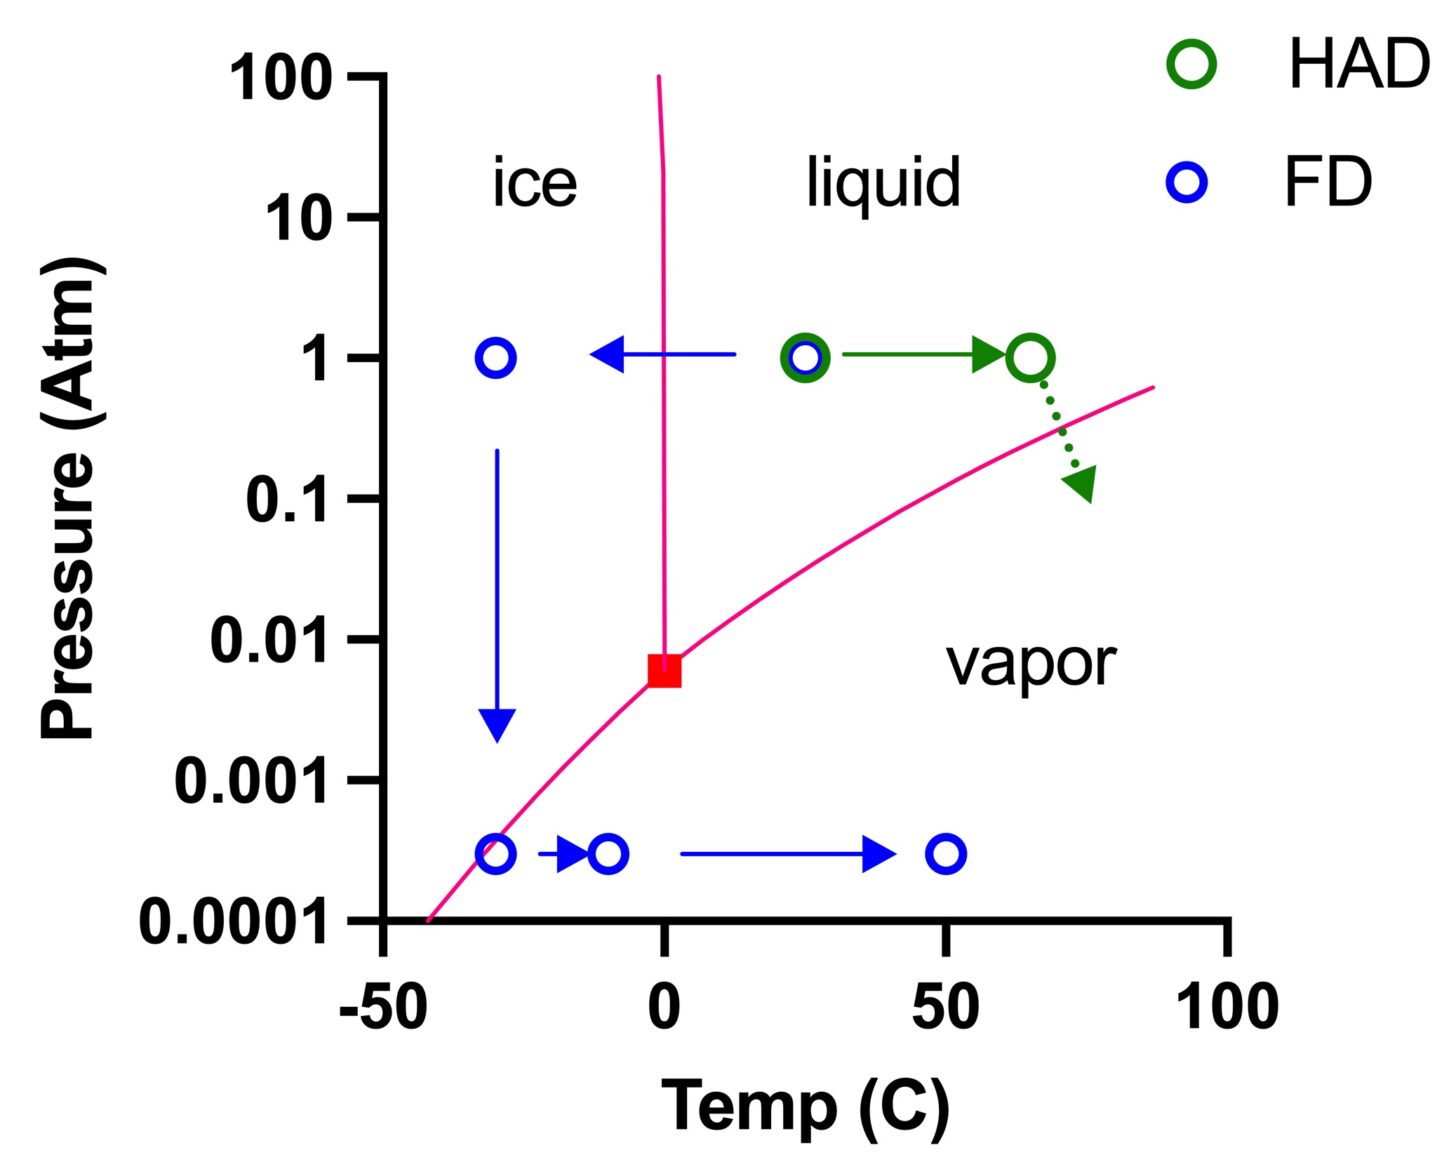
The red lines are the phase boundaries that describe the status of water under different combinations of temperature and pressure. Reducing pressure lowers the boiling point of water. Even water near freezing (0 °C) will boil if pressure is less than 0.01x normal atmospheric pressure. In heat-assisted dehydration (HAD, right-ward path, green), water in food at 1 atmosphere (atm) of pressure is heated from room temperature (20 to 25 °C / 68 to 77 °F) to 50 to 65 °C (120 to 160 °F), moving it closer to the liquid-vapor phase boundary. Because water molecules are in a distribution of energetic states, a certain fraction per unit of time will evaporate from the liquid and enter the surrounding gaseous environment. As water is removed, the food collapses. Most foods are above their collapse temperature during the process of HAD.
A typical freeze-drying (FD) process follows the leftward path (blue). First, food is frozen to a temperature well below its collapse temperature (leftward arrow), and then a vacuum is applied (downward arrow). When pressure drops, water in food approaches the phase transition boundary between ice and vapor, beginning the dehydration process. Water in the form of ice evaporates directly, without first melting into water. This process is called sublimation.1
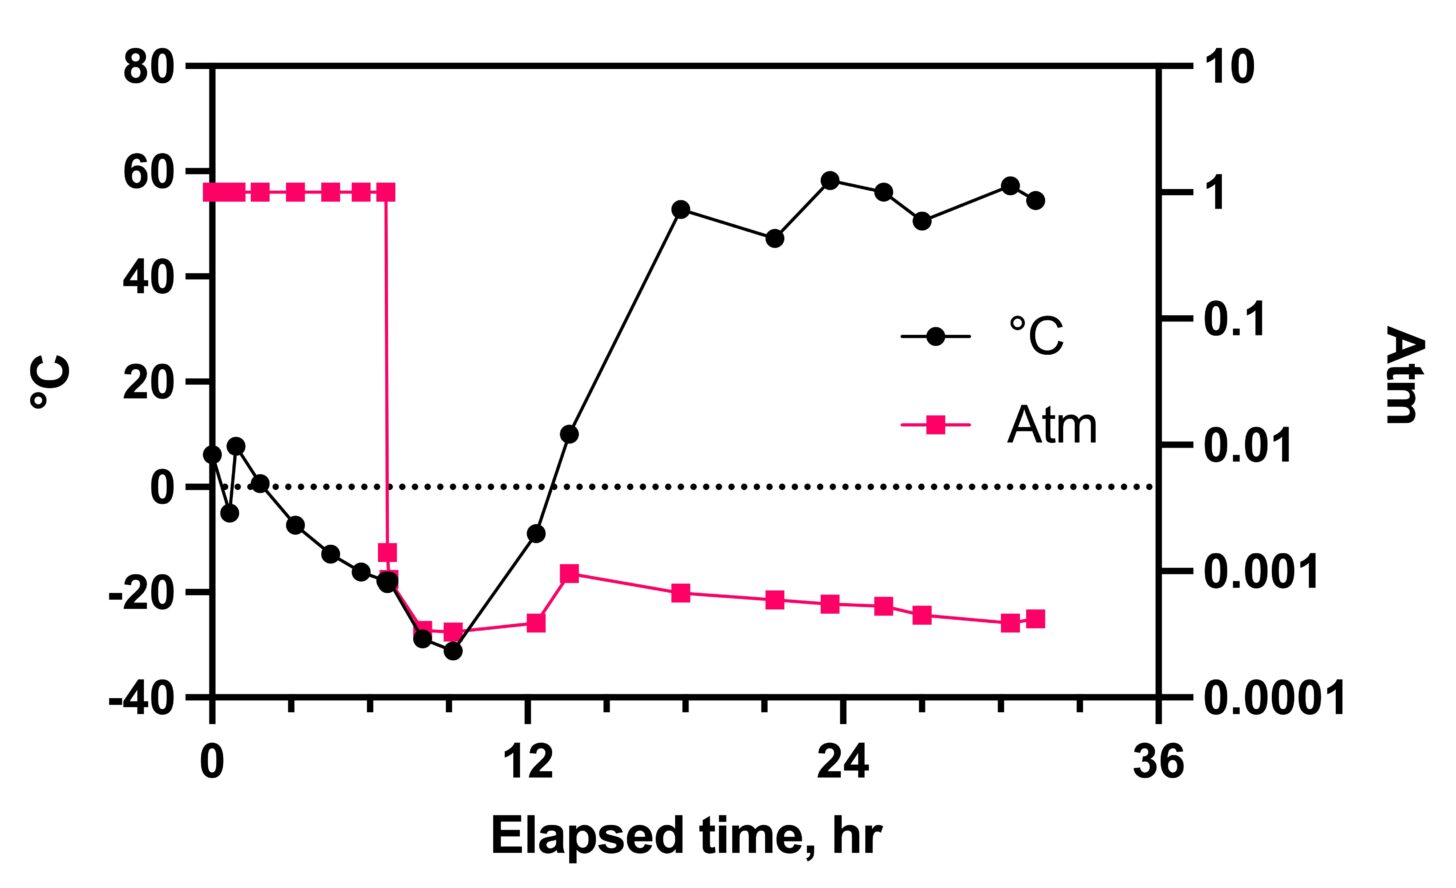
Although water is removed from the food by sublimation at low pressure, the process is painfully slow. First, food is slowly warmed to speed evaporation, although kept below freezing (bottom-left rightward arrow). This portion of the process continues until nearly all the bulk water (water molecules bound to other water molecules) evaporates. At this point, food is unlikely to collapse when warmed. Then, an additional warming cycle at low pressure but much higher temperature (bottom-middle rightward arrow) evaporates water molecules bound to food molecules. Sugars and carbohydrates bind water especially tightly (this is why cakes form in sugar that is stored in the pantry in humid weather). The time course of temperature and pressure in the freeze-drying process is charted out below.
Freeze-drying removes 90 to 95% of total water in food compared to 60 to 80% in heat-assisted dehydration. It does so in a near-vacuum, thus minimizing oxidative damage and thereby preserving taste and nutrition. In addition, freeze-drying dehydrates food below its collapse temperature, making it bulkier. However, it’s also less leathery and easier to rehydrate. This is usually a good trade-off in exchange for the added bulk.
As always, there are a few subtleties and complications with freeze-drying. Rapid freezing results in larger ice crystals. Large ice crystals expand the structure of the food, causing ice to sublimate rapidly, reducing the time and energy needed for dehydration2. However, large ice crystals destroy cellular and sub-cellular structures. This destruction causes a loss of some food texture and releases degradative enzymes that impair food quality. So slow freeze-down cycles are generally preferred. The Harvest Right Freeze-Dryer usually takes 6 to 8 hours to cool down to its target temperature before applying a vacuum.
Not all foods work well with a generalized freeze-dry cycle. For example, blueberries, with their waxy outer coating, are notorious for drying slowly and unevenly. During the commercial preparation of freeze-dried blueberries, CO2 lasers are even used to create micro-perforations in the berry skin before freeze-drying.
High-sugar foods, such as syrup, are even more problematic. Because sugars bind water so tightly, they form amorphous solids during dehydration. Amorphous solids are also known by the term “glasses.” As you can imagine, glasses, though technically a liquid, do not rehydrate readily. This issue will be explored in more depth in a subsequent article in this series.
That’s enough thermodynamics for today. Let’s talk about trail food!
Killer Homemade Hash Browns
I enjoy a good plate of hash browns and always order it for town-stop breakfasts. I would love to eat them on the trail, but my experiments with dehydrated hash browns haven’t turned out so well; they are hard to rehydrate and get mushy when they do. So, giving hash browns a try with the freeze-dryer was high on my priority list.
You can make hash browns with russet potatoes, but I prefer red potatoes. They are more fun, and they grow a bit better here on the Front Range than the big blocky commercial varieties coming from Idaho. However, I could not swear to you that homegrown red potatoes taste any better than store-bought white ones.
Flavor-wise, potatoes are pretty much a blank canvas. Add onions (vitamins B, C, and minerals), carrots (vitamins A, B, C, K, fiber, and minerals), and jalapeño peppers (vitamins B, C, and E) to improve taste and nutrition.
Preparation
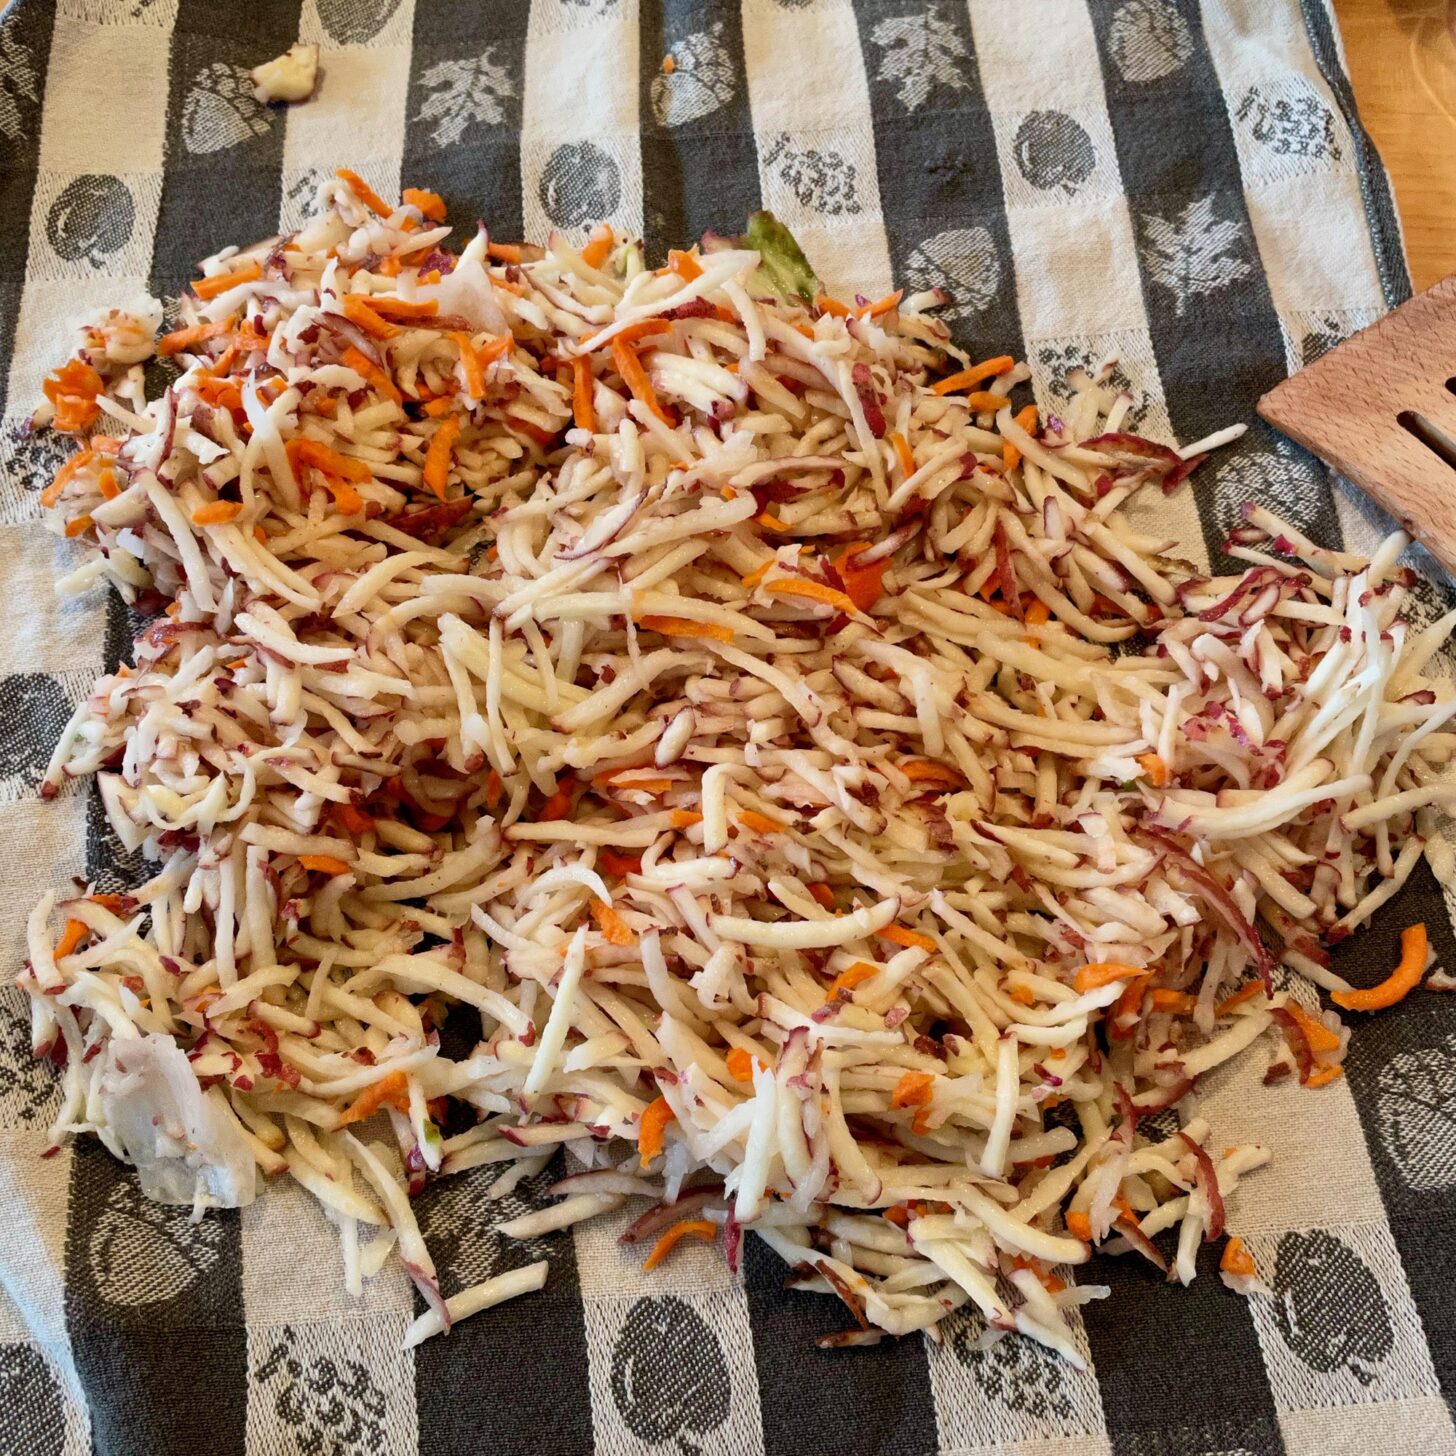
- Grate the potatoes, onions, and carrots in a food processor all together.
- Slice and de-seed the jalapeños.
- Roll up the grated root vegetables in a kitchen towel to absorb excess water. They will cook quicker and crispier that way.
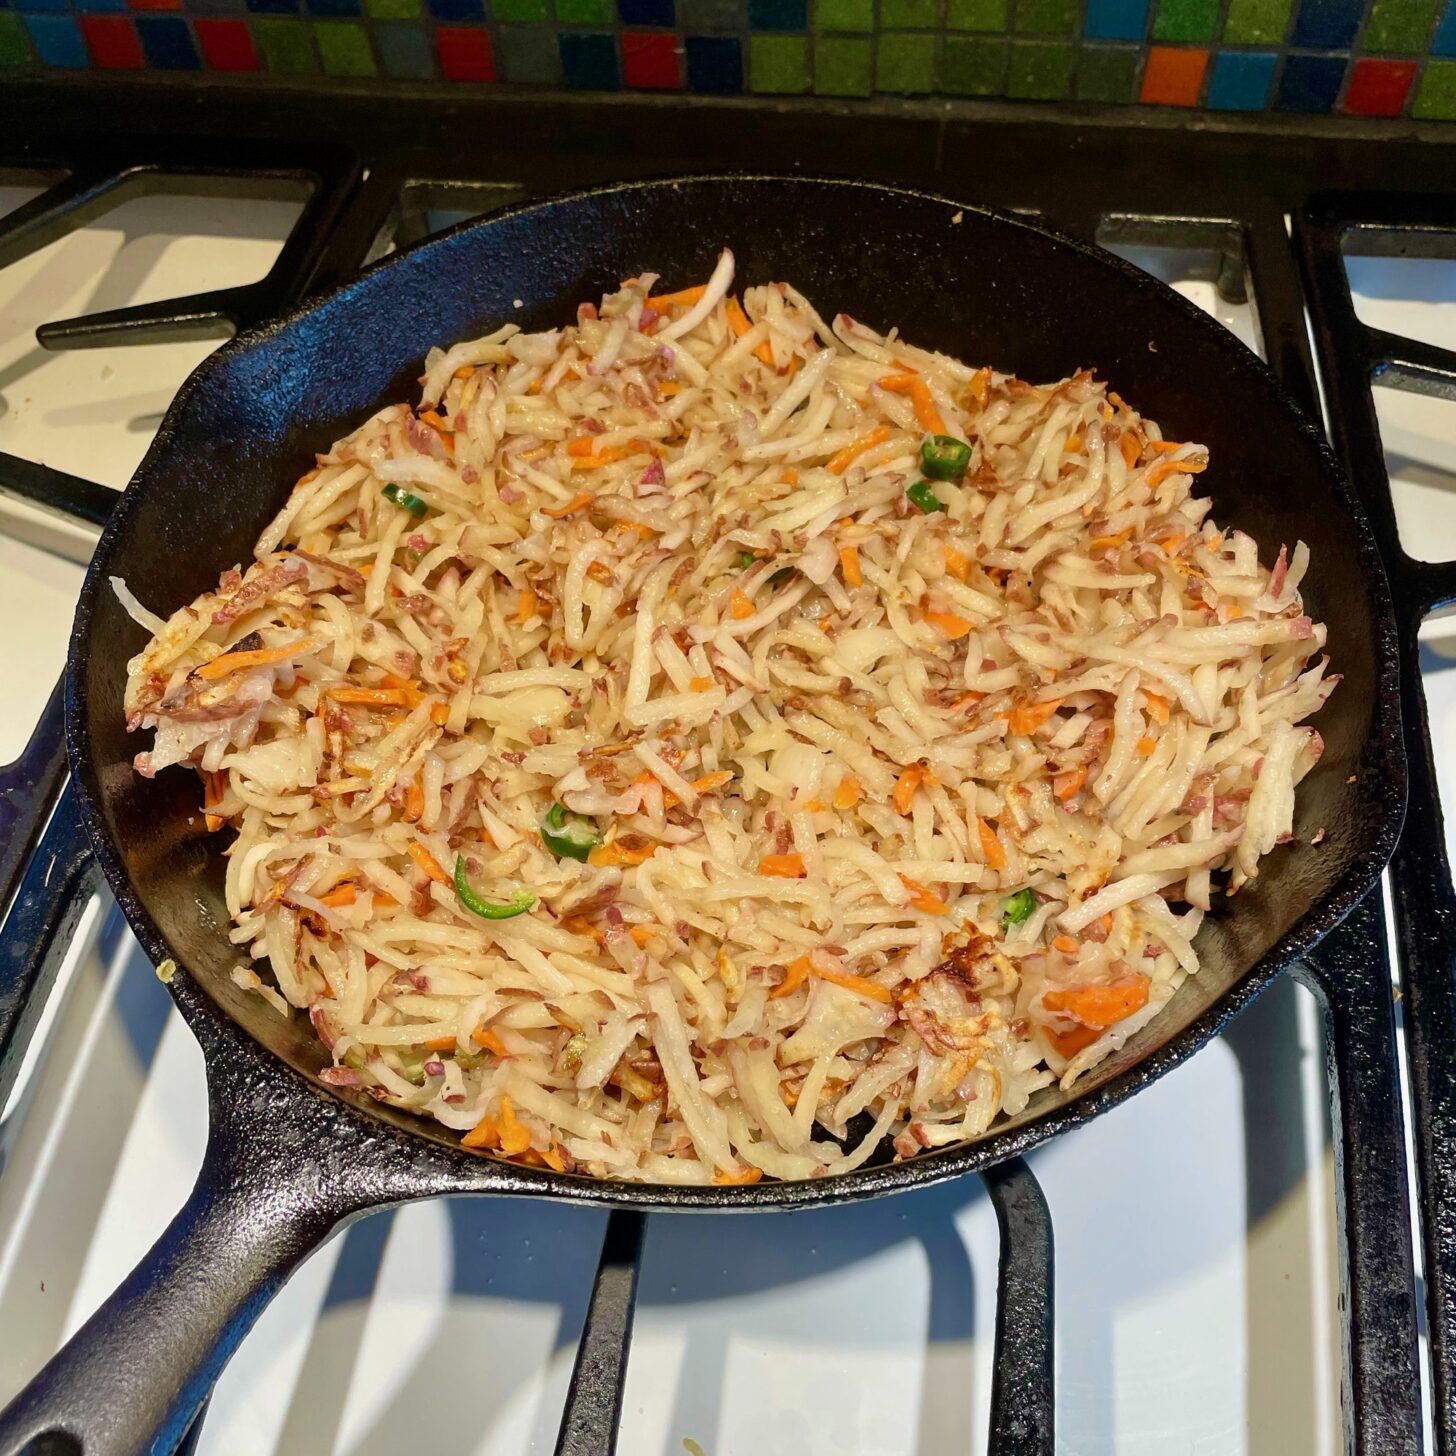
- Melt some butter (more than what seems reasonable) in a cast-iron skillet over medium-high heat, add the potato mix, and then add the pepper slices. Add salt and pepper and stir every five minutes to get even browning (frying them into a patty won’t work for rehydration).
- When finished cooking, allow the mixture to cool and freeze-dry it.
Adding Meat
If you like, add sausage. I did this with cut-up link sausages, but it wasn’t a good idea. The sausages rehydrated poorly. Next time I will crumble up bulk sausage.
Rehydration
Rehydrating hash browns was a bit challenging as I wanted them crispy. Also, I thought it would not be easy to cook them in a pot and have them turn out perfect. So, I used cook-in bags instead, adding just a bit of hot water and letting them soak. After five minutes, I had a very palatable meal.
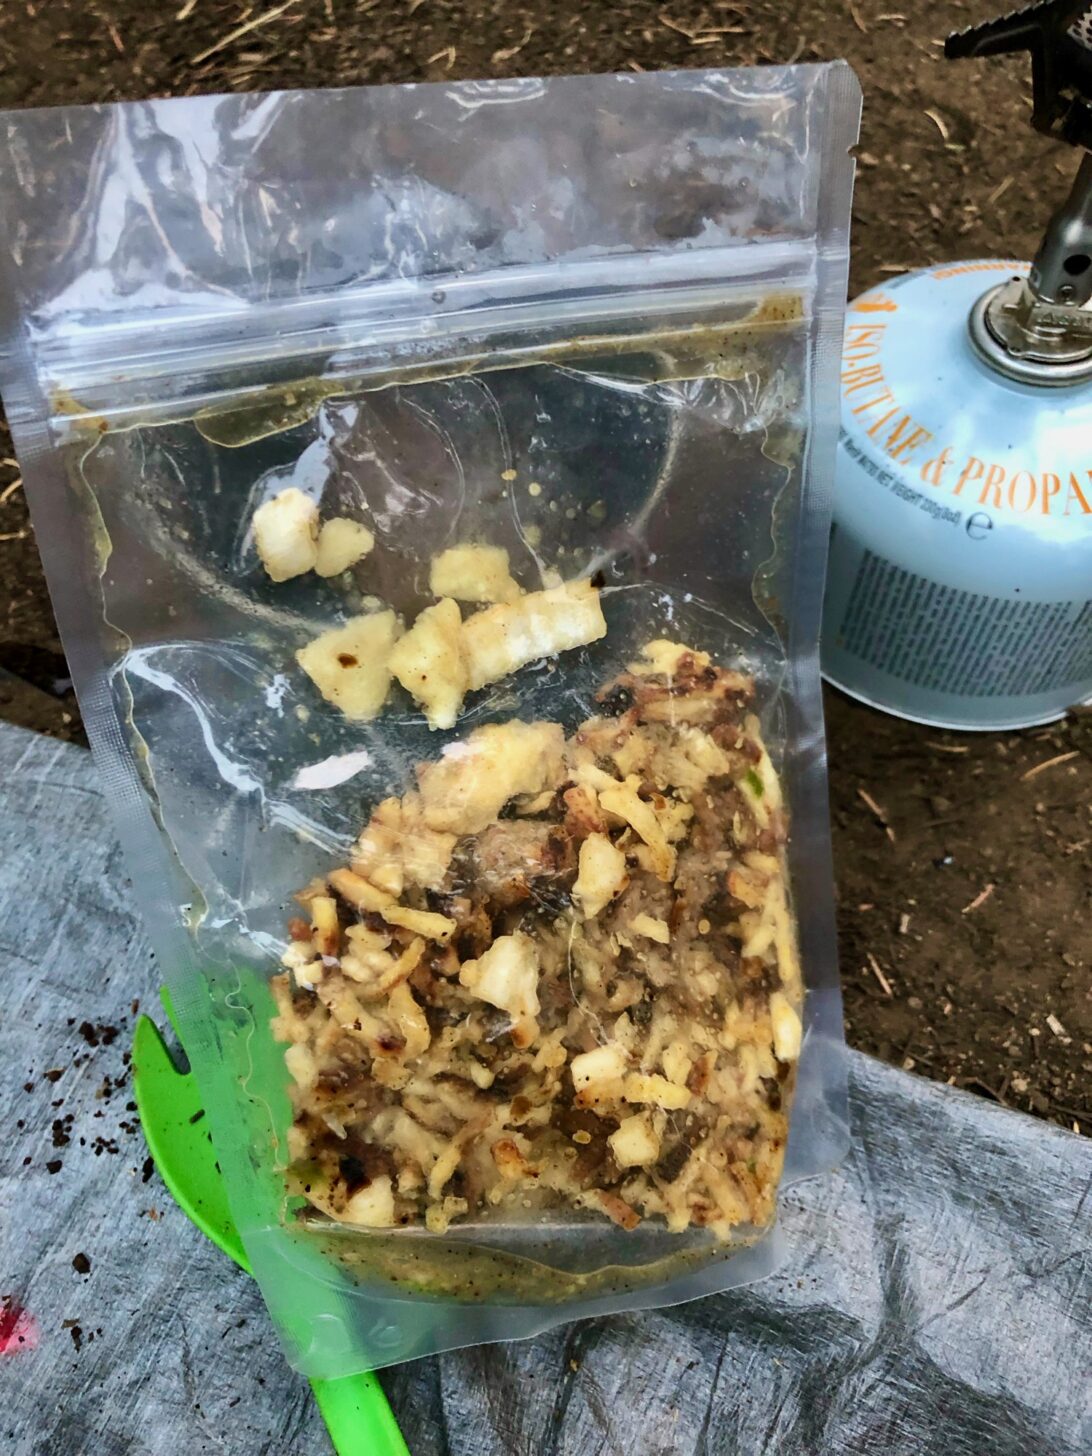
I can’t claim the hash browns were truly crispy, but they were not mushy either, and they were delicious. A great breakfast that takes no longer than oatmeal to prepare and tastes way better. I will be eating this a lot in the future.
Next Time
The next article in this series will discuss the chemistry of flavor and nutrition and share some ideas on preparing tomato sauce and pasta. See you then.
Learn More About Freeze-Drying Backpacking Food
This article is part of a multi-part series featuring the principles of freeze-drying, experiments with freeze-drying food for backpacking, and operation and reviews of the Harvest Right Freeze-Dryer, which is the gold standard for home-based freeze-drying equipment.
- Learn more about freeze-drying
Browse our curated recommendations in the Backpacking Light Gear Shop – a product research & discovery tool where you can find Member gear reviews, Gear Swap (used gear) listings, and more info about specific products recommended by our staff and members.
Gear Shop » Food Preparation and Packaging
References
1. Nowak, Dorota, and Ewa Jakubczyk. 2020. “The Freeze-Drying of Foods—The Characteristic of the Process Course and the Effect of Its Parameters on the Physical Properties of Food Materials” Foods 9, no. 10: 1488. https://doi.org/10.3390/foods9101488
2. Fellows, P., (2017). “Freeze drying and freeze concentration”. Food processing technology: principles and practice (4th ed.). Kent: Woodhead Publishing/Elsevier Science. pp. 929–940. ISBN 0081005237. OCLC 960758611
Related
- Search: more info about backcountry food
- Browse Topic: more about freeze-drying
- Member Q&A: watch a recording of the live event How to Plan Food for a Backpacking Trip
- Webinar: watch Backpacking Food and Nutrition
- Author: more from Drew Smith
- Gear Shop: learn more about the Harvest Right Freeze-Dryer
DISCLOSURE (Updated April 9, 2024)
- Backpacking Light does not accept compensation or donated/discounted products in exchange for product mentions or placements in editorial coverage. Some (but not all) of the links in this review may be affiliate links. If you click on one of these links and visit one of our affiliate partners (usually a retailer site), and subsequently place an order with that retailer, we receive a commission on your entire order, which varies between 3% and 15% of the purchase price. Affiliate commissions represent less than 15% of Backpacking Light's gross revenue. More than 70% of our revenue comes from Membership Fees. So if you'd really like to support our work, don't buy gear you don't need - support our consumer advocacy work and become a Member instead. Learn more about affiliate commissions, influencer marketing, and our consumer advocacy work by reading our article Stop wasting money on gear.

Discussion
Become a member to post in the forums.
Companion forum thread to: How Does Freeze-Drying work? (The Physics of Making Freeze-Dried Backpacking Food)
Why and how does freeze-drying work? The physics and science of freeze-drying your own backpacking food, plus a killer freeze-dried hash browns recipe.
Thanks, I am about to buy a freeze drier after following the articles on BPL. One thing I have not figured out is there a way (not trial and error) to know how much water to add to properly rehydrate your food? Can you weigh the food before and after freeze drying and get an accurate amount?
Weighing before and after will get you the information you need. Just remember to convert units of mass to units of volume (easily done if you use grams and milliliters) unless you plan to bring a scale with you on the trail.
Become a member to post in the forums.