Introduction
We all carry around a lot of preconceived notions about clothing performance. These preconceptions may result from personal experience, exposure to marketing campaigns, or a misunderstanding of clothing function. I think it pays, from time to time, to check whether our preconceived notions hold water.
I have not worn merino wool garments of any type for years. I have made that choice because merino fibers, like cotton, are hygroscopic—they absorb and hold onto moisture. So, I reasoned, I would remain dryer and warmer by wearing polyester base layers, which wick moisture but do not absorb water into the fibers.
In this paper, I subject base layers in various weights made from merino, merino blends, and alpaca to the suite of tests I have developed to evaluate base layer performance. I then compare the performance of these base layers with those of the polyester base layers I have recently reviewed. We also see if my preconceived notions about merino hold water. Finally, we will see how to choose the fiber for our base layers.
In summary, here is what I found:
- As I have demonstrated in prior articles, the rate at which moisture dries from a polyester fabric is a function of drying conditions: ambient temperature, humidity, and air movement. This finding is also the case for merino, alpaca, and blends. The drying rates of all these fibers show modest variation and, as a practical matter, can be considered equivalent. Fiber choice does not significantly influence the rate at which moisture evaporates from a base layer.
- The time a garment will take to dry depends on the quantity of moisture trapped in the fibers. The more water a garment can hold, the longer it will take to dry. A fast-drying garment is simply one that cannot trap a lot of moisture. A fabric built to be warm will trap a lot of air but also a lot of water so that it will dry slowly. Fiber choice does not significantly influence drying time in a base layer.
- The amount of air trapped in a fabric determines its warmth. The knit pattern and yarn characteristics determine the amount of air trapped in a fabric. It does not seem to make much difference whether those fibers are natural or synthetic. Polyester can provide an exception: as we saw with the Mountain Hardwear Airmesh’suse of Octa fibers, warmth is influenced by complex fiber extrusions that trap more air than a typical circular fiber. Fiber choice does not significantly affect the warmth of a base layer.
- Despite the claims made by some manufacturers, merino and alpaca do not wick (except through chemical treatment, which, in the limited examples observed, results in poor wicking performance). The exterior of these fibers is hydrophobic, meaning water will not bond to their surfaces. They do not support capillary action. When exposed to liquid water, the force of diffusion can drive water into merino and alpaca fabrics. Liquid water or water vapor may then enter the hydrophilic core of the fibers, where it will bond to interior proteins and remain trapped until enough energy is present to drive evaporation. Some manufacturers utilize the chemical treatment of merino to render a fabric either more hydrophobic or more hydrophilic. These treatments seem to have a limited impact on performance. Fiber choice does influence moisture management performance. If you desire a wicking fabric (and you may not), you may need to rely on treated polyester or hydrophilic natural fabrics such as cotton, lyocell, or various blends. It may be possible to find a treated merino fabric that wicks well. However, my limited testing did not encounter that fabric.
So, if natural fibers such as merino and alpaca do not offer drying or warmth advantages over polyester, how can we choose our base layer fibers? To make that decision, we need to examine other characteristics of our base layer garments and other personal objectives. These include our moisture management strategy, price point goals, garment durability, garment comfort, laundering requirements, and environmental impacts over the life of a garment.
Review Stephen Seeber’s past work on base layers to get more out of this article and better understand the testing methods used.
- By the Numbers: Do Moisture-wicking Fabrics Work?
- By the Numbers: Why is My Base Layer Soaked?
- By the Numbers: Testing the Performance of Mountain Hardware AirMesh Garments
- By The Numbers: Patagonia Capilene Thermal Weight vs. Patagonia Capilene Midweight Performance Comparison
catch up on the entire By the Numbers series here.
Table of contents
Table of Contents • Note: if this is a members-only article, some sections may only be available to Premium or Unlimited Members.
- Introduction
- Table of contents
- How I tested
- The test fabrics
- Discussion of Test Results
- Fiber diameter – the key to itchy fabrics
- Table 3. Measured fiber diameters
- Which Fiber is Warmest?
- Table 4: R-value in ascending order
- Table 5: R-value per ounce of fabric weight in ascending order
- Table 6: Summary of measured and calculated values for three fabrics
- Which fiber dries the fastest?
- Which fiber wicks the best?
- Table 7: Wet/dry and drop test results
- Commentary: how to choose a base layer fabric
How I tested
Garment manufacturers claim numerous benefits from their garment’s fibers. These include claims about warmth, moisture management, comfort, durability, environmental impact, and more. Investigating all of these claims for fibers would be an exhaustive task. Measurements of actual fiber performance for warmth and moisture handling are beyond the capacity of my test instruments. In this article, I don’t investigate fiber performance. Instead, I measure fiber performance when incorporated into fabrics.
The performance characteristics that I measured include physical characteristics, air permeability, insulative ability, wicking, wetting, and drying.
Fiber diameter
Fiber diameter influences garment comfort. Fiber diameters below 20 microns tend to eliminate itching. As fiber diameters increase above 20 microns, they are more likely to result in itching. Human hair is 40-50 microns in diameter. Wool from sheep tends to have a range of diameters ranging from 17 to 33 microns. Merino sheep fiber diameters range from 17-24 microns. Alpaca fibers can range from 15-40 microns. The finest fiber is from Angora rabbits at 11 microns. Typically, market scarcity forces finer-diameter natural fibers to command higher prices. Garments made with finer diameter fibers will tend to command higher prices. We measured the fiber diameter for each fabric under a microscope.
Garment weight
In this article, we test garments or fabric samples. We weighed all garments. We list the size of each garment. When possible, we attempted to obtain men’s extra-large garments. Arms of Andes provided women’s extra small garments.
Fabric thickness
Fabric thickness is determined utilizing a method that applies consistent compression to the fabric as part of the measurement process. A 50-gram weight applies compression to the fabric. The weight measures 1.27mm x 76mm x 76 mm. An iGAGING digital thickness gauge measures fabric thickness. The gauge applies slight additional pressure onto the 50-gram weight. The average thickness of each sample is calculated based on 3-5 measurements.
Fabric weight per unit area
The fabric area and weight were measured to determine grams/square meter and ounces per square yard. When garments were tested, we used the manufacturer’s specifications for fabric weight per unit area.
Air permeability
This measurement determines how much air flows through the fabric at a pressure difference of .5 inches (1.27cm) of water column. The higher the reading, the greater the amount of air that can flow through the fabric at any wind speed. Higher air permeability enables greater ventilation and improved moisture vapor transfer through the fabric.
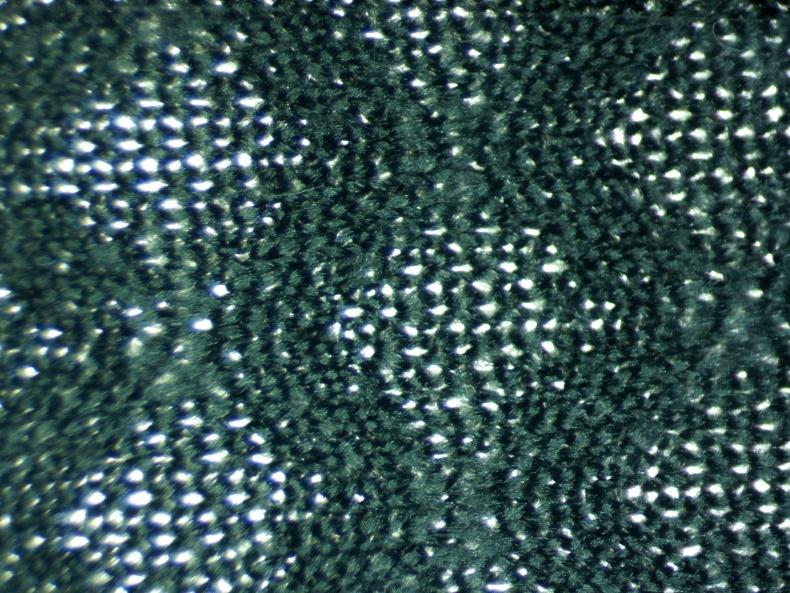
Porosity
This measurement is generally related to air permeability. The measurement indicates the looseness of the knit or how much of the fabric is void or air space. Porosity is measured by placing the fabric sample on the microscope using backlighting. We set the magnification at .8 and produced a photomicrograph. The resulting image is analyzed using Photoshop to determine the portion of surface area through which light can penetrate. If you hold two fabrics in front of a light source, the fabric with higher porosity will permit more light to penetrate.
R-value
R-value measures a fabric’s resistance to heat transfer from the wearer to the environment. Higher R-value means a fabric will help reduce heat loss in cool weather or prevent the body from shedding heat in warm weather. I measured R-value on my guarded hot plate.
R-value/ounces/square yard
This is a measure of thermal efficiency. Higher efficiency occurs when more resistance to heat transfer occurs with lower material weight. As ultralight backpackers, we like to experience the insulating value required for our comfort at the least possible garment weight.
Wicking tests – wicking, infab, evap
This test demonstrates how well a fabric wets, wicks, and dries. I conducted using my permeation kettles. I place a sponge containing a predetermined quantity of water on the 120F (49C) kettle surface. Then, the test fabric is draped over the kettle surface and rests directly on the wet sponge. The fabric can absorb water which may wick across the fabric’s surface. An overhead thermal imager observes and records the progress of water as it spreads. The test continues for 30 minutes. At the end of that time, the fabric is removed and weighed. An increase in fabric weight occurs from water retained during the process and is called INFAB. Next, we weigh the sponge. The difference between the sponge’s starting weight and the finishing weight is the amount of water wicked into the fabric from the sponge. The difference is called WICKING. Finally, we subtract INFAB from WICKING to determine the amount of water that evaporated from the fabric during the process. Using these three values and watching the time-lapse drying video, we can readily determine which fabrics can remove sweat effectively from the skin and those that provide little or no ability to move sweat away from the skin.
Wetting tests – 200 and 400 microliter (ul) drops
The drop test measures how rapidly water contacting a fabric is absorbed. Drops can sit indefinitely on a hydrophobic (water-hating or water-repellent) fabric. Water drops can be absorbed rapidly into a hydrophilic (water-loving, absorbent) fabric. The industry-standard test places a 50ul drop on the fabric using a pipette. The test ends if a drop is not absorbed within 60 seconds. In our test, we use larger drops – four and eight times larger, respectively. These larger drops will hasten the wetting and absorption process. If the drops do not wet and absorb into the test fabric, we can be confident that the fibers are hydrophobic and do not support wicking.
Drying tests – water added, water dried, time to dry and drying rate
This test examines the following question: How long does it take for a saturated fabric to dry? Saturation for this test is the maximum amount of water a fabric can hold without dripping. This quantity is determined by dunking and carefully squeezing out excess water five times and then calculating the average weight after each dunking. We install the saturated fabric on the 120F permeation kettles’ surface. The moisture begins to dry. We record the drying process with the thermal imager. When the fabric is dry, the surface becomes uniformly warm and shows no further temperature rise. At this point, the test ends, and we weigh the test fabric to determine how much water evaporated. We calculate the drying time by measuring the elapsed time to dry from the thermal imager video. The drying rate is the weight of dried water/drying time.
The test fabrics
We base our findings on the performance of 16 base layer fabrics. Some were provided as complete shirts by their manufacturers. Others are fabric samples. We cut the garments and fabrics to fit the permeation kettles and the guarded hot plate. Table 1 shows the fabric breakdown:
Table 1: Test fabric distribution
| Fiber | Samples |
|---|---|
| 100% Merino | 5 |
| 100% Alpaca | 5 |
| 100% Polyester | 4 |
| Merino/Polyester Blend | 1 |
| Merino/Polypro Blend | 1 |
| Total | 16 |
Member Exclusive
A Premium or Unlimited Membership* is required to view the rest of this article.
* A Basic Membership is required to view Member Q&A events

Discussion
Become a member to post in the forums.
Lots of opinions, but rather less field data.


OK, OK, the snow bridge collapsed and I ended up in the river. The water was cold. I got wet to mid-thigh.
I stripped off my heavy synthetic XC ski trousers and wrung them out best I could.
Then I put them back on and we carried on. In about 15 minutes I was warm and fairly dry. And we crossed the creek somewhere else.
Bald statement of hard experience: cotton would have taken maybe 8 hours, and wool would have taken maybe 4 hours. And I would have been very cold for at least half that time, if not more.
HTH
Cheers
Then there are a few things the article and discussion leave me wondering. Well, a lot of things actually, but three which haven’t been mentioned are probably most relevant to the article and, hopefully, interesting to others:
First, we learned that more permeable means more warm. Of course, permeable is not so warm when it’s windy, but we can just put a hard shell on. Or is it so simple? Even with Gore Tex with all the hatches battened down, the windier it is, the more air will move around under your hard shell. So maybe, unless we know no wind awaits us, (naked) Alpha isn’t the best thing???
However, I have a hypothesis that, while on the one hand, air can more easily move through and thus steal heat from a soft, shaggy fleece like alpha, on the other hand, a soft, shaggy fleece will reduce the airflow under a hard shell or insulating layer more than a smoother, harder garment and thus increase the insulation from itself and the boundary layer … .
Second, I always fear that a garment that wicks well will suck too much moisture from my skin, which is the last thing my skin needs in Winter. That’s part of the reason I keep trying merino, alpaca, yak, camel, cashmere, and even New Zealand possum. (Yes, all scratchy.) Is there anything too this? Or maybe merino (or cotton?) sucks up moisture even more?
Third, the article and the test results tell us about R value (warmth) per gram, but there is one kind of garment for which warmth per gram is irrelevant, and what matters is warmth per mm of thickness. A kind of garment for which merino and alpaca are quite relevant: Winter socks. It would be great to learn how different fibers compare for winter socks. (And among synthetics, particularly relevant is the one everyone says is “low quality”, but which is also said to be the most like wool – acrylic.)
Hi Andrew, regards your search criteria
I recently, as in this week, bought the Norrøna 850 down knickers. It seems to check your boxes.
I can’t say for sure if I’ve come across others that have similar features, as I just recently switched my own criteria from full length down pants, to also include 3/4 shorts, so I haven’t paid much attention to the shorts alternatives up until now. Beyond specs I haven’t compared it to anything else out there. Unlike many of the alternatives I can actually find these in local stores as, well.. norwegian brand and living in Norway, and I really wanted to try these on before buying.
To everyone else, sorry for going off topic
When I first read this, I didn’t think much of it, as it kind of makes sense. But as I had more time to digest it and relate to my own experience, I don’t think I can unreservedly endorse your claim.
As @nunatak alluded to in an earlier post,
Especially when it gets really cold, a layer that provides zero R-value is basically pointless, because it means you’ll always need an additional layer anyways.
Because there is so much variability between every outdoor scenario a lot goes into my selection process, so I don’t want to speak in absolutes, but I will say that I’m more likely to wear a thicker/more insulating base layer in the winter.
A fabric layer will have a small R value. There is some trapped air. Maybe a stiffer fabric would trap more air? Or a layer that clung to your leg would trap less air?
But the R value will be small for just a fabric. If it’s a thicker heavier fabric maybe it would have a slightly larger R value, but still small. If you need more R value, it weighs less to have fleece, or better synthetic, or better than that down.
I wear nylon (supplex) pants which are baggy, so there’s more of an air layer underneath. Down to 20F. But I wear more insulation on the rest of my body.
If it gets colder, or it’s windy, then I’ll be cold so I add synthetic insulation layer underneath my pants. But, when it’s been 20F and calm I overheat.
Haakon, thanks for the Norrøna tip! Regarding thin base layers, I certainly agree that when it’s cold, it’s pointless to wear something with a zero R value. But as per Jerry’s post, that’s not really a base layer option. And the reason I say the R value is irrelevant for base layers is that, if you want a base layer made of a certain fabric, you want one with the lightest version of the fabric, so that instead of using lots of grams for a base layer, you can use some or all of the grams saved for something that insulates better per gram. As a result, you’ll be warmer, or have lighter gear, or both.
While the ideal gear choices always depend on conditions, and while it’s possible I might be missing something, I struggle to imagine any conditions in which, for example, the 149g/m2 midweight “base layer” would be better than an 85m/m2 base layer combined with 65g/m2 alpha (total fabric weight 150g/m2). You would have a lot more warmth available, and also be better prepared for warm conditions, when you could take the alpha off. Nor can I imagine any conditions in which the 149g/m2 “base layer” with a mid-layer on top would be better than an 85g/m2 base layer with a warmer mid-layer and/or a (warmer) outer layer on top.
In theory, because it can be pretty impractical to shed bottom layers, and bottom base and mid-layers usually don’t have any mechanical venting that adds temperature flexibility, there could be a situation where a thin bottom base layer with anything additional layer over it would be too warm, but just a thin base layer would be too cold, so you would want something in between, and a 149g/m2 poly base layer would fit the bill. In practice, though, I’ve never seen a day where I needed a bottom base layer and the right choice wasn’t either just a thin base layer, or the same with one (or more) layers on top. I’d be quite surprised if I ever do.
Andrew, there’s a couple of things going on at once here, so it could quickly turn into a conversation where we talk passed each other. I think we’re mostly in agreement about the realities we have to deal with and that we’ve both found solutions that work well for us within those constraints. It’s the basic presumption that R-value is irrelevant for base layers I find to be more nuanced than you presented it.
And of course Jerry is right, base layers with no R-value isn’t an option. And while we’d often would have liked for such abase layer to exist, my point was that sometimes that R-value is useful. And I’d even argue that sometimes it’s useful to have more than the minimum possible R-value in a base layer.
I don’t want to go into the specifics of the weights of Patagonia base layers mentioned, as I have no experience with any of them and how much insulation they provide. I’m just more broadly trying to point out that a warmer base layer isn’t always the worse option.
Like you touched on yourself, relegating basically all your insulating needs to a mid layer comes with some down sides in really cold weather.
For one, you’re likely to use a mid layer all the time, requiring this layer to be very thin in order to not overheat. And maybe even require an additional mid layer in your pack to have something dry and warmer when it really gets chilly.
I’ve tried to find the perfect combination of thin base layer + mid layer on many cold days, and it’s a very tricky equation to get right. Once I have more than one layer under my outer layer, heat builds up very fast and temperature regulation and moisture management is hard to get right.
Again, as you touch on, bottom layers are probably the best example of such challenge, but IMO relevant for top layers as well.
Any kind of layer adjustment in the cold comes with a certain degree of discomfort, so avoiding those to the extent possible is always good. So if I’m going out in stable cold weather I try to pick a base layer that will keep me just about warm enough in the low intensity sections, yet reasonably comfortable in the high intensity sections by allowing ample ventilation through my outer layers.
In -10 to -20C (14F to -4F) which is not uncommon here in the winter, my thinnest base layers very rarely makes sense. Even when working hard they’re not adequate on their own to keep me warm, whereas a warmer base layer can work on it’s own under a high CFM/well ventilated jacket or sometimes even without a jacket if I’m keeping a good pace and the sun and wind is playing along nicely.
There are caveats to this of course, that’s why I tried to avoid being too specific. For longer trips where conditions are more likely to change, low R-value base layer + mid layer will allow more flexibility for the weight carried. Drying characteristics and what drying opportunities are available. Individual differences in how warm/cold we run and how much or little we sweat and what type of activity we’re pursuing in the outdoors is all going to play into our clothing preferences.
I wish we could use AI to summarize this thread into a few sentences :-)
You might find this interesting https://www.researchgate.net/publication/262863533_Clothing_systems_for_outdoor_activities Conclusion on page 156 2.5.
>I’ve tried to find the perfect combination of thin base layer + mid layer on many cold days
I’ve experimented a lot with this on 25-35km day hikes. Its cold here. The core is the most important part to get right first because if it gets cold, blood flow to the limbs starts getting cut off.
For me, the best approach for managing moisture in cold is to use polyprop Brynje as a starting point. No other base layer construction type or material sheds sweat off the skin nearly as well, and it also adds some warmth.
The benefit of a warmer base layer is that it reduces the thickness of the mid and how much sweat it traps. This reduces the chance of frost forming on the inside of the mid. Here was the result of a -20C hike when I wore too thin a base layer:
I’ve never felt the need for any base layer while on the move above 5C
-3C to 5C, the Brynje goes solo with a light mid layer.
Below -3C, I add a snug lifa on top of the Brynje. The Lifa pulls off sweat and sheds it quickly as its polyprop and adds more warmth by better trapping air over the Brynje (reducing bellows effect blow off) which allows the mid to be thinner and more breathable. An argument can be made that the reduced bellows effect over the mesh retains moisture longer but the reality for me has been that the Lifa just pulls it right off, and the benefit of allowing a thinner mid warrants the trade off.
Below -15C I swap out the Lifa for a 200 weight Intraknit over the Brynje to increase the base layer system insulation value. Even though it holds more moisture than the Lifa, the system effect is better moisture management as that is more than made up for by the lighter and more breathable mid it allows. This year I plan on experimenting more with swapping out the Intraknit for Airmesh octa which I suspect will work better due to its better hydrophobicity, lighter weight and warmer insulation value
Scale mid weight based on the conditions and your personal heat levels. I favour poly mids for the moisture management
Below ~ -10C I also keep a very breathable fleece in the pack for extended breaks
I find ~ 3 or 4 different weight mids allow this to be optimized from -30C to 5C
I also carry a Dooy highly breathable wind shirt at all temps to regulate convective cooling on top of all this. If I was in openly exposed areas in very high wind, a Houdini for its more aggressive wind blocking
Hats, gloves, neckers, pants are another story
The benefit of a warmer base layer is that it reduces the thickness of the mid and how much sweat it traps.
May I suggest that a lot of the problem is in the second half of this sentence. If one is sweating liquid water, one is wearing too much clothing!
It is a standard and pretty much absolute Arctic and Antarctic rule: do not sweat! You will have no chance to dry the sweat off, and you will freeze with wet clothing.
My 2c
Cheers
I’ve never froze as long as I keep moving, even down to -30C for 8 hours or so
Different folks have different physiology. I sweat a lot. Lighter clothing causes me to still start sweating while cold. I chose the layers to just avoid being cold. Never too hot
The only way around it is to slow way down. I agree its an option. OK for mellow overnights, but not long day trips getting out for exercise. Different insulation choices and exertion levels depending on the goals
It’s tempting to consider trying overnights with a pulk, full second set of clothes and a hot tent to dry off the sweaty garb. What’s stopped me is an allergy to down.
Are pulks made of down now? Must be one of those ultralight pulks.
I’ll bet you could find one made of synthetics. Then you could even afford to pull a five kilo synthetic sleep system. But maybe you wouldn’t need it with a hot tent?
So much to consider. ;)
That could be the solution right there. :)
For purposes of comparing results across fabrics, the process of “lightly squeez[ing] the excess water out so it was not dripping” does not seem very reliable. While the process was repeated for each fabric sample until all results for that sample were within a standard deviation of 5%, that only addresses variation of the process as to a given sample – not variation between different samples. (I.e., the process was repeated to get a consistent level of saturation for a given fabric, not a consistent level of saturation between fabrics.)
That’s not to say the results or conclusions are necessarily inaccurate, but would it be possible to use a more objective standard to determine when the excess water is removed? E.g. (and just throwing this out as a thought experiment) but if all fabric samples are the same size/shape, let them soak until saturated, then clip them so they are hanging by one corner, and let them hang there until there is one drip of water every X seconds, and then take the weight at that moment? (If they are small samples, I would think this would only take a few seconds, but perhaps doing the test in a cool humid environment would minimize the potential impact of any evaporation while it is drip-drying.)
In terms of anecdotal experience, the closest I have is that I have two long sleeve Brynje mesh shirts – one is the Super Thermo (100% polypropylene) and the other is the Wool Thermo (80% merino, 20% polyamide). They are a similar (but not identical) mesh weave pattern. I use both regularly and my experience has been that the Wool Thermo stays wetter longer – but I’ve never tried to measure that. (The Wool Thermo definitely resists odors better than the Super Thermo – that much is clear!). I don’t think I have a scale accurate enough to do any meaningful testing but I could poke around and try.
I have both types in short sleeves. I can take the poly version out of the laundry and have it dry before the rest of the load finishes in the dryer. The wool version takes a number of hours beyond that to air-dry.
The ability to take a soaked baselayer, wring it out, put it back on, and have it dry without chilling me is one reason I choose to use the poly version outdoors, while the wool version is reserved for day-to-day living at home.
Hi Chris: That is an astute observation. As I mentioned, getting fabric saturated, with uniform moisture distribution and not oversaturated, is a challenge. As far as I have found, there is no standard method for doing this. (Actually, AATCC has a standard using a pipette to wet a tiny area. It has its issues and cannot work on my kettles.) Every study I read does it a different way. Over the years, I have gone through several iterations, including rinsing/spin drying (terrible), hand crank drying rollers (even worse repeatability), hanging and counting drips (time-consuming and produces non-uniform moisture distribution (due to gravity), and the present method. I certainly recognize the limitations of the present method. I suspect the present method may understate drying times. However, the 5% standard deviation requirement does impose some discipline on the pressure application. I know that I get good moisture distribution on the sample because I can see the temperature uniformity when I place the sample on the heated kettle surface. I have some thoughts to try the next time I need to measure drying times, so we will see if I can improve on this method.
Both Eric and Chris’s observations are interesting. They are both making a fair comparison with respect to fabric weight and construction. Brynje superthermo polypropylene uses 140 g/m2 fabric for a garment weight of 130 g. While brynje wool thermo uses 125g/m2 fabric for a garment weight of 140gm.
And yet both report that the wool thermo has a substantially longer dry time.
This seems at odds with the claim that controlling for weight/ thickness there is no appreciable difference between wool and synthetic wrt absorption and dry time.
Stephen do you have a view about what might be going on here?
I washed my oversized wool fishnet in very hot water, then wore it while it dried. I mostly hand wash it now. Is boiled wool less absorbant? Less air space. Is poly thread absorbant or adsorbant?
Boiled wool may be more water resistant — my old Dachstein mitts were quite resistant, but they may have been treated with something. If nothing else, the shrinkage would make access by water to most of the fibers much more difficult.
Polypropylene is naturally somewhat hydrophobic unless treated otherwise (apparently treated poly is used for diapers). The poly fishnet feels almost dry coming out of the washer.
I can understand that, as Haakon mentioned, being able to choose from a range of base and mid-layers makes it easier to get the right combination. Though with enough mid-layers to choose from, I would think it might always be possible to get the right result with a very thin base layer. My usual mid-layer has a full zip, and worn over a base layer with a “quarter” zip, the combination works in a wide range of conditions. Also, the mid layer is very porous, so by adding, substracting, or unzipping the next layer(s) (usually just a shell), I can be comfortable in a very wide range of conditions.
Of course, when resting in Winter conditions, I need another layer, usually down. But when resting in such conditions, one needs another layer no matter how thick one’s base and mid-layers are.
It is however true that there are times when I’m not resting, or not resting long, and my favorite mid-layer is not warm enough. If I know I have a cold day ahead, I simply wear a warmer mid layer or add a very thin, quarter zip mid layer under my usual one. If I had something like 125g/m2 Polartec Alpha, I might use that instead. If I’m not sure, I usually pack a very thin, synthetic, down-style vest. I can understand some may not like either the thin, double mid layer solution or the vest solution (though it works for me). But assuming 125g Alpha works well, I’m still not sure the thin base + right mid combination won’t work best for all conditions.
I’m not entirely convinced that “the benefit of a warmer base layer is that it reduces the thickness of the mid and how much sweat it traps”. I know this is all a bit easy to say when I wasn’t there, and everyone is different. But if two combinations of base and mid layers are equally warm, why would one with a thin base and thick mid absorb more in total than one with a thick base and a thin mid? If one chooses fabrics well, the first combination will weigh less and thus, all else being equal, absorb less. And mids can be very porous. (That’s what Alpha is designed for, no?) Not as much as fishnet, but are we talking about cool versus warm fishnet? Are there such big differences in fishnets? If there are, then I can see a case for a warmer base layer, as it maximizes how much of your insulation is very porous.
Hi Hugh, I do. I decided to do my own drying test to see how they performed. It has turned out to be very interesting. These outlier fabrics perform very differently than the more conventional fabrics I tested for this article. However, testing “boundary” fabrics can provide insights into the performance of conventional fabrics. This is the case here.
The general conclusion from this test is as follows: I think, at some point, conventional fabrics tend to hold so much moisture that the characteristics of the underlying fibers are overwhelmed and it becomes difficult to determine how fibers impact performance.
Right now, this is speculation. I hope to redo the testing over a broader range of synthetic and natural fibers. I will also delve further into the method of achieving saturation.
Now I will try to briefly describe how this test worked out, although I am not sure brevity is something I often achieve.
I have done this test three times. I will focus on the final test.
I tested a nearly new merino shirt and a well-used polypro shirt. The merino shirt was a turtle neck zip model, so I also used a turtle neck zip polypro shirt. The second round of testing of these shirts produced some pretty wonky drying results because of the very different drying behavior of the mesh vs. knit components of the turtle neck and the cuffs.
For the third round, I cut off the knit turtle neck and cuffs on both shirts. I then tested the four types of fabrics. The knit turtle neck/cuff fabrics perform more like conventional fabrics. The mesh fabrics do not.
To “saturate” the fabrics, I put them through a cold water delicate wash/rinse cycle, with all the fabrics in the same wash load. The rinse cycle was set to low. Before and after the wash, I weighed all the fabric samples. This provided the dry and saturated weights. I then hung them to dry. I didn’t measure the temperature or humidity. The temperature was probably around 70F, and the RH was perhaps around 30%. The air was still. I weighed at 5, 10, or 15-minute intervals, depending on how the samples were drying.
My lab scale measures in grams but not fractional grams. This test needs fractional grams to provide the best drying time curve fits.
Here is summary data from the test:
Note that the drying rates for the wool and polypro mesh are very far apart. The cuff and collar sample drying rates are closer but not comparable to the minor drying rate deviations in the article.
Here are drying data for the tests:
The upper graph shows the actual weights of the fabrics measured during the drying process. The lower graph plots the reduction in trapped water weight as the drying proceeds.
The top graph makes one aspect of drying very clear. The drying rate, as is conventionally provided as a single average number, is continuously changing. It starts at a high rate and then is reduced. This is consistent with Newton’s Law of Cooling, which he discovered hundreds of years ago.
In the top graph, let’s compare the drying for the mesh samples. We see rapid initial drying for both fabrics, but the polypro dries quickly, and the wool takes far more time to dry. You can see that the wool curve becomes flat after 60 minutes and then dries very slowly.
Here is what I think is happening. Ventilation through the fabric will dramatically influence the drying process. The mesh fabrics have copious ventilation: they are exposed to air movement on both sides with no obstruction, as would be present in a conventional fabric. The polypro shirt dries very fast. The fibers do not absorb moisture, and moisture cannot form a tenacious bond with the hydrophobic fiber surface. Therefore, it dries very quickly. The wool shirt acts differently. The water that is lightly bonded to the wool exterior dries quickly. After 60 minutes, 79% of the water has evaporated from the shirt. Most of this is exterior moisture. The remaining 21% will dry over the next 2.5 hours. I believe most of this water is absorbed into the wool fiber proteins, where it bonds to those proteins. Water absorbed into the fibers will dry slowly because more energy is required to evaporate bonded water; there is far less ventilation to carry vapor away, and, as the fiber dries, it provides increasing insulation from outside air, so there is less heat available to support evaporation.
In short, the fiber qualities of the mesh shirts are on clear display!
Look at the two plots below for the collar/cuff fabrics. Compared to the mesh, these are more like conventional fabrics and offer far less ventilation for carrying off vapor from evaporating water. Bear in mind that these densely knit components are two layers of fabric, so they have a lot of capacity to hold water and have far worse drying conditions. If we look at the shape of the curves, we see much slower drying than was initially for the mesh fabrics. However, the wool collar/cuffs take far longer to dry than the polypro collar/cuffs. This is likely due to the same slow drying of absorbed moisture stuck in the wool proteins. Again, we see the fiber properties influencing the outcome, contrary to what several sources (including me) showed. The difference in drying rates for these two fabrics is surprising to me. The drying mechanism used in the article was a heated surface, which provides far more energy to support drying than the still, low-temperature air used for this test. I intend to take a closer look at this issue before further testing.
The bottom plot shows the % of water remaining in the samples at any time during the test. The steeper the curve, the faster water is evaporating. We can see the extended slow drying times for the wool fabrics. In use, this may not be as large of an energy drain on the user as it appears. In these flattened curve sections, the exterior of the fibers is likely dry. That was what I felt each time I placed them on the scale. The quantities of water in the fibers appear to be less than the maximum absorbent capacity. So, some increased insulation performance from the wool will slow the loss of your body heat in support of the drying process. Your total energy loss to support wool drying will always be higher than that of polypro. However, your instantaneous heat loss will be reduced over the latter part of the process. Possibly, this will be easier to live with.
That is enough for now. I plan to delve into all this in greater depth over the next couple months.
Yeah, a heated surface would be interesting, more closely like wearing a garment and it drying from body heat. And there wouldn’t be so much ventilation.
Good experimentation, thanks
Stephen, thank you.
This is such a neat follow-up analysis. And no small job to collect the data!
Your point about water molecules bonding to wool was especially interesting. Is there a significant “heat of desorption” required to break the bond between the water and the wool that is slowing down the drying process? Or is that something different?
Actually, a lot of water gets absorbed INTO the wool fibres. And of course, it takes quite a while to come back out. Even longer when the fibres are all bunched up together in thread or fabric.
At one stage back in the past, I had to design and build an automatic instrument for measuring just how fast water went into a single wool fibre and/or came back out again in response to a step change in humidity. Fun stuff.
Cheers
Hi Roger, It does sound like fun stuff. Do you still have any of the data you created? For example, relative weight gain in fibers for adsorption saturation vs saturation by means of exposure to water. How did you measure weight gain at the fiber level? Did desorption occur as fast as adsorption in response to RH changes? As you referenced above, how did fiber characteristics change once they were spun into yarns?
Become a member to post in the forums.