Introduction: what does moisture-wicking mean?
Moisture management is the process whereby fabrics enable perspiration (sweat) to move from our skin through our clothing layers and finally, into the environment.
It is a fraught journey with iterative rounds of condensation, evaporation, and even freezing throughout. Moisture-wicking is part of how this journey is accomplished.
Many of those who spend a lot of time working or recreating outdoors have made an effort to learn how to dress to try to achieve effective moisture management.
We typically accept that moisture-wicking clothing (including base layers and underwear) is the best way to accomplish moving sweat (moisture) away from the skin and into outer layers where it can evaporate. This process helps keep us comfortable and dry during cold weather.
The best moisture-wicking performance apparel is generally made with synthetic fabrics. While natural fibers including merino wool and cotton are used in some layers that are considered to be moisture-wicking, they aren’t optimal. In this article, we will focus on polyester base layers. In a future article, we will evaluate the performance of merino wool in comparison with polyester.
We know that moisture management does not always work very as we expect during high levels of exertion and cold weather. So we tolerate our moisture-wicking garments becoming wet (or even saturated). And we accept that dry skin and dry clothing layers may have to wait – until the next major innovation in moisture-wicking clothing is announced.
This article deals with the subject of wicking in base layer fabrics and specifically asks the question: how does moisture-wicking work?
When this article was initially conceived, the plan was to conduct wicking tests of many fabrics and garments to see how they compare. But, as I started looking at Polartec fabrics, I discovered discrepancies between marketing claims and the results of my moisture-wicking tests. So, I turned my attention to trying to investigate the accuracy of the marketing claims by adding two additional types of wicking tests and evaluating a larger variety of Polartec fabrics. After we discuss the fundamentals of wicking, this article focuses on the evaluation of Polartec fabrics and what was found.
The manufacturers of moisture-wicking garments claim their products deliver superior wicking performance. That is not necessarily so – wicking claims are like breathability claims. There can be a wide gap in the moisture-wicking performance of different fabrics just like there can be a wide range of breathability performance. Unfortunately, the consumer cannot know what they are buying unless they know how to test for it. In this article, I will describe how end users can conduct simple but useful wicking tests using a very low-cost device.
In this article, I will not dwell on the effectiveness of moisture-wicking as a tool to meet the goal of dry skin, dry clothes, and comfort. Rather, I will be discussing how moisture-wicking works and the abilities of specific Polartec fabrics (and a few non-Polartec fabrics) to move sweat away from the skin on its journey to the environment outside of our clothing. The effectiveness of wicking and alternative moisture management techniques to promote dry clothes and skin will be discussed in a future article.
How does moisture-wicking work?
Moisture-wicking is a process of immense importance in our lives. Without wicking, most plant life would not exist. From small shrubs to giant redwood trees, wicking transports water and nutrients from the ground to every portion of the plant structure including the tallest limbs and farthest leaves. Wicking makes candles burn. A candlewick, on its own, will burn and turn into ash in seconds. Paraffin wax, the main ingredient of candles, is made from hydrocarbons and is difficult to combust. However, by placing an absorbent fiber wick of the right diameter into a block of paraffin wax, you can sustain a flame for hours without burning the wick. In a candle, the wick is covered with wax. Upon lighting the wick, the wax melts and then vaporizes. The flame consumes vaporized wax, not the wick. The heat from the flame causes adjacent wax to melt and flow up the wick. As the melted, flowing wax nears the flame, it vaporizes to maintain the flame. All of this is due to wicking. Of course, wicking can also be a critical component in moving sweat away from our skin to a place it can evaporate, leaving our skin, in theory, dry.
To appreciate the wicking process, you need to understand the science of what supports wicking. In order to avoid putting readers to sleep with a technical explanation of this, I will turn to professionals in the following videos who provide easy-to-understand explanations of the processes involved and even provide a wick rap for those best served by earworms.
- Wicking Fiber Video – this video illustrates how moisture-wicking and capillary action works
- Moisture Wicking Clothing Explained – this video presents the relationship between capillary action and evaporation and how they work together to drive the wicking process in concert with both hydrophobic and hydrophilic fibers
Before going further, make sure you understand the concept of cohesion, which is the molecular electrical force that bonds water molecules into a drop, and adhesion, which is the molecular electrical force that bonds water molecules to non-water molecules (including fabric material fibers). If you’d like, watch the videos twice and absorb all the wicking goodness.
We have learned from the first video that water molecules have a slightly negative charge. They will be attracted to and cling to non-water molecules (fiber surfaces) that have a positive charge. The stronger the positive charge of the non-water molecule, the stronger will be the attraction of water molecules to non-water molecules.
We can see from the videos that wicking requires a capillary. A capillary can be an actual tube that is solid all the way around. A capillary can also be a construction that performs electrically like a tube, i.e., water molecules surrounded by molecules that are positively charged. In moisture-wicking fabrics, capillary tubes are formed by multiple parallel fibers within a yarn. In a moisture-wicking fiber, the yarns have multiple fibers whose spacing is maintained by twisting the fibers together. The tighter the twist, the smaller the spaces between the fibers. Tighter twists can support higher wicking pressure. It will move water farther along the capillaries. Looser twists can move larger volumes of water but for lesser distances. Figure 1 illustrates wicking fibers.
In Figure 1 we see yarns that are knitted together. The yarns consist of bundles of individual fibers. In this example, the bundles are somewhat loosely formed and contain minimal twisting. These yarns are designed to move large moisture volumes a short distance. This type of yarn is present in all of the face sides of the Polartec moisture-wicking fabrics examined in this article. The face side of the fabric is oriented away from the skin; the fabric side that is oriented toward the skin is called the back side or skin side).
Hydrophobicity vs. Hydrophilicity
Two more words mentioned in the videos must also be understood: hydrophobic and hydrophilic.
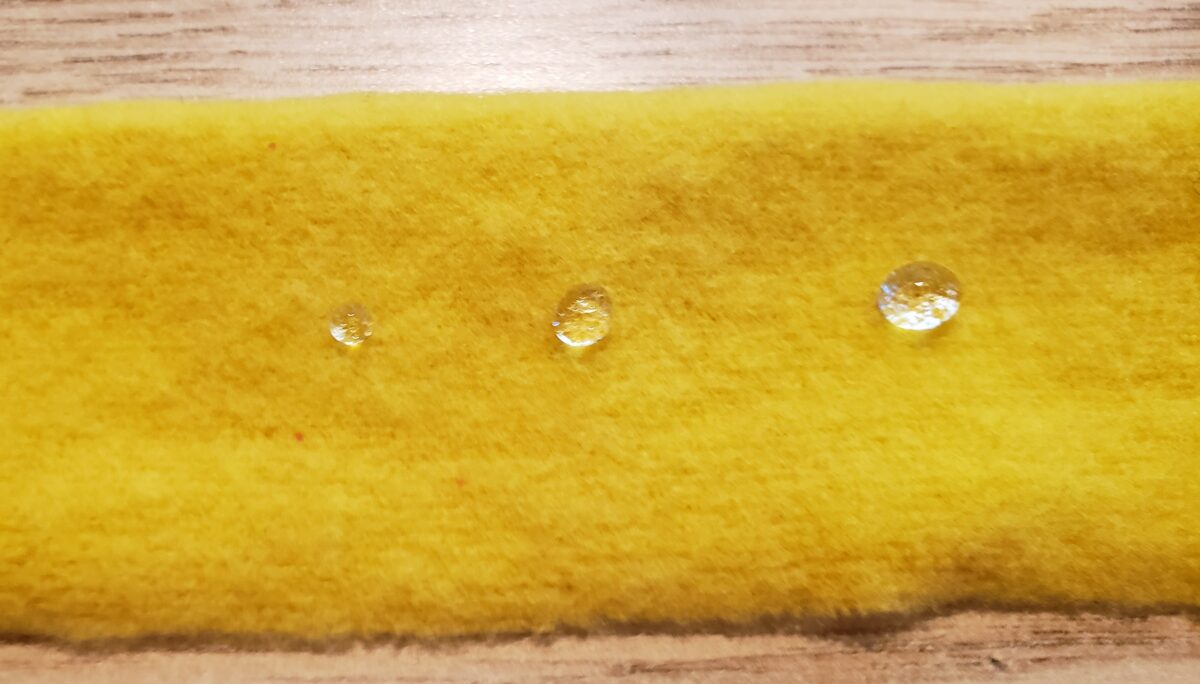
Hydrophobic (water-fearing) fabrics are water repellent. If you squirt a drop of water at a hydrophobic fabric, water beads on the surface and stays there, just like you see in the photograph at the beginning of this article. Hydrophobic fibers have a strong negative charge – they will repel negatively charged water molecules. Raw (untreated) synthetic fibers tend to be hydrophobic.
Hydrophilic (water-loving) fabrics are water absorbent. If you squirt a drop of water at a hydrophilic fabric, it will be absorbed into the fabric. Hydrophilic fibers will have a positive molecular charge and will attract water molecules. Cotton, wool, and other natural fibers tend to be hydrophilic.
Contact Angle
The degree of hydrophobicity and hydrophilicity will vary amongst fabrics. There is a continuum in water attraction to, or repulsion from, a solid material that is described by a concept called contact angle. Contact angle permits visualization of those forces by simply observing a drop of water applied to the surface.
When a drop of water is placed on a surface, the amount of adhesive force from the surface material determines the shape of the drop. If the surface is highly hydrophobic, the surface adhesive force is far weaker than the cohesive force of the water molecules forming the drop. In this case, the drop will be spherical or nearly spherical (the force of gravity can provide some flattening at the bottom of the drop).
If the surface is highly hydrophilic, the surface adhesive force is far stronger than the cohesive force of the water molecules forming the drop. In this case, the drop will flatten and spread out as the water molecules travel over one another to reach the highly adhesive surface molecules.
The difference in drop shape due to the strength of adhesive forces is described by the contact angle.
The figure below provides a Contact Angle diagram. In each case, the drop is red. The green line shows the contact angle that corresponds to the drop deformation due to the level of adhesion. Adhesion increases from Drop A to Drop C, so A is most hydrophobic, and C is most hydrophilic.
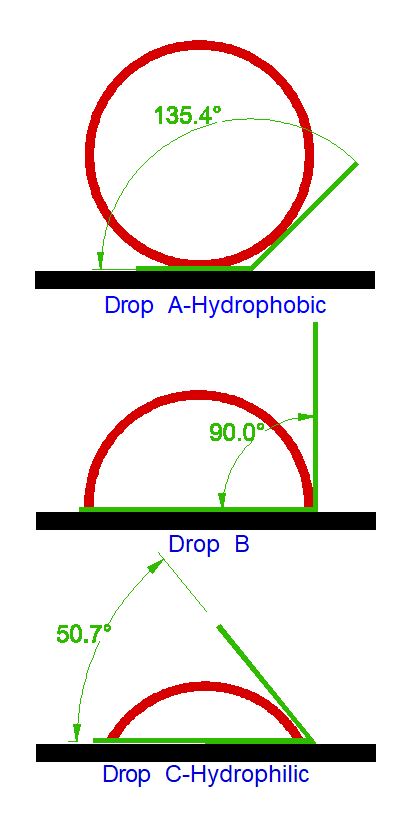
In general, a contact angle below 90° is considered hydrophilic and a contact angle above 90° is considered hydrophobic.
Let’s consider real-life examples in the photograph below:
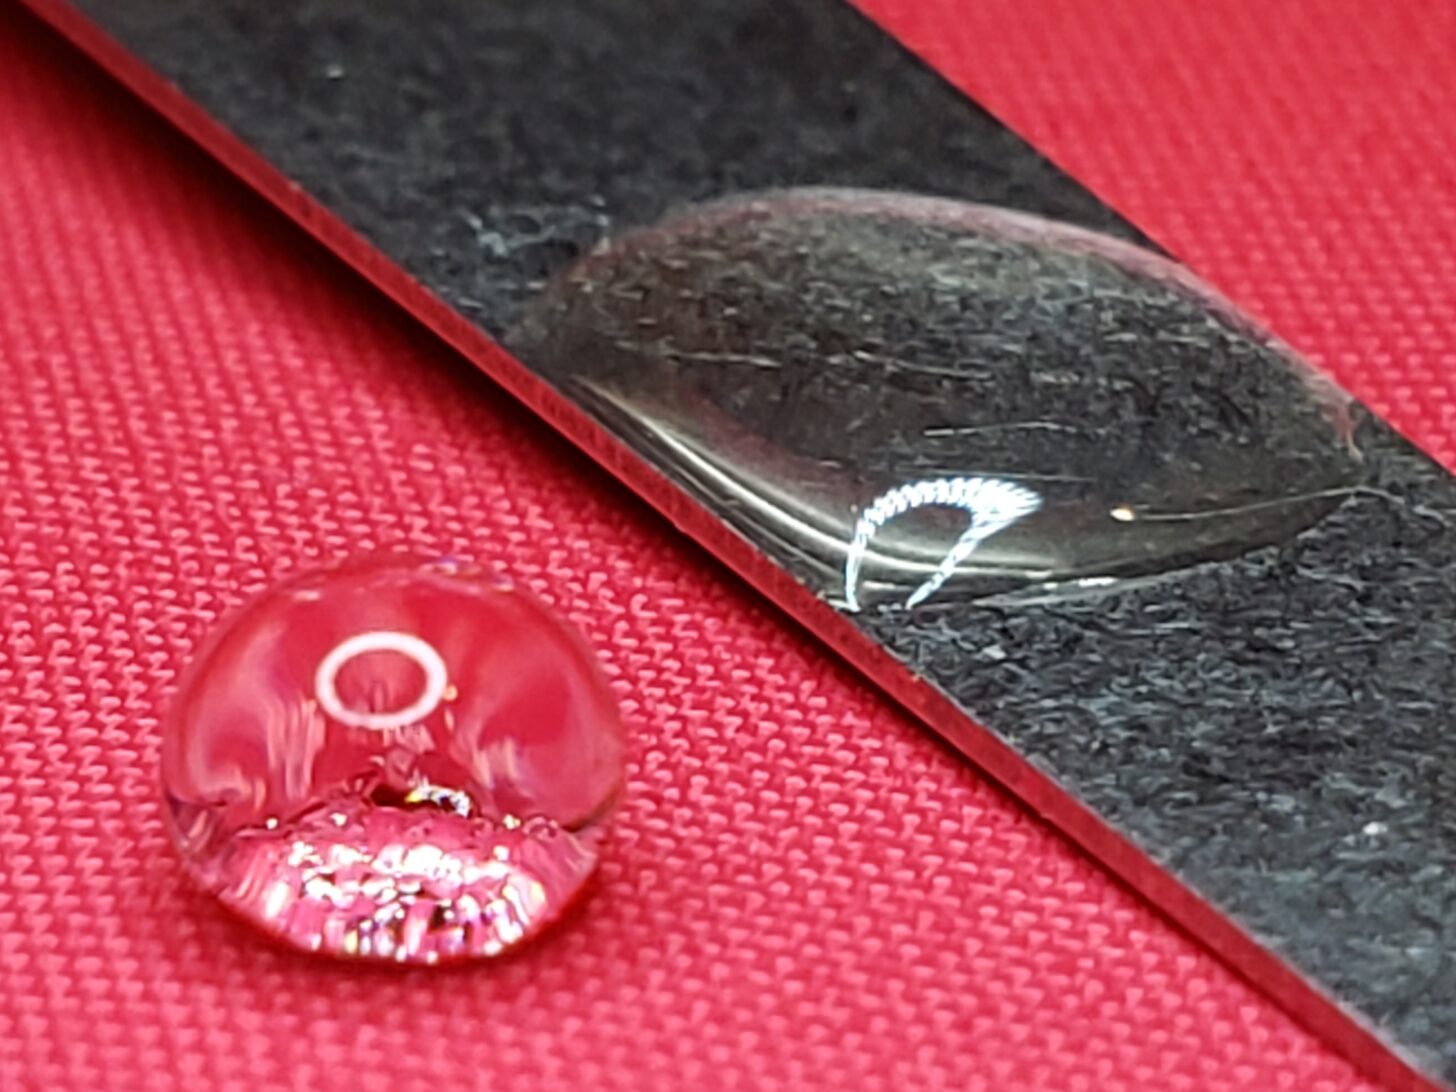
The red fabric is a Neoshell fabric. It is treated with DWR to render its surface highly hydrophobic. As a result, the left drop of water is nearly spherical. The contact angle, viewed at the bottom of the drop, is well over 90°. The flattening at the bottom is due either to the force of gravity or a low level of adhesive force. One way to determine this is to invert the surface. If the drop remains attached, there is some adhesive force. If the drop slides off, the flattening is likely due to gravity.
The right drop is visibly flat. The contact angle is very low, perhaps 20°. We can see that this surface is hydrophilic. The water molecules show a high level of adhesion to the metal surface. In fact, I flipped the metal strip upside down and the drop remained in place! If you think metal is necessarily hydrophobic, think again.
It is not absorbent, but it need not be hydrophobic.
By observing contact angle from a drop applied to a garment, you can immediately have a good understanding of whether the surface is hydrophobic or hydrophilic. Below, we will discuss the concept of wetting. The flatter the drop, the faster wetting will occur and the more readily wicking will proceed. The rounder the drop, the slower wetting will occur and the greater the difficulty in supporting wicking.
Don’t expect contact angle to remain the same over the life of a garment. It is affected by contaminants, wash cycles, changes in surface roughness, and more.
The photograph at the beginning of this article is a Patagonia base layer made from Polartec Power Dry. It has been washed many times over the years. It is now hydrophobic. I doubt it started that way, but back then, I was not checking my garments’ hydrophobicity and hydrophilicity with a dropper.
Here are some typical contact angles for real surfaces: a paper towel or fabric with excellent wicking properties may have contact angles of 0°. A drop will never form – the water will be instantly absorbed. Untreated polyester might have a contact angle of around 74°. Extremely clean glass can be very hydrophobic with a contact angle approaching 160°
Chemical Fiber Treatments Can Modify Hydrophobicity and Hydrophilicity
Chemical treatments during fiber manufacturing can change the hydrophobicity or hydrophilicity of fibers, allowing the moisture-wicking ability of fabrics to be controlled. A nearly hydrophobic raw material, such as polyester, can be rendered highly hydrophilic with the right chemical treatment. On the other hand, some chemical treatments of cotton can produce a fabric that is very hydrophobic. And of course, we can engineer just about any level of hydrophobicity or hydrophilicity we want.
Moisture Regain and Fiber Moisture Content Capacity
An important characteristic of a hydrophilic material for moisture management is moisture regain. This is the amount of water, by weight of the fabric, that can be absorbed from moisture in the air. Moisture regain is typically very low for synthetic fibers (e.g., polyester is about 0.4% – source). In contrast, the moisture regain for natural fibers (which is dependent on relative humidity) ranges from about 8% to 27% (cotton) depending on relative humidity and about 16% to 30% (merino wool).
The moisture content capacity is the maximum amount of water, by weight of the fabric, that can be absorbed into the fiber. Synthetic fibers have moisture content capacities of 1% to 5%. Natural fibers such as merino wool absorb as much as 60%. of their weight as water into the fiber core.
Why is moisture regain and moisture content capacity important? The higher the moisture regain and moisture content capacity of a fiber, the more moisture will soak into the fibers. Wicking for moisture management is about getting rid of moisture from sweat. The higher the moisture regain or moisture content capacity of a fiber, the more moisture will enter the fiber and the longer it will take for the moisture to evaporate out of the fiber.
Very little moisture can enter a polyester fiber. If the wicking ability of polyester is enhanced through chemical treatment to become very hydrophilic on its surface, it can transport large amounts of moisture with almost no absorption into the fibers. Wool or cotton do not share this property. When wicking large amounts of moisture, a significant portion of the moisture will absorb into the fibers. As a result, drying time for cotton and wool can be substantial in comparison with polyester along with the risk of getting cold when you stop your activity.
It is important to understand the conditions that are necessary to start and maintain water distribution through wicking. Let’s assume that our fabric has sufficient hydrophilicity to support wicking. Before wicking can start, wetting of the fabric must occur. Wetting means that air which is in contact with the fabric surface is replaced with water. If wetting does not occur, wicking will not follow. To sustain wicking, wetting must be continuous. If wetting stops because the moisture supply ends, wicking will end. In order for wicking to occur continuously, evaporation of the water from the garment must also occur at least as fast as water is being moved by the wicking process. Evaporation causes water that is being wicked to leave the fabric. If evaporation does not occur fast enough, fibers will become saturated, and wicking will cease. At that point, you will end up with a wet wicking layer that may take a very long time to dry.
How We Tested
Permeation Kettle Wick & Dry Test
This is a test I developed in 2015. It utilizes my permeation kettles. The test is developed to simulate the interface between skin and fabric. It is a simple test to perform and interpret.
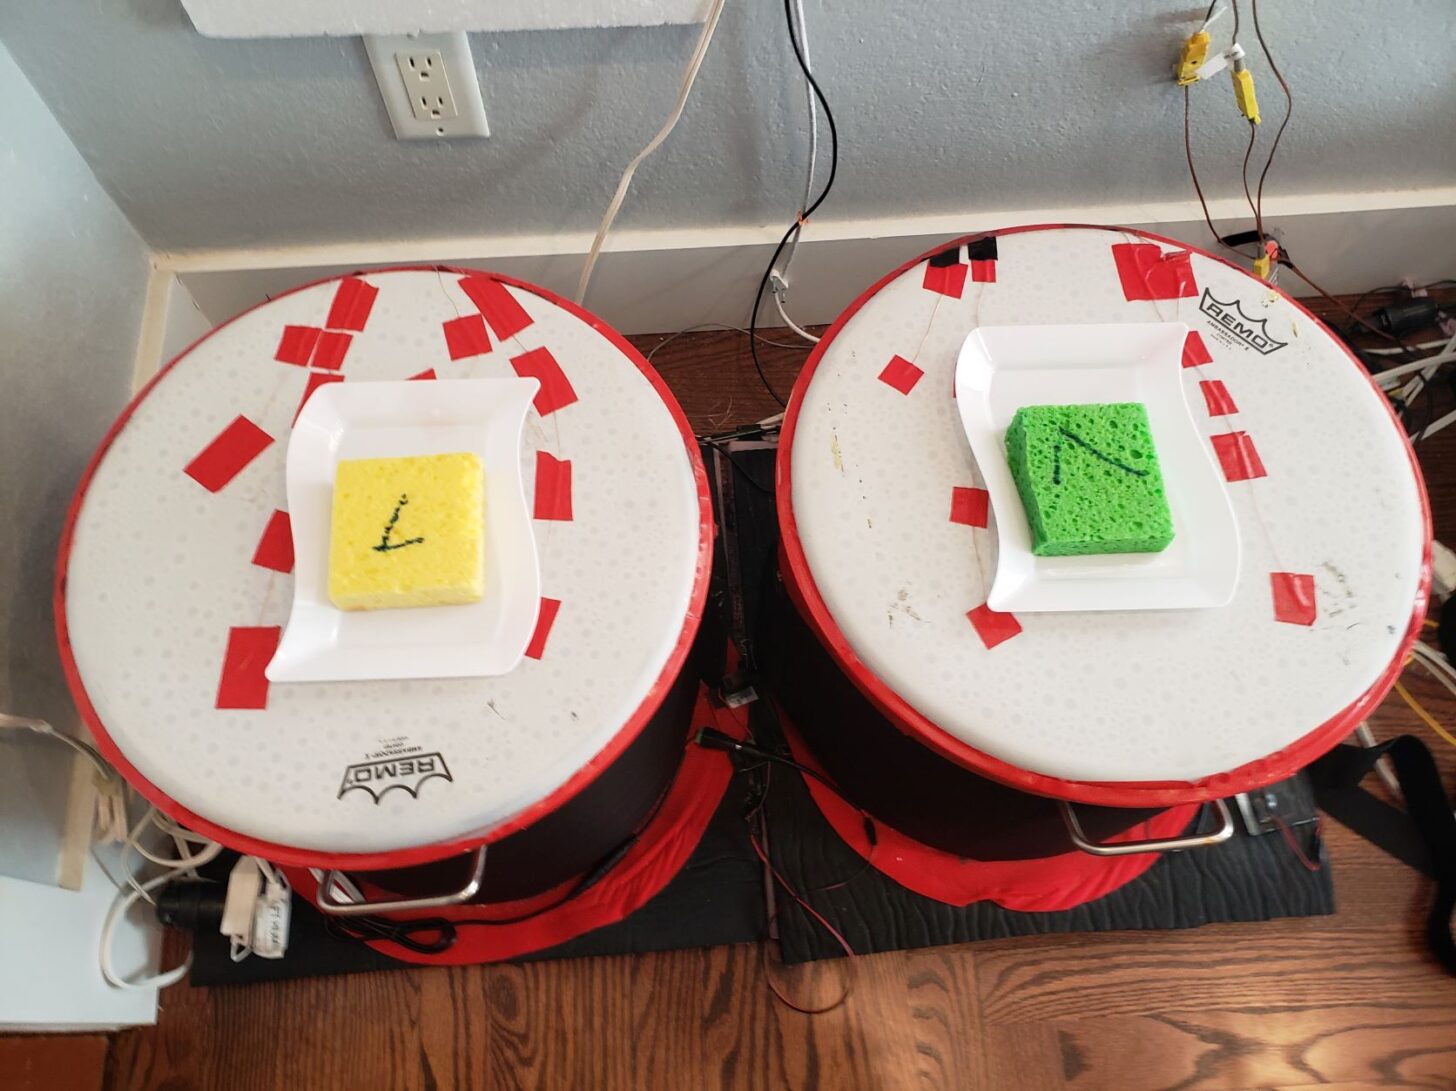
The kettle water is heated to 120 °F (49 °C). A sponge is soaked in 120 °F (49 °C) water and placed on a plastic tray. The weight of the soaked sponge and tray is determined. The sponge and tray are placed on the permeation kettle work surface. The test fabric is weighed and then placed over the top of the kettle. The fabric is pulled sufficiently tight to remove wrinkles. The bottom of the test fabric, which would normally be against the skin, is directly in contact with the wet sponge. The test operates for 1 hour. At the conclusion, the fabric is weighed, and the sponge/tray is weighed. We now calculate the loss of moisture in the sponge to determine how much water was transferred from the sponge into the test item. This is the quantity of water that was wicked. Next, we calculate how much moisture remains in the garment. Finally, we calculate how much water evaporated from the test garment as the test progressed. Evaporation is a critical metric. The more water that is eliminated, the better the fabric performance. Since we have calculated how much water remains in the test fabric at the end of the test, we get an idea of how much water is retained and how much risk might be posed at the end of an activity by using body heat to dry out our garment once our activity is concluded. This test directly addresses a number of issues relevant to our comfort that are not considered in many of the available wicking tests.
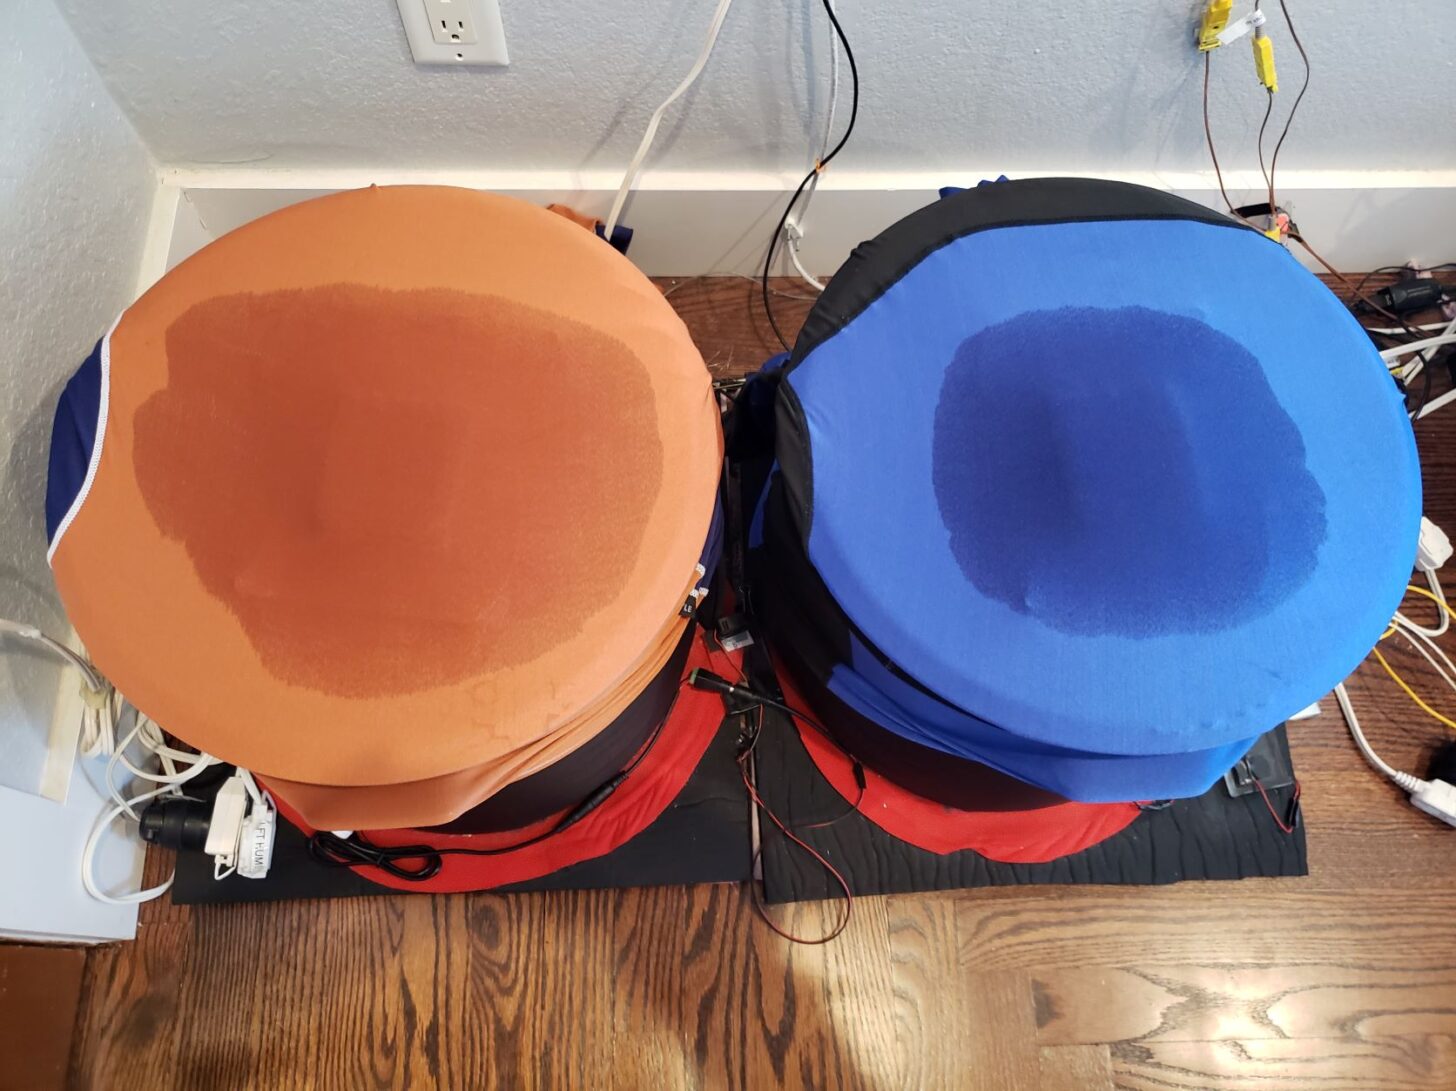
The thermal imager is used to produce a time-lapse video that shows the rate and extent of moisture spread due to wicking across the test fabric.
Figures 2 and 3 show the test setup.
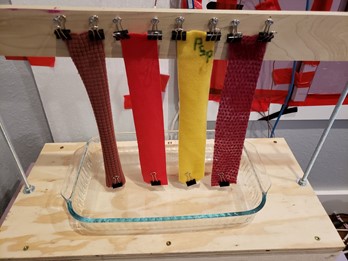
Vertical Wicking Test
The vertical wicking test may be the most popular method of measuring wicking. It is very simple. Hang some fabrics strips into water. Water will travel vertically up the strips. After a predetermined amount of time, the strips are removed, and the travel distance is measured. The strip with the farthest travel is the winner. I have enhanced this test by using the thermal imager to produce a time-lapse video of the process. As wicking occurs, the surface temperature on the wet area drops due to evaporative cooling. The thermal imager allows progress to be easily seen for all fabrics. The wet area can be difficult to see visually on some fabrics. The thermal imager offers another benefit. Fabrics have a face and back. Wicking performance is not necessarily equal on the two. At the end of the test, I can flip the strips and check wicking on the other side. If wicking occurs predominantly on one side, that side will have lower surface temperatures than the poorly wicking side.
There are some problems with the vertical wicking test. The water source is an essentially unlimited reservoir in direct contact with the newly cut bottom fibers. With fibers sitting directly in water, there is no concern for fabric wetting performance – the fabric sample bottom is already sitting underwater so the issue of replacing air around the fibers with water is eliminated. Fabrics that exhibit poor wetting characteristics or uneven wicking on one side or the other will not be identified by the vertical wicking test. Wicking on one side or the other can produce the misleading appearance of excellent performance for the entire fabric. The wicking mechanism here has nothing to do with the skin to fabric transfer that occurs when wearing a garment. As we will see below, the vertical wicking test can cause fleece to appear to be a good wicking fabric. This is only because the vertical wicking test can exploit a wicking mechanism not available in real use. Figure 4 shows the vertical wicking device.
Wetting Test
The first step in establishing wicking is wetting. Wetting is replacing the air surrounding a fabric surface with water. This can happen faster or slower, depending on the fabric contact angle and the fabric construction. In order to better understand the role wetting plays in enhancing or degrading wicking performance, a wetting test can be completed. AATCC TM-79 is a popular example of a wetting test. Most of the popular tests operate in a manner that imparts additional energy (pressure) to a drop contacting a fabric that is not present in the skin/fabric interface during garment use. Such tests can distort the measured performance of fabrics that do not wet easily. In order to avoid what I consider to be a source of mischaracterization for certain types of fabrics, I created my own test that I felt would better represent the skin/fabric interface.
This is another very simple test. Three 4 x 4 inch (10 x 10 cm) samples of a test fabric are produced. Each is weighed. A saturated paper towel is placed on the bottom of a dish. Each individual sample is carefully placed on the surface of the saturated towel to avoid placing pressure between the sample and the paper towel. The sample sits for 30 seconds. At the end of 30 seconds, the sample is removed and weighed. The weight gain for each sample is calculated. The average dry weight and wet weight for the three samples are calculated. A sample with excellent wetting will show a weight gain that is significantly higher than the dry weight. A sample with poor wetting may show no weight gain at all.
A fabric that does well in the wetting test may still not provide exceptional wicking performance. A fabric can be very fast to wet but then lack the capillary capacity to move a great deal of water. This can be seen in some of the wicking specific fabrics included in this study such as the Polartec Silkweight Power Dry sample.
Figure 5 shows the wetting test setup.
Dropper Test
Placing drops on a fabric can provide a preliminary understanding of the speed of wetting and the possible extent of wicking performance. Even more information can be gleaned by adjusting the size of the drops. This is best done with an adjustable pipette. A hydrophobic or poorly wetting fabric will result in droplets remaining on the surface of the fabric. A hydrophilic fabric will absorb the drops. The better the wetting, or the more hydrophilic the fabric, the faster the drops will be absorbed into the fabric.
Standard AATCC TM-79 describes how drops can be applied for this test. Anyone wishing to have a low-cost, quick assessment of wetting and wicking performance can acquire an adjustable pipette online. I recommend the 10-100 µL version. When you get it, practice for a few minutes, watch the training video that is on the supplier’s website and have at it. The pipette is shown in Figure 6.

Now, let’s look at some of these tools in action.
Test Results: Video Observation of Wicking Performance
Dropper Test
In this test, we see an example of fabric with poor wetting performance (Polartec Power Grid) versus another fabric with excellent wetting performance (Polartec Power Dry). The poor wetting performance of the first fabric results in unreliable wicking performance.
Member Exclusive
A Premium or Unlimited Membership* is required to view the rest of this article.
* A Basic Membership is required to view Member Q&A events

Discussion
Become a member to post in the forums.
Companion forum thread to: Do moisture-wicking fabrics work?
Moisture-wicking fabrics (base layers and underwear) are designed to move sweat away from the skin. In this study, we test if Polartec and other base layer fabrics meet manufacturer claims.
good article thanks
one thing you mentioned in passing is that all the base layer fabrics had about the same, near zero insulation value. it doesn’t make much difference which base layer you use
I am skeptical that wicking fabrics are useful, more just marketing hype. I think your article is consistent with that. But I’m open minded about it.
I don’t see how there’s any advantage to wicking the sweat away from my skin. Whether the water is next to my skin or wicked into a mid layer, eventually it will have to be evaporated which cools me down. The amount of cooling is dependent on the amount of sweat, not its location.
If the sweat stays on my skin, then I’ll be more aware of it. Then I can remove insulation so I quit sweating. So, wicking may actually be a disadvantage.
The key to moisture is to not have too much insulation so you don’t sweat. Either remove insulation layers or unzip a full front zipper. Or slow down and quit generating so much heat.
This is cold weather related. If it’s hot that’s a different subject.
I’m re-reading your article several times. Complicated subject. Nice experiments and write-up – thanks
Testing brings back a lot of memories. I worked for many years in the InkJet business and wicking is a key parameter both in ink delivery systems (foam) as well as ink absorbtion into paper.
Is ther an advantage to wicking moisture away from your skin? Well, in humid conditions, silk is and ideal material to draw moisture away and keep you cooler. Prior to all of the current synthetics, silk long underwear was very common.
That being said, wicking is a very complex topic. My understanding is that sock design can be very intricate as the weave and pattern is designed to pull moisture up from your feet and out through the upper sections of your sock. Crazy stuff.
Hi Jerry:
Do wicking fabrics work? That is the $64000 question and, as I say in the article, one that will be addressed in a future article. I hope people will discuss their experience with both summer and winter wicking layers–what might work, what might not work. Thank you for reading and commenting!
This topic makes my head spin whenever I think about it. It’s so complicated. There’s wicking (liquid transport), vapor transport, evaporation, condensation – and it’s all happening at once at just about every point in the clothing system. The processes reach a semi-stasis at a constant output (exertion level), a new semi-stasis when hiking uphill, another one when hiking downhill, another one at rest.
The main thing I’ve learned in the winter is that nothing is constant, and the clothing system usually degrades (accumulates moisture) the longer you hike (even if you don’t “sweat” because you will emit vapor and that will condense as liquid moisture in your clothing layers in cold temps, and then your body heat will be sapped to evaporate it). So carry a dang big puffy for the end of the day, because that’s an important insurance policy.
My approach to winter layering is this:
So I carry more weight than is necessary (high loft insulation layer) on trips where I have to move fast and sweat to meet some arbitrary objective I set 🙄
So to save weight on clothing: move slower, don’t sweat. That’s rule #1.
Selecting layers that “wick” the “right” way … I think that’s how Stephen is going to educate us in this series! Maybe that will be rule #2.
I used to wear shorts and short sleeve shirt in summer to stay as cool as possible
Then I switched to long pants and sleeves for sun and bug protection
Initially, the long sleeves and legs were annoying because they get wet with sweat. And it seemed like I was getting hotter.
Except after a while I am thinking it doesn’t make me hotter. The extra fabric will actually cool off a little from evaporative cooling so maybe it’s about the same.
If the fabric was wicking maybe it would be cooler?
I seem to remember an article on BPL about this a few years ago
excellent info. Thank you. I would be interested in learning more about fabric systems and how they work. For example Paramo has a multi layer fabric it uses to push water away from you. Does it work and how well?
Would like to have seen some other fabrics besides polartec tested. Specifically curious about the phasic fabrics from Arcteryx. I own several and they “seem” to perform quite well in my anecdotal assessment
Thanks for another good article. In your future tests of wool it would be nice to compare alpaca. I like alpaca plus bison down, yak and others.
Interesting, but sounds like article 2 will probably answer more questions :)
I do remember when Patagonia came out with their Thermal Weight base layers (I think it was named at least three different names- never quite understand why they do that). I thought this will make a great mid-layer as often the older R-1 was simply too heavy. The thermal weight didn’t make a great mid-layer at all and I thought I had wasted my $. Then someone here mentioned that it makes a great base layer in cold conditions. I was skeptical as I was in the camp of lightest base layer year round is what you want. So I tried it. Voila- a great base layer in cold conditions!
My go to base layers (outside of cold) are the (now discontinued) Patagonia Lightweight Capilene and OR’s Echo line, which God bless them they haven’t discontinued. Upon casual examination, they look almost identical (and are pretty much identical in weight).
Please include one of these in further testing.
Thanks
Mike
HI Karl: Both Paramo and Buffalo are interesting systems. I did a limited test on a Paramo Ostro fleece and Bentu jacket several years ago. Both are treated to be hydrophobic. Both pieces offered good MVTR. The Bentu is a rather heavy microfiber wind layer. It had decent HH for a wind layer. Air permeability is around 3 CFM/Ft 2, so good wind blocking. The Bentu has very good breathability, most likely, due to its microfiber fabric. I would say both pieces should offer good vapor transmission performance, but since they are treated to be hydrophobic, I don’t see how they would wick. If sweat evaporates on the skin or an underlying layer, the vapor may well escape through the layers as long as it does not encounter temperatures below dew point or freezing. Then, mechanical ventilation such as pit zips may be necessary to allow vapor to escape. I did not conduct wicking tests on these garments.
I have never seen a Buffalo Systems garment in real life. I have looked at photographs of some of the garments. The skin side can have the appearance of a fleece but it does not appear to be napped. It appears to be pile, which are yarns (collections of individual fibers) that unlike fleece or napped base layers, would contain well defined capillaries. As such, they probably wick very well.
If anyone has examples of these systems and are curious about their performance, I am happy to look at them. I would like to test a Buffalo systems pile jacket. If you are interested in sending me one of these, just PM me.
Hi Randy: Until your post, I had not heard of Phasic. I thought maybe it had some cool Phase Change technology. But, no. I took a look at the Arcteryx website and it seems to be sort of like Patagonia Capilene which does not describe a specific fabric technology, rather a generic term for a base layer that might use a variety of technologies. In my brief look, I found references to bicomponent yarns, combinations of wicking and non-wicking fibers and just references to Phasic without any further explanation. If someone wants to send me some Phasic examples, for testing, I am happy to do it. I just need them for a few days. PM me and let me know what you have.
By the way, I started with Polartec fabrics because I can buy them by the yard and they supply lots of brands and seem to incorporate a lot of the existing technologies. Buying fabrics by the yard is relatively inexpensive and I can cut them up for R value testing on the guarded hot plate. Testing finished garments is another story. The test garments will have far higher costs and thermal performance cannot be tested without destroying the garment.
I am happy to test a wide array of brands and fabrics but someone has to provide them to me for testing. If members have a particular wicking garment they want tested, PM me and prepare to live without it for a few days. Of course, I will not be cutting it up for thermal testing. The wicking/drying test and drop testing can be easily and quickly accomplished.
I recently went snowshoeing in 18-25 degree F temps with a Brynje merino wool layer under a 150 weight Icebreaker Cool Lite shirt. The Icebreaker outer layer was saturated over the areas of heavy perspiration, with moisture visible on the slim tendrils of the fabric, but in the same areas the underlying Brynje next to my skin was only very slightly damp.
The nice thing (or one of the nice things) about my Buffalo Systems jacket is that it has full length zips on the sides, with a velcro attachment at the bottom to keep it closed at the hem. So you can pretty much fully vent on the sides when really working hard.
When I did my winter trip with Ike in northern Michigan I wore a Montane Extreme Smock (similar concept as Buffalo) which I bought for the trip. It was much too warm when working hard (even in ~10-15 degree temps with a wicked wind that drove temps further down), so even with those zips open I’d sweat a lot but once we stopped and I put on a jacket everything, including me, was dry pretty quickly. (I sweat a lot easily and always have, I once did a winter dayhike up Mt. Si with my brother while it was lightly snowing/misting in ~25 degree temps wearing only a KUIU Peloton 97 shirt on my upper body and didn’t get cold until we stopped regardless of being quite wet and still sweating). I became a fan of the system after that trip with Ike, and bought a lighter Buffalo Systems jacket for winter use, as well as a pair of bibs.
Of course, being me, I haven’t used them as a system because I haven’t been on a true winter backpacking trip since I bought them. But I have no doubt they’d work great for someone like me. I need to use the jacket on a cold winter hike one of these days.
I’ve lost track with the what Paramo are selling now but have a number of Paramo items from around 15 years ago that I still wear during the shoulder seasons. The old single layer shirts I have certainly do wick. Pour some water on a hard surface and drop the shirt furry side down and water is drawn up onto the smooth outer side. It doesn’t spread outward by much but within a short time the inner surface feels noticeably drier than the outside. The fabric does become saturated fairly quickly but I’ve found that it does dry reasonably quickly if you stay active.
I use the thicker double layer fleece in winter though usually with a wool layer or two beneath it. I be had a layer of frost across the outside though suspect this is mostly from vapour moving through the outer layers.
I enjoyed the testing report though do wonder if placing the fabric over something that simulated a skin surface would be better than a sponge, after all a sponge is “designed” to hold on to water.
Hi Mike: I thought article 1 was already long enough. So, more to come. I wish I understood the naming conventions. I have two Polartec bottoms The other is a much lighter, loosely knit fabric. Both are hydrophobic. They don’t wick and, they work very well for me. As I mentioned in the article, I don’t know if they started out hydrophobic, but they are now. The one in the photograph is a little warmer but much heavier than the one they label thermal weight. Sort of like the 9110 style in the report. The one called “thermal weight” is very light. It is lighter and looser knit than either the 9076 or 9077 styles that I tested. I am confident that if I cut the thermal weight (not willing to) and tested it on the hot plate, it would show less warmth than the 9076 or 9077 styles and a lot less warmth than the 9110 style. So, what does thermal weight mean? I don’t have a clue. However, I am confident that my Polartec thermal weight bottom is no warmer than one made from Power Dry 6000 or Delta Cool Mesh 6093 which are not marketed for warmth, just wicking.
So, does your thermal weight wick? Mine does not. Take a dropper and apply some drops and see if the drops are absorbed or just sit on the fabric. With my thermal weight, the drops will sit on the fabric until they evaporate.
Hi Chris. I appreciate your description. Paramo makes two kinds of fabrics. The first kind is rendered hydrophobic by application of Nik-Wax. It will not wick until the DWR coating wears off. At this point, Paramo recommends reapplying Nik-Wax. The other type is called Parameta. It is designed to wick and not rendered hydrophobic with Nik-Wax. I would suggest, if you have a garment that was coated with Nike-Wax that the coating has degraded. Of course, if it is Parameta, it is probably doing what it is supposed to. You can read about this here.
Concerning the sponge. You are clearly a careful reader! The method of water application in a wicking test can greatly influence the results of the test. I have tried a variety of materials and keep coming back to a sponge. What I am trying to avoid is imparting energy or mass that exceeds what is available on the skin surface. I think, by the way you worded your comment that you are concerned that water could wick out of the sponge and then back into the sponge. It is possible, but remember, the way wicking works: wetting, capillary transfer, spreading and evaporation. It it cannot evaporate, saturation occurs and wicking stops. In the wicking test, to work in reverse, water would would have to move into the sponge and then evaporate into the environment around the sponge. Since this environment has very high humidity and high temperature, evaporation and therefore backwards wicking is unlikely. At some point, one might expect the sponge to run dry. Then wicking would stop or possibly moisture move from the fabric to the sponge by diffusion. I use a thick, large sponge that sits in a small pool of water, so it has a reservoir available to replace water that leaves the sponge. If any of these things happened drying would be seen in the thermal image occurring around the sponge perimeter. I have never witnessed this sort of behavior. When I run the test for longer periods, drying always occurs at the kettle perimeter and works its way back to the sponge. Sort of like watching the video in reverse. The sponge never dries in the video. If it did, the garment surface over and around the sponge would warm. It never has. So, perhaps someone in the community can suggest another method and if it is something I can implement, I will try it.
Ryan…..What other ways do you use Polartec Alpha as a midlayer besides under a rain layer?
Stephen- I have both tops and bottoms (actually a couple of each) of the “thermal weight” Patagonia ones. I’m assuming they’re wicking as the moisture is moving from inner to outer and leaving them pretty dry, pretty quickly. Possibly another action going on???
They aren’t overly warm, but definitely warmer then most light base layers (ie the Capilene Lightweight/OR Echo ones)
It seems to me. the article is discussing wicking materials and what a lot of people are interested is the overall water transportion on a system level and in particular during the winter.
I tend to agree with Ryan. It seems to me the key ot to “Not Sweat”. Wear multiple layers, and adjust dynamically. It is almost like you want to never be warm, just cool and dry. While the focus is on gear, a lot of moisture/water control is technique.
Here is an old article that was published in BPL years ago. https://gizmodo.com/how-the-navy-seals-prepare-for-extreme-cold-weather-sur-1737644998. My understanding is that the of all the Navy Seals courses, the artic one is the most demanding. It takes a lot of practice to adjust your clothing correctly in cold enviroments. My 2 cents.
Good article but somewhat confusing in that VAPOR transmission has not been mentioned much.
I like polyester base layers and have different weights for different temperatures activity levels. Heavier weights DO insulate more, despite this article’s observations, unless I have misunderstood.
I want hydroPHOBIC base layers to let sweat vapor through the base layer to outer layers. Why do we say , “Cotton kills”? Precisely because cotton IS highly hydrophilic and keeps moisture next to our skin, cooling us dangerously. Wool is somewhat hydrophilic itself when compared to polyester base layers.
“Part II” will be interesting to me if vapor transfer is addressed in more detail.
Hi Eric: Thanks for reading and your comments. Vapor transmission is of great importance. I have discussed this at length in prior articles and it will definitely be part of a future article. I think wool vs polyester will be next up. Concerning warmth: You can review table 2 and compare the warmth of different weights and construction of base layers. My point is not that higher weights are not warmer. They tend to be. My point is that it is an inefficient way to keep warm for two reasons: 1) higher weights tend to reduce wicking performance (seen figure 9) and 2) The increase in warmth for the weight gain is inefficient (shown in figure 7). The best course if you are using a wicking layer is to to wear an excellent wicking layer against your skin and a mid layer that provides adequate warmth.
Hi Stephen
A very detailed article. Thank you.
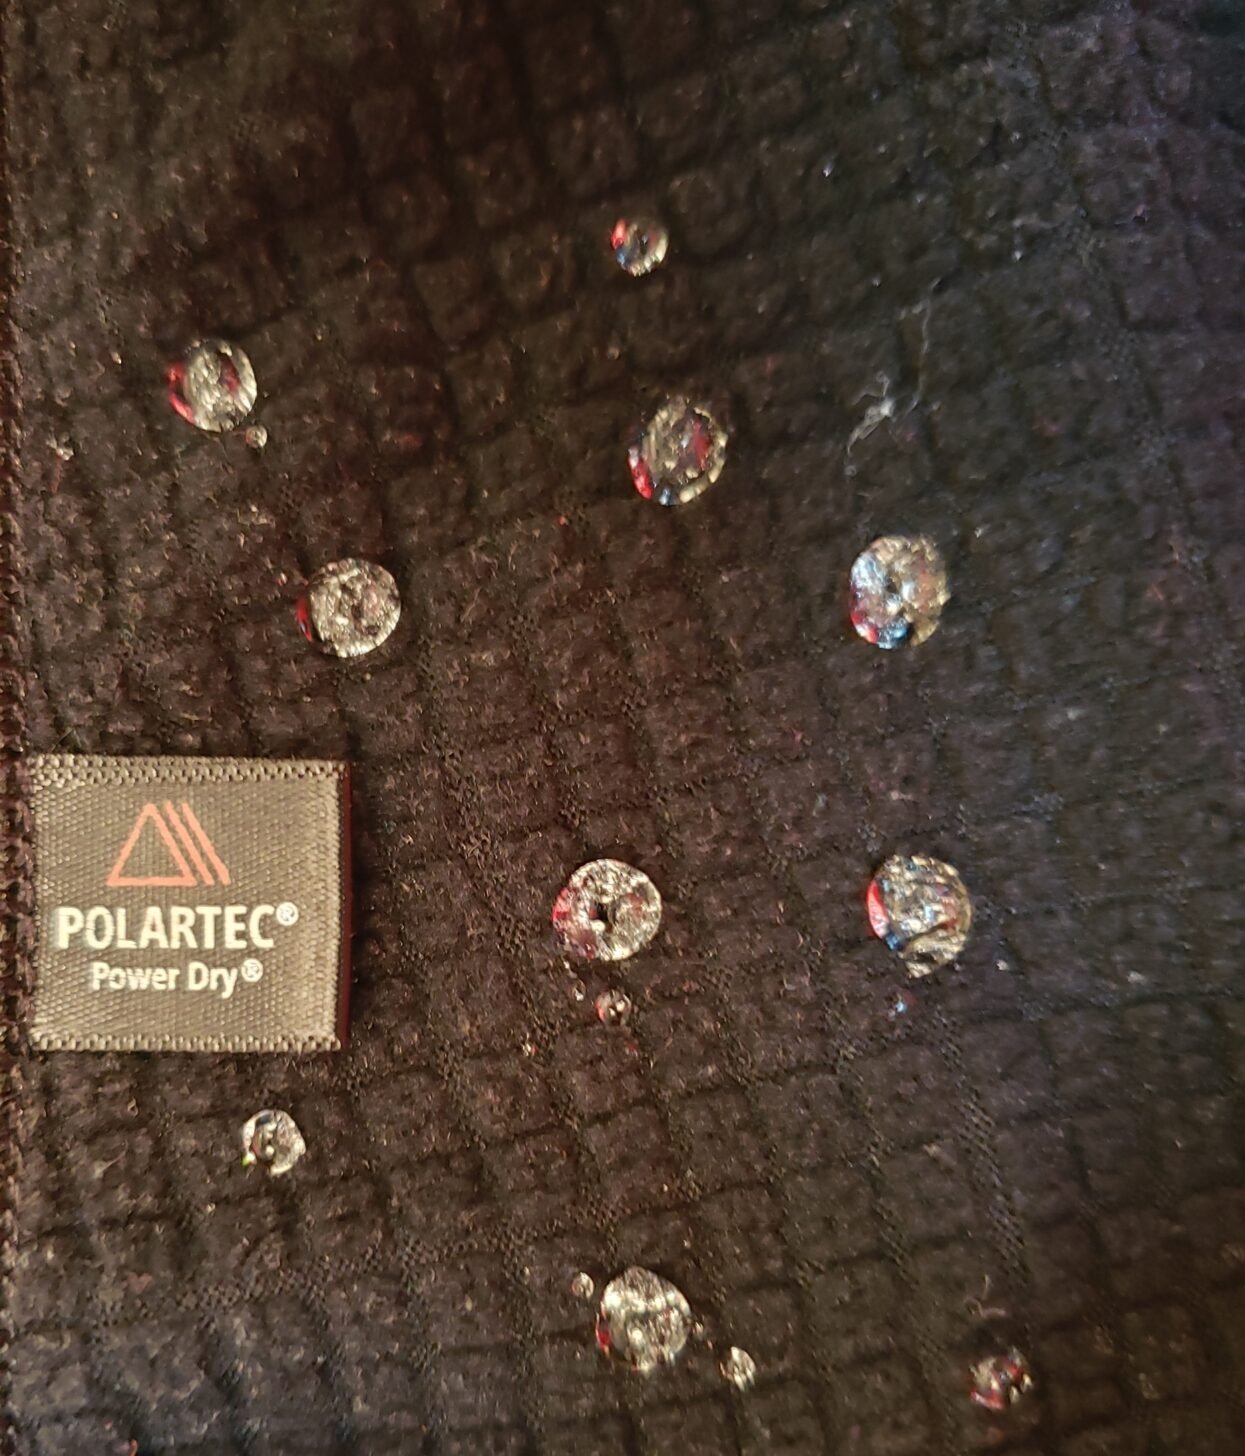
The first photo in your article shows some brown Power Dry fabric. Interesting. I bought some of this fabric in 2007 or 2008 off-label at the local fabric shop. It was fairly cheap. See attached. A close-up detailed examination of my fabric shows exactly the same napped and knit appearance as your photos.

This was its first outing. The top has since been relegated to home use as it was not all that wonderful.
I wonder whether it was in production BEFORE Polartec decided to sell it as one of their products? It would seem extremely likely. Hum . . .
Cheers
Hi Roger. I suspect I purchased both of my Polartec bottoms at a shop in Keane, NY, in the Adirondacks around 2015. So, I am guessing yours is not the one in my photograph.
One thing I learned from this project is that a lot of the Polartec fabrics look similar but perform differently. And, of course, you can’t really guess how they perform by looking at them. At least I can’t, not even under the microscope. I think among other things, their chemical treatments vary a good bit from style to style. But the pillar density and spacing can vary and the fibers can vary.
Of course, there are always a lot of knock offs of Polartec products. They did not patent their original fleece, but now they have lots of patents, many of which have already expired. Some of the knockoffs look like the real thing. Others can be pretty readily recognized as not the real thing.
It would appear that your backpack is not consistent with ultralight backpacking!
Become a member to post in the forums.