Introduction: what does moisture-wicking mean?
Moisture management is the process whereby fabrics enable perspiration (sweat) to move from our skin through our clothing layers and finally, into the environment.
It is a fraught journey with iterative rounds of condensation, evaporation, and even freezing throughout. Moisture-wicking is part of how this journey is accomplished.
Many of those who spend a lot of time working or recreating outdoors have made an effort to learn how to dress to try to achieve effective moisture management.
We typically accept that moisture-wicking clothing (including base layers and underwear) is the best way to accomplish moving sweat (moisture) away from the skin and into outer layers where it can evaporate. This process helps keep us comfortable and dry during cold weather.
The best moisture-wicking performance apparel is generally made with synthetic fabrics. While natural fibers including merino wool and cotton are used in some layers that are considered to be moisture-wicking, they aren’t optimal. In this article, we will focus on polyester base layers. In a future article, we will evaluate the performance of merino wool in comparison with polyester.
We know that moisture management does not always work very as we expect during high levels of exertion and cold weather. So we tolerate our moisture-wicking garments becoming wet (or even saturated). And we accept that dry skin and dry clothing layers may have to wait – until the next major innovation in moisture-wicking clothing is announced.
This article deals with the subject of wicking in base layer fabrics and specifically asks the question: how does moisture-wicking work?
When this article was initially conceived, the plan was to conduct wicking tests of many fabrics and garments to see how they compare. But, as I started looking at Polartec fabrics, I discovered discrepancies between marketing claims and the results of my moisture-wicking tests. So, I turned my attention to trying to investigate the accuracy of the marketing claims by adding two additional types of wicking tests and evaluating a larger variety of Polartec fabrics. After we discuss the fundamentals of wicking, this article focuses on the evaluation of Polartec fabrics and what was found.
The manufacturers of moisture-wicking garments claim their products deliver superior wicking performance. That is not necessarily so – wicking claims are like breathability claims. There can be a wide gap in the moisture-wicking performance of different fabrics just like there can be a wide range of breathability performance. Unfortunately, the consumer cannot know what they are buying unless they know how to test for it. In this article, I will describe how end users can conduct simple but useful wicking tests using a very low-cost device.
In this article, I will not dwell on the effectiveness of moisture-wicking as a tool to meet the goal of dry skin, dry clothes, and comfort. Rather, I will be discussing how moisture-wicking works and the abilities of specific Polartec fabrics (and a few non-Polartec fabrics) to move sweat away from the skin on its journey to the environment outside of our clothing. The effectiveness of wicking and alternative moisture management techniques to promote dry clothes and skin will be discussed in a future article.
How does moisture-wicking work?
Moisture-wicking is a process of immense importance in our lives. Without wicking, most plant life would not exist. From small shrubs to giant redwood trees, wicking transports water and nutrients from the ground to every portion of the plant structure including the tallest limbs and farthest leaves. Wicking makes candles burn. A candlewick, on its own, will burn and turn into ash in seconds. Paraffin wax, the main ingredient of candles, is made from hydrocarbons and is difficult to combust. However, by placing an absorbent fiber wick of the right diameter into a block of paraffin wax, you can sustain a flame for hours without burning the wick. In a candle, the wick is covered with wax. Upon lighting the wick, the wax melts and then vaporizes. The flame consumes vaporized wax, not the wick. The heat from the flame causes adjacent wax to melt and flow up the wick. As the melted, flowing wax nears the flame, it vaporizes to maintain the flame. All of this is due to wicking. Of course, wicking can also be a critical component in moving sweat away from our skin to a place it can evaporate, leaving our skin, in theory, dry.
To appreciate the wicking process, you need to understand the science of what supports wicking. In order to avoid putting readers to sleep with a technical explanation of this, I will turn to professionals in the following videos who provide easy-to-understand explanations of the processes involved and even provide a wick rap for those best served by earworms.
- Wicking Fiber Video – this video illustrates how moisture-wicking and capillary action works
- Moisture Wicking Clothing Explained – this video presents the relationship between capillary action and evaporation and how they work together to drive the wicking process in concert with both hydrophobic and hydrophilic fibers
Before going further, make sure you understand the concept of cohesion, which is the molecular electrical force that bonds water molecules into a drop, and adhesion, which is the molecular electrical force that bonds water molecules to non-water molecules (including fabric material fibers). If you’d like, watch the videos twice and absorb all the wicking goodness.
We have learned from the first video that water molecules have a slightly negative charge. They will be attracted to and cling to non-water molecules (fiber surfaces) that have a positive charge. The stronger the positive charge of the non-water molecule, the stronger will be the attraction of water molecules to non-water molecules.
We can see from the videos that wicking requires a capillary. A capillary can be an actual tube that is solid all the way around. A capillary can also be a construction that performs electrically like a tube, i.e., water molecules surrounded by molecules that are positively charged. In moisture-wicking fabrics, capillary tubes are formed by multiple parallel fibers within a yarn. In a moisture-wicking fiber, the yarns have multiple fibers whose spacing is maintained by twisting the fibers together. The tighter the twist, the smaller the spaces between the fibers. Tighter twists can support higher wicking pressure. It will move water farther along the capillaries. Looser twists can move larger volumes of water but for lesser distances. Figure 1 illustrates wicking fibers.
In Figure 1 we see yarns that are knitted together. The yarns consist of bundles of individual fibers. In this example, the bundles are somewhat loosely formed and contain minimal twisting. These yarns are designed to move large moisture volumes a short distance. This type of yarn is present in all of the face sides of the Polartec moisture-wicking fabrics examined in this article. The face side of the fabric is oriented away from the skin; the fabric side that is oriented toward the skin is called the back side or skin side).
Hydrophobicity vs. Hydrophilicity
Two more words mentioned in the videos must also be understood: hydrophobic and hydrophilic.
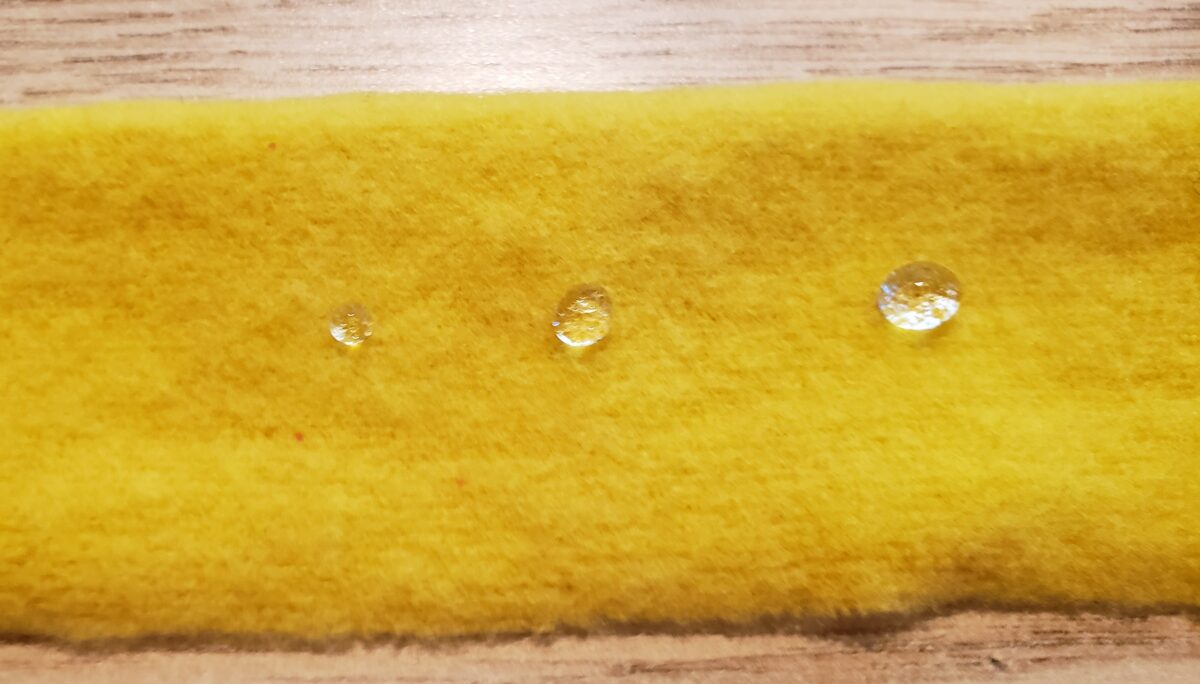
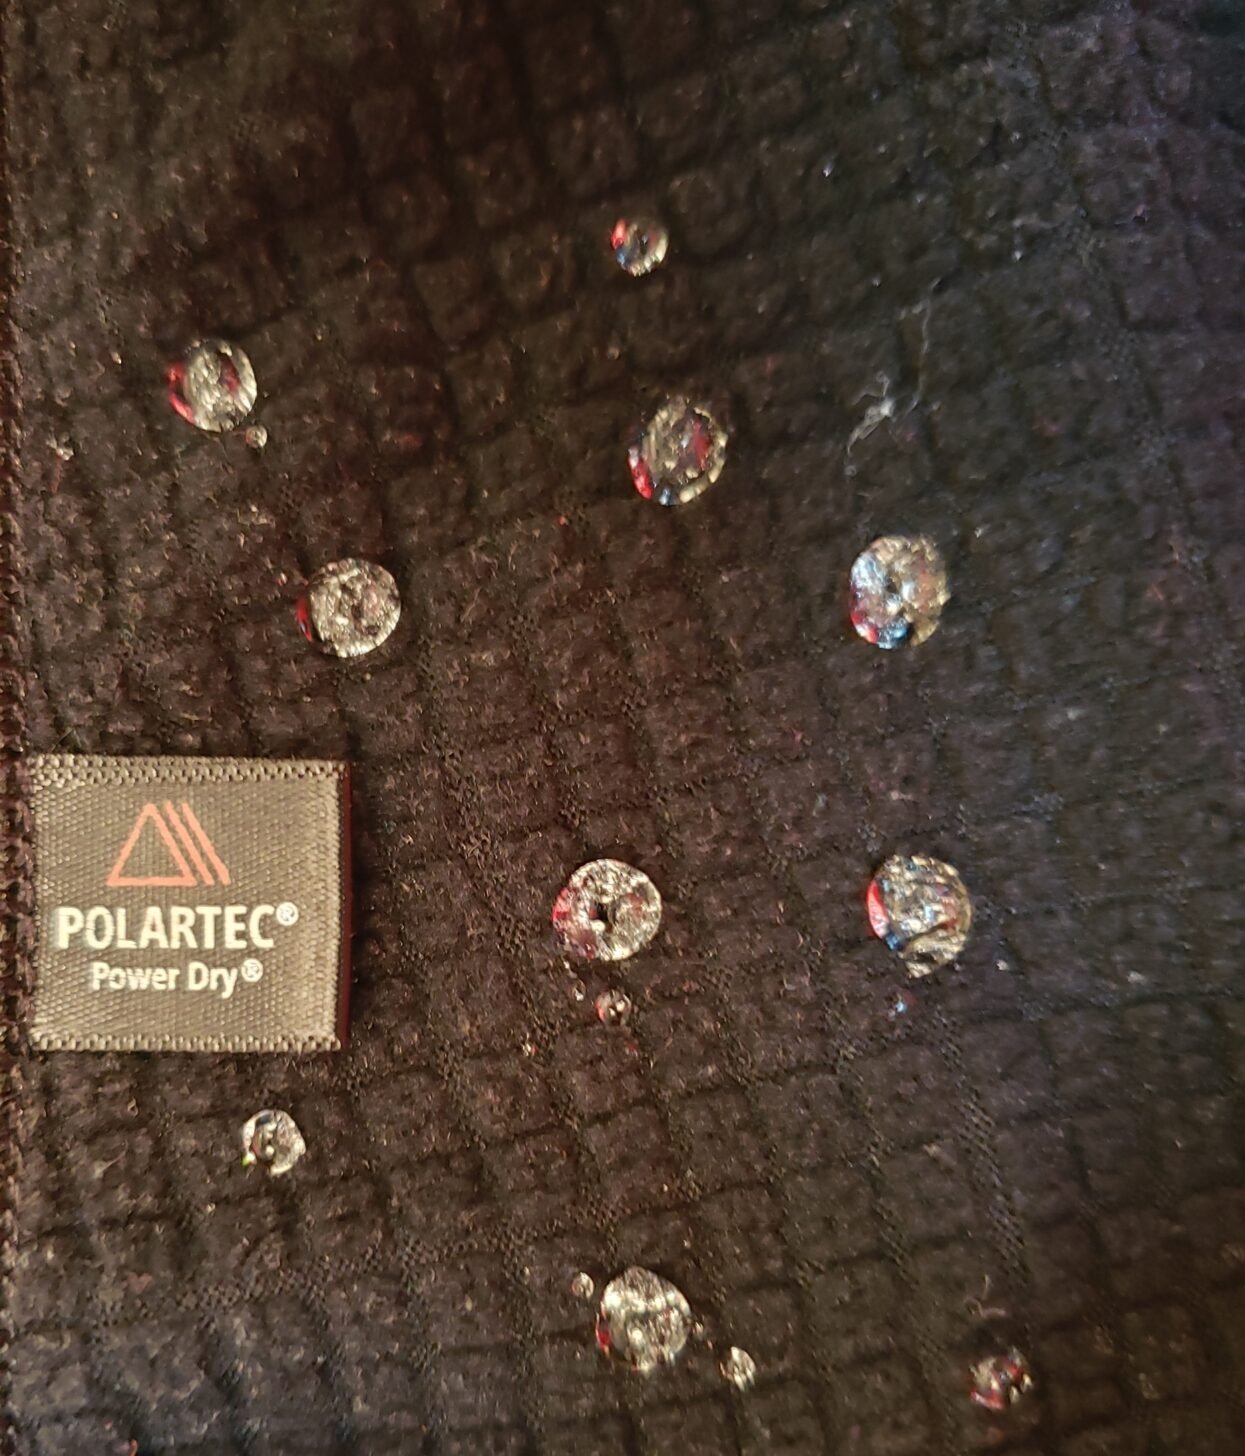
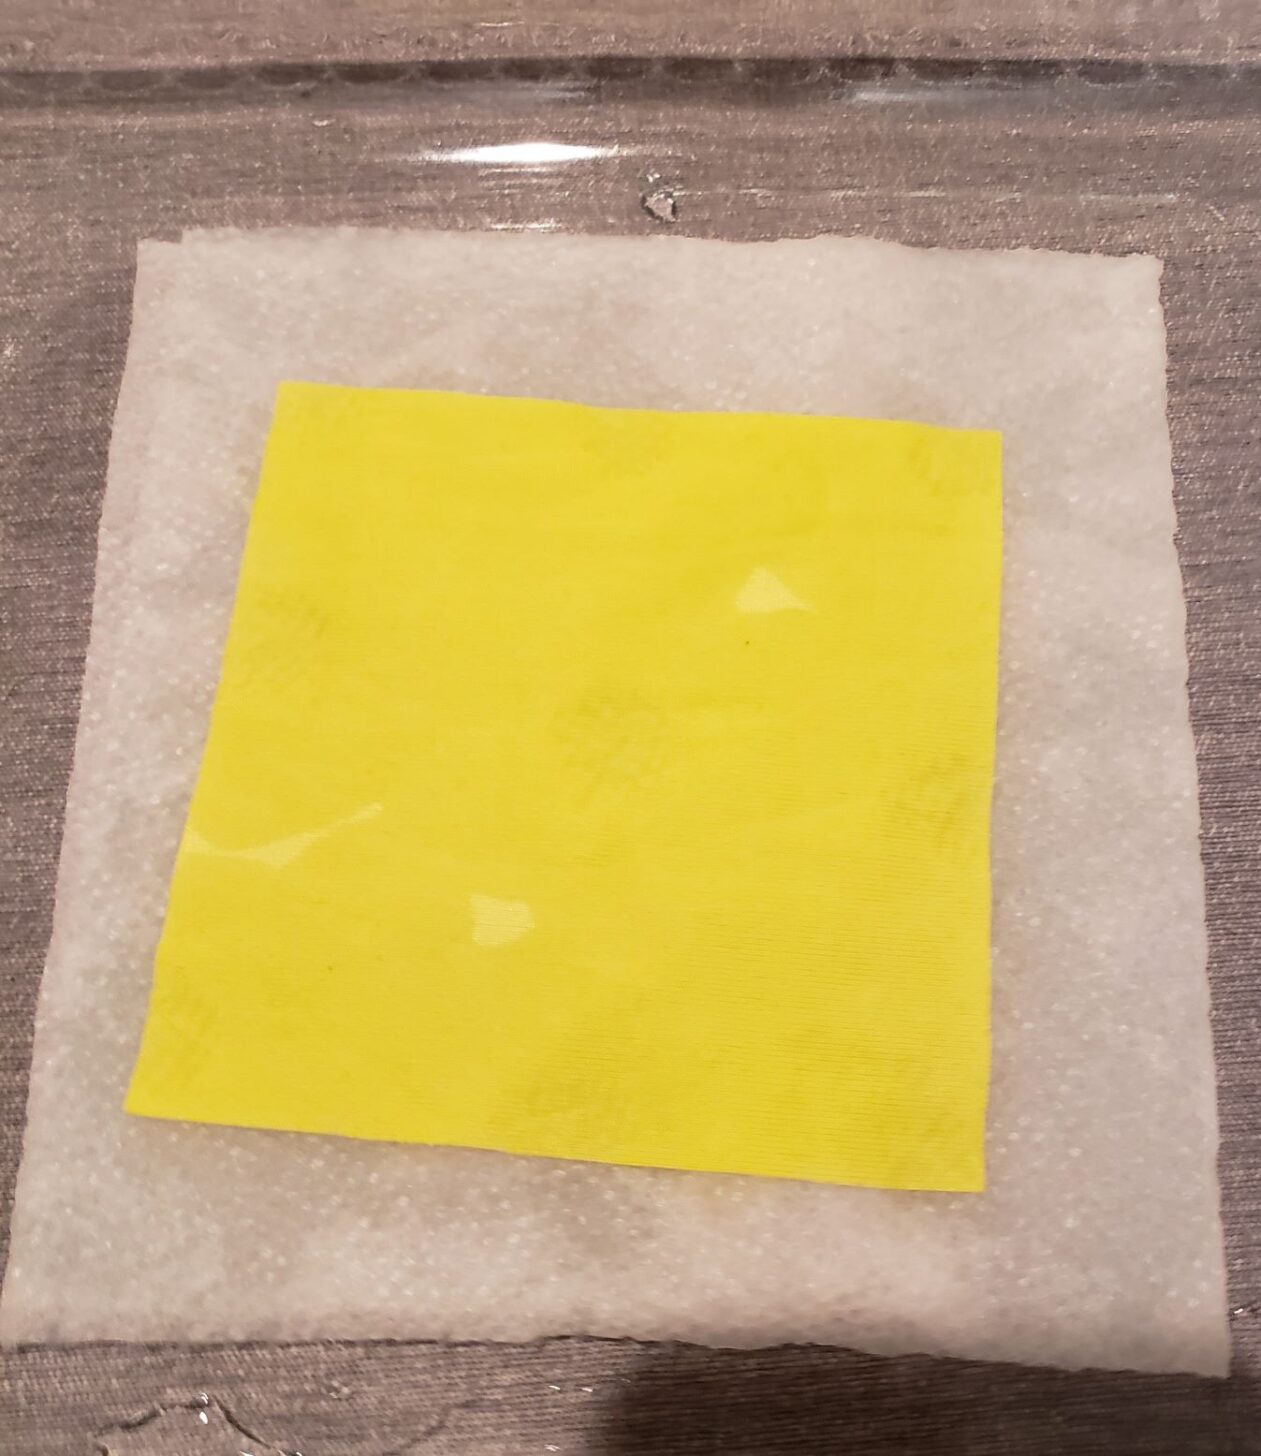
Hydrophobic (water-fearing) fabrics are water repellent. If you squirt a drop of water at a hydrophobic fabric, water beads on the surface and stays there, just like you see in the photograph at the beginning of this article. Hydrophobic fibers have a strong negative charge – they will repel negatively charged water molecules. Raw (untreated) synthetic fibers tend to be hydrophobic.
Hydrophilic (water-loving) fabrics are water absorbent. If you squirt a drop of water at a hydrophilic fabric, it will be absorbed into the fabric. Hydrophilic fibers will have a positive molecular charge and will attract water molecules. Cotton, wool, and other natural fibers tend to be hydrophilic.
Contact Angle
The degree of hydrophobicity and hydrophilicity will vary amongst fabrics. There is a continuum in water attraction to, or repulsion from, a solid material that is described by a concept called contact angle. Contact angle permits visualization of those forces by simply observing a drop of water applied to the surface.
When a drop of water is placed on a surface, the amount of adhesive force from the surface material determines the shape of the drop. If the surface is highly hydrophobic, the surface adhesive force is far weaker than the cohesive force of the water molecules forming the drop. In this case, the drop will be spherical or nearly spherical (the force of gravity can provide some flattening at the bottom of the drop).
If the surface is highly hydrophilic, the surface adhesive force is far stronger than the cohesive force of the water molecules forming the drop. In this case, the drop will flatten and spread out as the water molecules travel over one another to reach the highly adhesive surface molecules.
The difference in drop shape due to the strength of adhesive forces is described by the contact angle.
The figure below provides a Contact Angle diagram. In each case, the drop is red. The green line shows the contact angle that corresponds to the drop deformation due to the level of adhesion. Adhesion increases from Drop A to Drop C, so A is most hydrophobic, and C is most hydrophilic.
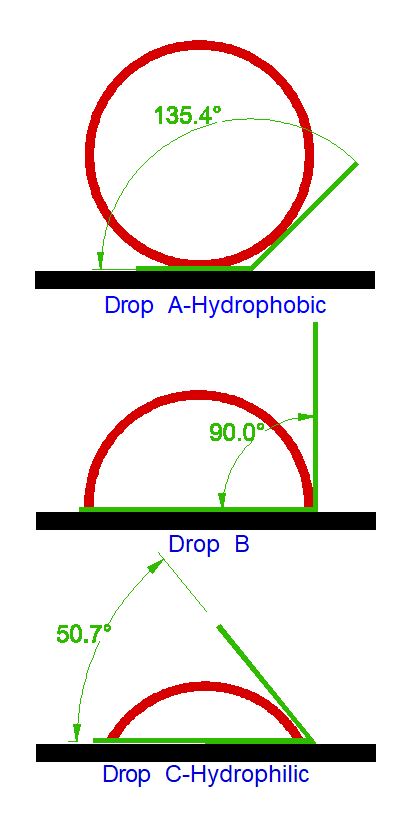
In general, a contact angle below 90° is considered hydrophilic and a contact angle above 90° is considered hydrophobic.
Let’s consider real-life examples in the photograph below:
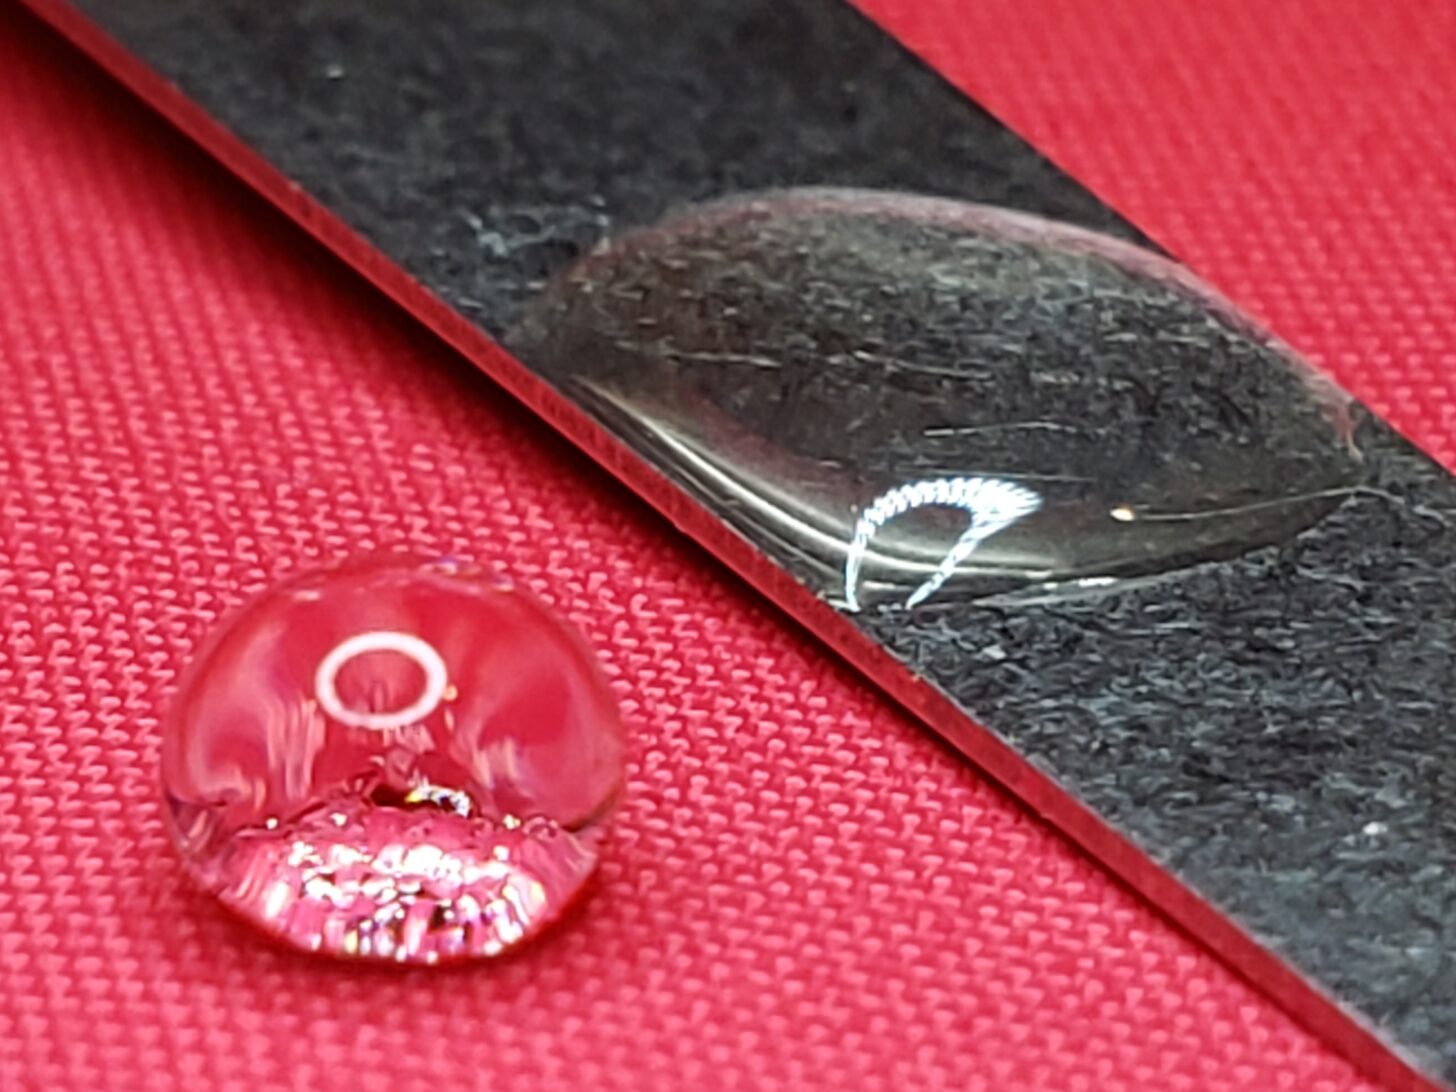
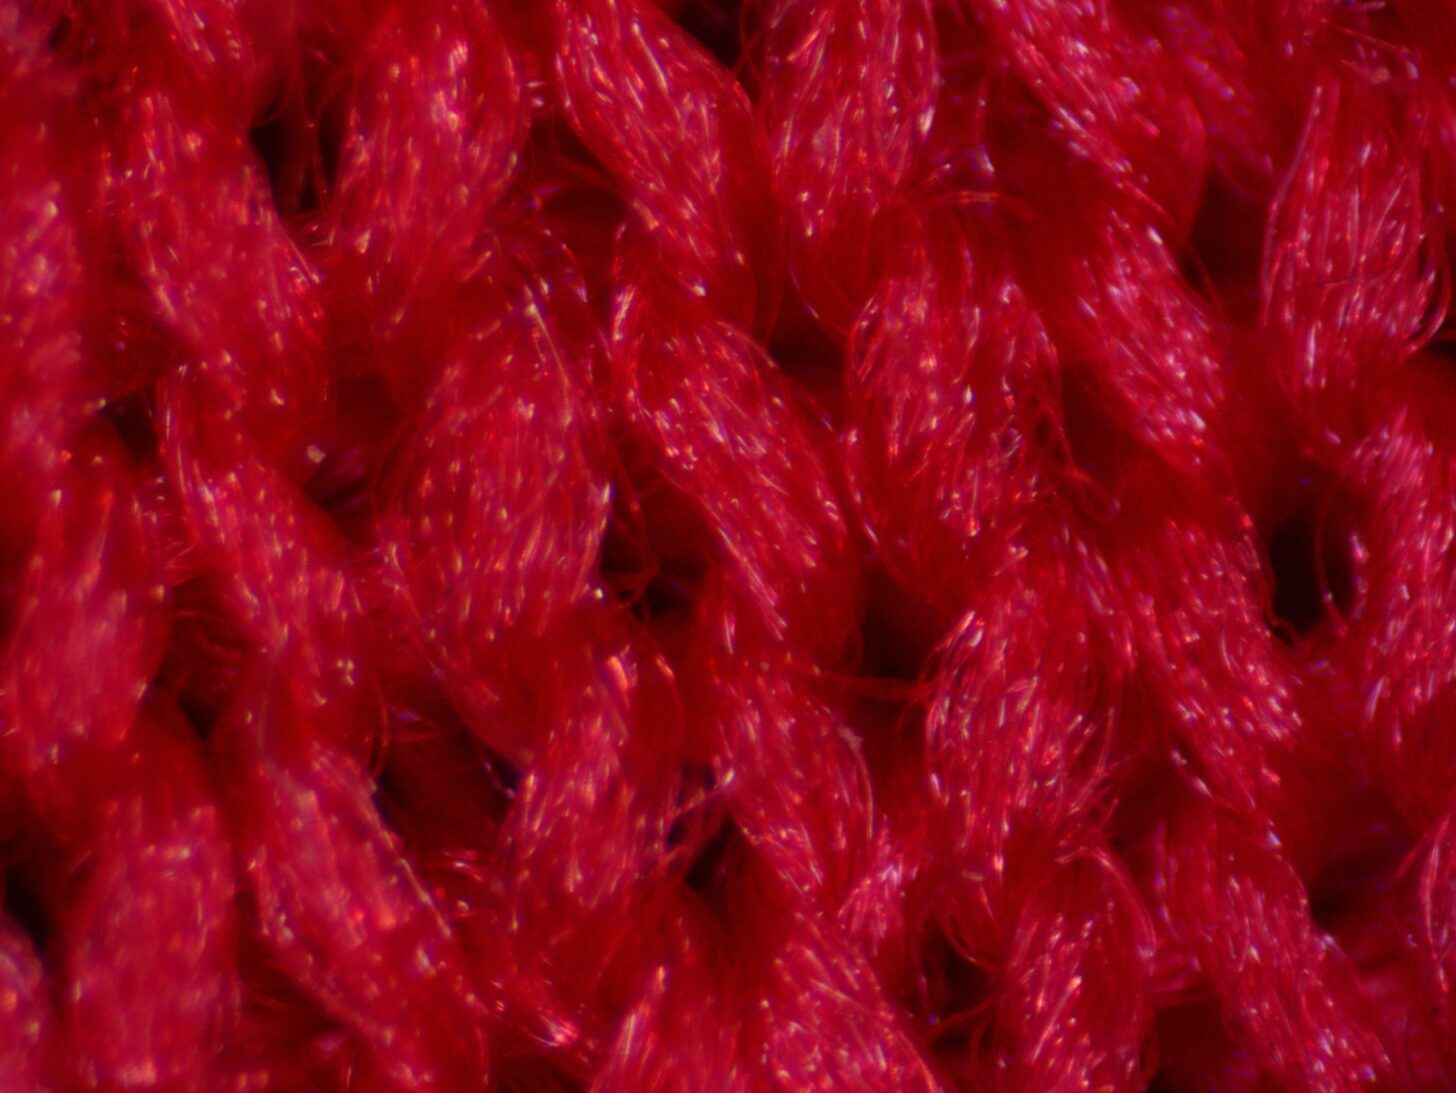
The red fabric is a Neoshell fabric. It is treated with DWR to render its surface highly hydrophobic. As a result, the left drop of water is nearly spherical. The contact angle, viewed at the bottom of the drop, is well over 90°. The flattening at the bottom is due either to the force of gravity or a low level of adhesive force. One way to determine this is to invert the surface. If the drop remains attached, there is some adhesive force. If the drop slides off, the flattening is likely due to gravity.
The right drop is visibly flat. The contact angle is very low, perhaps 20°. We can see that this surface is hydrophilic. The water molecules show a high level of adhesion to the metal surface. In fact, I flipped the metal strip upside down and the drop remained in place! If you think metal is necessarily hydrophobic, think again.
It is not absorbent, but it need not be hydrophobic.
By observing contact angle from a drop applied to a garment, you can immediately have a good understanding of whether the surface is hydrophobic or hydrophilic. Below, we will discuss the concept of wetting. The flatter the drop, the faster wetting will occur and the more readily wicking will proceed. The rounder the drop, the slower wetting will occur and the greater the difficulty in supporting wicking.
Don’t expect contact angle to remain the same over the life of a garment. It is affected by contaminants, wash cycles, changes in surface roughness, and more.
The photograph at the beginning of this article is a Patagonia base layer made from Polartec Power Dry. It has been washed many times over the years. It is now hydrophobic. I doubt it started that way, but back then, I was not checking my garments’ hydrophobicity and hydrophilicity with a dropper.
Here are some typical contact angles for real surfaces: a paper towel or fabric with excellent wicking properties may have contact angles of 0°. A drop will never form – the water will be instantly absorbed. Untreated polyester might have a contact angle of around 74°. Extremely clean glass can be very hydrophobic with a contact angle approaching 160°
Chemical Fiber Treatments Can Modify Hydrophobicity and Hydrophilicity
Chemical treatments during fiber manufacturing can change the hydrophobicity or hydrophilicity of fibers, allowing the moisture-wicking ability of fabrics to be controlled. A nearly hydrophobic raw material, such as polyester, can be rendered highly hydrophilic with the right chemical treatment. On the other hand, some chemical treatments of cotton can produce a fabric that is very hydrophobic. And of course, we can engineer just about any level of hydrophobicity or hydrophilicity we want.
Moisture Regain and Fiber Moisture Content Capacity
An important characteristic of a hydrophilic material for moisture management is moisture regain. This is the amount of water, by weight of the fabric, that can be absorbed from moisture in the air. Moisture regain is typically very low for synthetic fibers (e.g., polyester is about 0.4% – source). In contrast, the moisture regain for natural fibers (which is dependent on relative humidity) ranges from about 8% to 27% (cotton) depending on relative humidity and about 16% to 30% (merino wool).
The moisture content capacity is the maximum amount of water, by weight of the fabric, that can be absorbed into the fiber. Synthetic fibers have moisture content capacities of 1% to 5%. Natural fibers such as merino wool absorb as much as 60%. of their weight as water into the fiber core.
Why is moisture regain and moisture content capacity important? The higher the moisture regain and moisture content capacity of a fiber, the more moisture will soak into the fibers. Wicking for moisture management is about getting rid of moisture from sweat. The higher the moisture regain or moisture content capacity of a fiber, the more moisture will enter the fiber and the longer it will take for the moisture to evaporate out of the fiber.
Very little moisture can enter a polyester fiber. If the wicking ability of polyester is enhanced through chemical treatment to become very hydrophilic on its surface, it can transport large amounts of moisture with almost no absorption into the fibers. Wool or cotton do not share this property. When wicking large amounts of moisture, a significant portion of the moisture will absorb into the fibers. As a result, drying time for cotton and wool can be substantial in comparison with polyester along with the risk of getting cold when you stop your activity.
It is important to understand the conditions that are necessary to start and maintain water distribution through wicking. Let’s assume that our fabric has sufficient hydrophilicity to support wicking. Before wicking can start, wetting of the fabric must occur. Wetting means that air which is in contact with the fabric surface is replaced with water. If wetting does not occur, wicking will not follow. To sustain wicking, wetting must be continuous. If wetting stops because the moisture supply ends, wicking will end. In order for wicking to occur continuously, evaporation of the water from the garment must also occur at least as fast as water is being moved by the wicking process. Evaporation causes water that is being wicked to leave the fabric. If evaporation does not occur fast enough, fibers will become saturated, and wicking will cease. At that point, you will end up with a wet wicking layer that may take a very long time to dry.
How We Tested
Permeation Kettle Wick & Dry Test
This is a test I developed in 2015. It utilizes my permeation kettles. The test is developed to simulate the interface between skin and fabric. It is a simple test to perform and interpret.
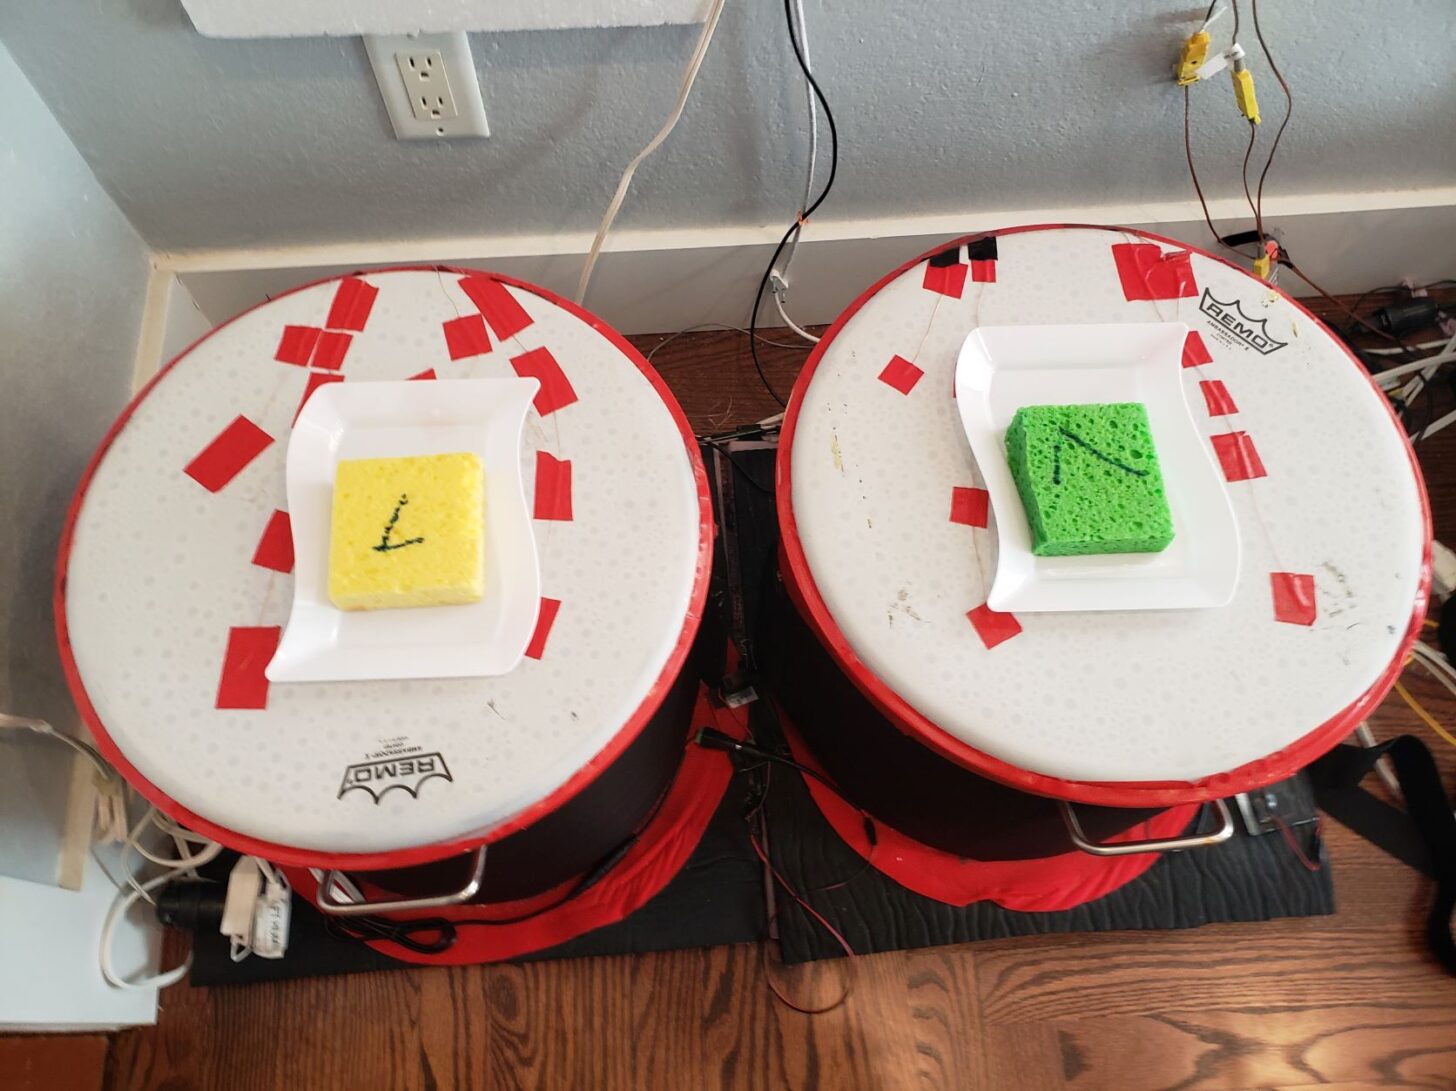
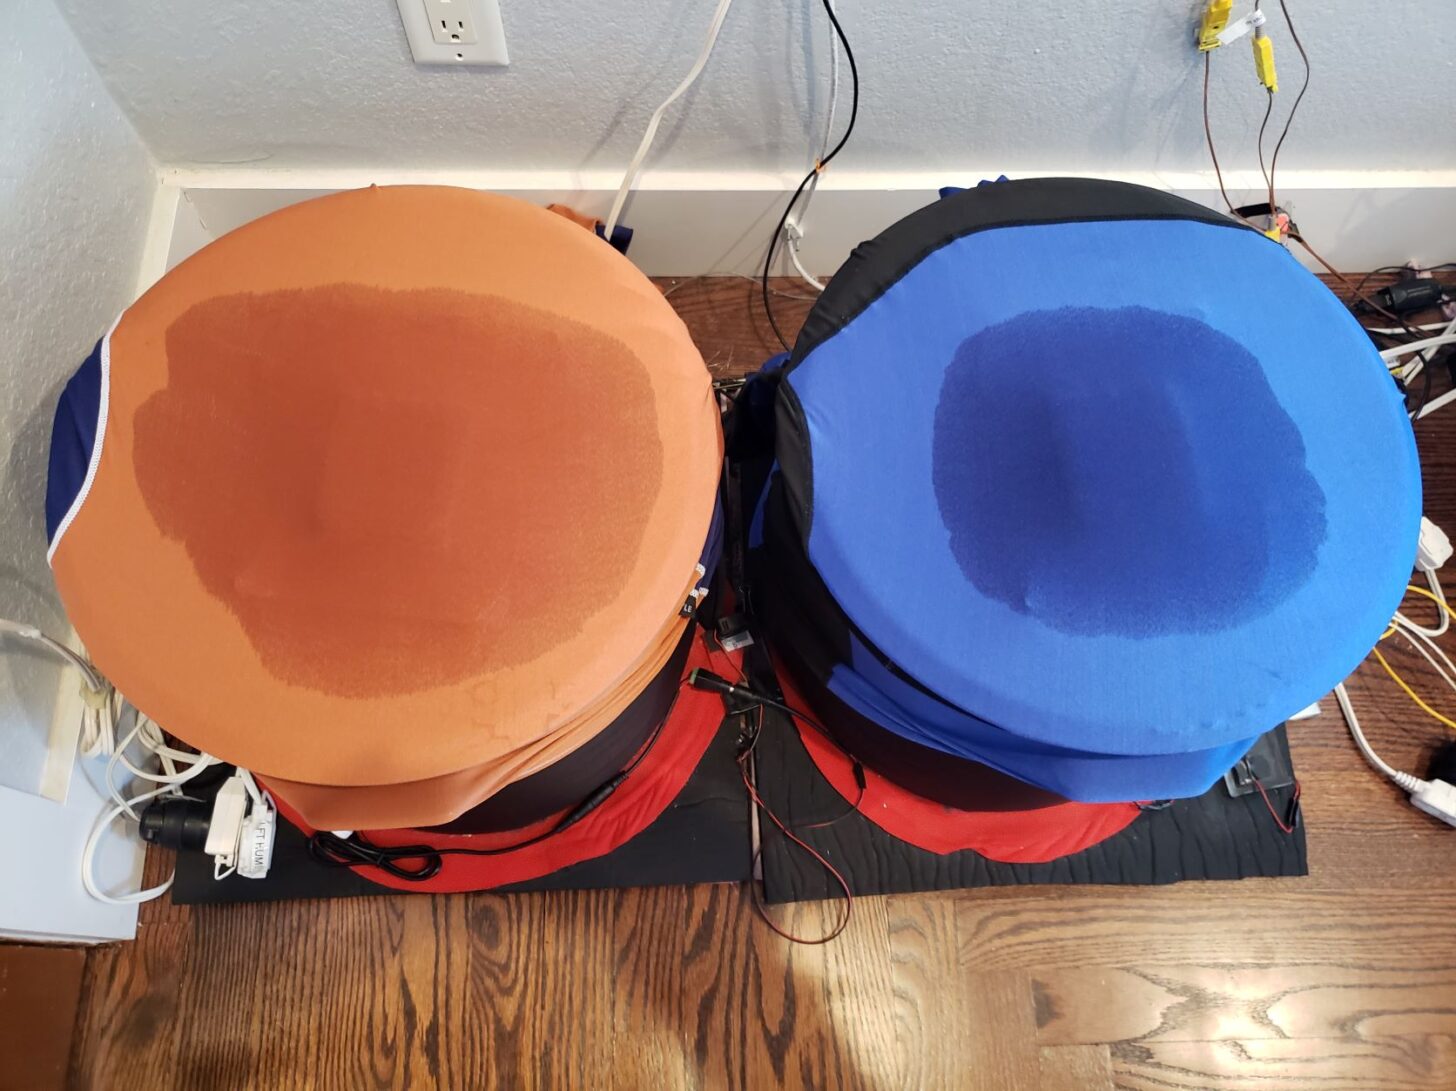
The kettle water is heated to 120 °F (49 °C). A sponge is soaked in 120 °F (49 °C) water and placed on a plastic tray. The weight of the soaked sponge and tray is determined. The sponge and tray are placed on the permeation kettle work surface. The test fabric is weighed and then placed over the top of the kettle. The fabric is pulled sufficiently tight to remove wrinkles. The bottom of the test fabric, which would normally be against the skin, is directly in contact with the wet sponge. The test operates for 1 hour. At the conclusion, the fabric is weighed, and the sponge/tray is weighed. We now calculate the loss of moisture in the sponge to determine how much water was transferred from the sponge into the test item. This is the quantity of water that was wicked. Next, we calculate how much moisture remains in the garment. Finally, we calculate how much water evaporated from the test garment as the test progressed. Evaporation is a critical metric. The more water that is eliminated, the better the fabric performance. Since we have calculated how much water remains in the test fabric at the end of the test, we get an idea of how much water is retained and how much risk might be posed at the end of an activity by using body heat to dry out our garment once our activity is concluded. This test directly addresses a number of issues relevant to our comfort that are not considered in many of the available wicking tests.
The thermal imager is used to produce a time-lapse video that shows the rate and extent of moisture spread due to wicking across the test fabric.
Figures 2 and 3 show the test setup.
Vertical Wicking Test
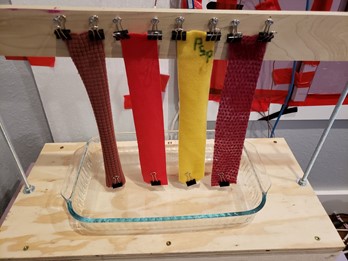
The vertical wicking test may be the most popular method of measuring wicking. It is very simple. Hang some fabrics strips into water. Water will travel vertically up the strips. After a predetermined amount of time, the strips are removed, and the travel distance is measured. The strip with the farthest travel is the winner. I have enhanced this test by using the thermal imager to produce a time-lapse video of the process. As wicking occurs, the surface temperature on the wet area drops due to evaporative cooling. The thermal imager allows progress to be easily seen for all fabrics. The wet area can be difficult to see visually on some fabrics. The thermal imager offers another benefit. Fabrics have a face and back. Wicking performance is not necessarily equal on the two. At the end of the test, I can flip the strips and check wicking on the other side. If wicking occurs predominantly on one side, that side will have lower surface temperatures than the poorly wicking side.
There are some problems with the vertical wicking test. The water source is an essentially unlimited reservoir in direct contact with the newly cut bottom fibers. With fibers sitting directly in water, there is no concern for fabric wetting performance – the fabric sample bottom is already sitting underwater so the issue of replacing air around the fibers with water is eliminated. Fabrics that exhibit poor wetting characteristics or uneven wicking on one side or the other will not be identified by the vertical wicking test. Wicking on one side or the other can produce the misleading appearance of excellent performance for the entire fabric. The wicking mechanism here has nothing to do with the skin to fabric transfer that occurs when wearing a garment. As we will see below, the vertical wicking test can cause fleece to appear to be a good wicking fabric. This is only because the vertical wicking test can exploit a wicking mechanism not available in real use. Figure 4 shows the vertical wicking device.
Wetting Test
The first step in establishing wicking is wetting. Wetting is replacing the air surrounding a fabric surface with water. This can happen faster or slower, depending on the fabric contact angle and the fabric construction. In order to better understand the role wetting plays in enhancing or degrading wicking performance, a wetting test can be completed. AATCC TM-79 is a popular example of a wetting test. Most of the popular tests operate in a manner that imparts additional energy (pressure) to a drop contacting a fabric that is not present in the skin/fabric interface during garment use. Such tests can distort the measured performance of fabrics that do not wet easily. In order to avoid what I consider to be a source of mischaracterization for certain types of fabrics, I created my own test that I felt would better represent the skin/fabric interface.
This is another very simple test. Three 4 x 4 inch (10 x 10 cm) samples of a test fabric are produced. Each is weighed. A saturated paper towel is placed on the bottom of a dish. Each individual sample is carefully placed on the surface of the saturated towel to avoid placing pressure between the sample and the paper towel. The sample sits for 30 seconds. At the end of 30 seconds, the sample is removed and weighed. The weight gain for each sample is calculated. The average dry weight and wet weight for the three samples are calculated. A sample with excellent wetting will show a weight gain that is significantly higher than the dry weight. A sample with poor wetting may show no weight gain at all.
A fabric that does well in the wetting test may still not provide exceptional wicking performance. A fabric can be very fast to wet but then lack the capillary capacity to move a great deal of water. This can be seen in some of the wicking specific fabrics included in this study such as the Polartec Silkweight Power Dry sample.
Figure 5 shows the wetting test setup.
Dropper Test
Placing drops on a fabric can provide a preliminary understanding of the speed of wetting and the possible extent of wicking performance. Even more information can be gleaned by adjusting the size of the drops. This is best done with an adjustable pipette. A hydrophobic or poorly wetting fabric will result in droplets remaining on the surface of the fabric. A hydrophilic fabric will absorb the drops. The better the wetting, or the more hydrophilic the fabric, the faster the drops will be absorbed into the fabric.
Standard AATCC TM-79 describes how drops can be applied for this test. Anyone wishing to have a low-cost, quick assessment of wetting and wicking performance can acquire an adjustable pipette online. I recommend the 10-100 µL version. When you get it, practice for a few minutes, watch the training video that is on the supplier’s website and have at it. The pipette is shown in Figure 6.

Now, let’s look at some of these tools in action.
Test Results: Video Observation of Wicking Performance
Dropper Test
In this test, we see an example of fabric with poor wetting performance (Polartec Power Grid) versus another fabric with excellent wetting performance (Polartec Power Dry). The poor wetting performance of the first fabric results in unreliable wicking performance.
Member Exclusive
A Premium or Unlimited Membership* is required to view the rest of this article.
* A Basic Membership is required to view Member Q&A events

Discussion
Become a member to post in the forums.
Hi Stephen
Do not equate the size of the pack with its weight! Big mistake!
My pack weighed about 12 – 13 kg, with food for a full week in it, plus everything one might need for extreme bad weather and sub-zero conditions. We got the extremes all right.
Thing is you see, when the pack is large you don’t need to really compress everything. So I didn’t. But I did have a winter down bag, and over-quilt, puffy, etc. Just not compressed real hard.
I suspect that Polartec may sometimes buy in a fabric rather than make it themselves. They all do that. Under magnification they do both look very similar.
Anyhow, thanks for the article.
Cheers
I always love your articles Stephen. Especially being independent of the manufacturers who are trying to sell us a story. I have a few scientist friends who’ve wintered in Antarctica, and one of the first things they were taught was not to overexert, because the windproof outer layers hold the sweat in, so it freezes once you slow down.
Here in Sydney we’ve just had a week of 30° temperatures (85°F) with intermittent heavy rain and about 90% humidity. The super lightweight synthetic fabrics from OR and Salomon seem to be the best T-shirt material that let air through to the skin, so there is some direct evaporation from the skin. They do get sweat wicking also. The heavy rain was too annoying for dogwalking in a T-shirt, so after some in vivo experimenting, the thin T-shirt plus a Patagonia Houdini was the least unpleasant option for an hour or so. A Labrador fur coat and intermittent shaking also seemed to work, for my colleague who doesn’t sweat.
I doubt there is a test for it, but real world wicking seems a bit different than the sponge block technique, because there is pressure from movement and pack straps etc. Some sort of sliding/pistoning mechanism might show whether the fabric allows more moisture transfer under conditions of movement, where droplets get physically pushed into the fabric. The shirt is always wetter under the pack straps. I also wonder about chemicals like sunscreen, underarm deodorant etc, which must greatly affect the hydrophobic/philic balance even on a day walk, and maybe have a cumulative effect.
The other ‘comfort’ trap is like alcohol for hypothermia, what actually feels good for you may be bad for you, giving a false sense of security/skin comfort. Again, not sure how you’d test for it, but evaporation from skin is probably mostly human powered at low temperatures, definitely more wind powered at 30-40+°C. Does evaporation from clothing occur due to inner heat (cooling the body) or evaporation/sublimation down a concentration gradient of a cold dry wind (less cooling of the body)? The ultimate advantage of a cold weather wicking layer would be if the sweat evaporation from the outer fabric was powered by the wind, saving core body warmth, not just feeling drier.
The similar technology is in the disposable nappies/diapers my grandkids wear, which hold the liquid in a hydrophilic layer, but feel more dry in the hydrophobic lining than the old cotton ones my kids started in. Not a problem if you can remove the wet layer, like Ryan’s exertional sweat, but risky if you can’t remove the moisture which then freezes.
Nice write-up! Admittedly I need to read it some more to digest the details.
In addition of the stated topic (wicking claims vs. wicking performance), which is important, the article also got me thinking about the role of wicking in actual use – particularly high-exertion activity in cold weather. Is wicking an effective method of moisture management, and if so under what conditions?
I’m pretty hot and sweaty and have tried a lot of different items and have gravitated to usually using a mesh baselayer. I haven’t done any testing of materials, but from a comfort perspective they have just done the best job for me.
Subjectively, I’ve noticed two main things with the mesh that seem to work. (1) The mesh structure holds the outer layers away from the skin. Other baselayers I’ve tried will certainly soak up moisture, but then they are stuck to the skin and the next layer will often stick to them. That may be the goal – to keep passing the moisture outwards. But I just don’t find it as comfortable or as easy to adjust.
(2) When you do get hot (or ideally, *before* you really get hot & sweaty), the mesh allows you to vent very quickly – just open the zippers on the outer layers and you have lots of skin exposed directly to the outside air. When I run in the winter (in these parts that means 20s and 30s) I typically just wear a mesh baselayer and a wind jacket, and adjust the jacket zipper as needed. I rarely build up any sweat. If I’m hiking instead of running, I may add a thin midlayer with a zipper to accomplish the same thing.
I know that is just subjective and anecdotal, but I can unequivocally say this approach works very well for me, and it doesn’t seem to involve “wicking” in the traditional sense, since there is so little fabric against the skin with the mesh. So it seems to circle back to the question about the conditions (either environmental or the other parts of clothing) that need to be present for a wicking approach to be effective?
Thanks for this extremely detailed and informative article! My main take-away is that a thin, non-napped base layer with high proportion of synthetic fiber is the best place to start. This absolutely matches my experience in pretty much all conditions.
I have an observation about wool content. A small or moderate amount of wool in a base layer seems to add a lot of additional comfort across ranges of sweating and saturation when compared with pure synthetics, even if they hold more moisture. Are any of the measures from your study indicative of performance/comfort across a range of moisture levels from damp/wet to dry? Is that the moisture capacity piece Ryan mentions above in relation to wool?
I hope your future article on polyester vs. wool includes some samples of synthetics that include a lower % of wool than those marketed as full merino. Capilene Air now is something like 50/50 wool polyester.
Hi Ian: Thanks for your comments. Concerning freezing in the outer layer, that is where pit zips for ventilation can really shine. Of course, I don’t know how that works in the Arctic, but here in Colorado, it works well in the winter temperatures and conditions I experience. I very seldom suffer from frost in my outer layer by using my pit zips to provide needed ventilation.
I suspect you are correct that pressure from movement, particularly movement between layers can get hard to wet layers start wicking. There is probably a way to replicate and prove that. The problem is that sort of motion will have unpredictable impact in the field. I would rather use a layer that begins to wet without additional external and undependable forces. Wetting at backpack straps or where the backpack contacts your back if no spacing is provided is definitely an issue. There is a lot going on here. Those issues produce localized changes in dewpoint that can lead to condensation because moisture simply cannot evaporate in these locations. The pressure in these areas can also lead to moisture transfer due to diffusion in those areas that are subject to added pressure. Backpackers face a special challenge to avoid saturation in those areas. I also agree that contaminants are an issue that require extra care in the use of the items you mention.
The source of heat that is powering evaporation from your layers is always a key issue. When water is trapped in your layers and your heat production goes down, if your body is the heat source, you are in danger of hypothermia as your body expends heat and energy to dry the trapped water. In the summer, during high temperature, high humidity periods, if wind is powering drying a wet outer layer, your body may tend to overheat. The sweat you are producing may well be wasted if the latent heat of vaporization is not removing heat from your skin. These sorts of issues will be covered in the upcoming articles in this series.
Hi Chris: Thanks for reading and sharing your experience. Is wicking an effective moisture management method? That is the name of the article and that is where this series is going. The use of mechanical ventilation, along with high MVTR clothing are things I have advocated since I started posting on BPL. I will have more to say on these issues in this series of articles.
Imho
Testing fabric as raw fabric is easy (for a given value of ‘easy’).
But testing clothing as it is used in the field by different people and under different conditions on different days is a nightmare and almost impossible. It certainly won’t be reproducible!
Cheers
Hi David: Thanks for describing your experience with napped vs non-napped base layers. Concerning wool: I should start my wool vs polyester testing tomorrow. I had not considered blends but given their popularity, it would make sense.
^ I’ve owned a couple of 100% merino pieces, the only ones I own now are blended (I think most are in the 25-35% synthetic range)- last longer and you get some of the benefits of syn and the wool both.
Mike: Why do you prefer wool or blends to polyester?
I don’t :) But if it’s going to be a long trip I’ll compromise a little and bring a merino blend base layer. My go to base layers are the OR Echo for most 3 season stuff and Patagonia’s Thermal Weight for winter.
I still have a couple of the old Patagonia Merino 1 tops (65% merino/35% syn iirc) and will use them if the trip is going to be on the longer side. After about three or four days syn base layers can get a little odoriferous!
Roger,
“But testing clothing as it is used in the field by different people and under different conditions on different days is a nightmare and almost impossible.”
I agree. Been experimenting for 65 years of backpacking and every day on my 1 hour walks.
Still hopeful. I read all the articles (go Stephen) and discussions. Still buy new products if they sound promising.
Yet another mind testing, great article Stephen, thanks you. Is the Amazon Dozier sample a garment or fabric? I’ve found one listing which seems like it could be what you’ve tested https://www.amazon.com/Dozier-Textiles-Moisture-Wicking-Stretch/dp/B091G2KG37/ref=sr_1_12?crid=12PKDSAJ5Q406&keywords=dozier+textiles&qid=1641958740&sprefix=dozier+%2Caps%2C590&sr=8-12 Is this it?
Hi Scott: That is it. Even the same color. Are you going to make a shirt out of it? Is so, let us know how it works out.
Interesting article although I would have liked that an ultralight fabric like e.g. OR’s Airvent-fabric at 78 gsm was also included.
I had – and may still have, if I dig for it – a shirt that I got from the Patagonia rep back in the early 80’s when they introduced Capilene. One half of the shirt is Capilene, the other polypro. The idea being to convince us retail shop folks how much better the capilenes was than the polypro. I could never tell any difference in warmth or wicking. The capilene sure looked better, and kept its shape better after numerous washings. Since that time I have a variety of synthetic base layers, and all seem to do the job about the same. I have some polartec Powerstretch bottoms, which I do find warmer than the lighter stuff, but I don’t really use them as a base layer, more as a light mid layer.
I’ve used merino wool base layers, and I liked the performance in terms of moisture manage ment, and I prefer them in the case where I am wearing long johns with shorts on a ski tour , with the long johns primarily acting as sunscreen; they seem to be a bit cooler in that use than the synthetics are. But too fragile for me, they do not hold up anywhere near as long as the synthetics do.
I think a key point is drying time. As Ryan has said, you are almost guaranteed to sweat at some point during your outdoor day, no matter how carefully you manage your layers. So, how fast those layers dry is very important. My favorite baselayers are currently OR Echo, and some old Terramar shirts that I have had for many years. Both work for me.
Also, I think that how these things work is very dependent on both the conditions you are in, your own metabolism, and what you are wearing on top of them. When I’m at 12,000 feet in the Sierra in a breeze, with the humidity in the teens, everything sure seems to wick really well. Different story at sea level , 90% humidity. You won’t get much wicking or drying when there is no evaporation.
RE: Winter use:
Stephen,
I understand your comment about not using a heavier baselayer for winter use, as the wicking performance declines, and insulation value doesn’t increase very much for the weight gain.
So that brings us to the idea of a system of:
If the good baselayer is wicking moisture off your skin, then spreading it across its face, and it is evaporating there, then that moisture vapor must then pass through the insulation and the shell, right?
If that is functioning correctly, then what is the benefit of the baselayer at all?
After all, in that scenario, the outer face of the base layer is functionally the same as your skin, except moisture will evaporate more slowly, since the temperature is slightly lower.
I wonder if that is how mesh baselayers work.
Coincidently, I did do a brief, relaxed XC ski a few days ago, wearing my Polartech Alpha Hoody directly next to skin, underneath a shell, in temps just above 0 F/ -18 C , and it was comfortable, but this was only an hour or so.
Re: Wool blends
Yes, please do test some wool blends. Several companies now make garments with the nylon core wrapped in merino.
From a wicking point of view, that would seem interesting, with the (fairly) hydrophobic nylon, surrounded by hydrophilic (but not entirely, and not homogenous) wool,
I really wonder what that results in as far as wetting, wicking and drying.
Thin, wicking baselayer
sufficient insulation layer for your needs
shell
Curiously, this is exactly what any experienced ski tourer does.
And we have known about this for decades.
Sadly, the knowledge dos not seem to get passed on.
Cheers
Interesting article. Far more in-depth than I was expecting!
I personally, honestly, never really thought much about the moisture wicking aspect of base layers for my use. It always felt like an over-hyped aspect with not much real-world implications outside of the most extreme conditions. I always just used a base layer that met 3 criteria:
1. Can it stretch considerably, so that I can cram material with insulating value inside of it?
2. Does it have at least UV-15 protection for wearing in direct sunlight?
3. Does it feel nice and dry fast?
Been using an OR Echo hoodie year round, which fits all these criteria. I’ve crammed vegetation inside of it for an insulation boost. LOL (it actually works amazingly well)
Hi Tjaard: If that is functioning correctly, then what is the benefit of the baselayer at all? I will be getting to that in article 3. If the good baselayer is wicking moisture off your skin, then spreading it across its face, and it is evaporating there, then that moisture vapor must then pass through the insulation and the shell, right? The evaporation from the wicking layer is the problem, winter and summer, especially if you are working hard. This is something I will be discussing in the next article.
I like Brinje Fishnet and will also discuss other functionally similar items in the 3rd article of this series.
Isn’t Alpha Direct comfortable against your skin! I hope you washed it afterward and then felt the fabric after it came out of the wash. Pretty hydrophobic I’d say. For really cold weather, I had a 2x60gsm shirt made. 20% warmer than 1 layer of 120 gsm. Weighs nothing. R value around .69. Good stuff.
I will look into wool blends after testing the straight stuff. If straight wool fares poorly compared to polyester, I don’t see how a blend can improve the situation in any way. Stay tuned. I can see wool providing better anti-stink performance. However, once you wrap it with polyester fibers there is not much in contact with your skin. Readers who use blends can weigh on on that question.
I presume you saw the results of my test of 1 version of Power Wool, which is made with the wool fiber surrounded by polyester. That is what Polartec describes in their patent. I cannot discern that under the microscope. Maybe I need a more power microscope. In my testing it was functionally hydrophobic despite Polartec’s claims. If you wear that stuff as a base layer and you get good and sweaty, eventually diffusion will push moisture into it. But, I can’t tell you how it will handle the water once it enters since I could not get any to enter. The sweat may end up running down your pants! I am sitting here waiting for a test to finish, and happened to have a little piece of Power Wool sitting here. I thought I’d try another drop test. The drop test standard calls for 50ul drops. That will sit on Power Wool until it evaporates. I placed a 600ul drop on Power Dry. It sat there for 40 seconds and then wet the skin side. It then wicked through quickly but left a considerable amount water behind. My contention that the amount of force required to initiate wetting when in contact with the skin will not be enough to support wetting and wicking.
Stephen, I can’t thank you enough for all the time you spend doing this testing and writing up the results for us. Though I suspect, as a fellow engineer/scientist, you get a lot of satisfaction and excitement from running the tests and compiling the results.
I want to share some recent experiences I’ve had with base (next-to-skin) layers that I’ve had. I got a MHW AirMesh fleece top for Christmas, which is similar to PolarTech Alpha Direct in that it has a fairly open mesh weave, with napped fibers on the inner layer. The AirMesh fabric uses hollow fibers – I don’t know how much that affects wicking, or if PT AD also uses hollow fibers. Like Tjaard above, I have used it a few times now as my next-to-skin layer, even though that is not what it is designed for, and I have to say I stay more comfortable while exerting myself, and after I stop, than I have with any of the base layers I have tried (all are synthetic).
My main winter outdoor activity is backcountry skiing. I think this activity is somewhat unique for layering systems, because it involves a fairly high exertion level going uphill (I am usually at or near my aerobic threshold for 1-2 hours at a time), then a low to moderate exertion level, with higher speeds, going downhill that can create more significant air pressure differential across air-permeable fabrics than you would experience when hiking, snowshoeing, or even running.
Earlier this season, I had a handful of trips where, while driving back home after BC skiing, even though I had taken off my outer windproof or WPB layer (“breathable” is relative!) to help dry out my inner layers, I was very cold for the entire 20-30 minute drive, with my truck’s heater on full-blast. This occurred wearing both a mid-weight Capilene 100% polyester base layer, and a thin, older Terramar base layer (86% Coolmax polyester, 14% Spandex) that I have found wicks sweat very effectively. Observing my base and mid-layers, they were still pretty wet (high “water in fabric” in Stephen’s nomenclature) even after skiing downhill which provides a pretty good opportunity for both evaporative and convective moisture removal. But on the last 2 BC ski trips, plus a couple of 3-4 mile runs, I have worn the MHW AirMesh fleece as a next-to-skin base/mid-layer. Driving home after the BC skiing trips, I was perfectly comfortable. Feeling the AirMesh fabric when I got back to my truck (before driving), the outside face did feel damp in places, but the inside face felt perfectly dry.
Perhaps my comfort level in this case has less to do with wicking, and more to do with 1) the napped inner face provides less contact between my skin and the cool, moist outer layer of fabric, and 2) the open mesh weave allows more direct evaporation of sweat from my skin than a more typical tight-weave base layer.
This leads to the reason why I personally have stopped using wool for any outdoor clothing. While I agree that it does feel more comfortable against the skin when wet than SOME synthetic layers (but not all), as soon as I stop moving I get chilled pretty quickly because of the high water retention capacity. My other winter activity is mountaineering, which can involve periods of relative inactivity while climbing and especially at camp. I’d rather wear synthetic layers that retain much less water, so they can become more dry while I’m wearing them in camp. (You can’t dry clothing by hanging it in your tent in the winter!)
Last thing – Chris, I too have experienced some of my synthetic “base layer” running shirts clinging to me uncomfortably when they get soaked with sweat. Similar to my above observations, I think that fabric just retains too much moisture (too hydrophilic). On the other hand, I have used a Patagonia Capilene Cool Lightweight shirt to run and hike in many, many times and it always feels perfectly comfortable. Maybe part of its good performance is that it is a very light-weight fabric (actual weight for my size L short-sleeved shirt is 2.6oz), so it can’t retain much moisture mass. But it also seems to be good at both wicking moisture from my skin and allowing it to evaporate from the fabric.
I have used Alpaca for many years. It absorbs about 8% moisture by weight versus about 30% for Merino. Bison down, musk ox and Yak also absorb much less water than wool. In addition, they are hollow fibers that retain more heat.
Intersting, I didn’t know that alpaca fibers were hollow. BTW posum hairs (New Zealand anyway) are also hollow. In NZ they are often blended with Merino to create a lighter. warmer garmet. It’s great as well as posums are pretty much a pest down there.
A suggestion for a future article: is there a difference in moisture management and warmth when, in colder temps, layering two (ultra)lightweight baselayers vs. wearing one thicker, heavier baselayer ?
I’ve read a study decades ago that suggests the layering approach performs better and I used that approach since then and I must say that in all those years it worked wonderfully.
Become a member to post in the forums.