You don’t have access to view this content.
Storm Resistance of Ultralight Shelters
Evaluating the wind and snow loading of shelters for ultralight backpacking in inclement conditions.
Evaluating the wind and snow loading of shelters for ultralight backpacking in inclement conditions.
You don’t have access to view this content.
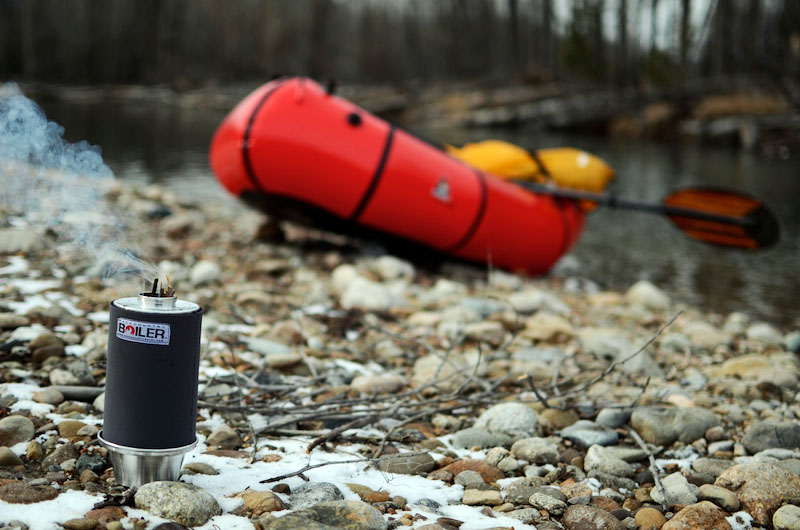
Investigating the lightest-weight options on the market and assessing ease-of-use, reliability, fuel efficiency, and time to boil.
You don’t have access to view this content.
Simplicity and strength in an all-season shelter.
The 17-ounce (482-g) Mountain Laurel Designs TrailStar claims to be the “first shaped tarp with five low-angle sides and no doors that combines the performance of a traditional pyramid shelter with the open and multi-function pitching of a tarp” (manufacturer website on December 20, 2011).
The primary purpose of this review is to push the TrailStar to its performance limits and find out under what scenarios this and other manufacturer claims start to break down.
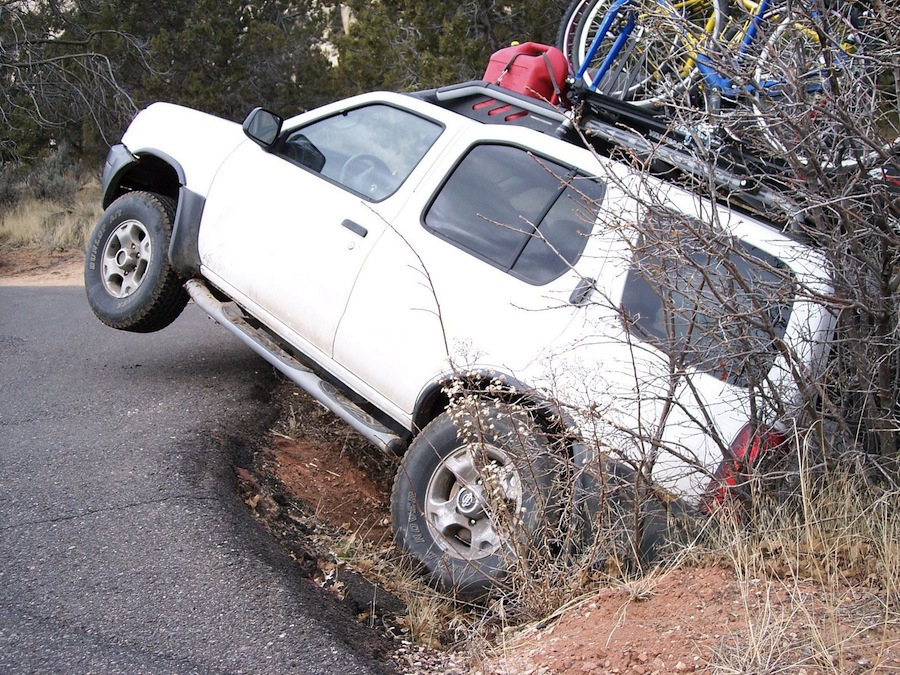
My first experience with the TrailStar came in the midst of the coldest weather Montana has seen thus far this winter season – a few days where mountain lows dipped below 0F (-18C) and nightly snowfall ranged from a few inches to more than six inches (~5 cm to 15 cm) per night.
I first camped with the TrailStar during this spell on Big Creek in the Gallatin National Forest, west of Emigrant, Montana, where temperatures were low (-1F to +1F / -18C to -17C overnight lows), snowfall was minor (less than 6.0 in / 15 cm per night of low-density snow), and wind was nonexistent.
A lot has been said about the TrailStar’s finicky pitching requirements. When you increase the number of panels of a shelter, two things happen. First, the number of pitching options decreases. Second, tolerance for the geometry of the pitch (stake locations and pole heights) decreases. The TrailStar is no different, but with five symmetrical panels and two (and in some cases, only one) straight pole requirement, it doesn’t require an advanced degree in engineering to pitch it.
That said, when it’s 0F/-18C outside, dark, and there is a bunch of snow atop rock-hard frozen ground (these were the conditions when I pitched the TrailStar for the very first time), trying to figure all this out isn’t exactly trivial. After about 20 minutes of playing with it, I was able to achieve a pitch that offered drum-tight panels, plenty of headroom, steep sidewalls for good snow shedding, and an aesthetically beautiful-looking shelter. This is less a testament of my uncanny ability (sic) to figure things out and more a testament of the manufacturer’s ability to create a shelter that is intuitively easy “enough” to use – assuming you have plenty of experience pitching tarps and pyramids tightly.
Although I haven’t validated it yet, I suspect somebody with less experience pitching tarps might repeat my virgin TrailStar pitching experience, but with no shortage of frustration.
Pitching the TrailStar with an open door (see photo) is significantly less trivial than pitching a four-sided pyramid, which requires only that you insert four stakes into the corners to make a square and prop a pole up in the middle. It turns out that when you add one additional side, you exponentially increase geometric failure potential and thus, effort. Pitching now becomes an iterative, rather than a serial exercise of “pitching with slack,” “inserting the pole,” “resetting the stakes,” “adjusting the pole,” “fine-tuning the stake locations,” etc. During the summer, when temperatures are warm and the ground is soft, it’s no big deal. During the winter, this process is not insignificant.

My camp on Big Creek. The TrailStar, with a little bit of effort, can be pitched as an aesthetically beautiful shelter with tight panels for good wind and snow shedding. The yellow silnylon version provides warm light on dreary days. It’s also available in a more stealthy gray silnylon and, for lighter weight, less durability, and more debt, Cuben Fiber.
I have not explored the snow-loading limits of the TrailStar at time of writing.
My first experience brought no more than six inches (15 cm) of low-density snow on any given night, and for the most part, it easily slid off the shelter’s slick silnylon walls (I suspect that a Cuben Fiber version would fare much worse, as snow seems to stick more to Cuben Fiber).
As with any poorly structured winter shelter (and the TrailStar certainly qualifies as such, with large fabric panels and minimal pole-structure), heavy snow-loading demands attentiveness to the accumulation of snow during the storm, and requires the usual routine of reaching out of your sleeping bag periodically and banging the snow off the sidewalls of the shelter. The result is that lots of snow accumulates at the bottom of the walls, pushing the walls inward and thus reducing the interior space and, sometimes, the shelter’s ability to resist condensation.
With overnight snows of six inches (15 cm) or so, the amount of snow that managed to accumulate at the bottom of the TrailStar’s walls was significant. However, with me as the only occupant, it was not such a big deal. And, with temperatures so cold, condensation wasn’t a problem either – it just froze to the interior of the tarp and fell down as pretty little ice crystals when the wind blew – hardly an inconvenience in the grand scope of winter camping.
I really liked the interior space inside the TrailStar, and I’d find it to be entirely suitable for my dog, or my son (probably not both) – in the summer. In the winter, however, given that the sidewalls will be compressed inward in storms due to snow accumulation around the shelter’s perimeter, and the fact that I have more gear to sort, organize, and spread out, I’d want to share this shelter only with an exceptional friend in a situation where we’re serious about saving every ounce in our pack weights.
The ability to pitch the shelter with one panel propped up in a triangle by using a short pole (thus creating a door), while still being able to pitch a symmetrical-to-the-ground shelter (with only one center pole) with full-perimeter wind protection, is nothing short of brilliant. I prefer the door option, obviously, for ease of exit/entry and better views, but I love knowing that a full-perimeter option exists when conditions (mosquitoes, wind) deteriorate from bad to worse. I don’t get this flexibility with any sort of tarp, and to accomplish this with a pyramid requires that you leave its zippered door partially open, significantly reducing the amount of floor area that remains sheltered from precipitation.
I find the TrailStar to fill an important gap for lightweight backpackers. Its 17-ounce (482-g) weight precludes its use as a solo shelter for hikers that spend more time on virtual hikes than real walks in bad weather, but, I suspect, offers a weather-resistance-to-weight ratio that may best a pyramid tarp and easily clobbers any cottage-made solo tent on the market – nearly all of which fail miserably in high winds, interior space, and under substantial snow loads.
This will be a rolling review, and I’ll add more content (at this URL) as it becomes available. The test methodology for the TrailStar will be based primarily upon reviewing the manufacturer claims (posted at the manufacturer’s website as of December 20, 2011) as follows:
Disclosure: The manufacturer provided this product to the author and/or Backpacking Light at no charge, and it is owned by the author/BPL. The author/Backpacking Light has no obligation to the manufacturer to review this product under the terms of this agreement.
Can 100% titanium justify the price tag?

Alcohol stoves have long been a standard of contemporary ultralight backpackers. Their virtues are well documented. They can be somewhat to extraordinarily lightweight, typically have no moving parts to break, clog, or otherwise misfire, fuel is cheap and easy to purchase, they are silent while operating, and so forth. Aside from cold temperatures, the case for the utility of alcohol stoves need not be made. What might need some justification is an alcohol stove system that costs $127 (*at time of writing, but $112 currently) and doesn’t even include a pot. Considering the popularity of alcohol stoves for ultralight backpackers was built upon the backs of tuna can stoves, which were in essence free, there better be good reason for such a tony unit.
In the case of the Clikstand T-2, there may be reasons to consider dropping that kind of coin on a stove with no moving parts. First, consider that this is the same design which, way back in 2005, was one of the best stoves Will Rietveld tested. The T-2 is virtually identical, with the virtues unchanged: excellent stability, easy to use, compact, and excellent wind protection. The T-2 however, goes to 11. It is, you guessed it, made 100% of titanium and thus lighter and better in every way. The Clikstand T-2 stacks up with leading edge alcohol stove systems fairly well in boil time and weight and boasts unrivaled versatility. The wide range of possible uses may not appeal to all users, however.
The Clikstand is indeed a system and must be evaluated as such. I tested what Clikstand calls their Sierra Titanium combo, which consists of an Evernew titanium alcohol burner, ti Clikstand pot stand, ti foil windscreen, and burner adapter. The ti burner is Evernew’s lightweight version of the classic Trangia burner, a time-tested and powerful design. The Clikstand itself is the centerpiece of the system, and consists of a triangular, four-piece stand which snaps together with authority. It cradles the burner an optimum distance from the pot, serves as a stable, broad based pot stand, provides a rest for the foil windscreen, and serves as the second layer of defense against the wind. The whole thing is quick and easy to assemble or disassemble and fits together well as a unit.
Calling the windscreen “foil” is a bit of a misnomer, as the ti is quite sturdy. The windscreen has a few bends built into it that allow it to hook together at two different widths, to best suit different pots. It then rests on hooks built into the stand. The burner adapter is a pentagonal bit of wire intended to give the Evernew burner better purchase inside the stand. The burner is only just wide enough to sit inside the stand, though my sample was stable enough, and I never found the adapter necessary. The whole thing goes together emphatically and inspires confidence.
How then does the Clikstand system perform compared to other alcohol stoves? There are an enormous number of stoves available, but at the moment the clear favorite in terms of boil time and wind resistance is the Trail Designs Caldera Cone. The Caldera Cone is by nature built around a given pot, so, to provide as generalizable a comparison as possible, I researched data on the ubiquitous Evernew 1.3 liter ti pot (model ECA 253). Averages from a dozen user tests found in various places online came out to around 4 minutes 30 seconds to boil 16 fluid ounces of lukewarm tap water with a Caldera Cone alcohol setup and the Evernew pot, in “normal” conditions (not too cold, not very windy). My own average with the Clikstand T-2, using the same pot and similar back porch conditions, came out to about 5 minutes 30 seconds over half a dozen trials. That’s as scientific as I care to get, but the consistency of the numbers lend them apparent validity.

Interestingly, things changed quite drastically when I used my new-model BackpackingLight Firelite 900 ml pot, with its 4.375-inch diameter, much narrower than the Evernew’s 5.91 inches. Boil times with the skinnier pot, under the same conditions noted above and with the same volume of water, were consistently 2 minutes slower, again across half a dozen trials. I can think of no other conclusion but that the Clikstand stronger favors the broader heating surface provided by a wider pot. Not a stunning conclusion, but with this stove a demand perhaps particularly stark. Examining the Clikstand’s dimensions further explicate this state of affairs. The diameter of the stand is 4.2 inches. To get the rounded edges of the Firelite 900 to sit comfortably, I followed Clikstand’s instructions and bent the three prongs slightly inwards. This did nothing to fill the large gap between the pot and the windscreen, a gap through which much heat evidently escaped. The Evernew, on the other hand, just barely fits into the wider of the windscreen’s two settings, trapping heat admirably and maximizing efficiency.
The Clikstand boils water a bit slower than a Caldera Cone, or a lot, if you have a narrower pot. It’s a bit heavier, depending on the model, though in terms of stability we can assume the Clikstand equal if not superior to the largest Caldera, and thus weight is a wash (see complete comparison chart, below). So why would you spend all that money? It’s not top shelf efficient, but still pretty fast boiling for an alcohol stove. It can be used with a variety of pots, unlike the Caldera system, which bends the cost curve towards the Clikstand depending on your culinary predilections. It’s also ti, and sturdy ti at that, while the aluminum Calderas have had mixed durability over the long haul. Lastly, the ready heat and outstanding stability make it perhaps the premier alcohol stove to use with a frying pan. Fancy some fried trout on your next backpack? Done. Sautéed veggies with your ramen? Easy. Bacon and eggs? If you want to carry the eggs, no problem. The Clikstand is hot enough to cook them any way you like, and stable enough to keep them out of the dirt.
In summary, the Clikstand T-2 is a durable, functional, easy to use, and expensive alcohol stove system best suited to those who use a variety of larger cookware. As a bonus, it works well with a frying pan.
| Clikstand T-2 | Caldera Cone | |
| Weight oz / g | Burner: 1.1 / 30 Windscreen: 0.7 / 20 Stand: 1.8 / 50 |
Burner: 0.6 / 16 Cone: 1.0-2.8 / 28-78 |
| Boil times (16 oz H20, “normal” conditions, 1.3L Evernew pot, multiple trials averaged) |
00:5:30 | 00:4:30 |
| Cost (USD) | Burner: 46 Windscreen: 20 Stand: 75* (*at time of writing, but 60 currently) |
All components: 35 |
Disclosure: The manufacturer provided this product to the author and/or Backpacking Light at no charge, and it is owned by the author/BPL. The author/Backpacking Light has no obligation to the manufacturer to review this product under the terms of this agreement.
Nemo becomes a serious player in the ultralight tent category. The Obi Elite 1P is a cutting edge one-person double-wall tent that matches the weight and roominess of many single-wall tents.

The new for 2011 Nemo Obi Elite 1P utilizes weight efficient design and 10 denier fabrics to achieve a minimum weight of 2 pounds (0.91 kg) for a one-person double-wall tent.
The Obi Elite 1P is Nemo’s lightest tent construction yet, and sets a new standard for lightweight double-wall tents with 10 denier nylon fly and interior fabrics and weight-saving design. The minimum weight of this one-person double-wall tent is right at 2 pounds (0.91 kg) measured weight, which matches the weight of many poled single-wall tents (single-wall tents that utilize trekking poles for support are lighter). We have reviewed quite a few new ultralight tents in the past, only to find their weight reduction was accomplished by making the tent smaller; so does the new Nemo Obi Elite 1P really stand out or not?
| Year/Manufacturer/Model | 2011 Nemo Obi Elite 1P |
| Style | Three-season, one-person, double-wall, freestanding tent with floor, one side entry door, and one vestibule |
| Included | Tent body and fly, pole system with stuff sack, repair sleeve, six stakes with stuff sack, two guylines, drybag type storage sack |
| Fabrics | Tent body is 10d polyurethane coated nylon and mesh, fly is 10d polyurethane coated nylon, floor is 20d polyurethane coated nylon |
| Poles and Stakes | One gREEN anodized DAC 8.55 mm Featherlite NSL aluminum Y-shaped one hub pole system, six aluminum alloy Y-stakes |
| Inside Dimensions | Manufacturer specifications: 87 in (221 cm) long x 39 in (99 cm) wide at head end, 29 in (74 cm) wide at foot end x 40 in (102 cm) high Measured dimensions: 89.5 in (227 cm) long x 39 in (99 cm) wide at head end, 29 in (74 cm) wide at foot end x 40.5 in (103 cm) high |
| Features | Lightweight fabrics, large side entry door with vestibule, one mesh storage pocket, headlamp pocket for tent lighting, Jake’s foot connectors on head end, LineLok tensioners on tieouts, drybag-type storage sack |
| Packed Size | Tent plus stakes 6 x 6 in (15 x 15 cm), pole in sack 18.5 x 2 in (47 x 5 cm) |
| Total Weight | Measured total weight: 2 lb 4.5 oz (1.04 kg) Manufacturer specification: 2 lb 7 oz (1.1 kg) |
| Trail Weight | Measured weight: 2 lb (0.91 kg) Manufacturer specification: 1 lb 15 oz (0.88 kg) (excludes stuff sacks, repair sleeve, and guylines) |
| Protected Area | Floor area: 21 ft2 (2 m2) Vestibule area: 9 ft2 (0.9 m2) Total protected area: 30 ft2 (2.79 m2) |
| Protected Area/ Trail Weight Ratio |
15 ft2/lb (3.1 m2/kg) |
| MSRP | US$400 |
| Options | Footprint US$45 (7.9 oz/220 g) |
As the word “Elite” in the name suggests, this is a special version of the Obi 1P tent with 10 denier fabrics, which reduces the minimum weight by 9 ounces (255 g) and increases the cost by US$50. The standard Obi 1P tent is the same design, but is constructed of 20 denier nylon fabrics and has a minimum weight of 2.5 pounds (1.13 kg). The Obi 2P version has two doors and two vestibules and a minimum weight of 3 pounds (1.36 kg). All are new models for 2011.

The tent’s pole is a Y-shaped unit with one hub, it’s made of DAC 8.55 mm Featherlite NSL aluminum alloy. The tent body and fly use 10 denier polyurethane coated ripstop nylon (a first), and the floor is a slightly heavier 20 denier version of the same fabric. Clearly, the materials and design are cutting edge to produce a minimal weight tent, short of using Cuben Fiber.

Views of the Nemo Obi Elite 1P. Entry is from the side (top left) via a large zippered door in the vestibule. The back of the tent (top right) is protected by the extended fly, while allowing more ventilation. The head end (top left) is 39 inches (99 cm) wide, while the foot end (bottom left) is 29 inches (74 cm) wide. The top view (bottom right) shows the overall proportions of the tent.

Included in the tent’s measured total weight of 2 pounds 4.5 ounces (1.04 kg) are the tent body, fly, pole and sack, six Y-stakes and pole repair sleeve, two guylines and stake sack, and drybag-type stuff sack. The drybag stuff sack is handy for carrying a wet tent inside a backpack. It has a loop on the opposite side for attaching the stake sack, if desired.

Outside features. The head end of the tent has Jake’s Feet (left) for quick attachment of the pole ends and fly corners. And the foot end and side tieouts have LineLoks (right) for easy tensioning.

Inside Features. The entry vestibule (left) has a lot of reachable protected space for storing gear or for a canine friend. The interior (center) is quite roomy, especially with the inner door open, and provides enough length and height for a tall hiker. An overhead light pocket (right) allows a headlamp or other light to double as a tent light.
The tent has a fly-only pitching option, but you need to purchase the optional footprint to go that route.


I tested the Obi Elite 1P in a variety of conditions on four backpacking trips in the spring and summer of 2011.

To minimize weight I carried only the tent body, fly, pole, and stakes (left), which weighs just 2 pounds (0.91 kg). The Y-stakes supplied with the tent hold very well, but they retain dirt in the grooves.
The Obi Elite 1P is very easy and fast to set up: 1) lay the tent body on the ground in the desired location and stake the four corners; 2) assemble the pole, connect two ends to the Jake’s Feet at the head end of the tent, and other end into a grommet at the foot end of the tent; 3) attach the body to the pole with seven clips, 4) lay the fly over the inner tent, with the vestibule door aligned with the entry door, 5) clip the front corners of the fly to the Jake’s Feet and rear guylines to stakes; and 6) stake the rear guyline and front vestibule. The tent sets up in about 2-3 minutes, less time than it took to write this paragraph.
I endured several mountain thunderstorms in the Obi, and found it to be very storm worthy and wind stable. Its domed design sheds wind very well, although the large vestibule can flap a lot if it’s not well tensioned. The fly at the head end is raised (see photos above) to save weight and improve ventilation, but it comes into contact with the inner tent during rainstorms, so it would be a good idea to guy it out. There are a total of seven guy points on the fly.
Although the Obi does not have a high vent, it does have a large amount of space between the tent body and the fly, and the sides are raised above the ground (see photos above), so there is good air circulation between the tent walls. When there is some air movement at night, the Obi has little or no condensation on the inside of the fly. However, on a calm night with a large temperature drop, the Obi has lots of condensation on the inside of the fly. Under such conditions, especially after an afternoon or evening shower, condensation is unavoidable.

I tested the basic Obi in a light snow on one occasion and found it not well suited for snow. It will withstand a light snow load, but any significant amount of snow flattens the entry vestibule and could damage the tent. Of course, if you find yourself in this situation, it helps to slap the tent walls from the inside to keep the snow from building up.
The following table compares the Obi Elite 1P with similar one-person double-wall tents with poles. The table does not include solo single-wall tents because they are not a valid comparison.
| Tent | Floor Area ft2 (m2) |
Vestibule Area ft2 (m2) |
Entry(s) | Ventilation | Mfr.Total Weight oz (kg) | Cost US$ |
| Nemo Obi Elite 1P | 21 (1.95) | 9 (0.84) | One side | Raised side walls, large space between tent and fly | 39 (1.1) | 400 |
| Nemo Obi 1P | 21 (1.95) | 9 (0.84) | One side | Raised side walls, large space between tent body and fly | 51 (1.5) | 350 |
| Big Agnes Fly Creek UL1 | 22 (2.04) | 5.5 (0.51) | One end | Raised side walls, moderate space between tent body and fly | 35 (0.99) | 300 |
| Big Agnes Seedhouse SL1 | 22 (2.04) | 5 (0.46) | One end | Raised side walls, moderate space between tent body and fly | 45 (1.28) | 250 |
| Tarptent Scarp 1 | 19 (1.77) | ? | Two side | Raised side walls, 2 top vents, 2 vestibules | 48 (1.36) | 295 |
| Terra Nova Laser Photon | 17.4 (1.62) | 8.4 (0.78) | One side | Two end vents | 27.8 (0.79) | £330 (approx. US$525) |
Some highlights and observations from the comparison table are as follows:

Nemo Obi Elite 1P (left) and Big Agnes Fly Creek UL1 (right). Although the manufacturer numbers in the above table indicate that the Big Agnes Fly Creek UL1 is a roomier, lighter, less expensive tent, my personal comparison of the two tents side by side leads to a different conclusion, as explained below.
The floor in the Fly Creek UL1 is 4 inches (10 cm) wider at the head end, yielding an extra square foot of floor area, but the measured inside height is 2.5 inches (6.4 cm) less than the Obi Elite 1P. The measured minimum weight of the two tents is nearly identical. The big difference between the two tents is the entry type; the Obi Elite 1P has a large side entry and vestibule, while the Fly Creek has a small end entry and vestibule. The side vestibule on the Obi Elite is much larger and more useful; with the inner mesh door tied open, the usable space within the tent is much larger and items in the vestibule are easy to reach. The end entry and vestibule on the Fly Creek UL1 is much less convenient and useful because the vestibule needs to be kept clear in order to enter the tent.

The side entry on the Nemo Obi Elite 1P (left) is much more convenient than the end entry on the Big Agnes Fly Creek UL1 (right), and more of the vestibule space is usable too.
The bottom line, in my opinion, is the small difference in floor area is inconsequential; the headroom difference is more important, and the large side entry and large side vestibule on the Obi Elite 1P is a huge plus. Since the measured total and minimum weights of the two tents are nearly identical, the Nemo Obi Elite 1P emerges as the most convenient and useful tent for the weight. Granted, the Obi Elite costs a hundred bucks more. If cost were not a consideration, I would choose the Obi 1P Elite over the Fly Creek UL1 in a heartbeat.
Nemo’s approach to designing an ultralight one-person double wall tent delivers a tent with extra features, plenty of usable space inside, and easy setup and entry. In contrast, the Big Agnes Fly Creek seems downsized to reduce weight.
What’s Good
What’s Not So Good
Recommendations for Improvement
Disclosure: The manufacturer provided this product to the author and/or Backpacking Light at no charge, and it is owned by the author/BPL. The author/Backpacking Light has no obligation to the manufacturer to review this product under the terms of this agreement.
News from the cottage industry is conspicuously absent from Outdoor Retailer, where even modest booths can be more costly than a serious gear-buying habit. So, here are a few new and noteworthy pieces of gear from smaller manufacturers that were either released late in 2011 or are coming in 2012. Keep these items on your radar as you prepare for the coming season!
As we enter a new year, we can’t help but wonder when winter will release its grip, and we can once again replace our titanium crampons with zero drop shoes and leave the handwarmers at home as we begin the process of planning trips for the coming year.
With that trip planning comes a twinge of excitement, perhaps, for what new gear will be released this year, starting with this coming week’s announcements from the Outdoor Retailer Show. Unfortunately, missing from Outdoor Retailer (and rightfully so, considering the massive costs of renting a booth) is news from the cottage industry.
So, here are a few new and noteworthy pieces of gear from smaller manufacturers that were either released late in 2011 or are coming in 2012. Keep these items on your radar as you prepare for the coming season.
Tarptent Notch – Henry Shires introduces another entry into the “double-wall, double-entry, double-vestibule, trekking-pole-supported ultralight tent” niche with the Notch (and the larger Stratosphires). Ever since Bob Molen (Big Sky Products) introduced a double-entry / double-vestibule solo tent more than eight years ago, I’ve been a big fan of the design concept for its usability – keep gear on one side of the vestibule, and cook in the other. I especially like that the Notch offers fly-protected entries, which means big views and ventilation when rain is falling. Requiring only four stakes to pitch, I think the 26-ounce Notch just might prove to be “light enough” of a summer shelter solution to sway a few tarp campers. I hope Henry explores the possibility of expanding this design to include a full-fabric inner and the ability to use skis for support – which would make for a very light, warm, and imminently usable winter tent for mild conditions.

Tarptent Notch – A 26-oz, double-wall, double-door, double-vestibule, trekking-pole-supported summer tent, and only four stakes required.
Gossamer Gear Murmur – The Gossamer Gear Murmur promises to usher in a new wave of small volume packs that are not made with wispy fabrics, which means they only gain a few ounces of weight and should last longer. At 8.4 ounces and 28 liters of volume, the Murmur is sized about right for the proficient ultralight backpacker that has managed to downsize the volume of the rest of his gear to miniature proportions, and thus, is most suitable for short weekends and summer trekking that don’t require a lot of food or gear. Although still using silnylon for the bulk of its body, much of its outward-facing wear areas are reinforced with more durable 140d and 210d nylons. Also keep an eye towards the 2012 version of the Mountain Laurel Designs Newt pack, which is targeted similarly, but is manufactured entirely from 210d fabric. What I really like about the Newt is that the manufacturer claims that its load rating is “strong enough for 40+ pounds” – which tells me that Ron Bell is paying very careful attention to the manufacturing quality, and seam strength of the pack, perhaps more so than his competitors. Finally, Six Moon Designs is working on a similarly-positioned “Feather” pack, weighing in at 11 ounces with a packbag of slightly larger volume, perhaps.

Gossamer Gear Murmur – 8.4 oz, 1700 ci main compartment, 20 lb maximum load carrying capacity.

Mountain Laurel Designs Newt – 7.5 oz, 1500 ci main compartment, manufactured to a load rating of 40+ pounds, with durable 210d fabric throughout.
Mountain Laurel Designs Big Star – Riding on the coattails of the popular TrailStar, MLD will usher in 2012 with a larger version, the Big Star. For 24 ounces, you get multi-pitch options, weather resistant shelter, strong silnylon construction with no zippers, doors, or other frills (or failure points), and enough room to sleep three or four hikers. I don’t think it will offer the snow or wind loading resistance of its smaller cousins due to much larger unsupported fabric panels, but it should provide the basis of a good time when sharing shelter for a group while on a nice romp through the mountains during non-snowy seasons.

Mountain Laurel Designs Big Star – A 24-oz shelter for three or four based on the popular Trail Star design concept.
Nunatak Gear 950+ Fill Power Down – Nunatak recently announced the option to fill your custom garments and bags with 950+ fill power goose down for only $8 an ounce extra. Their confusing marketing suggests that their “875+ fill power down is superior in every way”. My guess is that Nunatak is well aware of the poor moisture resistance of this high-grade down. My own experience with “very high” (i.e., > 900) fill power downs suggests that it’s so sensitive to humidity and condensation that it takes precious little moisture (e.g., one night of condensation accumulation during a cold night) to reduce its loft to levels that have always made me wish for something a little more robust. So if you’re considering it, you might also consider that it seems mostly to be a novelty that looks better in your gear list weight column than on a rainy night in the wilds. I will concede that there may be some applicability of very high fill power down for hikers traveling through mostly dry and warm environments. Look for 900+ fill power down in Katabatic Gear quilts as well in 2012.
Goosefeet Down Jackets – Goosefeet is best known for their really light down booties. When I hiked with Ben Smith last spring, he was sporting an awfully puffy looking hooded down pullover while whispering its weight under his breath to our hiking companions. I couldn’t resist the urge, so I had him make me one, too. With a 7d shell and lining, 900 fill power down (yes, the stuff that is most sensitive to humidity), hood, long length, and loft measured in inches instead of centimeters, my 7-ounce down hoody is way too warm for summer use on warm evenings, but seems to be a reasonable complement for quilting in cold conditions. Look for Ben to bring this jacket into his core product line in 2012, perhaps, but don’t expect it to remain too lofty in damp conditions.

Goosefeet Down Jacket – 900 fill down, 7d shell and lining, hood, pullover design, and long enough to cover the butt (parka length), this jacket weighs about 7 oz.
Hyperlite Mountain Gear Traverse Shelter – Take the twin-peaked MLD Circus Tent (or the GoLite Shangri-La 6) and downsize them for a more reasonable capacity of three or four people, lighten up the fabric, and you have the Traverse. At 11’6” x 8’0” (with 7’2” between the poles) and a 4’0” height, the 19-ounce traverse would be a terrific group shelter in the mountains. Replace more robust poles with trekking poles for support, carve out some benches with a snow shovel, and you can bet this will attract the eye of winter travelers. Save your coin, though. At $650, ultralight group living doesn’t come cheap.

HMG Traverse Shelter. 19 oz, room for four + gear, supported by trekking poles.
Ruta Locura Wasatch Bivy Sack – With a 7x10d breathable fabric upper and 7d silnylon floor, this new bivy sack weighs a remarkable 4.35 ounces. The utility of breathable bivy sacks, especially for tarp campers using quilts, cannot be emphasized enough, and Josh Leavitt takes the concept a step further with this innovative use of what will undoubtedly be an exciting new fabric (7d silnylon) that we’ll see pop up in more applications in 2012. My fear is durability of the seams. Every sub-8-ounce bivy sack that I’ve ever used (including Backpacking Light’s original Vapr Bivy models) has failed due to seams ripping out, and never from using fabrics that are too light – although the risk of low strength seams becomes much higher with ultralight fabrics. It will be interesting to see if Josh can solve this dilemma and create seams that are durable enough to handle repeated seam stress exerted by those of us who thrash in their sleep. Also coming from Ruta Locura in 2012: three-piece collapsible (to 20”) trekking poles that weigh 4 ounces each, and what should be an astoundingly ultralight jacket made of the new 7d silnylon.
Also for bivy campers – keep your eye on Oware USA, who will release their first bivy sack made with the newest version of “waterproof-breathable” and seam-taped Cuben Fiber. At 3.5 ounces, it may be the lightest waterproof-bivy ever specified. Worth watching. Joe Valesko at ZPacks is also making rain jackets out of the same material. For four ounces, if the jackets prove to be durable – this could be a big winner in 2012 as well. Also from ZPacks: whisperings about a new freestanding dome tent made from Cuben Fiber. Joe’s goal: make the lightest freestanding tent available.

Oware USA Cuben Fiber waterproof-breathable bivy sack, 3.5 oz, size small.

ZPacks waterproof-breathable Cuben Fiber rain jacket. 4.5 oz, size medium.
Six Moon Designs Skyscape X – SMD is offering a Cuben Fiber version of the Skyscape Tent – making it one of the lightest solo tents available – 15 ounces. Kurt Russel, a long-since-retired (resigned?) cottage gear manufacturer under the Wanderlust label, pioneered the design (he called it the Nomad Lite), and it became one of the most popular ultralight tents on the market, especially in the eastern U.S. Lightheart Gear and Six Moon Designs have both caught on to the concept, which is based primarily upon the premise that “some” amount of structure can be provided by placing the trekking poles in an “A” frame configuration internally, and then tensioning the ends of the tent as high as possible. In theory, the concept should work – especially for wind and snow loading. In practice, it depends on whether or not the tent’s construction and fabric can handle the extreme tension required to keep the fabric panels taut enough for meaningful storm resistance. My experience with both the Nomad Lite and early Cuben Fiber prototypes of the Lightheart Gear were not terribly positive – buttoned up, they were condensation traps, and their poor fly coverage resulted in sideways-blowing rain easily entering the tent. I’m more hopeful for the Skyscape, which makes important design modifications to the floor shape and fly configuration. My favorite thing about these tents is the view: roll up the fly and you have fantastic 360-degree views – something I value when hiking in grizzly bear (and mosquito) country. Regardless of what you value in an ultralight tent, the Skyscape X looks to provide a very lightweight – albeit a rather expensive ($450) – option as a solo summer shelter.

Six Moon Designs Skyscape X – A 15-oz Cuben Fiber solo tent with a roll-back fly for 360-degree views and internal trekking pole support for wind resistance and snow loading.
For gram counters who hike in pairs, the Six Moon Designs Cuben Fiber Haven might be a good option. When included with an inner tent, the Haven becomes a two-person, dual-entrance, dual-vestibule summer tent – for a remarkable 24 ounces. Pitched with two trekking poles and requiring four stakes, the Haven would not provide a lot of structure for a tent this size, so don’t expect its large panels to provide a lot of peace on a stormy or snowy night. However, did I mention that it’s 24 ounces? That makes it the lightest two-person double-wall tent on the market.

Six Moon Designs Haven – Dual entry, dual vestibules, sets up with two trekking poles, Cuben Fiber fly, 24 ounces with a fully enclosed inner tent. This is a photo of a prototype, so we expect the less-than-perfect patterning in this one to be tightened up on production models.
Speaking of Cuben Fiber, keep your eye on Terra Nova. This year will see the launch of their new Quasar Cuben Fiber pack line. Check out these specs: 30, 45, and 55 liters at weights of 12 to 30 ounces, with the biggest version offering an internal frame.

Terra Nova Quasar Cuben Fiber Packs. 30 to 55 liters, 12 to 30 oz.
Yama Mountain Gear is moving away from commercially manufactured products and towards building DIY kits, but not before they release what is a very nice looking Cuben Fiber tarp with lots of storm coverage. The 7-oz Cirriform Tarp should mate nicely with their Model 1.25 Bug Shelter for a very light and roomy summer solution for the solo hiker.

Yama Mountain Gear Cirriform in Cuben Fiber, 7 oz.
Locus Gear, a manufacturer of pyramid-style shelters in Japan, will release a version of the Khufu shelter in eVENT in 2012. I’m glad to see them exploring breathable fabrics for floorless shelters. While a little heavier, the condensation-free comfort they bring, especially in winter conditions, might be worth it for some. Several years ago, I contracted GoLite to manufacture versions of their Hex pyramids out of Nextec’s Epic fabric, and their performance was exceptional during the winter. Combined with a snow skirt, an eVENT fabric pyramid might be appealing to winter hikers.
Water-Resistant Down – Chemists have figured out how to add hydrophobic nanomolecular coatings to down plumules. If this works, this will offer a far better bang for your buck than spec’ing super-high-fill down (see above), which is only useful when the garment is hanging in your closet. Down that resists loft degradation in response to the accumulation of humidity or condensation in the garment or bag – now that gives us something to hope for. Look for new products in 2012 from Sierra Designs, Brooks Range, and others using this new “hydrophobic” down.
ULA Equipment will upgrade their pack line in 2012 with new fabric that preserves weight, doubles puncture resistance, increases tear resistance, and (maybe!) decreases water absorption – all without increasing weight or sacrificing that cool “Dyneema Grid Look.”
Tenkara USA will offer an attachment for existing rod owners that will allow them to reduce the length of their rod. This might be a good option for those that want to own only one rod and adapt it accordingly (reducing weight) for some backpacking scenarios.
Alpacka Raft has redesigned their pack raft spray skirts (again) so they behave more like a kayak sprayskirt and deck. Being able to exit the boat when flipped without fooling around with Velcro or fumbling with grab loops will be nice. Combined with last year’s introduction of the drop tail, the Alpacka is emerging as a very serious tool for whitewater use, while maintaining “pool toy” weights that save us pack weight.

The 2012 Alpacka Spray Deck adds 14.5 oz to any packraft and is essential for packrafting in whitewater and a very nice option to have in cold, wet weather.
Finally, from the non-commercial side of things – this is where much excitement is generated – Forrest McCarthy brings us the Unbinding Ski System.
Backpacking Light will be taking a much closer and critical look at cottage-industry manufactured gear in 2012. With the “ultralight” product niche becoming increasingly crowded with similar products, distinguishing them based on features or weight alone is no longer the overwhelming concern of many customers – a key finding we discovered in our Fall 2011 reader survey. Manufacturing quality, durability, performance under a wider range of environmental conditions, cost, and aesthetic appeal to become increasingly important for cottage manufacturers as they continue to compete for slices of the somewhat small pie of of the ultralight gear market.
Rotating feature with tips and illustrations from Mike Clelland!’s new book: Ultralight Backpackin’ Tips

(Excerpted from Ultralight Backpackin’ Tips: 153 Amazing & Inexpensive Tips for Extremely Lightweight Camping by Mike Clelland!)
Focus on these initial ten points, and everything else will fall into place.

This is rule number one, and it’s absolutely essential. Do not proceed until this is solved. There is simply no way around it; weighing your gear is a prerequisite.
If you are an aspiring ultralight camper, this is the one and only tool that is truly required to get your pack weight to plummet. A simple digital postal scale has accuracy down to a tenth of an ounce, and knowing the weight of every single item is essential.
These are cheap and easy to find; a simple 5-pound digital postal scale from any office supply store is perfect. No need to pay more than 35 bucks, and if you shop around, there are good scales for as little as $19.95.
Anyone can go out into the mountains with a tiny amount of gear and suffer – it’s easy to be cold, hungry, and ill prepared. You need to be warm at night, dry in the rain, well fed, and ready to deal with safety issues. Ultralight camping should be delightful, not stressful. The challenge is to succeed with only the gear that’s absolutely needed (see Tip 28).
The first-aid kit is a good metaphor for your lightweight camping mind-set. You would be foolish to travel without one, right? But what is truly required? What can you effectively improvise? There is a blurry line between TOO heavy and TOO light. You can still go out into the backcountry with a very light pack and be comfortable and safe (see Tip 55).
This entire book could get boiled down to those two words. Do NOT simply put stuff in your pack. Look at every single item, weigh it, document it, hold it in your hand, ponder it, brood on it, and meditate over it. Only after this mindful deliberation should you decide if this item comes along. This cautious thought process happens for every single item! Do this every time you prep for an outing.
Questions to ask: Will I be fine without this? Is there a lighter option? Can this item serve more than one purpose; is it multiuse? Can I use something else and get the same results? A tent stake can hold your shelter down in the wind and also makes a pretty good trowel for digging a cat-hole, making it a true a multiuse option.
Be extremely meticulous with every decision – and every item. Weigh it, trim it down, and weigh it again. You either need it or you don’t. If you don’t need it – it doesn’t go in the pack.
It’s super fun to tinker with homemade designs and then put them to use in the backcountry. And quite often the lightest and simplest gear can be salvaged from the trash. The humble plastic water bottle is as light as it gets, and it’s essentially free (see Tip 102). And an aluminum cat food can pulled out of the garbage makes a very efficient ultralight alcohol stove (see Tip 120).
There is a myth that ultralight camping is an expensive undertaking, but it just ain’t true (see Tip 30). Sure there are a few items where it’s nice to purchase a high-quality piece of gear – titanium cookware is wonderfully light, but it comes at a high price. Would an old beer can with the top cut off serve the same purpose?
I am living proof of this credo. I delight in the quirky problem solving required when wrestling with all the minutia of my pack weight. I encourage you to dig deep and fully accept your inner nerd. It’s okay to obsess about half an ounce. I encourage that attitude! I enjoy using my finely crafted do-it-yourself gear in the mountains.
I fully recognize how dorky all this can be, and I acknowledge that I fit every stereotype of the weirdo zealot. But it’s fun, and fun counts for a lot. I take great pride wearing my homemade rain skirt with a team of burly men!

Don’t be content with achieving a homeostasis; you should unceasingly be evolving toward a goal of greater efficiency, comfort, and lighter weight. There will always be some new and interesting thing or technique you can test. Challenge yourself with every outing. If you try something and it doesn’t work quite as well as you hoped – so what! You learned something valuable by trying. Always try something new, ALWAYS!
The easiest way to get an item’s weight down to zero is simply NOT to put it in the pack. Yes, this means leaving stuff behind. This is harder than you think. There may be an item (or a bunch of them) that you have simply always carried with you, and it might be an ingrained routine to just toss that thing in your pack. Be very self-aware whenever this happens. Question your mind-set: Are you clinging to old habits?
Go through every item you might want to bring and truly ask yourself: Will I be okay without this thing?
This answer should be either YES or NO – never maybe.
You actually NEED very little. Food, water, and oxygen are obvious. So are warmth, comfort, and peace of mind. But we are all too easily swayed by our WANTS, especially me!
Some things, like the backpack, are obviously required. But what about the tent? Is that something you WANT or NEED? These are decidedly different, and it can be a challenging human exercise to attempt to separate them from each other. Can you replace the thing you WANT with a something you truly NEED? Is there an option that’s lighter, cheaper, simpler, or multiuse? Can it be nixed entirely? It should be easy to ditch the tent and replace it with a tarp, but all too often this decision can be fraught with emotion.

I have a beautiful camping knife. I love this elegantly crafted tool. I feel a very real WANT associated with my well-designed (and expensive) toy. This is a good item to truly scrutinize with ultralight eyes.
Are you hypnotized into believing you NEED a knife when all you really do is WANT a knife? (See tip 53.)
Personally I’ve found that a 0.1-ounce single-edge razor blade, void of frills and charisma, solves my need for a sharp thing in the mountains. Thus the beautiful knife stays at home, and that liberation feels good!
The quintessential plastic soda bottle has a lid, and under that lid is a little plastic ring. That extra piece of plastic went on in the factory, and it serves no purpose after you first open the bottle. Use a tiny pair of wire cutters (or your fingernails) and get that thing off. The paltry weight is obviously insignificant in the grand scheme of things. But to me it’s more of a mind-set. If you dedicate yourself to these (seemingly) inconsequential items, you are setting yourself up with a heightened level of overall standards. This mind-set will trickle up and influence the big stuff too.
Get a pair of scissors and trim off anything you can, and then reweigh things. The act of shaving off small extraneous stuff will really reinforce your goal. Your backpack, no matter the make or model, can always use a little trimming (see Tip 62). Get a razor blade, and go to town on it!
One system involves a three-ring binder and a pencil, and every piece of camping gear gets weighed and noted. The other involves a computerized spreadsheet (see Tip 20).
Yes, everything gets weighed on a scale, and all these numbers get written down. This may sound totally nerdy, but this deliberate act makes it very easy to take only what’s really needed. And while you’re at it, go ahead and write the weight right on each piece of gear with a Sharpie.
The simple act of weighing your gear creates a resolve and focus that’ll force you to really think about every piece of gear. Record the totals, and make sure to add a column titled “Why” for each item. If you can’t answer “why” you need something – don’t take it!

Chris Wallace joined our team as Backpacking Light’s Wilderness Trekking School Manager in 2010. We’re pleased to welcome him aboard as our new Gear Editor to see us through 2012 and beyond!
Chris brings a unique blend of analytical, perceptive, and experiential talents to this position – firmly grounded on his growth in and participation from our community, and in our school (as both a student and an instructor), for several years. Chris is best known for pushing the limits of ultralight in contexts that require extreme levels of fitness and tolerance for the unknown, rapidly evolving skill in gear design, manufacturing, and do-it-yourself projects, and an awareness of the wider market for ultralight gear that allows him to fairly evaluate trends and opportunities for lightweight hikers.
In appointing Chris to this position, my primary goal was to increase Backpacking Light’s reputation as a voice of authority in the analysis of lightweight gear. In 2012, we will:
In that context, we expect to:
Please join me in welcoming Chris to the team, and we look forward to the exciting changes he will bring to Backpacking Light in 2012!
– Ryan Jordan
Dear Backpacking Light Reader,
Thank you for the opportunity to serve your interests and to help you grow as a lightweight hiker.
I’d like to start by discussing some of the important changes that we’ll be implementing immediately that relate to my role as Backpacking Light’s Gear Editor:
To address delays in reviewing gear, publishing information as it becomes available, publishing inadequate information about key pieces of gear that deserve more comprehensive review, and consolidating gear review information about a particular product in one location, we will launch “living” reviews that will be hosted at a single URL and that will change over time. These living reviews will most often be launched with a preliminary review of a product based on our initial industry research, and/or “unboxing,” and/or our first field experience. Then, over time, we’ll post information to the review as it becomes available during our testing period. At the end of the test period, we will release the review rating for the product, so that a product only garners a review rating in response to validation of its long term performance. We feel that this change will improve the relevance, quality, and publication time of our reviews, as well as engage our community more by involving them in the review process with an opportunity to contribute feedback during the review period as our results are released.
In the past two years, we have focused most of our non-gear content on trip reports and photo essays (don’t worry, these won’t go away), but we expect to invest much more in the near future on technique-related content, largely due to an overwhelming amount of feedback from our members in our winter 2011 reader survey. From the newbie interested in learning how to pitch a tarp or build a fire, to the MYOG enthusiast needing to know how to fell a seam properly, to the experienced ultralighter who wants to know how we pitch an ultralight tent in wind-driven rain without getting soaked, we realize the need to address these requests.
I’ve noticed two primary camps in the BPL community. The first are new to lightweight backpacking and mostly interested in gear, gear, gear (although some of us never fully leave that camp). The second have been at it for a while, are mostly content with their gear choices, and are more interested in refining their kit, their style, and their knowledge base.
While BPL has historically been very focused on foot travel, we will be exploring other modes of human powered travel as well, consistent with our mission. The lightweight methodology has long been migrated and integrated into other methods of backcountry travel that deserve more attention. Look for increased content on packrafting, kayaking/canoeing, cross-country skiing, adventure cycling, and more.
All of these travel modes provide great opportunities to see more while carrying less, and we are discovering that more and more of our members are exploring these modes of travel as their experience with lightweight hiking increases.
You made it loud and clear in our reader survey that you want to do more at BPL than just read. An overwhelming number of you asked us to bring back podcasts, to introduce more video to our reviews, and to make more video instruction available. We have made significant steps in this direction already in 2011, with the introduction of the first Ultralight Backpacking Boot Camp (an online video course) offered last fall, and our decision to become the Executive Producer and sponsor of Hendrik Morkel’s ULAZ video series. Hendrik is a long time BPL member, and we’re proud to be his partner on this project.
In addition, we plan to revive Ryan Jordan’s popular “24” series, and we are exploring other film projects (in both short and long formats) as well.
In the meantime, look for the increased use of video in our gear reviews and technique articles, and stay tuned for an announcement later this spring about the possibility of reviving the podcasts.
I’m looking forward to my tenure as Backpacking Light’s Gear Editor.
– Chris Wallace
If unlimited traction is what you want in a snowshoe, the Lightning Flash delivers; it can rightfully lay claim to the title of lightest high-traction snowshoe available.

Testing the MSR Lightning Flash at 11,500 feet (3505 m) on a cold blustery January day. The Flash is MSR’s lightest snowshoe in their Lightning series; our measured weight for the 25-inch (64-cm) length is 3 pounds 6 ounces (1.53 kg) per pair.
The new Lightning Flash is the lightest snowshoe in MSR’s Lightning series of snowshoes that have a distinctive vertical flat aluminum alloy frame. These snowshoes have what MSR calls their “360° Traction Frame;” unlike other aluminum frame snowshoes, the frame has teeth on the bottom side, plus two toothed cross-members. The Lightning arguably has the most traction of any snowshoe out there. In this review we compare the Lightning Flash with a lightweight conventional tubular aluminum frame snowshoe, the Northern Lites Elite.
| Manufacturer | MSR |
| Year/Model | 2011 MSR Lightning Flash |
| Sizes | 21 in and 25 in (53 and 64 cm) |
| Dimensions | 25-in length tested: 8 in wide x 25 in long (20 cm x 64 cm) |
| Frame | Vertical flat 7000 series aircraft Aluminum, 1.1 in (2.9 cm) high, powder coated |
| Deck | Polyurethane coated polyester scrim |
| Binding | SpeedLock step-in |
| Crampons | Steel toe crampon, two toothed steel cross-members, serrated bottom of frame |
| Weight | Measured weight: 3.4 lb (1.54 kg) per pair Manufacturer specification: 3.6 pounds (1.63 kg) per pair |
| Load rating | 120-220 pounds (54 to 100 kg) |
| MSRP | US$200 |
| Options | Instep Strap (3.1 oz/88 g per pair) US$8; Tails (9.5 oz/269 g per pair) US$50 |
Most conventional tubular aluminum snowshoes have a toe crampon and heel crampon, and some have extra lateral crampons attached to the decking to help with sidehill stability. With the MSR Lightning snowshoes, the entire bottom side of the frame is serrated to provide traction, in addition to an aggressive steel toe crampon and two toothed cross-members. Clearly, these snowshoes have no shortage of traction.

MSR Lightning Flash snowshoe top (left) and bottom (right). Their distinctive feature is a vertical flat aluminum frame that is toothed on the bottom side.

The Flash has MSR’s new SpeedLock binding, which is an adjustable band over the toe that you adjust once, and then you don’t have to adjust it again (for the same person and same boots). Simply insert your boot at an angle, return to a straight position, and tighten the heel strap. The snowshoes go on and off very quickly. An optional instep strap is available (shown above) for more challenging conditions.
The steps to adjust the SpeedLock binding are: 1) unlock the top strap clasp; 2) place the ball of your foot over the crampon hinge and fold the strap over the boot snugly; 3) note the number on the strap; 4) adjust the strap at least two settings smaller, and 5) engage the strap’s teeth, slide the clasp over both straps, and lock. I found it challenging to adjust the binding without directions, and resorted to watching a video on the Cascade Designs website to get the step-by-step procedure. Fortunately, you only have to do it once, if you will be using the same boots with the snowshoes.
The decking on the Flash is similar to Hypalon, a lightweight durable fabric that is standard in the industry.

The steel front crampon pivots on two clevis pins. It rotates freely and has plenty of range to climb the steepest hills without binding. The Lightning Ascent version of this snowshoe has a heel lift to make hill climbing more comfortable.

Snow camping in mid-May at 12,000 feet (3658 m). I got out with the MSR Lightning Flash on five day trips and one overnight trip from January to May 2011.
I snowshoe with a group of friends who like to do extreme snowshoeing; we call it “plunging” or glissading on snowshoes. On our way down off a mountain, we choose the steepest routes and literally slide on our snowshoes. I gave the Flash a thorough testing on these trips.
I quickly found out that the Lightning Flash does not slide that readily. It does while going down really steep slopes, where the snow simply gives away and you go into a controlled slide. But the Flash locks on when going down moderate slopes and sidehills. The same is true on snowshoe tracks when snowshoeing with a group.
The extreme traction is something you have to get used to. Conventional tubular aluminum snowshoes are smooth on the bottom, except for the crampons, and you can glide along by lifting the snowshoe a bit and sliding it forward. The Lightning snowshoes don’t glide; you have to lift them up more and push them ahead. It’s more like walking with the snowshoes rather than shuffling.
In my testing on steep hills, I found that my boots tended to slide forward in the binding. Tightening the binding alleviated the problem, but it put uncomfortable pressure on the toebox area of my boots. A better solution is to add MSR’s optional Instep Strap, which is an extra strap over the front of the boot. The Instep Strap is not needed for typical snowshoeing in moderate terrain. If you typically snowshoe in more challenging conditions, I recommend getting the Lightning Ascent instead of the Flash; rather than the SpeedLock binding, it has three conventional straps on the front that hold the foot in place more securely.

I also tested the optional Lightning Tails, which give the snowshoes another 5 inches (13 cm) of length. Since the snowshoes I tested are 25 inches (64 cm) long, I found the tails to be overkill most of the time, and they limit maneuverability. The tails are a more useful option if you choose the shorter version of the snowshoes.

Like any metal frame snowshoe, the Lightning Flash ices up in certain conditions, usually when going from wet snow to colder snow in the shade. The solution is to spray the bottom of the snowshoe with silicone or WD-40.
While the MSR Lightning Flash is not the lightest snowshoe to be found, it could rightfully lay claim to the title of lightest high-traction snowshoe. The Northern Lites Elite is the lightest snowshoe; so how do the two compare?

The MSR Lightning Flash (left) compared with the Northern Lites Elite (right). The difference in traction is obvious. Note on the Elite that the numerous nylon clamps around the frame have a ridge on them to provide some peripheral traction.
Both snowshoes are the same size: 8 inches wide and 25 inches long (20 cm x 64 cm). The Flash has more surface area on the snow because it’s not upturned as much on the front and has less taper on the tail. The difference in traction capability is obvious in the photo above; you can almost climb trees with the Lightning Flash, but the Elite has less aggressive traction and is more comfortable on moderate terrain. One situation where you notice a big difference is when sidehilling on firm snow; the Flash does not slide sideways, but the Elite breaks loose.
The weight difference is not that large: the measured weight of the Flash is 3 pounds 6 ounces (1.53 kg) per pair, and the Elite weighs 2 pounds 6.1 ounces (1.08 kg) per pair, a difference of 1 pound (454 g). Yes, a pound (454 g) is significant if you are carrying the snowshoes, but the choice gets down to whether you need the extra traction or not. In gentle to moderate terrain, the Elite (which has aluminum alloy crampons) is adequate; but in steeper terrain and sidehills, the Lightning Flash is king.
Another factor to consider is the Northern Lites Elite costs a bit more, US$219 versus US$200 for the MSR Lightning Flash.
Overall, the MSR Lightning Flash is the lightweight high-traction king of the mountain. Its SpeedLock binding works well once adjusted, but adjusting it can be humbling.
Large sensor. High resolution. Small package. Interchangeable lenses. Is the DSLR finally dead for the backpacking photographer?
The subject of this review will be to discuss the merits, usability, performance, and suitability of the Sony NEX-7 for wilderness travel. Based on a comprehensive review of the state of the digital camera market today, we hypothesize that the Sony NEX-7 is capable of capturing higher image quality for less weight than (1) any other camera body equipped with a digital sensor smaller than full-frame; (2) any other camera body lighter in weight than the full-frame sensor equipped Leica M9; and (3) any compact mirrorless interchangeable lens camera body. Thus, one important goal of this review is to evaluate this lofty thesis, which could have significant implications for the backpacking photographer.
This is a rolling review that will be released in several parts during the review period:
Wilderness travelers who are enthusiastic about saving weight on gear often do so in the interests of adding weight back in order to increase their enjoyment of wilderness travel. In my consulting work with the U.S. Marines, I have discovered that the rifleman cares less about his absolute pack weight and more about the number of bullets that he can carry. In other words, if he can carry less weight in communications equipment, armor, cold weather clothing, and camping gear, then he can carry more weight in bullets. Ergo, the manifestation of lightweight backpacking philosophy for the U.S. Marine is to increasing his killing power (effectiveness), and not in reducing his load stress, per se (it is worth recognizing that bullets might be considered “consumable” items on the Marine’s gear list, resulting in significant pack weight reduction during the course of a combat mission).
It is like that for others as well, including hardshell kayakers, wilderness scientists, and professional photographers. For some, packing along lightweight camping gear is simply greater justification for packing along heavy gear for which substitutes would be considered heresy. I’ve known more than a handful of boaters unwilling to give up their particular model of hardshell, scientists unwilling to give up their chosen field instrumentation, and photographers unwilling to give up their large format camera, lenses, and an eight-pound tripod.
For the rest of us, and in particular, the rest of us that are hikers first and photographers second, the pursuit of a path of reason trumps the need to carry a camera that gives us uncompromising image quality.
Thus we fall into one of two camps.
The first camp is occupied by those who simply wish to carry a camera as a mechanism to document their travels. Image quality is less important than ease of use, weatherproofing, compactness, light weight, battery life, ruggedness, and reliability.
The second camp is occupied by more practiced photographers who wish to maximize image quality in a small, compact, and lightweight package, without compromising those aspects of photography that preserve creative control for the photographer – things like manual exposure control, interchangeable lenses, and large sensor sizes that deliver high resolution images that can be manipulated later during post processing.
Until just a few years ago, the latter group’s only option was a camera system based on a DSLR body and lenses. A typical DSLR kit for wilderness travel might include a medium range kit zoom lens, one or two extra batteries, and a case, resulting in a carry weight in the range of 1.5 to 3.0 pounds.

Comparing the size of the Nikon D7000 (and Nikon DX 35/1.8 lens) with the Sony NEX-7 (and Leica Elmarit-M 28/2.8 lens). Two systems that offer good image and video quality and creative control, with dramatic differences in both size and weight.
Then, a few years ago, the game started to change, with the introduction of two distinct classes of cameras: large-sensor fixed lens compact cameras, and mirrorless interchangeable lens cameras. The former category is characterized by the Sigma DP1 / DP2, Leica X1, and Fuji X100 – cameras that weigh in the range of 11 ounces or less (including lens weight). The latter category is characterized by the Micro Four Thirds systems from Olympus and Panasonic, the Ricoh GXR system, and the Sony NEX system, cameras that weigh in the range of 12 to 20 ounces with a lightweight lens. These “system” camera weights (including the camera body, a few batteries, carry case, and a lightweight lens) range from about 1.0 to 2.0 pounds (depending primarily on the choice of lens), making them distinctly lighter (and more compact) than their DSLR counterparts – but not without cost. These systems suffer from poor or nonexistent viewfinders, slow autofocus speeds, lack of quick and direct manual exposure controls, and, especially for Micro Four Thirds systems (which have smaller sensors than conventional DSLR sensors), substandard image quality (specifically: resolution, low noise at higher ISO, and dynamic range) relative to what is available in modern DSLR systems with APS-C sized sensors.
One of the more recent entries into this market is the Sony NEX-7. What distinguishes the NEX-7 from virtually every other “more compact than a DSLR” camera is not one specific unique feature or performance benchmark, but rather the fact that it includes all of the following:
Considering that all of these features are available in such a compact and lightweight package (the NEX-7 body weighs only 10 ounces), the NEX-7 should be on a pretty short list of cameras to be considered by the lightweight backpacker who is also a serious photography enthusiast.

The Sony NEX-7 kit I’m using includes the NEX-7 body, Leica Elmarit-M 28/2.8 lens (with Voigtlander VM adapter, lens hood, and UV + ND filters), a Lowepro Edit 100 case, extra battery, extra SD card, lens cloth, silica packs, Loksak, and shower cap for protecting the camera in rain. Total carry weight is about 28 ounces. When I take a tripod (as I often do), it’s the Gitzo GT0531 (with a Really Right Stuff BH-25 ball head), which adds another 1.9 pounds to the kit.
Thus, the subject of this review will be to discuss the merits, usability, performance, and suitability of the Sony NEX-7 for lightweight wilderness travel. Based on a comprehensive review of the state of the digital camera market today, we hypothesize that the Sony NEX-7 is capable of capturing higher image quality for less weight than (1) any other camera body equipped with a digital sensor smaller than full-frame; (2) any other camera body lighter in weight than the full-frame sensor equipped Leica M9; and (3) any compact mirrorless interchangeable lens camera body. Thus, one important goal of this review is to evaluate this lofty thesis, which could have significant implications for the backpacking photographer.
When evaluating the usability, performance, and applicability of any particular “system,” whether a cooking system or an image making system, one must consider the relationship between the components of that system, and in particular, the performance of the system as a whole – realizing that the performance of the system as a whole is far more important than the individual performance of the system’s separate parts, which in most cases, lacks relevance.
There are several E-mount system lenses capable of being autofocused by the NEX-7 body, and on top of that (with adapters), literally hundreds of legacy lenses that can be combined with the NEX-7 body. And out of those, I’ve selected two as being among the most interesting to lightweight backpackers: the Sony 16/2.8 for its small size, light weight, and wide angle view and the Leica 28/2.8 for its small size, light weight, and high resolving potential.
Thus, in this review, I’ll be taking a look at three NEX-7 centric systems by considering combinations of the NEX-7 body with the following lenses:
One might typically start the usability portion of a review like this by discussing the operation of the camera with a kit lens, or at the very least, an autofocus lens that integrates perfectly with the camera body’s computer. I’ve chosen an opposite route, and have decided to start with a discussion of the camera’s performance with a legacy manual focus lens that requires manual adjustment of both focus and aperture via controls on the lens itself.
The reason for this is twofold.
First, I suspect the NEX-7 will appeal to photographers who have an interest in using the highest quality, smallest, and lightest lenses possible, with the NEX-7 acting only as a necessary, depreciating evil, i.e., the “lens recorder,” if you will. Consequently, because the highest quality, most compact, and lightest lenses are often manual focus rangefinder lenses from the likes of Leica and Zeiss, the operation of the NEX-7 with these lenses will be of the utmost interest to this user niche.

Coffee. East Gallatin River. Sony NEX-7 and Leica Elmarit-M 28/2.8.
Second, the NEX-7 is the first digital camera body I’ve used, in a long string of what I now consider largely failed attempts, that makes shooting with legacy manual lenses easy, simple, and enjoyable. To establish the entire process that a user must go through with the NEX-7 to capture an image manually provides the necessary foundation upon which can then be laid a discussion of using lenses that automate focus and aperture. This automation is neither special nor unique with the NEX-7, and the NEX-7 behaves like most other bodies when coupled with automatic lenses. In other words, the NEX-7’s ability to integrate with legacy manual lenses is one feature that makes it a particularly special camera.
The NEX-7‘s OLED viewfinder may be its greatest asset other than its sensor. The viewfinder is bright, has a high resolution, can be used easily for manual focus feedback, is engaged automatically simply by holding the camera up to the eye, and offers a wide array of information, including all of the essential information required for exposure and composition (including gridlines, aperture and shutter speed values, an exposure compensation scale, the mode setting, and a histogram).
A significant benefit of the viewfinder, combined with the camera’s intuitive user interface (which is based on three dials and a few well-spaced buttons), is that most of the settings required for managing the exposure and focus of an image can be manipulated while looking through the viewfinder.
With the Leica Elmarit-M 28/2.8 lens, I have four settings to consider when shooting with the NEX-7 in aperture priority (“A”) mode: focus, aperture, exposure compensation, and ISO. Let’s take a look at how each of these is adjusted, and what sort of feedback the NEX-7 provides you in response to adjustment.
Focus with legacy lenses, including the Leica Elmarit-M used in this review, is manual, using the focusing ring on the lens. The challenge of using manual focus lenses on digital bodies is in interpreting the exact point at which the subject is in focus, i.e., the camera’s focus feedback mechanism.

Tenkara. East Gallatin River. Sony NEX-7 and Leica Elmarit-M 28/2.8.
Most cameras use one of two (and sometimes both) types of manual focus feedback mechanisms. The first involves contrast detection at the focus point. For example, on the Nikon D7000, when the subject in the focus point is in a state of maximum focus, a small green dot is visible in the viewfinder. Two arrows on either side of the dot indicate the direction that the focus ring on the lens needs to be turned in order to achieve a state of focus. Other cameras, including a number of Micro Four Thirds bodies from both Olympus and Panasonic, require a very high degree of zooming using the LCD screen (or perhaps, an external electronic viewfinder). The better of these systems trigger automatic zooming upon rotation of the focus ring on the lens. Both of these types of systems suffer from some imprecision due to their subjectivity. Further, “LCD-screen zoom type systems” suffer from slow use in actual practice.
The NEX-7 offers a feature Sony calls “focus peaking.” It works the same whether you are looking on the LCD screen or through the viewfinder.
Focus peaking is enabled in the Settings Menu and offers two settings: Peaking Level and Peaking Color. Peaking Level can be set to High, Medium, Low, or none, and defines the extent to which outlines of subjects in focus are enhanced with the (specified) Peaking Color. Peaking Color can be set to White, Red, or Yellow.
In addition to focus peaking, the NEX-7 offers a Focus Zoom button within easy reach of the thumb on the grip hand. The combination of focus peaking and focus zoom, along with the focus ring of the lens, results in rapid focusing with a highly effective feedback mechanism that has easily given me the ability to properly and very accurately focus nearly 100% of my shots with manual focus lenses.
Aperture on a manual focus lens is adjusted normally with the lens’ aperture ring. Objective feedback (the aperture value) is not available – you have to look at the aperture setting on the lens’ aperture ring to know what the aperture is. However, subjective feedback is available on the LCD screen (or viewfinder) by monitoring focus peaking – an increased depth of field is indicated by noting the presence of the peaking color on the edges of in-focus subjects throughout the depth of image.
When in “M” (manual) exposure mode, shutter speed is controlled by the left dial on the top of the camera (the right top dial controls exposure compensation), and feedback (as indicated by the shutter speed) is available on both the screen and in the viewfinder.
Exposure compensation is controlled by the right dial on the top of the camera (the left top dial controls shutter speed), and feedback (as indicated by the amount of exposure compensation via a pointer on an exposure compensation scale) is available both on the screen and in the viewfinder.
Using exposure compensation is most helpful when the histogram is turned on in the display, which provides feedback for dialing in correct exposure. The histogram can be turned on and off in the Camera Menu and can be viewed both on the LCD screen and in the viewfinder.
ISO is adjusted with the thumbwheel. ISO feedback is provided on the LCD screen and in the viewfinder.
It’s also worth noting that all of the dials (any many of the buttons) can be customized to control a variety of other functions. My preference is for the dials to be dedicated, and their function clearly labeled. This, of course, is a Catch-22, because it might be helpful for some photographers to assign other functions to dials and buttons that better match up with their style of shooting.

Trees and Sky. Sony NEX-7 with Leica Elmarit-M 28/2.8.
I find it helpful to document processes for accomplishing specific tasks, especially digital cameras that are capable of customization. What follows is the process that I use for capturing the vast majority of my images with an NEX-7 and a manual focus lens while backpacking while in “A” (aperture-priority) mode.
Steps #5 through #12 can be accomplished while looking through the viewfinder – a significant benefit in bright lighting conditions. In addition, these steps can be performed intuitively by feel using only your thumb for controlling three dials and one of three buttons that are spaced rather far apart so as to avoid confusion.
Finally, switching modes (e.g., between “M” and “A”) can also be accomplished by looking through the viewfinder, and requires a press with the right thumb on the button in the center of the rear dial, a turn of the dial to change the mode, and a press of the dial button to choose the mode.
I have neither the interest nor the experience in writing camera reviews to write a technical review of the Sony NEX-7. My objective here is simple: evaluate the applicability of the NEX-7 in the context of wilderness travel.
To that end, I’m most interested in three things: how to deploy and use the camera while hiking, how the camera behaves with manual focus lenses, and what sort of image quality results from various lightweight lenses. In addition, I’m very interested in shooting HD video with the NEX-7, and will present the next episode of “24” in the context of this review.
Finally, I’m approaching the usability and performance of the NEX-7 from the usability and performance of my primary high-quality / HD video shooting system, the Nikon D7000. I realize that some shooters will be evaluating the NEX-7 as a “step up” from a more compact camera. To you, I have to ask, “why do you want to add pack weight back to your pack?” I mean that question to be only half-cynical. After all, we’re in the business of saving weight, not adding it. Of course, that question is an important one, because perhaps the NEX-7 will open up creativity and quality to the backpacking photographer who has previously shot only with small sensor compact cameras.
I’ve not spent a lot of time with the NEX-7. However, I’ve spent enough time with it to communicate my key findings that are most relevant to my own backpacking experience, and those findings are worth outlining in this interim summary to whet the appetites of those considering the NEX-7 as a backpacking camera before the more comprehensive parts of this review are completed:
(Added on July 5, 2012)
When a lens reviewer reviews the quality of a lens, they pixel peep, i.e., they view the resulting images at 100% magnification on screen, so that the sharpness of the lens can be adequately evaluated.
The lens reviewer studies MTF curves, takes photos of wine bottle labels, American coins, and other accoutrements of modern civilization that pixel peepers find fascinating, and then make judgments about how those tiny little pixels translate into the archaic world of viewing – an increasingly strange manifestation of modern day photography – the often elusive “print”.

I enjoy creating prints from my images. This 16×20 print of the sunset behind the infamous Camp Parsons Pier complements a media nook in my home. It was taken with a Nikon D7000 and a Voigtlander Color Skopar 20/3.5 SLII lens (ISO 100, f/5, 30s), curve-corrected and sharpened very slightly for print output, and exported with the custom printer profile at my local Costco. Any APS-C sensor – and a quality lens – should capture RAW images that, with a little effort, are nothing short of stunning at this size, and entirely suitable for home decor at sizes up to 24×36. However, lower lens quality is magnified in large prints, and their limitations begin to be seen at prints larger than 8×10.
I’m neither a lens reviewer, nor a pixel peeper. I’m an outdoorsman. I’ve shown my photos in galleries, but rarely, and when I do, I care way more about the composition of the image, and how compelling it is, rather than its sharpness, or how well it compares to the seven other guys in the gallery showing prints from files captured with their Hasselbads and Linhofs.
So, the review you’re going to get here about lenses for the Sony NEX-7 is going to be from the perspective of an outdoorsman in general, and a lightweight backpacker in particular. Yes, I’ll peep at some pixels at 100%, and I’ll let you know what I find. But I’ll try to give you a more practical perspective as well.
It is well known that manual focus rangefinder lenses, especially those from Zeiss and Leica, offer “better image quality” (some combination of sharpness, microcontrast, bokeh rendering, and color rendering) for the weight than any other class of lenses. There are a few lenses that may be higher in quality than the best rangefinder lenses made by Leica or Zeiss, but they are much heavier. Likewise, there are plenty of lenses that are lighter than Leica and Zeiss’s best rangefinder lenses, but their image quality is inferior (however, even Leicaphiles who only view their images online have to admit that this gap must be closing, no?).
It is no great surprise then, that there is a demand for adapters that allow rangefinder lenses to be used with popular mirrorless formats, including Micro Four Thirds (Olympus and Panasonic), the Ricoh GXR, and the Sony NEX systems.
There are practical disadvantages to using manual rangefinder lenses on the Sony NEX-7.

Trailstar in Bridger Mountains. Note the magenta color fringing in the corners of this image. Sony NEX-7 with a Voigtlander Super-Wide Heliar Aspherical II 15mm f/4.5.
I’ve used four manual focus rangefinder lenses on the NEX-7 (all Leica M-mount, and used with the Voigtlander LM adapter) and several autofocus lenses (including the tiny and light Sony 16/2.8, featured in this review). My lens selection is based primarily upon using the very smallest and lightest lenses at each focal length that I want. For the purpose of this review, I’ll summarize a few notes about my experiences with each of the lenses I’ve used, eventually moving on to the lenses that I now use most often in the context of backpacking.
Obviously, what follows is a sampling of what I’ve used, not a sampling of what is available or what may become available soon. Certainly, you might have differences in opinion or criteria when it comes to lens selection.
This wide angle lens requires the correction of color fringing (I use Cornerfix), and results in a 35mm-equivalent field of view of about 21mm, making this a good focal length for wide, sweeping landscapes with a strong foreground element. Thus, the feature that I value the most in a wide angle lens for backpacking, because I use it primarily for capturing landscapes, is sharpness. The Heliar is well known for its excellent optics, and the NEX-7’s ability to capture that detail across the entire frame is excellent. Unfortunately, it suffers from severe color fringing and, for most of my photo work, the hassle to correct it simply isn’t worth it. For wide angle applications, I prefer the cheap (albeit lesser quality) optics, autofocus, compactness, and light weight of the Sony 16mm f/2.8 (see below).

Fire and Trailstar in Bridger Mountains, Montana. Sony NEX-7 and Voigtlander Super-Wide Heliar Aspherical II 15/4.5 (ISO 800, 2.5s, Aperture unknown). This image wasn’t corrected in Cornerfix, and magenta color fringing can be seen in the snow at the left edge of the image, and very slightly in the flame at the lower right edge. Cornerfix completely eliminates this fringing without meaningfully perceptive loss of image quality, unless you start to peep at pixels.
With a 42mm field of view (35mm equivalent) on the NEX-7, the Elmarit-M 28/2.8 represents a good focal length for “everyday” use – wide enough to capture a landscape, long enough to capture people at close range without a fisheye effect, and fast enough at f/2.8 to be used in lower light and/or for good subject isolation. Like most wide angle rangefinder lenses, this one requires the correction of color fringing on the NEX-7. Otherwise, the NEX-7 is able to resolve plenty of detail offered by this legendary lens and the resulting images are excellent. I really wanted this lens to work on the NEX-7 without color fringing. It’s one of my all time favorite lenses, and probably the highest resolving lens that I own. On the NEX-7, the resolving power of this lens is extraordinary. Unfortunately, color fringing adds hassle to my workflow, and it usually stays home.

Skyscape X and Cottonwoods. Sony NEX-7 and Leica Elmarit-M 28/2.8 lens (ISO 200, 1/60s, aperture unknown). Color fringing has been corrected in Cornerfix, and very light vignetting added back for artistic effect.
This little gem is one of my favorite lenses on the NEX-7, and is a staple in my kit for shooting low light portraiture (or portraiture in bright light with a neutral density filter attached) and renders beautifully for 24p video. Resolution of this lens is not the greatest, so it stays packed when I’m shooting faraway landscapes (e.g., mountains). The Nokton works perfectly on the NEX-7 and doesn’t require color fringing correction.

Snow Pit Fire, Gallatin Mountains. Voigtlander Nokton Classic 35mm f/1.4 on a Sony NEX-7. Handheld, ISO 800, 1/125 sec.
I have an older version of this lens (pre-ASPH, thin barrel), which at 225g (8.0 oz) is one of the very lightest 90mm lenses ever made. With a 35mm equivalent field of view of 135mm, it certainly qualifies as a telephoto lens, but it’s too short for wildlife photography. Its image quality and weight drove me to purchasing this lens, but it’s become my all time favorite lens to work with for outdoor photography. It’s not a popular focal length for outdoor photographers, and I think the reason for this is twofold. Most “kit” zoom lenses, especially those on mirrorless systems, offer terrible image quality and small apertures (which require low shutter speeds and poor sharpness when handheld, or high ISO and thus high noise), so the resulting images that are captured may not be so inspiring (especially when the pixels are peeped!). Second, using a telephoto lens requires that more careful attention be paid to composition, which requires more time on the part of the photographer. My favorite images from my outdoor activities consistently come from this lens, and my satisfaction results from the combination of using the longer focal length for subject isolation, its beautiful rendering of out of focus areas (bokeh), and its excellent optics wide open at f/2.8. This lens accompanies me on every backpacking trip, and is a beautiful lens for cinematography as well.

Warren Peak, Anaconda-Pintler Wilderness. Leica Elmarit-M 90mm f/2.8 on a Sony NEX-7. ISO 100, 1/500 sec., aperture unknown.
This is the lens you want to love if you are a Sony NEX user.
It weighs an astonishingly light 70g (2.5 oz), has a “pancake”-like thickness of 2.3cm (0.89 in), can be quickly autofocused by the NEX-7, and has the perfect 35mm equivalent focal length of 24mm on the NEX-7 for landscape photography.
Best of all, when mounted on the NEX-7, it makes for an extremely light and compact package.

Hornbeck Blackjack on Holter Lake, Montana. Sony 16mm f/2.8 on a Sony NEX-7.
Thus, the combination of the NEX-7 and the Sony 16/2.8 (small size and weight, landscape-worthy wide angle) is a very compelling one for the backpacking photographer, especially if you enjoy shooting landscapes that have strong foreground elements.
If you are a pixel-peeper, however, you might hate this lens. Especially after shelling out $250 on it. Here’s why:
But, if you are not a pixel-peeper, and your expectations for image quality are lower, and you post mostly to Facebook or otherwise to the Web, then the lens will deliver images that will look just fine, and you’ll be tickled about its size and weight (I certainly am, and for 2.5 oz, who cares?). In addition, if you are shooting images for a magazine or book printed on cheap paper, or in B&W, then the lens will suit you fine. Just be aware that if the camera drives the lens, this pairing is a bit like putting Dale Earnhardt behind the wheel of a Ford Escort.
I believe wholeheartedly that strong composition, sharp focus, and good technical exposure always outweigh lens quality, and that good images can be captures with bad lenses (even Dale could drive the Escort to its limits, right?). If any one of these three factors is missing, then bad images can easily be captured from the world’s best optics. However, I’m a firm believer that strong composition, sharp focus, and technical exposure are prerequisites to achieving technically outstanding images, and that the difference between a good image and a technically outstanding image, especially in landscape photography, has everything to do with the quality of the file delivered by the lens and captured by the sensor. To that end, the Sony 16/2.8, by nature of its less-than-awesome technical performance, not only hampers the excellent NEX-7 sensor, but limits what the accomplished photographer can do as well.
In that context, I’d rather carry a higher quality lens (along with the extra weight) for wide angle shots (like the Heliar 15/4.5). If saving weight is your primary goal, and rapid publication, web, or mass paper print publishing is your primary display, then you’ll be able to achieve nearly equivalent image quality with a much lighter small sensor camera (like a Canon S100 or Lumix LX5), and better image quality with a competing mirrorless system with a better lens (like the Panasonic 20/1.7 for Micro Four Thirds, or the Fuji X100 fixed lens camera). Unfortunately, the size and weight of the Sony 16/2.8 is too compelling not to ignore, and image quality is good enough for many purposes when the camera is in the hands of an accomplished photographer who understands the limitations of this lens.
That said, the 16/2.8 accompanies me on many trips, for the simple fact that it affords me some neat creative options (like the canoe shot above) for a tiny weight and bulk penalty.
Of course, there is the Sigma 19/2.8 EX DN, which seems to have better optics, but is significantly larger, a little heavier, and of course, not as wide.
This $200 autofocus lens, when paired with the Sony NEX-7, is simply outstanding for backpacking.
The reasons are many:
This is the lens that spends the most time on my camera.

Supermid in Gates of the Mountains, Montana. Sigma 30mm f/2.8 on a Sony NEX-7. ISO 100, f/2.8, 1.3sec.
Of course, the Sony NEX is a young system, so its native lens offerings are minimal. Based on what Sony has delivered for the NEX so far, it’s clear that light weight and consumer grade image quality are Sony’s immediate goals. Zeiss is also making lenses for the E-Mount and early results from lens reviewers suggest that the new Zeiss 24/1.8 is an excellent, albeit bulky lens on the NEX-7. In a similar size, I’ve discovered that the Sony 50/1.8 offers fine optics as well but it’s bulk makes me less than enthusiastic about using it for backpacking. I have no interest in reviewing bulky lenses for the NEX-7, as these types of lenses remove the primary benefit of keeping the kit compact for wilderness travel.
Now that I’ve used the Sony NEX-7 for several months, I find myself gravitating to a consistent selection of equipment. I think you should find this to be valuable because it represents the process of discarding what I don’t like, preserving what I do, and understanding my photography objectives on trips and how this kit meets those objectives.
I’ll start by summarizing what I don’t take.
First, I don’t fool around with lenses that require additional post-processing when I get home. I just don’t have time for it. If I was a professional photographer with very specific needs, then I might. Therefore, my Leica 28/2.8 and Voigtlander 15/4.5 will stay home and unused until I can mate them with a camera that can take advantage of their optics without undue time tax.
Second, I don’t mess with bulky lenses. They defeat the purpose of what I’m trying to accomplish with the NEX system, which is minimal size (primary advantage) and weight (secondary advantage). Size is more important for me than weight because I like to carry all of my camera gear in a small chest/hip pack worn in front of me while I hike (more on that below). I may allow for one exception to this: The Zeiss 24/1.8 offers image quality and speed not found in any other E-mount lens, and the tradeoff in bulk just may be worth it for the opportunity to shoot wide angle landscapes at shallow depth of field (this is particularly appealing to the videographer).
Third, I don’t need a lens to cover every possible situation. You’ll notice that I did not discuss zoom lenses above. The Sony 18-200 is a fine lens with good optics across most of its range, but it’s a monster. I think this is a great lens for the “one-lens photographer” but it’s not exactly a stealth lens and is generally inconsistent with my personal philosophy of photography which focuses on minimal size. The Sony 55-210 suffers the same bloat as the 18-200. Finally, the kit lens (Sony 18-55mm) simply doesn’t offer fast enough apertures to minimize depth of field or for low light photography at low ISOs, suffers from image softness at wide apertures, and is bulkier than I like. In other words, the versatility of zooms is not worth the sacrifices that I have to make in terms of weight, size, and image quality.
In short, what I do want when I build a camera kit are just a few small, fast, high quality prime lenses.
Therefore, the two lenses I have grown most fond of are the Leica Elmarit-M 90/2.8 and the Sigma 30/2.8. These two lenses go with me on nearly every trip.
Their small size and outstanding optics on the NEX-7 are the defining criteria for these two lenses. The Sigma 30/2.8 gives me the flexibility to have autofocus for the occasional action shot and for run-and-gun shooting while on the trail. The Leica 90/2.8 simply produces beautiful images and video at small apertures and I can’t imagine that a smaller replacement exists at this focal length.
For each lens, I carry both variable ND and circular polarizing filters (multicoated). In addition, a typical week long trek where I’m shooting lots of video requires five batteries. For sensor and/or optics cleaning, I use a LensPen and a small Giottos Rocket Air Blaster.
I often carry a tripod (mostly when I know I’ll be shooting video). Most often it’s a Gitzo 0541 with a Really Right Stuff BH-25 Ultralight ball head.
For carry, I use a Simms Hip Dry Pack with a foam insert. It has welded seams and a water resistant zipper and I have total confidence in its ability to keep my equipment dry. In particularly wet conditions, I take along some silica gel (desiccant) packs to manage moisture when my camera and lenses do get wet – which occurs when I remove the camera from its case in the rain.
If I’m shooting video, I’ve been adding the Voigtlander 35/1.4 lens with both ND and polarizing filters, and sometimes replacing the Sigma 30/2.8 with this lens. Finally, I’ll toss in the 16/2.8 on shorter trips as a “just in case” lens for more dramatic wide angle shots (and include ND and polarizing filters for it as well).
Generally, depending on the specifics of my kit, I’ll carry about three pounds of camera equipment between the camera body, cleaning supplies, two lenses, and carry bag. Adding a tripod, a third lens, and perhaps some other supplies specific to high end videography (e.g., a follow-focus rig and a panning head), my kit weight is still less than about eight pounds. This is a far cry from the 20 or 30 pounds we used to carry when shooting Super 8, toting multiple cameras, medium format boxes, or today’s pro-level brick-sized (and weighted) DSLRs and lenses.
This will not be a detailed review of the Sony NEX-7’s movie making capability. I will summarize what I think are the most important aspects of its feature set of interest to the backcountry videographer.
The Sony NEX-7 offers the usual basic specifications for routine HD video capture, including:
For someone who has more than a casual interest in making movies for commercial use, I also appreciate that the NEX-7 offers
From an “ultralight” perspective, the primary limitation of the NEX-7 is its lack of in-body image stabilization, which limits its applicability for hand held shooting with lenses that lack in-lens stabilization.
This makes for shaky handheld shots when using lenses that don’t have in-lens image stabilization, which for me, are most of the lenses that I want to use with the NEX-7 (i.e., legacy manual focus lenses) for movie making. This limitation is clearly seen in the video vignettes that are presented with this article, and for the backcountry videographer, this is a major limitation. Being able to shoot high quality handheld video without stabilizing paraphernalia (tripods, gyros, counterweights, or chest/shoulder rigs) means that you’ll be able to grab candid shots when they happen, and not when you stage them.
However, if you limit yourselves to lenses that use in-lens stabilization, then shaky handheld shots become less of an issue. Unfortunately, this limits your lens selection significantly to lenses that have poor manual focus control, excessive size, high apertures, and/or less-than-stellar optics. The number of small, light, bright lenses that offer in-lens stabilization and are of interest to a cinematographer is pretty limited right now. I’d propose that the number is zero, with perhaps a consolation prize for the Sony 50/1.8 OSS, which is limited by its poor manual focus control (at least, relative to something like a MF M-mount lens from Zeiss, Cosina-Voigtlander, or Leica).
Reports about the NEX-7’s sensor overheating in video modes at “normal” room temperatures started popping up shortly after the camera was released. I’ve used two different NEX-7 bodies and both of my bodies have this problem as well.
The practical impacts on my own style of videography have been limited. I mostly shoot short clips less than one minute in length.
However, the overheating sensor becomes an issue in reasonably warm weather when trying to capture clips in excess of three or four minutes. Worse, once the camera sensor overheats, the camera must be shut down and restarted, and the ability to shoot even short clips of a minute or two become seriously compromised until a significant amount of time has passed to allow the camera to cool down.
This is an unacceptable defect in the camera, and although it doesn’t impact me directly very often, it does limit the camera’s flexibility for outdoor videography in warm conditions. Online buzz seems to indicate that the issue has been resolved with the new NEX-6.
Image stabilization aside, there’s little to criticize about the NEX-7’s movie making capabilities. For its size, weight, image quality (due to the large sensor), lens flexibility, and manual control, the NEX-7 may offer the most powerful movie-making package for the enthusiast videographer.
However, don’t mistake this for a perfect camera. Lack of in-body image stabilization and a sensor that seems too sensitive to normal ambient temperatures (resulting in overheating and subsequent shutdown) should be considered carefully before investing into a NEX-7 system.
In addition, this is not a professional editor’s camera. The output is not robust enough to handle a significant amount of post-processing (e.g., color correction), so you had better get it right (white balance, exposure, etc.) as you record.
These limitations aside, content is still king, and in the hands of someone with a good cinematic eye, the NEX-7 should be able to create some very compelling movies.
The video below pulls together a series of vignettes that I shot from some of my summer 2012 backcountry trips with my Scout Troop. The topic: food, of course!
Disclaimer: The Sony NEX-7 digital camera evaluated in this review is on loan to Backpacking Light from a generous BPL Member. Backpacking Light does not own the camera, has not been paid to review it, and receives no compensation from Sony related to the outcome of this review.
Rab’s new baselayers blend merino wool and synthetic fabrics – do they achieve the best of both worlds?

The MeCo 165 Long Sleeve Zip Tee does well in winter conditions, but so do most wool garments. How does the fabric handle warmer weather, when synthetics tend to perform better?
Like many other backpackers in the last decade, Kristin and I have switched from synthetic to Merino wool baselayers. Merino wool is soft, handles moisture comfortably, and has natural anti-microbial properties. I like that wool is a renewable resource, and therefore prefer it to petroleum-derived synthetics. However, wool is generally more expensive and it doesn’t last as long. I tend to get holes in my lightweight (150-200 g/m2) wool layers after 120 days of use.
Synthetic fabrics have superior wicking ability, quicker dry time, better durability and are generally cheaper. Some companies, like GoLite and Patagonia, have started to address the environmental concern by using recycled content in their fabrics.
So, which one should a backpacker choose?
Well, you may no longer have to pick between one or the other, as Rab tries to bridge these two worlds with their new MeCo baselayers. Rab combined Merino wool and Cocona to create a fabric that wicks and dries like a synthetic, but smells and feels like wool. We tested these baselayers to see if they live up to Rab’s claims.
Rab’s MeCo baselayers are composed of 65% Merino wool and 35% Cocona. They will be available in two fabric weights, 120 g/m2and 165 g/m2, in September 2011. The 165g/m2 line includes a long sleeve zip-neck tee, pants, balaclava, beanie, and gloves. A long sleeve tee, short sleeve tee, and pants will be available in the 120 g/m2 weight. All baselayers have women’s and men’s versions, in a choice of three colors each.
What is unique about these baselayers is the fabric itself. Rab describes MeCo as:
Ethically sourced Merino wool and recycled Cocona yarns have been blended to produce a high performance fabric which combines the warmth and softness of Merino with the fast drying and wicking performance of Cocona. Activated carbon is derived from discarded coconut shells and is contained inside the Cocona recycled fibre and will not wear out or wash off. It is extremely breathable and absorbs odour molecules within the activated carbon. It offers UVA and UVB protection.

Features of MeCo baselayers: no seams on the shoulders where pack straps abrade (top left); flatlock seams reduce bulk (top right); long torso length and really long sleeves (bottom left); and deep chest zips on the 165 Long Sleeve Zip Tee: 10 in (25.4 cm) for women and 12 in (30.5 cm) for men (bottom right).

165 Long Sleeve Zip Tee, Rose color, Women’s medium, 7.1 oz (200 g), $90. The medium is a tad tight on the shoulders and loose in the waist for Kristin’s 5’7” (170 cm) frame.

120 Long Sleeve Tee, Spring color, men’s medium, 5.8 oz (165 g), $80. The size medium fits me (6’0”, 170 lbs) perfectly as I prefer a snug, but not restrictive, fit.
Kristin and I each tested a 120 Long Sleeve Tee and 165 Long Sleeve Zip Tee in the winter and spring of 2011. We used the shirts on a variety of backcountry ski tours, hikes, and runs throughout the Alps.
For winter backcountry skiing, the 165 Long Sleeve Zip Tee was my go-to shirt. It was light enough for skinning up a mountain, yet warm enough for the ski descent. When I became too warm, I simply rolled up my sleeves and vented with the deep chest zip. The shirt fit well and was comfortable.
Like most Rab shirts and jackets, the neck on the 165 Long Sleeve Zip Tee is less snug than the competition. This is likely due to the fact that Rab makes gear for climbers, who need the unrestricted movement. Kristin really liked the loose neck as she feels that collars on some other shirts are too restrictive. I didn’t mind the collar on the Rab, but I do prefer a more snug fit. Not only is it loose, it is not as tall as others. This helps performance in warmer weather, but is something to consider for really cold temperatures.

We tested the 165-weight fabric on many high-exertion activities in warm weather. Kristin often wore her shirt on hikes even when the temps rose above 70°F (21°C) (left). I was as comfortable as I could be on a late season ski trip in the Dolomites, with the weight of my ski gear, a long approach, and a high of 72°F (22°C) (right).
I really enjoyed the 120-weight MeCo fabric. The gossamer 120 Long Sleeve Tee was a pleasure to wear on days above 60°F (15°). I sweated less with the thin fabric and was comfortable as the moisture was absorbed by the shirt. The Long Sleeve Tee was light enough to wear in the warmest conditions, when I rolled up my sleeves, but also gave me the option of sun protection on my forearms.

On one hike, I gained 3100 feet (950 m) on an unshaded south-facing trail. The day was quite warm (75°F/24°C) and I was wearing a pack without any mesh back panel (left). When we stopped for lunch, my back was very sweaty and the shirt was wet. However, sweat was not visible as the fabric had efficiently wicked the moisture away from my skin and spread it over a greater surface area (right). This accomplished two things: increased comfort and faster drying (less than ten minutes).

We poured 50ml of water onto a 200 g/m2 Merino wool shirt (left) and the MeCo 165 Long Sleeve Zip Tee (right). The water naturally spreads out quickly on the 165 g/m2 MeCo shirt on the right, as contrasted to the visible water stain on the 100% wool shirt. The Cocona wicking works!
How about the smell? We can say conclusively that these shirts have all the odor-fighting capability of pure wool. I wore the 165 Long Sleeve Zip Tee for two weeks straight. I usually hung it up at night to air out, but sometimes I wore it for days on end. There was no discernible odor or oil buildup in the shirt over those two weeks, or at any other time during our testing. Kristin also tested the shirts’ odor-fighting capability. However, her clothing rarely smells, so she is not the best subject for testing. These garments were no exception – her shirts never smelled badly. We only washed the shirts three or four times over the entire testing period. Even then, we usually washed the shirts because of food spills, which were removed without any residual stains.
In another test, I walked under a waterfall and drenched my 120 Long Sleeve Tee. It temporarily had the same distinctive smell that wool has when it is soaking wet. Wool-wearers know what I’m talking about. Typical sweating does not produce this odor.

A closeup of the pilling that formed on my 165 Long Sleeve Zip Tee.
Throughout the many months of hard use, the only issue we had was pilling on the face of the garments. This happened in all of the shirts and was present throughout the garment, not just the high-wear areas.
The pilling happened after only three machine washings, even though we were very careful with cleaning: the shirts were inside out, all zippers were closed, we used delicate cycle, mild detergent, and line drying. I contacted Rab, who had not seen this issue during their year of product testing, nor were they able to replicate it after my inquiry. Pilling happens when the fabric yarns are pulled out slightly, but not enough to compromise the durability. Pilling happens occasionally on wool garments. [Editor’s update: the testers have now used the baselayers for more than seven months without any issues in durability, so the pilling in this case is merely cosmetic.]
Rab has made a technical line of athletic wear, while lessening the environmental impact of the manufacturing of the fabrics. “Ethically sourced Merino” comes from Australian sheep that are not mulesed (a controversial surgery that removes the skin around the sheep’s buttocks to prevent flystrike). Cocona is made in a bluesign accredited facility and uses non-chlorine wash to save water and energy. Using recycled synthetic fibers reduces the fabric’s carbon footprint by about 40%, as compared to new polyester. Cocona also uses a wider fabric roll, which they claim reduces waste by about 25%.
The lightest 100% wool baselayers are made with 140 g/m2 fabric, though 150 g/m2 is much more popular. A few synthetics are significantly lighter than the MeCo 120. The most popular is probably the 80 g/m2 DriMove Lite fabric that GoLite uses in its Wildwood Line.
A few other companies have recently brought wool/synthetic blends to the market.
| Brand | Line | % Wool/Synthetic | Fabric Weight (g/m2) |
| The North Face | Tolowa | 65/35 | 149 |
| Mammut | All-Year | varies* | 150 |
| Montane | Bionic | 38/62 | 168 |
| Devold | Active | 80/20 | 205 |
| *Mammut uses a fabric blend on the garment body and a synthetic-only fabric on the underarm area. | |||
Rab hit the sweet spot with the MeCo layers, garnering the best of both fabrics. The shirts are soft, comfortable, and odor-free. We sweated less with the lightweight fabrics and the shirts dried quickly when they did get wet.
The success of these baselayers doesn’t just depend on great fabric, though. The shirts are snug yet comfortable, sport a long torso and even longer arms, and a generous zipper. I was pleased with my fit, but Kristin preferred a slimmer cut. The shirts have a no-frills design – there is nothing that we would have (or could have) removed. In fact, the 120 g/m2 shirts each weighed about 1 ounce (28 g) less than Rab’s stated weight. The craftsmanship is impeccable. The minor issue of pilling is the only lingering issue. The MeCo line shows that it is possible to make a highly technical product that is environmentally friendly and competitively priced.
Just as we were considering switching back to synthetics, Rab has given us the best of both worlds. Our only hope is that Rab comes out with a hooded version soon!

One happy hiker: warm and dry at 2000 meters, looking across to the Mont Blanc Massif, near Chamonix, France.
| Manufacturer | Rab (rab.uk.com) |
| Model Line | MeCo Baselayers |
| Availability | September 2011 |
| Fabric Composition | 65% Merino Wool, 35% Cocona |
| Fabric Weights | 120 g/m2 and165 g/m2 |
| Model (size Medium) | Men’s 165 Long Sleeve Zip Tee | Women’s 165 Long Sleeve Zip Tee | Men’s 120 Long Sleeve Tee | Women’s 120 Long Sleeve Tee |
| Manufacturer Weight | 7.8 oz / (220 g) | 7.1 oz / (200 g) | 5.8 oz / (165 g) | 5.1 oz / (145 g) |
| Measured Weight | 8.0 oz / (226 g) | 6.9 oz / (195 g) | 4.8 oz / (137 g) | 4.1 oz / (117 g) |
| Full Line of MeCo 120 | ||
| Long Sleeve Tee | Men’s 5.8 oz / 165 g Women’s 5.1 oz / 145 g |
MSRP $80 |
| Pants | Men’s 4.4 oz / 125 g Women’s 4.1 oz / 115 g |
MSRP $60 |
| Short Sleeve Tee | Men’s 4.2 oz / 120 g Women’s 3.5 oz / 100 g |
MSRP $60 |
| Full Line of MeCo 165 | ||
| Long Sleeve Zip | Men’s 7.8 oz / 220 g Women’s 7.1 oz / 200 g |
MSRP $90 |
| Pants | Men’s 5.8 oz / 165 g Women’s 4.8 oz / 135 g |
MSRP $70 |
| Gloves | Unisex sizes 1.0 oz / 28 g | MSRP $20 |
| Beanie | Unisex sizes 1.3 oz / 36 g | MSRP $25 |
| Balaclava | Unisex sizes 1.5 oz / 42 g | MSRP $25 |
Disclosure: The manufacturer provided this product to the author and/or Backpacking Light at no charge, and it is owned by the author/BPL. The author/Backpacking Light has no obligation to review this product under the terms of this agreement.
Backpacking Light staff pick their favorite gear/cool dealio/thingy-dingy of 2011.
Previous Years
2010 Backpacking Light Staff Picks
2009 Backpacking Light Staff Picks
2008 Backpacking Light Staff Picks
Getting ready for this year’s Staff Picks was entertaining. One editor suggested all photo thumbnails should, when clicked, jump to a full-size photo to better display the gear. When asked precisely how much work he intended for me (Addie), another editor jumped in and requested that each photo hyperlink to a professionally produced HD video of me using the actual product.
Challenge. Accepted.
It didn’t work out, mostly because my videographer husband had other things to do and because we Bedfords were busily moving from tiny condo to roomy home right before Christmas. WHAT were we thinking?! Next year, faithful readers. Next year…
Then I passed off the initial editing and loading to my trusty intern. Our actual chat transcript:
D: Feminine products will be big on the list this year…
A: There will be TWO, which is more than in years past, yes, but still not very representative of the ladies.
Men are so weird about that stuff.
So don’t be weird, enjoy the fun. Some contributors went with straight gear, others, well… not so much. Most folks provided me with a bigger photo, so click on the thumbnails and see who coughed up and kept me hopping in between wrapping gifts, unpacking boxes, and hosting family. This isn’t an “Editor’s Choice” or formal endorsement, just a list of stuff we like. Don’t forget to add your own favorites in the forum below!
| BPL Staff Member | Favorites | ||
| Ryan Jordan | Bivy Sacks | Boilerwerks Backcountry Boiler | TroutSticks |
| Chris Wallace | HMG Porter Backpack | The Stateless Society Custom Quilt | Max |
| Will Rietveld | Outdoor Research Versaliner | Sawyer Squeeze Water Filter | MontBell Versalite Pant |
| Janet Reichl | EZ Reacher | Rain Skirt | Goat Poles, Fixed Length |
| Roger Caffin | Canon Powershot G11 Camera | Poncho | Victorinox Knives |
| Mike Martin | Páramo Waterproof Cap | Patagonia Nine Trails Jacket | Mountain Laurel Designs Solomid |
| Damien Tougas | Patagonia Houdini | Arc’Teryx Gamma LT Pant | Downsizing |
| Dave Chenault | The Flathead River Watershed | Werner Shuna Paddle | 2000 Nissan Xterra SE 4×4 |
| Danny Milks | CAMP G-Comp Wind | Rab MeCo Baselayers | Couchsurfing |
| Kristin Tennessen | Aclima Sports Top | Diva Cup | Cuisinart DLC7 Pro 14-cup Food Processor (from 1983) |
| Ray Estrella | Therm-a-Rest NeoAir All Season | KookaBay GoosePad | Camp-Tek Microburst |
| Doug Johnson | Boilerwerks Backcountry Boiler | EnLIGHTened Equipment Protege Quilt | Geocaching.com iPhone app |
| Daniel Paladino | MontBell UL Comfort System Pad 120 + UL Comfort System Pillow | Tip 116: ‘Liberate yourself from toilet paper’ from Mike Clelland’s Ultralight Backpackin’ Tips | Scarpa Maestrale Alpine Touring Ski Boots |
| Addie Bedford | Eddie Bauer First Ascent Downlight Sweater | NPR Podcasts | e.p.t. |
|
|
Bivy Sacks | I’m not recommending or endorsing any particular model over others here, because the bivy sack experience can be replicated with just about any decent waterproof bivy on the market today from Mountain Laurel Designs, Integral Designs, Outdoor Research, and others. I will say that I’m partial to three-layer eVENT bivy sacks, because I get less condensation in them when temperatures are below freezing. The one in the photo is the Integral Designs Micro Bivy, and currently, it’s my “favorite,” and I’ve been using it for a few years on a consistent basis now. Bivy sack camping – whether under a starry sky or in a snow shelter (pictured) – is still my favorite way to enjoy a night in the Wilds.
Weight: Varies by brand |
|
|
Boilerwerks Backcountry Boiler | Take an entrepreneur that has no idea what he’s getting himself into and mix it with innovative thinking, support from the fantastic community at Backpacking Light, and creative crowdsourcing for funding, and you end up with the Backcountry Boiler. In spite of it being one of the most beautiful new products on the market, and refreshingly tactile and joyful to use, it’s one of the neatest success stories of 2011. Kudos, Devin.
Weight: (Ryan didn’t mention his iteration) |
|
|
TroutSticks | Daniel Galhardo (pictured in the photo) of Tenkara USA joined me for a weekend of fishing in Montana this spring, and he introduced me to one of the most fantastic inventions I’ve ever seen: TroutSticks. TroutSticks allow you to grill fish over an open fire in a way that minimizes gear, thus maintaining a light pack, while still affording you the luxury of wonderfully flavored wild trout. TroutSticks are available almost anywhere trout are found, and only require an ultralight pocketknife, sea salt, and sake to round out the complete system.
Weight: Varies by length |
|
|
HMG Porter Backpack | The Porter has become my go-to pack. The body is large enough to use when guiding, but compresses well enough for a quick weekend out. The construction is almost completely waterproof, and the latest harness is all I could ask for. One of my favorite features, though, is its modular capability. I currently have a front mesh pocket, two water bottle pockets, and two hip belt pockets to choose from and will take only what I need for a specific trip.
Weight: 32 oz / 907 g |
|
|
The Stateless Society Custom Quilt | I’ve had my TSS quilt for a couple of years now and have used it on every trip I’ve taken when it wasn’t frigid. It’s been in multiple states in the southeast, as well as several areas of the northern Rockies. My version is a custom taper specifically made for my size and shape and designed to be good to around 30 degrees. The quilt has kept me warm to around the mid-20s with additional clothing and compresses very well due to the top notch materials.
Weight: 16 oz / 454 g |
|
|
Max | My wife, Robin, and I rescued Max around the first of this year. We were still in Georgia, and a local lady had found him wandering her neighborhood during the winter storms we experienced. Our decision to take him was almost instant, but our first trip to the vet was as bad as our worst fears. Max had heartworm disease. After a lot of money, some trying times with his mood adjustments, and a successful treatment, everything is wonderful. These days Max keeps us both busy with twice daily walks of 1-5 miles each, which he needs because of his Border Collie background, so we have all become quite fit. Thanks to Max, I walk an average of 40-50 miles a week, which keeps me ready for that next big trip.
Weight: About 45 lbs / 20 kg |
My previous favorite gear picks are still favorites, but I like to feature something new each time. I have been testing gear that is really lightweight and functional for an upcoming article on “Mountain Super-Ultralight Backpacking,” and here are some favorites that have really performed well for me.
|
|
Outdoor Research Versaliner | This is a shell and liner combo that weighs just 3.1 ounces per pair in men’s size XL. The inside liner gloves are plenty warm for summer backpacking or active cool weather pursuits, and they’re water-resistant and fairly durable. They are smooth on the outside, fleecy on the inside, and have silicone gripper dots on the palm side. The shells weigh just 0.8 ounce per pair in size XL, which makes them the lightest currently available. The Versaliner is worth the price just to get the waterproof/breathable shell gloves, and the bonus is a pair of high quality lightweight liner gloves. The liners have a zippered pocket on the topside to stash the shell, or use it for a heat pack. Men’s and women’s sizes available.
Weight: 3.1 oz / 88 g per pair |
|
|
Sawyer Squeeze Water Filter | I have tried a lot of different water treatment systems, and this is my current favorite in terms of light weight, simplicity, and efficiency. The Squeeze filter comes with three lightweight flasks that the filter will attach to, but I personally prefer to attach it to a disposable beverage bottle. It will fit any threaded beverage bottle – it is available in a range of sizes – but it does not fit a Platypus flask which has a different type of thread. For mountain backpacking, I use a 1-liter Coke bottle because it is easy to fill from a stream and easy to reach and replace in a pack side pocket. To drink, simply squeeze the bottle and suck at the same time. The filter removes organisms down to 0.1 micron (which catches most everything), has a good flow rate, and is claimed to be back-flushable forever. The filter itself weighs just 2.4 ounces and a 1-liter Coke bottle weighs just 1.2 ounces. Admittedly, it is not as light as a chemical treatment, but it’s a lot simpler and faster – no mixing and waiting, just fill and drink. (Watch a video on the process here.)
Weight: Filter only is 2.4 oz / 68 g |
|
|
MontBell Versalite Pant | Remember the original GoLite Reed Pant? It weighed just 4 ounces, but people gifted with big feet (like me) couldn’t get their boots through the cuffs. Then GoLite added ankle zips, which bumped the weight up. Then GoLite discontinued them. The new MontBell Versalite Pant for spring 2012 weighs the same, fits well, and I can get my size 12s through the ankle openings. They don’t have ankle zips, rather they are sized just large enough to get hiking boots through (a size 12 or 12.5 is about the limit). They have an elastic band and tie cord at the waist and an elastic cord in the cuffs. Removing the waist cord will get the weight of men’s size Large down to 3.95 ounces. I find rain pants to be very versatile because they can be used as rainwear, windwear, campwear, and sleepwear – I even wear them in my sleeping bag when it gets really cold.
Weight: 4.2 oz / 119 g for men’s L |
|
|
EZ Reacher | This resides in our vehicle, along with a plethora of plastic bags, and is used whenever I have a few moments to spare, like when dropping Will off or picking him up at a trailhead. When car camping, it’s great for leaving one’s campsite cleaner than how one found it (like any well-trained former Girl Scout would). It is also my constant companion whenever I go on a walk around town. Having used mine for 12 years, it has paid for itself many times over. For my 5’2” height, the 20″ length ($13 for Outdoor Standard) is perfect. I just need to squat slightly, and no arm contortion is needed to drop an item in a bag.
Weight: 11 oz / 312 g for 32″ length |
|
|
Rain Skirt | I started off using the Etowah Rain Wrap, but I wanted one that overlapped at an angle and would lie flat for use as a ground cloth. Since making it, I rarely wear a rain pant. The skirt is quick and easy to put on, moisture from sweat doesn’t build up inside, and it seems to provide a little extra warmth when left on after a rain on a chilly evening. Mine is a rectangle that measures 31 x 60 in and weighs 3 oz. Etowahs come in 30- and 33-inch lengths.
Weight: 2.5 oz (71 g) |
|
|
Goat Poles, Fixed Length | These aren’t available in fixed length anymore, so I better not break one. They’ve gone with me on nearly every hike since 2006. Each 41″ pole weighs 3 oz. Without any wrist straps, I can easily adjust where and how I place my hands, sometimes just cupping my hands over the top, sometimes holding the poles below the handle. The strapless version also gives me greater confidence that I won’t break a wrist in a fall, like a friend did this past summer. The current version adjusts from 30″ to 51″.
Weight: 3.5 oz / 99 g per pole, current version without basket |
|
|
Canon Powershot G11 Camera | Some years ago I listed my Canon A95 as one of my Staff Picks. Well, I am going to list my Canon G11 camera this time. Why? For three main reasons. The first is technical: the G11 sits in between the typical point-and-shoot (P&S) and the DSLR. It gives far better image quality than a P&S because the sensor is larger, the optics are better, and, starting with the G11, Canon switched from competing in the MegaPixel race to improving the noise levels in the sensor. Other camera companies are starting to follow suit. As for phone cameras – yuk! The second reason is because the G11 offers me every one of the typical SLR features – except for interchangable lenses. But for ergonomic reasons I don’t want interchangable lenses as I explain below. If I want to do an SLR-type thing with this camera, I can, and easily: the Canon User Interface is very good. (Actually, the camera has far more minor “fancy-that” features than I could ever want, but they do not get in the way. I guess some programmer had memory space to spare.) The third reason is more ergonomic, and is the reason why I don’t go for a DSLR. This camera rides in a small waterproof pouch mounted on the shoulder strap of my pack. I can get it out with one hand, turn it on, and take a good photo in seconds. The lens has adequate zoom and Macro, down to a few centimetres. Compared to how long it takes to get a DSLR out of its larger carry-case, using the G11 is fast. It is also fairly splash-proof, so I can use it in bad weather without worrying. The credo here is that the only bad photos are the ones you don’t take.
Weight: 12.5 oz / 354 g (camera body only) |
|
|
Poncho | This design was the subject of an MYOG article some years ago. They have been with both my wife Sue and I for many years now, in sometimes very severe weather. Photos in my article on the GR5 show our ponchos being worn in really bad rain and snow conditions, and yet we were warm enough inside them. To be sure, one gets damp inside them, from condensation, but what do you expect from any gear under those conditions? The photo here shows Sue heading down the hill from Bokkarschart Pass on the Via Alpina in Europe, in some nasty weather. Just above us it was snowing, wiping out the track, plus thick fog and wind. It was bad enough that the local farmer (in front of Sue) offered to drive us down to the town (quite some distance away) rather than see us go up in that weather. Sue accepted his kind offer with alacrity – I wasn’t even consulted! The ponchos were quite adequate even under these conditions – and were not our main concern right then! Two days later the sun was out and the snow had melted away. We had a pleasant crossing of the Pass.
Weight: 6.7 oz / 190 g |
|
|
Victorinox Knives | Forgive me if I soapbox slightly. I know many people love their great big knives, citing survival needs and so on. I’ve got a stack of such knives as well, but I never use them. The reality is that all we really need is a knife to cut food and spread butter and jam. Crocodile Dundee knives need not apply – we prefer to stay out of trouble in the first place. But we do like our knives to be sharp. You will see two knives in the photo. The red one (16 g) started life with a point as well, but I carefully ground it off to make the current rounded shape. This knife is for spreading butter and jam, and scraping it out of containers. A sharp point is seriously obstructive here, even damaging to the Nalgene bottles we use. The black one (27 g) is shared between the two of us. It is for cutting up bread, sausage, cheese and so on – food preparation. I could use the red one for that, except that its tip is blunt, and the blade is now a bit short. Since we do a lot of walking in Europe, buying fresh bread every few days for lunch, having a knife long enough to cut slices off a loaf is worth the extra weight. The grey thing below the two knives is a sheath for the sharp black knife – or at least for its point. Cut out a rectangle of plastic from the side of a PET juice bottle, fold twice into a flat sheath, and wrap a couple of turns of stout packaging tape around. The tape is much lighter than ‘duct’ tape, but that hardly matters. The entry is angled to match the handle. The steel on these knives is excellent. They stay sharp for a long time and don’t rust. I could lighten the handles a bit more maybe – but why bother?
Weight: .6 & 1.0 oz / 16 & 27 g |
|
|
Páramo Waterproof Cap | Backpacking Light contributor, Chris Townsend, introduced me to this cap during a 2008 winter trek in Yellowstone National Park. It’s been my favorite cold-weather headwear ever since. If I keep the DWR refreshed, it is “functionally waterproof” while being much more breathable than membrane-based wp/b alternatives. I can even dry out wet hair while wearing it. The generous brim keeps the sun off my nose and snow off my glasses. The ear flaps can be raised for ventilation or lowered for wind protection. Its chinstrap has held it secure on my head in winds above 50 mph. The smooth shell sheds snow, while the hydrophobic directional microfleece liner provides just the right amount of warmth for moderate exertion activities. For extreme cold, I just layer a balaclava under it. If it has a drawback, it is that I have yet to convince my wife how stylish it truly is.
Weight: 2.8 oz / 79 g (size L/XL) |
|
|
Patagonia Nine Trails Jacket | As a trail runner, cyclist, skier, and Backpacking Light staffer, I’ve had occasion to use an embarrassing number of windshirts over the years. The Patagonia Nine Trails Jacket is by far my favorite for high exertion activities. For backpacking, there are certainly lighter alternatives with hoods and better weather protection. But for trail running, the Nine Trails jacket is hard to beat. It uses Patagonia’s particularly long-lasting Deluge® DWR. It compacts down small enough to stuff into a fanny or hydration pack. Its trim cut minimizes flapping in the wind. 1.1-oz 15-denier ripstop nylon fabric on the front and arms perfectly balances wind protection with air permeability, while highly permeable 3.5-oz 75-denier stretch woven polyester panels on the back and armpits really move moisture when you are working hard. When you are trail running or cycling, your movement creates an apparent wind that is disproportionately at your chest rather than at your back. The dual-fabric design of the Nine Trails Jacket provides wind protection where it is most effective, and high air permeability elsewhere to achieve outstanding breathability. It’s also available in non-purple colors so as not to clash aesthetically with your choice of cap.
Weight: 4.8 oz / 136 g (size Large) |
|
|
Mountain Laurel Designs Solomid | Maybe it’s a sign of… ahem… “maturity,” or maybe it’s my personal penchant for camping in cold, windy, snowy locations. But for the past few seasons, I’ve found myself stepping away from the SUL edge and enjoying more substantial shelters. My Mountain Laurel Designs Solomid just plain sees more use than the other options in the Martin gear closet. I like the sturdy A-frame trekking pole setup. I like the 360-degree weather protection. I like being able secure it with deadmen and seal the edges to the ground in snow. I like the fact that it is long enough so that my head and feet don’t collect condensation in the middle of the night. I like that the floorless design allows me to cook (with due care) inside during harsh weather. Yes, there is weight to be saved with a non-woven laminate micro tarp. But, except in very mild summer or very harsh winter conditions, I’ve found my Solomid to be the perfect balance of size, weight, design features, and weather protection. For the ultralight adventurers among us, a 9-oz Cuben Fiber version is also available at a premium price.
Weight: 14 oz / 397 g (Silnylon version) |
|
|
Patagonia Houdini | For combating sun, wind, bugs, or a light shower in three-season conditions, this is probably my single most versatile and loved piece of clothing. It weighs almost nothing and squeezes into the tiniest of spaces, making it a no brainer decision to bring on virtually any outing.
Weight: 3.3 oz / 94 g |
|
|
Arc’Teryx Gamma LT Pant | Arc’Teryx has really nailed the fit on these pants. Although they are billed as a soft-shell pant, they are basically a lightweight stretch nylon. Not too heavy for summer and not too light for winter, they make for an incredibly versatile piece of kit. They are durable, comfortable, breathable and work equally as well around town as they do in the backcountry.
Weight: 10.9 oz / 309 g |
|
|
Downsizing | This past year has been a huge transition for our family. We have simplified and downsized considerably – we are not just going light with our packs, but striving to go light with the rest of our life as well. The end result is that we are a family of five living in 750 sq.ft. cabin near the mountains of the Gaspė Peninsula in Quebec. It has been hard work learning what is most important and figuring out how to make due with less, but the benefits have been well worth it. Having less clutter means we can spend more time, energy, and resources on the things that really matter.
Weight: Varies |
|
|
The Flathead River Watershed | It is not a coincidence nor a matter of luck that I live two miles from the Flathead River, whose three headwater streams (the North, Middle, and South Forks) drain one of the greatest backcountries on the planet. The human side of the Flathead is peculiar, it’s a rather isolated place, fairly far from almost everything else, and people need a purposive reason to end up living here. For me, that reason is the Flathead. It drains half of Glacier National Park, most of the Bob Marshall Wilderness complex, and has some of the best hiking, fly fishing, and wilderness packrafting available anywhere. Living with such a vast and nuanced ecosystem within an easy after-work drive has allowed me to get to know it in a leisurely fashion across the seasons, and I’m beginning to appreciate flower blooms, river levels, and the placements of game trails in the macro context of annual variance, something which takes years to see and lifetimes to understand. There are downsides. Winters are long and, on the Pacific side of the rain shadow, tend to be rather grey. Any change of scenery takes quite a bit of driving. I’d make 30-40% more doing the same day job in a more populous part of the country. But the payback of living where others go to vacation is as vast as it is inexpressible. Flying back from my summer holiday, to Alaska, I sat next to the father of a very boisterous family flying in from (where else?) California. His default question, making conversation, was where was I from? The assumption was that no one actually lives here. It was fulfilling to give him my answer.
Weight: Incalculable |
|
|
Werner Shuna Paddle | All my best trips in 2011 involved packrafting; not a coincidence, given the unrivaled way a packraft opens up the landscape to human experience. I like my Alpacka Yukon Yak, but it still has refinements to undergo before it earns this sort of endorsement. My Werner Shuna (210 cm, four-piece, fiberglass blades and carbon shaft) on the other hand is one of those transcendent pieces of gear which unites lighter and better into one inextricable whole. This paddle gets me excited to go paddling, just and simply paddling, because it does what it does so well. It’s a pure tool with seeming 100% efficiency; all my effort goes into paddling the water, not paddling the paddle. The lighter touring blade won’t stand up to the gorilla treatment a nylon blade will, but the quantum leap in performance and pleasure is worth it. We may be the tool-making ape, but few of our creations unite form and function so seamlessly, and towards such a profitable end.
Weight: 32 oz / 907 g |
|
|
2000 Nissan Xterra SE 4×4 | Horrid indictment of our car culture though it is, a capable automobile is essential for just about any American adventurer. Our country is big, one of the reasons our backcountry is so good, but also the reason it’s so hard to get to and around without a car. Public transit is effectively non-existent in many places, and hitchhiking increasingly difficult. We bought our Xterra used in 2004, with 90,000 miles on it. It now has 270,000 (and on the original automatic transmission), and while the number of broken things is too extensive to list, it is still going strong. More importantly, the memories and experiences in which our Xterra has been a prime mover are innumerable and priceless. We’ve lived out of it for extended stretches (the back seats are long gone, in favor of a plywood sleeping platform), gone on trips summer and winter, hauled all manner of gear, driven down some truly appalling roads, and only gotten it stuck three times (two of them involving snow, ice, and stupidity, the third pictured here). Yes, it only gets 21 mpg under the best of circumstances, yes, it is underpowered, and yes, it’s ugly, but my wife and I have quite the attachment to our Xterra. Its time is running out, but the memories and gratitude for a great tool aren’t going anywhere.
Weight: 2 tons |
|
|
CAMP G-Comp Wind | These are my go-to gloves for all but the coldest conditions. They are light and thin enough to use during most high-intensity backcountry winter activities. Breathability is about as good as fleece liners, but the synthetic leather is tough enough for several years of use without being so heavy-duty as to inhibit dexterity. A wind-proof mitten shell is permanently attached, tucked away in a little buttoned pocket on each wrist. When the temps drop, like on a windy summit or a speedy descent, I pull the mitten shell over my gloves for extra protection without losing my stride. The only flaw I’ve found is the Grip’r strips on the palm and fingers fall off too easily, but the gloves work nearly as well without the strips.
Weight: 3.2 oz / 92 g |
|
|
Rab MeCo Baselayers | I’m a big fan of merino wool for numerous reasons, but given the high price of wool and the relatively low durability (as compared with synthetic), it is not pure love. In my experience, a 150 g/m2 wool t-shirt falls apart after around 150 days of use, with laundering after ten days of use. Enter Rab MeCo Baselayers. These garments are made of 65% merino and 35% Cocona, which is a yarn recycled from used coconut fibers. MeCo is made with 100% natural fibers, has all of the odor-fighting properties of pure wool, and can be made thinner yet more durable. It wicks well, dries fast, and is comfortable against my skin. It’s a win-win-win. My favorite product is the MeCo 120 g/m2 Long Sleeve Tee. This shirt is good for everyday travel, running, backpacking and spring skiing. I appreciate the ability to wear a thin shirt but also protect my forearms from sun exposure. This shirt shows no signs of wear after months and months of use.
Weight: 4.9 oz / 140 g for Long Sleeve Tee |
|
|
Couchsurfing | Couchsurfing.org formalizes the process of meeting other like-minded folks – those who value traveling. You can find a place to sleep for a few nights or a local to have tea with or walk around town. I used this site extensively in fifteen countries over the last two years. I found places to stay where there were no hotels and met locals who taught about their heritage and region. I learned more, laughed more, lived more, and spent less. Now that I have a permanent residence, my couch is open to other travelers, helping them along their way. The enjoyment of other cultures, the value of learning, and the pay-it-forward mentality is alive and well through Couchsurfing.org.
Weight: 0 oz / g |
|
|
Aclima Sports Top | When your tent is too small to change clothes while inside, it is too cold to strip down, and you’d rather not expose your best parts to your ski companions, the perfect solution is the Aclima Sports Top. The fleece pile lining wicks sweat away from my skin while the exterior merino layer insulates my core. I wore this bra comfortably for eight days without taking it off. Until my skin started to itch a little on day seven, I didn’t even notice it was there. I was warm, dry, odor-free, and appropriately clothed while skinning uphill, skiing downhill, bootpacking, making dinner, reading in the tent, and sleeping during the coldest hours of the night. After almost a year of heavy use, it is a bit stretched out, but there is no visible wear. With the Aclima Sports Top, there is no reason to pack, or even own, a second bra.
Weight: 2.8 oz / 79 g |
|
|
Diva Cup | The Diva Cup has allowed me to minimize the time and cost needed to manage that once-a-month special event. It is especially useful while backpacking, because no waste needs to be packed out. Because the Diva Cup only needs to be changed every 12 hours, I can hike all day long without having to stop. I am most grateful for the Diva Cup on alpine start mornings, when the exposure makes even a quick pee break uncomfortable.
Weight: 0.5 oz / 14 g |
|
|
Cuisinart DLC7 Pro 14-cup Food Processor (from 1983) | My favorite backpacking food is made in my own kitchen. With the Cuisinart, I can quickly slice whole apples for the food dehydrator, make my own nut butters and chocolate-hazelnut spreads, and mix up a quick batch of cookies or oatmeal bars. I can eat healthier on the trail, reduce packaging, better control calorie intake, and all at a lower cost. Does anyone want my Raw Date Ball cookie recipe?
Weight: More than your entire backpacking kit |
|
|
Therm-a-Rest NeoAir All Season | This fall and into the start of winter, I have been very happy with my new NeoAir All Season. While the Large weighs 6 oz more than my traditional NeoAir (Large also), it has much more robust material and almost twice the R-value at R-4.9. I have been able to go as low as -1 F (-18 C) with a quilt, but did get chilly that night. While I will switch to an R-9 pad as we continue dropping in temperature here in northern Minnesota, for many areas the NeoAir All Season may truly be a pad for all seasons.
Weight: 25 oz / 710 g |
|
|
Kooka Bay GoosePad | All last winter I used a GoosePad from Kooka Bay and was very happy with it. As I plan even colder trips this winter, I upgraded to a warmer one. A large pad at 24.5 x 74.5 in (61 x 191 cm) when inflated, it is 3.5 in (9 cm) thick and has 900-fill power goose down to achieve a stated R-value of 9. The pad has a new style of valve that is easier to use and a new baffle system to keep the down in place. It also comes with a Millair Company Instaflator with a Kooka Bay-specific adaptor to make inflation easier. As the pads are made to order, prices and weights vary, but mine is listed below.
Weight: 31.3 oz / 887 g |
|
|
Camp-Tek Microburst | One of the biggest pains about backpacking in extreme cold is inflating pads without introducing moisture to the interior, which will freeze inside. I have used many forms of inflation devices over the years and have to say that the Microburst is hands down the easiest. With most pads that have a standard size valve, it is literally a set-and-forget process. For my Kooka Bay pad and down pillow, I do have to hold it in place to use. About the size of two golf balls, the tiny unit inflates my Large NeoAir or All Season in around three minutes time.
Weight: (w/2 AAA batteries): 2.3 oz / 65 g |
|
|
Boilerwerks Backcountry Boiler | I love exclusive items. Getting a first generation Backcountry Boiler from Boilerwerks was the ultimate version of this experience. From prototypes and all the way through the manufacturing process, my son Henry and I witnessed Devin Montgomery creating our new stove. With each video and detailed update, we grew more excited; we saw how it was turned in a lathe, the laser etching process, and even the final packaging – it was all there, and all done in Devin’s home town of Pittsburgh! But the final product far exceeded my expectations – it is highly refined, beautifully manufactured, and very practical. It is lightweight, durable, packs small, and boils in about 5 minutes. It is now my favorite stove. Knowing how it was built and the process it took to create it – and feeling it was built by a friend – well, that only adds to the experience.
Weight: 9.7 oz / 275 g with full sleeve and second generation stopper |
|
|
EnLIGHTened Equipment Protege Quilt | My custom EnLIGHTened baby and toddler bags were one of my Staff Picks back in 2009. Here we go again! As my kids have grown, this year we picked up a pair of larger Protege quilts from Tim Marshall – and these will last my kids for years. He made them for us in custom colors with rainbow for my daughter and bumblebee for my son. Tim even added a stinger to my son’s bag- his favorite part! The craftsmanship is outstanding and the price is very reasonable. The bags use synthetic Climasheild APEX insulation, which can handle moisture, and at 12.3 ounces, they are far lighter than any other kid option on the market. The bags feature a foot drawcord for ventilation, a footbox zipper to create a blanket if needed, snaps all the way up, and no cords anywhere except the feet to ensure safety. These bags are brilliant – all parents take note!
Weight: 12.3 oz / 349 g |
|
|
Geocaching.com iPhone App | These days, many of our trips include a geocache at some point and this adds a great deal of fun. Geocaching is basically a GPS-enabled treasure hunt, but it’s not just for kids: geocaching is an activity that can bring you to incredible places, and the challenge can range from a simple suburban walk to elaborate puzzle-based multi-caches. While we love geocaching near home, we also love backcountry geocaching, and it adds a lot of fun to our family trips. The Geocaching.com app allows me to save caches in advance, making descriptions, maps, pictures, and hints available even when a cell signal is not. It’s quick and easy for the me and has made map-usage and trip planning a huge draw for my son. We love geocaching, and this app is the easiest way to add this to your next trip!
Weight: 0 oz / g (just add smartphone) |
|
|
MontBell UL Comfort System Pad 120 + UL Comfort System Pillow | One frigid night in the Crazies, I awoke to the grunting of a grizzly bear in close proximity to my face. As the beast sniffed my forehead and I struggled to remain completely still, I thought, “At least I’ll die in comfort,” as I lay on my MontBell UL Comfort System Pad and Pillow. The pillow and pad attach together using MontBell’s “Quick Connect” system, ensuring that you don’t wake up with your head on a rock. This combination comes in at 17 oz and is, by far, the most comfortable setup I’ve owned. It’s quite warm and the price isn’t too bad either!
Weight: 17 oz / 482 g |
|
|
Tip 116: ‘Liberate yourself from toilet paper’ from Mike Clelland’s Ultralight Backpackin’ Tips | As a recently ‘liberated’ backpacker, this tip will always hold a special place in my heart. From the cherished Mule’s Ear that is plentiful around Lake Tahoe and the Sierra to the uncomfortable but effective grass brush, I shall never bring TP into the wilderness again. The one landscape I found myself regretting leaving the TP at home was in Bolivia’s Salar de Uyuni. With crusty salt flats as far as the eye can see in every direction, the landscape is not conducive to ‘liberated’ backpackers. Aside from Salars, the need for TP is negated by plentiful resources provided by mother nature.
Weight: 0 oz / g |
|
|
Scarpa Maestrale Alpine Touring Ski Boots | After suffering through the foot torture of skinning in stiff, heavy downhill boots, the Scarpa Maestrales, my first pair of touring boots, made climbing a comfortable and enjoyable experience. With rugged soles and a huge range of motion in ‘walk mode,’ these boots have carried me up some very sketchy surfaces with confidence. Best of all, the Maestrales have four buckles and are still stiff enough to make the descent enjoyable. Scarpa claims that they are the world’s lightest four-buckle AT boot.
Weight: 3 lbs 6 oz / 1.5 kg |
|
|
Eddie Bauer First Ascent Downlight Sweater | I love all the head knowledge I get from my job. After editing and publishing Will’s 2010 UL Three-Season Down Jacket SOTM, I was painfully aware of my lack of a down jacket (lost to an alteration gone terribly wrong a few years earlier). I don’t care how nice they are, wool coats do not cut the mustard when it’s sub-zero at the Christmas Stroll. In my budget with a rating I trusted from someone who would put it through tougher paces than I, I ordered my down sweater with my 2010 Christmas money. It’s thin and light enough to layer over wool and under further hard- or softshells, extending my comfort as far as I need it in my dangerous, icy treks from the car to the store. Or from the woodpile to the back porch. Yeah. I’m pretty hard core.
Weight: 13.4 oz / 380 g |
|
|
NPR Podcasts | It’s amazing how quickly a few hours of chores or a long drive pass by when you’re listening to something engaging, entertaining, even funny. From NPR! Who knew? I subscribe to six podcasts that each make my heart beat faster for various reasons. The Sunday Puzzle, which I like to save to listen to with Rob and flex my wordy/nerdy muscles by coming to the answer faster. It sometimes even works (he’s awfully clever). Planet Money keeps me advised of financial news in a format that doesn’t make me want to shoot myself in fear or extreme boredom. Selected Shorts makes me feel all literary without having to build my own library or visit the public one more frequently (my business degree was obtained largely because I wanted to own a bookstore). This American Life tells often interesting stories, though it can take itself far too seriously at times (skip!). Wait Wait… Don’t Tell Me! is a weekly news quiz that invariably makes the whole family laugh (and is my favorite). Finally, Radiolab takes on intriguing scientific questions and addresses them in either a regular podcast (one hour) or shorts (~20 minutes). It’s fascinating, often funny, and their sound engineers do a fantastic job at bringing what could be dry content to life, also known as “making the hippo dance.”
Weight: Depends on your player |
|
|
e.p.t. | I’d like to simply say I chose this for telling me what I needed to know, when I needed to know it, but the first test this fall turned out to be a false negative. Second one was a winner, and, God willing, baby Bedford numero dos will be making their appearance in early June, 2012!
Weight: Before, or after use? Never mind, I didn’t weigh it. |
Commentary on the (lack of) gear you can love from the cottage industry.
You don’t have access to view this content.
The conclusion to Balls and Sunshine’s 2011 PCT hike. Is the best yet to come?
You don’t have access to view this content.
For fast, easy over-snow travel, combine the traits of a snowshoe and those of a ski. A short, fat ski would keep the maneuverability, packability and hopefully light weight of a snowshoe as well as the glide and easy trail breaking of a ski. How well does this theory play out in reality?

It took me decades to really care about skiing. Growing up in flat Ohio didn’t help, but even on trips further afield the lift-served, in-area alpine skiing never resonated. I usually got bored before my legs gave out or the lifts stopped running. Cross-country skiing was more my style, but I inevitably wanted to venture away from golf courses and groomed trails, where the floppy boots and skinny, plastic edged skis made the steep and narrow woods exciting in a way only enjoyable by those young people yet to realize their own mortality. Hiking, mountain biking, and kayaking always seemed like a better use of my time outdoors. I went to college in Iowa, and after graduation escaped further west to Utah and Arizona. I skied occasionally, at both alpine and cross-country areas, but as before failed to see the possibility inherent in skiing which made so many so fanatical about it.
Three years ago, I moved to western Montana to attend graduate school.
Even before the move I knew I’d need to learn how to actually ski. The most interesting areas for a wilderness traveler – the mountains – are in western Montana under snow for over half the year. A wilderness traveler has three options: stay home or in the lowest and most civilized valleys, get snowshoes, or learn to ski. I wanted to learn to ski, not primarily as a means of exercise or of kinesthetic enjoyment, but as the most efficient way to move around the snowy wilderness. Snowshoes are easy to use, but if driven with a modicum of skill, skis are almost always a faster and more elegant way to travel. Or at least, that was what conventional wisdom had to share with me, the unstudied newbie.
So I bought some short alpine touring skis on closeout and got some telemark boots and bindings. I went skiing, a lot. I got new boots and new skis; Karhu Guides, then the widest metal-edged waxless (fishscaled) ski available. I skied more, flailed a lot, got frustrated, and had a lot of fun. It didn’t take me long to realize that not only did none of the existing ski gear fit my needs particularly well, but that virtually all of the momentum in the market was concentrated on two distant ends of a spectrum. I wanted to ski along in the middle of that range, going from one point to another as I did on dirt during the summer, and there wasn’t much gear at all suited to doing so.

Amber Steed enjoys some backcountry alpine skiing in western Montana. Steep, deep powder with fat, heavy skis, two miles from the car.
The ski market as it exists today largely caters to pure alpine skiing or pure Nordic skiing. Alpine skiing is, to steal one company’s jingle, all about the down. Folks spend cataclysmic amounts of money to visit places to ride lifts so they can ski back downhill around lots of other people and then do it again and again. The equipment reflects this, being great for difficult, chopped up snow and knee-dislocatingly heavy. Virtually all backcountry skiing gear, be it alpine touring (heel fixed for downhill) or telemark (heel freed) is dedicated to doing what is in essence the same thing. The gear is lighter, increasingly much lighter, in order to make climbing slopes to ski down faster and more enjoyable, but skiing relatively steep terrain is still the raison d’etre. Even ski mountaineering race gear, where the application of technology has facilitated ski/boot/binding pairs which weigh less than a pair of alpine boots, is still circumscribed by the necessity of descending steep slopes quickly.
Cross-country skiing hasn’t changed much, in focus or application, since my youthful golf course exploits. Even the heavier boots and wider, metal edged skis meant for “Nordic backcountry” or “rugged touring” look and ski like fat Nordic race gear. This gear can be quite light, and in the right hands and under the right conditions travel through the woods impressively fast, but the not-right conditions slow such gear to a crawl, and these conditions, namely weird snow, breakable crust, ice, and tight trees and brush are all too common if your winter interests involve approximating summer backpacking routes. What was good snow last night will be miserable in the morning, and sometimes you’ll get all of the aforementioned in one place, together, a state of affairs which, in reasonable folks, engenders swearing and crying in equal measure. Quite simply, skis may be the best way to backpack in deep snow, but the skis and ski gear yet produced are not designed with such ends in mind, and their application in the arena of winter backpacking reflects this.
The temptation for many winter hikers is to buy some quality snowshoes, warm boots, and powder baskets for their trekking poles, then call it good. Even the poshest of snowshoes are cheap compared to ski gear, snowshoeing can be learned via the infamous ten-step program (take ten steps and you’re an expert), and their utility changes little from one snow condition to another. When deep snow combines with intense brush and deadfall, snowshoes and their compact maneuverability remain the most efficient option, but in most other conditions snowshoes are much slower than a well chosen set of skis, provided you have the skills to ski them. Snowshoes dig a crater with each step, and have to be lifted up and out before a step forward is taken. Skis apply their surface area more efficiently, and broad tips shove deep snow to the side as they slide forward with more effort applied purely to forward movement. When the snowpack is deep and the terrain is gentle and open, skiing is simple, and with practice almost automatic. You kick and glide forward with ample leisure to examine the splendor at hand. Once tasted, this ease is hard to give up for the ponderous gait, lower speed, and greater effort of snowshoeing.
|
|
|
So then, the obvious compromise is to combine the traits of a snowshoe and ski. A short, fat ski would keep the maneuverability, packability and hopefully light weight of a snowshoe as well as the glide and easy trail breaking of a ski. Many dedicated wilderness travelers who live and work in snowy, forested, steep regions have seen the need for such a tool. Jackson, Wyoming based adventurer Forrest McCarthy calls them fast shoes, while Nils Larsen and Francois Sylvain, designers of the Altai Hok, use the term skishoes. Messrs. Larsen and Sylvain are both long time ski industry insiders and were both involved with what is perhaps the Hok’s most prominent predecessor, the Karver and Meta short skis produced by Karhu in the early oughts. Both were short (120 to 130 centimeters), fat (100 to 110 millimeters underfoot), had metal edges and a permanent skin inserted level with the ski base taking up a majority of the surface area. These both fell out of production some time ago, though according to correspondence with Mr. Larson, forces other than market demand were to blame.
Fast shoes can thus be defined as short, wide skis with some sort of permanent traction device in or on their base, with all these features striving to synergistically maximize overland travel in woods, rolling terrain, and moderate mountains.
Why short? Maneuverability, packability, and light weight. Most of the reasons both alpine and cross-country skiers use much longer skis are not relevant for a wilderness traveler. Longer skis are stable at speed downhill, but in the rare cases that terrain allows opening the throttle 20 miles from the road, safety probably dictates that such an impulse be limited. Cross-country skiers use longer skis because the length maintains momentum and direction better, but these factors are largely negated by the trail breaking which is almost always a part of over-snow backpacking.
Why fat? Surface area is necessary for float in deep, light snow, and if we place an arbitrary, yet functionally proven cap of 150 centimeters as the longest a fast shoe ought to be, the ski must be fairly wide to maintain float. Wider skis are harder to put on edge, all things being equal, and that becomes a factor when boots must be chosen, as is discussed below. Finally, wider skis, especially wider ski tips, break through and float over crust, logs, and other junk which is part and parcel to skiing the terrain presented by circumstance.

The packability of short skis is highly relevant in many situations. Here the author finds the Hoks easy to attach to a packraft, during the aforementioned Bob Marshall traverse, and to strap to a mountain bike, to access spring skiing in Glacier National Park.
Why a permanent traction device? The only way to move forward absent skating or double poling (both rare, wonderful conditions in the backcountry) is to have something for grip on the ski. Ideally this would provide perfect resistance to backward motion and no resistance to forward motion, and thankfully such a thing has existed for the better part of a century in the form of kick wax. Sadly, kick wax is an unforgiving creature that must be well matched to the snow temperature and type. Sometimes this is easy to do and thus magically effective, such as the consistently dry 10 F (-12 C) powder snow you might find in Yellowstone during February. Other times it is an impossible nightmare, such as late on a spring morning when transitioning from overnight shade to sun, when snow instantly increases 15 degrees in temperature and 20 percentage points in water content. Carrying and effectively applying and reapplying (and reapplying, and thoroughly cleaning off before starting over) the correct kick wax is not a realistic option in many wilderness conditions.
The other proven options for over-snow traction are fishscales and skins. Fishscales being an alteration in the base material of a ski for it to grip directionally, skins being typically synthetic fibers arranged to be not unlike a thick, close-shorn, directional carpet. The fibers lay flat sliding forward, yet stand up to grip and resist backwards motion. Fishscales come in different designs, with a strong inverse correlation between grip and glide being to a certain extent intractable. Fishscales also work much better in wet, dense snow types. Light, very dry powder makes fishscales drastically less effective. With these caveats arrayed before you, it is easy to see why Messrs. Larsen and Sylvain chose to put a permanent skinsert in the base of their new fast shoe, the Hok.

The test set of 125-centimeter Hoks, with X-Trace bindings in place, showing the substantial tip rise, subtle tail rise, and moderate camber: all elements of a predictable and utilitarian backcountry tool.
Nils Larsen is something of a ski anthropologist. Videos he has made of the Altai peoples of northern Asia skiing on handmade skis can be found online, as well as material concerning Mr. Larsen’s own experiments with this most ancient of ski technologies. He named his new ski company after the Chinese mountains in which skiing may well have been born, and the company’s first model after one such group’s word for ski. Skiing evolved in this region of Asia, as it did in Scandinavia, for functional rather than recreational purposes. It is thus a fitting midwife for a backpacking ski. The Altai Ski website says that the Hok was designed for “pocket backcountry,” the sort of woods and thickets and low snowpack many residents of snowy latitudes have out their back doors; convenient terrain poorly suited to conventional ski gear and mindset. This is no doubt true, but it is my contention that for a considerable range of rugged over-snow backcountry travel the Hok is the single best tool yet commercially produced.
That there is a growing demand for this sort of short ski is obvious, because the Hok is quite similar to another fast shoe introduced recently, the Marquette Backcountry ski. Unlike the Hok, which uses traditional ski construction with a p-tex base, wood core, and metal edges, the Marquettes are blow-molded out of plastic. Marquettes are also marketed at pocket backcountry, and they excel at skiing soft snow in tight places. Sadly, they are not good tools for unpredictable, remote backcountry adventures. They lack metal edges, making them quite terrifying on hard snow and, as the chart below demonstrates, they are very heavy.
| Item | Weight (single) | Dimensions (tip, waist, tail) | |
| Gear Tested | 125 Hok Ski, bare | 2 lb 5 oz (1.0 kg) | 123, 109, 123 |
| X-Trace Binding (w/ mounting hardware) | 1 lb 2.5 oz (0.5 kg) | n/a | |
| Voile Mountaineer (w/ anti ice tape) | 7 oz (175 g) | n/a | |
| Comparison Gear | 185cm Karhu Guide (w/ full hardware) | 3 lb 12 oz (1.7 kg) | 109, 78, 95 |
| Marquette Backcountry Ski (w/ full hardware) | 5 lb 5.5 oz (2.4 kg) | 150, 130, 140 | |
| Atlas Run Snowshoe | 1 lb 5.5 oz (0.6 kg) | n/a | |
| MSR Lightning Ascent W’s 25″ Snowshoe | 1 lb 12 oz (0.8 kg) | n/a | |
| Tubbs Sierra 30″ Snowshoe | 2 lb 6.5 oz (1.1 kg) | n/a | |
| Boots used | Crispi CX4 (mondo size 28) | 3 lb 8 oz (1.6 kg) | n/a |
| Scarpa T2 (modified, mondo size 28.5) | 2 lb 14 oz (1.3 kg) | n/a |
That minimizing equipment weight is essential in maximizing efficiency and enjoyment in the backcountry is in these parts axiomatic (look at the current IP address). However, increasing weight in the name of efficiency can occasionally be the best option. For most hikers, shoes, even though they add weight when compared with bare feet, are faster and more fun. This weight versus functionality calculation is central in evaluating fast shoes versus snowshoes for types of trips, and is the question around which the final section of this review will orbit.
I obtained a test pair of 125 cm Hoks (they’ll be available in 145 cm lengths as well, though the dimensions and weight are not yet finalized) in early May, and used them for various trips around my home in NW Montana for about a month in late May and early June. We had an exceptional snowpack in the winter of 2010-2011, and while there was thus no shortage of terrain for testing, the snow types I was able to ski were necessarily limited. No powder was skied in the testing of these skis, but I did ski a wide variety of spring snows, from bullet ice to foot-deep rain-rotted corn, as well as heavy 24-hour-old snow. I skied the Hoks with the X-Trace universal binding and my usual trail runners (LaSportiva Crossleathers and Inov8 OROC 280s), as well as Voile Mountaineer three-pin bindings and two different pairs of plastic boots. The first were my Crispi CX4s, a three-buckle telemark boot considered to be on the lower and softer end of the spectrum of plastic boots. (They can be seen mounted on my bike in the above photo.) The second are an older pair of Scarpa T2s which I have heavily modified into touring-only winter boots. By touring I mean primarily rolling terrain where making horizontal rather than vertical miles is the goal of the trip. To this end I removed the tongues entirely, cut down the uppers, and ground down the material on the back of the cuff, among other things. With thermo-moldable liners they are very warm, have a great range of fore-aft motion, and provide plenty of side-to-side rigidity. For wilderness touring, especially in cold temperatures, they work very well.

The author’s touring-specific plastic telemark boots. Something comparable, such as the Garmont Excursion, would be a good match for the Hoks. Weights of the boots used in this test can be found in the above table.
I skied the Hoks on day trips to our local cross-country ski trails, closed ski resorts, and the rolling backcountry near both, all with both plastic boots as well as the X-Trace bindings. Mounted with Voile Mountaineers, I took them on easy ski mountaineering outings in the local mountains, and I used the Hoks with the universal bindings on the aforementioned Bob Marshall traverse, crossing miles of snow-bound terrain and passes over 7000 feet (2135 m) in elevation.
In short, I found the Hoks to be outstanding at all of these applications and to have no significant limitations other than those inherent to fast shoes. They are quite stiff both torsionally and over their length, the result being that they descend difficult terrain exceptionally well, provided that they are skied by a sufficiently stiff boot and are not pushed to excessive speeds. As a frame of reference, using both of the aforementioned plastic boots I skied the most difficult in-bounds terrain at Whitefish Mountain Resort (including North Bowl Chute, a double black) in funky half-melted conditions. The Hoks held an edge as well as any ski I’ve used, and the short length combined with the gradual curves and up-turned tip and tail made them extraordinarily easy to turn. I skied the X-Trace and trail runner combo at the resort as well, and found that, provided the snow was soft and fairly predictable, I could link turns down moderate runs (Toni Matt, top to bottom) with ease, though this did demand substantial attention from most of the muscles in my legs. At Mr. Larsen’s encouragement I skied the X-Trace mounted Hoks with a lurk, in the style of the skis namesake. This method of skiing quickly became great fun, and while a lurk is an inferior substitute for conventional ski poles when forward motion or weight are considered, the lurk technique might be kept in mind as a way to add an extra margin of control to certain descents on backcountry trips with less-supportive boots.

The author at Whitefish Mountain Resort, six weeks after the lifts stopped turning, skiing the Hoks and X-Trace bindings with trail runners and a lurk (a 7-foot pole from an alder bush). This tripodal way of skiing predates any major recreational use of skis by western cultures and allows low cut footwear to turn the skis with much less effort than “traditional” alpine style.
The Future of Backcountry Ski BootsThe perfect boot for backcountry skiing does not yet exist. Boots designed for backcountry alpine skiing, be it telemark or alpine touring, are heavy and historically choose to restrict fore-aft motion (and thus touring efficiency) in favor of downhill performance. The heavier variants of NNN (new Nordic norm) boots are beefed up Nordic race boots, and while by design they provide excellent range of motion for the flats, the interface between boot and binding (a metal bar in the boot toe is held by a metal clip in the binding) is widely considered to be a liability for turning and more serious terrain. The interface has more flex and play than a three-pin binding, and the toe bars are known to rip out under the more severe forces applied by wider skiis, taller boots, and trying to turn and/or stop in rugged terrain. The ideal backcountry boot for distance-oriented wilderness travel would provide the largely unrestricted fore-aft motion of a Nordic race boot with the side to side rigidity of a downhill boot, ideally at the same time and without flipping levers or tightening buckles. Unlike backcountry downhill, where laps of long slopes with extended transitions from up to down mode are common, the sort of backcountry travel I discuss here often has frequent transitions from flat striding to steep climbs and descents. As discussed in the body of the article, these descents often feature challenging snow and narrow trails. Efficient travel dictates that a complex gear transition not be needed to go downhill. My modified T2s demonstrate that it’s fairly easy to have good fore-aft ankle motion and sideways rigidity: a moderately tight upper buckle combines with a free flexing cuff to provide both at the same time. It does not ski like a big boot with a lean lock, but enough edge pressure can be applied, provided you stay centered on your skis, to make turns in very challenging terrain (albeit not at high speeds). The more exacting design element is sole flex. The ideal BC boot would flex with the ball of the foot like a lightweight hiking shoe, but resist torsion like a downhill boot. I’m unaware of any boot that comes close to balancing these well. A flaw of many fabric/leather NNN and three-pin boots is that they mate a fairly stiff plastic cuff with a flexible sole, and the latter prevents force from the legs being effectively transferred to the skis. This shortcoming can be addressed to a certain extent by excellent telemark technique and very strong legs, but has limited applicability to most users and does not point the way toward technical innovations. For the moment skiers are forced to compromise based on expected terrain and personal preference, favoring touring at the expense of turning, or vice versa. I have not been content with the options provided by such compromises, and my modified boots are a result. They have some sole flexibility, excellent sole resistance to torsion, good fore-aft flex and decent sideways stiffness at the ankle. The fore-aft flex compensates to some extent for the stiff sole. The thermo-moldable foam liners are blister-free if molded correctly (lots of toe spacers), and warm enough for temperatures below zero (F). Another approach was pioneered by Alaska endurance racers and detailed by Luc Mehl is his article Fast and Light Winter Travel. Luc used stripped down Dynafit rando race boots and the toe piece from a Dynafit alpine-touring binding. This system has a totally rigid sole, but the combination of good ankle flexibility and no resistance to forward rotation within the binding system makes this a reasonable option. Luc details the virtues at length in the aforementioned article. All of this is to say that when the market does not provide adequate gear, ingenuity and power tools can provide a good solution. |
Throughout the testing, on both downhill and rolling terrain, I was impressed with how little drag the skin insert provided. I had assumed it would be noticeably more so than the fishscaled skis I’ve used, but the additional resistance on all types of snow and all angles proved to be minimal. On one mountain descent I did notice that when transitioning snow types the skinsert tended to grab certain (wetter) snow types in a way which a well-waxed conventional ski would not have. On the whole, given the impressive grip of the skinsert and the minimal drag, I am quite sold on the idea. Compared with fishscales and even a good wax, the grip force per inch of the skins is very good, a particular asset when weird maneuvering over brush or melted out spots forces a skier to rely on a small patch of the ski for purchase. I do wonder about two potential downsides to the skinsert idea. The first is water absorption. Even skins rigorously treated with DWR and wax will get soaked in short order under many conditions, and while separate skins can be stored in your sleeping bag overnight, the possibility of a wet skinsert freezing into uselessness does occur to me. During the testing period I never had any nights much below freezing, so this must remain the territory of speculation. Vigilant use of skinwax to prevent icing of the skin should be considered a mandatory part of preventative gear maintenance.

Dirty and abrasive spring snow is hard on skis of any type. I was not responsible for all of the stains or lost skin hairs seen above, but this could prove to be an issue for long-term, intense users.
I also worry about the long term durability of the skinsert. Not so much its adhesion to the core of the ski, but the extent to which some abrasion-induced balding might occur over several seasons. It would take serious abuse to produce functional degradation, but I would be remiss if I didn’t mention this as a possibility.
The Hoks come with threaded inserts built around the common three-bolt pattern used in all common three-pin bindings. Burly three-pin bindings are reliable, cheap, and simple, and thus the only choice for this application. NNN bindings can provide comparable performance, but have a well-documented history of failing under serious use (the toe bar rips out), and thus are not an appropriate choice for anything but the most mild backcountry skiing applications. Threaded inserts not only save the consumer the effort of drilling holes, they make mounting and changing bindings fast and easy (blue Loctite on the bolts proved essential). They also save weight, as the area of the ski which needs to be reinforced in order to support binding screws and prevent pull-out is much reduced. Of course, inserts are only as good as their location, and on a ski like the Hok trail breaking ease (which favors a forward mount) must be balanced with downhill turning (which favors a rearward mount, especially in deep or weird snow). Messrs. Larsen and Sylvain were still in the process of tweaking this when the prototype I skied was made, and the production version will feature inserts mounted 2 centimeters behind those of my pair. I skied this position using adapters and agreed that it will provide the most balanced compromise.

The tip rise of the 125 cm Hok. The green grid is in inches.
The tip of the Hok rises about 3.5 inches over 7 inches of run (8.9 and 17.8 cm, respectively) (when the camber is uncompressed, both increase somewhat when the ski is weighted), both a good bit more than conventional skis. It’s not the fully rockered tip of the Marquette, but the added rise in the tip is a great aid in trailbreaking as well as in floating over irregularities when descending. Any more rocker would have likely had an adverse effect on the edge hold. The tail rise is much more subtle, just enough to allow some smear-turns but not enough to impede plunging the tail into the snow. The gentle sidecut is enough to allow for good turns on hard snow, but not enough that tracking is affected. All this and the light weight mean that insofar as the ski design is concerned, I cannot think of a single improvement. The Hok promises to float and break trail well, turn quickly, and deal with funky snow. It’s light and durable, and it’s simply a bargain at $200.
The X-Trace universal binding is more of a mixed bag. I likely will not be buying myself a pair of these, for reasons which have partly to do with this binding in particular, and partly to do with universal bindings in general.

The X-Trace at home on my couch.
The first challenge with a universal binding is making it durable enough for the backcountry, and on that ground the X-Trace succeeds admirably. I ought to note here that Altai is importing, not producing, the binding. When a ski binding is paired with floppy shoes or boots, lots of emphatic forces are placed on it, and the plastic in the base and toe plate of the X-Trace manages to flex evenly and well while seeming quite bulletproof. If anything, the whole binding is overbuilt, resulting in the porky weight noted in the above table, which when paired with the very light Hoks makes them borderline too heavy for the benefit they provide. The bindings function well enough. The adjustment mechanism is easy to use and doesn’t require tools, and the ratchet straps operate fluidly under all conditions. The forward motion is mediocre, and could be improved by moving the binding toe support back to place the end of the shoe closer to the pin line around which a ski boot pivots. This shortcoming is alleviated, but not eliminated, by using flexible footwear. The binding does a good job at holding the shoe stable within the binding, and a moderately good job at reducing diagonal or twisting flex. The pad under the toe buckle did display an annoying tendency to creep forward, and the geometry of the toe plate allows for ice to easily build up under the front of your toes, eventually requiring releasing the front strap to remove it.

The X-Trace in detail. Note the buckle misalignment during use, which created a pressure point. Also note the posts in front of the toes. The base plate slopes upwards there, trapping snow, which becomes ice under compression, eventually causing backwards toe pressure, which cannot be ignored.
Beyond all the details of the X-Trace, during the testing of it and the Hok I’ve developed deeper reservations about the extent to which universal bindings are appropriate in the weight to performance calculus all wilderness travelers ought to undertake. A look at table one reveals that the 125 cm Hok is a pound heavier than the Atlas Run snowshoe, one of the smaller and lighter snowshoes currently available. Even assuming a universal binding substantially lighter than the X-Trace, the weight gain with fast shoes would have to be made up by the efficiency of the setup. Whether this will be the case has much to do with the snow conditions and terrain expected on a given trip. The limitations of universal bindings are to a large extent tied to the footwear used, in my case trail runners. I do not think that rigidity and edge control will ever be anything but desperate with universal bindings and floppy shoes (even, I would imagine, lighter high-top hikers), and thus side hilling on harder snow and descending in anything but ideal conditions will be at best problematic. On my Bob Marshall trip I did not have anything close to ideal snow conditions, and found myself transitioning out of the Hoks and X-Traces to posthole on steep side slopes, crampon up hard snow, and even posthole down some slopes rather than crash and risk injury under the weight of the nasty wind-slabbed snow and my large pack. Small snowshoes would have been slower in many places, but would have been faster in others and would have saved me 51 ounces from my pack. Even with the Hoks at my disposal, I used the Atlas Run snowshoes on a similar trip two weeks later. It would take a lot of gentle terrain, and a distinct absence of steeper, more technical skiing, to justify the weight of the Hok and X-Trace combo over a pair of slower, lighter snowshoes.
I am, in short, skeptical about the breadth of application for universal bindings. For most spring trips where they’d be of use, that is to say when large sections of dry trail make hiking shoes a necessity, smaller snowshoes with an aggressive crampon may be the lightest and most efficient option in the grand scheme of a trip. A narrower ski could address some of the limitations here, but not in a comprehensive fashion.

Following black bear tracks in the Bob Marshall.
It’s difficult to compare the Hoks to other skis or snowshoes, or to evaluate them relative to other products, because the only close relatives are either out of production, like the aforementioned Karhu Sweeper skis, or built to different specifications and with inferior technology, like the Marquette Backcountry ski. The Hok defines its own category, using top of the line ski construction with a lightweight wood core, inserts, and metal edges to create a ski best suited to fundamentally different terrain than conventional backcountry skis. The Hoks are not the best tool for wide open, gentle terrain, like the plateaus of Yellowstone in winter. They’re not designed for backcountry downhill skiing, though their ability in technical terrain will surpass expectations. They are best for deep-winter travel in wooded terrain and on unbroken trails, places where glide is not a salient attribute and maneuverability uphill and down is essential for safe passage.
The choice of a permanent skinsert has potential drawbacks. Care will need to be taken to avoid icing of the skins, with prophylactic application of a DWR and skin wax a prerequisite, and more aggressive skin-drying tactics being perhaps necessary under extraordinary circumstances. Given that both fishscales and glidewax are each largely useless under certain conditions, and that skins work in all of them, the use of a skinsert is the most versatile choice available given current technology.
The need for a heavy boot to support the wider Hok is also a disadvantage, though only when viewed through the blinkered vision of mild winter conditions which would not already require heavily insulated double boots. Modern thermo-moldable boot liners are not only warm and comfortable when fitted correctly, the close-celled foam out of which the best liners are made is also largely impermeable to water. The lining fabric of the boot liner can get wet, but the foam insulation itself is incapable of absorbing water, and thus the whole assemblage is easily dried out. Under conditions where insulation of a certain magnitude is already a necessity, the added weight of boots for the Hok becomes less of a weight penalty than a performance boost.
Finally, the skis themselves are flawlessly engineered. The gentle sidecut, rounded tips and tails, and subtle rise/rocker on both ends represents a synergy of the best of modern ski design. The Hoks’ predictability in difficult snow conditions, and their applicability to a wide range of trips and terrains, is due above all else to solid design. A well designed and constructed fast shoe like the Hok, when paired with a set of burly three-pin bindings and light plastic or heavy fabric/leather boots should hit the sweet middle-of-the-road spot between light Nordic and heavy downhill gear. Such a set-up is the ski equivalent of a good light hardtail mountain bike: capable of making miles on smooth roads, difficult rocky trails, and everything in between. It is a ski rig focused on making distance in all backcountry conditions, and on doing so in an efficient and safe manner.
While exploring the narrow wooded valleys and buried trails of Glacier and the Bob, I won’t have to futz with applying and removing skins, or flail and overexert my triceps when fishscale grip comes up short. I won’t be wallowing in powder on showshoes, or quaking in terror 15 miles from the road at the top of a steep, fall line singletrack descent cut through dog-hair spruce. I’ll have the perfect tool for single and multi-day trips into quiet places away from just about everything: other skiers, snowmachines, avalanche danger. As I write this, last winter’s snow is a long way from melted, and much though I’ll value dry trail backpacking, the Hoks are going a long way to get me excited for when the snow starts falling again.
The Jacks ‘R’ Better Sierra Stealth Quilt is an ultralight summer quilt designed “with the ground sleeper in mind.” As the lightest of three wearable quilts available from JRB, the Sierra Stealth has a resealable Velcro head hole in the center that allows the quilt to be used as a serape around camp – eliminating the need for a lightweight jacket in addition to sleeping gear.
The Jacks ‘R’ Better Sierra Stealth Quilt is an ultralight summer quilt designed “with the ground sleeper in mind.” As the lightest of three wearable quilts available from JRB, the Sierra Stealth has a resealable Velcro head hole in the center that allows the quilt to be used as a serape around camp – eliminating the need for a lightweight jacket in addition to sleeping gear. Like other JRB quilts, one end can be formed into a foot box for ground sleeping and six lacing tabs on the sides can be used to secure the quilt around yourself or under a hammock. This review focuses on the quilt as used for ground sleeping.

JRB Sierra Stealth Quilt.
The quilt features a tapered cut, with a 52-inch (132-cm) width from the head down just past the hips, then tapering to 42 inches (107 cm) at the foot box to eliminate unnecessary weight. Two length options are available (78 in/198 cm and 86 in/218 cm) with the long size recommended for those over 5’10” (1.8 m). I got the long option for this review, and though it measured only 82 inches (208 cm) instead of the specified 86 inches (218 cm), I did not find myself wishing for four more inches (10 cm) of length (I’m 6 feet/1.83 meters tall).
The goose down fill is available at either 800 or 900 loft, with the latter being $15 more for a mere 0.75ounce (21.3 g) of weight savings. The stitch through baffle design is a weight savings over other down baffling methods and is meant for warmer temperature use (40-45 F/4-7 C).
Twenty-one-inch (53-cm) Velcro strips and a drawstring are used to transform the narrower end of the quilt into a foot box, which is necessary to keep the quilt in position while sleeping. A bit of experience using quilts makes it easy enough to keep the top end in position when rolling over on a sleeping pad, but the foot box is a must for the lower end. Traveling toward the head of the quilt, there are three sets of lacing tabs designed to “secure the quilt around a pad,” although I didn’t find this to be a very useful sleeping method as the foot box itself is much too small to fit around a sleeping pad. The tabs are handy for securing the quilt around your body when using as a serape or cape – to be discussed shortly. A second drawstring and the final pair of lacing tabs at the head of the quilt can be used to close the top if desired.
The uniqueness of the Jacks ‘R’ Better wearable quilts is just that – you can wear them like a jacket to keep warm in camp. There is a 12-inch (30.5 cm) Velcro opening halfway down the length of the quilt to poke your head through and wear the quilt like a serape. Though not nearly as cool looking as Clint Eastwood, the serape-mode is functional as a method of staying warm around camp without the need for another jacket. There is even a handy carabiner included on one of the lacing tabs to hold the quilt more snugly to your body and out of the way of any game changing cook fires. The dual-purpose nature of the wearable quilt makes it attractive for ultralight summer backpacking.
| Manufacturer | Jacks ‘R’ Better |
| Sizes | Regular: 78×52 in (198×132 cm) Long: 86×52 in (218×132 cm) Long Tested: 82×52 in (208×132 cm) |
| Weight | Manufacturer Claim: Regular 16 oz (454 g) Manufacturer Claim: Long 18 oz (510 g) BPL Measured: 18.7 oz (531 g) |
| Fill | 800 or 900 fill goose down |
| Loft | 1.5 in (3.8 cm) |
| Fabric | 1.1 oz, 30 denier ripstop nylon |
| Temperature Rating | 40-45 F / 4-7 C |
| Packed Size | 7x7x5 in (18x18x13 cm) |
| Stuff Sack | Manufacturer Claim: 1.2 oz (34 g) silnylon BPL Measured: 1.4 oz (40 g) |
| Price | $209.95 – $234.95 (reg 800 FP – long 900 FP) |
Summer camping with the quilt has been a pleasure. I’m one who likes to lie on my camping pad with my sleeping bag unzipped over me so I can spread more – so the quilt was a welcome weight savings over the typical 20 F mummy bag I’ve found myself lugging around in summers past.

The JRB Sierra Stealth is 52 inches (132 cm) wide through the head and shoulders, and tapers to 42 inches (107 cm) at the feed (right side). The foot section can be closed into a foot box via Velcro strips and tied at the top to keep it from opening (blue arrows). There are six lacing tabs to tie the quilt around you for draft prevention or when used as a serape (red arrows). The Velcro head hole is in the center of the quilt.
The closeable foot box is a key feature of any top quilt. Without the ability to tuck your feet in the bottom, the quilt would tend to migrate all over the place while sleeping (at least for me). There is a set of ties at the top of the Velcro section to keep it from separating due to movement and a drawstring at the bottom to close the hole. The drawstring at the bottom of the Sierra Stealth leaves a small half-inch hole when fully cinched up. On cooler nights the hole can be plugged with a spare sock before cinching the drawstring to eliminate drafts at the foot – a method I discovered in my efforts to find every available means to seal up drafts when one of my summer adventures dropped unexpectedly below freezing at night.
The JRB website says the six lacing tabs (three on either side) are to secure the quilt around a sleeping pad if desired. I don’t think this is a practical quilt tactic. The foot box is too small to stuff a pad into and still have enough wiggle room for your feet, and having the quilt wrapped around the upper portion of a sleeping pad and not the lower portion just invites warmth sucking drafts. On warm nights I felt no need to tuck the sides in, preferring the roomy feeling of the quilt simply lying on top. If I started to feel cool, it was easy to grab the open sides of the quilt and give them a quick tuck between my body and the sleeping pad to eliminate the drafts.

The open top quilt method preferred on warm nights (left). On cold nights I hooked the middle two lacing tabs (red arrow) together with the provided carabiner to use the quilt more like a mummy bag. This provided a means to keep the sides of the quilt tucked between me and the sleeping pad to eliminate drafts.
In cooler weather it was very important to keep the quilt tucked between me and my pad. On the cold nights alluded to above I found it difficult to keep the open sides of the quilt sealed against drafts until I used the included carabiner to hook the middle two lacing tabs together underneath me, as shown in the figure above (right). This turned the quilt into more of a mummy bag with an open slit on the bottom, much more manageable to keep tucked in and warm. Clipping the tabs together with the carabiner was easy to do after I climbed into bed, so there was no restriction on entry. I found it unnecessary to hook the remaining two sets of lacing tabs together. The lower section seemed to stay tucked fine and I naturally tuck the head end under myself or my pillow while sleeping. Having the middle two of the lacing tabs hooked together made a snug but comfortable width for my torso. A short length of cord could be used in place of the carabiner to add more width while still maintaining the tucking capability.
I personally didn’t find any use for the drawstring at the head end of the quilt. The lacing tabs at the top can be tied together and the drawstring used to tighten the opening around your neck, but with the lack of hood this seemed more like strangulation than draft reduction. I found it easy enough simply to tuck the top end of the quilt under my shoulders or pillow.
Rolling over took a little getting used to, as the roll-with-it technique I’ve used to keep my mummy bag breathing hole in place gave me a cool thrill until I twisted the quilt back around. By the end of the first night, I had mastered the roll inside method while leaving the quilt in place and avoiding troublesome drafts. After a little practice it takes only slightly more awareness when turning to keep the quilt stationary.
A word about the down and baffles – the down insulation tends to gather at the edges of the quilt. The baffles are about 6 inches (15 cm) wide and stitched across the width of the quilt. After several trips out I found that I had little insulation on top of me and most of the down had bunched at the edges, or tuck zone, where it is mostly useless, but there is a quick fix. By laying the quilt flat and using one hand to “sweep” the down back toward the center I was able to quickly recover the migrated insulation. This method is useful in planning ahead for cooler nights as you can effectively increase the insulation in the center of the quilt by stealing it from the edges, where it doesn’t serve as well.

When wearing the quilt, I attached the middle two lacing tabs together in front (left). This kept the quilt tight around my core like a jacket, allowing for easier management of camp tasks like cooking (right).
The wearable mode of the quilt is quite useful. Just open the Velcro strip in the center, slide it over your head and voilà, instant serape. The best way to secure the serape is to place the foot (small end) in the front, then grab the middle lacing tab on each side of the back and secure them together with the carabiner in front of you as pictured above (left). This makes the serape feel more like a jacket with the sleeves cut off. The quilt is kept close to your core and out of the way from destructive sources like cooking stoves. If your hands get cold, just tuck them back inside the flaps. Using the quilt as a jacket like this is functional for tasks in and around camp, but the bulkiness and lack of arms makes it a no-go as a replacement for your trail jacket.
The takeaway? If you need something to keep warm in the mornings and evenings while chillin’ and making food, save weight and wear the quilt. If you need something during go time, make sure to bring your normal jacket.
The JRB Sierra Stealth fits nicely into the niche of ultralight summer sleeping system. It’s well suited for trips where temperatures won’t drop below 45 F (7 C), and the wearable design means you can leave your jacket at home. The only recommendations for improvement are to include a small carabiner on each pair of lacing tabs, and do away with the drawstring at the head end.
Disclosure: The manufacturer provided this product to the author and/or Backpacking Light at no charge, and it is owned by the author/BPL. The author/Backpacking Light has no obligation to the manufacturer to review this product under the terms of this agreement.
Further discussion on the four individual categories, a review of the products tested within the context of each category, and a brief conclusion of ways in which various alternative rainwear products can be combined, both with each other and with WPB garments, to suit various hiking environments and conditions.
You don’t have access to view this content.
An unruly, heterogenous group, Dave divided it into four categories: simple poncho-tarp, complex poncho-tarp, alternative upper-body wear, and alternative legwear.
You don’t have access to view this content.
This single-wall, three/four-season, tipi-style shelter is the largest tipi in the VersaShelter line. A significant amount of the weight savings comes from the use of an all carbon fiber pole.
For families who want to do overnight backpacking trips or groups who need to set up a base camp, a larger tent is usually required. In both cases, this is a common scenario: the group carries their gear to a central location where a camp is established, from which day trips are launched. Tents used for this purpose are selected for their space, features, and comfort. They should be lightweight (if you are the parent you might have the whole thing in your pack), suitable for backpacking, easy to set up and enter/exit, and possess good wind stability, bug, and storm resistance. Tents in this category can also be used for car camping.
The Seek Ouside VersaShelter is a single-wall, three/four-season, tipi-style shelter. The largest tipi in the VersaShelter line, the 6-Person Tipi has almost a third more protected area than other shelters we have tested in the same weight class. A significant amount of the weight savings comes from the use of an all carbon fiber pole.

The Seek Outside VersaShelter after weathering a healthy east coast rain, showing the typical sag of wet, cold silnylon. When dry, the VersaShelter pitches much tighter, but imperfect manufacturing tolerances prevent a perfectly taut shelter with tension exactly distributed across the surface area of all panels.
| Year/Manufacturer/Model | 2011 Seek Outside VersaShelter 6-Person Tipi |
| Style | Four-season, six-person, tipi-style, single-wall, non-freestanding shelter, with front and rear doors. |
| Included | Tipi, pole, stakes, tensioners, pole storage bag, stake storage bag, tent storage bag |
| Fabrics | Tipi fabric is 30 denier ripstop sil-nylon 1.47 oz/yd2 (50 g/m2) |
| Poles and Stakes | One 15 mm diameter adjustable carbon fiber pole and 16 8-in (20-cm) plastic stakes |
| Floor Dimensions | 170 in (432 cm) long, 160 in (406 cm) wide |
| Features | Two zippered doors (front door has no-see-um mesh), Versa Vent peak vent which converts to a stove jack, sod skirt, guyline tie-outs, self-adjusting tensioners. |
| Packed Size | Tent Body: 12 x 9 in (30 x 23 cm) Pole: 26 x 2 in (66 x 5 cm) |
| Total Weight | Specified: 5 lb 3 oz ( 2.4 kg) Measured: 5 lb 9 oz (2.5 kg) |
| Trail Weight * | Specified: 5 lb 3 oz (2.4 kg) Measured: 5 lb 3 oz (2.4 kg) |
| Protected Area | Floor Area: 148 ft2 (13.3 m2) |
| Protected Area/Trail Weight Ratio | 28.5 ft2/lb (5.4 m2/kg) |
| MSRP | $749 |
| Options | Four-season DWR liner, siliconized fiberglass stove jack, titanium wood stove, floor (flat or bathtub), awning (which converts to a two-person tarp) |
*Trail weight: BPL’s measured trail weight includes the minimum required to pitch the tent: tent body, center pole, and 16 stakes.

The basic tent package (not including the optional floor).
The VersaShelter is a tipi-style shelter with an oval shaped footprint. It features a pole-forward design, which means that the center pole is closer to the front door of the tipi than the back. The reason for this design is to make the front entry a little steeper, while making the back a little shallower to accommodate for gear storage and/or stove use. The center pole is constructed out of carbon fiber and is adjustable in one-inch increments.
The tent has a full-height (from base to peak) zippered door on the front and a half-height zippered door on the back. Both doors have storm flaps, and the front door features a zippered no-see-um mesh panel. A second optional no-see-um mesh panel can also be fastened across the back door to allow for increased ventilation while minimizing bugs. Attached around the bottom perimeter edge of the tent is a four-inch sod skirt.
The peak vent (called the Versa Vent) is a square hole with velcro around its perimeter on both the inside and the outside. Attached to the velcro on the outside is piece of no-see-um mesh and a weatherproof storm flap. The mesh vent assembly can be removed and replaced with an optional siliconized fiberglass stove jack, or closed-off completely with a square silnylon panel.
Several tie-out points are placed on the inside and outside of the tent body, anchored at the seams. The external tie-outs can be used for guylines or attaching accessories (screens, etc.), and the internal tie-outs can be used for whatever you like (hanging lights, lines, etc.), or tying lines for additional wind stabilization.
The tent comes with sixteen Durapeg tent pegs and a full set of elasticized tensioners. The tensioners can be used (although not required) to both keep the tent pitch taut and to pitch the tent higher off the ground for increased ventilation. They are especially handy for situations on uneven ground where getting a good pitch might be difficult.

Left: A typical tie-out with the optional elastic tensioner in place. Right: The carbon fiber pole.

Left: The front door, partially open with the bug netting screen behind. Right: The half-height rear door.

Left: Attached bug-netting screen across the open back door. The screen can be attached from either the outside or the inside. Right: The rear door with screen, as seen from the inside. There did not appear to be any way to roll-up and tie back the rear door.

Left: The Versa Port peak vent with no-see-um netting and storm hood. Right: Another view of the Versa Port peak vent.

Left: Versa Port attachments: A fiberglas stove jack, a waterproof cover, and a no-see-um mesh screen. Right: The optional floor, tied-in around the perimeter.

The optional floor.
The tent takes some practice to set up properly. The set-up instructions are as follows:
The process is not quick and easy, especially if you are new at it. There were several times where I set up the tent and found that things weren’t quite right, making it difficult to get the fabric nice and tight. The tipi comes with a full set of elastic tensioners that can be used at each tie-out around the perimeter. Although not required, I found that I got consistently better results setting up the tent whenever I used the tensioners, as they are more forgiving and ensured consistent tension at all times.
Once set up, the amount of interior space available is huge. The tall center pole means a full-sized adult can stand near the center. When sitting, there is a lot of headroom available, making it possible for several people to sit in a circle around the pole. The amount of available floor space makes it easy to sleep six people, and since the floorplan is round, you can be creative with the layout of sleeping bags.
The large front door and mesh screen offer good ventilation. Although the front door zips right to the peak, if you are on the short side, you may find it difficult to unzip it all the way. Due to the slope of the wall at the front of the tent, we did find it somewhat difficult at times to unzip the doors from the inside, and the rear door did not have any way to tie it back.
The tent seams need to be sealed prior to taking it out in the rain. Sealing the seams around the peak and the peak vent proved to be a difficult process. The layers of fabric and the strips of velcro on both the outside and inside made it difficult for me to adequately get sealant in and around the thread holes. The end result was some leaking around the peak vent during a rain storm. On a related note, the protective hood over the peak vent does not cover enough of the vent, and so wind driven rain is prone to entering through the mesh (I have been told that this has been fixed in newer revisions).
The tent we received for review was a pre-production sample/prototype. The seams, while double-stitched, were not lap felled and they looked a little on the sloppy side. The center pole felt under-designed. We had also received a prototype titanium stove, which after some initial testing, didn’t inspire a lot of confidence. After communicating with the owner and outlining our initial impressions, we were sent a production version of the tent which also included a beefed-up pole. The stitching on the production version was much improved, and the pole felt much sturdier, but we experienced some failures with the updated tensioners. We opted not to test a production version of the stove as the cold winter weather was quickly transitioning to spring.

Left: Inconsistent and uneven seams in the pre-production version. Right: Testing the titanium wood stove. This version had some issues, but I have been told the production version has solved many of them. We opted not to review it as part of this article as it wasn’t production-ready in time.
Two tipi shelters that are similar in design to the Seek Outside VersaShelter are the Titanium Goat Vertex 7.5 and the Kifaru 6-Man Tipi.
The Titanium Goat Vertex 7.5 has an oval shape, similar to that of the Seek Outside shelter, with the pole being closer to the front door and a shallower slope towards the back of the tent. The Vertex is constructed out of the same 1.1 oz silnylon, has 133 square feet of covered space, and stands 7.5 feet tall. The Versa Port, at the peak of the tent, can be configured with either a vent or a stove boot. The tent is available with either an aluminum or carbon fiber adjustable pole. The aluminum pole version weighs 4 lbs 12 oz including tent, pole, stuff sack, and stakes, and retails for $750. The carbon fiber pole version weighs 11 oz less and costs $100 more.
The Kifaru 6-Man Tipi – also oval in shape – is constructed out of what they call UV coated paraglider fabric. At 14 ft 10 in long x 13 ft 2 in wide and 7 ft 6 in tall, it is similar in size and shape to both the Seek Outside and Titanium Goat versions. The tipi comes with a stove boot and storm flap, tent pegs, and an aluminum pole. The entire package weighs in at 6 lbs 4 oz and retails for $991.
When it comes to maximum floorspace for minimum weight, the VersaShelter is a worthy contender.
The Versa Shelter is well suited to western US alpine mountain environments – environments where there are large open spaces, few bugs, and the climate is relatively dry. In those conditions, the 6-Person Tipi is a good option for people who need a lot of space for groups of four to six people. For eastern climates where thick forests, tons of bugs, and lots of rain are the norm, this shelter may not be as well suited.
At the time of this review, this tent was still in its development phase. As a result, design changes were made along the way, and the last version we were able to test still did not reflect all of the changes in the current production version.
What’s Good
What’s Not So Good
Recommendations for Improvement
Disclosure: The manufacturer provided this product to the author and/or Backpacking Light at no charge, and it is owned by the author/BPL. The author/Backpacking Light has no obligation to the manufacturer to review this product under the terms of this agreement.
Incorporating a stand-alone trail crampon that works along with the snowshoe itself, the Mountain 28 eliminates the need to carry a separate traction device for conditions that call for grip, not float. Intriguing in theory, how did it work in practice?
With their Mountain Series of snowshoes, Kahtoola has come up with a two-part snowshoe system to cover a wide range of backcountry winter use. Incorporating a stand-alone trail crampon that works along with the snowshoe itself, the Mountain 28 eliminates the need to carry a separate traction device for conditions that call for grip, not float. I put it to the test over a two-week period to see how it performs for winter hiking.

| Manufacturer | Kahtoola Inc. (http://www.kahtoola.com) |
| Year/Model | 2011 MTN 28 |
| Weight | Manufacturer Specification: N/A Measured Weight ea: 35.8 oz (1015 g) |
| Size | Length: 28 in (71 cm) Width (at widest point): 8.4 in (21 cm) |
| Materials | Aluminum frame, synthetic CSM deck |
| Suggested Use | Multi-day backcountry trips, powder, unbroken trails |
| MSRP | US $289.00 |
The MTN 28 is the largest snowshoe made by Kahtoola, a company that got their start making flexible crampons for hikers. They have incorporated their Kahtoola Traction System (KTS) into these snowshoes that they say are, “designed for the technically advanced adventure.” The frame of the MTN 28 is made of 6061 T6 aluminum tubing. The 25.8-ounce (731-g) frame is 8.4 inches (21 cm) at its widest point and narrows at both the front and back. It also lifts up in the front 4 inches (10 cm) and 2 inches (5 cm) at the back.
The decking is made from a material called CSM (chlorosulfonated polyethylene), which is a synthetic rubber that has been bonded to a polyester fiber based core. Kahtoola says they chose it for its excellent flexibility and durability under all weather conditions, high resistance to puncture, and also because snow has a very hard time sticking to it. Flipping the shoe over, we see that triple-pointed teeth have been riveted to the deck for traction. A group of four is located in the center of the shoe with two more mounted further back to keep the shoe from having the tail slide down during traverses.

Top: The MTN 28 has an aluminum frame and a synthetic rubber deck. A steel binding plate sits under the ball of the foot. Steel traction teeth are riveted to the underside of the deck. Bottom: The binding plate has a T-shaped pull for the binding release and an oblong pull to reset the plate. When the steel bar is showing, as in the plate to the left, it is ready for action.
More teeth are incorporated into the steel binding plate at the front of the shoe. This is part of the SKYHOOK step-in system. The binding plate has a steel bar that runs across the plate which can be seen through the two slots on the top. Pulling a T-shaped handle on the side of the plate will slide the bar up, clicking and locking into place after it is completely clear of the slot. On the other side of the plate another pull, this one kind of oblong, releases the lock, allowing the bar to snap back to the ready position. As the binding plate is attached to the frame with a piece of CSM material, it will flex allowing the user’s boot to pivot downward.
The second part of the snowshoe is the 10-ounce (283-g) Trail Crampon. This piece is the rest of the binding. It consists of a hard plastic foot plate with the crampon points attached to the bottom. A piece of CSM material has been attached to the bottom to keep snow from balling around the crampon teeth. The plate can be adjusted to three different widths to accommodate a wide range of footwear. The top of the foot plate has a nylon strap that crosses the front of the user’s footwear and tightens with a sliding buckle. A rubber strap goes around the back of the footwear and hooks with an aluminum toothed anchor. A sliding plastic hook on the rubber strap keeps excess strap tucked in tight.
The ingenious thing about these snowshoes is the funny shaped crampon teeth that are the other part of the SKYHOOK system. These teeth slide into the slots on the binding plate and snap onto the bar described earlier, by stepping down on them. The bar locks onto the round notch on the teeth and stays there until the release is pulled to allow the bar to move out of the notch.
Because the Trail Crampon is attached to your footwear, it can be used as a stand-alone traction device for times that conditions warrant traction but not snowshoes. Icy trails that do not have dangerous drop offs (that would call for real crampons and ice axe) or frozen lakes are situations that often are better served by something like YakTrax or Kahtoola’s own (better performing) MICROspikes. But having the trail crampons of the MTN 28 lets you just pop the snowshoe off and go. Back to deep snow again? Step back into the snowshoe.
Once the Trail Crampon is attached, the MTN 28 has some formidable traction with twenty points of contact around the ball of your foot.

Top Left: The star of the show is the eight-point Trail Crampon. Top Right: When attached to the snowshoe, the MNT 28 has traction galore with more teeth than a great white shark. (Well, maybe not, but it has a lot!) Bottom: The Trail Crampon attaches to my boots and can be used alone on ice or hard packed snow. (Note the bent aluminum buckle).
I was asked if I could do a fast turn-around review of the MTN 28s. Due to the willingness of Kahtoola to get them to me quickly, I was able to get one overnighter on the North Country Trail in Chippewa State Forest, a dayhike starting at MB Johnson Nature Park and continuing along the Red River outside Moorhead, Minnesota, and a three-day backpacking trip in Voyageurs National Park at the border of Minnesota and Canada. Each trip saw different trail and weather conditions.
One thing I would like to share is the fact that in 2004 I was snowshoeing in Mt. San Jacinto State Park heading for the summit of the namesake peak. The snowshoes I wore were conventional shoes with a crampon only under the ball of my foot. While traversing, the back of one shoe slid out and I tore my meniscus, which led to knee surgery. Since then, I will not use a snowshoe that does not have excellent traction. (No, just “good” ain’t good enough…) I am pleased to say that the Kahtoolas fit the bill with maybe the second best traction I have used and seen to date, and I have owned seven pairs of snowshoes. I suppose this is to be expected from a company that makes crampons and slip-on traction devices.
Minnesota received record snowfall last winter. After it settled down, I was on top of three to four feet (1-1.3 m) most of the winter. Because it is so cold here, the snow does not solidify into the Sierra Cement I have spent most my life on. Instead, it stays loose and dry. Three days before my first trip with the MTN 28s, we had a crazy warm spell for two days that saw temps go above freezing, then it dropped back down near 0 F (-18 C) The result was snow with a hard crust and loose sugar-like snow beneath.
I took the shoes hiking on the North Country Trail and, when I parked where it crosses a Forest Service road, I saw that the snow covered road was almost ice. A bunch of snowmobile riders came up and stopped next to me as I was unloading to go. They said that the roads were so hard-packed that there wasn’t any snow to fly up and cool their engines so they needed to park a while to cool down. A couple were really interested in my pulk, so I asked one if they would mind taking my picture coming up the road they had just rode up.
They were right. The road was so slick that it would have been very hard to climb in just boots, especially with the weight of the sled pulling me back. Descending the road would have been scary. The Trail Crampons alone worked absolutely great. They bit into the ice and hard back very well.
Saying goodbye to the snowmobilers, I hit the trail. There was a hard crust there too that I thought might support my weight but, a few steps down the trail, I broke through and dropped about 18 inches (46 cm). Snapping the decks on actually proved to spread my weight out enough to mostly stay on the surface of the snow, which is much more desirable than slogging through deep stuff. When I did bust through, I only sank about 6 inches (15 cm). Not bad at all. The snowshoes worked great the entire weekend with no problems.
A few days later we got a storm that dropped 6 inches (15 cm) of fresh snow the first day. I did a dayhike on the second day of the storm while it was still dropping a bit more snow. The MTN 28s did well. They sank through most of the fresh snow, but did not punch into the deep snow that was there before. I did, however, encounter my first problem with the snowshoes here. After I had just started walking, I met two ladies coming back from their own hike on the nature trail. One asked what kind of snowshoes I had as she was in the market for her first pair. I showed her how the SKYHOOK system works and was embarrassed when I could not get the right one to snap back in. I made sure that the bar was back in place, I banged it to make sure there was not snow inside the plate, but it would not attach while stepping down. I finally had to resort to putting it on by hand, carefully smacking it so as not to impale myself.

Traction in action! Top Left: Trail Crampons alone worked well on a hard-packed icy road in the Chippewa Forest. Top Right: An icy slope on the Cruiser Trail System was no match for the MTN 28’s plentiful traction points. Bottom Left: Snowshoeing on fresh snow in falling snow along the Red River. (Lots of “snow” in that sentence…) Bottom Right: Punching deep holes on Elk Lake in Voyageurs National Park.
The last trip was a killer three days in Voyageurs National Park, where we were on miles of frozen lakes with either loose snow on ice, hard pack on top of ice with loose snow on top of that, or plain wind scoured ice. Once on land, we were on very deep untracked snow. Because of the extreme cold, (it was between 7 and -31 F (-14 to -45 C)) the snow was very loose and powdery.
The MTN 28s performed excellently on the lakes. There were some iced-over southern facing slopes that the snowshoe did a wonderful job ascending and descending, but the deep snow proved to be a bear for me. The 28-inch (71-cm) length just did not give enough flotation for a 215-pound (98-kg) guy. The way that the design narrows at the back takes away a lot of potential load-bearing surface too. There were times that I sank to my hip in spots with huge drifts. On more than one occasion I had to go back and try from a different direction as we were ascending, and I just could not get through it. My 168-pound (76-kg) hiking buddy was wearing 25-inch (64 cm) MSR Lightnings that, because of their shape, have more deck touching snow than my MTN 28s did. I really could have used a longer shoe. Considering that I was only carrying a daypack load and pulling a sled with my main gear, there is no way I could carry a 40-pound (18.1-kg) winter backpack through deep snow with the MTN 28s. Not everybody is a fat guy like me, so they may work just fine for lighter hikers. I bet they would work great for me on most of my old heavy California snow too. Powder hounds may want to look for something with a bigger deck.

The problem with the SKYHOOK continued the entire Voyageurs trip. They attach fine in the morning, but any time I took them off on the trail, at least one would have a hard time re-attaching even though I would stamp down on a firm surface to stand on. As I write this, they pop on and off just fine. Maybe it had something to do with the temperature or snow being clogged inside that was not coming out when I banged them to clear it.
One thing that was very impressive was how well they stay on my feet. I have owned many snowshoes that would pop off occasionally. Someone steps on my snowshoe as I am walking, or it catches a buried branch. Even the weight of deep snow as I drag my foot back up was enough to cause my foot to slip. I put the Trail Crampons on my Kamik Conquest boots when they first arrived and never took them off. I left the boots in my vehicle, putting them on at the trailhead. Not once did the rubber back strap pop off or the front straps loosen throughout the six days of use.
Looking back on all the trips that I have brought my YakTrax Pros on (to use at the start or finish of places like Arches National Park, where I had to go down a steep ramp to get to the desert floor, or San Jacinto State Park with its slick ramp at the tram station and trails that become solid ice for the first quarter-mile (0.4 km) because of all the tourist traffic), makes me really appreciate this design. Kahtoola kindly sent a pair of their MICROspikes for comparison. While the MICROspikes have much better traction than the YakTrax, neither are as stable as the Trail Crampon, and the lack of hassle and time wasted to get other traction devices out and put them on is a huge plus.
Another benefit of having the Trail Crampon on my boot instead of bindings that stay attached to the snowshoe is how nicely the decks pack. When nestled together (as seen to the right) they are only 2.25 inches (5.7 cm) thick. That helps when bushwhacking through trees that have thick branches, especially when I’m elevated 4 feet (1.2 m) above the trail by the snowpack.
As I was writing this, I took the Trail Crampons off and noticed that somehow one of the aluminum toothed-buckles that holds the back strap in place had bent. It had deformed to the point that I was unable to unhook the strap. For the life of me, I can’t figure out what I did to bend it. I don’t recall any huge shock to my foot while hiking. Kahtoola may want to switch the buckle to a sturdier steel one in the future.
Lastly, a note about the CMS material that constitutes the deck and covers the steel plate on the Trail Crampons: I did not experience any snowballing at any time over the six days of use. Snow does not stick to it. The material shows no signs of wear, even after walking on a lot of branches and rocks in Voyageurs. (The frames did pick up a few scratches.) I continued to use these for multi-day backpacking trips for the rest of the winter, which in northern Minnesota lasts until, oh, about May. If any durability or performance issues arise, I shall ask to amend this review.
What’s Good
What’s Not So Good
Disclosure: The manufacturer provided this product to the author and/or Backpacking Light at no charge and is owned by the author/BPL. The author/Backpacking Light has no obligation to the manufacturer to review this product under the terms of this agreement.
 Loading...