You don’t have access to view this content.
Finnish Thousand Meters Round
An in depth look at an exploration above the Arctic Circle. Journey to where Finland and Norway collide.
An in depth look at an exploration above the Arctic Circle. Journey to where Finland and Norway collide.
You don’t have access to view this content.
The Columbia and Western is a section of the Trans-Canada Trail, a haven for thru Hikers. It caters to all skill sets and is a wilderness of pristine beauty.
You don’t have access to view this content.
Talus can be tricky but with a few tips and a new approach you’ll be all set for some Talus Dancing. And boy what fun it is!
You don’t have access to view this content.
The quest for the perfect lightweight backpacking shoe continues. Don’t hold your breath. While these shoes are great for most hikes they are less than ideal for seriously demanding trips.
The quest for the perfect lightweight backpacking shoe seems about as futile as chasing a rainbow. Just when you think you are within reach, and eager for next year’s version of your favorite shoe to be released, you either grab the pot and find it to be full of fool’s gold or it vaporizes entirely and your quest begins anew.
Such is how I feel about the Altra Lone Peak 1.5.

The Altra Lone Peak 1.5 (women’s version shown in photo) offers a wide toebox, thick underfoot cushioning, zero drop, and sub-10-oz weight – key attributes that could be the foundation of a perfect backpacking shoe.
I’ve worn Lone Peaks since they were released and put hundreds of backpacking miles on v1.0.
To summarize how I feel about v1.0, please refer to my comments about it in the context of the larger market of minimalist footwear in my article Considering Minimalist Footwear for Backpacking published last October.
To save you some labor for now (but don’t be lazy – read the article above to broaden your view of what minimalist footwear has to offer us as backpackers), the following list summarizes what I liked about Lone Peak 1.0’s:
Of course, the wide toebox and zero drop differential promotes “natural” biomechanics. This may or may not be a benefit to you, but it’s at least a perceived benefit to me because the whole thing sounds well enough, not unlike eating “natural” cookies or fueling my truck with “natural” oil products, I suppose.
The idea that “natural” biomechanics promotes is longevity: I should be able to hike for more hours or more miles during the day, perhaps, and maybe I’ll be able to hike to a riper, older age than the fellow next door still encapsulated in his old school Scarpas with their high heels and pointy toes.
I wasn’t completely enamored with Lone Peak 1.0’s, however, and note the following limitations with those shoes:
So let’s take a look if and how the v1.5’s addressed these v1.0 limitations:

Here’s why the lugs under the metatarsal region of a shoe wear the fastest – and why they are the most important lugs for traction.
Lone Peaks are darlings in ultrarunning circles. I’m not so enamored with them for backpacking, so let’s consider these differences.
First, ultrarunners don’t carry heavy packs. Pack weight adds stress to the shoe on every step. This stress is magnified on steep terrain, when the shoes are wet, or when you’re off trail. A backpacker simply isn’t going to get as many comfortable miles on a trail shoe as an ultrarunner.

Light packs and easy terrain, like when day hiking on this subalpine Wasatch trail, don’t pose particular problems for most minimalist shoes.
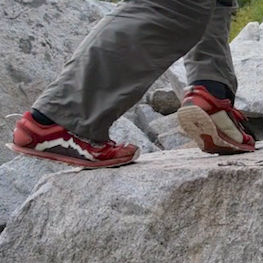
Second, I hike in places not frequented by ultrarunners. I spent a lot of time on snow, talus, scree, and in steep and brushy terrain – terrain that adds to the stress load on my hiking shoes. A backpacker who travels through steep, rugged terrain will wear shoes out sooner than a backpacker who sticks to trails.

My son and I both wore Lone Peak 1.5’s on a 10-day High Sierra traverse this summer. We started the traverse with 45-50 pound packs and spent a fair bit of time scrambling through scree and talus on moderately steep Class 2+ terrain, like Alpine Col (here). This type of trip taxes footwear significantly.
Third, my shoes spend a lot of time wet – snow, river crossings, packrafting, and flooded, early season tundra are common where I hike. Wet shoes cause hydrolysis of glues, stretching of threads, and delamination of bonds. Shoes that spend a lot of time wet don’t last as long as shoes that stay dry. For the backpacker, having shoes remain wet day after day for multiple consecutive days places particularly high demands on a shoe’s construction quality.
Those three factors – heavy packs increasing the stress on the shoe, steep and rugged underfoot terrain increasing stress on the shoe, and sustained wet conditions increasing stress on the shoe – mean that we have to adjust our expectations of how long running shoes will last.

Very rocky terrain, like this granite trail in Utah’s Wasatch, places high amounts of stress on shoes when carrying a heavy pack. These stresses are magnified on multi-day expeditions, and when shoes are wet.
That said, I generally consider a reasonable lifetime for trail shoes for backpackers to be in the following ranges, based on my experience with shoes that weigh less than 12 ounces, including La Sportiva, Montrail, Inov-8, and Salomon – the primary trail running shoe brands that I’ve worn in the past 15 years.
| Terrain | Description | Example | Shoe Life |
| tundra | wet or dry off trail travel, moderate steepness | Western Brooks Range | 400-600 miles |
| trails | hardpack, rocks, steep | JMT | 300-500 miles |
| granite alpine | off-trail, scree, talus | SHR | 200-400 miles |
| limestone alpine | off-trail, scree, talus | Northern Rockies | 150-250 miles |
I don’t have extensive experience with the Lone Peaks on tundra (other than the accumulation of incidental stretches to the tune of about 50 miles per pair at most), but having gone through three pair myself, and observing two pair each worn by wife and son, I have a reasonable sense of their lifetime on trails and alpine off trail travel.
The following summarizes my empirical observations for shoe life while backpacking on this limited data set, and compares them to a handful of other shoes that I’ve used extensively.
Note: I estimate shoe life to be the point at which a shoe begins to fail catastrophically, either from delamination of sole bonds, worn stitching/glues that affect the structural integrity of the upper, rips in the upper that compromise its structural integrity, breaking of sole lugs, or wearing of sole lugs under the metatarsal region of more than 50%.
| Terrain | Shoe Model | Shoe Life |
| trails | Inov8 BareGrip 190 | 200 miles |
| trails | Inov8 X-Talon 212 | 300 miles |
| trails | Inov8 RocLite 315 | 400 miles |
| trails | Altra Lone Peak v1.0 | 300 miles |
| trails | Altra Lone Peak v1.5 | 250 miles |
| granite alpine | Inov8 BareGrip 190 | 150 miles |
| granite alpine | Inov8 X-Talon 212 | 200 miles |
| granite alpine | Inov8 RocLite 315 | 300 miles |
| granite alpine | Altra Lone Peak v1.0 | 150 miles |
| granite alpine | Altra Lone Peak v1.5 | 100 miles |
| limestone alpine | Inov8 BareGrip 190 | 100 miles |
| limestone alpine | Inov8 X-Talon 212 | 150 miles |
| limestone alpine | Inov8 RocLite 315 | 250 miles |
| limestone alpine | Altra Lone Peak v1.0 | 100 miles |
| limestone alpine | Altra Lone Peak v1.5 |
Failures on my Lone Peaks have included the following:

Blown stitching on the Lone Peak 1.5’s instep reinforcement patch. Single-stitched construction combined with rotting thread from several straight days of wet shoes contributed to this failure, which resulted in decreased sidehilling performance due to the inability of the upper to retain structural integrity.
I never expect a shoe not to fail. And I certainly don’t expect a lightweight trail shoe to last as long on a limestone ridge route in the Bob Marshall Wilderness as on the hardpack of the California PCT.
Backpackers carrying heavy loads in alpine terrain, especially in wet weather, are going to place severe demands on their shoes. It’s part and parcel with the decision to trade in boots for lighter footwear that allows you to go faster and further with less foot pain and stress.

Abrasion of the upper while traveling through alpine areas littered with High Sierra granite talus and scree. Again, this is a structural failure of the upper that makes for a sloppier fit, reduced sensitivity during precise foot placements on steep terrain, and a general feeling of emotional stress, wondering when the more fragile inner (white) layer is going to blow.
In that context, I’d rate the applicability of the Altra Lone Peaks (especially v1.5) at the lower end of what I’d expect for durability both on and off-trail.

There’s no drama here, just a simple scramble up a short Class 2 granite slab. This isn’t the realm of advanced backpackers, and even beginners will find themselves relying on the traction of their shoes to remain safe and secure while trekking. As lugs wear out, so too does traction. I found myself slipping and sliding, even on rough-surfaced Wasatch granite, as my Lone Peaks came to the seemingly premature end to their practical life.
Before anyone goes postal on me in the forums for giving the shoe what you perceive to be a low review rating, let me qualify it.
First, this is my family’s outdoor shoe of choice. This is what all three of us wear for day hiking, backpacking, and packrafting. We wear them daily. They are our shoe du jour for all of our outdoor pursuits.
Second, my current pair of Lone Peak 1.5’s are worn out. Guess what I’m buying next? Yep, Altra Lone Peak 1.5’s. And I’ll probably buy another pair after that. That doesn’t mean that the price tag isn’t painful and that I’m not disappointed by their short lifespan. In fact, when I purchase my next pair, I’m going to have a big stomachache because of my contribution to the global economy’s premature use of resources for what amounts to my personal recreation.
However…
There’s no shoe quite like this one. It’s special, with a unique blend of attributes that makes it both comfortable and philosophically compatible with my desire for my footwear to promote natural biomechanics.
Therefore, it more than deserves an Above Average review rating (as opposed to something less attractive) because it does stand apart from the crowded market of lightweight backpacking shoes and I’m looking forward to future iterations that pay greater attention to both sustainability and the economic limitations of its customers.
The lightweight philosophy coupled with high adventure creates a schoolroom for incredible growth. Witness it here.
In July 2013, I participated in the first ever BSA-sponsored packrafting school at the Montana High Adventure Base in Dupuyer, Montana. The program principles and curriculum were developed by Ryan Jordan, and I had the great privilege of serving with Ryan as an instructor and mentor for a select group of Scouts who would be our guinea pigs and pioneers, and who would pave the way to opening up a dramatic new mode of high adventure wilderness travel in the Scouting program.

Scouts search for packraftable rivers in the Bob Marshall Wilderness.
This essay and trip report reflects some of my experiences, thoughts about Scouting, and importance of a lightweight philosophy as part of effective wilderness group dynamics.
The paddles dug into the water, spilling us into the river, and we were off.
The landscape around us was enveloping, and peaceful. As we paddled I couldn’t help thinking how cool it was to be doing a Wilderness packrafting trip with teenage Boy Scouts. But this trip was greater than the packrafts. In fact it was greater than the location, the gear, and the hikers individually. This trip was about working together to overcome obstacles.
When we simplify life – boil it down to the basics as we are forced to in the backcountry – we begin to identify what really matters. We see that the people around us and their safety and well-being become the priority. We begin to rely more on ourselves and then work as a team to come out safely. Couple the backcountry with learning a new challenging skill that forces participants to go out of their comfort zone and you have a recipe for growth.
At the beginning of the trip the Scouts were uncomfortable as they adjusted to new experiences with their as-yet-unproven decision making matrices. But with each riffle, rapid, and river bend, their confidence increased with their experience. I was amazed at the transition. By the end of the trip they were totally different; far better equipped to face challenges, more resilient, and willing to be helpful and be helped. This latter attribute was surprising, and reflected the positive benefits of going through shared experiences that test physical, mental, and emotional limits.

Ryan and Eric teach Scouts how to attach their packs to their boats at the put-in.
High Adventure (especially, backcountry travel in remote environments) is one of the best schools for growth offered by the Scouting program. There is something about a challenge that forces people to look deep within to overcome the obstacle. We started as a group of individuals and by the time we ended we were functioning as a team and loving every minute of it. I’m sure the lure of the backcountry and the growth that comes along with it may be why some of you subscribe to BPL and why you seek intimate backcountry experiences.
Honestly, I was blessed to serve as an instructor for this trip – the first ever BSA-sponsored wilderness packrafting program. So the trip was born; 5 days in the majestic Bob Marshall Wilderness: 4 scouts, 4 adults, and 8 packrafts. The trip was challenging, it was engaging, and it was fun. It was a pilot trip – to see if packrafting was a feasible high adventure BSA program.
On the trip, we ran challlenging water for newbies (Class 2-3 / PR 2-4), saw diverse forms of wildlife (ducks, bear, deer, and lots of trout!), saw some beautiful country, but the best part was watching the Scouts grow as a result of the challenge.
To better accommodate our high adventure itinerary we stayed true to the principles of lightweight backpacking, choosing our gear based on anticipated weather and actual need. This included packing thin, light, non-absorbent clothing, sharing a significant amount of personal gear (knives, first aid kits, insect repellent, and more), and taking advantage of careful cooking and water treatment techniques to minimize our need for fuel and water chemicals while learning important skills.Our necessity-based packing and sharing mindset enabled us to run this trip with less than 40 lbs of gear per person, which included 12+ pounds per person of whitewater packrafting gear (individual and group shares), 8 pounds of food per person, and a variety of lightweight luxury items that included tenkara rods and bratwurst.
We got out of the cars at 10 am and after a short restroom break inflated the packrafts and put into the river right from the parking lot. How cool is that! Wilderness packrafting from a car. The water was cool and the boys immediately faced a challenge – a strainer. This water hazard (a log stuck in such a manner that the current flows over it) is an unwelcome sight to inexperienced and experienced packrafters alike. The boys readily adapted and relied on their previous training to easily navigate the hazard.
Shortly thereafter, after hitting a tricky PR3 rapid, we had the first (and only) unplanned wet entry into the water when one of the Scouts flipped his packraft after his stern was bandersnatched by a pourover. He quickly recovered demonstrating proper recovery form as he kept his feet off the river floor (to prevent them from becoming lodged in the rocks) and swam to bank, shaking his head, but smiling. He later remarked how his experience flipping the boat was a blessing as he understood that he could safely and comfortably handle a wet entry.

Ryan teaching the art of scouting rapids, and helping new packrafters make paddle-or-portage decisions.
The day passed without further incident as we traversed the beautiful landscape before us. We had been floating for 4 hours or so and the sky was darkening – it appeared that a thunderstorm was about to let loose.
One of the values of Scouting is that it promotes leadership and responsibility at a young age. These 13-16 year olds took the initiative when they saw the storm approaching in the distance to make finding a campsite the main objective. We stopped to scout a potential camp and the boys made the decision to continue downstream to find a nicer place to camp, their confidence in paddling and inclement weather management keeping their options open
This ended up being a great decision as the storm passed us by but what amazes me about their behavior was not only did they have the foresight to look far down the horizon they saw what was coming and prepared a plan to meet it head on. The storm’s drama dissolved, but these Scouts demonstrated the Scout Motto “Be prepared” when they decided to take their fate into their own hands.
We floated some beautiful country down to our camp and the two patrols (one adult patrol, and one Scout patrol) each set up their respective shelters and bear bags, treated water, and arranged the cooking area. That night we carved willow sticks, built a fire, and roasted Bratwursts.

First night weiners roasted on a willow stick over fire. We introduce Scouts to an important packrafting tradition.
Day two dawned with all of its glory and we packed up. Ryan was quick on his tenkara draw while the rest of us were tying our packs to our boats and caught 15 trout in 15 minutes, foreshadowing what would become a continuing theme on the trip – superb fishing.
After packrafting for an hour or so we stopped for a tenkara fly fishing class. Tenkara fly fishing is becoming increasingly popular among backpackers. Its light weight and collapsible design are ideal for backcountry travel. The scouts immediately took a liking to the fishing with a few catching fish right away.
We packrafted without incident as the landscape enveloped us. We had to be focused today. At the bottom of the South Fork lies a gorge that marked a transition point for us, and we didn’t want to suffer the inconvenience of running whitewater beyond our current ability when our route was to be transitioning to trekking. Navigation played a role here as we had to make sure we didn’t accidentally plunge into the gorge where the close proximity of the cliffs to the water’s edge would not only make water travel hazardous but would also make portaging an extreme challenge. We wanted to pull out of the river before the gorge.

Working together to portage loaded boats around a logjam in a braided side channel.

The majesty of river travel in the Bob Marshall Wilderness.
As with all things on this trip the Scouts were in charge with the adults serving as advisors and making sure extremely dangerous situations were avoided. Therefore it was the Scouts’ responsibility to evaluate every rapid, navigate on both the water and trail, and execute route decisions accordingly – without the aid of GPS units (we teach precision map and compass navigation combined with a continuous “look up and pay attention to the landscape” routefinding).
They did an excellent job relating what they saw around them to the features on the map. We pulled out above the gorge, ate lunch, and were soon on the trail to evening campsite. That evening, we camped on a gravel bar island and ate fresh trout that night.

A tenkara-caught wild rainbow from the North Fork.
Today we would leave our camp set up for the afternoon, trek up to the North Fork headwaters, and float back to camp. Upon our arrival back to camp, we packed up and started making our way down the top of the North Fork Gorge with an uneasy evening float as ominous weather, a nearby forest fire, and loud whitewater echoed on the canyon walls below. Our camp would be located above the gorge’s first major rapid in a lovely meadow protected by pines on three sides and decorated with bear scat.

Packrafting is about “packing a raft” as much as “rafting a pack”. Climbing out of the South Fork Gorge.
After scouting a solid Class 3 (the entrance rapid to the gorge), and teaching more advanced packrafting principles, Ryan ran the rapid while the Scouts teetered on the edge of excitement and fear. All of the Scouts attempted it, and ran the rapid carefully, intentionally, and aggressively — the hallmark attributes of seasoned packrafting veterans. This point was a shining, proud moment for us as instructors.

Chase running the entrance rapid to the North Fork Gorge.
Although the rapid was a challenge the preliminary scouting was perhaps a more crucial learning experience. It gave the scouts an opportunity to demonstrate what they had learned, reinforce their comfort on the water (especially compared to Day 1!), and parse complex whitewater into its less-intimidating parts. When we were scouting the rapid, we felt that this was the type of challenge that Baden-Powell had in mind when he envisioned a patrol of Scouts facing a backcountry challenge.
We continued downstream a quarter of a mile to a river-wide pourover shelf and spent a few hours fishing in the riffles and pools near our boats.
In the early afternoon, we decided that we wanted to give the gorge a shot, so we scouted the next several rapids downstream of our fishing spot. Unfortunately, within the span of just a few days, water levels had dropped enough to make safe navigation of some of the rapids problematic – we were worried about the prospect of repairing boats incessantly as they scraped through razor-sharp limestone bedrock bands for the rest of the day.
After scoping it out we decided to play it safe and trek around the gorge and camp in the vicinity of the entrance gorge to a stillwater body downstream. We pitched camp in a sagebrush meadow overlooking the gorge while casting tenkara flies to finicky trout until well after dark.
We woke up at 5:30 am to ensure we had enough time to reach our pickup point by 1:00 pm. We caught the sunrise as we came through the top of the reservoir’s entrance gorge, which would lead into our final stretch of paddling.

Early morning paddle through a stillwater canyon.
The last day was a tough paddle against the wind and after having a final packrafting exam (which included a deep, open-water wet entry and exit with a loaded packraft in high wind), the scouts were sufficiently exhausted. We stopped for lunch halfway across the lake, took some time to readjust, and hit the trail for a midday walk in blazing heat to the trailhead.
There were many obstacles on the trip that forced the boys to demonstrate their knowledge and leadership. I think the most prevalent example and the most defining moment of the trip was when they made the decision to not continue down the North Fork gorge. We had walked a ways into the gorge in an effort to scout it out and it was clear to us that low water, tall cliffs, some private property, and a steep gradient would make portaging extremely challenging. The adventurous side of me really wanted the scouts to go down the gorge but at the current water levels the likelihood of a packrafting trip turning into a packraft repair trip was high. Even though I was marginally disappointed I knew they made the right decision and I was impressed at their judgment. It was one of those moments. They probably don’t even realize how special it was. It was just an affirmation to us instructors that they were paying attention and learning and they knew their limits. It was cool to see them exhibit that wisdom and elect a mode of travel that was dictated by their desire for efficiency to keep moving across the wild landscape.
I am no stranger to high adventure and can say that it is one of the reasons I am who I am today. I draw upon my 50 miler in the Beartooths and other trips often. Not because it was such a cool trip (which it was) but because serving as the crew leader on that trip gave me an incredible opportunity to demonstrate leadership in an adventure setting. The beauty of the Scouting program is that it not only gives boys training on skills and leadership and service, it gives them tangible ways to experience them.
I saw this type of leadership demonstrated first hand on the trip. It was rewarding to come full-circle and observe the boys meet similar challenges that I faced and watch them grow as they handled them. I really admire the Scouting program and am grateful that it gave me so many opportunities to demonstrate and learn leadership in an adventure setting.
These types of experiences are distinguished from other leadership programs in that high adventure breeds trust within the Scout patrol. When faced with extreme adversity we begin to identify who we can actually depend on because of the way they handle that pressure. And for those who are not quite ready to lead, just being a part of the patrol structure furthers their preparation by giving them experiences to witness leadership at the edges of challenge.
On the trip we talked about four principles that Ryan incorporates into his high adventure instruction: Honor, courage, service, and leadership. These four attributes became guiding principles and shaped our mindset for how we acted during the trip:
I suppose I share all of this with you out of some sense of pride. When I went through the Scouting program as a youth, it was tough to see what I was actually learning and how I could apply it to my life. The Scouting program is unique in that it explains leadership and provides examples and facts about it, but it goes a step further than other youth leadership programs in that it gives creative, hands-on experiences that allow the participants to really learn what leadership is. It gives them opportunity in a high adventure type-setting to face problems together.
Looking back on it now, when I am faced with challenges in school or at work or in the backcountry, the lessons I have learned from Scouting continually point me in the right direction. The purpose of this article is not to recruit for the BSA (most of you are probably past the 18 year-old cutoff anyway) or to encourage you to get your kids involved (which is still a good idea). I hope that in writing this article I could encourage you to take some of the lessons from the way Scout troops operate their high adventure programs and apply them to your own trips in the backcountry, whether it’s using the patrol method, teaching skills to other members in your expedition, or cultivating a sense of bonding by sharing difficult challenges together.
As was noted in the introduction, we also shared a lot of gear to cut down on weight. At first pass this makes sense from the methodology of lightweight backpacking. Cutting down weight means we can travel fast, safer, and conquer more advanced terrain. Aside from those benefits, sharing gear forces you to be more dependent on those around you. This may sound limiting but in the wilderness any excuse that brings you closer and forces you and your group to operate as a team is a good thing. In the wilderness, hazards can appear in the blink of an eye and we are continually adjusting to meet the circumstances. The closer you are with your group the better prepared you will be to successfully meet the challenges.
Another benefit of lightweight philosophy is that less time is spent looking for, thinking about, repairing, using, and otherwise managing gear. Gear gets out of the way so the most important parts of the Scouting curriculum can be emphasized: learning skills, building positive relationships, and working towards the group’s goals.
“This is High Adventure” is a film written and directed by Ryan Jordan and produced by the Montana Council BSA and the Boone and Crockett Club that will be released in the Winter of 2013, promoting packrafting in Scouting and the importance of high adventure in building youth leadership, outdoor skills, positive group dynamics, and character.
View an unofficial “pre-trailer” of “This is High Adventure” here:
If you are a parent of a Scout, or a Scout leader and would like to inquire about youth participation in this program in 2014 and beyond, please contact the Montana Council BSA High Adventure Committee Chair, Ryan Jordan (publisher@backpackinglight.com).
The Leadville Runners are light and we mean really lightweight. But don’t worry you won’t have to sacrifice comfort or stability as you conquer the outdoors.
You don’t have access to view this content.
A unique and diverse area, the Grayson Highlands are an excellent hiking location in the Mid-Atlantic.
You don’t have access to view this content.
Grizzly Bears! Mountain Goats! Elk! With a clear conscience the author returns to conquer this vast wilderness.
You don’t have access to view this content.
Going ultralight and cooking for a group can be a real challenge. The “Critter” stand is lightweight and takes the pain out of cooking for a group.
You don’t have access to view this content.
The Teton Wilderness is vast and beautiful. Take a journey through this landscape and enjoy the scenery.
You don’t have access to view this content.
Buckskin Gulch is one of the top 10 most dangerous hikes in America as sudden rain fall can lead to flash floods. Paria Canyon is stunning. Grab a seat and relive the journey.
You don’t have access to view this content.
Take a more in depth look at the tights best suited for the backcountry.
You don’t have access to view this content.
Part 1 helped you choose the rod. After reading part 2 you’ll be all set with the tackle needed to fish tenkara in the backcountry.
You don’t have access to view this content.
Tights are a very versatile backpacking tool. Their close fit keeps you warm and quickly wicks away moisture.
Hiking and backpacking safely is largely all about moisture management. We spend inordinate amounts of time figuring out how to keep moisture out of our packs (i.e. pack liners), off of our sleeping gear (i.e. shelters), off our backs (i.e. rain gear), and in our bodies (i.e. water treatment and hydration). In fact, if it weren’t for moisture management, I would hazard a guess that 95% of the outdoors industry would be largely unnecessary. Ok, maybe 95% is a bit of an exaggeration but you probably get my point.
In this two part article series, we are going to discuss a moisture management strategy for a body part that we often don’t give much attention to: our legs. More specifically, the use of tights as a backpacker’s tool for comfort and moisture management in all (or most) seasons. Yep that’s right, tight pants. I can see a lot of you men cringing already.

Hiking in tights.
A lot of my research into backpacking clothing and gear can be credited to my wife Renee. Early on in our hiking/backpacking days she was reluctant. She had fears of being cold, wet, and uncomfortable. If I wanted to have her joining me on crazy outdoor adventures, I needed to figure out systems that work. While she is able to grit her teeth and push through some discomfort if she has to, she also encourages me (ok, maybe complains is a better word!) to figure out how we might be able to improve our systems when we encounter adverse conditions.
One condition we have been working on improving is backpacking in wet and damp conditions. Living in eastern Canada (after having moved from the eastern US) wet conditions are no stranger to us. Learning how to be as comfortable as possible in those conditions means we can get out more often and even enjoy it too.
When it comes to rain, backpackers spend a lot of time discussing waterproof shells for their upper body. Generally, they don’t however spend a lot of time talking about their lower bodies. Most backpackers belong to one of two camps: either they wear waterproof pants or they don’t (disregarding the few who wear chaps or ponchos). My wife and I belong to the camp who doesn’t wear waterproof pants, as we find them way too hot and sweaty.
While avoiding the use of rain pants helps, it isn’t always a comfortable situation. When the air is cool and wet, having wet pants can be chilling. The wet fabric when exposed in the air becomes cold, and then when it brushes against your warm leg it feels chilly. Having wet loose fabric draped around your legs is just generally not a pleasant feeling, especially when the rain is coming down hard. If conditions are cold – as can be found in the shoulder seasons – being cold and wet can lead to undesirable circumstances.
Before we talk about tights and how they potentially solve some of these problems, let’s first talk about drying.
The act of drying is really just a transfer of moisture from something with high moisture content to something else with lower moisture content. In the case of clothing, the thing with the high moisture content is the fabric, and the thing with the low moisture content is the air.
The amount of moisture the air can hold at any given time is affected by temperature. The higher the temperature, the more moisture the air can absorb, and the lower the temperature, the less moisture it can absorb. Relative Humidity (RH) represents the how close the air is to its moisture capacity for a given temperature. 100% RH means the air cannot absorb any more moisture. At any given moisture content (say 50%), if the temperature rises the RH will decrease (the air’s capacity for absorbing moisture increases), and if the temperature falls the RH will increase (the air’s capacity for absorbing moisture decreases). If the temperature continues to fall until the RH reaches 100% then dew (condensation) forms. That temperature is called the Dew Point.
Now back to drying. How quickly a piece of clothing will dry thus depends on the RH of the air. When the sun comes out the air warms up (the temperature increases), and the air can hold more moisture. As a result things will tend to dry faster (unless of course conditions are both hot and humid). As the ambient temperature cools drying can take a lot longer.
One significant source of heat that can also affect drying is body heat. Our bodies warm up the air around our clothing, and thus the RH of the air in that “microclimate” drops. The air is able to absorb more moisture (hence, dry quicker). That is also why close fitting clothing dries quicker than loose fitting clothing: the looser fitting the clothing, the slower drying it is because your body is unable to warm up the air surrounding the fabric.
Another factor in drying is air movement. When a piece of clothing dries, the air directly surrounding the fabric starts to become saturated with moisture (especially when it already has a high humidity). In the absence of air movement, at some point that air will not be able to absorb any additional moisture, and hence drying will slow significantly. If the air moves – via wind, walking, etc. – drying is able to continue at a steady pace because the air surrounding the fabric doesn’t have a chance to become saturated.
I have never understood the purpose of a loose fitting base layer. The real reason is probably one of fashion. Many people will feel that a snug fitting garment is not flattering, and thus will opt to wear something baggier. We wear base layers for moisture and thermal management. If the garment is not form fitting, then we really do not maximize the benefits of moisture management or thermal regulation. Many professional cyclists will even wear a base layer in very warm conditions simply for wicking. The closer fitting the base layer, the better it will perform.
Tights – long the staple of runners and cyclists the world over – haven’t really made much headway into the backpacking world, but actually have a lot to offer it. They excel at wicking moisture due to being close to the skin. They dry quickly due to being close fitting. In wet/rainy conditions, they kind of behave like a wetsuit.
The theory behind a wetsuit is that the moisture is held against your skin and acts as an insulating layer. The water on the outside may be cold, but the water against your skin is warm and provides a barrier to cold transfer. Tights work in a similar way. In wet conditions, although your legs may be wet, the layer of water against the skin is kept warm by your body heat. If your legs continue to get wet via external moisture (i.e. precipitation), the cold is buffered by the insulating layer against your skin. Thus it is less of a shock to the body and therefore you are more comfortable. Because tights are much thinner than a wetsuit, and don’t have as much of a resistance to moisture traveling through them, they are not as effective or efficient. That being said, they are much more comfortable (thermally) than loose fitting pants of the same thickness.
Ok, now that we have gotten through the theory, how do they work in real life? When my wife and I first embarked on this article project, neither of us had used tights for hiking or backpacking. We wanted to conduct an experiment. We wanted to try out a bunch of different brands and models to figure out what worked and what didn’t, and see how tights might fit into a backpackers toolkit. What follows is our observations after almost a full year of testing.

On the trail and staying warm.
There are all kinds of brands, models, and concoctions in the tights world. These are generalizations of what we like, not specific to any particular model. Part two will get into the specifics about tight fabrics and construction.
Generally, Renee and I have come to prefer wearing tights in the “other” three seasons (i.e. fall, winter, and spring). Especially conditions/locations where the air is going to have the tendency to be cool and damp, or wet – conditions in which getting wet has a higher likelihood of being uncomfortable. In the summer, it is kind of hit-and-miss, depending on the conditions.
After having experienced good success with them, I am more or less sold. Why aren’t others? Why don’t we see more tights in the backcountry?
One reason I can think of is fashion. Tights aren’t fashionable in the backcountry. Actually, women don’t mind it so much, I see women wearing them more often than men. In the era of Bear Grylls with big knives and burly nylon pants packed with pockets, tights don’t fit the stereotypical outdoorsman image. Of course the fine readers of BackpackingLight wouldn’t necessarily fall into that category, as one of the main the reasons you are here is because you are looking beyond the mainstream.
Another reason might be modesty. Perhaps people feel self conscious of their bodies and would rather hide behind something a little baggier. For people who might be self conscious with wearing them, pairing tights with a pair of lightweight shorts can be a good option. It adds a little more weight and hinders dry time somewhat, but adds durability, a little more wind protection and leaves more intimate details to the imagination. In fact, instead of bringing a pair of long underwear and a pair of pants, why not try bringing just a pair of tights and a pair of shorts? We have found that to combination to work quite well.
Perhaps durability is the third reason. If you need to do some heavy bushwacking in nasty/thorny conditions, then yes, tights won’t be the best option. In many conditions, especially on-trail, durability won’t be an issue.
Stay tuned for part 2 of this article where we will discuss several brands/models of tights that we have tested.
A look at the best rods to bring into the Backcountry. It may not be what you think. Sometimes the best combination takes into account both the weight and the reach of the rod.
If the word “tenkara” really means “from Heaven” it’s probably just shorthand for “God’s Gift to Backpackers.” Tenkara may be the best thing to hit the backpacking world since freeze-dried food. Of course, if you seriously compare a dinner of fresh trout to a pot of “rehydrated, freeze-dried whatever”, I think the trout would win every time. If your backpacking takes you along or even just across a mountain stream or to an alpine lake, tenkara is way better than freeze dried food.
Although tenkara is a centuries old pursuit in Japan, it is still relatively new in the US, having only been introduced in 2009. In the few short years since then, however, the number of available tenkara rods has expanded dramatically from only a handful of rods from only one company to dozens of rods from upwards of a dozen companies. This article will provide an overview of some of the rods and other gear that might be of interest to backpackers.
Before jumping straight into descriptions of individual rods, I would like to introduce a couple of terms that many readers may not have seen before. I suspect most by are now are familiar with “Tenkara” and know that it is fly fishing with a long rod, no reel and the line tied to the rod tip. (There are nuances, and the discussion of what is and isn’t true tenkara still goes on, but let’s stick to the basics for now.)

Backpacking Light Hane – the first tenkara rod for backpackers.
In addition to Tenkara, there are two closely related fishing styles, also traditional in Japan, called Keiryu and Seiryu. The word “keiryu” is translated as “mountain stream” and “seiryu” as “clear stream.” Although mountain streams are certainly also clear, the connotation of Seiryu is of a more placid stream rather than the high gradient rushing mountain stream. Both also utilize a rod with no guides and no reel, and with the line tied to the rod tip.
Keiryu fishing and tenkara fishing are both done in high gradient mountain streams and both target the same fish. In a party of several anglers, there might be some who are tenkara fishing and some who are keiryu fishing. The primary difference is that tenkara fishing is done with flies and keiryu fishing is done with live bait, often using nymphs gathered from under rocks in the stream they are fishing, the ultimate in “matching the hatch.”
With an unweighted fly, tenkara is largely limited to the top few inches of the water column. If there is a plunge pool you can use the plunging water to pull your fly deeper, but without one you can only cast further upstream, giving your fly a bit more time to sink. An unweighted fly is just not going to sink very far, though. Keiryu fishing, on the other hand, utilizes split shot so it is quite possible to fish just off the bottom, whether in runs or in pools. Keiryu rods tend to be stiffer than tenkara rods, I suspect partially because you need a stiffer rod to fish effectively with added weight and to get good hook sets when fishing in deeper water.
In the US, very few people use keiryu rods for bait fishing. Most choose keiryu rods to fish weighted nymphs and to handle larger fish. Some keiryu rods offer a distinct advantage for backpackers – collapsing to a shorter length than any tenkara rod.
Seiryu fishing, on the other hand, targets smaller species and is done in more placid streams. For those reasons, seiryu rods are generally softer than tenkara rods. They are not well suited to fishing heavily weighted nymphs or to big wind resistant flies. They can’t handle big fish. They don’t collapse to a short, convenient length. Why then, you might ask, would any backpacker be interested in a seiryu rod? How about a full fishing kit that weighs just 2 oz (57 g) – including the rod, line, tippet, flies and fly box? Interested now?
Which class of rod – tenkara, keiryu or seiryu is the best choice for you depends on where and how you will fish and what you will catch, and on which attributes are most important to you. Every rod is a compromise.
The rods that follow were chosen primarily for two criteria – weight and collapsed length, with lighter weight and shorter collapsed length being better. I have recently found a very nice rod that I like quite a lot, but it only collapses to about 43 in (109.2 cm). It’s not a rod for backpackers and it’s not on the list. Similarly, there is a very popular rod that weighs almost 4 oz (113 g). At that weight, it’s not on the list either.
Tenkara rods come in a variety of lengths, and both keiryu and seiyru rods come in an even greater variety of lengths. I have chosen the 10.8 ft (3.3 m) length to try to be consistent. Most tenkara anglers use longer rods, but longer is heavier. Plus, you can add fishing distance with a longer line – which weighs a lot less than a longer rod.
The choice of rod may depend on whether you are a fisherman who backpacks or a backpacker who fishes. The fisherman may choose a longer, heavier rod. I suspect many backpackers will want to save the weight and will gladly pack a shorter rod. Ounces add up. Only one of the rods that I’ve highlighted weighs over 3 oz (85 g) and many are closer to two (some are less than one). To some extent, the following list does reflect my personal preferences. It includes rods I like a lot and rods that I don’t particularly care for but which needed to be included to provide a more complete picture. There are many rods that are not included. There was a time when I was personally familiar with every tenkara rod sold in the US, but there are just too many now and new models are offered all the time it seems.
Tenkara rods are the standard – what most people have and what most people know. They were first on the scene and do offer advantages. Most tenkara rods are 11 ft to 14.5 ft (3.35 m to 4.42 m) in length when fully extended, around 20 in (51 cm) when collapsed, and have cork grips. There are (or were) exceptions to each one of those characteristics, but they describe most tenkara rods. Most tenkara rods are well suited to casting a light line and fishing an unweighted fly. Because of the soft rod tip required for casting a light line, most do not do well with heavily weighted flies. Tenkara rods are often rated by a 5:5, 6:4, 7:3 ratio that supposedly indicates what percentage of the rod is stiffer and what percentage is softer. I have not included those ratings here because not all companies use them and even among the companies that do use them they are not at all consistent from one company to the next. Including the rating without substantial additional explanation for each particular rod is more misleading than leaving it out. If a rod is particularly stiff or soft I have noted it in the description.
This is the granddaddy of backpacking tenkara rods. As far as I know, it is the first, last and only tenkara rod specifically designed for backpacking. The rod has been discontinued and is only rarely available on the used market, but is included out of respect and as a benchmark. The Hane is 10 ft (3 m) extended (the initial marketing materials showed 9 ft 10 in (270 cm) but my Hane measures 10 ft 2 in (310 cm)), 16 in (41 cm) collapsed and weighs 2.7 oz (77 g). The action is extremely stiff for a tenkara rod, but given that Ryan Jordan’s fishing kit when the rod was designed included split shot, the stiff action is quite understandable. Rods that collapse to a shorter-than-normal length, as the Hane does, also tend to be stiff. If you will be fishing with split shot or heavily weighted nymphs and want a cork grip on your rod, the Hane is still a very reasonable choice – if you can find one.

Daiwa NEO LT33SC collapses to 16 ¾ in (43 cm) which is short for a tenkara rod.
The NEO is Daiwa’s line of starter rods. They come in LL and LT versions, with the LL standing for Level Line and the LT for Level Line or Tapered Line. I’ll cover lines very briefly later, but tapered lines are almost uniformly heavier than level lines, and the rods designed to cast them are stiffer than rods intended for level lines. The NEO LT33SC is a relatively stiff rod, as tenkara rods go, but it is not as stiff as the Hane. Still, it would be a good choice if most of your fishing will be with weighted nymphs. One thing the NEO LT33SC has going for it is that when collapsed it is a relatively short 16 ¾ in (43 cm) (the only reason it made the list). Unfortunately, it’s a relatively heavy 3.5 oz (99 g). The NEO LL32SC is a full flex rod that is much better at fishing unweighted flies – the classic tenkara approach. It is quite a bit lighter than the LT model at 2.8 oz (79 g), but is a relatively long 19 7/16 in (49 cm).
The Enshou series are Daiwa’s premium rods. They are wonderful rods and would be worthy of consideration if you are a serious tenkara angler who backpacks rather than a backpacker who just wants to catch a few fish. The LT33SF is just a bit heavier than some of the other rods, at 2.7 oz (76 g) but the 18 in (46 cm) collapsed length is shorter than most.
This is the rod for the backpacker on a budget. At $75 it is a lot of rod for not a lot of money. It is neither as light, 2.6 oz (73 g), nor as short collapsed, 20 ½ in (52 cm), as many of the other rods but it will certainly get the job done.

The Nissin Pro Spec can be fished at two lengths, providing great versatility.
The Pro Spec is new this year from Nissin, one of the few Japanese tenkara rod companies that actually make their rods in Japan. One of the main features of the Pro Spec is that it is designed to be fished at either 10 ft 3 in (3.1 m) or 11 ft 9 in (3.6 m). That gives the ability to easily fish small brushy headwaters and also more wide open streams or beaver ponds. The collapsed length is a bit long at 22 ½ in (57 cm) but at only 2.4 oz (68 g) the rod is very light for a 11 ft 9 in (3.6 m) rod and lighter than many of the 11 ft (3.3 m) rods. The grip is a bit more aggressively shaped than most tenkara rods and is very comfortable. If the 22 ½ in (57 cm) collapsed length is not a deal breaker for you, this rod deserves serious consideration. .The Pro Spec 360 comes in both a 6:4 and a 7:3. Despite my comment that the ratios are not consistent, you can compare two rods of the same model. The 6:4 Pro Spec is a very soft rod. The 7:3 has quite a bit more backbone and would be suitable for larger fish. Still, if you will be catching 16 in – 20 in (41 cm – 51 cm) bruisers in larger rivers with fast currents you’d want a beefier rod.
The Zerosum 320 is the lightest true “tenkara” rod at this length, weighing in at only 2.1 oz (60 g). The light weight is unfortunately offset by a relatively long 22 1/8 in (56 cm) collapsed length. It is a very light, very responsive rod, though, and if you are fishing for relatively small fish in the headwaters, this is one to consider. Like the Pro Spec, the rod comes in 6:4 or 7:3. The 6:4 is a pretty soft rod. The 7:3 has more backbone but is not a big fish rod for large streams and fast currents.
If you crossed a tenkara rod with a trekking pole, this is what you’d get. If you already had or wanted to have the Yana trekking pole (the trek- part of this trek-kara pole) or the Gossamer Gear LT4 pole, which can be used with an adapter, the Clarkii might make good sense. I say might because I do not have first-hand experience with it. The Clarkii rod (not counting the trekking pole) weighs only 1.3 oz (37 g) and collapses to 20 in (51 cm), though, which in and of itself makes the rod a contender. There are very few comments on the net about the Clarkii, and even fewer that compare it to a regular tenkara rod. That’s not much to go on. I really don’t know what to make of a Yamame / Yana hybrid. I suspect it might be a mule – strong but sterile.
The Shimano LLS33NB and LLS36NB are Shimano’s entry level rods. One generally thinks an “entry level” anything is likely to be a cheapened stripped down version of the real thing, but this Shimano is a very nice rod. It is light at just 2.3 oz (65 g), has a wonderful action – crisp and responsive, and collapses to a shorter length, 19 9/16 in (50 cm), than any of the tenkara rods other than the Daiwas. The Shimano NB is definitely worthy of serious consideration.
The LLS33NX and LLS36NX are Shimano’s premium rods. Shimano does make two high end “zoom” rods, the “main stream” ZE and “mountain stream” ZL, which like the Nissin Pro Spec can be fished at two different lengths, but neither one collapses to a short enough length to seriously consider as backpacking rods. The NX rods, though, at 2.3 oz (65 g) and 19 3/4 in (50 cm) collapsed, are very nice rods. Considering the quality of the rod, the weight and the collapsed length, they are probably the nicest tenkara rods for backpackers.
The Tenkara 3.3 and 3.6 are starter rods from Shimotsuke, a rod company that is known in Japan but not well known here in the US. The rod is a good basic all around rod with a nice action. The rod is one of the more inexpensive rods with 2.6 oz (74 g) and 20 1/2 in (52 g) stats that are neither the best nor the worst. The rod is available separately or as part of a kit along with line, tippet, flies and a 0.7 oz (20 g) fly box.
Unfortunately, this rod has been discontinued. In order to get an 11 ft (3.35 m) Iwana you will have to buy the 12 ft (3.65 m) Iwana and also buy a replacement grip that will convert it into the shorter rod. At 2.3 oz (65 g) the 11 ft (3.35 m) Iwana is the same weight as the Shimano rods but its collapsed length of 20 ½ in (52 cm) is a bit longer. The rod comes with a hard case, which you’ll probably never take with you because of the extra weight. It also comes with the strongest warranty and cheapest replacement parts so if you are going to break a tenkara rod, break this one.
Keiryu rods vary much more widely than tenkara rods, ranging from under 6.5 ft to 20 ft (2 m to over 6 m). In general they are stiffer than tenkara rods and have a nonskid finish right on the rod blank rather than a cork grip. Although they are used primarily for bait fishing in Japan, some of them cast a tenkara line quite nicely. Because they do tend to be stiffer than the most tenkara rods, they will do better with a heavier level line or a furled line.
Why choose a keiryu rod rather than the better known tenkara rod? Most of the rods I outline below collapse to a very compact length and will easily fit entirely within even a modest daypack. Most are also available in shorter lengths and the shorter the rod the less it weighs. If you will be fishing smaller headwaters streams, you may not need a longer rod, and you might very definitely appreciate a lighter rod. If you will be fishing with split shot or with weighted nymphs, you may also appreciate a keiryu rod’s relatively stiffer rod tip.

Daiwa Kiyose 33SF excels at fishing weighted nymphs.
Just as the Hane was the first tenkara rod available in the US geared to backpackers, the Daiwa Kiyose SF was the first keiryu rod available in the US that appeals directly to backpackers. Like the Hane, it is a relatively stiff rod, perhaps a bit stiffer than you’d want or need for dry flies or unweighted wets, but it excels at fishing weighted nymphs. It can easily cast the heavier line you might want on windy high mountain lakes. It is just as good as the Hane at fishing with split shot or weighted nymphs but weighs less at 2.3 oz (65 g), packs smaller at 15 ½ in (39 cm), and will still slide into the shaft of your packraft paddle.
The Kozuka NT packs even smaller than the Kiyose at only 14 ° in (37 cm) when collapsed, and weighs the same at 2.3 oz (65 g). The tip cap has a clever built-in line holder so you don’t have to pack a separate tenkara line holder or pair of Fuji EZ Keepers. The rod is not quite as stiff as the Kiyose, making it a better choice for all around fishing. I think this is a nicer rod than the Kiyose and is a serious contender for the best backpacking rod.
Although the Kiyotaki comes in the same 11 ft (3.3 m) length as the Kiyose and Kozuka rods, only shorter lengths are readily available in the US (longer ones can be ordered). The 9 ft (2.7 m) rod is short for a tenkara rod. The shorter length makes sense if you will be fishing small, brushy headwater streams or Eastern streams that have a low canopy of overhead branches. With this rod you do not get the casting distance you do with any of the other rods outlined here, but you do get a 1.5 oz (43 g) rod that packs down to just 15 ° in (39 cm) and can get your fly into some of the tighter places that other anglers can’t fish. Like the other keiryu rods, the Kiyotaki is a little stiffer than most tenkara rods. The rod is a bit heavier than the sieyru rods, but is capable of landing much larger fish.
The Suntech Suikei is unique among the rods available in the US in that it is a three position zoom rod. The (stiff) notation is provided because it also comes in a softer version that is not currently available. It is designed to be fished at 10.5, 12, or 13 ft (3.2, 3.6, or 3.9 m). That provides extreme versatility in matching one rod to a wide variety of streams or mountain lakes. The cloud surrounding that silver lining is that the rod is heavier than most, is stiffer than most and is longer than most when collapsed, 2.8 oz (79 g) and 21 3/8 in (54 cm). The rod might be worth considering for its versatility, but it is not really what I think of as a backpacking rod. (I would consider a backpacking rod to be lightweight and a short collapsed length.)
Finally, we have the seiryu rods, which truly are specialty rods. They do not collapse to a short, convenient length, and they really are intended for relatively small fish. The only reason I’ve included them is that for the small wild trout you find in the headwaters, they are by far the most fun to fish with. Plus, of course, they weigh less than half what any of the tenkara rods weigh. If you want an ultralight fishing kit, and you will be backpacking to or through an area where the trout are generally just 7 in – 10 in (18 cm to 25 cm), and a 24 in (61 cm) collapsed length isn’t a deal breaker, they are worth considering.

A most memorable catch – 7 in fish.
The three rods I’ve listed here are really pretty similar. All are 9.5 ft (2.9 m) which is actually a reasonably good length for many of the willow choked small headwaters streams. All weigh just about one ounce. The biggest difference, other than the color of the paint, is the action. The Shimotsuke is a full flex rod, the Nissin is a mid flex and the Suntech is a tip flex. All are soft rods, though and all will do very well casting unweighted wets on a light line. I have fished small beadhead nymphs with them but they are better with standard wet flies. I really love these rods, but for backpacking I am a bit concerned about the 23 ½ in (60 cm) collapsed length. Depending on how much you are willing to sacrifice to save an ounce, you might find the length acceptable, and depending on how much you are willing to sacrifice to have an 8 in (20 cm) brookie give you a whale of a fight, nothing else might matter. One of the most memorable catches I’ve ever had was a 7 in (18 cm) fish on the very soft Shimotsuke “Just One the” Oikawa III – it wasn’t even a trout but boy did it fight. Fishing just doesn’t get much more ultralight than this.
Nissin Air Stage 290 23 5/8 in (60 cm) 0.8 oz (23 g)
Shimotsuke Oikawa III 290 23 5/8 in (60 cm) 0.9 oz (26 g)
Suntech Kurenai 30H 23 ½ (60 cm) 1.0 oz (28 g)

The Nissin Air Stage 290 is an incredibly light weight rod for small headwaters trout.
| Weight(oz) | Collapsed Length (in) | Action | Price* | |
| Tenkara Rods | ||||
| Backpacking Light Hane | 2.7 | 16 | stiff | Discontinued |
| Daiwa NEO LT33SC | 3.5 | 16 3/4 | stiff | $195 |
| Daiwa NEO LL32SC | 2.8 | 16 7/16 | soft | $195 |
| Daiwa Enshou LT33SF | 2.7 | 18 | $300 | |
| Fountainhead Stone Fly 330 | 2.6 | 20 1/2 | $75 | |
| Nissin Pro Spec 360 | 2.4 | 22 1/2 | soft (6:4 rod) | $195 |
| Nissin Zerosum 320 | 2.1 | 22 1/8 | soft (6:4 rod) | $270 |
| Ruta Locura Clarkii | 1.3** | 20 | stiff | $87** |
| Shimano LLS33NB | 2.3 | 19 9/16 | $185 | |
| Shimano LLS33NX | 2.3 | 19 3/4 | $275 | |
| Shimotsuke Tenkara 3.3 | 2.6 | 20 1/2 | $99 | |
| Tenkara USA 11′ Iwana | 2.3 | 20 1/2 | $157.95 + $39.95*** | |
| Keiryu Rods | ||||
| Daiwa Kiyose 33SF | 2.3 | 15 1/2 | stiff | $145 |
| Shimano Kozuka 33NT | 2.3 | 14 1/4 | stiff | $155 |
| Shimotsuke Kiyotaki 27 | 1.5 | 15 1/4 | $90 | |
| Suntech Suikei 39 (stiff) | 2.8 | 21 3/8 | stiff | $200 |
| Seiryu Rods | ||||
| Nissin Air Stage 290 | 0.8 | 23 5/8 | soft | $200 |
| Shimotsuke Oikawa III 290 | 0.9 | 23 5/8 | soft | $165 |
| Suntech Kurenai 30H | 1.0 | 23 1/2 | soft | $215 |
* Prices based on published sources. Believed to be accurate at press time but not guaranteed. ** Does not include weight (3.5 oz) or cost ($150) of trekking pole. *** To get an 11 ft rod you must purchase a 12 ft rod and a separate 11 ft grip.
Relive the exciting experience that is Philmont.
You don’t have access to view this content.
Solo-Backpacking the Sierra High Route – a remote expedition.
You don’t have access to view this content.
Relive the exciting experience that is Philmont.
You don’t have access to view this content.
Don’t lose hope – Backpacking is still possible with infants.
You don’t have access to view this content.
Dehydration is more than water loss – it’s about the salts too.
You don’t have access to view this content.
 Loading...