
You don’t have access to view this content.
2005 Lightweight Down Jackets Review Summary and Gear Guide Overview
We rate and compare the lightest down jackets on the market based on our measurements and their performance in the field.
We rate and compare the lightest down jackets on the market based on our measurements and their performance in the field.
You don’t have access to view this content.
A comfortable and lofty 14-ounce jacket with some nice features, but missing ultralight appeal.
The GoLite Cumulus Down Jacket weighs 14.1 ounces in a size L, has loft competitive with the best jackets on the market, and a few nice features for additional comfort; fuzzy hand warmer pockets and a warm, 2-inch high down filled collar. Other features include an elastic hem and cuffs, zippers on the pockets, and a full zipper in front.
|
Model Year |
2005 |
|
Style |
Full zipper jacket |
|
Weight |
Size men’s L tested. 14.1 oz (400 g) measured weight, manufacturer’s specification 14 oz (397 g) |
|
Shell Fabric |
15d micropolyester shell with DWR finish |
|
Loft* |
3.6 in (9.1 cm) double layer, measured |
|
Fill |
800 fill power goose down |
|
Features |
Single-quilt construction, full zipper, zippered hand warmer pockets, elastic cuffs, elastic hem, 2 in (5 cm) down filled collar |
|
MSRP |
$200 |
* Loft is a weighted average of maximum, double-layer torso and sleeve lofts. Torso loft is double weighted.
The GoLite Cumulus Down Jacket has easily handled the testing I have done this fall in the Arizona mountains. At temperatures down into the 30s, it was cozy in camp, and very warm as part of my sleep system, even with a wimpy sleeping bag that by itself was not comfortable below 50 degrees. With 3.6 inches of double layer loft, the Cumulus can comfortably be used at temperatures well below freezing – either as part of a sleep system, or layered with other clothing during the day. I found the relatively high (2 inches plus), well insulated collar to be a good addition to the warmth of the jacket, but with plenty of room to avoid feeling choked.
A couple of features on the Cumulus caught my attention; the elastic hem and the lined, hand warmer pockets. I was concerned that the elastic in the hem would be too constricting, providing less control than a drawcord hem. The hem was comfortable, but it did interfere with other layers; forcing other layers to be shorter than the Cumulus or to be tucked inside the jacket. One benefit of the elastic hem is that the jacket is less likely to ride up on you – the hem helps to keep the jacket in place if you lift your arms or otherwise move around. I am a fan of pockets on down jackets. Even though they add a bit of weight, I find the comfort and convenience of pockets well worth it in cold camps. The pockets on the Cumulus are very functional – insulated, lined with a thin but warm fleece and zippered to keep out the snow when necessary. I use them constantly, but would prefer pockets a little bit larger so they can be used more easily with lightweight gloves.
The shell fabric is 15 denier micro polyester with a DWR treatment. I had no problems with down leakage during the course of my testing. I encountered only light rains, which the DWR finish easily repelled. The full length front zipper is backed by a 1-inch down filled draft tube with a grosgrain stiffener to reduce zipper snags. I had no problems with the zipper, or with the draft flap during my testing. Although the shell fabric is light, it stood up well to off trail hiking. I took the Cumulus on a long, off-trail, early morning bushwhack up a streambed choked with willow and sycamore branches. The shell had no problems with snags even when I boldly pushed into thickets with the intention of stressing the fabric.

The GoLite Cumulus Down jacket has a warm collar and pockets to complement the 3.6 inches of double layer loft.
The size large test sample Cumulus weighs 14.1 ounces, just above the manufacturer’s specification of 14 ounces. This is a couple of ounces heavier than the leading competition, but the Cumulus does offer a few features not seen on those lighter jackets, such as zippered, lined pockets and an elastic hem. If you are looking for those features and are willing to trade a couple of ounces, the Cumulus may be a good choice. It is a well made and reasonably durable jacket and at $200 it is priced fairly.
Good combination of loft and features for a 14 ounce down jacket.
Of course I would like to see the Cumulus come in a little lighter and still keep its best features. Of the features on the Cumulus, I might give up the zippers on the pockets, and reduce the weight of the elastic hem – this might save an ounce or so – with only limited reduction in functionality.
Staff Favorites – Our gear picks from the 2005 hiking and backpacking season.
The sweat, the furrowed brows, the blank stares of concentration – all from our staff trying to narrow their “favorite” gear choices for the year down to just three. But, we forced ourselves, and list just three items of gear each that we’ve most enjoyed and/or depended on in 2005.
This isn’t an “Editor’s Choice” or a formal endorsement, just a list of gear we like.
Enjoy – and don’t forget to add your own 2005 favorites in the forum below! – Your BPL Eds
| Backpacking Light Staff Member | Favorite Pieces of Gear | ||
| Ryan Jordan | Backpacking Meal Gear: Backpacking Light Long Handled Titanium Spoon & 9×7 Aloksak | Bozeman Mountain Works TorsoLite | McHale Summit Pack |
| Carol Crooker | CW-X Sport Support Bra | Gossamer Gear pack Liner | Hennessy Hammock Adventure Racer |
| Vic Lipsey | Ibex Outback L/S Jersey | Inov-8 Terroc 330 | Long-Handled Titanium Spoon |
| Andrew Skurka | GoLite Jam | Montrail Masai | RBH Vapor Mitts |
| Ken Knight | Ibex Outback L/S Jersey | Nalgene Canteens | Spark-Lite Firestarting Kit |
| Jay Swan | Injinji Tetrasoks | Railriders Rampage Shorts | Montane Aero Windshirt |
| Jay Ham | BMW Stix Pro Carbon Fiber Trekking Poles | BMW Stealth 1 NANO (7×9) Catenary Ridgeline Ultralight Backpacking Tarp | Lite My Fire Spork |
| Will Rietveld | SummitShelters Evolution 2P Tent | Gossamer Gear Mariposa Pack | GoLite Feather-Lite Sleeping Bag |
| Don Wilson | Black Diamond Ion Headlamp | Montrail Hardrocks | Nunatak SkahaPlus |
| Doug Johnson | Tarptent Squall 2 | Bozeman Mountain Works Spin Poncho T-Lite | “Doug Ritter Special Edition” Photon Freedom Micro LED Flashlight |
| Stuart Bilby | Oware 11×11 Silnylon Pyramid Tarp | Pentax Optio WP camera | OR Zealot Jacket |
| Roger Caffin | Trangia Kettle | KT-26 shoes | Décor |
| Rick Dreher | REI-Komperdell Peak UL carbon fiber trekking poles | Princeton Tec Eos+Pilot | AquaStar Plus! UV water treatment |
|
|
Backcountry Meal Gear: Backpacking Light Long Handled Titanium Spoon & 9×7 Aloksak Backpacking Light Store |
In my quest to design the lightest titanium spork around, which is my first choice for my “SuperUltraLight” kits and when I’m on a backcountry fishing trek, I almost forgot what it was like to enjoy the 0.2 ounce penalty – and luxury – of a highly functional spoon. Being able to dig down into the bottom of a 9×7 Aloksak and extract the last bits of precious food without greasing the knuckles of my Possumdown gloves offers a great morale boost on the trail. The 9×7 Aloksak holds enough food for a hearty dinner and its odor-proof plastic and light weight means that it fits right in with my “simple, light, functional” philosophy of backcountry cooking. |
|
|
Bozeman Mountain Works TorsoLite Backpacking Light Store |
Breaking my lower back this summer in a skateboarding accident has meant that I’ve been avoiding my normal SUL 1.4 ounce torso sized closed cell foamie for ground sleeping and replacing it with the 10 ounce TorsoLite during the rehab period. This is not going to be an easy luxury to give up! The TorsoLite is still my first choice when reducing volume is more important than reducing weight. And for sleeping on snow, I don’t think twice: the TorsoLite is my primary pad for three-season alpine climbing bivies and when combined with a 60″ x 1/4” closed cell foam pad, the core component of my winter pad system. |
|
|
McHale Summit Pack www.mchalepacks.com |
I’ve never used another pack that has come close to the comfort of a custom-fit McHale. My 2400 cubic inch, 2-pound McHale Summit Pack has a packbag based loosely on the Subpop design, retains ultrathin 7000-series aluminum frame stays, and a wide hip belt. If uncompromising comfort, and not ounce-counting, is your gig, then give the McHale Summit a look. |
|
|
CW-X Sport Support Bra www.cw-x.com |
A lot of research and engineering went into the design of this bra including the 5-point inner cup Soft Support Web, which supports breasts during upward movement (most bras only provide support for downward movement). That’s all fine and good, but the reason I love this top is because it is so comfortable that I can wear it for four days and nights in a row and still not be itching to take it off, unlike any other bra or sport top I’ve ever worn. |
|
|
Gossamer Gear pack Liner www.gossamergear.com |
Takes a lickin’ and keeps on tickin’ and only weighs 1.2 ounces. Far outlasts compactor trash bags, and the medium size is just right for SuperUltraLight and ultralight packs. |
|
|
Hennessy Hammock Adventure Racer www.hennessyhammock.com |
You can’t beat the comfort of a hammock for sleeping (at least not without carrying a 2-pound sleeping pad) and no other commercially available hammock system beats the weight of the Adventure Racer. |
|
|
Ibex Outback L/S Jersey www.ibex.com |
Merino wool is the next best thing to growing my own fur. And it’s much easier to clean. This shirt stays cool for summer hiking, and is a perfect base layer for the other three seasons. Plus, low stink, high comfort, and only 6.9 ounces. |
|
|
Inov-8 Terroc 330 www.inov-8.com |
They just fit my feet well. At about 10 ounces, they feel as groovy as hiking naked . . . so I’ve heard. Love the light swing weight, plenty of traction, and the stock insoles actually feel great. With a sub-10 pack, these are just fun. I plan to try their Mudrocs next. |
|
|
Long-Handled Titanium Spoon Backpacking Light Store |
No more licking my hand after dinner! The extended reach makes digging rehydrated goop out of a Ziploc a joy. And I haven’t missed the fork points either. About half an ounce. |
|
|
GoLite Jam www.golite.com |
500 miles on the Colorado Trail and 6000 miles on the Sea-to-Sea Route, plus a few hundred miles more on a few shorter excursions. Who said lightweight packs aren’t durable? I had trimmed it down to about 15 ounces, and recently retired it for no other reason than the feeling that it should be retired after such a stellar performance. |
|
|
Montrail Masai www.montrail.com |
7800 miles of cushioned, blister-less walking. Highly breathable and quick-drying; external mesh is surprisingly durable. Will be replaced in ’06 by a better model. |
|
|
RBH Vapor Mitts Backpacking Light Store |
I can still count to 10 with my hands even after snowshoeing 1400 miles through Michigan, Wisconsin, and Minnesota during the first three months of 2005. Saved my hands; they are absolutely spectacular. And the new version is even lighter. |
|
|
Ibex Outback L/S Jersey www.ibex.com |
This 18.5 micron wool long sleeve shirt takes a licking and keeps on wicking. It provides comfort, warmth, protection, and stays stink free for days on end. It continues to remain exceptionally comfortable even when the weather gets quite warm. An all around fine performer that looks good and weighs 6.2 ounces (size S). |
|
|
Nalgene Canteens Backpacking Light Store |
I have found the versatility of the Nalgene wide-mouth canteens makes them exceedingly useful in all sorts of conditions from fast and light day hiking to extended backpacking treks. They provide a level of flexibility and security that I’ve never quite achieved even with Big Zip Platypus bladders though they do harken back to an earlier age before hydration systems became so popular. |
|
|
Spark-Lite Firestarting Kit Backpacking Light Store |
This fire starting kit can be used to ignite flames in emergency situations as well as normal conditions. I use the firestarter to ignite canister and alcohol stoves and can count on it working under a broad range of weather conditions that would challenge a regular match or lighter. In a time where traveling with really robust fire starters like REI Storm Matches can be problematic (e.g. flying) the Spark-Lite comes into its own. |
|
|
Injinji Tetrasoks www.injinji.com |
These socks have an individual pocket for each toe. While this looks like some kind of 70s-throwback product, the result is no blisters! I used to have a lot of trouble with blisters between my toes, and had to use BodyGlide or other inconvenient lubricants. With Injinji socks, these problems are a thing of the past. My first couple of pairs wore out really fast, but the ones I’ve bought recently have been quite durable. |
|
|
Railriders Rampage Shorts www.railriders.com |
The signature feature of these shorts is the four huge pockets. I use them for carrying gloves, a Buff, and windshirt. They work well as swim trunks too. |
|
|
Montane Aero Windshirt www.montane.co.uk |
The Aero weighs in under 3 ounces but provides a lot of functionality. Moving quickly, I’m reasonably comfortable down to fairly cold temps wearing just the Aero and a merino wool top. |
|
|
BMW Stix Pro Carbon Fiber Trekking Poles Backpacking Light store |
Super light and super stiff. While there are lighter trekking poles available, none give the same confidence when negotiating rough terrain. The carbon fiber shafts feel stiffer than my aluminum Komperdells, thanks partly to their one piece shaft design. They weigh a mere 5.4 ounces per pair, and the grips are super comfy. Don’t leave them lying around in the high country though. I left the poles behind while fishing a remote lake in the Weminuche Wilderness, CO only to find the soft grips reworked by some salt-crazed rodent. It didn’t ruin the poles, and they now carry the memories of that trip and a story whenever I use them, but it really soured my day when it happened. |
|
|
BMW Stealth 1 NANO (7×9) Catenary Ridgeline Ultralight Backpacking Tarp Backpacking Light Store |
I love sleeping under the stars, and the drier climate of the southwest lets me do it often. What I hate is carrying a tent or tarp that I never set up, especially if it adds much weight to my pack. I was given an opportunity to try out a prototype BMW Stealth 0 NANO tarp (6×8) and really loved the minimal weight and ease of set-up (great line tensioners). The fiber-reinforced Mylar film is incredibly lightweight (beating the weight of spinnaker by 40 percent) with little loss in strength. Abrasion resistance is not as good, but if set up and taken down carefully abrasion shouldn’t be an issue. After trying it out, I decided to go with the larger Stealth 1 because our infrequent rains can be quite ferocious when they come, and the extra protection is worth the ounce. |
|
|
Light My Fire Spork Backpacking Light Store |
This is not a spork! And that’s why I like them so much. My hat’s off to Joachim Nordwall who created a one piece eating utensil with fork, knife, and spoon that could replace the Lexan spoon I have carried for over 15 years (yes, the same spoon). What makes the Light My Fire Spork so great? The spoon and fork are on separate ends. Unlike a spork, you can eat soup or cereal without leaking liquid though the tines; or stab a particularly thick piece of rehydrated jerky using the longer tines of the fork without it slipping off. Great innovation. |
|
|
SummitShelters Evolution 2P Tent www.bigskyproducts.com |
At a fraction over 3 pounds, the SummitShelters Evolution 2P Tent is a roomy double wall two-person tent that provides two doors and two vestibules. Sure, there are lighter shelters available for two people, but when my wife and I go backpacking together, we want to share a fun experience. I’m the pack mule, and we bring a few luxuries, like the Evolution 2P. It’s easy to pitch, has large entry doors, has plenty of headroom and stowage options, ventilates well, and is storm worthy. It’s basically the same design as their single-wall Revolution tents, but is more stable in the wind because of its double wall structure. The Evolution 2P ($345 with carbon fiber poles, $260 with aluminum poles) is a great way to get extra protection and features for two without a serious weight penalty. |
|
|
Gossamer Gear Mariposa Pack www.gossamergear.com |
I’m the Packing Systems editor for Backpacking Light, so I have tested a lot of backpacks. Choosing my favorite is like deciding which one of my kids I love the most. There are several packs I really like, but if I had to choose one I would pick the Gossamer Gear Mariposa Pack ($130). Its carbon fiber stays weigh only 0.4 ounce each, and are removable. So is the sternum strap, and the padding in the shoulder straps and hipbelt. But the bottom line is that the pack weighs only 17.2 ounces with everything in, so there’s little incentive for me to lighten it down to bare bones. The Mariposa is just the right size for multi-day ultralight trips, and will comfortably carry a sizable load. It’s made of silnylon, so it is also a little more durable than the SuperUltraLight spinnaker fabric packs. The only drawback is the carbon stays can’t be bent to the curvature of your back, so the top of the pack hangs back. The solution I found is to fold my TorsoLite pad into fourths and slip it into the bottom part of the sleeping pad sleeve. This gives a thick lumbar pad that levers the top of the pack against my back. Gossamer Gear never loses sight of light, and the Mariposa Pack is a perfect example. |
|
|
GoLite Feather-Lite Sleeping Bag www.golite.com |
I discovered the GoLite Feather-Lite Sleeping Bag ($250) this summer while gearing up for SuperUltraLight backpacking. This bag is a “sleeper.” Its Pertex Quantum shell and 800 fill-power down are state-of-the-art. In my size, I found it to be 1.5 inches loftier than the manufacturer specifications (almost unheard of!). GoLite conservatively rates it at 40 °F, but by wearing my camp clothes inside I easily stayed warm down to freezing on mountain summer nights. There’s no hood or zipper, which suits me just fine. It comes in six sizes, so you can save some weight by choosing just the right size (length and girth). Shorter folks take note – getting the Feather-Lite in a size short is a great way to save weight and sleep warmer. |
|
|
Black Diamond Ion Headlamp www.bdel.com |
Even in summer, I’m awake in the dark; rising before dawn to get an early start, or reading maps and writing while lying in my bag at night. The Black Diamond Ion is a great combination of a wearable headlamp, light weight and reasonably good light – plenty good for camp use, but not as much light as you want for late night alpine descents. The Ion weighs 1.0 ounce with the battery. It uses a 6 volt battery that can last you weeks of summer use, but will not last nearly so long on cold winter nights. My Ion has never failed me and I suspect it will be with me for a long time to come. |
|
|
Montrail Hardrocks www.montrail.com |
Last spring I hiked the Southern California section of the Pacific Crest Trail. I wore Montrail Hardrocks for the entire trip and was very pleased with their performance. The Southern California section of the PCT is a long, hot hike. Footwear is crucial to every hiker; footwear and foot care were the most common topics of conversation while hiking through the mountains and deserts. The Hardrocks were just right for me – they kept my feet dry and cool but have enough support to protect my feet over many days of long, rocky hiking. I did develop a couple of blisters one day when I dropped over 8000 vertical feet over the course of 20 miles. But my blisters healed quickly and I had far fewer problems than most other hikers. Hardrocks were quite popular on the trail this year, and nearly everyone I talked to was pleased with their performance. Mine are still in good shape after at least 900 trail miles. It is likely that I will wear another pair on the PCT in 2006. |
|
|
Nunatak SkahaPlus www.nunatakusa.com |
For pure warmth per weight the Nunatak SkahaPlus is unrivaled as a jacket, in my opinion. At 10.6 ounces for a size large, the SkahaPlus provides an amazing 4 plus inches of two layer loft, plus a very warm, comfortable hood. It is devoid of features for convenience – no pockets, partial zipper, only the necessary drawcords. The baffled construction, light fabric and high quality down are totally focused on keeping you warm for the fewest grams possible. Its light weight and hood make it the perfect jacket for a sleep system, allowing you to downgrade to a lighter bag in cool or cold weather. I used a SkahaPlus while trekking and climbing in Peru this summer and just loved it – pricey at $325, but a great example of a jacket using the best and lightest materials available with no compromise in giving you the best performance for every ounce. |
|
|
Tarptent Squall 2 www.tarptent.com |
An update of an old favorite, the Squall 2 improves on the original in several areas. Headroom is MUCH better, a bathtub floor and extended beak keeps things drier in heavy rains and wind, and the option of using two poles in the front increases wind stability and makes entrances easier. Add these qualities to what I loved about my old Tarptent – full bug protection, stable catenary-cut design, excellent space to weight ratio, good ventilation, and ease of pitching – and you’ve got my new favorite tent. I’ve used mine from Washington to Newfoundland and it’s just fantastic. |
|
|
Bozeman Mountain Works Spin Poncho T-Lite Backpacking Light Store |
This poncho made its way into my sub-4-pound base pack this summer because of its amazing 6.2 ounce weight. However, I ended up loving the versatile design. The adjustable neck and side buttons keep the rain out and an elastic belt keeps it from flapping in the wind. When worn with a wide-brim rain hat, it is comfortable and offers full rain protection to the knees. When I was slammed with a crazy storm on an exposed ridge on the Long Trail in Vermont, the Spin Poncho kept me dry all day. I’ve found that I like it better than a rain jacket most of the time. When combined with an ultralight bivy, it becomes a well-rounded three-season shelter too! |
|
|
“Doug Ritter Special Edition” Photon Freedom Micro LED Flashlight www.equipped.org |
I love the Photon Freedom Micro. It’s brighter than a Black Diamond Ion, weighs only 0.22 ounce, runs over 10 hours on the battery, and has adjustable brightness levels (including four different flashers!). The Doug Ritter Special Edition ups the ante with a hard-to-lose yellow color and an LED tube that eliminates side scatter, helping to preserve night vision. The included clip adds a small bit of weight but allows you to clip the flashlight to a hat, shoulder strap, or belt loop for night hiking or organizing in a tent and it has proven to be very durable. This tiny wonder has made many of my other LED flashlights obsolete. |
|
|
Oware 11×11 Silnylon Pyramid Tarp www.owareusa.com |
Shelter for five with room to spare at only 3 pounds (1360 g) including pegs. The pyramid tarp was a pleasure to use in the Himalayas – fast setup, minimalist shelter that keeps snow and rain off without trouble. This is accommodation at under 10 ounces each that comes with standing room. |
|
|
Pentax Optio WP camera www.pentax.com |
I love this – a tiny digital camera, light and easy to handle, that I don’t have to worry about getting wet. It takes photos up to 1.5 meter underwater, so it can sit in my pocket on a rainy day without me worrying about it. Because it fits in any small pocket I catch those surprise shots that I would otherwise miss out on. The easy access means I take those glorious bad weather epic shots that prove it is not always sunny and warm on my trips. |
|
|
OR Zealot Jacket www.orgear.com |
A simple, no fuss Gore-Tex jacket. Only 8.3 ounces (236 g) for XL. A nice cut, I went one size larger than usual to fit over an insulated jacket. I remember the days when my waterproof breathable jacket weighed four times as much. |
|
|
Trangia Kettle www.trangia.se |
Let it be cheerfully admitted, the Trangia kettle at 190 grams (6.7 oz) is nowhere near as light as a cut-down beer can. However, my wife and I do a day walk each week if we are not away on a longer trip, and a big feature of our morning in the bush is stopping somewhere with a view for morning tea. The kettle boils, the water is poured out and the tea and coffee are made: that moment is special. It wouldn’t be the same with a beer can instead of our kettle. Anyhow, for day walks the extra weight doesn’t matter: a heavier pack just keeps us in training for longer trips. |
|
|
KT-26 shoes | These iconic shoes are an Australian special. They were first sold more than 25 years ago, and haven’t changed in that time. They sell in huge quantities all around Australia, are very cheap (about US$30), and weigh only 656 grams (23 oz) a pair. They have a curious pattern on the carbon rubber sole – extremely distinctive if you are into tracking, and quite pronounced lugs around the edge that grip very well on most things. The Australian manufacturer Dunlop doesn’t bother advertising them on their web site: they don’t need to as everyone knows the shoes. Needless to say, the heavy boot brigade are usually horrified at the thought of these lightweight shoes. |
|
|
Décor Cup | Décor is an Australian plastics company, and they make a range of plastic crockery. I guess you might call it picnic-ware. They are priced at the supermarket level – cheap. Anyhow, their plastic mug is very light – only 41 grams (1.5 oz), lasts very well, holds 250 mL or a standard ‘cup,’ doesn’t burn my mouth when filled with coffee, and they stack. Mine has been in use for morning coffee on trips for about 15 years: you can see the coffee stains. |
|
|
REI-Komperdell Peak UL carbon fiber trekking poles www.rei.com |
The wind ripped across the mountain-fringed lake straight into our Hex 2 teepee, making it flap and shudder all night. But the center pole never faltered, even though it had to be snugged upward as guylines loosened and stakes tugged in their moorings. Not bad for trekking poles. Pairing carbon fiber’s capabilities with collapsible convenience, the REI-Komperdell Peak UL poles excel on the trail and in camp. Their reduced weight compared to aluminum poles is immediately obvious, and carbon fiber’s inherent vibration damping qualities render so-called shock absorbers moot. Multi-section adjustability pays off three ways: tailoring length for steep up and downhills, stowing the poles on my pack without their jutting 2 feet above my head; providing the exact height desired when joined as a teepee center pole; as well as allowing late night adjustments without getting out of bed. The poles’ only downside is section locks that want to spin freely when tightening. Fortunately, once locked they stay that way on the trail. |
|
|
Princeton Tec Eos+Pilot www.princetontec.com |
Bright light, no city. Forming a dynamic lighting duo, the Princeton Tec Eos gives dazzling 1-watt Luxeon performance that’s made even better by effective current management. To expand on the Eos’ capabilities, I’ve added a red Pilot button cell light, also from Princeton Tec, to the headband. This gives me an amiable, night-vision friendly alternative to the bright white Eos. The pair sneak in at less than 4 ounces, with batteries. Speaking of batteries, a single set keeps both lights running an entire season of normal use. The competition is nibbling at the Eos’ heels, but haven’t yet caught it. |
|
|
AquaStar Plus! UV water treatment www.uvaquastar.com |
Ooooh, purdy blue glow! Not a filter and not a chemical mix, AquaStar Plus! is a high-tech water treatment alternative that inactivates biological contamination using ultraviolet light. Paired with the supplied bottle (other containers can be used as well) AquaStar treats 1 liter in about 80 seconds, so it takes all of 5 minutes to accumulate water for the evening’s camp. Because UV has proven lethal against viruses, bacteria, and protozoan cysts, AquaStar stands apart from chemical treatments and all but the rare purifier-class filters in efficacy, and it doesn’t alter taste. Debris, however, must be either prefiltered or somehow removed from the source water, and very cold water requires warming before treatment. A pair of CR123 photo batteries treats between 10 and 16 gallons of water (condition dependent). Added to the new Plus! model is an LED lantern feature, making it a pleasant bedside companion as well. AquaStar has been my surprise gear hit of the year. |
Full three-season (non-bomber) weather protection for one person for only 11.2 ounces including guylines and stakes.
The Gossamer Gear Spinnshelter is the lightest full-protection one-person shelter on the market. Sure, a spinnaker fabric poncho/tarp is lighter, and doubles as rainwear and pack cover, but it doesn’t provide full weather protection.
|
Manufacturer |
Gossamer Gear |
|
Year/Model |
2005 Spinnshelter |
|
Style |
One-person single-wall floorless shelter |
|
What’s included |
Shelter, stuff sack, 50 ft (15 m) of EZC spectra core (275 lb/125 kg tensile strength) line, four base line clips, setup instructions |
|
Fabric |
0.9 oz/yd2 (31 g/m2) high thread count spinnaker cloth, 70d nylon ripstop reinforcements, grosgrain tieout loops |
|
Weight |
Measured weight of shelter 8.8 oz (249 g), manufacturer’s specification 8.9 oz (252 g); measured weight of complete setup (shelter, base lines, guylines, eight 6-in (15 cm) titanium stakes 11.2 oz (318 cm), manufacturer specification 11.3 oz (320 g) |
|
Dimensions |
Length 86 in (218 cm), front width 55 in (140 cm), rear width 38 in (97 cm), front height 40 in (102 cm), rear height 23 in (58 cm) |
|
Area |
38.3 ft2 (3.6 m2) total, 27.8 ft2 main shelter, 7.5 ft2 front vestibule, 2.9 ft2 rear vestibule (2.6 m2 + 0.7 m2 + 0.3 m2) |
|
Features |
Catenary ridgeline, color coded front and rear grommeted pole connections, 10 stake out loops on sides, 4 stake out loops on ends, 8 inside loops for a clothes line or tent light, or attaching the optional bug canopy |
|
Options |
Titanium stakes, aluminum pole set, carbon fiber pole set, bug canopy |
|
MSRP |
$175 |
The Spinnshelter, as the name implies, is made of 0.9 oz/yd2 high thread count spinnaker cloth. There are a lot of different spinnaker fabrics available, and the trick is to find one that has the right balance of waterproofness, strength, and weight for use in a shelter. Gossamer Gear claims that their Spinnshelter fabric is equal to silnylon in its ability to handle wind stress and rain, with a significant reduction in weight.
In the standard pitch (edges to the ground) the protected area in the Spinnshelter is 38.3 square feet including the vestibules, and 27.8 square feet in the main section. That is as big as many two-person tents. I measured it and checked the math, and the area is there, but frankly it doesn’t seem that big. The angled walls and minimal headroom (40 inches at the entrance) limit the usable space and make it seem much smaller. It feels and functions like a one-person tent. In the raised pitch (three guylines on each side, edges raised above the ground), the Spinnshelter is distinctly roomier, and can provide shelter for two, but in that configuration it functions more like a tarp.
The beauty of the Spinnshelter is its ease of setup and numerous pitching options. One very clever feature is the use of base lines (a thin cord clipped between the corners, one at the front and one at the rear) to set the width of the shelter, making it easy to pitch in the standard configuration (full protection, with edges down to the ground). To pitch, simply lay out the shelter (front and rear ends are color-coded), stake the four corners while stretching out the shelter and base lines, lift the rear peak and attach it to a pole or stick and stake it out, lift the front peak and do the same. The Spinnshelter is designed to utilize trekking poles or sticks found on-site (optional aluminum or carbon fiber poles are available).

For a standard pitch (edges to the ground), the process is to lay out the Spinnshelter and stake the outstretched shelter (top left), then attach hiking poles (or on-site sticks) to raise the front and rear. The result is pup-tent-like shelter with minimal headroom (top right). Alternative pitches include raising the front with the rear staked down (bottom left), or raising both front and rear (bottom right). The latter pitches provide more headroom, but open the sides more like a tarp.
There is a vestibule on each end of the Spinnshelter. Each has two doors with a Velcro attachment in the center. The doors can be pitched fully open, fully closed, one side open, or in a beak configuration. To minimize condensation inside the shelter, it’s best to open the doors as much as the weather and bugs will allow. My favorite configuration is the rear doors completely open (or the top closed to produce a beak), and one front door open for easy entry/exit. To get more air circulation in hot weather the Spinnshelter can be pitched so the sides are raised above the ground. This gives a larger protected area and more headroom. It requires three short guylines on each side and two additional stakes.

Some pitching options for the rear doors include fully closed (top left), creating a rear vestibule; one side open (top right), both doors open (bottom left); or creating a beak (my favorite) with both doors half closed (bottom right).

Some pitching options for the front of the Spinnshelter include completely closed (top left), which creates a large vestibule; one door open (top right); or both doors open (bottom left). My favorite is staking one door beyond the centerline so that the other door is slack enough to easily fasten the Velcro closure when needed (bottom right), or open it up (top right).

Gossamer Gear provides spectra core cord for baselines and tieouts. The baselines at front and rear (top left) set the shelter width, making the standard pitch fast and easy. The front and rear of the ridgeline have grommets for attaching hiking poles (top right). The closure on each end consists of Velcro strips (bottom left). Side guyout loops are grosgrain sewn into the hem; the inside loops are attachment points for an optional bug canopy.
On cool nights during bug season, I closed the doors to keep the bugs out, and did not have any problems with mosquitoes coming in under the edges of the Spinnshelter. However, fully closing a single-wall tent is an invitation for heavy condensation. I opened the doors later in the night when it had cooled off enough to chase the skeeters away. For situations where bugs are a problem all night, Gossamer Gear has a mesh bug canopy available ($19, 3 ounces) that clips to loops inside the shelter. It drapes over the top of your sleeping bag and creates a protected vestibule around your head area. It works quite well, and can be left attached for repeated use during the bug season.

The bug canopy accessory for the Spinnshelter clips to loops inside the shelter and creates a vestibule around your head area. It has two pockets in the front corners to put a rock (or boot) into to extend the canopy. For exit, the front rolls up and ties at the red loop shown above my head in the photo.
I weathered a number of Rocky Mountain thunderstorms and overnight rains in the Spinnshelter, and it faithfully kept me dry and secure. As recommended by Gossamer Gear, I seam sealed the ridgeline with silicone sealer to ensure there is no leakage through the stitching. At least eight stakes are needed for a pitch secure enough to withstand normal winds (seven if you don’t stake out the rear vestibule). I went to ten stakes during the monsoon season so I could also stake out the middle of each side.
I found the Spinnshelter to be wind stable in “normal” breezy/windy conditions. Its catenary ridgeline helps to obtain a tight pitch and reduce flapping in the wind. The pointed vestibule on each end helps to deflect the wind; it’s a good idea to point the rear of the shelter into the wind. Gossamer Gear recommends the Spinnshelter for sub-alpine use, or alpine use by experienced ultralight backpackers. Our Pacific Northwest Editor found out what that caution means. Camping at timberline, he encountered winds estimated at 45 mph, which resulted in the front pole connection being torn loose. That unfortunate experience indicated the upper limit of the Spinnshelter’s wind stability. In our estimation, the Spinnshelter is adequately strong and wind stable for normal backpacking conditions, assuming it is properly set up and secured, and used as recommended. However, don’t treat it like a bomb shelter, because it’s not.
The condensation situation in the Spinnshelter is the usual drill for a single wall tent. The warm, moist air from your breath hits a cool surface (the tent wall) and produces condensation, just like car windows on a cold day. The trick is to maximize ventilation as much as conditions permit – the more ventilation, the less condensation. It’s best to have both ends of the tent somewhat open so air can circulate throughout. Condensation is unavoidable in some situations (like a rainy night, or a calm/humid night where it cools down later), so it’s a matter of not brushing against the wet tent walls. I frequently packed up the Spinnshelter while wet on both the outside and inside, and carried it in a mesh side pocket of my pack. The following evening it dried out quickly after I set it up.
The Spinnshelter provides full three-season weather protection for only 11.2 ounces complete with guylines and stakes.
Offer a two-person version of the Spinnshelter, and offer more options like a sewn-in floor and no-see-um netting in both ends. This is starting to sound like a Tarptent, but why not borrow a few ideas from Tarptent? To make the Spinnshelter stronger for withstanding wind, sew a strip of grosgrain into the ridgeline seam.
Minimal features and prone-to-abrasion-damage spinnaker fabric make this the lightest 2000-cubic inch backpack on the market.
The 2000-cubic inch Gossamer Gear Whisper Uberlight backpack is sized to accommodate ultralight overnight or multi-day SuperUltraLight loads. It is the lightest weight 33-liter pack commercially available. It beats out its nearest competitor, the Mountain Laurel Designs Prophet 30, by a fraction of an ounce by eliminating all “luxuries” except for one – a front bellows pocket.
|
Manufacturer |
Gossamer Gear |
|
Year/Model |
2005 Whisper Uberlight |
|
Style |
Frameless, top loading, roll-top closure |
|
Volume |
2000 ci (33 L) |
|
Size |
One size, fits 18 – 22 in (46 – 56 cm) torso |
|
Weight |
3.5 oz (99 g) measured weight (3.9 oz/111 g with shoulder pads inserted); manufacturer’s specification 3.7 oz (105 g), foam shoulder strap pads add 0.2 oz (6 g) each |
|
Fabrics |
0.96 oz/yd2 (33 g/m2) spinnaker ripstop nylon, limited use of 210d 4 oz/yd2 (136 g/m2) urethane-coated nylon double ripstop |
|
Features |
Front bellowed spinnaker fabric pocket, shoulder straps can accept unused clothing for padding, removable foam inserts for shoulder straps, roll-top closure secured by hook-and-loop tabs, four grosgrain loops along each backpanel/side seam |
|
Volume To Weight Ratio |
571 ci/oz (based on 2000 ci and a measured weight of 3.5 oz without shoulder strap pads) |
|
Comfortable Load Carrying Capacity |
15 lb (6.8 kg) estimated maximum comfortable load an average person can carry all day in this pack. Manufacturer specifies maximum load carrying capacity of 15 lb (6.8 kg) |
|
Carry Load to Pack Weight Ratio |
68.6 (based on 15 lb and Backpacking Light measured weight of 0.219 lb) |
|
MSRP |
$99.99 |
The Gossamer Gear Whisper Uberlight pack is designed to provide enough volume for lightweight overnight or multi-day SuperUltraLight trips (or day hikes from a base camp) at a minimum of weight. The Whisper Uberlight is the lightest weight pack for the volume you can buy, beating out the Mountain Laurel Designs Prophet 30 by a few tenths of an ounce. Gossamer Gear succeeds by using very light spinnaker fabric and leaving out most features. The pack is very simple, consisting of a packbag with roll top closure, shoulder straps that can have foam pads or unused clothing inserted, and a single front pocket. It doesn’t have a hipbelt or haul loop, but it does have eight grosgrain loops sewn into the seams where the backpanel and sides are joined. A bungee or cord can be threaded through the loops to attach something to the front or sides of the pack (like a Gossamer Gear Thinlight pad, see photo below), or to compress the pack. I didn’t miss the hipbelt most of the time – at recommended maximum loads of 15 pounds I didn’t need one. In fact, it was freeing to be able to slip the pack on and off without unbuckling anything, and my waist didn’t get sweaty as it usually does under a hipbelt. A hipbelt would have been nice when I was carrying extra water (bringing total pack weight up to 18 pounds), and when I was scrambling down a rock and deadfall choked canyon and the pack slid up onto my head when I bent double to maneuver through a tight spot.

I also tested a Gossamer Gear Whisper Uberlight pack modified with mesh side pockets on the Black Forest Trail in Pennsylvania. Note the small pieces of duct tape marking abrasion damage from a rough plane ride inside an old duffel bag.
The wide shoulder straps are the Whisper’s best feature. The shoulder straps distribute weight over a large area and make a big difference in comfort on the occasions when extra weight (e.g. water) is carried. We rated the comfortable load carrying capacity of the Uberlight at 15 pounds as compared to the 12 pound rating we gave both the Mountain Laurel Designs Prophet 25 and the Fanatic Fringe Alpine Trail. The Whisper Uberlight shoulder straps are 3.5 inches wide as compared to about 2 inches for the Mountain Laurel Designs and Alpine Trail packs. Of course “comfortable” is very subjective and many people will have a higher tolerance for carrying weight in these small packs.
The shoulder strap webbing adjustment buckles are sized too narrow for the shoulder strap webbing, making adjustment difficult. I “solved” this problem by rarely readjusting the straps after the initial fitting. Ryan Jordan solved this problem easily enough by replacing the buckles with slightly larger ones, a modification that requires no sewing and only a trip to your local Fastex supplier.
A minimum of features and very lightweight (0.96 oz/yd2) fabric keep the weight of the Whisper Uberlight under 4 ounces. The spinnaker fabric is surprisingly resistant to puncture, but prone to abrasion and is weaker where it is sewn. After testing, my sample pack has just a tiny scuff in the spinnaker fabric on the bottom, and three small spots where the fabric is ripping away from where it is sewn. One spot is where the Oxford nylon at the top of the pack is sewn to the spinnaker, but more troubling, the fabric is starting to rip away from the bar tacks on both shoulder straps. The bar tacks finish the tops of the hook-and-loop strips used to open the shoulder straps for pad insertion. A close inspection reveals that the bar tack stitches are too closely spaced and cut into the fabric. A looser grouping of stitches and/or some added fabric for reinforcement should help. (Click here for suggestions on how to increase the durability of the Uberlight where it is stitched.) Another sample pack that was modified by Gossamer Gear with side pockets is in worse shape. The rips above the bar tacking are much more pronounced. Additionally, the pack developed numerous abrasion-caused holes after I inserted the fully loaded pack into a duffel bag and carried it onto an airplane rather than checking it – all to protect it. The interior seams on the duffel are rough and rubbed through the Uberlight in various spots – see above photo
The Whisper is at the extreme low end of industry durability for packs and requires the attention and careful gear handling habits that come with experience and practice. Ryan Jordan has used the same Whisper pack for more than 120 days in the backcountry of Montana and Wyoming. He is confident that he could do a typical through hike with a Whisper, but qualifies it: ‘If you can deal with the minimal abrasion resistance of the fabric, you also need to understand the load carrying capacity of this pack and not exceed it – seam failure due to over packing will be your enemy.’
The spinnaker fabric backpanel left the back of my hiking shirt soaked with sweat, more so than a backpanel of some absorbent – and heavier – material would have. I’m not suggesting that Gossamer Gear change the fabric of the backpanel, just noting a trade off inherent in the extreme light weight of this backpack.

Uberlight pack floating in West Clear Creek, Arizona during pack liner/dry bag testing. Note the wide shoulder straps and Oxford cloth partially covering the bottom and back of the pack.
The Whisper Uberlight volume (2000 ci/33 L) is just right for ultralight and SuperUltraLight overnight or multi-day trips. It contains all the needed gear – except possibly an extra sleeping pad that can be strapped to the outside. The pack is relatively wide with a shallow depth (12″ x 5.25″ as compared to the more square shape of the Fanatic Fringe Alpine Trail, which is 9.5″ x 8.5″). The pack doesn’t extend far from your back and is narrow enough to make it fairly easy to slip between rocks and horizontal, vertical, and slanted uprooted trees during descents down debris choked canyons. The pack shape keeps gear close to your back.
I missed a side water bottle pocket – a half-height pocket that a water bladder can be plucked out of without removing the pack. If Gossamer Gear adds a half-height pocket, it is likely that another pocket will be needed on the other side to balance the load. That would bring pack weight up and probably cause the Whisper Uberlight to be de-throned as lightest 33-liter pack. Is the added weight worth it? It depends on whether you think the convenience of on-the-move hydrating is worth the weight penalty.
The Gossamer Gear Whisper Uberlight is the lightest 2000-cubic inch/33-liter pack on the market. It is also the only SuperUltraLight pack with wide shoulder straps, which enable it to carry heavier loads more comfortably than SUL packs with narrow shoulder straps.
This pack is stripped to the bare essentials and, other than replacing the shoulder strap webbing adjustment buckles with larger ones and making changes to the bar tacks on the shoulder straps, the only improvement I can think of that won’t affect weight, may not be possible… yet. Replace the spinnaker fabric with a fabric that is just as light but more abrasion and slip resistant, and is stronger when sewn. My other recommendations will increase the weight of the pack and I’d recommend offering them as options. Add a half-height side pocket, replace the spinnaker backpanel with an absorbent material, and offer a version constructed of more robust material.
We found a “sleeper” – the Feather-Lite has 1.5 inches more loft than specified.
The Feather-Lite is a hoodless, zipperless, summer weight down mummy bag using state-of-the-art materials. It’s available in six different sizes, so short or thin people can save weight and stay warm.
|
Year/Model |
2005 GoLite Feather-Lite |
|
Style |
Hoodless, zipperless mummy bag |
|
Fill |
800-fill goose down |
|
Loft |
Measured loft 4.5 in (11.4 cm) total with about 2.5 in (5 cm) of loft on top of the sleeper; claimed loft 3 in (7.6 cm) |
|
Manufacturer Claimed Temperature Rating |
40 °F (4 °C) |
|
Weight |
Measured weight 19.8 oz (561 g); manufacturer’s specification 20 oz (567 g); stuff sack 0.6 oz (17 g) |
|
Sizes |
Medium length, regular girth tested; available in six sizes: three lengths (short, medium, long), and two girths (trim, regular) |
|
Fabrics |
Shell is 20d Pertex Quantum with Shield DWR, lining is 22d polyester (1.2 oz/yd2, 41 g/m2) |
|
Features |
6 in (15 cm) baffles, elastic drawcord collar, baffled foot vent, 2 hang loops, silnylon stuff sack, cotton storage bag |
|
MSRP |
$250 |
The Feather-Lite is a no-frills, ultralight, summer-weight, mummy-style sleeping bag. It has no hood or zipper, just an elastic drawcord that snugs the bag at your neck. It requires a hat or balaclava to keep your head warm, which allows those items to do double-duty. The only extra this bag has is a baffled foot opening to stick your feet through and increase ventilation when needed.
Especially for short or thin people, one way to save weight (and sleep warmer) is to get the exact size sleeping bag you need. GoLite offers the Feather-Lite bag in six different sizes: three lengths (short, medium, and long), and two girths (trim and regular). Most other manufacturers’ bags are available only in regular or long lengths, and one girth for each.
The medium length, regular girth bag that I tested had 1.5 inches more loft than the manufacturer’s specifications and the weight was right on the money (at least for current GoLite catalogs, older catalogs list the weight 4 ounces higher than actual weight). This is a bit unusual for GoLite because they are usually right on with their specifications. Loftier than the specification sounds like a “sleeper” to me!
Let me say up front that I have nothing but praise for the GoLite Feather-Lite sleeping bag. It is not the absolute lightest 40-degree rated sleeping bag to be found (sleeping quilts, top bags, and bags with ultra-thin shell fabrics get that honor), but its design and state-of-the-art materials optimize performance, weight, and durability.
The outer shell of the GoLite Feather-Lite is Pertex Quantum, considered by many to be the best shell fabric currently available. It is soft, durable, water-repellent, breathable, and downproof. I found the claims to be true, but emphasize that water-repellent means just that. With extended exposure to water, the fabric wets through and the bag gets damp. I had this happen several times while sleeping in a bivy or under a tarp in rainy weather.
For the cool night conditions under which I tested the Feather-Lite, I have no reservations about the bag’s hoodless, zipperless design. The issue for me most of the time was keeping heat in, not venting off excess heat. The bag is easy to slip into and out of, so that was not an issue. I liked not having to mess with a zipper and hood.
Most of my bag nights were below the Feather-Lite’s temperature rating. That was intentional; the bag was used as part of a SuperUltraLight backpacking system, where my base pack weight was less than 5 pounds. My technique was to use a minimal bag, and wear clothing inside as needed to extend the warmth of the bag. It worked beautifully, and I had no problem extending the Feather-Lite down to 30 °F wearing micro-fleece long johns and an insulated jacket. The 62-inch shoulder girth (in the size tested) was just right to allow room for extra clothing without being too loose or too tight.

The Feather-Lite has an elastic drawcord closure that seals around the neck like a gasket (top photo). To reach for something, all I had to do was stretch the drawcord (second photo). The bag’s baffled foot vent (third photo) allows you to cool your feet when needed, and increase ventilation through the bag to exhaust excess heat. With six sizes available, it is easy to size the bag for a good fit and allow room to wear extra clothing inside to extend the bag’s warmth (bottom photo).
One simple feature I really liked is the bag’s elastic drawcord closure for the top opening. It allowed me to snug the top of the bag around my neck like a gasket to seal heat inside, yet I could stretch the cord with my arm to reach outside the bag to get something (see photos above).
The bag’s foot vent is sealed with overlapping baffles. On one warmer night (55 °F) I tested the foot vent and found that it ventilated through the bag fairly well. The obvious alternative for really warm nights is to sleep partially out of the bag, then slide further in as the temperature drops. On colder nights, I did not have a need to use the foot vent for ventilation, and was happy to find that it does not create a draft or cold spot. Basically, the feature is there to use when you need it.
There are a lot of factors that affect a bag’s warmth, not the least of which is the shelter system used. For example, sleeping under a tarp with a nighttime convectional breeze is a lot different than sleeping fully enclosed in a double wall tent. I used the Feather-Lite with several different shelter systems and clothing systems, and had no problem staying warm below the bag’s rating by adjusting the amounts of clothing worn inside.
Missing from this review (and for all sleeping bag reviews published here, for that matter) will be an assessment of whether or not the sleeping bag performs adequately at temperatures near its manufacturer-reported temperature rating. Click here for the complete Backpacking Light Position Statement on Sleeping Bag Temperature Ratings.
GoLite uses state-of-the-art materials and a minimalist approach to hit ultralight backpacker’s needs squarely on target with the Feather-Lite bag, and it’s available in six different sizes (three lengths x two girths) so most people will find a good fit.
A 30-degree version of this bag would be really nice; just add a little more down. A nitpick: one of the hang loops could be eliminated to save a few grams.
You won’t see this one in stores, or on the Mountainsmith website yet. We take a first look at a super comfortable and well designed alpine/snow sport backpack; a precursor to our full review.
At 54.1 ounces, the 2014 cubic inch (size Regular) Mountainsmith Fusion 35 is by no means a featherweight, unless you consider what it was designed for. The Fusion is a high-end alpine/snow sport top loading pack with design elements to comfortably and conveniently carry skis, poles, snowshoes/snowboard, ice axe, and avalanche gear. The extra weight is devoted to equipment specific attachments and appropriate reinforcements with Hypalon and heavier fabrics.
In the world of lightweight snow sport packs, the weight of the 54.1-ounce Fusion is comparable with other similar volume packs. The Osprey Switch 25+5 weighs in at 65 ounces, the Granite Gear Contrail at 58 ounces, and the GoLite Delirium at 43 ounces.
The Mountainsmith Fusion 35 is currently being reviewed, and a full report will be available as soon as we get some decent snow for final testing. I have taken it on several day hikes, one SuperUltraLight overnighter, and traipsed around the yard with skis and snowshoes attached to get a feel for how it might perform under its intended purpose. This is one of the most comfortable small volume packs I have used. The dual density shoulder straps, hip belt, and backpanel padding are very soft and supple, conforming well to my contours. Attachment options for snow sport equipment appear convenient and secure. The pack has great overall compression and a single stay to control the load. Look for our full review later this winter after we test the Mountainsmith Fusion on the slopes.
Reader submissions of spreadsheet files used for trip planning and gear lists.
How do you use a spreadsheet program to plan for a trip?
What follows are the reader entries for the BackpackingLight.com contest to crown THE BEST GEAR LIST SPREADSHEET.
Using a spreadsheet compatible with either OpenOffice or Microsoft Excel, create a spreadsheet “template” or “application” that can be adapted for any season, any trip, that anyone can use to help plan their gear and supplies.
All submissions will be juried by their peers in the BackpackingLight.com forums (forum thread below). Winners will be selected by the BackpackingLight.com staff.
1st Prize: $100 Gift Certificate to BackpackingLight.com
2nd Prize: $50 GC
3rd Prize: $25 GC
Click the thumbnail screen shots to see larger versions.
|
|
Alice P. Neuhauser Download spreadhseet Attached you’ll find our version of a Gear Spreadsheet. Please note that this is a modified version of work done previously by Carol Corbridge and others (our sincere thanks goes out to them for their generosity in sharing their spreadsheets…). Also note that this is in no way an ultralight list — it is a simply a template. As “newbies,” we have a loooong way to go to reach our load-reducing goals, but we realize it is both a journey and a process; we’ll make progress each & every trip. Hope that this template is of help to others, as Ms. Corbridge’s was to us. Happy trails |
||
|
|
Garen Szablewski Download spreadhseet Attached is my submittal for ” THE BEST GEAR LIST SPREADSHEET ” contest. |
||
|
|
Channing Sze Download spreadhseet The attached spreadsheet is quite rough, but I don’t have time to pretty it up. I’m not intending to win, just thought I’d share some ideas that others may not have thought of.
kind regards |
||
|
|
Kim Clements Download spreadhseet (no text) |
||
|
|
Marc Valley Download spreadhseet Attached is my submission. |
||
|
|
David King Download spreadhseet #1, Download spreadhseet #2, Zip file containing David’s spreadsheets Here’s the equipment list I’ve developed for my own use. I can dump everything I own (or want) into the list and the subtotal it for specific trips and uses. I’ve included one with all my stuff in it and one with most things removed so that it can serve as a template. Weights where shown are real. It utilizes several features hardwired into Excel: AutoFilter – menu is Data/Filter/Autofilter – These are the little drop down arrows in row 7, the title column. This allows the user to restrain a multi-colum list based the contents of one column. It’s a cheap and cheerful way of making the worksheet behave as a database. You can customize the filter (select Custom) but a limitation of the autofilter function is that you can only use two values at a time. Subtotal – The subtotal formula is used in Column 5, Rows C and D to calculate weight. Subtotal works in conjunction with the Autofilter feature. It calculates only those rows that are visible. These two cells calculate the total weight of the rows below in pounds and ounces. Select “Bpl” from the drop down list in cell B7 of “BackpackList01”, for instance, and it calculates my winter weight list. Validation – Validation (Data/Validation/Allow:List is applied to all the cells in colum B. This constrains the contents of the cells in that column to the items in the list B1 – B4. It prevents the user from incorrect entries in collumn C (leading space, space at end, etc.) It supplies a drop down list of correct choices whenever you’re in a cell in the column. You can, of course, have a much longer list of allowable entries. Outlining – I use outlining to simplify navigation and to make small corrections to weight calculations. Some headings have total calculations in column F. After I weigh the individual items that go into a stuff sack, for instance I weight the total and, if there’s a difference between the total weight and the weight calculated in column F for that heading I enter a correction in Row D for that stuff sack. Got that? Outlining is not essential for this worksheet because I don’t subtotal on outlines. Freeze Panes – menu Window/FreezePanes – keeps the upper part of the worksheet visible at all times. Other notes – Some items are in the list twice on purpose. I might, for instance wear a pair of socks and take an extra pair so one is part of personal clothing and other is basic pack weight. Column E, like column B, is used to label items. But unlike column B it is not constrained to certain values. You can use any label you want. I use it to compare the weight of alternative kits – like raingear that uses a poncho compared to using a rain jacket, for instance. Users will have to know how to insert and delete rows in excel and use outlining. Don’t insert rows at the top or at the end of the list because they might end up outside the calculalation range of the subtotal function. Pretty geeky, but I use it every trip to generate a checklist. I mull over the gear I’m going to take and then use the autofilter function and print it up. I’m 56. If I don’t use it I forget stuff. I also print and fill out the worksheet entitled Meals for meal planning for the same reason. |
||
|
|
David Lewis Download spreadhseet #1, Download spreadhseet #2, Download spreadhseet #3, Zip file containing all David’s spreadsheets Here are my entries for the spreadsheet contest. There are 3 excel files included… Sheet 1 Sheet 2 Sheet 3 I’m attaching both the loose files and a ZIP archive of the files in case the loose files don’t come through properly. There is more I would have liked to do, but any further improvements would have involved using macros which would have a) taken a lot of time for me to learn and b) might make users uncomfortable… i.e. afraid of malicious code. May the best list win :) Cheers |
||
|
|
Dave Johnston Download spreadhseet #1, Download spreadhseet #2, Zip file containing all David’s spreadsheets Attached is a copy of the gear list spreadsheet I have developed for my own use and as an entry in the contest. Two files are attached: one is blank (except for some sample data in the Pack tab) and ready to be downloaded and used by someone else. The other one is already populated with my own gear data and most recent selections. This should serve as a sample of how anyone can fill in the blanks with their own gear and weight data, make selections, create a printed report, etc. When the file is loaded into Excel you will proably get a warning about macros, depending on the security level you have set in Excel. Ironically, the spreadsheet doesn’t actually contain any macros, but it does contain radio buttons, which Excel apparently considers to be using code. If your security level is set at medium, you can go ahead and let it enable the “macros”. Even if the security level is set to high, which disables macros, the radio buttons still seem to work. If they don’t work, change the security level to medium. As far as I can tell, this is a classic Microsoft bug embedded in Excel. Both files include a page with instructions on using the spreadsheet. They provide a method to allow weight entry in either grams or ounces, selectable by the user. Even though this approaches the level of an “application” that you have in mind, it is still pretty easy to pick up and start getting useful results; but of course I’d appreciate any feedback on how to make it as user friendly as possible. I’m looking forward to seeing the comments and suggestions from the forum. Please let me know if anything else is needed. |
||
|
|
Luke Ludwig Download spreadhseet Attached is my submission for the BPL Gear List Spreadsheet CONTEST. Enjoy! |
||
|
|
Al Tong Download spreadhseet Attached is my entry for the gear list contest. This is a simple Excel spreadsheet that utilizes the Excel pivot table function to summarize and tabulate the gear data. As sent, the spreadsheet contains 3 tabs; pack list, gear inventory and BPL data. The 3rd tab is not necessary. I only used it to populate the gear inventory tab with data from the BPL web site. This spreadsheet is designed to inventory your gear AND create pack lists. It is trip specific and allows you to select gear from your inventory. In the Gear Inventory tab, select your gear by insert a trip name next to the item. If you are not taking the item, leave it blank. Once all your gear is selected, go to the Pack List tab and generate the new pack list. Right click inside the data and choose Refresh data. Check Cell B1 and make sure your Trip is selected. If not click in the drop down arrow, select your trip and click OK. Try this out and have some fun with it. Writing instructions is not my forte, so contact me if you have any questions. Regards |
||
|
|
Jim Wood Download spreadsheet Attached is an entry for your spreadsheet contest. It’s an updated version of an Excel model that I’ve used for several years. To make it easier for others to try, I’ve cleaned it up a bit and added some instructions and usage notes on the first worksheet tab. The model uses a simple flat file Excel database with each gear item recorded as a separate record (row) in the list. As you’ll note, there’s also backup data for some of the entries (those shown with blue hyperlinks). From this database list, a variety of reports can then be generated using built-in Excel’s Pivot Table functions. Aside from offering a lot of flexibility, this reporting approach also eliminates the need to manipulate live data when creating different views of the gear list. A subset of my own gear collection is included in the model to serve as sample data. The file also includes two sample Pivot Table reports-one in English units (ounces and pounds), and one in metric units. In addition, I’ve done a bit more testing with the new version of Open Office (V2.0) and have added a couple of comments on the “Instructions” page about that testing. |
|
Mike Moccia Download spreadhseet Real basic but works well for me. I just rename in for the trip and edit away. I really like the bar chart to give me a visual of were the weight is going. The password to remove protection is, what else, backpack. Cheers and thanks for the contest. |
|
|
Dick Matthews Download spreadhseet #1, Download spreadhseet #2, Zip file containings Dick’s spreadsheets Thank you the contest provided the incentive to update and add to my existing list. I am looking forward to seeing new ideas. |
||
|
|
Vick Hines and Joshua Mitchell Download spreadhseet We (Vick Hines and Joshua Mitchell) are submitting our “Gear Decision Matrix” spreadsheet for the spreadsheet contest. Details / Introduction have been included in the first tab of the spreadsheet Thanks! |
||
|
|
Don Ackley Download spreadhseet #1, Download spreadhseet #2, Zip file containing all Don’s Spreadsheets Good afternoon. I hope I made it under the 12/1/05 wire for contest entries. Attached are two Excel documents for your consideration. (See attached file: my gear list template 120105.xls)(See attached file: my three season gear list 120105.xls) The first, labeled “my gear list template 120105” is a blank spreadsheet ready for personal gear entry. Users simply enter each item of their own gear in the appropriate category and its weight in ounces. The spreadsheet then adds up the weight of the gear in each category, converts it to pounds, and add each category total to the successive subtotals and grand total. If a user doesn’t have an entry for each type of gear, the line can be left blank or deleted. Additional lines can also be inserted. This template may provide more built-in analysis than some users will want, but I find it useful to know my base weight for a particular outing or seasonal gear collection, the weight of my consumables (which vary with the length of the trip or the distance between resupply points), and my “skin out” weight. The second, labeled “my three season gear list 120105” is a sample of the spreadsheet I prepared for a recent 9 day hike on the AT in North Carolina and Georgia, with one resupply point. If you print out either document, you will see they are formatted to print as two pages side by side on a single landscape-oriented page. If the print is too small that way; you can reformat to print on two portrait oriented pages. Hoping you find my spreadsheet interesting and that others might be able to use it. |
||
|
|
Ryan Faulkner Download spreadhseet I dont know if this is what you are looking for, I have never used spreadsheet software before, but here you go. |
||
|
|
John Shannon Download spreadsheet template #1, Download spreadsheet template #2, Zip file containing both John’s files. Attached is my submission for the contest in template files for Excel and NeoOffice (mac version of OpenOffice) [Editor’s Note: An X-Windows implementation of OpenOffice also exists for the Mac OS X if you would rather the native X application instead of the NeoOffice Java counterpart]. I have no idea how it will act in Excel, but it works great in NeoOffice. Instructions for Mac Users using NeoOffice: 1. Type in title, context of trip, items and comments. Type over the words items and comments as they are only there to remind you what those columns are for. Then save your gearlist. 2. Type in weights in red area. For example, if only grams are known, type the amount in the red area and press enter. When the ounces conversion appears in column H, type that amount in the red area of column J. This is done so the formulas of columns H and I are not deleted. 3. In the green area type a 1 for each item being taken on that particular trip. Leave the 1 for each category or they will not be seen after the filter is run. 4. Click on the drop down menu of cell A4 and click on 1 to show only the items being taken. 5. While holding down the command key, click on the A, J, and K to select those columns. Under the format menu, choose column and hide to hide those columns from final printing. |
||
|
|
Meir Gottleib Download spreadhseet, Zip file of Meir’s spreadhseet Pack List – Gear list based on the 3-season checklist at backpackinglight.com. Includes a summary for base pack weight and full skin out weight. Food weight is carried forward from the Menu. The Categories column is a droplist of available categories from the Gear Closet. The Item column is a droplist based on the Category selection. Items in the droplists can optionally be filtered to include only items specially marked in the Gear Closet. Weights are automatically populated from the weights in the Gear Closet and adjusted for Quantity. Menu – Tool to plan menu selection for backpacking trip. Includes summary of weight and nutritional information. Like in the Pack List, the Menu items are selectable based on Categories from the Pantry. Weight and nutritional information is automatically populated from the Pantry and adjusted for Servings. The Menu weight is carried onto the Pack List as a component of consumable weight. Additionally, there is an input box on the Menu for Food Days. Gear Closet – Provides an inventory of all available gear for selection in the Pack List. All item descriptions and weights are entered in the Gear Closet page. Weight can be entered in grams or ounces as specified in the Options page. Pound and kilograms will calculate based on the weight entered. The Category column is a droplist of available gear categories which is configurable in the Options page. The Gear Closet has been seeded with about 600 items. Much of this data is from the backpackinglight.com Gear Guide. The Visible column specifies whether or not items are visible in the Pack List dropdown menus when filters are turned on in the Options page. Pantry – Provides an inventory of all available food for selection in the Menu. All food descriptions, weights, and nutritional information are entered in the Pantry page. All weights entered in the Pantry are in grams regardless of the units specified in the Options page since that is the standard for Nutritional Information labels. Like in the Gear Closet, the Visible column specifies whether or not items are visible in the Menu droplists when filters are turned on in the Options page. Options – Contains various parameters for the display of information in the spreadsheet. Weight and energy units are selectable. As is the format in which pounds and kilograms are presented. Options are available to limit the food and gear choices available to those specially marked in the Pantry and Gear Closet respectively. Additionally, available food and gear categories are configured in the Options page. |
||
|
|
Ben Tomsky Download spreadhseet Hello fellow backpacker, Attached is my planning spreadsheet. As I am in Europe for business, unfortunatly I’m not sure if this is going to make it by the deadline. I tried to calculate the time for end of day in California, but then realized that maybe that’s too late for your timezone. I hope you can accept it. Some notes to consider: Comments on cells, named cells, and named lists are used extensively. All weights are in ounces unless stated otherwise. Macro Ctrl+ D formatts cell to number with three decimal places. That is the only custom macro. Thanks for considering my submission, |
Lofty, light, warm, and durable for its weight – although it does lose a few feathers at the seams.
The Western Mountaineering Flight Jacket packs a lot of loft and a few nice features into an 11.5-ounce (measured, size large) package. It hasn’t changed much since being introduced a couple of years back. Is it still among the leaders in ultralight down jackets?
|
Model Year |
2005 |
|
Style |
Full zip jacket |
|
Weight |
Size XL 13.0 oz (368 g), size L 11.5 oz (326 g), size M 9.9 oz (280 g) Backpacking Light measured; manufacturer’s specification 10.5 oz (298 g) |
|
Shell Fabric |
0.9 oz/yd2 (31 g/m2) taffeta shell |
|
Fill |
850 plus fill power goose down |
|
Loft* |
3.7 in (9.4 cm) double layered, measured |
|
Features |
Sewn through construction, full front zipper, elastic cuffs, elastic drawcord hem, handwarmer pockets, down filled draft tube, down filled collar |
|
MSRP |
$225 |
* Loft is a weighted average of the maximum double layer loft in the torso and sleeves. Torso loft is double weighted.
The Western Mountaineering Flight jacket has been my constant companion in cold weather over the past couple of seasons. I’ve subjected it to desert sands and cactus, high mountain climbing, weeks of hiking on the Pacific Crest Trail, and a lot of cold nights in my sleeping bag. About the only thing I haven’t done to it is have it out in a lot of heavy rain. I’ve been cursed with good weather most of the time.
The Flight jacket packs 3.7 inches of loft into an 11.5 ounce package. I’ve been very comfortable wearing this jacket on many occasions with temperatures below 25 °F. Under those conditions I usually wear a light base layer and a synthetic vest, such as the Patagonia Micro Puff vest, under the Flight jacket. That’s a very warm combination for low exertion times such as early morning and late evening. The draft tube and collar on the Flight are generously stuffed with down and are significant additions to warmth under windy conditions. Like most down jackets, the shell of the Flight jacket is essentially windproof, although wind can enter through the bottom if the drawcord is not adjusted.
I’ve used the Flight jacket as part of a sleep system regularly for the past couple of years. The warmth of the Flight translates very well into a sleep system. I have used the Flight with a very low loft sleeping bag (40-50 degree bag) and ventured down well below freezing. My feet get cold, but the rest of me stays toasty. In Peru this summer, the Flight jacket performed nearly as well as the Nunatak Skaha Plus in our sleep systems, primarily losing out because it lacks a hood. Other jackets tested on that trip were not as warm or comfortable as these two jackets. The light, comfortable fabric and lightweight, low bulk zippers on the Flight add to comfort in a cramped mummy bag.

The author and his daughter, jacket testing on a cool morning at 15,600 feet in the Cordillera Vilcanota, Peruvian Andes. Ausangate (20,948 ft) in the background. The author (right) in the Flight jacket and stylish Peruvian hat.
The Flight jacket uses sewn through construction, with large, lofty down chambers sewn 4 to 5 inches apart. These large down chambers are important to the loft and warmth of the jacket. The jacket is impeccably built and has been surprisingly durable in heavy use. I took the Flight along on a 5 week trip on the Pacific Crest Trail this year, using it every night to sleep in, or as a pillow. It was subjected to a lot of sand, rock, dirt, and sweat; I took care of the jacket, but I did not baby it. It still looks as good as new. Even the 0.9 oz/yd2 taffeta shell, which is not a ripstop material, has held up very well.
The fit of the Flight jacket leaves room for layering beneath the jacket, which I have done frequently, but it is not overly roomy. Sleeve length is generous and articulation is good. The Flight jacket has an angled cut on the bottom hem, covering about 5 more inches in the rear than in the front. The extra rear coverage is an important contributor to warmth in a sleep system, preventing cold lower back syndrome.

The rear coverage of the Flight jacket is good, especially for such a light jacket on a tall frame (the author is 6’4″).
Other features on the Flight jacket add to comfort and warmth, without adding much weight. The collar is 3.5 inches high and is generously stuffed with down. The collar was a significant contribution to overall warmth on cold, windy days and on very cold nights while sleeping. The shell fabric is a very light and comfortable 0.9 oz/yd2 taffeta. It has a smooth, tight weave, and like most taffeta fabrics, a slight luster to its surface. As stated above, the shell has withstood a lot of use and looks great. It is normal for down products to leak some down through the fabric, but I have noted regular leakage through the exterior shell, especially very close to the seams; not enough to be a serious issue, but more than I have seen in other test jackets.
The Flight is not meant to be used as an outer layer in inclement weather, so I always carry a layer that I can wear over it in the event of cold, wet weather. I found the elastic hem drawcord easy to use and cinch up tightly when needed. There are two drawcord pulls, one on each side. The handwarmer pockets do not have zippers and are lined with down on the inside and outside. The pockets are large enough for use with moderate sized gloves. With an MSRP of $225, the Flight jacket is not among the least expensive lightweight down jackets, but given its high loft, low weight, well chosen features and good performance in the field, it is worth a few extra dollars over most other competitive jackets. It will remain a part of my gear list for the foreseeable future.

The author in the Flight jacket at the southern terminus of the Pacific Crest Trail. Mexican border fence in the background.
With 3.7 inches of loft at just over 11 ounces, including a full zipper and nice warm pockets, the Western Mountaineering Flight jacket offers a unique combination of lightweight performance and comfort.
There is not much to complain about with this jacket. I frequently use a stuff sack with my lightweight jackets, and always appreciate it when they are included with a jacket. A stuff sack would be a welcome addition, if included. If Western Mountaineering could add a very light, removable hood, the Flight jacket would perform even better in a sleep system.
The MontBell Down Inner Jacket is only $139, but lacks the loft of the leading jackets.
The MontBell Down Inner Jacket is designed as a middle layer, offering more warmth than the MontBell U.L. series jackets, but still weighing just over 12 ounces.
|
Model Year |
2005 |
|
Style |
Full zip jacket |
|
Weight |
Size men’s L tested. 12.3 oz (349 g) measured weight, stuff sack 0.5 oz (14 g), manufacturer’s specification 11.4 oz (323 g), size M |
|
Shell Fabric |
30d Ballistic ripstop nylon shell |
|
Fill |
725 fill power hypoallergenic goose down |
|
Loft* |
2.6 in (6.6 cm) double layer, measured |
|
Features |
Single-quilt (sewn-through) construction, full front zipper, elastic cuffs, Chameece micro-fleece lined handwarmer pockets, Chameece lined collar, two interior drop pockets, stuff sack |
|
MSRP |
$139 |
* Loft is a weighted average of the maximum double layer loft in the torso and sleeves. Torso loft is double weighted.
I’ve had the MontBell Down Inner Jacket in a variety of conditions this year; Arizona desert mornings, Utah slickrock canyons, and high altitude trekking in the Peruvian Andes. Although MontBell states that the Down Inner jacket is intended as a middle layer, I mainly used the jacket as an outer layer in good to moderate weather. When the weather got wet one afternoon in Peru, I put a shell on after a few minutes when the jacket began to soak through at the shoulders.
When testing several jackets this summer, the first thing I noted about the Down Inner jacket was its loft. With 2.6 inches of loft, it fits neatly in the mid-range of jackets with similar weights, with about an inch less loft than the leading jackets. The warmth performance was borne out in cool temperatures where this jacket was not as warm as the Western Mountaineering Flight, GoLite Cumulus, or Nunatak Skaha Plus. As you would expect, its performance in a bivy is similarly impacted – warmer than the MontBell U.L. series jackets, but not as warm as the higher loft jackets. I found the diagonal quilting of the jacket to be attractive, as did others who saw the jacket and commented on it. But the volume in each down chamber is reduced by the large number of seams inherent in this construction technique.
One real plus of the Down Inner Jacket is the price tag; with an MSRP of $139 this jacket will set you back considerably less than most other jackets in this category. In combination with the low price, the feature set on this jacket is more complete than most other competitive jackets, making it a very good value. It has a full zipper in front, which is backed with a down-filled storm flap and grosgrain stiffener. The hem and cuffs are terminated with light and comfortable elastic closures. Two roomy hand warmer pockets are lined with Chameece micro-fleece on the outer side of the pocket. MontBell has also added two large, unzipped storage pockets to the interior. These are suitable for carrying water bottles or other large items, but with an unzipped top opening you have to be careful not to lose items. The collar is 2 inches high, lightly insulated and lined with comfortable Chameece.
The shell fabric is 30-denier ballistic ripstop nylon. After several months of use, the jacket is holding up well and shows no signs of wear on the fabric. The fabric is quite windproof, which was noted in comparative testing of jackets on windy passes during my trip to Peru. In these tests the Down Inner Jacket performed similarly to the Western Mountaineering Flight Jacket in keeping out the wind, and did a little better than the Nunatak Skaha Plus. I have not noted any down leakage, even with repeated trips in and out of the stuff sack. The overall construction finish is good, with even stitching and finished seams throughout the jacket. The fit leaves plenty of room for layering, but is almost too roomy for me. The torso and sleeve lengths are good, but the jacket would be more efficient with less bulk in the torso. This jacket is roomier than any other size large jacket in its category – something to keep in mind depending on your frame size and intended use of the jacket.

Left Image: The MontBell Down Inner Jacket stuffs nicely into the included stuff sack – which makes a great pillow. Right Image: The cut and fit of the jacket are comfortable and leave plenty of room for layering.
The MontBell Down Inner Jacket has a great price ($139) and feature set for a 12 ounce down jacket.
Increasing the loft of this jacket while maintaining its features would be the most beneficial improvement. A less roomy cut could allow for more down (and loft) while maintaining the overall jacket weight.
The lightest down jacket on the market.
The MontBell U.L. Down Inner jacket is the lightest down jacket on the market. MontBell has kept the design simple and materials lightweight to create a full front closure down jacket weighing less than 7 ounces in size medium.
|
Model Year |
2005 |
|
Style |
Full front snap closure jacket |
|
Weight |
Size men’s M tested. 6.6 oz (187 g) measured weight, manufacturer’s specification 7.4 oz (210 g) |
|
Shell Fabric |
Down specific 15d Ballistic Airlight hollow fiber nylon shell |
|
Loft* |
1.6 in (4.1 cm) double layered, measured |
|
Fill |
2.1 oz (60 g) of 725 fill power hypoallergenic goose down |
|
Features |
Single-quilt construction, snap closure, elastic cuffs, DWR treatment |
|
MSRP |
$140 |
* Loft is a weighted average of maximum double layer lofts in the torso and sleeves. Torso loft is double weighted.
I tested the MontBell U.L Down Inner jacket in a variety of conditions: desert high country in the fall and spring, southwest canyon country in the spring, and the Oregon dunes in early summer. Temperatures were moderate and rain was mild. The jacket hits the design mark of a very lightweight, warm layering piece. At around 7 ounces, it’s easy to justify throwing it in the pack for a little extra around-camp, and bag rating boosting warmth.
Features are kept to a minimum with a snap front closure, non-adjusting elastic cuffs, and a drop tail – no pockets. The design is carefully thought out. Sewn through baffles vary in size and shape so that the jacket fits the body. The stand up collar, an area that could have easily been neglected, thoughtfully has two baffles and two snaps to keep collar and down in place and your neck warm. Articulation is fair; the bottom hem lifts about an inch when arms are raised parallel to the ground, and 3 inches when arms are raised overhead – but the U.L. Down Inner is long enough to prevent a breezy gap between pants waist band and jacket bottom even when reaching overhead.
The shell fabric is 15-denier Ballistic Airlight nylon, which MontBell claims is more abrasion resistant and has a higher tear strength than other similar weight nylon fabrics. The Ballistic nylon is created by heating and stretching nylon fibers so that the nylon molecules in each fiber align and the fibers become stronger. I did not experience any damage to the shell fabric in the course of testing, even after a minor amount of bushwhacking. The tight weave of the fabric helps to keep prickly things from catching in the fabric. DWR and the tight weave kept the Ballistic nylon from wetting out even after 40 minutes in a light sprinkle.
Construction quality is good, with finished inside seams and even stitching. When I first saw the jacket, I was concerned about the durability of the small plastic snaps on the front closure. The snaps are attached to a strip of grosgrain ribbon, which adds a bit of stiffness and strength. I have not babied the snaps and none have pulled out or loosened during the test period.
Our medium sample MontBell U.L. Down Inner jacket weighs 0.8 ounces less than is specified for a size medium, and some of the baffles are a little flatter than others. This is one case where I’d prefer that an item not weigh less than specified. With that said, the U.L. Down Inner is warm and cozy and very light. It’s the jacket I pack when I’m expecting lows of around 40 ºF.
The MontBell U.L Down Inner is the lightest down jacket on the market.
MontBell’s concept for the U.L. Down Inner series is to: “make the lightest and warmest insulation layer available.” They’ve hit their mark. I miss a zipper at times, but it would add weight – unneeded weight since the jacket is nice and warm as a mid layer under a wind jacket – as it’s intended to be used.
What a conundrum! The upgraded pack has some great improvements, and is now an outstanding value, but (darn it) it’s also heavier.
Internal frame backpacks now have “model years” just like cars – there are incremental changes each year, and a makeover every 3-5 years. The popular Osprey Aether 60 was last updated in 2003. It gained some features and weight, to the chagrin of some backpackers who relished its light weight and simplicity. For a while the previous model was sought after because it was a few ounces lighter. The Aether 60 is updated again for 2006, and again it advances in features and weight. This review details how much weight the 2006 Aether 60 gains and whether the new features are worth it.
|
Manufacturer |
Osprey Packs |
|
Model |
2006 Aether 60 |
|
Style |
Internal frame, top loading, drawstring closure, floating top lid |
|
Volume |
Size M tested: 3700 ci (61 L) |
|
Weight |
4 lb 0.1 oz (1.82 kg) measured weight; manufacturer’s specification 3 lb 15 oz (1.79 kg) |
|
Fabrics |
Main body is 210d double ripstop and 210d oxford, wear areas are 420d oxford and 500d Kodra, pockets are two-way stretch woven nylon with Lycra, backpanel surface is 840d power mesh |
|
Features |
Floating top lid with two connecting straps, 6-inch extension collar with drawstring closure, zippered floating top pocket with key clip, two side and three front compression straps, two stretch-woven side pockets with top and side openings, stretch-woven front pocket, two ice axe loops, two ski loops, two front accessory straps, 3-liter hydration sleeve with two ports, haul loop, load lifters, hipbelt stabilizers, sternum strap |
|
Volume To Weight Ratio |
57.7 ci/oz size L (based on 3700 ci and a measured weight of 64.1 oz) |
|
Comfortable Load Carrying Capacity |
35 lb (16 kg) estimated comfortable load for an average person carrying the pack all day |
|
Carry Load to Pack Weight Ratio |
8.73 (based on 35 lb and a measured weight of 4.01 lb) |
|
MSRP |
$199 |
It’s an understatement to say that the Osprey Aether 60 (and Ariel 60 for women, now the Ariel 55) is a popular lightweight backpack. The beauty of the Aether 60 is that it’s just the right size, loaded with useful features, very comfortable to carry, very durable, and lightweight. When a new model comes out it gets a lot of attention. So, what are the changes, and how do they translate into comfort and convenience on the trail?
In brief, the changes from the previous version are: the top pocket is better fitted, an internal hydration sleeve and hose ports have been added, the peripheral frame rods are now 7075 aluminum instead of delrin composite, the backpanel is a nubbed foam that ventilates better, outside pockets are a stretch-woven fabric instead of mesh, and the hipbelt is custom molded to the user and is removable. It sounds like the Aether 60 just got a lot better. Well, mostly yes, but read on to get the analysis. There is one upgrade that is not necessarily better, I have a few nitpicks, and then there is the issue of added weight…
Frame and suspension changes are by far the nicest upgrades to the Aether 60. The peripheral delrin composite strut has been replaced with a 7075 aluminum alloy rod for more strength and durability. The bottom of the each rod fits into a sleeve connected to the hipbelt stabilizers, and the rigid top loop fits into a tight sleeve. These stiffer peripheral rods combined with an internal HDPE framesheet create a frame that is capable of carrying a substantial load, yet is still flexible enough so the load lifters and shoulder straps effectively pull the top of the pack to your shoulders for a body hugging fit.

The most important changes to the Aether 60 are in the frame and suspension (top left). The peripheral composite frame rods have been replaced with strong 7075 aluminum rods, the Airscape backpanel has foam nubs faced with a durable mesh for better ventilation, and the underside of the shoulder straps is spacer mesh (top right). Another big upgrade is the addition of Osprey’s Bioform custom moldable hipbelt to the Aether series (bottom left). Both the hipbelt and shoulder harness are removable (bottom right) and available in sizes so your dealer can fit you with a combination of pack, hipbelt, and shoulder harness sizes.
Contoured shoulder straps on the new pack are 0.5 inch narrower than the previous version, which is not necessarily an improvement. The underside of the shoulder straps is now spacer mesh for more ventilation. The sternum strap has a sliding adjustment on each end, and incorporates a whistle. The Airscape backpanel is firm closed-cell foam that has projections (nubs) at a 0.5-inch spacing that stick out about 0.25-inch toward your back. It’s faced with 840 denier power mesh for durability. I really liked the improved ventilation and resistance to sliding.
The biggie is the addition of Osprey’s Isoform CM heat-moldable hipbelt to the Aether pack series. While the hipbelt on the previous Aether 60 was sewn-in, the Isoform CM hipbelt is removable, and adjustable with a Velcro attachment behind the backpanel. It has to be removable for the custom bake-to-fit service at your local dealer. The process is to remove the hipbelt, place it in a special Osprey oven (at about 125-150 degrees) for about 10 minutes, put it on your hips and hold it tight for about 10 minutes while it cools, then put it back on the backpack. It’s an outstanding personalized feature, and it really works to increase the hipbelt contact area and make it fit perfectly. Another feature on the hipbelt that I really like is that the tightening straps work on a pulley principle, where each strap doubles back through another buckle. Both straps pull toward the center to provide precise tightening.
Fitting the Aether 60 is easy with Osprey’s Velcro-attached shoulder harness and hipbelt. The pack’s torso length can easily be lengthened or shortened by sliding your hand between the Velcro panels and moving the shoulder harness or hipbelt up or down. Additionally, both the shoulder harness unit and the hipbelt come in sizes, so they can be interchanged to fit the user. For example, a person can get a medium pack with a large shoulder harness and/or hipbelt, or vice versa.
Turning to features on the packbag, the addition of an internal 3-liter hydration sleeve will delight many backpacking enthusiasts. It has a hose port on each side and an elastic hose sleeve on each shoulder strap. The floating top pocket on the new Aether 60 is better fitted than its predecessor, and its zipper now has one slider instead of two. The bottom of the packbag has two ice axe loops and two ski loops.
The pack has two side compression straps plus three front compression straps that combine to provide good load control and volume adjustment, and lots of options for external attachment. The three straps on the frontpanel connect to a flange that can be used to cradle snowshoes, snowboard, tent, sleeping pad, or tall stuff sack of gear mounted vertically. In addition, there are two accessory straps near the bottom for attaching even more gear to the outside of the pack.
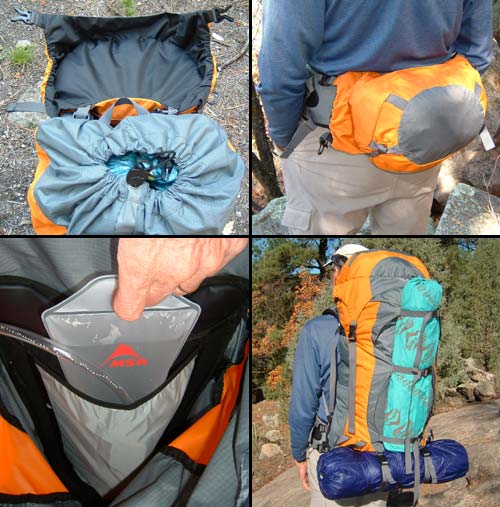
The top pocket on the new Aether 60 is better fitted to cover the top of the pack (top left). Removing the hipbelt and top pocket creates a nice lumbar pack for taking day hikes from camp (top right). A 3-liter hydration sleeve has been added (bottom left). The exterior has lots of attachment straps for securely carrying gear on the outside of the pack (bottom right).
Since the hipbelt is now removable, one can remove both the hipbelt and top pocket and combine them to create a lumbar pack for day hikes from camp. It takes a few minutes to assemble and disassemble, but is worth the effort. (Tip: the Velcro hook panel under the backpanel snags the fabric on the inside of the hipbelt, so protect it with your hand as you pull the hipbelt out.)
One item that is missing is hipbelt pockets, which are becoming increasingly popular on backpacks. Another thing I missed was a convenient place to mount my digital camera. I resorted to attaching it to the surface of the hipbelt using safety pins. In my opinion, hipbelt pockets and a case for a compact digital camera or MP3 player are very useful features and a good way to impress potential buyers.
Now for the change that I am less excited about. The outside pockets (two on the sides and a larger one on the front) have been changed from a durable mesh to a stretch-woven fabric. When the pack is empty they indeed look impressive compared to the previous old-technology mesh pockets. However, when the pack is stuffed full of gear, the pockets are way too tight. They have half the capacity of the old mesh pockets, and are very difficult to reach into with your hand. The side pockets are especially tight, making it laborious to insert and remove even a slender water bottle. Don’t get me wrong, I like the stretch-woven fabric, the pockets just need to be bellowed out more so they have good capacity when the pack is full.

The outside mesh pockets on the old Aether 60 (left) are voluminous, capable of holding a lot of gear (even a 2-liter bottle in a side pocket) within easy reach. The stretch-woven outside pockets on the new Aether 60 (right) are much smaller and very tight when the pack is stuffed full of gear. Even a slender 1-liter water bottle is a tight fit in a side pocket.
So, what’s the weight penalty for all of these improvements? By Osprey’s numbers it comes to 7 ounces more weight compared to the 2005 model (7.5 ounces by our scale, based on a size medium). That’s almost a half pound (12%) heavier. I have mixed feelings about that. On the one hand I acknowledge that most of the upgrades make it a better pack, but on the other hand I wish the changes were weight-neutral, or close to it. I hate to see the weight of a favorite pack escalate higher and higher. Compared to the previous Aether 60, the volume to weight ratio has dropped 7.3 cubic inches per ounce of pack weight. Strictly speaking, the Osprey Aether 60 no longer makes our list of lightweight internal frame backpacks; at 57.7 ci/oz it is below our cutoff of 60 ci/oz. We opted to review it because of its legendary superb fit, comfort, and weight-carrying capacity (read my comments below). In comparison, the GoLite Galaxy pack recently reviewed by Backpacking Light has a volume to weight ratio of 79 ci/oz and is also a superb internal frame pack.
When I backpack with my wife I morph into a lightweight backpacker, leaving my ultralight backpack at home and carrying about 25 pounds that includes extra luxuries. Being a pack mule and carrying extra weight keeps me from getting out 100 yards ahead, and makes me more humble and sociable. I carried the Aether 60 on numerous mountain and desert trips, on-trail and off-trail, in a variety of weather conditions. Besides family trips, I used it on section hikes where I carried as much as five days of food, and also for cold weather trips where I carried more volume and weight.

The new Aether 60 conforms to my back well. It was very stable for off-trail backpacking, like this steep descent to a wilderness lake during a September rain/snow shower. I found that I didn’t need a pack cover for light rains.
The Osprey Aether 60’s claim to fame is its size and comfort. At 3700 cubic inches (size medium) it is a perfect size for lightweight backpacking. Not too big, not too little. It allowed me to conveniently organize my gear. I like to put rainwear in the top pocket and frequently used items in the other outside pockets. Its fit me like putting on a jacket, and the pack weight became part of me. The load levelers really work to pull the top of the pack to my shoulders. With proper adjustment of the suspension system I could easily place most of the weight on my hips. I often didn’t use the sternum strap, except where I needed more lateral stability.
To determine the pack’s maximum comfortable load-carrying capacity (my estimate of the amount of weight an average person can carry in the pack all day) I assessed the pack’s structural load capacity and suspension comfort (see Quantitative Analysis of Backpack Suspension Performance by Ryan Jordan). I tested the Aether 60 with up to 45 pounds and found no pack torso collapse. To evaluate suspension comfort I carried the pack all day with a range of loads. The narrower shoulder straps reduced suspension comfort a little, but this didn’t matter because I carried most of the pack weight on my hips. From these tests, I estimated the Aether 60’s maximum comfortable load carrying capacity to be 35 pounds. For a strong person, this pack will carry 40 pounds or more. For me, it easily carried my normal lightweight backpacking loads of 24-30 pounds, which now includes an extra half pound of weight due to the 2006 Osprey Aether weight gain.
Osprey has pioneered the heat molded hipbelt for backpacks, and has added that feature to the Aether 60 in the 2006 model. Overall, the upgrades in the Aether 60’s frame and suspension system adjust to achieve a superb fit and make the pack very comfortable to carry.
Let’s not forget value. With all of the improvements to the 2006 Aether 60, Osprey has kept the price at $199, so the value has taken a big jump. The new Aether 60 is an outstanding value!
The conundrum is this: the new 2006 Aether 60 is a superb pack that has benefited from another round of improvements, and it is now an outstanding value because the price has not gone up. But, darn it, I just don’t like to see the weight jumping higher and higher. With this upgrade, the Aether 60 has gained 7.5 ounces and weighs over 4 pounds, and its volume to weight ratio has dropped to under 60 ci/oz. I like the upgrades, but what I would like to see even more is for Osprey to keep the changes weight-neutral, or better yet, find ways to reduce pack weight.
Some further refinements I would like to recommend are:
A waterproof sleeping bag may sound like overkill, until you think about the possibilities – like sleeping under the stars without getting damp or wet insulation, and leaving the bivy sack at home.
The Macpac Epic 150 SF sleeping bag has a lightweight Pertex Endurance shell and is fully seam taped. It is functionally a bivy sack and sleeping bag combined. Think of it as an insulated bivy sack. I did some controlled experiments, and also tested it stargazing in a damp meadow and sleeping under a minimal poncho-tarp on a stormy night. So, how waterproof is it?
|
Manufacturer |
Macpac (New Zealand) |
|
Year/Model |
2005 Epic 150 SF |
|
Style |
Hooded, waterproof, zipperless mummy bag |
|
Fill |
750-fill (US Standard) goose down, 5 oz (150 g) of down |
|
Loft |
Measured loft is 2.25 in (6 cm) double layer; manufacturer claimed loft is 2.5 in (6 cm) |
|
Manufacturer Claimed Temperature Rating |
54 °F (12 °C) |
|
Weight |
Measured weight 20 oz (567 g); manufacturer’s specification 19 oz (540 g); weights include sewn-in stuff sack (0.6 oz / 17 g) |
|
Sizes |
One size (Standard); length 79 in, shoulder girth 61.4 in, foot girth 42 in (200 x 78 x 53 cm), fits a person up to 73 in (185 cm) tall |
|
Fabrics |
Shell is 30d (2 oz/yd2, 68 g/m2) Pertex Endurance (hydrostatic head pressure 1500 mm/2.1 psi, moisture vapor transmission rate 9000 g/m2/24 h); lining is 30d VapourLite ripstop nylon taffeta with DWR. Note: the 2006 model will have a Reflex LoftPro outer shell (a proprietary PU laminate with nylon face), 2.2 oz/yd2 (63 g/m2), hydrostatic head pressure 10,000 mm/14.2 psi, moisture vapor transpiration rate 15,000 g/m2/24hours |
|
Features |
Pertex Endurance outer shell, all seams taped, non-baffled construction, drawcord hood, hang loop, attached waterproof stuff sack |
|
MSRP |
$280 USD |
Pertex Endurance is 30-denier ripstop nylon with a highly water-resistant outer coating. It allows moisture to pass freely from the inside, which makes it ideal for a sleeping bag shell fabric because there is minimal moisture trapped inside the bag. Several sleeping bag manufacturers use it as an outer shell fabric because of its exceptional water resistance, but actual waterproofness depends on whether the seams are sealed and how much hydrostatic pressure is placed on the fabric. Endurance will withstand a hydrostatic head pressure of 1500 mm (about 2 psi) before leakage occurs, which is not very high. In comparison, most polyurethane coated tent floors have a rating of 5000 mm or higher. A person side sleeping in an Endurance-shelled sleeping bag would come very close to exerting a 2-psi downward force, especially at the hips, so water under the fabric could potentially come through under pressure.
My first impression upon receiving this bag for review was “this bag is 75% fabric and only 25% down”! However, if you consider the utility of its Pertex Endurance shell and do the math and testing, you’ll see the Macpac Epic 150 SF in a different light. This bag is targeted to the adventure sports niche, where the intended use is minimalism – grabbing some sleep under the stars and getting back on the trail. For us ultralight and super-ultralight backpacker types, it means we can leave the bivy sack at home, because the Epic bag is functionally a bivy sack and sleeping bag combined. (For clarification, the Macpac Epic sleeping bag only uses the name “Epic;” it does not use the water-repellent Epic fabric by Nextec.)
If you sleep under the stars or use a poncho-tarp or ultralight tarp for shelter, chances are you also take an ultralight bivy to protect your sleeping bag from dew or spindrift. Alternatively, if you use a waterproof sleeping bag you can leave the bivy at home, saving 6 ounces or more. The trade-off is that the Pertex Endurance shell material, at 2 oz/yd², is twice as heavy as Pertex Quantum (0.9 oz/yd²) used on many ultralight bags, and adds about 3.5 ounces to the weight of the bag. The extra weight is partly offset by the bag’s zipperless design.
Macpac uses a proprietary Stitch-Free construction technology to attach the bag’s outer shell to its inner lining, which avoids stitching through the Endurance shell and seals the sewn seams in the lining. It also creates chambers to control the down, which is equivalent to sewn-through construction (no baffles). This unique seam taping technology preserves the integrity of the prized Pertex Endurance shell, eliminating the possibility of leakage through stitched seams. The VapourLite lining has a DWR finish, which causes water to bead up on the surface, but it is not waterproof.

The outer shell (left) on the Macpac Epic 150 SF is Pertex Endurance seam-taped to the VapourLite lining (ripstop nylon taffeta with DWR). There is no stitching through the outer shell. The hood (right) operates smoothly to cover your face and provide a breathing hole.
When a manufacturer claims that their sleeping bag is waterproof, it better be, because you are counting on it to keep your butt dry and warm. This is even more important for a down bag, which loses its loft when wet and can be difficult to dry in the field. I took Macpac’s claim as a challenge and put it to the test. Since leakage will most likely occur when a fabric is under pressure, I set up a simple experiment to simulate sleeping in a puddle of water all night. I poured two cups of water on a tray, laid the hip area of the sleeping bag on the tray, put two 5-pound weights on top of the bag, then poured 2 cups of water around the weights and let it stand for 8 hours.
Was the bag truly waterproof? Well, almost. There was no leakage at 4 hours, but after 8 hours one seam on the top side leaked enough to produce some noticeable wetting on the inside. I weighed the bag and found that it had gained 0.35 ounce of water. There was no evidence of leakage on the bottom side. I turned the bag inside out and it dried out quickly.
The amount of leakage was minimal, and only occurred on the top side. In a normal situation I would expect leakage to occur from below, where pressure from my weight caused the leakage, not from above. It was time to scrap weights and put myself in the puddle of water under real sleeping conditions.

In my first waterproofness test (left) I placed the hip area of the sleeping bag over a tray of water, placed two 5-pound weights on top, and poured water around the weights. After 8 hours a small amount of water leaked through the top side and was visible on the inside (right).
I did a second test with me in the bag to determine whether leakage would occur under simulated field conditions and whether it is actually a problem. I placed an open-cell foam pad (which acted like a sponge) in a tray of water, arranged Therm-a-Rest pads on both ends of the tray, and slept in the bag with my hip area on the wet foam pad.
The result was similar to the first test, only this time the water came through from the bottom and was enough to dampen my microfleece pants and underwear. Again, it took about 4 hours for the leakage to be detectable. I stopped the experiment after 6 hours, when my butt felt thoroughly wet. I weighed the bag and clothing before and after drying and found that 0.88 ounce of water passed through. Although the actual amount of water passing through was not high, it was enough to thoroughly wet the compressed area and cause discomfort. Conclusion: concentrated body weight (such as the hips) provides enough pressure to move water through the sleeping bag’s Pertex Endurance shell, and the amount of water transmitted is enough to collapse the down and chill your tail.

My second waterproofness test (top) simulated worst-case field conditions. I slept overnight with the hip area of the sleeping bag on top of an open-cell foam pad in a tray of water. The water started leaking through after about 4 hours, and after 6 hours (bottom) both the bottom of the sleeping bag and my butt was thoroughly wet.
The “lab” tests I performed simulated a worst case scenario – sleeping in a puddle of water, so how does that translate to using the sleeping bag in the field? On backpacking trips I slept in the Macpac Epic 150 SF under the stars in an open meadow and under a poncho-tarp on a rainy night. Under Southern Rocky Mountain conditions I had to wear a down jacket and pants inside the bag (which the bag’s girth easily accommodated) to stay warm, but the real issue was whether or not the bag would stay dry inside.
When I slept under the stars there was heavy dew on the bag surface in the morning, but shedding surface moisture was no problem for the Pertex Endurance shell because it was not under pressure. The fabric’s hydrophobic surface shed heavy dew literally like a duck’s back.
Sleeping under a poncho-tarp on a rainy night was basically a similar situation. Some spindrift come in under the poncho-tarp, even with mild wind gusts, and the humidity was very high, but there was not enough moisture to create a puddle of water. The sleeping pad elevated the Macpac Epic 150 SF off the ground, adding further protection from any water that might run in. The bag stayed dry inside in spite of whatever moisture my body gave off and the Macpac being quite damp on the outside. On another occasion I slept in the bag in a single wall tent during an overnight deluge (2 inches of rain overnight); conditions that produced a lot of condensation inside the tent and dampened gear. An ordinary down bag would get pretty damp and lose loft under these conditions, but the Macpac Epic didn’t gain a gram. Conclusion: the Pertex Endurance shell is effectively waterproof; it readily sheds surface moisture, and water does not come through the shell as long as it does not exceed 2 psi of pressure. Avoid sleeping directly on wet ground, in a puddle of water, or with water between your sleeping pad and bag.

The functionally waterproof Macpac Epic 150 SF sleeping bag provides an extra measure of dry butt insurance while sleeping under a minimalist spinnaker poncho tarp.
I slept in the bag under a variety of conditions and did not detect any clamminess inside from trapped perspiration. The Endurance fabric breathes very well and readily passes moisture from the inside out.
The Epic 150 SF contains 150 grams (5 ounces) of 750 fill-power goose down. As I mentioned, only 25% of the bag’s weight is down, but that may be enough. With a comfortable temperature rating of 54 °F, this bag is suitable for summertime backpacking in many locations. For me, it was a little light for summer backpacking in the Southern Rocky Mountains, where nighttime temperatures can drop a lot lower. By wearing my hiking and camp clothes inside the bag, I was able to stay warm down to about 40 °F.
Although it’s obvious that this bag is too light for mountain backpacking, that’s not really an issue. Instead of the Epic 150 SF, one can get the 300 SF with 300 grams (10.6 ounces) of down, or the 450 SF with 450 grams (16 ounces) of down. With baffled construction and half-length water-resistant zipper, the 300 SF would be a better choice for summertime backpacking in the mountains, and the 450 SF would be a good choice for spring/fall backpacking and sleeping in a snow cave or igloo.
Comparing the Macpac Epic 300 SF (with its Pertex Endurance shell) with the popular Marmot Hydrogen bag (with its Pertex Quantum shell), the Macpac bag comes out approximately 3.7 ounces heavier. Both bags have approximately the same amount of down, baffled construction, and a half zipper, so the weight difference is mostly due to the Pertex Endurance shell and slightly heavier lining material in the Macpac bag (30 denier versus 20 denier). The total weight of a waterproof/breathable bivy plus the Marmot Hydrogen easily exceeds that of the all-in-one Macpac Epic bag.
I did not find the zipperless design to be a problem for mountain backpacking, where the issue is getting enough warmth out of a bag. However, ventilation is likely to be an issue in warmer, more humid climates. One annoyance was that the bag’s nylon taffeta lining is not completely downproof, so there were always a few feathers coming through each time I examined it.

The Macpac Epic 150 SF VapourLite lining is not completely downproof.
Missing from this review (and for all sleeping bag reviews published here, for that matter) will be an assessment of whether or not the sleeping bag performs adequately at temperatures near its manufacturer-reported temperature rating. Click here for the complete Backpacking Light Position Statement on Sleeping Bag Temperature Ratings.
At $280 the Macpac Epic 150 SF is a bit pricey. The seam taped Pertex Endurance shell apparently accounts for about half of the bag’s price tag. Performance doesn’t come cheap! However purchasing a comparable sleeping bag and lightweight bivy sack separately does add up to more cost and weight.
As of this writing (December 2005), the future of Perseverance Mills and production of their Pertex Endurance fabric is uncertain. If and when the supply of Endurance runs out, Macpac plans to use their proprietary Reflex LoftPro shell fabric (a polyurethane laminate, see specifications at the top of this review) on their Epic series of sleeping bags. This fabric is slightly heavier, and I predict it will be more waterproof but less breathable than Pertex Endurance when used as a sleeping bag shell.
The Macpac Epic 150 SF is a functionally waterproof sleeping bag, which gives it extra utility and saves weight for adventure racing or ultralight backpacking. It’s essentially an insulated waterproof/breathable bivy sack.
I suggest that the bag’s waterproof stuff sack not be attached to the bag. Many people stuff their sleeping bag into the bottom of their pack, which eliminates the stuff sack to save a little weight and avoids over compressing the down.
The Macpac catalog shows this bag having a “two part multi-adjust closure.” My test sample had one simple drawcord, which worked fine. The two part closure sounds like overkill and would add weight.
This snowshoeing accessory adds warmth and water resistance to any shoe, without adding much weight. Will their one-size offering fit your shoes?
In addition to a great line of snowshoes, Crescent Moon makes super warm shoe covers designed to fit over running or hiking shoes. Using 6-millimeter stretch neoprene, the Crescent Moon booties add an incredible amount of warmth for minimal additional weight. The pair weighs 9.5 ounces. Wear them with lightweight trail runners and the total weight for warm snowshoeing footwear is hard to beat.
The Crescent Moon shoe covers have an open bottom design to allow your running shoes to provide the traction. They slip on and secure with Velcro in the back. Elastic straps hold the bottom around your shoe, and the toe is reinforced to prevent excessive wear.
The one-size stretch neoprene really stretches more than standard neoprene (I was skeptical) and fits a large range of sizes. However, there is very little adjustment in the Velcro closure, so despite the stretch the booties don’t fit extreme shoe sizes. The booties measure 10 inches in length fully relaxed and stretch to 12 inches, which corresponds to the outside length of your shoes, not the shoe size. Shoes shorter than 10 inches (outside length) will work with a looser fit. Those longer than 12 inches won’t fit without modifying the booties (adding an extension of fabric and Velcro to the back might do the trick).
The open bottom design prevents the Crescent Moon booties from being totally waterproof. Some moisture will work its way up on long days of snow travel. I found the 6-millimeter neoprene kept my feet warm even when damp; though, the booties are better suited to shorter duration day trips rather than overnight trekking. Wearing the booties in combination with my non-waterproof Montrail trail runners and thin wool socks, I can tolerate temperatures down into the teens for several hours. Different shoe/sock combinations and user tolerance will affect the usability of this product.
Weather resistant Epic shell, good loft, great price – but heavier than the lightest down jackets of similar loft.
The Feathered Friends Hyperion is a lofty, lightweight down jacket available with three shell fabric options. This SpotLite review details our experience with the Epic shelled Hyperion during a short field-testing period.
Feathered Friends specifies a weight of 11 ounces for the Hyperion jacket. Our size large sample weighs 14.2 ounces, but has the Epic shell option, which is heavier than the Pertex Quantum shell option. Feathered Friends does not specify which shell option is used to determine the specified weight.
The Hyperion (Epic shell) has 3.7 inches of double layer loft based on our measurements. I was very comfortable in temperatures down to 20 °F. It is easy to be too warm if wearing the jacket in any moderate activity, and I frequently leave it unzipped. The YKK windproof zipper keeps almost all wind from seeping into the jacket. I did notice air movement when I stood facing a 30 mph blizzard for a few minutes, but even then I could just feel a slight band of cold along the zipper.
The top of the zipper has a soft fabric flap so the zipper won’t rub on your chin – especially nice if you have a beard that may snag in a zipper. The jacket has a large interior pocket where you can store lunch or a camera, keeping them safe and dry. The exterior handwarmer pockets are fully surrounded by down making them great for keeping hands warm, but they are too small for gloved hands and have no closure mechanism. There is a hem draw cord with a single pull on the right side that can be operated with a gloved hand. A stuff sack is included and measures 10.5 inches long with a 5.7-inch diameter opening and makes a nice pillow when the Hyperion is stuffed inside.
The Hyperion can be ordered with Epic, Pertex Quantum, or eVENT shells. The eVENT version will set you back an additional $20. Our test sample has the Epic shell option – heavier and more weather resistant than Pertex Quantum. The Epic fabric is water resistant, but on one snowy and rainy trip in Yellowstone Park I left the jacket uncovered in wet weather and water eventually soaked through the shell. In wet conditions, a separate weatherproof shell should be used as an outer layer – or consider the waterproof/breathable eVENT shell option for the Hyperion. If you are looking for the lightest option, go with the Pertex Quantum shell.
Our sample Hyperion is a size large but is smaller than most size large jackets. It sometimes hikes up my waist and needs to be tugged back down into place. Consider sizing up if you want extra room.
The Hyperion (Epic shell) is durable. I wore the jacket through thick brush and even slipped once on a steep, hard-packed, snowy slope and slid on my back for about 100 feet. The jacket came through without a scratch. The Hyperion uses sewn through construction and 700 fill down. An upgrade to 800 fill down is available for $7.
Overall, the Feathered Friends Hyperion (Epic shell) is a very warm, lightweight jacket. The shell options are a nice feature not available from other manufacturer’s of lightweight jackets, and the $175 price tag makes it one of the best values in lightweight down jackets.
 The Hyperion stuffs nicely into the included 0.8-ounce stuff sack. |
* Loft is a weighted average of maximum double layer torso and sleeve lofts. Torso loft is double weighted.
Not the lightest snowshoes we tested, but wonderful performers.
The Atlas 10 Series All Mountain snowshoes are feature rich and solidly built. Although features add weight, one can make a strong argument that the comfort and performance of the 10 Series snowshoes are worth the weight.
|
Manufacturer |
Atlas Snow-Shoe Company |
|
Year/Model |
2005-06 Model 1025 (10 Series All Mountain) |
|
Dimensions |
8.5 in wide x 25 in long (22 cm x 64 cm) |
|
Surface area |
Measured surface area 200 in2 (1290 cm2), manufacturer specification 179 in2 (1155 cm2) |
|
Frame |
Anodized 7075-T7 Easton aluminum, ¾-in (19 mm) tubing |
|
Deck |
Duratek, a proprietary urethane-coated fabric claimed to have three times the abrasion resistance of Hypalon and lighter weight |
|
Binding |
Arch-Flex featuring built-in arch support, padded tongue, and uniform tightening system; left and right foot specific |
|
Crampons |
Stainless steel, toe and heel, with two additional 6.5 in (17 cm) long side crampons |
|
Weight |
Measured weight 4.01 lb (1.82 kg); manufacturer specification 3.99 pounds (1.81 kg) |
|
Load rating |
120-200 lb (54-91 kg) |
|
MSRP |
$249 |
Based on quality, features, and performance the Atlas 10 Series snowshoes were one of my immediate favorites. These snowshoes really have it together. Just slip your foot into the binding, pull one strap, and it clamps your feet in the right position. They have one of the best bindings in our test group for ease of attachment and release, and the operation is easily handled with gloved hands.

The Atlas 10 Series All Mountain snowshoes have a “spring-loaded suspension” that amounts to a pivot strap that wraps around the frame twice, attaching to the front and back of the toe plate (left). Their superb binding (right) is easy to adjust and aligns your feet perfectly.
The Arch-Flex binding is indeed a premium binding, and is left and right foot specific. It is not quite a step-in like the Tubbs Elevation or MSR Lightning Ascent, but is nevertheless easy to put on and take off. By pulling on each end of a looped strap, the binding distributes pressure evenly over your foot to hold it securely. One nitpick: the webbing tightening strap creates a sizeable loop when the binding is tightened, and there is no good provision for securing the loop to keep it from catching on things. I had no problems with the webbing strap stretching when wet, or freezing up so I couldn’t release it. The heel strap is exceptionally easy to adjust and has a ratchet tightener. I had no problem adjusting the binding to my size 11.5 boots or my wife’s size 6.5 boots. The binding has a curved plate under the ball of the foot, which is claimed to provide extra arch support, but I didn’t see that it made much difference when wearing winter boots.

The 10 Series snowshoes use the Atlas Arch-Flex binding, which is right and left foot specific. The binding positions your foot perfectly and holds it securely. The photos show the outside (left) and inside (right) of the right snowshoe and binding.
The 10 Series have the Atlas “Spring- Loaded Suspension System,” which consists of a flexible pivot strap that wraps around the frame twice, attaching to the binding’s toe plate at both the front and the back. The binding and pivot strap combination attaches your foot securely to the snowshoe and maintains perfect alignment. I particularly liked this design because it kept my pronated feet straight with the centerline of the snowshoe. On other snowshoes with less rigid bindings I had a problem with my feet not being properly aligned.
The “Spring-Loaded Suspension System” also builds some torsion into the pivot strap, so when you put your weight on the snowshoe it transfers extra downward pressure to the heel and lateral crampons, increasing traction and stability. When you unweight and lift the snowshoe the pivot strap system works normally to raise the snowshoe below your foot for improved maneuverability. The pivot strap/binding design also puts your foot closer to the front of the snowshoe for better articulation and climbing ability.
Crampons on the business side of the 10 Series are made of stainless steel. The teeth on the toe crampon are large and spaced out to resist icing. Unlike most of the other snowshoes we tested, the 10 Series have an extra set of linear crampons in the middle of each snowshoe to increase sidehill stability. I had minimal problems with the crampons icing up, even in slushy or sun-snow/shade-snow conditions.

Atlas 10 Series Spring-Loaded Suspension and crampon set (left). Two additional lateral crampons provide extra sidehill stability. Front view (right).
I used these snowshoes weekly over a four-month period on an unusually deep snowpack. It was an awesome experience to walk 10 feet above the ground! The Atlas 10 Series did everything I wanted them to do. They climbed steep slopes to the point where I had to use my hands to hang on. Walking downslope they gripped slopes up to about 40 degrees, then slid on their tails in a controlled slide when I leaned back, which complies with the laws of gravity (and skiing). These snowshoes resisted sliding sideways on sidehills better than the other tubular framed snowshoes we tested (only the MSR Lightning Ascent was better), owing to their extra set of linear crampons in the midsection.

In the raised foot position, the pivot strap on the Atlas 10 Series has moderate torsion, as shown. It does not raise the deck of the snowshoe up under the foot as much as other snowshoes with a stiffer pivot strap, but it also didn’t flip snow onto my backside like some of the other shoes.
Other notable features of the Atlas 10 Series snowshoes are their durable materials and construction. The frame is made of anodized 7075-T7 Easton aluminum (the good stuff) for strength and light weight. I expected the points where the decking material and spring-loaded suspension wraps around the frame to be wear points, but after four months of hard use there is no sign of wear at all. All of the attachments are made with heavy duty rivets. These snowshoes are really solidly built! One nitpick: the anodized finish on the frame scratches fairly easily.
The downside of the Atlas 10 Series snowshoes is their weight. At 4 pounds they are right at our weight limit for this review series. All of the superb features of these snowshoes add extra weight. In my running test, these snowshoes glided smoothly, but their extra weight was noticeable. When I strapped them on my pack, I was adding almost 2 pounds more to my load compared to the Northern Lites Elite. Their weight and bulky bindings make these snowshoes one of the least packable in the group of snowshoes we reviewed.
The Atlas 10 Series All Mountain snowshoes (and other high-end Atlas models) sport their “Spring-Loaded Suspension System,” which combined with the Atlas “Arch-Flex” binding and lateral crampons, provides exceptional stability and articulation.
Backpacking Light is a strong advocate for lightweight, highly functional outdoor gear, so predictably we would like to see at least one lightweight snowshoe in the Atlas lineup for performance-minded backcountry enthusiasts (and I’m not talking about racers). One obvious place to save weight would be to go to smaller diameter tubing for the frame. Another place would be to use lighter materials in the binding. This may sound like unfair nit-pickery on an already well-refined product, but if Northern Lites can produce a 2.4-pound pair of multi-purpose snowshoes, Atlas should be able to get the weight down to at least 3.5 pounds.
Durable, resistant to compression, and very comfortable for the weight, but a couple of extra inches would be nice.

The Gossamer Gear NightLight Sleeping Pad (Torso Length) is just long enough for my torso; I am 6 feet 2 inches tall.
The Gossamer Gear NightLight Sleeping Pad (Torso Length) is very lightweight at 3.4 ounces (measured, 96 g) and short at 29 inches (73.7 cm). It features durable closed-cell Evazote foam that has egg-crate contours on one side and is flat on the other. It offers some key advantages over the popular Therm-a-Rest Z-Lite pads.
|
Year/Model |
2005 Gossamer Gear NightLight Sleeping Pad (Torso Length) |
|
Material |
Evazote foam |
|
Weight |
3.4 oz (96 g) measured weight; manufacturer’s specification 3.7 oz (105 g) |
|
Shape |
Rectangular |
|
Dimensions |
Thickness: 3/4 in (1.9 cm); Length: 29 in (73.7 cm); Width: 18 in (45.7 cm) |
|
Folded Size |
10 x 18 x 2 in (25 x 46 x 5 cm) |
|
R-Value |
2.27 |
|
MSRP |
$15.95 |
The Gossamer Gear NightLight Sleeping Pad (Torso Length) has a short 29-inch length, which is just long enough for my 6 foot 2 inch frame, but can be a little short for other users. It provides 3/4 inch of padding but seems like more due to the inherent give of the egg-crate design. The NightLight does not compress as much as a Therm-a-Rest Z-Lite pad, making it more comfortable with the raised sections down so you don’t feel them when sleeping. Don’t expect the comfort of the NightLight to match an inflatable pad, but it is quite comfortable for a foam pad.
With an R-Value of 2.27, the NightLight has an insulation value that is roughly the same as a Therm-a-Rest Z-Lite (2.2) or ProLite 3 (2.3), but less than a RidgeRest (2.6) or Bozeman Mountain Works TorsoLite (3.5). By design, torso-length pads do not provide insulation for your head or legs. By using my clothing, pack, or natural materials, I hardly miss the extra length of a full 3/4-length pad.
The NightLight is slide resistant. Even when placed on silnylon floors and when used with slippery nylon sleeping bags, this pad hardly slides an inch. This is a big advantage over inflatable pads when using an ultralight tent with a silnylon floor.
The torso-length NightLight folds neatly into thirds because of pre-cut scoring. The folded width fits comfortably into a frameless backpack to make a virtual frame and also fits neatly into Gossamer Gear or Six Moon Designs packs with an outside pad sleeve. The torso-length NightLight is a nice fit even in a very small volume, narrow SuperUltraLight pack such as the Fanatic Fringe Alpine Trail; once inserted against the backpanel, open the two sides to form a triangular enclosure for pack contents. (The 3/4-length NightLight pad does not fold and must be rolled.)

The torso-length pad folds neatly into thirds. The 3/4-length version must be rolled.
After many nights sleeping on rock and other hard surfaces, the NightLight pad still looks like new. Unlike Z-Lite pads, which tend to lose their cushioning over time due to foam compression, the Gossamer Gear NightLight pad is just as thick and stiff as when it first arrived. It is a tough, durable pad.

When compared to a Therm-a-Rest Z-Lite pad, the Gossamer Gear NightLight is more durable, light, warm, resilient, and bulky. Here 8-pound weights show the difference in compression between a NightLight (left) and an older Z-Rest pad (both pads have had similar amounts of usage).
At just 3.4 oz, the NightLight is a good balance between warmth, comfort, and light weight. At only $15.95 for a comfortable lightweight pad that is very durable, the Gossamer Gear NightLight Torso-Length pad is an outstanding value.
The Nightlight sleeping pad is the lightest sleeping pad for the comfort it provides. It is durable, resistant to compression, and at $15.95 is an excellent value.
The current NightLight design is excellent, but we’d like to see it a couple of inches longer so it’s easier to stay on it. It also isn’t very compressible for packing. If possible, it would be nice to see a design with contours on both sides that would be able to fold in an interlocking pattern like a Z-Lite.
The lightest snowshoes on the market, but with less traction than heavier shoes.
At 2.4 pounds per pair the Northern Lites Elite are the lightest snowshoes on the market. These shoes embody the lightweight backpacking principles of keeping it light, simple, and functional. Obviously we like their weight, but how do the Elites measure up to beefier, toothier, full-featured snowshoes we reviewed?
|
Manufacturer |
Northern Lites |
|
Year/Model |
2005 Elite |
|
Dimensions |
8 in wide x 25 in long (20 cm x 64 cm) |
|
Surface area |
Measured surface area 185 in2 (1194 cm2), manufacturer specification 163.5 in2 (1055 cm2) |
|
Frame |
Aluminum alloy tubing, 5/8 in (16 mm) diameter, powder coated |
|
Deck |
Coolthane (polyurethane coated nylon mesh) which is claimed to be 250% tougher than Hypalon |
|
Binding |
TruTrak Binding System made of a heavier weight of Coolthane, three hook-and-hole front straps plus one webbing and buckle heel strap; pivot strap is 1.5 in (4 cm) wide Biothane (basically nylon seatbelt webbing in a water resistant, toughened polyurethane shell) |
|
Crampons |
Duraluminum toe and heel crampons, claimed to have greater strength and abrasion resistance than many titanium alloys |
|
Weight |
Measured weight 2.4 lb (1.1 kg) per pair; manufacturer specification 2.2 pounds (1.0 kg) |
|
Load rating |
Less than 175 pounds (79 kg) |
|
MSRP |
$199 |
The Northern Lites Elite, at 38.4 ounces per pair (Backpacking Light measurement), are by far the lightest snowshoes we reviewed. While most of the other snowshoes we reviewed are well-designed, feature rich, and unquestionably durable, the Elite seems to combine the same attributes in a much lighter package. The light weight of the Elite is very noticeable, akin to hiking in trail runners compared to conventional hiking boots. Those benefits are explained more fully in our upcoming snowshoe Review Summary. In this review I will focus on how the features and performance of the Elite compare to the other snowshoes we reviewed.

The Northern Lites Elite at 38.4 ounces per pair are the only truly lightweight snowshoes we reviewed. The deck is attached with 19 nylon clips that have projections on the bottom for extra traction around the perimeter.
The deck on the Elite is Coolthane (polyurethane coated nylon mesh), which is claimed to be 250% tougher than Hypalon. It is also nice and light. In dozens of miles of testing, I was not able to damage this material.
Decking is attached to the frame using 19 toughened nylon clips. Each of these has a 1/4-inch protruding ridge on the underside, which act as perimeter cleats for extra traction.
The binding on the Elite is simple and functional compared to the more elaborate bindings on the high-end snowshoes we reviewed. The Elite binding is made of a heavier weight of the Coolthane decking material that is riveted directly to a flexible Biothane pivot strap (see specifications for a description of these materials). There are three hook-and-hole straps across the toe area, plus a webbing heel strap with a ladder-lock buckle. This type of binding is similar to that found on the MSR snowshoes, and has been proven over time to be durable and reliable. For my size 11.5 boots, I found that the heel strap was too short to provide a good handle for tightening, especially with gloved hands. I would personally prefer another hook-and-hole strap around the heel rather than the webbing strap because it is easier to tighten and loosen.

The Elite has a simple collapsible binding with hook-and-hole fasteners over the toe area, and a nylon webbing heel strap. I found the binding fairly easy to tighten, and secure once attached. However, the heel strap was barely long enough for my size 11.5 boots, and the strap end was too short to grasp for tightening while wearing gloves.
The crampons are a hardened aluminum alloy with serrated edges that are cut at about a 45 degree angle. The toe crampon is attached to the pivot strap, and the heel crampon is attached to the decking below the heel plate. Each crampon has a plastic “de-icing pad” on it They resisted icing to a large extent, but still iced up in contrasting sun-snow/shade-snow conditions.

Toe and heel crampons on the Elite are made of an aluminum alloy, and are not very aggressive. Each of the nylon clips that attach the deck to the frame has a protruding ridge on the bottom for extra traction.
In climbing tests, I found the Elites have adequate uphill traction under most snow conditions. Because of the blunt angle of the teeth, the crampons do not perform especially well on steep slopes and on hard icy snow. Other shoes we tested that had longer, thinner, sharper stainless steel or titanium teeth performed much better in the same snow conditions. However, the aluminum alloy crampons held up well, showing little wear after four months of testing.
For downhill walking on firm snow, I found the Elite’s traction to be a little less than the toothy Atlas 10-Series, Tubbs Elevation, and MSR Lightning Ascent with sliding occurring at about 30 degrees. On soft snow, gravity took over at a steeper slope angle, generally around 35 to 40 degrees, resulting in a controlled slide.
On sidehills, the Elite’s performance was average. Lacking lateral crampons like the MSR Lightening Ascent and Atlas S-10, they broke loose and slid sideways more easily.
In running tests the Elites were a standout because of their balance and light weight. The reduced effort was very noticeable. The pivot strap has a medium torsional stiffness, which returned the snowshoes back to a favorable angle without slapping the bottoms of my boots. If I were to enter a local snowshoe race, these are the snowshoes I would want on my feet.

The Elite pivot strap has a medium torsional stiffness that works well for general snowshoeing. When a foot is raised, it lifts the snowshoe to a favorable angle to improve maneuverability and maintain a smooth forward glide.
The Northern Lites Elite snowshoes were also the most packable shoes we tested. The bindings lay flat, making the shoes easy to strap to a backpack, and the extra weight was much less noticeable than other snowshoes weighing nearly twice as much.
Overall the Northern Lites Elite came close to the manufacturer’s claim of “combining ultra-light weight with incredible performance and durability.” They provided adequate (but not exceptional) traction under most snow conditions, but lose their grip and slide on steeper hills and sidehills more readily than toothier snowshoes we reviewed.
Presently the Northern Lites Elite (and other Northern Lites models) are the only truly ultralight snowshoes on the market. They are durable and perform well in a variety of snow conditions and terrains.
Although the aluminum alloy crampons seem to be fairly durable, they are not particularly sharp or long. Sharper teeth on the aluminum alloy crampons, or switching to sharp titanium crampons, would improve traction in harder snow and icy conditions. Longer teeth would improve traction in soft snow or on steeper slopes.
Nice innovations including a shape that allows a more natural walking gait, but heavy.
Crescent Moon Gold Series 9 snowshoes are designed for lightweight, all-around performance. Their dramatically tapered shape stands out among a sea of bean-shaped and back-tapered shoes typifying the market. Crescent Moon also adds a toe cleat and cam locking heel strap to their bindings to improve traction and better secure the foot. The merits of these design innovations for walking in the flats are undeniable, but how well does this snowshoe perform in deeper snow and on steeper slopes?
|
Manufacturer |
Crescent Moon |
|
Year/Model |
2004-2005 Gold Series 9 |
|
Dimensions |
8 in wide x 27 in long (20 cm x 69 cm) |
|
Surface area |
169 in2 (1090 cm2) |
|
Frame |
TIG-welded 6063 aluminum alloy tubing, 3/4 in (19 mm) diameter, powder coated |
|
Deck |
TGS, a polyester scrim core coated in a blend of PVC and neoprene able to withstand -70 °F temperatures, and more abrasion and tear resistant than Hypalon. 05-06 model will use DuPont Surlyn for the upturned front section |
|
Binding |
Foot-glove binding with two toe area straps and one ratcheting heel strap (like those found on high end ski boots) |
|
Crampons |
Stainless steel at toe, ball, and heel of the foot |
|
Weight |
Measured weight 4.3 lb (1.9 kg) per pair; manufacturer specification 3.9 pounds (1.8 kg) |
|
Load rating |
Less than 190 pounds (86 kg) |
|
MSRP |
$239 |
What really sets the Gold Series 9 apart from other brands of snowshoes is Crescent Moon’s radically tapered frame. Crescent Moon creates their frames from a single 0.75 inch diameter piece of tubular 6063 aluminum, TIG welded at the tail tip. The frame is extremely stiff, more so than riveted designs. They finish the Gold Series 9 frame with a thick powder coat (red in the case of our review sample). The finish looks great, is extremely durable, and sheds snow very well.
The Gold Series 9s were some of the most maneuverable full-sized shoes we tested. The radically tapered shape concentrates most of the snowshoes’ weight near the foot, greatly reducing the swing weight, and allows a more natural walking gait. It is difficult to trip over your other foot with this design, even intentionally. The Crescent Moon Gold Series 9s maneuver like a much smaller, lighter snowshoe.
Crescent Moon’s black TGS (The Good Stuff) decking has a polyester scrim core coated in a blend of PVC and neoprene. This material is claimed to withstand abrasion and tears better than Hypalon, and is tested to be cold tolerant down to -70 °F. In use, I found the material at least as durable as Hypalon. I abused the material on several late season hikes, where snow melt exposed sections of rock and debris, with little damage to the material. The latest Gold Series snowshoes are decked with DuPont’s Surlyn material at the front of the shoe to reduce weight. Surlyn is used to cover golf balls and coat snow plow blades. The material is tough and cold tolerant, and survived our tests of the Crescent Moon Gold Series 12 snowshoes (which use Surlyn for the entire deck).

The latest Gold Series 9 uses transparent Surlyn decking up front to lighten the weight. Besides looking cool, Surlyn is highly durable and cold tolerant, and held up well during our testing of the Crescent Moon Gold Series 12 snowshoes.
The decking is held onto the frame with 16 rivets. The rivet work looks rather crude, particularly those attaching the crampons. It looks like Crescent Moon uses rivets that are too long for the application, and crushes them down to secure the decking/crampons together. Concerned this might be a weak point, I attempted to physically remove the crampons with pliers (since snowshoeing hard didn’t seem to have any affect on them). My concern for the rivets turned out to be unfounded; they are plenty secure to handle very rigorous treatment.
The bindings are anatomically designed for either a right or left foot. They are very comfortable and adjust to a variety of foot sizes – they adjusted to fit my wife’s size 6 and daughter’s size 1, as well as my own size men’s 10). The binding wraps over the front of your boot creating a toe box to ensure guess-free, repeatable foot placement and to prevent “heel creep.” Snowshoes without a toe box can allow the foot to slip forward when snowshoeing downhill.
The foot is secured in the binding with three straps. Two run over the toe area and are secured with non-ratcheting cam-lock buckles located on the outside of the foot. The heel strap is secured by a ratcheting cam-lock buckle. There is no nylon webbing on these shoes to stretch with wetting or ice up in the cold. Crescent Moon uses Hypalon for all binding straps, which is resistant to abrasion and UV, and remains supple over a wide range of temperatures. The culmination of these design elements makes for a very secure and comfortable binding. The ratcheting heel strap, in particular, really makes the fit secure. You can adjust to fit different shoe sizes, or dial in just the right fit with ease.

The Crescent Moon Gold Series binding consists of two cam-lock buckles over the foot, a ratcheting heel strap, and toe box in front to prevent the foot from moving too far forward.
Compared to other tubular frame snowshoes, the Crescent Moon Gold Series 9 snowshoes are competitively outfitted for traction with three sets of stainless steel crampons. All three sets have well designed teeth for traction – sharp enough for ice and long enough for powder. The standout is their addition of a toe crampon. I found the toe crampon very effective on steep icy climbs. Snowshoes lacking the toe crampon can cause you to change your walking style to concentrate weight onto the ball of your foot (where the traction is). With the added toe crampon, I could climb steep slopes more naturally, by rolling from the ball of my foot to the toe as I completed a step. The traction is better than average compared to other tubular framed shoes.

The Crescent Moon Gold Series 9 has three sets of steel crampons. The toe crampon, despite its small size, added a lot of effective traction on steeper climbs.
The Gold Series 9 uses a pivot strap that lifts the back of the shoes when hiking or stepping over obstacles. This design requires you to lift nearly the entire snowshoe with every step, but makes it easier to negotiate rougher terrain.

The pivot strap on the Gold Series 9 does not allow the shoe to drag much when hiking. Occasionally, this design allowed snow to be flipped up when moving fast.
The Gold Series 9s are great climbers in firm snow, performing a little better than average thanks to the toe crampon (slipping at around 35 degrees). The narrower back section improves straight-down descents as the tail tends to sink into the snow better, keeping the foot level.
The 9s are average performers on side hills. The lack of lateral crampons makes it difficult to maintain traction unless the snow is soft enough to allow the snowshoe to sink in and level out. The tapered shape accentuates the performance problems in harder snow. The tail end of the frame does not bite into harder side slopes as well as the front, and can slip downhill in those conditions.
Crescent Moon clearly has some design innovations that improve the performance of their snowshoes. The downside is the weight these innovations add. The Gold Series 9s tipped our scales at 4.3 pounds. While other similarly sized shoes on the market are heavier, Crescent Moon should look into ways to reduce the weight to be more competitive with lighter weight shoes.
The radically tapered design allows for a natural walking gait and the toe crampon adds a great deal of climbing traction, particularly on steep hard pack.
Get the weight down. The maneuverability and binding fit are excellent, and the traction is very good for a tubular snowshoe. But at 4.3 pounds, the Crescent Moon Gold Series 9 snowshoes could be lightened considerably using lighter materials in the frame and binding, without sacrificing durability or performance.
Clever, simple, user-friendly, and durable; but heavy.
I was very impressed with the elegant, simple design and user friendliness of this high-end snowshoe. Its step-in binding, larger surface area, and long toothy crampons make it a good performer in most situations. But in spite of their simplicity, the Tubbs Elevation snowshoes are not lightweight.
|
Manufacturer |
Tubbs Snowshoes |
|
Year/Model |
2004-05 Elevation 25 |
|
Dimensions |
8 in wide x 25 in long (20 cm x 64 cm) |
|
Surface area |
Measured surface area 205 in2 (1323 cm2), manufacturer specification 188 in2 (1213 cm2) |
|
Frame |
7075-T7 series aluminum alloy tubing, 5/8 in (16 mm) diameter |
|
Deck |
ArcTec (a proprietary plastic material) |
|
Binding |
Nexus step-in binding; left and right foot specific |
|
Crampons |
Stainless steel with jagged teeth, toe and heel |
|
Weight |
Measured weight 4.19 lb (1.9 kg); manufacturer specification 3.93 pounds (1.78 kg) |
|
Load rating |
120 to 200 pounds (54 to 91 kg) |
|
MSRP |
$249 |
The first thing I noticed on the Tubbs Elevation is the Nexus step-in binding, which is left and right foot specific. It works like a clamshell; you simply put your foot in the gap, connect a clip on the top, and pull one webbing strap to secure it. The binding holds the adjustment. I did not have any problems with the top webbing strap icing up and interfering with tightening or loosening. The heel strap is a tried and true hook-and-hole type. The binding effectively secured my feet to the snowshoe with uniform pressure, and kept my feet aligned for tracking in a variety of conditions. Of all the snowshoes we reviewed, the Nexus binding on the Elevation is the easiest to attach and release. It is also remarkably simple and lightweight. One nitpick is that the heel strap lacked enough holes to accommodate smaller boots, but there is a women’s model available with smaller bindings.

Tubbs Elevation 25 bottom and top. The decking is a super tough plastic. The Elevation has a “western tail,” which is rounded rather than pointed. This design maximizes floatation and stability, while keeping the length shorter for better maneuverability.
The next thing I noticed is the frame and decking. The frame is 7075 T7 aluminum alloy (the best available), which enables a smaller tubing diameter to save weight. Its anodized finish is very durable. The ArcTec deck material is a super strong and pliable plastic that seems indestructible. It does not have an imbedded fabric and is claimed to be puncture and abrasion resistant to -40 °F. The deck on these snowshoes is very tight and looks great, but it is also thicker and heavier than the other snowshoes we tested, adding to the weight.

The Nexus binding on the Tubbs Elevation is a clamshell design. It’s easy to step in and secure, and positions your feet perfectly. Pictured are the outside (top left) and inside (top right) of the right snowshoe. The bottom photo shows how the binding positions the toe area.
The Elevation has stainless steel toe and heel crampons with long jagged teeth. They enabled me to climb a slope so steep that I was holding on with my hands so I didn’t fall over backwards. Walking downslope, the long crampons held on about a 40 degree slope (on firm snow), then as I leaned back (and unweighted the front crampons), the rear crampon was not enough to hold on and gravity took over sending me into a controlled slide on the smooth tails. In powdery snow conditions, the Elevations were great fun for “plunging” (sliding) down steep slopes. Side slope stability was average because the Elevation lacks any specific lateral crampons like the Atlas 10-Series or MSR Lightning Ascent.

The Tubbs Elevation has crampons like a great white shark – long and jagged. Each crampon has a piece of the decking material attached to the bottom to resist icing (left). Note the hinge-type pivot system, consisting of a steel rod that passes through a sleeve on the crampon.
The Elevation has a hinge type pivot system that will turn 360 degrees. There is no stop on it, so if you lift your foot high the snowshoe will point straight up. Basically, the system depends on your shuffling the snowshoes forward and dragging the tails. It provides good stability and freedom, but it requires more energy and makes it a little harder to step over logs, climb steep icy slopes where you need to kick in the front crampons, and back up in tight places.

The Elevation has a free hinge-type pivot system, which is very strong and gives lots of freedom, but does not align the snowshoe for you like a pivot strap does. Basically you shuffle forward, lifting the tips and dragging the tails. The vertical hang is definitely uncool when you’re jumping off a snowbank!
With its elegant and simplistic design, the Tubbs Elevation seems like it should be lighter than it is. The extra weight comes from the steel hinge pivot mechanism, steel crampons, and deck material. All are unquestionably durable, but contribute significantly to weight.
The Elevation is elegant in its design simplicity and user friendliness, and is built to last. In particular the Nexus binding is delightfully simple, yet it effectively positions and clamps your foot in place and tracks well. Also the toe pivot design is very strong and provides free movement.
There’s a lot to like about the Tubbs Elevation, I only wish they were lighter. How about providing a lightweight version using the same basic design?
I would also like to see a stop added to the hinge pivot system to limit its rotation. That would make the shoes more maneuverable while retaining their excellent stability.
 Loading...


