Articles (2020)

Sea to Summit Ultra-Sil Dry Sacks (Production) SPOTLITE REVIEW

The lightest dry sacks, but also the leakiest (compared to lightweight dry sacks from four other companies) when subjected to harsh conditions.

Overview

Sea to Summit Ultra-Sil dry sacks are incredibly light. And, like other ultralight gear, the user needs to know the limitations and use accordingly or be disappointed in the performance.

I released a SpotLite Review of prototype versions of these dry sacks in August 2005. I have now tested two production dry sacks and compared their performance to dry sacks from Outdoor Research, Cascade Designs (SealLine), Granite Gear and Pacific Outdoor Equipment. The Ultra-Sil dry sacks did not fare well in these tests.

Although the web site does not indicate anything other than that the Ultra-Sil dry sacks are waterproof, the instructions that come with the sacks say, “Ideal for keeping contents dry in any situation that the bag is not submerged.” Also, as noted in the 2005 SpotLite Review, the Ultra-Sil Dry Sacks are waterproof when used as designed, according to the US marketing rep. She adds, “If you are going to be getting really wet, as in floating them in a river, we also recommend another layer of protection for expensive items such as cameras or GPS. They are not recommended for prolonged submersion.”

Other lightweight dry sack manufacturers include similar caveats and all the dry sacks tested provide more protection from moisture than a typical stuff sack.

However, even the caveated claims did not hold water in my testing. The Ultra-Sil bag did not keep its contents dry after 10 minutes under a hard shower with seam side up. The Ultra-Sil bag did successfully safeguard contents when standing upright under a shower for 10 minutes. Of course, a dry sack inside a pack is unlikely to experience such conditions.

It was disappointing that these dry sacks – the lightest by a significant amount of all the dry sacks commercially available – also did not satisfy the following claim, the “Dry Sacks will not leak in that situation [dry sack in the bottom of the pack … partially submerged underwater for quite some time].” The prototype dry sacks did not pass this test, but Sea to Summit was sure that further tweaking of the taping technology would stop water leakage through the seams.

However, the round bottomed Sea to Summit dry sack performed the worst of the dry sacks I tested in two tests with the sack sitting upright and on its side (seam down) in a couple inches of water for 8 hours. The idea was to simulate a worst case scenario, e.g. backpacking in horrible storms in Patagonia resulting in a couple of inches of water in the bottom of the pack at the end of the day. Contents of the Sea to Summit dry sack were soaked after this test. Two other bags failed one or both of these tests, but allowed just a wet spot or two on bag contents.

The Ultra-Sil sack leaked so badly after 8 hours in shallow water that I wondered if some water might be soaking through the fabric. To check this idea out, I formed a small pocket in a sack where there were no seams. I put a t-shirt in the pocket, closed it off, and sat the pocket in water. The t-shirt was completely dry after 8 hours. The fabric is not leaking when immersed in shallow water – the circular seam is the main culprit.

Happily, Sea to Summit appears to have improved straight seam taping procedures since the prototype I tested. The production dry sack with a straight seam on the bottom kept contents dry after standing on end in water for 8 hours and during a 5 minute submersion test.

The Sea to Summit dry sack was the only one tested to leak through the roll top closure. It appears that the very things that make these sacks so light contribute to this. The Sea to Summit dry sacks use Siliconized Cordura fabric. It is very light, and did not absorb water during a 10 minute hard shower (see Lightweight Dry Sacks: Comparison Testing Results). Fabric on the other sacks I tested absorbed some water which kept at least some water that was working inside the roll top closure towards the top of the dry sacks from making it all the way. The Sea to Summit sack is the only sack that doesn’t use webbing along the top opening. Sea to Summit sacks have a lightweight ribbon/tape and plastic stiffener at the top opening. The webbing used on other sacks absorbs more water than the accoutrements at the top of the Sea to Summit sacks and helps to keep water out of the inside of the pack.

Keep in mind that much of my testing was harsher than a dry sack will normally experience inside a pack. The Sea to Summit dry sacks provide more water resistance than a normal stuff sack at not much more weight. The prototype Sea to Summit Ultra-Sil sacks I tested in the field and at home by floating them in a pool of water, kept my gear dry. The reason – both the round and flat sacks floated with the round seams out of the water.

Sea to Summit recommends double bagging valuables. Double bagging using a Gossamer Gear pack liner and Sea to Summit Ultra-Sil Pack Liner or dry sack is still quite light. I used a prototype 20 liter Sea to Summit Ultra-Sil dry sack (1.8 oz) and a medium Gossamer Gear Pack Liner (1.3 oz) inside the Gossamer Gear G6 for a SuperUltraLight canyoneering trip. I floated my pack on a TorsoLite self-inflating pad when I needed to swim, and the pack contents stayed dry. The total weight, 3.1 ounces, for double bagging using these options is still less than most 20 liter dry sacks.

Note that I have not done any testing on the Ultra-Sil dry sacks to determine how their performance holds up with use.

The Ultra-Sil dry sacks offer viable options for ultralighters who know their limits and manage them properly. For those who want more protection and are willing to carry the extra weight, Sea to Summit also offers Lightweight Dry Sacks constructed from 70-denier nylon, laminated with polyurethane with weights still in the lightweight range (e.g. 3.7 oz for the 13 L size, same size Ultra-Sil weighs 1.4 oz). Other companies also offer heaveir, more robust options – see the listing in Lightweight Dry Sacks: Comparison Testing Results.

Features and Specifications

Dry Sack

  • Super compact and ultra lightweight
  • Made of Ultra-Sil nylon, a polyurethane coated Siliconized Cordura
  • Watertight, non-wicking Hypalon roll top closure with stiffener at the top for a better seal
  • Soft and flexible with a slippery finish for easy packing
  • Nearly transparent allowing good visibility of the contents
  • All seams are double stitched and tape sealed
  • Smaller sizes have flat bottoms, others are round
  • Uses low profile buckles

Pack Liner, additional features

  • Ultra-Sil Pack Liner opens wide for easy packing when it’s inside a pack
  • Unique top closure: extra fabric at the top folds in and velcros in place, then rolls down, creating a more compact closed loop at the top
  • Designed to fit the internal contours of a backpack, so the base is oval, rather than round
Size Volume
ci
Volume
L
Dimensions
in
Dimensions
cm
Weight Specified
[Measured]
oz
Weight Specified
[Measured]
g
MSRP
$
1 61 1 6 x 9 (flat) 15 x 23 0.7 20 8.95
2 122 2 8 x 12 (flat) 20 x 30 0.8 23 10.95
4 244 4 9 x 15 (flat) 23 x 38 0.9 [0.8] 26 [23] 11.95
8 488 8 6.5 x 18 17 x 46 1.1 30 15.95
13 793 13 8.5 x 21 22 x 53 1.4 [1.4] 40 [39] 18.95
20 1220 20 10 x 24 25 x 61 1.8 50 22.95
35 2136 35 12 x 27 30 x 69 2.3 65 29.95
Pack Liner Small 3000 50 21 (H) x 19 x 16 53 x 48 x 41 2.6 74 34.95
Pack Liner Medium 4300 70 35 x 20 x 8 89 x 51 x 20 3.4 96 39.95
Pack Liner Large 5500 90 48 x 22 x 10 122 x 56 x 25 4.4 125 44.95

Ultralight Adventure Equipment (ULA) Relay Backpack REVIEW

Both lightweight AND durable, the new ULA Relay is a full-featured frameless daypack capable of comfortably carrying a heavy load – but there are a few nits to pick.

Introduction

Ultralight Adventure Equipment’s entire pack line has been redesigned for 2006, and the frameless Relay at 2100 cubic inches and 17 ounces is the smallest pack in the new lineup. It’s a roomy multi-purpose daypack with plenty of pocket space and load-carrying ability. So does the performance of the Relay meet our expectations?

What’s Good

  • Lightweight AND durable
  • Ample volume for a day pack, and good volume adjustment
  • Lots of outside storage
  • Wide, well-padded shoulder straps spread weight
  • Optional removable accessories
  • Quality construction

What’s Not So Good

  • Pack torso length is shorter than specified
  • Shallow front pocket
  • Delta wings on hipbelt are too small

Specifications

  Manufacturer

Ultralight Adventure Equipment (ULA)

  Year/Model

2006 Relay

  Style

Frameless, top loading, drawcord closure

  Sizes

S/M fits 17-19 in (43-48 cm) torso, M/L fits 20-22 in (51-56 cm)torso

  Volume

2100 ci (35 L)

  Weight

1 lb 2.3 oz (519 g) measured weight (size M/L); manufacturer’s specification 1 lb 1 oz (482 g)

  Fabrics

Main pack body is 210d Dyneema Gridstop polyurethane-coated nylon, pockets are durable polyester mesh with an elastic binding, frontpanel is 1.9 oz/yd2 (64 g/m2) urethane-coated ripstop nylon

  Features

Angled mesh side pockets with drawcord closure, bellowed fabric pocket and bungee attachment system on front, two equipment loops, two ice axe loops, removable foam backpanel pad, two side and one top compression straps, two hydration tube ports, 1.5 in (3.8 cm) webbing hipbelt, interior pad sleeve, sternum strap, haul loop, attachment loops for optional accessories

  Options

Zippered internal stash pocket (1.1 oz/31 g, $5), hydration sleeve (1.4 oz/40 g, $5), water bottle holsters (0.4 oz/11 g, $2 each), handloops (0.8 oz/23 g, $2 each)

  Volume To Weight Ratio

114.8 ci/oz size M/L (based on 2100 ci and a measured weight of 18.3 oz, without options)

  Comfortable Load Carrying Capacity

20 lb (6.8 kg) estimated maximum comfortable load an average person can carry all day in this pack

  Carry Load to Pack Weight Ratio

17.5 (based on a 20 lb load and measured weight of 1.14 lb)

  MSRP

$99

Performance

The distinctive trait of ULA packs is their Dyneema Gridstop fabric, which is both durable AND lightweight. The fabric contains polyethylene fibers that are claimed to be ten times stronger than steel and two times stronger than Kevlar. The mesh used in the side pockets is also very durable. This is a lightweight pack that is also bomber.

With 2100 cubic inches of total volume (main body 1500, front pocket 150, side mesh pockets 250, extension collar 200), the Relay provides plenty of room for everything you need for a day and the ability to organize it the way you like.

Ultralight Adventure Equipment (ULA) Relay Backpack REVIEW  - 1
A tour of the ULA Relay pack. The front (top left) has a fabric pocket, bungee attachment system, ice axe loops, and Velcro pole retention loops; each side (top right) has a mesh pocket, one compression strap, and a hose port; the backpanel view (bottom left) shows the Relay’s wide shoulder straps, sternum strap, and webbing hipbelt; and the top view (bottom right) shows the drawstring closure and top compression strap.

The Relay pack is full-featured (see specifications), and only lacks load lifters, which one can argue are not needed on a pack this size. Besides the standard feature set, the Relay (like all ULA packs) will accept ULA’s optional internal stash pocket, hydration sleeve, water bottle holsters, and handloops. All of these options are removable, so you can use them when you want them or transfer them to other ULA packs you own. The options are also bargain priced (see specification table).

Ultralight Adventure Equipment (ULA) Relay Backpack REVIEW  - 2
Optional accessories for the Relay (that attach to all ULA backpacks) are a zippered internal stash pocket (top left), hydration sleeve (top right), water bottle holsters (bottom left), and handloops (bottom right). See specification table for prices and weights.

The Relay comes in two sizes (S/M and M/L), each with a fixed torso length. The size M/L tested is claimed to fit torsos 20 to 22 inches, but I measured the pack torso length to be only 18 inches. For me (6 feet, 170 pounds, 20 inch torso), the pack was a bit small, but acceptable. It would definitely be too small for a taller person. Basically, the longer your torso, the lower this pack rides on your shoulders (see top photo).

In the field, I used the Relay on a variety of outings and found it to be very versatile and a serious load hauler. I liked its 3-D Spacer Mesh padded 3-inch wide contoured shoulder straps, which did a great job of distributing weight. For a daypack, it also has a serious 1.5-inch webbing hipbelt. I found that I could easily and comfortably carry a 20-pound load with the Relay, which is right on target with the manufacturer’s claim. The pack also has a slight hourglass shape, which helps to provide elbow room.

Ultralight Adventure Equipment (ULA) Relay Backpack REVIEW  - 3
The Relay’s well padded 3-inch wide shoulder straps account for its excellent load carrying ability.

A good measure of a pack’s user-friendliness is whether you can reach and replace a water bottle in a side pocket without having to take the pack off; the Relay passed. I also found the ULA optional accessories to be very useful. The internal stash pocket and hydration sleeve easily clip in, provide a lot of utility for little extra weight, and can be transferred to other ULA packs. The water bottle holsters are simple and light and keep a pint of water very handy. The handloops…, well, you will just have to try them and see if you like them.

Now for a few nitpicks. Although many people will like the Relay exactly the way it is, there are a few design elements that I personally differ with. On the frontpanel, I would prefer to have a full height mesh pocket instead of the shallow fabric pocket at the bottom and bungee attachment system above it. The bungee system interferes with inserting items into the pocket. I used the bungee system, and it works fine, I just prefer a large front mesh pocket.

Also, the frontpanel does not have a good provision for attaching bulky items. The pocket can handle a narrow snow shovel or a gear bag, but it’s difficult to attach anything larger. To provide more versatility, it would be nice to have four attachment loops sewn into the front seams and optional accessory straps offered.

The angled mesh side pockets are a ULA trademark, but I personally don’t find them to be very functional. To me, they amount to half a pocket. I would prefer to have full-height mesh pockets, one with a side opening to facilitate inserting a water bottle.

I would also like to see the top compression strap reversed, so the female end is attached to the top of the backpanel. As it is, the strap (which is too long) dangles behind your back. Finally, I found the delta wings (that the webbing hipbelt attaches to) so small that the padding on them has little function. Larger wings that pad the hipbelt across the hipbone would be more functional.

Assessment

At a little over a pound, the ULA Relay is a full-featured pack that provides a generous amount of volume for a day pack, organization options, weight-carrying capacity, and durability. Other daypacks with the same volume and weight carrying capacity have an internal frame and weigh 2 pounds or more. The Relay is very comfortable to carry, if its torso length is a good fit for you. Its standard feature set is very nice, but could benefit from some tweaking (depending on your preferences).

The Relay should not be overlooked as a potential pack for fastpacking. Its rugged construction, weight-carrying capacity, water carrying capability, and hourglass shape are features that adventure racers look for, but it lacks hipbelt pockets.

The Relay at 2100 cubic inches and 17 ounces could be used as a durable overnight backpack, however it has a weight penalty compared to the Fanatic Fringe Alpine Trail pack at 2400 cubic inches and 7 ounces (but no hipbelt), and the GoLite Dawn at 2500 cubic inches and 14 ounces.

What’s Unique

The use of Dyneema Gridstop fabric for most of the pack makes it both lightweight and durable. ULA’s optional accessories are removable and can be interchanged in other ULA packs.

Recommendations for Improvement

Please don’t misunderstand my nitpicks above; the ULA Relay is a fine lightweight pack. However, I do have a few suggestions for improvements that are worth considering:

  • Replace the shallow fabric pocket and bungee system on the frontpanel with a full height mesh pocket.
  • Replace the angled side pockets with full height pockets, possibly with an angled entry near the bottom to allow inserting a water bottle without taking the pack off.
  • Reverse the top compression strap so the strap hangs on the front side of the pack.
  • Enlarge the delta wings on the hipbelt so there is adequate padding over the hipbone.
  • Add four attachment loops to the frontpanel seams, and offer optional accessory straps for attaching larger items to the front of the pack.

Modified Vargo Triad XE Stove REVIEW

Robust, lightweight, stable titanium alcohol stove that can be hard to get going – until a small modification is made.

A Modified Vargo Triad XE Alcohol Stove REVIEW - 2
The Triad XE stove in operation, with priming cap.

Introduction

The Vargo Triad XE is a jetted and pressurised alcohol stove that looks superficially a bit like its sibling, the Triad, but there are a number of significant differences. It is promoted as being ‘dual-fuel’: you can use the assembly to burn solid fuel tablets as well by removing the alcohol tank. This review will focus on using the Triad XE with alcohol, and a small modification I made to the stove.

The Vargo XE is light, robustly constructed of titanium, and it has really strong legs and pot supports. However, getting it going proved very difficult at first, and the stove usually just went out with fuel remaining. Basically, there’s a lack of thermal feedback without a very close-fitting windscreen.

The reasons for the poor performance suggested that a small modification might make the stove far more tractable. I tested the modified stove and the result was wonderful: the modified stove works with or without a windscreen, and it burns far hotter than before. Best of all, the modifications are easily made.

What’s Good – as bought

  • Robust construction
  • Stable on the ground
  • Strong – handles a heavy pot
  • Easy to set up

What’s Not So Good

  • VERY hard to get going
  • Can go out
  • Needs a very close windshield to get going properly

What’s Good – after modifications

  • Strong, stable and robust still
  • Burns much hotter
  • Can operate without a windshield in still air

Specifications

  Manufacturer

Vargo Outdoors

  Year/Model

2006 Triad XE

  Construction Material

Titanium

  Construction Process

Stamped, spot-welded and riveted

  Mechanical Design

‘Pill can’ with holes around the top, in a small support base with legs and pot supports

  Jets

12, drilled around rim of lid

  Alcohol Capacity

Not stated, but a shade over 1 fl oz (28 mL) of denatured alcohol

  Stove Style

Pressurised jet

  Boil Time

Claimed: 6 minutes for 2 cups

  Burn Time

Claimed: 9 minutes when filled (packaging) or 25 minutes (web site)

  Target Use

“One weight-conscious backpacker,” boiling water and light cooking

  Weight

Measured: 1.73 oz (49 g) total, claimed 1.5 oz (42.5 g)

  MSRP

US $32.95

Performance

Overview

The Triad XE looks a bit like the Triad at first, but there are several differences.

  • The XE design has separated the support structure from the fuel tank/burner.
  • The XE fuel tank has a lid, so filling and emptying it is much easier.
  • The XE is pressurised.
  • The XE is heavier (but it’s still very light).
  • The flames on the Triad go upwards; the flames on the XE go outwards.

Before we get into the operation of the stove, I should mention that the design makes the stove very stable. The fold-out legs can be dug into the soil a bit, after which the stove doesn’t move. The fold-out pot supports are just as rugged. I can confirm that the stove will support many pints (or litres) of water without a worry. However, if your pot/cup has a base smaller than 3.6 inches (92 mm) diameter, it does not sit on the pot supports very well unless you fold the pot supports inwards, to rest on the fuel tank. The support circle is then rather small. This is a stove for wide pots.

The tips of the legs and pot supports are quite sharp and could damage other gear if not folded away carefully. I did worry a bit that the tips would gouge my aluminium pots. Of course, a titanium pot or cup would have no trouble. If this really worries you, it is fairly easy to smooth the tips down a bit with a grinder or small sharpening stone.

Field Experience – Part 1

I spent some time with this stove, but I could not get it to burn well. Time and again the flames went out while there was still some alcohol inside the tank. Obviously I was doing something seriously wrong. I sat down and had a careful look at how this stoves works, and came to the conclusion that the support base was actually cooling the fuel tank down by channeling air against it. This is illustrated in the photo here, where the green lines show airflow being sucked in through the holes by the flames to hit the side of the tank. If this incoming air is cool, it will cool the tank and stop the alcohol from boiling.

A Modified Vargo Triad XE Alcohol Stove REVIEW - 3
The Triad XE stove with green lines showing cooling air flow.

Subsequent discussion with the designer, Brian Vargo, revealed that I should be using a very tight windshield (as with the Triad). While the XE packaging does not mention the use of a windshield, the web site states: “NOTE: A special windscreen is required! The windscreen will maintain the intensity and efficiency of the flame.” The windshield will cause the air around the support to be heated by the flames so the tank won’t be cooled down.

However, it seemed to me that there should be another ways to make this pressurised stove burn well, so I decided to see if my ideas would work. This means that the rest of this review concerns a modified Triad XE. However, the modifications are simple.

Design Theory

The alcohol has to be boiling to be forced out the holes in the lid, to make flames. This means the fuel tank has to be heated. The flames coming out of the standard holes all point away from the tank, so they won’t do this. Could I add a couple of flames which would heat the tank? Certainly this would be possible if I could get them pointing downwards from the lid rather than outwards.

A Modified Vargo Triad XE Alcohol Stove REVIEW - 4
Modifications to the Triad XE.

When the lid of the fuel tank is pressed on properly it comes down to the pink line in the picture above. I marked this line, and drilled four small 0.7 millimetre diameter holes at 90 degree intervals around the wall just above the line. The red arrow points to one of them. This was easy to do with a sharp new drill bit. These holes would make four more jets of flame, except that they would be largely blocked when the lid is pressed down. So then I lightly tweaked the rim of the lid away from the hole at each hole. The tweak is visible at the two blue arrows, with the lid slightly rotated out of position. This tweak makes a gap over the new hole, and this gap lets the alcohol vapour come out, but the jet is deflected downwards. The deflection is most obvious when you look at the right hand blue arrow. When the alcohol vapour burns there will be a flame going down the side of the stove for a little way before it curls back upwards toward the pot on top of the stove. This flame (all four of them actually) will heat the side walls of the fuel tank.

The four tweaks to the lid were done with some round-nosed pliers, and are pointed to by the red lines in the photo below. There is one tweak to each hole I drilled. The exact shape of the tweaks isn’t critical as long as the alcohol vapour can come out. Equally, I found that the tweaks don’t need to be very large: what is shown is probably more than is needed. Only a very small gap is needed, so don’t overdo it.

A Modified Vargo Triad XE Alcohol Stove REVIEW - 5
Tweaks to the rim of the lid to deflect gas flow.

With the extra flames going down the side of the fuel tank for a little way the tank will be heated. The flames will soon turn around and go upwards because they are trapped inside the support base. There may be a very small loss of fuel efficiency, but I haven’t been able to measure it with any reliability.

Field Experience – Part 2

Does the modification work? It certainly does. A little bit of priming fuel in the support bowl plus some under the support (in the green cap shown in the first picture) is enough to get the stove started, and once the flames start coming out from the new holes the stove is up and running. In fact, too much alcohol can make the stove roar a bit too much at the start. Priming now requires a delicate touch rather than a big slosh. The flames now coming out from the main jets are at least 1 inch (25 mm) long.

In fact, the first test run was perhaps a shade too successful, so I flattened the tweaks down a bit to restrict the flow out of the new holes. I found that not much flame was needed from those new holes to make the stove go just nicely. It is quite possible that only two new holes would suffice, but it was a bit hard to test that when I already had four holes.

It is hard to see alcohol flames in the daylight of course, but the next photo shows them coming out: there is an orange glow at the right hand side and a faint trace of blue at the left. There is a windshield in this photo, but it is more for convention and priming than for real need. The stove will now run quite happily with no windshield at all, as shown in the first photo at the top.

Modified Vargo Triad XE Alcohol Stove REVIEW - 5
This photo shows a small green aluminium bottle cap under the stove. I use this for priming both the XE and the Triad. The use of the cap lets me monitor how much alcohol I use for the priming, and I found that I really needed only a millimetre or two of alcohol in the cap, plus slightly less in the support bowl. Too much priming is to be avoided. As soon as the alcohol in the cap is lit I poke it under the stove, where it makes a nice controlled flame which burns for between 3 and 4 minutes. The fuel in the support bowl is lit by the flame from underneath, especially if I put the little cap at one edge rather than right under the middle of the stove.

Field Experience – Part 3

The Vargo Triad has jets pointing upwards, while the Triad XE has flames pointing outwards. I found I needed to use a fairly wide pot with the XE to take advantage of the flame spread. This is especially so now the stove burns more strongly. Typically I use my 150 millimetre (5.9 in) diameter Trangia kettle. If you don’t want the flames spreading out so much, you should have only two small extra holes under the lid, to apply less heating to the tank.

Boil time depends on a lot of things, but there was no question about whether the modified stove could bring 2 cups of water to the boil. It did so very reliably, and much faster than the Triad. With the windshield shown in the pictures set about 1 inch (25 mm) out from a Trangia kettle, priming to a good flame took about 20 seconds, and then the boil time for two cups of water (500 mL) was about 5 minutes 20 seconds after that, from 20 C (68 F).

Filling the container up with 1 fluid ounce of alcohol, which is the maximum amount of alcohol it can reasonably take, gave a burn time of about 7 minutes after I had done my modifications. If you run the stove without the modifications the burn time will be longer, but so will the time to boil. A definite time cannot be given since the burn rate depends so much on the amount of thermal feedback provided.

Other Features

  • Putting fuel in the stove tank is very easy (especially compared with the Triad).
  • The packaging claims that the burn time is 9 minutes, while the web site claims 25 minutes. The 9 minutes seems about right for the modified stove.
  • Dual fuel operation: tip the stove upside down and burn solid fuel tablets on it. Not tested.
  • Recovery of unused alcohol is easy once the stove has cooled down, provided you haven’t pushed the lid on too tightly.

Modified Vargo Triad XE Alcohol Stove REVIEW - 7
Morning tea with the Vargo Triad XE.

What’s Unique

The Vargo Triad XE is a very sturdy combined alcohol and solid fuel burner.

Recommendations for Improvement

  • I’d like to see the modifications I discussed offered on the stock stove. I have discussed these modifications with Brian Vargo and at present he does not wish to adopt them as he is happy with the stove as he uses it. This is fair enough.
  • You should use metal layer under the stove for safety; a windshield is a very good idea anyhow, and the small priming pot is very useful.

Vargo Triad Stove REVIEW

Lightweight, simple titanium alcohol stove with very stable, secure legs but just adequate heat output.

Introduction

The Vargo Triad stove is a jetted but unpressurised alcohol stove with a lot of good things going for it. It is light, it is very robust being made of titanium, and it has really strong legs and pot supports. However, if it is used incorrectly it can be a poor performer that is hard to start and doesn’t bring water to the boil. In this review I focus on how to use the stove properly. With proper operation it is possible to use this stove to make cups of tea and soup for two people.

What’s Good

  • Adequate alcohol capacity
  • Robust construction
  • Stable on the ground
  • Strong – handles a heavy pot

What’s Not So Good

  • Hard to get going
  • Not very hot
  • Needs a very close windshield to get going properly
  • Priming mistakes can send boiling alcohol everywhere
  • The instructions which come with the stove are very minimal (check the web site)

Specifications

  Manufacturer

Vargo Outdoors

  Year/Model

2006 Triad

  Construction Material

Titanium

  Construction Process

Stamped, welded and riveted

  Mechanical Design

Basic can with legs for stove support and pot supports as well

  Dimensions

Can is 2 1/4” (58 mm) diameter by 3/4” (18 mm) high

  Jets

28, drilled around top of rim

  Alcohol Capacity

Open centre well holds about 1.3 fluid ounces (37 mL) of denatured alcohol

  Stove Style

Open jet

  Burn Time

Claimed: 30 minutes when filled, but this depends on how the stove is run

  Target Use

One person, boiling water

  Weight

Measured: 0.77 oz (22 g), claimed: 1.0 oz (28 g)

  MSRP

US $29.95

Performance

Overview

I am not an expert with alcohol stoves, and at first this stove had me beaten. I simply could not get it to generate much heat, and there was always the possibility that the flame would go out. However, some email discussions with the designer, Brian Vargo, cleared up some major misunderstandings, and I was eventually able to get the stove going moderately well.

Before we get into that, let me point out here that the design makes the stove very stable. The fold-out legs can be dug into the soil a bit, after which the stove doesn’t move. The fold-out pot supports are just as rugged. I can confirm that the stove will support many pints (or litres) of water without a worry. However, if your pot has a base smaller than 3.6 inches (92 mm) diameter, it may not sit on the pot supports very well.

That said, the tips of the legs and pot supports are quite sharp and could damage other gear if not folded away carefully. As the photo shows, this can be done. I did worry a bit that the tips would gouge my aluminium pots. Of course, a titanium pot or cup would have no trouble.

Vargo Triad Alcohol Stove REVIEW - 2
The Vargo Triad titanium alcohol stove with legs open (left) and folded (right).

Field Experience – Part 1

I will start by describing what I did wrong. That way the significance of what Brian told me later on will have real meaning.

I set the stove up by opening the legs and pot support out, placed it on some sheet steel in my laboratory, poured alcohol into the well in the middle – and made a mess. I found I had to pour the alcohol into the well quite slowly: it doesn’t run down through the tiny central hole very easily. Now I had alcohol inside the stove, over it and under it on the sheet steel. So I lit the alcohol and waited for the stove to fire up. It didn’t: the flames went out. I think I had used too little priming fuel.

I reread the instructions, which say to ‘Carefully pour denatured alcohol into the centre until the stove is full and alcohol creates a small pool. Ignite the pool of alcohol (which acts as a primer).’ So once the stove had cooled down I did that, filling up the stove until the alcohol level was just above the bottom of the central well. However, again the stove failed to light up once the surface alcohol had burnt away. I think the amount of priming fuel I used was still not enough to heat the volume of alcohol inside the stove enough. Maybe I should have added yet a little more fuel to the stove.

To make this stove work you have to get the alcohol inside the container hot enough for it to be pushing vapour out of the holes. So I tried again with some alcohol on the steel under the stove as well as some in the middle of the stove. Well, I got the alcohol hot all right: it started to boil inside the stove and there were splashes of burning alcohol erupting everywhere for a while. Maybe this time I had used a little too much priming fuel underneath plus too much inside the stove? At least it was burning, so I put a pot of water on the stove and waited for it to boil. The flames died down to a low level and the water never got past the hot stage.

What was happening inside the stove was that the alcohol was boiling away, giving off vapour, and cooling down. Once the temperature of the alcohol drops below its boiling point there is relatively little vapour coming out through those little holes, and the stove will die. As far as I could see, there simply wasn’t enough thermal feedback from the flames to keep the alcohol boiling. They were going straight up in the air, away from the stove.

It was at this stage that I got some advice from Brian. He assured me that he manages to use the stove quite happily, but he emphasised the need for a close windshield right around the stove and pot, with holes at the base of the windshield. This is actually written on the packaging: “A wind screen is highly recommended to maintain flame”. Read the instructions! What this windscreen does is to trap some of the flame between the stove and the windshield and recirculate some of the heat downwards, to heat the stove and the incoming air.

So I tried again, with a Backpacking Light titanium windshield around the pot about 1/2 inch (12 mm) away from the rim of the pot all around, and with small holes around the base of the windshield. I used a discrete amount of alcohol under the stove plus some pooling in the middle top. A flame was applied to the alcohol under the stove, and after a while the stove lit up. This time the stove ran continuously, right to the end of the alcohol inside it. There were little flames coming up the side of the pot the whole time. Success! The water in the pot got hot, even to ‘mostly boiling.’ That is, there were lots of little bubbles coming up, and even a bit of obvious boiling, although it wasn’t the typical ‘rolling boil’ you get with more powerful stoves.

This means is that the Triad simply isn’t a ‘high-powered’ stove. Will Rietveld’s testing of alcohol stoves also found that the Triad stove wouldn’t work very well in windy conditions. The hot air is not being trapped sufficiently to heat the stove. But if all you want is simply to heat up a cup (or two cups) of treated water for some soup, it probably doesn’t matter whether the water reaches a rolling boil.

Field Experience – Part 2

I subsequently tried using a little aluminium cap (green out, gold inner, visible below) off a bottle to hold the priming fuel instead of sloshing it around. This let me monitor how much I was using for the priming, and I found that I really needed only a millimetre or two of alcohol in the cap. As soon as the alcohol in the priming cap is lit I poke it under the stove, where it makes a nice controlled flame. Usually, the vapour at the top of the stove is lit by the flame from underneath, once the alcohol is hot enough, especially if I put the priming cap at one edge rather than right under the middle of the stove.

I found that the further out I put the windshield, the smaller are the flames. The greater the space inside the windshield and the greater the gap between the windshield and the pot, the less the thermal feedback, as the flames are able to escape upwards more easily. So just where you put the windshield is fairly critical. In windy conditions the windshield is especially critical, and holding it down becomes part of the exercise! By using a tight windshield (about 1/2 inch or 10 – 12 mm gap all around) I am usually able to get a satisfactory flame from the stove and boil two cups of water for morning tea and coffee for my wife and myself. But it takes much care.

Controlled Testing

I ran some tests under controlled conditions in my laboratory at about 20 C (68 F) using a 6 inch diameter (150 mm) Trangia Kettle and two cups (500 mL) of water. I used common ‘methylated’ alcohol for the trials: this does not contain much water. For each trial I used a measured 1 fluid ounce (28 mL) of alcohol. About 1 – 2 mL of the alcohol went into the priming cap, with the remainder in the stove. This amount of alcohol filled the stove to near the central filling hole. The specifications claim up to 1.3 fluid ounces (37 mL) can be put in the stove. This is pushing it a bit, but is possible, and the alcohol is then visible in the central well. I surrounded the stove with a 3-inch (75 mm) high windshield with holes around the base. This was positioned to give a 1/2 inch (10 – 12 mm) gap around the edge of the Trangia Kettle.

Vargo Triad Alcohol Stove REVIEW - 3
An ‘exploded’ view of the laboratory test arrangements for the Triad.

I lit the alcohol in the priming cap and pushed it under the edge of the stove so that the flames just came up the side of the stove. I also tried to light the alcohol in the central well, but this was not always possible at the start when the alcohol is cold. In my tests I found it usually took about 2 minutes before the alcohol became hot enough for vapour to start coming out of the jets: the flame from my priming cap is rather small. I could usually hear the alcohol starting to boil inside the stove just before the flames appeared from the jet. It is important to understand that until the alcohol is near boiling inside the stove, little vapour will come out the jets. The amount of priming fuel I was using actually seemed to last about 4 minutes, which helped to get the stove hot enough to sustain operation.

The stove is a bit slow to get going once the jet flames appear: it is still heating up. However, after several minutes of operation the water in the kettle would be heating up at about 10 C (18 F) per minute. About 11 minutes after I lit the priming fuel the water would reach boiling. That’s about 9 minutes of jet flame time. The measured quantity of fuel continued to burn generally for a total of 16.5 minutes after the jet flames appeared. The specifications claim that a full tank will burn for 30 minutes, but under the test conditions I used I was not able to get the jet flames to burn for more than about 21 – 22 minutes. If the windscreen was placed further out so the feedback was lower and the flames smaller, the 30 minutes could possibly be reached. But it would take longer to boil the water like this.

These test conditions give me two cups of boiling water. This is enough to make soup or tea/coffee for two people, and dinner for one person. So for day walks this stove would be sufficient for two people. But the windscreen is essential for the stove to work.

Other Features

  • The packaging claims that the stove will boil 1 1/2 cups of water in 7 minutes. This depends on the conditions under which the stove is running: how hot you keep it. But it certainly can be done.
  • Dual fuel operation: tip the stove upside down and burn solid fuel tablets on it. This was not tested.
  • The packaging claims you can decant unused alcohol by pouring it back into a bottle using a leg as a spout. I managed to get about half the alcohol into the bottle; the rest went everywhere. And there was still some left inside the stove: the holes were too small to let it all drain out.

What’s Unique

The Vargo Triad, unlike many alcohol stoves, is very sturdy.

Recommendations for Improvement

  • I would prefer a stove which didn’t have to be cosseted so much, and had a little more power. (The Vargo Triad XE is worth considering.)
  • You will need a windshield and a metal layer under the stove, and the small priming pot is very useful. It would be nice if these were included with the Triad.

Outdoor Research HydroLite Dry Sack SPOTLITE REVIEW

The lightest dry sack available – almost.

Overview

The Outdoor Research HydroLite Dry Sack is a lightweight dry sack with roll top closure and taped seams.

The HydroLite Dry Sack has not been field tested. It was subjected to a series of tests simulating conditions beyond what normally might be expected inside a pack (its implied intended use). For test results, click here.

Outdoor Research also makes a heavier series of dry sacks, Hydroseal, that are still in the lightweight range. The 15.9 liter Hydroseal sack weighs 4 ounces and is constructed of Antron nylon with a durable waterproof coating. These sacks were not tested.

Features and Specifications

  • HydroLite coated fabric is waterproof and ultralight
  • Waterproof taped seams
  • Roll-top waterproof closure
  • Durable buckle secures roll top
  • Webbing bottom handle
  • Website: “This dry sack offers lightweight, compressible protection. The fabric has a waterproof coating and the seams are taped to keep moisture out. A roll-top closure keeps your gear dry and secure.”
Size Volume
ci
Volume
L
Dimensions
in
Dimensions
cm
Weight Specified
[Measured]
oz
Weight Specified
[Measured]
g
MSRP
$
#1 498 8.2 15 5/8 x 6 45 x 15 2.1 60 16.00
#2 775 12.7 20 1/8 x 7 51 x 18 2.6 [2.5] 74 [70] 17.00
#3 1137 18.6 22 5/8 x 8 57 x 20 3.0 84 18.00
#4 1983 32.5 25 ° x 10 64 x 25 3.8 107 19.00
#5 2590 42.4 27 ° x 11 69 x 28 4.4[4.3] 124 [123] 21.00
#6 3894 63.1 29 x 13 74 x 33 5.2 146 23.00

Cascade Designs SealLine Storm Sack Dry Sack SPOTLITE REVIEW

Top performing lightweight dry sack with roll top closure and taped seams.

Overview

The Cascade Designs SealLine Storm Sack is a lightweight dry sack with roll top closure and taped seams.

The SealLine Storm Sack has not been field tested. It was subjected to a series of tests simulating conditions beyond what normally might be expected inside a pack (its intended use). For test results, click here.

Features and Specifications

  • Roll-Down Closure
  • Sewn and Taped Construction
  • PVC-free 210D PU-coated nylon body and bottom
  • Website: “Our lightest, most versatile dry bag is also plenty rugged. It boasts a roll-down closure and seam-and-taped construction to ensure water tightness. Use it for organizing and protecting gear in a pack, or on its own when you really need to watch every ounce.”
  • Instructions inside packaging: “There is no roll-down closure from any manufacturer that is totally waterproof when submerged. This bag is not suitable for protecting from submersion such items as optical, electrical or photographic equipment, which can be permanently damaged by immersion or impact…SealLine Dry Bags are intended to protect your equipment and belongings from rain, splash, spray and intermittent shallow immersion. They are not intended for submerged use.”
Size Volume
ci
Volume
L
Dimensions
in
Dimensions
cm
Weight Specified
[Measured]
oz
Weight Specified
[Measured]
g
MSRP
$
2.5 165 2.7 4.5 x 12 11.4 x 30.5 1.6 45 9.95
5 390 6.4 6 x 15 15 x 38 2.2 62 12.95
10 656 10.8 7.5 x 17 19 x 43 2.7 [3.0, 3.0] 77 [84, 85] 15.95
20 1310 21.5 9 x 21 23 x 53 3.8 108 18.95

Granite Gear Drysack SPOTLITE REVIEW

Fairly lightweight dry sack with roll top closure and taped seams.

Overview

The Granite Gear Drysack is a lightweight dry sack with roll top closure and taped seams. Unlike the typical dry sack the roll top closure buckles clip to the bottom of the pack.

The Granite Gear Drysack has not been field tested. It was subjected to a series of tests simulating conditions beyond what normally might be expected inside a pack (its intended use). For test results, click here.

Features and Specifications

  • Hot-weld waterproof tape over sewn seams
  • Body of sack leak proof up to 200 psi
  • Roll top closure
  • Website: “Although our Dry Sack is intended for use in wet, stormy weather, it is not recommended for extreme submersion situations, such as white-water paddling.”
  • Package: “Our Drysack is intended for use in wet, stormy weather inside a pack.”
Size Volume
ci
Volume
L
Dimensions
in
Dimensions
cm
Weight Specified
[Measured]
oz
Weight Specified
[Measured]
g
MSRP
$
SM 600 9.8 6.5 X 16.5 17 x 42 3.5 99 15.00
MD 900 14.7 8 X 18.5 20 x 47 4.2 119 16.50
LG 1200 19.7 9 X 20 23 x 51 4.5 128 17.00
XL 1600 26.2 10 X 21 25 x 53 5.2 [5.2] 147 [148] 18.00

Pacific Outdoor Equipment WXtex Pneumo Lightweight Dry Sack SPOTLITE REVIEW

Lightweight dry sack with a twist – purge/inflate valve and welded seams.

Overview

The Pacific Outdoor Equipment WXtex Pneumo Lightweight Dry Sack is a lightweight dry sack with roll top closure and, unlike other lightweight dry sacks, welded seams. Another unique feature is an inflatable sleeping matt style purge/fill valve.

The Pneumo Lightweight Dry Sack has not been field tested. It was subjected to a series of tests simulating conditions beyond what normally might be expected inside a pack (its intended use). For test results, click here.

Pacific Outdoor Equipment also has a Pneumo line using 50-denier instead of 40Dx30D fabric. Weights are still in the lightweight range, with the 15L size at 5 ounces as compared to 4.4 ounces for the 15L Penumo LTW dry sack.

Features and Specifications

  • Roll down closure with double seal opening
  • Purge/fill valve for load compression
  • Welded dry construction
  • Lightweight PU coated
  • 40Dx30D ripstop fabric
  • On package: “…they are totally waterproof, allowing you to stay worry free in even the mightiest downpour or inopportune river crossings.”
  • On package: “If the bag is to be submerged temporarily, keeping as much air inside the bag as possible will keep pressure against the [roll top] seal and provide the greatest potential for dryness.”
  • On package: “If you are storing a critical item, it is best to have redundant protection; e.g. use two dry bags layered together.”
Size Volume
ci
Volume
L
Dimensions
in
Dimensions
cm
Weight Specified
[Measured]
oz
Weight Specified
[Measured]
g
MSRP
$
5L 305 5 10 x 20 25 x 51 3 [3.1] 85 [88] 17
15L 915 15 14 x 28 36 x 71 4.4 [5.0] 125 [141] 24
25L 1525 25 16 x 33 41 x 84 5.8 [6.4] 164 [181] 28

GoLite DriMove Long Sleeve Top SPOTLITE REVIEW

Lightweight, good fit, very comfortable, really wicks moisture away, but snags easily.

Overview

Weighing only 5.6 ounces in size Large, the GoLite DriMove Top is a very functional and versatile piece that can be worn as a base layer or outer layer in a variety of outdoor activities. The fabric is a polyester knit with a very soft inner surface for comfort against the skin and a textured outer surface. The combination is very effective for wicking sweat away and staying dry.

On me (6 feet, 170 pounds, 41-inch chest, 34-inch arms), a size Large DriMove LS Top had a relaxed fit. GoLite lists it as semi-fitted, and it probably is on a huskier person. I found the sleeve and tail length just right. It has flat seam construction and raglan sleeves, which gives it good freedom of movement without binding or chaffing.

I wore the GoLite DriMove Top as an outer layer on nine backpacking trips (ok, I’m bragging a little bit) in cool, windy, and warm/hot weather. I can easily say that this is the driest top I have worn. The only area that got wet was the patch behind my backpack, and it dried out quickly when I took my pack off.

For its weight, the DriMove Top had a surprising comfort range. As long as I remained active, I was quite comfortable hiking in a wide range of temperature and wind conditions. I also wore it as a base layer in camp, in my sleeping bag, and on cold mornings and found that it added extra warmth without bulk. I also wore it as a base layer while hiking on cold mornings, and managed to stay comfortable until the temperature rose into the 60’s.

GoLite DriMove Long Sleeve Top SPOTLITE REVIEW - 1
The DriMove wicking polyester fabric is smooth and soft on the inside (left) and textured on the outside (right). Unfortunately it snags easily.

The only downside I found with this top is that it snags fairly easily. When bushwhacking through brush I was quite careful with it, and it still acquired a collection of snags. So, a bushwhacking shirt it is not.

Specifications and Features

  • Manufacturer: GoLite (www.golite.com/)
  • Product: DriMove Long Sleeve Top
  • Fabric: DriMove wicking polyester knit
  • Features: Men’s crew neck/women’s V-neck, raglan sleeves, flat seams
  • Sizes Available: S, M, L, XL, XXL
  • Weight: Measured weight 5.6 oz (men’s L), manufacturer specification 6 oz (men’s L)
  • MSRP: $25

Make Your Own Gear Sewing Primer: Straight Stitch and Top Stitch

Instructions on how to properly sew two workhorse stitches.

Sewing Primer: The Straight Stitch and Top Stitch - 1

Introduction

The straight stitch and top stitch are the mighty work horses in the world of sewing. The straight stitch is necessary to complete nearly any sewing project. In this article I cover the basics on these stitches, including how to take your straight stitch around corners and add a top stitch for greater durability and a better finished look.

The Straight Stitch

This stitch is most often used to sew two pieces of fabric together along their edges. The finished seam ends up on the inside, unseen, once complete. Before tackling the straight stitch, make sure your sewing machine is properly set up. The next step is to place the two fabrics together, right sides on the inside (This puts the seam on the inside when complete). Depending on the fabric, place the fabric under the sewing machine’s presser foot with a 0.25 to 0.5 inch seam allowance.

I always start with a reverse stitch by depressing the reverse-feed button on the sewing machine. Sewing a few stitches in reverse locks the end of the seam, preventing it from unraveling. After reverse stitching about 0.5 inch, release the reverse-feed button and proceed to stitch along the fabric’s edge. While sewing, use your right hand to hold the edge of the fabric feeding into the machine and steer the fabric to maintain the desired seam allowance. I use my left hand to keep the rest of the fabric out of the way. To keep the two fabrics together, I usually use my thumb and forefinger, but many will find pins handy for this. Finish the stitch by reverse stitching the final 0.5 inch of the seam.

Sewing Primer: The Straight Stitch and Top Stitch - 2

Sewing Primer: The Straight Stitch and Top Stitch - 3

I start off my straight stitches with the reverse-feed button depressed (left) which adds stitches while backing up. Back stitching for a few stitches first locks the end of the stitching, and prevents it from unraveling.

Sewing Primer: The Straight Stitch and Top Stitch - 4
When sewing, I use the thumb and forefinger of my right hand to feed the fabric. This allows me to keep the two pieces of fabric together with their edges aligned (one could use pins instead) and steer the fabric to maintain my desired seam allowance. Finish your stitch with a reverse-feed stitch to lock the seam.

Sewing around Corners

Many outdoor gear projects require a sewn corner (i.e. backpacks, stuff sacks, sleeping bags, etc.). We could stop the straight stitch at the corner with a reverse-feed stitch to lock the seam, clip the threads, and realign the sewing project to sew the next edge. What a pain. How about just steering the fabric around the corner as you continue sewing? There’s another, much easier option.

Upon reaching the corner, stop sewing with the needle down in the fabric. You might have to advance the sewing machine by hand using the hand wheel to get the needle where you want it. With the needle in the fabric, raise the presser foot and rotate the fabric to the new direction you wish to sew. Continue sewing after lowering the presser foot.

Sewing Primer: The Straight Stitch and Top Stitch - 5

Sewing Primer: The Straight Stitch and Top Stitch - 6

Sewing Primer: The Straight Stitch and Top Stitch - 7

Sewing Primer: The Straight Stitch and Top Stitch - 8

When you reach the corner, stop with the needle in the fabric. Lift the presser foot (top left), and rotate the fabric around on the needle (top right). Once realigned (bottom left), drop the presser foot and continue sewing (bottom right).

Top Stitching

Adding a top stitch gives a finished look to your seam and adds a bit of strength. The top stitch is sewn on top of a primary straight stitch, sewing through the top of the fabric and the seam allowances underneath.

To sew the top stitch, lay open the previously sewn fabrics with right sides up and the seam allowance underneath. Fold the seam allowance (underneath) to the side where you intend to top stitch. You will sew through the top fabric and through both fabrics’ seam allowance underneath to hold the seam allowances flat. Sew as you would a straight stitch, with the top stitch seam about 1/8 to 1/4 inch from the straight stitch seam.

Sewing Primer: The Straight Stitch and Top Stitch - 9
Adding a top stitch is as easy as doing a straight stitch. Try to keep it parallel to the primary stitch, about 1/8 to 1/4 inch beside it. A crooked top stitch really stands out. In the above photo, the primary straight stitch is on the left. The top stitch is on the right and is sewn through the top orange fabric and both layers of seam allowance underneath.

Sewing Primer: The Straight Stitch and Top Stitch - 10

Sewing Primer: The Straight Stitch and Top Stitch - 11

The top stitch adds a bit of strength to the seam, looks more finished and forces the seam to lay flat (right photo).

Sewing Primer: The Straight Stitch and Top Stitch - 12

Sewing Primer: The Straight Stitch and Top Stitch - 13

Top stitching can also be used along a fabric edge to help define the edge and hold it flat. The pictures above show a sewn corner (as demonstrated above) turned inside out so the seam allowance is on the inside. The left picture shows this corner without top stitching, and the right shows the top stitch. Using a top stitch in this way is mostly cosmetic, but can give a simple project a more professional look.

Final Word

Nothing detracts more from the finished look than hanging threads, and most sewing projects have lots of them at the ends of every seam. Certainly you will want to clip them, but now is not the time to be in a hurry. I have snipped the fabric, along with the thread I was after, a time or two when trying to get done before my next trip. It takes a lot of time to rip seams and re-sew so caution is advised.

CW-X Sport Support Bra and Firm Support Bra REVIEW

Good looking, quality construction, supportive – and comfortable too?

Introduction

The CW-X Sport Support and Firm Support bras look good. They won’t make the grade as outer garments at an upscale soiree, but they will bring a touch of elegance to your sunrise meditation at Perfect Kiva in Grand Gulch Primitive Area.

Of course the CW-X bra will be invisible most of the time, so what really matters is whether the bra is comfortable and supportive.

What’s Good

  • Supportive
  • Comfortable enough for multi-day, all-day wear
  • Attractive
  • Dries fast
  • Stays in place

What’s Not So Good

  • Snug bottom band can make it hard to pull on/take off
  • Heavier than some mostly single layer sport tops
  • Some users noticed hot spots at the arm opening

Specifications

  Year/Model

2005/2006 CW-X Sport Support Bra and Firm Support Bra

  Weight

2.7 oz (77 g) as measured Sport Support size L

  Fabrics

Four-way stretch Coolmax Tricot fabric, 80% Coolmax/20% Lycra

  Sizes

Sport Support – S, M, L; cup size regular, (A) and (D) covering bra sizes from 32AA/A through 36D.

Firm Support – M, L, LL; cup size regular and (D) covering sizes 34B/C through 38D

Sizes tested – Sport Support L regular (36B/C) and M (A) (34AA/A), Firm Support LL regular (38B/C), and LL (D) 38D

  Features

  • Inner cup Soft Support Web (80% polyester/20% polyurethane mesh) provides targeted Soft Support to breasts during activity using five interconnected floating inner cup straps
  • Elastic base strap sits comfortably around rib cage and works in tandem with the inner cup support web and shoulder straps
  • Four-way stretch mesh (78% polyurethane/21%nylon) lining panel approximately 0.25 in ( cm wide) sitting just under the bust for breathability and moisture movement
  • Offset flat seams
  • Racer-back cut
  • Mesh back panel (80% polyester/20% polyurethane mesh) for extra compression and fabric reinforcement

  Colors

Black, Black/Grey, Black/Pink, White

  MSRP

Sport Support Bra $44.95 , Firm Support Bra (available August ’06) $51.95

Performance

CW-X uses technology and body movement analysis to create apparel as technical as other gear you use to enhance your backpacking experience. Their parent company, Wacoal, has spent 40 years studying the human body. The CW-X Soft Support technology was developed after extensive high-speed video analysis of women in motion. The Soft Support Web utilizes mesh webbing built into the cup of the bra in a five-point star pattern. Suspending the breast from the shoulder strap of the bra, the webbing is claimed to reduce the initial upward bounce experienced during high impact activities. Anchoring the Soft Support Web at the base strap and shoulder is intended to provide the wearer with a floating inner support web that is comfortable, yet supportive. In addition, compression is used to provide added motion control and increase the bra’s ability to move moisture away from the skin.

CW-X has extended the size range of their Sport Support Bra and added the Firm Support Bra. The Firm Support Bra uses a modified Soft Support Web for larger cup sizes. Sport Support Bras are now available in sizes 32A/AA through 36D, while Firm Support Bras are available in 34B/C through 38D. The sizing convention used by CW-X is somewhat confusing necessitating a chart (below) for clarification. Four reviewers representing the complete size range of the line tested the CW-X Sport and Firm Support Bras backpacking, day hiking and at the gym and confirmed that sizing is accurate.

Size S M L LL
No designation 32 B/C 34 B/C 36 B/C 38 B/C
(A) 32 AA/A 34 AA/A 36 AA/A
(D) 32 D 34 D 36 D 38 D

Does all the technology behind these bras pan out in actual use? In a word, yes. The Sport Support Bra is very comfortable to wear day and night with no chaffing during intense activity. Testers for both the Sport Support and the Firm Support Bras all commented on the good support.

Comments were mixed on the difficulty of donning/doffing the bra. Our largest tester needed assistance taking the bra off after a sweaty workout, while another tester found the CW-X bra easier to get on and off than other sports bras she owns. Any difficulty is due to the snug bottom band (tip – keep the band from rolling over on itself when pulling the bra over your head). Once the bra is in place, the bottom band is amazingly comfortable – it holds the bra securely in place without pinching. There are no skin indentations after prolonged (multi-day) use, except for a very minor indentation at the bottom circumference that doesn’t cause any discomfort. The tag bothered some users and two of us noticed a hot spot at times at the front of the arm opening.

The CW-X Bra is constructed with an inner and outer layer of fabric with a Soft Support Web of five interconnected floating inner cup straps suspended in between. Each breast is supported individually rather than compressed together into one “mono-boob.” The two layers of fabric help hold in warmth – a plus in cool weather. CW-X offers the Mesh Support Bra and Ventilator Support Bra for warmer weather, although I have not felt overheated wearing the standard Sport Support Bra hiking in desert conditions.

Contrary to my expectations, the CW-X bra does not take excessively long to dry. In fact, in a hang to dry comparison test with an older model Patagonia Mesh Sport Top, the CW-X was completely dry first. It was neck and neck throughout the test with the Patagonia bra slightly in the lead, until the end when the CW-X pulled ahead with a faster drying bottom band.

Minimal accents give the top an understated stylish look. The straps are fixed length and long enough for those with a long torso – like me. The Patagonia Mesh Sport Top has shorter straps and feels like it will pull up out of place when I lift my arms above my head. That is not the case with the CW-X bra (see photos below). As a bonus, the CW-X bra passes the sniff test after intermittent use – 15 days and 5 nights.

CW-X Sport Bra REVIEW - 2a

CW-X Sport Bra REVIEW - 2b

CW-X Sport Bra REVIEW - 2c

After a faster than anticipated 3-mile hike to the top of Rincon Peak to watch the sunset, we arrived an hour early to cool, windy conditions. My shirt was soaked and I was getting chilly fast. But not so chilly I didn’t take the time for a photo op as I peeled off my wet shirt to replace it with dry insulation. Notice how the CW-X Sport Support Bra stays securely in place even with my arms over my head. (Thanks to Don ‘Photon’ Johnston for being a good sport and taking the photos.)

What’s Unique

The CW-X Sport Support and Firm Support Bras are good looking, supportive, and comfortable enough for continuous wear.

Recommendations for Improvement

The CW-X bras are wonderful, but there’s always room for improvement. The sizing could be clearer (even the sizing chart isn’t immediately obvious).

Backpacking Light Editor, Don Wilson, on the PCT this Summer

Mojave, CA (June 12) to Ashland, OR (August ?) – say Hello!

Backpacking Light Clothing Systems Editor, Don Wilson, spent some time last summer hiking the PCT north from Campo. He returns this summer to crank out some more miles and test a few pieces of gear through-hike style.

Don left Mojave, California on June 12th and plans to end up in Ashland, Oregon the beginning of August. He averaged 30+ miles a day last summer, although the severe snow fall in the Sierras last winter may slow him down this year.

Don has lightened his pack since last year from a 12+ pound baseweight to about 10.5 pounds. Lighter items include a 35 degree Western Mountaineering Summerlite sleeping bag, cook kit, clothing, trekking poles (Komperdell C3), and shoes (Montrail Continental Divide replacing Montrail Hardrocks). He’ll still carry a Six Moon Designs Starlite pack and his shelter will vary with conditions. Once he gets off the trail, Don will report on lessons learned and how his gear fared (including the Summerlite and Komperdell C3s).

Don’s trail name is Lobo. Say hello if you see a tall skinny guy on the PCT this summer who resembles a scruffier version of the photo to the right.

Mini Bull Designs Sketti Stove REVIEW

Powerful, dead easy to light, sturdy alcohol stove – just be careful lifting a pot off before it burns out.

MiniBull Designs Sketti Alcohol Stove REVIEW - 1

Introduction

Mini Bull Designs claims that the Sketti alcohol stove is powerful enough for two people, is robust and simple, and doesn’t require a pot stand. This review investigates these claims.

What’s Good

  • Large alcohol capacity
  • Powerful
  • Stable on the ground
  • Strong – handles a heavy pot
  • Easy to use

What’s Not So Good

  • Uncertainty about amount of fuel to use
  • Flaring when pot removed

Specifications

  Manufacturer

Mini Bull Designs

  Year/Model

2006 Sketti

  Construction Material

Several bits of a 25 oz Fosters beer drink can

  Construction Process

Hot-rolled seams with no tape or glue to melt

  Mechanical Design

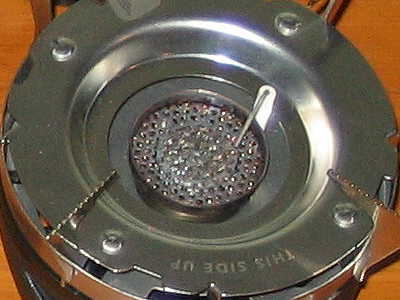
‘Pepsi-can’ inner wall creates annular chamber for alcohol

  Jets

31, drilled around outside, 3/4 in (20 mm) down from rim

  Alcohol Capacity

Open centre well claimed to hold up to 4 oz denatured alcohol

  Stove Style

Looks like an open jet, but closer to pressurised in use

  Burn Time

Claimed to run for 20 minutes when filled

  Target Use

Two or more people, heavy pots and heavy use

  Weight

0.77 oz (22 g) measured

  MSRP

US $12

Performance

I have used many white gas, kerosene, and gas canister stoves. I have used some old alcohol stoves, but only a couple of the newer ultra-lightweight alcohol stoves. It had struck me that the new alcohol stoves were all slow and fragile, but Tinny of Mini Bull Designs assured me otherwise, and recommended the Sketti stove as an example.

Well, I can vouch for the strong bit. The design is such that the pot sits on top of the stove; no pot supports are needed. I tried putting some very heavy pots on the Sketti, and it simply wasn’t bothered. The large Fosters can makes the Sketti more stable under these loads, compared with other smaller diameter stoves.

MiniBull Designs Sketti Alcohol Stove REVIEW - 2
Details of the Sketti stove, showing the holes around the edge

I set the Sketti up on my test bench, poured 1 fluid ounce of denatured alcohol into it and struck a flame over it with a butane lighter. Nothing happened. This surprised me, especially as I was in the middle of the Australian summer at the time. Maybe the vapour was sitting in the middle of the can and not coming up high enough for the flame from my lighter to reach it? So I dipped a timber splint into the alcohol, lit it, and slowly lowered it into the middle of the can. Indeed, the alcohol lit only when the flame was about 1/2 inch (15 mm) below the rim. With the alcohol near boiling I could light the stove with a butane lighter, but not otherwise. In cold weather or with a little breeze blowing I found I had to put the flame slightly closer to the surface of the alcohol to get it to light.

Once lit, a flame rises from the middle and dances around, but nothing comes out of the jets immediately. One could hold a pot over this flame and start heating water already: this does slightly improve the fuel efficiency, but it’s hard to say by how much. About 60-70 seconds later there are flames coming out of the jets and I can lower my pot onto the rim of the can. If I do this too early, the flames from the jets go out: I have to wait until they are over 1 inch (25 mm) long for the stove to work. But once it is going, things get interesting.

While the stove is just sitting there with a big flame coming up from the middle, the jets give out small flames. It functions like an open jet stove. But when I put the pot on the rim, the centre chamber is at least partially sealed, and the stove becomes pressurised. The flames coming out the side grow larger. After a while, they grow to at least 2 inches (50 mm) long and sometimes come up the side of the pot some way. Of course, flames coming up the side represent a loss of efficiency, so small diameter pots are not recommended with this stove.

Lifting the pot off the stove while it is burning normally releases the pressure inside the stove, so the flames from the jets decrease in length. However the alcohol is still boiling with lots of alcohol vapour coming off, and the centre flame will rise, up to 2 feet (600 mm) high or more. This is a bit scary and I would not want this inside my tent. I also found that lifting the pot off the stove under these conditions has to be done with some care, or with some pot grips, to avoid getting one’s arm singed – those flames can leap around a bit. If you need to remove your dinner from the flames before the alcohol has run out, much care is needed as to where and how you do it.

MiniBull Designs Sketti Alcohol Stove REVIEW - 3
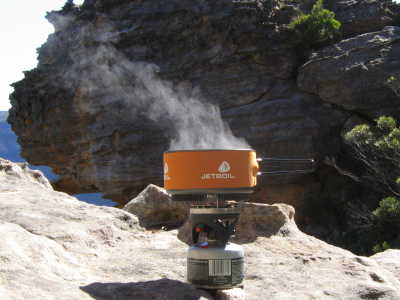
Boiling up for morning tea using the Mini Bull Designs Sketti alcohol stove on the bank of a small creek.

For the alcohol to give off enough vapour to make these long flames, it must be boiling away quite vigorously. This means the flames must be providing lots of thermal feedback to the stove, and I think this is a prime requirement for a good reliable alcohol stove. Well, the Sketti sure meets this requirement. Were the jets much closer to the top of the can this feedback would be reduced – and it might not be possible to use the can as a stove support either. That said, maybe moving the level of the holes just a millimetre or two closer to the top might throttle the stove back just a little, and the shorter flames might improve the efficiency. As it is, some heat is visibly lost up the sides of narrower pots with this stove. This is a stove for big pots.

I was a bit concerned to note that the flames come out of the stove very close to the ground. I would not be game to run this stove on any surface that was burnable, let alone on the floor of the Australian eucalypt forest in summer. The risk of starting a fire seems very real. I have compromised in the bush by only using the Sketti on bare sand beside creeks, bare rock and very clean earth.

With many of my other stoves I use a small square of plywood as a stove base, to provide stability. I tried using the same base for the Sketti, but the plywood started to get a bit hot. This is the same problem as above. So in the photo above I had planted the stove into bare sand; later on I used a small square of stiff aluminium sheet as a base in the field.

The testing of these two base materials (plywood and aluminium) made me realise that the aluminium base would suck some heat out of the stove, cooling the alcohol down. Then I realised that damp sand would do the same, only worse. Fortunately, the sand in the photo was fairly dry and did not cool the stove down much. Regardless, the stove burned well.

Measurements

I have used this stove inside at home for testing and out in the (Australian) bush for real, mainly to boil water for morning tea/coffee. I have to confess that in two cases in the field I slightly underestimated the amount of fuel needed, so that the flame went out shortly before the water boiled. I was intrigued to note that the flame did go out quite quickly when the fuel ran out: from full-bore to out in a couple of seconds. The stove cooled down fairly quickly when this happened.

I had to refill the stove each time. I wasn’t sure just what was safe and what wasn’t, so I waited a moment in each case and then poured a bit of alcohol into the centre. The can was still slightly warm when I did so, but the addition of cold alcohol quickly cooled it down. The warmth of the empty stove has not presented me with any hazard when refilling – in my experience. Relighting is done with a twig as before.

My standard test case is to boil two full cups (500 ml) of water for tea and coffee for my wife and me in our Trangia kettle with a base diameter of 150 millimeter (5.9 inches) and the lid on. The normal boil time starting from about 20 C (68 F) was 5.5 – 5.7 minutes. This compares very well with the 10+ minutes for one cup of water I have experienced with two other small alcohol stoves I have recently tested. It includes holding the kettle over the flames while the alcohol is heating up – before the jets start working.

What I can’t answer with precise numbers is whether the fuel economy of the Sketti is better or worse than for the slower, smaller stoves. It is very hard to do this comparison. The smaller (one-man) stoves are designed for smaller pots and smaller quantities of water, while the Sketti stove is a two-man stove and is designed for larger pots and larger amounts of water. Using a small pot on the Sketti is not very efficient as the flames reach up the side of a small pot far more than with the smaller stoves, and this wastes heat. As it is, the flames often lick up the side of the Trangia kettle.

Starting with exactly 1 fluid ounce (28.4 ml) of alcohol fuel in the Sketti had the kettle boiling at about 5.6 minutes, and the flames went out at 7.0 minutes. In practice I can use a bit less than the 1 fluid ounce to make tea and coffee: about 0.9 fluid ounce (25 ml) usually suffices.

The claimed burn time of 20 minutes would be about right if you came close to filling the Sketti with alcohol – this would be about 3 fluid ounces. However, you would want to be sure you need this much heat before doing so: removing the pot before the flames have gone out is risky, and there seems to be no simple way of putting the stove out. I tried blowing, but this didn’t always work. A snug cap of alfoil worked if I was very quick, but I don’t normally carry such a thing. Also, there is a high risk of getting burnt doing this.

MiniBull Designs Sketti Alcohol Stove REVIEW - 4
Brown goo in the bottom of the stove after some use

Other Matters

After a while I found the inside of the can looked a bit brown and wrinkly: something had been ‘cooked’ there. Whether this is from whatever is put in the alcohol to ‘denature’ it, or whether it represents varnish off the inside of the can, I cannot say. But it didn’t seem to matter.

I also looked to see if any alcohol would leak from the join that runs around the base. This seemed like a strange place to put a join: up near the top might have been more logical. However, the process Tinny uses to join the parts together (hot rolling) seems to create a pretty much leak-proof seam. The rolled seam means that there is no worry about epoxy getting too hot and melting.

I did try pouring excess alcohol back out of the Sketti. This was not very successful. Some did come out of the jet holes, but the double wall construction means you can’t just decant. This means that you should try to gauge the right amount of fuel to put in each time. This comes with practice – and maybe a small measuring container. I just looked in the base of the stove to see how much was there.

In short, this is a powerful and robust two-man alcohol stove at a quite low price. You can throw it in your pack with few precautions. The design is more than the amateur stove maker could create, unless he had a lathe and skills in rolling tubing. It will boil enough water to make a meal for two to four people, but forget simmering.

What’s Unique

The Mini Bull Designs Sketti alcohol stove has features which are relatively uncommon, and the combination of features is unique. Mini Bull Designs offers other quite similar, but smaller stoves.

  • Rolled seams which don’t leak or soften with heat
  • Big heat output, enough to cook for two or more people
  • Integral and very strong support for the pot
  • Low profile despite the integral pot support
  • Use of the pot to force a pressurised jet operation
  • Very light weight
  • Dead easy to get going

Recommendations for Improvement

The Mini Bull Designs Sketti has a lot going for it, but of course I have some recommendations for improvements.

  • It would be lovely if there was some way of throttling the stove, but it doesn’t seem very easy to include such a feature.
  • Maybe the row of holes could be moved up a very small amount, or slightly reduced in number, to reduce just slightly the power of the stove.

Jetboil Group Cooking Sytem SPOTLITE REVIEW

The second generation Jetboil stove system – efficient, but speed of heating can vary wildly.

Overview

The genuine claim to fame of the Jetboil system is the efficiency of heating, due they say to their ‘FluxRing’ heat exchanger on the base of the pot. Jetboil claims the stove is twice as fuel-efficient as conventional canister stoves when used with a FluxRing pot. At the time of the release of the original Jetboil product, the Personal Cooking System (PCS), the company also claimed a boil time of two cups in 90 seconds for the PCS. However the current Jetboil web site now claims 2 minutes for this. While the PCS had a 1 liter/quart tall mug as a pot, the pot on this new release, the Group Cooking System (GCS) system, is larger at 1.5 liter/quart (4 cups) capacity, and is more conventional in shape. This pot should usually be enough to cook for three people. Jetboil claims a boil time of 4 minutes for 4 cups for this pot. Understandably, power and efficiency were subjected to careful testing!

The Jetboil Group Cooking System consists of many items, as shown on the picture. The key items are the burner and the pot.

Jetboil Group Cooking System SPOTLIGHT REVIEW - 1
The Fluxring on the underside of the pot
(picture by Jetboil)

The FluxRing is a ring of fins around the base of the pot, made of concertina’d thin aluminium welded to the base of the pot. The pot has an anodised surface, inside and outside, and the anodising is been done after the FluxRing has been welded on. There are two plastic-coated steel swing-out handles on a large steel bracket. The handles are quite strong, and don’t get hot even when the stove is run fairly hard. However, the handles and their support bracket are quite heavy in themselves. There are gradations inside the pot at 0.5 L intervals. In addition, Jetboil provides an orange neoprene cozy (middle of photo) which can be left on the pot without damage while it is cooking. This means the FluxRing on the base of the pot does actually trap a lot of the heat from the flames. I have to add that, in my experience, putting a cozy on a pot for the short time it is heating does very little for fuel efficiency. It might keep the pot warm later, but there are other lighter ways of doing this – I use my hat. Far more critical for efficiency is the use of a lid.

The complex heat exchanger on the underside of the pot does need protecting in your pack, so Jetboil provides a special rugged black plastic cover for the base of the pot. This adds weight of course. Jetboil also provides plastic clip-on lid, which is a bit heavy compared to the shim aluminium lid I use on another pot, but it does seal quite well, and keeps everything inside when packing. Less obvious is the idea that both of these plastic bits can be used as plates, although the bottom cover is a shade flexible even when cold. In addition, the bottom cover has gradations for 2 and 4 cup volumes. This dual use does help with the overall weight.

Jetboil Group Cooking System SPOTLIGHT REVIEW - 2
The Jetboil burner face, pot supports and igniter

The stove itself is made of brass, plastic and steel. Jetboil seem to be seriously concerned about the strength of the connection between the canister and the stove as the hard black plastic surround under the burner has legs which go down almost to the gas canister. What actual use they serve is not clear however, because there is a 0.12 inch (3 mm) gap between the canister and the legs. The author has never had any problem with the strength of the connection between any stove and any gas canister. The burner itself has a face which seems to be made of woven steel mesh in the middle and perforated steel around the edge. The reason for the two different materials eludes me, but the flame produced is quite smooth. This is different from most other stoves where there is a distinct flame from each little hole in the burner head. There is a well-shrouded piezo-igniter built inside the stove, although popular opinion about piezo-igniters does not give them a very long life. The button on this one has to be really fully depressed to make it work.

The actual pot support part can be separated from the burner and the legs folded sideways. They still stick up, but the diameter is reduced a little. It is helpfully labeled ‘this side up’ in the picture. The whole burner can fit inside the pot with the plastic lid on. The Jetboil product photos show a gas canister fitting inside the pot along with the stove. Be warned that this is a 100 g canister, not the more popular 220 g one which is both more weight-efficient and economical. The 220 g canister does not fit inside the pot. Given the inevitable rattling around which gear does in a pack, the user would be well-advised to put some padding between the canister and the pot when packing, or risk having the anodising scraped off over time.

Finally, Jetboil includes a canister stand with fold-out legs in the kit – this is the triangular spider thing at the left in the top picture. It has notches for both the 100 g and 220 g versions of the canister, and non-slip rubber pads at the tips. To be sure, it is light and can add stability, but does one really need it? I have to confess that while I was at first a bit dismissive of the spider, the lightness of it grew on me over time. I find it can be used instead of a base plate as the downwards radiation from this stove is very small. Base plates are usually a bit heavier.

Jetboil Group Cooking System SPOTLIGHT REVIEW - 3
The Jetboil stove in action at the top of Du Faur Buttress, Blue Mts, Australia (Coleman canister used here)

Testing

Testing was done at ‘room conditions’ (around 18 C or 64 F), with cold water at about 15 C or 59 F. The standard test volume was 1.0 liter (4 cups). The stove was run flat out with the valve wide open and only the jet limiting the gas flow. Wind protection was used around the stove, although it does not seem to be especially sensitive to wind. Testing was done with two different canisters: a heavily-used Coleman gas canister which contained 70% n-butane / 30% propane when new, and a full Kovea canister which contained 70% isobutane / 30% propane. The used Coleman canister had been used in the cold a fair bit, and it is likely that by the time of this test the propane fraction had dropped significantly, to maybe 15% propane. The significance of this will be explained below. Time to boil for the two different canisters and weight of gas used are listed in the table below.

Analysis of Test Results

Canister Boil time Fuel used
Coleman 8:20 10 g (0.35 oz)
Kovea 5:10 10 g (0.35 oz)

The difference in boil times is immediately obvious, and quite startling. The slower speed is entirely consistent with the previous Backpacking Light initial tests which showed a boil time of (effectively) 8:30 minutes for 1 liter (4 cups). Tests by other groups have since duplicated these general findings of slow speeds. But the second test showed a remarkable improvement. What is going on here?

The answer lies in the quantity and composition of the gas in the canister. The Coleman canister contained mainly n-butane, and n-butane boils at -0.5 C (31 F). With only a small amount of gas left in the canister, the temperature dropped quite rapidly during the testing, and was only just above the boiling point. The pressure driving the gas through the jet was not high. Contrast this with the full Kovea canister. The isobutane boils at -12 C (10 F), while the propane boils at -42 C (-44 F). Anything near room temperature will be much further above the boiling points of these liquids, and the pressure inside the canister will be much higher. Further, the full tank of gas will cool down much more slowly as it has greater thermal mass. Looking at pressure/temperature curves for the three gases, it seems quite reasonable to say that the pressure in the new Kovea canister may have been nearly double that in the Coleman canister. Double the driving pressure translates to double the gas flow through the fixed-size jet, assuming the valve was wide open in each case. It was. So the Kovea canister could drive the stove at nearly double the power – and this is reflected in the shorter boil time.

Convincing though this explanation may be, it should be noted that original test referred to used a Jetboil canister, not a Coleman one. Since the stove was new at the time it could be assumed that the canister was new with the stove, and therefore full. However, it is more than two years since that test was done, and we don’t know what other factors might have affected the result. The current results have been taken under carefully controlled test conditions.

The fuel consumption for both canisters of 10 grams for 1 liter is good. The author normally uses about 15 grams of gas to boil 1 liter of water under similar conditions – without the FluxRing. Jetboil claims their system is twice as efficient as the competition, but the author’s figures only make it 50% better. Jetboil claims a fuel efficiency of 75 – 80%, which would make the efficiency of the conventional stoves around 50%. This is consistent with the author’s experience and measurements over many other stoves. Jetboil claims the FluxRing is responsible for this improved efficiency, and the author would agree with this. The tests were done with the neoprene cozy in place, and that was not affected by the heat. The gas coming up the side of the pot above the FluxRing was not too hot: the author could hold his hand near the pot quite safely. So the FluxRing-enhanced pot base was certainly absorbing a lot more heat from the flames than an ordinary pot could. However, it does mean that the user is restricted to using just this pot if this sort of fuel efficiency is required.

It is worth noting that Jetboil themselves claim the power output of the stove is about 4,500 BTU/hr, while similar stoves usually claim about 10,000 BTU or more. This is fully consistent with the reduced gas consumption. Regardless of the stove design, the lower power output does mean that using this stove with a non-FluxRing pot is going to give quite slow performance.

Assessment

It seems the performance of this stove is limited by the gas pressure in the canister, while the gas pressure is of course highly dependent on the temperature of the canister. During testing the temperature of the canister fell as the gas evaporated. If the starting temperature of the canister had been, say, 10 C (18 F) higher, even better performance would have been obtained as the internal pressure would have been nearly 50% higher. So the stove should really ‘go’ on a hot summer day, but using this stove in the snow could prove to be a very slow exercise.

Is this Jetboil Group Cooking System going to be the answer to the lightweight walker’s dreams? Probably not. It is well made, it is quite fuel efficient and it is fairly wind-resistant. Under the right test conditions the performance comes close to the claims made by Jetboil, but that requires a new canister of the right sort and quite warm weather. In the author’s experience, other stoves seem to be much less sensitive to these factors. Finally, and sadly, both the pot system and the stove are heavier than the competition.

Features and Specifications

  • Stove burner with integrated pot support and piezo ignition: 7.34 oz (208 g)
  • Aluminium pot: 1.5 L (1.5 qt) capacity, 7.87 oz, 223 g
  • Pot dimensions: 180 mm dia x 90 mm high (7″ x 3.6″)
  • Anodised surface, inside and outside
  • ‘FluxRing’ heat exchanger on base of pot
  • Protective plastic cover for base of pot: 1.45 oz (41 g)
  • Plastic lid for pot: 1.69 oz (48 g)
  • Neoprene pot cozy: 0.78 oz (22 g)
  • Gas canister stabiliser, plastic: 0.92 oz (26 g)
  • Total weight: claimed: 19 oz (540 g); measured: 20.0 oz (568 g)
  • Boil time for 1 L: claimed: 4:00 minutes; measured: 5:10 minutes
  • MSRP US$109.95 for the full system