Introduction
StoveBench defines a protocol that is used to measure two important backpacking stove performance features (power and efficiency) in order to determine a single, quantifiable performance factor called the StoveBench Score.
Power is important because it characterizes a stove’s ability to perform well in adverse conditions (e.g., wind, cold temperatures, cold water). Efficiency is important because it defines a stove’s ability to conserve fuel and save weight for the hiker. Most consumers are enamored by reported boil times (a measure of power), while most ultralight backpacking gram-counters are enamored only by fuel usage amounts (a measure of efficiency). In actual use outdoors, both are important to consider.
This article introduces the StoveBench protocol and presents the definition of the StoveBench Score and how to determine it using the protocol.
As a case study, the protocol is applied specifically to the testing of upright canister stoves. Future applications of StoveBench will be applied to other types of stoves. In addition, special considerations, limitations, potential sources of error, and other applications of StoveBench are discussed.
Listen to our podcast about StoveBench to learn more (click here for the podcast show notes):
Context
Backpacking stove manufacturers often report the performance of their stoves in terms of:
- Boil time (i.e., the time required to boil a given volume of water) – a measure of a stove’s power; and
- Burn rate (e.g., the amount of fuel burned in a given amount of time) – another measure of a stove’s power.
In addition, ultralight backpackers, in particular, are interested in a metric that defines the mass of fuel required to boil a certain amount of water (a measure of the stove’s efficiency). Calculating this metric is popular amongst the more serious kitchen-counter stove testing enthusiasts.
However, the conditions during which these metrics are determined are not necessarily standardized from manufacturer to manufacturer or stove tester to stove tester and can’t necessarily be used to compare stove models from different brands.
Therefore, we have developed a protocol at Backpackinglight.com that we’ll be using in our stove reviews, called StoveBench (a portmanteau derived from the term benchmark, a type of test that defines a standard point of comparison).
In particular, we don’t see metrics that define “power” (e.g., boil time, burn rate) or “efficiency” (mass of fuel required to boil a certain volume of water) as mutually exclusive performance indicators. After all, any manufacturer can optimize stove performance for one vs. the other. However, balancing both power and efficiency with system weight is a design and engineering challenge of developing and using any cooking system (which may include multiple components, such as the burner, fuel container, windscreen, heat exchanger, pot, and lid). After all, a stove that is 100% efficient but takes 20 minutes to boil a pint of water, or doesn’t have the power to boil water in cold temperatures or breezy weather is as disadvantageous as a stove that boils a pint in three minutes but requires 50 grams of fuel.
Thus, the real purpose of StoveBench is to provide a meaningful way to compare different stoves so that efficiency, power, and fuel economy are implicitly defined in a single quantifiable performance factor.
The StoveBench Score
The goal of the StoveBench Protocol is to produce a numerical “performance factor” that considers both a stove’s power output (proportional to its boil time) and its fuel efficiency (proportional to the amount of fuel used during the test) during a standardized stove operation test, during which a stove will be used to heat some predetermined amount of water.
This StoveBench Score (“F”) can be described as follows:
F = output ÷ input
In any cooking scenario, output is defined primarily by water volume and temperature change (heating). More energy is required to heat larger volumes of water, and to change the temperature by more degrees.
Input is defined primarily by time (more energy is used the longer a stove boils) and fuel mass (more energy is used by a greater amount of fuel).
It follows that higher values of F are better, as they represent higher levels of output (water volume boiled) for a given amount of input (energy expenditure).
Therefore, F can be written in these terms:
F = [ V ⨉ ΔT ] ÷ [ t ⨉ M ]
where
- V = volume of water used in the test
- ΔT = difference in starting and ending water temperatures
- t = time of test duration
- M = mass of fuel used during the test
For example, a test performed under the following conditions at sea level might look something like this:
- V = 0.5 L
- ΔT = 100°C (i.e., start with 0°C water and end when the water boils at 100°C)
- t = 4 minutes (boil time)
- M = 15 g (mass of fuel used to boil the water)
The calculated StoveBench Score would thus be:
F = [ 0.5 L ⨉ 100°C ] ÷ [ 4 min ⨉ 15 g ] = 0.83 L•°C/min•g
Which can be read in layman’s terms like this: in this test, this stove was capable of heating up 0.83 liters of water by 1 degree Celsius (or, 1 liter of water by 0.83 degrees Celsius) in one minute using one gram of fuel.
The StoveBench Score will vary across different test conditions, being influenced by factors such as:
- Pot geometry
- Ambient air temperature
- Fuel type
- Presence of air current (e.g., wind).
However, because the StoveBench Score is normalized for water volume and temperature differential, it has the potential to be less sensitive to factors such as the elevation of the test location or starting water temperature, which means that across a narrow range of test environments and materials used, results should compare relatively well. Unfortunately, manufacturers seldom publish the details of their test protocols, emphasizing the importance of testing stoves using a standard methodology when comparing stoves from different brands, or in different environments.
For example, let’s consider two tests using a well-known canister stove from a major US brand.
Test #1, performed by the manufacturer, is conducted with water having a starting temperature of 70 °F (21.1°C), an ending temperature of 212 °F (100°C), and water volume of 1.0 L. In this test, the manufacturer reports a boil time of 3.5 minutes and 14 g of fuel consumption. The StoveBench Score is thus calculated as follows:
F = [ 1.0 L ⨉ 79°C ] ÷ [ 3.5 min ⨉ 14 g ] = 1.61 L•°C/min•g
Test #2, performed by the author, is conducted with water having a starting temperature of 32.9 °F (0.5°C) and an ending temperature of 199 °F (92.7°C), noting that these tests are conducted at an elevation of 7,205 feet, where water boils at a lower temperature than at sea level. A 0.85 L titanium pot was filled with 0.5 L of water for the test, and the stove operated at full power. The boil time was 3 min 5 sec and 11.3 g of fuel was consumed. (Full details of the test protocol are described below in the “Materials and Methods” section of this article.) The StoveBench Score for this test is thus calculated as follows:
F = [ 0.5 L ⨉ 92.2°C ] ÷ [ 3.08 min ⨉ 11.3 g ] = 1.30 L-°C/min-g
The differences between the two results are not dramatic (F is only 20% lower in Test #2), given significant differences in starting water temperature, water volume boiled, and elevation of the test location. However, the differences highlight the need to ensure standardized testing when comparing the performance of different stoves.
This is important because the vast majority of “gear guides”, “best stoves” comparisons, and stove reviews simply re-publish manufacturer-reported performance data, and make judgments accordingly, without regard for the factors that influence stove test results.
Considering Efficiency
A stove’s efficiency can be loosely defined as its ability to minimize waste heat. Heat is wasted via a number of processes, including incomplete combustion of fuel, a flame pattern that causes heat to spill up the sides of a pot vs. being targeted to the bottom of the pot, and heat losses from the pot itself (e.g., always use a lid!).
Efficiency is a function that balances fuel economy with flame power. A high-power stove aids efficiency by delivering more heat in a shorter period of time which can combat system heat losses. However, a high-powered flame can also waste more heat because the heat cannot be absorbed into the water fast enough.
Consideration of efficiency is built into the StoveBench Score, which is calculated from both boil time and fuel usage. Short boil times (high power) and low fuel requirements (high fuel economy) both contribute to higher StoveBench Scores.
Specifically, the fractional contribution of stove performance by fuel economy is defined by the Feconomy = [ V ⨉ ΔT ] ÷ M part of the StoveBench Score equation, and the fractional contribution of stove performance by flame power is defined by the Fpower = [ V ⨉ ΔT ] ÷ t part of the StoveBench Score equation.
Since efficiency can be defined as the ratio between the actual amount of fuel used in the test and the theoretical amount of fuel that should have been used in the test if the stove was operating at 100% efficiency (i.e., no heat loss), the StoveBench Score is particularly useful for comparing stoves of different types (e.g., alcohol vs. compressed gas vs. liquid gas), where inherent inefficiencies in both the heat capacity of fuels and heat losses in stove systems will be reflected by both Feconomy and Fpower.
Often, there is a direct correlation between heavier stoves and stoves that are more efficient. Thus, the StoveBench Score is a versatile metric that can provide a backpacker with valuable information about which stove type might be best for a given set of water heating requirements based on trip duration and required water volumes. The StoveBench Score can provide the foundation for a variety of subsequent analyses to aid the hiker in evaluating different stove systems. For example, the StoveBench Score divided by the total cook kit weight (which might include the stove, fuel container, pot, windscreen, etc.) would provide valuable insight into the performance:weight ratio of a particular stove and cooking system.
The StoveBench Test Protocol: Overview
What follows are the materials and methods used in a standardized protocol for determining the StoveBench Scores for any stove type.
Environment and Instrumentation
In general, the standard (“control”) boil test of the StoveBench protocol measures stove performance under the following conditions:
- Indoor room temperature (ambient)
- No ambient air flow (wind)
- Measure the time and fuel required to boil water originally near its freezing temperature
- No stove windscreens or other accessories unless they are integrated into the burner design.
The following table describes my own test environment and instrumentation in more detail.
| Ambient Environment | Indoors; Air Temperature = 19.5 °C +/- 0.5 °C, thermostat-controlled fanless convection heater; RH = 20-40% (monitored); elevation = 7205 feet above sea level. |
| Water | 500 g of water (0.5 L) +/- 2 g; measured starting temperature = 0.5 to 5.0 °C (water temperature stabilized by ice); stopping ("boiling") temperature = 91.0 °C (measured temperature at the beginning of a rolling boil at this elevation) |
| Water Temperature Measurement | HTI HT-9815 Digital Thermometer w/K-type Thermocouple Sensors (±1 °C accuracy, 0.1 °C resolution) |
| Weight Measurement | Adam Equipment CBK 8a scale, 4kg capacity, 0.1g accuracy (calibrated) |
| Stove System Thermal Imaging | HTI HT-18 Thermal Imaging Camera, -20 °C to +300 °C range, image resolution 220x160 pixels. |
| Infrared Temperature Measurement | Etekcity Lasergrip 1080 Infrared Thermometer, 0.1 °C resolution. |
| Water Heating Container | titanium pot with lid (0.85 L capacity, 5.0 in wide x 3.75 in height, 4.0 oz dry weight) |
General Test Procedure:
- Prepare ice water using a 50/50 mixture of ice cubes and tap water in a gallon container that can be easily stirred so as to ensure uniform temperature distribution of the water. Store the water in a cold environment when not in use.
- Record the ambient air temperature of the test environment to within 0.1°C regularly throughout the test.
- Using infrared temperature measurement, ensure that the temperature of the fuel is the same as the ambient temperature of the test environment by comparing the temperature of the test fuel to the temperature of fuel stored nearby that isn’t being used in the test. This is important because different material types can emit different levels of infrared radiation, and the surface temperature of the material itself may differ from the ambient room temperature. Ensure that the surface temperature of each batch of fuel is within 0.1°C of each other.
- Measure the starting weight of the fuel (this generally requires measurement of the stove plus fuel) to within 0.1 g.
- Place the water heating container on the bench scale, tare the scale, and add the specified amount of ice water (filtered so as to remove the ice) to within +/- 0.5% of the target weight. The target weight should be converted to water volume, and water volume used as V in the StoveBench Score (F) formula above.
- Place the water heating container on top of the stove burner (centering it on the stove’s pot supports), insert the thermocouple into the water so that it measures the temperature of the water halfway down the water column and does not touch the sidewall of the container. Place the lid on the container. The thermocouple wire should be suspended vertically over the pot, so waste heat from the stove system can’t materially cause damage or temperature measurement interference with the thermocouple wire.
- Measure the starting temperature of the ice water to within 0.1°C resolution. Ensure that the starting temperature is less than 5.0°C.
- Within the span of 1 second, light the stove burner/fuel, open the stove valve to a fully open position (not applicable for stove types with no fuel flow regulation), and start a stopwatch.
- When the water temperature reaches a predetermined temperature defined as the boiling point (to within 0.1°C resolution), record the elapsed time to the nearest second and extinguish the stove (i.e., turn off the fuel flow) immediately. This elapsed time shall be recorded as the “boil time”. Boil time should be converted to decimal minutes, which will be used for t in the StoveBench Score (F) formula above.
- The difference between the starting and ending water temperatures will be used for ΔT in the StoveBench Score (F) formula.
- Measure the ending weight of the remaining fuel to the nearest 0.1 g (or as applicable, the stove plus fuel assembly). The difference between this weight and the starting weight shall be recorded as the “fuel consumed”, and used for M in the StoveBench Score (F) formula above.
- Calculate the StoveBench Score (F) for the test.
- Repeat the test as needed to ensure statistical confidence in the result (1-2 additional times in a highly-controlled test environment with accurate instrumentation; up to 6 times in less controlled environments).
StoveBench Protocol Application: Upright Canister Stoves
What follows are the specific materials used in the application of the StoveBench Protocol for upright canister stoves:
| Fuel | 80/20 mixture of isobutane/propane; 227 g net weight canisters between 30% and 80% of their fuel capacity* |
* Canisters are retired when fuel capacity reaches 30% or less when changes in internal canister pressures can skew results materially. At high canister capacities, high canister pressure causes excess heat losses that can skew results materially when stoves are operated at full throttle. See below for more details.
Specific Procedural Notes When Using Upright Canister Stoves:
- Fuel Weight Measurements. During the fixation to and removal from a canister, a stove may cause small amounts of compressed gas to leak out of the canister, which could skew results. Thus, fuel weights are determined by calculating the difference in weights of the entire stove-canister assembly at the start and end of the test.
- Fuel Temperature Measurements. The surface temperature of the canister is measured with an infrared thermometer to ensure that it’s the same temperature of a nearby control canister that isn’t being used in the test (and is thus, at ambient temperature).
- Starting the Test. A lighter is held to the stove burner while the stove gas valve is turned on very slowly until the burner is lit. Within one second, the stove valve is turned to its maximum at the same time a stopwatch timer is started.
- Ending the Test. When the thermometer readout reaches the stopping temperature, the stopwatch timer is recorded and the stove gas valve is immediately turned off.
Proof of Concept: Preliminary Stove Test Results
Comparing Upright Canister Stoves
As part of a series of new Backpacking Stove Gear Guides, we are planning on releasing our upright canister stove gear guide later this month.
What follows is a small selection of control boil test results (using the protocol above) from one test batch that included 18 models of upright canister stoves (the final gear guide will include approximately 25 models). For the purpose of this article, brand and model names have been hidden. They will be revealed with the rest of the results in the upcoming gear guide.
Results have been sorted by order of highest to lowest StoveBench Scores.
| Model ID # | Boil Time (mm:ss) | Fuel Usage (g) | StoveBench Score - F (L•°C/min•g) |
|---|---|---|---|
| 1 | 3:30 | 8.3 | 1.56 |
| 2 | 2:45 | 13.2 | 1.25 |
| Average | 3:30 | 12.3 | 1.16 |
| 3 | 4:05 | 10.9 | 1.02 |
| 4 | 3:10 | 19.7 | 0.73 |
The StoveBench Score rewards not only stoves that have good fuel economy (low fuel usage), or stoves that have high power output (low boil times), but stoves that are efficient – that can deliver a high amount of power for the least amount of fuel.
Sources of Error
- Scale accuracy. Calibration standards were used to monitor and verify scale accuracy using the USBR 1012 protocol. The accuracy of measured standards was determined to be less than 0.04 g, resulting in an error % of reported fuel consumption amounts of less than 0.3%. The scale manufacturer reports linearity of +/- 0.2 g, which could contribute an error of up to about 2% in reported fuel consumption amounts.
- Fuel usage at start and end of test. Up to one full second of time was required to start and stop the stove during which the valve was turned (two seconds total). Thus, up to two additional seconds of unnecessary fuel consumption may have occurred. The average amount of fuel used in the tests was 12.3 g over the course of a burn time of about 210 seconds (i.e., 0.059 g/sec). Therefore, over the course of 2 seconds, up to 0.12 g of additional fuel may have burned, amounting to an overstatement of approximately 1% of reported fuel usage. This error was consistent over all tests.
- Temperature measurement accuracy. Thermocouples were calibrated in both ice water and boiling water. Measurement accuracy proved to be within 0.1°C. Since the test was stopped when the water temperature reached 92.7°C, and if heating is assumed to follow a fairly linear progression from 0°C to 92.7°C, then over the course of the average boil test (210 seconds), the approximate rate of heating was 2.3 seconds/°C. A temperature inaccuracy of 0.1°C would thus introduce a boil time error of only 0.23 seconds, which corresponds to a fuel consumption error (see #2 above) of only 0.014 g (about 0.1% error).
- Starting and Ending Canister Temperatures. Starting canister temperatures were measured with a laser infrared thermometer (Etekcity Lasergrip 1080) and were always within 0.1°C of another canister (not in use) that was used as a room temperature control. Ensuring consistent starting canister temperature in all tests was critical to minimizing error. Canister temperatures often dropped 4 to 6°C during the course of a test due to the heat of vaporization principle, the process by which heat is converted to energy required for liquid gas to become vapor. Starting the next test immediately after resulted in boil times that were as much as 20% slower than the previous test, since lower-temperature canisters had lower vapor pressures (i.e., lower fuel flows, lower burn rates, and thus, longer boil times). While some method of controlling canister temperatures during the test (e.g., placing it in a water bath with temperature controlled by a thermostat) might be valuable in order to prevent the canister temperature from decreasing, doing so would add significant complexity to the protocol and further decrease the protocol’s relevance to how stove systems are used in the field by most users.
Error percentages will be higher when using consumer-grade instrumentation (e.g., digital kitchen scales and meat thermometers). For example, a typical made-in-China digital kitchen scale has an accuracy of 0.1 oz (3 g) with linearity of up to 0.2 oz (6 g). With this much potential error introduced in the measurement of fuel consumption during a single boil test, replicate testing becomes even more important. Verification of scale accuracy with calibration standards is important, even for at-home stove testing enthusiasts.
Other Considerations
What about using tap. vs. distilled vs. water from a lake or stream?
This concern is propagated by Betty Crocker et al., based on the common kitchen practice of putting a teaspoon of salt into a pot of water to make it boil faster. In other words, do differences in the concentration of solutes have an effect on boiling time?
For those of you that think physicochemistry is fun (you have a copy of the CRC-HCP by your bedside), consider the basic principles that:
- Solutes will lower the boiling point (water will boil faster) because the specific heat capacity of those solids (e.g., salts) is lower than the specific heat capacity of water.
- However, solutes will also increase the boiling point of water (water will boil slower) because they raise the vapor pressure of the solution, requiring more heat energy to boil.
So, at what sort of solute concentrations does this make a difference?
A 1% solution of salt water (e.g., 10 g of salt dissolved in 1 kg of water) will increase the boil time by about 1% (physics fans: use the heat equation Q=MCΔT) to determine this). Adding more salt starts to tip the scales, however, and by the time we reach a 5% solution of salt, the boil time is decreased by about 1.5%. Of course, these calculations are based on a perfectly efficient system (where 100% of the heat produced by the fuel is transferred to the water). But even with highly inefficient (10% to 40% efficiency) stove systems characteristic of solid fuel, alcohol, and gas stoves without pressure regulation, the effects of solutes on boil times are likely negligible relative to the other sources of variability inherent in performing testing like this.
In other words, we are talking about minute effects on the boil time and concentrations of salt that would make your water unpalatable.
For my own testing, I use tap water that has a total dissolved solids (a measure of solutes) concentration of less than 100 mg/L (0.01%).
Do changes in canister pressure skew results?
For tests involving canister stoves, the amount of fuel remaining in the fuel canister could impact results.
As a fuel canister is used, the volume of fuel inside a canister decreases (which also decreases the pressure and resulting flow rate of fuel that is delivered to the burner).
In addition, fuel mixture composition could change, but that effect is probably not as dramatic as it’s assumed to be.
To evaluate this effect, the control boil test described above was repeated using a stove that does not include a pressure regulator (since the effects will be less dramatic on a stove that has a built-in pressure regulator). A 227 g (net weight) canister containing a mixture of 80/20 isobutane/propane was used for this test.
Boil times, fuel consumption, and StoveBench Scores are presented in the following chart as a canister is used from full capacity to nearly-empty capacity.
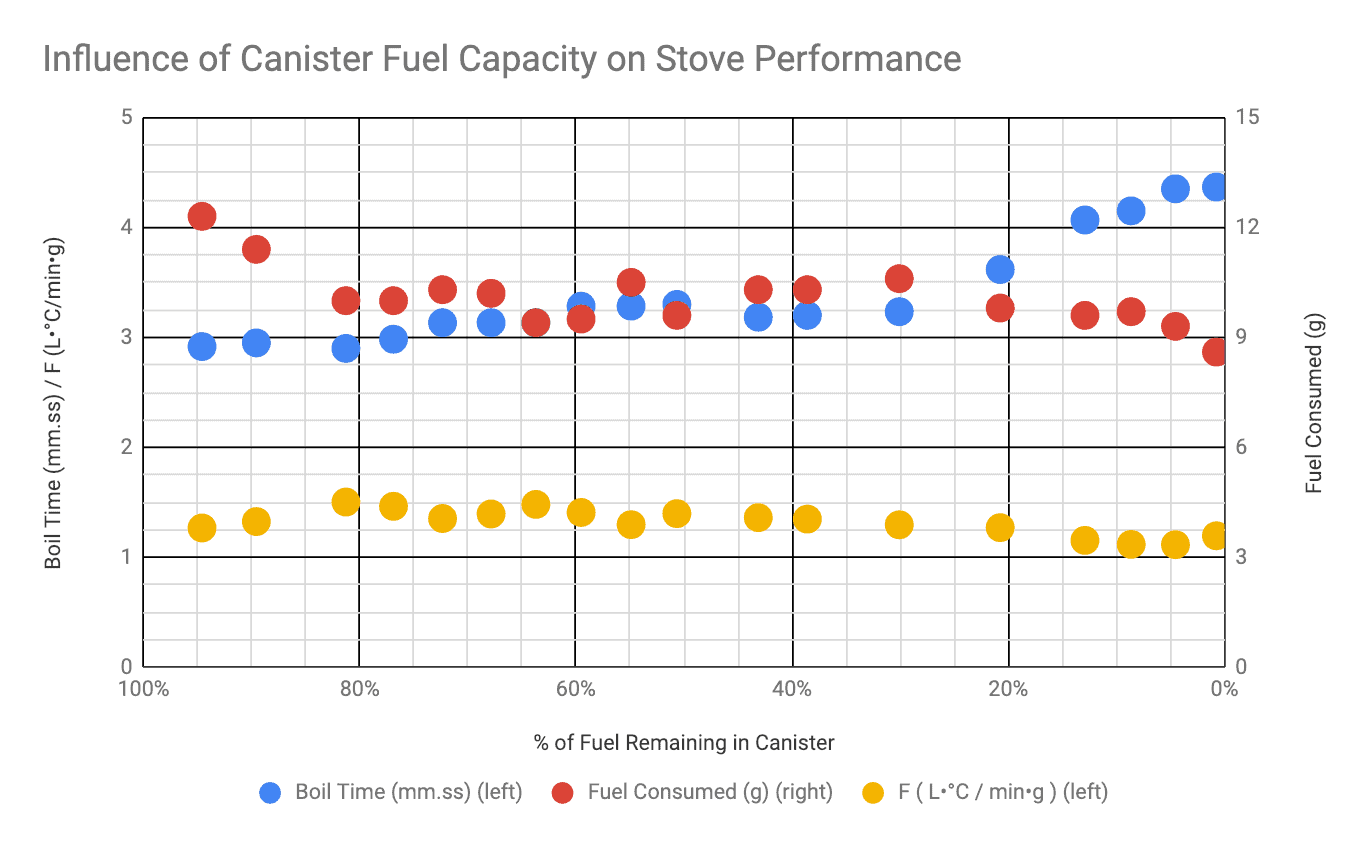
The following table provides a basic statistical analysis of all tests performed for this canister:
| Boil Time (mm.ss) | Fuel Consumed (g) | StoveBench Score - F ( L•°C / min•g ) | |
|---|---|---|---|
| Average | 3.4 | 10.08 | 1.32 |
| Standard Deviation | 0.49 | 0.83 | 0.12 |
| StDev% (100 x Standard Deviation / Average) | 14.5% | 8.2% | 8.9% |
Based on examining the graph above, I attribute the high variability to the high pressures in the canister when full (or nearly full), and the low pressures in the canister when nearly empty. Here are my conclusions when examining the graph, noting, in particular, those values that are near to or exceed +/- one standard deviation from the average values. StDev% is a useful statistic for estimating the range of error of experiments that should be repeatable. For the purposes of this protocol, I’m hoping for a range of StDev% of +/- 5%. From the table above, all three ranges are outside this criterion.
- Boil times are abnormally high at low canister fuel capacities (<30%).
- Fuel consumption is abnormally high with a full canister (>80% capacity) and abnormally low with a nearly empty canister (<5%).
- StoveBench Scores (F) are abnormally low at low canister fuel capacities (<20%), and (possibly) abnormally high at high canister fuel capacities (>80%).
Based on these observations, the most reliable repeatability for the two measured performance metrics (boil time and fuel consumption), and the calculated StoveBench Score, occurred when canister fuel was in the range of 30% to 80% of its capacity.
With this restriction in place, if all tests performed at capacities exceeding 80% and lower than 30% are discarded, we can examine the resulting statistics:
| Boil Time (mm.ss) | Fuel Consumed (g) | StoveBench Score - F ( L•°C / min•g ) | |
|---|---|---|---|
| Average | 3.16 | 10.1 | 1.39 |
| Standard Deviation | 0.13 | 0.41 | 0.07 |
| StDev% (100 x Standard Deviation / Average) | 4.1% | 4.1% | 5.0% |
This constraint results in StDev% values for boil times, fuel consumption, and StoveBench Scores that are 5% or less.
Consequently, all tests measuring StoveBench Scores will be performed when the canister is within the 30% to 80% range of fuel capacity.
These results indicate that (at least for upright canister stove tests adhering to the control protocol defined above), a StoveBench Score can be interpreted to have an experimental standard error (defined by +/- 1 standard deviation) in the range of +/- 5.0%.
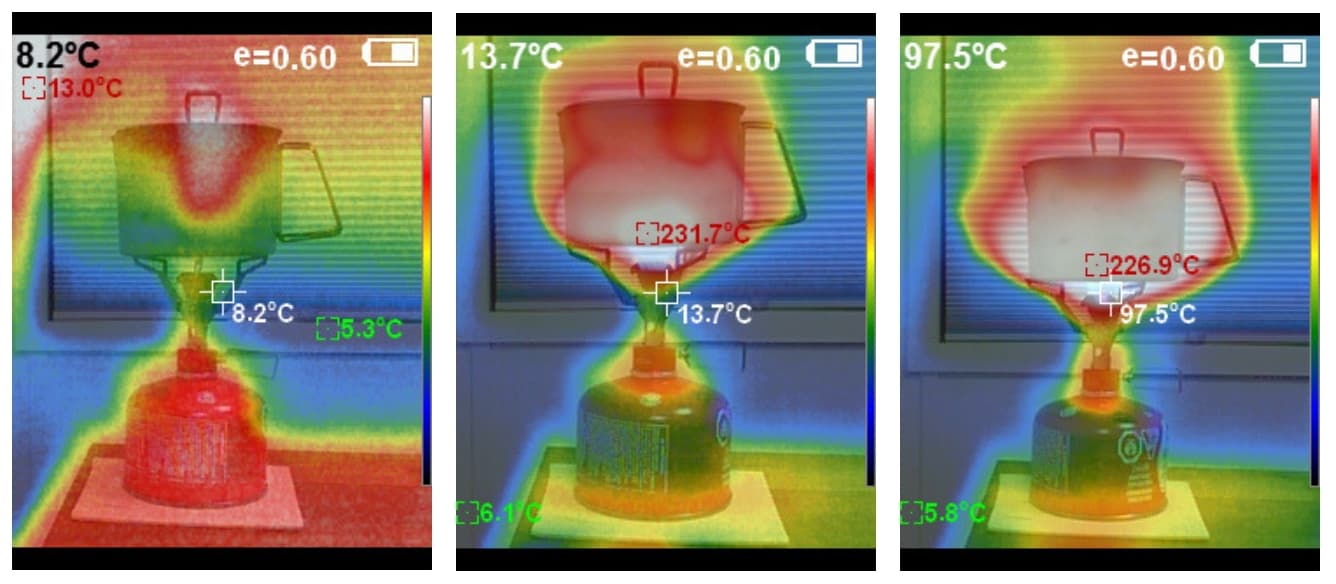
What are the problems associated with running stoves at full throttle?
Running a stove at full throttle probably wastes unnecessary heat when using stoves that don’t have built-in pressure regulation. Most users will “feel” that their stove needs to be turned down a little in order to run it more efficiently, but thermal imaging can reveal the effect more objectively.
Unfortunately, without (extremely difficult to make) direct measurements that correlate the fuel valve orifice opening, fuel valve handle positioning, and a stove’s heat output, running a stove at any output level less than 100% (fuel valve handle turned all the way counterclockwise so the fuel delivery orifice is at its maximum) will introduce too much subjectivity that may interfere with test repeatability and/or performance comparisons between stove models.
That said, having a control test at full throttle provides a good foundation for further testing where stove output is controlled by the fuel valve handle, and results of this type of comparison testing will be presented in our forthcoming Upright Canister Stove Gear Guide.
Interestingly, the effect of wasted heat was much more significant for canisters having a fuel capacity that was greater than 80% (see “Do changes in canister pressure skew results?” above), suggesting that operating a stove at full throttle has more detrimental impacts when using fuller canisters. I used thermal imaging to verify this.
What about mismatched burners and pots?
Large pots don’t necessarily match so well with small burners, or low power fuels (e.g., solid fuel tablets). On the other end of the spectrum, small pots get overwhelmed by large burners, resulting in significant heat loss and fuel waste.
I recognize that burner-pot mismatches will result in a stove system that perhaps scores lower than it should in the control test protocol defined here.
This control test protocol is optimized for solo cooking in three-season conditions (small pot volume, low water volume). Users should consider StoveBench results for large pots and large water volumes as part of any burner’s overall performance, and not rely solely on the control test described above before choosing a stove for boiling larger volumes of water.
“No wind, full throttle, not my pot, this test isn’t representative for me.”
This is a controlled testing environment where we’ve arbitrarily defined a set of test conditions and a test protocol that gives us repeatable results that can be used to identify one performance metric benchmark that we can:
- Use to compare different stoves; and
- Use as a point of reference for different test environments and conditions (see next section).
Is the StoveBench test useful for other types of stoves, and how do F factors compare?
Yes, of course. The rationale for determining a StoveBench Score is applicable for any type of stove and fuel, including solid fuel (e.g., hexamine tablets), alcohol, upright/inverted/integrated canister stoves, liquid fuel (e.g., white gas, kerosene) stoves, or wood stoves.
We’ll be developing protocols for each of these stove types as part of the StoveBench program.
StoveBench Scores for stoves using different fuel types will differ primarily as a result of the specific energy capacity of a fuel (i.e., energy per weight), and the efficiency of the benchmarked stove system (e.g., stove/pot/burner combination).
When we publish stove reviews and gear guides, we’ll also include a metric equal to the StoveBench Score divided by the stove system weight. This will (perhaps) represent at least some of the benefit of carrying so-called ultralight stove systems (e.g., solid fuel and alcohol), even though these stoves use fuels that don’t contain as much specific energy (energy per gram of fuel) in them as gas stoves.
Variations of the Control Protocol
In addition to Control Boil Tests (described above), we are devising a number of other performance scenarios that will be featured in upcoming reviews and gear guides, including:
- Wind Test: add a low-speed fan to the test environment to create a wind speed characteristic of a light breeze. We performed a test similar to this in a recent comparison of integrated canister stoves and the differences in stove performance results was dramatic.
- Large Water Volume Test: 1500 g of water in a titanium 2-liter pot, a common scenario for groups of 2-3 hikers sharing a cook kit.
- Cold Temperature Test: a test performed at an ambient temperature of 32 °F (0°C) or less, a common scenario for winter backpacking environments and/or snow melting.
- Stress Test: 1500 g of water, ambient temperature of 32 °F (0°C) or less, and wind induced by a fan.
Our first round of StoveBench Scores will be released later this month when we publish the results of our new Upright Canister Stove Gear Guide, which will include StoveBench Scores for all of the above scenarios from a subset of the approximately 25 canister stove models being reviewed in the Gear Guide.
How to Perform Your Own StoveBench Tests and Contribute to the StoveBench Database
You don’t need fancy instrumentation to run your own StoveBench tests. In fact, your own tests can be extremely valuable for our community!
If you can reasonably measure the temperature of your water and measure fuel consumption weights, then you are well on your way to running your own StoveBench tests.
Here’s a short video that illustrates how I run a StoveBench Control Boil Test for an upright canister stove:
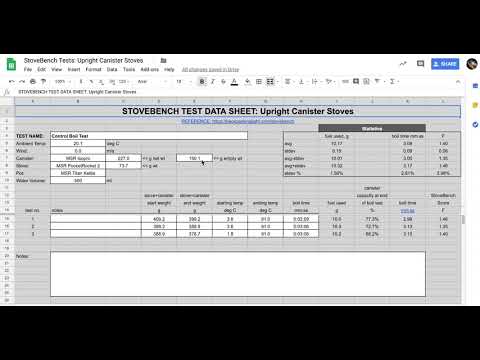
I use the following spreadsheet template for each test I run:
Here’s a video that shows how I use the spreadsheet test template:
We are building a user database of StoveBench Scores calculated from your own test environments and protocol parameters.
We’ll be publishing this information in a subsequent article to be published in early February 2019. In addition, if this information proves to be valuable to our community, we’ll be releasing a live version of the database (with real-time updates as new user tests are submitted) as well.
StoveBench Testing Services
- If you are a stove manufacturer and would like to have your stove tested using the StoveBench protocol, here is some more info.
- If you’re interested in starting your own StoveBench Lab, click here.
Final Commentary and Disclaimer
When interpreting StoveBench Scores, do so with an understanding of this protocol’s limitations and error sources (outlined above). When interpreting StoveBench Scores calculated from user-submitted test data to our database, consider that different test environments, different types of measurement instrumentation, and differences in protocols may result in StoveBench Score variability that may not be present when we perform our own StoveBench tests in our own laboratory environment. The StoveBench database will distinguish between user-submitted stove testing data and stove testing data we perform on behalf of Backpacking Light that adheres more strictly to the protocol described herein.
Finally, the StoveBench Score is not the holy grail of stove performance. While it can factor into your decision-making process to purchase a stove, or select a type of stove for a particular trip, there are other issues of importance as well: the dry weight of the system, the starting weight of the system including fuel, the environment you are cooking in, the cost of the fuel, the allure and satisfaction that comes with making a homemade stove, brand loyalty, and so much more. So, let StoveBench be one of your guides in making decisions, but not your only one.
Acknowledgments
The author wishes to acknowledge Roger Caffin, Hikin’ Jim Barbour, Gary Dunckel, and Jerry Adams for their helpful and critical reviews of the StoveBench protocol.

Discussion
Become a member to post in the forums.
Yeah, I agree. A sample size of three with tight measurements is likely a fair initial test.
A sample size of 5 is what I used for 90% of my testing. Toss out the high and low as likely my error in preparing things. Average the remaining 3 to get a single average data point. Median, mode, stddev were usually pretty much ignored since they really only report on the test itself (known to be rather sloppy.) All using a large measuring cup as a volume measurement for water, and, a simple kitchen scale with an accuracy of 1 gram for fuel weights for cannisters (all calibrated at work at Cornell’s ChemEng lab initially.) Nowhere near your scale’s accuracy, though.
In the field, I brought my scale once, and measured all burns for a couple weeks. There was a discrepancy between lab testing and field results on the MINUS side. It seems I was out in summer and all my water during testing was ice water! Nice to know, I guess. This validated the lab tests in my mind, though some conditions can change this. 0F environment, rain and wind, etc…
James Marco, you know that you you shouldn’t throw out the high and low! You are artificially narrowing your results. The high and low indicate experimental uncertainty with the procedure/setup. Statistics are used to quantify that variability. My 2 cents
Jon, Yes, I know. I am familiar with statistics, statistical analysis, research methodology, research analysis, etc. though mostly in the guise of microbiology and medicine. But we are talking 45-50 year old info, there. But in a “kitchen lab” it didn’t really matter… I was finding a 10% repeatability to be a GOOD number between all the tests. Soo, what the hell… I am sure Ryan can get the repeatability accuracy down to within 5% or better using his setup. I already knew my stuff was guaranteed to be off, though it took a few tries before confidence was good due to the high and low values. (I ran a couple tests of 10 to check it and found that dropping the high and low actually increased the confidence to about 2stdev for the 8 remaining. Close enough…) I dropped the test number to 5 and continued to drop the high/low. I wouldn’t say high confidence, but good confidence. It gets VERY difficult to compute with small sample sizes and have any meaning (3 is not enough.)
OK, a couple of other notes.
F = output ÷ input
F = [ V ⨉ ΔT ] ÷ [ t ⨉ M ]
The output looks like a scalar version of just an energy: Mass* Specific Heat * delta temperature
Joules = MCp ΔT
That being said then [ V ⨉ ΔT ] ÷ t is a scalar to watts
Watts = MCp ΔT/t
That means that F is a scalar to Watts/M in other words, you are looking at effective power out per gram of material.
I just seems like will a few more constants, that the variables would actually have a physical meaning that are known in the world of physics (Roger?).
It seems like you are striving towards a metric looking at overall efficiency as a function of time
Metric = (Output / Input)/time or Efficiency/ time
Metric = [(Mass* Specific Heat* Delta T)/(Fuel Mass *Fuel Energy Density)]/Time
This would allow you to characterize stoves across various fuel types as most of the Fuel Energy Density are known.
It may be more work, however; once you set up a test metric and the database starts to fill up, it is difficult to change. Luckily, most of the changes are actually constants.
My 2 cents.
Exactly. Using standard physical parameters already in existence will actually simplify overall database entries by simply placing constants in a single table/spreadsheet to be added to any calculations by reference…”pointers” if you will. I still worry that data collection is flawed though…
the variables would actually have a physical meaning that are known in the world of physics
I don’t have any problems with the variables Ryan is using, but I am a geek …
F = output ÷ input
F = [ V ⨉ ΔT ] ÷ [ t ⨉ M ]
The first line is not quite the same as the second. In this context ‘input’ relates to M; the ‘t’ is extra. Simple fuel efficiency (water heated per fuel used) would be V ⨉ ΔT / M , but Ryan has included the time taken for the heating in his equation.
There are two good reasons for doing so. The first is that some would prefer a stove that boils their water in a short time rather than a long time, especially if it is freezing cold and the water is for coffee. Tales of waiting 15 minutes for a tiny alky stove are well-known.
The second is an interesting and tricky trade-off, to do with how much heat is lost up the side of the pot. As we know, if you run a stove flat out in the hope of a faster boil the efficiency will fall badly. Now, if the if the amount of fuel used doubles but the time halves, then the F value stays the same. You do however end up having to carry more fuel. Will the amount of fuel used balance this way against the time taken? I don’t know, but I have my doubts.
So this brings us to the question of whether you can adequately represent a stove by a single parameter. Maybe, maybe not, but this sort of testing will give the enthusiast a LOT more information about a stove then you could get from the marketing spin (which never gives the actual test conditions anyhow). Me, I would be looking at the full data set.
Will any of this matter to the novice about to buy his first stove? Probably not.
My 2c
Cheers
“Will any of this matter to the novice about to buy his first stove? Probably not.”
I guess that was my question about practical application. The engineers seem to be enjoying themselves. Have at it.
Hi Ken
To be sure, the techno-geeks will lead the way. But we did that with the whole UL concept too, before it became mainstream.
Cheers
Consider this: techno-geeks led the way on the most recent revival of lightweight/ultralight backpacking starting in the late 1990s – which has mostly failed to take hold in the mainstream market (I differ with Roger on this point). And the lightweight backpacking boom in the late 1970s to early 1980s was very mainstream, but faded anyway.
We might not want to make the same mistakes again – in the case of stove metrics, by using test procedures, units, or jargon that most people can’t understand, use, or (most important) see the value difference between one number and another
Virtually everyone can understand “boil times”, for all the imperfections in how stove makers and home tinkerers misuse that concept.
More later.
— Rex
Joules = MCp ΔT
That being said then [ V ⨉ ΔT ] ÷ t is a scalar to watts
Watts = MCp ΔT/tMetric = (Output / Input)/time or Efficiency/ time
Metric = [(Mass* Specific Heat* Delta T)/(Fuel Mass *Fuel Energy Density)]/Time
Exactly. Using standard physical parameters already in existence will actually simplify overall database entries by simply placing constants in a single table/spreadsheet to be added to any calculations by reference. Exactly! Ryan will get it down on a spread sheet for us via the Stovebench. Look forward to it. My 3 dollars worth.
Simplified answers generally don’t work. You need all the data.
If you want a stove for use always outdoors and you want to melt lots of snow in sunny weather, the MSR Reactor could be a good choice.
But if you want a stove you can use inside your tent at a gentle simmer – the Reactor would be a terrible choice. A single parameter cannot handle this.
Cheers
Exactly, one parameter will not be able to characterize a stove.
That being said, StoveBench is close to characterizing some important one. With very little work you can characterize the following
Power, Efficiency and your factor F which almost sounds like Effectiveness (efficiency/time)
A few more parameters that will likely pop up are Effectiveness per pound (of your cooking system)
Regardless of what Ryan does, I will probably calculate those parameters anyway. My 2 cents.
There are simply too many variables to translate most, if not all, stove testing to real life use on the trail. And, conversely, too many variables in real life trail use to translate to stove testing.
Perhaps the most glaring example is measurement protocols. We rarely, if ever, haul a scale into the back country. It is most usual to simply mark your pot (or use premarked graduations) for volumes. Yet, as StoveBench demonstrates, weighing is generally used by most of us for testing procedures. It doesn’t really matter in the field when the goal is simply to produce a hot cuppa when needed. In this I concur with Roger in that a single calculated number has little translated value to field use.
Each parameter in the environment would need to be accounted for. StoveBench does well with this. Even with our much loved heat shields/wind screens, pot lids, pit stoves, wind breaks, tent alcoves, etc we cannot entirely mitigate the effects of a wind. Anything more than a gentle ventilation breeze will effect accuracy. But, there is more, of course, accounting for the rather large variability in data points despite our best efforts. Hell, even walking by a running stove can effect run-time by disrupting air flow patterns.
Let the test stand as an opening protocol. Do not attempt to calculate anything at this point, though as preliminary results they might be worth a mention. It is fun to play with numbers, averages, and statistics, but there are a few variables that may be out of range for some stoves: eg,, Wide burners.
But do not mention efficiency. This test protocol is not very efficient nor does it test for efficiency, except at a very gross level among data points generated by this test protocol. Indeed, even these are suspect. But, simply reporting data wouldn’t give the geeks much to chew on would it?
Great test protocol. I also agree it’s about the best one could do for this subject despite other people’s comments about it’s flaws.
One quick note for people that want to attempt this at home which has not quite been directly stated by others. In regards to sample size, keep in mind there is always a learning curve for any new procedure you do. Doing a lab experiment like this requires consistent technique every time, and you likely won’t achieve that until at least the 3rd – 5th time. Yes all data is good, but only if the technique is consistent. So if the results of the first couple of runs are significantly different from subsequent runs, it’s ok to throw those out.
A little protocol from the hard science community might help.
Come up with an idea.
Do some experiments to test the idea.
Write up a paper or report on the results.
Read the paper and see what experiments should have been done.
Do or repeat the experiments properly.
Check the new results against the conclusions in the paper.
This is never mentioned in the published papers!
Unfortunately, many people in the ‘softer’ areas like medicine, nutrition, psychiatry, etc, never get beyond the third step, which is why those areas have such a problem with unreproducable research. The current move towards having to make all the experimental data publicly available is essential.
Cheers
Ha, ha….yes. Even the so called hard sciences have trouble with releasing preliminary results too soon. Quarks, and cold fusion come to mind. Good cautions, Roger!
Will Roger or someone with his experience be doing an analysys of the needle/control valves as part of the TESTING PROTOCOL? How well the fuel is delivered to the burner is the most important part of determining the quality of a stove. It should be incorporated into the BPL testing protocol.
Hi Dan
Yes, the needle valve is important. It was discussed a little in the CO series (whence the photos), and rather more extensively in the V2 and V3 winter stove series. A very gentle taper in region D is desired, to give a fair control range but the quality of the corner E is also important as that corner (and the valve seat) determines how well and how easily the fuel may be shut off. Clearly, these comments apply to all fuel stoves: canister, white gas and kero.
Less obvious is what happens to the fuel as it goes through the valve. In most (all) cases there is a pressure drop, and in some cases there may also be an expansion and boiling, so that it is vapour, not liquid, which reaches the jet.
The boiling bit is important. If the fuel is not hot enough the expansion may cause a cooling, leaving some fuel components as a liquid. This can happen with a propane/butane mix in cold weather. In general, priming is needed to get the stove hot enough that all the fuel vapourises. Some stove mfrs have claimed that you don’t need to prime their white gas stoves: this may be so if the air temperature is >20 C, but otherwise it is just marketing spin.
What have I not covered here?
There is quite a bit of esoteric detail I have not mentioned, but a good design should hide all of that.
Cheers
Reproducibility is a problem in the hard sciences, too. And it’s likely to get worse before it gets better.
For example, I’m very skeptical of the “leaning tower of models” approach used in many fields. Take the output of one computer model, feed that into another computer model, and repeat until you don’t understand how much error you have, or why you get startling results. Publish the startling results, but don’t mention the other problem. Years later, if someone fails to replicate your findings, blame it on changes to the model code, or on unpublished parameters. Requiring open data publication won’t solve that problem.
Where were we …
With Stovebench at least we have a reasonably straightforward test protocol and few poorly understand models, none involving computers (however, beware the perils of Excel!)
I agree that making the raw(-ish) data publicly accessible is a Good Thing. But I’ve been arguing with scientists about data management for more than 40 years.
— Rex
Rex, yes. The raw data becomes the important part of these tests. Raw data can be mined for all sorts of things down the road, often in unexpected ways. Calculated results, well, these are always iffy. As long as the basis for any calculations isn’t lost, sure,.. But as you say, the “leaning tower of models” can be a very bad thing.
There will never be a backpacking stove to match the Svea 123. The “whispers” and the alcohols will come and go, but my Svea is indestructible and totally reliable. Mine is now almost 60 years old, I have fired it up thousands of times without a single failure… I have twice witnessed the “O” ring on whisper lights fail resulting in a pool of burning gasoline…My sweet little Svea always works like a charm and welcomes meal time with its wonderful roar. But, then again, I’m 76 years old and have been packing since I was a Boy Scout…so what do I know? :)
Jerry, yup, the old 123 is a good reliable, durable stove that would suffer badly in these tests due to low power and time to boil testing, regardless of overall fuel efficiency. But all the data for StoveBench is canister “toppers”, right now. Even other items that are technically toppers, like a JetBoil with the general pot adapter for the standard pot will suffer due to reduced BTU/Kw/hr outputs, for example. Reactors, Windburners, etc all fall into this same test protocol trap and just in this one category of stoves.
I think we, as the community here, understand enough about stoves to come up with a rather standardized test that would allow testing across the board. For example, clearly there is SOME advantage to alky, lots of people use them. Under what conditions? Why is it worth the weight trade off? And so on… We miss soo much using a single narrow test protocol. On the opposite side of the scale, how can you even quantify “reliability”? Sure, you can say this stove has been around for 60 years with no problems, but how do you do that with a new stove? See what I am getting at?
I have tried to follow this conversation but can’t understand what it has to do with the Philmont forum???”
Dear David Y
I think you have your Forum channels crossed. Th one has ZERO to do with Philmont.
Cheers
Stove #2 has a better needle valve than the #1 stove. The gas flow of #2 can be lowered to be equal in efficiency as #1. The number 1 stove can’t increase flow of gas for more energy to be equal to #2, but yet it gets a higher Stovebench score than #2.
I would purchase number 2.
Become a member to post in the forums.