
Introduction
In my past two articles (here and here) I have described the critical importance of high Moisture Vapor Transmission Rate (MVTR) for removing moisture vapor from your clothing layers. By choosing a high MVTR waterproof shell, I can use one jacket to replace both a wind layer and a rain layer. This jacket provides excellent weather protection and comfort over a wide range of conditions while saving weight and space in my pack.
There is a problem with aspiring to wear high MVTR garments – finding which garments have high MVTR! Most manufacturers are happy to claim that their garments are breathable. Unfortunately, few actually publish MVTR measurements. Even when the results from standardized testing are published, they are not necessarily comparable given the number of testing standards that a clothing manufacturer can select.
In this article, I present MVTR, hydrostatic head (water resistance), and air permeability measurements for 18 waterproof-breathable shells from nine manufacturers. The shells in my test utilize numerous membrane and face fabric combinations. With these test results, we can understand how the clothing on which we spend our hard-earned money will perform and what features we are actually buying.
Here is what I have learned from the test results:
- This survey identified only three waterproof-breathable (WPB) jackets with what I consider to be very high MVTR. This means the opportunity to combine the functions of a wind and rain layer in a single, lightweight garment is limited.
- Gore-Tex membranes have generally high denier (fiber weight) face fabrics. High denier face fabrics reduce MVTR performance for any of the Gore membrane types. The best MVTR performance for any of the Gore membrane types will be achieved using the lowest face fabric fiber deniers.
- Gore-Tex membranes are all adequately air impermeable and waterproof. The variation among the garments will be in denier and MVTR, as well as in the feature set. In general, (excluding Gore Shakedry) the Gore Active or Gore Pro membrane will provide the best MVTR performance. However, laminating a Gore Active or Gore Pro membrane to a high denier face fabric will substantially reduce the MVTR performance. As you will see, laminating a 100-denier face fabric to a Gore Pro membrane produced the second-worst MVTR performance amongst the garments tested.
- Arc’teryx price points vary substantially according to fabric weight and membrane type. However, the performance metrics reveal that spending a lot more money may provide a more robust jacket but does not necessarily result in a significant change in MVTR, water resistance, or air permeability. Don’t buy more jacket than you actually need!
- Higher MVTR values are generally achieved with lighter-weight fabrics. The purchaser needs to think carefully about how much face fabric durability is required for their intended uses. If you are a rock climber and constantly rubbing against hard, sharp surfaces, then perhaps you need that 100-denier jacket. Just be aware that you should try not to sweat while wearing it.
Testing Methodology
18 waterproof-breathable jackets were tested for this project. All were new when tested with the exception of the Arc’teryx Beta AR. The jackets were selected to provide a mix of available membranes and fabrics. Of course, there are numerous membrane technologies on the market, so additional performance options may be available and may be tested in future articles.
The following tests were performed:
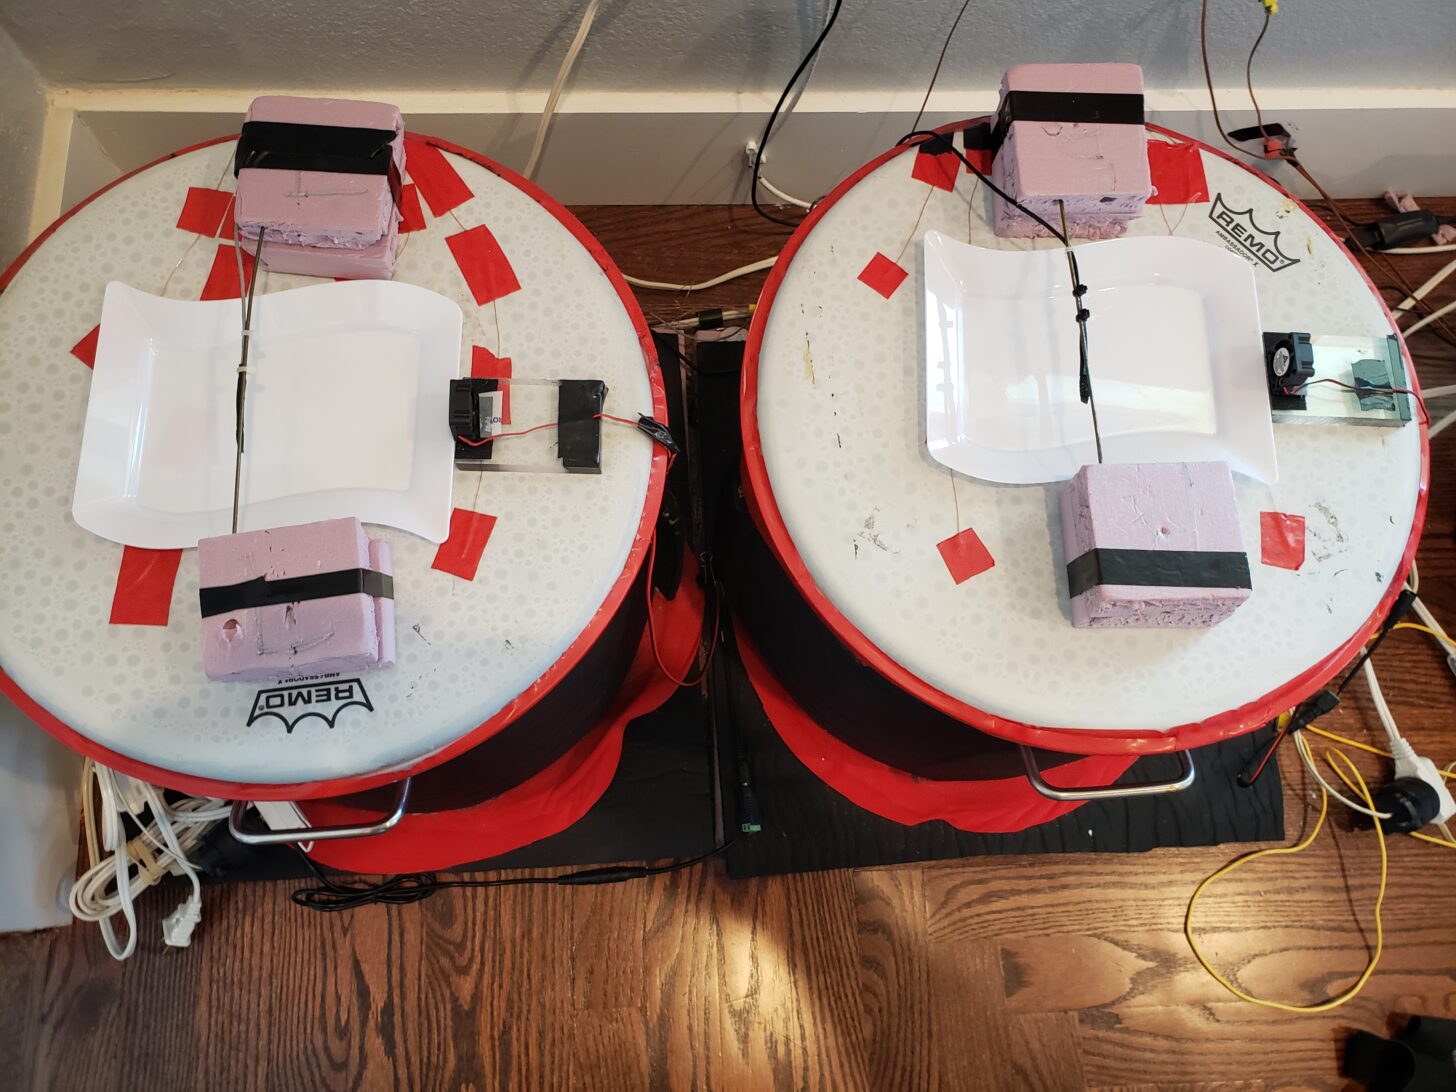
MVTR is measured using our permeation kettles. For this test, the kettle water is heated to a predetermined value, typically from 105 °F to 125 °F (41 °C to 52 °C). A tray containing 100 grams of 120 °F (49 °C) water is placed on the work surface of each kettle. This is our vapor source for the test. A small air circulating fan is placed at the foot of the tray. The fan continuously blows air over the water tray. A digital thermometer/hygrometer sensor monitors the temperature and humidity just below the garment bottom surface. A third thermometer/hygrometer sensor is located three feet above the kettles. This sensor measures the ambient temperature and humidity. The data from the sensors is used to control heating elements that adjust the water temperature in the permeation kettles to achieve a vapor pressure target. This target is typically 0.3 psi. The data from the three sensors is monitored by a custom program that controls the kettle heating element operation. Figure 1 shows waterproof/breathable garments mounted on the permeation kettles for testing. Figure 2 shows the testing components mounted on the permeation kettle work surfaces. Figure 3 shows a screenshot of the Lab View control program.
During the test, which runs for three hours, water evaporates from the tray and passes through the test garment. At the end of the test, each tray is weighed to calculate the quantity of water that passed through the test garment. This weight is then converted to units of g/m2/24 hr (grams/square meter/24 hours), a measure of MVTR.

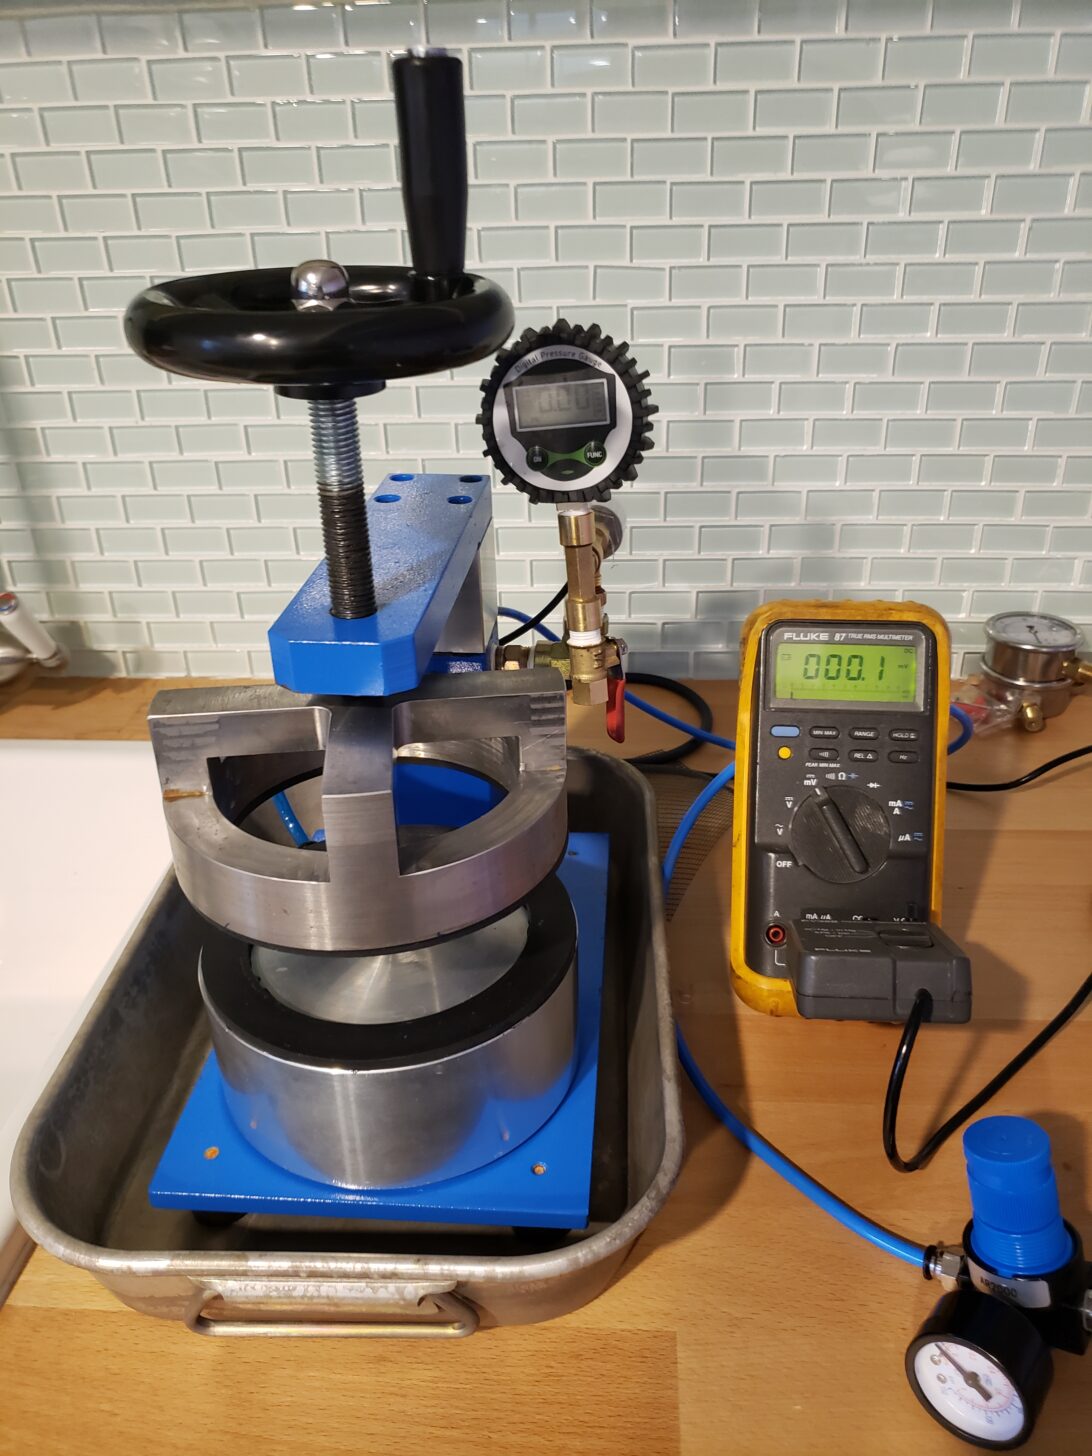
Hydrostatic Head (HH) pressure is measured to determine fabric water resistance. The test is conducted according to ISO 811 for most fabrics. For lightweight fabrics, the test is conducted according to AATCC 208, which permits the use of a restraining device to prevent the fabric from splitting under test pressures. The test results from the two standards are not comparable. When you read a manufacturer’s water resistance test for light fabrics (7-10 denier fabrics and perhaps higher) be concerned that a restraint was likely used, and the published test result would probably not be reached unless the restraint was present to avoid failure of the fabric.
Figure 4 shows the test instrument (a Suter tester). To begin the test, the reservoir (lower tank) is filled with water. The test fabric is placed between the upper and lower clamps and then the top clamp is screwed down tight. Compressed air is slowly introduced into the reservoir which pushes water up against the test fabric. The air pressure is slowly increased until three water drops appear on the top surface of the test fabric. At this point, the test ends, and the failure pressure is recorded. Typically, three to five readings are obtained and averaged together. We generally run the test up to 16,000 mmwc (mm of water column) of pressure. A fabric that achieves this level of pressure can be assumed to be waterproof for most uses and weather conditions.
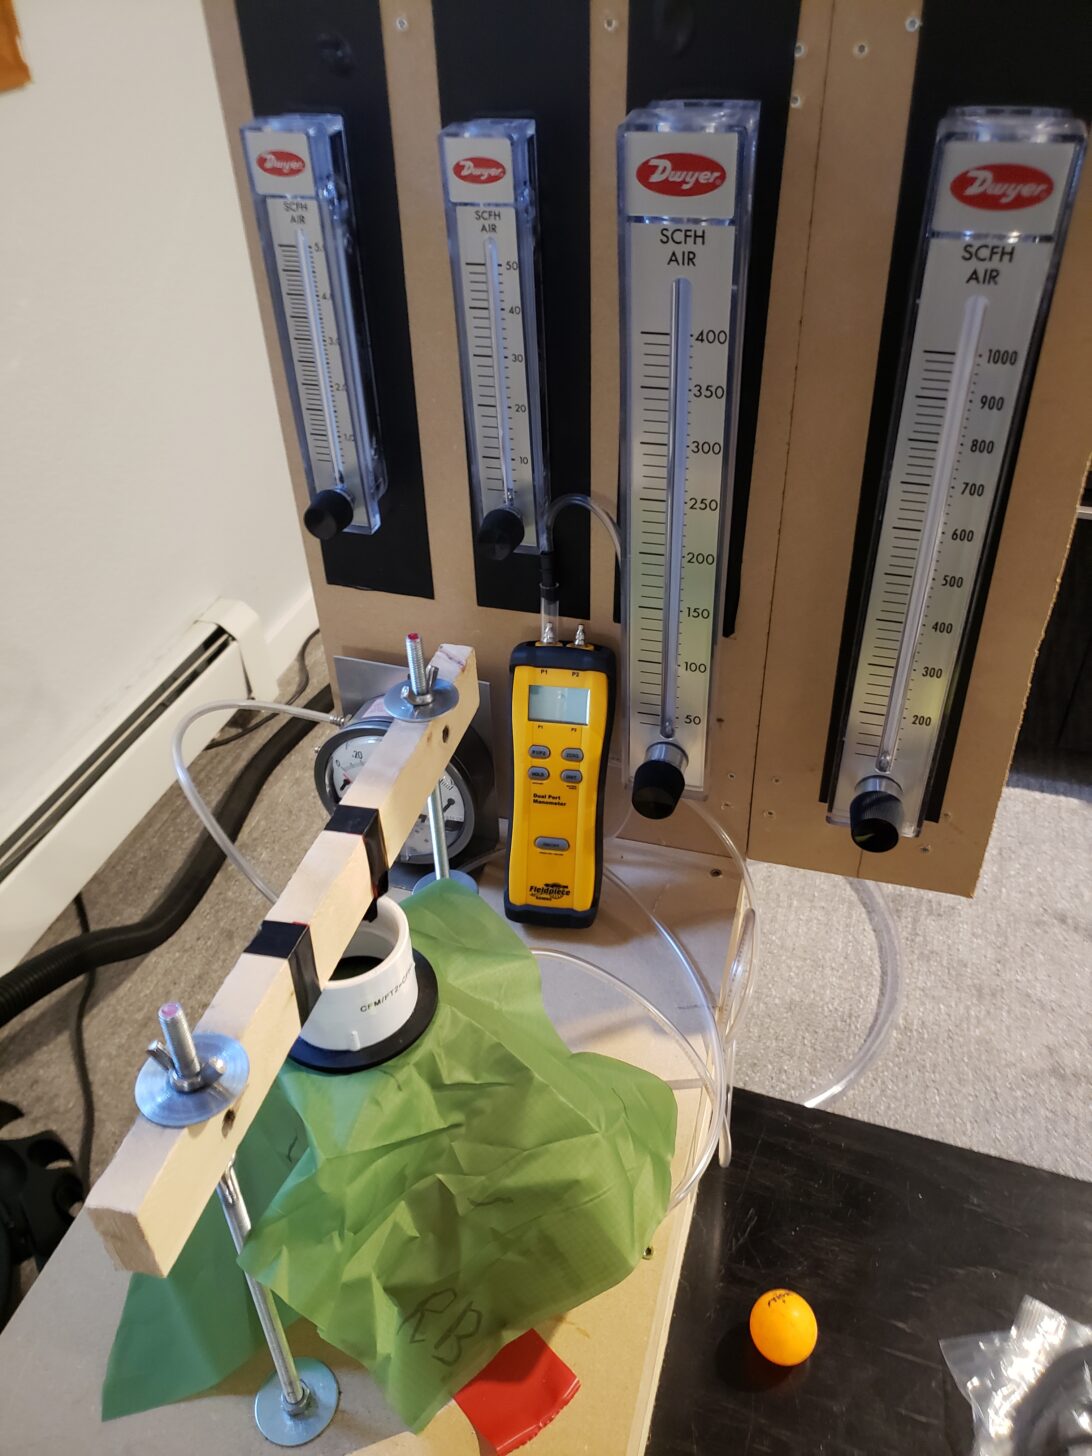
Air Permeability is measured according to ASTM D-737. Figure 5 shows the test instrument. In this test, a fabric is clamped within an air duct and pressured from the bottom so that a pressure difference of 0.5 inwc (inches water column) is present across the fabric from air flowing through the test instrument and exiting from the top of the duct. The air pressure difference across the fabric is measured by both a Magnehelic gauge and a digital manometer. The volumetric rate of airflow required to maintain this pressure is controlled and measured using one of four Dwyer flow meters. This number is then converted into units of CFM/ft2 (cubic feet per minute per square foot). This test is generally not necessary for a waterproof/breathable garment – they are typically air-impermeable, where impermeable is defined as less than 5CFM/ft2.
Member Exclusive
A Premium or Unlimited Membership* is required to view the rest of this article.
* A Basic Membership is required to view Member Q&A events

Discussion
Become a member to post in the forums.
Ben: Obviously, it is pretty difficult to figure out what happened since the jacket is gone. On the other hand, you are a very experienced backpacker and would have a good sense of when a piece of gear is failing. Unless the wind was blowing pretty hard, even with a wetted out jacket, water should not have come through if the membrane performed at >10000 mmwc. Maybe it did leak. How much use did that jacket have? Was your base layer soaked or were you just cold. The wetted out jacket would increase your rate of heat loss. You didn’t say how wet your base layer was, but would you say you were working hard enough to wet out your base layer with sweat? My Neoshell jacket has only seen winter use, so no time spent in the rain. My Neoshell pants would let water through if I went sliding on the snow. Getting water through my Neoshell pants was an ongoing issue and I eventually retired them, maybe 4 years ago. I still have them. So, I just went to where they are stored, took them out and inspected them by holding them up to a light. I found decent size areas where a lot of light was coming through. I placed one of those areas on the HH tester and started pumping it up and immediately a large amount of water ran through the area. I checked another area that had no obvious failure. At 1687 mmwc there were numerous bubbles coming through the surface. I think it is safe to say this Neoshell has failed. Those pants had a fair amount of winter use for hiking and snowshoeing and clearly were worn by the use. By comparison, the Gore-tex pants I replaced them with have many more hiking and snowshoeing miles and several seasons of ski runs on them and have never leaked. So, if no wind was blowing and you weren’t working hard enough to wet things out, I have to wonder if 1) the jacket was worn due to use or 2) the membrane was defective. Perhaps other people can weigh in with their experience with the durability and water resistance of Ascentshell, Neoshell and Future Light.
from the restoring silnylon thread
https://www.versaperm.com/materials/Silicone%20and%20vapour%20permeability.php
“It is an excellent barrier against liquids, but many vapours – such as oxygen, water vapour and hydrogen can pass through most types of silicone almost as if it was not there.”
of course that’s qualitative, but, you’d think maybe silnylon would be good as a WPB jacket
except, in my limited experience I have heavy condensation with silnylon
I wonder what it’s MVTR would be
Hi Jerry: I am happy to find out. Do you have anything lying around you think could be a good test case? If so, PM me and I can give you an address and dimensions that I need.
sure, I’ll send you a piece. I just got some from RSBTR recently. I think its MTN silnylon, but I just weighed it and it was 0.86 oz/yd2. Their current version is 1.5 oz/yd2. Must be a previous version?
I’ll see if I have a silpoly too.
Hello Stephen,
Thank you for this article and all the work you do.
You had said you had tested previous AscentShell jackets. Is it possible if you could provide models and MVTR? I know the Interstellar had a 20D while the Guardian had a 50D so I suspect the Interstellar had a lower MTVR.
I tried out an OR Motive but the lack of full cuff closure and a really wonky hood did not did it for me. Nor does it have any pit zips or other ways to vent other than the front zip. The inside fabric is nice to the touch though.
I did find an original OR Guardian with AcentShell which has a 50d face fabric so maybe that will have similar MTVR as the Motive as that has a 50d also. It is only slightly more in weight but has pit zips and vented pockets. I have always thought direct venting options are of a great benefit and Ryan Jordan’s article reinforced that for me.
I have not had a great chance to full check out the jacket in long and heavy rain yet but it worries me that there are quite a few reviews out there for the AscentShell fabric where it did wet out fast and did leak. I did read a number or articles about the Marmot Eco Precip that were also similar. I will try to get a Eco Precip also and see if there is much difference between the two.
As I am a XXL or XLT I am quite limited in the choices I have available to me so it is nice to see that I have a few options in the upper tier.
Great testing and article. I have a question about the Arcteryx Norvan SL. I love mine. If carrying a heavy pack or bushwhacking, I wear a Houdini wind jacket over the Norvan for extra protection. I assume that the outer wind jacket may increase the MVTR?
I also did not see any test for eVent. I use eVent glove shells that don’t make my hands feel damp.
I’ll add my vote to the request for a test of MVTR for dry vs wetted-out fabric, @stephen. You don’t need a very old jacket to be able to wet out the face fabric – just spray the faucet or shower head on it for more than a minute, in my experience. I would say I take better care of my WPB garments than most people, including futilely to restore / reapply the DWR, but never to any effect. Yes, a drop of water placed on the surface might bead, but poke it with your finger, let it sit for 5 mins, or use a faucet, and there will be no contact angle between the droplet and the fabric – on its way to being absorbed.
Hi again Stephen, I did listen to the podcast, twice at the weekend but I still don’t understand why a microporous membrane can have a significantly higher MVTR than a tightly woven, or even loosely woven wind shirt fabric. Aren’t the holes much bigger than a microporous holes in a membrane? Why is the MVTR of Shakedry 3360 and the MVTR of the Patagonia Houdini 2250? Is it something to do with the difference between vapour pressure and air pressure?
I now understand about the air permeability and lack of air movement through fabric when it is being worn, that was an interesting revelation which had been hiding in plain sight the whole time.
Thanks, Scott
Hi Brett: Here are the 2019 MVTR results you requested: TNF Futurelight Flight-2780; Neoshell fabric-2940, Mountain Equip Arclight (2015)-3060; OR Skyward II-3060. After Ben Kilbourne’s post, above, I share your and his concern about the performance of Ascentshell. I hope there are others out there who can respond with any experience they have with that fabric. I just retested my Mountain Equip Arclight. It has two more ski seasons on it. Visual inspection shows a couple of small holes in the fabric. Another spot tested similarly to the value posted above. A 3rd area had a persistent drop that appeared at around 2800 mmwc and another area where numerous small drops appeared at 5243 mmwc. I actually retired that jacket at the end of ski season last year. That jacket has seven years of heavy winter use. I will be testing 4 different Neoshell fabrics shortly but that will not get to the issue of durability for these fabrics.
Hi Scott:
Here is a photomicrograph of a Houdini.
Here is a Houdini Air:
You can readily see the additional gaps in the weave that render the Air more air permeable.
I think you need to wonder how much open space, comparatively, a water vapor molecule would encounter from a microporous membrane vs a woven fabric. I suspect that to a water vapor molecule that is much smaller than the holes in the microporous membrane that the water vapor molecule actually sees more open space than in the woven fabric.
The Houdini Air MVTR is 3120, so not that far from Shakedry. My studies demonstrate that there is a correlation between Air Permeability and MVTR in that as Air Permeability increases, so does MVTR. You can see it in these two fabrics. But, let’s not confuse the difference in the ability of MVTR vs Air Permeability to remove moisture. My studies have clearly shown that MVTR is more important at hiking speeds than Air Permeability.
So, I don’t think I have provided the authoritative answer to your question, but I hope I have a presented a way to think about the mechanisms involved.
Thanks Stephen, so if I am understanding what you are saying correctly, there are more microporous holes in a membrane for the vapour to escape through than there are in the above fabrics? So even though it appears that the holes are bigger in the woven fabric, the sheer number of microporous holes in a membrane are the reason that some membranes have a higher MVTR?
I do feel that I have my head around the difference between air permeability and MVTR and that higher air permeability doesn’t equate to removing more moisture, I too have experienced this over the past year of experimenting with garments.
Cheers, Scott
Jerry, I dont have access to the full article, but curious if you tested Frog Toggs? Material claims a waterproof rating of 8000MM and an breathability rating of 3,000 MVTR. At 20-25 bucks for a pair of rain pants, will last about one season, and have been happy with its lightweight (0.4 lbs) and waterproof/windproof performance
Hi Stephen,
just wanted to understand what a 10k mmwc really means (I’m referring to the ascentshell in the table ), how that translates to the real world usage? Should be expected to leak? Under which conditions exactly?
Btw, I have collected the following data from your previous tests (maybe a couple of years ago) where AscentShell is reported to be around 16k mmwc, does this mean that they control the impermeability of the membrane in base of the jacket/product? Or is this due to recalibration or something ?
AscentShell MVTR is 3060, HH 16170
Futurelight MVTR 2780, HH 16416
Gore Pro: MVTR 2869, HH of >30000
Thank you very much for the eye opening article.
Easy answer first. The HH instrument that I have used over the years was claimed by its manufacturer to meet the requirements of the relevant test standards. It turned out that the reservoir and clamp diameter were undersized. This resulted in elevated HH readings. Towards the end of 2020 I had a machine shop produce new, properly sized components. Now, all readings will be lower than produced on the original device. Unfortunately, the variance is very much fabric specific so there is no way to correct the older readings.
My personal experience is that 10000 mmwc should be adequate for most activities. I have found for high pressure uses, such as kneeling in a puddle, water might come through. I have experienced leaks sliding on snow numerous times with Neoshell. Also, very high winds will increase the pressure on the membrane and could require higher HH to remain water proof. Normally, I run the test to 16000mm. In the case of the Ascentshell jacket, I stopped the test at their claimed performance because I did not want to risk damaging a garment that I intended to return. Readers who have used electrospun WPB jackets are encouraged to post their experience with this technology.
Jerry, if you send samples of silnylon to Steve, you might want to take care that they have 100% silicone coating. All but one of the sil-coated fabrics at RBTR currently actually have blended sil/PU coatings. The exception is 30d MTN silnylon, which they advertise as having 100% silicone coating.
Hi Stephen. Have you ever or could you test a layer of say Houdini fabric over a Norvan SL. Opinions exist amongst engineers that I backpack with whether an outer layer would improve the MVTR or reduce it?
Hi Tim: Everything you put between any layer and the environment adds more resistance to MVTR. What you want to do would reduce it. For a better feel for this, see table 4 in this article.
Thanks Stephen: I was impressed by all of your testing including Table 4. And that reinforces my thinking a few years ago. I have some materials science and engineering friends who believe that a wicking porous material outside the membrane could possibly enhance the evaporation rates. The increased surface area of a highly porous material could act as a catalyst. Thus air has a larger contact area with the moisture.
You might relate it to wind blowing across a lake and causing evaporation. If you make the lake bigger given the same wind, the evaporation increases. I have noticed over the years that my rain gear feels less clammy when it is windy, kind of like a tent stays dryer inside on windy nights. Does your test equipment account for wind evaporation?
In addition, we have discussed that different materials can affect the surface tension of water droplets passing through the fibers. Water clings to some fibers more than others. So if the outer materials create a lower surface tension they will release moisture at a faster rate. You could relate this to climbing on a wet muddy surface versus a dry knobby surface. You can hold on to one surface less than the other. Things people talk about around the campfire?
a wicking porous material outside the membrane could possibly enhance the evaporation rates.
While adding a couple of kilos weight in the rain.
Cheers
Hi Roger: these guys who work for major companies in this business are thinking very thin layers of material that absorb very small amounts of water. They mostly wick but absorb little.
Putting a fragile fabric layer on the outside of a hard shell would present durability issues and, ditto Roger’s point. If there is enough wind to make such a thing work, the MVTR of the outer layer would go up due to the reduced MVTR of the air layer outside the jacket. So, the fabric probably would not add anything. In any case, what is coming out of the shell would be vapor and would go right through a wicking layer. If the wicking layer were below dew point, than ditto Roger’s point.
If the layer is that thin, it won’t be very effective at wicking.
A new brilliant breakthrough every couple of years.
But none of them so far have ever worked in the field.
Yeah, so I am old and cynical. And experienced.
Cheers
Stephen: Have you tested a layer of Houdini over the Shakedry? I have used that combination for bushwhacking for about three years with good success. The Houdini has held up well unless we encounter cats claw, devils club, cactus or sharp rocks. I have not noted the clamminess in this combination like on my other Goretex?
I was also suggesting a wind across the surface test to determine what that effect might have.
Of note Polyester absorbs about 0.04% moisture and is very wicking. I have designed wicking drains to dry up swamps, wetlands and mine tailing deposits with great success. We used polyester fibers for wicking and blew air into the holes to enhance evaporation rates
I may not be as old, cynical and experienced as Caffin. I am just a retired engineer backpacker in my mid 70s with a couple of questions.
Why does the Gore-Tex website say that their Infinium membrane (previously Windstopper) is NOT WATERPROOF??
https://www.gore-tex.com/technology/infinium
This article tested an Infinium jacket and showed that it IS waterproof.
I’d like to buy the Montbell Rain Trekker, which uses Infinium, and is highly rated by this Greenbelly article:
https://www.greenbelly.co/pages/best-lightweight-rain-jackets
Does anyone here have experience with the Montbell Rain Trekker?
Only Gore can answer that. For years they did not permit seam sealing with Windstopper, which meant that it could leak. The Montbell Versalite has sealed seams. It is waterproof. I have tested HH to be greater than 20000mmwc. I have also tested other Windstopper garments. The fabric is waterproof. I have not tested the Rain Trekker, but it should perform like the Visp.
Become a member to post in the forums.