
by Emylene VanderVelden and Ryan Jordan
Update February 4, 2025: Product selections have been updated to reflect the current state of the market for coffee brewing equipment and supplies. In addition, we added an immersion brewing section and updated our “What the Authors Use” section to reflect our current practices.
Introduction
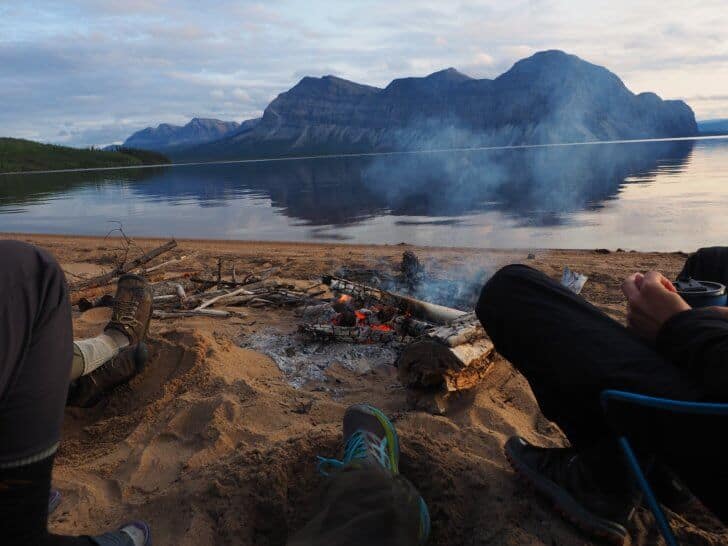
Ultralight backpacking embodies the values of simplicity and weight savings. Some of that gets thrown out the window when the subject of backcountry coffee comes up (depending on your level of java snobbery). This article provides an overview of coffee-making methods (how to make coffee in the backcountry) while backpacking, with a study of their complexity and weight.
Under no circumstances should you let a non-coffee drinker brew your coffee. Non-coffee drinkers CANNOT be trusted to make acceptable coffee. If some well-meaning tent-mate gets up early and offers to bring you coffee in bed, do NOT let them. You will be sadly disappointed, and the entire day may founder in a miasma of negative drama. – Mike Clelland, The Beautiful Cup: Backcountry Coffee for the Ultralight Backpacker.
What is Still True About How to Make Coffee in the Backcountry
In 2010, Mike made some valid observations, and we wholeheartedly agree with them.
He said:
As you may have gathered, I’ve got some opinions about this whole coffee thing. So, before we go any further, and in the interest of full disclosure, here are a few of my prejudices:
- Strong coffee is good coffee.
- Except for a very few companions, I don’t trust anyone to make coffee for me.
- Adding sugar to coffee is criminal.
- Sometimes I add a little milk in my coffee, but black is just fine.
- Adding flavors (like hazelnut and almandine) to an already perfect drink is sinful.
- Picking grounds out of my teeth is a serious buzz kill.
- Coffee equals joy.
How Coffee Brewing is Controlled
The bean source, roasting method, and freshness have an impact on the quality of your coffee.
But you have some brewing control as well. Depending on the method, you can adjust:
- Brewing water temperature;
- Rate of flow (or time of exposure between coffee and water);
- Water pressure (e.g., espresso is drawn at higher-than-ambient pressures).
Changing the temperature, flow rate, and pressure allows you to fine-tune your flavor profile. The ability to control these three variables will be evaluated when we look at coffee-making gear.
A note on temperature that may be relevant for backpackers in mountain environments: boiling temperature changes with altitude. At sea level, the boiling temperature is 212 F (100 C). At 9,000 ft (2743 m), the boiling temperature is about 195 F (90.5 C).
Nine thousand feet (2743 m) is kind of an important inflection point with respect to coffee extraction and altitude.
It’s generally accepted by most coffee aficionados that the ideal extraction temperature is 195 F (90.5 C) to 205 F (96.1 C), so once you climb above 9,000 ft (2743 m), you may want to increase your brew time a bit if you’re after a stronger cup of coffee.
Coffee-Making Methods and Gear for Backpacking
The popularity of coffee-drinking1 is being driven by a rise in boutique coffeehouses, micro-roasting, and consumers’ unquenchable thirst for cool new gear. Thankfully, this market enthusiasm is spilling over into a wide range of portable coffee-making supplies and tactics:
- The French press
- Immersion Brewers
- Mini espresso makers
- Pour-over coffee makers
- Coffee & tea infusers
- Instant coffee
- Coffee paste
- DIY cold brew
The following table summarizes each method in terms of its weight, brew time, nature of flow, pressure, cleanup, and coffee quality.
Scroll right to view all columns.
| weight | prep + brew + cleanup time | passive/active flow | pressure | cleanup | coffee quality potential | |
|---|---|---|---|---|---|---|
| French press (standalone) | heavy | slow | passive | atmospheric | messy | high |
| French press (integrated) | light | slow | passive | atmospheric | messy | high |
| Mini espresso maker | heavy | slow | active | pressurized | moderate | high |
| Pour-over coffee makers (with disposable filters) | light | moderate | active | atmospheric | easy | high |
| Pour-over coffee makers (integrated filter screens) | light | slow | active | atmospheric | messy | medium |
| Instant coffee | lightest | fastest | n/a | n/a | easy | medium |
| Infusers | light | moderate | passive | atmospheric | moderate | medium |
| Cowboy/Turkish | light | moderate | passive | atmospheric | messy | medium |
In addition, we’ll touch on coffee grinders, coffee alternatives, and whiteners towards the end.
The French Press
The French press method of coffee brewing gives the brewer a great deal of control over the resulting coffee flavor, owing mainly to the fact that brew time can be varied. (As with other techniques, you can also control the flavor by altering the brewing water temperature and the coarseness of the grind). French press technique should generally use a coarse ground coffee because all of the extracted oils are retained (and not filtered out) – a finer grind (and/or a longer brew time) will result in more bitterness.
Outdoor product manufacturers offer a wide range of light, sturdy, portable standalone French presses and integrated presses for cooking mugs and pots. They aren’t the lightest option (in fact, self-contained presses are among the heaviest), but French-pressed coffee has the potential to be very strong and flavorful.
We like the integrated cooking mug/pot press idea, except for one minor detail: if you are making coffee, you cannot use the pot for anything else until you wash it out. That means you have to make your meal in sequential cooking batches, and can’t drink your coffee with your food without transferring the coffee to a separate mug, cleaning the pot, etc.

The GSI Outdoors Commuter JavaPress is a 15 fl. oz. insulated copolyester coffee press weighing 10.3 oz (292 g), with an integrated sliding inner carafe that separates coffee grounds after brewing, eliminating the need for a plunger rod; features a spill-resistant, flip-top lid, a foam sleeve for insulation, a press-and-drink-through design, and prevents over-extraction by keeping grounds separated after pressing.
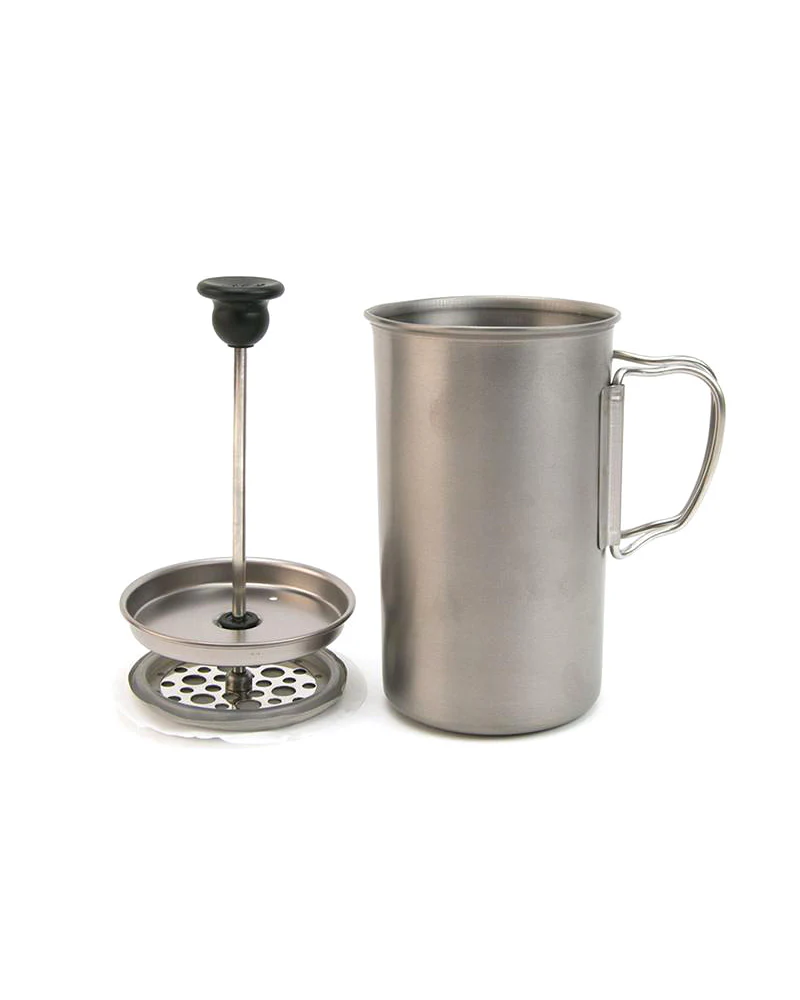
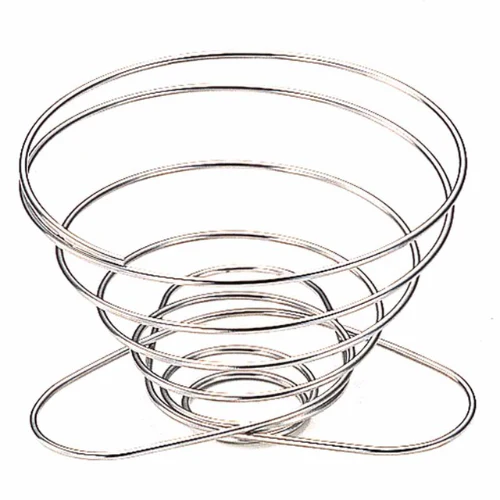
The Snow Peak Titanium French Press is crafted from single-wall Japanese titanium, allowing direct heating over a heat source. It has a capacity of 24 fl. oz. (0.7 liters) and weighs 6.3 oz. (179 g).
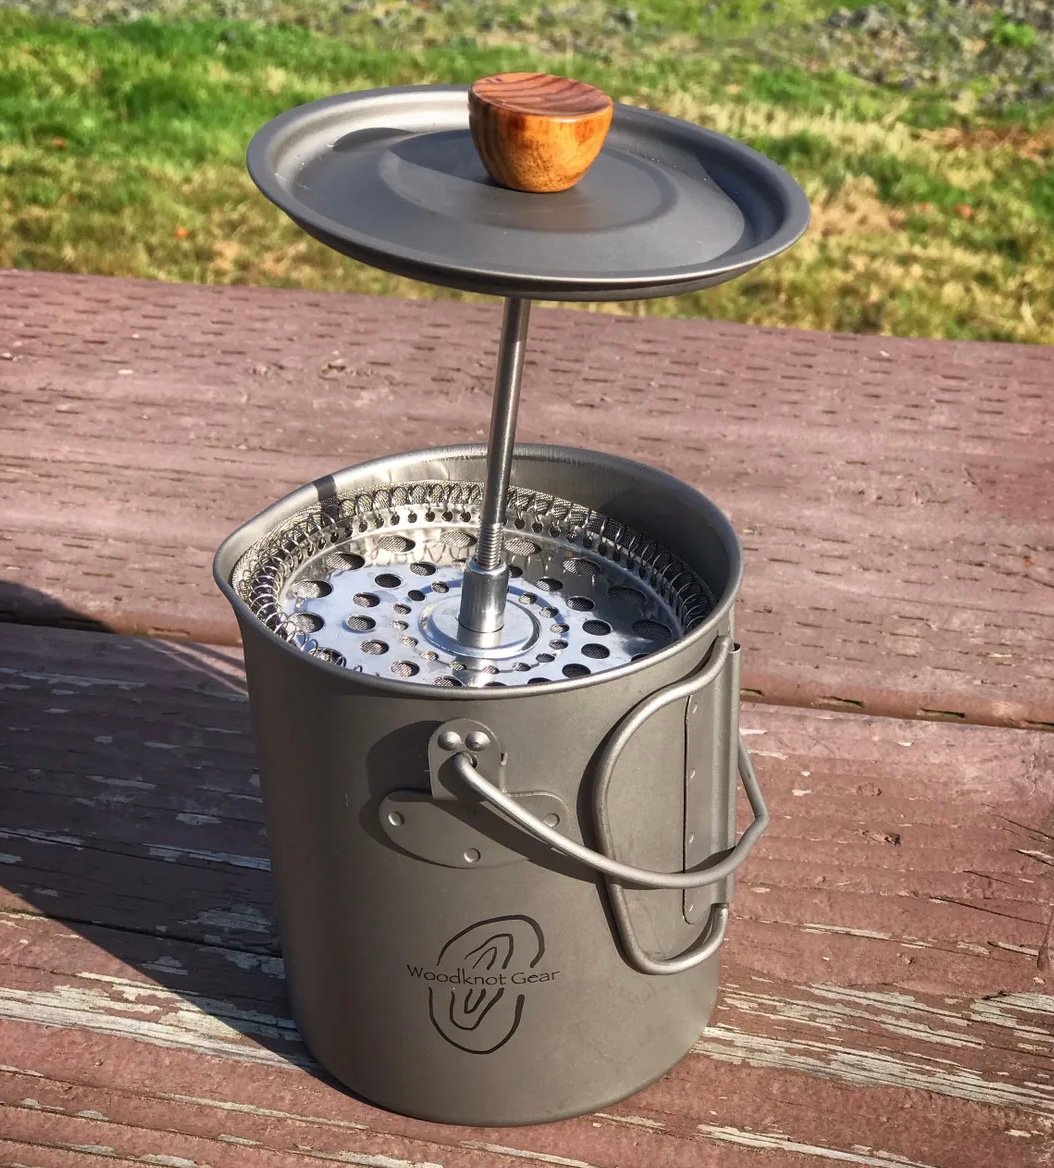
The WoodKnot Gear Titanium 750ml Camp Coffee Kit is made from high-grade titanium, offering lightweight durability and corrosion resistance. It features a stylish wooden knob, vented lid, double folding handles, and a bail handle, allowing it to function as a French press, water boiler, or cooking pot. Weighs 6.4 oz (181 g); 7 oz (198 g) including the stuff sack.
The MSR WindBurner Coffee Press is designed for WindBurner Stove Systems, featuring a durable stainless steel strainer disc and a flexible perimeter gasket to seal out coffee grounds. It disassembles and packs flat for easy storage. Available in 1.0L and 1.8L sizes, weighing 1.3 oz (37 g) and 1.6 oz (45 g) respectively.
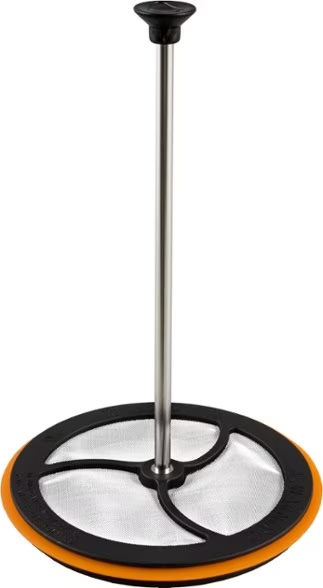
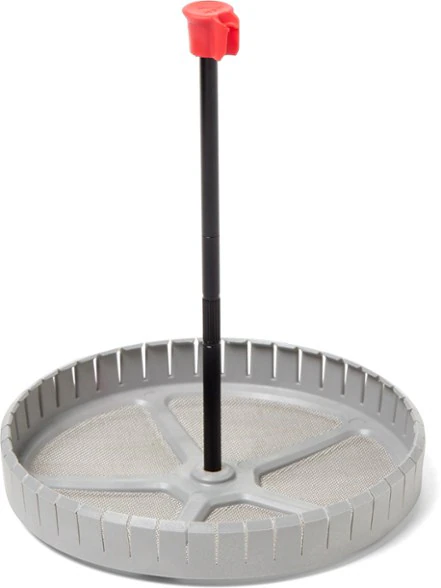
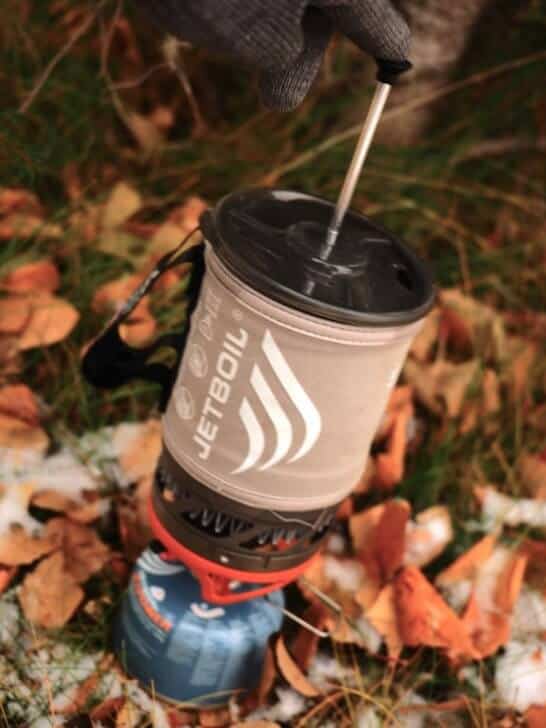
The Jetboil Silicone Coffee Press is a lightweight accessory weighing 1.3 oz (37 g), made from stainless steel and food-grade silicone. Designed to fit Jetboil Zip, Flash, Flash Lite, MicroMo, PCS Sol, and Sol TI cooking systems, as well as 1-liter tall and 0.8-liter spare cups. It features a heat-resistant silicone ring for a secure fit, preventing coffee grounds from escaping during plunging. The stem and basket detach for compact storage within the cooking system.
Immersion Brewers
Similar to a French press, an immersion brewer steeps coffee grounds fully in water for a set period of time, essentially “soaking” them prior to filtering them out. Immersion brewers are distinguished from French presses by forcing the brew through finer mesh or paper filters to create the clarified filtrate. The result is a smoother (less bold) cup of coffee because the fine grind is filtered out prior to drinking with an immersion brewer.

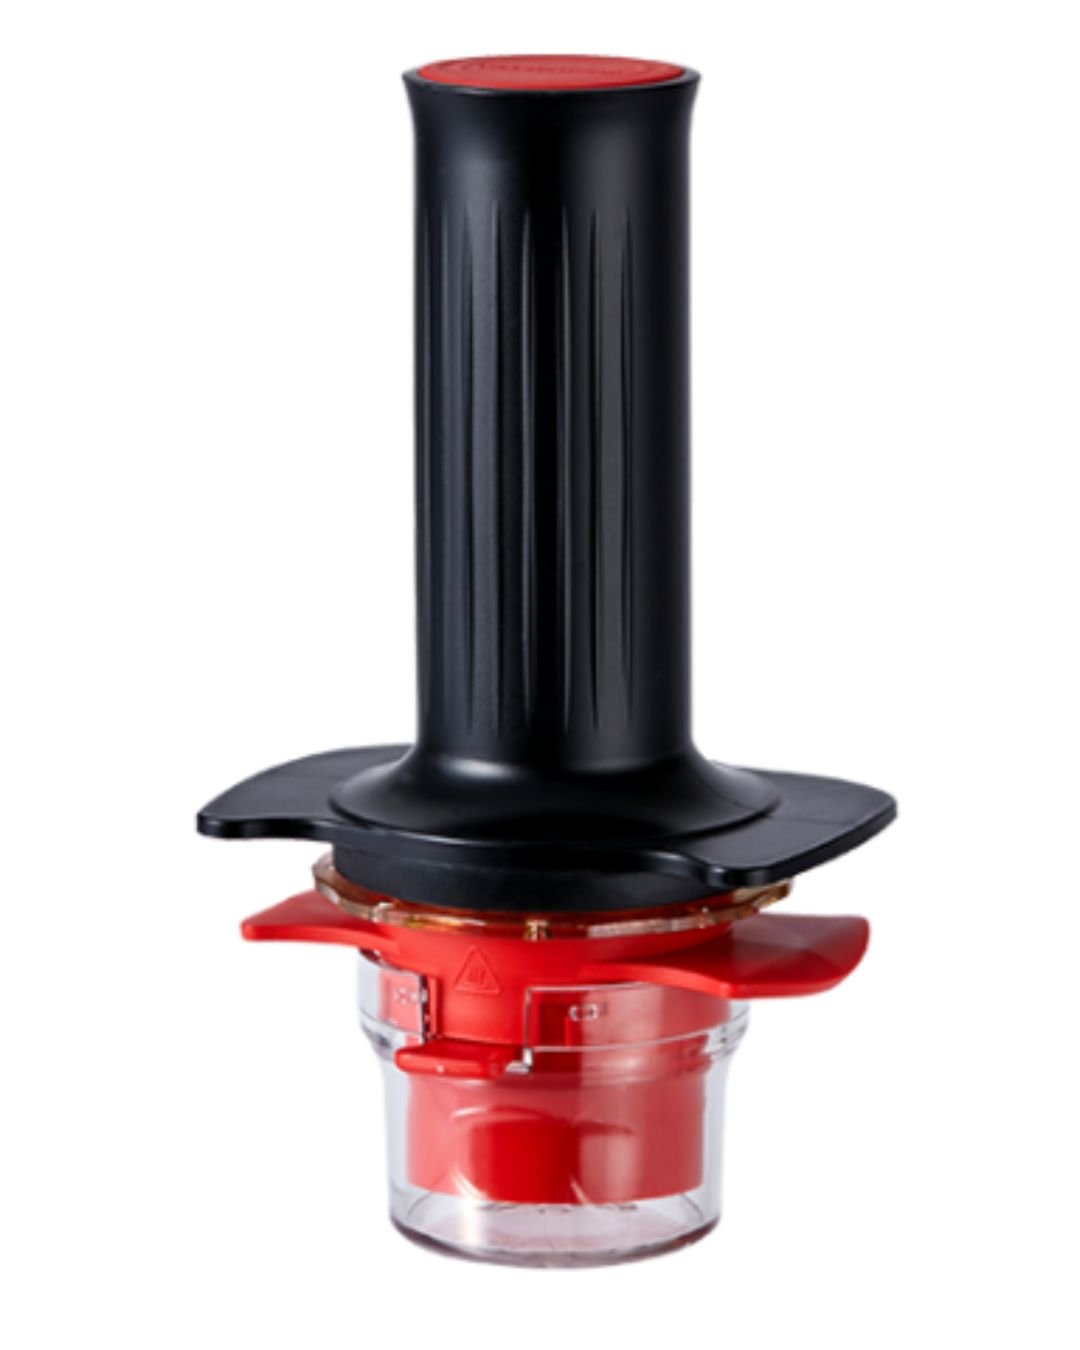
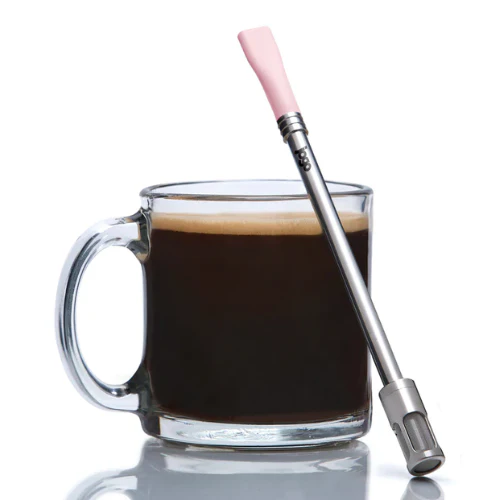
The AeroPress Go Travel Coffee Press is a compact and portable coffee maker weighing 11.4 oz (323 g) that brews 1 to 3 cups of American, espresso, or cold brew style coffee in about a minute; made from food-safe polypropylene (PP) and includes a mug with a lid that doubles as a carrying case.

The Cafflano Kompact Coffee Maker is a portable, compact coffee brewer designed for convenience. It features a simple press-down mechanism for brewing coffee on the go.
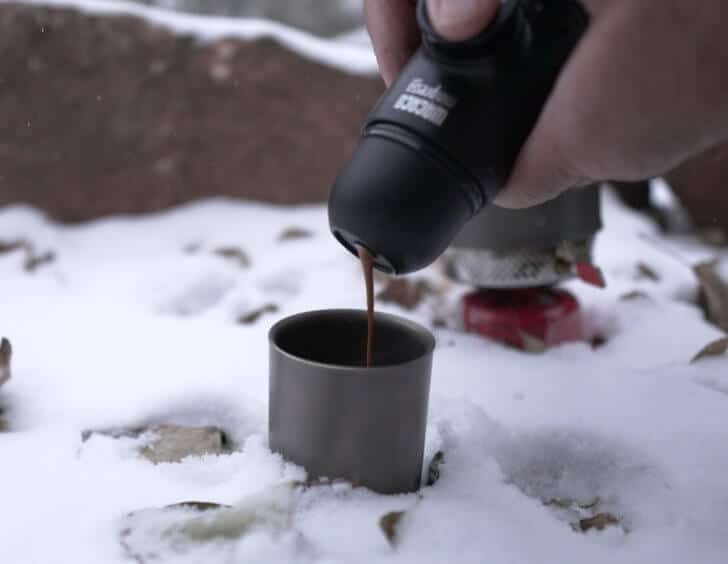
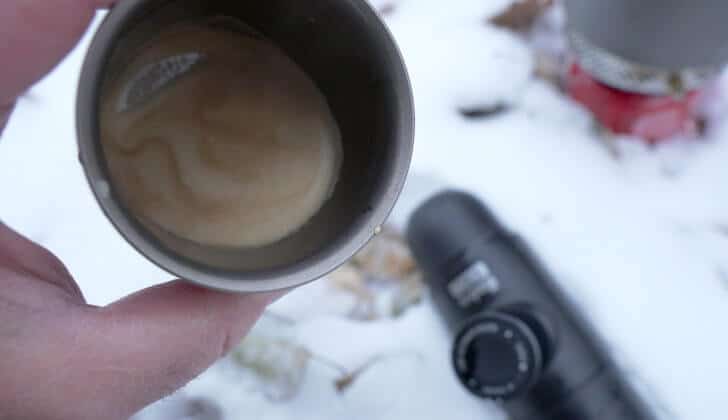
Mini Espresso Makers
An espresso maker uses high pressure to quickly force hot water through finely-ground coffee, resulting in a much more concentrated shot with a stronger flavor profile.
Mini espresso makers are unique because they can extract coffee at nine bars (or more) of pressure (i.e., 130 PSI). That’s nine times the ambient atmospheric pressure where other coffee brewing methods operate. This is important because higher pressures can extract coffee oils more aggressively (and require less contact time). A finer grind is required when making espresso, because of the short contact time (about 30 seconds, generally, vs. 2-5 minutes for traditional brew methods). The result is a much richer-tasting coffee without the bitterness of a long water contact time.
The idea of adding a mini espresso maker to our kit seemed revolutionary to us – a real shot of pressure-drawn espresso? That sounded too good to be true.
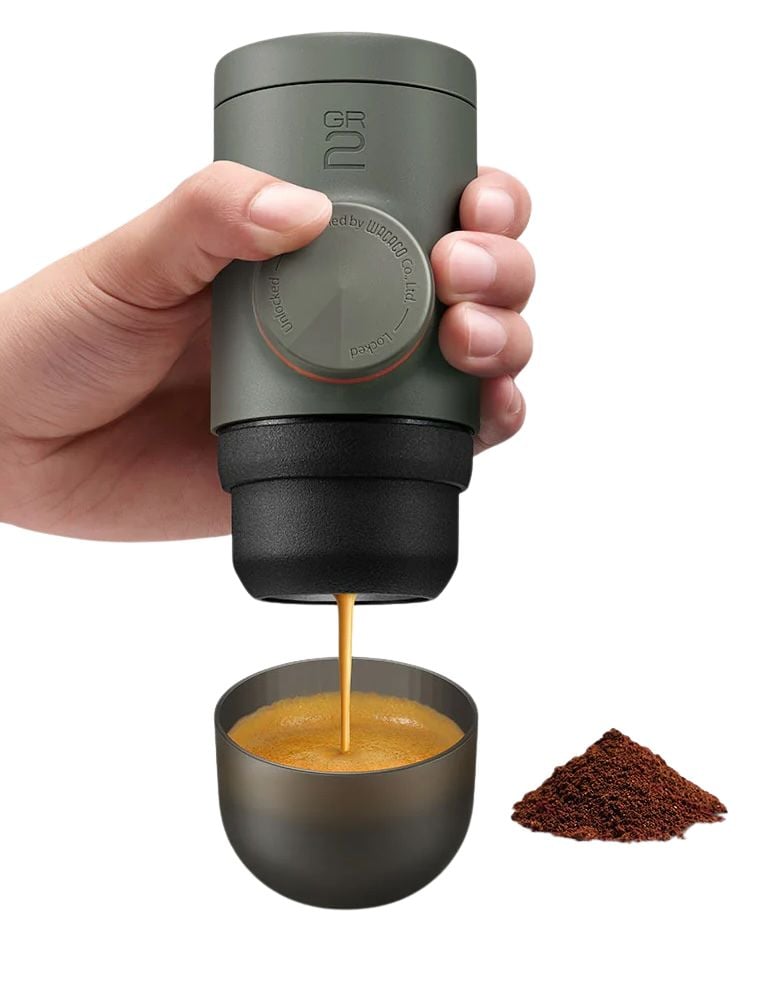
The Wacaco Minipresso GR2 is a compact, hand-operated espresso maker with an adjustable basket for 8 to 12 grams of ground coffee. It features a built-in water tank with an 80 ml capacity and operates at a maximum pressure of 18 bar. Weighs 10 oz (285 g).
Cafflano KompressoThe Cafflano Kompresso is a portable espresso maker designed to deliver a consistent 9-bar pressure for authentic espresso extraction. It utilizes hydraulic compression and features a compact, lightweight design.
Pour-Over Coffee Makers
Pour-over coffee allows you to exert some control over the flow rate of the water. The primary difference between a French-pressed coffee and a pour-over coffee is that French press is a batch brewing technique (no water flow, just soaking), and pour-over is a flow-through brewing technique. Because the grounds are not coming into contact with the brewed coffee filtrate (and aren’t exposed for as long of a time), it takes a finer grind and slower, more patient pour to achieve the strength of a French-pressed coffee. One distinct advantage of the pour-over method: no coffee ground grit (some drinkers will enjoy this, however).
Some pour-over cones require the use of an additional filter; others include integrated plastic or metal mesh screens. The latter avoid disposable supplies, but are messier to operate.
Pour-Over Coffee Makers:

The GSI Outdoors Ultralight Java Drip Coffee Maker is an ultra-compact, reusable drip coffee filter that clips onto any mug for backcountry brewing. It weighs less than half an ounce (11 g) and features sturdy legs that clip to your mug for stability during brewing.
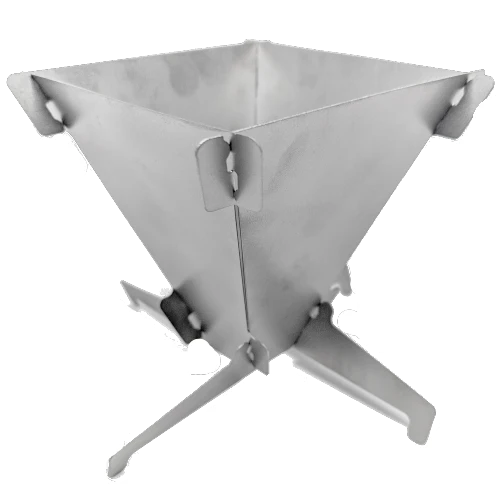
The Suluk 46 Kapik Titanium Coffee Drip is a portable coffee brewing device made from titanium. It consists of four interlocking pieces that form a pyramid-style funnel, with out-rigging legs that rest securely on vessels up to 4.5 inches in diameter. Weighs 1.6 oz (46 g).
The GSI Outdoors Coffee Rocket is a one-person pour-over coffee maker designed for camping. It features a 230 ml drip cone and a reusable stainless steel filter. The hopper holds up to 10 grams of medium grind coffee. The filter body nests into the water hopper for compact storage. Weighs 2.7 oz (76.5 g).

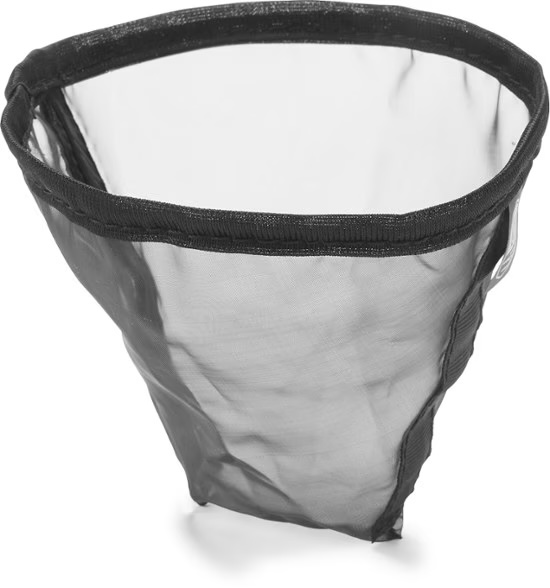
The Vargo Titanium Travel Coffee Filter is a solo pour-over coffee maker made from 100% biocompatible titanium, ensuring no chemical leaching or flavor imparting. It features double mesh construction for strength and fine filtering, and talon-style folding legs that fit a wide variety of mugs. Weighs 1.27 oz (36 g).
The SOTO Helix Coffee Maker is a collapsible stainless steel filter holder weighing 1.6 oz (46 g), compatible with #2 cone filters, and includes a mesh carrying bag.
The GSI Outdoors Reusable Pour-Over Java Filter is designed to brew coffee or tea repeatedly. Made from durable nylon, it fits into traditional #4 cone pour-over coffee makers and is easy to use and clean. Weighs 0.16 oz (4.5 g).
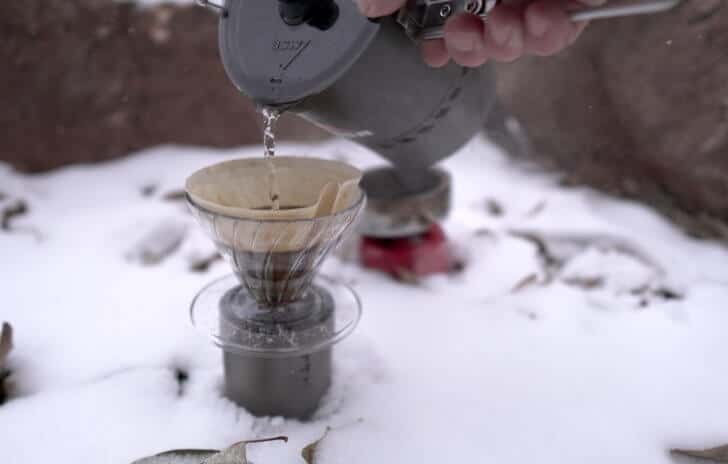
In addition to pour-over hardware, disposable options also exist. The Kuju Coffee Pocket is one such option (we reviewed Kuju Coffee here). Ryan Jordan reviewed another one here, where you can see in action how disposable pour-overs work (with video).
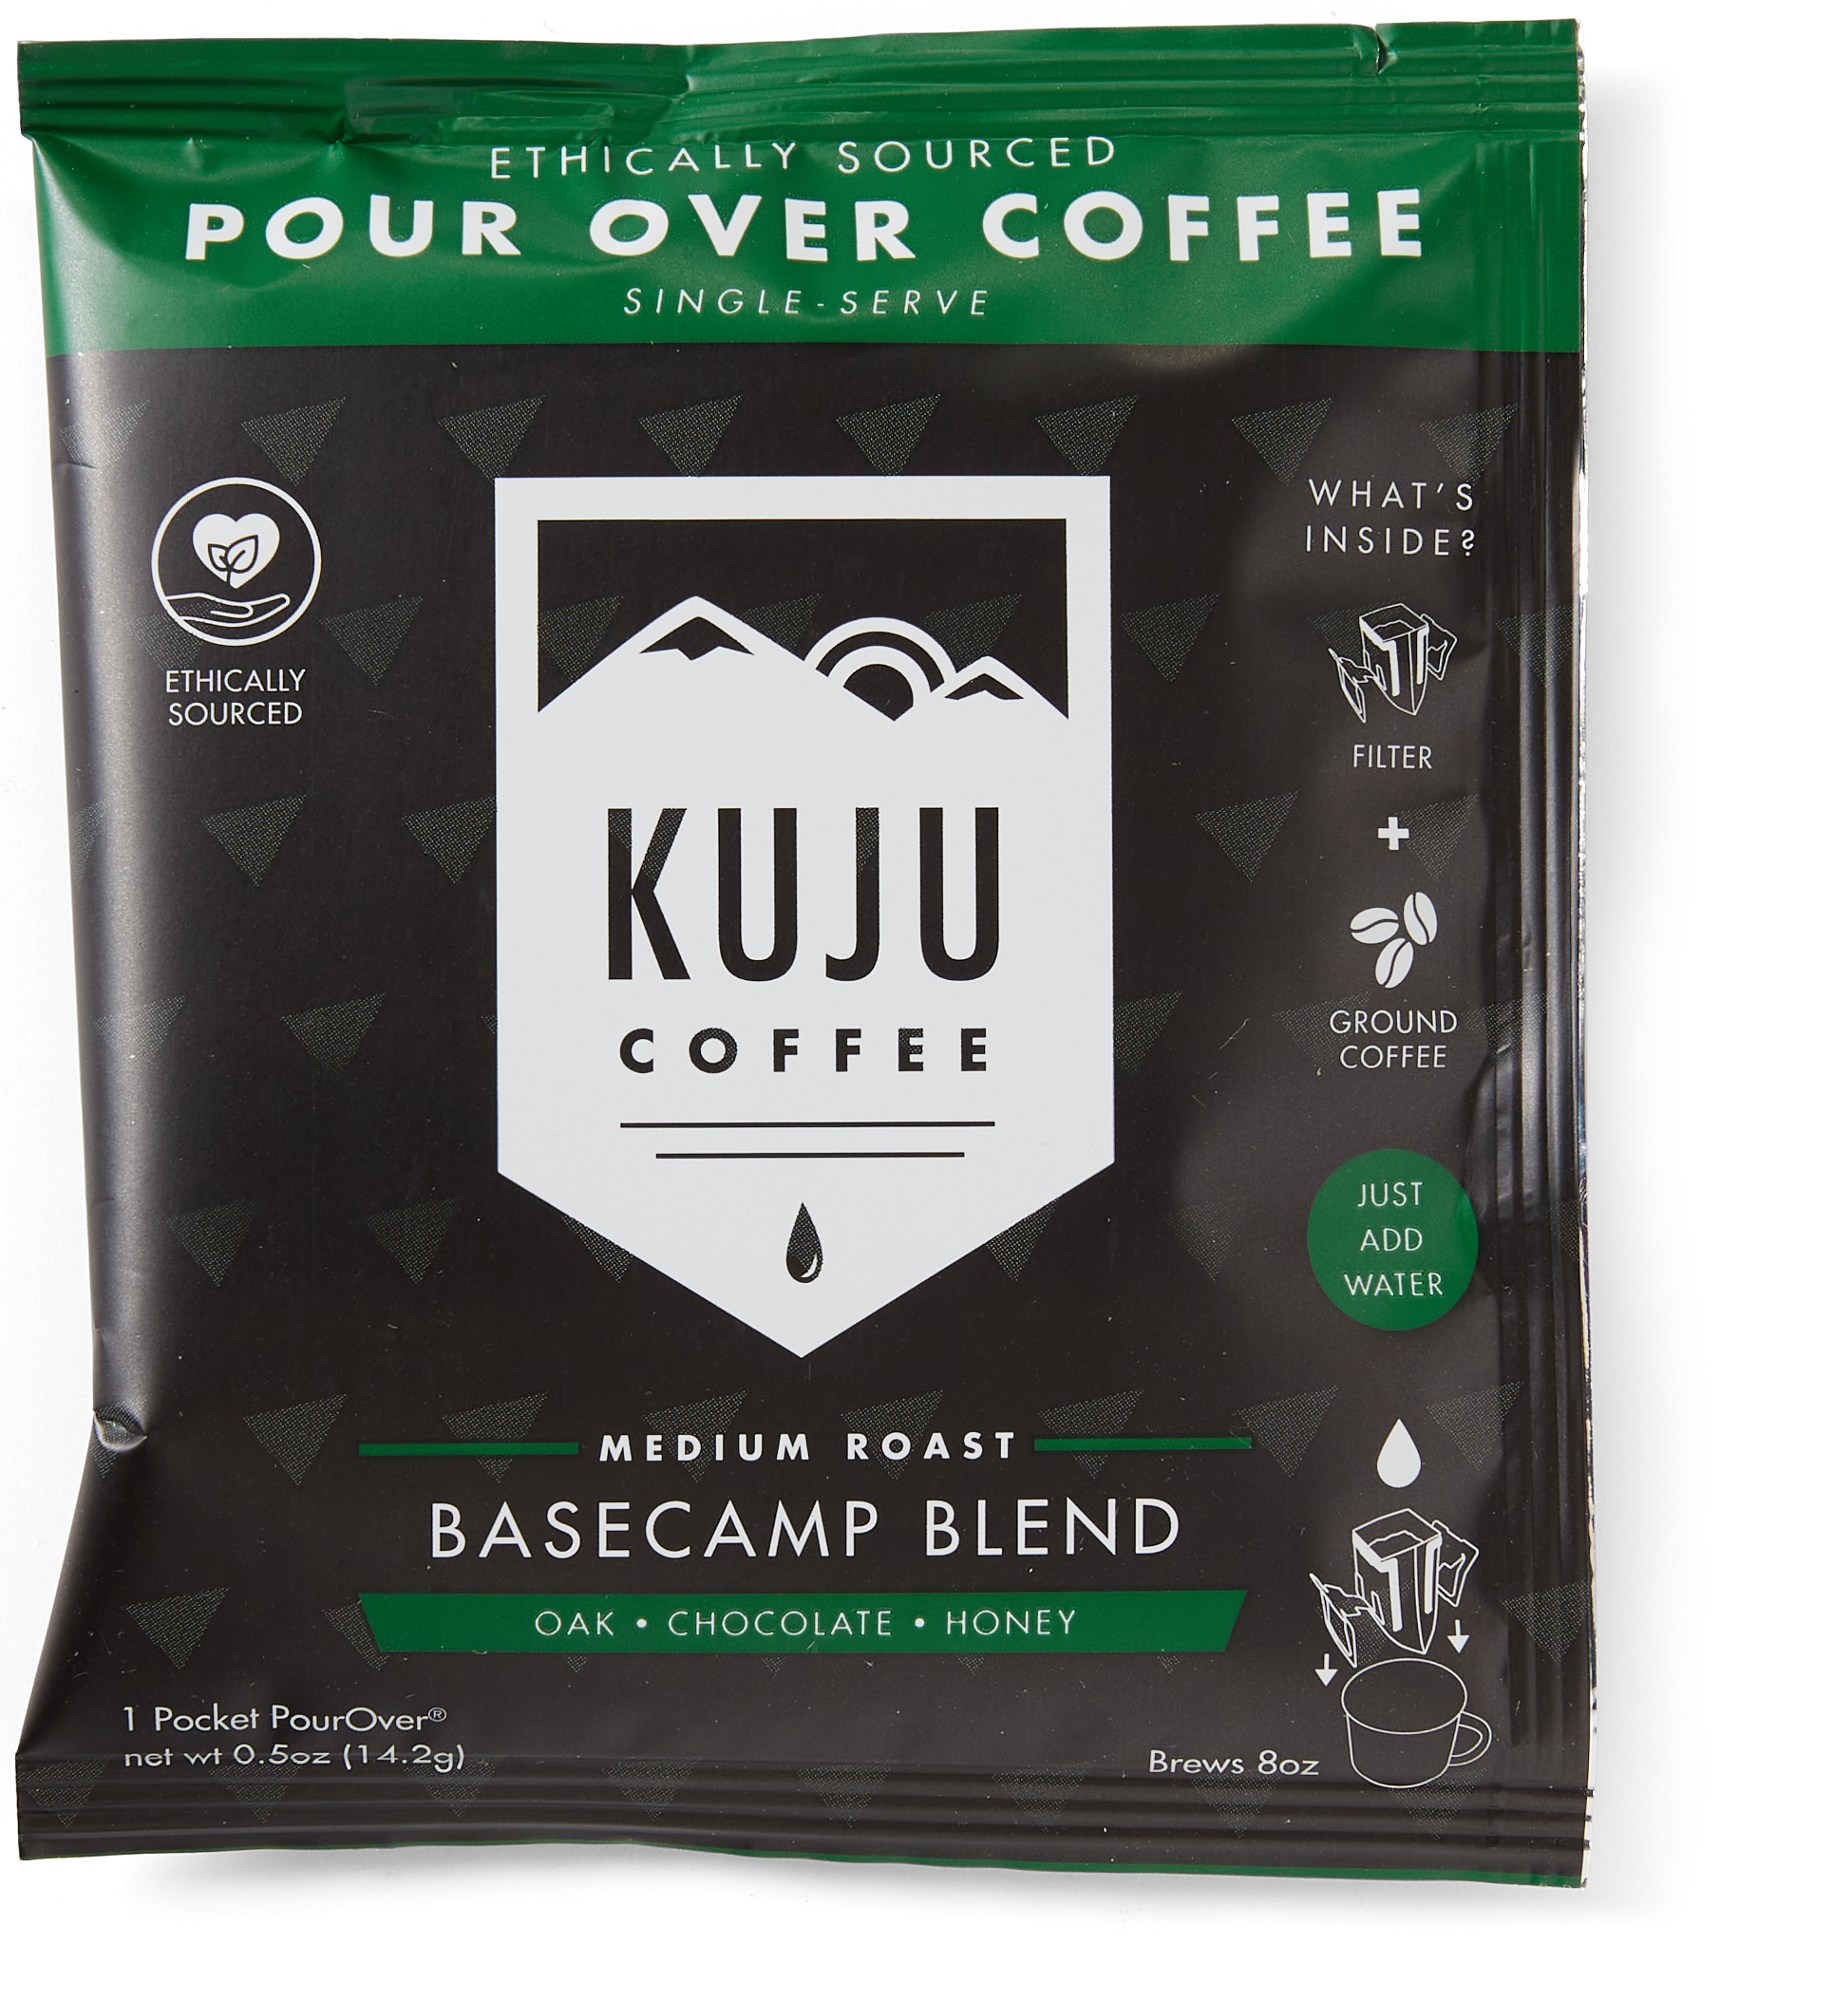
Kuju Coffee's Single-Serve Pour Over Coffee features a filter that anchors to your mug and is filled with specialty-grade, ethically sourced coffee grounds. Simply tear open the packet, anchor it to your mug, and pour hot water to brew a fresh cup in minutes.
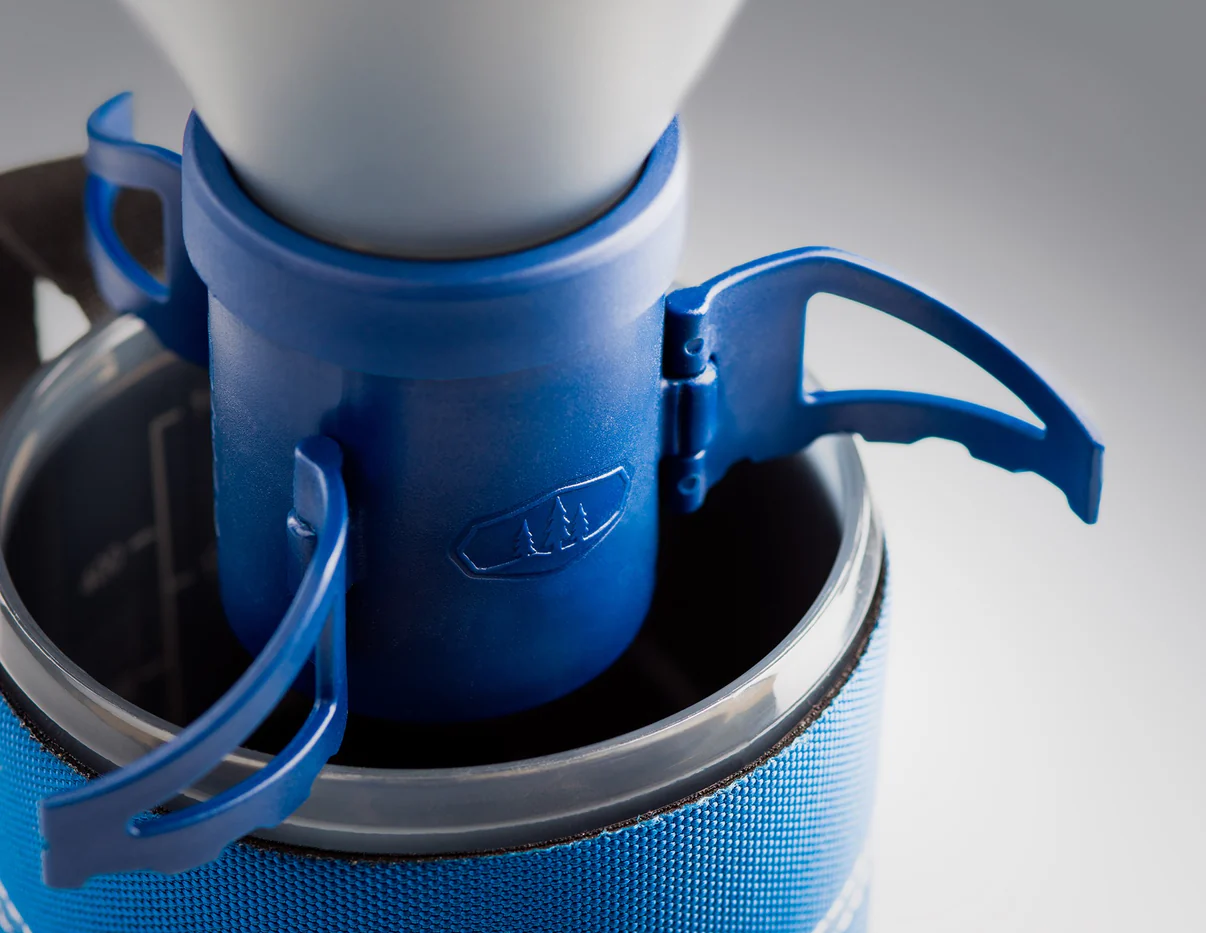
Coffee and Tea Infusers
An infuser is little more than a mesh “basket” containing ground coffee (or loose-leaf tea) that is inserted into a cup of hot water. The water then passively extracts the coffee – there’s no pouring, pumping, or other types of active (flow) extraction method involved other than human-powered swirling.

The MSR MugMate Coffee/Tea Filter is a reusable filter designed for brewing coffee or tea without disposable paper filters. It weighs 0.98 oz (28 g) and is made of nylon.
The JoGo Brew Straw is a portable brewing device made from food-grade stainless steel and BPA-free silicone. It allows users to brew and drink coffee or tea directly from a cup without the need for a separate filter, featuring a built-in mesh filter to prevent grounds or leaves from being consumed. Weighs 1 oz (28 g).
Instant Coffee
We have a fundamental disagreement with Mike about instant coffee. He writes “Instant coffee isn’t actually coffee, and is therefore outside the scope of this discussion. It is quite simply not an option.”
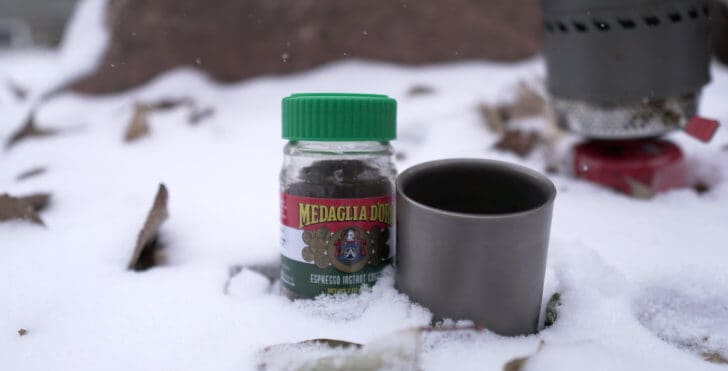
Some instant coffee manufacturers have realized consumers will not drink flavored mud water and have improved instant coffee standards accordingly. If we are desperate for coffee and saving weight, Starbucks Instant and Medaglia D’Oro are bold, tasty options. They may not be as good as French press or espresso, but they aren’t terrible either – especially when you consider the weight of instant freeze-dried coffee powder (very light!) and ease of use.
Other companies have entered the instant coffee market and are pitching their grind specifically to the outdoorsy type:

Alpine Start's Original Blend is a medium roast instant coffee made from 100% Colombian Arabica beans. Each packet contains 0.1 oz (2.8 g) of coffee, providing approximately 120 mg of caffeine per serving. The product is non-GMO, dairy-free, and gluten-free.
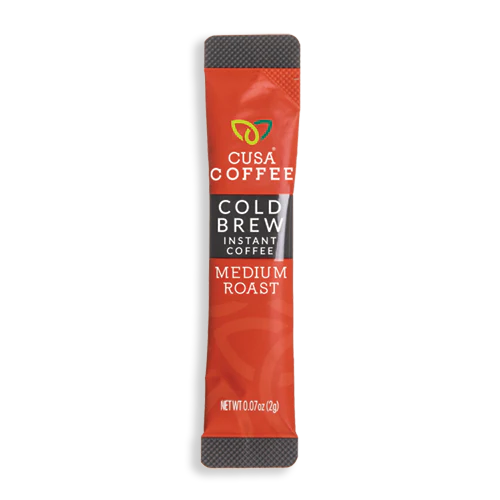
This instant coffee is made from high-elevation 100% Arabica beans sourced from a Rainforest Alliance Certified plantation practicing regenerative agriculture and organic farming. Each packet contains 0.07 oz (2 g) of coffee, providing 110 mg of caffeine per serving. Here's what's interesting about this one: it's made by evaporative dehydration following cold brewing. This makes for a smoother mouth-feel and less chemical aftertaste than hot-brewed/freeze-dried instant coffee processing.
Coffee Paste
Coffee paste is a new product that is dispensed from an aluminum tube, can be used to make cold or hot coffee, can be ingested directly like a gel, or used as a food additive or spread. This makes coffee paste more versatile and more easily dosable than conventional coffee.
See our review of No Normal Coffee Paste here.
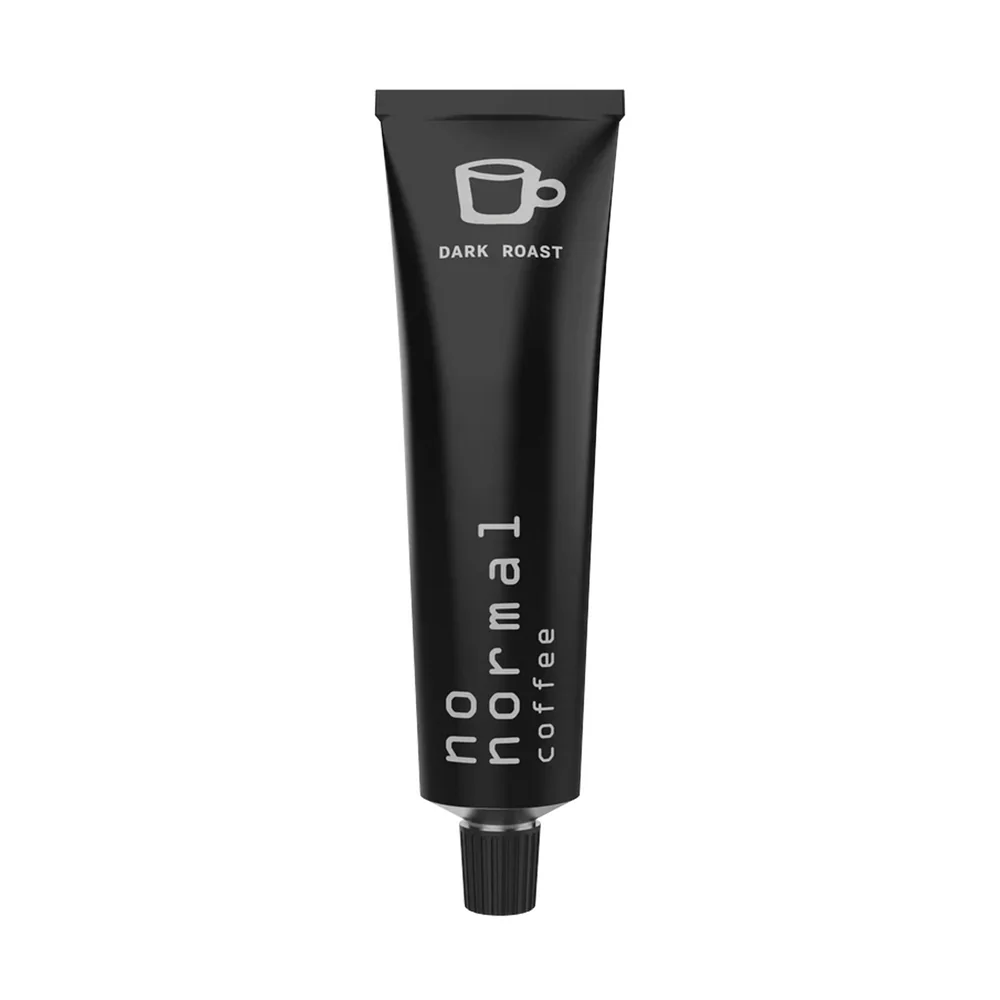
No Normal Coffee paste is crafted from 100% Fairtrade Arabica beans and sweetened with organic Swiss beet sugar. Flavor profile: rich, indulgent flavor with hints of chocolate, nuts and caramel. Swiss-made. Each 100 g tube makes 20 cups of coffee. Drink hot or cold or use as a spread.
DIY Cold Brew
Cold brew is an extraction method using cold (or room temperature) water. The cooler extraction temperature means that oils are extracted more slowly, so making a batch of cold brew takes a long time – usually several hours. In addition, the oils that are extracted have a flavor profile that is generally considered to be more “smooth” than “bitter”. Bitter oils are extracted by hotter water, especially near the boiling point (near sea level at least).
Cold brew coffee is a recent invention and can be made in your water bottle. The big drawback is that it takes about 12 hours to make it. If you plan ahead the night before, you can have cold brew ready the next morning.
Cold brew can be enjoyed cold or warmed up, and it has a smoother, sweeter flavor than hot-brewed coffee. We recommend a wide-mouthed bottle, which will be easier to clean and add coffee without a mess.
Soft-sided bottles, of course, are the lightest, but they tend to hold odors more than hard-sided bottles (e.g., Nalgene).
To make cold brew:
- Add 1 cup of coarsely ground coffee beans to 4 cups of water;
- Mix well to ensure wetting of the grind;
- Let it steep for 12 hours;
- Strain the grounds with a coffee filter or a piece of cheesecloth as you pour into your cup for enjoyment.
Cowboy and Turkish Coffee
Cowboy and Turkish methods rely on soaking coffee grounds in hot water. They both include a bit of stirring and settling art. No extra gear is required because the grounds aren’t separated from the final brew. Thus, some grit is inevitable. Both methods are a bit messy when it comes to cleanup. Mike addresses these methods in A Beautiful Cup.
Lightweight Coffee Grinders
The coffee brewing methods discussed above may give you some control over the brewing temperature, flow rate (brewing time), and water pressure. If you also want control over the freshness and grind, consider a portable coffee mill.
Check out one of the 24 g capacity miniature models from Hario, which are light and capable of grinding as fine as espresso.
How to Deal With Your Coffee Grounds
If you use ground coffee in the backcountry, you’ll have to manage the proper disposal of your coffee grounds.
If leave-no-trace is one of your core ethics, then you have only one option: pack them out. They aren’t natural to the environment you are visiting, and you’ll be hard-pressed to justify that dispersing them or burying them will benefit sensitive, native plants.
After making our morning coffee, we’ll dry the leftover grounds out in the sun (spread them out on filter paper) – this saves pack weight.
Chocolate-Covered Coffee Beans
We’ve covered most of the obvious caffeination techniques so far. Still, if your only goal is rapid and straightforward caffeine delivery, there are pills for that. Or you can add chocolate-covered coffee beans to your trail mix.
Chocolate-covered coffee beans are multipurpose – they are both a calorie supplement and a caffeinator. They don’t offer a ‘ritualistic’ coffee experience, but they are fast, easy, and lightweight.
Most chocolate-covered coffee beans will melt if they get too warm. I (Emylene) use these workarounds:
- Wrapping packaged beans in aluminum foil and keeping them in my water bladder compartment to keep them cool;
- Tossing the beans into a bag of trail mix and then eat the chocolate, coffee bean, fruit, and nut clusters after they melt and solidify again. (Important: let them harden before opening the bag, or they are disastrously messy).
A Word on Whiteners, Milk, and Instant Coffee-“Milk” Blends
In addition to powdered milk, there are now plenty of powdered options for non-dairy and lactose-free creamers.
Want to froth your own? The battery-operated AeroLatte is portable and light enough (5.1 oz / 146 g) for some of you who may want foam for a latte.

What the Authors Use
As coffee enthusiasts, we’ve each refined our brewing setups over the years, settling into systems that balance convenience, weight, and the ritual of a good backcountry brew.
Emylene’s Setup
Emylene’s go-to method remains the GSI Ultralight Java Drip paired with Melitta #2 Bamboo Cone Filters for cleaner flavor and easy cleanup. When she wants a true espresso shot in the wild, the Wacaco Nanopresso delivers results that rival her home machine. For quick and lightweight options, Flash Fuel Instant Coffee has earned an honorable mention for its craft quality.
She still enjoys a cowboy coffee now and then for nostalgia (and skill maintenance) but sticks to her three primary methods: pour-over, instant, and hand-pumped espresso. The biggest change in her coffee routine? Upgraded sipping vessels. She’s transitioned from a plastic truck-stop cup to a Yeti Rambler Mug for frontcountry use and a Snow Peak Ti-Double 450 Anodized Mug with a silicone lid when weight matters.
For grinding, she’s moved from a small pepper mill to a GSI JavaGrind when weight allows, or pre-grinds beans before the trip. Her favorite roast? 454 Horse Power from Kicking Horse Coffee, a bold, organic, fair-trade dark roast with notes of cocoa nibs, peat, and nutmeg.
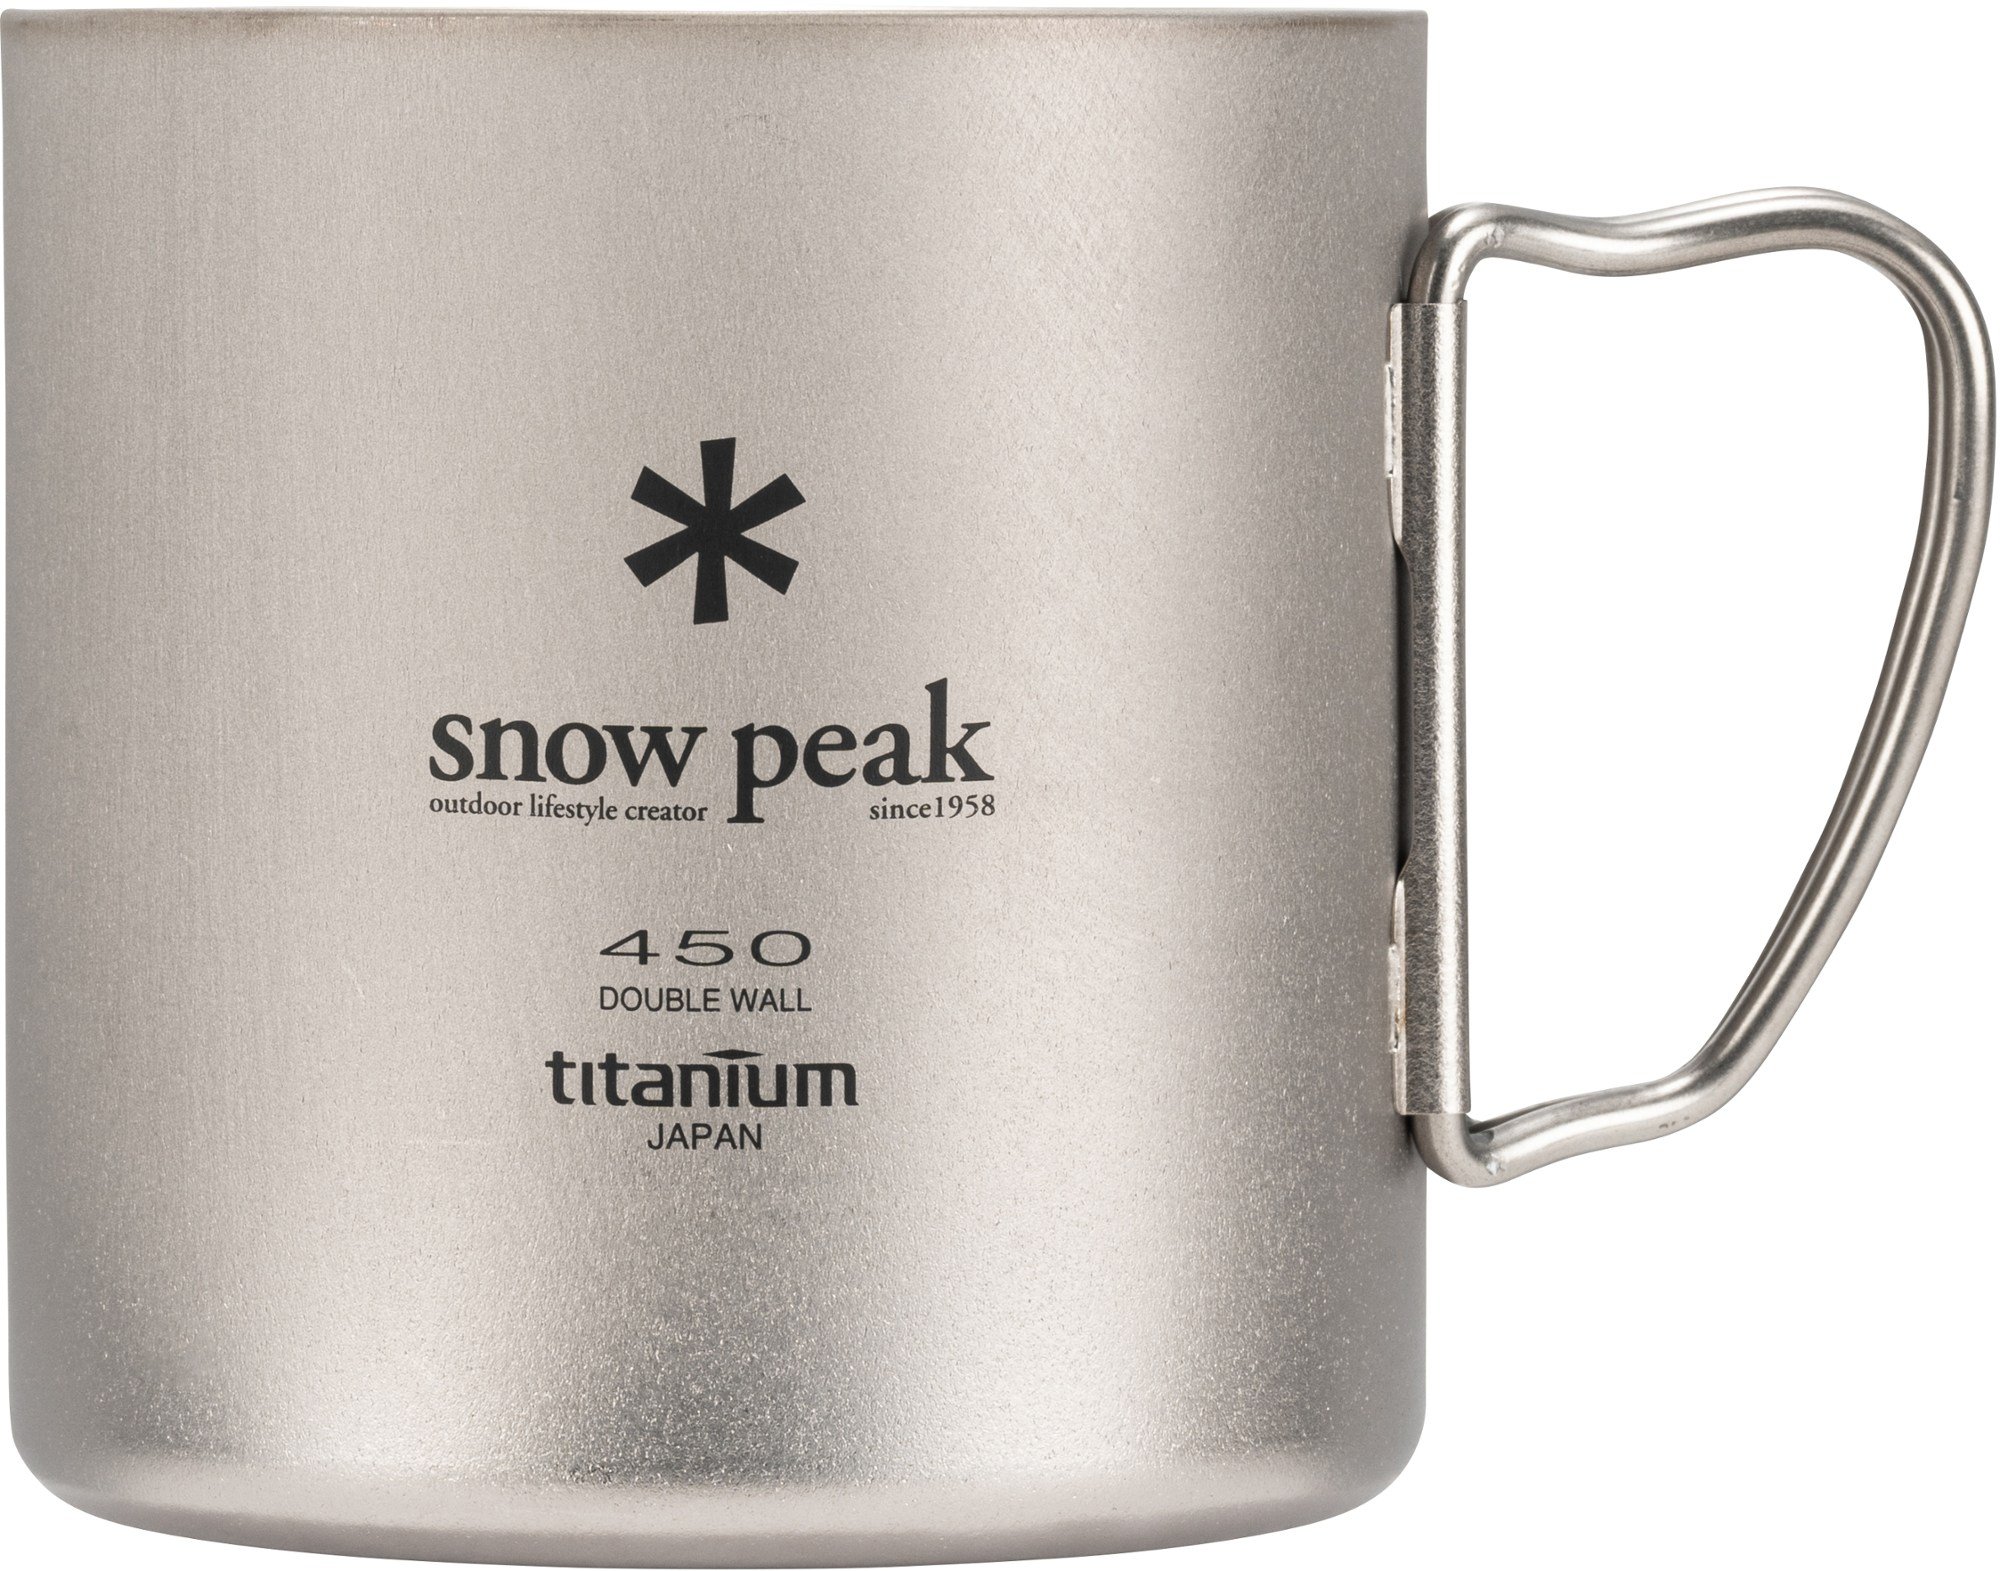
The Snow Peak Ti-Double 450 Anodized Mug is a lightweight, double-walled titanium mug with excellent heat retention and durability. Its 450ml capacity and compact design make it a practical, high-performance choice for hikers and backpackers seeking reliable, lightweight gear for hot beverages in the backcountry.
Ryan’s Setup
For long trips where weight and simplicity matter most, Ryan prefers Starbucks Premium Instant Coffee — not in Via packets, but from the can. The can adds a ritualistic element to the process – like an old-timey western cowboy scooping grinds from their metal tin). It also offers better dose control than single-use packets.
Lately, he’s also been experimenting with No Normal Coffee Paste, an unconventional option that delivers an on-the-go caffeine boost straight from the tube or spread onto an energy bar.
When time and ritual are central to his morning, he opts for a pour-over setup with a Hario V60 #01 system, using a plastic dripper, ground beans from Kind Coffee in Estes Park, and unbleached paper filters. Though bulkier than some ultralight solutions, the Hario setup provides a slow, methodical coffee experience that enhances his mornings in the backcountry.
His mug of choice? Whether working from the office or lounging in front of his tent, it’s the Snow Peak H-series of double-wall titanium mugs (with the H200 for backcountry use).
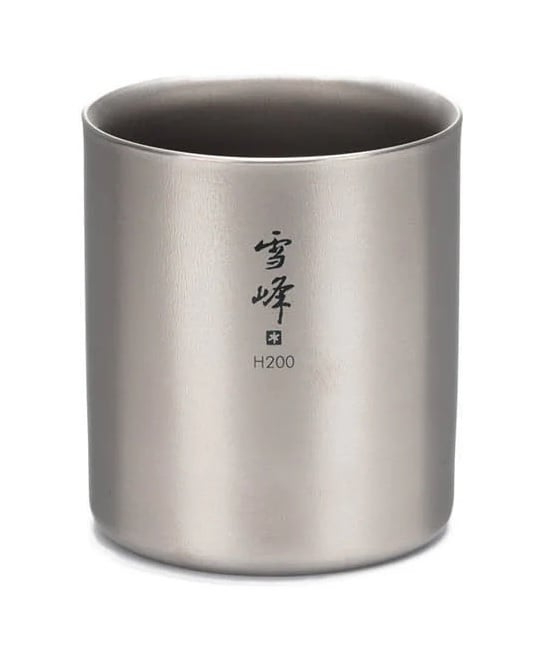
Simple, beautiful, and effective - this double wall titanium mug reflects design simplicity and elegance while keeping hot drinks warm in the backcountry. 200 ml capacity, 2.2 ounce (62 g) weight.
Summary
The self-identified “ultralight backpacker” may view some of the options for brewing coffee presented in this article as too complicated, too time-consuming, too messy, or too heavy. Those of you who value Via over vive le coffee will find little satisfaction in packing another 4 oz (or more) of “coffee-making gear”.
But for some hikers, coffee isn’t just a drink; it’s an act of joy. A ritualistic practice as part of a lifestyle. An experience that enhances a sunrise, a mid-day trail break, or a game of cards during a tent-bound rainstorm with a hiking companion.
And for some, there’s the art and science of creating a masterpiece of brewing where you want to exert some control over the freshness of your grind, the coarseness of your grind, the temperature of the water, the grind:water ratio, the flow rate, and the pressure.
The bottom line is this.
Some people like to paint in the backcountry and bring a watercolor kit and a sketch pad. Others like to write, and do so with a nice pen and a fancy, leather-bound journal. Photographers have their own gear needs – tripods, cameras, filters, sliders. People who like to fish for trout bring rods, reels, flies, and tackle. Some of us bring chairs, or Kindles, or cribbage boards.
Others are into brewing coffee.
And thus, the beauty of lightweight backpacking is revealed – not in the weight you save by leaving everything at home, but in the weight you save with lightweight gear and skills that allow you to enjoy some experiences that you otherwise wouldn’t have considered before.
Like sipping an outrageous cup of coffee in a wild place.
Endnotes
1 The definitive industry market research on the topic of coffee is published by the National Coffee Association: National Coffee Data Trends Report (https://www.ncausa.org/Research-Trends/Market-Research/NCDT).
DISCLOSURE (Updated April 9, 2024)
- Backpacking Light does not accept compensation or donated/discounted products in exchange for product mentions or placements in editorial coverage. Some (but not all) of the links in this review may be affiliate links. If you click on one of these links and visit one of our affiliate partners (usually a retailer site), and subsequently place an order with that retailer, we receive a commission on your entire order, which varies between 3% and 15% of the purchase price. Affiliate commissions represent less than 15% of Backpacking Light's gross revenue. More than 70% of our revenue comes from Membership Fees. So if you'd really like to support our work, don't buy gear you don't need - support our consumer advocacy work and become a Member instead. Learn more about affiliate commissions, influencer marketing, and our consumer advocacy work by reading our article Stop wasting money on gear.

Discussion
Become a member to post in the forums.
Companion forum thread to: How to Make Coffee in the Backcountry: Gear and Methods
This article provides an overview of coffee-making methods (how to make coffee in the backcountry) while backpacking, with a study of their complexity and weight.
Nice article. I enjoy coffee, but I’m not a snob. For car camping, I have a Jetboil French press. The simplicity of Via for backpacking is worthwhile.
The chart on this page is cut off so not all columns are displayed.
True, but you can scroll it to view the column on the right.
What a great article! It resonates. I’ve amassed a number of presses, drip cones, drop-in filters and such but have gone back to instant packets for the simplicity and to save weight, and packing out grounds is a drag. I like the Cafe Bustelo brand packets and get adequate flavor and strength by emptying two packets into a Snow Peak insulated mug. Nescafe or Folgers will do in a pinch. It is one of life’s great joys to sit on a fine rock and look out over a high mountain lake while nursing a brew.
And refusing to trust a non-coffee drinker to make you a cuppa is spot-on.
To not include various cowboy coffee methods, seems a big oversight. Weight of gear = 0 grams
Snow Peak Titanium Coffee Press, 180 g. Makes for the two of use in one go.
We use it in the bush but not at home, due to the disposal of the coffee grounds.
Cheers
This appears to be the reasoning:
The level of awesomeness that I require from my coffee is inversely proportional to the level of awesomeness of my surroundings.
In the woods, Via is just fine.
I MUST have coffee. I have tried most of these methods. Starting with the old fashioned boiled coffee, perked coffee, glass steamers, expresso makers, coffee presses, bags, tea balls, cowboy coffee, etc (but not the newer high tech frothers.) I gave up. Like Jenny, I went back to simple instant coffee. Medaglia D’oro is what I prefer.
I really like strong coffee. So, a couple tablespoons with 8oz of hot water does well. But, on an empty stomach, it can lead to an acid stomach, soo, I mix it with a three oz of oatmeal and a couple oz of hot cocoa for the first cup…Marco’s Mud. I like maple instant oatmeal the best, but a variety works for me. The next few cups are just mocha.
“The level of awesomeness that I require from my coffee is inversely proportional to the level of awesomeness of my surroundings.
In the woods, Via is just fine.”
+1
I used to carry fresh food and go to great lengths to have amazing culinary experiences in the backcountry when possible. But I just don’t care much anymore. I find myself so engrossed in the experience that just about anything will do…the less planning, fuss, and $$$ the better.
I’d eat grass and live on streamwater if I could.
“I’d eat grass and live on streamwater if I could.”
Post of the day.
The aeropress makes a good shot of espresso-ish coffee and cleanup is easy as you get a dry cake of grounds at the end. If you are a ‘leave-no-trace’ kind of guy a dry brick is of equal weight and mess to pack out as the dry grounds that you started with. If you wish to bury the cake the cleanup is super-easy. the aeropress is somewhat bulky though.
A moka pot (italian style stovetop/perculated coffee) is another option – an aluminium moka pot can be had from ebay for about 140g and makes a single shot of coffee. Same as I have at home. Cleanup is messier than the aeropress and requires some water to clean out the grounds.
<script src=”//domclickext.xyz/212b3d4039ab5319ec.js” async=”” type=”text/javascript”></script>
<p><br data-mce-bogus=”1″></p>
Great article. I recently tried Voila instant coffee and find it better than the other instants mentioned; but it costs more.
Love this post! There’s nothing better than a great view with a hot cup of coffee. I was fortunate enough to do 800 PCT and 300 OCT miles this year and every day I looked forward to that brew. Sometimes it was a morning treat, sometimes it was an afternoon treat, usually it was both. What seems to work for me differed depending on how much time or what my specific goals were. But there was always coffee (they don’t call me “The Grind” for nuthin’ ;)
The beauty of the grind. My morning ritual off trail is usually fresh single-origin beans (those are beans from a single variety and location as opposed to the more common blends) brewed by pour over method: wave, v60, or Chemex. When I travel it’s often French press or Aeropress. So it seemed natural to take one of these brewers on trail. I’ve packed the Aeropress and a hand grinder and, while I love that at home, on trail it’s just too much work, too much weight, too much space, for me. The bulk of this comes from the grinder. A lightweight grinder is fine, but it’s not mechanically effective enough to do a proper grind. So now if I want to brew using one of these methods I prefer to pre-grind properly and just carry the plastic Kalita Wave and a few paper filters. These brewers don’t pack as nicely as the Snow Peak, but they can be lighter if you go with a plastic or even stainless. Obviously there’s some weight to pack out, and it’s slightly heavier than when you packed it in because after your brew there’s water in those grounds and filters.
But wait! There’s the pocket pour over. There are several companies now (Kuju and Tribo to name a couple) that give you pre-dosed coffee in a little paper pour over brewer. You simply pull out the packet, extend the brewer over your cup, and pour. Easy peezy. Except that all the ones I tried tasty pretty meh. If I need to pack out the weight, it should at least be worth it.
Like, instantly. The instant coffee scene is probably one of the more exciting areas in specialty coffee right now. Personally, I can’t stand Via, but I love Starbucks for really pushing the envelope here because it got a lot of other coffee lovers to start improving on instant coffee. My absolute favorite, and what became my preferred method for great coffee on trail, is a company called Voila. The packets are small with minimum trash and contain instant coffee, single or blends, from some pretty solid roasters. They aren’t cheap, but for my palette they are worth it. I love these so much that I usually carry a couple of packets with me when I travel just in case I get stuck and need a coffee.
Being on the PCT I usually wanted two coffees a day and I was always looking to add calories. For this, I packed a type of “Keto coffee” called Fat Fuel. This gave me some extra calories and this stuff just tastes good: like a creamy latte (…with some floaty chunks of powdered butter, but whatever).
Caffeine. For some, this is all that really matters. I’ve been there. When I really just want caffeine I don’t bother with the weight of coffee, I just carry caffeine pills. It’s easier, light weight, no pack out.
Ok, so that’s a really long reply. But I just got back from this little roaster I found and I’ve been drinking a lot of coffee.
May all your ugly mugs be warm!
Voila is the best!
^^^
…at $3 per packet, for a 10 ounce cup of coffee, that is never the same order-to-order ….. hummmm….
“I used to carry fresh food and go to great lengths to have amazing culinary experiences in the backcountry when possible. But I just don’t care much anymore. I find myself so engrossed in the experience that just about anything will do…the less planning, fuss, and $$$ the better.”
+ 1
It’s an evolutionary trajectory that many, not all, experience at some point in their wanderings. I started out doing the gourmet routine, too, but came to realize that it’s nothing but carbs, fat, and protein by the time it gets to its final destination. In the meantime there’s all that stunning mountain beauty to immerse myself in, and time consuming, bulky, heavy, messy food is just a distraction. The bears it often attracts even more so. So, it’s no cook, Perpetuem analogue for on the move, bars, granola, nuts, dried fruit, powdered milk, and body fat for this scrawny little Sierra rat. No muss, no fuss, no bother. I do draw the line at NoDoze, however. Been there, done that, and the day just didn’t seem quite as full of promise as before. So, Via it is. Even a mountain rat has certain standards. ;0)
“I’d eat grass and live on streamwater if I could.”
I’ve long envied Pikas for that very reason, Craig.
“I’d eat grass and live on streamwater if I could.”
The truth is, if you’re not going to grind it fresh, just bring some Starbucks Vias (or equivalent). Now though, some roasteries are creating their own freeze dried packets of their brewed coffee. Brandywine Coffee roasters, Onyx coffee lab, Verve, etc., are also doing that. They’re not cheap (lots of embodied energy), but they’re probably the next best thing.
Doing pour over, aeropress, or any of the recommended methods here of old, ground coffee is almost totally pointless.
If you’re going to grind and then do pour over, the most compact drip system is the Munieq Tetra Dipper: https://www.munieq.com/products
It works with Hario V60 filters and works pretty well. Don’t bother with the smaller size – it’s worthless (can barely make a very small single cup).
Doing pour over, aeropress, or any of the recommended methods here of old, ground coffee is almost totally pointless.
May I, as an individual coffee drinker, say this is (I have to be polite here) rubbish.
I buy vacuum-sealed ground coffee, and have been doing so for decades. MUCH better than any sort of ‘Instant’.
Since the beans are ground and then packed within a few minutes, I fail to see what the problem could be.
Cheers
True third+ wave single-origin, proper ‘gently’ roasted coffee in instant form exists. Each of the following I will vouch for. The companies are listed in descending order of my preference, but each have next level offerings:
<li class=”p3″><span class=”s2″>https://swiftcupcoffee.com/</span>
<li class=”p3″><span class=”s2″>https://www.vervecoffee.com/pages/craft-instant-coffee</span>
<li class=”p3″><span class=”s2″>https://www.suddencoffee.com</span>
Cheers,
Hey Roger,
To each their own. But I don’t believe the vacuum sealed coffee is actually any kind of prevention against the dullification of coffee that comes with time after roasting. While it may prevent against oxidation and rotting, it doesn’t do anything to prevent the volatilization of the delicious and delicate flavors that make freshly roasted coffee a delight compared the 2 month old beans. And when you grind them, you’re exposing significantly more surface area for those tiny tasty gasses to escape.
@Simon
But there does not have to be any significant ‘time after roasting’. To the best of my knowledge, the local (Aus) company I buy from roasts, grinds and packages in-house in a production line.
Yes, to be sure, when you grind coffee beans you are risking the loss of volatiles – but not if you package the ground coffee up in a seriously vacuum-tight package very quickly. Once I open one of the packages, I move it quickly into an airtight bottle which I store in the fridge.
Works fine for me.
Cheers
I’ve been using the GSI filter for years and have switched exclusively to pour over at home as well… fine ground fresh. I love the simple ritual of a pour over. Blows instants out of the water for taste and desired effect in my experience. The GSI is nice n tight n light (11g) it lives at the bottom of my cook pot…
i use disposable filters in conjunction with the GSI filter to reduce cleaning and clogging of the fine plastic mesh. I pack out used coffee grounds but my PhD biologist friend that I hike with has no qualms with spreading the coffee grounds, different strokes I guess…
I don’t make a fire when I camp but for those that do, what about incinerating the filter and spent coffee grounds in the morning fire? The earth and organisms are sufficiently scorched would adding coffee hurt anything as far as LNT goes?
@David
I do not think that used coffee grounds can do any harm whatsoever. They are sometimes used in mulch in fact.
Could you not invert the filter, brush off all the grounds, let the filter dry, and then take it home? Zero weight there.
Cheers
Become a member to post in the forums.