
Introduction
Given that my last stove was called the V4 and this article is about V6, what happened to V5? Well, there was a V5: an attempt at making a simpler burner head for the V4 design. Along the way, I learned a lot about airflow within the burner head and why many commercial stoves have concave (dish-shaped) burner heads: it is all about the fine details of the airflow inside the burner head. But I don’t like concave burner heads because they tend to focus the flame to a focal point, which is not what I want for cooking (I want to cook food, not just boil water). Basically, stoves with a concave burner head just mean the designer could not solve the airflow problem. The V4 has internal baffles inside the burner head, and they work well, but making them is complicated.
So eventually I abandoned the idea and looked instead at enhancing the V2 and V3 Vortex stove designs. Could I combine the reliability of them with some of the other advances I had achieved in the V4? I could, and this became the V6. Yes, the V6 is another vortex burner design, like the V3, but it has many features of the V4.
In what follows I have used photos from V2, V3, and V4 as well as photos of V6 to illustrate various points. That’s evolution. Some of the V6 photos have been taken indoors: at the time of writing we in Australia were in a very strict COVID lockdown, and going walking for any distance was not possible. But I snuck out for a few photos.
Editor’s Note: If you’d like familiarize yourself with the previous versions of Roger’s stoves, check out these articles and forum posts: V1, V2, V3, V4, and Engineering the V4 Winter Stove
Basics of the V6
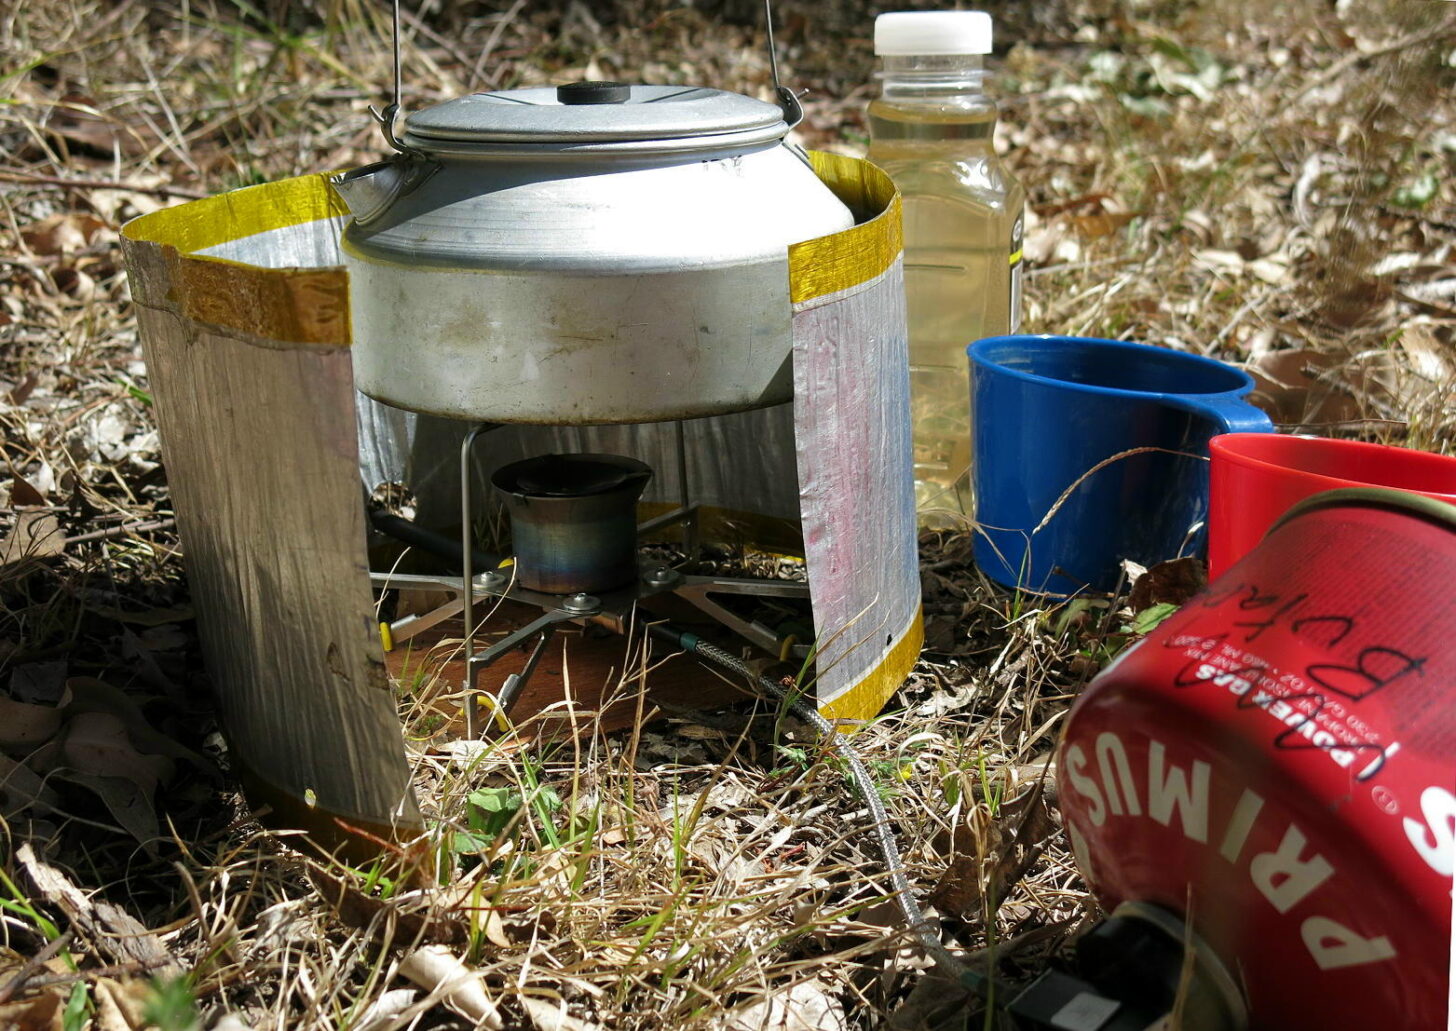
This is it. Well, it’s a Vortex burner, as in the V2 and V3 stoves, but with legs and pot supports inspired by the V4.
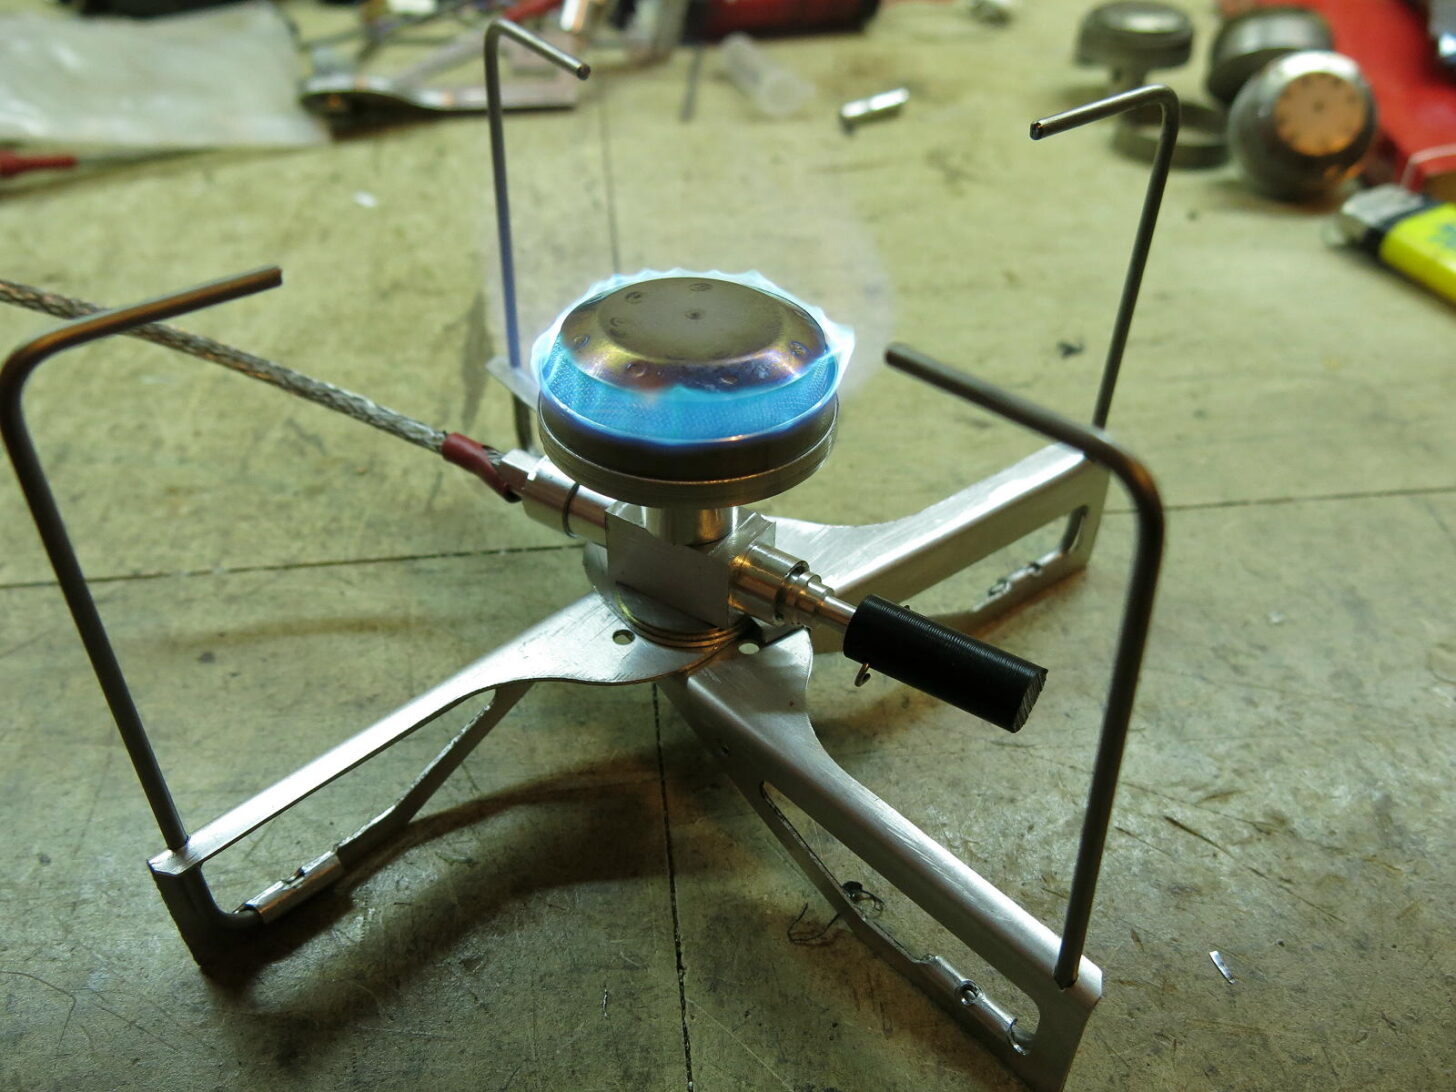
There are upgrades to the base plate, the stove body, the needle valve, and the legs and pot supports. The base plate is the flat plate between the bottom of the burner chamber and the stove body, and it supports the legs and pot supports. What I call the stove body is under the base plate and is therefore out of sight in this photo. It is the stove body that connects to the hose from the canister and which holds the control valve and the jet. The stove body is in effect the core of the whole thing. The stove body itself has been seriously shrunk from previous generations, decreasing the weight.
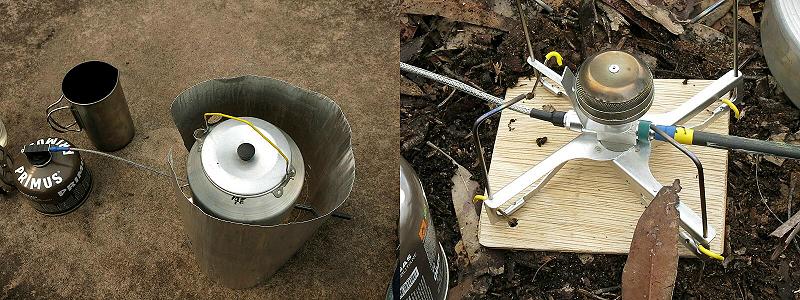
This is the V4, with its pivoting legs. I had noticed that while the pivoting legs in the V4 were very easy to use in the field, the length of the basic aluminium leg meant that one had to be just a little bit careful with sideways forces, especially at the top of the pot supports. One stove had actually been squashed in the post (mail) on the way to a European buyer, which left all the pot supports tilted sideways by about the same angle. The burner head was also bent or tilted in the same way to about the same angle. The stove did not leave me looking like that! It was all very upsetting. The buyer took it into his workshop and fixed it: a lot cheaper than posting between Australia and Europe for repairs. I have also seen (on YouTube) damage to an ultra-light BRS-3000T upright stove caused by a user putting a 10 lb cast iron cooking pot on it. You should treat UL gear with at least some care.
Under my typical cooking use any slight wobble has never been a problem, and in fact has not been noticed anyhow, and many dinners have been cooked by myself and others with no spills that I know of. The design worked, but I felt I could do better. To make the legs stiffer I could either use heavier gauge sheet metal or make the sheet metal legs shorter. Obviously shorter legs would be both lighter and stiffer, so that is the way I wanted to go. I also wanted better support at the pivot.
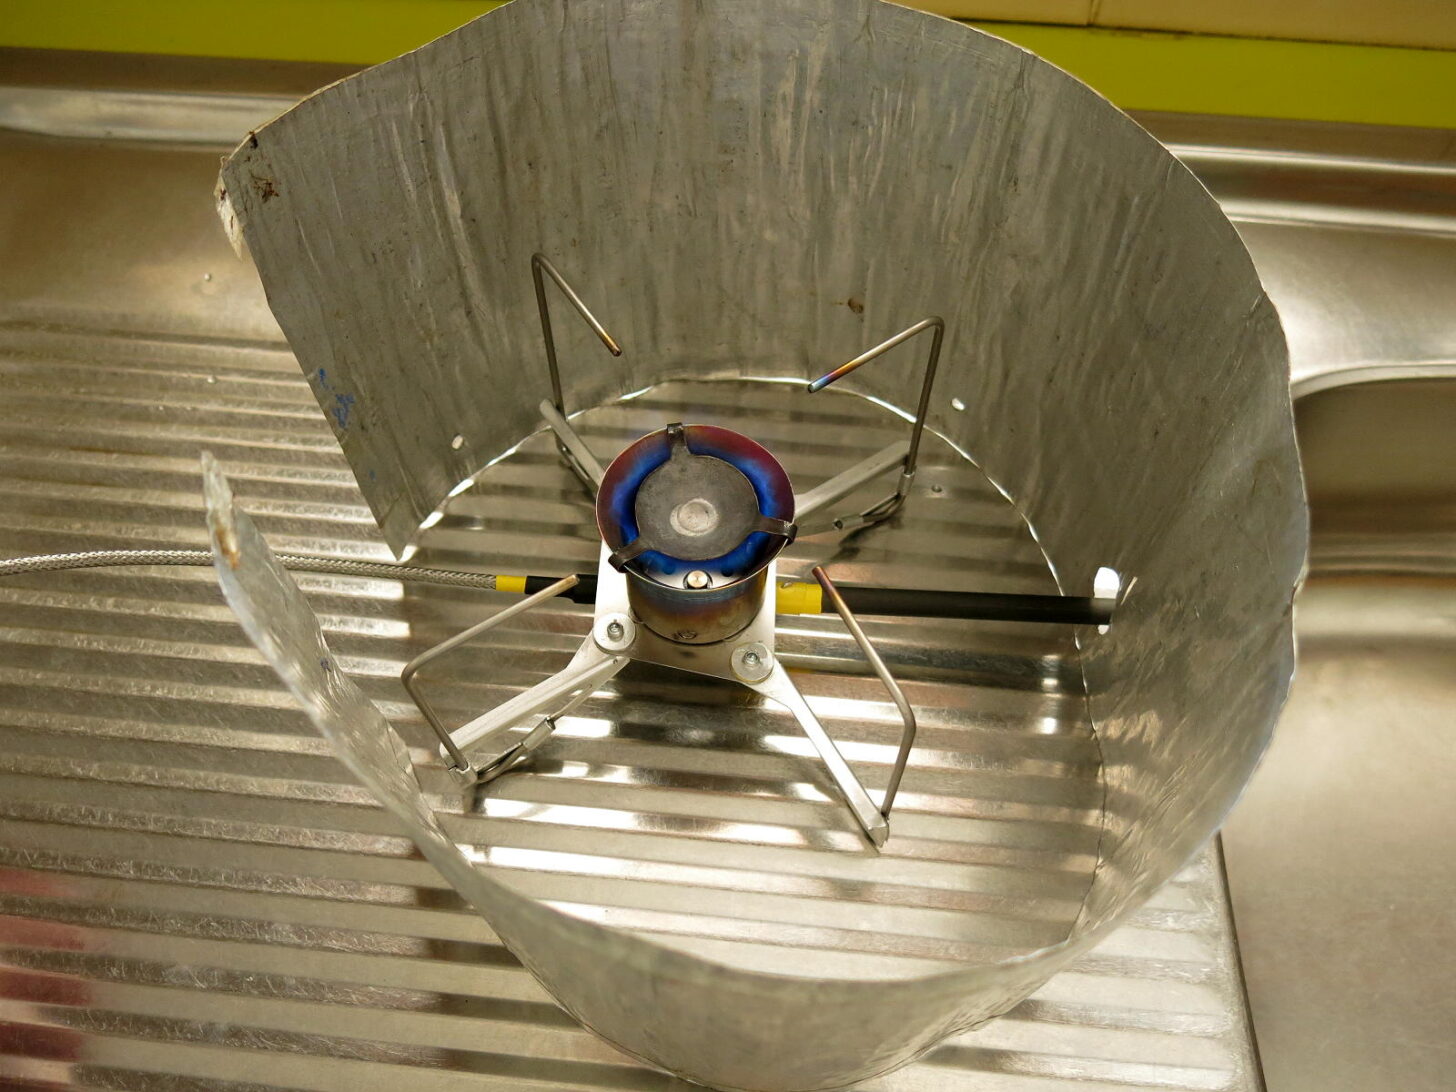
I still wanted to have a large pot support outer diameter, to handle large pots such as my 1.5 L titanium pot. Such wider pots make far more efficient use of the heat from the flames than do narrow pots. The solution was obviously to move the pivot point for each leg outwards, to the edge of the base plate. That is, instead of having one central pivot for all four legs, each leg would have its own dedicated pivot point. This would make the leg shorter and stiffer, although it might throw more force (twist, actually) onto the round base plate. Would it flex? Well, not much.

So I shrank the size of the base plate a bit and cut off the excess edges, leaving a sort of tapered rectangle shown here. The reason for the taper is explained later. However, with the 0.8 mm thick aluminium alloy sheet, I thought the stiffness was not quite enough; the stiffness was also reduced by the number of holes in the design. As you can see here, there are quite a few of them. So I switched to 0.44 mm titanium sheet, which is much stiffer. Why 0.44 mm thick sheet? I had it in stock, and it seemed stiff enough. Titanium does have a higher density (4.54 g/cc) compared to aluminium (2.12 g/cc), but when you factor in the reduced thickness of the titanium sheet it turns out to be slightly lighter than the aluminium sheet, by about 12%. We are winning (even if the total win is not all that great).
Burner Chamber
Below is a V6 stove in operation, in the kitchen for testing. The photo is meant to show the burner chamber. The diameter of the burner chamber is set by the titanium tubing I have in stock – 38 mm OD, 0.5 mm wall thickness. It was bought for this purpose a long time ago. Other diameters are of course available, but most of them have a thicker and heavier wall, like 1.0 mm or greater. This tubing seemed to work just fine in the V2 and V3 stoves, so why change?
Member Exclusive
A Premium or Unlimited Membership* is required to view the rest of this article.
* A Basic Membership is required to view Member Q&A events

Discussion
Become a member to post in the forums.
Companion forum thread to: Remote Inverted Canister Winter Stove V6
Longtime Backpacking Light contributor Roger Caffin debuts the V6 model of his inverted canister stove.
Hi Roger, Its been some years since I purchased one of the earlier models from you. I enjoy trying new equipment. Is the V6 for sale. I enjoied your article and would love to try one out.
Kindest regards,
[email and mailing address removed. Suggested that you use a Private Message to contact and discuss. – MK]
More testing done since the article was written. Goes well.
Now selling.
Cheers
Please, any enquiries to roger@backpackinglight.com, not to PM as PM cannot include files. Yes, stoves are available.
Cheers
I seem to do this every time (with each model). I forget to give the weight!
The V6 weighs 82 grams.
Cheers
I’m still using one of your earliest stoves with the FMS-116T burner head. I don’t do a lot of winter camping these days, but it’s a fun stove to also use for fry-baking, pancakes, etc. The biggest gripe that my wife and I have about it is poor stability with wider pots and skillets like the MSR skillet.
I’ve been thinking of replacing it with a Kovea Spider for similar trips, but I’m intrigued by the V6.
How well does the V6 stove simmer? Can it go really low for fry-baking?
My ONLY experience with vortex stoves in the past was with MSR Dragonfly stoves on winter trips and a glacier mountaineering trip. I remember the those vortex burners being quit loud. Is that still the case?
The biggest gripe that my wife and I have about it is poor stability with wider pots and skillets like the MSR skillet.
That is a problem with most upright stoves. They do not have very long pot supports. Care is needed.
The V6 (and the V4) address this problem by having pot supports going out to the edge of a large pot, and also by having 4 supports rather than 3. The stability is much greater.
How well does the V6 stove simmer? Can it go really low for fry-baking?
It simmers very well. It has to, because its primary customer is ME, and I cook our dinners rather than just boil water.
I have never tried fry-baking, so I don’t know the answer there. Actually, I don’t really know what the term means. If it means dry-baking (a typo), then I think it should be fine. But dry-baking always risks damage to the outer pot, and I carry only one pot anyhow.
Yes, it makes a vortex noise. That is inherent in the design of the burner/flame. Actually, my wife likes the noise: to her it is saying ‘dinner is coming’ (or maybe ‘coffee is coming’).
Cheers
Thanks.
Drybaking = Frybaking?
The Banks Fry-Bake company is where I’m most familiar with the term “frybake” vs “drybake”.
https://frybake.com/products/
Frybaking is pretty much what I do. The major difference drybaking simply uses the cup/pot inside another pot, or, a heating chamber around the item being cooked. Frybaking uses about a teaspoon of oil or a few teaspoons of butter in a single pot with the lid on. Both require a relatively low heat compared with boiling water or cooking. The internal temp is around 300-350F (roughly equivalent to a slow oven) for both, but drybaking is less efficient. The oil in frybaking tends to transfer the heat to the item a bit more efficiently, and, it can burn easily (well, my daughter calls it carmelized.) It works well for small amounts of doughy/battery stuff. Mostly I use it to make fritters out of stuff I find on the trail: apples, berries, etc. I mix up a small batch of Bisquik, or the like and add the stuff in, add oil to the pot, then drop the mix into my greased pot for about 15-20min.
James,
Any recipe book suggestions? I’m always looking for ways to make camping with my grandson more enjoyable, so those are the trips when I’m willing to do a bit more gourmet.
No, not really. Just anything I find I toss in to the mix, even fiddleheads. A little more work preparing, you can add 1/2 cup Bisquik, 1/4 cup sugar/cinnamon, and a packet of apples & cinnamon oatmeal. It makes a fairly good breakfast for 2. Of course, everything liquid is water and I add a little extra for the oatmeal. You can make it fairly doughy, roll into small tablespoon balls, a couple tablespoons of olive oil and cook them. They get crunchy/hard. They are easy to put in your bandana and in your pocket for a quick snack on the trail.
Anyway, the old V1 (FM300T) holds a very small flame, you cannot even boil a single cup of water with it. Or, you can crank it up and boil 3cups in 4 minutes. I REALLY like the flame adaptability and the size.
Roger, on the canister valve, the “O” ring retainer (the part that also wedges into the fingers to hold it down to the canister) has come loose twice now. Once it jammed down and I could not get it loose. (I clipped the canister/lindal valve off with a small Leatherman scissors.) I glued it back with some super glue, but this only holds for a year or so. The design should be modified to avoid that problem (‘O’ ring loss.) Removing all the stress from the retainer would be ideal. (Perhaps extend the body slightly and inset the retainer into the body, this should remove the potential jamming problem of a separate piece..)
In my experiences, each cooking technique requires a different level of heat
Boiling – 400 watts and above
Frying – 200 watts
Dry baking – 100 watts
My 2 cents.
Absolutely, John. I believe a somewhat better measurement, for me at least, is to simply weigh the fuel used. 100W x 1/2 hour is 50 Wh. 400Wx0.1h (or, 6min) is only 40Wh.
Hi James
I think what you are calling the O-ring retainer is what I call the ‘Main Ring’?

It is held in place with two #0 x 6 mm self-tapping screws, marked with red lines in the photo below.
Under normal use there should be almost no force on those screws. They require a bit of force to pull them out (as opposed to unscrewing them), and this can only be done by unscrewing the Spider (the ring with the fingers) with some force beyond what is needed. So, are those two screws still in place?
If they are not there, they can be replaced. If they have been pulled out the thread in the plastic may be damaged, but this can be dealt with in several ways. How about you email me a photo of how it is now and we should be able to restore it to 100%.
I support my stoves.
As for stove power: a good canister stove should be able to poke out well over 2.5 kWatts, up to 3 kW. A large electric hotplate on a kitchen stove can put out maybe 2.4 kW flat out, and most canister stoves are more powerful than that. White gas stoves are somewhat less powerful than canisters. But as Jon points out, most cooking does not need that power.
Cheers
Roger, Thanks, but I already got it fixed. The screws are still in place, but, they stripped the threads out the first time it got jammed. By the third time, I have it down to a 15minute repair job that can be done in the field. It is just annoying because a simple design change can prevent it.
The stove is very efficient except for the actual cans.
You can do a better repair job IF you have a drill press with a small vise. You will also need a 1.3 mm drill bit, preferably a stub drill. (Or a Number 55.)
Remove the self-tappers and the ‘Main ring’. Rotate the Ring something like 15 degrees and replace it. The holes in the Ring now face solid plastic, away from the damaged holes. Mount the connector in the vice with the big thread pointed up. Carefully align the drill bit to one hole in the Ring and drill a hole 8 mm deep. A drop of water or oil to keep the bit cool would help. Repeat for the other hole without moving the ring (so the two holes are aligned).
You can now insert the self-tappers, creating new threads in the plastic.
I tried to design something which could do the same job with the Main Ring without the self-tappers, but so far without joy. Suggestions would be welcome.
Cheers
Someone asked what the legs look like when folded back, and there is no photo in the article. So, here is one, taken during development. The hose goes to the left. Bolts rather than pop-rivets at this stage.
Cheers
Roger, I expect a second set of screws would work, also. I believe the culprit is the temp changes. It goes from 40F-60F (4.5-15.5C) to ~25F(about -5C) causing those things to just bind up.
Thanks, but I think I have to set up my drill press for the new screws as a permanent fix.
New screw holes would certainly be the best. Rotating the Main Ring means you would still have the recesses for the heads of the screws.
Myself, I have never had any problems with temperature changes over the -10 C to +35 c range, but who knows?
Cheers
Hey Roger do you still have any of the V6 (or now maybe even V7?) stoves available to buy? I would be super keen to try one out
Hi Jarvis
Um – good Q. I have most of one stove left, but I am not sure I have all the hose bits, like the connnectors. I will have to have a look in the ‘cupboard’. Beyond that would need some machining as I have run out of stove bodies. I will go and have a look, and return today or tomorrow.
Cheers
That needs a direct contact via bushwalkingroger@gmail.com
Cheers
Become a member to post in the forums.