Black Packing Light
  • Sections
  • Today’s Features
  • Subscribe
  • Sign In
  • Subscribe
  • Home
  • Email Newsletter
  • Membership Info
  • Articles
    • Recent Features
    • Gear Reviews
    • State of the Market Reports
    • Gear Guides
    • Gear Lists
    • Skills & Techniques
    • MYOG
    • Science, Technology & Testing
    • Stories
    • Calendar
  • Education
    • Podcast
    • Webinars
    • Masterclasses
    • Online Courses
    • Guided Treks
    • Education Portal
  • Forums
    • Forum Index
    • Recent Forum Posts
    • Gear Forums
    • Gear Swap (Buy/Sell)
  • Gear Recommendations
  • Gear Deals

Backpacking Light

Pack less. Be more.

You are here: Home / Skills & Techniques / Make Your Own Gear (MYOG) / DIY Backpacking Stove: An Ultralight Vortex Burner (Part 1- Background and Theory)

DIY Backpacking Stove: An Ultralight Vortex Burner (Part 1- Background and Theory)

by Roger Caffin on June 10, 2016 Make Your Own Gear (MYOG), New Features

DIY Backpacking Stove: An Ultralight Vortex Burner for Winter Backpacking: Series Outline

  • Part 1: Background and Theory
  • Part 2: Research and Development
  • Part 3: Mechanical Design
  • Part 4: Lab & Field Testing
  • Part 5: Pot Support

Part 1: Background and Theory

Introduction

Author's V1 Winter Stoves, Many Canisters, Roger Caffin MYOG Vortex Burner Ultralight Winter Stove System Part 1

My V1 Winter Stoves on many different canisters.

Dissatisfied with what was commercially available at the time, I have been working on the design of ultralight winter stove system since 2007, and have settled on a remote canister winter stove system. (OK, OK, a bit obsessive, but so what?) The design required several novel features including versatility, functionality, and safety. These features were explained in a whole series of articles, starting with Part 1 and going on to Part 5.  I ended up with a limited commercial production and sold about 115 of them, mostly to BPL members, but over a surprisingly global range.

But the result of all that work on so many variations was just one design. There were so much unused data and so many incomplete designs that the variations were just begging to be followed through. Having sold so many of the first design, and now having some spare time, I started looking at some of my unused designs. But I did not want just to make another very similar stove as the last one; where’s the fun in that?

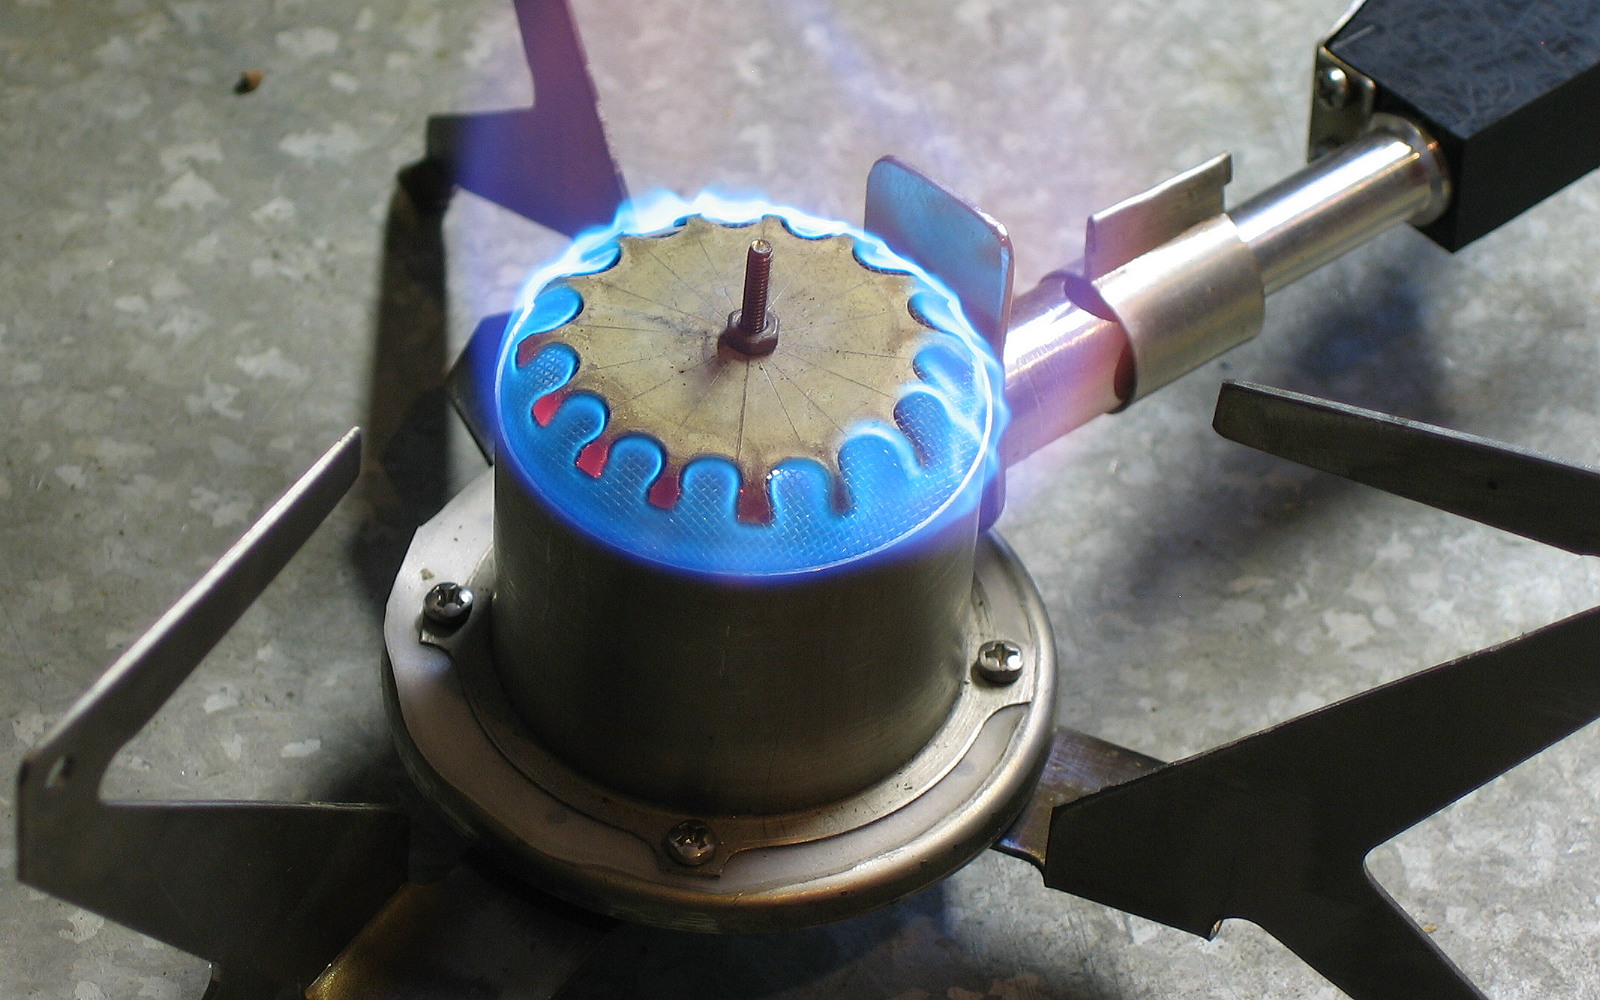
So I deliberately started down a different track for a very different stove: a Vortex Burner stove. Part 1 of this series will cover the background theory (it does matter) and highlight some successes and some unsolved problems. Subsequent parts will work though some practical realities, with the goal of a UL MYOG remote-canister Vortex Burner winter stove. There may be blind alleys along the way, but we will get there.

Successes

My Winter Stove V1 design met most of my essential goals (and met them very well I think):

  • Liquid Feed for winter use: remote inverted canister
  • Gas Valving (rather than liquid valving) for decent and fast control
  • Safety: a (separate) fast shut-off valve at the canister
  • Lightweight: the final weight for that stove was 3 oz. (86 g)
  • Canister Flexibility: take screw-thread, Campingaz and Coleman Powermax canisters
  • Manufacturable (by me)
  • The stove works well in the snow

I had better explain the Flexibility requirement. Screw thread canisters may be the norm in the USA, and they are very common in Australia, but sometimes when walking in Europe, I could only get French Campingaz canisters. They have a different connection. And for historical stove-testing reasons I have a lot of Coleman Powermax canisters in the cupboard, and they are very nice winter canisters too. I wanted to be able to use any of them, freely, without special adapters.

The resulting Winter Stove V1 is fully functional and eminently usable, as evidenced by the number of repeat orders some customers have lodged. Yes, indeed: some have come back for a second unit. However, that stove missed out on some other broad and less essential goals. Not goals of functionality, but rather goals of aesthetics. Let me explain.

Commercial Burner Head in V1

I must have spent at least a year playing around with the design of burner heads. The photos here are only part of the range of discards I have stored away in shoe boxes. Some of them worked well, but I did not have the equipment needed to actually “manufacture” these in anything more than single units. That spelt trouble if I just wanted a spare for myself, let alone if I wanted to make a stove for someone else.

Experimental Burner Designs Developed Over Years, Roger Caffin MYOG Vortex Burner Ultralight Winter Stove System Part 1

A vast array of experimental burner designs developed over the years.

In the end, in the interests of “getting it finished” and manufacturability and cost, I went with a commercial burner head for the flame source on V1. Since this is a remote canister winter stove, the burner head is only a small part of the complete stove. There were several other major goals to be met. I will add here that my greater knowledge of how burner heads work can improve some of these designs, and also by using my CNC machine, but none of them were really “good enough” at that stage.

Since I was using the burner head off of a commercial stove, I also used the needle valve and the jet out of the same stove. Why waste them? Yeah – I now have a huge box of bright orange left-over stove bodies sitting there. That saved me time, and produced a very functional winter stove, but it diluted the MYOG aspect. Aesthetics you see …

Burner Principles: Upright vs. Vortex

A second and the more subtle thing was that all of the above burners shown above bar one were “upright burners.” To be sure, the upright burner works very well, as everyone who has ever used one on top of a canister in fine weather can attest. They are relatively simple and can be very powerful (above 3 kW if you want). But there is another design possible for backpacking: the Vortex Burner. The classic example of this is the MSR XG-K white gas and kero stove. The physics of this design is different and interesting. In fact, I had built a couple of these, and I show one in the above picture in the bottom right-hand corner. Below another version is shown. (There is a third design, as epitomised in the MSR Reactor, but that design turns out to be a significant carbon monoxide hazard when used for backpacking.  The burner is not good in a storm-bound tent, and not very reliable when the temperature crashes.)

Early MYOG Vortex Burner Stove, Roger Caffin MYOG Vortex Burner Ultralight Winter Stove System Part 1

An early MYOG Vortex Burner stove.  It worked quite well.

Pot Supports

Even so, using a commercial burner head was not perfect. A complaint which did surface with the burner head I used was that the pot supports were a bit small and not suitable for big pots – unless you exercised a lot of care. That was true, although many of us manage just fine even with melting snow in a 1.6 quart (1.5 L) pot. Experience has shown that there are hazards with big pots: they tip over and produce excess downwards reflected radiation. But still, it was a small niggling hassle.

Leftover Stock

Somewhere along the line I had at some expense bought several meters of thin-wall titanium tubing, 1.5″ (38 mm) in diameter, for stove experiments and it was just sitting there on the shelf. It wouldn’t cost anything to experiment a bit more, would it? Especially as I had run completely out of burner heads for the V1 model and orders had also run out. And my CNC machine was sitting there looking hopeful. (Er – not true. I had to rebuild all the electronics when the gear put in by a third party started to fail). 

Vortex Burners: The Whats and the Whys

What is a Vortex Burner, and how does it work? Why is it different? And why does it make such a loud noise? It turns out the noise is almost an intrinsic part of the fundamentals.

Comparison Upright Vortex Burners, Roger Caffin MYOG Vortex Burner Ultralight Winter Stove System Part 1

Comparing the insides of Upright and Vortex burners – (I am not an artist).

On the left, we have an upright burner. Gas (red) comes out the jet under pressure and whistles up the burner tube. The high speed of the gas going up the tube drags air (blue) in through the air holes. The fuel/air mix blends in the burner tube and the burner head and comes out the small holes in the burner head. (It’s a shade more complex than that, but no matter). The flame cannot get back inside the upright burner head because the holes are small – the same principle as used in the original Davy Safety Lantern (1815) for coal mines. In some designs, the face of the burner head reaches red heat, but very often it does not. I suggest, in fact, that it is better if the head does not glow; there is less risk of the flame getting inside. In one never-to-be-repeated Chinese copy of the MSR Whisperlite, the flames did get inside the burner head – via the air inlet. The burner head went bright red, and my hand went for the control valve. This was a very repeatable disaster due to a small Chinese change in the design for ease of assembly. They truly did not know what they were doing, which is scary stuff.

The Vortex Burner on the right starts with a jet at the bottom with the gas coming out of it, but then things change. Air is sucked in from the sides, or the base of the chamber and the flame starts to burn inside the burner chamber. Needless to say, the chamber gets extremely hot!

Glowing Vortex Burner, Roger Caffin MYOG Vortex Burner Ultralight Winter Stove System Part 1

A glowing Vortex Burner.

Glowing bright red is normal. The explosion of volume due to the burning process pushes the flames and the burnt gases out of the burner chamber, to heat whatever is above. But in the process, the gases swirl around inside the chamber a bit, forming a sort of chaotic donut-shaped vortex. The very high speed of the swirling or random oscillation is what causes the “white noise” you hear from such a burner. Hence the name and the noise. Yeah, this is very different.

Quiet Almost 'Vortex' Burner, Roger Caffin MYOG Vortex Burner Ultralight Winter Stove System Part 1

A quiet almost “Vortex” Burner with a cap on it (one of mine).

Can you quieten a Vortex Burner down? The answer is yes, in fact, you can, but it ceases to be a “Vortex” Burner when you do. You make up a burner head to fit over the top of the vortex chamber, with lots of holes, which converts it to a quiet upright burner. There are several ways to do it, and I have made and used such conversions. The first one I saw was created by a friend of mine long ago (30+ years ago?), but I don’t know from where he got the idea. The one here uses SS wire mesh instead of little holes in a plate, but that is just a small detail. You can buy such converters today from quietstove.com as well. Some of the burner heads in the second photo above would also come close to qualifying for this description.

A caution is in order if you wish to experiment. If you restrict the flow of fuel/air mix out the top too much, you may get some fuel/air mix coming out the air inlet holes lower down. This would, of course, instantly catch alight. That could be unfortunate, to say the least. Careful balancing is needed. Eh – what’s the matter with a little roar? It says dinner is on the way. My wife Sue listens for such things from where she snoozes at the back of the tent in the evening while I get dinner. It also provides extremely useful feedback to the cook while he is doing something else, like getting the food ready to go in the pot. If the roar changes, you check the stove immediately.

Early Vortex Burner Stove Designs

Experimental Vortex Burner Chamber Designs, Roger Caffin MYOG Vortex Burner Ultralight Winter Stove System Part 1

Early experimental Vortex Burner chamber designs.

It is tempting to jump straight to the finished article, but doing so would mean missing out on all the interesting deviations, fun, and failures I met along the way. It would also mean missing out on all the theory and practical results covering how and why a Vortex Burner works, and we wouldn’t want to leave you ignorant, would we? So here we have, in the roughly clockwise direction from the top left-hand corner and going into the middle, some of my early experiments. They all did work, at least “sort of,” although not well enough.

  • Two conical burners, the left one being spot welded titanium and the right one brazed gal steel. The steel is easy to form, but the zinc coating is a health hazard. The Ti was an utter pain to form.
  • Three Coke can windshields: two around titanium chambers with flared and flanged tops carrying holes used for holding pot support wires
  • A brazed brass attempt – very early and rather crude (bottom center)
  • Flared Ti tube with an external bottom rim, on a spun gal steel base (missing the splash plate)
  • Another flared Ti tube with lugs at the top for pot support wires, missing a splash plate.
  • A flared Ti tube with a splash plate done with Ti wire spot welded to the plate, on a Ti sheet base (middle)

Some of the splash plates are dish-shaped and are made from Titanium. Those took a lot of heat/thump cycles to get there. That little bit of metal cooled off so fast while I was getting it into the vice to squeeze or thump it. The flanged top rims on the chamber did take a fair bit of heat/thump too. Most of these chambers have the air inlet in the Ti tube, the same as on some commercial models. You can see from these how the idea of using Ti tube for the burner chamber developed.

Early Stage Vortex Stove Design, Wide Pots Supports, Roger Caffin MYOG Vortex Burner Ultralight Winter Stove System Part 1

Another early Vortex Stove design, also quite functional, with wide pots supports.

This is a somewhat more developed Vortex Burner stove, complete. The canister connector was a primitive version of my eventual solution for the Winter Stoves I sold, but the idea of mating with different canister designs was there already, as well as the safety shut-off valve at the canister. The idea of valving the gas flow very close to the jet rather than trying to micro-valve the liquid flow way back at the canister was also there. See the lumpy white control knob on the stove. The actual needle valve was inside the tubular body with the point of the needle and the valve seat near the jet, where the fuel was a gas. This “control valve on the gas flow” idea is one of the core features of my first winter stove design. This model even included wide pot supports and an integral windshield (not shown). The stove worked fine in the lab under gentle handling (OK, on the kitchen sink). I was not game to try it in the field on anything more than a day walk, for reasons which will quickly become clear.

I could see that this model had many defects in the design of the stove part, and it is instructive to go through them. Well, I think it is anyhow because they teach such a lot.

  • Weight: a bit too high, at 3.7 oz. (110 g)
    Some of this was due to the use of 1/4″ (6.4 mm) ERW stainless steel (SS) tubing for the main inlet tube. I started with this because I had a lot of it. (I forget why).
  • Needle valve jamming
    The needle valve was an inspired bit of .1 in. (2.4 mm) titanium wire with a machined tapered tip at the far end and a brass screw thread fitted onto it near the control knob at the near end. However, titanium and stainless steel have different coefficients of thermal expansion, and the difference goes in the wrong way. If I shut the needle valve off while the stove is hot and let it all cooldown, I can have immense trouble getting the valve open again. Due to the difference in the coefficients of thermal expansion, the stainless steel tube shrinks more than the Ti wire as it cools, so that the Ti needle always ended up jamming at the valve seat at the far end, under the jet. I could see damage and destruction coming.
    Yes, I could replace the SS tube with titanium tube of the same size (I have some). Braze the SS tube to the brass jet fitting block, or there will be leaks, and you can’t (I can’t) readily braze titanium.
  • Mating the brass screw thread with the Ti wire
    With some materials you would braze them together, but not with titanium. We have seen what happened when Jetboil tried to weld aluminum fins to titanium in some of their pots: there were too many weld failures. You can electron-beam weld Ti to Ti very nicely, but I didn’t have one of those toys lying around. A press-fit would only last so long, especially with the jamming. Glue was not an option at the potential temperatures; I was always allowing for >392 ºF (>200 ºC).
  • Making the heat exchanger work
    The long SS tube forms a heat exchanger to vaporize the liquid fuel. The inside diameter (ID) of the SS tube was a bit over 13/64″ (5 mm) while the Ti wire was .1 in. (2.4 mm) outside diameter (OD). That left a huge gap, 3/64+ in. (1.3+ mm), between the two, and I found that the liquid fuel did not always fully vaporize as it traveled down the length. It often stayed in blobs, insulated from the hot tube by a thin layer of gas around it, and it sputtered out the jet still in liquid blobs. The solution (as used in my other Winter Stove), was to fill the bore up, so the fuel travels down it in a thin film. The Coleman Xtreme does this with that long thin brass rod which people puzzle over. I did this with a solid Teflon sleeve, but making those to a close tolerance was extremely difficult. Teflon is very soft and wobbles all over the place in the lathe. It is just as likely to spin around the Ti wire rather than being turned down. I didn’t want to use anything else because other materials were either too heavy (e.g., brass) or could melt when the stove got going for awhile.
  • Titanium wire legs welding
    I did manage to do a bit of spot-welding of .1 in. (2.4) mm titanium wire to 2.4 mm titanium wire, as seen on the legs. However, I was not confident that the welds would last for years in the field. It’s tricky stuff to weld, and my welds can fail almost randomly. (I explain more about this below). A TIG or MIG welder with an Argon shield might have solved this (or that electron beam welder I wanted for Xmas), but I did not have either; the spot welder I used was another MYOG effort of mine.
  • Burner chamber top flare
    In some early commercial Vortex Burner stoves (e.g., Optimus 8R), the burner chamber looked a bit like a parabolic cone. Made out of a bit of brass (or maybe stamped), it was heavy. After several attempts, I despaired of making that shape out of titanium and went instead for a parallel side (i.e., tubing) with a flared top. Making the flare was hard – the details will come later, but buying Ti tubing was easy from the right places on the web.
  • Burner chamber bottom rim
    There has to be some way of rigidly connecting the burner chamber walls to the base. In the photo above there is an outwards turning rim, held down with some screws. Making this rim also presented real problems, as I will explain later. Curiously, it turned out that sealing this connection was not required. That was convenient.
  • Splash plate
    The splash plate is the plate on top of the burner chamber. It consists of a disk with three support arms. (You could have more arms, but why?) It keeps the vortex of burning gas circulating briefly inside the burner chamber instead of shooting up into the sky, and is utterly and obviously essential. It is normally stamped out of sheet brass on commercial stoves, but it has been known for brass splash plates to erode (burn) away and fall off. This happened on one early Antarctic expedition, leaving the guys with no stove and no cooking (at sub-zero temperatures) until in desperation someone made a replacement out of a scrap of galvanised steel using little more than a rock. Desperate times, there! I wanted a titanium splash plate. I spent a lot of time trying to get good spot welds between the .06 in. (1.6 mm) wire and the .02 in. (0.55 mm) sheet titanium but they were just not reliable enough and not manufacturable. I also tried thin strips of Ti sheet instead of wire, but the welds were still unreliable. More details (much more) on splash plates later.
  • Splash plate contour
    Most brass splash plates are dished in the middle, although manufacturers don’t tell us why. I guessed it was to aid in shaping the vortex flow. The dished shape is easy to get with brass (kerthump), but it seemed almost impossible with Ti 6Al-4V alloy sheet in the early days. That alloy does not bend cold, and the tiny thermal mass meant it cooled faster than I could process it, and I did not want to make a hot press for this! So it seemed I would have to use a flat splash plate, and make it work.
  • Plastic hose/stove connection
    You can see the white connector with the blue marker pen on it, connecting the hose to the stove. That style of connection had several problems. O-ring sealing inside between the plastic connector body and the SS tubing was finicky. Tolerances had to be tight, and I had to prevent the O-rings from flying out under pressure. Anchoring the hose into the connector was also tricky, with more O-ring problems due to the wire catch. The wire catch was not super-reliable either, and could damage the O-ring. Surprisingly, the use of plastic here was not a problem; I was using PEEK for this, and that plastic is usable to 482 °F (250 °C) long-term and 590 °F (310 °C) short-term. It’s not cheap, though.
  • Non-optimised design
    Need I add here that none of the features in any of the above models was anything like “optimised?” That stage always comes a lot later.

So in the short term, I focused on the upright burner model instead and got that Winter Stove V1 to market. But this Vortex Burner Stove did work moderately well, all the same, so once I had sold all the upright burner stoves I had made, my thoughts turned back to that expensive Ti tubing I had sitting on the shelf.

Technical Note on Welding Titanium

I am throwing this in here just in case someone asks why is it so hard to weld titanium. You can easily solder metals like copper and silver together, and it is not hard to solder or braze brass, and with a little bit more heat you can readily braze or weld steel. All you need for those metals is a flux which can displace any surface oxide layer so the molten filler metal can merge with the clean base metal.

The problem with titanium is that it is very reactive, and an oxide layer covers any new surface. Ordinary fluxes cannot displace the titanium oxide layer; it is too “stable” and tenacious. So when you try to join two bits of titanium together, you very often end up with a very weak oxide layer between the different bits of metal. Sometimes my spot welds displaced the oxide layer to give a strong metal joint, and sometimes they didn’t. Quite often what I got was more of a Lego-style joint, tiny bits interlocking through an oxide layer.

Critical Preliminary Experiments

It seemed to me that I had enough from the early experiments to say that a Vortex Burner Stove should be possible. The Canister Connector and Hose were known territory from the V1 stove. There needs to be a “stove body,” but again the work on making the V1 stove suggested that this could be done without too many problems. I assumed that the needle valve would be equally simple, which was not quite true. However, lots of people make needle valves, so I figured it should be possible. The big unknown at this stage was the Burner Chamber and the bit on top called the Splash Plate. I wanted to use the Ti tubing for the Chamber and Ti sheet for the Splash Plate. Could I make these in a realistic (repeatable, manufacturable) manner? At the start, that seemed to be the crucial question.

Bending Titanium, Hod Cold, Roger Caffin MYOG Vortex Burner Ultralight Winter Stove System Part 1

Bending Titanium, hot and cold.

Making a viable titanium burner chamber was for a long while a major stumbling block. The Titanium sheet I have is the very popular and very strong 6Al-4V alloy, which is impossible to bend cold. When you finally get it to bend (it takes a lot of force), it usually cracks unless the radius of the bend is large. But this 6Al-4V alloy is what they call “super-plastic.” It can bend very well once it is up to red heat. In the photo here, the sample on the left was bent at red heat, and is fine; the sample at the right was bent cold, and it cracked. You can see the crack. I will add that bending “pure” titanium, often called CP (for Commercially Pure), is much easier, but CP is nowhere near as strong as 6Al-4V.

Fortunately, the Titanium tubing I have is not the 6Al-4V alloy. Instead, it is the 3Al-2V alloy, and this sort of tubing often uses that alloy. Since the tubing I have is rolled up and welded (ERW) it can obviously bend a bit. Some “distortion” of this alloy or tubing was, therefore, hopefully, possible. I had several ways to do this.

Spinning Lathe, Hydraulic Force Replaces Screw Threads, Roger Caffin MYOG Vortex Burner Ultralight Winter Stove System Part 1

Spinning lathe: hydraulic force replaces screw threads (old dealer “For Sale” photo from the web).

The most obvious way was to spin the tube on a mandrel in the lathe and to shape it using “spinning technology.” After all, they make all sorts of spun aluminum shapes this way. But I found that Ti 3Al-2V alloy was a lot harder than any 5000-series aluminum. I could shape it in the lathe using a roller bearing as the “pusher,” but after one or two unsuccessful attempts it was obvious that the forces involved would soon destroy the cross-slide on my little lathe. The lengthwise feed along the lathe bed was also going to suffer. It turns out spinning lathes are built “slightly” differently, at least ten times heavier and stronger! Some of them are massive: a lot bigger than my lathe! They don’t use screw threads for movement; they use hydraulic rams, and that is still just for aluminum.

Manual Flaring, Roger Caffin MYOG Vortex Burner Ultralight Winter Stove System Part 1

Manual flaring – inelegant (posed photo, no flame).

The next way was to make up a female mold – essentially a tapered external clamp.  Put this around the tube and hammer the tubing out against this mold. I made one up out of steel, and it worked, but the result was a bit erratic and a lot of work. Heat from a propane torch helped (a lot), but holding a propane torch in one hand and doing controlled pounding with a hammer in the other hand, while holding the clamp in the vice was “a bit tricky.” Samples are shown here and in previous photos. The results were rough and inelegant, and also not manufacturable in volume.

Commercial Copper Flaring Tool, Roger Caffin MYOG Vortex Burner Ultralight Winter Stove System Part 1

Commercial copper flaring tool (one of many product photos on the web).

My next idea was to make a matching male mold to go inside the tubing while the female mold was on the outside, and to squeeze the two together, very much like the flaring tool used on copper tubing by plumbers. This was a great idea, but way beyond what force my drill press could do. You might note that typical plumbers’ flaring tools are for soft copper and for up to about 5/8″ (15 mm) diameter while the tubing I am using is titanium and 1.5″ (38 mm). Not to mention the huge mechanical advantage you get with the fine screw thread on the tool shown here. I tried putting the lot in my cast iron 4″ (100 mm) vice and cranking the handle. That worked, and it produced a satisfactory flare, but it was leaning a bit hard on the poor old vice. Life prediction for the vice if used for that was not encouraging (and good cast iron vices are expensive).

Then there was the problem of the other end of the burner chamber. I had managed to flare the bottom edge out with a hammer and heat. I used an internal mold to hold the inside shape and an external ring clamp to lock the tube on the internal mold. The result was a bit lumpy, and I had to completely disassemble the clamp to get the burner chamber out. Fortunately, that ring clamp had been made to come apart like that.

Burner Chamber, Diagrammatic, Roger Caffin MYOG Vortex Burner Ultralight Winter Stove System Part 1

Burner chamber, diagrammatic.

So when I restarted, I tried making the bottom rim go inwards, and this was an improvement. I could now just slide both parts of the mold off the tube. The external part of the mold slid down past the inwards-turning rim at the bottom, while the internal part of the mold came out upwards past the outwards flare at the top. A little care was needed when hammering the bottom rim inwards to avoid having the outside of the rim bulge slightly outwards. This happens as hammering the rim inwards compresses the titanium there, and that pushes outwards on the tube just at the bend. Any bulge would prevent me from sliding the external mold off the first time. (And yes, it does bulge outwards given half a chance).  I could do all that, but I had to flatten the rim against the inside part of the mold with a bit of hard steel and a hammer, and that made dents on the surface of the softer steel mold. (Did I just say mild steel was soft? Yep).

However, despite all the problems, making a titanium burner chamber was possible. And so, the project started.

Summary so far

The early photos show some of the bigger problems I met along the way. I didn’t have simple solutions for them at the time, so I let the ideas sit for a while and got on with developing, making and selling the upright burner V1 stove for a couple of years. That was very successful, and I have sold over 110 of them. (I don’t have any left for sale, but I could make more if needed). A recent revival of my experiments suggested that the idea of an MYOG Vortex Burner Stove was not impossible.

Finding that I could (probably) make a satisfactory vortex burner chamber shape out of my Ti tubing (somehow) was the necessary boost to my enthusiasm. All I had to do was to solve a few more minor problems (he says). So in the next few parts of this series, I will look at these “minor problems.”

canister stoves, winter backpacking

Get ultralight backpacking skills, gear info, philosophy, news, and more.


Comments

Home › Forums › DIY Backpacking Stove: An Ultralight Vortex Burner (Part 1- Background and Theory)

Viewing 14 posts - 1 through 14 (of 14 total)
Forums are supported by our merchant partners (disclosure)
REI (Coupons) • ZPacks • Hyperlite • Patagonia • Arc'teryx • RBTR • Drop • Backcountry • Feathered Friends • CampSaver • Gaia • Mountain Hardwear
Gear Deals • Gear Search
Login to post (Basic Membership required)
  • Author
    Posts
  • Jun 10, 2016 at 2:48 pm #3408171
    Roger Caffin
    Moderator

    @rcaffin

    Locale: Wollemi & Kosciusko NPs, Europe

    Companion forum thread to: DIY Backpacking Stove: An Ultralight Vortex Burner (Part 1- Background and Theory)

    In part 1, Roger Caffin explores the theory behind using a vortex burner as a solution for an ultralight winter stove system.

    Jun 10, 2016 at 3:27 pm #3408178
    Gary Dunckel
    BPL Member

    @zia-grill-guy

    Locale: Boulder

    And the good Sheriff Caffin rides again!

    Jun 10, 2016 at 4:34 pm #3408185
    Roger Caffin
    Moderator

    @rcaffin

    Locale: Wollemi & Kosciusko NPs, Europe

    More stoves, more stoves, gotta have more stoves …

    Cheers


    Jun 10, 2016 at 11:22 pm #3408221
    Dylan Atkinson
    BPL Member

    @atkinsondylan

    Locale: Southwest

    Good show. Damn good show.

    Jun 11, 2016 at 1:00 am #3408228
    Rick M
    BPL Member

    @yamaguy

    So as a Caffin Stove happy camper, I need to ask what is the end game of this Vortex design? Fuel efficiency, play nice with bigger pots, audible noise feedback, or just fun with stoves?

    Jun 11, 2016 at 1:54 am #3408231
    Roger Caffin
    Moderator

    @rcaffin

    Locale: Wollemi & Kosciusko NPs, Europe

    What an interesting question!

    Well … it did start partly with an itch about 100% MYOG, and the aesthetics of it all – as discussed at some length in this Part 1. It was ‘unfinished business’ as it were.

    But as I mention right at the end – having established that I could make a good Vortex burner using the 38 mm Ti tube I had, it naturally followed that I should make some. If the logic here is not obvious, then it can’t be explained. :-) I guess that could be ‘just fun with stoves’.

    Good fuel efficiency depends on complete combustion and good heat transfer into the pot. Most canister stoves can do that if you don’t run them flat out. Really fast boil time means a slightly lower efficiency.

    Play nice with bigger pots – yeah, as a secondary goal, not a primary goal.

    Noisy operation – no, that was never a significant factor. It just happens with the Vortex design.

    Cheers


    Jun 12, 2016 at 7:06 am #3408373
    Stuart R
    BPL Member

    @scunnered

    Locale: Scotland

    Fascinating stuff Roger, looking forward to the rest.

    One thought – if the vortex chamber is red hot then it is well above the Draper point and all that heat wants to go somewhere!

    cheers

    Jun 12, 2016 at 3:37 pm #3408449
    Roger Caffin
    Moderator

    @rcaffin

    Locale: Wollemi & Kosciusko NPs, Europe

    Hi Stuart

    Oh definitely – well above. It GLOWS!
    A lot of the heat goes upwards of course, hitting the bottom of the pot. This is good. Some of the heat goes sideways, and a bit of that can warm the canister. Within obvious limits, that too is useful, especially in real cold weather.

    Anyhow, more to come.

    Cheers


    Jun 15, 2016 at 7:11 pm #3409085
    The Ebbo
    BPL Member

    @ebbo

    Locale: Kosciusko Main Range, Bogong High Plains

    Nice read, Looking forward to the rest of this epic mission!

    Jun 15, 2016 at 7:31 pm #3409087
    Roger Caffin
    Moderator

    @rcaffin

    Locale: Wollemi & Kosciusko NPs, Europe

    Hi Ebbo

    Thanks. The rest is coming.

    Cheers


    Jun 15, 2016 at 10:46 pm #3409120
    Joshua Stillwell
    BPL Member

    @bearjosh

    Locale: Central California

    I loved the thorough explanation of the design process.  Really gives an engineers perspective on designing something.  Really cool.  My questions about the whole project is weight.  Beyond the aesthetics of a Caffin design, and the coolness of being released on BPL, is there really that much of a weight savings with this Caffin Vortex?  In the end my bottom line is always weight, and I kept wondering if the weight savings is truly worth the effort.  Sometimes its worth doing it just to do it, I agree, and I’m supportive of any MYOG no matter what, but the weight question comes to me generally.

    Jun 15, 2016 at 10:56 pm #3409124
    Roger Caffin
    Moderator

    @rcaffin

    Locale: Wollemi & Kosciusko NPs, Europe

    Hi Josh

    Ah well, you have to compare the weight of my finished stove with the weight of a commercial vortex stove to answer that. We haven’t got that far yet … :-), so I will simply say (at this stage) that I found the weight savings huge.

    There were several other reasons for doing it: the ‘universal’ canister connector was a big one for me, to handle trips around the world. That was covered in the previous series. The dual valving for better control was another. A better pot support for big pots was yet another – that has yet to appear.

    But do I really need a huge business ROI case to ‘follow my nose’ here? I am a career research physicist, with a severe case of ‘need to know’. As I am retired, I have the time (and facilities) to fill that need.  :)  :)  :)

    Cheers


    Jul 4, 2016 at 5:29 pm #3412245
    James Marco
    BPL Member

    @jamesdmarco

    Locale: Finger Lakes

    Love it Roger…sorry for the delay…out camping much of June…

    Jul 4, 2016 at 6:28 pm #3412262
    Roger Caffin
    Moderator

    @rcaffin

    Locale: Wollemi & Kosciusko NPs, Europe

    Hi James
    Thanks. Now read Part2 !It’s been great fun – better than the past week which has seen me repairing the rusted gal roof on my 100 year old barn/workshop.

    Cheers

  • Author
    Posts
Viewing 14 posts - 1 through 14 (of 14 total)
  • You must be logged in to reply to this topic.
Log In

Want outdoor gear and skills info you can really trust?

Get our Handbook - the resource you need to make intelligent decisions about gear, safety, comfort, and pack weight.


Today's Gear Deals

Guide’s Gear Recommendations

Find out what gear our guides recommend if you want lightweight gear that is durable and versatile.

guide's gear logo

Gear Recommendations

  • Publisher’s Gear Guide
  • Staff Picks
  • Guide’s Gear Recommendations
  • Our Lightweight Gear Recommendations for REI Members
  • Today’s Gear Deals
  • Search for Gear on Sale

Subscribe Right Now

Receive new Members-only content, gain access to 2,000+ articles in the archives, and become a part of the most passionate community of backpacking experts in the world.
Subscribe Now
  • Backpacking Gear Reviews
  • Backpacking Skills
  • Backpacking Trips
  • Backpacking & Outdoor News
  • Outdoor Recreation Science & Technology
  • Backpacking Courses, Webinars & Other Events

Follow Us

Get outdoor skills and gear info you can trust.

Download the Backpacking Light Handbook to help you make intelligent decisions about gear, skills, ultralight philosophy, and reducing your pack weight.

Join Now: Support fair and objective product reviews.

Something for everyone: Basic, Premium, and Unlimited Membership options available.

View Subscription Options

More @ Backpacking Light

  • About Us
  • Jobs
  • Advertise with Us
  • Write for Us
  • Submit a Product for Review
  • Diversity Grants
  • Help / Support / Contact
  • Terms & Policies

Call Us

Membership Sales & Support: 406-640-HIKE (406-640-4453) | About

© Copyright 2001-2021 BEARTOOTH MEDIA GROUP, INC. | U.S. Library of Congress Serial Registration ISSN 1537-0364
BACKPACKING LIGHT® and the FEATHER/MOUNTAIN icon are registered trademarks granted for exclusive use to Beartooth Media Group, Inc. Subscribe here.

  • Subscribe
  • Log In
  • My Account
  • Forum Profile
  • Private Messages
  • Newsletters
  • My Course Enrollments
  • Unlimited Membership Portal
  • Help / Support / Contact