Background
Why should we use a complicated remote inverted canister stove in the snow? Very simply, because propane boils under -40 F (-40 C) but n-butane only boils at 32 F (0 C). To understand what this means, look at the pressure/temperature curves in the graph below. The pressure axis is relative to ambient (pressure), which is the nominal ‘zero’ here. We will only get gas out of a canister if the pressure in the canister is greater than the ambient.
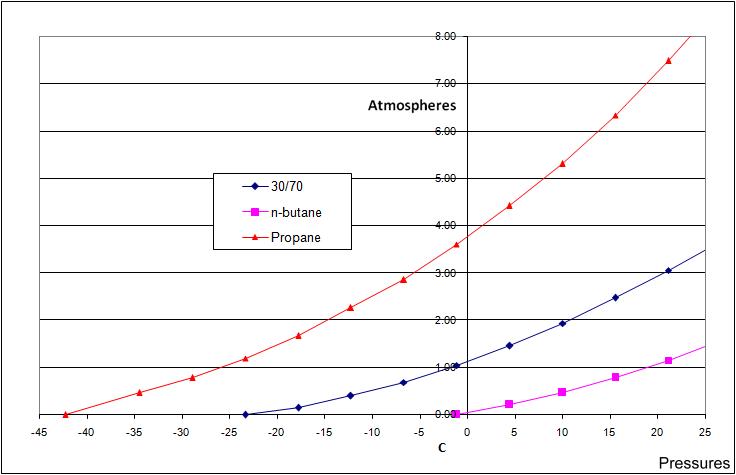
If we run an conventional upright canister stove on a 30% propane / 70% n-butane canister at -4 F (-20 C) the propane will get used up but the n-butane (two-thirds of the contents) will be left sitting there in the canister doing nothing, and we won’t get hot coffee (or hot dinner). This is a very well-known winter problem.
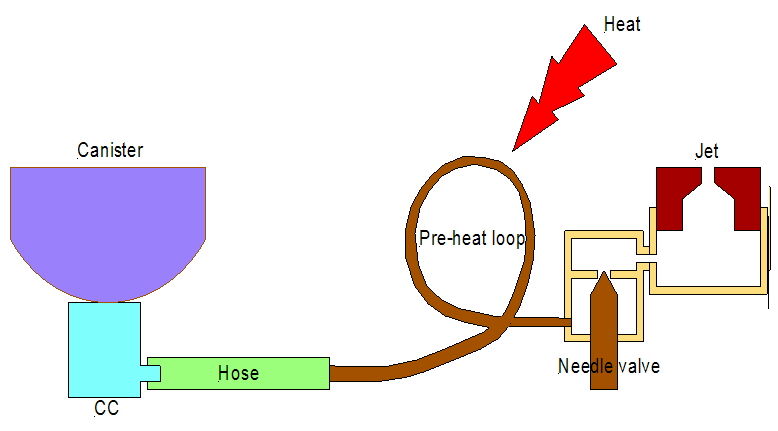
However, if we separate the canister from the stove with a hose and invert the canister, we will get liquid fuel in the original 30%/70% mix coming out the bottom of the canister and going down the hose to the stove, and this ratio will apply right to the end. This is illustrated in this rather basic drawing from long ago. But the drawing still applies.
This way we can use every last bit of the fuel in the canister. The catch is of course that we have to vaporise the liquid fuel before it reaches the needle valve in the stove so that it does not come out in blobs and flare-ups. For this we need a proper ‘remote inverted-canister winter stove’. They are available commercially, but many of them are big, clumsy, and heavy (and expensive). Interestingly, canister stoves in general are significantly more powerful than the old (traditional) petrol and kerosene stoves. Myths otherwise persist, but that is how it is.
I’ve made remote inverted canister stoves for the winter before. Below are my last two – the V4 and V6 stoves.
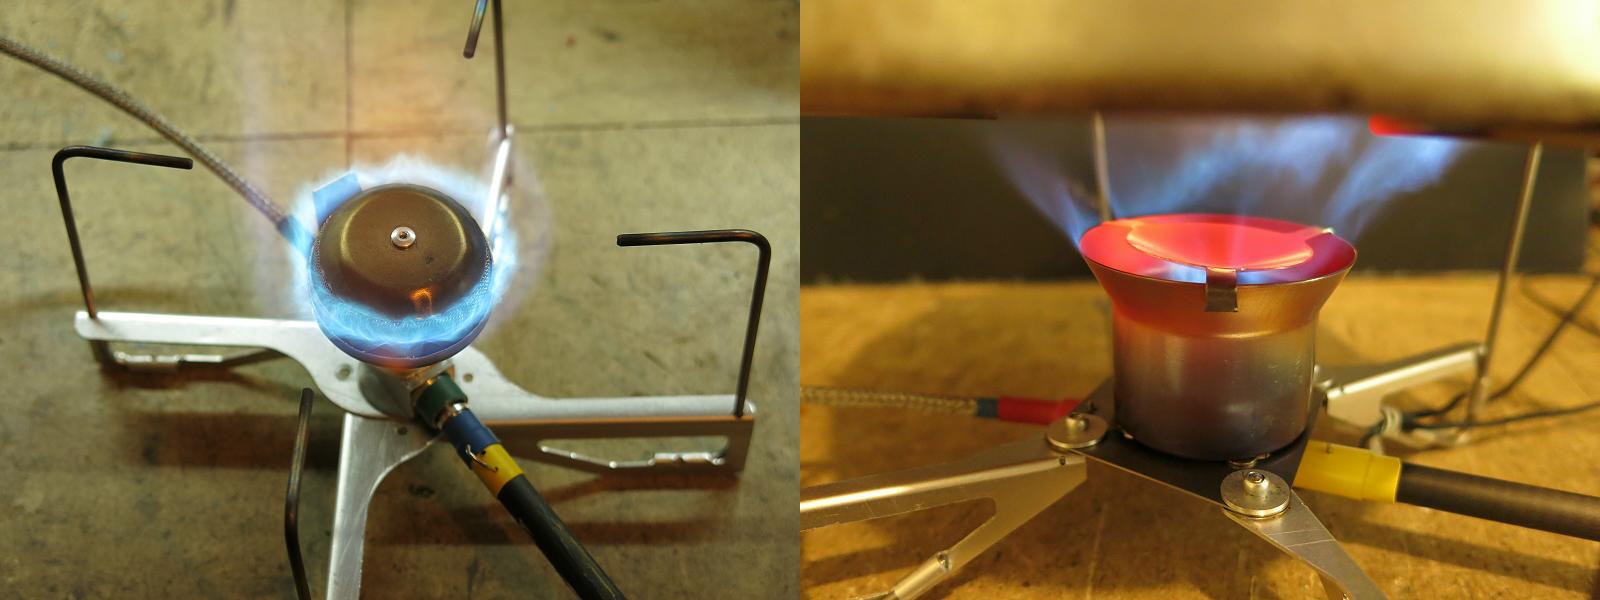
The V4 on the left has a ‘standard’ upright burner design; the V6 on the right has a less conventional Vortex burner design. For more on these stoves, see the articles here on BPL:
- MYOG: DIY Ultralight Remote Inverted Canister Winter Stove – Version 4, Part 1 – Backpacking Light
- MYOG: Remote Inverted Canister Winter Stove – Version 6
TOC
Table of Contents • Note: if this is a members-only article, some sections may only be available to Premium or Unlimited Members.
The V5 Stove – Which Didn’t Happen
After making the V4 stove, I tried making an improvement on the burner head. It was to be called the V5, but I was never happy with the results, so it didn’t happen. Part of the trouble was that I do not have the facilities for stamping and hot forming sheet titanium, which seems to be a feature of most commercial stoves. I abandoned the idea and went on to make the V6 Vortex stove (Yes, I like the Vortex design). The V6 does involve some forming of titanium for the flared top of the chamber, but not much. I can do that in my hydraulic press using a softer titanium alloy found in tubing.
But . . .
My remote inverted canister stoves are considerably lighter than similar commercial models and I thought I had finished, but after a while I began to wonder whether they really were the limit of what could be done. Rather than conventional thinking along the lines of a V5, I began wondering just how much lighter could I go? Not just small changes to the burner, but more significant changes to the whole stove: including the canister connector, the hose, and the stove body itself. Also, it seemed to me that both the V4 and the V6 might be a bit of an overkill for a solo walker (although very well-suited to a party of 2 or 3).
This led me to a real change of focus from UL to SUL. And so the thinking and designing began (all over) again. Well, it is something to do on a rainy day.
So… The V7 Stove
I will only give a few snippets here about the V7 stove; the subsequent ‘chapters’ will give all the details. But, briefly, since the aim was to go from UL to SUL, how do you do this?
While I am fond of my Vortex design, I did not think that making it much lighter would be possible. One of the limitations is the availability of thin-walled titanium tubing to make the vortex chamber, which by itself weighs 0.5 oz (14 g). The stuff I use has a 0.5 mm wall thickness; most available Ti tubing has a wall which is 1 mm thick or greater – double the weight at least – and the aerodynamics of the vortex inside the chamber meant I could not make it much smaller.
So it looks as though it might have to be a more conventional upright burner design, like the one in my original V1 or V4 stoves. As noted above about the V5 stove, making an SUL burner head with my facilities is unlikely. So, as with the V1 stove, what about using the burner head off a commercial stove for it?
For the V1 stove I used the Korean FMS-300T (weight: 1.45 oz / 41 g). The second choice was an FMS-116, with a weight of 1.66 oz (47 g). Both are good stoves, but that was back in 2008; is there anything lighter today? Yes, the BRS-3000T stove, with a remarkable total weight of 0.88 oz (25 g) and a power rating of 2.7 kW – and an ebay price as low as US$12.50 posted. (There are some poor imitations of the BRS design around the web, I recommend avoiding them.) If we remove the base from the BRS-3000T stove, we are left with a 0.46 oz (13 g) burner head unit. Amazing stuff.
The BRS-3000T must have sold in the tens of thousands, and it is a bit of a cult stove (neat, light, cheap, powerful, pick any four). It has its critics, but my impression is that much of that seems to derive from misuse and overloading. The rest of us have no problems with it.

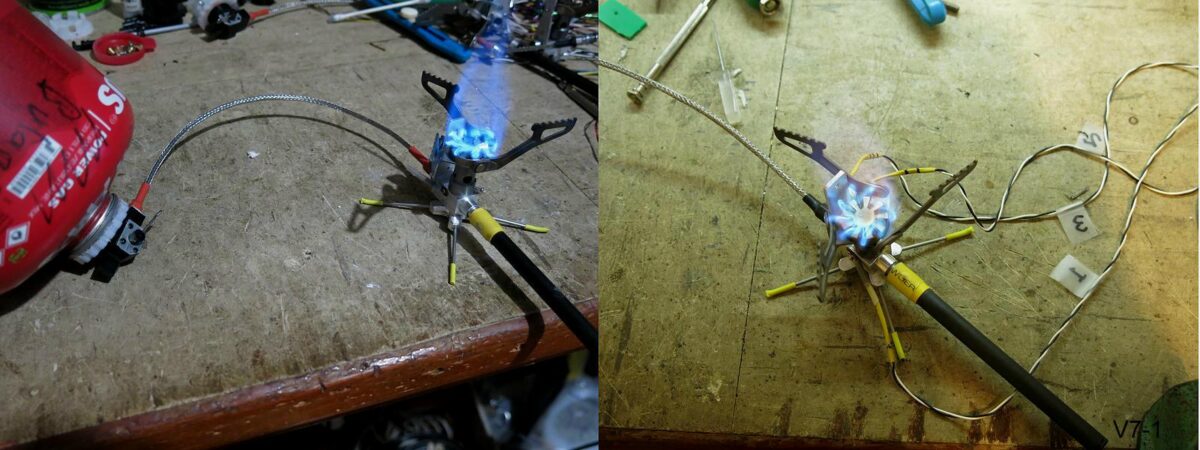
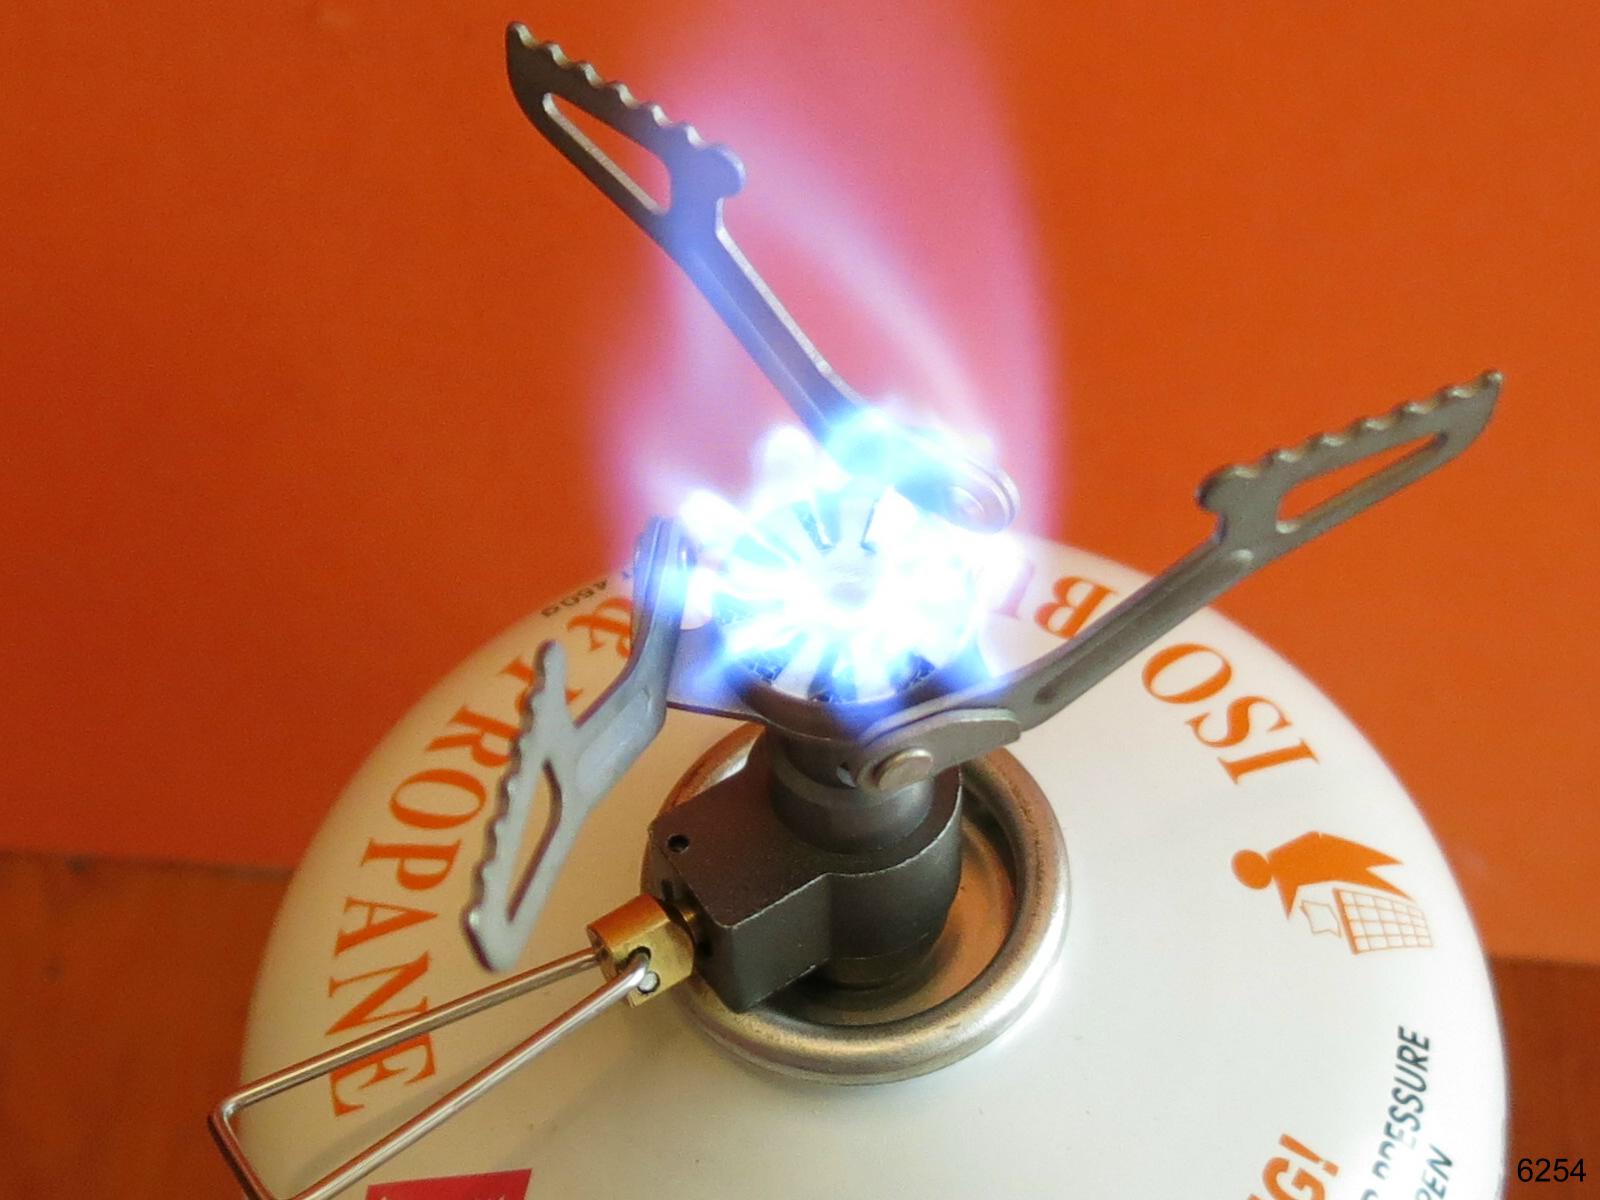
Okay, jumping ahead: what does the V7 stove look like? The photo on the left is a complete stove, running with an inverted canister. The complete stove weighs about 1.56 oz (45 g). The photo on the right shows a running stove fitted out with temperature sensors logging its performance. The data was used for fine tuning of several parts.
One comment about all this: when I am making something large (like a house) then errors of a millimeter or so may not matter, but when the thing is this tiny I have to hold some tighter tolerances, and when I am dealing with propane and butane much care is needed. I try to work to 0.01 mm, which is quite possible with a CNC machine, but not with manual machining.
Member Exclusive
A Premium or Unlimited Membership* is required to view the rest of this article.
* A Basic Membership is required to view Member Q&A events

Discussion
Become a member to post in the forums.
Roger,
Here I am working to make tunnel tents a bit lighter and stronger. Now I know why you aren’t totally and completely focused on improving, if only just slightly, this past issue.
I had, in my past, completely ignored tunnel tents (pardon the pun), but I must have had tunnel vision). Now I am hooked on the subject of tunnel tents, and you have wandered into another area. Boiling water? That is about the limit of understanding about what you are doing. Oh, I understand a bit more. But only a bit. However, I have complete faith that you are onto something both interesting and important.
Now, if you would only take a bit of time off and make some ferrules…
Hi William
Have you looked at the ferrules sold by http://www.questoutfitters.com? A range of sizes and angles.
Cheers
PS: no commercial links at all.
The stove arrived last Thursday which coincided perfectly with a planed weekend out.
So the first hing was to give it a test-drive at home. Worked well with a medium canister. The question became if I should disassemble the foot and the regulator or let it stay in one. I decided to let it together because of the thread of the stand (what is your recommendation?). In the field I removed the regulator as this is easy but have not touched the foot.
I used it then in the field (currently summer with around 16-18 C). Starting on gas feed and then changing to liquid as intended. Works as it should! On gas it actually sounds a bit and can be throttled – but no worries. The thing I learned is that when inverting I need to open a bit as the flow changes (like described by Roger – but it needs to be experienced).
In respect to the canister connection it works like a charm but needs to get used to. For me, getting the screwing ring first all up, then placing the connector on the canister and then screwing it down to tighten is still feeling strange after a weekend of use. I am used to screwing the canister onto the connector using the thread on the Lindal valve.. However, it works good and what I really like the easy switch on the connector which makes especially the switching off easy.
One notable thing is that I used a large canister (410g) in the field. Arguably strange with a ultralight stove but I had noting else with enough gas at home. Said that, the large canister was a challenge and needed stabilization to avoid tipping to level and impacting liquid flow. With a medium canister it was not a problem – just to be aware off.
All in all I am very pleased to have such a light stove with liquid feed. I will keep you posted with cold weather experience.
Hi Albin
the large canister was a challenge and needed stabilization to avoid tipping to level and impacting liquid flow.
I had not thought of that recently. Thanks for the feedback.
In the past I have always propped the large canister up between my joggers, in the vestibule of the tent. Actually, I also used my joggers with a ‘medium’ sized canister too. I set my joggers up before I light the stove: safer that way.
Cheers
Well done (again) Roger! What a great series. Following along with your design justifications and iterations here has been eye opening! I’ve been using the Fire Maple Blade 2 for a bit. Mostly for all the advantages of remote canister setup. It works fine but I hate how thick and stiff the braided fluel line is. There is always a near “kink” when packed away and I suspect it will be the first thing that fails.
I noticed the line hinge on one of your earlier designs and think, although it increases complexity, it’s a great advantage in packability and reduces stresses on the line. I would love to see V7 packed away. Cheers and thank you for being so detailed and open through this process!
Hi Dirtnap
I would love to see V7 packed away.

What a good idea! So I set it up and took a photo.
This shows a V7 stove inside my Trangia kettle – as used on all our day walks for morning coffee. I made the stove so the arms could be folded down and the base (wire legs) detached (M6 thread), but in this photo I haven’t bothered to do either of those things.
The stove is so small it just drops inside the Trangia, along with carbon fibre handle, mini-tea-towel (for drying the kettle afterwards), Bic lighter, optional sugar in Nalge container, and so on and so forth. The coffee container goes inside the SS filter, inside two stacked plastic coffee mugs.
Then the lid goes on the Trangia, it goes in a UL stuff sack and into my day pack. With this stove there are no kinks needed in the hose: it is very flexible.
Cheers
I am not sure about disassembling the stove. It makes for a LOT of fiddly small bits that have a way of developing legs and walking away. Examples: three times I lost the carbon tube (the black tube on the flame control) and found it in odd places, the stove base is OK and screws on and off, but removing the legs only creates more fiddly bits in my ditty bag (leaving it together works, but then there are four fairly sharp “poke” items in my bag.) The stove hose works well, though I had some minor trouble with it leaking (fixed with a touch of silicone adhesive caulk,) the base and stakes to hold it down can be painful with five pieces needed (again small stakes to loose and the small piece of plywood.) Because of all the parts, I consider the stove time consuming to set up, though not difficult.
The hose is flexible enough, but an extra three to six inches of tubing would have made it easier to use. Without a stand, using a large container for gas is not something I would do. It really sounds like asking for trouble. Besides, I often get things set up and run down to fill my water bag while boiling supper water…I need my shoes ON.
While the gas connector is better than the V1, it needs a couple small legs to hold the canister up. I’m sure Roger could mill them, or, use a screw on base similar to the stove base.
With the V1 (in the inverted position) a lot of debris/oils from the canister gas quickly plug up the filter/valve. I simply removed the filter and blow it out between uses. I also removed the filter from the V7, but it has been warm enough so far not to need the inverted operation. It runs very well in gas mode.
It takes about 30sec to set up the V1 stove. However, assembling the base, attaching it to the stove body, folding out the pot rests, setting up the stove base plate (and optionally staking it down) is a lot of work compared to a standard “topper” stove. All in all, it takes extra time to set up the V7 stove for operation and is quite fiddly.
Air mixing/gas flow did seem a bit impeded. I removed to burner, screwed the sleeve down two turns and reassembled it. That solved the problem for small flames. I have found the greatest efficiency above 0C, was around seven to eight minutes burn time to boil 2 cups of water. Below 0C, it drops to around five to six minutes due to the additional heat needed (ambient air temps really suck heat out of the system.)
However, the V7 seems to run close to the same as the V1, with rather high heat production for the amount of gas used. The low profile allows me to use a short wind screen (which also fits into my ditty bag) and get good heating at low outside temps.
Over all I like the V7.
Since Marco mentioned stability:
I still have what I think is a V1 with the fms-116 burner head. Stability when used with a Evernew ECA252 .9L pot or a Banks Frybake skillet has not been great. We were on Isle Royale last year and the picnic tables the park service sets up next to the wooden shelters are notoriously not-level. I had at least 1 pot of water tip over because those little legs were tippy and the table wasn’t completely level. Fortunately my 12-year old grandson wasn’t sitting in front of the pot when it spilled.
When it’s just my wife and me on 3 season trips, we use an upright canister stove like the Soto Amicus and a 750ml titanium pot. I don’t do a lot of winter camping these days, so my Caffin stove has been relegated to trips where I’m doing more gourmet cooking for 2+ people. Due to the “fiddly nature” of the stove however, I may replace it with a FireMaple Blade2, Kovea Spider, or similar.
Even on Mt Baker in July where I needed a more windproof setup, I wound up taking the Soto Amicus with a 1L Olicamp heat exchanger pot and one of Jon Fong’s new Ocelot 6 Universal windscreens. In fact, that setup will probably go with me when my wife and I hike the Laugavegeur Trail next year.
I did make a tripod for holding the canister upside down:
It even folds up to fit into the base of the canister.
Very cute, but I have to remember to put it on the canister before I connect the stove.
The alternative is very low-tech – and both simple and light.
I can leave the big rubber bands on the canister all the time of course. Strips of clear Lexan plastic, but anything would do. The red tape is because clear plastic is a bit easy to lose.
For the rest – I agree with Jim that doing a complete strip-down and rebuild every time is a hassle, so I don’t. As shown in the photo above, I leave it fully assembled and pack it away in my pot. Ir’s small.
Cheers
I’ve been thinking of fabbing a simple wire/rod inverter that can be snapped around the tank lip. Titanium. Doesn’t need to be vertical.
In fact, having it off-vertical might be a good thing. See
https://backpackinglight.com/dirt-in-canisters-caffin/
for why.
Trouble is, the wire won’t work when sitting on a rock scarp.
(V6 stove, Via Dinarica, Carsten Iwers, Jan 2020, with thanks)
Cheers
Roger
Roger –
My V7 stove package has arrived – It is amazing!
Half the weight of my V1 (42g vs 86g) and much more compact for storage in a pot or mug (~60mm long vs ~90mm). I should do a side-by-side photo too….
Now — to get it fired up!
Vance
Looks like your stove has the updated shunt design. 👍
I’ve been using mine in warm weather (first time slightly below freezing was last weekend) and I am loving it. Excited for the arrival of cooler weather.
All stoves now have the upgraded Heat Shunt.
Well, the owners of the ones already sold have been provided with the upgrade: it’s up to them to decide whether to fit it. The stove does work fine with the original Heat Shunt in ‘cold’ weather, just not at high power at -20 C.
Caution: this stove is not meant for use with a 100% gas feed: the body can get too hot after a while – no evaporative cooling. If you want a stove for a 100% gas feed – try a simple upright.
Cheers
Roger
Is this the case for the V7 version or do previous versions have the same overheating issue?
Good question, but I have not done the testing.
My semi-educated opinion would be that it would apply to all my stoves.
V1, V4 and V7 all have ‘conventional’ burner heads and rely on the Heat shunt to heat the stove body. With continued inflow of heat the stove body may be expected to get hotter and hotter. But that inflow of heat is balanced by the extraction of the energy needed to vaporise the liquid fuel. That is, the design assumes that there is a liquid feed. After all, they are ‘remote inverted canister stoves’ .
The other models (V2, V3 & V6) are ‘Vortex Burners’, and don’t have an explicit Heat Shunt. Instead heat flows down to the stove body under the Vortex Burner chamber by conduction through the base of the burner chamber. The base gets heat from the burner wall (which gets red hot) and by conduction from the swirling flames inside the chamber. There is lots of energy flowing down.
Footnote: the burner chamber wall is isolated from the chamber base by tiny stainless steel washers – to limit the amount of conduction from the red hot wall. There is such a thing as ‘too much’.
Regardless of the design, if a gas feed is used all the time the stove body is going to be getting a lot of heat in and losing little heat outwards. Which means the stove body can keep getting hotter, to the point where the two O-rings inside it can exceed their safe operating temperature. That is ‘unwise’.
This is why the stove needs to be primed with a gas feed for maybe 20 seconds: so the stove body gets hot enough that it can reliably vaporise the incoming liquid fuel. But no more than that. Once hot enough, switch to a liquid feed for safe and happy cooking.
Cheers
Until I read this post I was firmly convinced that I had a V5 (which, apparently went into the bin)…
Turns out that I’m a happy V4 owner.
Hi Kevin
No V5 design was ever finalised, let alone made.
I can confirm that you have a V4, bought on 20/08/2020.
Enjoy!
Cheers
Interesting about the overheating possibility Roger. There are many LF/MF stoves where you can use a canister upright without ill effect. My Omnite Ti and BRS-8 for example. I would think they would have similar issues with the O-rings given the amount of heat dumping into the body without liquid fuel to cool it off. Perhaps because they are so much more heavy and have so much more mass that plays into it? Always learning.
I’ve always wondered why stove makers went away from graphite packing on the valve stems. Svea 123R, Primus 8R et al going back a century. Works great and can withstand huge amounts of heat vs Viton O rings.
I have not examined a BRS-8 stove, but the web pics of it show a white-gas driven vortex burner. No signs of a canister. The Primus Omnite Ti looks like a copy of the BRS-8 (rebrand?). So – dunno.
The reason for replacing a functional packed-graphite seal with an o-rings is probably simple: $$$ O-ring are a few cents each, and very easy to fit.
Also, I believe the Svea may have been invented before Viton O-rings even existed. It would seem likely that the valve gets VERY hot. I would not be game to use an O-ring on it!
Such simple things, stoves . . .
Cheers
BRS 8 has many different iterations (8a, 8b etc) and copycats (APG). Too many varitations to count. Nowadays they almost all come with a lindal style pump connector to use with canister gas. I would consider these all ripoffs of the Optimus Nova just without control at the burner (cheaper).
Omnilite Ti is the lighter brother of the Primus Omnifuel. Same stove, different material, mostly titanium. Probably my favorite LF stove. Same thing the pump end has a lindal connector. I have the factory silent burner. Only use it on high country trips when it’s cold or when I want to play with fire. Alas I still have a weakness for liquid fuel stoves, but it’s too heavy and complex for summer use.
Strongly considering your V7 to replace my Fire Maple Blade 2. Fine stove but probably 3 ounces overweight.
Some light dawns. The stove has no valve at the body: it is at the canister? Well, yes, that means the hose connection to the stove can be a ‘hard’ connection, using compression for sealing rather than O-rings. This should allow the stove to get a lot hotter.
What about the hose material? I suspect it is cooled (enough) by the gas flowing through it. A guess.
Blade 2: I think it is quite a nice stove, very stable, wide flame, strong pot support. But those virtues make it a bit heavy – 137 g . Might be good for cooking for a party of, say, four?
Why don’t I use a hard connection at the stove? It would not make much difference, as there is still the O-ring on the needle valve. Having the control valve at the stove handling a GAS flow is a basic design feature. Also, I like being able to rotate the hose at the stove to get the stove to sit flat – the hose is always curved, in any stove.
Cheers
I recently made up a few more V7 stoves for sale. Probably last few.
Cheers
Become a member to post in the forums.