Background
Why should we use a complicated remote inverted canister stove in the snow? Very simply, because propane boils under -40 F (-40 C) but n-butane only boils at 32 F (0 C). To understand what this means, look at the pressure/temperature curves in the graph below. The pressure axis is relative to ambient (pressure), which is the nominal ‘zero’ here. We will only get gas out of a canister if the pressure in the canister is greater than the ambient.
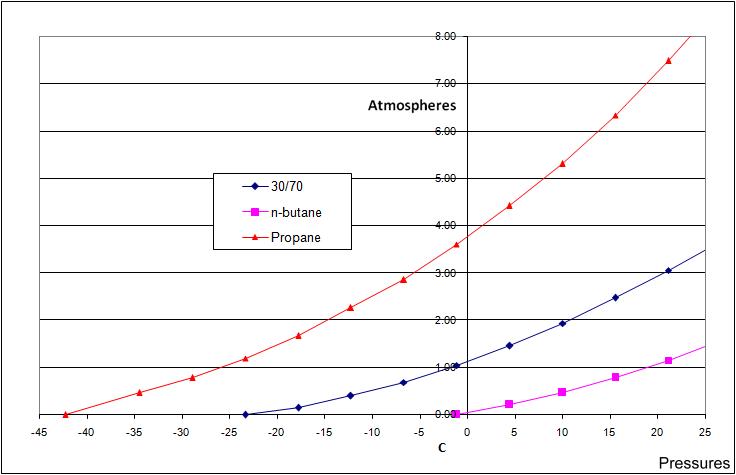
If we run an conventional upright canister stove on a 30% propane / 70% n-butane canister at -4 F (-20 C) the propane will get used up but the n-butane (two-thirds of the contents) will be left sitting there in the canister doing nothing, and we won’t get hot coffee (or hot dinner). This is a very well-known winter problem.
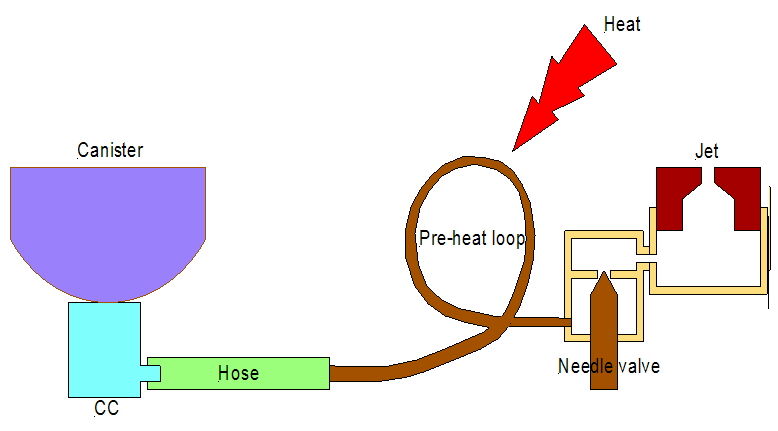
However, if we separate the canister from the stove with a hose and invert the canister, we will get liquid fuel in the original 30%/70% mix coming out the bottom of the canister and going down the hose to the stove, and this ratio will apply right to the end. This is illustrated in this rather basic drawing from long ago. But the drawing still applies.
This way we can use every last bit of the fuel in the canister. The catch is of course that we have to vaporise the liquid fuel before it reaches the needle valve in the stove so that it does not come out in blobs and flare-ups. For this we need a proper ‘remote inverted-canister winter stove’. They are available commercially, but many of them are big, clumsy, and heavy (and expensive). Interestingly, canister stoves in general are significantly more powerful than the old (traditional) petrol and kerosene stoves. Myths otherwise persist, but that is how it is.
I’ve made remote inverted canister stoves for the winter before. Below are my last two – the V4 and V6 stoves.
The V4 on the left has a ‘standard’ upright burner design; the V6 on the right has a less conventional Vortex burner design. For more on these stoves, see the articles here on BPL:
- MYOG: DIY Ultralight Remote Inverted Canister Winter Stove – Version 4, Part 1 – Backpacking Light
- MYOG: Remote Inverted Canister Winter Stove – Version 6
TOC
Table of Contents • Note: if this is a members-only article, some sections may only be available to Premium or Unlimited Members.
The V5 Stove – Which Didn’t Happen
After making the V4 stove, I tried making an improvement on the burner head. It was to be called the V5, but I was never happy with the results, so it didn’t happen. Part of the trouble was that I do not have the facilities for stamping and hot forming sheet titanium, which seems to be a feature of most commercial stoves. I abandoned the idea and went on to make the V6 Vortex stove (Yes, I like the Vortex design). The V6 does involve some forming of titanium for the flared top of the chamber, but not much. I can do that in my hydraulic press using a softer titanium alloy found in tubing.
But . . .
My remote inverted canister stoves are considerably lighter than similar commercial models and I thought I had finished, but after a while I began to wonder whether they really were the limit of what could be done. Rather than conventional thinking along the lines of a V5, I began wondering just how much lighter could I go? Not just small changes to the burner, but more significant changes to the whole stove: including the canister connector, the hose, and the stove body itself. Also, it seemed to me that both the V4 and the V6 might be a bit of an overkill for a solo walker (although very well-suited to a party of 2 or 3).
This led me to a real change of focus from UL to SUL. And so the thinking and designing began (all over) again. Well, it is something to do on a rainy day.
So… The V7 Stove
I will only give a few snippets here about the V7 stove; the subsequent ‘chapters’ will give all the details. But, briefly, since the aim was to go from UL to SUL, how do you do this?
While I am fond of my Vortex design, I did not think that making it much lighter would be possible. One of the limitations is the availability of thin-walled titanium tubing to make the vortex chamber, which by itself weighs 0.5 oz (14 g). The stuff I use has a 0.5 mm wall thickness; most available Ti tubing has a wall which is 1 mm thick or greater – double the weight at least – and the aerodynamics of the vortex inside the chamber meant I could not make it much smaller.
So it looks as though it might have to be a more conventional upright burner design, like the one in my original V1 or V4 stoves. As noted above about the V5 stove, making an SUL burner head with my facilities is unlikely. So, as with the V1 stove, what about using the burner head off a commercial stove for it?
For the V1 stove I used the Korean FMS-300T (weight: 1.45 oz / 41 g). The second choice was an FMS-116, with a weight of 1.66 oz (47 g). Both are good stoves, but that was back in 2008; is there anything lighter today? Yes, the BRS-3000T stove, with a remarkable total weight of 0.88 oz (25 g) and a power rating of 2.7 kW – and an ebay price as low as US$12.50 posted. (There are some poor imitations of the BRS design around the web, I recommend avoiding them.) If we remove the base from the BRS-3000T stove, we are left with a 0.46 oz (13 g) burner head unit. Amazing stuff.
The BRS-3000T must have sold in the tens of thousands, and it is a bit of a cult stove (neat, light, cheap, powerful, pick any four). It has its critics, but my impression is that much of that seems to derive from misuse and overloading. The rest of us have no problems with it.

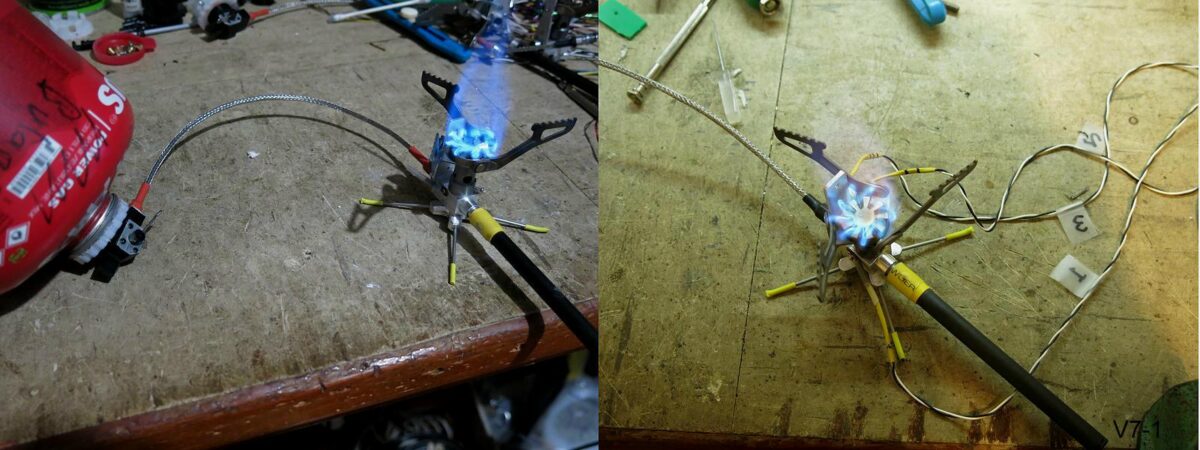
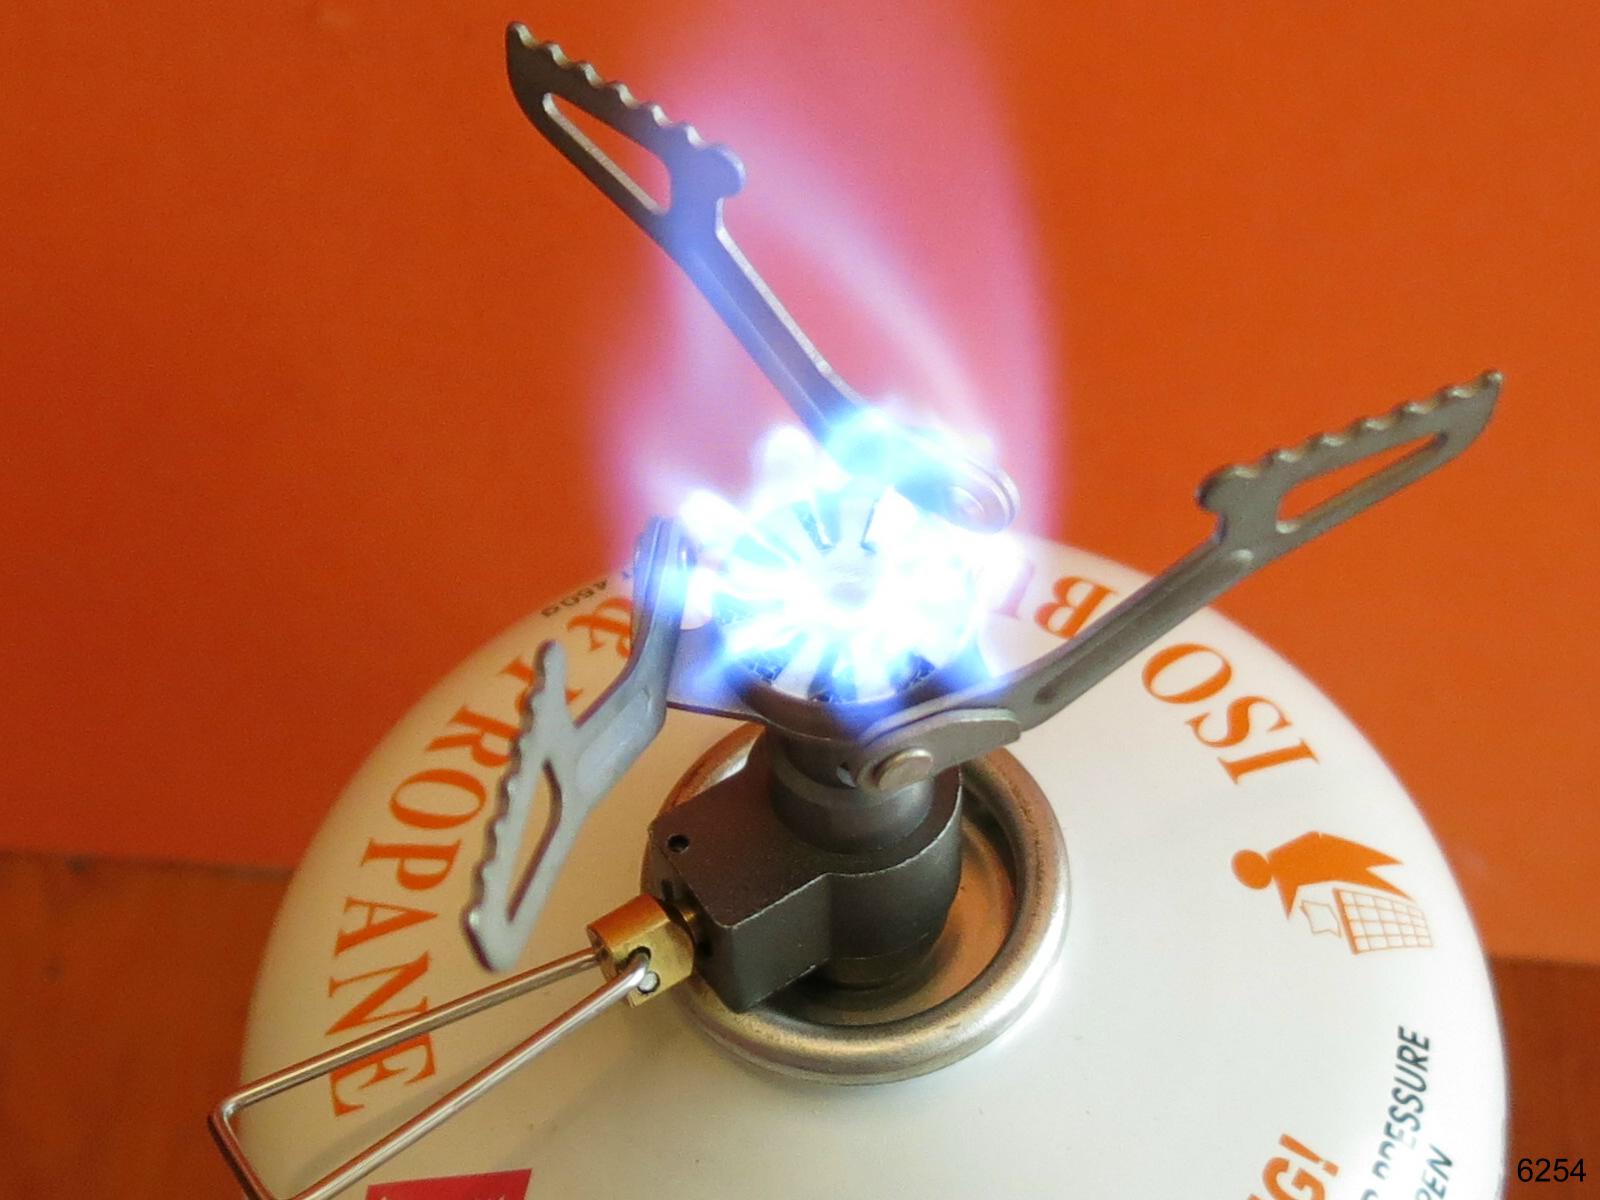
Okay, jumping ahead: what does the V7 stove look like? The photo on the left is a complete stove, running with an inverted canister. The complete stove weighs about 1.56 oz (45 g). The photo on the right shows a running stove fitted out with temperature sensors logging its performance. The data was used for fine tuning of several parts.
One comment about all this: when I am making something large (like a house) then errors of a millimeter or so may not matter, but when the thing is this tiny I have to hold some tighter tolerances, and when I am dealing with propane and butane much care is needed. I try to work to 0.01 mm, which is quite possible with a CNC machine, but not with manual machining.
Member Exclusive
A Premium or Unlimited Membership* is required to view the rest of this article.
* A Basic Membership is required to view Member Q&A events

Discussion
Become a member to post in the forums.
Hi Jim
Not at all!
You made me think. I don’t have to use a cyanoacrylate after all: a silicone adhesive works just as well. The idea if a slightly roughened surface was brilliant.
The key point here is that the adhesive does not have to fully anchor the PFA tube in the inner sleeve. The SS braid and the crimps provide all the strength needed. The silicone just helps keep the tube where I want it. And there is an added benefit of using a gap-filling adhesive here: it serves as a backup to the Viton O-ring.
We advance, 4 sides of a triangle at a time.
Cheers
More progress report
Then I ‘burn test’ each stove to make sure every one works. Well, unexpected trouble when I did that. They ‘worked’ but with quite limited power, and not in just one stove but in the several I tested. Not at all what you want in the mountains when you are trying to melt snow into water. What had gone wrong?
Checking back through previous models, I found that the bore in the stove body into which the Heat Exchanger fitted, had shrunk. It used to be 3.3 mm, but this had been reduced to 3.2 mm This is for a HX rod nominally 3.0 mm OD. Surely a clearance all around of 0.1 mm over ~5 mm should be OK? Well, possibly so, but the 3.0 mm OD for the rod was not what I had in practice. Oops.
So I bored out the hole in a stove body to 3.3 mm, inserted the HX rod, and retested. The stove roared.
The saga continues.
Cheers
Roger, how do I get in line to buy a V7?
My shop consists of a screwdriver, a crescent wrench and a hammer…….so I won’t be building my own inverted canister stove any time soon……..
Hi Gary
Email me: bushwalkingroger@gmail.com
All will be revealed. :)
Cheers
AAAaarrrggghhh
I think I mentioned in the article that I test each stove, first with 100 psi pressure from my compressor with the whole system under water, then a ‘burn’ test on the bench to make sure it works properly.
So I was pressure testing, and two stoves failed. Odd, very odd.
The failures were at the place where the hose goes into the canister connector: a stream of bubbles. I stripped the joints down, cleaned them, reassembled them, and retested. They still failed. But all the rest passed.
OK, back to the lab for forensics. The hose is 2.0 – 2.05 mm OD. Check. The 6x2x2 O-rings have a 2.0 mm cross section (CS), so the OD outside the O-rings should be 6.0 mm. In the failures, the OD was less, to the point of just not sealing in the 5.6 mm bore. Huh?
Eventually I had to carefully measure the cross-section of the O-rings involved. How very odd: the failures seemed to be about 1.8 mm CS. Um … Oh. An imperial sized O-ring can have a CS of 1.78 mm. More measurement, and it seems as though the vendor has allowed some BS005 O-rings to get into the metric 6x2x2 bin. They are very similar, at least in appearance.
That meant I had to strip every completed stove down and check the hose O-rings. Two more bodgie ones found. They were replaced with some (measured) 6x2x2 O-rings. The previous failures were also fixed.
Back to testing.
Cheers
More testing of O-rings. I think the whole batch was BS005 rather than 6x2x2. They are all ‘undersize’.
Insert rude words here.
Fortunately I had recently bought a second batch of Viton 6x2x2 O-rings, this time from a different vendor. I have checked: they seem to be what they should be.
Onward.
Cheers
Priming for a liquid fuel start
If you are trying to start an inverted canister stove with the canister already inverted, something less than desirable may happen. You can get liquid fuel coming out the jet immediately, without vaporisation (assuming cold weather). When the liquid fuel comes out the jet a flare-up is definitely possible. Tall wavering orange flames. These may not be good for your eyebrows or your tent.
Handling this sort of a start can be bit tricky if done incorrectly, but it can be done smoothly. The problem applies especially to Powermax canisters, which can only give a liquid feed. Commercial inverted canister stoves usually have a preheat tube over the top of the flames, but my V7 stove does not: it uses a Heat Shunt instead. On the other hand, the V7 is meant for use in the snow, and the Powermax canisters are very light, so there has to be a way.
The secret to handling this problem with a V7 stove is to start with an extremely small flame: definitely NOT with a large one. Start with the control valve almost closed, because what will come out may well be liquid fuel. Forget any idea of ‘power priming’!
Note that it may take a little while for the fuel to come down the hose to the burner head. The hose was originally full of air you see. Don’t open the valve more to hurry this up: that just takes you back into flare-up territory.
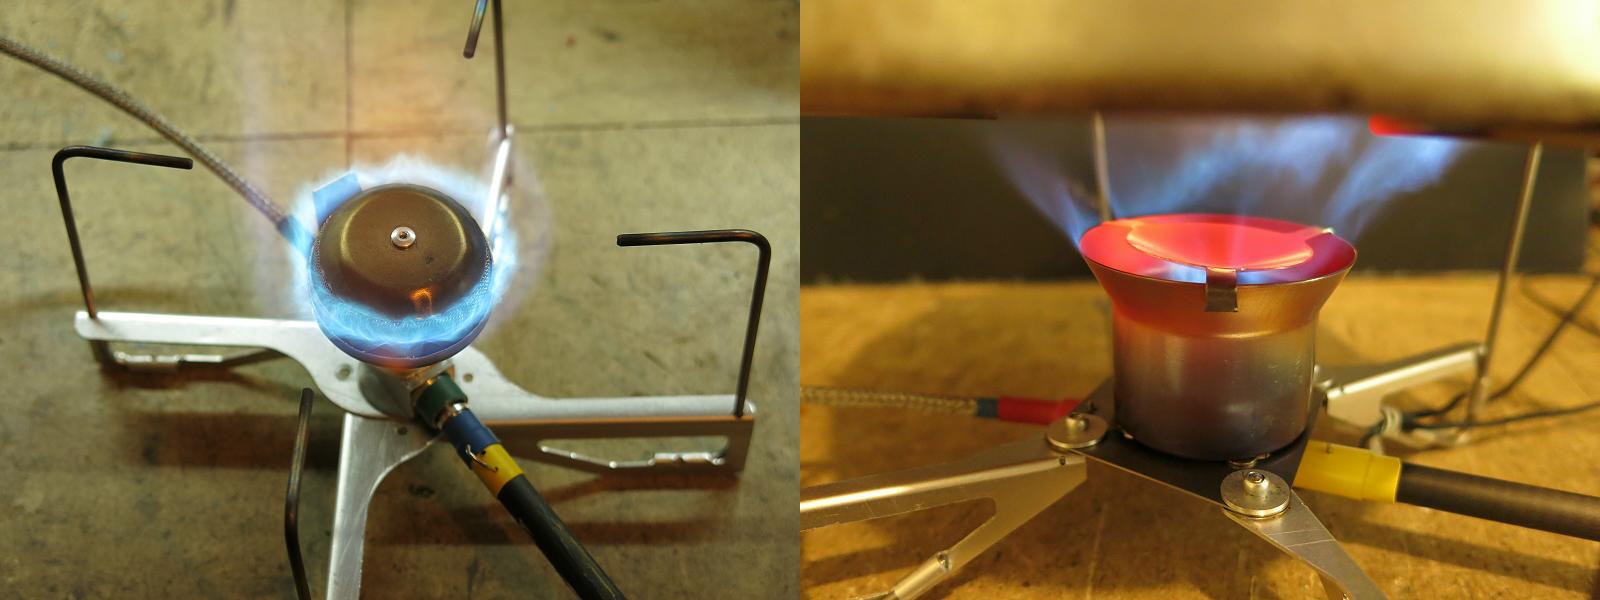
In the photo on the left we have quite a small flame (the camera makes it look bigger than it is); on the right we have a very small flame. In fact, it is hard to photograph a flame without it appearing bigger than it is. Anyhow, this is the way to smooth operation.
How does this work? There are two things in play here. The first is that you cannot get much of a flare when the liquid flow is minute: the heat of the flame vaporises the liquid fuel below it at once. The second thing is more cunning.
While the flame is extremely small, it is nonetheless hitting the top end of the Heat Shunt (HS) full on. That’s the strip of aluminium sticking up to the left of the burner head. The HS is getting hot fast, and that means it is taking heat down to the hose connector inlet. Here it will serve to vaporise the fuel.
In fact, the HS gets hotter under these conditions than when the stove is flaring, because a flare often goes over the top of the HS, almost missing it. With a little flame, the tips of the flame hit the top of the HS very nicely. We can see this with my data logger.
This log of operation shows graphically what happens when the stove is (deliberately) allowed to flare. The temperature of the top of the HS (blue) goes up and down like a yo-yo as I close and open the control valve, trying to prevent a disaster. The bottom of the HS gets a little warm, but only a little. The result is not heating the body at all for a long while.
The dip in temperature at the HS tip shortly before 200 seconds is where the stove was almost shut down because of a big flare. It was time to show what should be happening. At that point the tips of the flames came to bear on the top of the HS, and the flames started to heat the HS properly. Prior to that the liquid fuel was evaporating where it spilled out of the hose inside the stove body, sucking energy out of the cold stove body. While this was happening, the flaring flames were going straight up, past the HS, not really doing very much for it.
However, once the flames were heating the top end of the HS properly, the bottom end of the HS and then the stove body temperature started to climb – but only then. Once the body got a little warm, the fuel was able to vaporise without sucking too much heat out of the aluminium. Finally the flame settled down, after ~230 seconds.
But a lot of fuel can be wasted getting there with the liquid feed if you go too fast. Start real slow, allowing maybe 20 – 30 seconds warm-up, before you ramp up the power. Mind you, you don’t have to waste any of this fuel: I put the kettle on the stove as soon as the flame is lit. The flame energy is going into the water, even if the stove is on low.
Flares can be annoying. Another methode is to apply a flame to the stove body/heat shunt for about 5 to 8 seconds, letting it warm up a bit.
True. Can do.
Cheers
Can you start the stove with canister right side up. Wait maybe 10 seconds for shunt to heat up. Then invert canister?
Roger said:
Handling this sort of a start can be bit tricky if done incorrectly, but it can be done smoothly. The problem applies especially to Powermax canisters, which can only give a liquid feed.
Hi Jerry
Can you start the stove with canister right side up. Wait maybe 10 seconds for shunt to heat up. Then invert canister?
Exactly.
Canister right side up gives a gas feed. No problem, start that way. But note that this does not apply to Powermax canisters: they can only give a liquid feed.
I would however recommend 20 seconds at very low power before inverting the canister rather than 10 seconds. Trying to prime at a higher power will not work: it can even take much longer.
So why are Powermax canisters different? Because they have an internal ‘dip tube’ designed to always give a liquid feed. This is what the insides look like.,

Cheers
aren’t powermax canisters no longer available?
I saw 2 canisters on ebay for $90
I wonder if I can sell my incandescent bulbs on ebay for big bucks?…
Jerry, I usually run that way later spring/summer and early fall and do not bother switching to liquid feed. Once the temps dip to around 40-45F, I do it your way. Be aware that the older valves (on the V1) often change the power settings when switching between modes. not sure why that is, but I guess the heat/pressure bleeds back to the canister and the mode between gas/liquid likely happens after the valve for up to a minute after lighting.
Roger, IFF this is the case, the heat shunt should be placed before the actual valve, not on the back side. Just a thought…
the heat shunt should be placed before the actual valve, not on the back side.

It sure is. I would not call the socket for the hose connector the ‘back side’ myself.
Liquid fuel comes in at the left through the grey tube (PFA hose). It then goes past the bright light blue/green Heat Exchanger (HX) to the needle valve (purple). But note the position of the Heat Shunt (HS): the vertical red bar sitting as it were between the hose and brown O-rings to the left and the pale green body to the right. The HS is firmly bolted to the stove body so the energy (heat) coming down it from the flames at the burner head goes into the stove body before the HX. That energy heats both the stove body and the hose connector (blue nut and pink inner). While the HX is probably the major source of energy going in to the liquid fuel via the thin film, the energy going from the connector through the grey hose is also significant.
HTH
Cheers
Commercial inverted canister stoves usually have a preheat tube over the top of the flames, but my V7 stove does not:
Reconfigure your shunt so it goes into the flame ;-) because you said the flame goes over the top of it if valve is opened a little too much at first when….
I am pretty sure that the aluminum would melt in that configuration. My 2 cents
Use an alternate shunt material?
Enjoyed the article and the progression of steps to complete the project.
Might be helpful if you posted pictures (or a video) of the stove packed up for a trip and assembling it for use in the field.
Reconfigure your shunt so it goes into the flame ;-) because you said the flame goes over the top of it if valve is opened a little too much at first when….
…
I am pretty sure that the aluminum would melt in that configuration.
I have used a Heat Shunt with the top bent over, but eventually I chose to not do it that way, for two reasons.
Put the tip of the HS right in the flame and indeed, it could get close to melting. That would be a worry, wouldn’t it?
Not having the tip bent over still gets the stove body to 100 C or more when going properly, so a flat design is enough.
I guess I am inclined to the softly softly approach.
Alternate HS materials are possible: consider copper and brass. Copper has a slight advantage over aluminium in thermal conductivity, but is several times as heavy. Brass has poorer conductivity as well as being heavy. Other metals such as steel and titanium are far less conductive and still heavier.
The bottom line is that aluminium works well, and is light.
More photos – I will see what I can do.
Cheers
If the aluminum melted it wouldn’t matter. It would melt away leaving the part of the shunt that is just barely in the flame so it wouldn’t melt.
It would automatically trim its length to the perfect length.
“Not having the tip bent over still gets the stove body to 100 C or more when going properly”
“When going properly ”
For a Winter Stove? We want an easy to operate stove ;-)
Easy to lite stove, out lives may depend on it :-)…
Will the Heat Shunt in its current form melt? I think not. This data was taken while bringing water in a Trangia kettle (blue rising line) to the boil.
The tip can get over 200 C, but aluminium has a melting point of ~660 C. This graph may be found towards the end of the article with explanations for the markers.
Cheers
Dan-Y wrote:
For a Winter Stove? We want an easy to operate stove ;-)
Easy to lite stove, out lives may depend on it :-)…
Too right!
Attach canister connector to canister
Sit stove upright on little ply base with valve shut
Open canister valve (safety valve, on or off)
Gently open needle valve with Bic lighter flame next to it
Adjust to low flame for priming, sit pot of water on stove immediately
After ~20 seconds, turn stove up
Cook dinner
I build my stoves for these conditions.
Cheers
Thanks, Roger.
Become a member to post in the forums.