Background
Why should we use a complicated remote inverted canister stove in the snow? Very simply, because propane boils under -40 F (-40 C) but n-butane only boils at 32 F (0 C). To understand what this means, look at the pressure/temperature curves in the graph below. The pressure axis is relative to ambient (pressure), which is the nominal ‘zero’ here. We will only get gas out of a canister if the pressure in the canister is greater than the ambient.
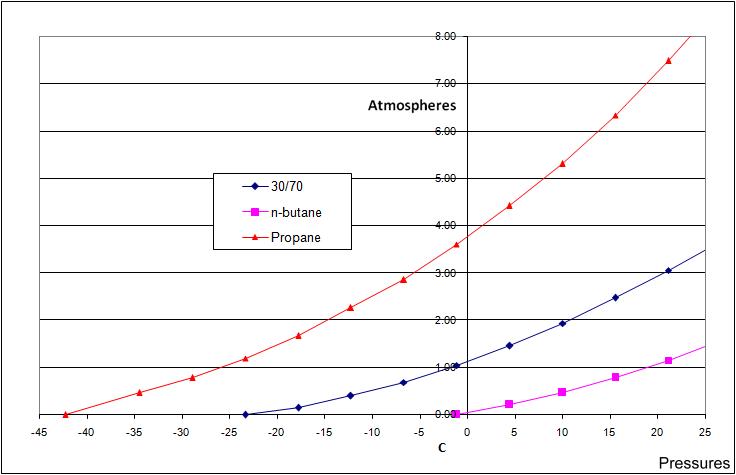
If we run an conventional upright canister stove on a 30% propane / 70% n-butane canister at -4 F (-20 C) the propane will get used up but the n-butane (two-thirds of the contents) will be left sitting there in the canister doing nothing, and we won’t get hot coffee (or hot dinner). This is a very well-known winter problem.
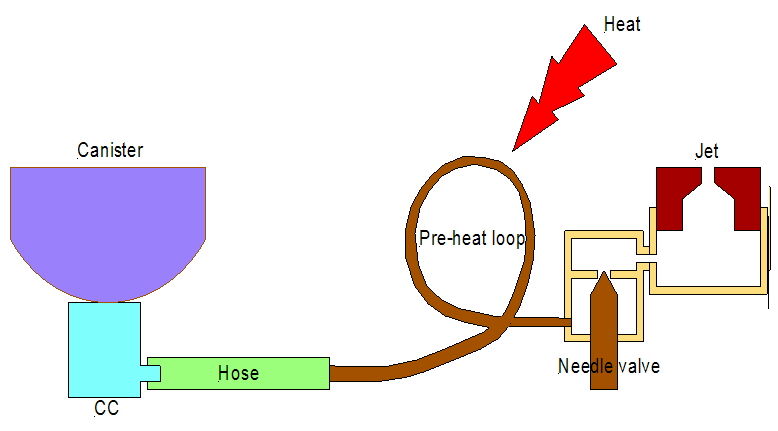
However, if we separate the canister from the stove with a hose and invert the canister, we will get liquid fuel in the original 30%/70% mix coming out the bottom of the canister and going down the hose to the stove, and this ratio will apply right to the end. This is illustrated in this rather basic drawing from long ago. But the drawing still applies.
This way we can use every last bit of the fuel in the canister. The catch is of course that we have to vaporise the liquid fuel before it reaches the needle valve in the stove so that it does not come out in blobs and flare-ups. For this we need a proper ‘remote inverted-canister winter stove’. They are available commercially, but many of them are big, clumsy, and heavy (and expensive). Interestingly, canister stoves in general are significantly more powerful than the old (traditional) petrol and kerosene stoves. Myths otherwise persist, but that is how it is.
I’ve made remote inverted canister stoves for the winter before. Below are my last two – the V4 and V6 stoves.
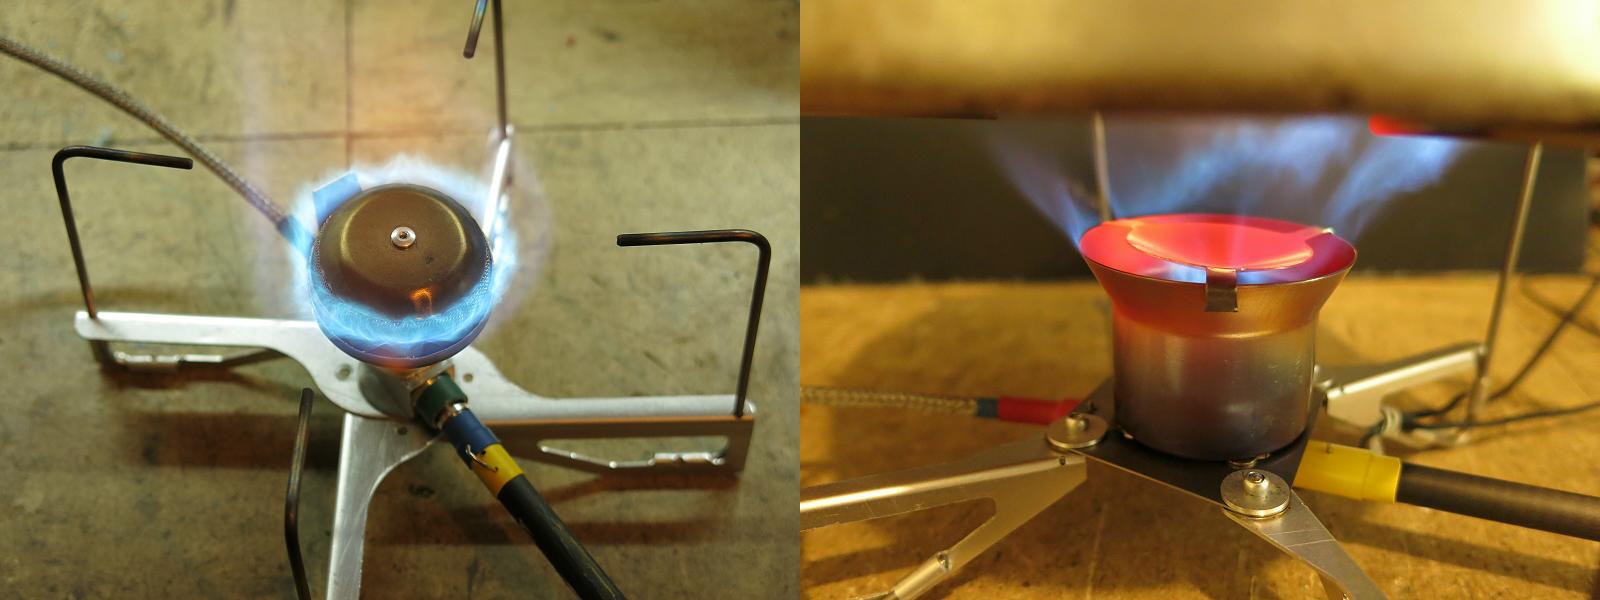
The V4 on the left has a ‘standard’ upright burner design; the V6 on the right has a less conventional Vortex burner design. For more on these stoves, see the articles here on BPL:
- MYOG: DIY Ultralight Remote Inverted Canister Winter Stove – Version 4, Part 1 – Backpacking Light
- MYOG: Remote Inverted Canister Winter Stove – Version 6
TOC
Table of Contents • Note: if this is a members-only article, some sections may only be available to Premium or Unlimited Members.
The V5 Stove – Which Didn’t Happen
After making the V4 stove, I tried making an improvement on the burner head. It was to be called the V5, but I was never happy with the results, so it didn’t happen. Part of the trouble was that I do not have the facilities for stamping and hot forming sheet titanium, which seems to be a feature of most commercial stoves. I abandoned the idea and went on to make the V6 Vortex stove (Yes, I like the Vortex design). The V6 does involve some forming of titanium for the flared top of the chamber, but not much. I can do that in my hydraulic press using a softer titanium alloy found in tubing.
But . . .
My remote inverted canister stoves are considerably lighter than similar commercial models and I thought I had finished, but after a while I began to wonder whether they really were the limit of what could be done. Rather than conventional thinking along the lines of a V5, I began wondering just how much lighter could I go? Not just small changes to the burner, but more significant changes to the whole stove: including the canister connector, the hose, and the stove body itself. Also, it seemed to me that both the V4 and the V6 might be a bit of an overkill for a solo walker (although very well-suited to a party of 2 or 3).
This led me to a real change of focus from UL to SUL. And so the thinking and designing began (all over) again. Well, it is something to do on a rainy day.
So… The V7 Stove
I will only give a few snippets here about the V7 stove; the subsequent ‘chapters’ will give all the details. But, briefly, since the aim was to go from UL to SUL, how do you do this?
While I am fond of my Vortex design, I did not think that making it much lighter would be possible. One of the limitations is the availability of thin-walled titanium tubing to make the vortex chamber, which by itself weighs 0.5 oz (14 g). The stuff I use has a 0.5 mm wall thickness; most available Ti tubing has a wall which is 1 mm thick or greater – double the weight at least – and the aerodynamics of the vortex inside the chamber meant I could not make it much smaller.
So it looks as though it might have to be a more conventional upright burner design, like the one in my original V1 or V4 stoves. As noted above about the V5 stove, making an SUL burner head with my facilities is unlikely. So, as with the V1 stove, what about using the burner head off a commercial stove for it?
For the V1 stove I used the Korean FMS-300T (weight: 1.45 oz / 41 g). The second choice was an FMS-116, with a weight of 1.66 oz (47 g). Both are good stoves, but that was back in 2008; is there anything lighter today? Yes, the BRS-3000T stove, with a remarkable total weight of 0.88 oz (25 g) and a power rating of 2.7 kW – and an ebay price as low as US$12.50 posted. (There are some poor imitations of the BRS design around the web, I recommend avoiding them.) If we remove the base from the BRS-3000T stove, we are left with a 0.46 oz (13 g) burner head unit. Amazing stuff.
The BRS-3000T must have sold in the tens of thousands, and it is a bit of a cult stove (neat, light, cheap, powerful, pick any four). It has its critics, but my impression is that much of that seems to derive from misuse and overloading. The rest of us have no problems with it.

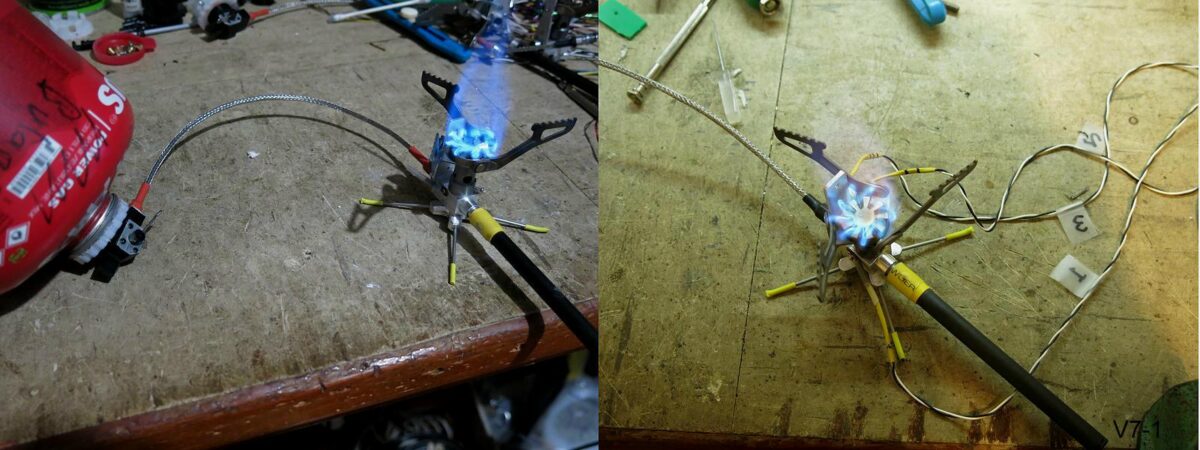
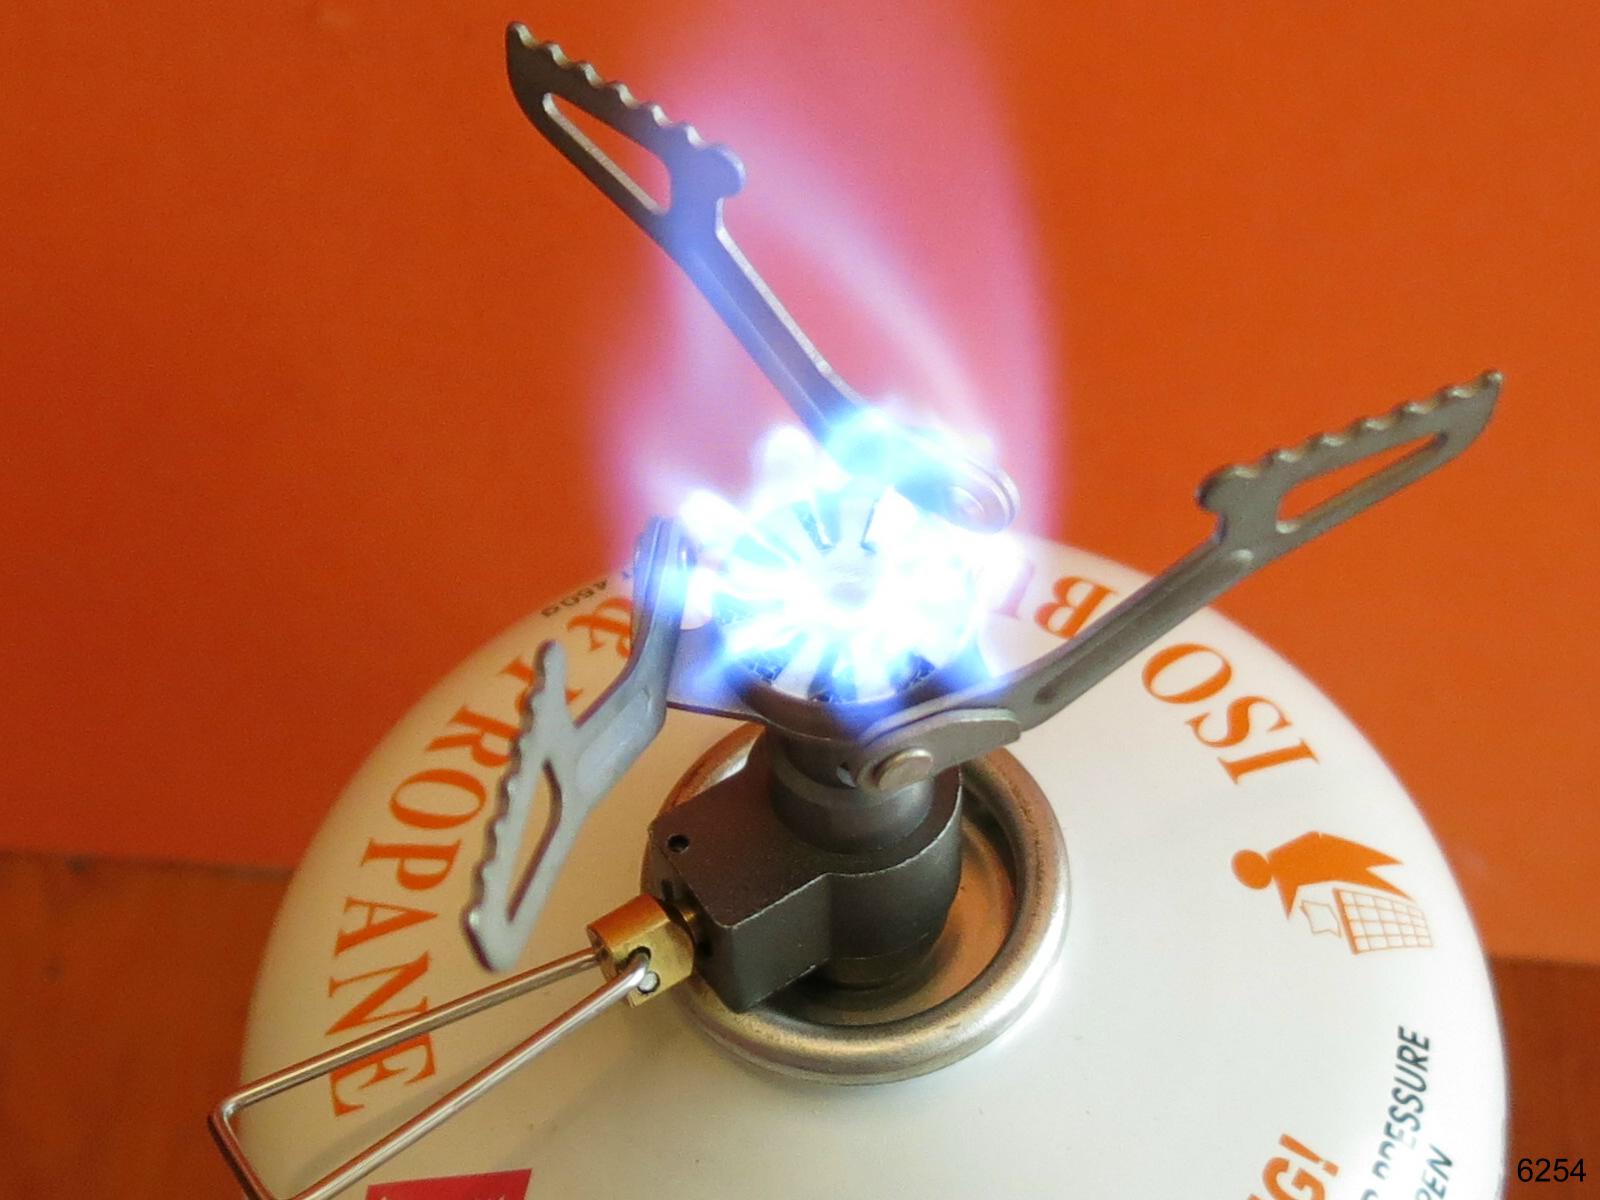
Okay, jumping ahead: what does the V7 stove look like? The photo on the left is a complete stove, running with an inverted canister. The complete stove weighs about 1.56 oz (45 g). The photo on the right shows a running stove fitted out with temperature sensors logging its performance. The data was used for fine tuning of several parts.
One comment about all this: when I am making something large (like a house) then errors of a millimeter or so may not matter, but when the thing is this tiny I have to hold some tighter tolerances, and when I am dealing with propane and butane much care is needed. I try to work to 0.01 mm, which is quite possible with a CNC machine, but not with manual machining.
Member Exclusive
A Premium or Unlimited Membership* is required to view the rest of this article.
* A Basic Membership is required to view Member Q&A events

Discussion
Become a member to post in the forums.
Companion forum thread to: MYOG: SUL Remote Inverted Canister Winter Stove Version 7
Roger Caffin details the process of designing and constructing the newest version of his SUL Remote Inverted Canister Stoves
Thank you! I’m looking forward to the future posts!
Hi Kevin
One thing which may not have been too clear in the article is that as the size has shrunk, the tolerances have had to tighten. Well, that figures of course.
And with the CNC, it is certainly possible.
Cheers
Thanks Roger! A nice lookin’ stove and quite light.
Roger,
Excellent article, design and analysis, obviously you spent many hours on this and it shows. I look forward to more details about the development. Incredible amount of engineering and execution went into this design,I am quite impressed.
From a consumer standpoint, there are some things that are extremely attractive about this design. Again, from an SUL viewpoint it’s the weight. But secondarily, it is about the ability to use a cheap, full windscreen to add wind robustness is the killer for me. You take a cheap, simple canister topped stove and transform it into a robust remote stove. What you lose in simplicity, you gain in real world performance.
From an engineering perspective, the pre-heat system is a crazy good design. I suspect that a majority of SUL backpackers do not go out in sub zero temperature. It would be interesting to see how the design would evolve if a pre-heat was not required. If it were stripped down to a bare minimum, it could be a real game changer.
One could take the BRS 3000t along with the MSR Lowdown as a competitor.
BRS 3000t $16 and 26 g
MSR Lowdown $41 and 6.2 oz (176 g)
Total $57 and 202 g
You are probably not interested in going mainstream but IMO a sub $100 system that weighs under 50 g would be an outstanding product.
Some notes on your article
Complete stove -45 g. outstanding!
.01 mm tolerance – As we use to say “ fine, at what temperature?”
Excellent chart on internal canister pressure versus temperature. Did you measure it or reference it? Just curious.
Why make custom jets? What is the advantage?
Exceptional thermal data collection
Such a thorough design, Roger. I’ve often thought that a device like an MSR Low-Down (paired with a BRS-3000t) would be great if it weighed less (and had a heat shunt to vaporize the gas). You’ve gone soooo far beyond that. :)
I suspect, but have only partially proven, that a windscreen or heat shield can be designed that out-performs an HX pot at a fraction of the weight. Heating the sides of the pot exposes more surface area than the fins on an HX pot, without adding more than a few grams to make a taller titanium foil windscreen. A remote canister stove makes this easier (maybe safer) to implement, as Jon points out.
Maybe overheating the stove must be considered as well? Similar to protecting the canister on an upright stove.
Excellent design & information Roger. I assume CO (carbon monoxide) production is very low (?) with this design. :-)
obviously you spent many hours on this and it shows
Hours?
Months! Many months. Ho hum – about 12 months in fact.
interesting to see how the design would evolve if a pre-heat was not required.
As mentioned in the article, I did try without the Heat Exchanger, and that idea failed. I suspect that the lack of a Heat Shunt would be even worse.
but IMO a sub $100 system that weighs under 50 g would be an outstanding product.
It would, wouldn’t it? :)
.01 mm tolerance – As we use to say “ fine, at what temperature?”
Actually, over a fair temperature range. The reason is that the materials are generally carefully matched: aluminium against aluminium and plastic against plastic. There is one place where aluminium is inside plastic, but clearance was allowed for that. The use of O-rings helps of course (well, is critical).
Excellent chart on internal canister pressure versus temperature. Did you measure it or reference it?
That is just standard engineering text book stuff. Reference.
Why make custom jets? What is the advantage?
Two answers for that. “Standard” jets are much bigger and bulkier, and I have not found a source for them. OK, third answer: a small amount of pigheadedness?
Maybe overheating the stove must be considered as well?
Well, yes, but only sort of. The stove part is designed to work at about 100 C anyhow, to make very sure the liquid fuel is vaporised. All stove parts are rated to over 200 C. So “overheating” is not really an issue.
I assume CO (carbon monoxide) production is very low (?) with this design.
Right. In fact, CO production with the V7 is just the same as with the upright BRS3000-T stove. And that is known to be very low.
Cheers
I found some custom jets on ebay! For some curious reason Primus kerosene stoves seem to need spares. However, while the average jet size for canister stoves is 0.30 mm, these Primus jets are all 0.50 mm: about 3x too big.
Cheers
If anyone is interested, please email me direct at bushwalkingroger@gmail.com .
I find the PM system a bit too difficult for this sort of thing.
Cheers
Ryan – Now would be a great time to do a stove bench test of remote inverted(able) canister stoves and include Roger’s latest iteration…
Probably worth a seperate thread as to not detract from this one but has anyone found the StoveBench Test metric of any value? If so , how did you use it and how did it add value? Inquiring minds …
The idea of finding a test that could be repeated for many stoves is a good idea. However, the choice to test at full throttle seemed fundamentally awkward to me. It isn’t real-life, and it resulted in questionable outcomes.
I understand that it was one way of trying to adjust for fuel flow, but I don’t think it produced the results that we all wished for.
Bill, I pretty much agree. Full bore is always questionable in my mind. It ends up only testing those stoves that work well at full throttle. Some can have flames that lift. Some produce gobs of CO, as Roger has reported several times. Others are intentionally limited by the intake of air to mix with the Butane/Propane blends and do not perform well at full bore. The test does NOT reflect how a stove would be used in the field with one or two people and a half or one liter of water. It is, however, useful as a full power test.
The big thing is there is no real measure of low and mid power efficiency, just on high. I know that I get far better efficiency on lower power. I try to balance that against heat loss in various conditions. This is a more meaningful/more useful metric in my book. But, what do I know, I still think my old SVEA is a fair stove.
The vortex burners seem better in general. The older FM-300t, BRS, and others do well even with relatively small air intakes.
Given that Roger is using the BRS 3000t as the burner componet, this chart is probably relavent. This is the fuel consumption verse time to boil water.
Ryan reported 4 out of 7 failed in his stove bench testing. ….bummer
I have had 0 failures on the bench and in the field.
I don’t know what went wrong for Ryan.
But what I can say is that you can NOT melt titanium with a propane flame. It is just not hot enough. It is used to make the nozzles for space rockets.
Cheers
Thanks, Jon! Good info…
I try to keep my runs around 6-9 minutes, usually 500ml/at around 60F. Note that ambient temps can alter your chart rather drastically, both Air temp/pressure and Water temp. I usually set the stove temp once and do other things around camp.
I dug through my files and found a better chart. This one comapres the Soto WindMaster to the BRS 3000t. This one graph shows a particular benefit to regulated stoves: a narrower dynamic output of the flames. As Roger has pointed out, an experienced user doesn’t need a regulated stove. From my work with alcohol stoves, it seems like most canister stove perform efficiently when you dial back the power output to 400 watts-600 watts. My 2 cents.
Jon, Thanks!
Hikin Jim had an issue about the same time as Ryan had his failures.
Photo of Jim’s stove lisping to the side due to support arm bending due to ???
https://adventuresinstoving.blogspot.com/2017/02/the-brs-3000t-worlds-lightest-stove.html
From hiking jim – one arm bent sideways causing the pot to list to that side:
It doesn’t have to be so hot that it melts the metal, it just has to weaken it so it will bend easier.
I have a BRS3000 that I’ve used with no problem. Maybe keeping the stove on low helps. Maybe there was a batch of stoves with metal that had a lower melting temperature
Therre is no doubt that the BRS 3000t had a one time reliability issue. My guess is that it was a manufacturing hiccup that has been resolved and has been put to bed. Realistically, if a stove manufacture had a persistent failure rate of 4/7 (57%) they would be out of business. Given the massive volume of BRS 3000t sold, even a 2% to 3% field failure rate would be a disaster on a high volume/ low cost product. I believe that there is sufficient data out there to say that the sagging is currently a non problem. Now, if only they could fix the feable performance in the wind…… My 2 cents.
who makes BRS3000?
it’s not a company like MSR or SOTO that wants to maintain it’s reputation
on Amazon there are many “brands” for BRS3000. Are those different companies that make them, or do the different “brands” all buy from one company that actually makes them, or …
would one “brand” maybe buy some parts from different suppliers that charge less but have lower quality?
Like Roger said: “They don’t really melt, they overheat and slowly bend under the weight and a full pot of water and food.”
Hikin Jim said:
Recommendations
I can’t exactly give a good recommendation to a stove that failed during testing. Neither can I give a stove that handles wind so poorly a good recommendation.
Again, however, I’m aware that there are plenty of people who are using the stove and are not experiencing problems. It’s an inconsistent stove. Maybe you’ll get lucky. Maybe you won’t. Clearly there are duds out there, and even if you don’t get a dud, the right wind conditions could still cause a pot support failure. Also, your pot supports could fail over time, as they did in Failure #3, above.
I suggest the following:
Run the stove for 15 minutes on high with 2 cups of water on before taking it out on the trail for the first time. If your stove can handle a 15 minute run on high at home, then it’s probably going to be OK out on the trail. If it fails at home, just buy another one. It’s not like they’re expensive. The chances of getting two duds are fairly low I would think.
Make absolutely certain to shelter the stove from wind. If you fail to shelter the stove, wind may channel heat to a single pot support which may deform and fail. You should always shelter a stove anyway so that you’re not burning through an inordinate amount fuel, but it’s particularly critical on the BRS-3000T.
Run the stove at about 50% to 75% of full flame to avoid overheating the pot supports. It’ll take a little longer to boil, but you’ll actually save gas this way, and you won’t have so much heat blasting the pot supports.
If you wanted to really play it safe, you could limit the amount of water boiled at any one time to, say, 500 ml. You could also run the stove for no more than maybe 5 or so minutes at a time, give or take, and you could let the stove cool a bit between successive boils
Long Term Reliability
What impact will repeatedly blasting the pot supports with high heat have? I have received reports from people who had good results at first but whose pot supports deformed over time. So, there is the possibility that even if your stove is good at first that it may experience problems over time.
Alternatives
BRS has a history of problems; some BRS stoves have been banned by countries in Europe due to repeated safety problems.
Become a member to post in the forums.