
Introduction
The big question with heat-exchanger (HX) pots is whether the much-vaunted improvements in gas efficiency are worth the extra weight of the pot. That is, given some weight saving in gas, how many litres of water must you boil to compensate for the heavier pot? This article attempts to answer that question using a test apparatus that I built myself to ensure accurate, real-time data collection.
Background
Some time ago Backpacking Light Member Dan Y bought some very inexpensive HX hard-anodised aluminium (HAA) pots from eBay, and sent a couple of them out for review. (I was one recipient: thank you Dan.)
The details for those interested:
- Volume: 1.2 L
- Weight: 174 g without handles or lid (270 g with steel handles & plastic lid)
- MSRP: USD $17.30 with free shipping from eBay at the time of writing.

I love measuring things, so I decided to resurrect the electronic measurement system I had used for my series on Carbon Monoxide Testing of Stoves. This allowed me to measure several data streams at once under laboratory conditions: water temperature, canister weight, and some other temperatures. I could then test several different pots under different conditions. For this, I used a new experimental remote invertible canister stove (V4) which I was working on at the time. More on that another day.
Methodology
Testing Apparatus
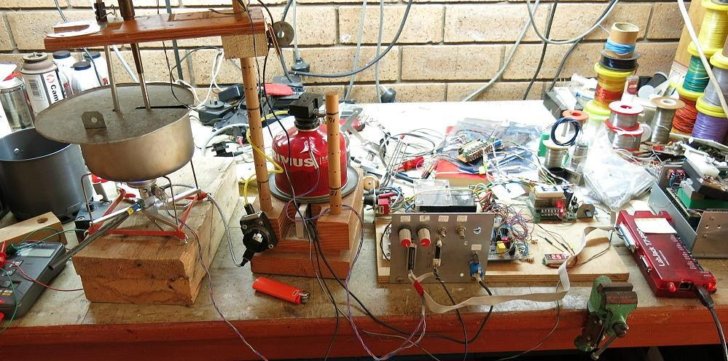
I could of course just used a stopwatch for the time and some scales to weigh the gas canister before and after the event, but I prefer to see what is going on during the process. The sort of results obtained are shown further on.
The Pots
- HAA HX pot sent by Dan: 1.25 L, 130 mm dia x 100 mm height, 174 g
- Same HX pot but with fins stripped right off, 144 g
- Small MSR Titan (Ti) pot: 0.85 L, 110 mm x 80 mm, 88 g
- Medium MSR Titan (Ti) pot: 1 L, 140 mm x 65 mm, 82 g
- Large MSR Titan (Ti) pot,: 1.6 L, 160 mm x 185 mm, 116 g
- Large HAA pot: 1.7 L, 150 mm x 100 mm, 123 g
The Titan pots are the ones I use in the field on longer trips. I use an aluminum Trangia kettle for morning tea on day walks.
Test Conditions
There were two different variables here (apart from the pots themselves):
- Flame height or power
- Windshield present or absent
I used 500 mL of cold tap water for each test.
I used Primus Winter gas or Power gas for these tests: apparently the same gas but different coloured canisters. We explored the marketing claims about winter gas already.
The canister was left upright for all the testing. This would have the inevitable effect of varying slowly the ratio of propane to butane from test run to test run, but since the gas consumption was low and the room temperature was >20 C, I did not think this was very significant. The gases do have fairly similar energy content by weight anyhow (mainly from the number of carbon atoms per molecule).
Keeping the flame power the same between test runs is always difficult. I solved this (at least partially) by leaving the stove control valve mostly untouched between test runs and used the safety valve at the other end of the hose to turn the gas on and off. This was only moderately successful as it did not handle testing over a couple of weeks.
In order to avoid jiggling the canister on the load cell, I actually used two hoses for this: one very flexible (yellow) hose went from the canister to a fixed (black) dummy connector, into which the real stove hose plugged. The very flexible hose isolates the canister from the on/off valve and the stove so there is minimal noise on the data, but I would not use this flexible hose in the field: it would be too prone to damage.
Data Collection
I measured the water temperature in the pot continuously while running a stirrer in the pot to get the best measurement of water temperature. I kept a lid on the pot during each test run. I measured the weight of the canister on a load cell continuously as well: by subtracting the starting weight of the canister from each measurement I could tell how much gas had been used. I also monitored the temperature of the canister and of the stove body during each run.
I calibrated the load cell before each test run by adding a laboratory-grade 50 g mass to the canister and looking at the difference.
I calibrated the temperature sensor using cold water measured with a laboratory-grade glass thermometer for the low end and boiling water for the high end. You can’t use ‘hot’ water for this as the steam coming off the water means it is steadily cooling down, but ‘cold’ water is reasonably stable.
It was interesting to note that it was possible to record a temperature a small fraction of a degree above the boiling point (100 C) when the pot was boiling vigorously. This was a real effect, due to the bubbles of steam which sometimes enveloped the temperature probe: that steam was definitely just above 100 C. Cutting off the gas dropped the recorded temperature back to 100 C quite smartly before it started a slow decay, confirming this diagnosis.
The data logging was done with a LabJack T7 Pro logger with the LabJack software (thank you Toby and Christie at LabJack). The device and software run beautifully. It was hooked up to a PC running Windows 7 and the data was analysed using Microsoft Excel 2007.
Each pot was covered by the same flat steel lid (visible above in the photo of the test apparatus) to prevent loss of steam and consequent cooling. It is well-known that a very low flame with no lid could mean your pot might reach (say) 90 C and never get any hotter. That is one reason why tiny stoves (eg candle stoves) do not work in the field: not enough power. Please note that a ‘real’ lid would more or less seal the top of the pot, but the lid used here has a slot on it for the temperature probe and the shaft of the stirrer. Some heat loss might be expected through this slot, and cooling measurements show this does in fact happen. This is one limitation of the whole experiment.
Results
We will start with some general analysis of the full range of pots before looking closely at the Heat Exchanger pots. Doing so allows us to see more easily where the HX pots fit in.
First of all, here we have the results from a typical test run.
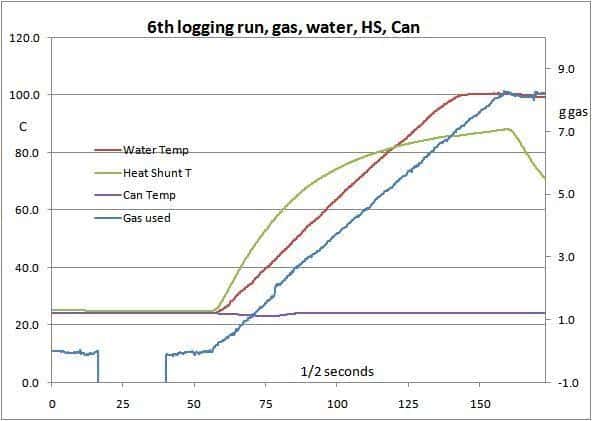
While the results are fairly reliable, there were many variations in test conditions (despite my best efforts), so strict comparisons are not exact. If one did a hundred test runs it might be different – but that would take a lot of time and gas.
The green line shows the temperature of part of the stove body: a matter of interest to me but not relevant here. It starts to fall once the gas is turned off. The flat purple line shows the canister temperature: it stays fairly constant as it is getting some radiation from the stove while it is running and the room is warm.
Flame Height or Burn Rate
Now we look at the range of pots used in this experiment.
The pots used, with their basic parameters are as follows:
Member Exclusive
A Premium or Unlimited Membership* is required to view the rest of this article.
* A Basic Membership is required to view Member Q&A events

Discussion
Become a member to post in the forums.
Take the tall outer titanium shell of an old alcohol or wood burning stove, if you can find one, and use it as a windscreen. Mine has the added advantage of allowing one to use wood chips and metal tent stakes threaded through the slots up top to hold a pot of water. If somehow run out of canister gas, this will work perfectly for cooking. It’s never happened however.
Ryan does not like it when I exercise my Australia sarcasm. Fair enough.
But putting the word ‘efficiency’ over a photo which shows flames going up the side of the pot, right to the top, does not seem encouraging.
Cheers
Gear Skeptic might be having a quiet laugh about it as well.
“The calculation are for a Hemishpere and not a Sphere: That is where the 1/2 came in the formula above. An HX pot will probably be more efficient with material as it is in the plane of the flame spread than the hemisphere as you don’t know how well the flames will hug the surface. My 2 cents.”
Well, I am not sure about the heat transfer through a hemispherical part of this pot design. You will find that heating the pot is only the first phase of heat transfer. The actual goal is to let the heat, warm the water so you can cook/warm up stuff in the water.
As such, a minor exercise in overall physics will show that a sphere has the least surface area for the internal volume. Rather, you can think of the water as totally surrounding the heat source (like the proverbial Dyson Sphere, but on a smaller scale.) I believe they have the mathematics of a hemispherical bottomed pot backwards.
Actually, you would want an inverted sphere around a heat source to gather as much energy as possible from the heat source. Since this is not really practical, an inverted hemisphere is used as an example.
This is constrained by having a gas (generally speaking, everything must be a gas before it can be burned) burn releasing byproducts: CO2, H2O (primarily.) These are hot gases that rise due to gravity/displacement. Soo, a perfect heat transfer would work well. Unfortunately, the trapped air in an inverted hemisphere prevents further entrance by rising gasses from the source.Simply, the heated gas puddles allowing heated gas to flow around the pot. I was getting about a 20%reduction in heat transfer when tested.
In the opposite case, where you have a hemisphere pointed down, but, this allows a smaller volume of heat to be transferred to the water. Surface area vs heat transfer is all opposed to maximum heating effect of the water.
The actual heating effect of smaller surfaces conducting the same heat to the larger internal volume (water in this case) means the outer skin needs to be hotter (10Cal/4sqin or 10Cal/10sqin.) Hence, there is greater opportunity for heat loss due to simple radiation as delta of ambient radiative heat loss. (Generally, ambient radiative heat loss means garbage in equals garbage out, or, GIGO. Heating one side increases radiative heat to the lower ambient side.)
So, if neither a inverted hemisphere nor a hemisphere work well for heat transfer to our water, then the answer lies in a plane as the mostest heat absorption. Ofcourse, allowing heated gasses to transfer the heat a little time to work means a slight ripple in the plane will work. Or, the basis for heat absorption of a heat exchanger.
You can optimize these effects (gas flow, heat flow, heat absorption, etc) by having the depth of each ripple correspond to the average heated gas flow, preventing puddling, but increasing surface area to heat absorption. Of course, the ideal distance changes with the amount of heat generated from the heat source.
In conclusion, a hemispherical heat gatherer, whether inverted or not, does not work the best for heat transfer from our average cooking stove. The compromise is a flat bottom with a resistance to gas flow along the bottom. Roughly speaking, when you can touch the top while heating water, you are doing pretty good.
Marco, I agree 100%. That’s why it is worth watching to see if it really does have an effect or is it all spin. The Switch is more money than I want to spend just to play with it. It will probably take a few months to get a real (actual usage) review on the product. My 2 cents.
OK, so here is a 125 g complete HX cooking system that is MYOG project.
Key performance is that it will boil 500 ml using under 9 g of fuel in an 8-mph wind.
It uses a modified Fire Maple G3 pot, a modified BRS 3000t and a Cheetah JetBoil Windscreen
Here is a more detailed video
That is a tiny windscreen. Yet it seems to work good.
Great video of the completed project, Jon.
4.4 oz total: Nice!
It’s funny. The windscreen works well on the smaller G3 pot but not very well on the G2 pot. The openning of the pot bottom of the G2 is too large to block the wind.
Super impressive Jon, well done!
Regarding boiling 500 mL using under 9 g of fuel in an 8-mph wind, what is your starting water temperature?
All of my test are 500 ml at 68 F (20 C). The 500ml adds a bit of margin over 2 cups (473 ml) and Internationally, few people know internalize the volume of 2 cups (I always got questions about this). 20 C also is better understood Internationally, and makes calculations easier. I use a 5 gallon bucket as a source and at 68 F, I have to add ice cubes in the summer and hot water in the winter to adjust the temperature.
I am impressed by the effectiveness of that tiny windscreen.
Cheers
It has always been my belief that the most underlooked value of a Heat Exchange pot has been it’s partial function as a windblock/shield. Yes, a small windscreen placed at the right spot can make a huge difference. In this case it is quite impressive given that this is using the BRS 3000t, probably one of the most sensative stove in the windy conditions.
Up to moderate wind speeds my Stash pot’s Hx ring is an effective wind block but it’s worth carrying an UL shield for high wind.
Jon,
Can a 4oz fuel cannister and the stove pack away in the cut down pot with the lid on?
How do you find the edge for drinking hot beverages directly out of the cut pot? Too sharp?
I wonder if a straight cut edge is hotter or cooler than a lip edge. On the stash, I need to let tea cool for 5 mins. Your Soto Thermostack lid recommendation is perfect but seems to be unobtanium up here
This is cool!
As Jon mentions there’s lots of improvement waiting in HX pots. I’m spoiled by the low conductivity of Ti and not sure I can go back to burning lips and fingers again with aluminum. With a Ti pot I don’t need pot grabbers.
I wonder what the performance to weight difference is between this system and an equivalently sized non-HX Ti pot with a Windmaster and no mini screen? I seem to remember Jon getting about similar boil times in 8mph
David D – In my testing, the Stash was pretty rock solid up to a 4-mph wind, after that it dropped off. As cut, a 4 oz fuel canister and BRS will not fit. This was cut to the bottom of the rivet hole and was meant to match the TOAKS 550. If it were me, I would make the cut a little higher to store the stove and not worry about the hole (or you could plug it as well). A little extra storage space would be good. The cut edge is not too sharp, but it will be hot. I purchased the Thermostack directly from Soto.
George H – It’s funny, the G3 (600 ml) and the G2 (750) weigh the same. The wall thickness on the G3 is thicker for some reason. Long term, I suspect that HX pots could come down to a 20% premium over a non-HX mug. 15 years ago, the Snow Peak Trek 700 seemed to be the mug of choice, now the TOAKS 550 is very popular due to the weight/volume advantage. HX mugs will probably go through a similar shakedown. Generically speaking, a non HX mug with a good windscreen will double the fuel consumption in calm conditions: 7 g in calm to 14 g in 8-mph wind, this seems to be pretty consistent. The exception to the case may be the Soto WindMaster as I have been able to boil 500 ml in a mug with no windscreen but consumed over 18 g of fuel at 8-mph . A cool feature that I haven’t mentioned is that the Soto WindMaster gets better in the wind with large diameter pot. The larger diameter has a long enough distance between the edge of the pot and the burner head so that the wind is deflected away from the burner head and does not seem to impact the flame profile. Hope that makes sense..
Thanks Jon. Soto doesn’t ship to Canada but there’s always the Toaks lid option.
If I give it a go, I’ll try out a more full coverage windscreen like this, 10g, cut to size and slid under the sleeve. More coverage for shifting wind but might take some tweaking to avoid CO production
Jon,any thoughts on other stoves that might work well with the G3 setup? Something like fms300t or amicus/windmaster?
Like any regular mug, an HX mug will get a performance improvement with a windscreen. For reasons that I do not fully understand, smaller burner heads (BRS, Fire Maple 300t, Fire Maple Hornet II) tend to be more efficient with HX mugs in calm conditions (compared to the Soto WindMaster for example). In higher winds, those same stoves are more sensitive to the wind. I happen to like the Fire Maple Polaris myself. My 2 cents.
Just released a Part 2 video on the MYOG HX pot. The reported weight of the HX mug was off by the weight of the shroud. Good news is all the performance testing is valid and was done before the shroud was removed. I also moved the cut line up in order to better store a fuel canister, the modified BRS stove and make allowance for the Soto Thermostack lid. The weight of the trimmed HX mug moved from 66 g to 88 g and the volume increased from 560 ml to 630 ml. Also, I added data on the impact of pack weight vs boils needed at 2 different wind speed.
Nice. The video states that the 560mL with shroud is 88g, how much does the 630mL with shroud weigh? Grazis tuto
In the video, I cut the stove about 0.2″ above the bottom edge of the lower rivet. This increased the capacity to 635 ml and the weight (including the shroud) was 88 grams. Sorry if that was not clear.
Jon
Become a member to post in the forums.