
Introduction
The big question with heat-exchanger (HX) pots is whether the much-vaunted improvements in gas efficiency are worth the extra weight of the pot. That is, given some weight saving in gas, how many litres of water must you boil to compensate for the heavier pot? This article attempts to answer that question using a test apparatus that I built myself to ensure accurate, real-time data collection.
Background
Some time ago Backpacking Light Member Dan Y bought some very inexpensive HX hard-anodised aluminium (HAA) pots from eBay, and sent a couple of them out for review. (I was one recipient: thank you Dan.)
The details for those interested:
- Volume: 1.2 L
- Weight: 174 g without handles or lid (270 g with steel handles & plastic lid)
- MSRP: USD $17.30 with free shipping from eBay at the time of writing.

I love measuring things, so I decided to resurrect the electronic measurement system I had used for my series on Carbon Monoxide Testing of Stoves. This allowed me to measure several data streams at once under laboratory conditions: water temperature, canister weight, and some other temperatures. I could then test several different pots under different conditions. For this, I used a new experimental remote invertible canister stove (V4) which I was working on at the time. More on that another day.
Methodology
Testing Apparatus
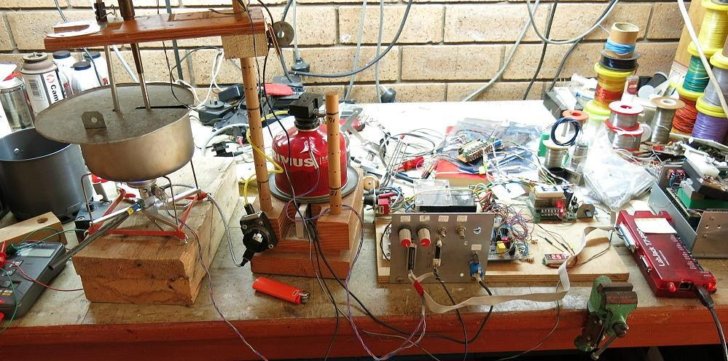
I could of course just used a stopwatch for the time and some scales to weigh the gas canister before and after the event, but I prefer to see what is going on during the process. The sort of results obtained are shown further on.
The Pots
- HAA HX pot sent by Dan: 1.25 L, 130 mm dia x 100 mm height, 174 g
- Same HX pot but with fins stripped right off, 144 g
- Small MSR Titan (Ti) pot: 0.85 L, 110 mm x 80 mm, 88 g
- Medium MSR Titan (Ti) pot: 1 L, 140 mm x 65 mm, 82 g
- Large MSR Titan (Ti) pot,: 1.6 L, 160 mm x 185 mm, 116 g
- Large HAA pot: 1.7 L, 150 mm x 100 mm, 123 g
The Titan pots are the ones I use in the field on longer trips. I use an aluminum Trangia kettle for morning tea on day walks.
Test Conditions
There were two different variables here (apart from the pots themselves):
- Flame height or power
- Windshield present or absent
I used 500 mL of cold tap water for each test.
I used Primus Winter gas or Power gas for these tests: apparently the same gas but different coloured canisters. We explored the marketing claims about winter gas already.
The canister was left upright for all the testing. This would have the inevitable effect of varying slowly the ratio of propane to butane from test run to test run, but since the gas consumption was low and the room temperature was >20 C, I did not think this was very significant. The gases do have fairly similar energy content by weight anyhow (mainly from the number of carbon atoms per molecule).
Keeping the flame power the same between test runs is always difficult. I solved this (at least partially) by leaving the stove control valve mostly untouched between test runs and used the safety valve at the other end of the hose to turn the gas on and off. This was only moderately successful as it did not handle testing over a couple of weeks.
In order to avoid jiggling the canister on the load cell, I actually used two hoses for this: one very flexible (yellow) hose went from the canister to a fixed (black) dummy connector, into which the real stove hose plugged. The very flexible hose isolates the canister from the on/off valve and the stove so there is minimal noise on the data, but I would not use this flexible hose in the field: it would be too prone to damage.
Data Collection
I measured the water temperature in the pot continuously while running a stirrer in the pot to get the best measurement of water temperature. I kept a lid on the pot during each test run. I measured the weight of the canister on a load cell continuously as well: by subtracting the starting weight of the canister from each measurement I could tell how much gas had been used. I also monitored the temperature of the canister and of the stove body during each run.
I calibrated the load cell before each test run by adding a laboratory-grade 50 g mass to the canister and looking at the difference.
I calibrated the temperature sensor using cold water measured with a laboratory-grade glass thermometer for the low end and boiling water for the high end. You can’t use ‘hot’ water for this as the steam coming off the water means it is steadily cooling down, but ‘cold’ water is reasonably stable.
It was interesting to note that it was possible to record a temperature a small fraction of a degree above the boiling point (100 C) when the pot was boiling vigorously. This was a real effect, due to the bubbles of steam which sometimes enveloped the temperature probe: that steam was definitely just above 100 C. Cutting off the gas dropped the recorded temperature back to 100 C quite smartly before it started a slow decay, confirming this diagnosis.
The data logging was done with a LabJack T7 Pro logger with the LabJack software (thank you Toby and Christie at LabJack). The device and software run beautifully. It was hooked up to a PC running Windows 7 and the data was analysed using Microsoft Excel 2007.
Each pot was covered by the same flat steel lid (visible above in the photo of the test apparatus) to prevent loss of steam and consequent cooling. It is well-known that a very low flame with no lid could mean your pot might reach (say) 90 C and never get any hotter. That is one reason why tiny stoves (eg candle stoves) do not work in the field: not enough power. Please note that a ‘real’ lid would more or less seal the top of the pot, but the lid used here has a slot on it for the temperature probe and the shaft of the stirrer. Some heat loss might be expected through this slot, and cooling measurements show this does in fact happen. This is one limitation of the whole experiment.
Results
We will start with some general analysis of the full range of pots before looking closely at the Heat Exchanger pots. Doing so allows us to see more easily where the HX pots fit in.
First of all, here we have the results from a typical test run.
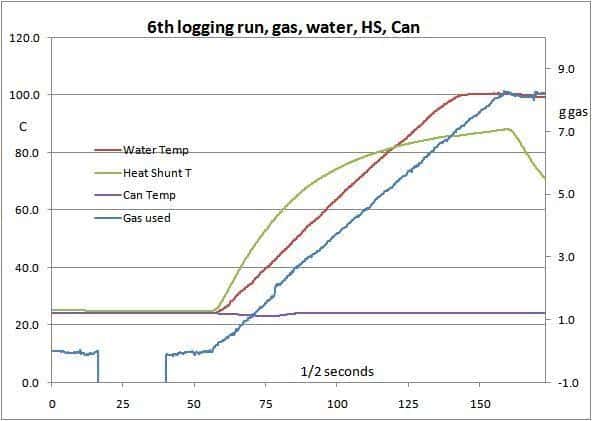
While the results are fairly reliable, there were many variations in test conditions (despite my best efforts), so strict comparisons are not exact. If one did a hundred test runs it might be different – but that would take a lot of time and gas.
The green line shows the temperature of part of the stove body: a matter of interest to me but not relevant here. It starts to fall once the gas is turned off. The flat purple line shows the canister temperature: it stays fairly constant as it is getting some radiation from the stove while it is running and the room is warm.
Flame Height or Burn Rate
Now we look at the range of pots used in this experiment.
The pots used, with their basic parameters are as follows:
Member Exclusive
A Premium or Unlimited Membership* is required to view the rest of this article.
* A Basic Membership is required to view Member Q&A events

Discussion
Become a member to post in the forums.
Companion forum thread to: Is a heat exchanger pot worth the weight?
This article attempts to determine how a heat exchanger welded to the bottom of a pot actually affects fuel consumption.
Very infomative writeup, well done.
thanks, good experiment and writeup.
you say that a hx saves 1.48 g of fuel per 1/2 liter of water boiled
I boil about 2 liters per day. 5 day trip is about as long as I ever do – 29.6 g of extra fuel used. So, for your 30 g heat exchanger I’d be right at break even – starting out at the same weight, but as I used up fuel I’d be better off with no fins.
The Roger’s data translate to about 20 percent savings, and that’s close to my results from my winter trips. On two similar trips, I had used the same stove, lid, base and windscreen, just the pot was different. I made detailed records of gas used vs. water boiled, and the amounts of gas needed for melting snow allow for reasonable statistics. On two similar trips, I had used the same stove, lid, base and windscreen, just the pot was different. My result is 17 %.
If it was just the weight of the gas saved, it won’t make a big difference on these 3-night trips. However, it just tips the limit where I can take a smaller canister, so the hx pot saves me quite some weight.
Moreover, with a large pot and a stove running at full power the temperature allows, this 20 percent of extra efficiency translates to 20% less time spent melting snow, and this also adds up.
“If it was just the weight of the gas saved, it won’t make a big difference on these 3-night trips. However, it just tips the limit where I can take a smaller canister, so the hx pot saves me quite some weight.”
I was also thinking that this would be the tipping point; when you can make a judgement call on not moving to a larger canister (that would have excess empty canister weight, and leave you with excess gas).
The same goes with making calls between esbit, alcohol, and gas… alcohol container weight is relatively minimal cf esbit by the time you package it in a way that it doesn’t get smashed up on a long trip and the weight of esbit vs alcohol stoves these days is trivial (few grams or so difference, maybe one boil). But they both win out over gas for weight if you are able to stay well below the number of boils available in a canister, and especially, if you convert to something like “sum of grams carried on each day” to take into account fuel weight declining. For me its approaching somewhere about 10-15 days of non-resupply.
Of course gas is so much faster, can be simpler, cleaner, less smelly, less risky (fuel spills with alcohol are a pain especially say with Scouts and dealing with fire danger), more adjustable, more easily scalable to pot size…
It would be interesting to repeat this experiment with alcohol. Given the higher fuel useage/L boiled, the difference becomes potentially more viable for shorter trip lengths.
I also wonder what the optimal length of the fins is.
So…~80% of the heat seems to be absorbed into the base of the pan. ~20% escapes up the sides and away from a non-finned pot as waste heat. (Sorry I’m guessing on the percentages here but for thought experiment purposes it will do).
The fins act to catch that heat at the edges of the pot base that might be about to escape, absorb it, and transfer it into the base of the pot and to the water.
However, I suspect that the inner portion of the fins is doing the majority of the heavy lifting here, with the outer portion of the fins, closer to the outer circumference of the pot, having progressively less available waste heat.
The weight of the fins would be directly proportional to the length of each fin. But the heat absorbtion benefit would likely not be.
So, like, if the fins of this pot were half as wide, they would only weigh 15grams. But perhaps they would provide 80% of the benefit of the full width fins? Who knows without testing.
The same thought could be applied to a windscreen (in the absence of wind). Waste heat travels away from the pot on the sides. The windscreen holds it against the pot sides for a bit longer, allowing it to be absorbed. But as you get higher on the windscreen progressively less waste heat is available to be trapped against the pot and absorbed by the windscreen.
There would thus be an optimal windscreen height/fuel weight saved.
Adam:
The amount of BTUs in the fuel that goes into the pot is much lower. Ballpark, 35% with a HX, 45% with a HX pot. So there is still heat to be captured by a more effective heat exchanger, but it takes increasing more fins to capture a diminishing amount of heat.
You’re right that the first, inner portion of the HX does more than the outer portion. Note the pot Dan Y sent to Roger (and me) has a pretty heavy shroud around the fins themselves. Some HX pots have more minimal fins.
Thanks for the experimentation and write up, Roger.
As you mention in the article, many HX pots start with a heavier pot, so, alas, there is not the pure play of adding HX fins to an already light titanium pot. You come down on the side of a light non-HX Ti pot and for boiling water for 1-2 people for less than a week, in summer, and I agree. OTOH, if you cook in your pot, then aluminum will conduct heat across the bottom of the pan much better and minimize scorched food. And if you’ve got to melt snow for drinking water, then the fuel (and fuel container weight) saved with an HX pot is greater because the fuel used is greater.
I actually use my HX pots the most at home because they add no pound-miles for that location and yet save fuel, time and money.
OTOH, if you cook in your pot, then aluminum will conduct heat across the bottom of the pan much better and minimize scorched food.
Theory.
Practice is that I always COOK dinner – you will have seen photos of my meals, but I have never burnt the bottom in the last 30+ years.
Cheers
I think you need thick aluminum to get significant heat to go sideways and prevent scorching. It makes a big difference for home cooking. A buried copper or aluminum layer with stainless steel on the outside is good. Heavy, heavy, heavy.
I don’t think the weight is justified for backpacking : )
A spreader plate (like a can lid) on top of stove, under pot, will reduce scorching at lower weight.
I agree spreader plates are a lighter option. I’ve used local flat rocks on a very large (150,000 BTU/hour = 44 kW) burner.
Our home saucepans are mostly stainless steel. Can’t say we have any problems with scorching.
I think it depends on whether you control the heat and stir the pot.
Cheers
+1 on stirring the pot (so to speak). And controlling the heat rate. Especially as something like rehydrated beans are starting to cook down and get viscous.
Reverting to the original subject of efficiency. It has occurred to me that I was comparing the weight of an unmodified HX pot with that of a pot stripped of all adornment. There is an intermediate possibility however.

What if one strips the rather heavy base ring off and leaves just the light fins still attached? I don’t have the bits, but maybe Dan still has the base ring? If so, what does it weigh? I ask, because I suspect that the fins themselves might not weigh very much, and the efficiency might go up a fair bit.
Cheers
The bottom plate probably served 2 functions: protection of the fins and controlling the direction/magnitude of the exhaust gasses. It seems like both of those are important. My 2 cents
Protection of the fins – most likely.
Controlling the exhaust gases – to me that seems less likely.
Instead, I think the ring was meant to provide a base for sitting on stoves. It might be possible for the pot supports to fit between the fins, although that would change the height of the pot base above the burner.
Dunno, but thought it might be interesting to investigate.
Cheers
I go back and forth on fins only or fins plus guard. The guard protects the fins and often make it sit more stably one the burner. Some guards direct the gases up towards the bottom side of the pot.
What I’d like to see is fins only in a Ti pot, but angled so as to be HX fins AND ALSO vortex generators to stir up the boundary layer.
No, I don’t find the HE pots to be effective on a 14 day trip. Using a 220gm (210-230gm) can I come home with about 40gm of fuel. (Note that there is rather wide variance using cans since they weigh somewhat differently when empty.) I boil about 1.2L per day yeilding about 4 cups of coffee/cocoa (Marco’s Mud-oatmeal, cocoa, cofee mixed, 2 cups of mocha on most mornings, 1 cup of evening cocoa along with a supper usually requiring 2 cups of boiled water. Note I add cold water for cooling the Mud and evening cocoa) I use about 12-14g/day for 13 breakfast/suppers (roughly 9gm/L) in summer months (may through august.)
There is a step function involved with the cans, though. Longer than two week trips require the use of a second can. At roughly a 7oz/200gm increase for each week out using a more’r’less standard 100-110gm canister is what it works out. Something less for a two week increment trip using a 220gm canister, or, about 12oz/340gm canister(fuel and can) for each two weeks. So for each up to a week trip, I usually bring a single 110gm canister (up to 8-9 days to empty) can, and, for each two week trip I bring a 220gm canister (up to 18-19 days to empty.) Or, a 7oz/200gm per week, and 12oz/340gm for two weeks in even increments of a week.
Heat exchangers? Well, I always a grease pot. This is technically a 40oz/1.1L pot though I call it 1qt grease pot. I add a wire bail for handling. I cut the top down to “flat” removing the outside rim and top lid handle. Dispose of the strainer. And I add 9 indentations in the bottom to act as a heat exchanger. At roughly 3.5oz or 96gm, this is the lightest 1L pot I know of, albeit not what many think of as a heat exchanger.
Okay, I can’t help myself
A compromise on both being a windscreen and a heat exchanger
1.25 ounces
saves 10% on fuel which might be half of what a real heat exchanger would do
aluminum flashing from home depot, #18 galvanized wire. Bend the two ends so they fit over each other such that it applies a spring action on the aluminum to keep it on and a little better thermal conduction between the aluminum and the pot. Take apart the two ends so it all fits inside the pot for traveling.
part of what’s happening is the hot exhaust is directed to next to the pot. A windscreen like a caldera cone would do that even better but it weighs 5 or 6 ounces and doesn’t fit inside pot
David mentioned vortex burner to stir up boundary layer
Is there any product that does this? I believe Roger’s stove does.
Anyone measure it to see how much it improves efficiency?
Yeah, like James said, there’s a step function
If efficiency can get you from a 8 ounce canister to a 4 ounce canister, or one canister instead of two, then that would be useful, otherwise probably not.
Or, if you turn the stove down to half (so it takes twice as long to boil) you use maybe 10% less fuel, and if you heat the water to 190F rather than boiling, that will save another 10% of fuel. To kill any bad things in the water, if you boil they’re killed instantly, 190F – you should let it sit for 1 minute. These are useful techniques to stay within a small canister or one canister instead of two. Or, if you’re on a trip and you unexpectedly are low on fuel you could use these to extend your fuel use as long as possible.
Jerry,
I was playing around with SUL pots in the form of stiffer aluminum cans like some energy drinks come in. Really light, but small bottoms and tall sides. An obvious application both for a wind-screen / shroud to keep the hot gases along the vertical sides, but also for vortex generators. I found real duct tape (the metallic stuff with super-sticky adhesive) worked fine. A strip, 1 cm x 4 cm, could be folded into a 1×1 VG with a 1×1 tab on each side to affix to the can. Rendered in text: _!!_ if the can was below the text. I did them about 30 degrees to the air flow, since that what aircraft VGs usually are. I don’t have any before and after numbers from that, but they weighed about nothing to add to the “pot”.
I did see an increase in efficiency when I JB-welded some aluminum BBs to the bottom of a pot – my logic was that the surface roughness would likewise stir up the boundary layer and it seemed to work, again at very minimal weight.
Yes, my latest stoves use vortex burners, but I have some doubts that the actual part of the flame hitting the pot is much different from a conventional moderately-wide burner head. My reasoning is that the combustion process is sufficiently ‘violent’ with enough gas expansion that the flames are pretty turbulent anyhow.
On the other hand, Davids comments about aluminium BBs has made me stop and think a bit. I wonder how some 2.4 mm Al wire bent into a circle would go? Or maybe 2 circles?
But on Ti pots, with their very different coef of thermal expansion? Maybe some Ti wire instead?
Cheers
Become a member to post in the forums.