
Introduction
The big question with heat-exchanger (HX) pots is whether the much-vaunted improvements in gas efficiency are worth the extra weight of the pot. That is, given some weight saving in gas, how many litres of water must you boil to compensate for the heavier pot? This article attempts to answer that question using a test apparatus that I built myself to ensure accurate, real-time data collection.
Background
Some time ago Backpacking Light Member Dan Y bought some very inexpensive HX hard-anodised aluminium (HAA) pots from eBay, and sent a couple of them out for review. (I was one recipient: thank you Dan.)
The details for those interested:
- Volume: 1.2 L
- Weight: 174 g without handles or lid (270 g with steel handles & plastic lid)
- MSRP: USD $17.30 with free shipping from eBay at the time of writing.

I love measuring things, so I decided to resurrect the electronic measurement system I had used for my series on Carbon Monoxide Testing of Stoves. This allowed me to measure several data streams at once under laboratory conditions: water temperature, canister weight, and some other temperatures. I could then test several different pots under different conditions. For this, I used a new experimental remote invertible canister stove (V4) which I was working on at the time. More on that another day.
Methodology
Testing Apparatus
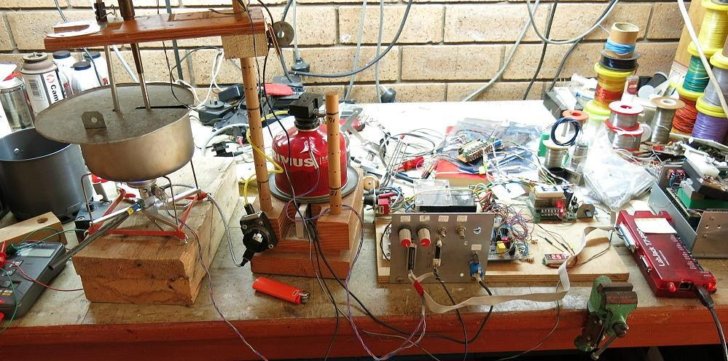
I could of course just used a stopwatch for the time and some scales to weigh the gas canister before and after the event, but I prefer to see what is going on during the process. The sort of results obtained are shown further on.
The Pots
- HAA HX pot sent by Dan: 1.25 L, 130 mm dia x 100 mm height, 174 g
- Same HX pot but with fins stripped right off, 144 g
- Small MSR Titan (Ti) pot: 0.85 L, 110 mm x 80 mm, 88 g
- Medium MSR Titan (Ti) pot: 1 L, 140 mm x 65 mm, 82 g
- Large MSR Titan (Ti) pot,: 1.6 L, 160 mm x 185 mm, 116 g
- Large HAA pot: 1.7 L, 150 mm x 100 mm, 123 g
The Titan pots are the ones I use in the field on longer trips. I use an aluminum Trangia kettle for morning tea on day walks.
Test Conditions
There were two different variables here (apart from the pots themselves):
- Flame height or power
- Windshield present or absent
I used 500 mL of cold tap water for each test.
I used Primus Winter gas or Power gas for these tests: apparently the same gas but different coloured canisters. We explored the marketing claims about winter gas already.
The canister was left upright for all the testing. This would have the inevitable effect of varying slowly the ratio of propane to butane from test run to test run, but since the gas consumption was low and the room temperature was >20 C, I did not think this was very significant. The gases do have fairly similar energy content by weight anyhow (mainly from the number of carbon atoms per molecule).
Keeping the flame power the same between test runs is always difficult. I solved this (at least partially) by leaving the stove control valve mostly untouched between test runs and used the safety valve at the other end of the hose to turn the gas on and off. This was only moderately successful as it did not handle testing over a couple of weeks.
In order to avoid jiggling the canister on the load cell, I actually used two hoses for this: one very flexible (yellow) hose went from the canister to a fixed (black) dummy connector, into which the real stove hose plugged. The very flexible hose isolates the canister from the on/off valve and the stove so there is minimal noise on the data, but I would not use this flexible hose in the field: it would be too prone to damage.
Data Collection
I measured the water temperature in the pot continuously while running a stirrer in the pot to get the best measurement of water temperature. I kept a lid on the pot during each test run. I measured the weight of the canister on a load cell continuously as well: by subtracting the starting weight of the canister from each measurement I could tell how much gas had been used. I also monitored the temperature of the canister and of the stove body during each run.
I calibrated the load cell before each test run by adding a laboratory-grade 50 g mass to the canister and looking at the difference.
I calibrated the temperature sensor using cold water measured with a laboratory-grade glass thermometer for the low end and boiling water for the high end. You can’t use ‘hot’ water for this as the steam coming off the water means it is steadily cooling down, but ‘cold’ water is reasonably stable.
It was interesting to note that it was possible to record a temperature a small fraction of a degree above the boiling point (100 C) when the pot was boiling vigorously. This was a real effect, due to the bubbles of steam which sometimes enveloped the temperature probe: that steam was definitely just above 100 C. Cutting off the gas dropped the recorded temperature back to 100 C quite smartly before it started a slow decay, confirming this diagnosis.
The data logging was done with a LabJack T7 Pro logger with the LabJack software (thank you Toby and Christie at LabJack). The device and software run beautifully. It was hooked up to a PC running Windows 7 and the data was analysed using Microsoft Excel 2007.
Each pot was covered by the same flat steel lid (visible above in the photo of the test apparatus) to prevent loss of steam and consequent cooling. It is well-known that a very low flame with no lid could mean your pot might reach (say) 90 C and never get any hotter. That is one reason why tiny stoves (eg candle stoves) do not work in the field: not enough power. Please note that a ‘real’ lid would more or less seal the top of the pot, but the lid used here has a slot on it for the temperature probe and the shaft of the stirrer. Some heat loss might be expected through this slot, and cooling measurements show this does in fact happen. This is one limitation of the whole experiment.
Results
We will start with some general analysis of the full range of pots before looking closely at the Heat Exchanger pots. Doing so allows us to see more easily where the HX pots fit in.
First of all, here we have the results from a typical test run.
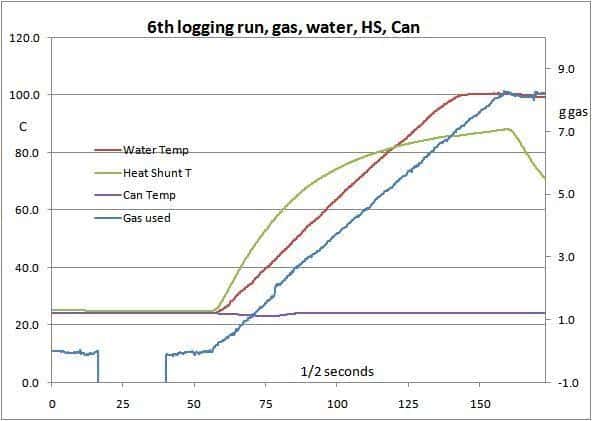
While the results are fairly reliable, there were many variations in test conditions (despite my best efforts), so strict comparisons are not exact. If one did a hundred test runs it might be different – but that would take a lot of time and gas.
The green line shows the temperature of part of the stove body: a matter of interest to me but not relevant here. It starts to fall once the gas is turned off. The flat purple line shows the canister temperature: it stays fairly constant as it is getting some radiation from the stove while it is running and the room is warm.
Flame Height or Burn Rate
Now we look at the range of pots used in this experiment.
The pots used, with their basic parameters are as follows:
Member Exclusive
A Premium or Unlimited Membership* is required to view the rest of this article.
* A Basic Membership is required to view Member Q&A events

Discussion
Become a member to post in the forums.
Roger, i couldn’t find that pot on ebay. Is there a way to share (within forum rules) the seller or at least keywords that would help me find it?
Wow! why would almost every response be flagged with
why would almost every response be flagged with
Because some miserable ratbag using the name geppotronico managed to hack into the system and splat around in the database. He has been removed, but his actions have yet to be dealt with.
I have unreported all the postings in this thread, but it took a while.
Sigh
that pot on ebay
Dan bought them, not me. I suspect they may have been a ‘disposal’ sale as they were quite cheap. This one may be more or less the same:
https://www.ebay.com/itm/Heat-Exchanger-Pot-1L-Foldable-Cooking-Pots-Mesh-Bag-Outdoor-Camping-Cookware/303670195818?hash=item46b427766a:g:xvAAAOSwPcpfTHD8
A search for ‘heat exchanger pot’ on ebay will bring up lots of them, often ‘Fire Maple’, and mostly dearer.
There are also a couple under ‘hard anodised pot’, but watch out for the cost of shipping from a USA vendor.
Cheers
Thank you Roger.
In your opinion, would this it well with a Soto Windmaster?
Give me some criteria and I’ll run a test for you this week. It’s also available with Olicamp branding https://www.ebay.com/itm/NEW-Olicamp-XTS-1L-Hard-Anodized-Aluminum-Pot-Heat-Transfer-System-Backpacking/362397617268?epid=1557506730&hash=item546094cc74:g:F0kAAOSwQZdgIGq2
The only problem with putting HX pot A on stove B is whether the pot supports mesh with the cover ring on the underside of the pot. You do NOT want the risk of the pot supports getting tangled up with the ring when you lift the pot up. Flames and hot metal going in unexpected directions.
Cheers
Here are a couple shots with the windmaster.
Oooh nice, that looks its great – with the 4 prong one, if my eyes don’t deceive me.
Chris have you found the combination with the windmaster to be a good one in wind/heat exchange, given the rep the windmaster has with “regular” pots?
Haven’t actually used that combination yet. I can try with a little fan and let you know.
Well, here is some test data to help answer that question. Bottom line, in windy conditions making more than 7 boils a Heat Exchange is a good idea. For most weekend trips a traditional pot is just fine.
Jon:
Why not just make taller windscreens? Do they have some limitation that isn’t immediately obvious?
Known limitations:
OK, so here are the limitations: I released a tall Ocelot windscreen a while ago. I noted that for best fuel efficiency, run the stove at a lower power level. Shortly thereafter, a customer sent me a video of the windscreen is operation, and the upper half of the windscreen was glowing bright read. Apparently, he thought that running at a burn rate higher than low would be fine. A second customer sent a photo of the same thing. At that point, I really internalized that 1) customers do not read instructions and 2) this was a liability problem. So, going forward, all Ocelot windscreens are short to prevent overheating the windscreen surface. Yes, I understand that the hot gases are flowing up that way anyway and can burn you. But the optic of one of our windscreens glowing bright red is unacceptable. My 2 cents.
Actually a heat exchanger does the same as containing all heat with a windscreen and ventilated lid. In some cases it will do better. Heat exchangers are intended to be used with a good windscreen, anyway. But on low heat, there is no noticeable difference. (Unless you are in the wind. ) Even in wind, they can perform as well. I simply added a series of radial ridges to the bottom of a grease pot. Add a wind screen, and, there is no difference. KCal absorbed by the water (food) is the bottom line. And a grease pot with a wind screen is still the “lightest for the mostest”.
OK, that explains it.
(OTOH, it almost proves that a windscreen is more efficient than an HX pot!)
I am keen watching the new MSR Switch; the pot with the hemispherical bottom. The advantage is that a hemisphere doubles the surface area of the bottom of the pot; though that may not translate to efficiency. IMO, the future may be to use a pot shape like this with a windsheild integrated into the mug in one package. Fins are great for fast speed and help with blocking the wind. They are also limited in how you cook with them. Since I do not care about speed and I am more interested in cooking, the hemisphere bottom looks great. Now they need to inovate a good windscreen and bring the weight and price point way down. I would be happy with a system that could boil 500 ml using less than 7 g in calm condition but also less than 10 g in the wind. That and have a system weight (including lid & stove) less than 150 g. My 2 cents.
It’s worth a try. It isn’t immediately obvious how the curved bottom is better than a regular HX, but if it does heat more evenly and/or saves weight (doesn’t look like it does), then that would be great.
Or use aluminum pots/pans and a windscreen. ;)
From pure geometry, a hemisphere has twice the surface area of a circle. That does not mean that the heat transfer will be double but, it should be better. My 2 cents.
Sure, but a heat exchanger adds something like 30%-50% more surface area to the circle. The Switch pot doesn’t add a full hemisphere. Does the partial sphere add more or less surface area than the HX?
It appears, from photos, to be close. We need measurements.
(The sides of the pot add several hundred percent of the area of the circle, but I understand why you don’t want to use that approach. At least not for customers.)
The calculation are for a Hemishpere and not a Sphere: That is where the 1/2 came in the formula above. An HX pot will probably be more efficient with material as it is in the plane of the flame spread than the hemisphere as you don’t know how well the flames will hug the surface. My 2 cents.
Yes, the Switch pot looks like less than a hemisphere to me. But I haven’t seen one close up.
Yes, that’s my estimate, too, that the HX might be more efficient at heat transfer, but the Switch could be lighter. We need measurements! :)
To quote Cascade Designs (MSR) on the Switch:
Lightweight:
Complete system weighs 13.8 oz (392 g); stove weighs just 4.1 oz (117 g).
US$140, but out of stock
“Lightweight” Yeah, right.
My 1.5 L Ti pot weighs 115 g.
My V7 remote inverted canister stove weighs 49 g.
Cheers
Oh, sure, the Switch product is not very interesting. The question is whether the hemispherical shape has any advantage over an HX pot?
We have already established that a proper windscreen is more efficient than an HX pot, but the most efficient windscreen is a potential liability hazard, no matter what instructions are included.
That explains why nobody sells the most efficient shape. You can get close with a tall titanium (or aluminum) foil windscreen and an aluminum foil lid, but you have to make it yourself.
I think that you get pretty close with your photos of your MYOG aluminum foil windscreen.
no matter what instructions are included
That is the sad part (for the mfr).
Cheers
Become a member to post in the forums.