Topic

The Joule Thief: Yet Another HX Pot


Forum Posting

A Membership is required to post in the forums. Login or become a member to post in the member forums!

Home Forums Gear Forums Gear (General) The Joule Thief: Yet Another HX Pot

Viewing 25 posts - 51 through 75 (of 107 total)
  • Author
    Posts
  • #3744474
    Tyler R
    BPL Member

    @trex

    That was a neat video CS, thanks for sharing!

    And you know what, I’m going to backpedal on my MSR Reactor bashing, its unwarranted (I’m actually one of the people who own one so I was also bashing myself) because far to often it’s near impossible to discern the design choices and why without being exceptionally experienced or talking directly to the designer. I have neither exceptional engineering experience or have ever directly talked to the designer, so any commentary on the bashing of MRS’s logic behind the Reactor is only an uniformed opinion on my part.

    There is no doubt the reactor is unrivaled in its use case and class, that isnt my opinion, that’s just data. Do a lot of people buy it to use it outside of its use case? Yeah, I’m probably one of those people. But that doesn’t take away from the incredible work that goes into making something like that. Plus it’s one thing to make a prototype, it’s completely different to bring it to market (or so i’m told, no experience there) ;)

    #3744478
    Tyler R
    BPL Member

    @trex

    Thanks Dan Y!

    Yeah its definitely not easy to clean. I have cooked, mostly cold soaking instant beans and rice (im currently working on a water tight lid for using the pot to colt soak as well), or cooking ramen noodles, but you run into issues where its hard to scoop food out from in-between the grooves so I just end up sloshing water in it and then drinking it instead of trying to pick it out, not the most appetizing thing to do. If there is any residual stuff, vigorous shaking with soapy water followed by a couple rinses done the job.

    I wouldn’t say it was designed just for boiling water, but that’s definitely how it ended up. Sure I can argue it has limited cooking capabilities, but that’s a cop-out answer. Its basically a water boiler.

    I tried many iterations without the star shaped bottom you see there, but that shape is the result of a design constraint imposed by the SLS printing process. The machine cant print free floating objects without supports, and support material increases material cost and machine time, so using that star pattern on the bottom only needs a single support in the very center and thin supports along the star’s crests instead of the entire surface area of the pots bottom if it were flat. It also increased the rigidity of the bottom of the pot so I can actually use less material there. This pot is lighter than its cousin with a flat bottom due to the added thickness needed for the flat bottom to have the rigidity to survive the support material removal process.

    Hope that made sense,

    Cheers!


    #3744481
    DAN-Y/FANCEE FEEST
    Spectator

    @zelph2

    Sure makes sense…. basically it’s a water boiler only. Jetboils are cookers because of flat bottom pot Makes sense.

    Do the walls of the JT flex when hot?

    #3744482
    Tyler R
    BPL Member

    @trex

    Yup, they have some flex when cold and when hot. To me, it feels as if the pressure needed to reach the some level of deflection is the same when hot as it is when cold. Though I have not tested this beyond just squeezing with my hand.. so very much open to large margins of error.

    #3744486
    CS
    Spectator

    @covecs

    And you know what, I’m going to backpedal on my MSR Reactor bashing,

    Na, I think they could use a little fire under them to continue to improve, it doesn’t sound like it’s much different than when it was released 15 years ago.

    There’s a lot of room where they could continue to improve IMO, just off the top of my head:

    • Settings for optimal fuel usage vs. quickest heat
    • Keeping the contents warm after it’s been heated – HXs are great at dissipating heat too I’ve found, which isn’t what I want normally, since I then need another vessel to keep things warm, could just be me though.
    • Automatic shutoff if CO levels get too high when you’re cooking in your tent
    • Automatic shutoff on tipping over
    • Automatic shutoff when the water is boiling — I sometimes space out I was boiling something and waste fuel this way.
    • Attach food pouches directly to stove to make it more efficient
    • Are canisters really as light as they could be? Are there new materials they could be made out of that would be just as safe and lighter?
    • Moulder Strip

    As much as I don’t want a chip and yet another thing with a battery, it seems unavoidable they’ll make it into stoves one day.


    #3744487
    Roger Caffin
    BPL Member

    @rcaffin

    Locale: Wollemi & Kosciusko NPs, Europe

    Its not the CO2 (carbon dioxide) level you should worry about, its the CO (carbon monoxide) level. The former just makes you feel the need for fresh air; the latter kills you.

    Cheers

    #3744488
    CS
    Spectator

    @covecs

    Yeah I corrected it. :)

    #3744499
    Jeff McWilliams
    BPL Member

    @jjmcwill

    Locale: Midwest

    The MSR Reactor video was certainly interesting.  In the past, I’ve seen posts on these forums criticize the use of pressure regulators, basically saying, “Pressure regulators can’t make a lower pressure canister higher, so what’s the point?”

    I like his explanation:  a full canister in summer may be at 70psi, while a cold canister could be at 5psi.  A non-regulated stove is probably tuned to operate efficiently at higher PSIs and performs poorly at low PSIs (i.e. when it’s cold and/or the canister is 1/4 full or less).  By using a regulator and optimizing the stove for low PSIs, it supposedly performs better at lower temperatures/pressures than non-regulated stoves.

    Is that claim borne out by field and/or lab testing of various stoves at different fuel temperatures or pressures?

    It’s an interesting design for mountaineering / snow melting.  I still wish it also operated with the canister inverted or had the equivalent of a Moulder strip.

    #3744505
    DAN-Y/FANCEE FEEST
    Spectator

    @zelph2

    Though I have not tested this beyond just squeezing with my hand.. so very much open to large margins of error.

    Do you think the flexing is what’s causing the carbon fibre to break away from the places where it meets the aluminum base and top rim?


    #3744527
    Rex Sanders
    BPL Member

    @rex

    There are some big hurdles for commercial stove innovation. From an interview with gear designer Michael Glavin:

    In the manufacturing world, there are [lengthy] tooling and lead times. I dealt with this at MSR. They plan to run those stoves for long periods of time to justify the tooling.

    DIY or small, direct-to-consumer companies can sometimes overcome these problems, but scaling to stocked-by-REI levels is a whole different story.

    Cheap knockoffs are another hurdle. If a company tries to amortize design, testing, and tooling over 10,000 stoves (totally made-up number), but sell-through rates decline after the first 1,000 despite/because great reviews, the designers aren’t likely to get a second chance.

    I’ve lost track of the number of cheap cartridge stoves I’ve seen online thinking “hmmm, that design or those parts look awfully familiar.” Apparently they often come from the same factories.

    Plus liabilities that cross company lines (stoves and cartridges and pots, oh my!). Sometimes I think of stove fuel preheat loops as Moulder strips for dummies. With compromises, of course.

    — Rex

    #3744533
    Tyler R
    BPL Member

    @trex

    Do you think the flexing is what’s causing the carbon fibre to break away from the places where it meets the aluminum base and top rim?

    Nope, nothing breaking away yet.

    What your seeing in the top picture is an absolute horrible top coat application on my part. I’m so happy to say that at the moment, surface finish is my biggest known issue with these pots. I’m content with most of the other issues.

    I’ve been experimenting with different top coat application processes lately because it is the most inconsistent thing I have going on in the assembly process and also the most time intensive. The glossy part in the top picture is the top coat, the matt looking part is the sanded undercoat that is peaking through an area where there is no top coat. This is where the top coat pooled away from that area while it was still a liquid in the oven. This particular pot’s top coat was hand applied with a brush, so great inconstancy in application followed by a mistake of putting it in the oven to soon (I really wanted to finish it before my Trans Catalina Trail trip.. oops). Here is a closer shot of that spot.


    What your looking at in the bottom picture is the meniscus the epoxy resin forms over the aluminum joint. Its essentially a semi convex shape that forms when the epoxy is still a liquid and its surface tension clings (idk if it is actually surface tension but it behaves like surface tension) it to where it meets the aluminum. It causes the epoxy to be thicker at the joints, I personally don’t mind it, it should make for a slightly stronger bond, and it would be a pain to try and sand away. Here’s a closer look at that section.


    The carbon fiber itself is inserted into a groove when epoxied to the HX before the top coat is applied. Here is a picture of a cross section of what that looks like. This is kind of cool because it means I can measure any delamination progress by simply taking calipers to the pot. If there is growth, the only way for that to happen is by the CF sleeve to start delaminating out of its groove. No measurable growth on these pot iterations so far, but it has happened on earlier iterations that used a different bonding epoxy.

    Thanks for the questions!

    Cheers!

    #3744537
    Roger Caffin
    BPL Member

    @rcaffin

    Locale: Wollemi & Kosciusko NPs, Europe

    I like the use of the deep groove: SO much better than just a plain one-sided socket fit. The groove might be what is needed for long life.
    I would try to use a semi-flexible epoxy or glue for the bomd.

    Cheers

    #3744544
    Tyler R
    BPL Member

    @trex

    I would try to use a semi-flexible epoxy or glue for the bomd

    Yeah I have found this is key. Like I mentioned earlier, past CF sleeves have delaminated before I learned about epoxies specifically formulated for joining two materials with different coefficients of thermal expansion. I don’t know exactly what is different about their formulations, but your suggestion of a semi-flexible epoxy is definitely supported by an anecdotal observation I’ve noticed on how much “softer” it feels compared to the more brittle epoxies I was working with before.

    #3744551
    Roger Caffin
    BPL Member

    @rcaffin

    Locale: Wollemi & Kosciusko NPs, Europe

    A similar thing happens with cyano-acrylate super-glues. They are very brittle. Loctite sell a super-glue called ‘Black Max’ (380) which is more flexible: it contains micro-grains of a rubber in it. I use Black Max for gluing the Easton aluminium tubing of my external-frame packs together. It lasts very well under the dynamic loading the frame gets. Not sure what the temperature rating is though.

    EDIT: it seems the idea of the rubber particles has been very successful, so that Loctite now also sell a silicone Black Max – if the ads I have seen are correct.

    The bond strength is down to 25% at 100 C, so I don’t think it would be suitable for your pots.

    However, the Loctite silicone Black Maxx 598 has an upper limit of 260 C. Hummm . . .

    Cheers

    #3744558
    DAN-Y/FANCEE FEEST
    Spectator

    @zelph2

    What is the depth of the groove in the rim? Does the rim flex when squeezed with fingers? Rim looks very thin.

    #3744626
    Tyler R
    BPL Member

    @trex

    The groove in the lip ring is the same width and depth has the HX body. It does flex, but its very hard to accomplish. I’d say its harder to flex the rim on a JT than it is on a toaks 550ml, but easier to flex than the rim on a Jetboil Zip.

    Its looks thin but it’s actually thickest part of aluminum on the pot. The top of the rim is a solid 1.9 mm of aluminum. To put that into perspective, The rim on the Jetboil Stash is made from what I think is rolled .8 mm aluminum.

    #3749846
    Adam Kilpatrick
    BPL Member

    @oysters

    Locale: South Australia

    Super cool Tyler! Just catching up on this thread.

    I note you mention a sealable lid you are working on in order to facilitate cold soaking. I was wondering this too, as, another way to save fuel is of course to cold soak in a couple of manners, eg;

    1. cold soak your main meals. But use the same pot to also boil water for hot drinks.

    2. cold soak your main meal, then heat it up to eating temp (no need to reach boil temps) for aesthetics, comfort, etc. (eg if you are going from 20C to 60C, rather than 100C, you are using ~half the fuel).

    3. partially cold soak your main meal (ie, less time cold soaking, or, things that just need a couple of minutes of finishing off at boil or near boil temps), then run the stove a much shorter amount of time than you otherwise would.

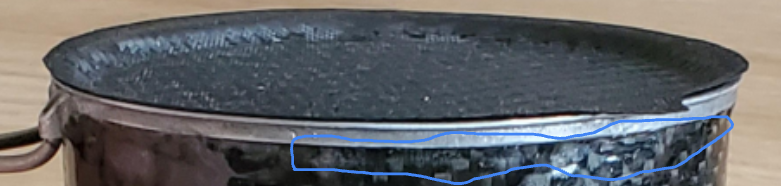
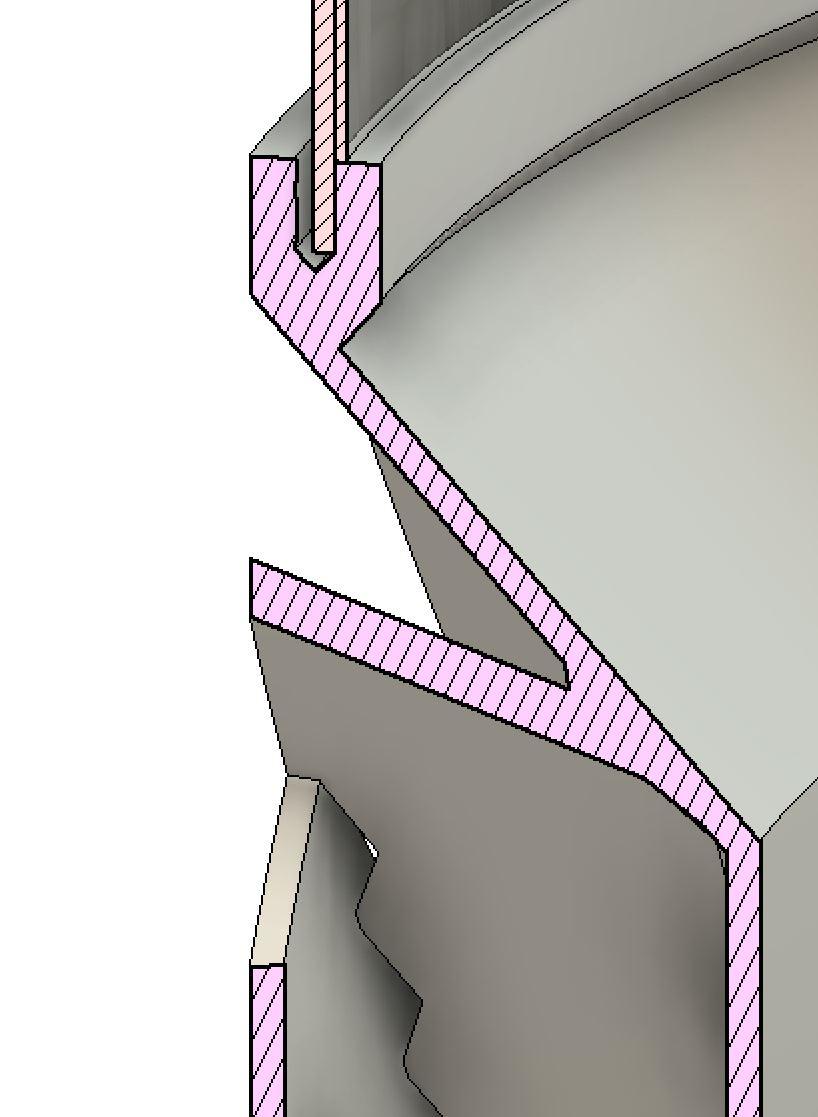
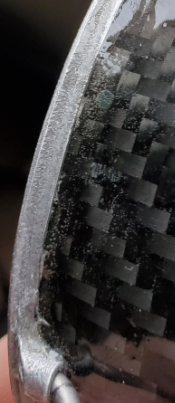
    Probably the main/only (?) contender for any of these options so far, is the Vargo Ti BOT (700 or 1L). I have the 700 and its great, but not perfect… the lid for example is extremely strong with multiple folds and likely overkill (there is at least one extraneous 90 degree bend in there…), also there is a super annoying lip on the lid that basically just functions as a great big gutter to catch food, liquid and sh*t. That lip is my biggest gripe. I still haven’t gotten around to it but at some point intending to dremel it off with my brother. There’s nothing I can do about the extraneous 90degree bend.

    Interestingly on the BOT pot, and lid, I’m certain that the threading in the pot adds quite a bit of strength in itself. Not sure if that helps.

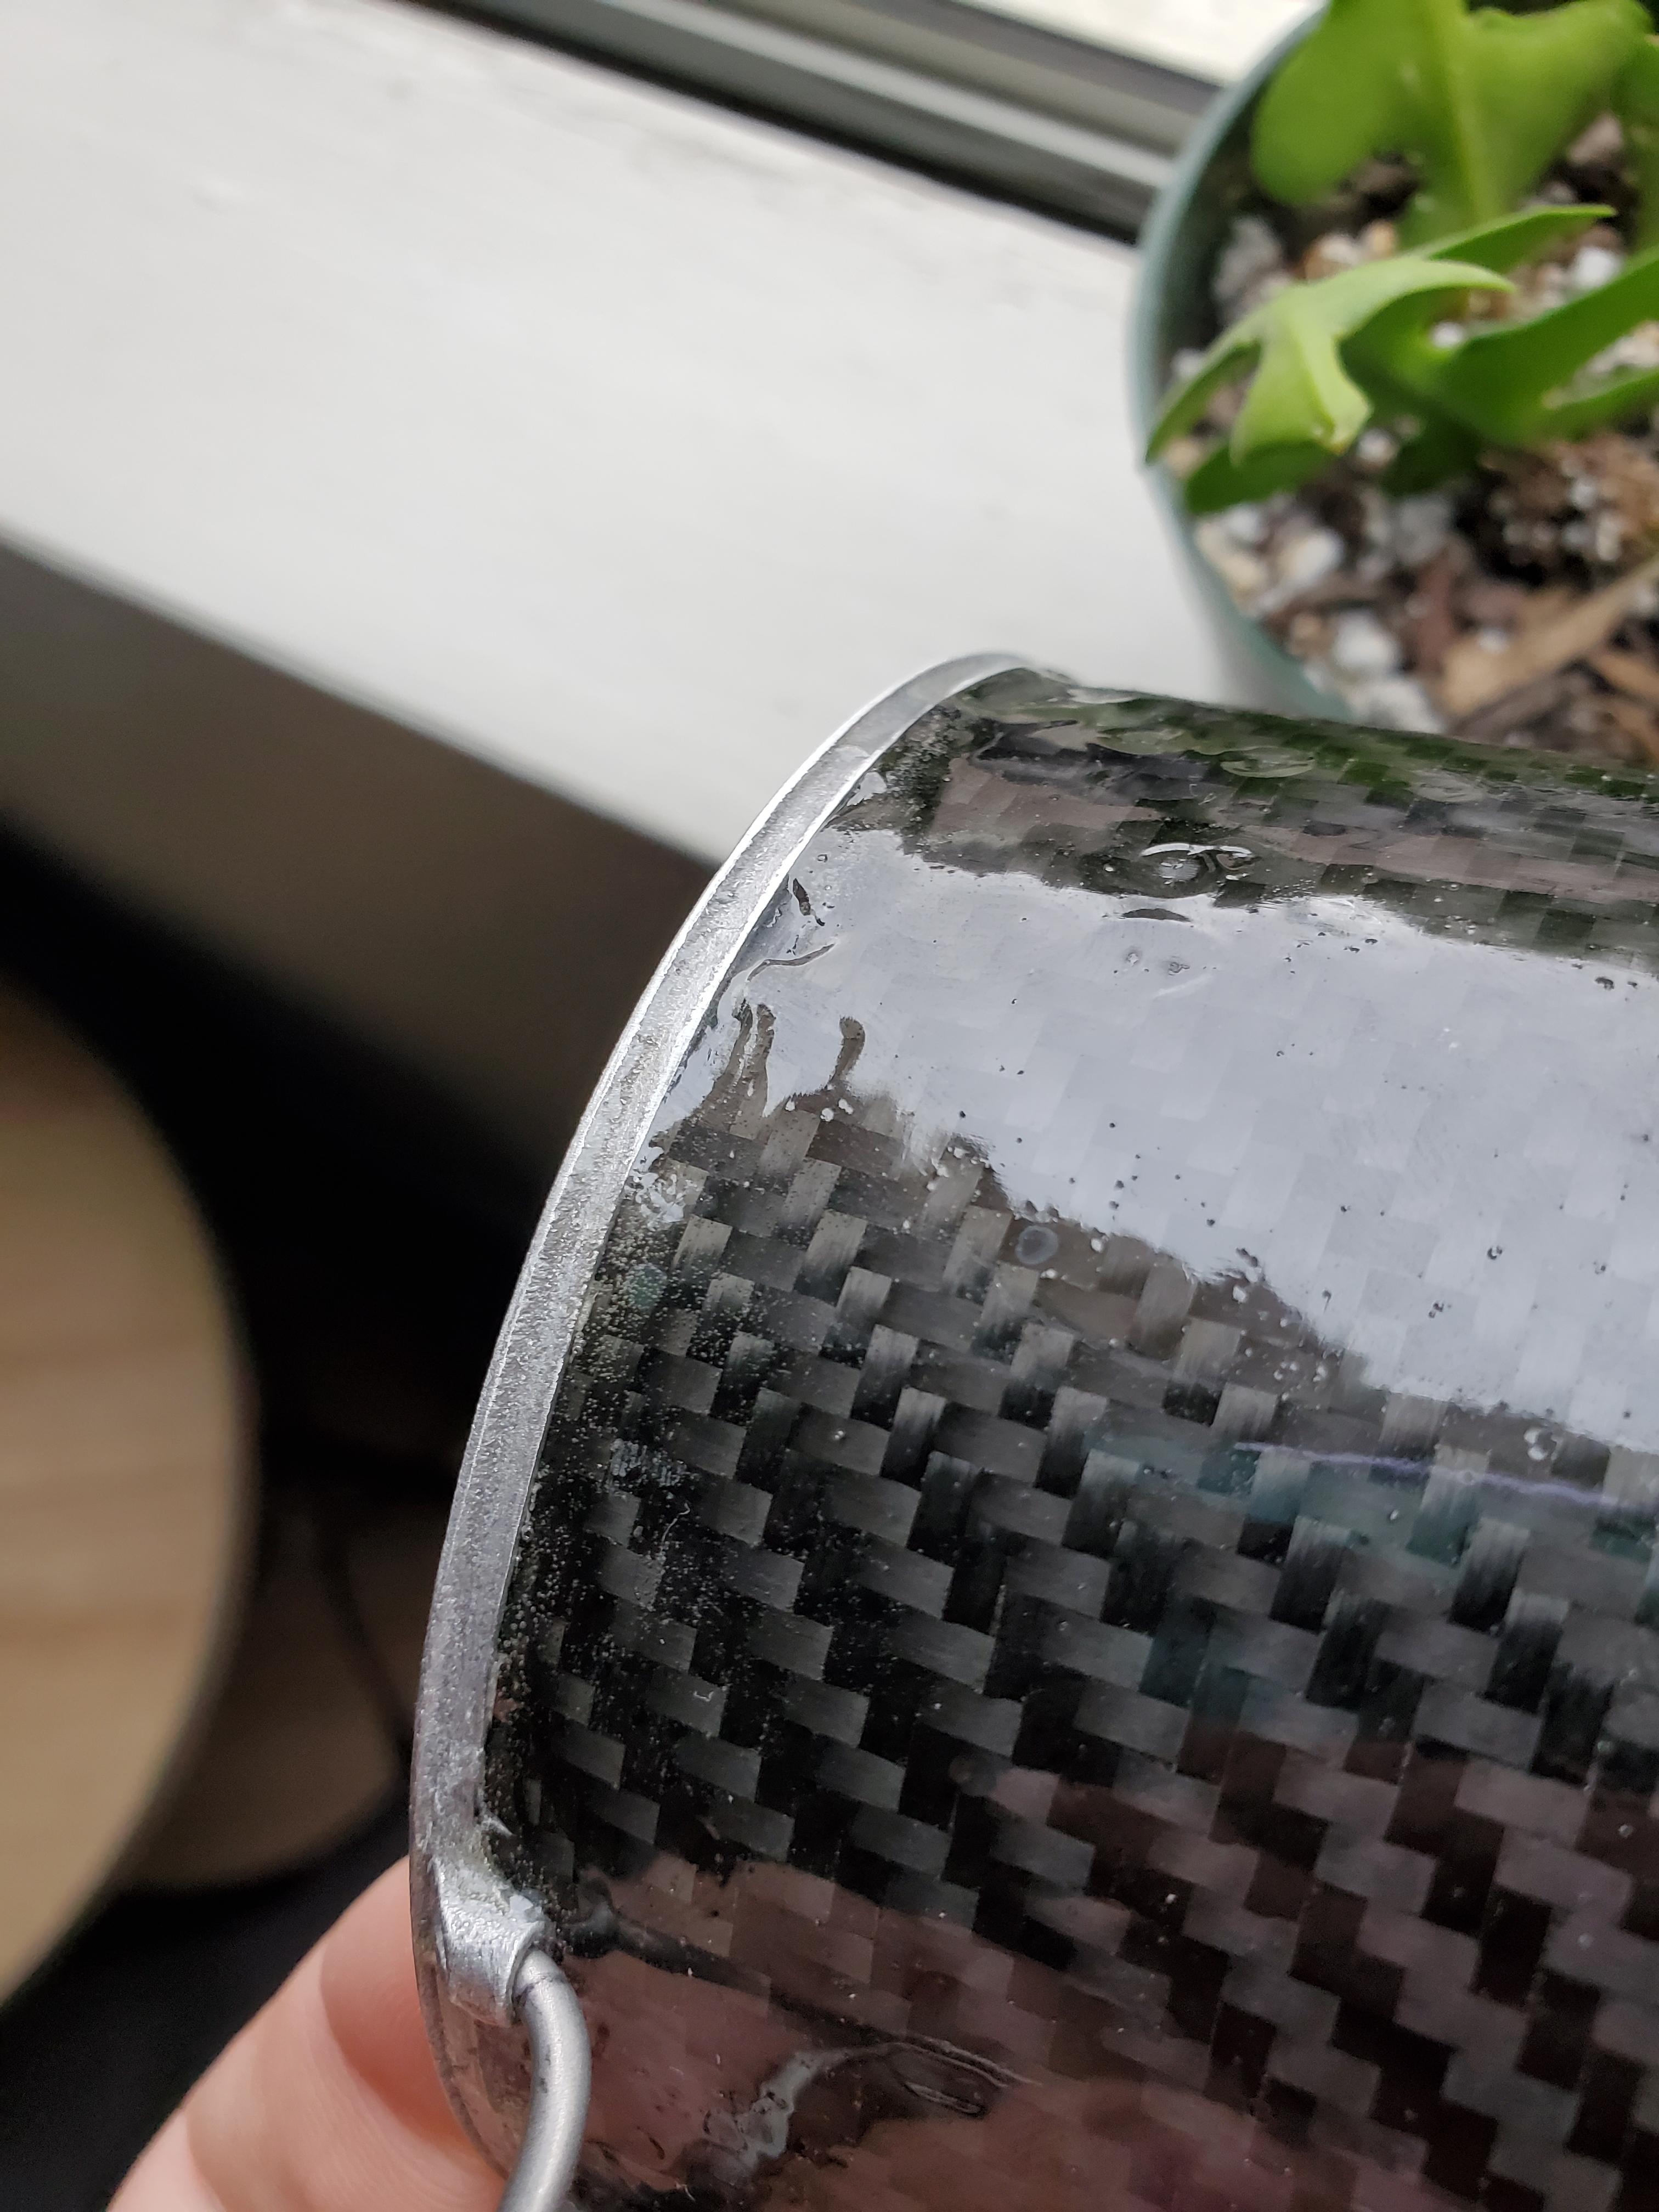
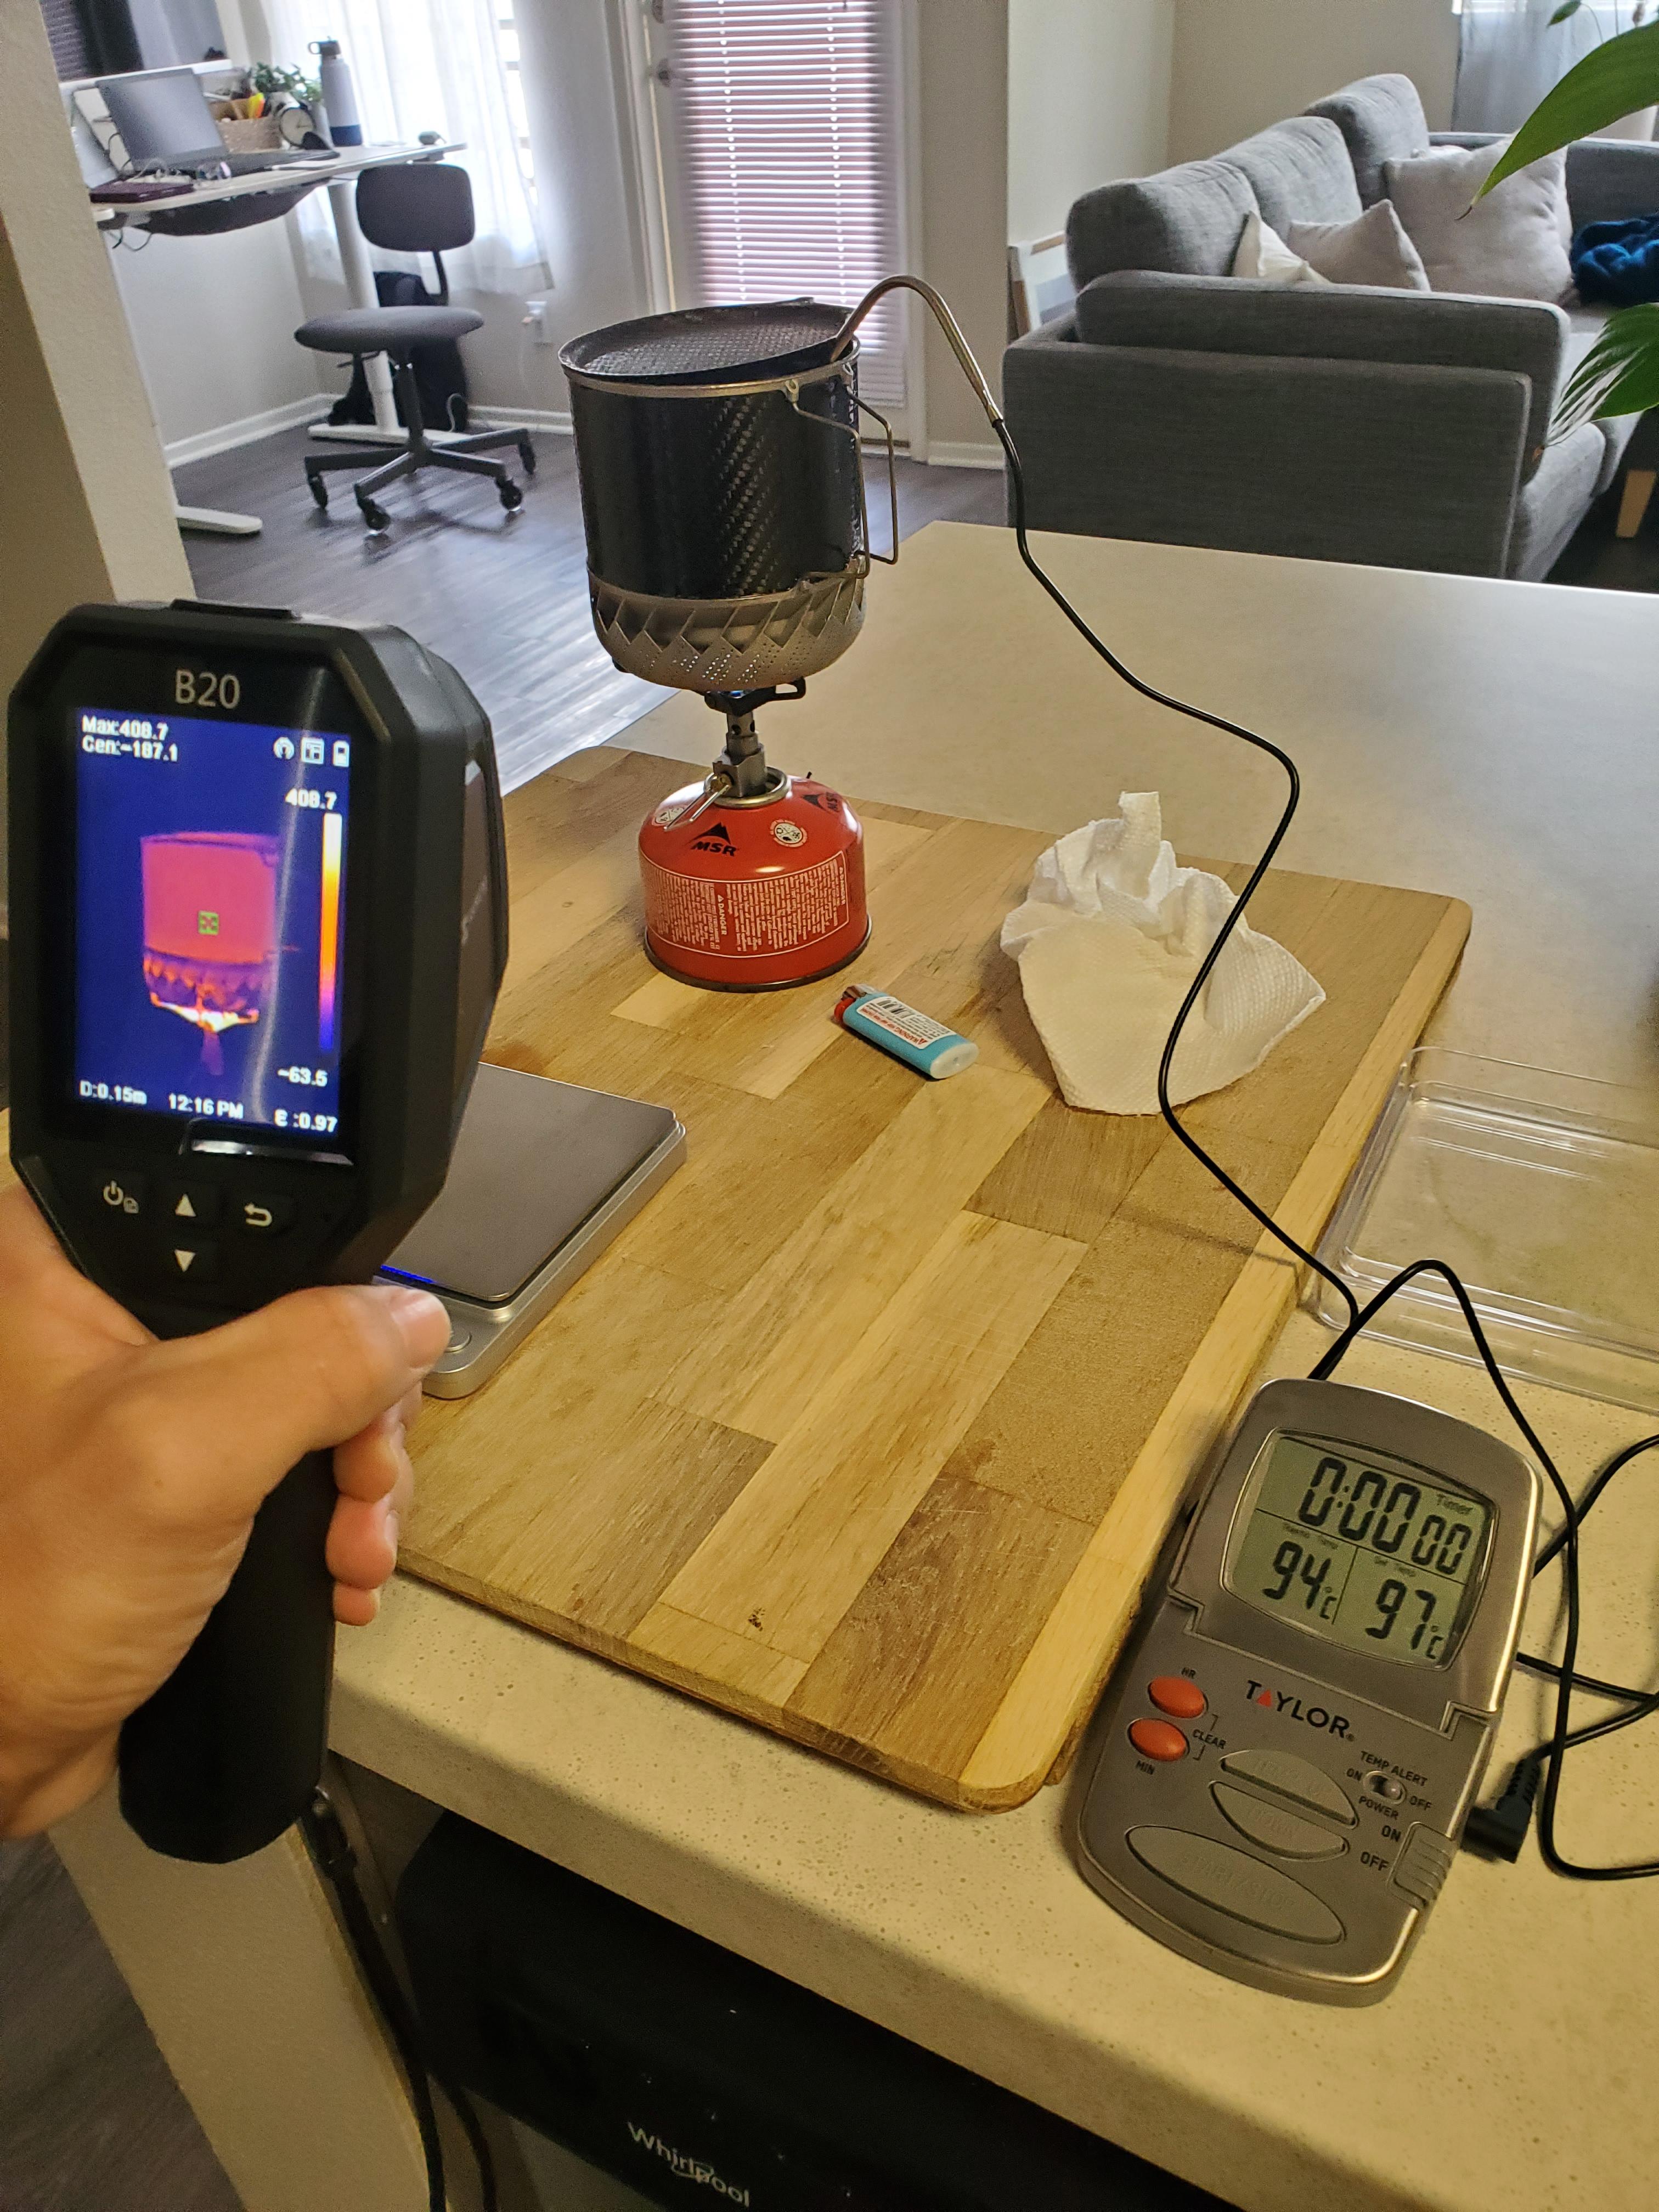
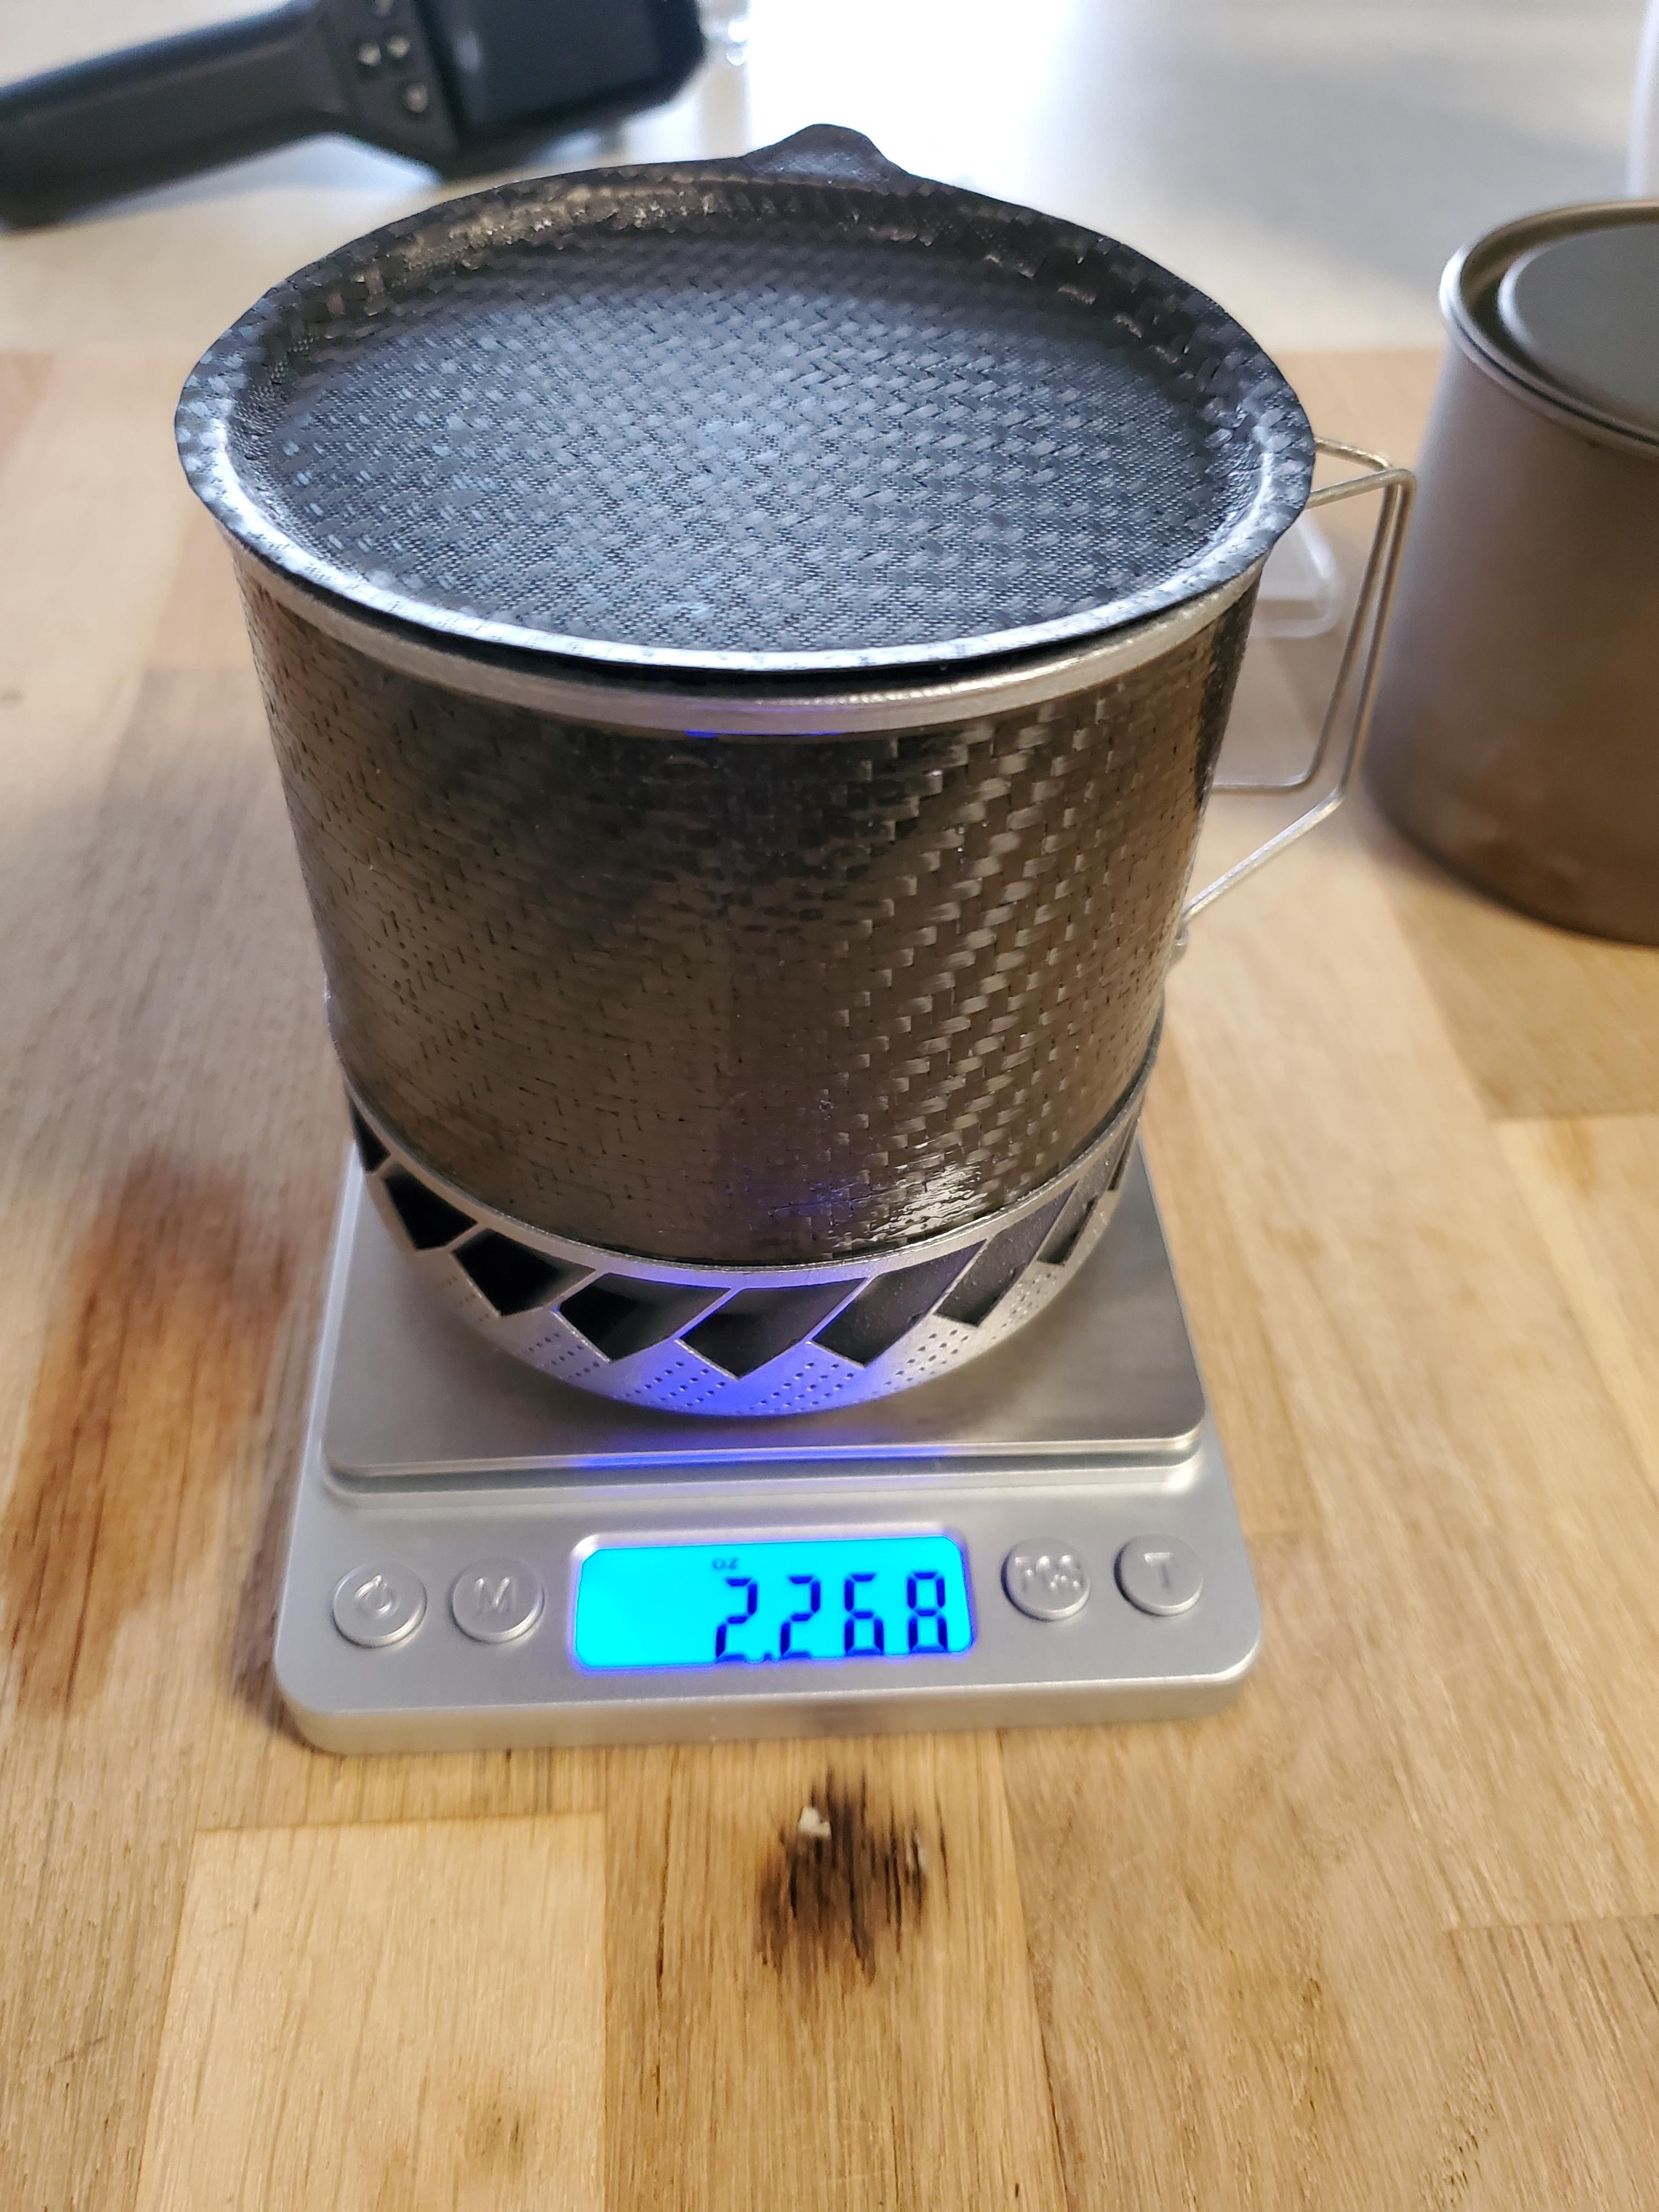
    Another random thought I had in regards to “cooking” and cleaning in your design. I don’t see the non flat base as too big a deal personally. It looks fairly smooth (certainly better than dealing with the lip on the BOT lid see above), and as its the aluminium portion I’d feel more comfortable putting more oomph into my cleaning eg with a small plastic scourer, or spoon, or leaf. I’d feel less comfortable about doing more intense cooking because of the silicon coating and CF sides… but without trying it I wouldn’t know. Eg, if I cook a pasta with a creamy sauce (my least fave pot clean up job!) will I struggle to get the sauces off those surfaces without damaging it?

    It seems though if you could combine the function of a super light HX pot with the ability to cold soak… wow.

    #3749905
    David Gardner
    BPL Member

    @gearmaker

    Locale: Northern California

    That is the most beautiful blending of form and function that I have ever seen in a cook pot. It is a jewel of a cook pot (more props for the punny name). Huge props.

    I hope you go into production. Now that I know they exist, I need one!

    #3749907
    YoPrawn
    Spectator

    @johan-river

    Locale: Cascadia

    He was selling them at one point and might still be?

    #3750278
    Tyler R
    BPL Member

    @trex

    Thanks for the kind words Adam!

    Yeah a cold soaking lid is still on the list of goals I want to reach with this project.  Though I haven’t made any progress on that front yet. I’ve been distracted by redoing all the thermal cycle testing with a new silicone coating that is NSF 61 certified and extraction tested/certified for boiling water. I got to talk to some engineers who work in the food industry and they both agreed changing to a NSF 61 silicone would be better. But that’s finished so I finally get to return to other aspects of this project.

    When I did the JMT last summer, I used a toaks 550 ml and one of those silicone stretch lids that let me cold soak in the toaks 550 ml. It worked great, I did the first technique you mentioned where I cold soaked breakfast (but has hot coffee) and lunch but cooked dinner + evening hot tea.

    My biggest complaint with that method though was the stretch lid was a dirt magnet. It was very hard to keep it clean. So I don’t think I want to go that route for the cold soaking lid on the Joule Thief. I’m kind of thinking of something like the Vargo Bot’s lid, but with a softer seal and held down with shock cord instead of threads.

    #3750280
    Tyler R
    BPL Member

    @trex

    Thanks David!

    I’m currently not explicitly selling them, or openly offering them to anyone. But if people reach out to me wanting one, I don’t mind making them one.

    If you liked the Joule Thief, you might get a kick out of its little brother, The Joule Bandit.


    The bandit is the result of my recent experimentation into sacrificing efficiency for further weight savings. It’s about 2.2 ounces and has the efficiency equivalent to a jetboil Zip (in no wind).


    Currently my goals are as follows. Idk what I’ll do once I achieve them, perhaps find a new project to entertain me ;)

    1.) Get a final lid design

    2.) Make a working cold soaking lind

    3.) Modify a stove to make it an integrated system for the two pots. Haven’t explored much options here but I really like the simplicity and design behind Jon Fong’s new Cheetah systems.

    Jon, if you see this, any chance I can trade you a pot for a custom built Cheetah Windscreen for these pots? ;)

    4.) Set up a test rig to simulate abrasion in the pot caused by hiking with a canister in the pot to get an idea of the lifespan on the silicone coating.

    5.) Make some neat tools to reduce the amount of time it takes to make these pots/lids.

    #3750282
    Jon Fong / Flat Cat Gear
    BPL Member

    @jonfong

    Locale: FLAT CAT GEAR

    Jon, if you see this, any chance I can trade you a pot for a custom built Cheetah Windscreen for these pots? ;)

    The Cheetahs are optimized for the Stove/HX Mug combinations.  What I have may work.  If you want, just send one of you mugs and I’ll see if I can modify one to fit.  After testing it out, I will send everything back to you (including the modified Cheetah).  I’ll PM you my shipping address.  Best wishes.

    #3750295
    David Gardner
    BPL Member

    @gearmaker

    Locale: Northern California

    Hmmm…Tyler, if Jon doesn’t want that pot what can I trade you for it? Zpacks Pocket Tarp With Doors maybe? Ever hopeful…

    :-)

    #3750297
    Adam Kilpatrick
    BPL Member

    @oysters

    Locale: South Australia

    Tyler, I saw your message while dropping my kid to school just now. So was thinking on the drive home.

    I got out my old BPL Firelite 550. Basically what the toaks 550 is now, just like 15 years old or something (the newer toaks 550 Ultralight version is much lighter). I have a Carbon fibre lid for it, from memory made by Titanium Goat? Or was it his son’s company? Can’t remember. Anyway, this one fits perfectly snugly, with sharp 90 degree bends in its lip. The carbon construction isn’t perfect… there are some little observable and feelable defects in the resin on some of the parts of the bend, kind of looks like chips out of the resin, though this was like that new (and I’ve never really used this lid in action apart from one test when I got it years ago).

    Anyway, its snug enough that if I hold the empty pot upside down it stays in.

    If I fill it half full of cold water, and hold it upside down with some gentle pressure to keep the lid on, no water leaks out!

    If I shake it vigourously, I get the occasional drop.

    Fewer drops if I do this held up the right way.

    I suspect with good quality control, and perhaps a ring seal? silicon? and some kind of band as you suggest, then you’d have a cold soaking solution. The lid in CF with a ring seal would be an utter fraction of the weight of the BOT 700/1000 lid. This particular CF lid is 9.13 grams. My BOT 700 lid (inc its seal) is 43.40 grams. The seal itself is 2.35grams. The Bot lid and the CF lid are very close in internal diameter, but not close enough that I can test with the Bot’s seal on the CF lid, its a bit too loose and the depth of the lip on the CF lid isn’t enough to make it work (both factors) in the shake test as above with the 550 pot.

    I suspect you could make a safe coated CF lid with seal in the range of 13grams +/- 3 grams to work. Plus the weight of the strap.

    Another thing I thought of just now, is this CF lid has a small hole (I held a finger on it for the test) to relieve pressure in case of a tight fit like my pot. With the bot, obviously you don’t screw the lid on and stick it on a stove and make a bomb, you invert it and it rests nicely with a lip. Need to be able to do likewise with what you come up with…not neccessarily an additional lip but not shaped in a way that it will just annoyingly slide off.


    Keep up the great work!


    #3750299
    Roger Caffin
    BPL Member

    @rcaffin

    Locale: Wollemi & Kosciusko NPs, Europe

    I want to add a warning here. If you try to cook (ie boil) rice or pasta in a sealed pot, you will not like the explosion and mess. Both of these make a sticky mess when they boil, and I am not sure what that mess is.

    There is no problem with an open pot or a pot with the lid tilted open so the pressure does not build up at all, but even a saucepan at home with a loose lid providing a seal will create a disaster.

    So I suggest you first try this at home with an ordinary saucepan, and see what happens.

    Cheers

Viewing 25 posts - 51 through 75 (of 107 total)
  • You must be logged in to reply to this topic.
Forum Posting

A Membership is required to post in the forums. Login or become a member to post in the member forums!

Get the Newsletter

Get our free Handbook and Receive our weekly newsletter to see what's new at Backpacking Light!

Gear Research & Discovery Tools


Loading...