Introduction
Upright canister stove performance is negatively affected by low temperatures (see The Effect of Cold on Gas Canisters and refer to forum threads here and here). Evaporative cooling is the culprit: as fuel evaporates from a canister when a stove is in operation, the canister temperature drops. This generates a negative feedback loop that then slows down evaporation (More detail about the process is offered in the article The Evolution of a Winter Stove). Evaporative heat loss in upright canister stoves causes extended boiling times and changes in fuel mixture composition that results in the hiker stockpiling partially-filled canisters that are often never used again.
Quantifying evaporative cooling in canister stove systems is the purpose of this article series.
I have measured how the temperature of a canister drops due to evaporative cooling by using an upright canister stove in the cold, covering a number of different parameters including air temperature, canister size, and how full it is. From this, I have determined a simple rule for determining at what minimum air temperature a canister can be used.
I have also measured the temperature for a couple of use case techniques which allow you to operate at air temperatures below freezing.
Finally, I propose a different paradigm for canister stove use, where you carry just as much fuel as you need for a particular trip, such as is done with alcohol, white gas, and Esbit. This lets you eliminate the partially-filled canisters that accumulate after trips.
Test Equipment
I used LM335 Zener diode temperature sensors. They come in the familiar plastic molded TO-92 package with three leads like old style transistors. The third lead is for calibration but I don’t use that; I just calibrate in software. The voltage across the diode is nominally 2.73 Volts at the freezing point of water (~273 Kelvin) and it varies by close to 10 mV per degree C from there. Their biggest error is a scale error around absolute zero so I calibrate that out using the triple point of water. I use a Labjack U3 data logger to read the data into my PC and I use Excel to generate plots and do calculations.
The LM335 sensor measures the temperature of what it is clamped to – it’s a thermometer. I clamped the temperature sensor to the bottom of the canister and put silicone where the clamp wasn’t and let it cure, then removed the clamp and put silicone where the clamp had been and let that cure. This silicone insulation isolates the sensor from the world while the sensor is in close contact with the canister. As a result, the sensor should fairly accurately measure the temperature of the side of the canister. Putting the sensor on the bottom as shown keeps it away from radiant heat from the burner.
There is liquid butane inside the canister, next to the sensor, so the sensor should in practice fairly accurately measure the temperature of the liquid.
I did my measurements while operating normally, boiling a pint of water, at some air temperature. You can do things like putting your canister into ice water or into the freezer to simulate cold temperatures, but it’s too difficult to correlate that with actual use, and of course the canister tries to match up to the ambient anyhow. It’s better to just use the stove to boil water like I do when backpacking, making a cup of coffee or whatever.
Butane and Its Mixtures
Although it has has been discussed a few times, it is worth noting that ‘butane’ canisters really contain a mixture of propane, isobutane, N-butane, and other gasses. I will provide more data later in this series that reflects how the mixture affects canister performance. For now, just note that because the label says ‘butane’ it does NOT mean the contents are straight (pure) n-butane. This is not common knowledge.
There is a boiling point for any mixture (whatever it is), below which there is not enough vapor pressure to push gas out of the canister. Above that ‘boiling point’ the internal pressure will force fuel vapor out of the canister, but that temperature will vary as the mix in the canister changes. This is actually the definition of ‘boiling point’.
While we are at it, please note that what is in the canister is a true mixture: the different gasses are not separate. So the behavior of a propane/n-butane mix (for example) is intermediate between the behaviors of straight propane and straight n-butane. How they evaporate is a bit complex.
Good fuels like MSR IsoPro contain mostly isobutane which has an 11 F (-12 C) boiling point. Adding some propane to this takes the boiling point further below that. What the article The effect of cold on gas canisters showed was that the percentage of propane falls as the canister is used up. I will conservatively say the boiling point of the MSR canister is 10 F – just below the boiling point of pure isobutane. I call this “the good stuff”. There are other brands: I just happen to have some IsoPro canisters (IsoPro does NOT stand for ‘iso-propane’: such a chemical does not exist).
Then there are the cheap fuels like the ‘butane’ canister I got at the Korean grocery for $1.25 for 8 oz. I measured the boiling point for one of these as 20 F (-7 C). This is in between the boiling points for n-butane and iso-butane, so it must contain a mixture of isobutane and N-butane (BP 31 F or -0.5 C). The easiest mix to produce during gas refining has a mixture of isobutane, N-butane, and other gasses, so I think the 20 F boiling point is typical, but I have only looked at two brands. I call this ‘cheap butane’. There are also brands of canisters that perform close to cheap butane but at a higher price.
I just used cheap butane for my testing. The fact that it has a higher boiling point is convenient because it’s never cold enough where I am for testing the ‘good’ stuff near its boiling point. I have calculated what the performance would be with the good stuff – I just subtracted 10 F (5 C) from all the cheap butane results. I did verify this a little – I used some MSR IsoPro at 18 F (-8 C) and the results were consistent.
This boiling point temperature is just the starting point. The first strategy for reducing the lowest temperature you can operate at is to get the good stuff. You can operate an upright canister with the good stuff at 10 F (5 C) lower than with cheap butane.
From here on I will be making references to canisters with a variable amount of a gas or gas mixture. For the purpose of this article, I was carefully refilling canisters. More on this later.
Experimental Results
I started with an 8 oz canister (typically 220 g) was half full of cheap butane and an upright Soto Windmaster stove. I boiled 16 oz of water. The water started at about 50 F (10 C). I heated it to 212 F (100 C). The sensor on the underside is of course directly below the butane liquid. I did the same thing for all my tests so they can be compared.
The dark blue line is the temperature of the probe under the canister, which will be very close to that of the butane inside. It started at the ambient temperature of 45 F (7 C) and dropped to 38 F (3 C) over the course of boiling the water. After I turned the stove off it started rising back up. The red line shows when the stove was burning. It took 3:00 to boil the water, and this is as fast as this stove goes.
The temperature at the surface of the butane inside the canister where it’s evaporating will start dropping as soon as the stove starts burning, but you can see that the drop in the temperature at the bottom of the canister is delayed by about a minute. It takes that long for the fall in temperature to propagate down through the butane, through the canister wall, and into the sensor. I expect that the last two delays will be relatively short. I’m going to assume the minimum the sensor gets to is the close enough to what the butane actually gets down to before it starts to rise again.
The minimum temperature of the fuel (about 38 F or 3 C) was well above the boiling point for my ‘butane’ (which was measured as being about 20 F or -7 C). That meant there was plenty of butane vapor to drive the burner at full speed during the 3 minutes it took to boil the pint of water. The Soto regulator would not allow a higher rate regardless of pressure/temperature. A more conventional needle valve would do the same, although different stoves will take a little longer or shorter time to boil a pint of water.
In the course of boiling the pint of water, the temperature at the bottom of the canister dropped 7 F (4 C). It takes energy to evaporate the fuel that leaves the canister to be burned. That energy comes from the liquid fuel in the canister dropping in temperature. This is evaporative cooling.
Then I did the same thing at several other air temperatures, all with an 8 oz canister and 4 oz of fuel.
The dark blue line was for an ambient air temperature of 45 F (7 C).
The purple line was for an ambient of 32 F (0 C). The stove started at a normal level but after a couple minutes slowed down noticeably. It took a little longer to boil – 4:15 rather than the normal 3:00. The butane got down to 26 F. This was close enough to the 20 F boiling point for this fuel, that the rate of butane evaporation was a little less, so the stove didn’t burn as fast, so it took longer to boil. I would consider this totally acceptable. This is the start of cold temperature performance degradation.
The light blue line was for an ambient of 28 F (-2 C). The stove started a little slowly, then got much slower. It took 7:30 to boil – more than twice as long as normal. The butane got down to 23 F (-5 C). The rate of evaporation was way less at this temperature so the stove burned much more slowly. To me, if it takes twice as long to boil my patience level is exceeded. I would consider this unacceptable.
The green line was for an ambient of 24 F (-4 C) air temperature. It took 14 minutes to boil, and the butane got down to 20 F (-7 C). The flame was so feeble as to be unusable in my opinion, although it eventually did boil. This is my measure of the boiling point for this fuel: 20 F. There was plenty of time for the system to stabilize, so the temperature I measured was close to the actual temperature of the fuel.
For all cases the burn started at minute 0 on the plot. For the 24 F case the stove continued burning past the end of the plot.
The measured temperature drop varied a little with air temperature:
- Ambient of 45 F ; Drop of 7 F
- Ambient of 32 F ; Drop of 6 F
- Ambient of 28 F ; Drop of 5 F
- Ambient of 24 F ; Drop of 4 F
Simplistically, the temperature drop should be the same in all cases, but it wasn’t. I think that when the stove was running at a lower power for a longer time, there was more opportunity for the surrounding air to warm up the canister back up and cancel out some of the temperature drop.
From here on I will (somewhat arbitrarily) define four levels of operation:
- The butane stays >6 F above the BP – normal operation
- The butane stays between about 3 and 6 F above BP – slow but still usable, doubles the boil time at the bottom of this range
- The butane gets to <3 F above BP – I would call this unusable, although if patient you might still get water to boil
- Butane temperature below BP – not even a feeble flame
Evaporative Cooling for Different Canister Sizes
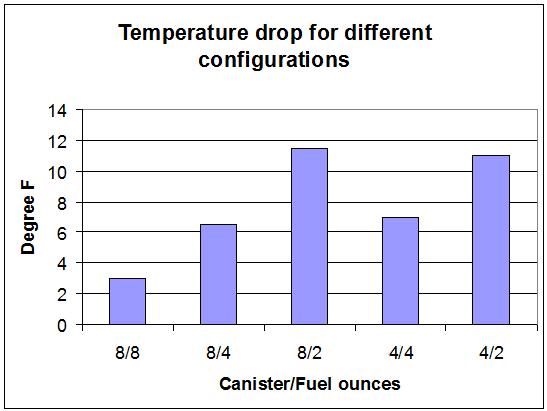
All of the above was for an 8 oz canister half full. I tested a number of combinations of canister sizes and fuel amounts:
- 8 oz canister with 8 ozs of fuel – full
- 8 oz canister with 4 ozs of fuel – half full
- 8 oz canister with 2 ozs of fuel – mostly empty
- 4 oz canister with 4 ozs of fuel – full
- 4 oz canister with 2 ozs of fuel – half full
For each, I boiled a pint of water and measured the temperature of the canister. For each run, I used the coldest air temperature that I had data for that had a 3:00 boil time.
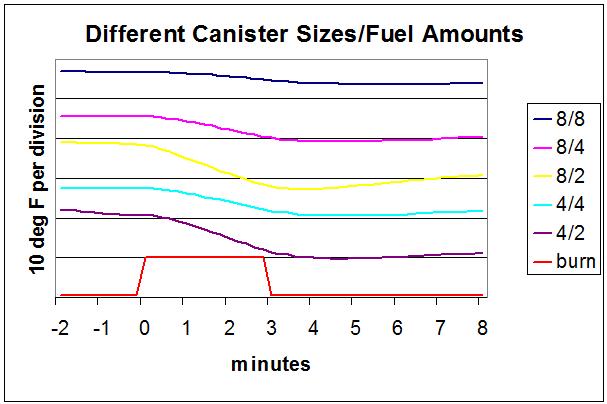
The top line is the temperature for an 8 oz canister with 8 oz of fuel. The next line is an 8 oz canister with 4 ozs of fuel and so on. The red line shows when the stove was on.
Note that I offset the lines on the plot so they wouldn’t be on top of each other, but they all have the same scale for temperature drop. For example, the top line, 8 oz canister with 8 oz fuel dropped about 0.3 divisions, so that would correspond to 3 degree F.
Summary
So, for example, if you use a full 8 oz canister (8/8) the temperature drop is only 3 F, so the minimum air temperature for normal operation is calculated thus:
- BP for this fuel = 20 F
- Margin for sufficient evaporation rate = 6 F
- Evaporative cooling temperature drop = 3 F
- Minimum air temperature for normal operation = 20+6+3 = 29 F
You can see that the results depend mostly on the amount of fuel (or its thermal mass). The 8 oz canister might be bigger than the 4 oz canister, so the steel in the 8 oz might have more thermal mass, but the experimental data says that the canister size is largely irrelevant. The small differences seen in the graph between the cases is simply experimental error.
The minimum air temperature you can normally operate at for a 3 min boil time for different amounts of fuel is shown next:
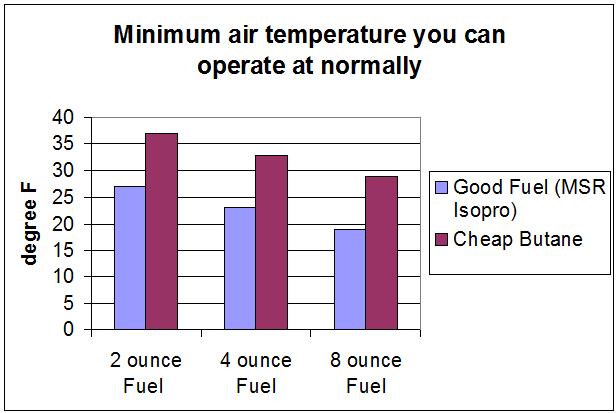
If there is less than 2 ozs of fuel the temperature drop will be even more. I tried to measure this, but there’s so little fuel I couldn’t get good measurements. 1 oz of fuel will have half the thermal mass of 2 oz, so it will cool down twice as fast – although the thermal mass of the canister will start to be significant soon. The temperature drop with 1 oz fuel might be about 16 F (9 C).
You can go about 3 F colder than this if you don’t mind doubling the time it takes to boil, or you can go 6 F colder if you don’t mind waiting 15 minutes to boil and the wind doesn’t blow the flame out. That could be limiting.
Case Study (A Technical Analysis)
I have used an MSR Isopro canister with 2 oz of fuel in it at 18 F air temperature and the boil time was 4 minutes. I was too lazy to measure the temperature, but I can estimate it. With 2 oz of fuel, there should have been 11.5 degrees F of evaporative cooling. With a 4 minute boil time, the fuel should have got to within 6 degree F of its boiling point. Thus, the boiling point of this fuel should be about 18 – 11.5 – 6 = 0.5 F (-17.5 C).
I conservatively use 10 F (-12 C) for the BP of the good stuff, which is what happens when most of the propane has been preferentially evaporated off, but my canister had not had its propane boiled off. Hence the lower number.
From Stuart’s spreadsheet, the partial pressure for propane is:
1.3333*POWER(10,6.82973-(813.2/(248+T)))
And for isobutane the partial pressure is:
1.333*POWER(10,6.74808-(882.8/(240+T)))
For both equations, T is the temperature in degree C. You have to weigh these by the mole fractions and add to get the total pressure. I calculated above that the BP of the Isopro fuel seemed to be about 0.5 F. For that temperature, to get the total pressure to be 1000 mBar so vapor would come out of the canister, the mole fraction must be 0.11 propane and 0.88 isobutane (assuming there are no other gasses). Multiply by 0.8 to get a mass percentage of 9% propane and 91% isobutane. They say it’s 20% propane, 80% isobutane. It’s difficult to measure this so maybe they don’t worry about meeting that spec and figure 9%/91% is close enough. Maybe they’re more concerned with minimizing N-butane, which is actually a good thing. Or maybe I’ve made a math error.
A Strategy for Cold Weather
All of the above leads to a simple strategy for cold weather usage – bring a full 8 oz canister. Many people already do this and have assumed it works because the full canister will have lots of propane in it, but my data suggests that a major reason it works is because of the thermal mass of the fuel. There is in fact a bit more to this, and we will come back to it in Part 4 of this series.
Appendix: Background Theory
The calculation of evaporative cooling is straightforward. We will switch units here and work in metric: it’s easier. Note that the Specific Heat, Heat of Evaporation, and the Heat of Combustion are about the same for n-butane, isobutane, and propane, so the amount of evaporative cooling should be about the same for all fuel types. We will assume n-butane.
The heat of evaporation of N-butane is 386 Joules/gram. That is, it takes 386 J to evaporate 1 g of N-butane. So if you know how much fuel you have used, you know how much energy you have used.
The Specific Heat of N-butane is 1.675 J/gC. This means that 1.675 Joules are released if you cool 1 g of N-butane by 1 C. The specific heat of steel is ~0.49 J/gC (different alloys give slightly different figures).
I use 7 g of butane to boil a pint of water, so 7*386 = ~2700 J were used to evaporate the fuel. That energy has to come from the fuel, which will cool down as a result.
I started with 114 g of N-butane in my canister, and the steel canister (nominally a 110 g one) weighed 85 g. Cooling 114 g ‘butane’ by 4 C gives 4*114*1.675 = 764 J. Cooling 85 g of steel gives 4*85*0.49 = 167 J, for a total of 931 J. This is much less than the 2700 J required.
I cannot easily explain why it cooled so little. It is possible that some heat got into the canister and fuel from the ambient or from the hot gasses from the flame. It is possible that the canister was also picking up some radiant energy from the flames as well.
If so, that means we really must pay attention to what heat can get fed back into the canister during operation. If we are smart, that feedback can be hugely helpful.
Next in this Series
There are four parts currently written for this series. Parts 2-4 will address canister stove warming techniques for operation at very low temperatures, refilling gas canisters, and propane depletion during stove operation.
Acknowledgments
Roger Caffin provided editorial assistance for this article series.

Discussion
Become a member to post in the forums.
Companion forum thread to: Evaporative Heat Loss in Upright Canister Stoves (Part 1: Measuring the Temperature Drop of Evaporative Cooling)
Evaporative heat loss in upright canister stoves extends boiling times and changes fuel mixture composition. Here’s how to combat it.
My strategy for cold weather is to place the fuel canister in a plastic peanut butter jar lid, and add some water. The fuel canister will run until empty, even at -20*F (-30*C).
Thanks, Jerry. You made it easy to understand how canister stove fuel works.
Thank you Jerry for this interesting article and tests. As Douglas, I found that keeping the canister inside a bowl of water works well to operate stove in cold conditions. I normally use one of those collapsible bowls but probably the peanut butter lid is lighter.
Here a picture of my set up.
As long as the water in the bowl remains liquid you know the canister is above freezing (32*) so no issues with performance of the stove. As you have noticed in your tests, as you run the stove the canister drops in temperature so periodically I need to add a bit of the boiling water into the bowl to keep the water above freezing.
I talk about that in part 2. Yeah, good points
By the way, none of this is all that unique. Lots of threads about this. I don’t claim to be more expert than others : )
But, I haven’t seen actual measurements of how many degrees drop there is, how it varies with amount of fuel left, and a few other points. And since I don’t do this for work any more, I have to continue doing engineering stuff to entertain myself. I think some of this will be interesting to BPL people.
and Roger added a lot to these 4 parts, and I stole ideas from Bob, Gary, https://adventuresinstoving.blogspot.com/,…
Good work, Jerry. And I rarely even use a canister stove.
Thanks, Jerry!
Why use an up right canister when one can simply invert the canister and receive a constant pressure throughout the burn.
If you are using a BRS-3000T (or any other upright stove) stove, inverting the canister may be considered hazardous to your health.
After all, the title of the article does say ‘in UPRIGHT canister stoves’.
Cheers
That’s a good solution. Most stoves don’t allow inversion. Stoves that do tend to weigh more (except Roger’s is pretty close to the lightest). When inverted, stuff from the canister can get out and clog the valve. All solutions have pros and cons.
Has everyone seen one of these valves: https://www.amazon.com/gp/product/B00U2EE6M2/ref=oh_aui_detailpage_o03_s00?ie=UTF8&psc=1
It allows you to get those unused bits of fuel from partial cans into another mostly full can. Or to fill the small cans from bigger ones with the exact amount you need. I think I learned about these on one of the BPL forums. I have had great success. Works in the field on really long trips (although I still use liquid for unsupported trips upwards of 7 days). There may be some issues with what type gas is left in an almost empty can so it can throw off the ideal ratios from something like a new MSR can. Never had an issue in mild to hot conditions.
This is getting really out there, but G-works also has adapters to run Lindal valve devices directly off of propane bottles, including the big grill size cans. These are some limited applications for most folks, but for program use and some other wacky scenario’s it is pretty handy to have multi-fuel capabilities.
And finally, you can combine the two adapters and fill standard lindal cans with propane. Again, limited applications and a huge list of “this voids warrranties and is dangerous if you do it wrong” type stuff.
Paul
That’s in part 3 : )
Which Bob clued me into on a previous thread. I added a little information to what Bob said.
Yeah, I have used that successfully, great idea
As mentioned on a previous thread and in part 3, if you put straight propane into a canister, the pressure is higher. It can cause the bottom to push out, if you’re lucky, or burst if you’re less lucky. Some people do this as long as you keep the canister below room temperature or something.
Nice work Jerry, I look forward to the rest of the series.
Paul, if you combine your adapter with this adapter you can also use cheap butane cartridges (available at most Asian markets) to refill your canisters. Works just fine in your “mild to hot” conditions and the BTUs are about the same as Isobutane and Propane. But it’s nice to have the flexibility to use other fuels for car camping, group situations etc.
and that’s the fuel I used (based on Bob’s recommendation) for my testing – boiling point 20 F – when you consider evaporative cooling you start getting into trouble below freezing, but then you have to use the Moulder strip or whatever…
I got 4 cans, 8 ounces each, for $5
Jerry, I liked your article. You summarized the cooling of the canister nicely, you correlated it with the amount of fuel remaining, and you did it for both sizes of canisters. Well done.
thanks : ) I believe there’s an article coming that you did that I look forward to
Hi Jerry,
Thanks for your research and reporting about the canister. Look forward to the next installments.
I learned the hard way that altitude may also affect the burn time of a canister.
For a number of years, I used Coleman cheap “butane-propane mix” canisters in Colorado, camping at 9-12,000 feet in July and August, and found that the canisters would last 6 days (5 nights) and still have some gas left. The meal routines for stove use were always the same, requiring approximately the same boiling and simmering times, and the canisters were weighed before the trips to see that they were full.
Then I commenced a 6 day loop trip in May in the Nash Stream-Phillips Brook area in northern NH, camping at 1-3000 feet, with the same routines and full canister. It was the first time in the Northeastern US that I had brought only one canister, based on the Colorado experiences. The canister ran out on the 5th morning (4 nights), possibly because the boiling and simmering times required for the same food and drink increased. The air temperature was about the same for both the CO and NH trips. Had planned to camp the 5th night on an open mountain ridge with no firewood, but it had been raining for several days, so the last day was a long one.
Hi Sam
You do not mention the size of the canister you took to Nash Stream. I assume it was a 110 g one if it ran out after 4 nights? Even so, that’s a lot of gas used for one person for 4 nights. Or were you cooking for 2?
Cheers
The boiling temperature of water is less at higher altitude, so it requires less fuel to boil a given amount of water – you’re not heating the water to as high a temperature. Maybe that’s why you use less fuel at higher elevations?
Hi Roger,
Re “You do not mention the size of the canister you took to Nash Stream. I assume it was a 110 g one if it ran out after 4 nights? Even so, that’s a lot of gas used for one person for 4 nights. Or were you cooking for 2?”
Myself and two dogs, around 30# each. Water was also boiled in the mornings.
These were Coleman 220g canisters. They weigh around 13 oz. when full, and fit nicely into a 900 ml ‘pasta pot’ if not too old and rusty.
The morning routine was to bring 750 ml of water to a boil, for hot water for a premix of instant coffee, instant breakfast and milk powder in a smaller pot. (warning: the powder will clump unless poured into and mixed with the water a little at a time, OR the powder can be mixed cold, then poured into the separate container and drunk cold or reheated – depends on the weather). The remainder of the boiled 750 ml was used for black tea, to moisten the 2 dogs’ kibble, and for clean-up.
The evening routine began the same way, but one cup of the hot water was poured into the smaller pot with a premix of some form of pasta and freeze dried meat, and then covered and simmered for 15-20 minutes, stirring regularly. When judged ready, a premix of seasonings was stirred into the cooked meat and pasta. The remainder of the 750 ml of hot water was used for herbal tea, moistening the dogs’ kibble, and for clean up.
The premixes for each meal were all packaged in separate polyethylene bags sealed and trimmed with a U-Line sealer.
There was usually enough boiled water in the larger 750 ml pot to complete the meal. Often, the 750 ml was just scooped from a nearby stream with the 900 ml ‘pasta pot,’ so the figure is not exact.
Same pots, same dogs. Pots were both Ti.
Hi Sam
Ah – 2 dogs. So about 2 people, and about 55 g/night. Even so, that’s a lot of gas used. I use 30 g/day for the two of us.
Um – OK, that’s in our summer with a cold breakfast. Winter might see us using closer to 50 g/day, what with warm milk for breakfast and so on. Understood.
Cheers
Become a member to post in the forums.