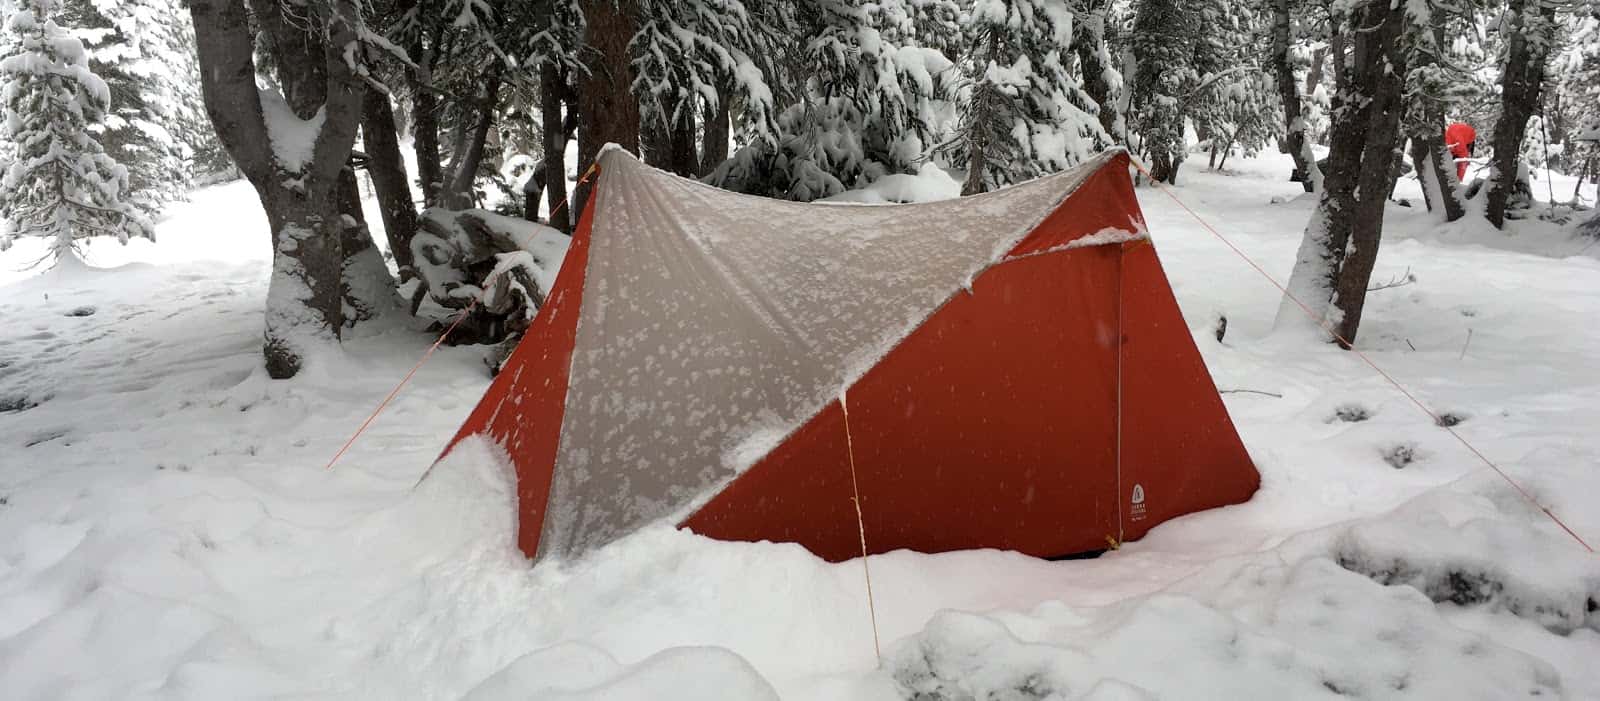
Updated: Notch Li V2 (2020 Version)
Updates:
- April 18, 2020 – added new field and detail photos of the v2
- April 9, 2020 – added stock photos and details about the v2 update
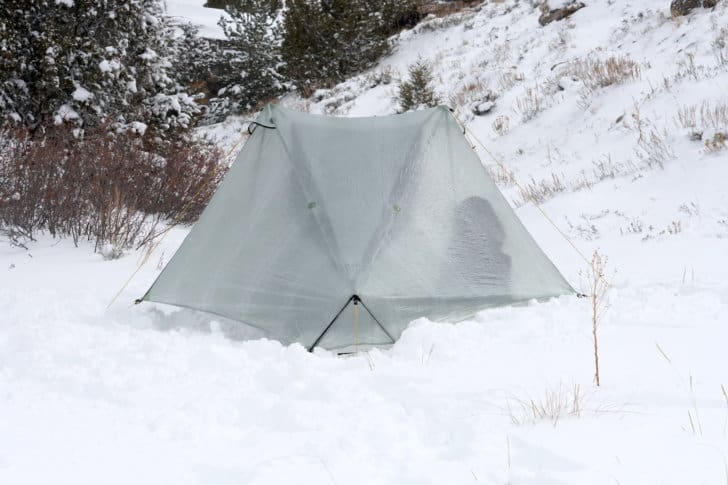
Tarptent released v2 of the Notch Li tent on April 10, 2020.
What’s changed?
- The most meaningful change is replacing the door flaps on the vestibules with waterproof zippers. This will drastically improve weather performance in wind, which was was the notable shortcomings we discovered in our review below. These are two-way waterproof separating zippers, which will help with ventilation at the peak as well.

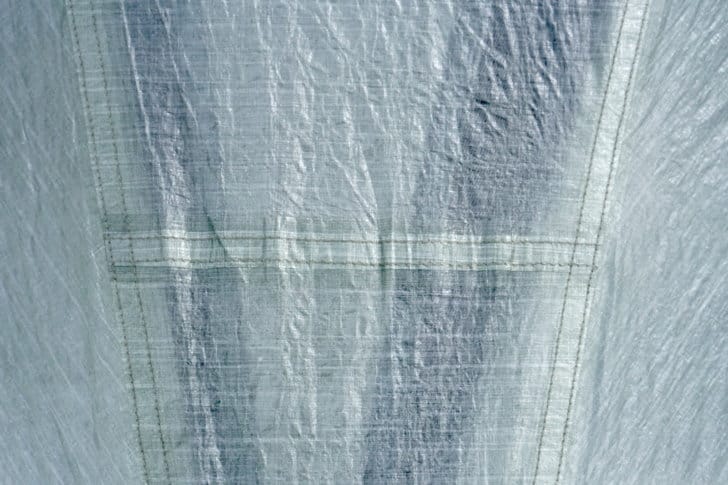
- The partial solid fabric interior now has a solid fabric (instead of mesh) roof panel. This type of construction is essential in order to prevent condensation that has accumulated on the inside of the roof from falling down on you through mesh. Best of all, Tarptent changed the fabric to a 10 denier weight – which means the partial solid fabric inner is now lighter than even the mesh inner.

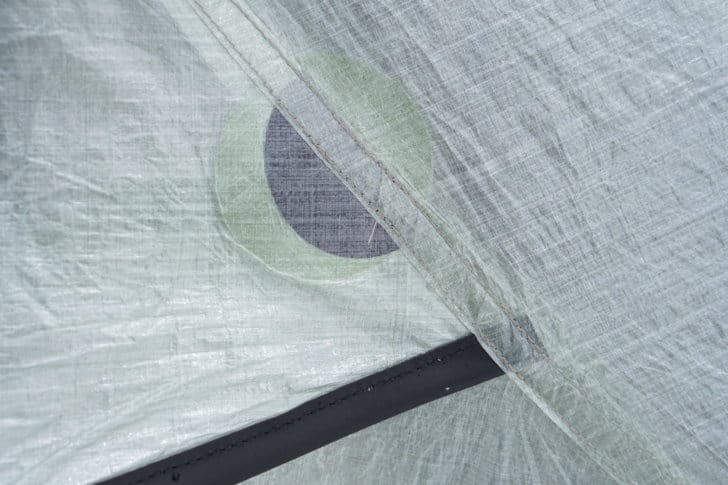
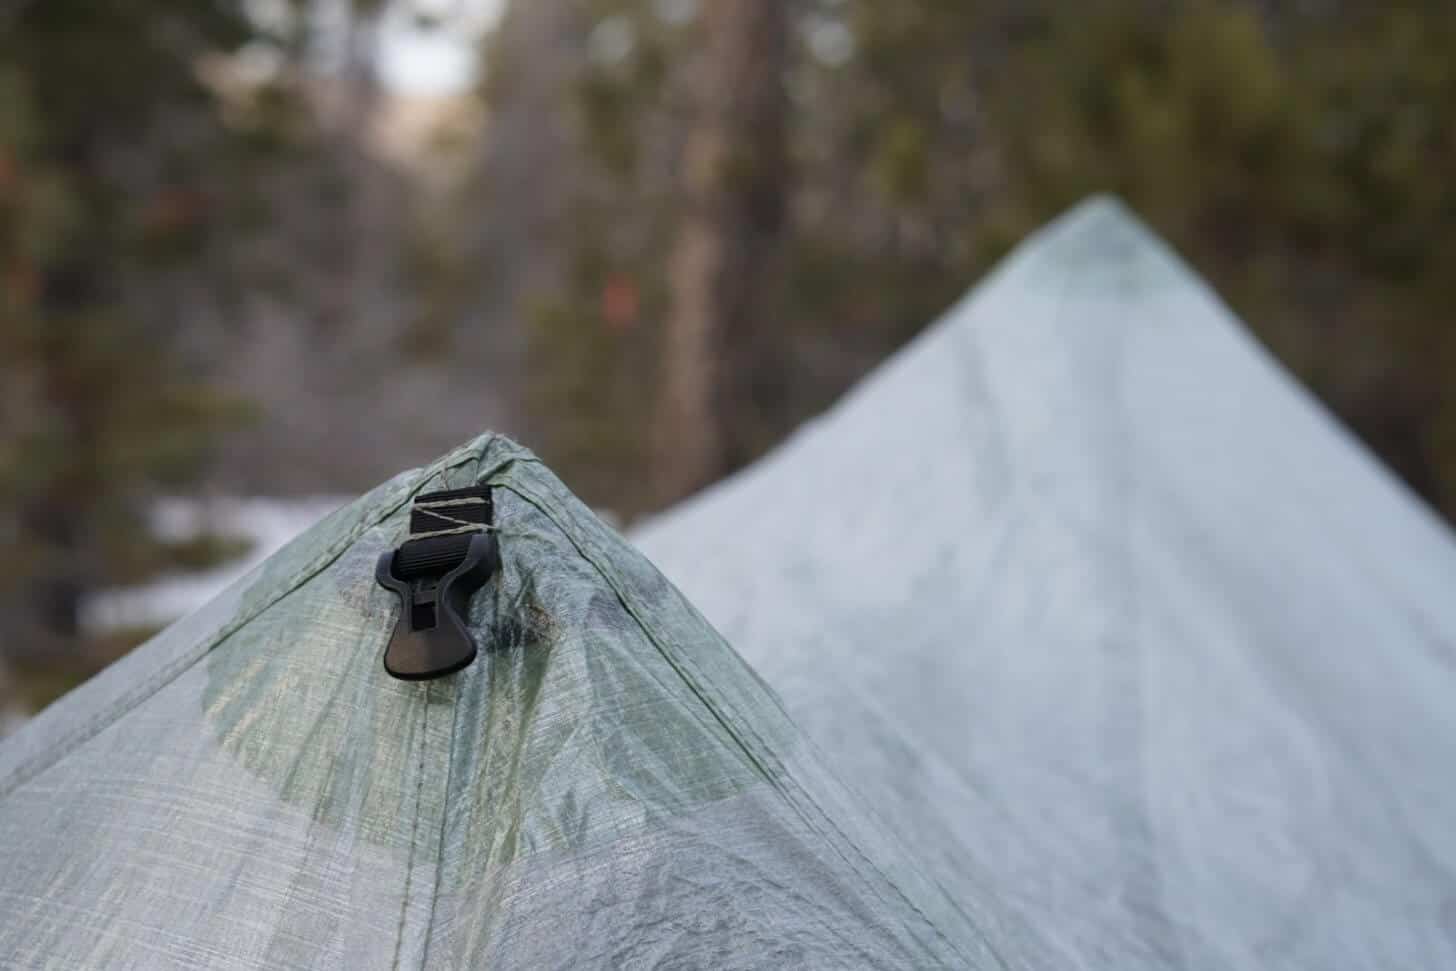
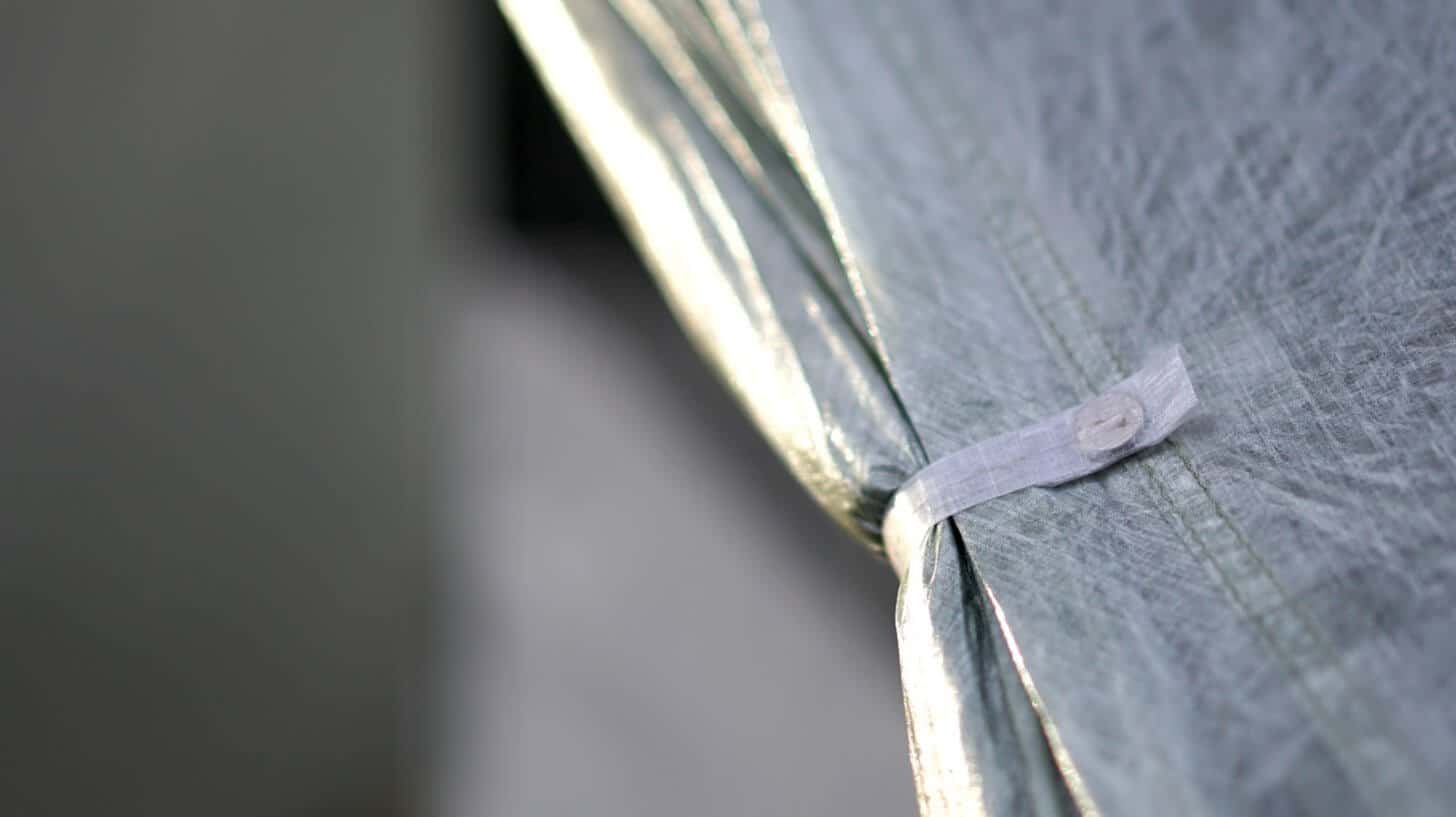
- Tarptent notes that they also made “end to end improvements in stitching, cutting, taping and bonding” which we can only assume will result in a better pitch and more strength. There are some obvious additional bonding patches here and there (see photos below for the magnetic door tie).
- It looks like Tarptent has addressed the magnetic vestibule door tie issue. It tended to pop open under very little pressure (wind, tight staking, etc.). Note in the photos below, the V2 magnetic closure is attached to a thicker strap and the location has changed along the door seam, so less stress will be imparted on the door tie and it should be less likely to pop open under tent stress.

- Manufacturing has moved from Seattle to China, at least for Lithium series tents. We expect this to improve sew and finish quality of these new tents dramatically.
New Photos
added 4/18/2020


Introduction
This review was originally published on March 4, 2018.
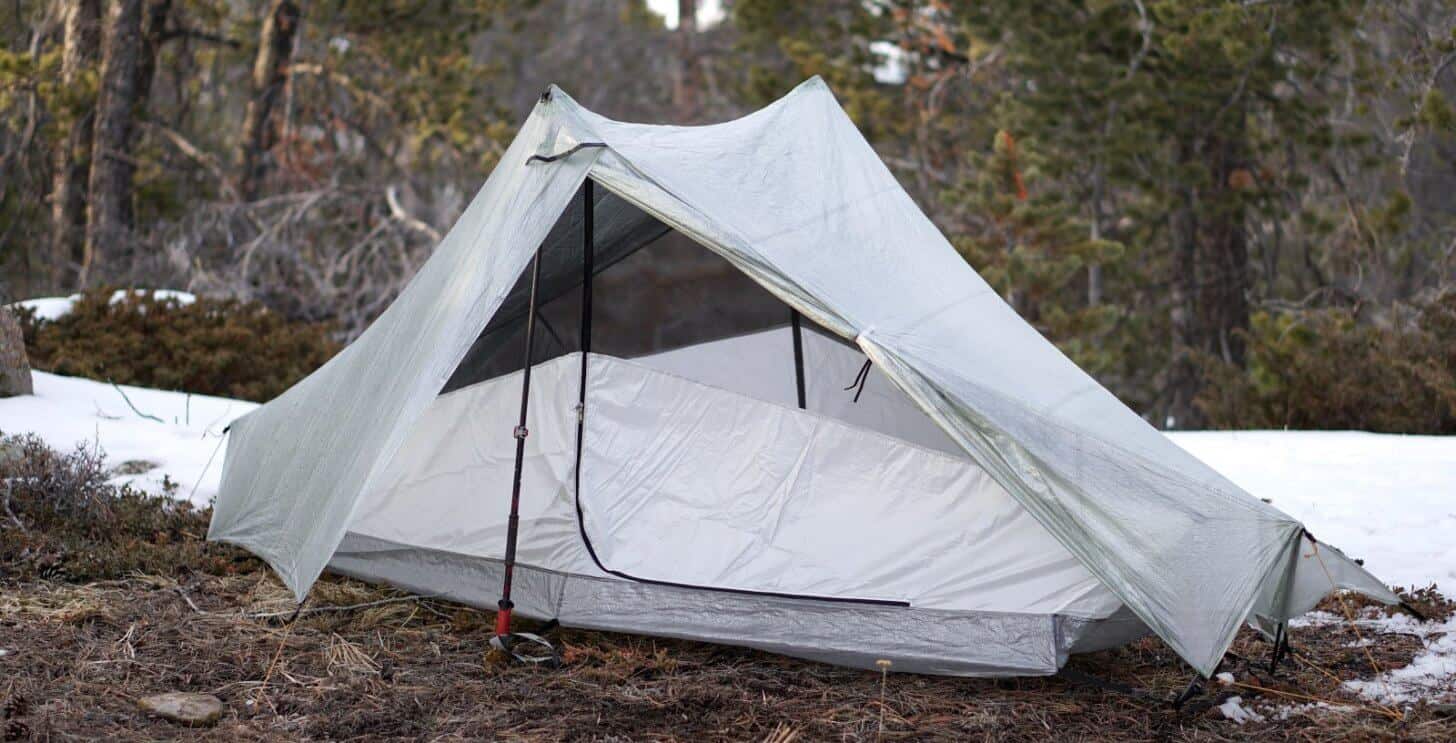
This Flash (“first looks”) Review provides an overview of the new Tarptent Notch Li shelter, representing Tarptent’s first use of Dyneema Composite Fabrics (DCF, formerly, Cuben Fiber) in their shelter line.
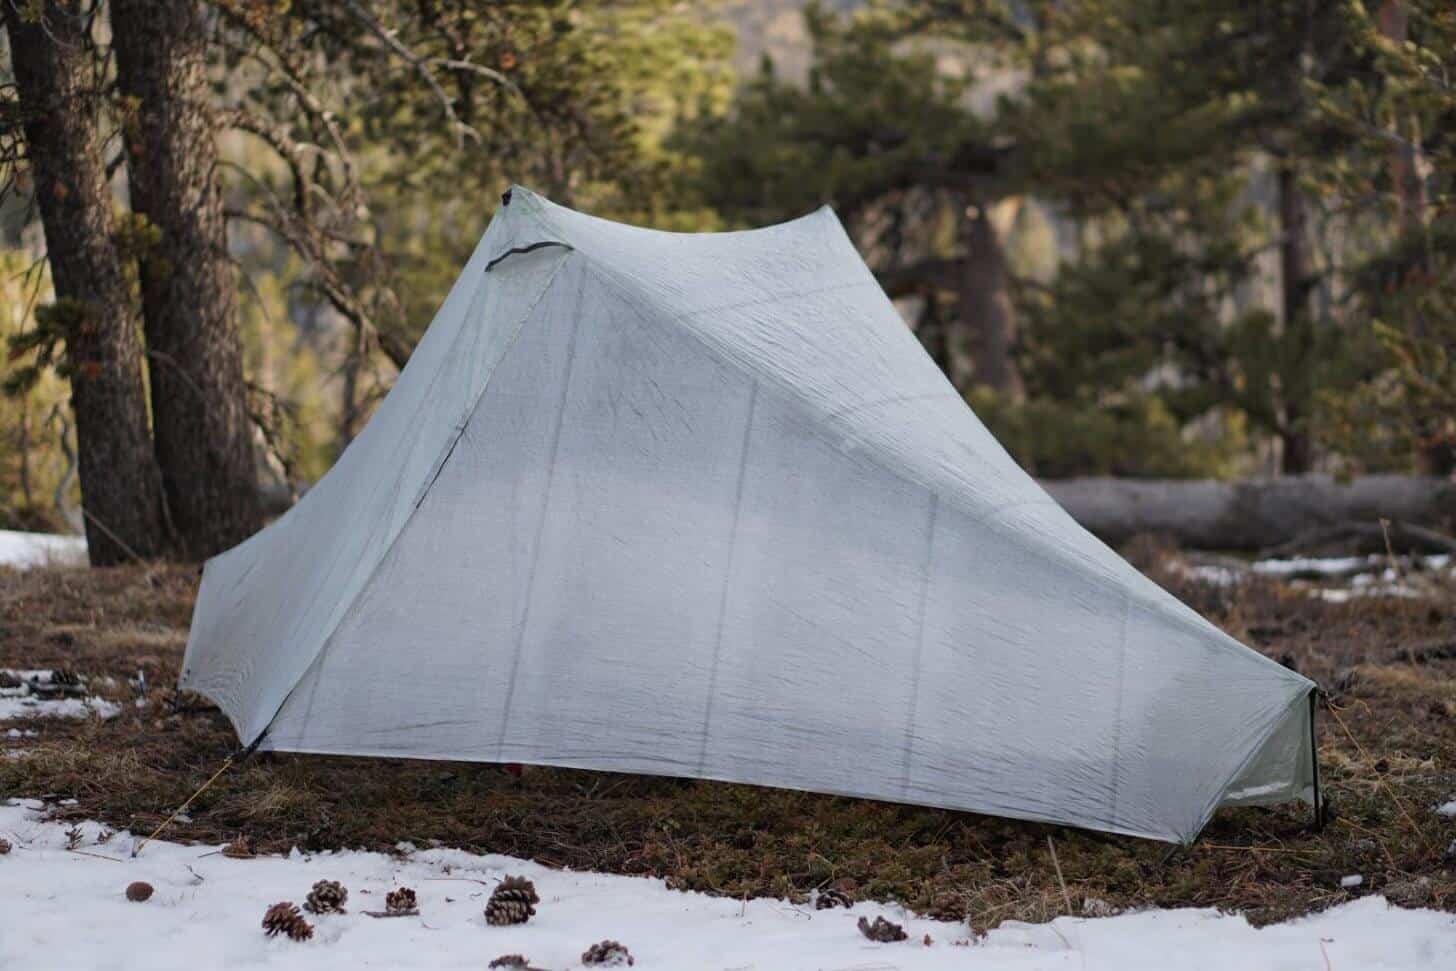
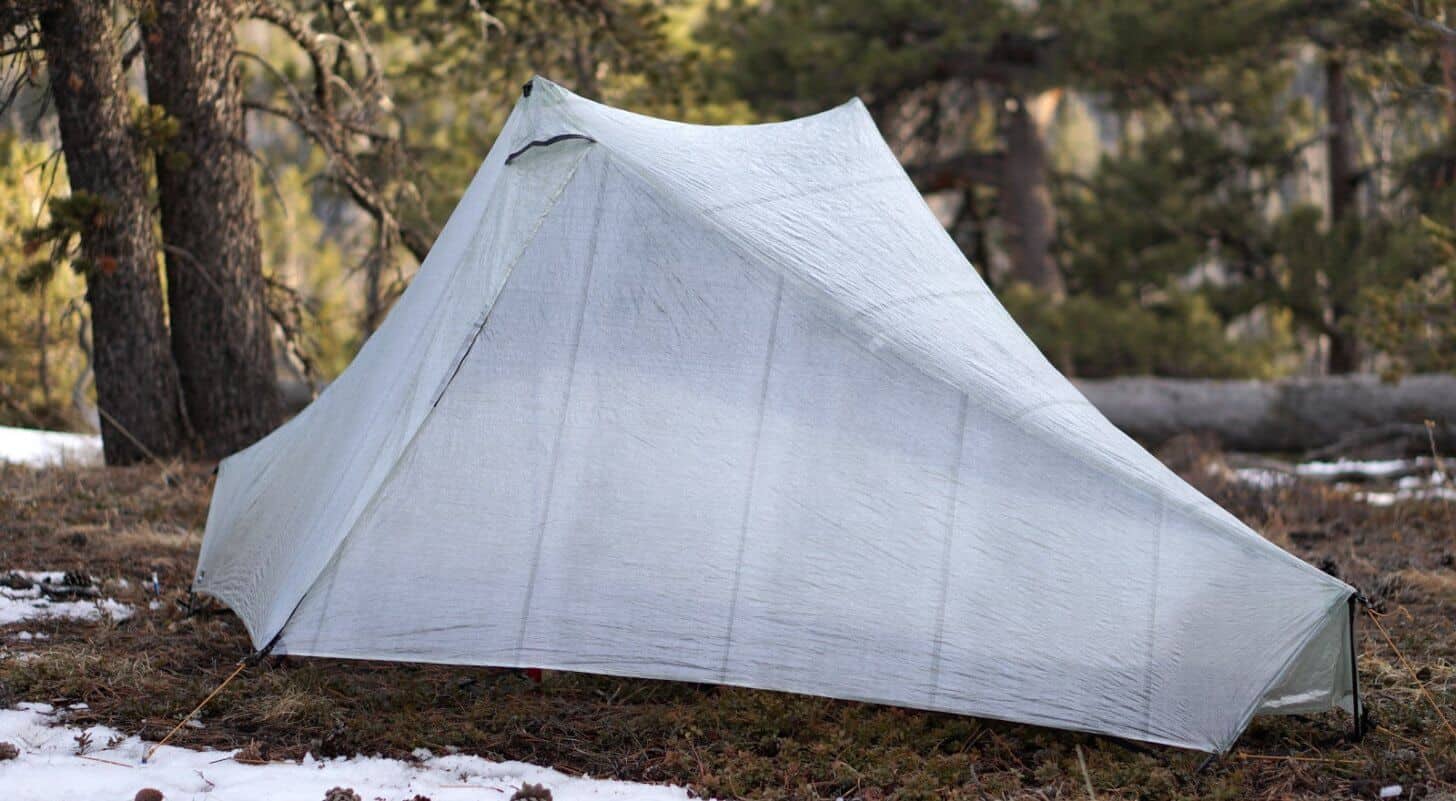
In DCF, it is quite a beautiful little tent, yes?!
DCF shelters have a cult following amongst hardcore ultralight hikers for their:
- High fabric tear strength-to-weight ratio (and very light weight);
- Low stretch (maintains a taut pitch across a wide temperature range);
- Less condensation than conventional nylon fabrics.
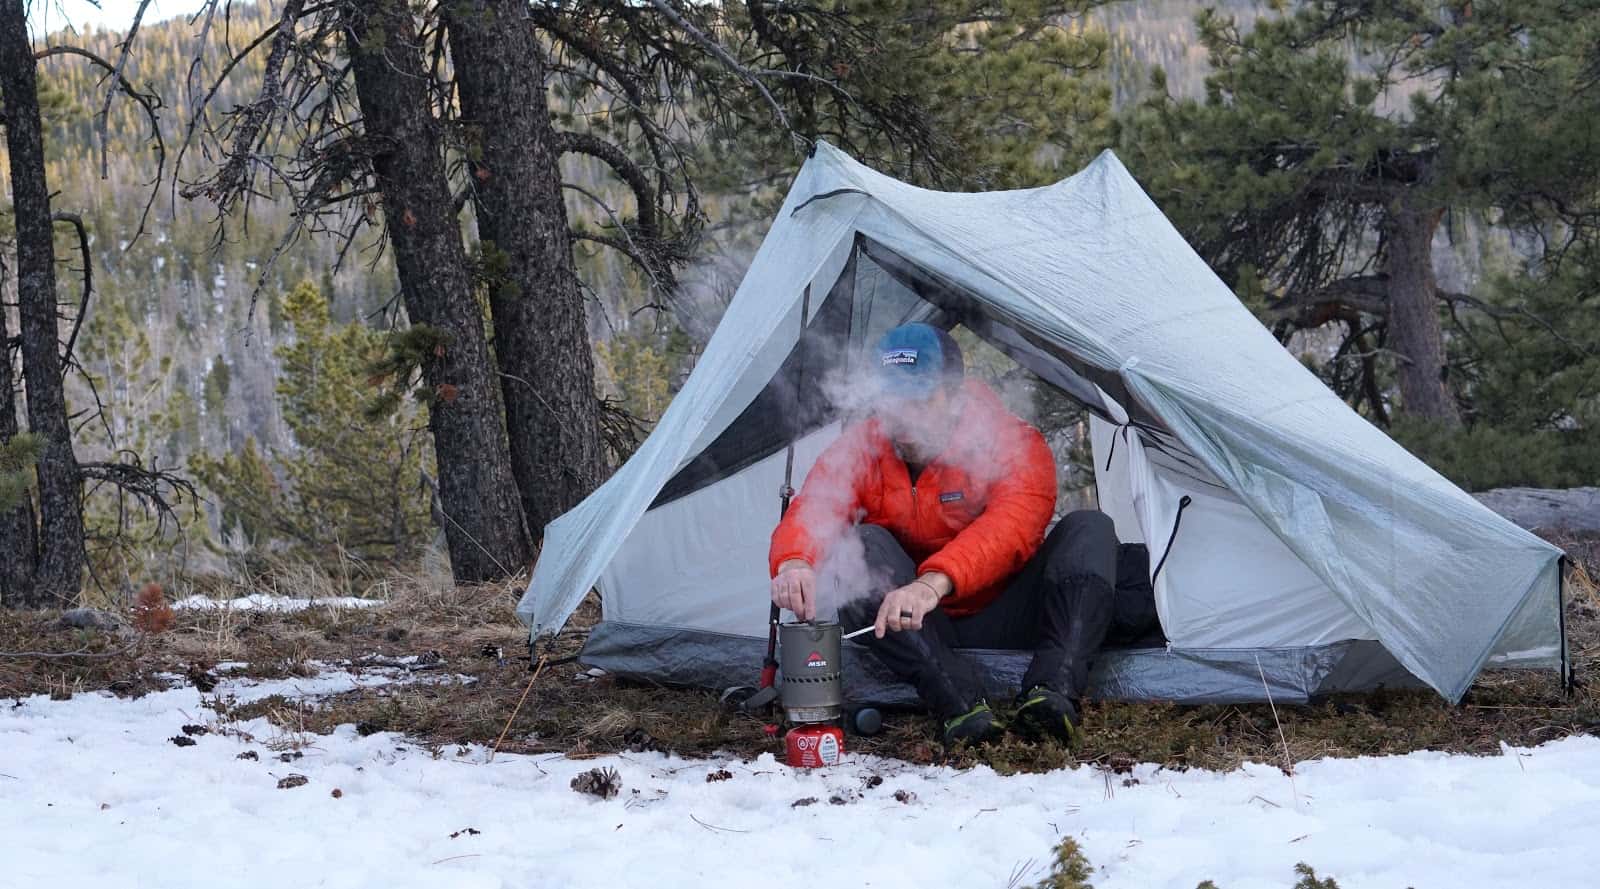
Tarptent is known for shelters that are well-made, stable in foul weather, and usable, roomy designs. We recently reviewed the Tarptent Stratospire 1, which I’ve personally found to be a highly-weather resistant shelter in four-season conditions. Oh how I wish for a DCF Stratospire!
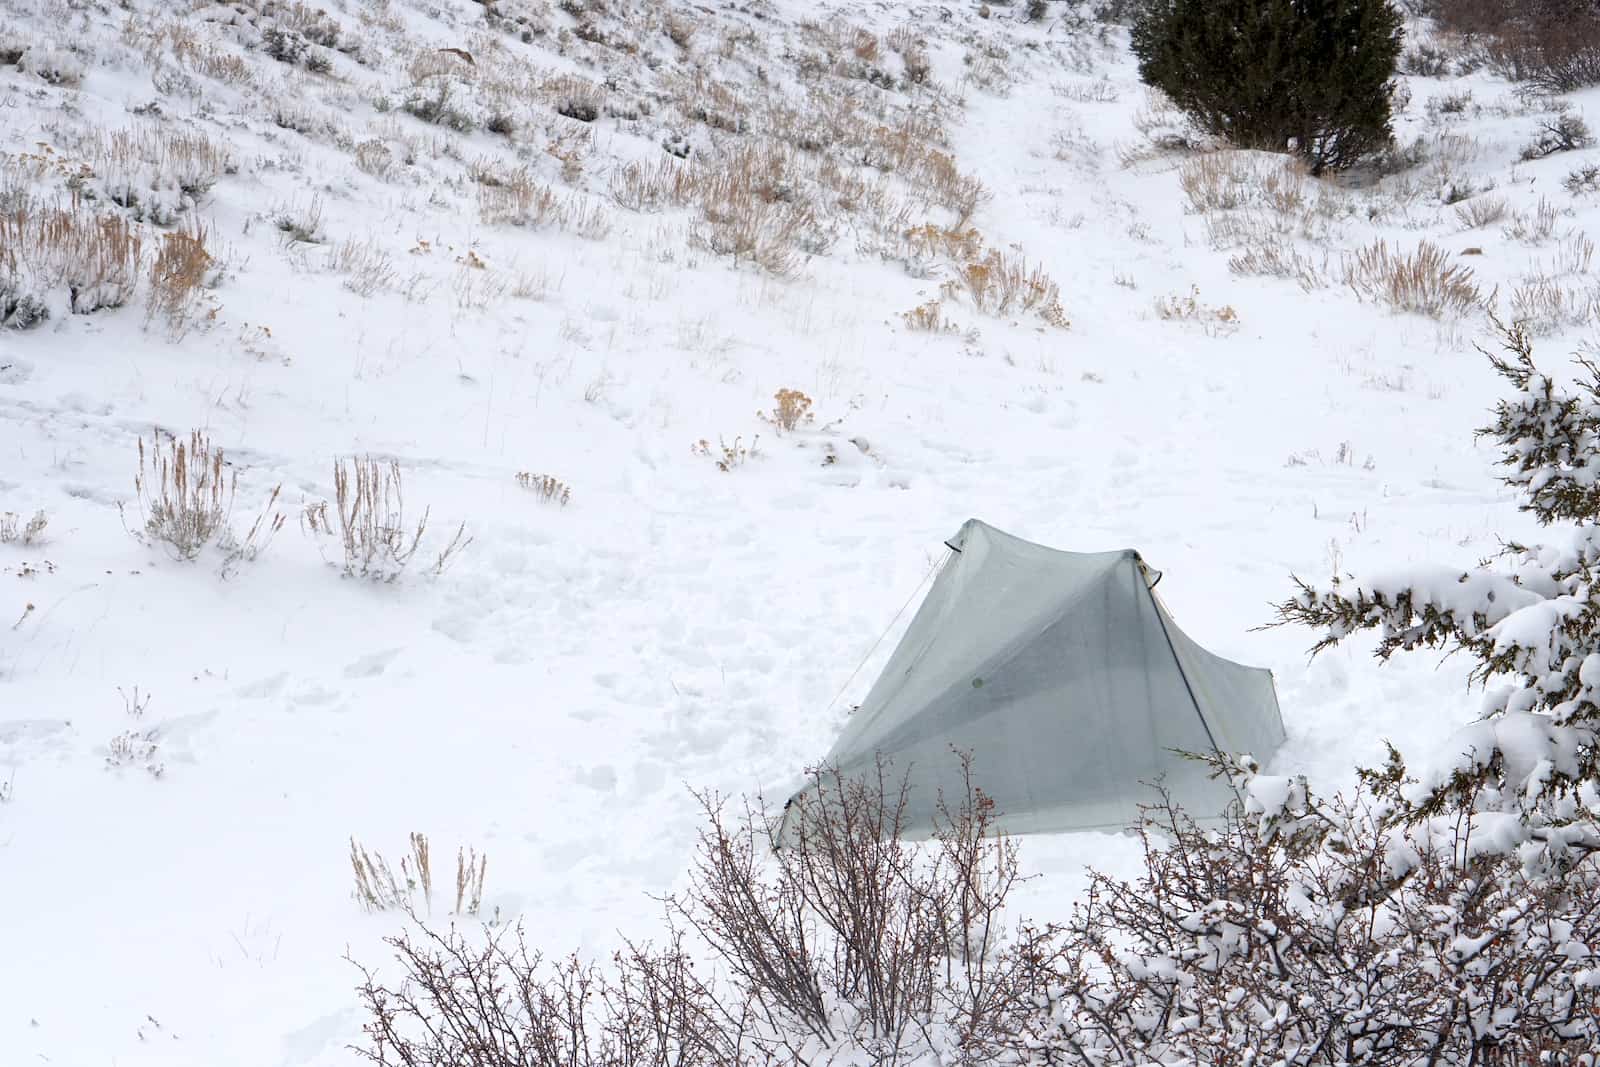
The (silnylon version of the) Tarptent Stratospire 1 on the Colorado Plateau. Constructed of DCF, this tent could weigh as little as 1.5 lb.
We’ve published a number of other Tarptent Reviews here. I find the curved-pole designs sort of ho-hum (others will differ in opinion, and I respect their preferences) due to their unflattering performance (storm-worthiness)-to-weight ratios. However, my personal experience in recent years has focused on their dual-trekking pole solo models, including the Notch and Stratospire.
I appreciate the design simplicity of the Notch – stability afforded by two trekking poles (and a few carbon struts). Its double-side entry/double vestibule design makes it a very usable shelter that offers great advantages for the solo hiker.
However, the use of silnylon fabric for a shelter this small makes it a condensation trap in all but the driest environments. On nights with little or no wind, at temperatures less than about 40 deg F, prepare to mop moisture from the walls – there simply isn’t enough ventilation in this shelter to manage condensation well.
In addition, the Silnylon Notch (and its more robust bigger brother, the Stratospire) suffers from fabric panel sagging as temperatures drop and/or precipitation falls. This isn’t unique to the Notch, it just happens to be one of the disadvantages of silicone-coated nylon fabrics. (Another 2-trekking pole-supported tent that suffers similarly is the Sierra Designs High Route FL1.)
And so it is with some hope that this new DCF version of the Tarptent Notch (the Tarptent Notch Li, or “Lithium”) improves on silnylon versions by increasing pitch tautness during a decreasing temperature / precipitation event, and being more resistant to condensation.
Of course, the weight savings of half a pound is nothing to shake a carbon fiber strut at, either.
Features
- Dyneema fabrics for weight savings and improved condensation performance;
- Taped seams;
- Dual trekking pole support; no poles in your living space (Requires minimum 43 in (110 cm) trekking poles or optional setup poles (extra $);
- Double wall, dual entry, and dual vestibules;
- Interior is completely removable and can set up independently;
- Interior protected from overhead precipitation during entry/exit;
- Alternate partial fabric and/or silnylon floor interiors available (extra $);
- PitchLoc™ foldable corners and integrated line tighteners for increased pitch tautness;
- Pole handle side up possible with optional adapters (extra $);
- Reflective spectra cord guylines;
- Catenary ridgelines improve pitch tautness and performance in wind/snow loading;
- Different interiors available (extra $).
Specifications
- Dyneema composite fabric (DCF) spec – 0.52 oz/sq yd on fly, 1.0 oz/sq yd on inner tent floor;
- Hydrostatic head rating: 8,000+ mm
- Interior surface area: 15.2 sq ft (1.4 sq m);
- Floor width (max): 34 in (86 cm) – fits a wide sleeping pad;
- Floor length (max): 84 in (213 cm);
- Interior height: 43 in (109 cm);
- Stakes (included): 4 x 6 in (15 cm);
- Packed size: 16 in x 4 in (41 cm x 10 cm);
- Weight
- Mesh interior with DCF floor (standard model)
- 19.9 oz (0.57 kg) – includes fly (10.1 oz / 0.29 kg), interior (8.2 oz / 0.23 kg), and stakes/stuff sack (1.6 oz / 0.045 kg).
- Mesh interior with silnylon floor
- 21.8 oz (0.57 kg) – includes fly (10.1 oz / 0.29 kg), interior (10.0 oz / 0.23 kg), and stakes/stuff sack (1.6 oz / 0.045 kg).
- Partial DCF/mesh interior with DCF floor
- 21.5 oz (0.57 kg) – includes fly (10.1 oz / 0.29 kg), interior (9.8 oz / 0.23 kg), and stakes/stuff sack (1.6 oz / 0.045 kg).
- Mesh interior with DCF floor (standard model)
Design, Features, and Usability Assessment
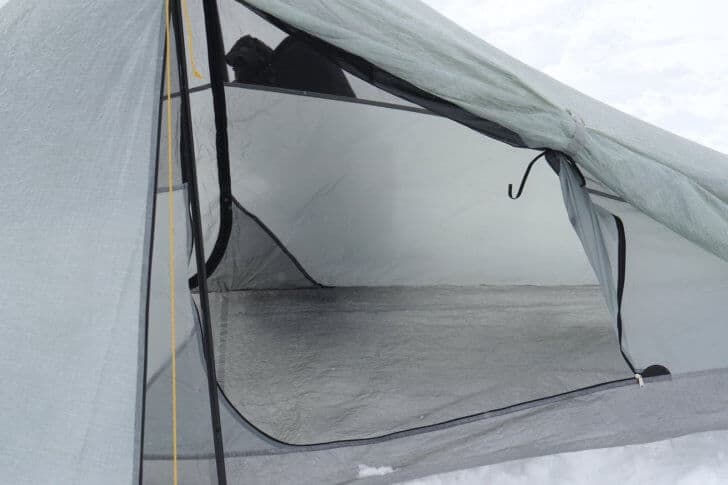
Inner Tent Layout
The Tarptent Notch Li includes a relatively small inner tent (34 in x 84 in, only 15.2 sq. ft. of area), but with notable features:
- PitchLoc corners integrate with the inner tent to provide more usable space at the ends. Consequently, nearly the entire 84 inch length can be used with a thick foam pad and winter-weight sleeping bag. A tall person using a long-length sleeping bag (e.g., 6′ 6″) should have no problem spreading out without touching any solid-fabric tent walls.
- With an inner tent width at its maximum of 34 inches (at the mid-point of the inner tent) and at its minimum of 20 inches (at the ends of the inner tent), the claim that a wide (e.g., 25 inch) sleeping pad will “fit” is a little dubious. That said, it works well enough, even though it all gets a little bit scrunched up at the ends.
- An interior peak height of 43 inches, even a tall-ish person (probably up to about 6′ 0″) can sit upright without rubbing their head on the top of the inner tent.
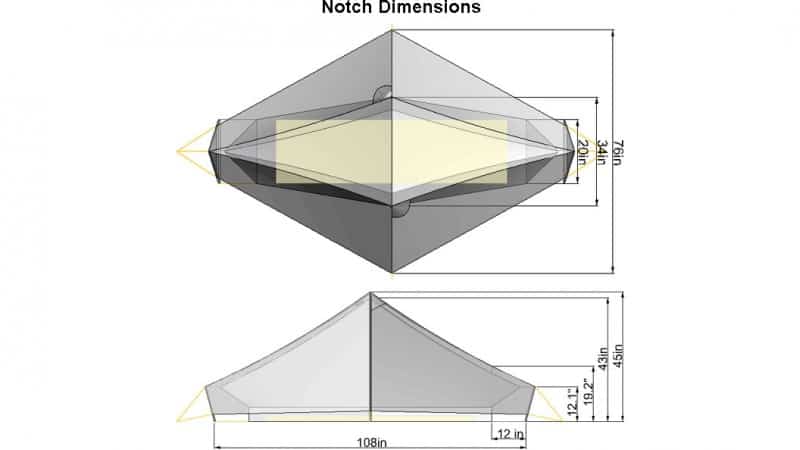
The Notch and Notch Li share the same geometry. Specifically, note the yellow-shaded model of a standard-sized sleeping pad (20 x 72 inches). A wide/long pad (e.g., 25 x 78 inches) will interfere a little bit with the footprint of the inner tent. Image credit: Tarptent
Dual Doors, Dual Vestibules
Dual doors and dual vestibules first appeared on two-person tents for obvious reasons: each person could have their own entrance and gear storage area.
However, and perhaps counterintuitively, I think dual doors and dual vestibules are even more important for a solo tent, and especially for a solo tent that has an inner tent as small as that included with the Tarptent Notch Li.
Here’s why:
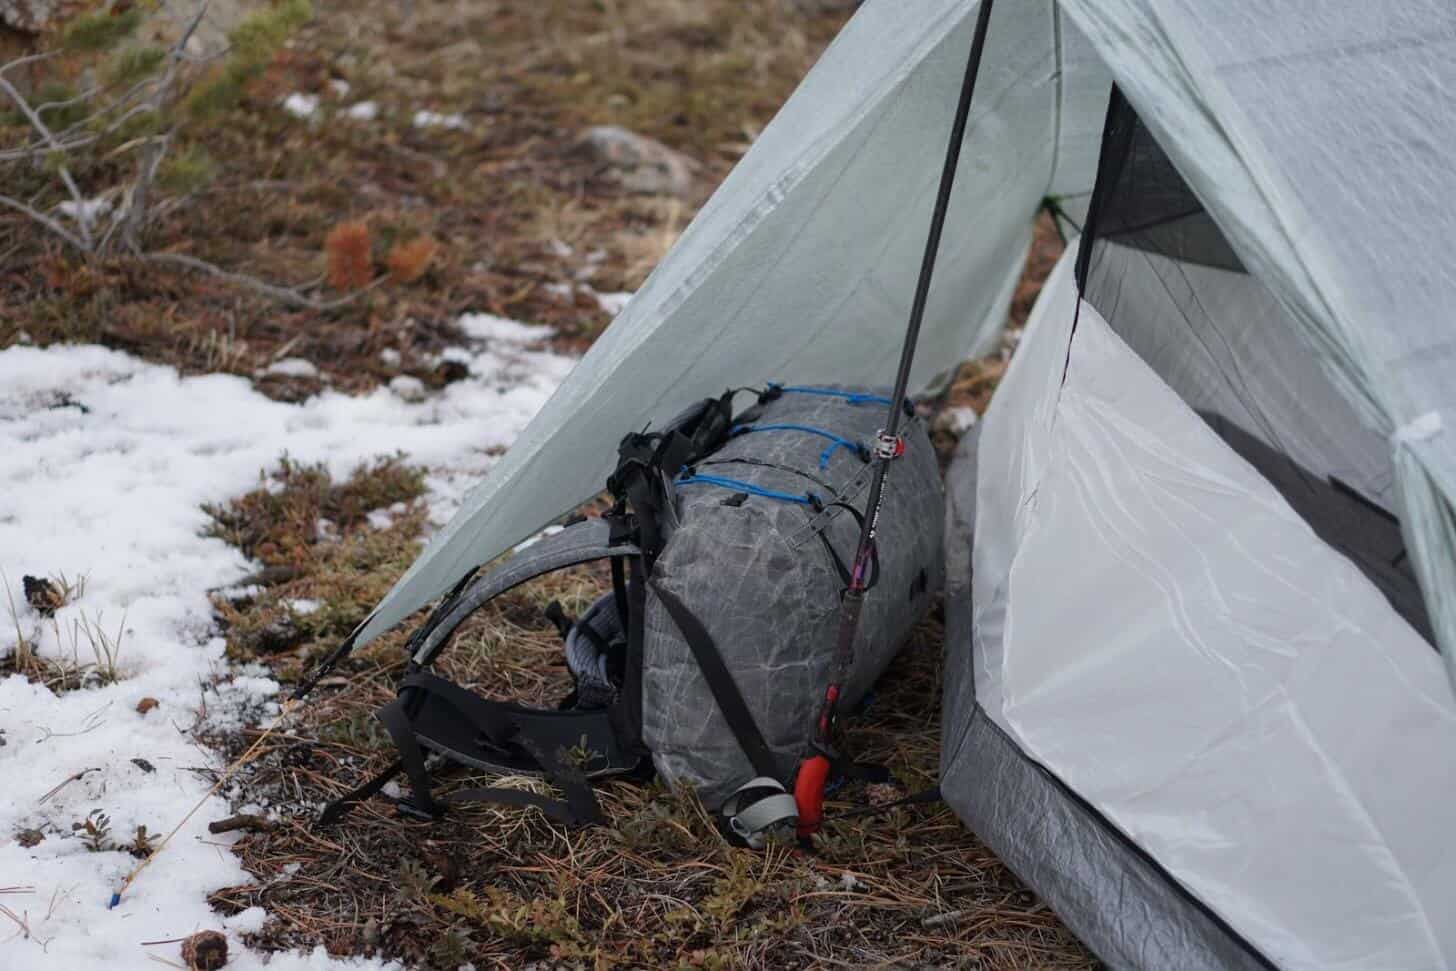
- Two vestibules allow you to organize gear more efficiently. For example, I often keep my pack, shoes, hiking clothing, and wet gear in one vestibule and my water, cooking gear, and food (if not in bear country) in my other vestibule. That leaves me one vestibule for gear storage and organization, and one vestibule for cooking and/or morning coffee.
- Two entrances (on both the fly and inner) allow me to open up all doors, and tie them back for the best views and maximum ventilation on warm nights.
- Two entrances allow me to use one or the other, depending on the direction of prevailing winds, when entering or exiting the tent in inclement (especially snowy) weather.
- Two vestibules and entrances also allows me to save one side for the dog.
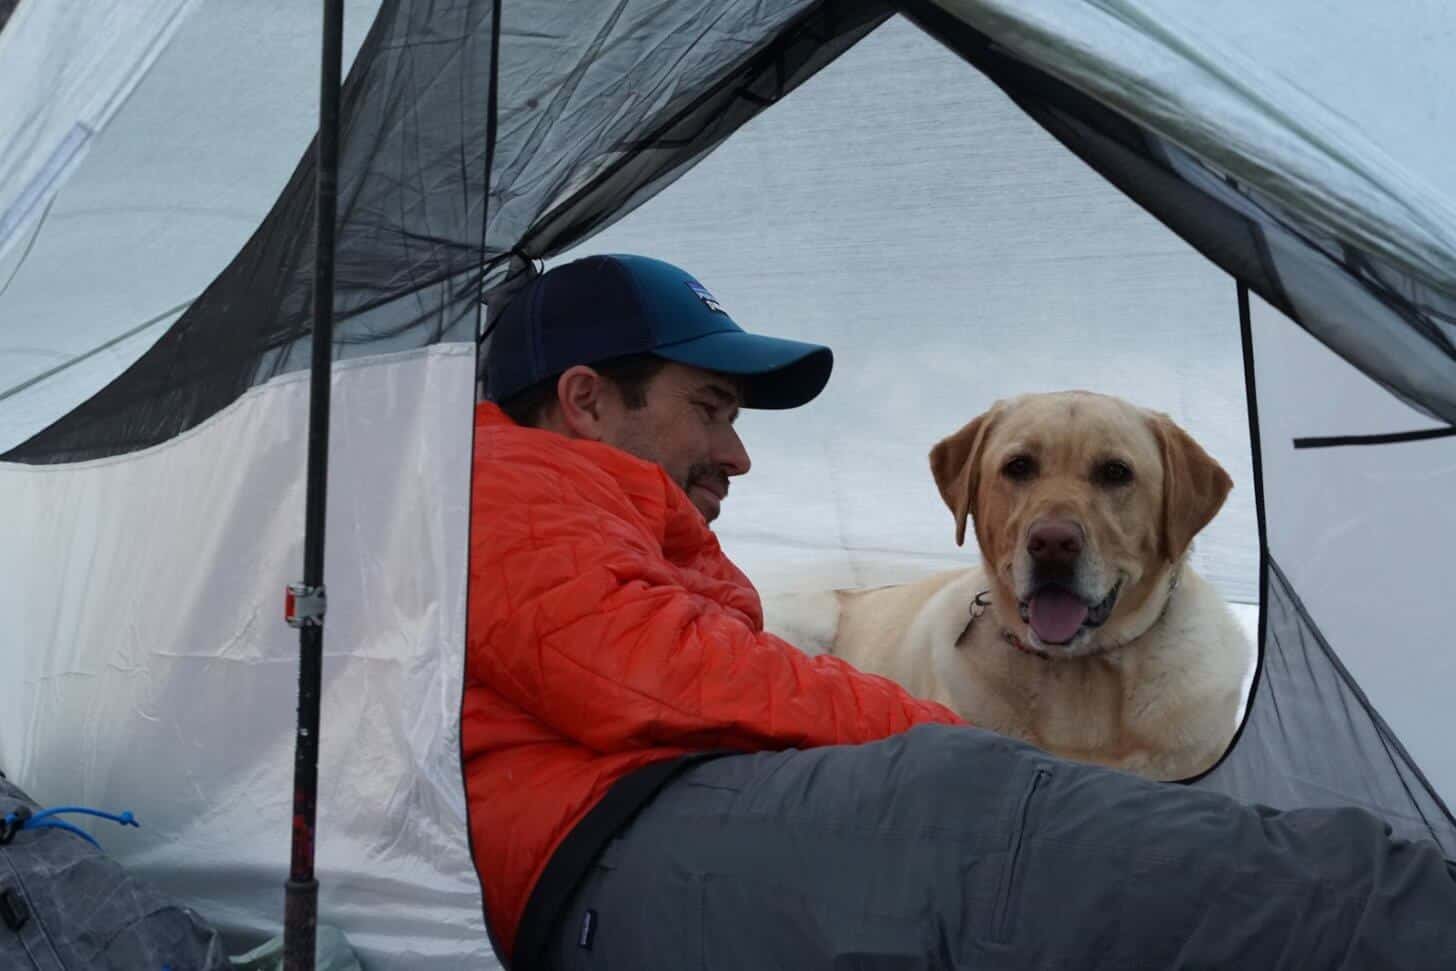 #BigSkySierra is happy enough in the vestibule as long as she can hang with me through an open door but when the weather hits, her backside needs to somehow fit inside, too. The Tarptent Notch Li vestibule isn’t big enough for a 95-pound labrador retriever, so keep that mind if you need this tent to accomodate your furry friend.
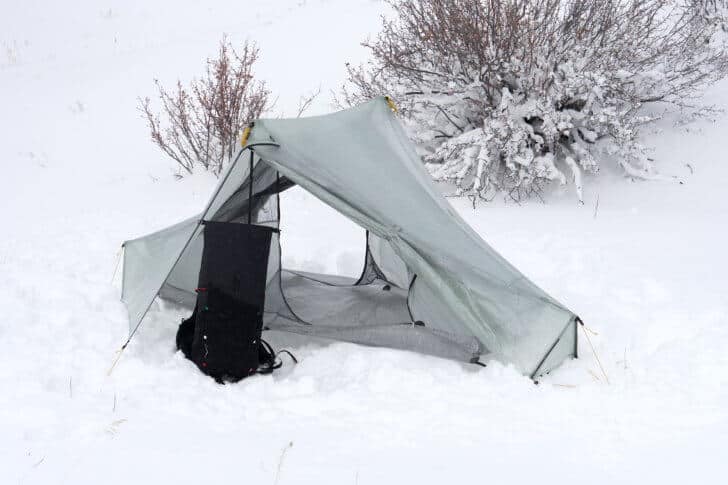
Design Geometry and Pitch Tautness
The Tarptent Notch Li features a catenary ridgeline, dual trekking poles for support, two PitchLoc corners, only four required stake-out points, and of course, low-stretch DCF fly fabric.
The aggressive catenary ridgeline is a good idea on the Tarptent Notch Li, but don’t expect to take advantage of its stabilizing properties unless you add guylines to the ridgeline Linelocs (shown in foreground), which effectively makes this a “6-stakes-required” shelter for inclement weather involving high winds or snow loading.
These design elements check off all the right boxes to make the Tarptent Notch Li a stable, taut shelter that maximizes wind resistance, and minimizes collapse in response to snow loading.
The result is a shelter that I can confidently rate as a 3+ season shelter. Having used the silnylon version of the Notch in snowy fringe-season conditions, I can’t say that it’s a shelter I’d recommend for any amount of snow. Silnylon simply has too much stretch, and more structure is needed to support it under even a small snow load. For any conditions where snow is expected, and I had to use a silnylon shelter, I’d upgrade to the Tarptent Stratospire 1 model, which offers additional stability afforded by more fabric stability resulting from an increased number of stake-out points.
Construction Quality
My beef with DCF / Cuben Fiber shelter construction quality goes back a long time.
DCF is expensive. Construction quality and attention should match it.
When I first introduced Cuben Fiber tarps as part of the Backpacking Light Gear Shop back in the early-2000s, the first generation tarps were horrific. Back then, we all assumed that we could treat Cuben Fiber like any other fabric and call it good. Boy were we wrong. Ripped seams, ripped fabrics, puckered panels – it became a customer support nightmare and an engineering debacle. My Cuben Tarps were ridiculed for their lack of durability. And deservedly so.
I learned a few hard lessons very quickly:
- Recalibrate the CAD software to consider the differences in stretch and bias vs. the fabrics we were used to building shelter flys with (silnylon, nylon, and poly).
- Find the balance between needle size (make it smaller) and thread size (make it bigger) to minimize the catastrophic effects of thread cutting that was so prevalent with Cuben Fiber.
- Orient the fabric bias (high strength threads which dominate in one direction over another) so that tensile strength resistance is consistent with the actual tensile forces exerted on the shelter in high winds.
- Remove raw fabric panels that contained puckering (manufacturing defects) from the production line.
- Never, ever – use Cuben in geodesic spherical panels. The math (lack of stretch) doesn’t work. Take note, Sierra Designs: you could have saved yourself a lot of heartache, cost, and embarrassment.
- Study seam, edge, and corner bonding as if bonding was the Holy Grail, because it is.
After I pulled all Cuben Fiber production from our inventory and recalled tarps purchased by our customers, I went to work and studied Cuben tarp design in more detail, and we eventually produced the Stealth Zero and Stealth One catenary-ridgeline tarps – the first Cuben tarps available on-demand to a wide audience. They were decent – not awesome – but durable, bonded, unpuckered, and properly bias-oriented. And the 7×9’s were five ounces, man!
Shortly thereafter, other manufacturers started introducing Cuben Fiber shelters, including Locus Gear, Mountain Laurel Designs, and Six Moon Designs. LG and SMD’s early shelters suffered the same durability problems as our early tarps – inadequate bonding (or in one manufacturer’s case, none at all), giant needle holes, poor bias orientation, and puckered fabrics.
But I applaud their guts. They took on an innovative new fabric and went for it.
All the while, Tarptent remained absent from the Cuben Fiber shelter market. Chickens!
OK, maybe not chickens. Maybe Henry Shires (Tarptent owner/founder) was simply … staging.
Meanwhile, we saw Sierra Designs release the Cuben UFO, which seemed more proof of concept than practical execution of anything (floppy and flappy in even light winds). Terra Nova introduced the Laser Ultra 1, seemingly to break a Guinness World Record rather than provide something more usable than a bivy sack. And Brooks Range brought us the Rocket, which was the finest mountaineering tent I’ve ever used – but was pulled off the market for suffering UV damage that sent the manufacturer into “fear and withdrawal” mode.
So that brings us to the present day.
SMD has pulled back from Cuben Fiber / DCF. MLD has modified their bonding at seams and tie-out points over several iterations. Locus Gear has set a totally new standard with the new CTF-B Khufu – one of the most aesthetically beautiful, and strongest DCF pyramid-style shelters ever produced.
And now we have the Tarptent Notch Li.
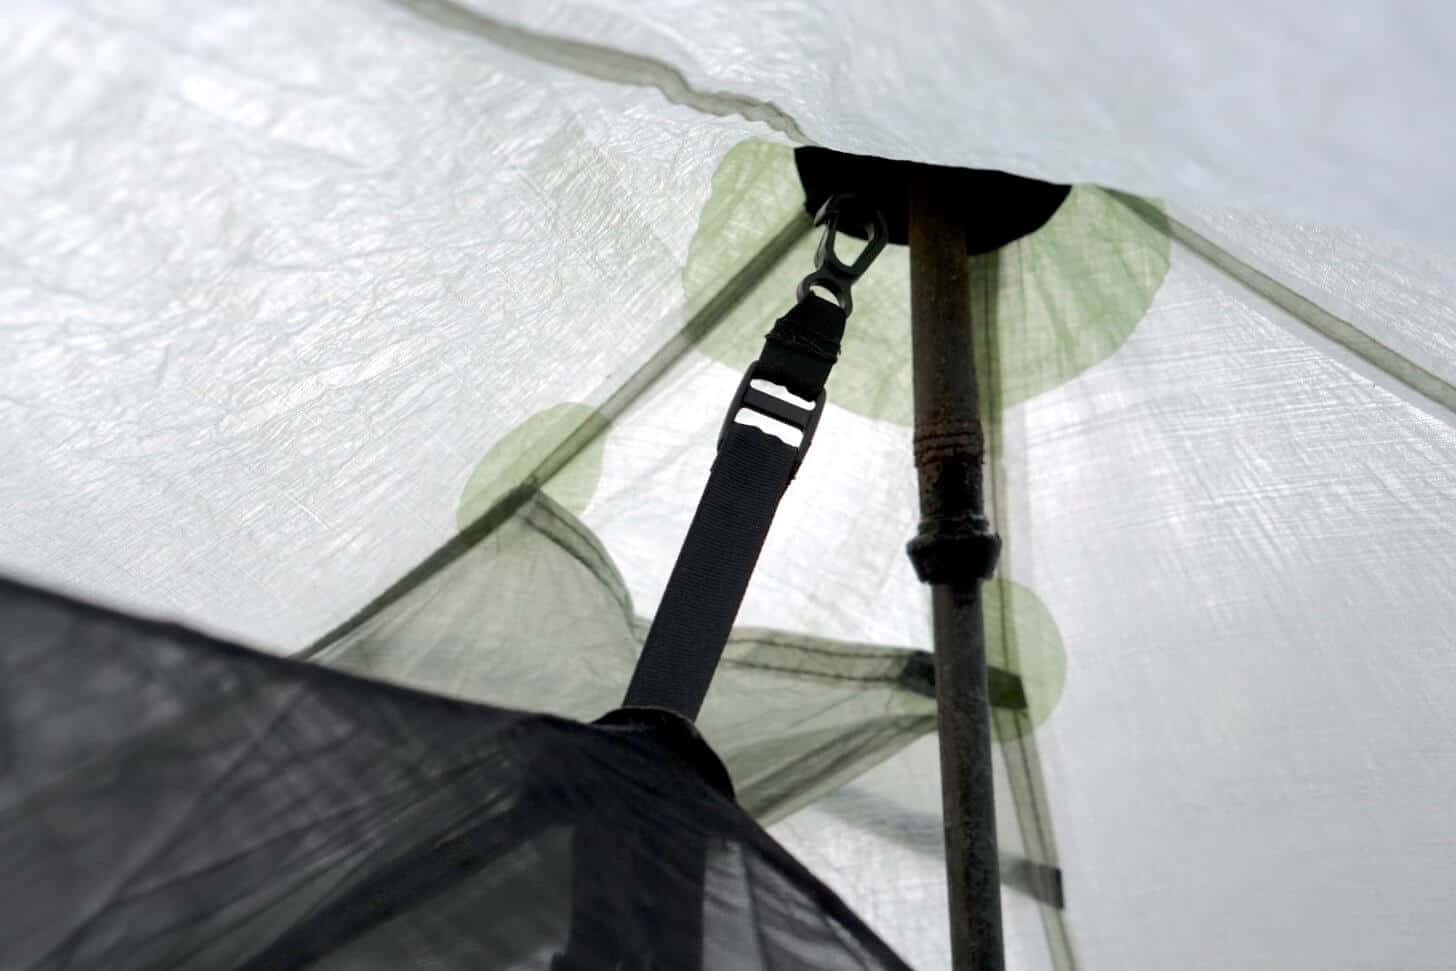
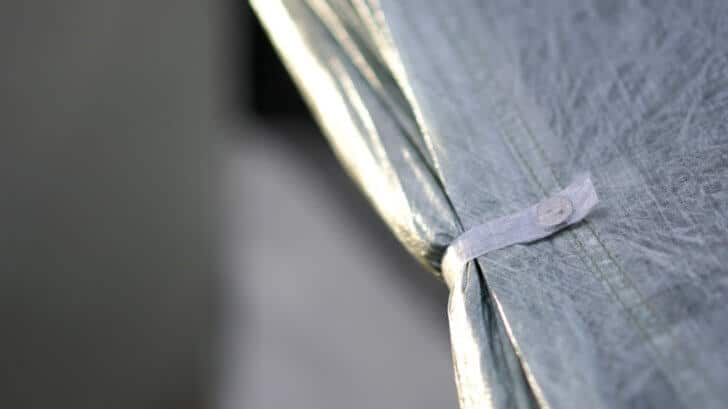
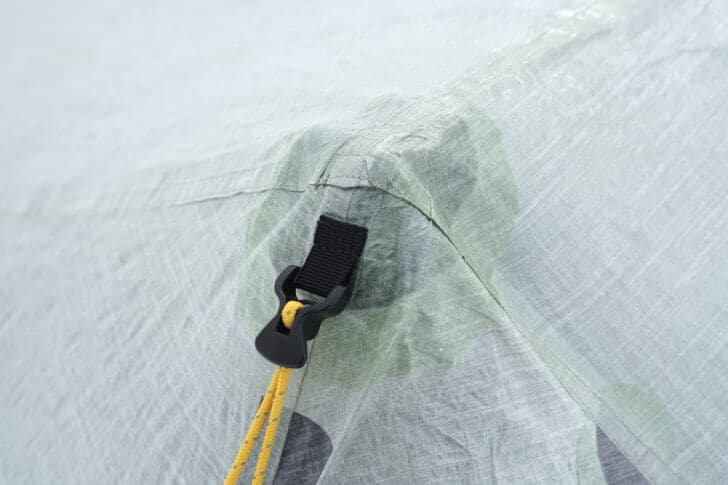
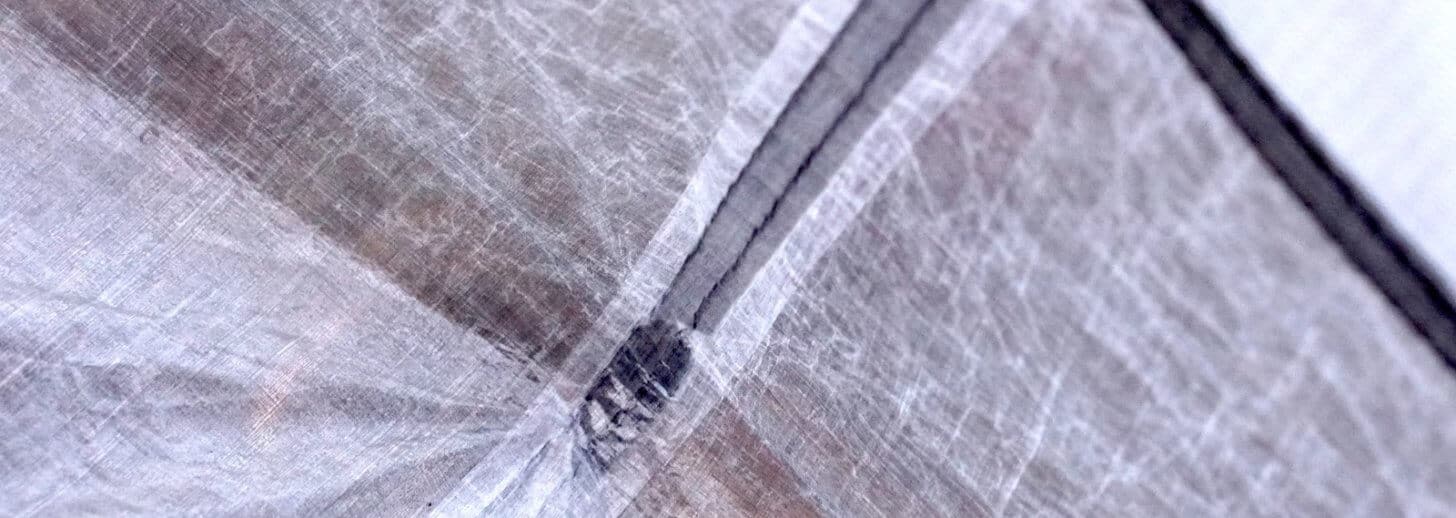
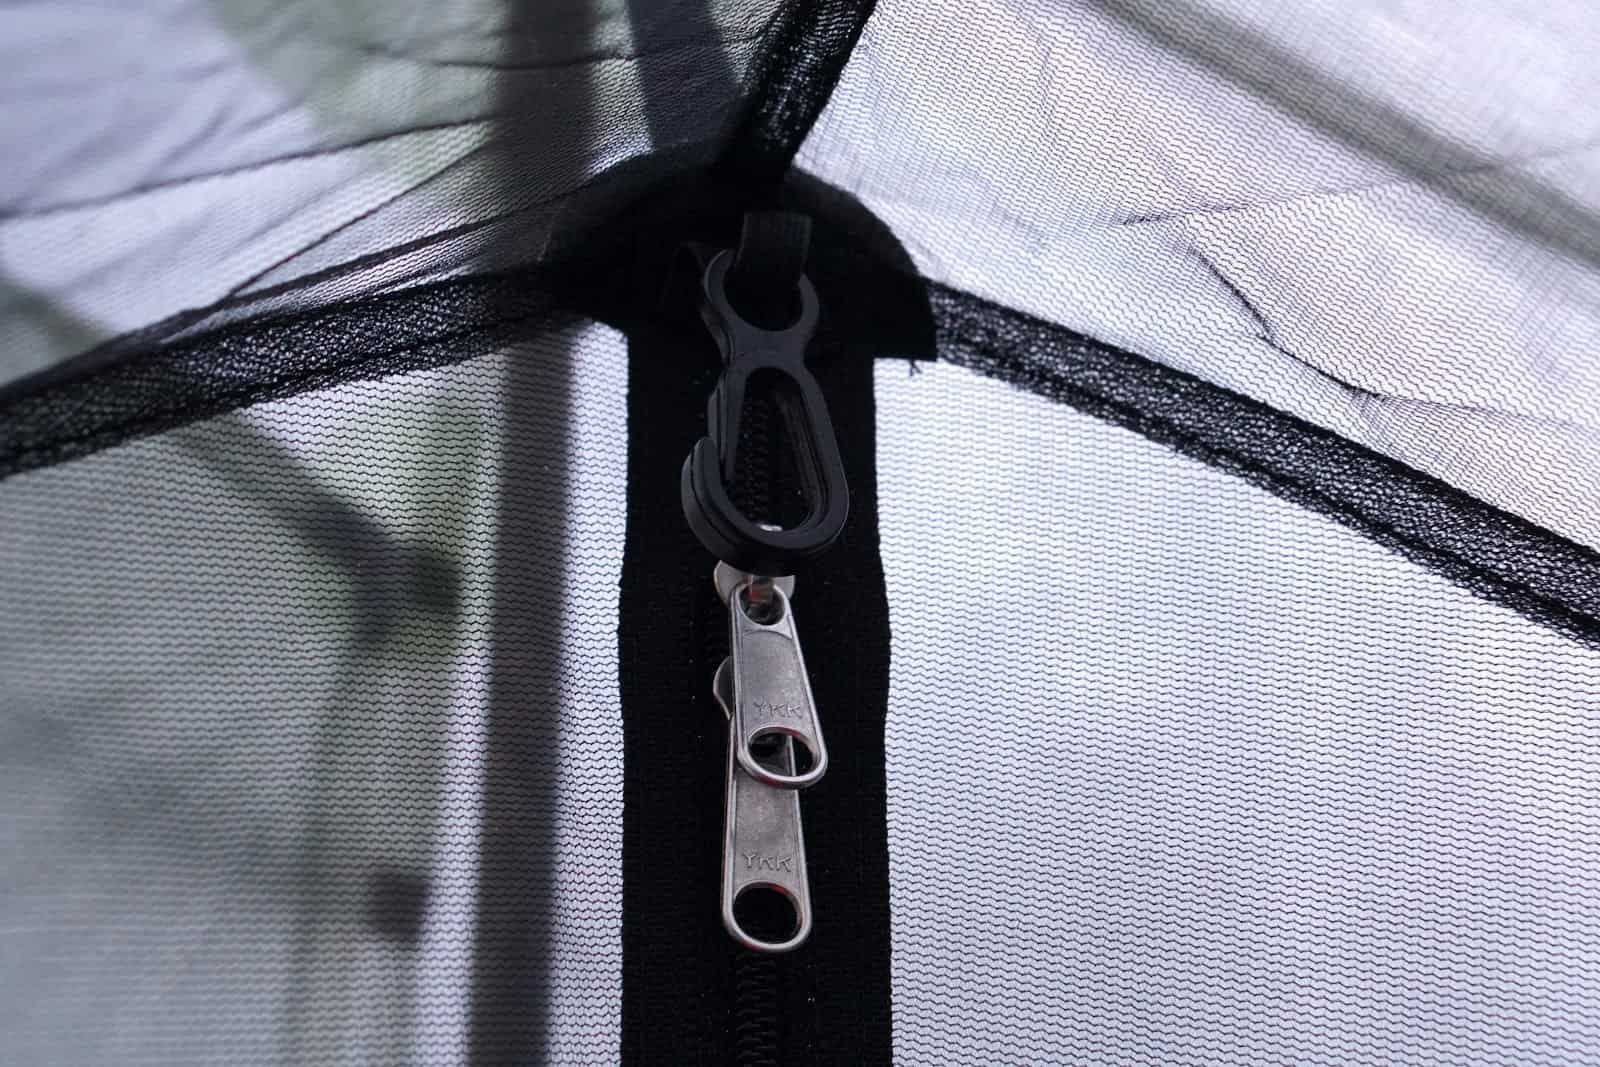
Look for bonded panels at every structural (tensile load-bearing) seam junction when shopping for a DCF shelter. Lack of bonded panels reveals the designer’s ignorance of how to properly design a shelter with DCF fabrics – these junctions are notorious for concentrating high stress as a result of tensile loads placed on the fabrics from tight pitching, high winds, or snow loading. This photo shows one of the ridgeline peaks of the Tarptent Lithium from the inside. The darker green areas indicate bonded reinforcement panels that help distribute stress at seam junctions. Well done.
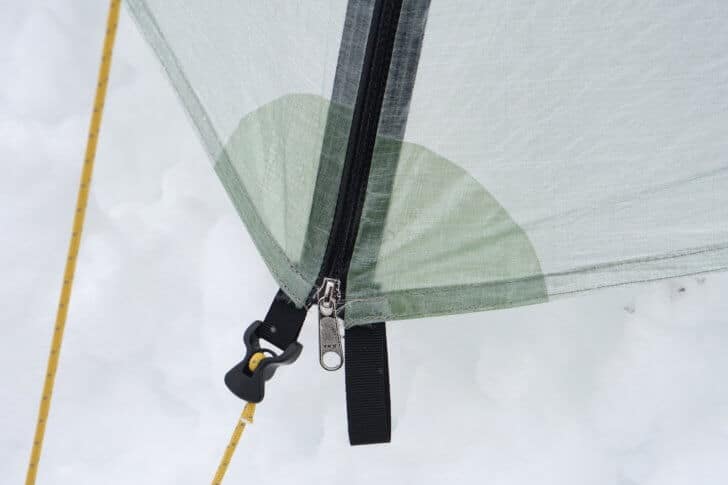
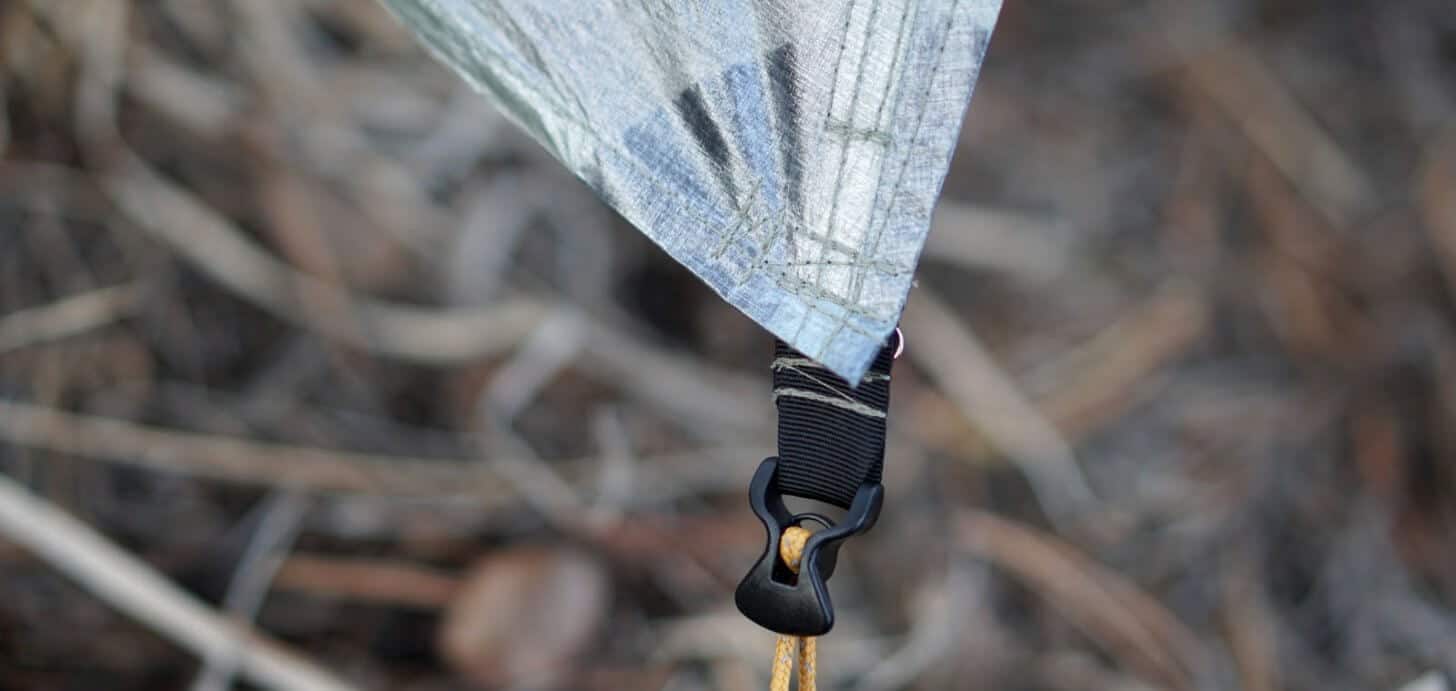
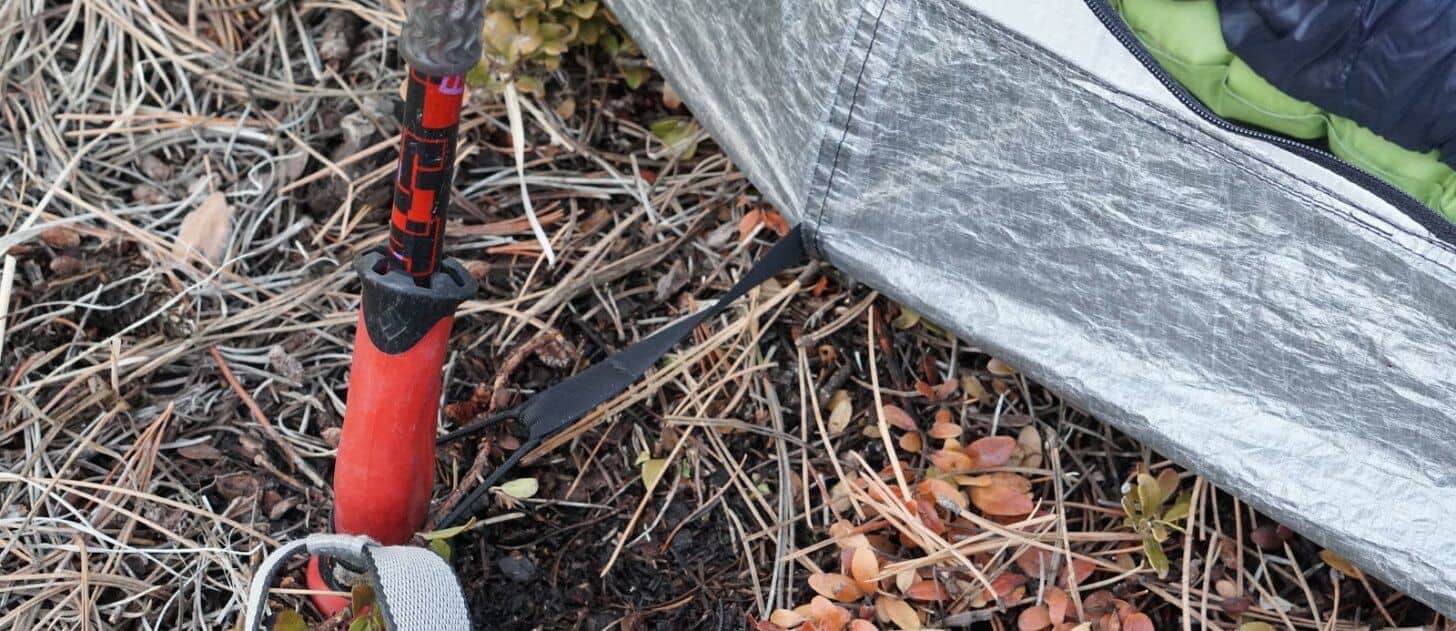
A common area of weakness in DCF tents is found where external tie-outs meet the shelter floor. Here’s a shot from inside the Tarptent Notch Li. The dark gray is a bonded reinforcement that secures the tieout sewing to the floor. As a bonus, the tieout cord is elastic, further reducing stress on the fabric.
The Tarptent Notch Li applies a bonded-then-sewn approach to adjoining DCF seams, which is reasonable. Just recognize that there is some controversy surrounding various DCF adjoining techniques. Sewing after bonding, most notably, introduces undesirable aesthetics, but probably no loss in strength vs. a sewn-then-bonded approach. And, because bonding can delaminate in cold temperatures, there is some legitimacy to the argument that a bonded-then-sewn approach results in a more durable, albeit a little bit uglier, seam.
A fly corner reinforcement is assembled using a bonded-then-sewn approach that reveals the aesthetic limitation of exposed, criss-crossing seams, but may preserve the security of the bonded tape in case of delamination in cold temperatures.
Snow-Loading Considerations

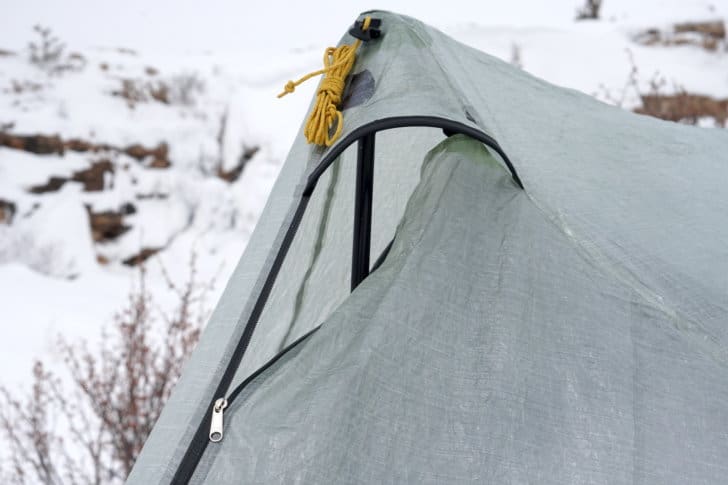
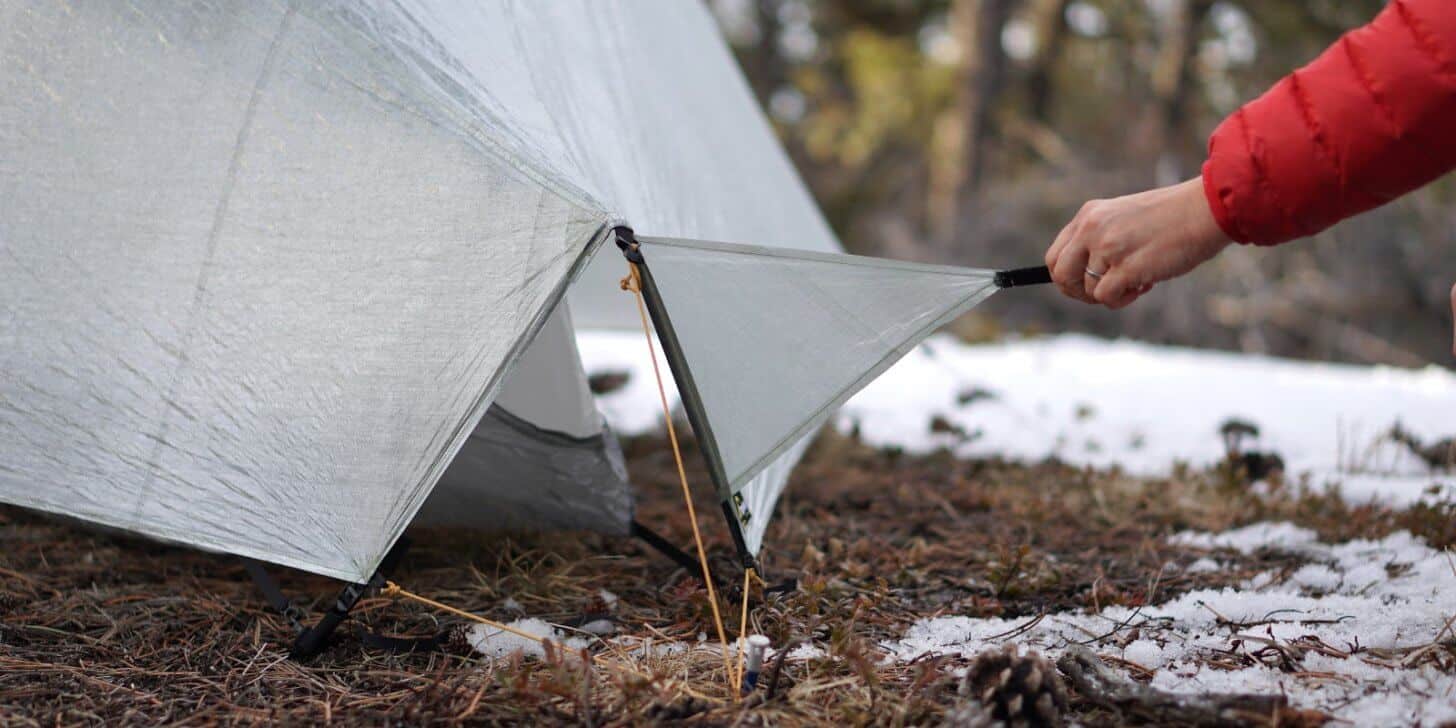
A relatively shallow roof pitch (about 30 degrees) doesn’t bode well for snow-loading. The Tarptent Notch Li will have to rely on the amount of tension that you use to engage those rooflines between the shelter’s peak (ridgeline) and the PitchLoc (carbon fiber strut) ends.
The good news is that the PitchLocs will keep the ends from collapsing, which is the main problem caused by snow loading of shelters where the corners and ends of the shelter go directly to guylines.
The PitchLoc corners and lower stretch of the DCF fly effectively make the Tarptent Notch Li a 3+-season shelter capable of handling a little bit of snow rather than a 3-season shelter.
Six Panel Geometry

The Tarptent Notch Li has four stake-out points (2 side, 2 end), and two ridgeline peaks. This creates a geometric shape comprised of six (generally triangular) panels (2 side panels on each side, and 2 roof panels).
This gives it some advantage over conventional one-pole pyramids (4 triangular-panel shelters), and quite a lot of advantage over shelters comprised of rectangular / trapezoidal panels (e.g., Six Moon Designs Skyscape, or conventional flat tarps – although tarp users can address this).
It is well known among tent designers that tension can be generated to a much higher degree in smaller triangular panels than in larger rectangular panels. Higher tension equals greater wind stability, better resistance to snow loading, and decreased condensation dripping.
Ventilation
Little tiny peak vents. Don’t expect any miracles.
The Tarptent Notch Li offers two tiny peak vents and two lower end vents. Don’t expect any condensation resistance miracles. The best thing going for the Notch Li is the fact that it’s made using DCF fabrics that remain taut in response to decreasing temperatures and/or precipitation during the night, and should accumulate less condensation than silnylon.
Lower vents on each end should provide much needed airflow on warm nights, especially when combined with opening the fly doors. When combined with the tiny peak roof vents, will they help resist condensation on cold nights? Time and testing will tell, I suppose.
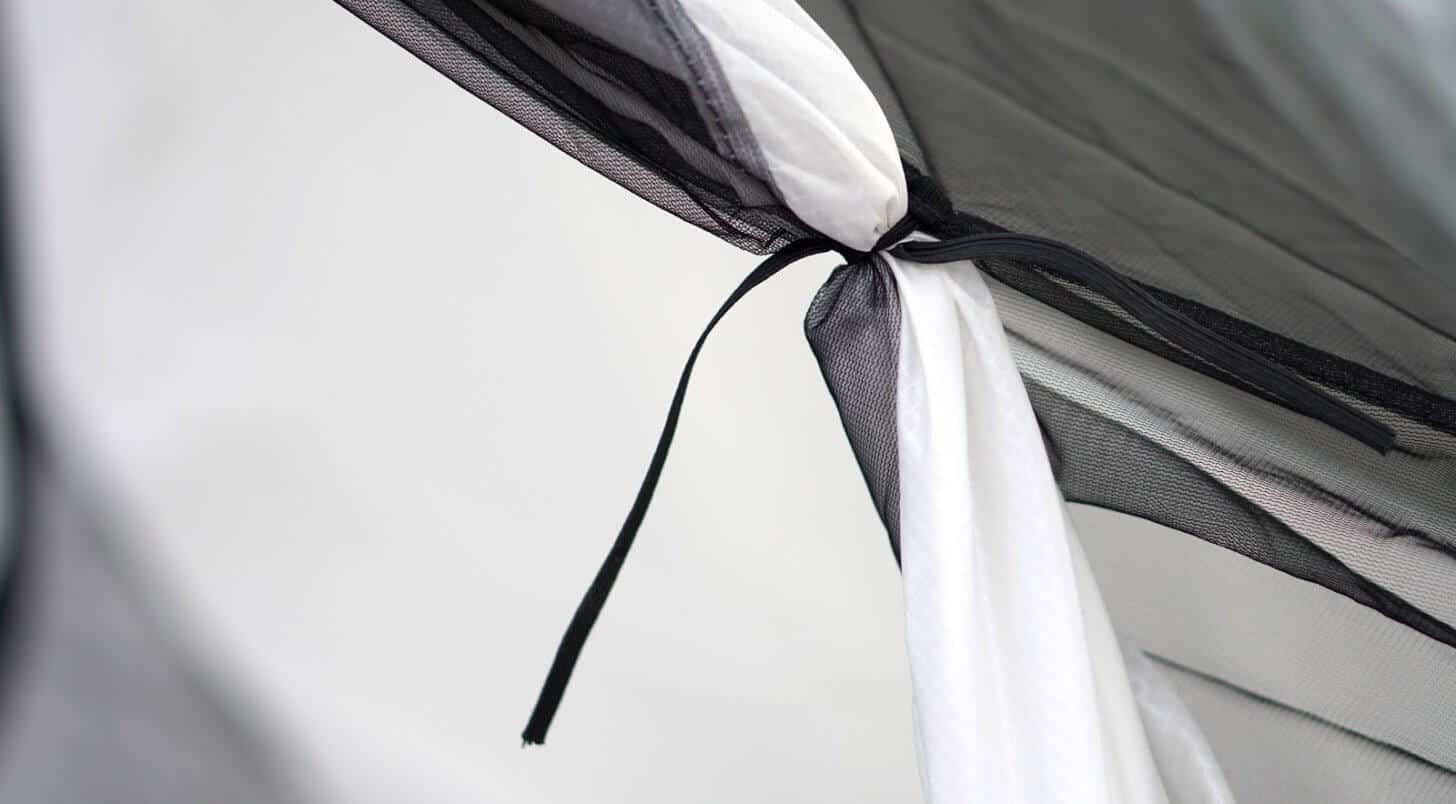
Magnetic Fly Closure Thingys
I’m not a fan of gimmicks.
I tend to be pretty conservative when it comes to design: use what works, and stop futzing around with it.
That’s what I was thinking when I discovered the *new and improved* Tarptent Notch Li tent fly retainer thingys (you know, what is usually some type of hook-and-loop or elastic toggle mechanism for retaining a rolled-back fly).
It was magnetic.
My first response was, “Oh, Lord, no.” I think I saw this on purse closures at the Nordstrom Rack the last time I went on a shopping date with Stephanie. I just hate to see her get pickpocketed. I like the sound of Velcro’s RRRRRR-R-R-I-P – it’s a good alarm system.
And my gut feeling was sort of validated when I realized that this little magnetic mechanism doesn’t work that well on the Notch Li.
I’ll get to its limitations in a second, but I have to admit that the idea is worth refining.
I like not having to hear the RRRRRR-R-R-I-P of Velcro when I’m trying to enjoy the peace of natural sounds in the backcountry. And fiddling around with elastic cord and toggles with cold fingers? No thanks.
In that context, the magnetic retainer is sounding pretty good right about now.
It just needs a little better execution:
- Longer tabs, so you’re not trying to secure so much rolled up fabric with such a short length of fabric – it’s too tight.
- A tab extending beyond the magnet, so you can operate it more easily with gloves or mittens, maybe? I did like the ability to “brute-force” the whole thing and just “tear it down” without fear of ripping out any seams, so maybe that’s OK as is.
- A stronger magnet would keep things more secure. I found the magnet popping loose quite a bit, especially when the shelter was pitched very taut.
Not a deal breaker for me. I like the idea. It could be improved.
Inner Tent Options
The Tarptent Notch Li comes with a few different inner tent options:
- All mesh body, 1.0 oz/sq. yd. DCF floor. This is the lightest version, best for most temperate-climate hikers who simply want insect protection and the feeling of coziness that comes from sleeping inside an inner tent.
- All mesh body with a silnylon floor. A little heavier, this is for the crowd who thinks that silnylon floors are better than DCF floors (they probably aren’t). DCF floors are easier to repair, result in less condensation accumulation, and are less slippery.
- Partial solid fabric (breathable nylon, uncoated) interior with a DCF (or silnylon, presumably) floor. Best for hikers who want additional windblown dust / snow protection, or a little extra warmth.
My personal pick is #3 for sand resistance in desert winds, and spindrift (snow) resistance for winter trekking. It also affords a little more privacy if you’re camped in a crowded camp in warm conditions and want to keep your fly doors open.
Vestibule Function and Space
The Tarptent Notch Li features two vestibules, which is great for organization, cooking, or stowing a dog.
The vestibules aren’t small, but they’re not huge. They big enough to stow my 90-L McHale expedition backpack, but too small to comfortably stow my 95-pound labrador retriever without her wanting to encroach on my turf inside the tent.
Fly doors that protect the vestibules are brilliantly designed with overlapping shingles secured by hook-and-loop patches and a neat little plastic loop-and-metal-hook gizmo at the bottom of the door. Like most other door security contraptions, this one is also a pain in the neck to use while laying inside the tent, it’s dark, wind and rain are starting to blow, and your fingers are cold.
The door closure clip. It requires more precision than I’m capable of giving when I’m tired and cold and I’m inside the tent.
Conventional elastic ties secure the rolled-away inner tent door. That works for me, but they’re hard to untie. There must be an innovation in the making in the dark recesses of some designer’s mind out there: how can we retain rolled-up-tent doors, and release them, with cold fingers in the dark? For now, I’ll try to stick with a quick-release slipknot loop instead of an overhand knot.
Securing the Inner Tent
The Tarptent Notch Li is a European-, and not an American-style tent.
Don’t worry, #maga fans, that’s actually a good thing!
You see, in America we have this view that “whilst” backpacking the sun always shines. Therefore, we can casually pitch our meshy inner tent, go brew a coffee, and then, when the occasion strikes us, we can decide to pitch our fly over it and retire to bed “when convenient” (a phrase we Americans really love).
In Europe, however, and the UK specifically, the situation is often different.
One arrives in camp in a mild gale, signaling an oncoming storm. It is then when tea is brewed and enjoyed.
But by the time the tea is half finished, the gale has given way to sideways driving sleet and graupel. Thus the Brit must erect the tent fly first, and then crawl under it to escape, and finish his tea.
After finding some solace that comes with refuge under the fly, the Brit (or Scot) can then “clip” the inner tent into the fly, and enjoy the dry inner tent accordingly.
Let’s take a look at the American, on the other hand, in a similar scenario.
Upon arrival to camp in a gale, the American is already in tears, claiming “this is the worst storm ever experienced in American history!” Regardless of wind speed, of course.
Then the American will pitch the inner tent of their American-designed shelter, through which its meshy-ness will permeate all precipitation falling from the sky, soaking the inside fully.
Still crying, the American will haphazardly toss the fly over the inner and spend the next forty minutes suffering mightily trying to get the fly tight, the floor mopped, and the ego revitalized, while composing an Instagram selfie to publicize the suffering.
I know this routine, because I’m an American, and I’ve experienced all this hoopla.
And I’ve hiked with Brits, and while I have a little disdain that they actually know more than us about tent design, I get pretty excited about tents that can be pitched “fly-first”.
The Tarptent Notch Li is just such a tent – whew!

In mild weather, you can leave the inner tent attached to the fly. In inclement conditions, however, you might consider leaving the two detached. Then, you can simply pitch the fly first and take refuge.
When you’ve finished your first cup of tea and have enjoyed a change of clothes and some gear organization, you can pitch the inner tent and crawl into it dry, all the while under the protection of the fly.
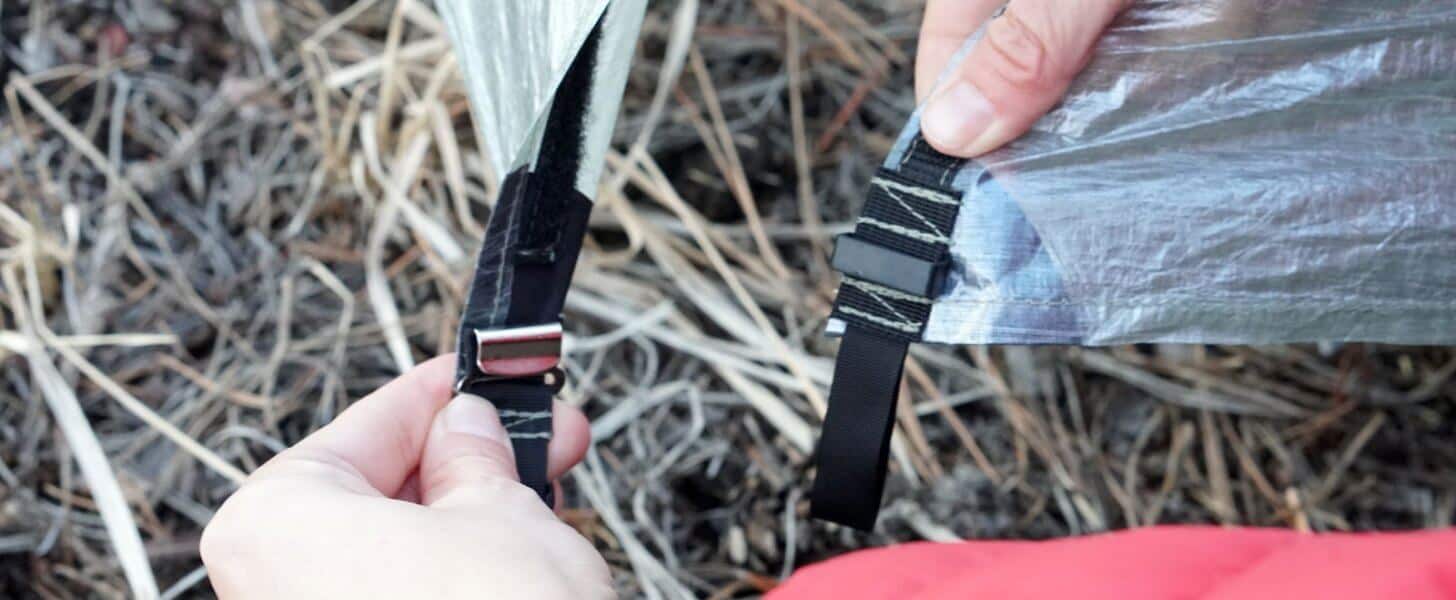
As shown above, the inner attaches to the fly using mitten hooks and elastic bands. The process of attaching the inner tent to the fly is pretty easy while sheltered under the fly, and requires no major body contortions (assuming you’re under the age of 40). It is easier, however, if you leave both inner tent doors open, so you can reach through the doors to access the various attachment points.
The corners of the inner tent attach to the PitchLoc struts via mitten hooks and grosgrain webbing.

The side edges of the inner tent attach to the trekking pole handle via a grosgrain ribbon tab attached to an elastic shockcord loop.
Headroom
I’m not tall – 67 or 68 inches on a good day. The Tarptent Notch Li offers plenty of headroom for me. A 74 inch human shouldn’t brush his head on the roof (too much), but if you’re any taller than that, you’ll probably need a shelter with an inner tent headroom of at least 45 inches. The Tarptent Notch Li offers 43 inches.
Other Features
Mitten hooks on the inside of the inner tent, at the ridgeline, allow you to connect a cord for clothes drying or hanging a tent light.
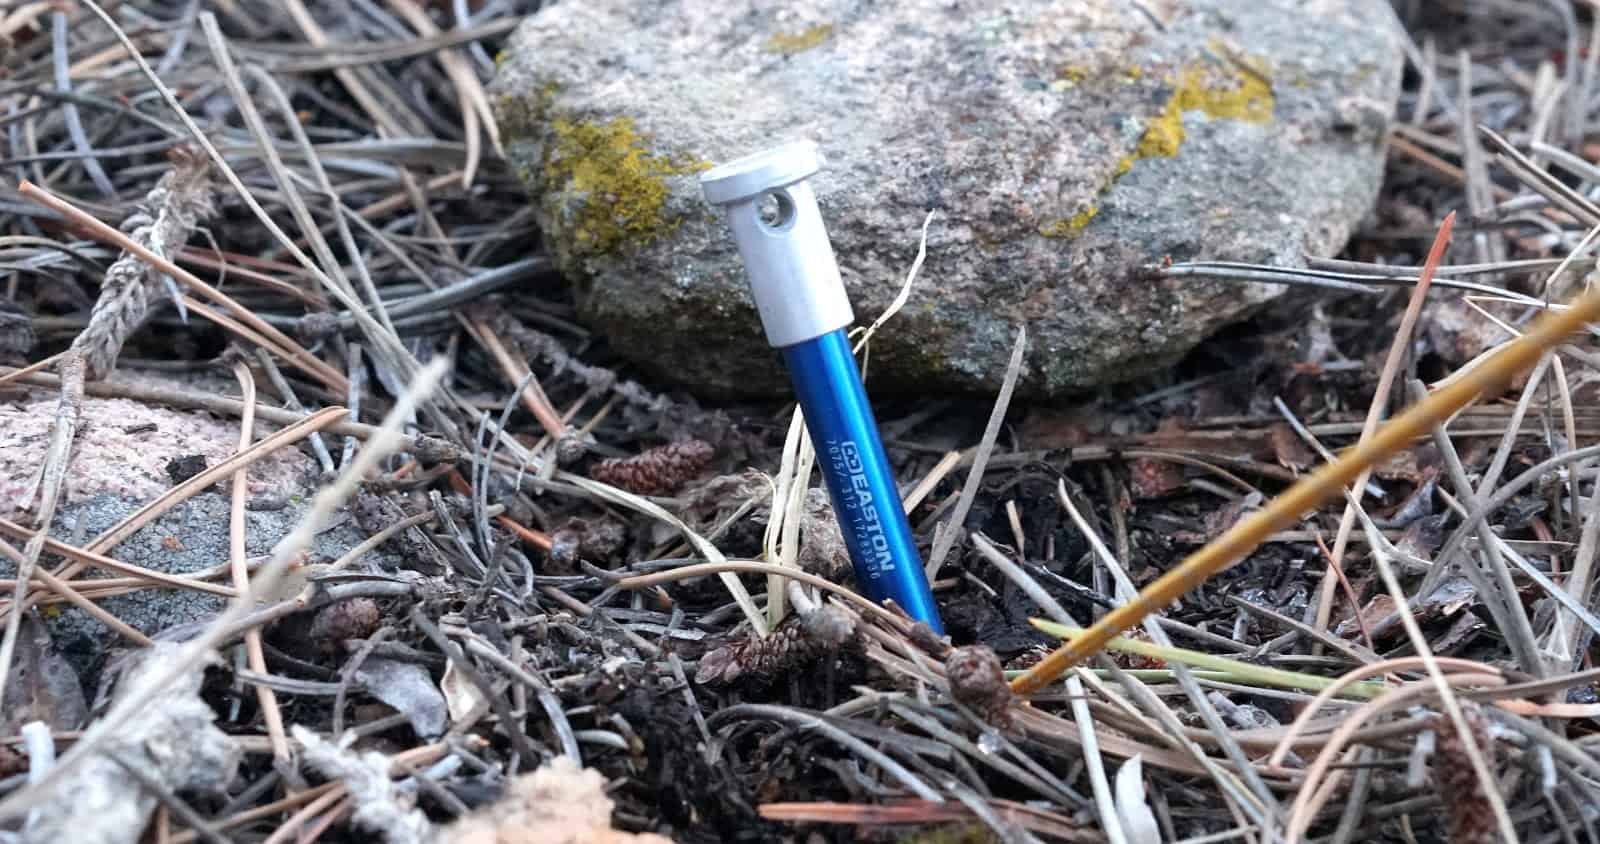
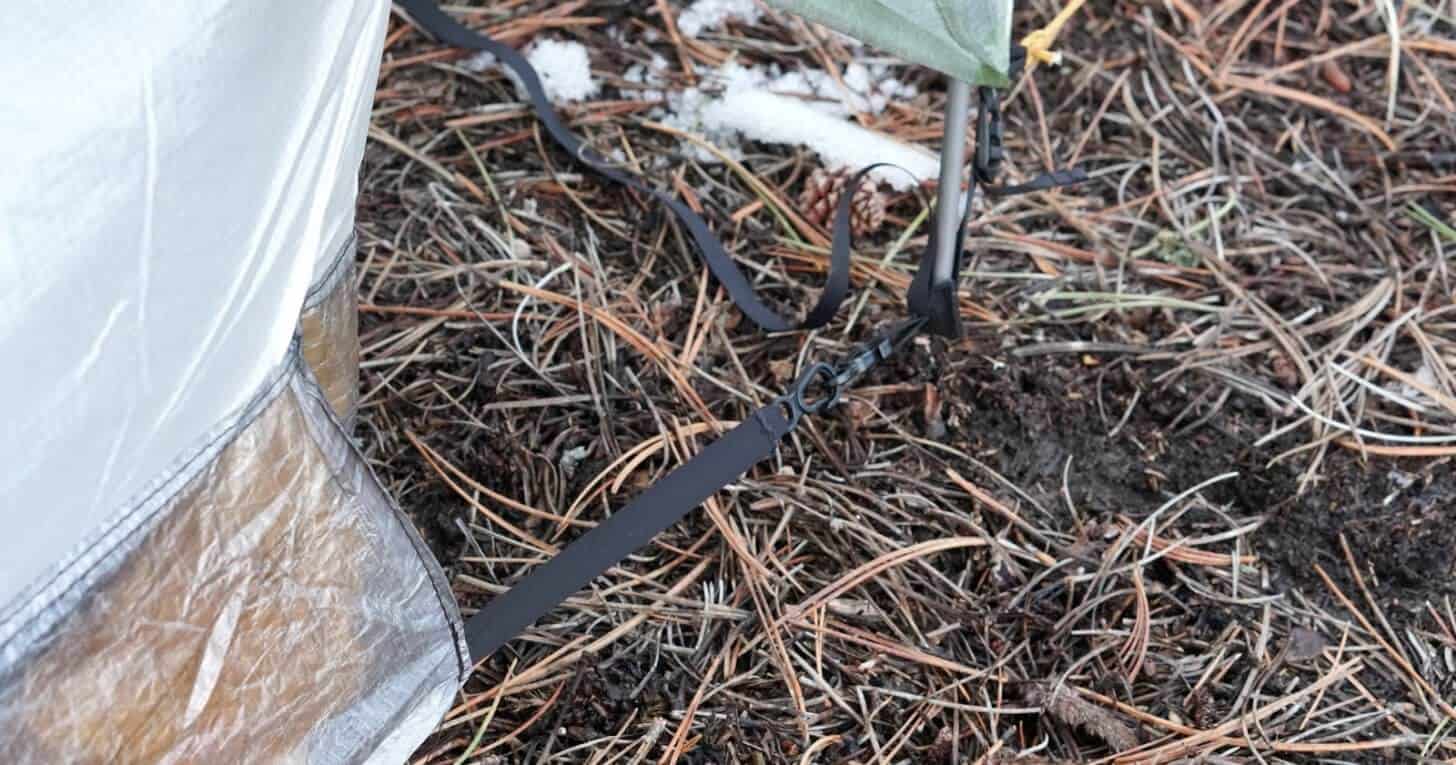
The Tarptent Notch Li ships with four (4) Easton 7075 tubular aluminum stakes. You’ll want to purchase two more, plus accessory guylines, to secure the ridgeline for more inclement weather.
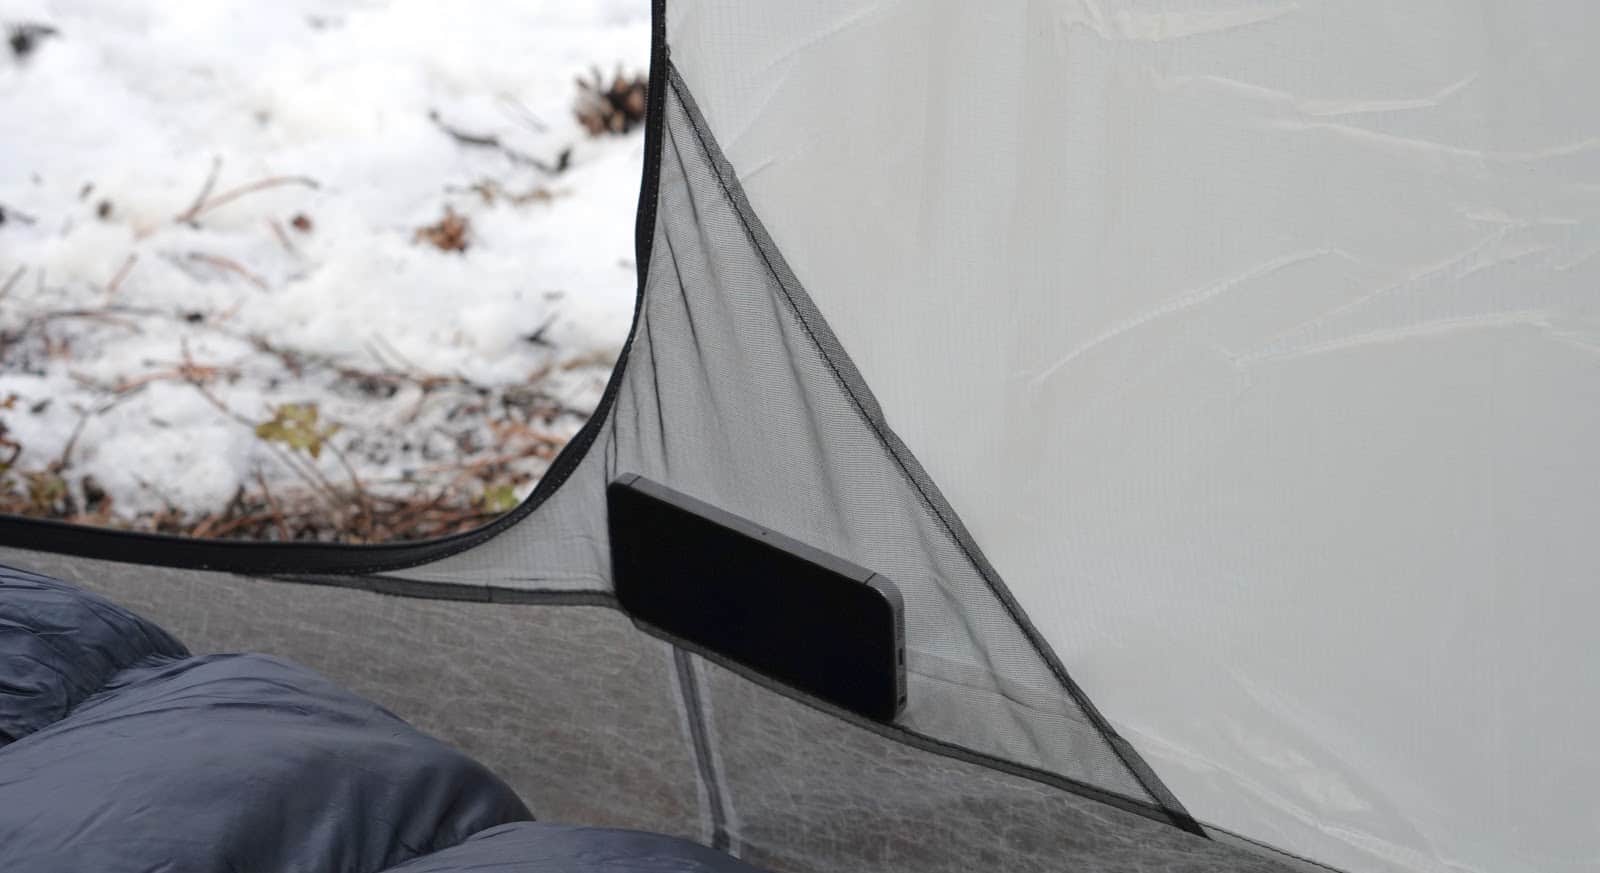
Two interior stash pockets are big enough for accessories. Shown is an iPhone SE for reference.
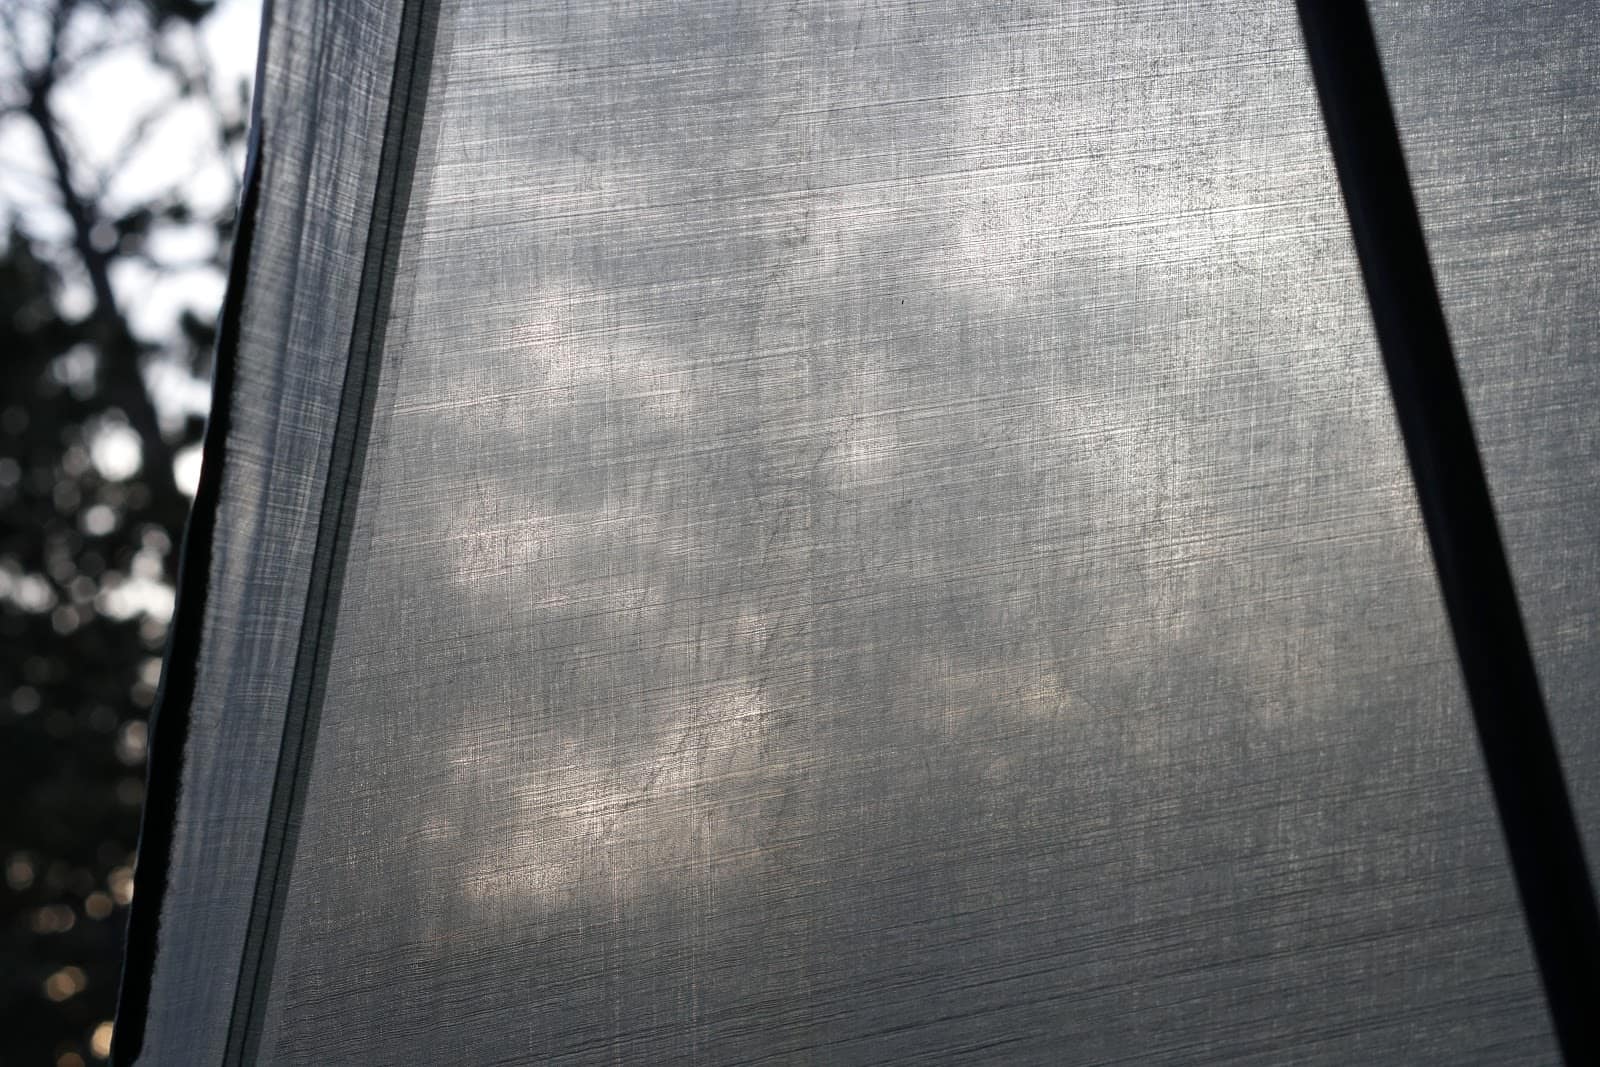
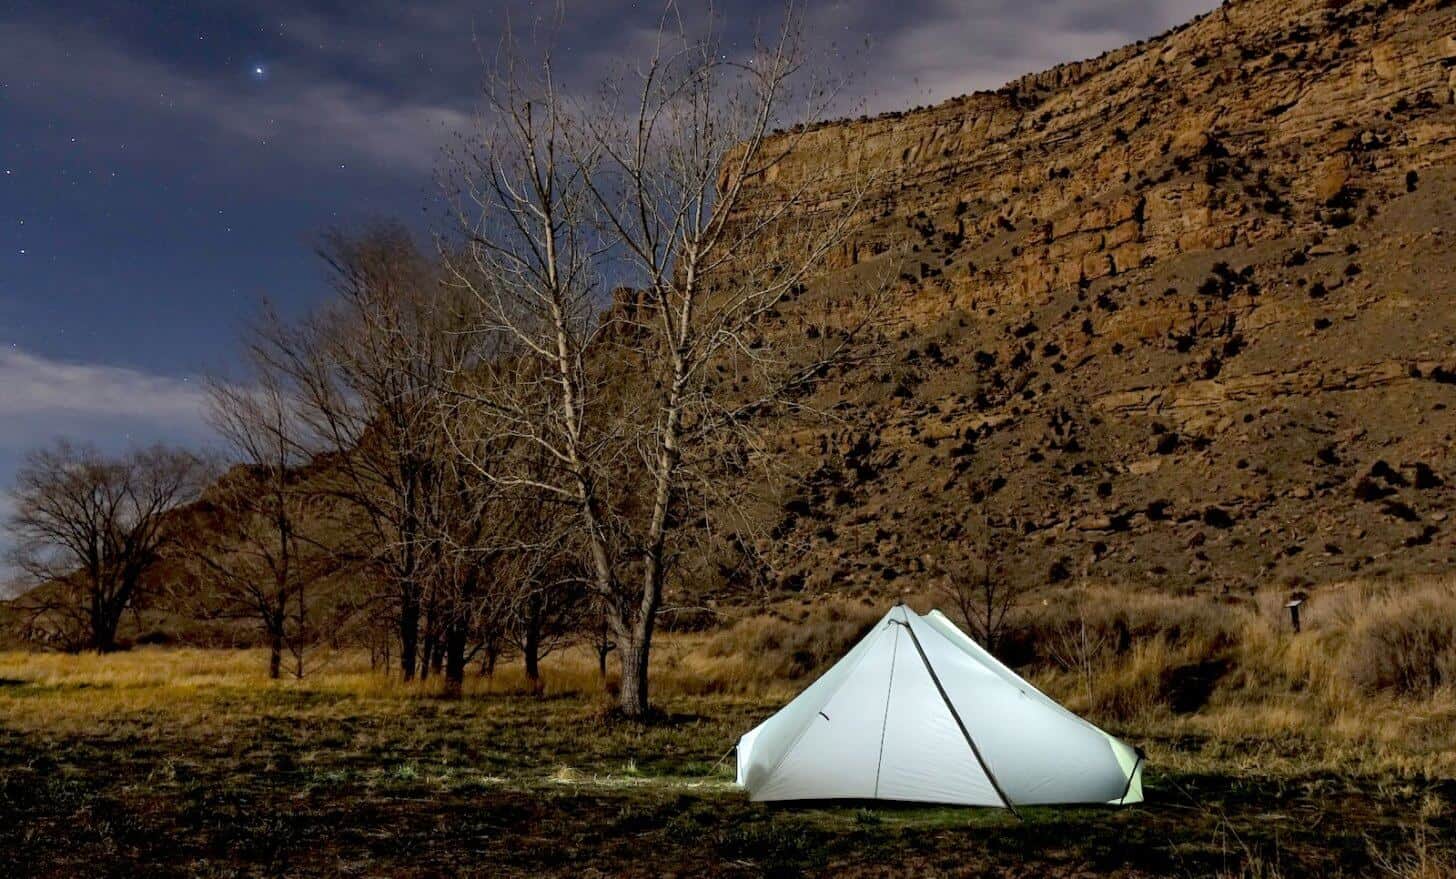
One of my favorite features of DCF fly fabrics is its translucency. It makes me feel closer to nature.
Compared To
If you’re shopping for a solo tent, consider the Tarptent Notch Li in context with these options:
Tarptent Notch Silnylon
Compared to the Tarptent Notch Li, the Tarptent Notch (silnylon version) is:
- $285 cheaper;
- 7 oz heavier;
- More condensation-prone;
- Less resistant to snow-loading;
- More likely to sag during cold rain / temperatures.
Tarptent Stratospire 1
Compared to the Tarptent Notch Li, the Tarptent Stratospire 1 is:
- $290 cheaper;
- 16 oz heavier;
- More wind- and snow-resistant;
- More condensation-prone;
- Larger footprint, but larger inner tent and larger vestibules;
- More likely to sag during cold rain / temperatures.
Sierra Designs High Route FL1
Compared to the Tarptent Notch Li, the Sierra Designs High Route FL1 is:
- $300 cheaper;
- 17 oz heavier;
- Larger footprint, but larger inner tent and larger vestibules;
- More wind- and snow-resistant;
- More condensation-prone;
- Has a lower level of construction / finish quality;;
- More likely to sag during cold rain / temperatures.
Sierra Designs High Route FL1, Absaroka-Beartooth Wilderness, Montana.
ZPacks Solplex
Compared to the Tarptent Notch Li, the ZPacks Solplex is:
- $45 cheaper;
- Narrower and shorter;
- Taller;
- 4 oz lighter;
- Less storm resistant.
Six Moon Designs Skyscape Trekker
Compared to the Tarptent Notch Li, the Six Moon Designs Skyscape Trekker is:
- $255 cheaper;
- 7 oz heavier;
- Has smaller vestibules;
- Is less stormworthy;
- Has a lower level of construction/finish quality;
- Less wind/snow resistant;
- Less condensation resistant.
Gossamer Gear The One
Compared to the Tarptent Notch Li, the Gossamer Gear The One is:
- $300 cheaper;
- 1 oz lighter;
- Has a larger interior floor space;
- Has one larger but one much smaller vestibule;
- Less wind/snow resistant;
- Less condensation resistant.
Summary
My first impressions of the Tarptent Notch Li are positive.
There are few shelters in its weight class that offer the following options:
- Dual trekking pole support for stability;
- Dual side entrances and vestibules for gear organization, views, and usability;
- Fabrics that are more condensation- and stretch (temperature)-resistant than silnylon.
In fact, there are only three. The Tarptent Notch Li, the ZPacks Soloplex, and the Gossamer Gear The One. They all range from about 19 oz to about 21 oz in weight.
However, the Tarptent Notch Li stands out even from both of those, due to a symmetrical design that allows for greater versatility, a six-triangular panel pitch that offers better stability, and of course, Tarptent’s unique PitchLoc carbon fiber strut system which improves both stability and usable space.
Disclosure
Backpacking Light has no financial affiliation with Tarptent. This is an independent review of a product owned by Backpacking Light, and Tarptent did not provide this product with any expectation or contractual obligation for a review.

Discussion
Become a member to post in the forums.
Companion forum thread to: Tarptent Notch Li Review (First Looks)
This Tarptent Notch Li Review presents the benefits of Dyneema Composite Fabrics (DCF) for ultralight backpacking shelters, assesses its design/feature set, and compares the Notch Li to its competitors.
The legendary tent maker finally caving in and using the best material currently available. I’m really looking forward to seeing what will come out of Tarptents doors. Well done Henry.
Great, thorough appraisal.
Very positive. And humourous too.
Good to see the careful construction.
I am Tarptent fan – we have 4. Including a Sil Notch. ( Scarp, Moment and Strat2). I/we have used the other 3 backpacking in Scotland and elsewhere in various weather conditions. The Notch I’ve used less so, yet – maybe 7 days on local hills.
I watched the Bungy B-roll’s video of the Notch Li yesterday and thought it looked great, though I had similar reservations about some features. If I was to splash out on such a big purchase, I’d want it a little nearer to perfection. This is what I wrote on another forum:
I actually watched a vid longer than 10 mins!
Looks really good.
To a point.
I like the new end pole arrangement.
And the inner adjustments.
Looks well put together.
But
Magnets? Keeps the lines clean, but as you can see…
Door fixing? Imagine leaning through to hook it up 2 handed in a downpour. Wet arms? A zip with long zip pull can be done easily with one hand and from completely inside in the dry.
And as already discussed, alternate direction doors will let wind and driven rain runoff into one of them. Makes manufacturing simpler though as only one side panels pattern needed as both sides made the same. An “ended” shelter like the Scarp is so much more practical for use in bad weather.
After using the ‘one-ended’Scarp for 7 years, I find the alternate diagonal doors of the Notch and Moment DW decidely sub-optimal for high wind and rain. To the point where one door can become unusable. In the narrow Notch inner, I find not being able to open doors at both shoulders somewhat confining and an irritation!
Any thoughts?
I look forward to a Stratospire in DCF. Maybe with better door fixings (Though my bank balance won’t! )
I am not a fan of DCF (cuben) in general. I look for durability and DCF does nothing for floors. Anyway, Henry Shires did a good thing waiting to get the manufacturing problems straightened out, before taking the plunge into DCF.
I only use a single 4oz hiking pole. So, I will not be getting a Li. The SoloPlex is close to the same except for the huge number of stakes needed. I also have a small sil tarp that works well. It rarely exceeds 50F at night in the ADK’s (except in high summer) so it is fine with no bug protection.
Very nice, thorough and objective review. I like that the review acknowledges that some people have different opinions on specific aspects of the tent.
Are silnylon floors really more durable than DCF? I only had brief experience with silnylon and didn’t care for how slippery the floor is. My Duplex floor seems more durable.
Based on this review, this tent would not be ideal for someone my height, but it’s a great addition to the market.
Thanks for this Ryan. Very helpful. Nice job.
It looks like a super tent for those in the market for a light double wall, and who are okay with a high price and somewhat small space.
Most attributes of the tent look really well done.
The door clips interest me because a good clip system has a lot of potential to reduce weight, cost and zipper failures. The challenge is making it easy to use. With clips like this, you need velcro nearby so the clips don’t fall open, but then to open it, you need to release the velcro and then use two hands to pull the clips apart, so it’s a lot harder than opening a zipper, and thus folks often just skip the clip and use only the velcro in mild conditions. I wonder if a better solution would be to use some type of buckle, rather than hooks which can fall open. With a buckle, you could eliminate the velcro, and releasing it would be a one hand job instead of two.
Regarding the magnetic closures, I can see some promise to this design but I also have some concerns. I worry that if you have snow or frost build up on the tent panels (e.g. heavy condensation that ends up freezing) then the door roll would be larger and you’d have a hard time securing it with a fixed length strap and limited securing magnet. I think the door clips are an idea worth refining, whereas the magnetics look okay but I don’t see the same benefit to perfecting this.
Brad: IMO Silnylon floors are far more durable than 0.5 – 0.7oz DCF and moderately more durable than 1 – 1.5oz DCF. DCF gets pinholes quite easily, and these translate into leaks when you’re pitched on soggy ground. The >1oz DCF has thicker mylar so it punctures less easily, but still much easier than silnylon. I think 0.5 – 0.7oz DCF is “stupid light” for a floor, whereas 1 – 1.5oz can be a reasonable choice if you’re willing to take care of it. Indeed silnylon is annoyingly slippery. I suspect sil/pu coated poly is the best floor material.
Excellent and detailed review Ryan – thanks. It’s good to see some innovations like the door clips and magnetic closures – we’ll see how these two features change over time and with customer feedback. As Dan suggested, a simple buckle (side release buckle) would probably be easier to use one-handed from the inside. The 8 attachment points holding the inner tent to the tarp would also benefit from a one-handed buckle of some kind. I find the mitten hooks fiddly and imposible to use with one hand, especially the six that are harder to reach at the head and foot of the tarp.
I had a Henry Shires silnylon solo tent years ago. I hated it. The condensation inside was terrible.
I have owned two Z-pack tents, used them a season and then sold them on eBay. Terrible mistake. The Z-pack tent is still, in my estimation, the tent to compare all other Cuban fiber tents to.
This review was well done, except one of the most important stats is the cost and I missed seeing that.
And the size of the TarpTent Notch Li is small smaller than the z-pack soloplex tent and I think it might weigh a bit more.
The article repeatedly mentions DCF being “less prone” to condensation. Being in coach class I can’t read your referenced article, so how about a one-sentence explanation why DCF would be less condensation prone? Are you referring to how moisture is absorbed by (or “sticks to”) the fabrics, or literally to how much condensation forms?
Also, I’ll point out that the Notch Li is double-wall, double-door, and double-vestibule, so comparisons to the Soloplex are not valid in all respects. Are there any other DCF tents out there with those characteristics?
As most here know I am an unabashed Tarptent fanboy, having owned 4 of them.
The Notch design, IMO, is likely the best hiking pole supported solo tent design on the market at this time. Being the owner of a very similar Tarptent Moment DW I can attest to the good design of the Notch and its livability in both good and inclement weather. And, I’m very happy to see see Tarptent finally including mesh pockets as standard equipment.
Since I’m an inveterate “modder” of my gear I wee several mods I’d love to make on the Notch Li. But as-is it is a great piece of gear for thru-hikers and geezers like me who must lighten up.
Now if I can just win a lottery I’ll buy one…
Such a fulsome, honest appraisal, Ryan! I’m an unabashed Tarptent fan and here in Melbourne, Australia, I’ve probably onsold (i.e. successfully recommended to others in my bushwalking club) well over a dozen Tarptents. My wife and I have had a few Scarps. Just yesterday I bought my first Zpacks products, a rain jacket and some gaiters, and I’ve been looking forward to checking out DCF tents, simply with a view to reducing weight. So this review is very opportune. For me, because I don’t hike with trekking poles and so would buy the 227-gram Tarptent standalone poles, the Notch Li is an 800 gram (28 ounce) one-person tent, a saving of 50%. I’ll be quite willing to be a guinea pig with regard to some of the features that might not be quite ideal, as noted by you and other commenting experts. The only issue standing between me and an immediate purchase is that the Notch Li is shown on the Tarptent website as out of stock!
Thanks, Ryan, for the very comprehensive review.
From all I can gather, the Li has a full net inner.
Have yet to get even damp using tents with a full net inner, so long as the net is reasonably durable, and kept taut by the design. So I think that a full net inner, especially one that pitches simultaneously with the fly, may be a major plus for the Li over its competition. And with the reported 8000mm HH and lower condensation on mylar surfaces, there should be much less chance of water falling on the roof of the inner.
And thank you Dan for your enlightened comments on Sil/PU coated nylon floors.
Thank you Ryan and all the commenters for a very enjoyable and informative discussion, I learned a lot. Also, checked out Mariah’s article on condensation, very technical but still very understandable. It’s a good read for even people like me who think they understand condensation.
Okay, answering my own question here. I still can’t read the article but found the thread discussing it. Best I can tell, the claim that DCF is less condensation prone is not confirmed and not supported by any strong theory. My guess is that condensation is less bothersome on DCF because it runs off more easily and dries faster. Water sticks to silnylon like syrup on a pancake. Also, maybe DCF shelters tend to be more open and airy and hence ventilate better. Who knows. Maybe now someone can do some side-by-side comparisons of the Notch and Notch Li. Maybe an Aussie affiliated with the mfr? :-)
I don’t have time to read it all but I think the summary is thermal conductivity of fabrics. If they don’t conduct heat well they won’t cool as fast and thus have less condensation.
This following informal experiment lends some support to this argument:
Cuben Fiber vs. Sil Nylon water absorption Test Results
Regarding the condensation issue.
Water absorption may play a role, I haven’t studied that very much. My anecdotal observations of shaking out / packing up water-soaked silnylon and DCF shelters certainly suggests that silnylon absorbs gobs more water.
But as for the actual physics of condensation formation, maybe we consider fabric emissivity (e) as well. Low-e glass retains heat better than standard glass, that’s why we use low-e coatings on our windows up here in at 7220′ in Wyo (so we don’t get condensation forming on the inside on wintry days).
So I recall from (what might be a foggy) memory that polyesters and nylons have emissivity values in the range of 0.5 to 0.8, depending on coatings and whatnot. Silicone emissivities (I think) are higher than polyurethanes, so it would make sense that silnylon would be more condensation prone than, say, a silpoly or a PU-coated nylon.
Mylars, on the other hand, have very low emissivities. I think they are on the order of ten times lower than nylons.
So if the emissivity of the fabric is important, then mylar-based fabrics should outperform sil/PU coated nylons.
That’s a nice looking tent. And nice review. However, you didn’t mention Z-packs anywhere for comparison. I’ve got the Duplex and wouldn’t trade it for the world. It’s a single wall but has TONs more interior room 45″x90″ (21oz) vs 34″x84″ (20oz) and similar vestibules. Not sure the double wall and 1oz savings is worth a 30% decrease in room. IMHO
Where does the 8000mm HH come from? Is that the non-aged value for either the floor or tarp fabric? Doesn’t seem right, unless of course when changing to DCF from Cuben something else changed as well?
Be interesting to see someone’s WET (soaked + shaken) weights for the Cuben vs Silnylon Notch’s. Now that we have a tent that is close to identical (dimensions and major design at least) in both fabrics. Aged tests as well would be good, with a few replicates for each tent. More hard data is always good :-)
It’s a little surprising that DCF tent/tarp manufacturers have not taken steps to collect more hard data on wet weight gain of DCF versus silnylon. Would this not be useful for product marketing purposes? Under wet conditions, real-world weight reduction beyond the dry weight specs could be significant. Such data could even be collected using flat tarps made from both materials, adjusting the results to apply to other shelters, although this would not be a compelling as using the exact same shelter.
Deleted; my post linked to a water weight gain study, that I discoverd after posting, was already shown in an earlier post… sorry.
Agree Lester; there’s lots of potential good ways of collecting such data. Flat solo tarps is probably a cheaper and straight forward way to get replicable data. I think its helpful to try and emulate field conditions but in a replicable way. To do this, one would have to control variables around the person underneath, and environmental variables. The person, perhaps with an electric heater pumping out ~100watts, and a device to emulate humid breath of a person. Easier to replicate and control that putting different people inside different shelters. With careful randomised site selection and enough n (number of tarps of each material), decent data could be collected, that would at least guide on whether there is a statistical difference, and by how much, % wise.
I’m wondering as well whether groundsheets/tent/bivy floors behave much differently here. I expect that a groundsheet and tent floor would be more similar than a bivy floor, with the bivy floor more likely to have condensation issues on the topside (humid air is much more trapped and likely to condense on the inside of that floor). I suspect they would mostly behave the same…underneath the mat/person, on the ground side. But, I dare say that side never gets close to the kind of saturation that happens on the outside of a shelter from rain. That’s my recollected experience. Though its more common that there is some moisture on the ground side, as opposed to none. I can’t really remember having condensation moisture on the top side of a ground sheet or tent floor, ever. So the % difference on the numbers for cuben vs silnylon might be less pronounced as a floor material…weighting decisions back towards silnylon? I’ve only used a (old Bibler Toddtex Bivy) a few times in the past, so I’m not sure what inside floor condensation is like on those? Or is it mostly underside of the upper fabric where issues occur?
Great job Ryan…as usual! I was wondering about the Zpacks Duplex cuben fiber tent? I understand that it weighs 21 oz but it’s larger inside and seems to be a great comparison.
Your thoughts??
Thanks,
Jim
Ryan, I looked up the emissivity. It is VERY difficult to translate a lot of these to real world measurements: coatings, denier of fabric, dyes, thickness, doping, wavelength, etc.
Overall nylon6,6 has about twice the emisivity of PTFE (teflon), PET, Polyurethanes or others roughly, very roughly speaking. (It varies a lot.)
Thermal conductivity across nylon6 was about 0.25 W/(m·K) where as for HDPE it was around 0.45 W/(m·K) …indicating it was a better conductor for heat, again about twice.
I strongly suspect that the actual condensation on cuben/DCF vs Silnylon could be a product of the better heat transfer between the inner surface and outer surface, thus removing a portion of the temperature difference between the two surfaces…hence, less condensation…not so much caused by the lower emissivity since this is only around 5-10% of the heat transfer at camping temps, around -20C to 20C. Conduction(convection) would play a *much* greater role in my estimation. Of course at higher wind speeds and 100% RH, you still get condensation…and, it is a thin membrane…and, I assume equal thickness for both fabrics…and, I do not account for coatings…and so on.
The Duplex isn’t an apples to apples comparison since it’s a 2 person tent and the Notch Li is a 1 person tent.
Become a member to post in the forums.