
Introduction
Knowing where you are in the backcountry and identifying that location on a map (“fixing your position”) is an essential skill. Doing so with analog tools (e.g., map and compass) seems to be a lost art, having been replaced by the digital position fix marker found in GPS smartphone apps.
In this skills article, you’ll learn a fundamental map use technique – what lines of position are and how to use them to fix your position on a map in the backcountry.
What is a line of position?
If you look at your map and say, “Hmmm…I’m somewhere on this map.” that’s not going to inspire a lot of navigational confidence.
However, if you knew with certainty that you were somewhere along a line on the map, that may make you feel quite a lot better about where you’ve come from and where you’re going.
A line of position, or LOP (sometimes called a “position line”) is a line on the map where you know with 100% certainty that you are somewhere along that line.
Lines of position may be straight (e.g., a boundary fence) or they may be nonlinear (e.g., a trail).
What are examples of lines of position?
The most important thing about a line of position is that it must always be identifiable on a map. A stream you discover in real life that isn’t on the map cannot be a line of position.
Lines of position can be manmade features, topographical features, terrain features, or sighted bearing lines.
Manmade lines of position:
- trails
- roads
- fences
- powerlines
Topographical features that can serve as lines of position:
- ridges (where peaks and passes live)
- valleys (drainages)
- steep slopes or cliffs adjacent to significantly less-steep terrain
- benches
- plateau boundaries (i.e., topographic perimeter)
Terrain features that can serve as lines of position:
- streams
- lake shorelines
- changes in vegetation
Sighted bearing lines can also serve as lines of position. These are the imaginary lines drawn between a known landmark and your current position. In most cases, they require the use of a compass.
The exception to this is when you, and two other (known) landmarks lie along a straight line. This type of LOP is called a transit line. A compass isn’t needed to draw a transit line.
Two or more lines of position = a position fix
The magic happens when you arrive at a point where two lines of position intersect. At that point, you can fix your precise location on the map.
One of the most obvious intersections of two lines of position for hikers is where a trail crosses a stream. As long as you’re paying attention as you hike, and make a mental note of major stream crossings that correspond to mapped streams, this is a reliable method for fixing your position. However, it can become confusing if you are hiking in particularly wet areas, or during the early summer, when you may cross several streams that are too small to appear on the map.
Any two lines of position mentioned in the previous section can be used to fix your location – the combinations seem limitless. The next section outlines some common examples.
Examples of intersecting lines of position used to fix your position on a map
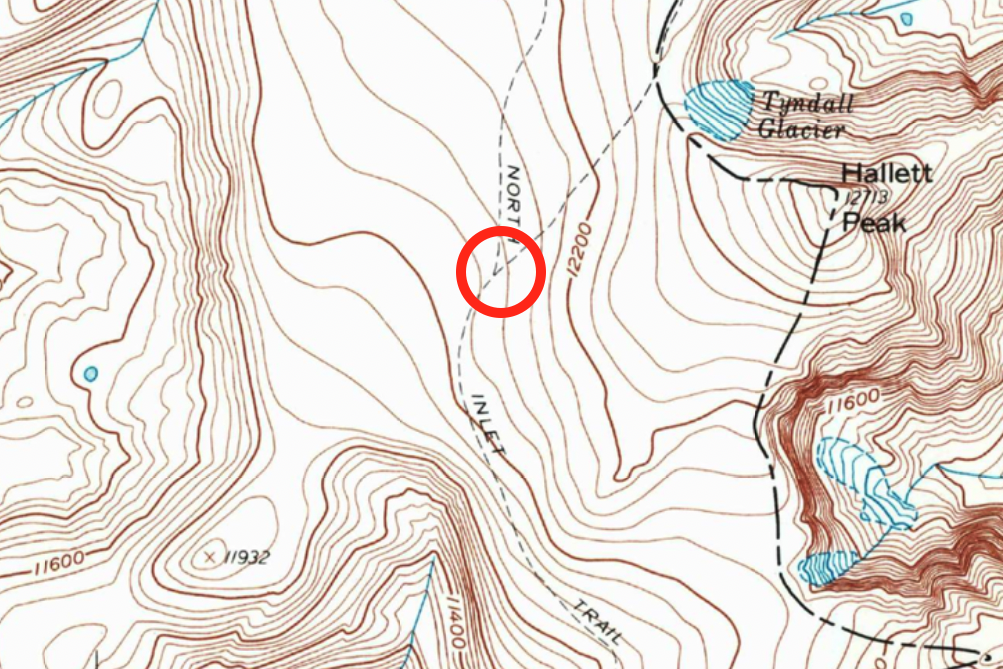
1. Trail LOP intersects another trail LOP at a trail junction
In most National Parks and other popular hiking destinations, we can enjoy the informative benefit of signed trail junctions. In the absence of signs, we can still use the information reliably – assuming our maps are up to date!
2. Trail LOP intersects a stream LOP at a bridge
This method is most reliable for significant streams that flow year-round, are mapped, and travel through topographically-obvious valleys that we can visually identify in real life.
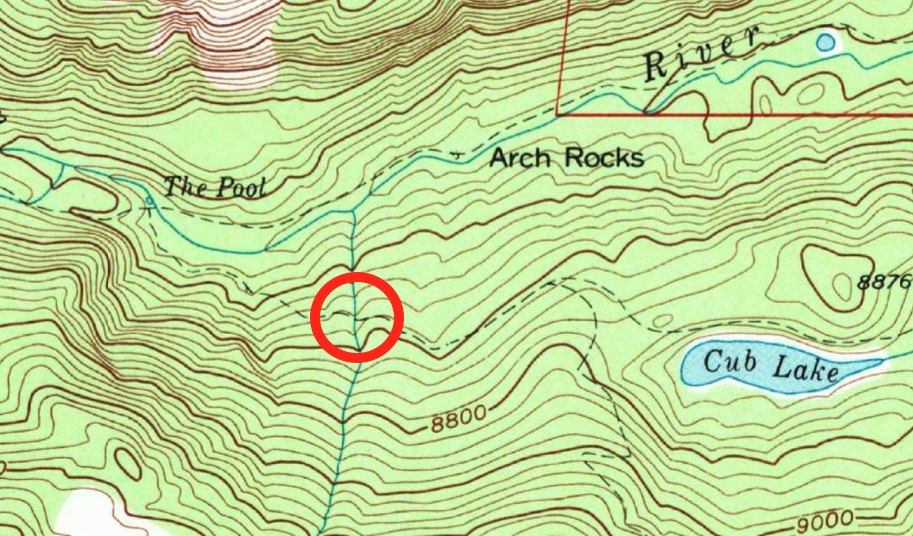
3. Trail LOP intersects a vegetation boundary LOP when it enters a meadow
This method requires updated maps. Be cautious of wildfire-burned areas that have appeared before the printing date of your map – vegetation cover can change significantly with wildfire.

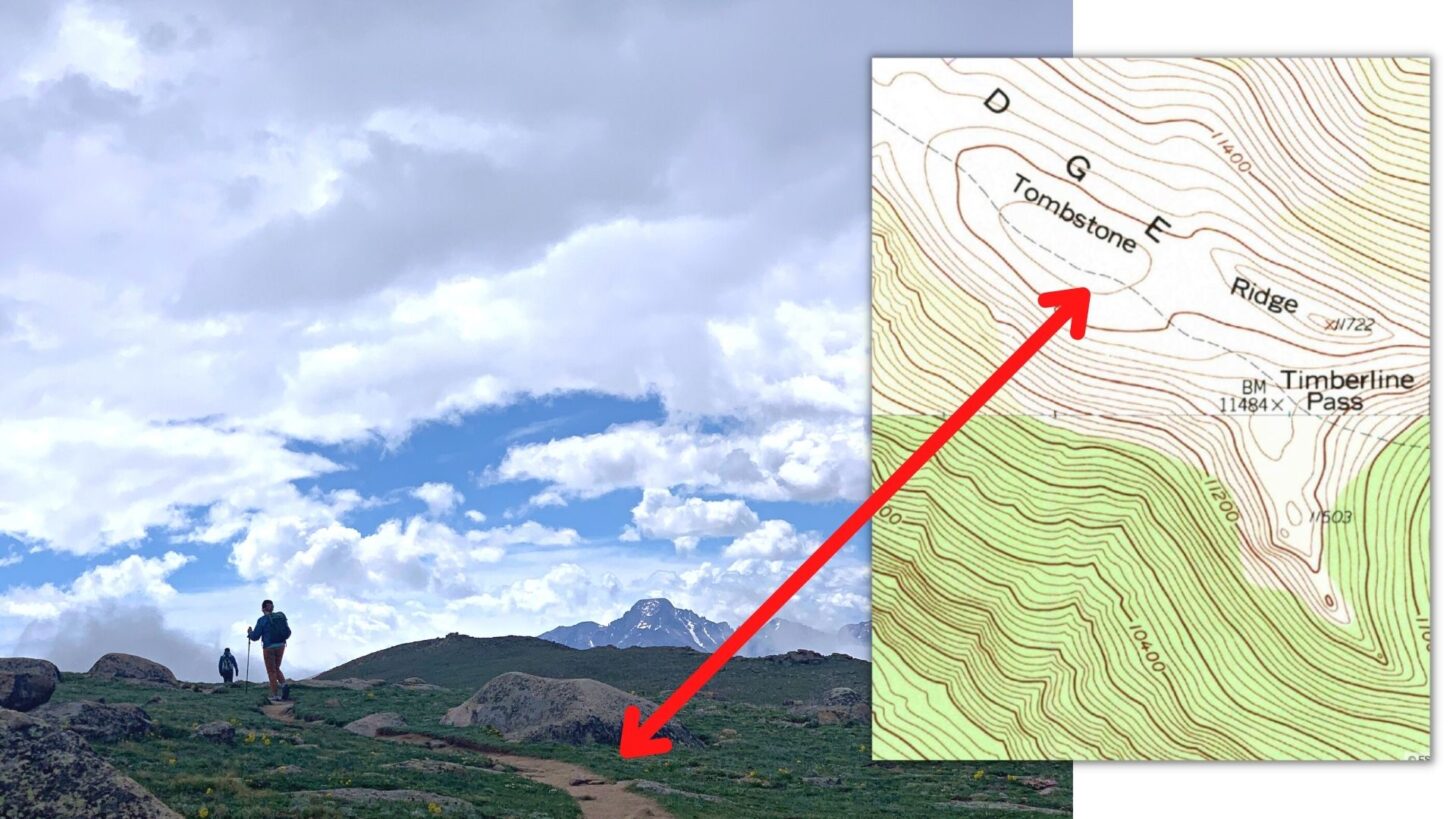
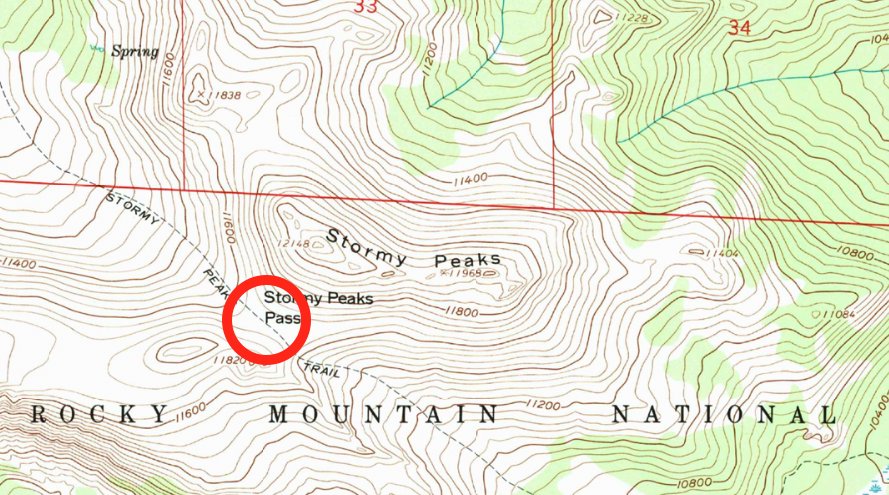
4. Trail LOP intersects a ridge LOP at a pass
Recognizing passes, ridges, and other topographic features requires practice. Make it a routine to take your map with you everywhere and correlate the terrain you see in real life with the shapes of the topographic lines on the map.
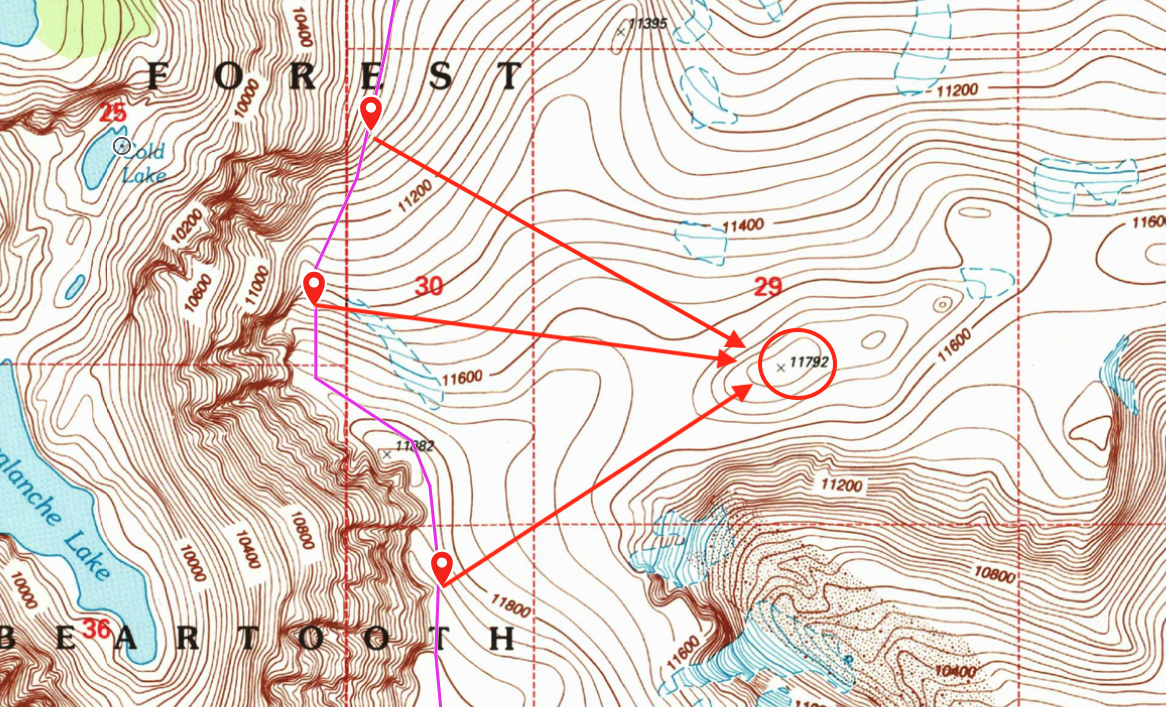
5. Sight line LOPs (compass required) to known landmarks that intersect with topographic LOP
In the absence of trails, you’ll need to get more creative. Here’s an example of a mountaineering route I attempted up the north ridge of a prominent peak in Montana. Most of the climb was performed in low-visibility conditions (cloud cover). I was handrailing (a technique where you follow a natural terrain feature) along the western edge of the summit plateau, which fell off steeply to cliffed terrain. So when the clouds cleared enough, I was able to sight a bearing line to Peak 11792 (compass required), and then draw that bearing line onto my map. My approximate position fix was where the bearing line LOP intersected my route LOP at the western edge of the plateau.
6. Trail LOP intersects a transit line LOP (no compass required)
We recently hiked the Ute Trail in Rocky Mountain National Park, and encountered a classic example of a transit line LOP. A transit line is a straight line that intersects your current position and two visible landmarks. Transit line LOPs can be used to orient a map, or sight a bearing without using a compass.
The two landmarks I observed were a small unnamed topographical bump (foreground) and the very prominent north face of Long’s Peak (background):
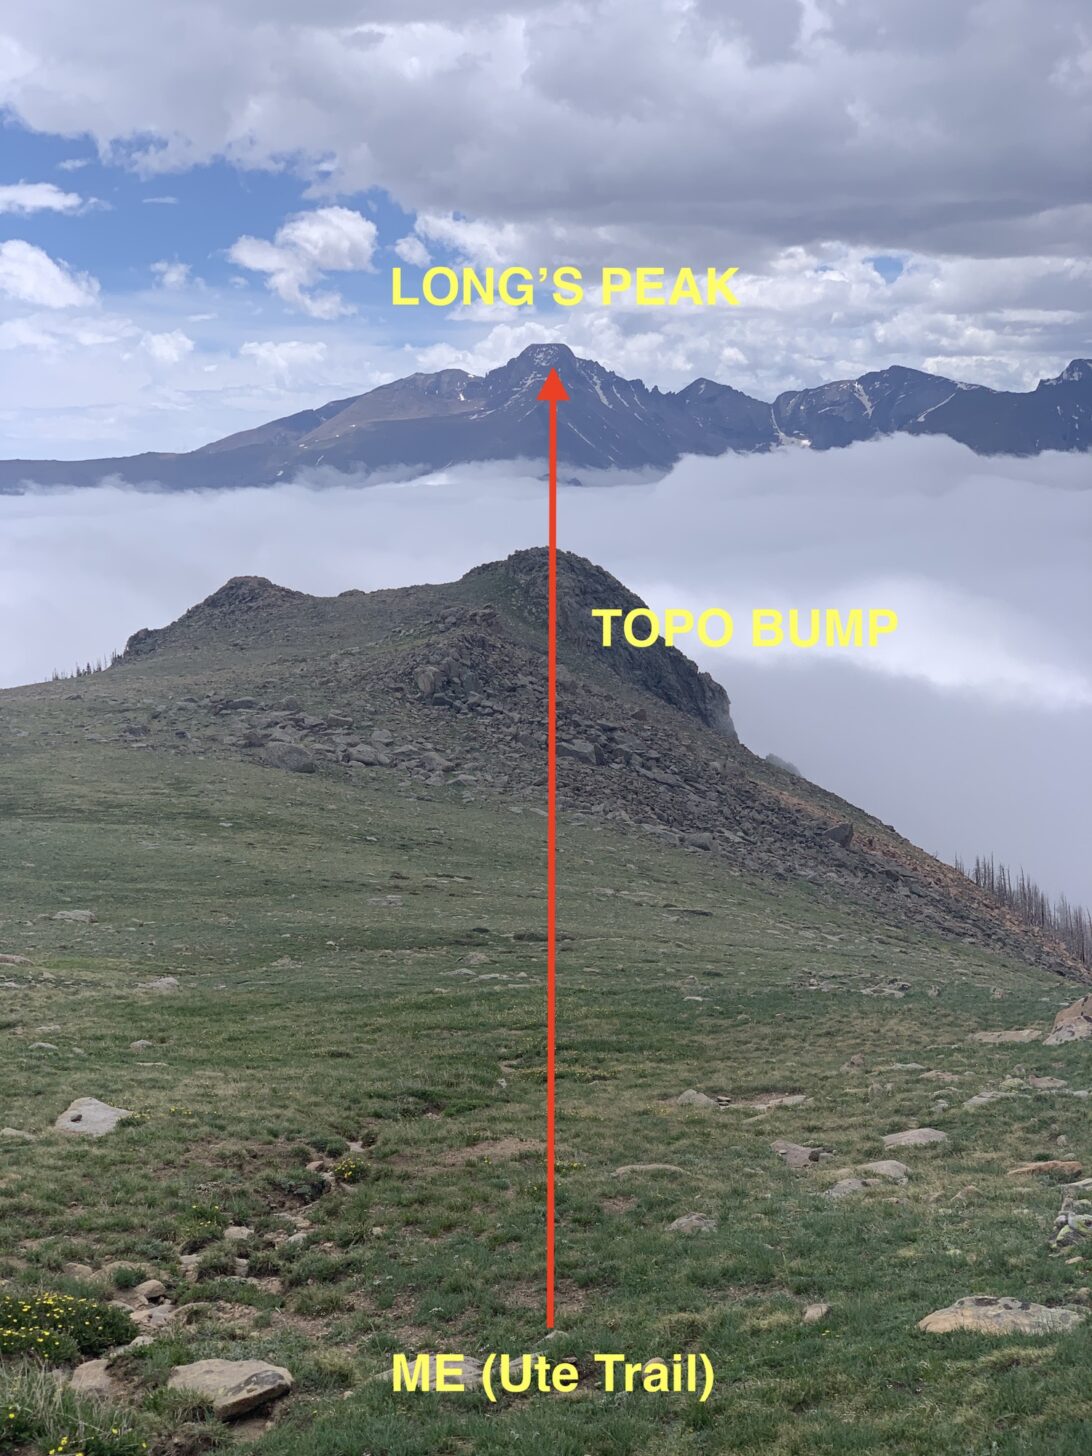
Now, simply drawing a line on the map from Long’s Peak, through the topo bump, and intersecting the Ute Trail, I can fix my position on the trail. In addition, by laying the map on the ground, and rotating it so the transit line drawn on my map is parallel to my line of sight to Long’s Peak, it’s now oriented. All this without using a compass – such is the power of a transit line.
Conclusion
Understanding how to identify and use multiple lines of position (LOPs) to fix your position on a map is one of the most valuable navigation skills you can learn. This technique does not require a compass most of the time, so it’s very fast and simple to learn. Practice it!
Learn More
Join us Saturday, July 2 at 9 AM US Mountain Time for a Map-and-Compass Member Q&A live webinar. I’ll expand on the topic of lines of position to include compass work, and we’ll address more analog techniques for backcountry navigation.

Discussion
Become a member to post in the forums.
Companion forum thread to: Using lines of position to fix your location on a map
Learn how to identify and use lines of position to help fix your location on a map while traveling in the backcountry.
I must be getting old — I thought this was standard practice.
Do people really only rely upon a GPS fix? Absolute reliance on an electronic device and associated systems (satellites, battery pack, etc.) — and with no backup option?
For my clients that meet with me 1-on-1 for private instruction, map-and-compass use has always been the #1 request. Which makes me happy – but I’m still in awe at the number of hikers I meet who just follow the alltrails location marker/arrow…
Pretty good stuff. I’ve been helping teach map & compass workshops to our local outdoors club for about 10 years, and am active in our local orienteering club as well. We use “Linear Position” where you use LOP. Same thing.
Really enjoying this content, thank you!
Good stuff. As in the other thread, in Orienteering we call the Linear Features “Handrails”. Something that can be followed in a compass direction until you reach a finite point (The trail crossed the power line in the middle of a thicket, 2 miles from camp). These features are also used as “Catch feature”. Say you are using the water channel, going NNW and were shooting/looking for some other feature (control in Orienteering speak) and there is say an oil pipeline some short distance beyond the feature. You are following the water feature/creek and hit the oil pipeline. OOPS! You know you have overshot as the “Catch feature” (also a linear feature) just showed up. But you also know right where you are! You are at the creek crossing the pipeline. Take a compass bearing, measure the distance (if you need) and pace count your way back to the feature you were shooting at.
Ryan did actually mention handrails in the article, and we use that term as well. Are all handrails linear features and are all linear features handrails? Hmm. I’d have to ponder whether I agree that’s true.
Catching features don’t necessarily have to be linear. Here in SE Michigan, our orienteering courses have a lot of notable depressions, ponds, and vernal ponds, because our topography was formed by glaciers thousands of years ago that formed kames, kettles, eskers, etc. I’ve often used them as catching features, but I wouldn’t consider them linear.
Most of the under 30 hikers I know only use phone apps with GPS. They don’t even think about maps. Our major map source in town just closed down permanently. Very sad, because they had every map for everywhere in Alaska you could want. I had the lovely experience recently of teaching some map reading skills to some kids on a backpacking trip. Not sure they’ll remember or ever use it again though. But they were interested that I could read the map and tell them how much climbing we were going to be doing the next day, and where good view spots might be. Glad I learned orienteering when young. That said, I’m pretty rusty with compass these days!
I’ll switch to GPS when the screen is as big and lightweight as my paper map, as easy to read in bright sun, and allows hand-writing notes that stay with the displayed map. Oh, and the batteries last two weeks with the GPS on 24/7, on a single charge. No luddite here!
Don’t forget when you can tear off half the GPS (Preferably the half you have already treked) and use it to start a fire.
Jeff M, Excellent point about Catching features not necessarily needing to be linear. I agree. I’ve used buildings and such. Linear features are just, for me, easier to spot. I usually need something catching that is large. River, cliff, building, pipeline/powerline. Stuff like boulder clusters often don’t work for me as some of our Texas venues are FULL of boulders. We’ve had running jokes about SID Richardson Scout ranch and the clues there. “Boulder, Boulder Cluster, Stony Ground, Between two boulders, On top of a 2 Meter boulder…….”
I’m with Eric. I learned this stuff decades ago when I was sailing on a regular basis. If you think this matters in the woods, you should try it a trackless stretch of water that is moving underneath you. Getting a fix on those distant points of land makes all the difference.
It’s harder to do this stuff in a dense forest…but this is still my primary navigational system, if you don’t count the trail signs themselves.
Someday I’ll get a GPS, I guess…
Good to see there are still some people pushing for compass skills. Very useful.
On top of taking a paper map and compass, I also do my entire route in Google Earth, pre-trip. I burn the entire area into my brain as a mental 3D map. Google Earth allows you to also get an idea of what every prominence looks like from the ground. If I was teleported to any spot within the area I am backpacking, I could probably gain a lot of intel just from looking at the terrain and vegetation and comparing it to my mental 3D render from flying around Google Earth for several hours.
Through the years I have owned two or three gps units. To me they are more of a curiosity than a tool I use when hiking. They are heavy and have short battery lives.
A better electronic tool is an altimeter. There are many versions that last over a year on one battery and also will give you the time of day!
I always hike with a paper map and keep it in my pocket for quick references. With a map, compass and altimeter I can usually pinpoint my location accurately. Orienteering is a necessary skill for backcountry activities.
Compasses – My pack with old Silva compass was stolen last year (car breakin). It had declination adjustment. Did research for a new compass. Now to get declination adjustment the mfg charge a premium. The standard Suunto M3 D is a whopping $73 for what used to be a common compass. Since my background is geography and mapping, I got the Suunto MC2 Pro, also $73. No wonder everyone under 40 uses phone GPS only! And so do most over 40.
No wonder everyone under 40 uses phone GPS only! And so do most over 40.
I don’t quite see this.
You can find perfectly satisfactory Chinese base-plate compasses on ebay for around $11.
You can even get a Coghlans baseplate compass for $12.34 on ebay.
So worries about the sky-high prices some places are charging seem a shade pointless. Shop around!
Advice: do NOT buy anything which is not fluid-filled. And beware of the extremely small button compasses: they can take ages to settle. Some of them just jam up.
Cheers
wow this thread is flushing out all the luddites (elders?) like me. I’ve probably seen you at a jazz concert.
I won’t bother to calculate the entire weight of a gps/battery/solar charger ensemble that seems to be de rigueur these days. That said, I’ve been forced to concede that a phone makes a good camera, and as long as you have that, why not add gps?
My response has been to go camera-less. I spent fifteen years lugging camera equipment and have all the slides I’ll ever need already.
Map and compass? 2-3 ounces? fail proof, in terms of technology. No batteries required. It’s a beautiful thing.
edit: yeah, wow, $73.00 for a compass is prohibitive, impossible…as compared to what, a single outer layer? or a phone? it’s not like the damn thing is going to wear out.
My favorite bit of navigation equipment is a high-quality altimeter.
in combination with a ridgeline, ascending trail or river, you know exactly where you are. Of course your watch and your phone have altimeters in them now too, so if you keep it adjusted, that’s a back-up to all your other tools. Alas, like a compass, is most useful for finding your way home if you were using it on your way in.
My biggest benefit from using an altimeter is that it doesn’t get overly optimistic. It’s emotionally draining to think the destination is just over that next ridge, and then the next one, and the next one. If camp is 9,600 feet and I’m at 8,000, I just need to settle in for another 1600 feet of climbing.
My favorite bit of navigation equipment is a high-quality altimeter.
In principle I totally agree – in the right country.
Around Sydney an altimeter is not that much use: the plateaus are flat, and the ‘valleys’ are lined with cliffs. But in the European Alps – oh yes, for sure! They go up and down a lot more.
Cheers
I’m delighted to see this kind of content here.
I’ve never heard the term ‘catch feature’, I’ve always used “handrail” to apply to a feature near my destination that I know I’m going to hit more or less perpindicular to my line of travel – a stream to cross, or a road, that I can hit a little below my line and then turn up, as a precaution against overshooting a destination. So now I’ve got a better vocabulary to work with.
A concept different than “handrail” but also helpful is to intentionally aim left of your destination and then you know it is to your right. That’s super helpful while boating and looking for a feature on the shoreline, but comes up in backpacking sometimes, too.
Alas, I often remember that trick when I’m ping-ponging further and further from predicted dead center covering the same ground over and over.
David – we call that “aiming off”.
David — we call that “deliberate offset.”
Orienteering, Handrail = something you can follow along. Catch Feature = something that would stop you in your direction of travel (you find the creek, boulder, house, trail) but I often use a Catch Feature to STOP me when I’ve overshot on a bearing. “I’m aiming off to the NNE, once I hit the trail (handrail), I’ll know to turn Left and follow it to the second drainage BUT if I hit the next trail (Catch Feature), I know I missed the drainage.
Roger – cheap Chinese compasses or Coghlan’s ones:
Ugh. Can I just say, “No thanks”? Those cheap ones do not have a declination adjustment, and I do not like the cheaper compasses with a “declination scale”, which is not the same as adjusting the compass’s declination like Suunto has.
Maybe for a lot of things, being off by a degree or two doesn’t matter. In Yosemite, however, the declination is 12.6 degrees east. With the error calculation being roughly 100 feet per degree per mile, walking a mile without adjusting for declination would put you 1260 feet off from your intended target. In the central portion of the New Zealand’s south island, declination appears to be about 24 degrees east.
Suunto compasses are my favorite baseplate compasses, but yes they are expensive. Brunton used to made an “Eddie Bauer” compass with a dayglow green baseplate that had an okay declination adjustment. You can still find it pretty cheap if you look around. The Brunton TruArc 5 also has a decent declination adjustment. The TruArc 3’s declination adjustment seems broken by design.
Become a member to post in the forums.