
Introduction
Knowing where you are in the backcountry and identifying that location on a map (“fixing your position”) is an essential skill. Doing so with analog tools (e.g., map and compass) seems to be a lost art, having been replaced by the digital position fix marker found in GPS smartphone apps.
In this skills article, you’ll learn a fundamental map use technique – what lines of position are and how to use them to fix your position on a map in the backcountry.
What is a line of position?
If you look at your map and say, “Hmmm…I’m somewhere on this map.” that’s not going to inspire a lot of navigational confidence.
However, if you knew with certainty that you were somewhere along a line on the map, that may make you feel quite a lot better about where you’ve come from and where you’re going.
A line of position, or LOP (sometimes called a “position line”) is a line on the map where you know with 100% certainty that you are somewhere along that line.
Lines of position may be straight (e.g., a boundary fence) or they may be nonlinear (e.g., a trail).
What are examples of lines of position?
The most important thing about a line of position is that it must always be identifiable on a map. A stream you discover in real life that isn’t on the map cannot be a line of position.
Lines of position can be manmade features, topographical features, terrain features, or sighted bearing lines.
Manmade lines of position:
- trails
- roads
- fences
- powerlines
Topographical features that can serve as lines of position:
- ridges (where peaks and passes live)
- valleys (drainages)
- steep slopes or cliffs adjacent to significantly less-steep terrain
- benches
- plateau boundaries (i.e., topographic perimeter)
Terrain features that can serve as lines of position:
- streams
- lake shorelines
- changes in vegetation
Sighted bearing lines can also serve as lines of position. These are the imaginary lines drawn between a known landmark and your current position. In most cases, they require the use of a compass.
The exception to this is when you, and two other (known) landmarks lie along a straight line. This type of LOP is called a transit line. A compass isn’t needed to draw a transit line.
Two or more lines of position = a position fix
The magic happens when you arrive at a point where two lines of position intersect. At that point, you can fix your precise location on the map.
One of the most obvious intersections of two lines of position for hikers is where a trail crosses a stream. As long as you’re paying attention as you hike, and make a mental note of major stream crossings that correspond to mapped streams, this is a reliable method for fixing your position. However, it can become confusing if you are hiking in particularly wet areas, or during the early summer, when you may cross several streams that are too small to appear on the map.
Any two lines of position mentioned in the previous section can be used to fix your location – the combinations seem limitless. The next section outlines some common examples.
Examples of intersecting lines of position used to fix your position on a map
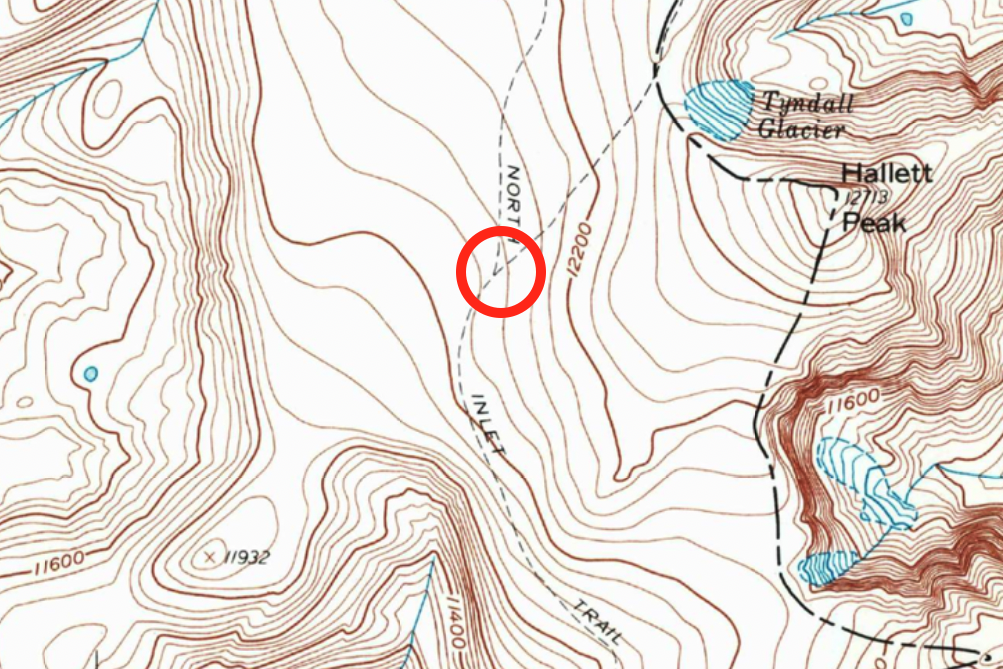
1. Trail LOP intersects another trail LOP at a trail junction
In most National Parks and other popular hiking destinations, we can enjoy the informative benefit of signed trail junctions. In the absence of signs, we can still use the information reliably – assuming our maps are up to date!
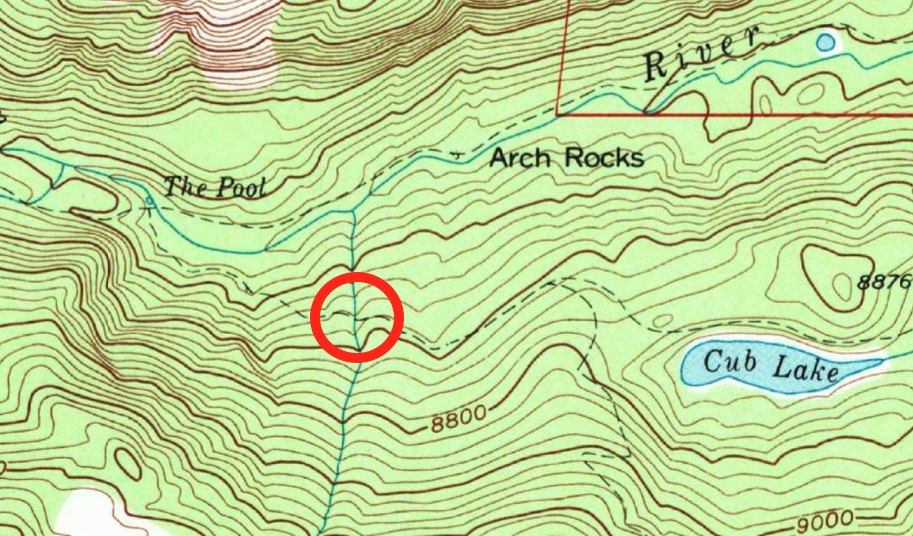
2. Trail LOP intersects a stream LOP at a bridge
This method is most reliable for significant streams that flow year-round, are mapped, and travel through topographically-obvious valleys that we can visually identify in real life.
3. Trail LOP intersects a vegetation boundary LOP when it enters a meadow
This method requires updated maps. Be cautious of wildfire-burned areas that have appeared before the printing date of your map – vegetation cover can change significantly with wildfire.

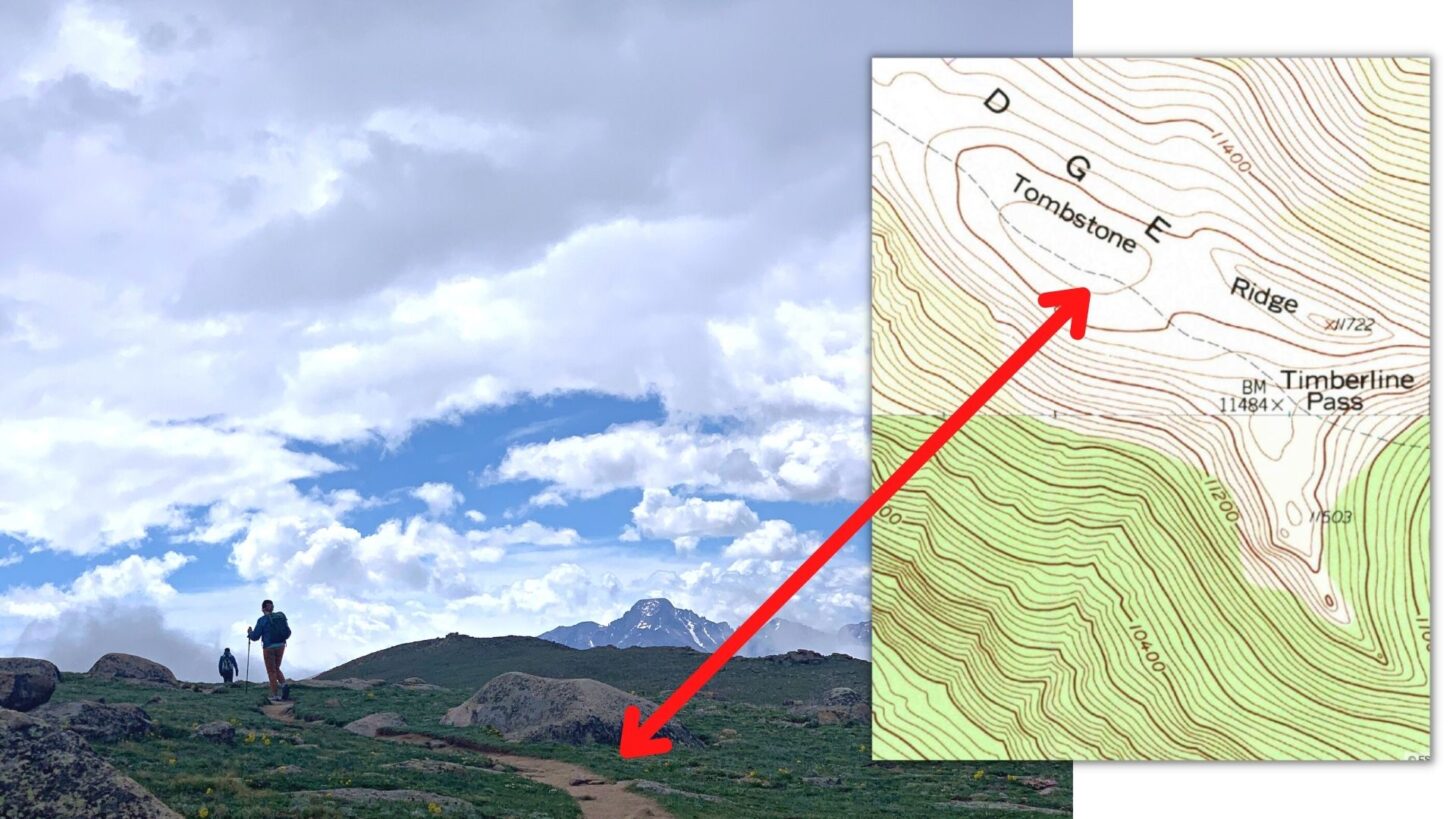
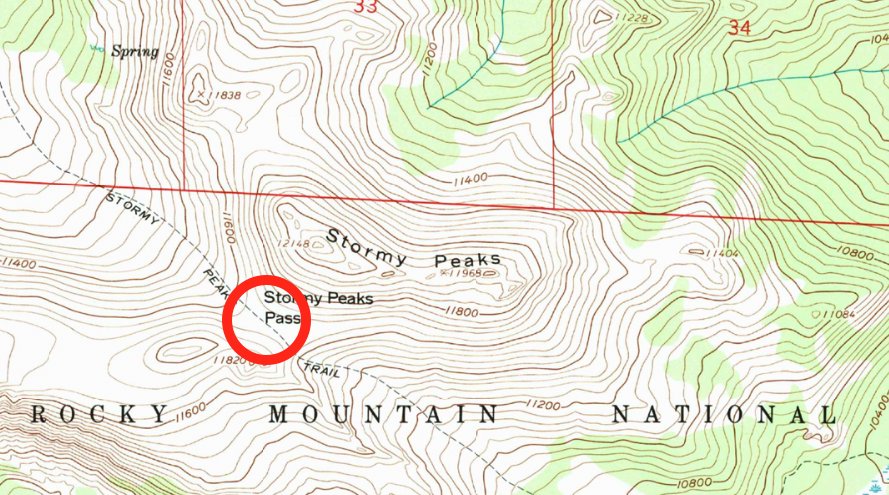
4. Trail LOP intersects a ridge LOP at a pass
Recognizing passes, ridges, and other topographic features requires practice. Make it a routine to take your map with you everywhere and correlate the terrain you see in real life with the shapes of the topographic lines on the map.
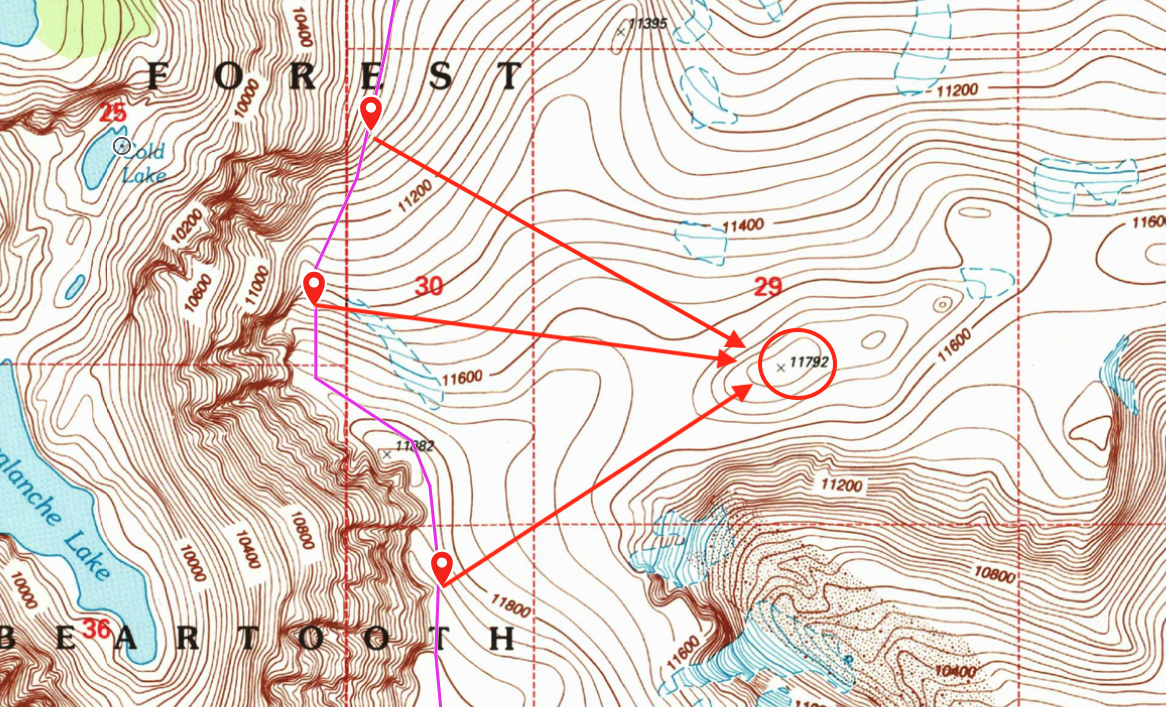
5. Sight line LOPs (compass required) to known landmarks that intersect with topographic LOP
In the absence of trails, you’ll need to get more creative. Here’s an example of a mountaineering route I attempted up the north ridge of a prominent peak in Montana. Most of the climb was performed in low-visibility conditions (cloud cover). I was handrailing (a technique where you follow a natural terrain feature) along the western edge of the summit plateau, which fell off steeply to cliffed terrain. So when the clouds cleared enough, I was able to sight a bearing line to Peak 11792 (compass required), and then draw that bearing line onto my map. My approximate position fix was where the bearing line LOP intersected my route LOP at the western edge of the plateau.
6. Trail LOP intersects a transit line LOP (no compass required)
We recently hiked the Ute Trail in Rocky Mountain National Park, and encountered a classic example of a transit line LOP. A transit line is a straight line that intersects your current position and two visible landmarks. Transit line LOPs can be used to orient a map, or sight a bearing without using a compass.
The two landmarks I observed were a small unnamed topographical bump (foreground) and the very prominent north face of Long’s Peak (background):
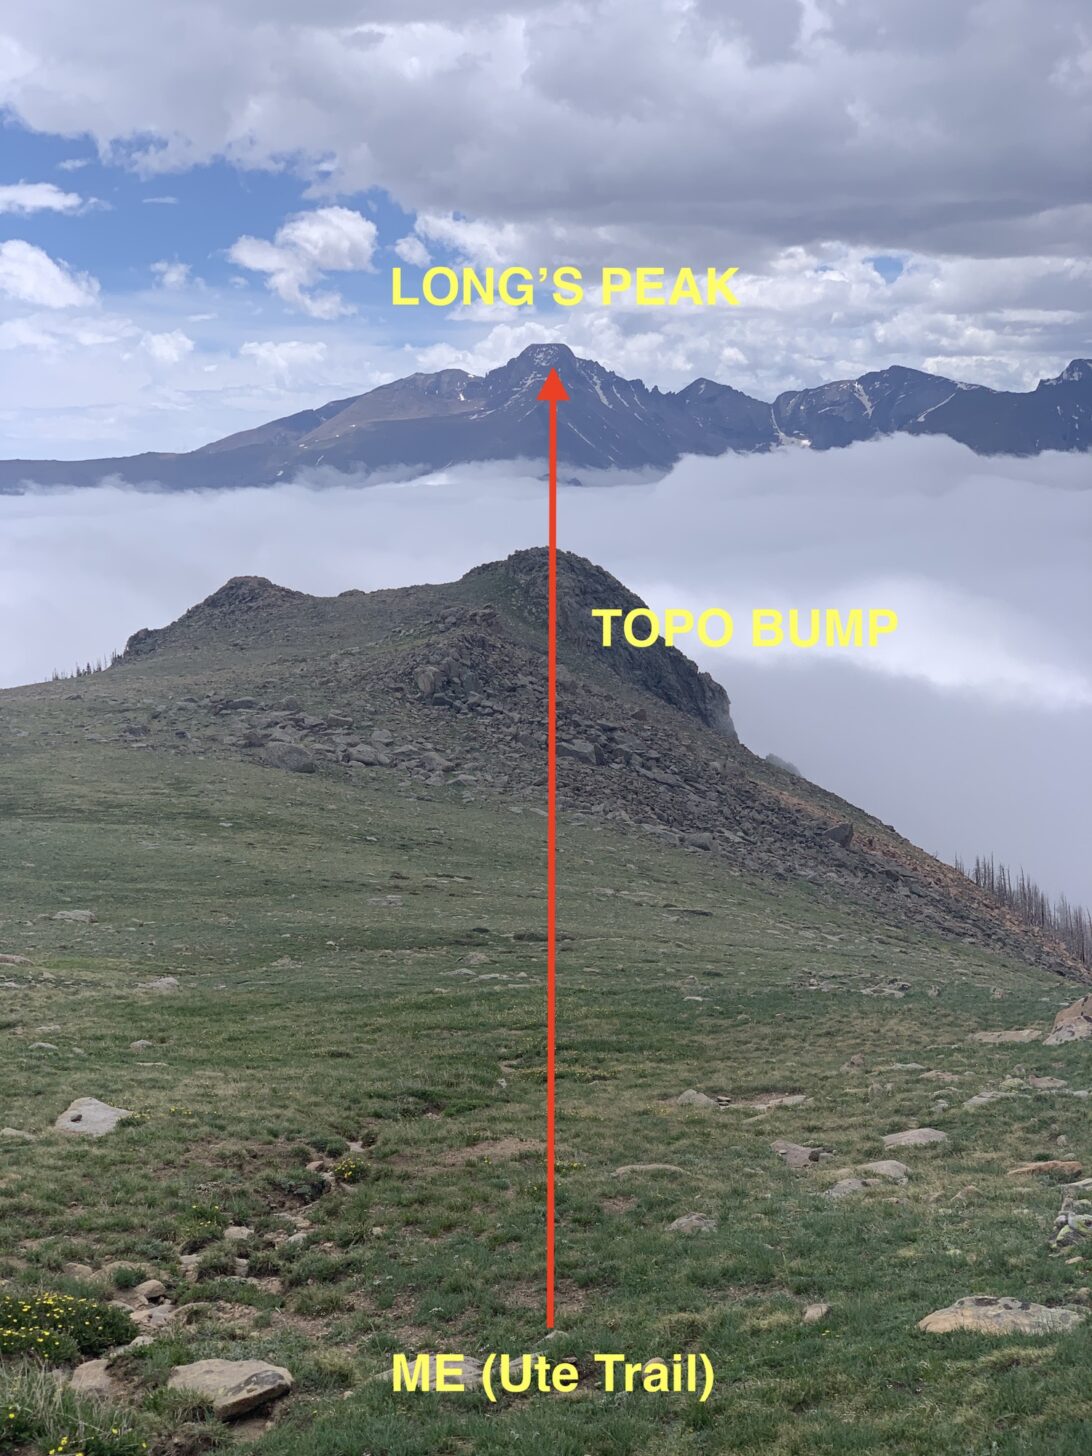
Now, simply drawing a line on the map from Long’s Peak, through the topo bump, and intersecting the Ute Trail, I can fix my position on the trail. In addition, by laying the map on the ground, and rotating it so the transit line drawn on my map is parallel to my line of sight to Long’s Peak, it’s now oriented. All this without using a compass – such is the power of a transit line.
Conclusion
Understanding how to identify and use multiple lines of position (LOPs) to fix your position on a map is one of the most valuable navigation skills you can learn. This technique does not require a compass most of the time, so it’s very fast and simple to learn. Practice it!
Learn More
Join us Saturday, July 2 at 9 AM US Mountain Time for a Map-and-Compass Member Q&A live webinar. I’ll expand on the topic of lines of position to include compass work, and we’ll address more analog techniques for backcountry navigation.

Discussion
Become a member to post in the forums.
Ray J – one more: attack point
I’m going to follow this trail until it crosses the next stream. The place where the trail crosses the stream is my attack point, where I will then follow an azimuth (or bearing if you prefer) of 35 degrees for approximately 500 feet until I reach my hunting blind. If I start dropping into a steep ravine (catching feature), I know I’ve gone too far.
one last comment.
If you’ve never heard of it, go search “Route to Christmas” or visit the 2020 collection at http://news.worldofo.com/rtc/?year=2020
These are case-studies in pro-level orienteering competitions, where picking a route that shaves a minute or two off of your travel time can make the difference between winning and losing. It can be pretty mind blowing to understand all the factors that go into a good route choice vs a great route choice.
Is it off-topic for backpackers? Not necessarily, especially for those who are aiming to do a “high route” or similar off-trail travel.
Hi Jeff
But have you tried one of them?
I do not need a declination adjustment: I simply correct the bearing in my head.
Actually, both of those compasses I mentioned do have a very simple declination adjustment on them: a rotating ring and grid. I line up the compass arrow with the rotated grid and it is all done. I don’t need anything more than that.
I would never walk a mile without looking at the surrounds anyhow. I use the topology as much as the bearing for navigation. Did that once in a serious snow storm over many km and came out spot on the bridge we had to find. YMMV.
Cheers
Jeff M, Great point. There’s even an Orienteering Forum called “Attack Point”.
Roger C. Yes the surroundings and the terrain are incredibly important. Our Orienteering classes even point out that the MAP and understanding how it relates to the terrain is more important. “Thumbing” the map in Orienteering speak. So your thumb (or the pointer on the compass) is at the last land feature/map point where you knew where you were. I do advanced, but short orienteering courses about 15 times a year. Plus I do course setting work for our club. About half my “legs” are done with only a rough compass bearing, because I’m focused on the terrain as I pass it.
Route choice is also very important. And knowing what you do best! I will often look for the easier way around something, even out of the way, instead of trying to go thru tough terrain or needing a compass bearing. “OK…I can try a fine compass over this terrain with no handrail and not much to note, OR I can go around a bit, hit the stream, follow the stream to that big bend which the map shows is a earth or rock face then, I’m 80 percent of the way on my travel”.
I will often look for the easier way around something, even out of the way,
Chuckle.
I remember one ’24 hr walk’ (a race, point to point, collect tags at the points) where the ‘obvious’ route was across two gullies, and the ‘long slow’ route was a big loop around on a road. Hehehe: the gullies were really chock-full of blackberries!
Cheers
Roger – I’ve been in one of those races! It was a 6 or 8 hour race down in southern Ohio and oh boy, the briar patches down there were brutal!
Simple compasses and declination: so I lead a map & compass workshop through our local outdoors club every year, with 8-16 participants each session. We have a bunch of the cheaper compasses, though I’m not sure exactly which brand they are. We teach the mnemonic for doing the declination adjustment mathematically: “map to compass, map to compass, map to compass, east is least & west is best”.
We also demonstrate how to draw new north-south lines on the map that are aligned to magnetic north, so that rather than adjusting the azimuth on the compass, the declination adjustment is already built into bearings measured on the map instead. (We do this on A4 1:24K maps that we print up for the workshop, not big 7.5 minute quadrangle maps or commercial maps.)
Given all these techniques, I much prefer setting the declination on my Suunto and forgetting about it. That’s even more true when doing 6-8 hour adventure/orienteering races where I may be transferring azimuths from the map 20-50 times in a single race. When I’m tired, I just don’t want to have to deal with the extra mental load of adjusting for declination manually. I prefer to let the compass do that part for me.
Also, do those cheap compasses have a global needle? I’m not sure they do.
Ray – Attack Point is awesome. SMOC (Southern Michigan Orienteering Club) is on there.
We also demonstrate how to draw new north-south lines on the map that are aligned to magnetic north,
Ah, OK. All our topo maps have a little compass rose on them indicating Magnetic North, Grid North and True North. We get used to allowing for the magnetic declination automatically. I do photocopy the topo maps for field use, but we don’t need the reminder any more.
do those cheap compasses have a global needle
They probably do, since they are selling the same ones around the world.
I know that the compass mfrs used to weight the needle slightly to make Southern Hemisphere and Northern H versions, but that is really not necessary if you slightly redesign the pivot. All you have to do is to lower the centre of gravity of the needle a few mm below the actual pivot point. Gravity does the rest.
Cheers
Chuckle… Roger C.
At one of my favorite venue’s, Tyler State Park, Texas, this last spring, I was moving and thought I could cut a switchback off a trail. At my map scale of 1:10,000, I didn’t “See” enough of the detail and had not been in that area in a number of years. The switchback went around not one, but TWO almost vertical cliffs down to a minor stream. I got down and up the first area, but the far side was full of Texas Briar’s (hard to describe, bring bandages). I looked down the next and GULP. I started tracking South to hit back to the switchback. If I’d stayed on the trail and done the switchback it would have been some minutes faster even going out of the way.
The Pre-Covid event at the same park, I was in a different area and looking at a 10 meter area of dark green. Dark green on our Texas maps is “Do you really think you can get thru this?”. But hey, 10 meters! And I’d hit a paved park road. Save about 50 meters of climb out of the gully system. Well, that 10 meters was actually a marsh and the dark green was about 6 inches of vines on top of the marsh and 14 feet tall bamboo and marsh grasses. Funny thing, I was about at a dead stop trying to push thru it and heard someone off to my side. I felt better as I wasn’t the only one trying it. The course setter (A friend) had a good laugh when I told him what I’d tried.
Our topo maps are so old that the printed declination is incredibly off, can’t remember just how much. Plenty far enough to get you lost if you relied on it. But I’ve gotten lazy anyway because the map alone is usually sufficient.
Hi Ray
Yeah, we know the feeling. Some of our 1:25k topo maps were done during the war, in a hurry and from limited aerial photos, and they have not been updated. They tend to miss a few ‘features’.
We had been trying to follow a fire trail or 4WD track shown on the topo along a very remote ridge. Well, we could see where it used to be: a slight dozer blade scrape on one side, and a solid wall of young scrub in front. This was NOT going to work. (Turns out it was dozer line put in during a fire long ago, and never maintained.) My Ranger friend knew about it, but had never expected anyone to try to follow it!
We were up on the sandstone plateau, where there is no water period, so we thought we would go off the side down what looked like a decent side spur to the creek below. The topo map suggested it was a very gentle even slope all the way.
We found the spur off the ridge all right (in the dense scrub) and started to follow it towards the creek below. The spur was actually fairly easynce we were on it, being mostly flat and with little soil for scrub. No problem! Ahhh – maybe TOO flat?
Then we got to the end of the spur – the end on the ground, not on the topo. Ah yes, well, maybe not so good. About 30 m of vertical sandstone cliff all around. Oh dear, but not really unexpected in this country. There are cliffs everywhere, but none on the map.
We had some water, so we camped. Excellent views, mind you: the top was quite flat and open. Soft flat site too.
Next morning we back-tracked a bit to where I had seen a wombat poo the night before. What is so special about that? Well, wombats need access to water (like humans), so I knew there had to be a way down to some water not far away. We carefully followed that wombat track through the scrub and cliffs to the crest of the ‘gentle spur’ below, and had morning tea on the very pleasant creek at the bottom. The cliffs looked just as bad from below.
Cheers
Become a member to post in the forums.