Topic

Windscreen airflow calculation?


Forum Posting

A Membership is required to post in the forums. Login or become a member to post in the member forums!

Home Forums Gear Forums Make Your Own Gear Windscreen airflow calculation?

Viewing 25 posts - 51 through 75 (of 98 total)
  • Author
    Posts
  • #3722906
    Roger Caffin
    BPL Member

    @rcaffin

    Locale: Wollemi & Kosciusko NPs, Europe

    Non-adjustable bender? Not going to work. Wrong tool.

    Bending red hot titanium? Been there, tried that, gave up and went to Grade 1 (CP) metal instead.

    Does this mean the Ti sheet you (Bonzo) have is ‘not suitable for purpose’? Well that would be my opinion, but then I have too many singed fingers.

    Is it time to try a different alloy, just to test the waters?

    Cheers

    #3722919
    Bonzo
    BPL Member

    @bon-zo

    Locale: Virgo Supercluster

    I took a close look at the bender, and yeah: just not going to work.  It’s just too sharp and too coarse; my smaller, nicer model world be ideal, though.  Unfortunately it’s under literal tons of other stuff.  This one is great for copper and galvanized sheet, though.

    I found my microtorch: it’s currently set up for oxyhydrogen, though.  That might be a *bit* too hot for this application, though.

    I’m not averse to changing alloys; at worst, I can just use this stuff for practice templates and tooling tests.  That’s pretty much what I’m doing now, anyway.

    On the original point: I did my best to do a little bit of math, and it turns out that I might not need any sort of air intake except the hole that surrounds the remote canister hose: any opening that’s large enough for that purpose is also large enough for all of the necessary combustion air to enter.  That makes my drilling and cutting operations far less involved.

    #3722935
    Roger Caffin
    BPL Member

    @rcaffin

    Locale: Wollemi & Kosciusko NPs, Europe

    Have a look at the photo in my post 3722231 (back one page).
    I have a little wire hook holding the windshield ‘closed’. Well, actually, a converted paper clip! That may be all you need apart from a hole for the handle – which you can drill. That would let you use the material you already have.

    Cheers

    #3722943
    Bonzo
    BPL Member

    @bon-zo

    Locale: Virgo Supercluster

    Knowing me, I will lose the paperclip connector…but the design is slowly working its way towards one that is similar to yours.  How’d that old saying go, again?  Something something reinvent something wheel..?

    #3722951
    Roger Caffin
    BPL Member

    @rcaffin

    Locale: Wollemi & Kosciusko NPs, Europe

    Drill holes near edge of ends
    Insert Al pop rivet in one hole
    Press out steel core, flatten crimped bit
    Insert 1 mm Ti wire, bend into loop so it stays attached. Make hook.

    Cheers

    #3722952
    James Marco
    BPL Member

    @jamesdmarco

    Locale: Finger Lakes

    Bonzo, you can always switch to aluminum…it is lighter and easier to bend than ti.

    #3722958
    Bonzo
    BPL Member

    @bon-zo

    Locale: Virgo Supercluster

    Not a bad thought, Roger…not a bad thought at all.  And I have some small rivets laying around… somewhere…

    James, I could absolutely swap over to aluminum and make this entire thing much easier, but learning to work with titanium – which I’ve never really done before – is part of the fun.  Also – and I know I’ll be somewhat vilified for saying this, but – I don’t try to scrape every excess gram from my pack.  That being said, I may do one from aluminum anyway just to see if I prefer it with this stove.

    #3723333
    Jan Rezac
    BPL Member

    @zkoumal

    Locale: Prague, CZ

    Back to the original question – the inlet / outlet ratio is determined mostly by temperature, what was already discussed. I did a rough calculation on the chemistry of burning butane, and the volume of the products is about 105% of the volume of the air-gas mixture on the input, if the ratio was exact. There should be more air in the mixture allowing a clean combustion, what makes this number even closer to 100%. This effect can thus be neglected.

    Calculation of the thermal expansion is easy, but one should consider the temperature of the gas at the right place. With a windscreen parallel to the pot, the bottleneck is around the bottom of the pot where the gas is still hot but the exhaust cross-section is already limited by the windscreen. I guess it may still be a couple hundred degrees C, and 300C translates roughly to having the outlet with twice the area of the inlet.

    But this is still not enough, now you’d need to know how much air and fuel does the stove consume.

    This can be measured and calculated too, but for me this is the point where I’d resort to the previous experience; a windscreen without any holes but with a gap for the fuel tube and possibly imperfect sealing to the ground, not too close to the pot, seems to work. It’s also what is sold with white gas stoves that are likely even more powerful.

    #3723342
    Roger Caffin
    BPL Member

    @rcaffin

    Locale: Wollemi & Kosciusko NPs, Europe

    now you’d need to know how much air and fuel does the stove consume.
    A useful reference point is that the air inlets on the stove are typically 4 off by 5 mm diameter. Granted, the flow through them will be faster. See my pic some time ago.

    white gas stoves that are likely even more powerful.
    Wrong.
    Most white gas stoves have a lower peak rating compared to a canister stove. A canister stove can be more powerful than the largest hot plate on a kitchen stove.

    Cheers

    #3723383
    Bonzo
    BPL Member

    @bon-zo

    Locale: Virgo Supercluster

    I’m going to knock together a cheap aluminum no-hole version this weekend and see where I get.  I think I’ve pared the design down to a workable minimum of fabrication, which is helpful.

    #3723408
    Roger Caffin
    BPL Member

    @rcaffin

    Locale: Wollemi & Kosciusko NPs, Europe

    Photos are required!
    Cheers

    #3724154
    Bonzo
    BPL Member

    @bon-zo

    Locale: Virgo Supercluster

    Photos are required!

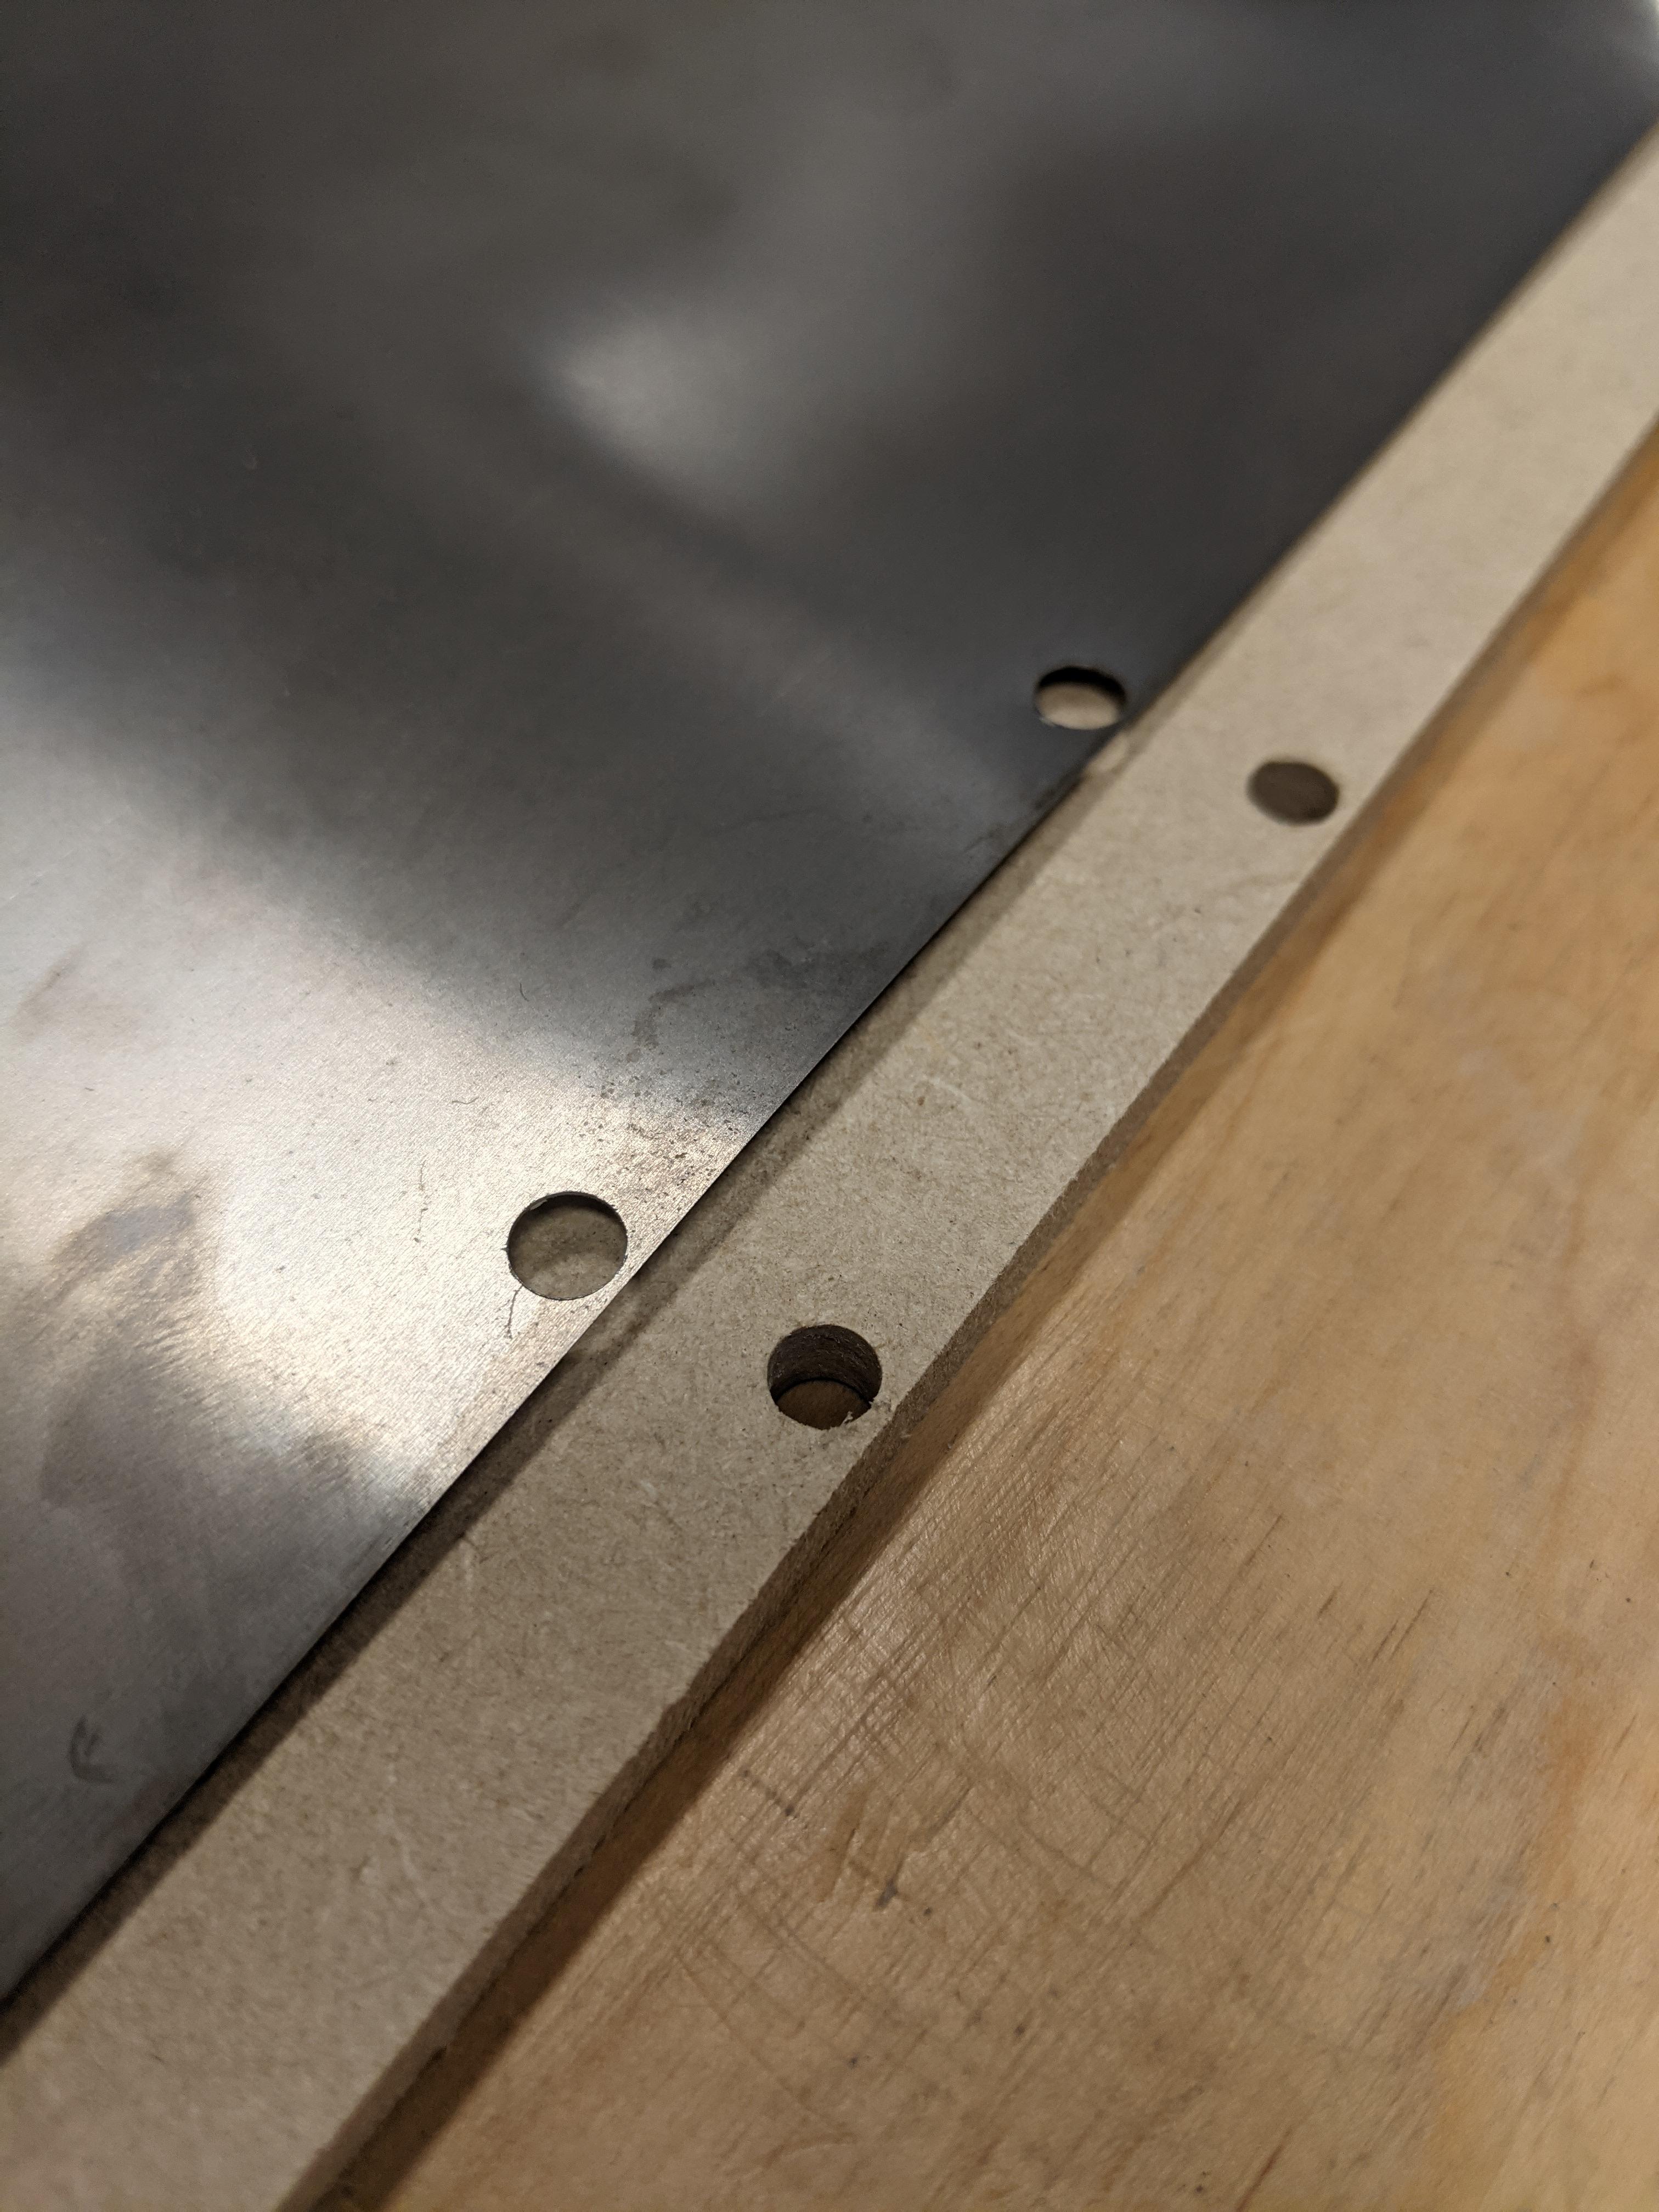
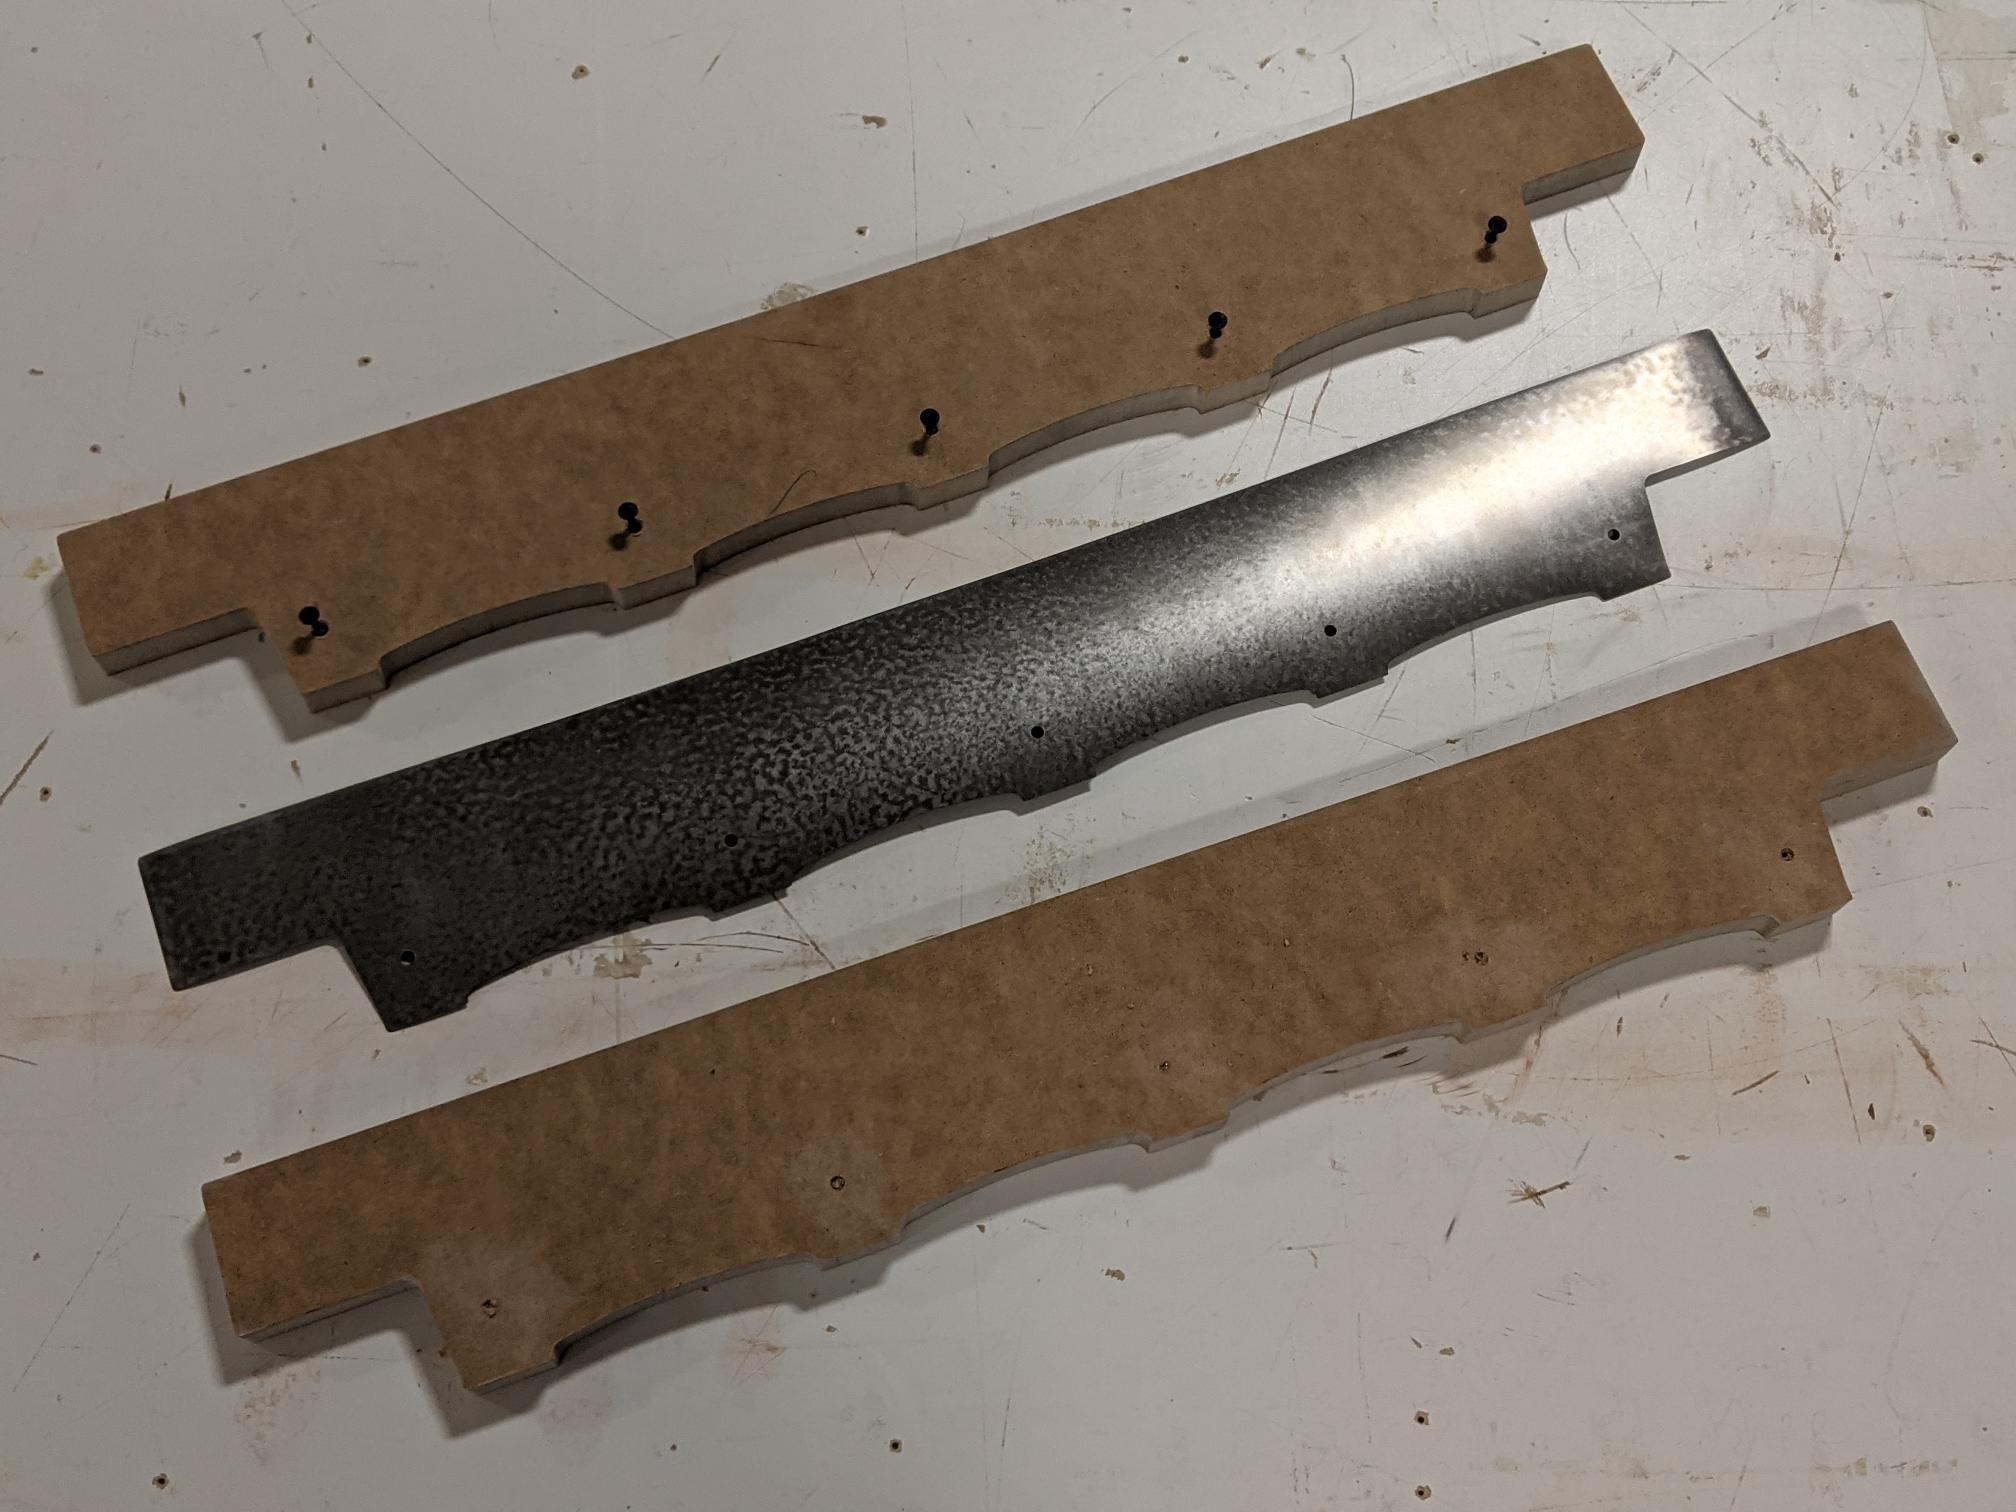
    I’m behind schedule, but I’m making progress.  I popped out a couple of templates today, and determined that a 5mm hole and a 5mm line boring bit – and appropriate clamping – can reduce a hole’s wrinkle-free side clearance to about .75mm.

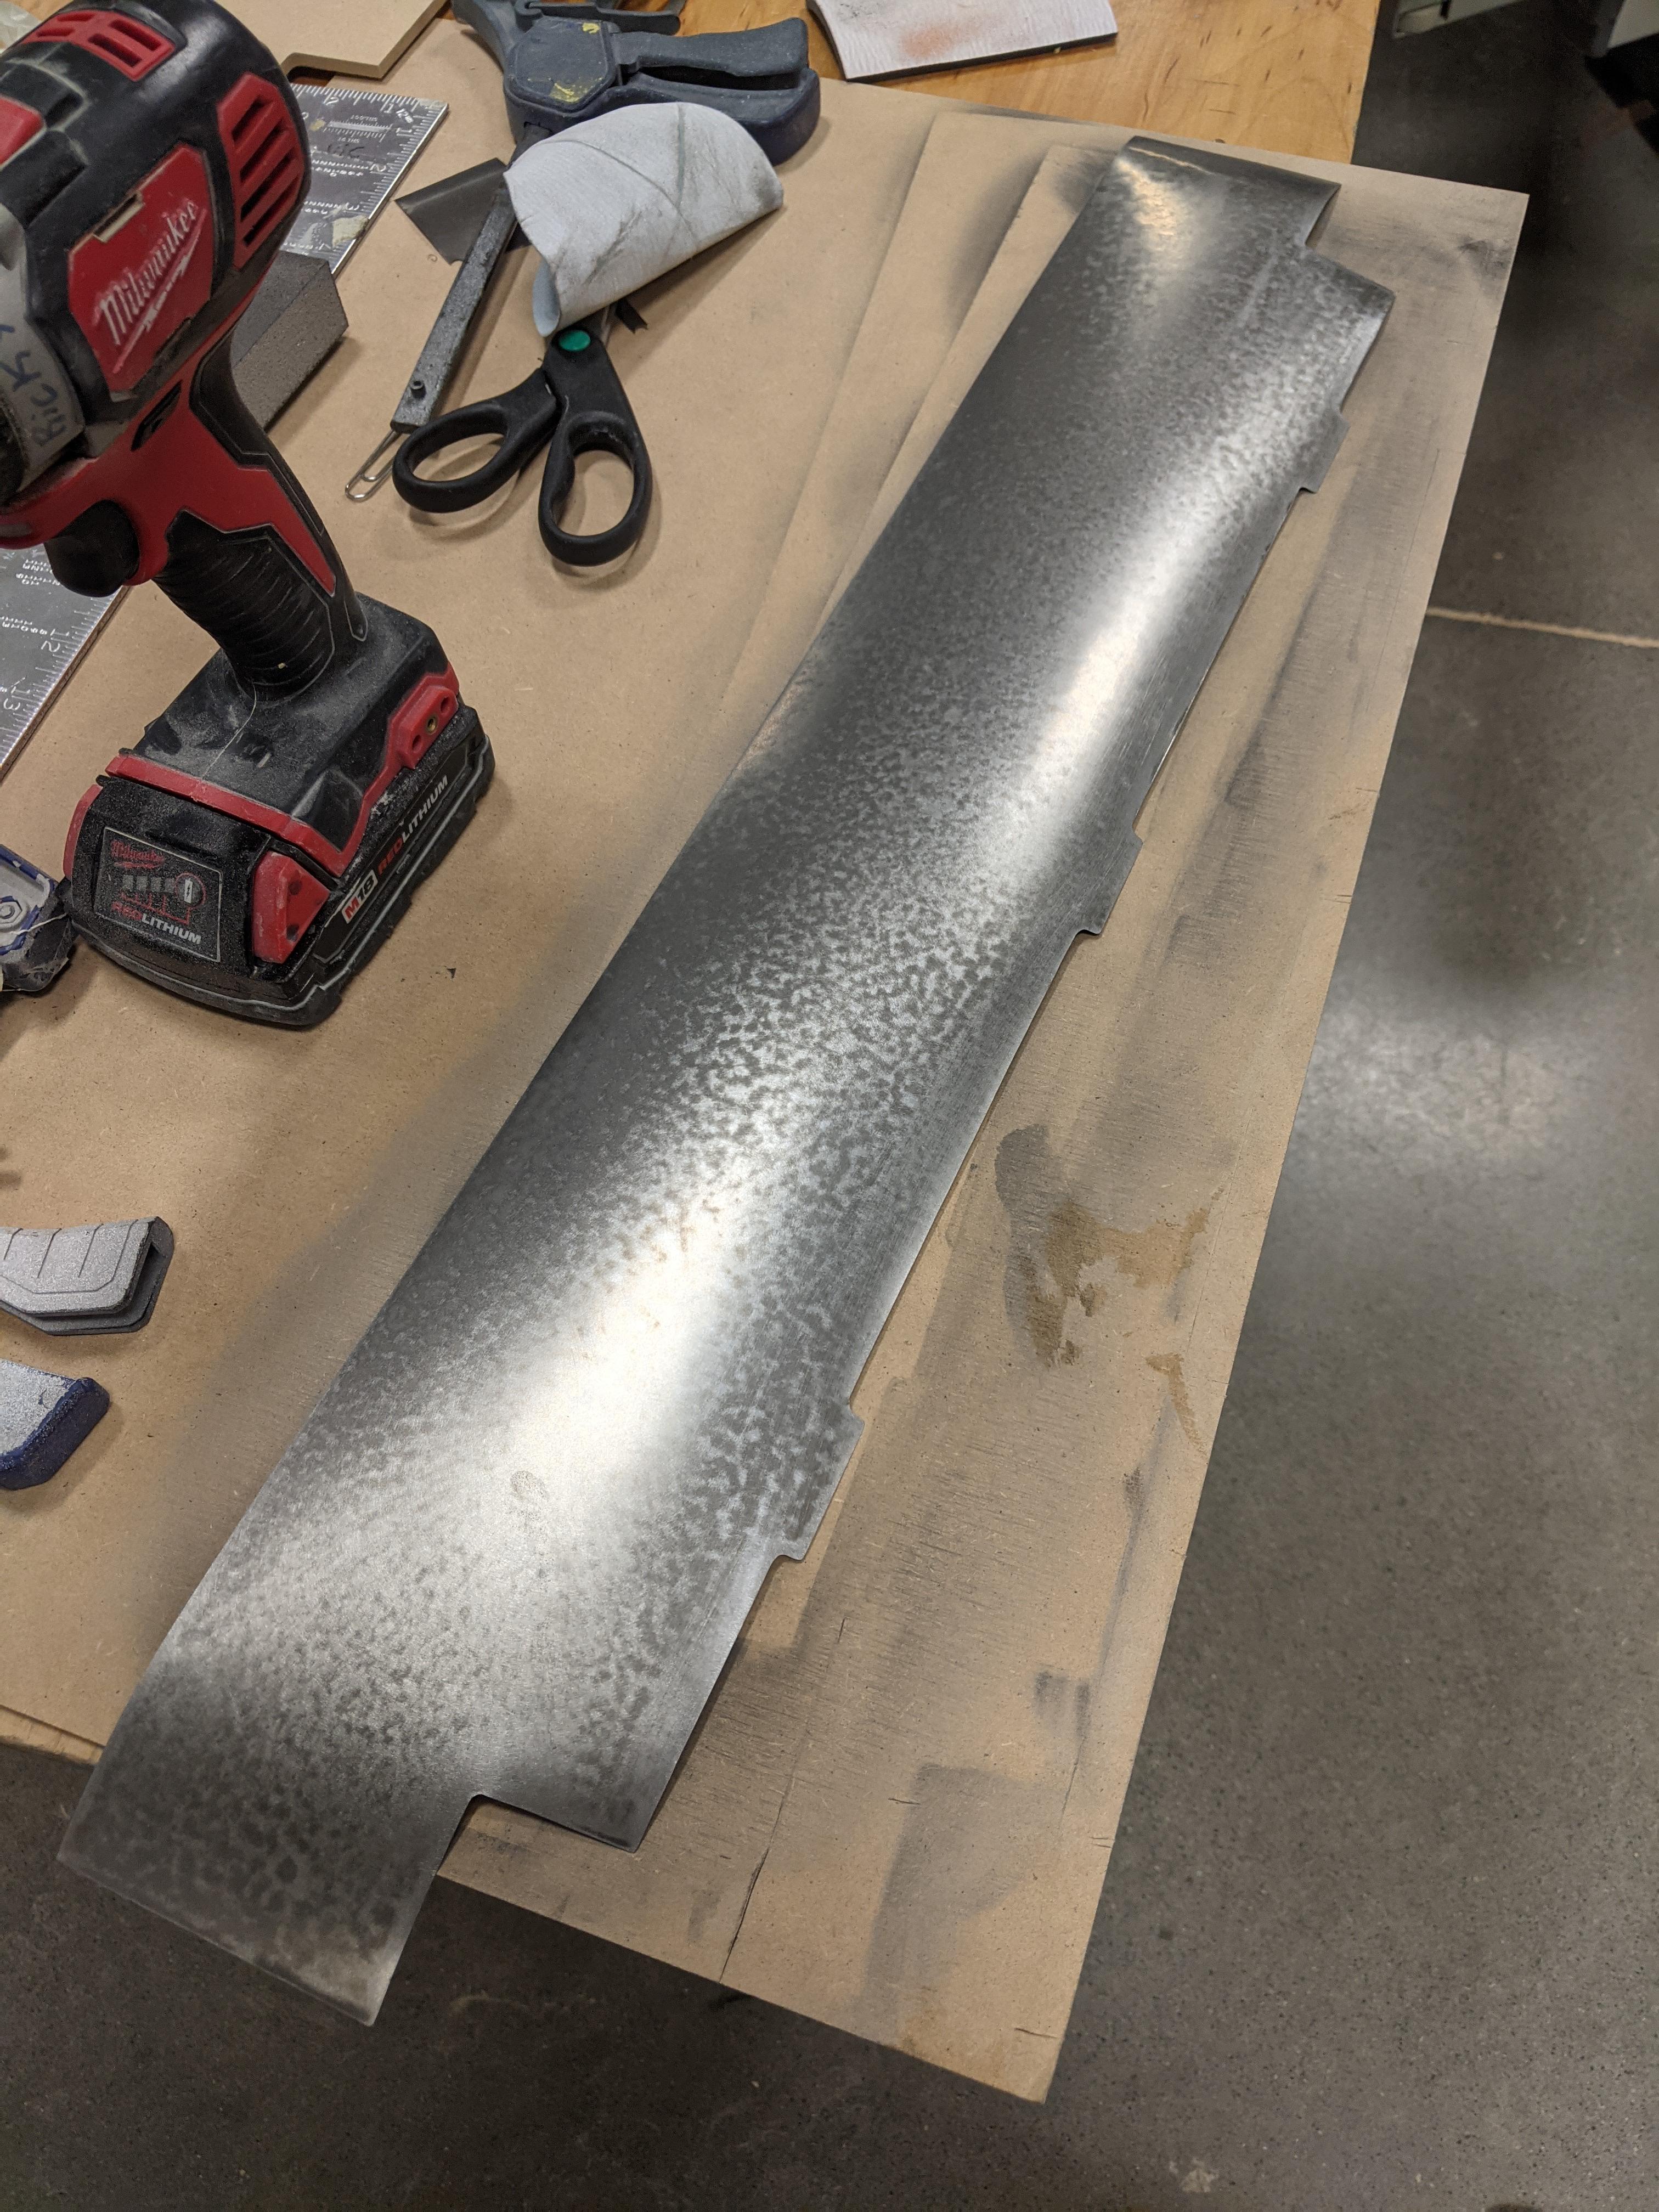
    So, titanium is kind of…weird.  I used the drilled holes to form the interior corners of my pattern – that worked well, by the way – and I had a terrible time of scoring between the holes in order to snap and break the metal… except for when I didn’t.  Scoring down the length of the ribbon was incredibly easy: three passes with a razor knife and the titanium foil was already cut.  Crosscutting it took about two dozen passes, and I still had to gently break it.  Curious…but not as curious as the smell: titanium smells sort of like pungent copper when it’s being sanded.  I knocked all of the edges down with some scrap 120-grit, and then took a 220-grit pad on a double-action sander to the surface.

    That’s when things got stranger.  Not only did the metal make a strange leopard-spotted pattern, but it cupped and bowed severely…so severely, in fact, that I flipped it over and started sanding the opposite side to see if that would make the metal relax.  Spoiler: it did.  Once the back side was sanded, the ridiculous and extreme curling that was taking place abated, and I flipped the metal back over to put a 320-grit pad onto the former side.  Unsurprisingly, the curl started to set in again, albeit not as severely as happened previously.

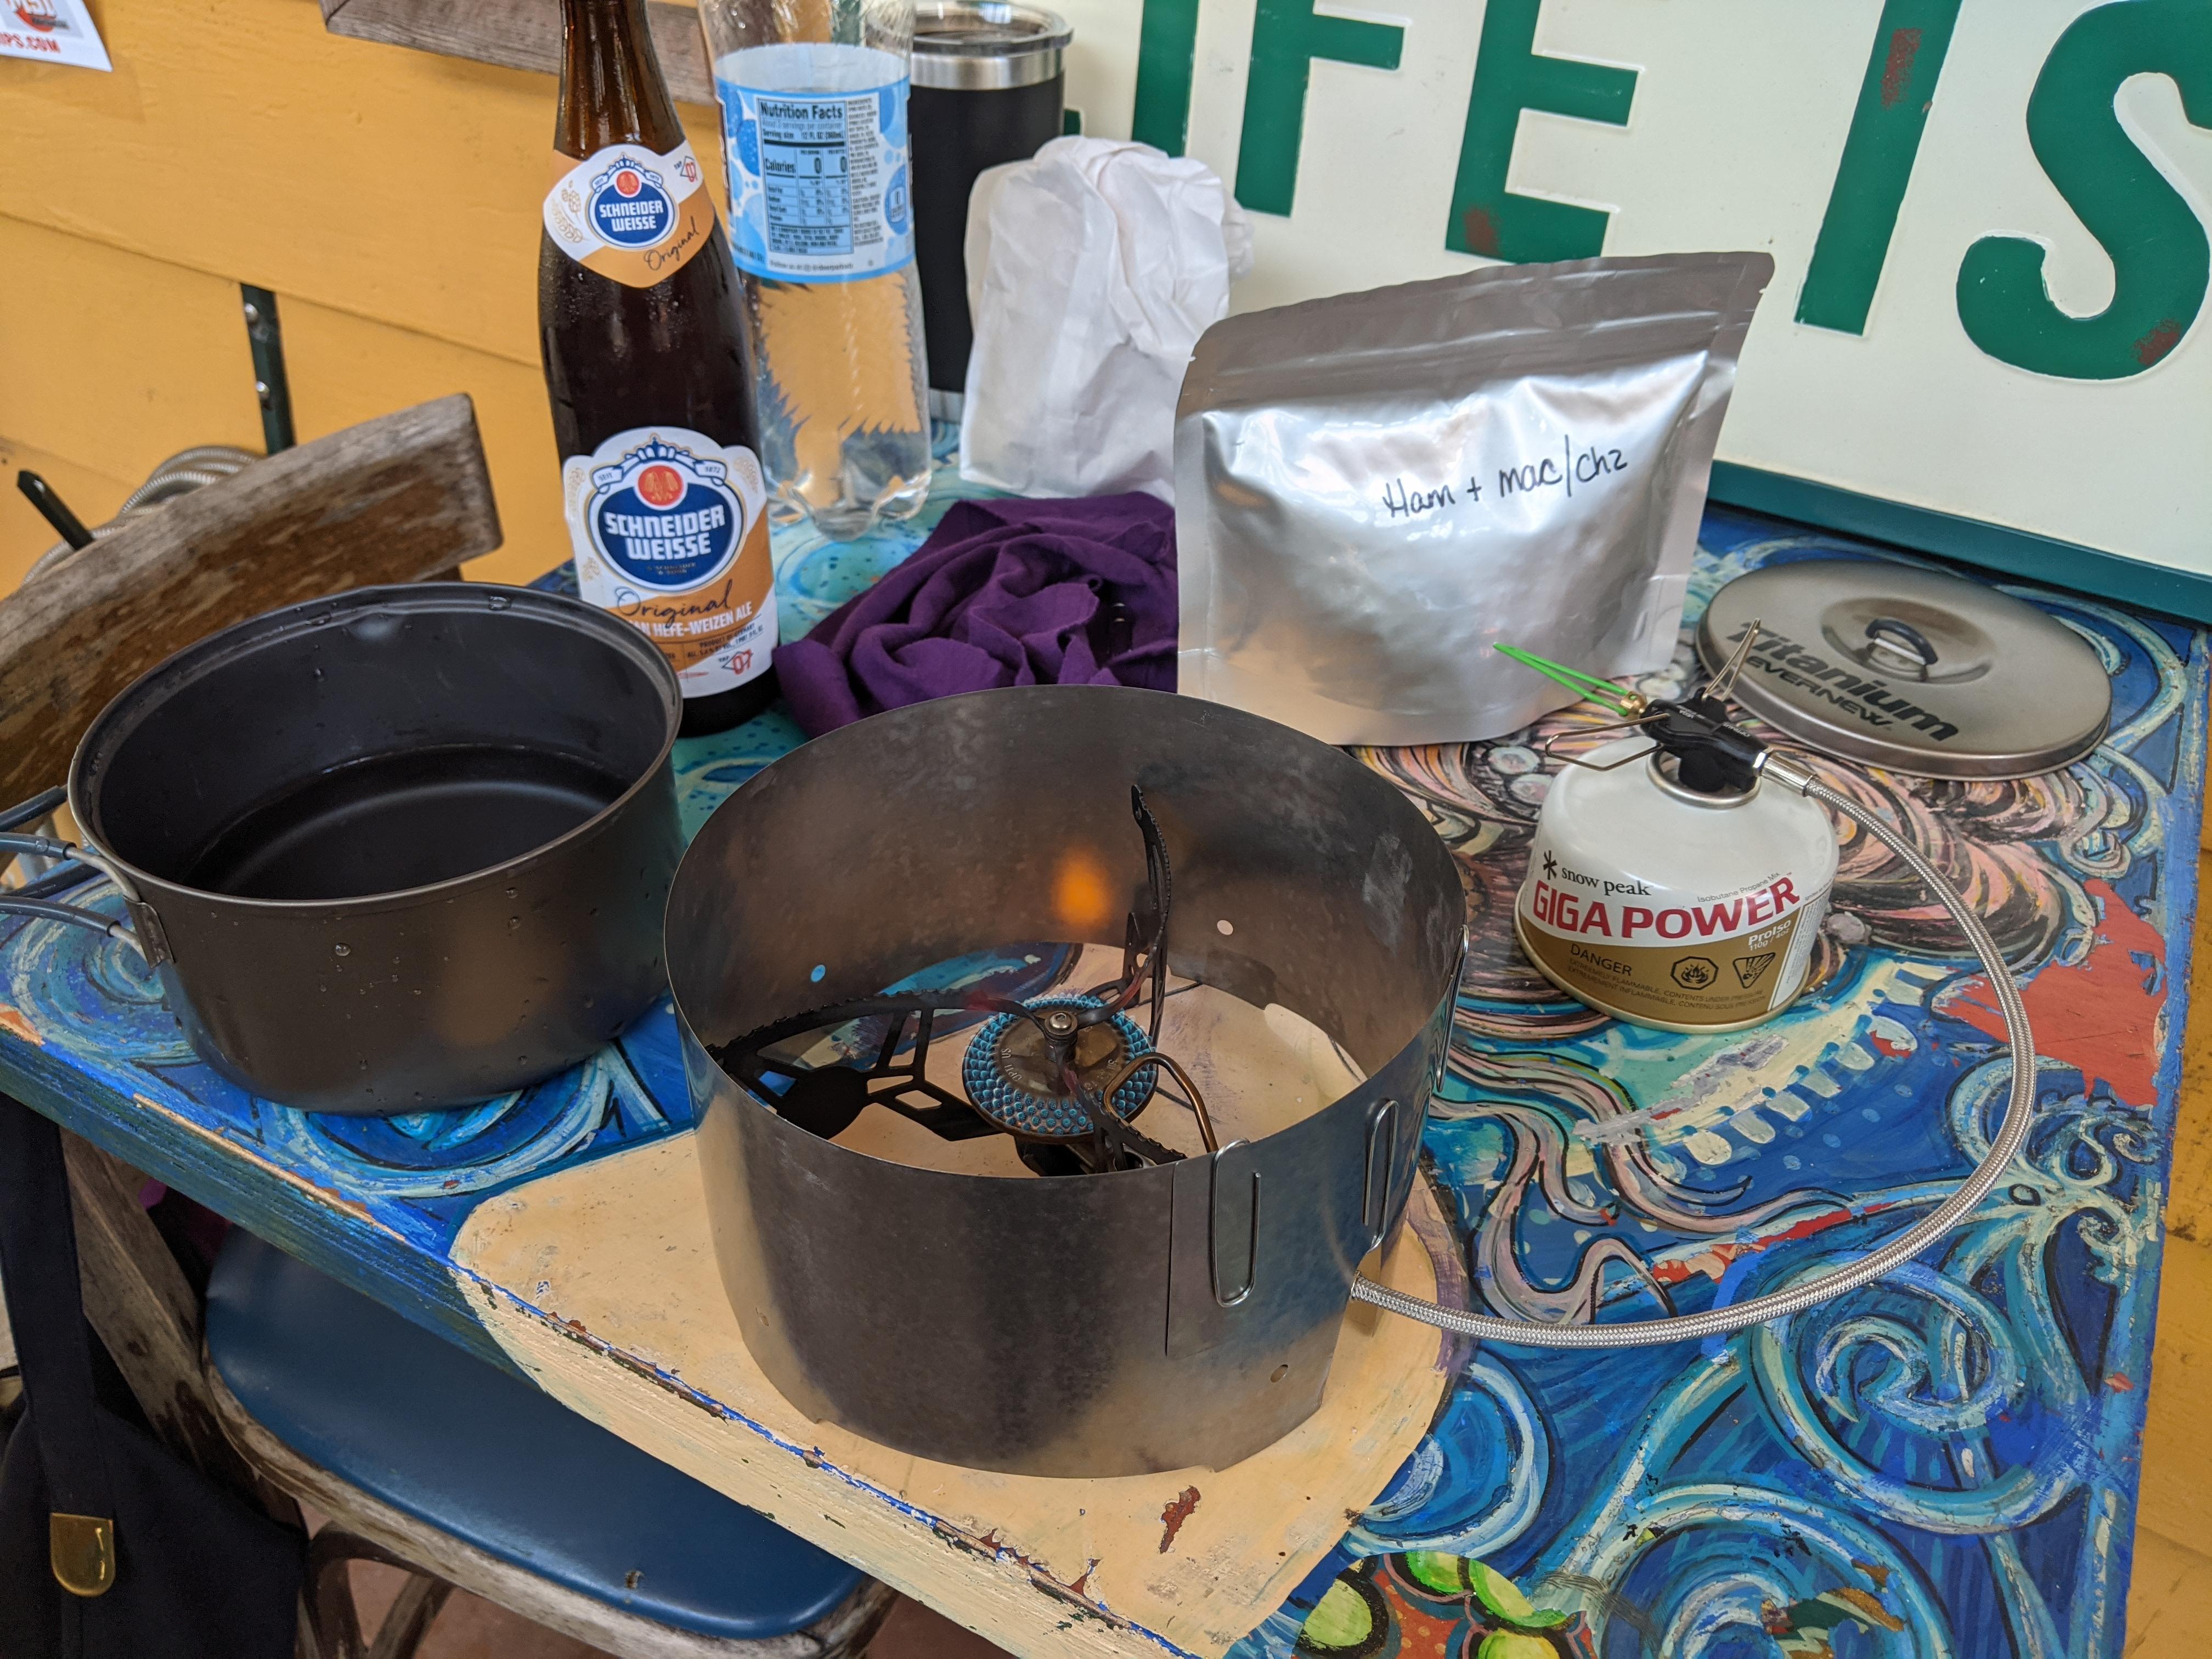
    After working on both sides a bit, I roughly rolled it into shape and fastened it with a couple of paperclips.

    It turns out that paperclips work so well as a joining device that I might forego any other fabrication and just use this method…but it’s clear that I need a couple of “feet” adjacent to the slot that I made for the fuel line.  I’ll include those in Version 2.0 and re-space the other three feet to equidistant locations…but at least the fuel line clears!

    I’ll also slightly change the size of the next version, because this one is just a smidgen too large in diameter.  I could cut a quarter-inch or so out of the overall size and still have it fit nicely around the stove.

    Also: yes, that’s an Optimus stove…and I love it, so no snide comments.  Awesome simmering, 6.75 ounces, and it does everything I want it to do: it’s one of my better purchases.  I’ll also be clipping an entire inch out of the windscreen height: the handles of my Evernew 1.3L actually sit pretty close to the bottom of the pot, so there won’t be a lot of windscreen wrapping up the sides of the pot.  I’m fine with that, because the Optimus does a good job as long as the burner is shrouded: it doesn’t need a lot of pot-coverage in order to impart heat.  I might do that tomorrow…but no promises: I need to get out in the hills more than I need to futz around with titanium on a weekend.

    #3724155
    Roger Caffin
    BPL Member

    @rcaffin

    Locale: Wollemi & Kosciusko NPs, Europe

    Love the photos.
    Looks very nice, leopard spots and all.
    The curl boggles me a bit: I have never seen that! But then, I have never tried sanding Ti shim down. Very strange, but looks charming . . .

    The paper clips seem to be about as light and as cheap as it gets. Idea noted for my own use. :)

    Have you thought of notching the top for the pot handles instead of reducing the height?

    Instead of the minimal clearance for the hose, you could notch both bottom corners for a bigger distance. That would allow you to vary the windscreen diameter to suit (with the paperclips), plus it would make good air inlets around the hose.

    Cheers

    #3724157
    Bonzo
    BPL Member

    @bon-zo

    Locale: Virgo Supercluster

    Have you thought of notching the top for the pot handles instead of reducing the height?

    I have, yes; that was actually my  first notion, and I started thinking around it for a very stupid reason: if I remove that much material from any given section of the windscreen, it may well create a pinch point that will make the windscreen less round, and more of an irritating egg shape.  Please note: this is complete and utter muppetry on my part…but there’s something about a not-quite-round windscreen that arouses my anger.  Same thing happens when I look at a druidic henge: I want to knock it all down and put things into a proper circle!

    I also thought about multiple pot-handle notches, but that’s a lot of extra cutting and sanding and shaping.  Translation: more chances to screw it up.

    Instead of the minimal clearance for the hose, you could notch both bottom corners for a bigger distance. That would allow you to vary the windscreen diameter to suit (with the paperclips), plus it would make good air inlets around the hose.

    That’s probably going to happen; I did some late-night, sleep-deprived math and realized that everything will actually lay out a bit better with a slightly-larger opening.  I can already adjust that notch with how I cut the pattern, but I’ll make a few slight changes nonetheless.

    The paperclips were a moment of “eh, f*** it” that rapidly turned into “wait…this actually works.” I’m sure I could come up with something sexier, but I doubt I can do it as cost-effectively or with as little effort.  I suppose that in a pinch, a paperclip could even be straightened for use as a micro-stake to hold the windscreen steady on less-than-ideal ground.

    #3724158
    Roger Caffin
    BPL Member

    @rcaffin

    Locale: Wollemi & Kosciusko NPs, Europe

    TITANIUM paperclips!

    #3724166
    James Marco
    BPL Member

    @jamesdmarco

    Locale: Finger Lakes

    I believe you can simply use a series of arcs rather than rounded notches. Save a lot of set up time. Of course it will simplify things, but complicate the air flow calculations. I still thing that reducing the outer draft will hold heat next to the pot more. You can still get plenty of input O2, but reducing the rate at which it flows out will also reduce the rate at which it flows in. Heated air has a good velocity out, but can be slowed a lot with no ill effects on the CO production.

    #3724169
    Bonzo
    BPL Member

    @bon-zo

    Locale: Virgo Supercluster

    TITANIUM paperclips!

    I don’t know of any, but I know that actual stainless steel paperclips exist…but I’m honestly content to use the garden variety plated steel.  When they start to come apart I’ll replace them.  Now, if I could get a stainless pen clip that wasn’t too large, I might be interested in that… 🤔

    I believe you can simply use a series of arcs rather than rounded notches. Save a lot of set up time.

    It’s the same setup time; there won’t be ten seconds of difference in the time it takes to make the patterns.  I’ll still have to drill a couple of holes, and possibly more if I notch in some pot support areas.  I like the rounded arcs, though; that makes for (possibly) easier cutting on the lower side.  Once I clamp the cut template in place I should just be able to score and snap like I did with the square notches.  I’m not sure that I’ll need to open up anything for further airflow: the stove just doesn’t need that much air, as best I can determine.

    I did some measuring, and it looks like I can cut the 5″-wide ribbon to 4″ and it will still shroud 1.25″ of the lower sides of the pot while completely clearing the pot handles.

    …or…

    …I could cut a half-inch out of the width and make some half-inch deep notches at various points.  That would allow 1.75″ of side-shrouding, but I’m not sure that the additional area would make an appreciable difference in heat transfer to the sides of the pot.  It might be increased fabrication effort for no practical gain.

    #3724170
    Bonzo
    BPL Member

    @bon-zo

    Locale: Virgo Supercluster

    …or I could do something incredibly stupid and try to cut the Ti foil directly on a CNC.

    #3724180
    James Marco
    BPL Member

    @jamesdmarco

    Locale: Finger Lakes

    Ha, hey!

    #3724194
    Roger Caffin
    BPL Member

    @rcaffin

    Locale: Wollemi & Kosciusko NPs, Europe

    I have machine sheet down to 0.3 mm, but at that thinness I have to clamp the stuff down with a strong top layer of, say, aluminium, to stop it moving and tearing.

    Ti paper clips: you can make them from 1 mm Ti welding wire. It bends fine.

    Cheers

    #3724201
    Bonzo
    BPL Member

    @bon-zo

    Locale: Virgo Supercluster

    CNC; not gonna work.  I’m going to go back to templates and cutting.  Started on my second piece of ribbon, and it didn’t cut/snap well, so I’m going to do it slightly differently…but the design changes are good.  👍

    #3724214
    Bonzo
    BPL Member

    @bon-zo

    Locale: Virgo Supercluster

    Back to the shop this morning: I think I can cut my first prototype into a working version, since the overall dimensions have gotten smaller.  I’ll be using a modified version of the Caffin Sandwich in order to get it into the proper shape. 😉

    #3724217
    Bonzo
    BPL Member

    @bon-zo

    Locale: Virgo Supercluster

    Pictured: Victory.

    This actually ended up being WAY easier than I expected it to be; I cut the template on a CNC, but anyone with a bandsaw or a jigsaw and a bit of time could do the same thing.  It’s really nothing more than placing the foil between two pieces of MDF and then getting rid of everything that’s sticking out.  The edge cleanliness actually exceeded my expectations.

    Pictured: This makes me happy.

    It’s hard to see the overall shape, but this image of the templates and the resulting windscreen shows it decently enough.

    Pictured: That arch suggestion was spot-on.

    I was going to take the arches all the way down to the base of the screen, but when I started thinking about how I was going to sand the titanium flush to the template I realized that I needed to leave a tight, downturned corner in place; without that corner, I risked accidentally over-rounding the very corner of the leg.  I also didn’t want to swap out the .375″ upcut bit on the CNC, so the resulting leg allowed me to account for the tool path radius.  Worked well, in the end; the arches prevented me from having to make perfectly flat notches.

    Now to go test it; if anyone’s interested in a more detailed build tutorial for how to shape titanium in a wood shop – which is a laughable statement, now that I think about it – let me know and I’ll write something up.  Turns out that you really don’t need much at all, aside from some patience.

    Oh yeah: finished weight is 36.73 grams.  I might be able to get a few tents off of that with titanium paperclips.

    #3724253
    Jon Fong / Flat Cat Gear
    BPL Member

    @jonfong

    Locale: FLAT CAT GEAR

    The scallops ought to work great, you probably need to add a base/heat shield to the bottom.  Without it, teh edges can sink into the sand/dirt thereby changining your airflow.  Been there / done that.

    Great looking design.

    #3724256
    Bonzo
    BPL Member

    @bon-zo

    Locale: Virgo Supercluster

    I decided to do a quick test at the local pub.  Results: in a light breeze – 2 to 4 mph, estimated – the Optimus now boils 500ml of water in under 4 minutes at 30% throttle.  No signs of poor combustion, and the burner is now far more efficient than heretofore.  I’m going to call this a win.

Viewing 25 posts - 51 through 75 (of 98 total)
  • You must be logged in to reply to this topic.
Forum Posting

A Membership is required to post in the forums. Login or become a member to post in the member forums!

Get the Newsletter

Get our free Handbook and Receive our weekly newsletter to see what's new at Backpacking Light!

Gear Research & Discovery Tools


Loading...