Topic

Windscreen airflow calculation?

Viewing 25 posts - 26 through 50 (of 98 total)
Bonzo BPL Member
PostedJul 17, 2021 at 7:00 pm

Could you leave a 1-2 mm hollow core to the full bend?

I can try.  I don’t want a pressed-flat fold, to be honest: I just want enough of a fold to keep the windscreen secure when I assemble it.

Main-topic note: according to my decidedly unscientific calculations, the stove needs less than one cubic foot of air per minute…so the air inlet shouldn’t need to be too large.  (Note: I may be totally wrong about that.)

Bonzo BPL Member
PostedJul 17, 2021 at 7:01 pm

Could you leave a 1-2 mm hollow core to the full bend?


I can try.  I don’t want a pressed-flat fold, to be honest: I just want enough of a fold to keep the windscreen secure when I assemble it.


Main-topic note: according to my decidedly unscientific calculations, the stove needs less than one cubic foot of air per minute…so the air inlet shouldn’t need to be too large.  (Note: I may be totally wrong about that.)

Roger Caffin BPL Member
PostedJul 17, 2021 at 9:05 pm

If it helps:

I am happy running with this sort of air gap in the ‘wall’.

Mind you, there are gaps between the boards as well in this case, but that is the sort of gap I often have in the field when it is windy. There is also the chance for air to drop down inside the windshield next to the ‘wall’, although I doubt much gets in that way when the kettle is on the stove.

Note that the incoming air is cold, while the outgoing air is hot (ie expanded) burnt fuel. The incoming air goes into the stove through 4 off 4.5 mm air holes, which is hugely less than the gap in the wall.

Cheers

James Marco BPL Member
PostedJul 18, 2021 at 5:41 pm

The output side is roughly 10% greater than the input side. One of the problems with heat efficiency is the velocity of the air flow. The higher the flame, the higher the velocity. So, Adding more heat also means wasting more heat. The whole conduction process also requires a finite amount of time. By slowing down the heat, you also improve the efficiency of heat adsorption, giving it longer to transfer thru the pot material to the contents of the pot. So, some crinkles, bends are fine and even helpful.

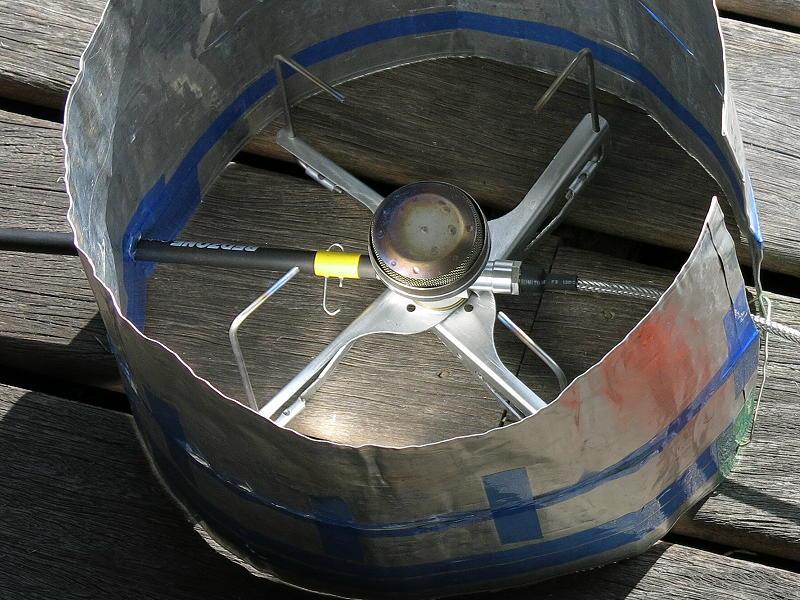
For example, I use a similar heat shield as Roger, and it is made out of rather rigid aluminum foil, or, the thicker grade that comes with the extra large temporary aluminum pans you can purchase at a restaurant supply shop. At about 6 grams it has lasted me for three years. I roll it up every day and unroll it for use. Anyway, it reflects a lot of heat back into the pot/burner system. I get around 220gm/14days boiling 3 ten ounce cups of water twice per day…roughly 15g/day for 6 ten ounce cups of water at around 60F. I shoot for about a 7-8 minute heat to boil. But, this is a poor measure because of the different places I go. Your mileage will undoubtedly be different.

Roger Caffin BPL Member
PostedJul 18, 2021 at 7:11 pm

Yes, how to carry the windshield is always a problem. Some companies, like MSR, would have you fold it up after every use, but that is a fast way to trashing it.

These days I wrap mine around one of my straight-sided water bottles inside a very light nylon stuff sack. This gives the windshield a certain amount of curvature, which means deploying it can be done just by springing it open a bit. Sometimes I hold it open with twigs or pebbles, although other times I just let it sort-of spring shut on the hose.

Cheers

Bonzo BPL Member
PostedJul 19, 2021 at 8:12 am

Roger, James: good info, there…thanks for posting it.  I’m really glad that I posted this thread, now, because the air intake actually needs to be a LOT less than what I originally figured.  This makes the cutouts and shaping much easier.  I haven’t played around with the bending any more, but I’ll take a look at it this evening and see what I might be able to do.  If I can’t get an uncracked bend I’ll have to come up with another way of fastening this thing to itself.  Slots might work.

PostedJul 19, 2021 at 11:04 am

Inlet / Outlet calculations check.  As I said earlier, it would be great to see a chemical analysis of the reaction.  For a reality check, I looked at a simple analysis for just air.  If 1 cubic meter of air at 20 C enters the inlet port and exits the outlet port at 100 C; what is the volumetric difference?  It calculates out to 27% more volume.  At 200 C, the volumetric difference is 61%.  I suspect that the 20% outlet area increase in too small.  I know that I have measure outlet gas temperature in excess of 100 C.  My 2 cents.

Roger Caffin BPL Member
PostedJul 19, 2021 at 4:54 pm

Ah, but where do you measure the outlet temp?
The flames themselves will be up to 900 – 1000 C, but then they mix with a lot of extra air, some of which is needed to ensure complete combustion and minimal CO emission. I would not be surprised to see 300 C at the corner of the pot.

Somewhere along the way I go empirical.

Cheers

Bonzo BPL Member
PostedJul 19, 2021 at 5:04 pm

CO is definitely a concern for me; I’ve only once had a stove run badly enough to seriously bother me, and thankfully I got a strange, out-of-nowhere headache that tipped me off to the problem.  I don’t want to accidentally introduce that issue again.

I’m going to change all of my holes to 5mm instead of .250″…mostly because I realized that I have dozens of used 5mm bits laying around that are even better for this kind of cut than a Forstner.

Didn’t get to do a test-bend this afternoon: had to beat the rain to get some exercise.  I did, however, realize that the edge of the metal brake I was using really is like a chisel.  Surprisingly sharp.

Roger Caffin BPL Member
PostedJul 19, 2021 at 6:43 pm

What do these ‘used 5 mm bits’ look like? I am very curious.

Sharpness of bend: oh yes. If you make a really flat or sharp bend the stresses at the outer surface can be extreme. Ti does not ‘flow’ like soft aluminium. Make the sheet metal curve around a rod and the difference in stress between the inside and outside surfaces is far far less.

My own opinion is that the fingers on a bender should never be all that sharp, for the above reason.

Cheers

Bonzo BPL Member
PostedJul 19, 2021 at 6:54 pm

They’re a type of dowel drill; I’ll get a picture of them tomorrow.

I don’t want to attempt to dig my own finger brake out of storage, so I’m either going to modify a piece of the chisel-edged brake or possibly make a tiny press brake that will do what I need to do (or what I think I need to do).  This is turning into quite the effort, and all for a stove that isn’t very popular or well-regarded.  🤣

Roger Caffin BPL Member
PostedJul 19, 2021 at 7:33 pm

Lots of different ‘dowel bits’. I assume that what you are talking about looks a bit like a Forstner bit anyhow. The other sort, for making plugs – doubtful.

If you back the fingers off a bit from the actual fold line and put some card or sheet Al (0.5 – 1.0 mm) on top of the Ti, you may get a suitable smooth bend. I do that myself sometimes.
(My bender allows a backoff on the fingers to compensate for metal thickness: do all?)

Cheers

Bonzo BPL Member
PostedJul 19, 2021 at 8:06 pm

Specifically, it’s a line-boring bit: it has a very durable edge, and the edge geometry itself is designed to score a line before any cutting takes place.

I might have some .5mm copper sheet laying around… 🤔

Roger Caffin BPL Member
PostedJul 19, 2021 at 8:56 pm

the edge geometry itself is designed to score a line before any cutting takes place
Bingo

A couple of layers (3?) of cardboard from a corn flakes packet would do for the bender. But back the fingers off as well.

Cheers

Bonzo BPL Member
PostedJul 20, 2021 at 3:36 pm

Line-boring bit pictures.  Apologies for the poor quality, but my cell phone dates from the late 1600’s.

From the side, showing the amount of scribing that takes place before cutting begins:

The cutting edge.  It’s aggressive, but surprisingly durable given the small size.

Hopefully this will work well; resharpened bits like this one tend to have less clearance between the scribing edge and the beginning of the cutting flute.

Bonzo BPL Member
PostedJul 20, 2021 at 4:01 pm

Depends on the particular bit.  This one should be carbide judging from the appearance and coding on the shank, but we use both materials and there are some HSS-tipped bits in the mix as well that look very similar to the carbide bits.

Bonzo BPL Member
PostedJul 23, 2021 at 5:12 am

So, update on the bending: backing with card stock or a sheet of copper or anything at all that’s about 1mm thick is a good way to prevent the sharp radius and the cracking that I was experiencing…but I can only bend to about 70° with this method.  The amount of spring-back in the titanium is surprising.  I can also bend it by hand around small rods or edges as Roger suggested, but if any crease or kink shows up in the bend, that’s it: crack, and we’re done.  I have no idea how I’m going to get a bend over 90° in this stuff and not have it crack; gonna have to rethink a few things on the design.

Bonzo BPL Member
PostedJul 23, 2021 at 2:36 pm

Annealing after the initial bend?

I’ll have to get savvy on how to do it; I can easily generate enough temperature, but I don’t have a good way to control it or measure it…so it would be guesswork.

PostedJul 23, 2021 at 3:19 pm

The first pass would be to hold  the bend over your stove or torch until it glows red.  Worth a shot on a sample piece.  My 2 cents.

Bonzo BPL Member
PostedJul 23, 2021 at 4:59 pm

I bought 72″ of sample pieces, thrice over; I can pull out a microtorch and give it a shot.

Roger Caffin BPL Member
PostedJul 23, 2021 at 5:38 pm

I am fairly sure you can bend it easily when it is red hot. It goes into what is called a ‘super-plastic’ state.

The amount of spring-back in the titanium is surprising.
That makes me wonder what the alloy really is. Ti 15-3 is meant to be very formable. The springback sounds more like 6Al4V.

Can you back the fingers off a bit to help get more angle?

Cheers

Bonzo BPL Member
PostedJul 23, 2021 at 9:08 pm

I have no good way of verifying the alloy, unfortunately…so I’m just kind of guessing (again) about the properties.  I can easily pull out a torch and heat it to red or beyond, so that shouldn’t be an issue; if it gets into an actual plastic state, I’m sure it would be much easier to create the 180°-ish bend that I first envisioned, even if I do so by hand.  Unfortunately, the brake I’m using is almost entirely non-adjustable; I’m very close to spending the hours that it’ll take to unpack my own, better-quality, adjustable brake.

Or, I can go another route.  I can easily create a halved joint, and I won’t have to bend anything.

PostedJul 23, 2021 at 9:19 pm

Or as Roger stated you can switch to Titanium (Commercially Pure) and life will be a lot easier.   I only used CP2 for my windscreens.   My 2 cents,

Viewing 25 posts - 26 through 50 (of 98 total)
Loading...