Topic

Incorporating 'Cat Curves' into tarps/shelters


Forum Posting

A Membership is required to post in the forums. Login or become a member to post in the member forums!

Home Forums Gear Forums Make Your Own Gear Incorporating 'Cat Curves' into tarps/shelters

Viewing 25 posts - 1 through 25 (of 35 total)
  • Author
    Posts
  • #3619441
    Craig B
    BPL Member

    @kurogane

    “Cat Curves” is a term that gets thrown around a lot here, and I’m curious how people have actually defined their catenary curves when incorporating them into a shelter.  For readers who don’t know the actual definition of a catenary curve, it’s the shape that occurs when a flexible line that is attached at each end is suspended in a uniform acceleration field (like gravity).  Power lines are the easiest example to picture.  The exact shape the line comes to rest in is very specific and can be derived from first principles (I remember doing so in one of my physics classes in college), so it’s not just an arc.  I believe the main reason that you would want say your tent/tarp ridgeline to make a catenary shape is to equalize the stress/strain on the panels the curve connects, so there are no lose spots in the panels.

    Given the depth/height of the catenary that would be made into a shelter (maybe an inch or so vs. the 80+” inches of length), I would argue that you wouldn’t get TOO much greater benefit from a true catenary vs just drawing a smooth arc or spline, especially since it might be difficult for the lay person to work with such an equation (I’m not sure I could do it by hand at this point, and even if I could, it would take me a long time to figure out).  I was able to program the correct equation into my Solidworks CAD program though, so I’m including them into a tent I’m designing.

    So:  How have you drawn a ‘cat curve’ into your shelter?

    #3619447
    Ken Thompson
    BPL Member

    @here

    Locale: Right there
    #3619551
    Craig B
    BPL Member

    @kurogane

    Haha!  Thanks, I guess I could have just done a search!

    #3619796
    Sam Farrington
    BPL Member

    @scfhome

    Locale: Chocorua NH, USA

    First, I learned that a square seam edge with no curve at all does not work.  Plenty of photos of that on BPL.

    Next, I learned that a curved arc with a constant radius, as in a section of a broken circle, does not work either.  Still lots of wrinkles.

    Then there was discussion on BPL suggesting that a parabolic curve, as in a tent pole tied and flexed just at the ends, is not the same as a catenary, or hyperbolic curve, but is very close.  There is a post to this effect on Ken’s older link; and there have been longer mathematical discussions and diagrams on other BPL threads.  This suggested using a tent pole of the desired length, with cord connecting the ends and tightened to produce the desired amount of deflection at the center.  The seam line is then easily traced on the fabric along the edge of the pole. This seems to work for the ridge line of flat tarp that is parallel, or almost parallel the ground.

    Then i noticed that cat cuts made at other areas of marketed tents are different if the seam is not parallel to the ground, but at an angle, as in a pyramid tent; or in the case of the base wall of a vestibule, even when the hem is parallel to the ground.  In both cases the curve is more pronounced at one end.  In the first case, like the wall of a pyramid, the curve is more pronounced closer to the top of the seam, as in a seam from a peak to the ground.  In the second case, the curve is more pronounced closer to a fixed point, like a tent pole connection at a bottom corner, and flattens out as the curve approaches the point where, for example, two ‘beaks’ connect at a guy out point.

    For these last two cases, a curve beginning at the center of a parabola would provide a more pronounced arc at one end, and could be drawn easily by flexing a pole twice the length of a the seam line, and tracing from the center of the pole to one end.  A little unwieldy, but easy enough using a large working space on a ping-pong table (Beware eventual caving on particle board tables),  But would these curves work to mimic the above mentioned cases on store bought tents?

    It is not just about the curvature created by gravity.  It also seems to depend on whether the curve runs roughly parallel with the grain of the fabric (warp or weft), or on a bias at an angle to the warp or weft, where the fabric is much more elastic.  With DCF and stiff sail cloth, this is probably less so.  In any event, it seems the fabric panels work better when the grain of the fabric (warp or weft) is parallel to the seam, easy to achieve on a tunnel tent. But obviously that is not possible on a pyramid’s triangular panels, where if one side of the panel runs with the grain, the other two sides will not.  In those cases, should be base of the triangle be cut along the grain, with the hope that the parabolic cut on the sides of the triangle will keep the tent taut?.  My old fashioned approach was to use small pins to tailor the ‘standing’ curves, but it was very imprecise.

    The above questions are resolved on higher end tents.  But for the MYOG tent maker, is there a simple way to mark the seam lines with more than a wing and a prayer?

    #3619910
    Roger Caffin
    BPL Member

    @rcaffin

    Locale: Wollemi & Kosciusko NPs, Europe

    BPL hasd a full article on catenary curves and how to generate them:
    https://backpackinglight.com/myog_tech_note_catenary_curves/

    If you have ends at different heights, that’s fine. Generate the curve for two ends at the same height, then truncate for the lower end. This may require a little fiddling to get both length and height exactly what you want.

    Cheers

    #3619938
    Sam Farrington
    BPL Member

    @scfhome

    Locale: Chocorua NH, USA

    Maybe I’ve had too much of plotting gps coordinates to show the locations of unmarked trails and routes on maps.  It is a tedious process, but not worth the effort unless done accurately.

    So maybe should have just come right out and said that I’m not into the ‘plot the dots-connect the dots’ approach for seam lines, and even if I were, am not clear how that works for the situations described later in my post, such as pyramid tents, where seam lines slope well over 45 degrees from horizontal..  Possibly am missing something, but don’t think so.  If any of the methods I mentioned actually work, will most certainly put up a detailed post.  It would save folks a lot of time, address situations beyond tarp ridge lines and probably be more accurate as well.

    As suggested, a formula based only on gravitational pull or moderately sloped ridges, is not going to address other factors.  A post in one of the links that suggested stretching the fabric between two corners on a fabric panel, and defining a line outside the resulting wrinkles  was intriguing, and may be worth some experimentation.  (Have plenty of old 30 denier fabric to work with.)  But am looking for a more definitive method.

    #3619951
    Roger Caffin
    BPL Member

    @rcaffin

    Locale: Wollemi & Kosciusko NPs, Europe

    @Sam
    Yeah, while the equation gives a catenary curve, that does not take into account what is going on at the other side of the panel. So … nice theory, but how it is used is another matter.

    Fwiiw, I think the catenary curves given by the equation are possibly better suited to the outer edges of the fly. A simpler case.

    Cheers

    #3619964
    Jerry Adams
    BPL Member

    @retiredjerry

    Locale: Oregon and Washington

    https://backpackinglight.com/forums/topic/tent-on-bias/ talks about how edges on the bias need a cat curve, edges along the grain don’t.  This is a consequence of fabric stretches much more along the bias than along the grain.

    I use Roger’s spreadsheet.  First I make a straight line where the edge is.  Make a mark every 4 inches.  Then measure the displacement from the straight line is for each point.

    You could make one pattern and use it to mark a bunch of pieces of fabric.  The pattern has to be made of a material that doesn’t bend.

    I think any similar curve would work about the same.  More important that it’s smooth.  If you make an error along the line, like at one of the 4 inch points you measured the displacement wrong, you’d see it.   And if the cat curve displacement isn’t large enough the tent will be flappy, if the cat curve displacement is more than needed then you lose headroom inside the finished tent.

    #3620036
    Sam Farrington
    BPL Member

    @scfhome

    Locale: Chocorua NH, USA

    Jerry,
    Thank you for the link to your thread. Somehow I missed that one, as well as the one linked in that thread. Will study them at length and see where they take me.

    I think you are right about the need for some kind of a curve when the seam runs across the grain of the fabric on a bias, even if the seam is vertical, and theoretically not affected by gravity. But am not clear what kind of a curve is needed, and if the seam runs part way between horizontal and vertical, how that affects it. Liked your photos of the Chinese tent, showing what a big difference properly curved seams make.

    This is going to take me deep into the weeds, but if higher end tents can be perfectly taut, there must be a way. And I think that elimination of the wrinkles on a tent canopy will make the tent not just better looking; but also quieter, more stable and resistant to high winds.

    With the design I’m working on, it is just a few peak-to-ground vestibule seams that need to keep the fabric around them taut. But those seams are very important, because they also act as partial guy-outs for the tent. Think of the vestibule guy-outs on one of Roger’s tunnels, for example. Only mine are longer seams, because it is a side entry design, the vestibules are larger, and there are larger fabric surfaces for the wind to make mischief with wrinkles.

    No doubt there are complicated formulas that answer these questions; but am looking for something that works more simply for me and other MYOG tentmakers. Hope to post further after studying your threads, mentioned above.

    #3620038
    Jerry Adams
    BPL Member

    @retiredjerry

    Locale: Oregon and Washington

    I think one thing to reduce wrinkes and improve tautness is to lay it out good initially

    I tape 4 corners of the fabric.  Pull it out to remove all slackness but don’t stretch it.  Then measure accurately.  Make a line on the fabric where you want the center of the first row of stitches.


    #3620064
    Sam Farrington
    BPL Member

    @scfhome

    Locale: Chocorua NH, USA

    Jerry,
    I’ve read a couple of your threads, including the one linked above.
    And see that mids raise some different issues with different solutions.

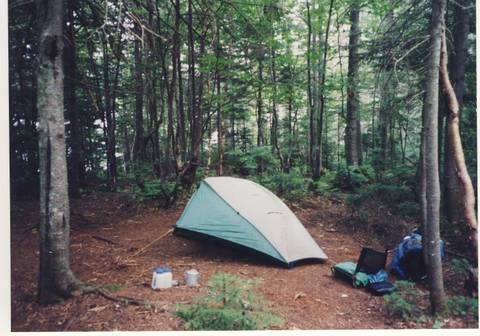
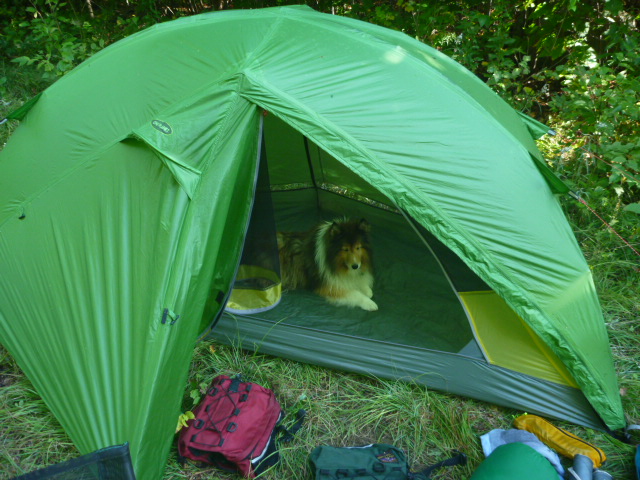
    This took me back to an old project that used crossed hoop poles to support the main canopy, but still needed ‘beaks’. The main canopy came out nice and taut, but could not get the beaks to zip together tautly with a nice cat-type curve. This was an unpleasant surprise, because had done the same thing before with no problem, as shown in this photo:

    The beaks zipped together nicely with only slight wrinkles. Note the beaks don’t come all the way to the ground as you might wish.  This is because there is an inner net tent with a bathtub floor with solid sidewalls that caught blown rain and snow.  But the more recent version, alluded to above, had beaks that came closer to the ground, and this may be what made it more difficult to construct to zip together without wrinkles.

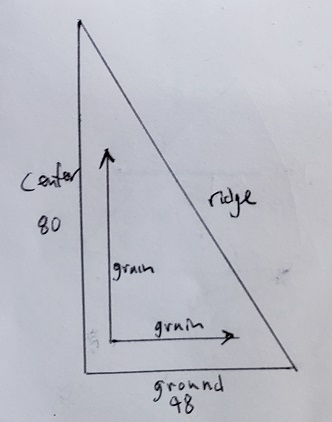
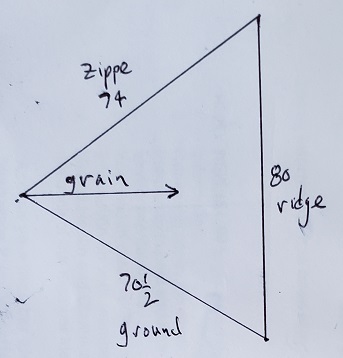
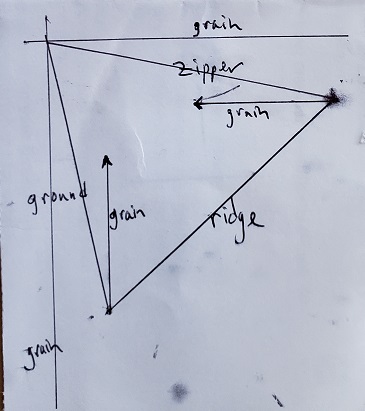
    Another issue you raise is since a non-right triangle panel, beak or otherwise, can only have one edge oriented along the grain of the fabric, which one goes where? In the first photo above, where the beaks form an almost right triangle, I suspect it is the bottom and leading edges of the beaks that is cut along the grain, because with the zipper used to join them, that is where I wanted the least stretch.  But am not sure, and when there is time will dig out these old projects, and see where the grain runs.

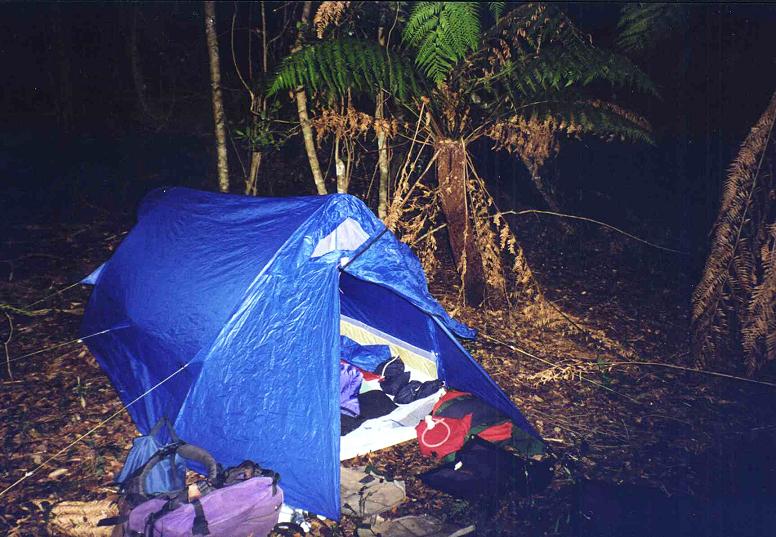
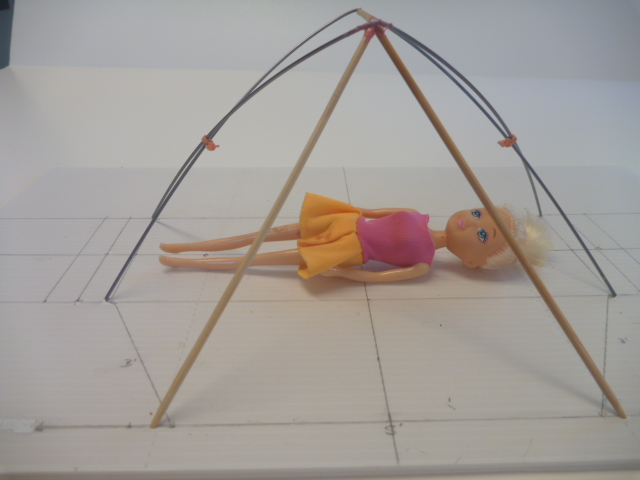
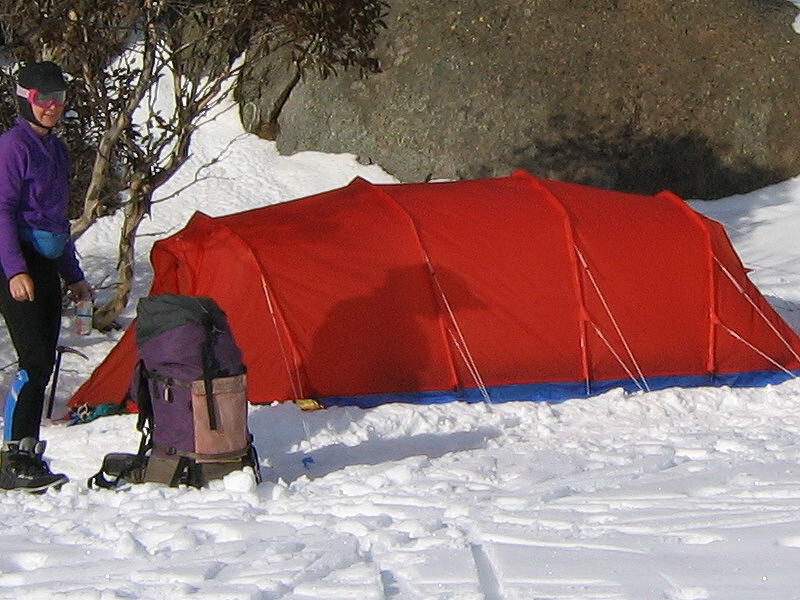
    What I’m working on now are two identical vestibules. Without cat-like curves, each vestibule has a shape similar to the one in this scale model, but with the main tent being freestanding :

    The two seams in question are the ones on each side of the triangular door.  At this point, am inclined to:  1) build the main freestanding canopy and set it up; 2) pin on panels of the vestibule sides with a cat-like edge marked inside the straight edge; 3) pin down the bottom corners on each vestibule side of the door opening; 4) sew the door panel including its center zip; 4) mark an estimated cat-like edge inside the straight edge on each side of the door panel, and 5) use small pins to join the sides and the door with a curve that yields a taut vestibule.  Will be working on an 8′ x 8′ surface of 1/2″ thick fiber board (‘Homasote’), so corner stake points may be pinned down with screws.

    By cat-like, is meant a curved seam line, but not necessarily catenary – more probably parabolic – defined and marked as noted in an earlier post above.  In other words, am using the marked inner and outer seam lines just as a guide when pinning.  The seam allowances would not be trimmed until the tent is unpinned from the work surface, and re-pinned with lap felled seams before sewing.  May be using Extrem Textil 20D sil, which is very slippery – so pinning up lap felled seams may require some new techniques.

    The grain will run along the bottom edges of the vestibule, but as you’ve noted, there still may be some curvature at the bottom edges when the pin-upped version is pulled taut.  As shown in the second photo, I think that there should be some space between the vestibule bottom edges and the ground to accommodate irregular ground surfaces and allow some lower ventilation.  For a winter tent, there would be snow flaps added along the bottom edges to stop spindrift.

    An alternative approach, which has been used successfully on MYOG, would be to make a wooden frame, and tailor the fabric to it.  Unlike the second photo above, the main tent will be free standing, and thus may provide a frame to work from without the need to construct a separate wooden frame.  Time will tell.

    Hope this provides a clearer picture of how the seam shape issues may be addressed.

    #3620065
    Roger Caffin
    BPL Member

    @rcaffin

    Locale: Wollemi & Kosciusko NPs, Europe

    Hi Sam

    The vestibule on your paper model (I have made them too) is very much like the vestibule on one of my early tunnels.

    Deep in Wollemi I imagine. Canon A95, flash, 2003.)

    That was spinnaker fabric, which made a lot of noise :) The little verandah is rolled up to expose the mossie net window inside.

    Anyhow, yes, I always have put the fabric grain along the ground edges. By proper design the edges stayed straight and did not pull upwards.

    Cheers

    #3620090
    Jerry Adams
    BPL Member

    @retiredjerry

    Locale: Oregon and Washington

    My half pyramid with vestibule:

    On the right is the half pyramid, on the left is the vestibule.

    The pyramid panels have the bottom and middle edges with the grain of the fabric.

    The vestibule panels are on the grain on the vertical to match the pyramid panel.  But then in the orthogonal direction, is also on the grain.  Red line in photo:

    In that direction, the fabric stretches less, so it pulls in the side pyramid panel, which reduces headroom inside.

    View from the peak down:

    You can see how it pulls that ridge down about 6 inches.

    I tried adding a strip that’s about 3 inches wide on one side:

    I tried it on a trip.  Much better.  It adds a bunch of headroom.

    The strip is a catenary curve – I just wanted a smooth curve.  When I made the side panel initially I could have made it wider with a cat curve of 3 inch deflection in the middle.  Now that I examine this, 5 or 6 inches would have been better.

    You can see I screwed up the strip pretty bad.  I sewed it to the main panel okay, but where I sewed it to the ridge, since it was an outward curve, it was longer than the ridge so I had to put in some folds.

    Since the strip is not wide enough the vestibule panel is still pulling down the pyramid side panel, thus the diagonal wrinkles.

    I don’t like any of this, have to ponder…

    #3620095
    Jerry Adams
    BPL Member

    @retiredjerry

    Locale: Oregon and Washington

    On a regular pyramid:

    The center edge and the ground edge are on the grain.  The ridge has a cat curve.  Everything is good.

    On my half pyramid with a vestibule, the vestibule panels are:

    The ridge goes on the grain which matches the pyramid panel it’s sewed to.  The zipper and ground edges are on the bias.

    But then from the corner between zipper and ground, the grain direction goes into the panel.  That causes all my problems.  With a regular pyramid you don’t have the problem.

    By adding that strip I made the side like:

    That helps.

    Maybe if I rotated the panel on the roll of fabric:

    That would fix the ground-zipper corner, but now the other two corners have the same problem – a line out of the corner going into the fabric that stretches less.  But it’s not into the middle of the panel, close to along the edge, maybe that would work better.

    This is probably too obscure for anyone to follow

    A solution is to just go with a regular pyramid.  But I like the half pyramid because it weighs a little less and requires a little less area on the ground.

    hmmm…..

    #3620143
    Craig B
    BPL Member

    @kurogane

    It’s an interesting problem, especially when you have all kinds of different forces acting on your fabric panels, the least of which is gravity.  Add to that the different stretch of the fabric in different directions and you have an extremely complex statics problem. Trying to model this would be incredibly difficult, and I suspect you wouldn’t even get that close to perfect once you moved your model into the real world.  In my experience with other engineering problems like this, the best bet is to make the actual thing in the lab then refine it a couple of times.  Of course this means making maybe 2-3 tents in a row, or at least the base you’re trying to get right, which is rather arduous.  But if you want good results….

    The catenary curve is derived from a 1-dimensional flexible line that has mass and is acted upon by a uniform force field.  This does not exist in the 2-dimensional panels of a tent structure, so using a cat curve there is really just an approximation in the first place.  The ‘force field’ acting on tent ridges is generally dominated by the tension applied to the panels via the internal structure and/or how you stake it out, not gravity, and is not very uniform in most cases.

    I suspect the curved edges/ridges on higher-end tents that Sam mentions may have started as a model, but then were tweaked a bunch in the lab to get just right before being finalized for production.

    #3620150
    Sam Farrington
    BPL Member

    @scfhome

    Locale: Chocorua NH, USA

    Roger and Jerry,
    Roger, your photo is very similar to the vestibule on the model I posted above. There are some differences though, so will post another photo of a model of just the frame and the front vestibule seams on each side of the door:

    The wooden skewers in the front outline the seam lines, but without a cat-cut..  A second photo with a 6″ long dollar store doll shows how, unlike Roger’s tent, the occupant is oriented to a side entry.  The scale is 1″ = 1′, and the main tent is 8′ long, 4′ high and 3′ wide:

    The side entry creates larger fabric panels than does Roger’s tent.  So there are more possibilities for wrinkling and flapping, and the proper curvature on the front vestibule seams becomes more critical.

    Along with the numbered steps in my previous post, it may be helpful to run cords on those seam lines when pinning up the vestibule panels.  The photos lack depth perspective, but those seams are also cut slightly on a bias on both the door and side panels.  So the bias stretch of the material on both sides of those seams is close to equal.  There is no bias stretch at the door and vestibule side bottoms, as they , run along the fabric grain.  That also should reduce fabric wrinkling and flapping.

    Jerry, you also noted attempts to match the grain of fabric panels on both sides of seams, the distortion resulting when there was no match, and the novel use of a fabric strip to address that.  Your half  pyramid tent appears reasonably taut.  I wonder if the space issues would have been reduced if the bottom of the vestibule panels also ran with the fabric grain, as Roger recommends.   But realize that would mean the grains on the pyramid and vestibule panels would not match.  Quite a conundrum.

    Some might suggest that the use of stiffer non-woven DCF would avoid these fabric grain issues, but actually I think that at least for MYOG they are less with silnylon, or even polyester woven fabrics, as there is more fabric stretch.

    #3620153
    Sam Farrington
    BPL Member

    @scfhome

    Locale: Chocorua NH, USA

    Craig,
    Totally agree. A compromise might be larger scale fabric models. Admit I avoided these because of the time involved. So the fabric must be made fully taut when ‘tailoring,’ or pinning it up during actual construction. If that can’t be made to happen, it probably means that something was overlooked in the design phase.

    #3620182
    Jerry Adams
    BPL Member

    @retiredjerry

    Locale: Oregon and Washington

    Good points, models,…

    I’ve been using lightweight silpoly.  I wonder if silnylon is any different.  I wonder if these lightweight fabrics have a bigger difference stretch between on the grain and on the bias.  DCF has no grain, I believe, so that might be better, no difference in stretch in different directions.  Maybe I’ll try a half pyramid with that.

    since the vestibule panels are not right triangles, I can choose only one edge to go along the grain.

    #3620195
    Roger Caffin
    BPL Member

    @rcaffin

    Locale: Wollemi & Kosciusko NPs, Europe

    I’ve been using lightweight silpoly. I wonder if silnylon is any different.
    Yes, I think nylon has a bit more stretch than polyester.

    I wonder if these lightweight fabrics have a bigger difference stretch between on the grain and on the bias.
    Very likely. The UL fabrics generally do not have as tight a weave as the heavier ones, so they can stretch a bit more on the bias.

    DCF has very little stretch (that is actually a design objective for sails), but equally it has almost no ability to absorb either a poor pitch or a severe storm the way nylon does. I am of course biased.

    Cheers

    #3620297
    Sam Farrington
    BPL Member

    @scfhome

    Locale: Chocorua NH, USA

    Looked at some old Epic Malibu, the polyester fabric formerly used by Black Diamond for its single wall tents.  The impregnation is silicone, and It is around 1.9 oz/sq/yd, but has considerable stretch on the bias.

    Then looked at 1.1 oz silpoly, (here “poly” means polyester, not polyurethane) with PU4000 coating from RBTR, around 1.4 oz/sq/yd.  It has considerable stretch on the bias, but noticeably less than silnylon.  The attraction with polyesters is the lack of sagging with rising humidity.

    None of the above have any noticeable stretch with the grain, but have no doubt that with a machine some could be recorded.   Ditto for silnylons.

    Note that the very lightweight ‘membrane’ polyesters do not have much tear strength, and are not comparable with nylon for that and puncture resistance.  RBTR has acknowledged the tear strength issues in the FAQ sections of its website, so it’s no surprise.  When ‘Cuben’ fabric first came out, there were problems with its water proofness, puncture & abrasion resistance, as well as durability (note Richard Nisley’s ‘dirty little secret’ thread).  I understand that this has improved in its DCF incarnation, and there is plenty more info about this on BPL than I have.  Don’t have any of the DCF, so can’t check its bias stretch.  RBTR sells samples that should be sufficient for checking bias stretch.

    Think the best that can be said is that the current silnyons are more flexible in every respect, that polyesters intended for tent use have acceptable bias stretch, but need a higher denier (thread weight) to compete with  best quality nylons for tear, abrasion, and puncture resistance as well as durability.  If you want all of that, nylon might be a better choice.  If you are willing to sacrifice some of that for a polyester tent that doesn’t sag, and may be a little heavier, that might be a better choice.  There are a number of recent threads and posts on BPL about these choices.

    Please also note that nylons and polyesters are not all created equal.  Dupont 6,6 nylon is available from RBTR and Thru-hiker, and listed as such.  Otherwise.it may be a bit of a gamble to choose best quality nylon and polyesters.  If harvesting a fabric from a tarp, the tarp maker may provide info on its provenance.

    For myself, I am willing to gamble that the above tent frame design will limit nylon sag, by permanently stretching the nylon canopy on the bias, and that.a ‘cat-cut’ can be achieved that will limit the sagging of the vestibules to a significant extent, and further by tensioning the aft vestibule with shock cord.  Note the previously posted photo of a 15D, PU coated nylon tent when sagging after a night of rain:

    If you can handle this much wrinkling, like Sara the Sheltie has, nylon might be the best choice.  If not, then polyester might be better.

    #3620300
    Roger Caffin
    BPL Member

    @rcaffin

    Locale: Wollemi & Kosciusko NPs, Europe

    It may be worth noting that, with nylon, you may not need a cat cut at all. The fabric can stretch to provide this when the tent is pitched.

    This has straight seams, no cat cut at all. It is stretched lengthwise by the anchors at the corners and over the poles by tension straps.

    Cheers

    #3620475
    Sam Farrington
    BPL Member

    @scfhome

    Locale: Chocorua NH, USA

    Roger,
    So your photo looks like you are OK with wrinkles like the ones shown at the end of my last post, above. Some people aren’t, so thought that was a consideration worth mentioning.

    Visible in your photo is a seam on the canopy, running from above the top left side of the door. There is probably another seam like it running from above the top right side of the door.
    I obviously can’t tell from your photo, but have cut apart canopy seams on hoop framed conical and cylindrical tunnel tents and found a slight cat-cut inside them.  And In some cases, the cat cut is visible without opening the seam.

    If that is one of your tents, would guess that there is no cat-cut inside those seams; rather the seams are there for strength, and you are relying, as you say, on the stretch of the canopy fabric and the tension on the hoops from front and rear stakes to keep the canopy taut, albeit sometimes wrinkled if the fabric is nylon.  Though I’d think that the rise of the canopy from a smaller to a larger hoop would require either some cadware or tailoring to a wooden frame in order to make curved edges on the pattern piece, and that might be a challenge equal to or more demanding than a cat-cut.  Anyway, it is a great tent, with the MacPac Olympus shape, and the wrinkles would not concern me, as is shown from the earlier photo of the Sheltie lying in my tent. Interestingly, that tent has significant wrinkling even when the humidity is low and the door is open:

    But the wrinkling is much diminished when the front door is zipped closed:

    Suggest this raises another factor discussed in Jerry’s posts relating to taut canopies, and that is how evenly the tension from the stakes, guylines and poles is distributed on the canopy.  That is why you converted me from one peg to two peg vestibules, as they more evenly distribute tension over the entire tent surface.  The weight of the extra two pegs (with two vestibules) is worth the much added stability, especially if the wind is howling when circumstances temporarily require opening the tent door.  For that reason, I’d acknowledge that the Olympus shaped tent in your photo is considerably more stable when the door must be opened, ever so briefly, in high winds.

    #3620496
    Jerry Adams
    BPL Member

    @retiredjerry

    Locale: Oregon and Washington

    With a tunnel tent all the edges are on the grain so no need for a cat curve?  Or a pup tent or A frame tent.

    Maybe that’s pushing too far the theory that only edges on the bias need to be cat curve.


    #3620590
    Roger Caffin
    BPL Member

    @rcaffin

    Locale: Wollemi & Kosciusko NPs, Europe

    Visible in your photo is a seam on the canopy, running from above the top left side of the door.
    I suspect that was due to the width of the fabric. Can’t win them all!

    Wrinkles – that stuff (PU coated) was prone to wrinkles a bit more than silnylon. That photo was taken while making camp, and I may have improved the pitch later. This shows silnylon:

    Nowhere nearly as many wrinkles. And no cat cut.

    the rise of the canopy from a smaller to a larger hoop would require either some cadware or tailoring to a wooden frame in order to make curved edges on the pattern piece, and that might be a challenge equal to or more demanding than a cat-cut.
    Very often CAD can NOT handle that case as the curves were specified as being elliptical. You can NOT invert an elliptical function to get the pattern – which is why elliptic curve cryptography is so good. The NSA can’t fiddle the internal numbers as they have (notoriously) with other forms of cryptography.
    I developed the SW for the pattern myself. I do not exaggerate when I say it took me at least 2 years to get it performing to my satisfaction, but it can now handle different sized pole arches. Keeps the brain active.

    The advantage of the two-peg vestibule is that it never relies on tension in the fabric on one axis to create tension on the other axis, with the door open or closed. That is what id causing the wrinkles in your 1st photo.

    With a tunnel tent all the edges are on the grain so no need for a cat curve?
    Chuckle – not quite. This is a panel from one of my earlier tunnels.

    Grain along the bottom edge, but nowhere else.
    Ah – if all the pole arches are vertical, then you would get rectangles for panels. My pole arches are tilted – more elegant.

    Cheers

    #3620603
    Jerry Adams
    BPL Member

    @retiredjerry

    Locale: Oregon and Washington

    maybe that’s close enough to on the grain

Viewing 25 posts - 1 through 25 (of 35 total)
  • You must be logged in to reply to this topic.
Forum Posting

A Membership is required to post in the forums. Login or become a member to post in the member forums!

Get the Newsletter

Get our free Handbook and Receive our weekly newsletter to see what's new at Backpacking Light!

Gear Research & Discovery Tools


Loading...