what annoying software this is : )
Topic
tent on bias
Become a member to post in the forums.
- This topic has 33 replies, 7 voices, and was last updated 6 years, 8 months ago by
 .
.
On a previous thread it was discussed to lay out fabric for a tent on the bias. I have finished my previous project so I am now moving on to this. Basically, a pyramid tent.
I got some https://ripstopbytheroll.com/collections/waterproof-polyester-fabric/products/membrane-silpoly 0.93 oz/yd2 silpolyester
My question, is how much does it stretch when the tent is set up
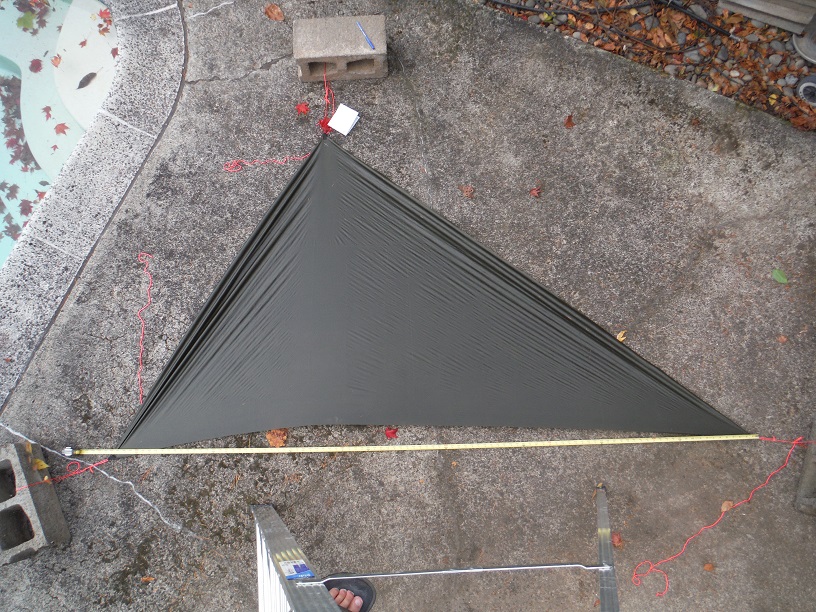
I cut out a piece, sewed grosgrain loops and then pulled out with concrete blocks, attempting to get the same amount of tension as when setting up the tarp.
The bottom edge is the tent ridge, with the grain of the fabric.
The left edge is in the horizontal direction of the finished tent, on the bias of the fabric.
The right edge is in the vertical direction of the finished tent, also on the bias.
Dimensions with the fabric relaxed – 96 9/15 x 57 6/16 x 78 7/16
Dimensions with the fabric pulled out like it was erected and pulled taut – 96 14/16 x 60 1/2 x 82 3/16
So, the fabric didn’t stretch hardly at all along the ridge but stretched a bit more than 3 inches horizontally and vertically. When I lay out the fabric, I will use dimensions that much less
96 4/16 x 54 4/16 x 74 11/16
Another thing I see is there is a “natural catenary” shape along the ridge. I will not use any catenary curve. Actually, for the four ridges I’ll just do one row of stitches, and finish with a (faux) flat felled seam only at the top and bottom, add tent stake loops at the bottom, and set up to see how it looks. If necessary, I’ll go back and lay out catenary curves. Then I’ll finish up the entire seam with flat felled.
:)
I think you’ll need a zig-zag stitch, or a serger, for you seams to stretch w/ the fabric.
Good idea
With silnylon which I think stretches similarly I’ve had the thread rip, especially at the corners, so I used zigzag
Just to make sure I understand your plan. Will two of those pieces make each of the 4 sides of your pyramid? . I think is a great idea to have the 4 ridges of your pyramid on the grain of the fabric. Are you planning to have tieouts where the two pieces meet? if that is the case perhaps having some stretch there would not be much of a problem, actually perhaps it is a plus. When pulled out and staked down, your shelter will actually have an “octagonal-ish” shape, which would be a good thing for wind deflection, etc.
I currently use hexagonal pyramid and I have been very happy with how it handles wind, definitely better than the rectangular base one I used before. So in my experience more angles is better. I do not have the problem of stretch as I made my pyramid out of cuben but in your case by leaving the bias in the middle & Bottom of your panels you are allowing to create that octagonal shape when using all 8 tieouts. I will be following with interest how your project develops.
Exactly. 4 ridges with the grain. For each side, sew two pieces together along the bias.
Hmmm… if I just use the relaxed as designed dimensions, then it’ll stretch more and make an octagon shape on the ground. If anything, that’ll be better. I think I’ll do that. Good idea.
Somebody, a professional tent designer I believe, said it’ll never work to have the ridges on the bias. I think that’s what he said but he was never clear. That’s what I’ve done in the past. As a result, the sides of the tent stretch up above the ground. Then stuff blows in when it’s windy. I can see some commercial tents are made that way.
I’ve experimented in the past with side pull-outs, but then the fabric is taut up above, and loose below. I think maybe it’s better to have 5 tent stakes on each side, 16 total for the tent. Then the fabric is evenly taut all the way up the side. Most of the time if not real windy I use only 8 stakes total.
My last project took a year. Maybe this one will be done faster. My last project was to make a quilt slightly warmer and thus heavier, which is only occasionally useful so maybe that’s why it took so long. This tent should be lighter and somewhat better in the wind, also a little more space, so maybe I’ll do it faster…
I would start with tie outs where you have seams (i.e middle of your panels and corners). You can always add more if needed. Tieouts where you have seams will be pretty strong as you have more fabric there so maybe you don’t even need reinforcements. I agree, having the bias in the middle seam of the panels will allow you to pin more evenly the whole base of the pyramid closer to the ground.
The times I’ve had disappointing results in regards to materials stretching were when the bias was running in different directions; Panels can be all different shapes so it’s really difficult to line up the weave based on the panels/seams themselves…However, the ground is always going to be a static reference point and the shelter is generally in tension in a similar way relative to the ground (from the ground to the peak)…so I try to align the fabric weave with the ground on all panels and counteract the different stretching of bias where the panels meet by using a slight catenary curve.
My blind recommendation would be to use flat hems along the ground and a slight catenary curve where panels are sewn together with a french seam…when laying out your panels, align the weave threads so they will be parallel/perpendicular to the ground when the shelter is finished.
Yeah, sewing two panels with different bias is a bad idea
Never be able to set tent up with taut, flat sides
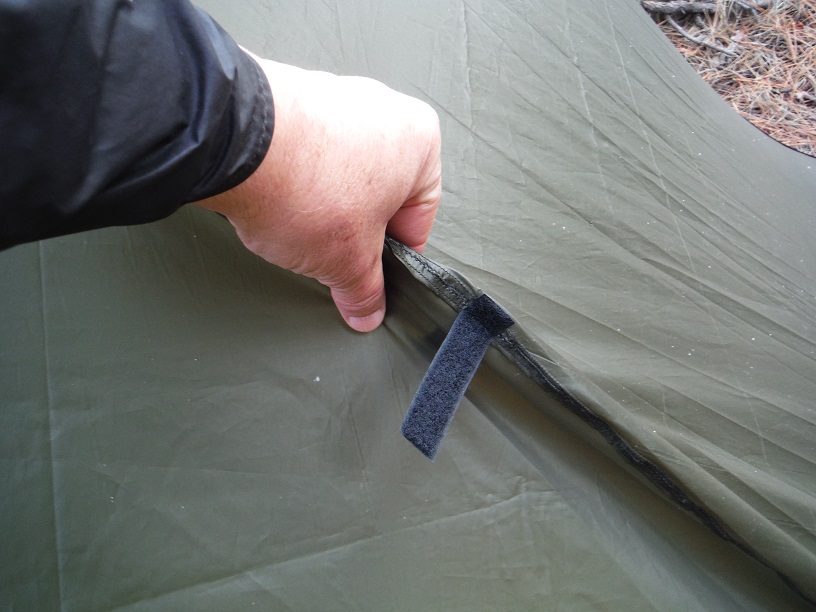
I noticed that fabric, membrane silpoly, has a duller side and a shinier side. I can use my Sharpie Proven Permanent on the dull side, but it’s hard to get anything on the shinier side.
I wonder if it would be better to have the shinier side on the inside or outside of the tent. RSBTR says there’s no difference between the two sides.
Maybe you have the membrane silpoly PU4000?. That product has different coatings in each side and therefore one side is shinier and the other dull.
good thought
I weighed mine, 1.001 oz/yd2
membrane is 0.93
pu4000 is 1.07
I’m half way in between
I smeared silicone on both sides and will let dry to see if one side is PU
it doesn’t matter. it’ll be good either way. If it weighs a little more that’ll be fine too regardless of whether it’s the polyester or the silicone (/PU)
Jerry,
I’ve read several of the other discussions you’ve been involved in about bias stretch and panel orientation in mids. Have you seen these hex and octa mids from the Chinese comapany Knot (ice-river.com)?
Hex:
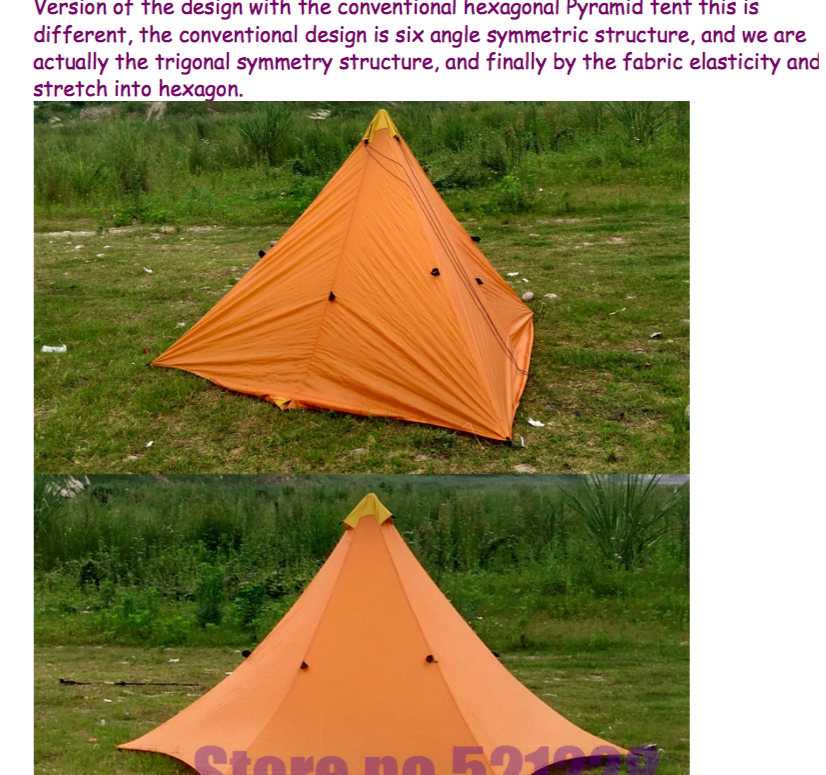
Octo:
I own the Hex version and as far as I can tell the panels were cut as per this post (https://backpackinglight.com/forums/topic/mid-set-up-issues-got-advice/page/2/#post-3443383) and ridges sewn alternating bias/bias, selvedge/selvedge.
The instructions are to stake out the 3 (hex) or 4 (octo) bias/bias corners, put up the pole, at which point the structures assume their trigonal or square configurations, then tension the selvedge/selvedge ridges. They pitch very taut with no fuss. I have no idea if the silly cut cut hems are functional or just a design flourish.
yeah, exactly
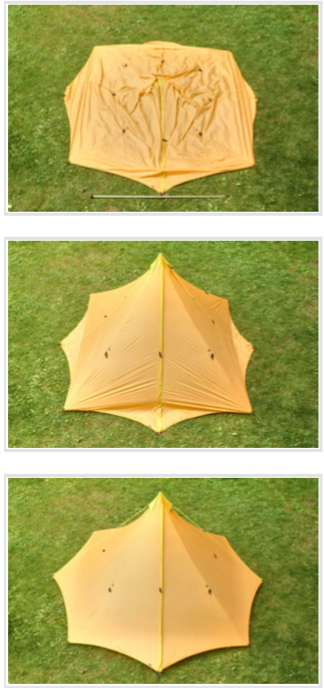
the top hex has the grain of fabric going down the middle, the bottom hex I think the bias going down the center. As a result it pitches much better, more taut
I will find out in mine and post pictures. I am trying to be very precise laying it out and sewing which also helps
Just to be clear, in both the Hex and Octo pictured, the ridges are alternating pairs of bias-on-bias & selvedge-on-selvedge seams. The bias/bias seams are staked first, then tensioned with the pole (and so the Octo looks very much like a taller Duomid at that point), finally the selvedge ridges are stretched taut, completing the Octagon shape.
(My knowledge level is pretty low; you probably figured the above out from my first post, but due to my ignorance I wasn’t sure so re-hashed in this second one:)
If you confirm you have the PU4000 variety indeed (again the different shine of the sides is a big give away IMHO) just keep a couple of things in mind: 1) RBTR recommends the PU side (dull side) facing out and 2) IF you glue any reinforcement patches use the appropriate adhesive depending on which side you put the patch. (
I did a tarp-poncho out of the regular Silpoly PU4000 (Finished weight 1.4oz/yd) last year and I have been quite happy with the waterproofness which is one of the advantages of the PU4000 (I have used it more on poncho mode than tarp mode). Very nice / easy to work with too, and I used seamgrip (diluted a little with cotol) to glue my circular reinforcement patches on the PU side.
Ahhh… now I understand Stumphges,
That has the ridges on the bias, which is the opposite of my theory, yet it looks like it pitches pretty good
(I think)
It probably doesn’t matter that much where the tent is laid out on the bias or along the grain
Another thing is, you could lay out the tent pieces, with the dimensions adjusted for the stretch of the fabric, which is different along the grain and along the bias.
Regardless, I will find out…
thanks Mario. I have some seam grip so I can go either way. I’ll see how the silicone is after it dries on both sides of my scrap piece of fabric
silicone sticks on both sides so it’s just sil, no PU
1.0 ozyd2 is just 7% over spec. Assuming my measurment is accurate. No big thing, probably a little more silicone than nominal. Maybe just as well.
Thanks for the link to that older BPL post. It was an interesting read, and I think I understand Jerry’s idea/motivation now. I had never before thought of how the typical method of pitching a pyramid tarp (stake out the 4 corners and insert center pole) leads to the 4 main ridgelines stretching along the bias. This stretching on the bias then pulls up the fabric in the middle away from the ground. I think a lot of people mistake this result for some catenary cut along the bottom edge.
This seems like a clever idea, Jerry. I’ve been planning to sew up a small pyramid tarp this winter, like an MLD Solomid. I may have to try sewing it with each main ridgeline going with the grain.
I got it from someone else : )
I tried out a version of a pyramid tent on bias – half pyramid with a beak:
This uses a little less space on the ground and a little less weight than a regular pyramid – 25 ounces.
Edge view:
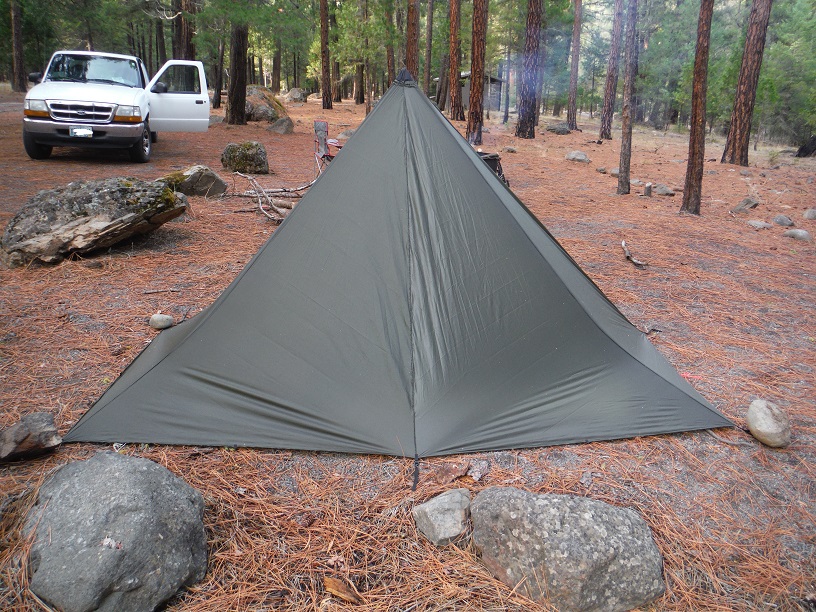
End view:

Beak view, there’s a #5 zipper along the ridge::

Several observations:
The edge of the tent is on the ground, not up in the air, which was an objective. I could pull the side out about 3 inches.
The side was designed to be 9 1/2 feet (114 inches), but stretched to 125 inches.
These would be the same on a square or rectangular pyramid.
The beak was 30 inches out as designed. The width of the pyramid portion of the tent was supposed to be 48 inches but I measured 42 inches. This is unique to this 5 sided pyramid tent. For some reason, the top of the pole shifted 6 inches in.
I tried raising the pole 1.5 inches, and the entire edge of the ten raised about that much off the ground, so my design height was the same as actual. This is unique to this 5 sided pyramid. Since the actual width was 42 inches instead of the designed 48 inches, I think if it was a rectangular pyramid the edge of the tent would be an inch or two in the air.
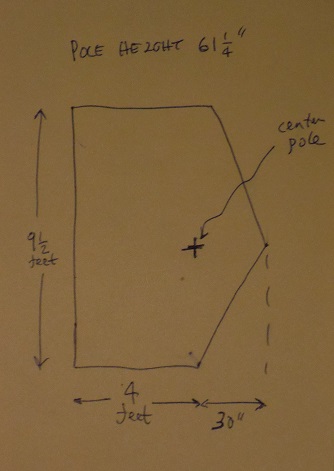
The design dimensions are:
- Height is 61.25 inches
- length is 114 inches
- width is 48 inches
- beak is 30 inches
- length of edge center is sqrt(height^2+width^2) = 77.82 inches
- length of end center is sqrt(height^2+(length/2)^2) = 83.67 inches
- length of the two ridges is sqrt(length of end center^2+width^2) = 96.46 inches)
- length of beak ridge (zippered) = sqrt(height^2+beak^2) = 68.2 inches
- length of beak along the ground – sqrt((length/2)^2+beak^2) = 64.41 inches
So I need 2 copies of 3 triangular pieces – edge, end, and beak.
- edge pieces are 96.46 inches along the grain x 77.82 x 57
- end pieces are 96.46 inches along grain x 83.67 x 48
- beak pieces are 68.2 inches along grain (zipper) x 83.67 x 64.41
If I was making a rectangular pyramid, I would probably subtract an inch or two from the design height. It would be interesting to see what would happen if anyone made one of these.
If you were making a square pyramid, it would require 8 identical pieces. Length/2 on one side. sqrt(height^2+(length/2)^2) on the second side. And, along the grain, sqrt(second side^2+ (length/2)^2) on the third side.
One thing funky about this is if you look at the ridge, there’s a bend about 1/4 of the way up.
Bad – you have to get further from edge of tent before there’s enough usable headroom.
Good – the force on the tent stake is closer to horizontal, so it’s less likely to pull out.
If you look at the ridge from the top:
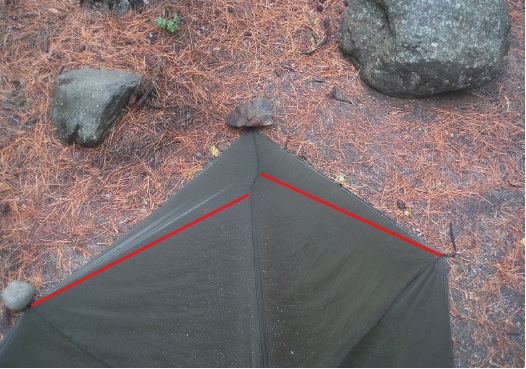
You can see there’s a second bend a little above the first bend. The red lines are drawn from the corner where the tent stake is, up to the ridge, along the grain of the fabric. It doesn’t stretch so much along that line. That’s why there’s a funky bend.
The lower funky bend is unique to this 5 sided pyramid design. In a rectangular pyramid, the bend would be just the higher up one. Probably less noticeable. You could correct for that by projecting a line on both sides of the fabric where you want the ridge to be, and then sew them together, sort of like a catenary cut, but that’s probably a why bother?
In a regularly laid out pyramid, the 4 ridges have to have a catenary curve, maybe 2 inches deflection at the center to make the tent pitch taut. The ridges are along the bias. The center of each side has a seam that goes along the grain and doesn’t have to have a catenary cut.
With this tent laid out on bias, the ridges do not have to have a catenary cut (although there is that funky bend). The ridges are along the grain of the fabric. But, the center seam of the side, which is along the bias, could have a catnerary cut with about 1 inch deflection at the center. I pinched about 1 inches and it seemed like it would be more taut.
With the 5 sided pyramid, the end ridges are really floppy, a catenary curve of about 2 inches. In my prevuous tent which I laid out normally, this ridge did not need a catenary curve:
The zipper edge of the beak did not need any catenary curve. On my previous tent, which I laid out normally, the zipper edge required a large catenary curve.
So, catenary curves have to be put on edges that go along the bias of the fabric, and not on edges that go along the grain of the fabric.
Become a member to post in the forums.
advertisementYour privacy is protected: We do not transmit your user data to third-party ad platforms or advertisers, and we do not host third-party tracking pixels. Backpacking Light serves ads on its own custom, native, and internal platform.
 Pro-Grade Water RepellencyPolypropylene face fabrics: see the future of raingear.