Topic

Down the Evazote rabbit hole and other load hauler pack questions


Forum Posting

A Membership is required to post in the forums. Login or become a member to post in the member forums!

Home Forums Gear Forums Make Your Own Gear Down the Evazote rabbit hole and other load hauler pack questions

Viewing 25 posts - 51 through 75 (of 114 total)
  • Author
    Posts
  • #3718076
    Thomas H
    Spectator

    @bandittheone

    Nick,

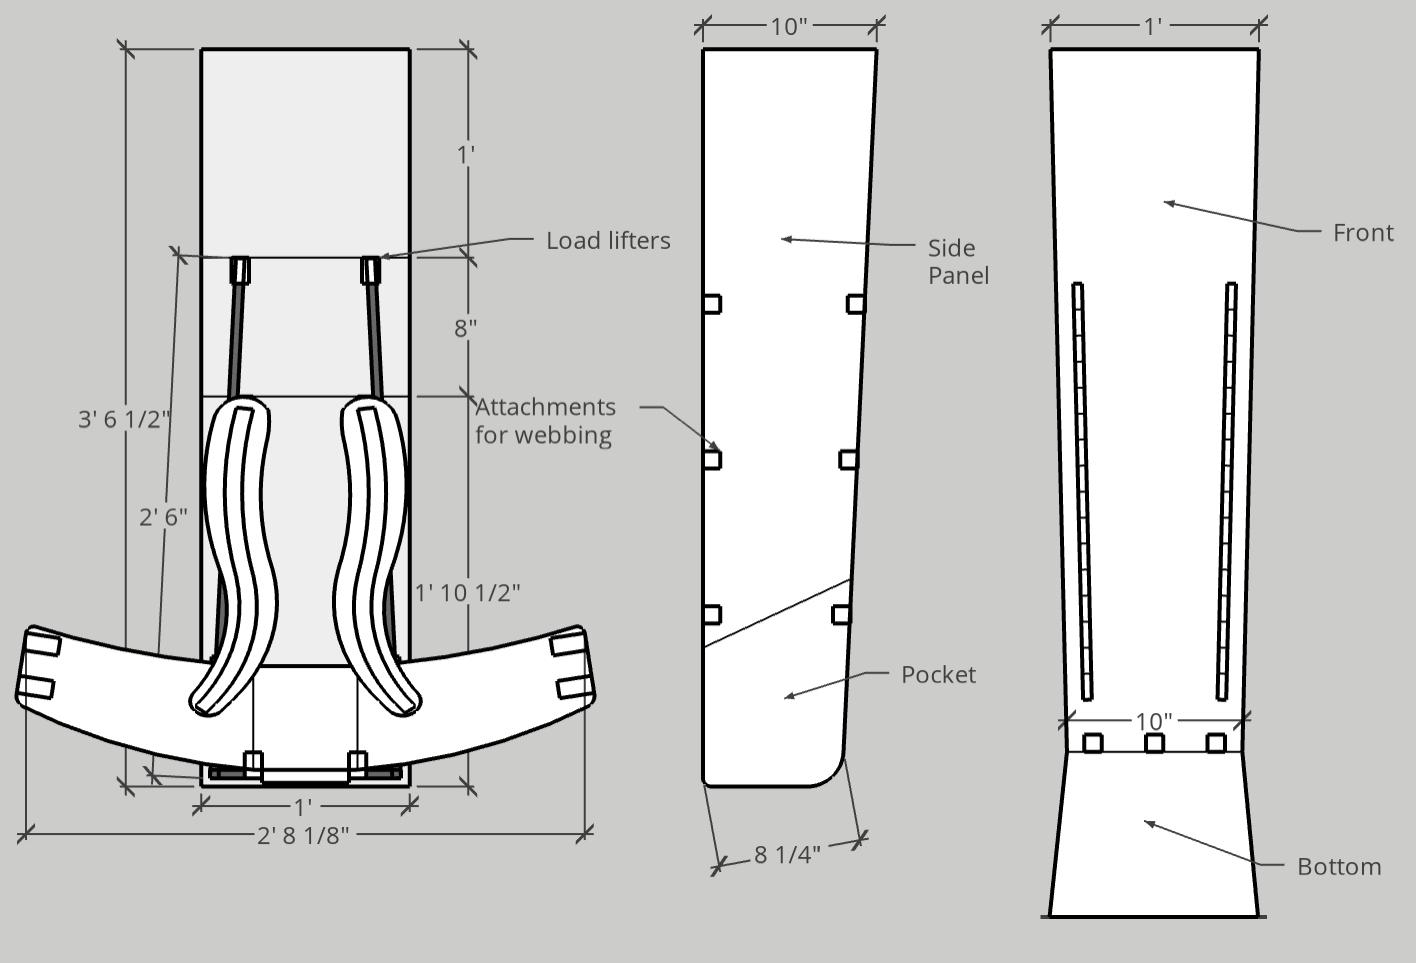
    Thanks for the pictures of the evolution of your hip belts on those framed Kelty packs, very interesting. Not something I’d like to duplicate however. The principals I’m looking to build around here, like hip belt connection on the bottom, full wrap, etc are quite the opposite. I do think that those frames could be made very comfortable with a new hip belt that hinges off the horizontal and load lifters though!

    Geoff,

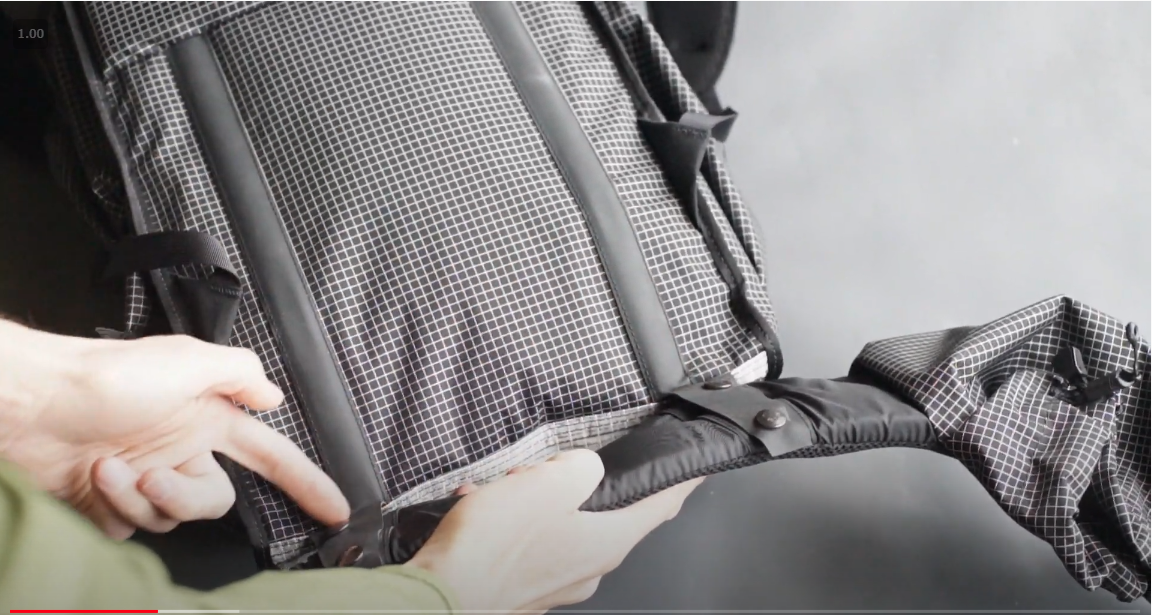
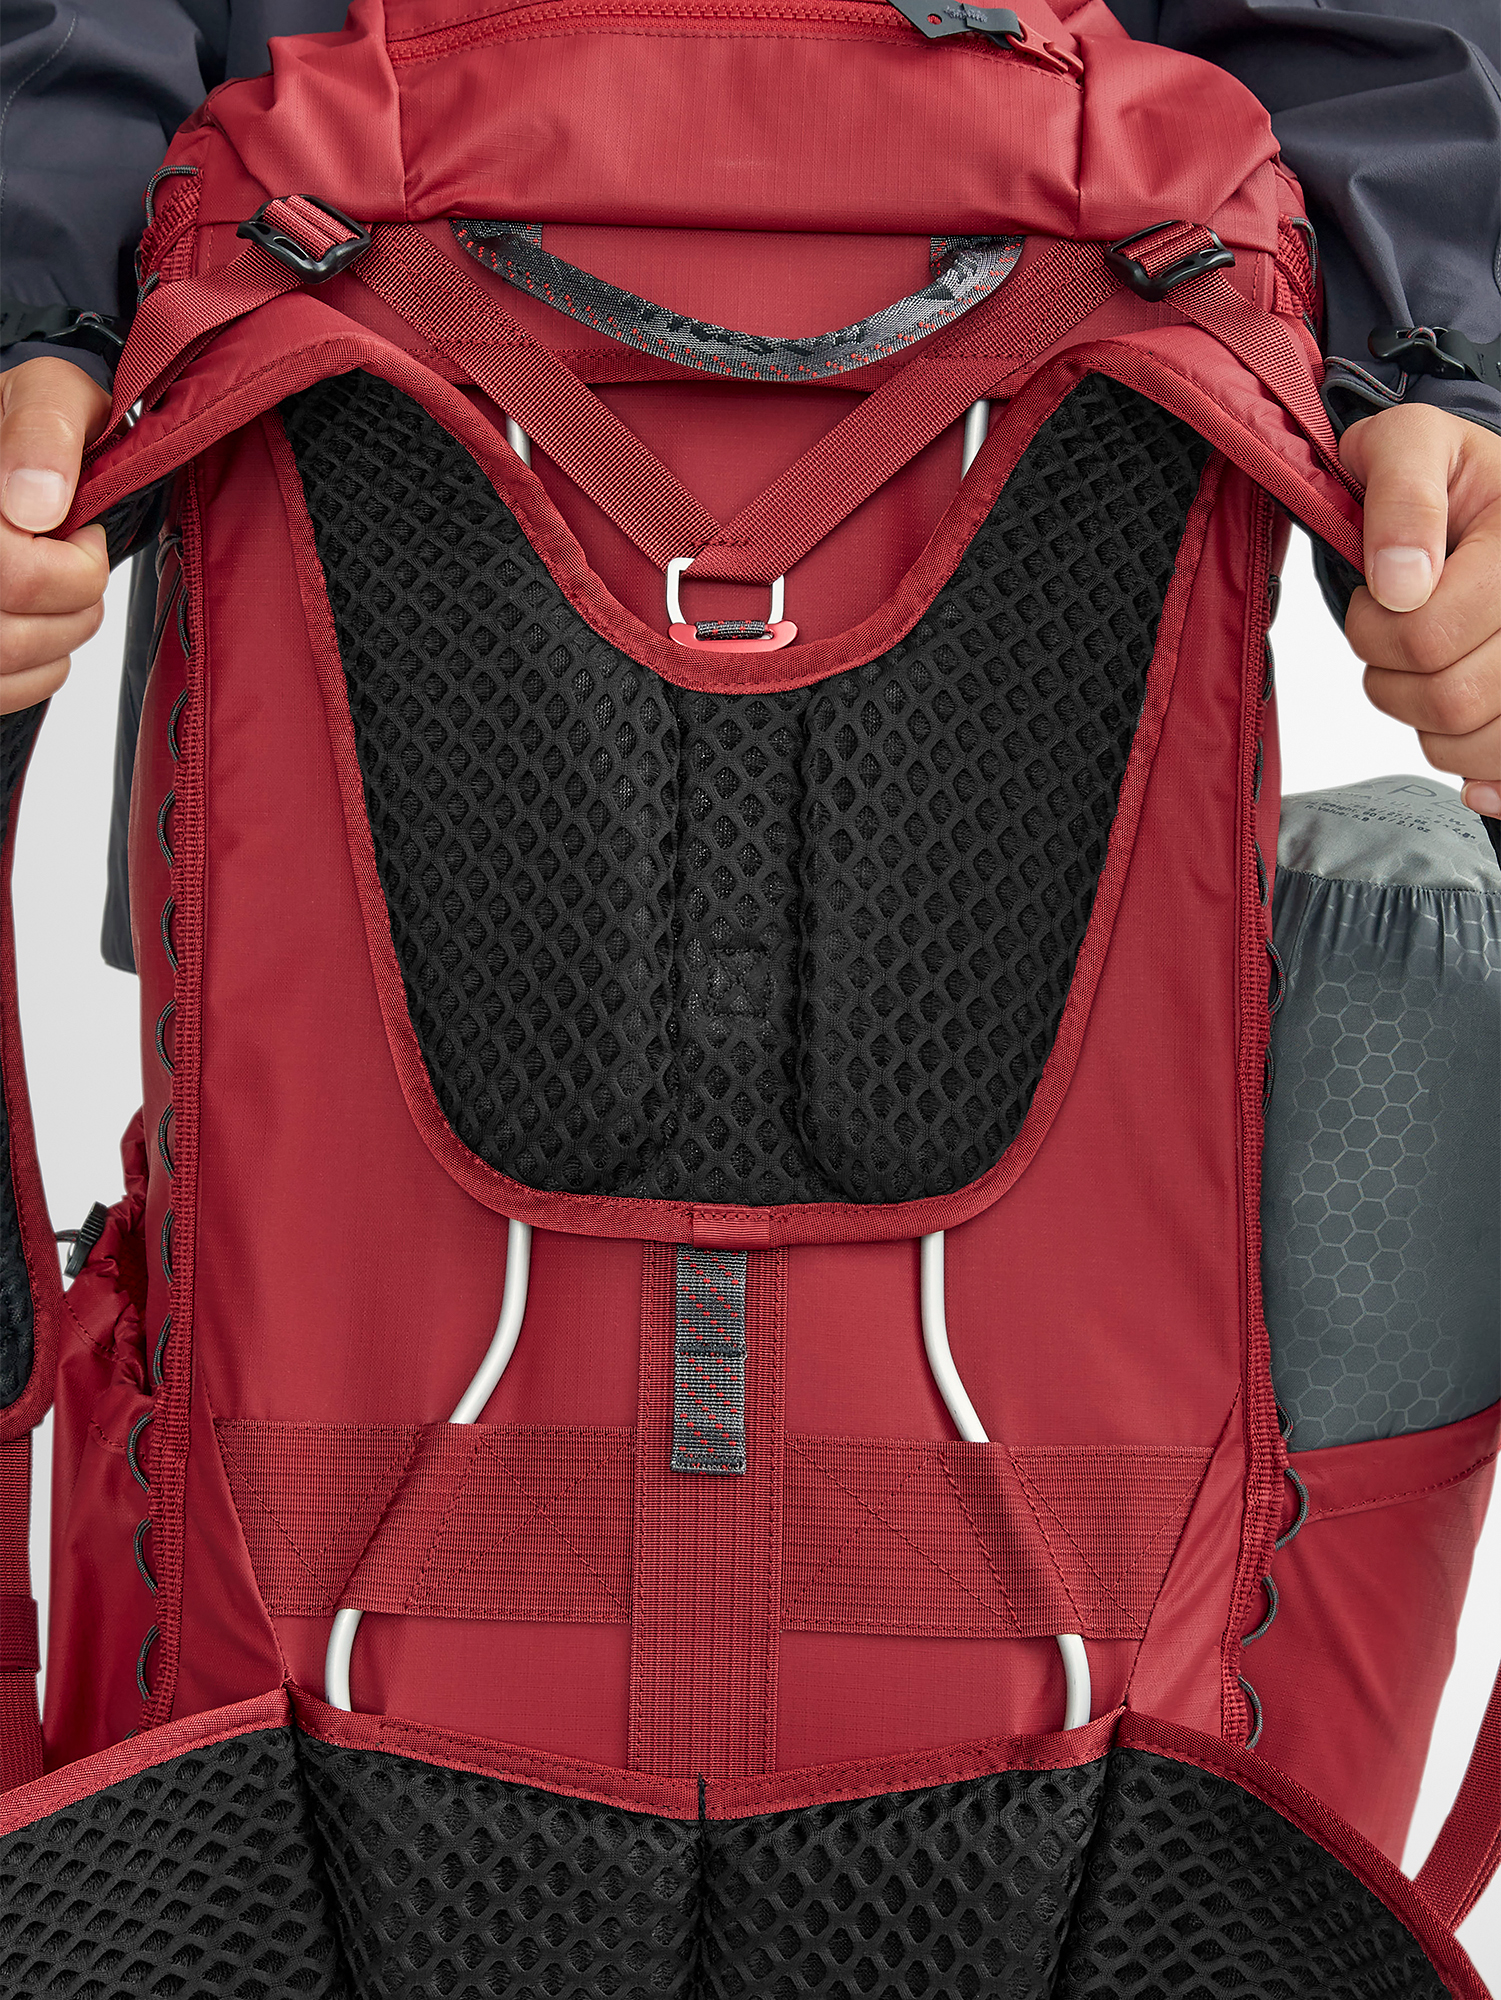
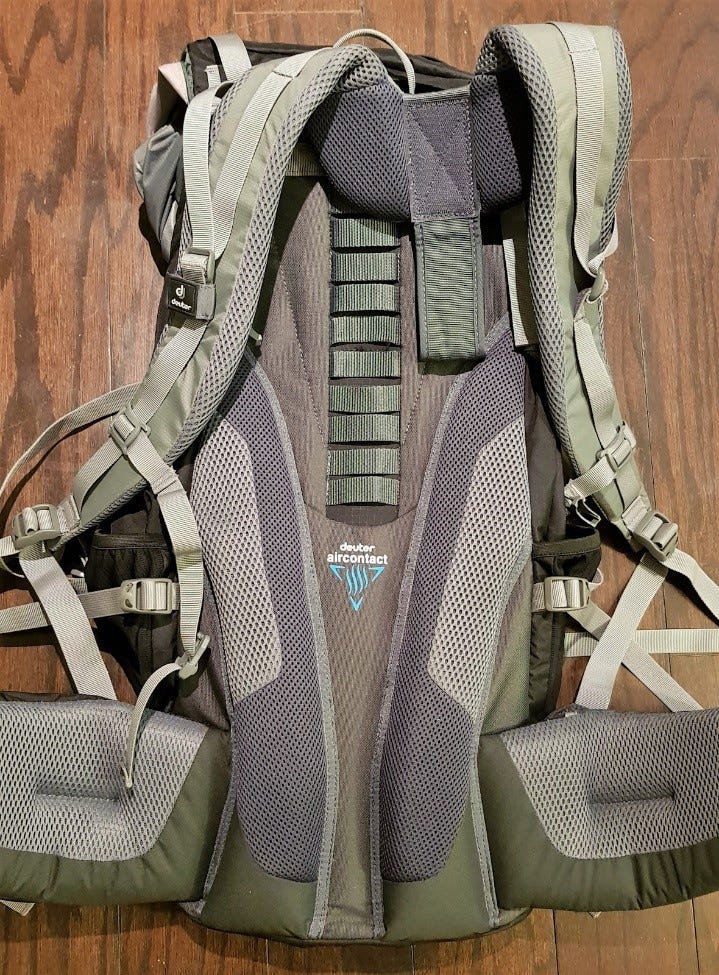
    Standard turn-inside-out shoulder straps are superior for comfort as they do lower the chance of abrasion. I think I will be doing my hip belt with external binding like Jan has been doing with the outer fabric, thin harder foam and 3D mesh all bound together on the outside, then have openings to stuff the 3D Mesh. I’m thinking 3 separate 3D mesh pieces: lumbar and the wings. Maybe you could pass the thicker foam behind the lumbar pad out to the two wings and add further padding to the lumbar in front.

    I have spent a lot of time researching and buying different binders for my sewing machine, let me know if you need any help. A word of warning…its very frustrating and wont work on all materials, especially thinner or floppy constructions.

    I don’t have too much intention of selling a bunch of the same bag, but would definitely be up for custom work on unique projects. I find that many people have unreasonable expectations on price because they compare everything to is effectively sweat shop labour, or at the very least mass scale production(money is made by volume). I’ve had people ask me to just recreate something they saw online for cheaper. Creating designs, then patterns, sourcing materials, ordering them, paying ridiculously high shipping costs,  cutting the fabric, assembling, etc is immensely time consuming.

    So if I post a cool pack on BPL and someone is interested in having a one similar but XX changes, and a pocket here added, etc. I would totally be interested, they would just have to understand the cost of making custom work. That being said I also do not charge much for my time as this is a hobby and I enjoy the challenge. And I love an excuse to order new fabrics and hardware that I otherwise wouldn’t because of shipping!

    #3718082
    Thomas H
    Spectator

    @bandittheone

    Here’s a quick SketchUp mockup of what I was planning earlier.

    Let me know what you guys think.

    Certainly because of the hanging belt you have to have a much taller frame. This is a 30” tall frame. My back is about 19-20”, and I generally measure that from the middle of the hipbelt to the bottom of the shoulder strap attachment. There are a few packs that have the shoulder straps actually attach to the frame and can adjust vertically using ladder locks and webbing.

    Little bit confusing, but that rectangular immediately below the belt is just a webbing tube sewn down to the back panel that the horizontal stay would go though.

    #3718092
    Geoff Caplan
    BPL Member

    @geoffcaplan

    Locale: Lake District, Cumbria

    Just to clarify what we’re looking at here – what’s the circumference of the main compartment?

    #3718098
    Thomas H
    Spectator

    @bandittheone

    The above just shows the back panel, haven’t decided what size the sides or front should be yet. I will probably make a ‘pack board’ style first to test the frame and hip belt out before committing to making it into a pack. I also intend to have the frame, shoulder straps and belt be interchangeable to different packs.

    Chances are if I was making this into a fairly big winter load hauler I’d probably do a 10” front at the bottom and 12 at the top of the roll top with, and 7” sides at the bottom up to 8 or 9 at the time. So that would be 29” circumference at the bottom and around 40” at the top.

    This would produce about 60+ Litres.

    #3718107
    Geoff Caplan
    BPL Member

    @geoffcaplan

    Locale: Lake District, Cumbria

    On the issue of custom work and pricing, by the way, I used to run a small business support agency so have given this a lot of thought over the years.

    I’m pretty sure you understand this already, but I can definitely conform that the biggest mistake a small business can make is to try and compete on price.

    You are always going to be at a disadvantage against economies of scale, such as a competitor who can use a short-run manufacturer in Vietnam – and in their turn they have to add niche value to compete against mass brands using long-run manufacturers in China. So competing on price generally means you’ll be working for less than minimum wage, which simply isn’t worth the candle…

    You have to flank the big boys by targeting niche markets that are too small for them to bother with, and have the confidence to charge what the work is worth. Radical customisation on the McHale model is  the ultimate small business weapon – because he has no real competition from the brands, or even from the less sophisticated cottage makers. If you want a McHale, there’s only one place on the planet with the expertise to deliver!

    People who are committed enough and discerning enough not to settle for the mass market products will mostly understand that they have to pay for the privilege. Dan seems to have customers from Connecticut to China who are prepared to pay $800 to north of $1,200 for the service.

    Of course he does offer some very unique features, like his coloured Spectra fabrics. But in general it seems that he’s developed a range of frames and components that he can mix and match in thousands of combinations. So he’s never starting from a blank sheet, which would be very time consuming, but he can adapt his end-product to accommodate almost any requirement.

    And he only does one thing – and that’s make super-rugged technical packs that carry well. If you want something else, he’ll refuse to make it – he’ll never dilute his brand.

    It’s a very smart model, though it’s never going to make anyone rich. The kind of thing people do for the love of it, I think.


    #3718109
    Thomas H
    Spectator

    @bandittheone

    Definitely all true!

    Another small business like McHale is Alpine Luddites, I think they’re out of Vermont. I wouldn’t call his designs as sophisticated as McHale’s, but he has some neat mountaineering and expedition features. He also charges upwards of $1k for some of his packs and options. Seems like a great way to go. I much prefer their style to some of the other cottage manufacturers who start mass production of simpler, non-customizable items while maintaining high prices due to cache or some other appeal like “buy my products just because they’re local”. Not that this isn’t a good model, it just doesn’t appeal to me personally.

    #3718230
    Thomas H
    Spectator

    @bandittheone

    Here is a better look at how this would all come together with the sides and front panel.

    For this hip belt I’m kind of thinking of buying some high density 1/4” CCF (maybe 12lb) from Foam by Mail or similar, externally binding vx21 on the outside and 500d cordura on the inside. The 500 D will have vertical gaps on the left and right side of the lumbar area to allow the 1.5cm Evazote 45 (from MEC Winter sleeping pad) to be stuffed. One full piece will be stuffed across the whole belt, with a 2nd one just in the lumbar area. All removable for testing purposes of course. The two pieces of 1” webbing will be sewn through the binding on the bottom.

    #3718244
    Geoff Caplan
    BPL Member

    @geoffcaplan

    Locale: Lake District, Cumbria

    Just spent a few hours wandering around some retail shops looking at the commercial packs. I live in the English Lakes, which is the epicentre of mountaineering here, so was able to try a wide range of brands. First time I’ve done that for decades.

    Rather bemused by what seems to pass for the norm these days. To my eye the hiking packs were all wildly over-engineered. The framesheets are stiff. The hip-belts are stiff. The shoulder straps are stiff. Some of them have stiffening in places where I couldn’t figure out what it was there for, and nor could the sales staff. On the best-selling Osprey Aether there is stiffening on the load lifter strap? Baffling…

    In particular, Gregory and Osprey seem to favour a hip-belt so stiff that it literally snaps around you like a man-trap being sprung. I found it wildly uncomfortable and restricting.

    Putting one of these things on was like donning a full suit of medieval armour. I can see how people overreact and go for a cottage frameless pack instead – it must seem like a blessed relief to have something that moves with your body. But I suspect that many of them have never experienced a well-fitting pack with a properly engineered suspension.

    What I found interesting was that the most comfortable pack by far was a 35 litre Patagonia with a very minimal hip-belt. So minimal that I don’t think there was any foam in it – it felt more like some kind of wadding. But it was very well cut, and moulded nicely around the hip. I suspect the cut is more important than the padding, especially if you make it wide to spread the load. Trying the thick belts it was clear that only the inside few mm of the padding was actually doing anything – the rest was simply redundant.

    As for your sketch, I like the simplicity. There seems to be a wide consensus from McHale and Seek Outside users that the U frame with full wrap belt carries well so it seems a safe bet.

    My only question would be why you prefer that to the suspension on the Zoro pack you showed me. He has eliminated the cross-strut by bringing the stays closer together and hanging the belt directly off the bottom, which is about as simple as it’s possible to go – though I suspect it might benefit from stabaliser straps and something to anchor the top to the frame as we discussed above. As he said in his note, he actively preferred this to the U frame because it moved better with his body. He counters barelling with a minimal framesheet which you can just make out at the top of stays – I suspect a bit of stiffish foam would do just as well.

    On the other hand I suspect you are losing top-end capacity with the Zoro design as there is more scope for the suspension to sag.

    So I’m interested in your views on the pros and cons of the two approaches. For my needs I’m tempted to try the Zoro solution before I go full McHale, because the simplicity is enticing.

    #3718247
    William Chilton
    BPL Member

    @williamc3

    Locale: Antakya

    @Geoff Caplan, Osprey have ranges of packs which certainly don’t have over-stiff hip belts. From personal experience, I can quote the Talon, Exos/Eja and Levity/Lumina ranges. There may be others.

    I say this not to deny what you experienced, but if you failed to come across them in the Lake District, perhaps these overbuilt, over-stiffened packs are what consumers are (mistakenly in my, and it appears your, opinion) looking for.

    #3718249
    Geoff Caplan
    BPL Member

    @geoffcaplan

    Locale: Lake District, Cumbria

    We’re discussing load haulers here – that’s why I focused on their load hauler.

    #3718262
    Thomas H
    Spectator

    @bandittheone

    Honestly the main reason is that McHale uses this cross strut/stay on his CM Critical Mass packs which are his load haulers…his dual stay only options are for lighter weights. This has me thinking that the cross stay helps at those higher weights.

    Plus I do like the fact that you can make the bag much simpler and you have can multiple packs that use this same frame/belt. With the cross stay I think I could get away with very little bag-frame elements. By this I mean you could literally have two loops of webbing in the bottom corners(on the verticals, just above the horizontal) and pockets for the top of the frame(load lifter attaches here). I will likely do a little more than this however.

    I’d even consider adding a cross stay where the should straps connect, so the shoulder straps would be affixed to the frame rather than the bag. This again would have the main benefit of simplifying the bag and allowing the bags to be swappable. This 7075 is very light and I like experimenting.

    I actually ordered several lengths and weights of the 7075 aluminum: 1/2 x 1/8 is what I intend for this heavy duty pack. And I have some 1/2 x 1/16 or so that I will make something closer to the Rogue Panda Zoro or Jans pack. This one will be similar in features, no cross strut, less padding, thinner belt, smaller pack sizes, etc.

    #3718268
    Geoff Caplan
    BPL Member

    @geoffcaplan

    Locale: Lake District, Cumbria

    Very lucid. In the end, I guess you just have to suck it and see. If you enjoy tinkering, it will be an interesting experiment. Please keep us posted.

    If you make the bag simple enough, you could do your external seam trick and seal the internals so effectively you’d almost have a dry-bag.

    You could even consider building it around the Sea to Summit Big River Dry Bag – 38cm x 25cm x 85cm / 65L / 293g, so a workable size and weight. There’s a 35L too, for day hiking…

    We simply can’t access the type of fabric and welding used by StoS, and it should be “epically” bomber.

    The ULA Epic frame is built to carry the StoS 65L, but it weighs a full 28 oz minus the bag. I’ll bet it could be done for less. They secure the bag to the frame with a kangaroo pocket.

    Mainly aimed at the canoe community, but reviews say it carries very well, and it’s been used by a few thru-hikers.

    Good review here of the pros and cons of the Epic by someone who is impressed by the carry. The cons are poor design decisions by ULA which could easily be fixed:

    https://easternpackrafting.com/best-backpack-for-packrafting-a-review-of-the-ula-epic/

    Probably involves too many compromises, but it’s quite an interesting idea to play with.

    For anyone who hasn’t seen it, here’s the frame with the StoS attached:

    #3718271
    Thomas H
    Spectator

    @bandittheone

    That ULA Epic is a smart design. You’ll see hunting brands like Seek Ouside have similar options. They have ‘integrated’ bags and ‘break-away’ ones. They all use the same hipbelt, frame and shoulder straps. Here is the break away from/panel you can buy, then attach various bags, or similar things to the Epic.

    https://seekoutside.com/revolution-suspension-pack-frame/

    I didn’t show this very well earlier, but my prototype bag here is similar. I actually have a prototype pack bag that the frame goes right into as well, but I didn’t bring it (away from home with work right now). All made with scraps and/or undesirable materials.

    #3718311
    Geoff Caplan
    BPL Member

    @geoffcaplan

    Locale: Lake District, Cumbria

    Just spotted this cunning system Klattermusen are using to attach the top of the yoke to the same point as the load-lifters. Rather elegant!

    A simpler alternative to Dan’s bayonet & bypass system would be a system to raise the yoke an inch or two to compensate for an unusually heavy load. This would be a lightweight way to do that, especially if you have a frame and breakaway system where you have to figure out a way to attach the yoke anyway. You’d probably get 80% of the benefit for 20% of the complexity.

    On his larger packs, Aarn has a system for adjusting the back length on the hoof – you don’t even have to break stride! Maybe more than is needed, but I quite like the idea of being able to fine-tune to back length to the load if it can be done without introducing much weight and complexity.

    Was just watching a PCT video and there was some issue with water caching that meant he ended up lugging 10 litres for a couple of days. He said his shoulders hurt like hell. The ideal pack would be able to adapt to situations like that…

    Do you see this as having any merit as against your current plan, which as I understand it is a fixed attachment point?

    #3718317
    Thomas H
    Spectator

    @bandittheone

    I’ve never even heard of Klättermusen. They have some very unique designs both on the functional and aesthetic fronts. I tried looking up videos or photos of how that above pack actually adjusts but alas, very little information.

    Have you seen the Exped Lighting? They have a very smart design that is very minimalistic yet seemingly great at taking loads. It uses a single vertical stay and a horizontal top one for the load lifters and the shoulder harness slides up and down on the horizontal stay. If you’re the right height this would be great, otherwise the load lifters won’t be effective.

    https://backpackinglight.com/forums/topic/75347/

    I see quite a few packs with adjustable shoulder harnesses and I think it is a nice feature…surprisingly McHale doesn’t have a system for this. However I think the frame height is more important when we’re talking about hauling packs or packs with load lifters. Once the belt is in action and the load lifters on you should have a very minimal amount of weight on your shoulders, but the exact fit of those shoulder straps aren’t as important as getting that 45 degree angle on the load lifters. So the issue with many packs is ‘normal’ people end up adjusting the shoulder strap height so that the load lifters aren’t at a 45 anymore, they’re just bringing the bag closer to you(still a desirable feature for climbing, even with frameless packs)

    My current prototype has a similar system for adjusting the harness as Seek Outside (I don’t like it, too complicated) I’ve done quite a bit of research on this topic myself and think that it is a valuable feature, but I’m not set on the correct way to implement.

    A lot of hunting packs use Velcro to adjust the shoulder harness height, which doesn’t look very good in my mind. Here is another weird one, but at least it is simple:


    #3718326
    Thomas H
    Spectator

    @bandittheone

    Just watched a Klattermusen video demonstration of one of their expedition packs and wow…what a bizarre contraption. I can’t figure out what some of the weird features even do, such as the small metal ‘frames’ on the shoulder straps.

    https://www.youtube.com/watch?v=JyO1PN6Y-P4

    Otherwise take a look at the dual stay system in this larger Exped pack, this seems like a simple solution. I think I may try this out, but you’d need to have parallel stays, rather than tapering.

    https://www.exped.com/usa/en/product-category/backpacks/explore-60-black#prettyPhoto%5Bnode-nid-13735-field_details_img%5D/3/


    #3718476
    Geoff Caplan
    BPL Member

    @geoffcaplan

    Locale: Lake District, Cumbria

    A lot to chew on in your last responses! I’ll reply piecemeal as I mull over your points.

    =============

    Klattermusen are an interesting company – at the bleeding-edge on the green front. Eye-wateringly expensive, but I did pick up a pair of their breeks at the tail-end of sale. The quality is absolutely outstanding, but there are points in the design where they have sacrificed functionality for style.

    And yes, their packs are decidedly eccentric and that load-hauler is over-engineered to the point of absurdity. As you say, the role of that “butterfly bridge” on the shoulder strap is absolutely baffling – a solution looking for a problem?

    But they do have some interesting ideas. In particular, I want to try out their discontinuous hip-belt.

    As they say, padding between the lumbar and the hip can and does cut off blood flow in the area of the gluteus medius, even with relatively light loads. At least it does for me, with my conventional pack.

    And you don’t actually need padding there. So why not have a webbing belt, and only attach padding at the lumbar and iliac where you really need it? Worth a try, I think, and quite easy to prototype. Would also make the padding easy to alternate or swap out on a long hike to handle compression.

    My experience with my Aarn Mountain Magic hip belt has me questioning the role of padding, as it is just webbing over the g medius with a very thin pad over the hip bone. I found it was just about OK with 3.5 season high-mountain camping gear and 7 days of food, which is more than it was designed for. So I’m going to play around with finding the realistic minimum that does the job.

    ===============

    The Exped Lightning – I did try it once in a store as there was a lot of buzz around it when it came out. But it has issues.

    The way it’s designed, it’s almost round when it’s fully packed and it felt a bit unstable, especially as there’s only one point of contact with the hip-belt. You do get stabiliser straps, but for me it didn’t feel part of my back.

    Second, with that thick central stay, it bangs into your spine if you bend forward.

    Third, the sliding yoke attachment has hard corners that would trash your clothing.

    And the shoulder straps are narrow and unpadded – the claim that it can carry 20k is not credible.

    But the yoke adjustment is smart, because it’s simple with almost no weight penalty unlike the velcro monstrosities you generally see. Here’s a screenshot that shows how it works:

    But the problem with bending forwards is a bit of a show-stopper with the central-stay system – I’m guessing there’s a reason why it’s not much used.

    ==================

    As you say, the issue with adjustable yokes is that the angle of the load lifters ends up wrong.

    The simplest way around that is to just increase the circumference of the pack so you get the volume without extending beyond the shoulder, and attach the straps directly to the top. Then it shouldn’t be much of an issue if the pack sinks an inch or two under heavy load. This is what Dave Chenault did. I think, when he was hacking the Unaweep:

    I’ve never had a pack with a direct connection like that so genuinely have no idea how well it works. Do you have any views? It dispenses with all the faff of the lifters, which is a win.

    In his BPL article, Luke Schmidt uses that approach with his MYOG Unaweep and says it carries heavy packrafting loads extremely well:

    https://backpackinglight.com/how-to-make-lightweight-pack/

    If you are going with a conventional yoke and lifter setup you are led pretty much inexorably to the McHale solution if the bag is attached – because pack fabric can’t stretch.

    But if you are using a breakaway frame, it becomes possible to extend the frame itself without the bag being involved. This should be a relatively trivial engineering issue – I can think of a number of potential approaches.

    The more we mull this over, the breakaway frame seems like the optimal solution provided it can be done without too much of a weight penalty…

    Who would have thought there would be so much involved in simply attaching a bag to the human frame? Not really an issue if you don’t care about weight, but finding an elegant, failsafe, adaptable lightweight solution is not so trivial. And most of the commercial solutions don’t even bother to try…

    #3718498
    Thomas H
    Spectator

    @bandittheone

    I think I was too harsh with my initial statements about Klattermusen, they actually have some really creative designs, most of which don’t fall into the ‘over-engieneered’ front.

    That crazy looking load hauler actually has some features that look similar to McHale’s ‘bypass’ system, which allow load lifters to be structurally separated from the shoulder straps themselves, a feature that I am going to implement, if only to see just how useful it is. The idea of adding an additional 6+’ of webbing is antithetical to the way I design gear, but its worth trying out. Luckily McHale’s system is totally removable.

    If reference to you not needing padding on certain parts of a hip belt, I’m not sure. I’ve used a dozen packs with big gaps in the padding in these ‘corners’. I would probably say most modern heavily built packs revolve around having a giant lumbar pad which prevents the full wrap of the hip belt. McHale actually does offer lumbar pads for his Critical Mass hip belts, but they are attached on the inside of the bag, behind the belt, almost like a large square that pushes out into the full wrap belt. Although McHale’s regular hip belts do have these corner gaps.

    I’m currently on this train of thought that these principles are required for a good load hauler:

    1. Hanging, full wrap hip belt, with some type of lumbar support(which the thickness is adjustable)

    2. 7075 aluminum stays with 45 degree angle on the load lifters

    3. Hipbelt and shoulder straps should not be excessively padded, as size/width is more important. The quality of the foam and stiffness should be carefully selected.

    It is very possible that the full wrap hip belts with good contact and support throughout is a dead end trail, or maybe it is completely subjective and only works for some folks.

    Your next point is talking about making packs with no load lifters at all. I think this system can work well in these situations:

    1. Low weight, the specific number is subjective

    2. A hip belt that doesn’t slide down (also subjective based on body type and clothing worn)

    3. Subjective comfort or acclimatization to having weight on shoulders.

    Before I knew a lot about packs I didn’t fully understand how load lifters worked, what features were desirable, etc. My personal backpacking experiences have progressed from old army ruck sacks that never had load lifters, to new army ones with load lifters but never knew how to use them and probably were the wrong height, to overbuilt REI/MEC style backpacking backpacks, to more minimalistic bags without load lifters like the HMG Southwest that I sold, to MYOG packs with no or sloppy frames, to MYOG packs with frames but incorrect height / load lifter angles. This being said, I still use a 25L frameless pack if I go on a ~3 day trip in the summer which would having me carrying only 20lb after food and water. I don’t even use a hip belt when doing this, love the freedom…but my framed MYOG pack really pissed me off last year going on a 6 day trip in the mountains in September, lots more weight combined with improper frame/load lifter height and slipping hip belt. After this I spend much of my pandemic winter building, testing, ripping apart, building, testing again, etc with 50-60 lbs. Every change I made I would take my dog on a 2.5km loop around my neighborhood, even in -30 C, almost every day.

    Another point to chew on is that many folk routinely put huge weights on packs without load lifters (some without hip belts even) and are fine. Soldiers carry packs like this all the time. Their bodies have been conditioned to this and some of it is mind over matter. There is a brand of packs called ‘GoRuck’ that are rarely used with hip belts and have little to no frame and no load lifters. People make a sport of putting 50+ lbs and hiking or ‘rucking’ long distances for fitness. I think the secret sauce of Dave C’s bag is a great hipbelt that doesn’t slip much and conditioning or fitness.

    Another point on load lifters is that even without a frame they stil bring the load in closer to your body, which is nice in many situations. Lots of frameless packs have this feature, such as Waymark Gear.

    Military packs are frequently huge wide beasts that don’t go higher than your shoulders as this can interfere with your helmet, or aiming your rifle. This style of pack is not good for climbing or off trail hiking. A complete side note, but the military often goes off the rails with ‘feature-creep’ and excess when it comes to equipment. Soldiers now carry more weight than at any time in history, much of it being completely overbuilt or unnecessary when we’re talking about backpacks for example.

    I think McHale has the solution for this with his ‘bayonet’ system of having a short frame for lower weights which the load lifters do nothing to adding in pieces that turn the frame into being extremely that creates this 45 angle. That or have multiple packs for multiple purposes.

    I’m actually thinking of a way that I can have a 20” frame with pieces that attach to bring the frame to 27-28” and instead of attaching to the bag directly they will only attach to the stays. Imagine having pockets with the load lifters attached with maybe a ladder lock attached to the pack and webbing that keeps this pocket on the stay by pulling it downwards. This way you can make the frame extension any height. I don’t think you need to have a break away/panel for this to work. The bag can hang off of the frame using strategically placed channels or loops of webbing.

    #3718668
    Geoff Caplan
    BPL Member

    @geoffcaplan

    Locale: Lake District, Cumbria

    A useful summary!

    My gut feel is that a yoke and load lifters will give a better carry for any significant weight. Just playing around with my packs, there’s something about the wrap from the upper back that adds to the sense of comfort and fit. Probably a reason why 99% of larger packs go with this system, even if it’s rarely properly designed. So I’ll probably man up and try and get this working.

    As you say, going too wide with the pack is clumsy, and I want the option of strapping on side pockets too. So narrow and high is probably the way to go, alpine pack style.

    So then the trick is to make the load lifters adjustable with a minimum of complexity and weight, so the pack will work equally well with 10 days of food as you set out and maybe desert water as well, or with no food and water left as you walk into your next resupply. And can be stripped down for safe transport through baggage handling on flights…

    Thinking it though, your idea might work well with a roll-top – there’s plenty of extra fabric at the top for the extension. I was initially thinking of a fixed-length pack with drawcord and lid, as that’s what I’ve always used. But that’s a less adaptable design. So maybe a 1.5″ or 2″ McHale-style bayonet on the stay plus a couple of tape stay-pockets on the roll-top bag at different heights is all it would take to do the business.

    Then you have to decide what to do with the lifters, and whether the complexity of making them independent of the shoulder straps would pay off.

    As you say, there’s really no point in having them on when the pack is lightly loaded. My antique alpine Lowe is frameless and has load-lifters that are virtually horizontal – they are pretty much useless. Especially as you’re never going to be putting anything heavy so high in the main compartment.

    It was interesting to note that the monster Klattermusen load-hauler was  just using something like 4 mm cord for the lifters. With the right cord grip, this would save weight and would be easy to channel down the shoulder pads. So much of what we put on our packs seems over specced. Their system means you don’t have to contort yourself to adjust the load lifters behind your neck, which is a nice touch.

    But they have a conventional system that ends high on the pad, rather than the McHale bypass approach. Maybe that butterfly thing is to counter the distortion of the shoulder strap that this would cause. Though why it has to be thicker than a crab designed to hold a 200m fall is a puzzler… Even the small 70l one weighs 3.5 kilos/8lbs. That’s almost as much as my 3.5 season base-weight!

    #3718669
    Geoff Caplan
    BPL Member

    @geoffcaplan

    Locale: Lake District, Cumbria

    Of course the other approach is to go old-school and build a minimal external frame like the Vargo ExoTi.

    Reviewers say it carries very well, but I can’t help feeling it would be rather rigid on the back compared to the U frame.

    Vargo only rate it at 30 lbs max which isn’t very confidence inspiring.

    As usual, Roger Caffin was ahead of the game with his ultralight H frame:

    https://bushwalkingnsw.org.au/clubsites/FAQ/DIY_RNCPacks.htm

    He says it carries 25kg very comfortably, which is no small claim for an 850g pack.

    The best way to answer all these questions is to start building some prototypes. Do you have any suggestions for an inexpensive fabric for testing? I bought some military surplus used for gun covers, but it’s so tough I can’t figure out a way to get a decent stitch in it!

    #3718674
    Thomas H
    Spectator

    @bandittheone

    I’m not so sure of the benefit of the yoke versus two separated shoulder straps. In my own pack making mostly I just sewn the shoulder straps directly to the bag, sometimes I have had webbing sticking out and I attached it to the shoulder straps with triglides(this slips unless you pick the right ones). The yoke I most recently made was MUCH more time consuming to make and used a lot more fabric/foam. I copied a Mystery Ranch pack’s harness and was worried about it being too wide or too narrow. I think the yokes are used because they are easier to make vertical adjustable if needed to be. You see some packs have yokes that extend half way down the back to provide padding. You see McHale uses shoulder straps attached with 1” webbing to the bag, then uses removable foam padding to ensure your back doesn’t contact the frame.

    I don’t think you need to add pockets or special features on the bag itself if you have a adjustable stay height or bayonet style system if its all external. Let my crude MS PowerPoint drawing show how I mean

    The load lifter would basically have a little sleeve of webbing that a ladder lock would attach to on the front and webbing going down to the pack to tighten it down on the back. This whole thing would be removable and could slot into the exterior of the pack just like how McHale’s Bayonets do.

    Thats a great point about air travel too! I definitely wouldn’t want to try to fit 28” stays into my duffle bag. Although I often just load up my main pack with kit and take that to the airport. In Canada and the US its easy to ask for a big plastic protective bag to put over your backpack.

    I’ve pretty much only gone with roll tops. So simple to construct, easy to change if you don’t like, easy to compress the load of your pack in the field. I never use top lids. I’ve been thinking about making a rectangular piece of fabric with attachment points in all 4 corners to act like a summit flap or whatever, basically just to make it easier to strap a rope to my bag, but removable.

    I think going forward I will only use a yoke if I intend to have adjustable height of the shoulder straps, and even then, I think there are probably better systems, like separate ones that slide up and down around the two vertical stays like Exped does. Also, the removable back pad is a great idea, but could potentially be removed entirely depending on  the shape of your back, thickness of the belt/lumbar, etc.

    I think that butterfly on the shoulder straps is to distribute the load of the 4mm cord which would otherwise dig in and create pressure points. I think a 4mm cord may be heavier than the 3/4” nylon webbing I’m intending on using for bypass system, but I’m not sure.

    Just based on my knowledge Roger’s bag at that Vargo could be excellent for load hauling with some changes. I think the frame needs to go higher on both to get that 45 angle for the load lifters. I do think the hanging belt off the bottom is the way to go, either like Critical Mass or like Jan’s at the bottom of the two stays.

    You could try Tyvek or shopping bag material(think IKEA bags). I purchased some really cheap 200 denier fabric for his purpose once and it was not good for prototyping…I wouldn’t do that again without seeing how the fabric feels in a store. There are lots of cordura rip-offs that would probably do you well, but ordering online may be a gamble.

    #3718681
    Geoff Caplan
    BPL Member

    @geoffcaplan

    Locale: Lake District, Cumbria

    Now that you’ve helped educate me on the real design issues, I went back and watched this Seek Outside video on how to fit one of their packs. This time around, I saw a lot more in it.

    https://www.youtube.com/watch?v=LxG6L8yAwfc

    I’m beginning to realise how very smart they’ve been with the design and how it offers extreme flexibility of setup. You can carry the bag high, medium or low on the hip-belt. Or using a ladder-lock it could be even more adjustable. You can wear the belt free-floating or constrained. It would be easy to adapt their system to allow the belt to be partially constrained like some of the examples we looked at. You can wear the belt with or without a lumbar pad. It would be easy to adapt their system to wear the lumbar pad behind the belt like the McHale system. The lumbar pad can be any thickness and adjusted in the field. You can adjust the top and bottom of the belt independently. You can micro-adjust the height of the yoke. You can adjust the frame size with extensions…

    The main drawback with this setup is that the belt needs to be an exact fit. I suspect that this is why they abandoned this approach for the Flight series, as Kevin has written here more than once that they are looking to minimise the number of SKUs they have to carry. But not really an issue for MYOG, unless someone is very big and tends to lose a lot of weight on the trail. Even there, you could probably make the belt adjustable and hide the join behind a lumbar pad?

    If you don’t enjoy Dan’s advanced fitting skills (and who does?), all this adjustability surely gives you much more chance of making a pack you can fettle to fit well under load as you learn how to get the best out of it.

    I’ve seen reviewers who own both a McHale and a Unaweep who say that the Seek Outside carries even better. Given that we are aiming for significantly less carrying capacity than the 100lbs the Seek Outsides are said to handle, it’s clear that a more minimal version of their system would be more than good enough. The Big Ugly points the way, I think.

    What’s interesting in that video is that the pack bag looks to carry fine even when it’s lightly loaded and highly compressed. The load-lifters are largely redundant in that scenario, but they aren’t doing any real harm and they’re ready to go for when you need them. Is the ability to strip off the load lifters really necessary if you’re not using the pack for alpinism?

    Dan’s bayonet system is great if you want to adjust the pack from a load-hauler up to camp to a technical pack for alpine climbing. And mountaineers are still his main target market. But if you’re prepared to accept a fixed-length frame the Seek Outside concept has a lot going for it. And for hiking there are few disadvantages – perhaps it’s a little less convenient for bushwhacking or light scrambling, but that’s rarely going to be much of an issue.

    As for the yoke issue – yes, I can see they would be a pain to make and may not add much value. Two separate straps that hung off an adjustable cross-stay might be just as effective and without sacrificing adjustability. It wouldn’t be beyond the wit of man to make the width between the straps adjustable too. If you attach them with a single strap, they will self-adjust for angle as with the Zoro. Or with a double strap you could adjust them to a fixed angle. Easy to prototype both options.

    I’m personally wary of a fixed strap height for a first attempt – too much chance of getting it wrong. It’s only after a month or two on the trail that you’ll begin to understand what you really need as wear and tear builds up on the body, and the ability to fine-tune in the field seems important, at least for a beginner pack-maker.

    And if you do have an aim to make a few for others, radical adjustability seems absolutely essential unless you are going to offer an elaborate customisation service with trial packs, video fittings etc on the McHale model. It would take a lot of trail-and-error to become good enough at that and it would really hike up the price, reducing the potential market. Plus a lot of people like to have a loaner pack they can offer to people they are introducing to the back-country, and a highly adjustable pack would be ideal for that too.

    #3718855
    Thomas H
    Spectator

    @bandittheone

    I actually started making my current prototype more similar to a Rogue Panda Zoro or Jan’s Plateau packs with dual external stay sleeves, but the 6061 aluminum was just too soft. I also had independent shoulder straps that used G-hooks to attach to vertical daisy chains to adjust height(not recommended) I found the only aluminum I could source locally that was stiff enough was the 1/2” tube…which kind of made me start going into the Seek Outside direction. As I was making it, cutting it up, making it again, etc I kept finding problems with my designs and found that Seek Outside just thought of almost everything. I kept thinking “I can do this simpler and lighter” then kept seam-ripping and making it closer to their packs.

    Here is an in progress picture using an old Osprey belt. You can see there is a horizontal cross stay at the bottom, but it isn’t attached to the belt. The belt has metal G hooks hooked onto webbing directly at the bottom of the way-to-soft 6061 aluminum.

    This one is actually quite successful at making an old MYOG pack into something that can comfortably carry 40lbs. This is with tent poles and parts of a camp stool.

    By the way I think those people that are saying that the Seek Outside carries even better than McHale’s are talking about his regular wing style belt, not the Critical Mass style, but I am just assuming here.

    I am definitely going to be going with that Big Ugly style of frame.

    By the way, the best place to get 7075 aluminum is from Online Metals. You have to select 7075 sheet, then have it cut to 1/2” wide x 1/8” x whatever length you want. You can do this all through their site. I purchased some 0.125” thickness(1/8), some 0.071 and 1/4” round in a bunch of lengths to test with lighter weight packs as well. You cannot bend this into tight curves, so don’t even think of trying to duplicate something like the Seek Outside frame. The ‘Big Ugly’ pack is using 0.16 x1/2” by the way, which is likely overkill from what I’ve read. There is even a weight calculator on the Online Metals site too.

    One of the advantages of the adjustable frame height is climbing, especially wearing a helmet…this load lifters can get in the way.

    About the adjustable shoulder strap height…I’m still looking at different options…so many of them just aren’t elegant enough for my taste. I recommend for your first pack is to make a flat panel of fabric like mine above with buckles / straps to add weights to test. This is much faster to iterate on until you’ve nailed down the specific locations you want everything. Very easy to move shoulder straps, compression strap locations, etc from a single sheet…not very easy from a 4 sided bag!

    I will also add that shoulder strap placement isn’t as crucial if you’ve got a good frame and load lifters, whereas if your pack relies on good fit to be comfortable and has no load lifters that is a different situation.

    #3718905
    Ivo Vanmontfort
    BPL Member

    @ivo

    an idea is to use wood for the stays

    https://photos.app.goo.gl/uxcDNkvjRpaomNbB3

    also see https://backpackinglight.com/forums/topic/105362/

    for other thoughts

    #3718906
    Geoff Caplan
    BPL Member

    @geoffcaplan

    Locale: Lake District, Cumbria


    Stay materials

    Ivo –

    The wood laminate idea is interesting. In that thread you reference David Thomas says it works well, and he really know his stuff.

    But it’s not very practical for someone like myself with no access to a shop – it’s quite a tool-intensive process. There’s an excellent tutorial here for anyone interested.

    https://www.youtube.com/watch?v=TXAeLwJ8fcw

    In use, the biggest drawback I can see is that the bend is fixed – you have to get it right first time. And you can’t adapt the fit for a new user. But as you say, it would likely be a touch lighter – plus it looks cool!

    Thomas –

    It’s proving difficult to source 7075 flat bar here in the UK. I was hoping to get away with 6082 which is about 15% stronger than 6061 but from what you’re saying that’s a waste of time. I’ve found one stockholder who thinks he can source it but I suspect I’ll have to import from the US at silly cost. The only solace is that I should be able to use the stays for any future projects – it’s a lifetime investment.

    I’d have to get the dimensions right – do you have any advice? It would be costly if I get it wrong. I’m minded to play safe and go for the Big Ugly sizing – the weight penalty can only be a few grams.

    Load Lifters

    We seem to agree that the main benefit of removable lifters is the ability to adapt the pack for alpinism. If it turns out that the simplest solution would be fixed lifters I could live with that, because I think my mountaineering days are over. But if it can be done simply, and I suspect that it can, it would be nice-to-have, and for a commercial design it would be a big plus, I think.

    Shoulder Straps

    Thanks for the prototyping tip – makes sense. In fact your advice is saving me from going up all sorts of dead-ends – it’s very much appreciated. Making a pack is intimidating, and you’re giving me the confidence to give it a go after literally years of dithering about design.

    Just to add an additional complication, I’m thinking of playing with Aarn Tate’s U-flow concept:

    https://www.aarnpacks.com/pages/movement

    https://patents.google.com/patent/US20060131355

    The essential idea is that the shoulder strap yoke is attached to the bag or frame a single point so it can pivot. Then the load lifters are joined in a continuous loop through some kind of running attachment system, so they can move while the bag stays fixed to your back. The same with the bottom of the shoulder-strap. The running attachments include a stopper to limit the movement, which you need to get the pack on and off.

    I have this on my Aarn pack, and although it’s not exactly a game-changer it does keep the bag significantly more stable on the back during the stride-cycle. I think it does reduce fatigue as your balance isn’t being challenged so much by a swinging load.

    The way he’s done it on my pack is simple but quite heavy. With the bottom of the shoulder straps, for example, he has a stiffened channel round the bottom of the bag for the loop to run through, and the stoppers are simply lengths of tape clipped to a loop on the bag. It’s failsafe, but it does add weight.

    A frame with cross-struts at the top and bottom might make it possible to implement this more simply and with less weight penalty. It may be that something as simple as some O-rings would do the trick, plus some high quality webbing. It would pretty much be a case of suck-it-and-see – the main problem with a simplistic solution might be too much friction to allow for a free flow.

    So what’s the point of MYOG if we can’t have fun playing with innovative ideas? It’s something I’d drop if it ended up getting complicated – very much nice-to-have rather than essential.

Viewing 25 posts - 51 through 75 (of 114 total)
  • You must be logged in to reply to this topic.
Forum Posting

A Membership is required to post in the forums. Login or become a member to post in the member forums!

Get the Newsletter

Get our free Handbook and Receive our weekly newsletter to see what's new at Backpacking Light!

Gear Research & Discovery Tools


Loading...