Topic

Down the Evazote rabbit hole and other load hauler pack questions


Forum Posting

A Membership is required to post in the forums. Login or become a member to post in the member forums!

Home Forums Gear Forums Make Your Own Gear Down the Evazote rabbit hole and other load hauler pack questions

Viewing 14 posts - 101 through 114 (of 114 total)
  • Author
    Posts
  • #3720102
    Geoff Caplan
    BPL Member

    @geoffcaplan

    Locale: Lake District, Cumbria

    Thomas –

    Thanks for the link to the Zpacks copy. That guy sure has awesome construction skills! As you say, it does seem over-complicated but there are some interesting ideas there.

    The big trick is going to be making an adaptable pack that is also simple and failsafe. I can see potential points of failure on that pack.

    Here’s an interesting mini-documentary showing local pack-maker Tom Gale of Atom Packs putting a pack together. I bumped into him in the hills recently (he’s extremely tall and hard to miss!) and got a standing invite to drop by and see how they operate. Now I’m double-vaccinated I think I’ll take up the offer. Very nice guy, and his packs are very well reviewed.

    https://www.youtube.com/watch?v=uVZajEMBX_U

    We call those bolts “connector bolts” but the cyclists call them “sex bolts” or “mating bolts”. Overactive imaginations – too much time sitting on those narrow saddles…

    #3720144
    Thomas H
    Spectator

    @bandittheone

    I will say that every time I make a pack with removable or modular components you lose quite a lot of simplicity and add additional failure points. You also lose aesthetic and functional elegance. I once made a pack covered in daisy chains that even the shoulder straps attached to. Lots of failure points and ugly. I definitely don’t like McHale’s water bottle pockets for example, but he has lots of well designed modularity on other parts of his packs that are elegant.

    The shoulder harness I have on my prototype is similar to the Seekoutside system with ladder locks up top, metal tri glides attached to the harness along with irritatingly long pieces of webbing(irritating in both resources and weight) and plastic Nexus ITW looplocs on the bottom. Every time I pick up 50lbs in the pack I am worried about the loop locs failing, but this is probably completely unwarranted, just like how ladder locks can take hundreds of lbs I’m sure this military grade looploc can take it too. I would probably replace them with aluminum or steel loops instead just for piece of mind. Another point of concern with the adjustable back system is it can rub against your back, which is why many of these packs have back/upper back pads. I prefer to not have to have any pad if I don’t have to.

    Another point about the harness is it will prevent you from setting it to certain torso heights or shoulder strap heights. For example, if you wanted to do the slight upward upward angle(instead of load lifters) the neck of the yoke would completely prevent this.

    That Atom Packs also makes a well reviewed framed pack called the ‘Mo’, but there aren’t too many details on their site. You should check out their shop and ask specifically about the framed pack design.

    #3736005
    Chris L
    BPL Member

    @thechrislundy

    Locale: Idaho

    Not sure if anyone’s still following this thread, but I’ve been working on similar MYOG load hauler pack designs as what’s been described – hanging, full wrap hip belt directly attached to the frame.

    I’ve been working on a design that uses the SO frame but in a simpler and lighter package. Not a whole lot of refinement to be done – SO’s done most of the leg work already.

    I’ve also been through a few iterations of a pack that’s fairly similar to the SWD Big Wild. It has stays in external sleeves with a similar attachment to a hanging hip belt.

    I’ve been thinking about the optimal spacing for the attachment to the hip belt. On the SO design, the attachment points are 10” apart. The Big Wild looks to be around 9”. Other designs described here are as narrow as 5-6”. In my tinkering, it seems like having a wider spacing gets the load closer to your hip bones where (in theory) is where you want the load to ride. Ideally the pack design and/or your packing style allows for a bit of a hollow or concavity for your lumbar – that makes it feel like the pack wraps around your lower back. But a poorly packed pack that barrels in the lumbar really inhibits comfort. Still trying to figure out the best way to address that.

    Another thing I’ve been thinking about is that many of these hanging hip belt designs transfer the load via two pieces of 1” webbing. So yes, all the load can be transferred to the hip belt, but focused in two small points. That doesn’t seem ideal, and in testing with 40-50# loads, the force does feel a bit too concentrated. Has anyone else noticed this? Seems like one solution is a stiffer hip belt to disperse the load, which doesn’t seem ideal. I’m definitely in the conforming hip belt camp – I’ve been using a simple 3/8 or 1/2” medium density foam hip belt. Another solution is to transfer the load to a larger area of the hip belt. Some ideas here are large patches of Velcro (quite strong in shear, might be able to take half the load or more) or a tunnel the belt slides through similar to some packs, but still retaining the original direct frame connection. Sort of a hybrid of the two McHale designs.

    Probably overthinking this (don’t we all) but curious if anyone’s had similar thoughts?

    #3736712
    Andrew S
    BPL Member

    @askalak22

    Read through this thread twice over the past few days. It is absolutely fantastic and one of the best I have seen in years. I have been thinking in parallel to everyone here and looking at the same professional and MYOG sources. My issue is that I do a variety of things and I am a photographer, filmmaker, and even field recordist. I really wish I could take less gear, but it’s what I like to to and I am seeking to make that as manageable as possible. I do both wilderness backpacking as well as general travel on planes and seeing the world.

    My goals:

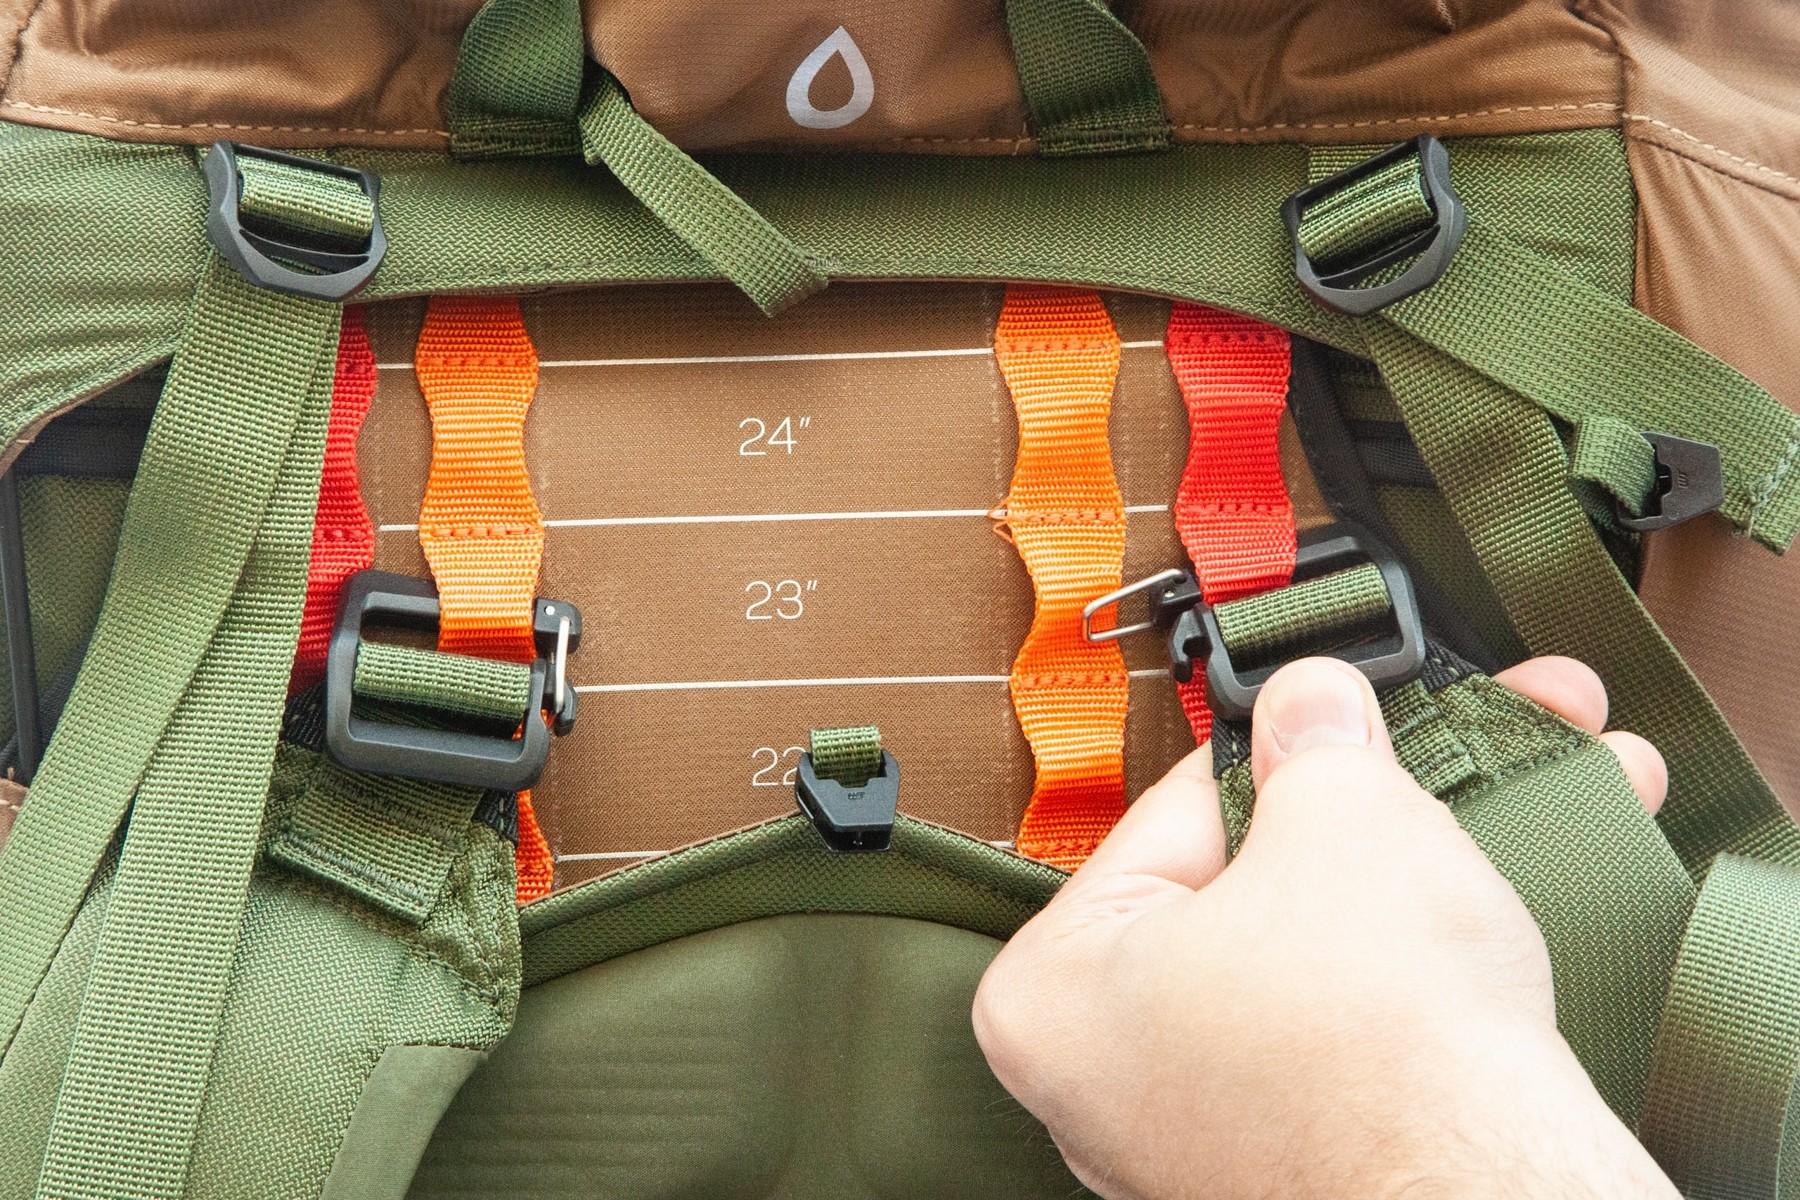
    1. A pack with a frame that does not exceed 22″ and can be compressed to allow me to bring my equipment as a carry on on airplanes.

    In my time I have found plenty of ways to go on planes all over the world with way more than one is allowed as long as this physical limitation is met. I adore the McHale P and G bayonet system with the idea that one can shrink a pack down to be an overbuilt daypack when needed and built up with an expanded rolltop to really carry weight and bulk when necessary. I have a long torso, and the photo bag I currently have does not have the correct torso length for me, and it is basically this size. For this reason the P and G is basically necessary for me to have a functional backpack and still hit this requirement.

    2. Allow quick access to photography equipment while storing this equipment in the optimal position for weight carry.

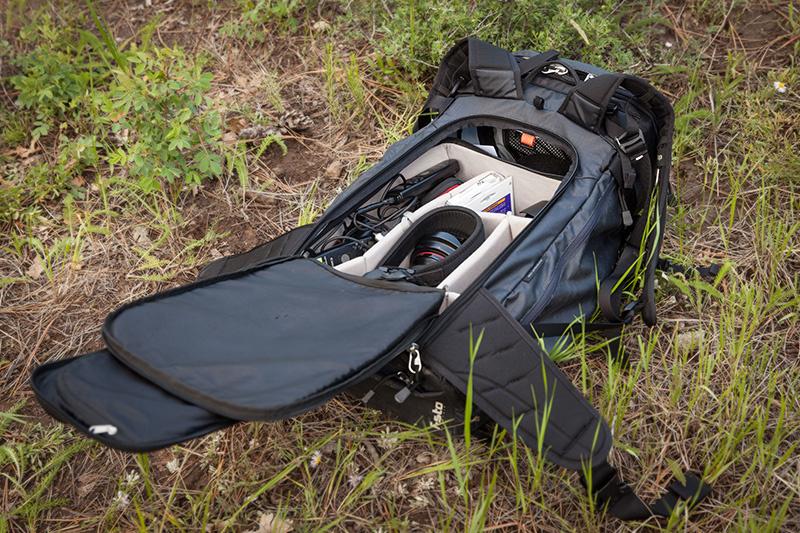
    There are many photography specific backpacks, but the ones I have used to no hold up to real mileage. Most people in my position just deal with packing and unpacking from a roll top when they find a spot they want to shoot from. Due to my preferences I want to avoid this. McHale has made some great packs for people like me with an expandable rolltop, along with a partial U-zipper that allows access to the rest of the bag. I am hauling around glass and metal and batteries, so I always want to keep this brick close to my back about half way up. Some photography backpacks and ski touring backpacks allow one to open this zip through the back panel of the pack. This is extremely convenient and allows one to keep the straps out of the snow or mud, but I have yet to think of a way this can be accomplished with a proper frame like those discussed in this thread, and it is something I can compromise on.

    This is an example of a back panel opening pack:

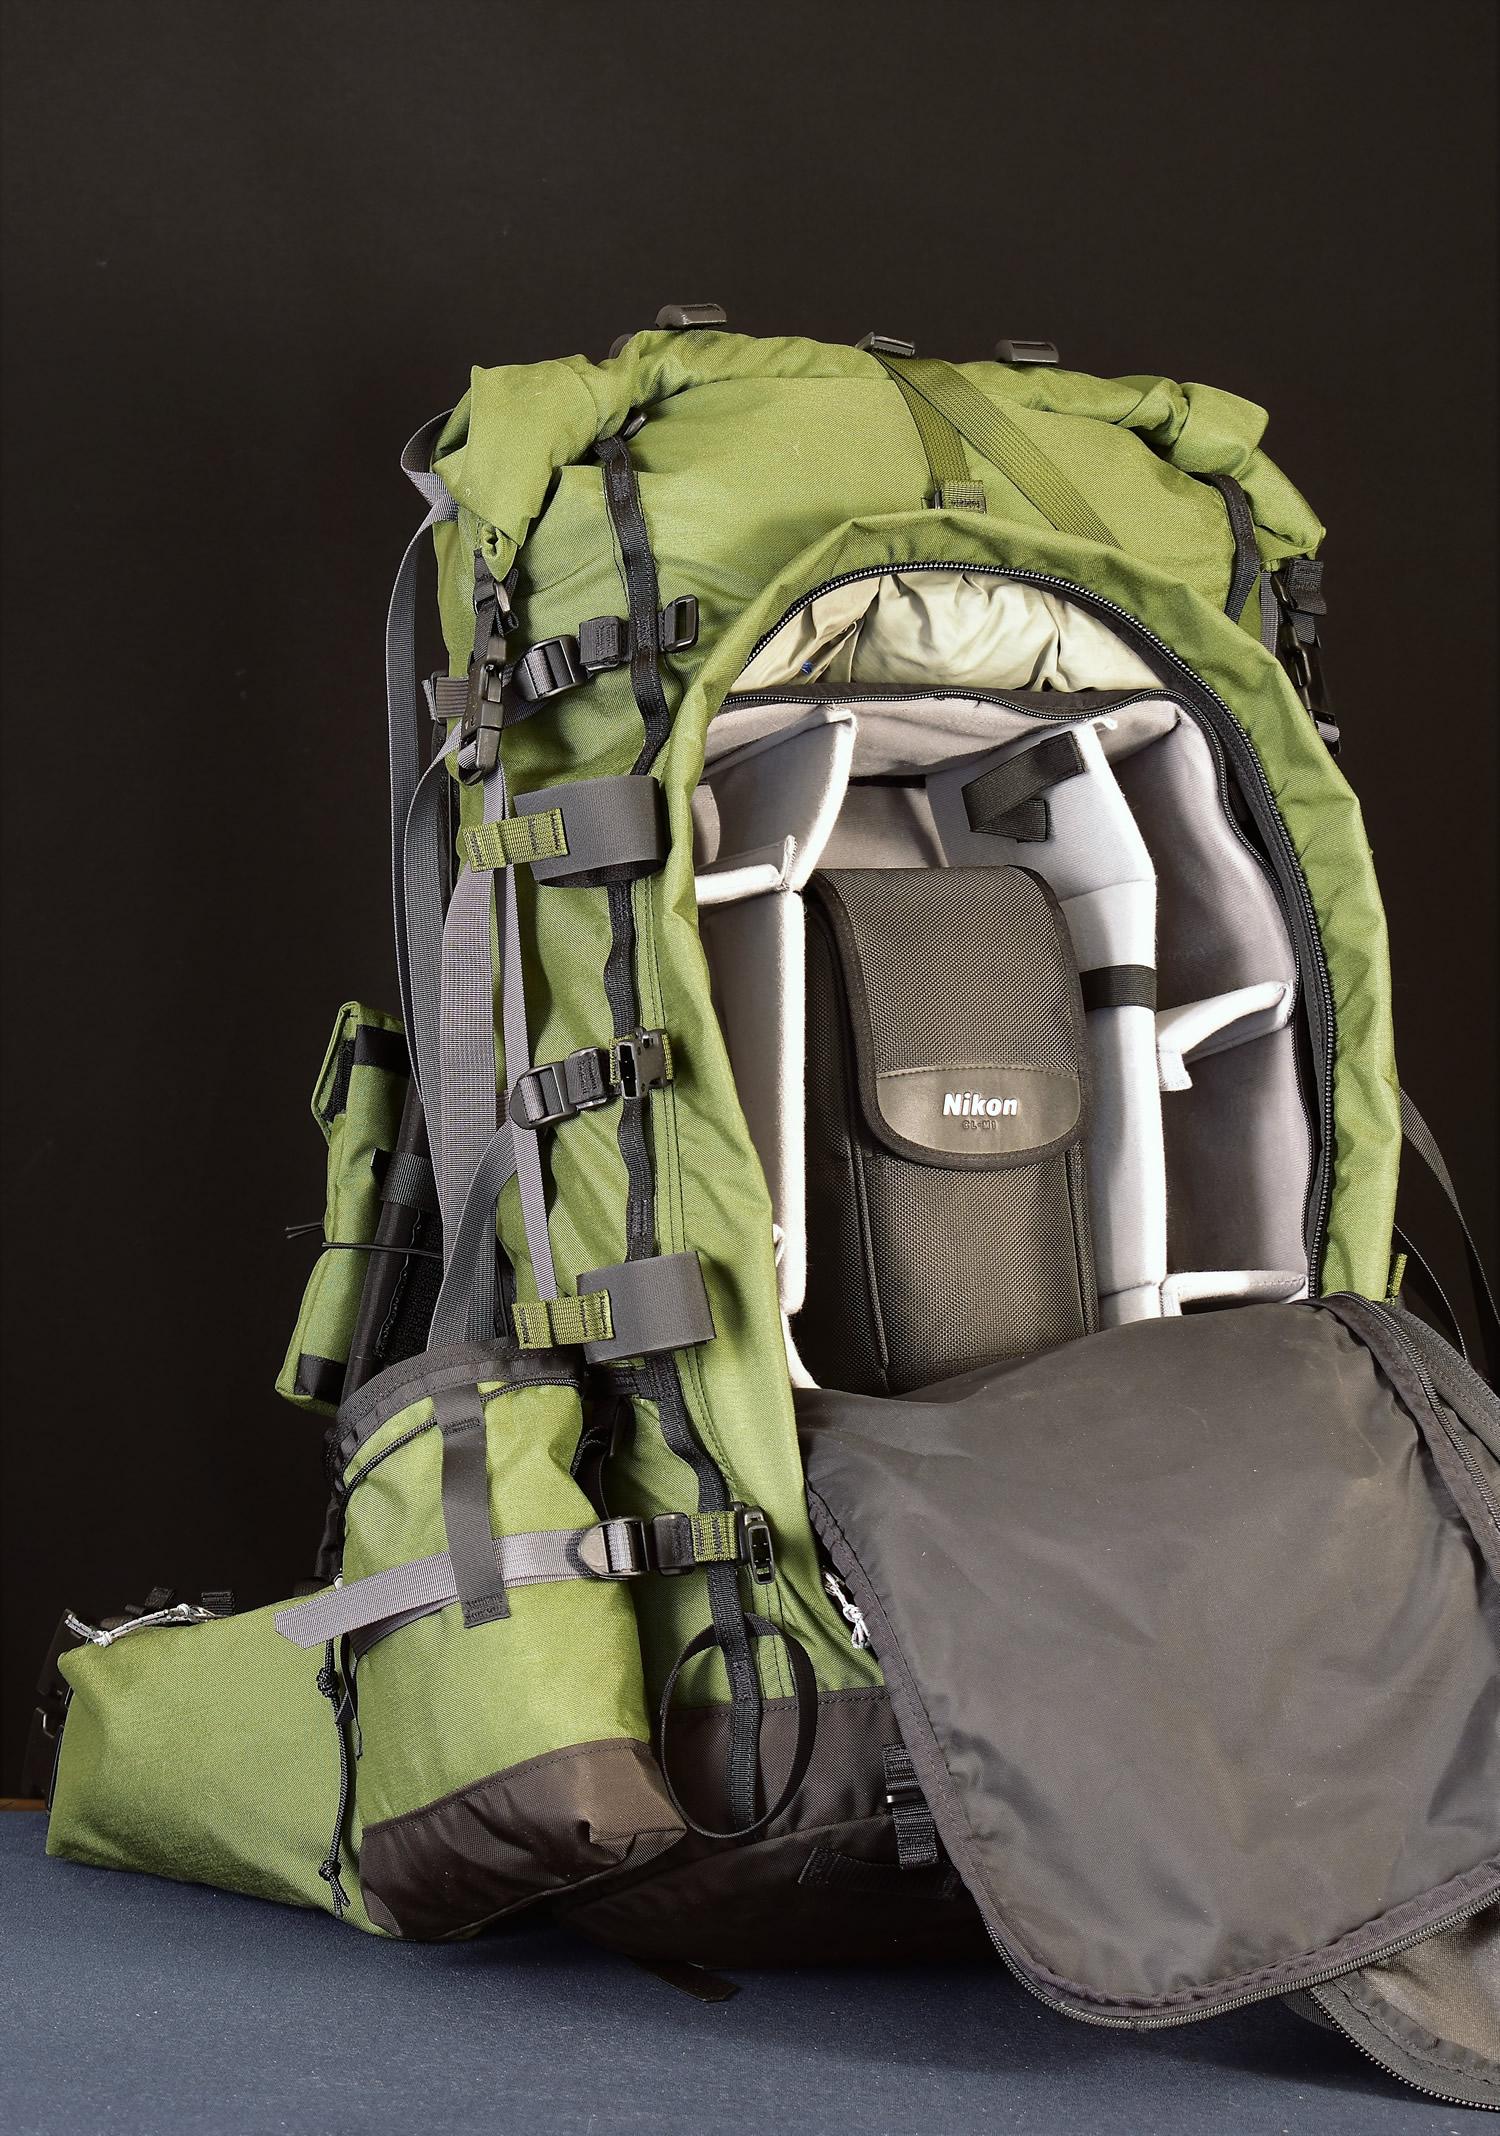
    This McHale is pretty close to what I would be aiming for. With a smaller padded area, and storage of quilt and shelter on the bottom under this cube.

    I really would just like to work with Dan, but I can’t really justify it, and I do think there are ways like the SWD big wild to make a pack lighter for the size than what he offers with comparable load carry. I also have always wanted to make more gear and would like to build the skill. I have considered working off the Seek Outside frame and making my own pack bag, but I can’t seem to find how wide their frames are. I don’t think they are skinny enough to sneak past to carry on, and an internal frame pack can be squished much more. I know some people have cut their Seek Outside frames down, which is what I would do, then add frame extensions.

    I hope some of the posters in this thread return, as I’d love to see what their experiments and results are. It was too complicated to try to reply correctly through all the posts, but I do have some questions and misunderstandings.

    On page 1 and in several other areas, people mention that a hanging belt requires a longer frame. I don’t understand why this is the case. It seems that one can have the frame ride low on a seek outside, but on Nunatak’s builds the hip belt and the end of the frame seem to still be parallel. Thomas H said “As far as height goes I have a 19” torso and the hanging style belt means your frame will have to be several inches taller than normal to get that 45 angle for the best heavy load carrying.”

    Thomas H also referred to Nunatak’s build as “the black one with two darts.” What does the term dart mean in this context?

    Regarding stays, the Zorro has vertical stays, the Seek Outside has very wide vertical stays (of course connected as one piece), and McHales have angled stays. What advantage does an inverted “v” have over horizontal stays?

    On page 3 Geoff Caplan spoke about changing the back length of a pack, and that an Aarn pack could be adjusted in this way while walking. I thought that with careful torso length measurement that there was a small realm of acceptable positions for shoulder straps. I do not see the advantage of an adjustable torso when one is making a custom pack.

    Geoff mentions his idea of a “roll bottom” on his pack for a sleeping bag compartment. I find this really fascinating and wonder if there are any other good examples of packs using roll tops in non-traditional locations?

    #3736990
    David Chenault
    BPL Member

    @davec

    Locale: Queen City, MT

    The SO frames are ~14″ wide outside to outside.

    #3736992
    David Chenault
    BPL Member

    @davec

    Locale: Queen City, MT

    A very fun thread.  10 years ago there wasn’t much of anything to be found in the truly UL loadhauler sphere.  Lots of cool innovation lately.

    I haven’t found a horizontal stay to be necessary or desirable for what most people would call backpacking loads (say, sub 50 pounds).  With something like the Big Wild things get a little soft all around above that mark, and I find it impossible to say what of that is a lack of horizontal structure, and what is the stays starting to deflect vertically.  Not too far north of 50 pounds I find all but the thickest alu stays to be too whippy vertically anyway.  When you get into 5mm by 30mm stays, even in 7000 series alloys, the weight is such that either a tubular alu or compositive frame makes more sense, unless you have a truly odd back profile.

    All of that is to say that these days I’ll use my Big Wild for any backpacking I might do.  Even something like a weeks food plus packrafting gear plus ski gear will fit and carry well.  Beyond that (read: hunting) I’ll take something built on a SO frame.  Folks with less conditioning for heavier loads and/or less upper body strength and bulk will do well to move that threshold down a bit.

    The scope of my personal testing, and that of my customers, has yet to find durability issues in modern EVA foams.  Most often these days I make shoulder straps out of 3 pound stuff, 5mm thick, with 3mm 3D mesh (inverted, as mentioned here).  This is just a great combo of structure/stiffness and pliability/draping.  In hipbelts I use slightly softer foam, which seems to wrap and stick on a bit better.

    #3737039
    Christopher S
    Spectator

    @chrisisinclair

    I havent read the thread but Ive gone down this rabbit hole way too far before


    Generally the “best” and usually pricey foam is the physically cross linked XLPE (also known as irradiated cross linked). Chemically cross linked XLPE is a bit cheaper and still pretty good. You do not want “EVA” foam – you want XLPE with a touch of EVA in it (very different types of foam). Generally any sleeping pad will be the lowest density foam (not always but they all tend toward that) because you get more insulation per pound and its more comfortable

    If you want a good source of Evazote and other high quality foams you can buy the Multimat Summit XL (and many other multimats) in various thickness. Theyre the oldschool but very high quality mountaineering mat. The yellow Summit XL is my go to (they also have one that is a combo laminated together of evazote and plastazote which is interesting)

    Oware also sells Plastazote depending on where you are.

    Mincell makes a million different foams but they do have one that is physically cross linked and has a touch of EVA – that would be the most similar to Evazote and I have messed around with it for sleeping pads and its very good stuff and (at least in the US) much, much easier to find and much cheaper.

    #3737044
    James Marco
    BPL Member

    @jamesdmarco

    Locale: Finger Lakes

    For three season hiking/camping, dedicated back panels/frame sheets or whatever you want to call them are a bit of a waste. I use an evazote pad that doubles as a frame in the back pack. Up to around 30 pounds it doesn’t need anything else. For shoulder straps, that is largely a matter of conditioning. I use around a 5mm (~1/4″”) strip for that. But, it is also on the wide side…about 3.25″-3.5″. That lets it distribute the weight better across it’s load bearing range. For hip belts, about the same. Over the years, I have found that too thick padding tends to slip down with any load (again, max is about 30lbs.) A thin padding lets me pull it tight and have it remain tight all day, ‘Corse, my pack for a week looks like most peoples packs for an overnight…or less. I started at about 32 pounds many years ago for a week out. Now I am at 22-27 pounds for 2 weeks. My load hasn’t changed much (5/32), but my range has increased by double.(1week to two weeks.)

    The evazote is nice but looses rigidity/stiffness very rapidly with the distance from a support member, OR, by decreases in thickness. For example, a 2.5″ sleeping pad is fairly ridgid over 20″ and will support about 10lbs if wrapped tightly with some sort of fabric, maybe a bit more. It is good for helping to support a load. But a 1.25″ pad will NOT support a 5lb load. Never bothered to figure out why.

    #3737300
    Andrew S
    BPL Member

    @askalak22

    Dave, thanks so much for hopping in this thread. I have taken a lot of knowledge and inspiration from your blog.

    I have a question regarding the use of a horizontal stay. I have figured out a design that will allow me to create an access panel on the back of the pack like I mentioned in my above post. My design is to use a wide-ish spaced set of vertical stays, linked at the bottom with a horizontal stay. The 12″ distance between the stays will allow me to create a back panel door that isn’t possible with stays closer together. I will then use a hanging hip belt design that can totally fold away from the back panel of the pack like a seek outside belt. This will allow me full access to use the area where the lumbar pad would be without hampering the suspension system. My belief is that if I am going to use widely spaced stays, the horizontal stay at the bottom will allow my hanging belt to have the most direct connection to the vertical stays. I have a very slender frame, so where the hip belt attaches would be somewhat close together near the centerline of the pack, not where the bottom of the vertical frames terminate. In summary, is a horizontal stay useful when the hip belt cannot connect directly to the terminating points of the vertical stays?

    This pack frame and belt design (the “big ugly”) are quite close to what I would try to replicate: https://outlivingblog.wordpress.com/2015/03/24/the-big-ugly/

    Here is a rough illustration showing where the access door would go. It would also go a bit higher into where the yoke is on this pack, while I would be using a more standard set of non-adjustable straps. This also demonstrates the utility of the hanging hip belt, which can easily be swung down for full access to the panel door.

    As a more general note for the thread, episode 35 of the Seek Outside podcast is a fantastic discussion of load carriage between the founders who created the packs. They talk quite a bit about the variables that go into it and how their pack frames can be used in different configurations into 100+ pounds. The same ideas can be applied to making significantly lighter weight more comfortable. https://blubrry.com/seek_outside_podcast/65892387/ep-35-packing-heavy-loads-tips-and-tricks-with-nathan-and-kevin/

    #3737306
    Chris L
    BPL Member

    @thechrislundy

    Locale: Idaho

    I’ve build a few hanging hip belt designs that are applicable to what you’re trying to do, the latest is described here: https://backpackinglight.com/forums/topic/ultralight-burly-ish-load-hauler-90l-2-6/

    In the pack described above, the stays are 10” apart at the bottom, so a bit narrower than what you’re trying to do. I think the SWD Big Wild uses a similar spacing. If you go to 12”, I think you’re correct in needing a horizontal stay.

    I wouldn’t place the hip belt attachment points narrower than you need to. Obviously I haven’t tried on the Big Ugly pack, but those attachments seem too narrow to me. You want the weight on your hip bones, not your lumbar. My wife loves her SO pack, with an 11” attachment point spacing, and she’s pretty slender. I built a pack with narrower spacing and like it less.

    My most recent build had the hip belt attachment points at about the vertical midpoint of the belt. I meant to have them lower, but it turns out I like them better at that location. It necessitates a bit longer attachment webbing, which in turn allows for more play and prevents the pack from pulling the hip belt away from your waist. SWD does this too, although probably on purpose and not by accident! Even with a relatively flexible hip belt using 3/8” foam, the hip belt doesn’t collapse with the weight pulling from the mid point.

    #3737341
    nunatak
    BPL Member

    @roamer

    Chris L: That pack looks real good.

    I also feel like waiting a season or two before boarding the Ultra hype train. I’ve made five packs with it so far, and there are consistently minor delaminations starting out right around the needle holes as I sew. With complex assemblies/high stress areas this is more pronounced.

    I’m curious as to the long term effects of having the belt hang buckles rub against the frame sleeves. With the wide frame spacing this may not be a problem. We did something similar for a friend doing the PCT. The constant micro movements of hundreds of days did a number on any webbing stuck between metal or even plastic hardware in areas that was cinched tightly against the body.

    Are those non waterproof zippers on the pockets?

    #3737414
    Andrew S
    BPL Member

    @askalak22

    Chris, that pack is really fantastic. Totally polished and clean as well. I definitely want to implement a lot of the features you have used. In particular, the use of gatekeepers/bachelor buckles for modularity. I saw that you used Dan Ransom stays, I am going to contact him eventually to do the same. I think we have been walking in each others tracks, though I have yet to actually get started.

    I really appreciate that note on spacing. I want to space my stays farther apart for the sake of my design needs, which I hope will work well. I think having the stays as close to the belt attachment points as possible is best, but I am trying to do something unorthodox with that middle of the back space. When you say “I built a pack with narrower spacing and I like it less,” do you mean that the 10″ spacing is a mistake on retrospect, and you wish this was a bit larger?

    I saw that the final version of the big wild has that change from hanging off the bottom, which I find interesting. I haven’t been able to try either of those packs, so it’s hard for me to understand what the difference would be.

    I see that the hip belt attachment has a couple loops. Is there some adjustability here? What length of webbing did you end up liking most for the hip belt? It looks like you could change both the attachment point on the belt, and the attachment of the belt to the webbing that holds it to the pack.

    That’s unfortunate to hear about the Ultra fabric. I was considering using Ultra 200 for my first version, as I think Dave C said in his test of the Ultra fabric that 400 was more burly than almost anything else available, which I felt that may mean Ultra 200 would be fine for me to take a risk on for a slight weight savings.

    Your shoulder strap design also interests me. Is the attachment webbing attached on an angle/ Are the gatekeepers sitting in it correctly, or is there some play for that connection to twist? On my first version, I may include a small webbing grid to allow for some adjustment of shoulder strap width and torso length. That way, in future packs I will know the perfect position for my body. Some inspiration from the Granite Gear Perimeter. I would make the grid tighter and the webbing width larger to avoid having too much play, but part of me thinks the play might allow better articulation, like the length of webbing used to attach the straps on the Red Panda Zoro. There’s also an aspect in which I feel like being able to make slight adjustment to shoulder straps over the course of a trip may create some comfort through variety, as well as potentially avoid long term injuries.

    #3737420
    Chris L
    BPL Member

    @thechrislundy

    Locale: Idaho

    @nunatak – That definitely seems like a potential wear point. It seems that since the attachment points are more widely spaced, the webbing attachments from the pack come out at a slight angle towards the belt, and the belt attachments aren’t as close against the pack and stay sleeves as they might seem. But that’s in a “normal” position, shifting body positions may change that. Time will tell – it seems like it could be repairable and even though this is a culmination of some design ideas, all MYOG packs are just prototypes :-)


    @Andrew
    S – My first version had the attachment points around 8-9″ apart if I recall. It felt like the load was too focused in the lumbar. Having a Seek Outside pack (with 11″ spacing) to compare with helped me conclude I like the wider spacing. It seems to get the load closer to your hip bones, which seems to be what we want. If the load is focused on the lumbar, you rely on the structure of the belt to distribute it to the sides. I do believe that anatomy and preference are strong players, so take this (and my other thoughts) for whatever they’re worth.

    As far as where the attachment points are vertically on the hip belt, I’m not sure what the answer is here. I think it’s important to have some amount of play (in the form of length of webbing from the belt to the pack) to prevent the pack from pulling the belt away from your hips. You can experiment with this with the SO pack – using a higher grommet on the belt reduces the play and (for me at least) pulls the belt away from my waist and reduces the wrap of the belt. Going to a lower grommet increases the length and prevents the pulling away from my hips. So it may be that the mid belt attachment effectively increases this play? If the attachment is low on the belt, having some play would require the pack to ride lower. I’m pretty sure this is more important with wider attachment spacing as the hip belt curves around your waist while the pack is more square.

    The shoulder strap webbing attachments do come out at an angle, but it also seems like there’s a fair bit of play in the webbing and also in the buckle. I’m not sure if the angle is needed…I thought about having them come out straight but decided the angle was pretty simple to do. Using a daisy chain for an adjustable harness height would be fairly straightforward.

    #3737545
    Greg Pehrson
    BPL Member

    @gregpehrson

    Locale: playa del caballo blanco

    What a great thread! Thomas, thanks for the loop lock idea–I love the idea of all plastic buckles being able to be replaced.

    I’ve been happily using a cut-down baby carrier frame as a load-hauler:

    https://backpackinglight.com/forums/topic/upcycling-a-baby-carrier-and-an-umbrella-into-a-load-hauling-backpack/

    https://backpackinglight.com/ultralight-ultradurable-ultracheap-backpack-car-airbags/


Viewing 14 posts - 101 through 114 (of 114 total)
  • You must be logged in to reply to this topic.
Forum Posting

A Membership is required to post in the forums. Login or become a member to post in the member forums!

Get the Newsletter

Get our free Handbook and Receive our weekly newsletter to see what's new at Backpacking Light!

Gear Research & Discovery Tools


Loading...