Topic

Alcohol Solo Cook Set (Best and Lightest)

  • This topic is empty.
Viewing 25 posts - 1 through 25 (of 69 total)
James Volk BPL Member
PostedJan 29, 2015 at 6:26 am

I am looking to get a new cook set. I don't do a lot of cooking on the trail, but it is nice to have the ability to get a hot meal if I choose. It would likely be just boiling about 2 cups of water to hot-hydrate the meal or make a warm bev.

I am looking for recommendations on cook kits.
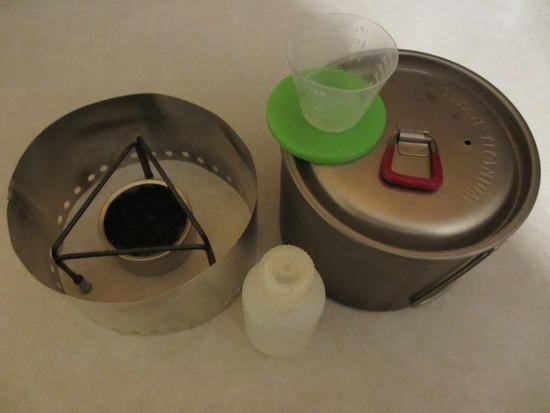
Please let me know what you suggest for the following that will work together:

– Pot
– Lid
– Stove
– Windscreen
– Pot Stand
– Fuel Bottle
– Cozy

It would be best if everything packed into the pot and it would be even more awesome if the pot would then fit into some sort of no-cook re-hydration container. That way it would all nest nicely and I could pull the pot out and just use the container if I was going to no-cook.

I know that there are some real rocket scientists on here when it comes to stoves… I get analysis paralysis when I try to run down what would actually work together, which is why I'm asking for it to be spelled out.

Thank you in advance.

Bob Gross BPL Member
PostedJan 29, 2015 at 12:39 pm

Before you get suggestions, let me add something to the discussion.

For a solo traveler, it is quite common for the amount of water to be heated is 500ml or else two cups. As a result of that, the capacity of the vessel is often desired to be 600ml, or maybe as much as 750ml.

One of the most expedient food rehydration systems is this: At breakfast, heat your water for coffee or whatever and pour another cup of hot water into a plastic peanut butter jar that contains the dry food. Then screw the cap on and carry it all day. At the end of the day, the food should be mushy and edible. If you get the water too hot, it might deform the plastic of the jar, but if you use water that is too cool, it may or may not fully rehydrate the dry food. Peanut butter jars come in different sizes, so you need to choose one that is right for your kind of dry food.

There are too many types of ultralightweight burners that you ought to refine your selection. A butane stove works pretty fast, but then you have the overhead weight of an empty steel canister and a burner. A butane burner is nearly always a commercial product that you have to buy. An alcohol stove is slower and has less overhead weight. Depending on the actual design, many can be self-produced with nothing more than an empty Coke can and a Swiss Army Knife, so cost can approach zero. Alcohol fuel must be transported in some container. An Esbit burner has very low overhead weight also, and there is no need for a transport container outside of the normal packaging. Esbit fuel can't leak out of a container.

Nearly anybody can make their own cozy out of some Reflectix from a good hardware store and a length of tape. At the last time that I bought any, it took me 40 cents worth.

A wind screen for any stove can be complex or it can be simple. If you want simple, you can use a piece of heavy duty aluminum foil. However, that is not terribly durable, and it might blow away. Titanium foil will do that more durably, but at significant cost. An aluminum foil roasting pan can be cut up and its sharp edges folded over, and that is the intermediate compromise.

–B.G.–

PostedJan 29, 2015 at 12:46 pm

Best Combo: Evernew 0.9L pot (ECA252) + Sidewinder Caldera Cone + Starlyte Stove

Super simple, light, stable and efficient. Everything packs in the pot. Pot rests on the cone for stability and the stove is easily snuffed and fuel can be stored inside until needed. Spill proof.

Dan Yeruski BPL Member
PostedJan 29, 2015 at 1:02 pm

Best Combo: Evernew 0.9L pot (ECA252) + Sidewinder Caldera Cone + Starlyte Stove

available at TrailDesigns.com

Troy Ammons BPL Member
PostedJan 29, 2015 at 1:16 pm

I like TI stuff but honestly you can make what you want for almost free.

Alcohol Solo Cook Set. This is a shorty but a taller Tang container with a fosters can
weighs about 6 oz as shown and is crush proof. The cozy travels on the outside.

With a taller pot and container you want a taller folding spoon.

From left to right.

Top for tang container.
Funnel for coffee.
Fosters can cut down with a bail.
Folding TI spoon
Cozy
Tang container
Flashing AL windscreen

Alc stove. This type the pot sits on top of the stove.

 photo 2.jpg

Dan Yeruski BPL Member
PostedJan 29, 2015 at 1:27 pm

" I get analysis paralysis when I try to run down what would actually work together, which is why I'm asking for it to be spelled out."

T R A I L D E S I G N S

They will talk with you as if you were "family" they will "make it right" trust me, I

know them well, like brothers.

PostedJan 29, 2015 at 1:28 pm

I find my setup works fairly well: starlyte, IMUSA mug (the zpacks ti cup looks like the perfect size me, but $$), chicken wire stand, aluminum foil/flashing wind screen and lid, reflectix cozy. Easy, light, and cheap.

I think I probably cook similarly to you. For someone that doesn't cook much and doesn't want to think about much when I do, the starlyte works great. I never got good at figuring out how much alcohol I need, but with the starlyte it doesn't matter. Just fill it up and go. It also stays amazingly cool to the touch compared to other alcohol stoves I've used. I used a myog cone a couple times and definitely appreciated the stability, but I didn't like how hot it would get and my fastening system wasn't great so I stopped using it. I just bring a twist lock container on the side. Not nesting though.

Matthew Turner BPL Member
PostedJan 29, 2015 at 1:57 pm

Like others posted above, go with a caldura cone set up. I have a snowpeak 750ml mug and a sidewinder caldura and everything fits inside the mug and total weight with out fuel is 5.6oz

PostedJan 29, 2015 at 2:16 pm

I currently use the conquistador cook set from zelph stoves. It comes with the pot, stove, windscreen, 4 oz alcohol squirt bottle container, measuring cup, and container has a top and bottom that screw together.My set, with lighter, and pot grabber comes in at 12oz, including 4oz of fuel. The container it comes with is nice because i can use one side for a cup to drink out of, and measuring water.i use the other side to put my freezer bag with food in it for easy eating. Oh yeah, that weight includes my long handled spoon as well, and it all fits together nicely. The pot holds 3 cups, i believe. This may be a bit much for some, but i use the extra cup of heated water to make a warm drink.
The stove is great, and you can use it with almost any other pot if you don't like the one the kit comes with. Many people that i have talked to enjoy this stove as well.

PostedJan 29, 2015 at 4:21 pm

I'd probably buy the following if I was starting over, because it works great, and is about as simple as it gets:

http://fourdog.com/olicamp-24-ounce-hard-anodized-aluminum-space-saver-mug/
3.2oz mug
http://fourdog.com/bushcookerlt-mini-camp-stove/
2.5oz stove(with windscreen/pot stand)
http://fourdog.com/snow-peak-titanium-lids/
.9oz lid

Nothing half-assed, homemade, fragile, or that needs replacement(like typical windscreens), and sold together as a package for a 6.6oz cook kit with a total cost of $49. All goes in the mug with lots of room to spare.
I have the exact same setup, except with a SnowPeak Trek700 mug. It can hold small containers with alcohol, and/or a bunch of hexamine tabs. In addition to those, I keep a mini-Bic, Scout Firesteel, MSR Folding Spoon, Snow Peak Hotlips, a small scrub pad(for Hexamine/Esbit residue), and a full-size bandana inside, too.
Using it is simple, quick, and efficient. Like you, stoves aren't something I want to fool around with or think about, and all I do is heat up a couple cups of water at a time.
An Esbit, two hexamine tabs, or ~.75oz of alcohol, and it's all good, though it doesn't perform quite as well in real life as it did in my kitchen(I don't always get quite to a boil 20+oz of water and 2 hexamine tabs):
http://www.backpackinglight.com/cgi-bin/backpackinglight/forums/thread_display.html?forum_thread_id=90404

PostedJan 29, 2015 at 5:05 pm

The other factor in determining "best" for most normal folk is cost /performance ratio.

Lets see-

Evernew .9 ltr UL pot- $55 most places (if you buy it from TD its $65)
TD sidewinder $85 shipped
Starlyte Burner $10 extra.

So, $150 to $160 for an alcohol setup with a Ti pot.

Not exactly bargain for what it actual does. Or, even very light at about 6 oz with stuff sack.

There are MANY pot ,windscreen burner systems one can put together or buy that are as durable, light and effecient that don't even cost $50 let alone $150.

The only thing you really give up by not having a Caldera Cone is some lateral stability. But ,unless you are a total klutz, or cooking during a major earthquake, that issue is way overblown for the posts most Solo hikers use.

James, one important aspect of your requirement us the rehydration aspect.

You can rehydrate food well in your pot with a cozy and not even carry a cozy, Just use your insulation on hand,vest parka or sleeping bag.

If you are concerned about bears and clothing smells, a dedicated pot cozy can be bought or just buy or make a freezer bag sized cozy.

A seperate hard "rehydration container" is waisted bulk and weight unless your cookpot is so fragile it needs the protection.

Really ,it comes down to if you want to eat out of your cookpot or not.

Bob Gross BPL Member
PostedJan 29, 2015 at 5:21 pm

"But ,unless you are a total klutz, or cooking during a major earthquake, that issue is way overblown for the posts most Solo hikers use."

I'm not a total klutz, but I can be pretty shaky in the morning before I've had my first cup of coffee. That is when I am most susceptible to accidents and also when I need the hot drink the most.

–B.G.–

PostedJan 29, 2015 at 5:30 pm

Ponit taken about mornings..

But did you have to run out and buy an $80 Ti cone shape stove setup to deal with it?

brian H BPL Member
PostedJan 29, 2015 at 6:11 pm

on this most endless of topics…
half my brain enjoys the constant tinkering/experimenting…
and
half my brain wants to say:
"one stud hiker named skurka did a 7000 mile hike with about the simplest setup of all, incl a stove thats free after he fed his cat, on which his ti pot sits so not pot stand,
using alum foil folded 3x…and if it's good enuf for 7k miles, dontcha think it's good enuf for most of us?!"

Bob Gross BPL Member
PostedJan 29, 2015 at 6:37 pm

"But did you have to run out and buy an $80 Ti cone shape stove setup to deal with it?"

Not exactly. I don't use any Titanium Caldera Cones except when I know what I will be burning twigs, and that is kind of unusual for me. For normal summer trips, I am mostly an Esbit wingstove kind of guy.

–B.G.–

PostedJan 29, 2015 at 6:38 pm

Really, I have those same thoughts exactly.

And there are tens of thousands of non "stud" hikers all over the world who use similar "unstable" setups. All without spilled food, first degree burns, setting the landscape on fire or fretting over 2/10 of an ounce more of Alcohol consumed per boil.

Its more fun to talk about how many anglels can dance on the head of a pin..

Or recommend 6oz $165 alcohol stove setups .

Someone should market $50 rolls of Cuben fiber toilet paper..Some folks here would buy it.

Bob Gross BPL Member
PostedJan 29, 2015 at 7:30 pm

"Someone should market $50 rolls of Cuben fiber toilet paper..Some folks here would buy it."

It is probably not as good as it is cracked up to be.

–B.G.–

jimmy b BPL Member
PostedJan 29, 2015 at 7:32 pm

Started with a canister and coated aluminum pot w/o windscreen. I treated myself next to a MSR ti kettle on sale. I just liked the size, spout and handle combo on that little pot.

I've now fallen for a starlyle with homemade three piece pot stand and aluminum windscreen. Other than the pot it cost $12. It all fits nicely in the pot, less alchy. I love the nice quiet burn at the end of the day as others here have mentioned and a minute or two more burn time makes the hot chocolate taste that much better.

alchy setup.

Of course as I say this I want to try an Esbit set up this year and see if I encounter the "stinky" issues some report. Even then it would be nice to throw one in my daypack for a hot drink now and then.

good luck, jimmy

jimmy b BPL Member
PostedJan 29, 2015 at 7:41 pm

Speaking of Esbit, could someone help me with what distance the bottom of the pot should be set above an Esbit burner. May be helpful to the OP as well.

jimmyb

kevperro . BPL Member
PostedJan 29, 2015 at 7:50 pm

Best is relative….depends on your priorities. I've tried several set-ups including the Caldera flavors and various wood burning, canister and multiple alcohol stoves and I'm at the point with the Flat Cat Snow Leopard Jr. where I cannot find a reason to try another.

It isn't the lightest but it is close enough not to matter. Ease of use and the fact that everything easily packs into my GSI mug are what sets it apart. There is nothing fragile that I have to be careful with. I have the stainless windscreen version and you would have to really work to damage any of the system. It is VERY wind resistant for an alcohol stove and efficient as any I've tried.

I'm a coffee kind of guy so I really wanted a mug that I could warm water for dehydrated meals then warm another cup for coffee.

http://www.flatcatgear.com/shop/snow-leopard-jr-system/

PostedJan 29, 2015 at 8:07 pm

Jimmy,
Looking at the potheight of your potstand (which looks to be about 2" tall ) I'd say you should be just fine burning esbit " on the deck" at ground level. 1.25 to 1.5" from the top of the Esbit cube to the pot bottom is about right.

You need at minimum an HD Alum foil "floor" and another piece if HD foil to put your Esbit tab on. Best to pull up the edges of the little piece foil under the Esbit cube to catch any drips as it burns.

How much of the cube you expose to flame affects effeciency alot as well.

jimmy b BPL Member
PostedJan 29, 2015 at 8:22 pm

Thanks jimmer. Good eyes man, 2 1/8 inches, dang good estimating at that camera angle.

jimmyb

M B BPL Member
PostedJan 29, 2015 at 8:50 pm

Best is a 4 letter word.

I like my zelph flat bottom foster pot, mesh pot stand, tealight stove, flashing windscreen.

About 1.9 oz all together. 1.95 with a square of al foil i put under it.

PostedJan 29, 2015 at 9:37 pm

"Lets see-

Evernew .9 ltr UL pot- $55 most places (if you buy it from TD its $65)
TD sidewinder $85 shipped
Starlyte Burner $10 extra.

So, $150 to $160 for an alcohol setup with a Ti pot."

If you're on a budget you can achieve basically the same for cheap:

Open Country 3 Cup Anodized Pot – $16, 3.8oz
Sidewinder Cone without extras – $40, 1oz
Starlyte Stove – $13 shipped, 0.5oz

Total: $59, 5.3oz

Comments:
1) Trail Designs includes a lot of stuff you don't need in that Sidewinder price (12-10 stove, fuel bottle, esbits, esbit holder). Sometimes you can contact them and ask to buy just the cone for around 1/2 that.

2) Anyone can make an alcohol setup for virtually free (cat can stove + foil windscreen). The value in paying for this stuff is in the durability and elegant operation. There's lots of alcohol setups that work fine, but titanium is worth it for the cone or windscreen because it lasts forever. Aluminum looks beat up pretty quick if you're rolling it up to fit in the pot. Similarly, a cheap pot works fine but a ti pot will last you a lifetime. Anytime you can pay a little more to get something that is both lighter and more durable it's usually a good call.

3) The cone + Starlyte setup delivers a great operating experience in addition to the usual accolades (light, efficient). It's the most stable setup, it's ultra simple at 3 pieces, very easy to snuff the stove, spill proof, easy to light in the winter, you can store fuel in the stove for next time, super easy to fill etc. It's just all around the best experience. You certainly don't NEED this, but if you're asking for the "best" setup then this is it. It's 5.3oz and will last a lifetime. You could get a setup that's cheaper and lighter, but it's won't be as durable or as pleasant to use. There's lots of good setups, but I've used a lot and this one or something similar easily stands out once you've tried it. The other way to save weight is with a tiny pot (400-700mL) but a 900mL is ideal if you're cooking up decent meals IMO. It's pretty tough stirring sauce into a pasta dinner in 700mL. The extra 0.5oz for a bigger pot is well spent.

Viewing 25 posts - 1 through 25 (of 69 total)
Loading...