If only I could weld aluminum that thin! I have been considering the use of thermal grease for CPU cooling fins to coat the parts of the fins in contact with the can, to better conduct heat into it. The hottest part of the system, aside from the alcohol flames, is the exhaust gas at the bottom of the cans. Willing to provide my fins to anyone interested in trying it.
Topic
The Alcohol Stove “Efficiency Percentage” Test Thread
Become a member to post in the forums.
- This topic is empty.
"If someone can develop a good attachment method for fins on a Foster's can…"
See my blurry picture at bottom of page 3.
Have wire on the outside of the fins applying pressure, forcing the fins against the Fosters can. You have to make it as tight as possible and still be able to slide fins onto can.
With mine, and I'm cooking oatmeal or whatever, it scalds on the inside of the pot opposite of where the fins are contacting, so I know it's conducting some heat to pot.
Of course alcohol is different than canister stove and for some reason may not work… You may need different sized fins – I mark line every 1/2 inch, and then bend one way on the first line, the other way on the next line, etc… So, the air channels are approximately triangular, 1/2 inch wide on all three sides.
I recollect there is a thermally conductive cement or epoxy used to attach high performance LEDs to their heat sinks. It would have to be high heat tolerant to do this. This is a Hail Mary suggestion, and probably won't pan out. BUT, on a quick search, I see there is a thermally conductive product called Omegabond 200 that is good to 500F–is that too low? How hot are the exhaust gasses? Oh, my, it's expensive stuff.
Rivets would also be a potential thin-metal attachment method. But then you'd have indentations around the inside and potential bacteria caves. Probably not a good idea unless it was a boil-water-only pot.
"This being backpacking light, you can't afford to have two layers of metal, it'll be too heavy."
Jerry, you bring a cone/heat shield don't you? This IS a second layer of metal.
"If the fins go below the level of the flames, then most all the hot gases can be directed between fins and pot."
"If there isn't enough cross sectional area for all the hot gases to flow through, then they will "back up" and start flowing under the fins and around on the outside."
Correct. These two statements show how important it is to balance the stove with the system you are using. Too much heat will do this. Too little heat allows heat to escape from the pot. When it starts getting this efficient, ambient temps(air temp, can temps, cone temps, floor temps, alcohol temps) will also play a role. No one stove is ever perfect for all conditions. It will ultimatly compromise something, usually time vs fuel consumption.
I have one layer of metal which is both fins and windscreen. For alcohol, the flame is further below pot so you'de probably have to do something different.
It's a bit of a compromise as a windscreen. The fins/windscreen goes a bit below the top of the burner. If it's not real windy or if I find a sheltered spot it works fine.
I always weigh fuel before and after and am pretty consistent – 0.8 to 0.9 ounce per day to heat 4 pints. Used to be 1 ounce when it was just screen without fins. I have also turned it down a little which improves efficiency.
This is all canister but I suspect fins would work with alcohol also. You'de have to play with it. 10% efficiency improvement is hardly noticeable so you almost have to be doing this as an intellectual exercise : )
So I'm getting ready to move May 1, and cleaning and packing my shop. Was surprised (appalled?) to see how many variations there are for systems using one particular stove concept:
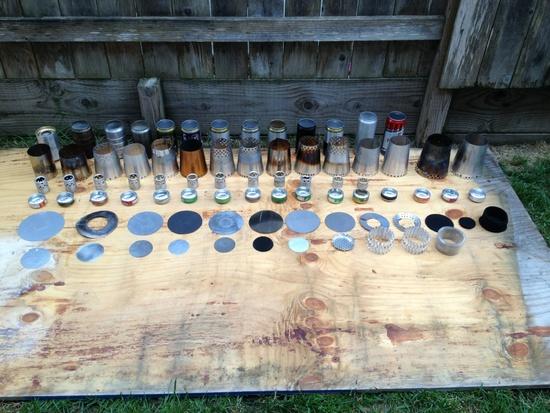
Once I figured out that I could "component-ize" the variations and swap different pot supports into different soda cans, the number of combinations increased exponentially.
Some of the variations are visually subtle, like the number, size and patterns of holes in the windscreens, pot supports, and soda can bases, but the performance differences can be significant.
13 pots x 15 windscreens x 12 pot supports x 16 soda can bases x 10 base sheets x 8 pot lids = 2,995,200 possible variations.
And this doesn't even count the fin and thermofelt variations, the polished vs. unpolished possibilities, and the use of different materials (aluminum, stainless steel, titanium) for windscreens, base sheets, and pot lids.
Of course I could never test all possible combinations. Many concepts, such as stock vs. brushed vs. blackened pots, are tested with only one stove and windscreen combination for basic comparisons. My wife said she thinks I'm OCD about stoves, and I guess I can't disagree with her. She says I just like playing with fire. I tell her it's science.
Ah, but Mother Nature (or is it Father Darwin) would not test all combinations either. She picks the best performers and keeps combining those, as you are doing. So that greatly reduces the experimental burden.
Impressive to see it all laid out; can't help but admire your intense focus on finding ideal combinations.
ADDED:
So tonight I finally started testing my rig.
.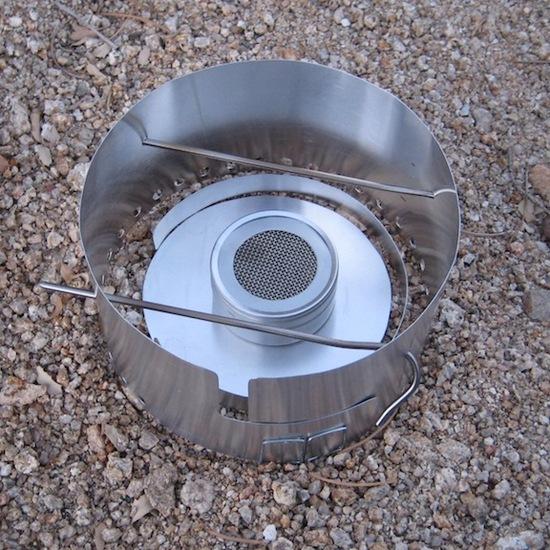
It's a Modified StarLyte with a straight-sided (no cone) self-made, short (3", fits in pot) screen that I want to test at a loose diameter around the pot, ie, 1/2" clearance all the way around my MSR Titan. (Next test will be a tighter screen.) There is 1" between the top of the stove and the bottom of the pot.
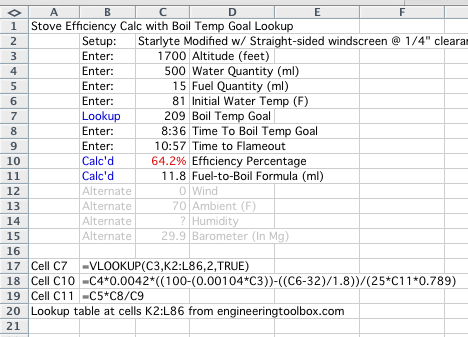
EDIT: First two boil data removed. Thermo placement failure–the probe was sticking into the pot, but the head of the thermo was above the lid of the pot, sticking out into the stream of hot gas. I was heating the thermometer directly–which inflated my efficiency ratings. Today made a flashing ring to protect the head of the thermometer and retested. For all: 1700 ft altitude, 500 ml water, 15 ml fuel, 209F boil temp target, ambient 78-80F, barometer 29.8.
1) 98F initial temp water
8:41 boil
10:50 flameout
54.5% efficiency
2) 90F initial temp water
9:36 boil
11:25 flameout
55.7% efficiency
…so figure around 55% efficiency with this setup, windscreen 1/2" clearance all around.
Seems like pretty good times for an actual pot. I'm assuming you found the barometer adjusted spreadsheet and got it working ok then?
Delmar,
Nice to see you testing your rig and keeping this thread alive.
It would be interesting to see your boil times with cooler starting water temperature.
Looking forward to your new, tighter windscreen results. What clearance are you going to try next?
OK, the "close screen" testing now done; I snugged up the windscreen so it was 1/4" clearance all the way around. Made a big difference. Same parameters as in last post, altho ambient = 70F and Baro = 29.9 for this morning.
Trial 1:
initial water temp 80F
to boil goal 9:26
to flameout 11:30
efficiency calc 61.9%
Trial 2:
initial water temp 81F
to boil goal 8:36
to flameout 10:57
efficiency calc 64.2%
…so average of 63% efficiency when I snug the screen up to 1/4" clearance. And, I made membership into the prestigious sixty-percent club, woohoo! If you consider that the surfaces are unpolished, that the windscreen is short enough to fit inside the pot (only 3" high), and that this is a straight-sided, no-cone screen, 63% is a very respectable number. I think it speaks well of the StarLyte Modified, and a square-profile pot with a big butt, like the MSR Titan.
I'm still losing plenty of heat with this setup–I can get my hands toasty warm from the exhaust gasses while testing. Certainly a cone would help with that.
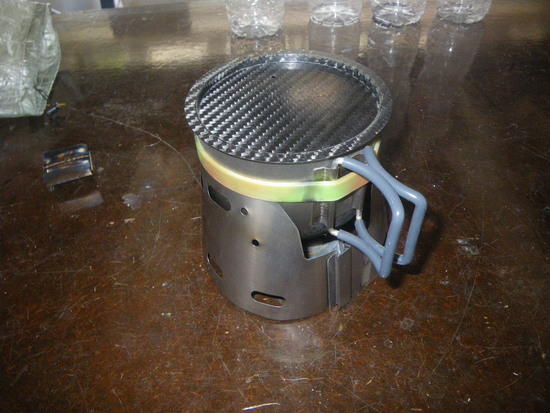
Here's a photo of the setup, notice large-ish heat shield for the head of the thermo (this photo was of the loose 1/2" setup):
.
Glenn: I do have a copy of your barometer-entry spreadsheet, thanks, looks good. I didn't use that SS for these calcs because I'm simply looking up the barometric pressure at a website; don't have my own barometer. I reported barometric for anyone who wants to check it tho. I did do one quick check against your barometric SS (its goal was about 3 degrees higher and I didn't have time-to-goal for that higher number…a few seconds longer I suppose) and I recollect getting a very similar efficiency. Of course, we're having normal-range barometric pressure here right now, so the altitude and the barometric spreadsheets SHOULD agree. I am using the altitude SS, and the boil-temp-for-altitude is not regressed as before, it uses a VLOOKUP function for increased accuracy over the regression formula I created earlier. Remember how the regression line is slightly curvilinear? The VLOOKUP function resolves that; it simply looks up the altitude in a table and returns the boil-temp goal.
David: Why are the initial water temps so high for me? A: Odd plumbing in my house, which makes for remarkably warm "cold" water from the tap. It gets heated in the attic, and, well, we live in the desert. At first I was messing with cooling the water to the 70s ranges, then figured the formula adjusts for initial water temp, so why bother? A side benefit is that I can do all my boils with room to spare with only 15ml of fuel, and the medicine measuring cup that I'm using maxes out at 15ml. Yes, colder water would increase boil times, but if our formula works, it shouldn't effect efficiency scores.
WHY I was testing screen tightness? Because it made a huge difference back in my super-cat days. If I got the screen any closer than loose, I wouldn't get a boil; the super-cat wants loads of air, apparently. So I carried that prejudice over to other alc stoves, but have been wondering if a slow, efficient burner like the StarLyte Modified actually wanted such a loose screen? Clearly it does not! The StarLyte Modified likes to be snug. That's great; it will also help with wind resistance.
Next planned tests: I have a Packafeather XL and a StarLyte Simmer that need examination.
Water that is colder will lose less heat due to evaporation. And other effects.
If you start with colder water, you will get higher efficiency.
But, probably negligible.
Nice work Delmar. 63% efficiency is excellent with a practical set up. I would expect the tighter windscreen to do better in the wind too.
What kind of fuel are you using?
How much does your stove/windscreen/base sheet/pot weigh?
Very interested to see how the Modified StarLyte compares to the Simmer StarLyte. My experience has been that at some point heat emission from the pot reduces efficiency.
Yes, we need to record carry weights; should have added that. My setup is not particularly lightweight.
The "minimalist" configuration for this setup would be the MSR Titan Pot with lid, a circular ground shield of flashing, 3" high windscreen, empty Modified StarLyte with plastic cap, and two ti tent stakes that act as the pot-holders. (The stakes don't fit inside the pot sadly.) Total is 6.4 oz. (If I recall, Glenn's setup is around 2.4 oz!!)
Normally kept with the kit but not included here are: fuel, an 8-oz plastic cup that nests inside, pot scraper, inner wind ring, and mini bic. Add these goodies minus fuel and the weight climbs to 7.4 oz. Add 3 oz fuel in poly bottle–just enough for a weekend, probably 4 boils in mild weather and 5 in hot — and it's at 10.4 oz
Fuel used was SLX from Home Depot, where I get all my up-scale UL gear. Although I also have a can of Klean Strip denatured, and I'm not 100% certain which made it into my poly bottle. I think the SLX. Does anyone know of differences between the two brands? [EDIT, as David points out below, they are one and the same.]
Ditto David's question about the very-slow-burning StarLyte Simmer.
PS: For peer review purposes, my calcs spreadsheet:
.
Another PS: When to start the timer? I light the stove in my hand, set it down, then reach for the timer and start it. Then plop down the wind screen around the stove, and then set the pot on the pot supports.
I think it used to be "SLX Klean Strip" and now it's just "Klean Strip" by the same manufacturer. But I don't have a can of the old stuff to compare for certain.
David what ounces is your setup, for comparison?
I've been following this alcohol stove efficiency discussion with interest. It got me wondering about the efficiency of esbit setups. I've got a cute little 400ml cup and custom sized Ti-Tri cone setup that Trail Designs makes. This setup is certainly smaller that the majority of the alcohol set ups tested here. I obviously can't report results for boiling 500ml of water since my pot holds a max of 400ml. However I did run a test on bring a cup (237ml) of water to a boil using a 4g tab of esbit. I used a modified BGET stove where the tray is narrowed a bit to better fit the small 4g fuel tabs I use.
I was surprised that I could boil a cup of water with just under 4grams of esbit. Esbit has ~13,300 BTU/lb as reported by various websites. That works out to 30.9kJoules/g which is more energy dense than the 25kJoules/g that's being used in the alcohol stove efficiency spreadsheets.
After a little bit of modification to the spreadsheet, I was able to calculate the efficiency of my little esbit setup.
water: 237ml
initial temp: 66F
final temp: 212F (330ft elevation)
fuel burned:4g
boil time: 8:45
burn time: 10:30
Efficiency: 77.9%
fuel to boil: 3.3g
I must say, I was very surprised at the high efficiency of this setup. Anyone else out there calculating the efficiency of esbit stoves?
I knew esbit was more efficient, but didn't realize how much more so. Would also be curious as to efficiency changes regarding water volume. I'm sure there something to be said about an "ideal" amount of surface area vs heat area vs water volume. Probably along the lines of the tall pot, fat pot, short pot, skinny pot, discussion.
I've been interested in esbit, but the availability of it has kept me back I guess, along with the smell and soot I hear about so often. I went straight from white gas to alcohol, so I never gave esbit a chance, to be fair. So for the spreadsheet, just replacing the 25 with 30.9 would convert the worksheet to esbit then?
Delmar, excellent results! It beginning to look as if the low to mid 60's is kind of a "milestone goal" to strive for when designing a kit. A way to know when you've "suceeded", so to speak. Curious to see what a cone would do with that burner, although being an open burner, it might not be affected as much by that design. We'll await your test results!
For weights, I've replaced the flashing windscreen with an identical cone made from oven liner foil and it had no impact on efficiency. Wrapped around the can and packed in a reflectix can-cozy, it seems to hold up well without creasing or damage. I still carry a water bottle inside for support, so I'm expecting good field results. Also, swapping out the official Fosters lid, back to the generic foil lid, has brought my weight down to:
Fosters pot w/bail handle
Foil lid
Foil baseplate
Foil cone windscreen
Barbasol stove
51 grams (1.8 oz) Water Boiler Kit Only
Add in:
65ml Fuel bottle w/flip cap
Mini Bic
Long handle spoon
Top and bottom (dual bowl) cozies
109 grams (3.8 oz) Total Cook Kit Weight
But I can't cook in it, like with a regular pot. I'm kind of drawing my own 'lines" with this, in that if I want a regular pot and heating food in the pot, then I'll pack in my BushBuddy and Imusa 12cm, and skip alcohol. It's highly practical where I go, so personal preferance, rather than environment are the only real factors for the majority of the time. If I can ever get some longer times out, I'll go bigger pack for more food, so twig stove setup, then for my 3-day weekenders, light and fast with my Murmur pack and alcohol setup… That's my plan anyway, but we all know how plans go ;)
The only thing I'm looking to change, is a slightly taller fuel bottle that will still fit inside my stove. One more boils worth of fuel would be perfect.
@Delmar
My XUL set up with 400 ml can and 8 liquid oz fuel bottle weighs 2.71 oz with aluminum flashing. Everything except the fuel bottle fits inside the can with the cozy on the outside. Without the cozy the weight is 2.21 oz: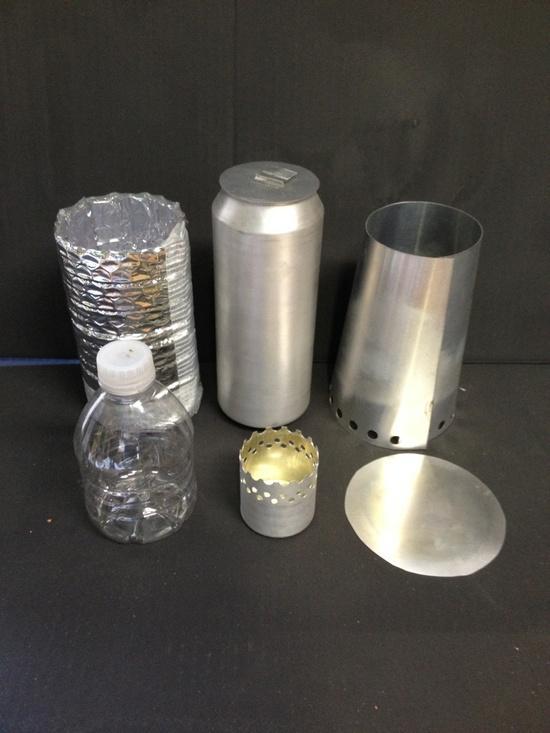
My SUL set up with 500 ml can and 8 liquid oz fuel bottle weighs 3.82 oz with aluminum flashing. Everything fits inside the can with the cozy on the outside. Without the cozy the weight is 3.14 oz: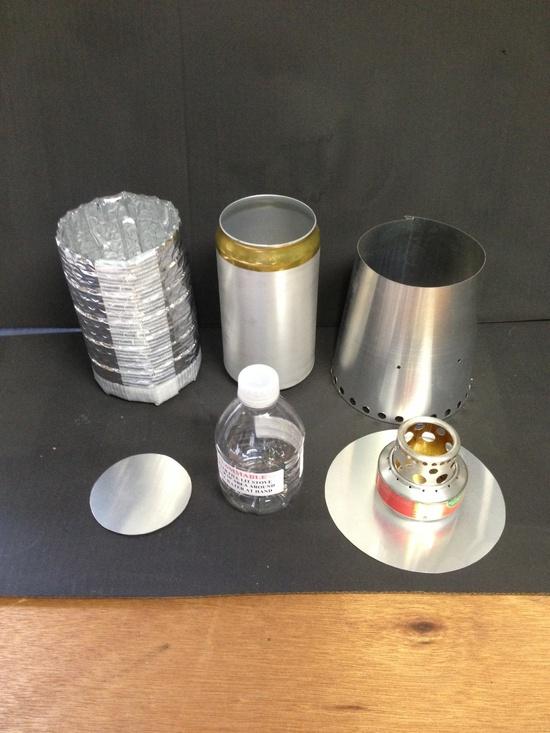
After reading your efficiency stats I am sorely tempted to switch to Esbits, despite the smell and soot. After I'm done moving and getting my shop reorganized I will have to give it a try!
Your weights are phenomenal! I need to try replacing my aluminum flashing with oven foil. Is the kind of "thick" foil that comes in a roll, or is fabricated from something like a pie tin?
Glenn – not quite a simple as just substituting the Esbit's 30.9 kJoules/g for acohol's 25 kJoules/g. You would also have to change the 0.789ml/g used to convert ml of alcohol to grams. Change that to 1.0, since esbit is already measured in grams, and you should be good to go.
My esbit system isn't the lightest around with the pot, cone, stove and stuff sack coming in at 3.125 oz. The cone does fits into the pot so the setup makes a nice compact and sturdy, since it's a Ti pot, package. I could make it a bit lighter if I replaces the silicon beer band around the pot with a few wraps of fiberglass cord.
Richard: Oh yes, still a simple conversion it would seem. Excellent.
David: I can't find the foil-in-a-roll locally, so I've resorted to oven liners. A largish pan with a lip all around it. I cut off the lip and roll the minimal embossing it has, flat with a rolling pin on the counter. They come in a 2 pack at Wallyworld for $2 and I can get 2 cones from a single pan. I hope to find some regular foil sometime though, without ordering online. Seems too easy to damage in shipping.
Also, the closure would need to be fastened differently. The flat-fold wouldn't work, as the foil is too thin to hold a gap. I make a double slot for my tab, and fold the tab back a bit to hold it closed, but I imagine it will fatigue over time and fail. There's a reason people use paper clips with this level of foil I guess, as it's so thin.
"I think the SLX. Does anyone know of differences between the two brands?"
I don't think that you want to put it to the taste test.
–B.G.–
"is a slightly taller fuel bottle that will still fit inside my stove."
That are the dimensions of what you seek?
Lately I have found some very handy plastic containers. One is a boullion cube jar. One is a large prescription pill bottle. One had peanut butter.
–B.G.–
Quickie report: I could not stop thinking about "what if" I snugged up the windscreen to 1/8" all around. David does it, after all. So I tried it. I smelled those acrid fumes that tell you you're not getting complete combustion, and the efficiency dropped to 60.2%. Also my wind screen warped. And I got my fastest boil to date, 8:07. But given the result, I did not even bother to repeat the test. Looks like the Modified StarLyte is happy with 1/4" clearance, and that's what it'll get.
You guys are hard core. I love all of the data that these threads are producing. It is really interesting to see the effects the various changes have.
In terms of esbit, I am surprised at how much of a jump in efficiency you see. I guess part of it would be using a smaller system. I think with a small system it is a little easier to get air flow into the combustion area and your cup has a better diameter to height ratio compared to a beer can pot.
David or Delmar or anyone else do you have data for small alcohol system comparable to Richard's?
I don't have a small system, or any other size system, which even comes close to the efficiency of Richard's system. The best efficiency I have been able to achieve with alcohol is a little over 65%.
I am basically committed to developing beer can pot systems because they are so light and have capacities of 16 and 24 ounces of water.
My focus going forward will be "pragmatic" alcohol efficiency, wherein I will be trying to achieve a boil with 500 g of 70* water in about 5:30 to 6:00 minutes with 15 ml of fuel. Also, a system that that will achieve a boil in about 6:30 in "windy" conditions (at least 5 mph) using less than 20 ml of fuel.
Become a member to post in the forums.
advertisementYour privacy is protected: We do not transmit your user data to third-party ad platforms or advertisers, and we do not host third-party tracking pixels. Backpacking Light serves ads on its own custom, native, and internal platform.
 Pro-Grade Water RepellencyPolypropylene face fabrics: see the future of raingear.