
Introduction
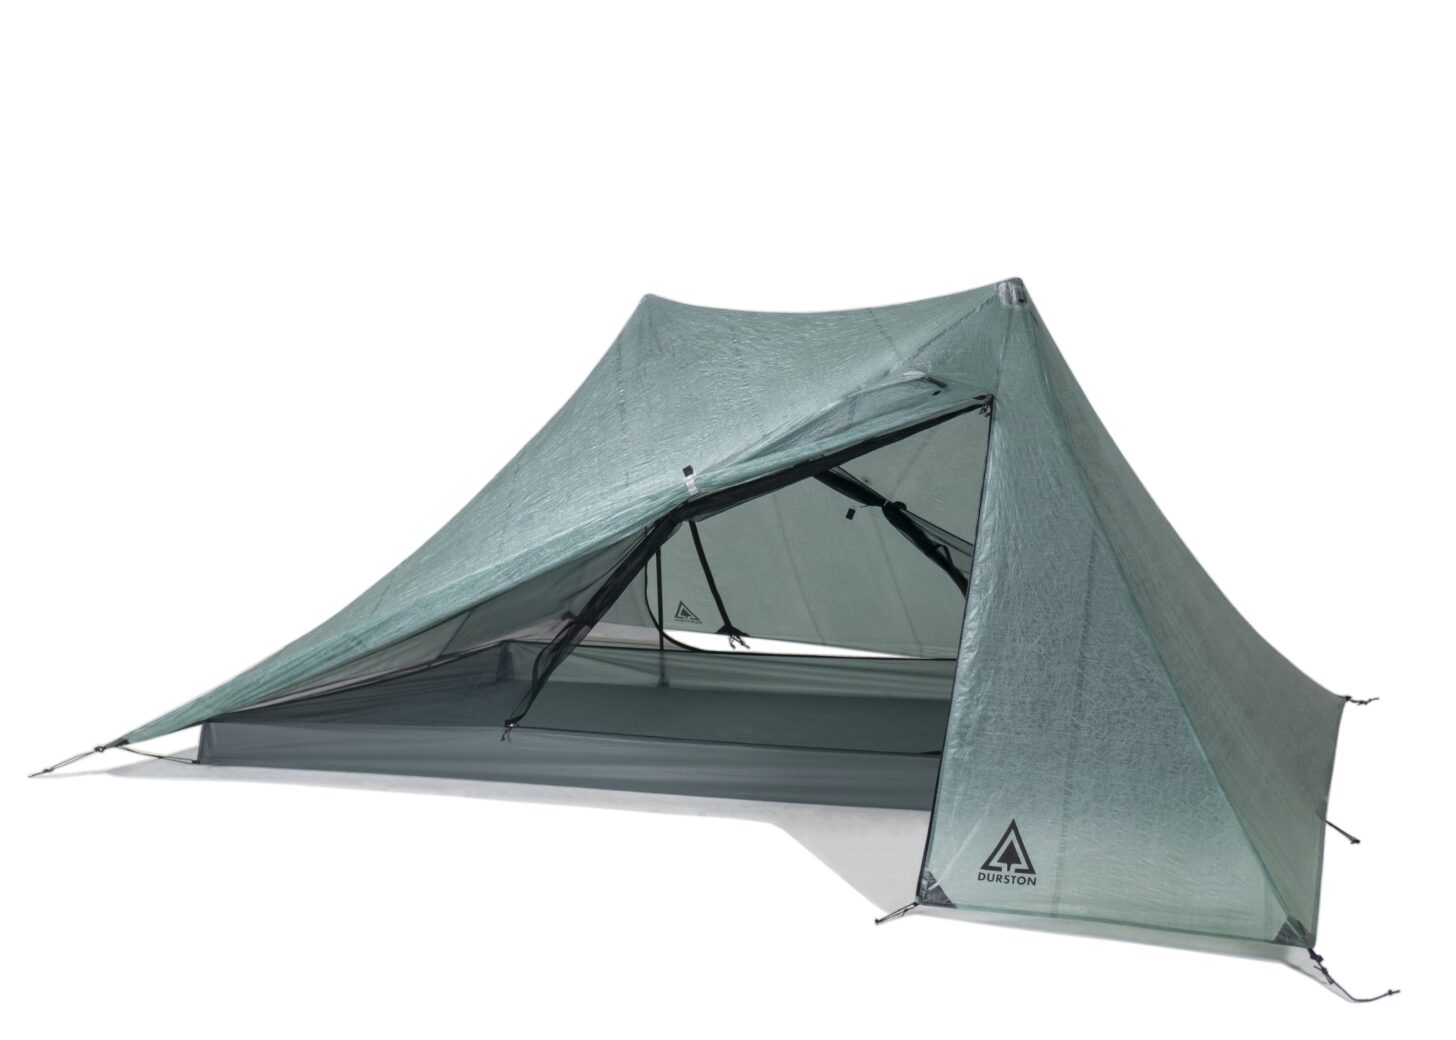
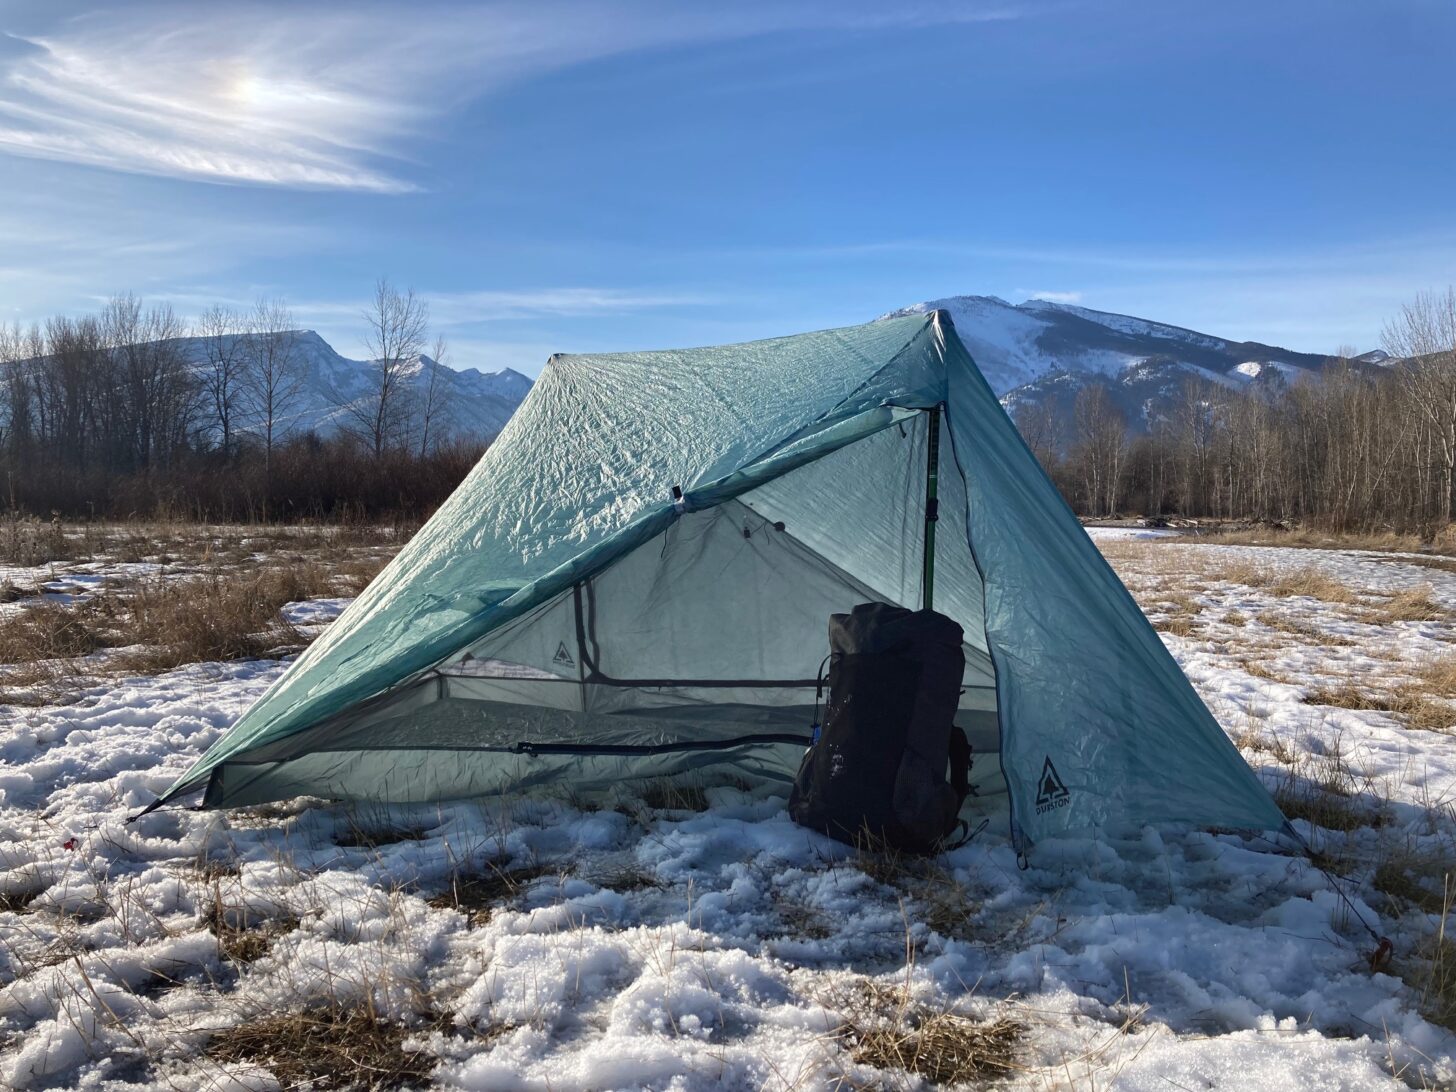
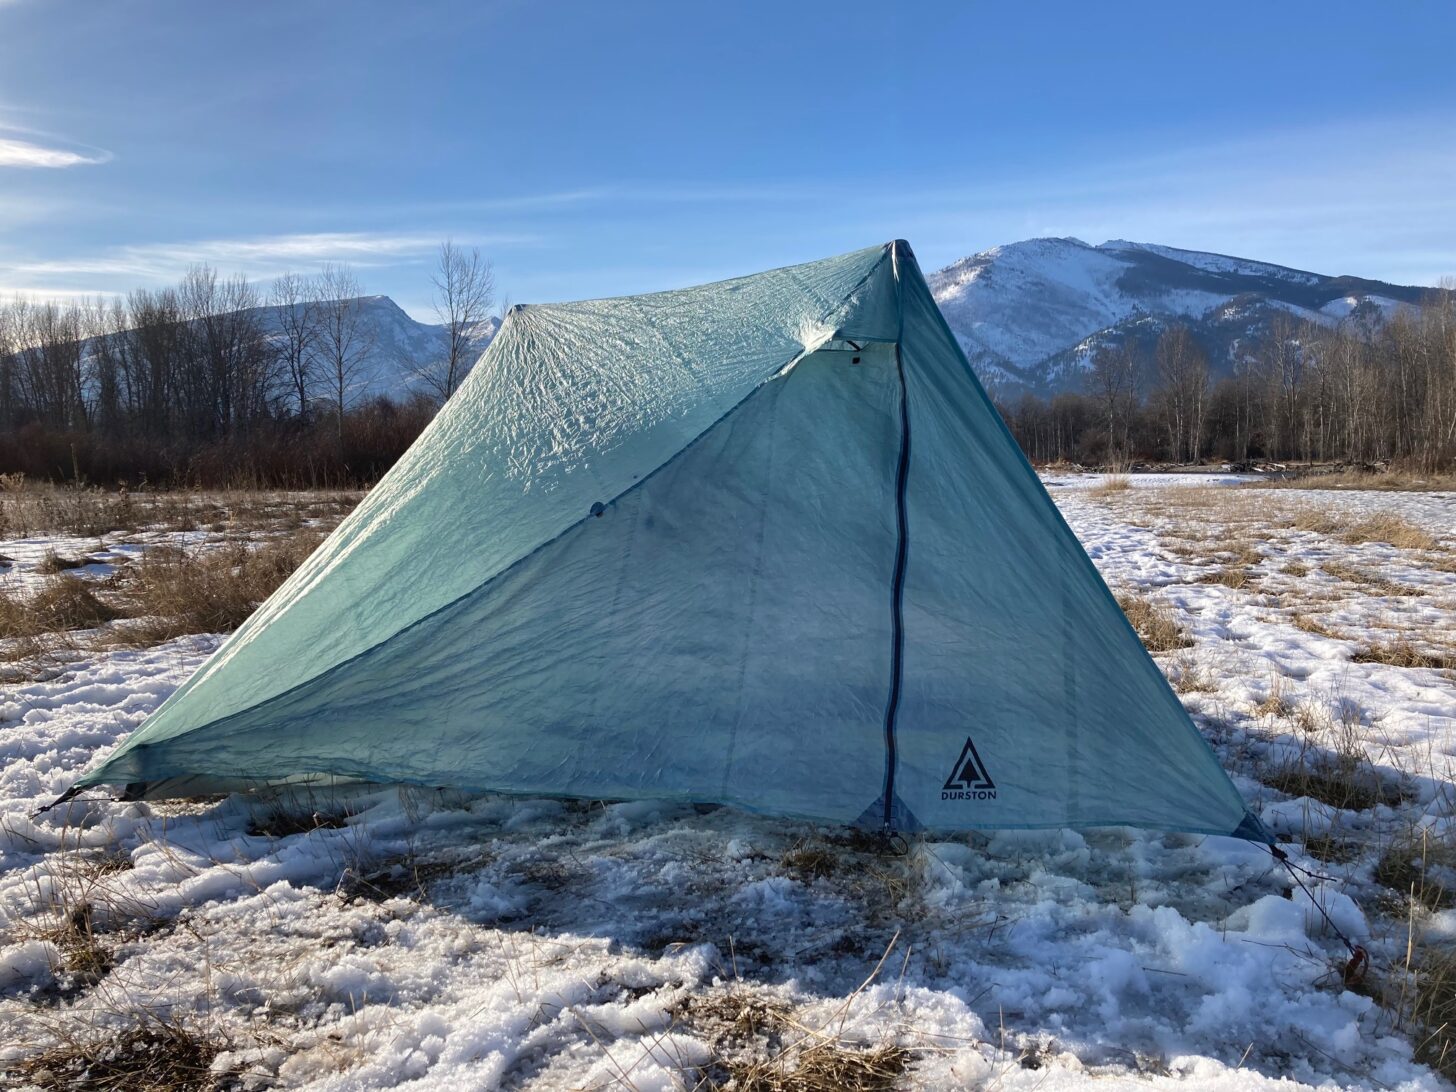
The Durston X-Mid Pro 2 tent (20.4 oz / 578 g, MSRP: $639) is an ultralight, single-wall, two-person, double-door, double-vestibule, side-entry, trekking pole-supported shelter made of Dyneema Composite Fabrics (DCF). It requires two trekking poles and a minimum of four stakes to pitch. The design combines the headroom and spaciousness of a classic double-pole single-wall shelter with the stormworthiness and simple set-up of a pyramid-style shelter.
The Durston X-Mid Pro 2 is a compelling product in the somewhat narrow category of ultralight, two-person DCF shelters. The silpoly Durston X-Mid 2 is already a popular tent and is Highly Recommended by Backpacking Light. That makes the lighter, updated DCF version particularly intriguing.
The Durston X-Mid series of tents has become a favorite among ultralight backpackers, and demand for these shelters is very high. A recent sale of the Durston X-Mid 1 sold out in three minutes. Company founder Dan Durston notes there that there will be a better supply of the X-Mid Pro 2, but it seems unlikely that they will remain in stock very long following their initial launch.
This First Looks review is based on our initial hands-on evaluation of a pre-production sample of the Durston X-Mid Pro 2 Tent.
Review Update Log:
- June 13, 2023: This review was updated with long-term performance results.
- March 25th, 2022: Backpacking Light founder Ryan Jordan and Backpacking Light canine-in-chief Sierra recently had a chance to spend some time with the Durston X-Mid Pro 2 in the field. The new photos are at the end of the review, in the Photo Essay section. Click to jump straight there.
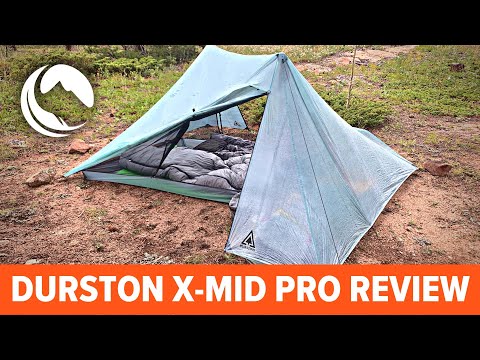
- August 22nd, 2022: We shot a video exploring the features of the Durston X-Mid Pro 2. You can find it below.
X-Mid Pro 2 Review Video
Highlights
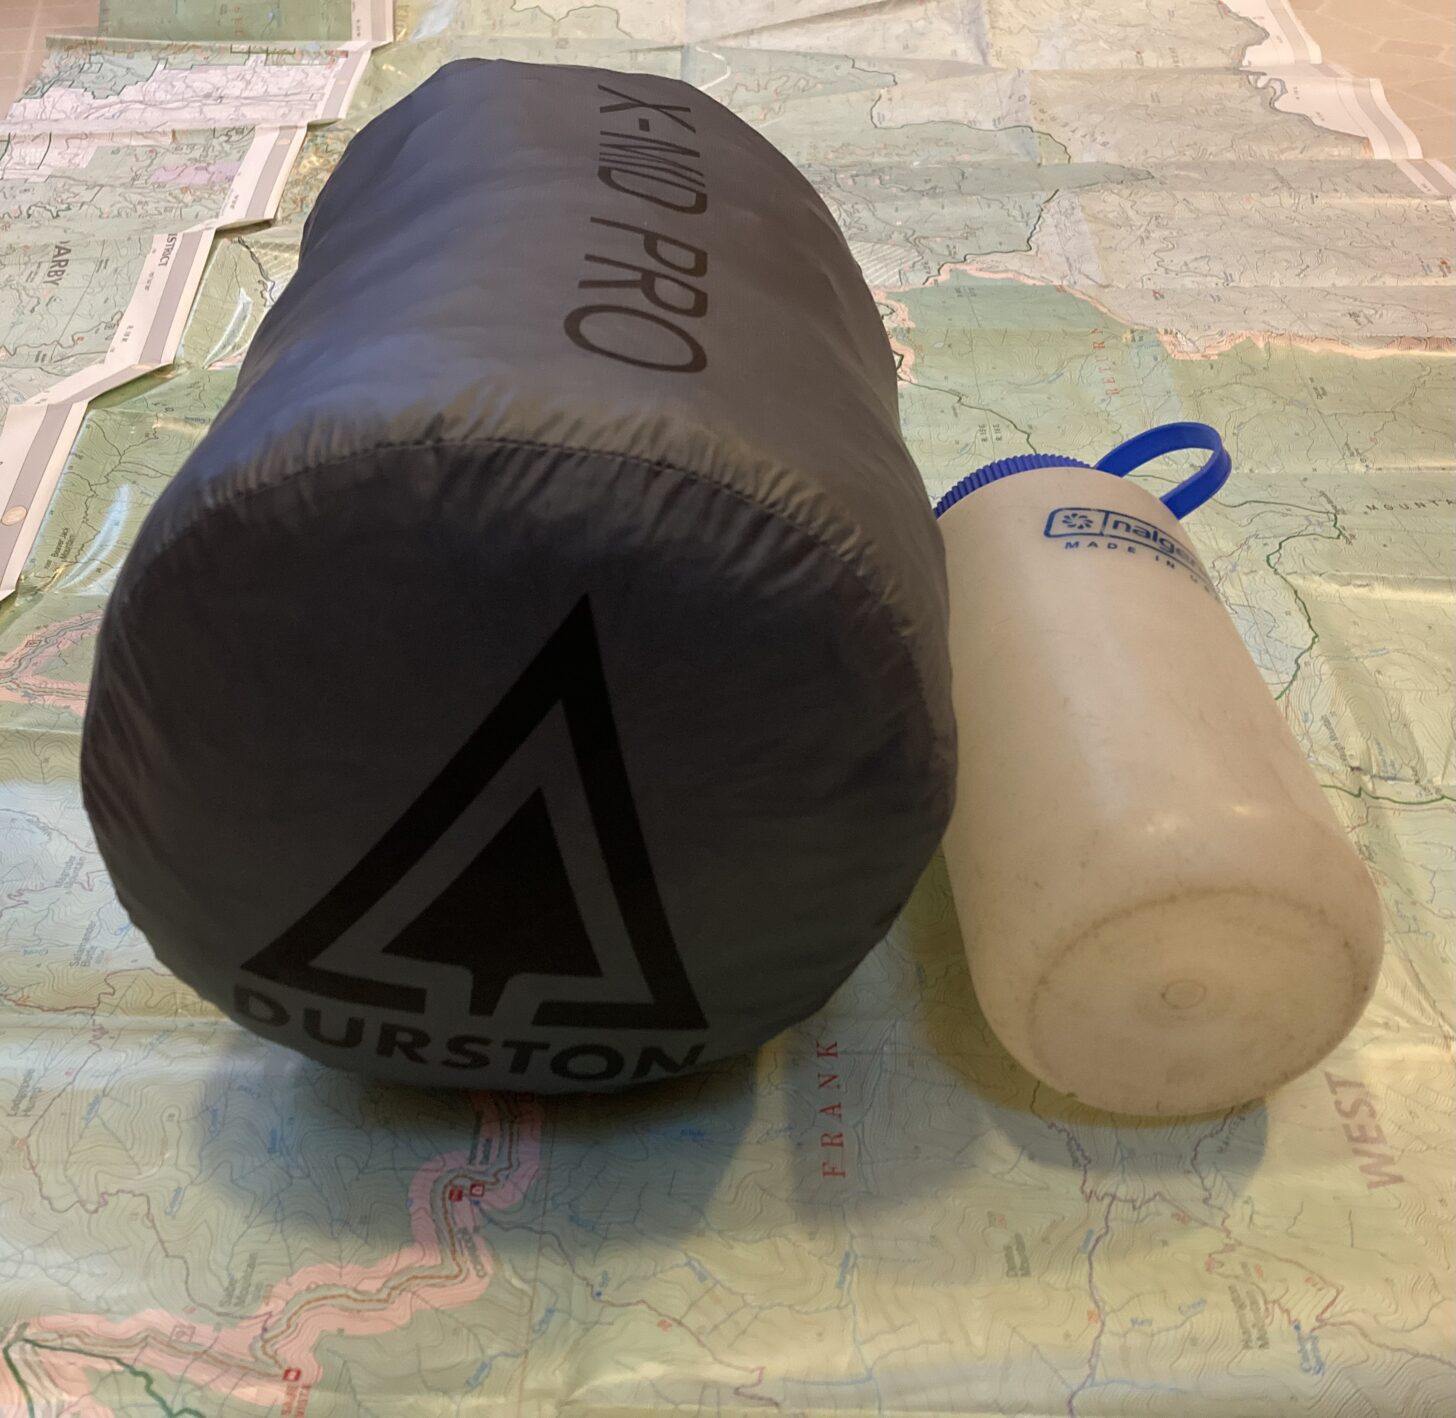
- shelter: 20.4 oz (578 g), plus 4 stakes and two trekking poles
- height: 46 inches (117 cm)
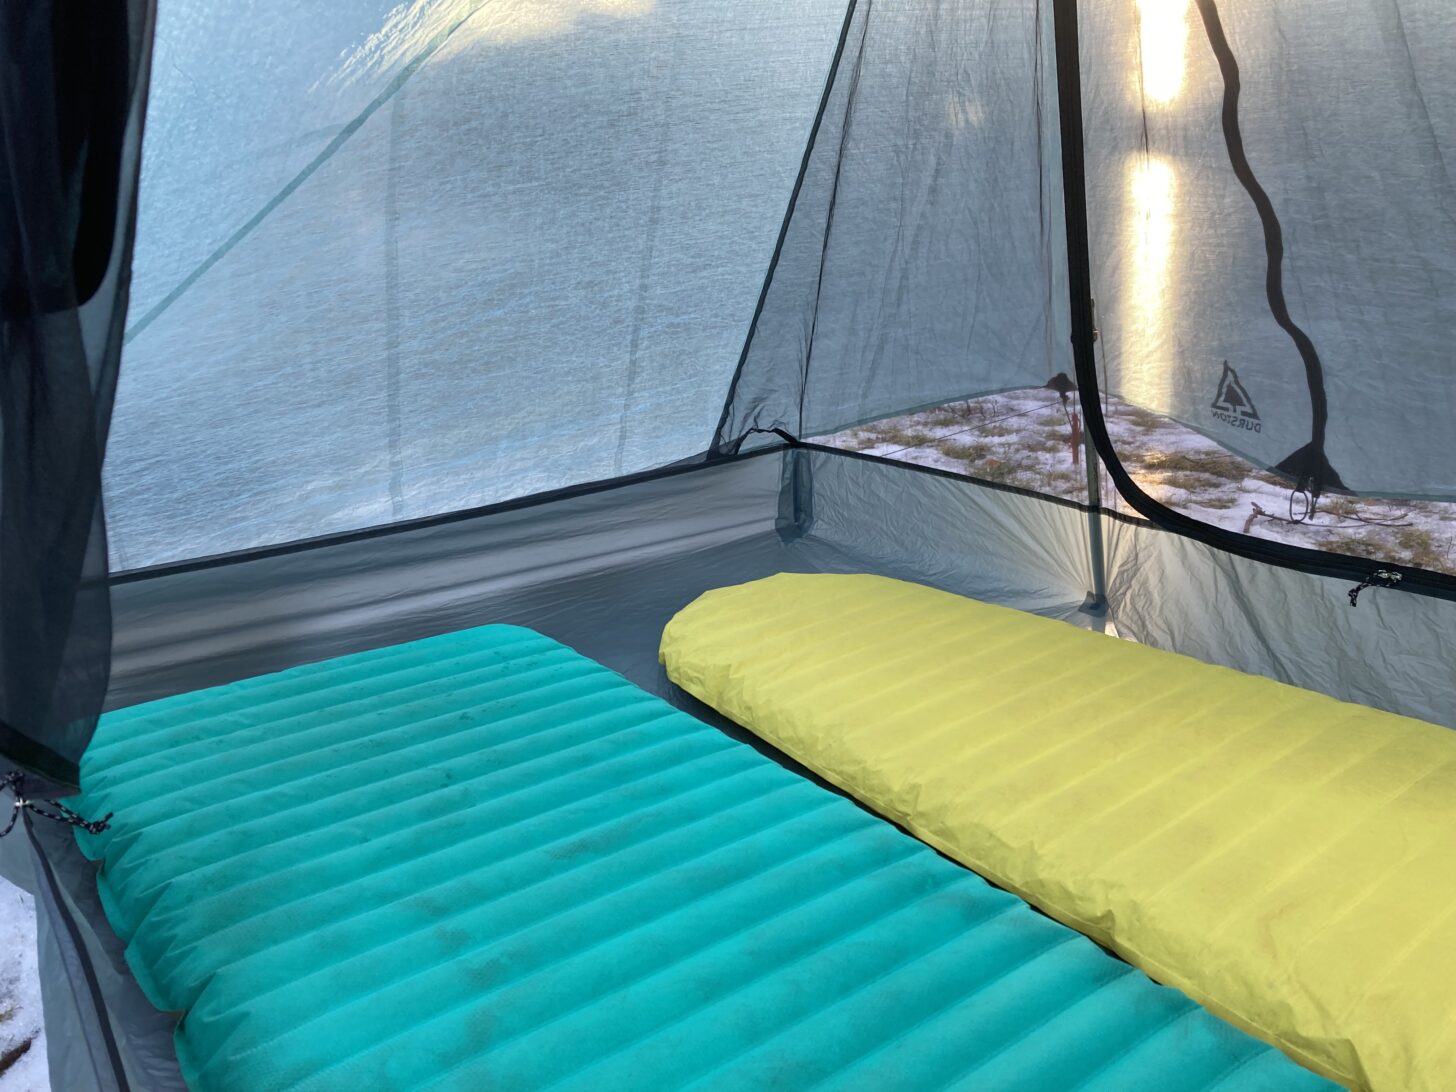
- floor width: 48 inches (122 cm)
- floor length: 90 inches (229 cm)
- floor area: 30 sq ft (2.78 sq m)
- vestibule area: 21.5 sq ft (2 sq m)
- packed size: 12 x 6 inches (30 x 15 cm)
- rectangular design allows the tent to be pitched with four stakes
- dual peak vents help manage condensation
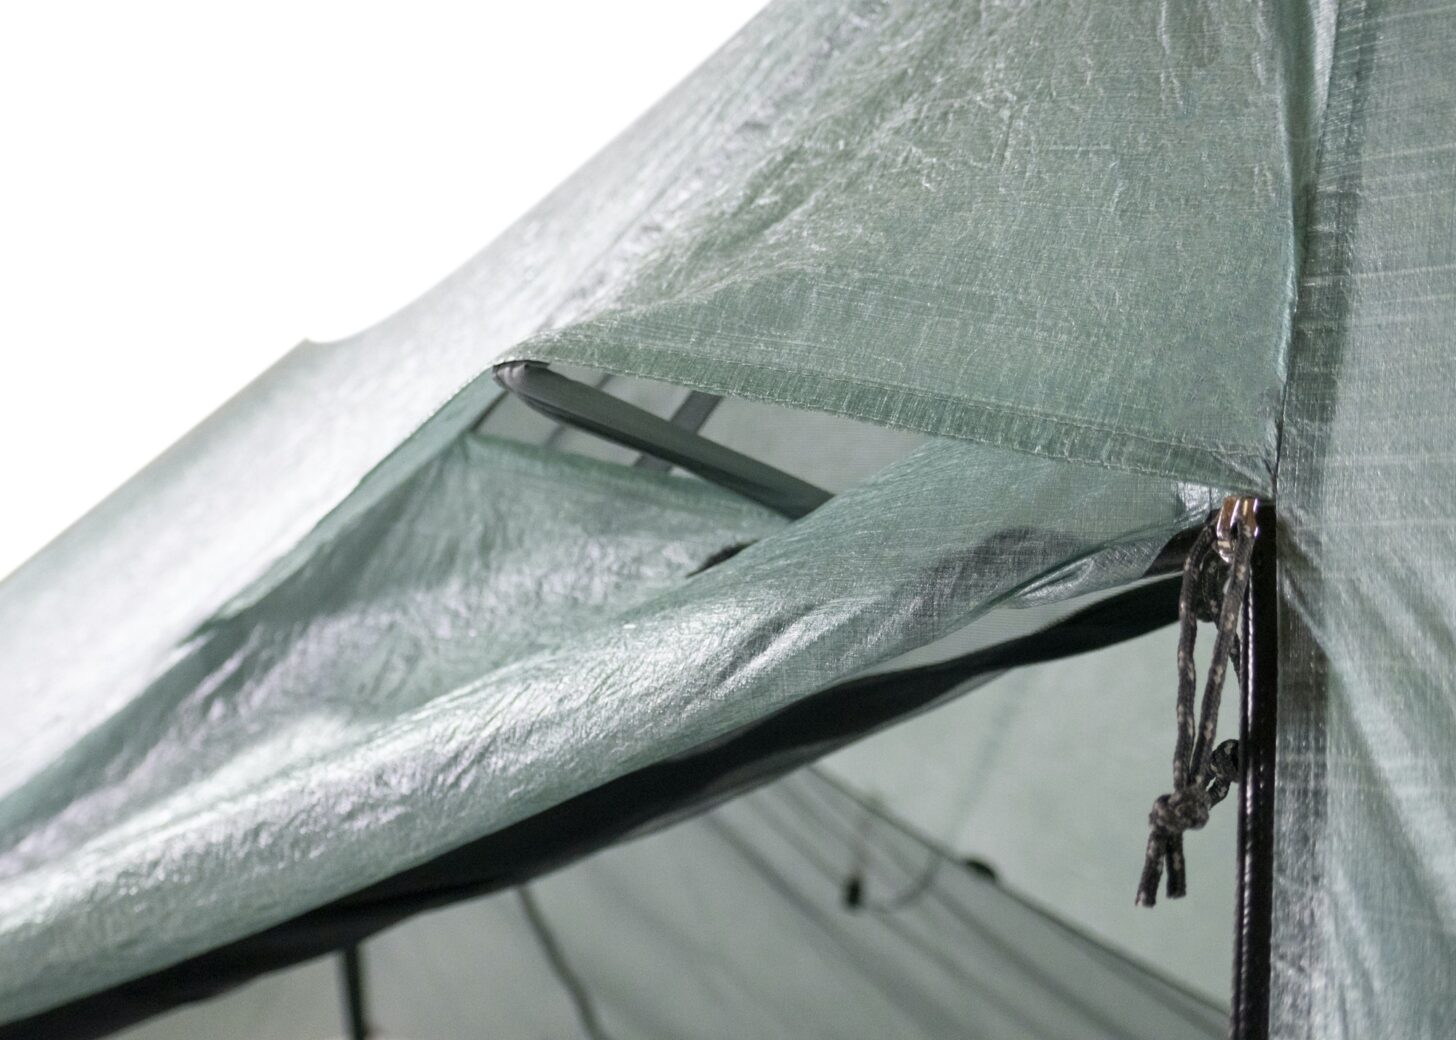
- bonded construction instead of sewn construction
- offset pole design allows for easier entry and increased interior volume
- two doors with dual vestibules, waterproof zippers on vestibule doors
- 15 denier nylon floor doesn’t require a footprint in most conditions
- floor lays taut when pitched and tensioned properly, instead of simply hanging
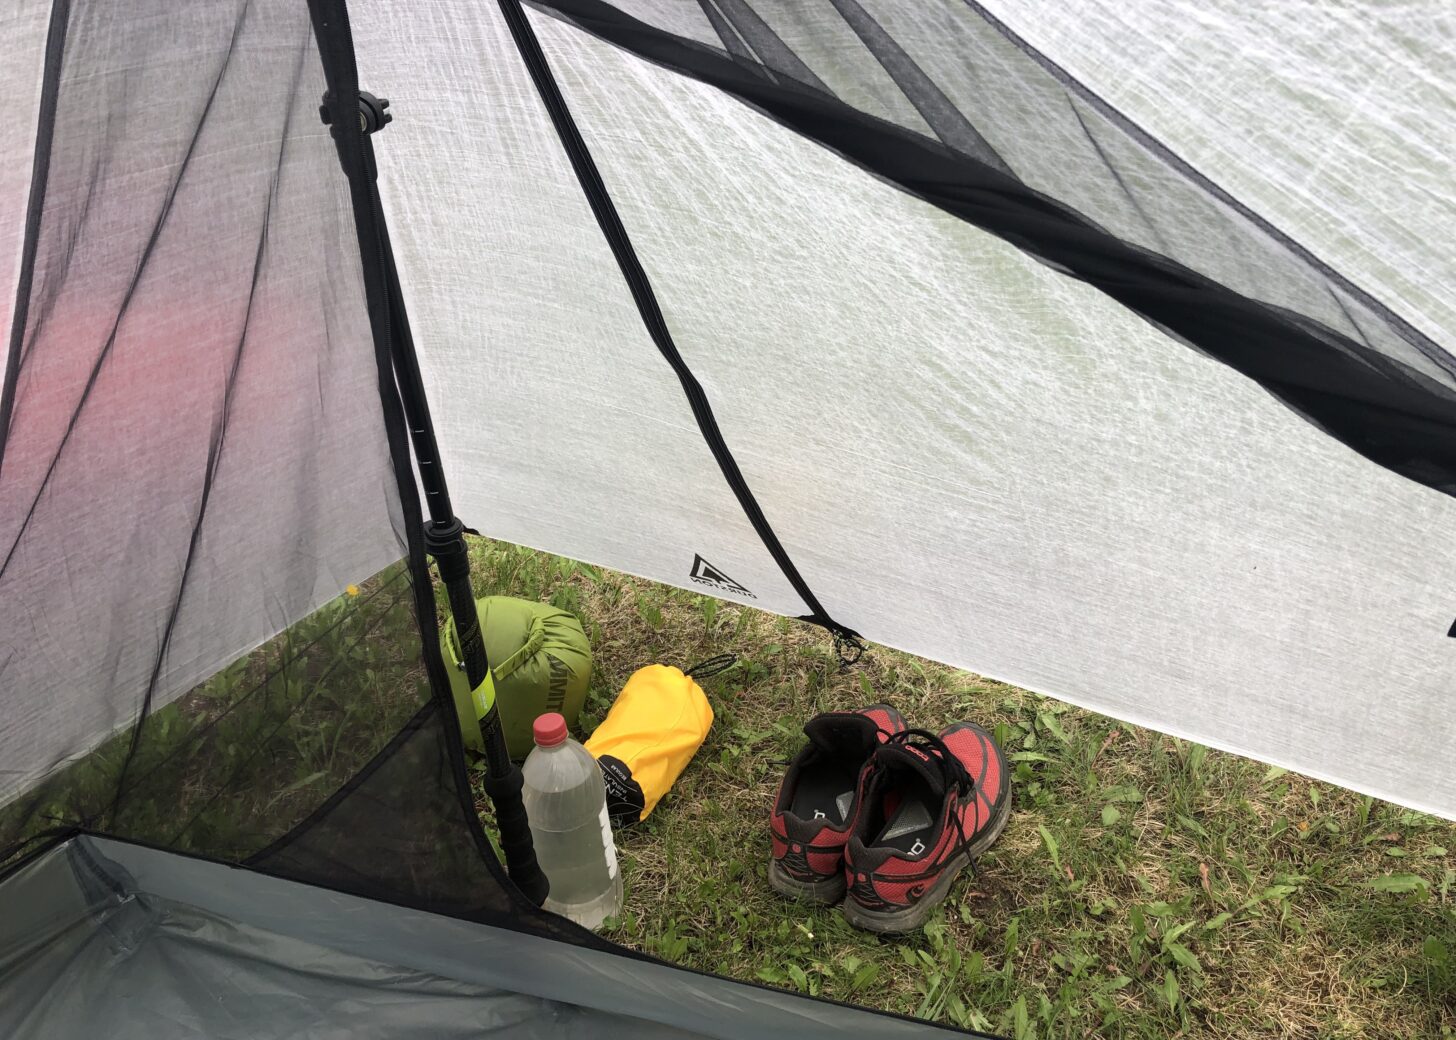
- vestibules provide ample room for storing packs and other items not brought into the shelter
- door zippers are easy to operate one-handed
- magnets allow for the vestibule and/or the mesh tent door to be easily rolled up
Testing Context
This review was conducted using both pre-production prototypes and production models of the X-Mid Pro 2.
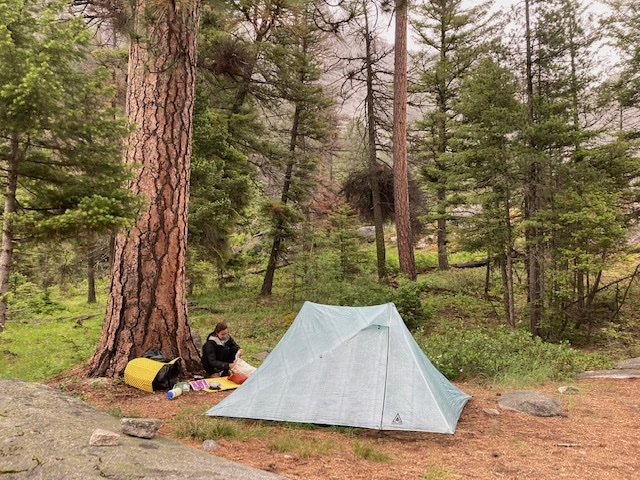
I used the Durston X-Mid Pro solely on summer and fall backpacking trips in the Northern Rockies. It was used for 27 nights. For 22 of these nights, I was the only occupant (the remaining nights were shared with a partner). This tent was tested in national forests and designated wilderness areas that did not require camping in designated sites; therefore I was able to choose locations at my discretion. Whenever possible, I chose sites that had ample room for the tent to ensure a proper pitch, soil that was easy to place stakes into, and natural features (boulders, trees, slopes) which provided additional shelter from the elements. I did not use a footprint while testing this tent and instead tried to practice good site selection and remove small rocks, pine cones, sticks, and other debris before pitching the tent.

I experienced several mild rain events while using this tent, two consecutive days of near-constant rain or drizzle while at a basecamp, three mild-to-moderate thunderstorms, and one severe thunderstorm with approximately 10-minutes of marble-sized hail and gusty winds of around 15-20 mph. I did not use this tent in snowy conditions or excessively windy conditions. Mosquitoes were present, and often in abundance, on roughly half of the nights while using this tent.
First Impressions
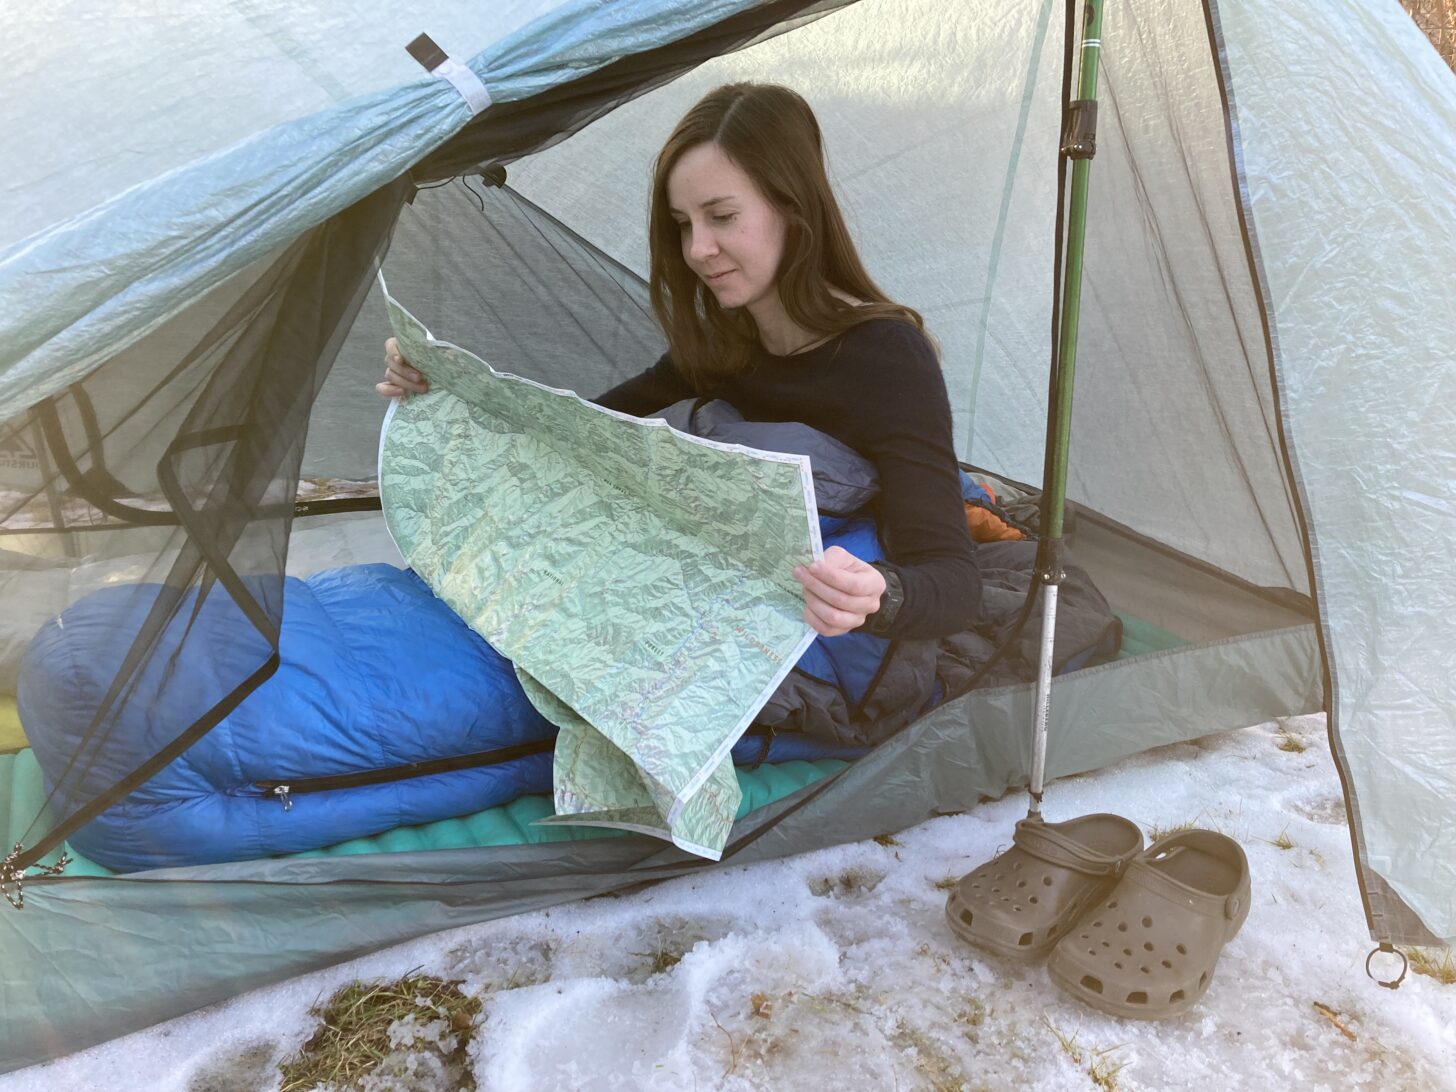
As with the popular X-Mid 1 and X-Mid 2, one of the most impressive attributes of the Durston X-Mid Pro 2 is its unique geometric design that incorporates offset trekking pole placements. (Compare this to most shelters that incorporate two trekking poles, which use a direct-opposite placement of the poles.) In addition, the details that caught my attention include its ease of use, livability, and potential performance in inclement weather.
We recommend you read our Durston X-Mid 2 Review to familiarize yourself with some of the design features of X-Mid tents. That review will aid in your understanding of the X-Mid Pro 2 design.
The most obvious unique design features of the X-Mid Pro 2 include:
- an intuitive (rectangular) pitch that requires a minimum of only four stakes;
- a spacious interior (a function of the offset poles and overall geometry);
- integrated fly that extends further to ostensibly provide better coverage in storms than similar tents. The area covered by the fly of the X-Mid Pro 2 is 55.5 sq ft (5.1 sq m), compared to the Zpacks Duplex whose area covered by the fly is 48.6 sq ft (4.5 sq m).
The Durston X-Mid Pro 2 Tent is designed to be pitched using two trekking poles. For hikers who don’t use trekking poles, or for bikepackers and packrafters, Durston Gear has a lightweight, folding pole kit that is compatible with the X-Mid Pro 2 (and other shelters).
“The X-mid Pro 2 can offer more space and function for the weight because it uses genuinely more efficient geometry (e.g. fewer seams, less fabric for the volume, etc.) so we can put more weight into things that matter,” said Dan Durston.
What’s the difference between the Durston X-Mid 2 and the Durston X-Mid Pro 2?
Compared to the X-Mid 2, the X-Mid Pro 2’s footprint is smaller:
- X-Mid Pro 2: 80 x 100 inches (203 x 254 cm)
- X-Mid: 90 x 102 inches (229 x 259 cm)
This allows the X-Mid Pro 2 to more easily fit into tighter campsites. The headroom is almost identical between the two shelters. The floor width of the X-Mid Pro 2 is only 2 inches (5 cm) smaller than in the X-Mid 2. The most obvious difference between the two shelters is that the X-Mid 2 is a double-wall shelter and the X-Mid Pro 2 is a single-wall shelter.
Is the Durston X-Mid 2 Pro easy to pitch?
Using only four stakes and two trekking poles, I was able to have this tent pitched in just a few minutes without having to readjust anything. It almost seemed too good to be true. There was no fiddling with pole height, moving stakes around, or tensioning (and re-tensioning) guylines. These iterative steps are often required when pitching trekking pole tents. The zippers – both the waterproof fly zippers and the zippers for the body of the tent – operated smoothly.
In soils where staking is more difficult than in my yard and in campsites with varying topography, pitching will obviously be a bit more challenging and perhaps require longer guylines or other adjustments to the pitch. However, given how straightforward the mechanics of erecting this tent are, it’s an easier pitch than most trekking pole shelters.
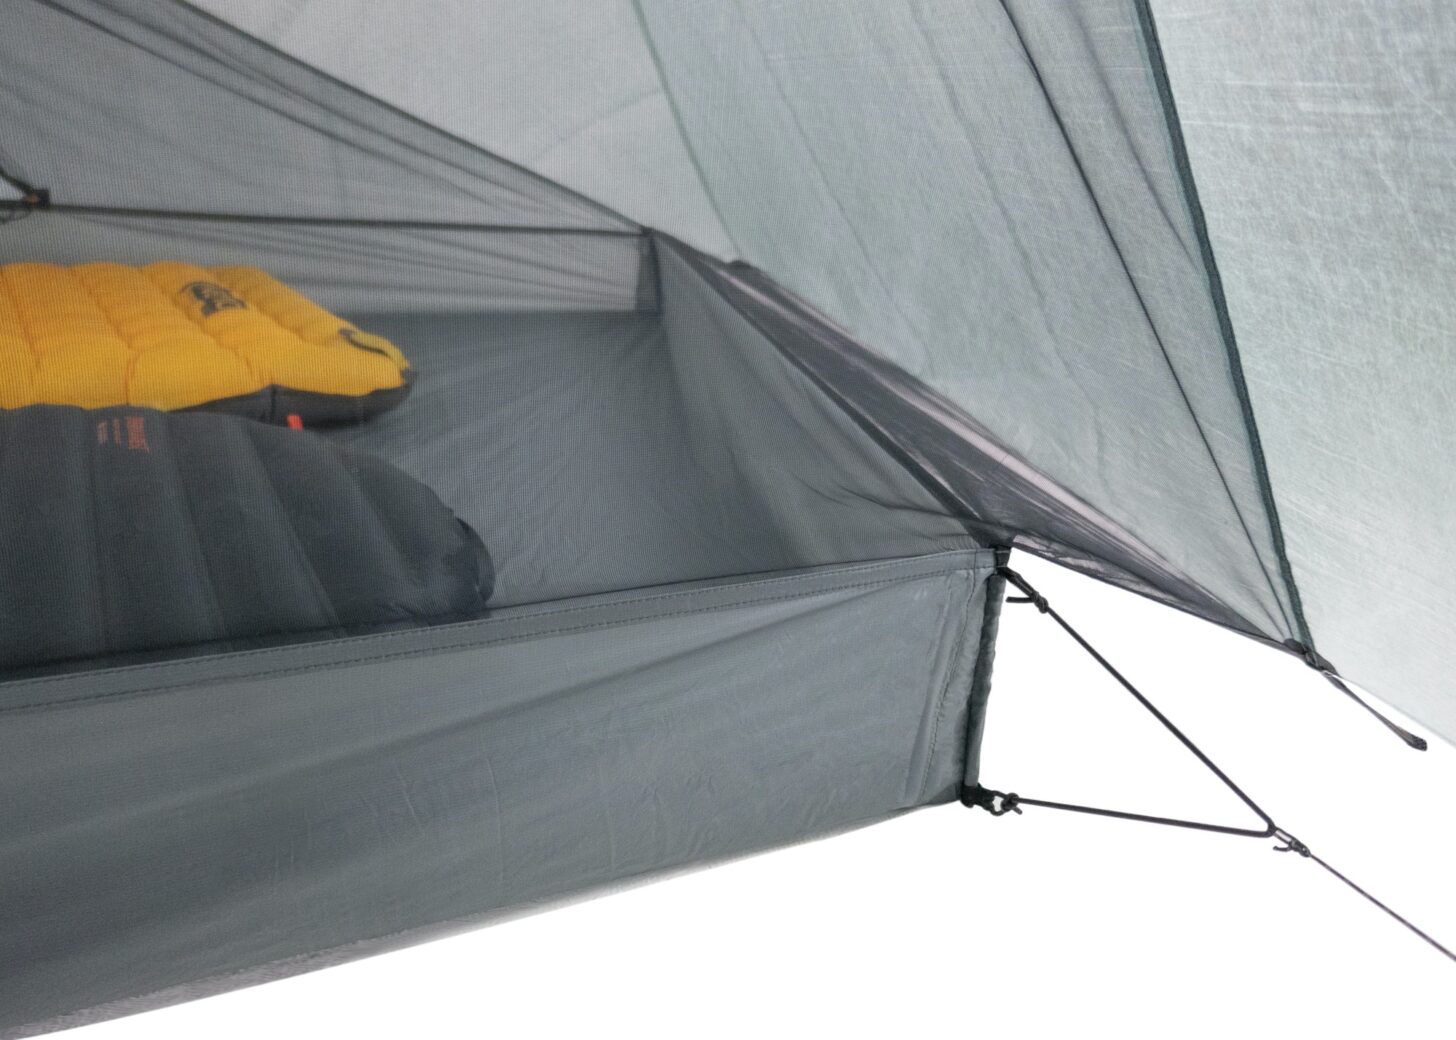
The DCF used for the body of the tent has been used extensively in many other tents by other manufacturers and will last a while for users who care for their gear with intention. One of the most common failure points of DCF shelters is sewn seams; the seams on Durston X-mid Pro 2 are entirely bonded with no sewing. (You can learn more about the advantages and disadvantages of bonded vs. sewn seams in the Dyneema Composite Fabrics episode of the Backpacking Light Podcast and the Dyneema Composite Fabrics Webinar.
Why does the Durston X-Mid Pro 2 have a nylon floor?
A 15-denier nylon fabric was chosen for the floor with the idea that a footprint wouldn’t be necessary for most situations if reasonable precautions are taken with campsite selection. However, hikers using it in conditions where punctures would be more likely (such as rocky terrain or desert environments, with their plethora of spiky things) might want to bring a ground cloth in those specific conditions. The 15-denier floor is similar to the fabrics used in other lightweight tents, including many of those made by MSR and Big Agnes. Many hikers forego using footprints with those tents without experiencing any issues in normal use cases. When asked why the X-Mid Pro 2 uses a 15-denier floor instead of DCF, Dan cited the advantage in packability as one reason.
“We think a 15 denier woven floor is a better choice because it is a similar weight but far less bulk and debatably more abrasion resistant and waterproof in the long term,” said Dan. Using the 15 denier nylon fabric is also less costly than DCF. “Cost is another advantage, although the cost savings are largely offset by our more expensive hot bonding construction process,” said Dan. “We would have used 1.0 osy DCF if we genuinely thought it was better.” Using 15 denier nylon over 1.0 osy DCF results in a less expensive shelter that packs smaller.

Other similar shelters, such as the Tarptent Stratospire Li, use an offset pole design. One of the advantages of the X-Mid Pro 2 is that it has such a simple pitch in addition to the benefits of having an offset pole design.
When asked how this was achieved without resulting in other trade-offs in performance, Dan said “The X-Mid uses a rectangular base to simplify the pitch (compared to a hexagonal tent) and combines that with two trekking poles (to improve headroom compared to a single pole pyramid). The classic challenge faced by other tents attempting this is locating the poles. Prior tents have positioned them around the perimeter which results in flat walls that catch the wind and mandatory guylines, or they have positioned them along the centerline where they interfere in the sleeping area and/or doorways. The X-Mid uses a new floorplan, where the poles are placed on a diagonal and then the sleeping area passes between them on the opposite diagonal. From the overhead view, these crossing diagonals form the “X” in the X-Mid name. From a functional perspective, they provide a good [larger] living space while avoiding all the common pitfalls (e.g., poles in the doorways, poles in the living area, mandatory guylines, flat walls).”
The Durston X-Mid Pro 2 Compared To…
| weight | MSRP | wall design (single-wall vs. double-wall) | floor dimensions | maximum peak height | floor material | canopy material | |
|---|---|---|---|---|---|---|---|
| Durston X-Mid Pro 2 | 20.4 ounces / 578 g | $639 | single | 48 x 90 inches (122 x 229 cm) | 46 inches (117 cm) | 15 denier nylon | 0.5 osy Dyneema Composite Fabric |
| Zpacks Duplex | 19.0 ounces / 539 g | $699 | single | 45 x 90 inches (122 x 229 cm) | 48 inches (122 cm) | 1 osy Dyneema Composite Fabric | 0.55 osy Dyneema Composite Fabric |
| Tarptent Stratospire Li | 27.5 ounces / 780 g | $699 | double | 45 x 86 inches (114 x 218 cm) | 45 inches (115 cm) | 1 osy Dyneema Composite Fabric | 0.51 osy Dyneema Composite Fabric |
| Gossamer Gear The Two | 23.5 ounces / 666 g | $375 | single | 42/48 x 84 inches (107/122 x 213) | 43 inches (109 cm) | 10 denier nylon ripstop | 10 denier nylon ripstop |
On paper, the Durston X-Mid Pro 2 bests many tents in its category (two-person, two-door, side-entry, dual-vestibule trekking-pole shelters) on a number of metrics. It is either lighter, roomier, less expensive, and in certain cases, all of those things. But how a shelter looks in a table is only part of the equation – one which we are increasingly less inclined to emphasize as shelter builders shave ounces at the expense of other important factors. Craftsmanship, quality control, user-friendliness (ease of pitching), livability, stormworthiness, and aesthetics all come into play. These are the performance metrics consider in this review.
Long-Term Performance
In this section, we evaluate:
- Pitching
- Livability
- Stormworthiness
- Fabric
- Durability
- Weight
- Finish quality/aesthetics
- Price
Member Exclusive
A Premium or Unlimited Membership* is required to view the rest of this article.
* A Basic Membership is required to view Member Q&A events

Discussion
Become a member to post in the forums.
Hi Jon
I’ve used a XPro2 for 8 nights with 4 or 6 stakes depending on wind and if I want to 1 hand the zipper.
The first 2 nights my pitch had the issues you’ve point out in the pictures. The 3rd night I concentrated on getting the corner to corner seam taught and the stakes at +/-45 degrees to the corners. After this the perimeter has been tight even with just 4 stakes.
Between the tension and possible wind load I didn’t trust the supplied 6″ stakes so I used 7-8″ stakes at the corners.
The biggest issue I had is getting use to the larger footprint.
I’m noticing a pucker in the video on the long side of the door, down low where the bathtub is attached. I received mine and have the same pucker. Have you noticed this and have you found a way to mitigate it (and is it even necessary)? I’ve tried loosening the bungees a little and it helped some, but not fully. Pitched easy and more stable than I expected with just 4 stakes.
Glad you’re finding the pitch easy and stable. That pucker is normal. The floor connects to the fly there and the floor is under some tension, so it does create a dimple on the fly at that point.
Thanks Dan! The more I mess with this the more I like it. Hoping to get it out in the field this weekend. 🤓
I appreciate the video update, but the staking section was exhausting. Whew! It seems that only the four corners use line-locs, and all the other stake points are elastic loops which seem to cause very steep pull angles and minimal discretion in stake placement. It brought to mind the very interesting pull-angle insights that DD expounded on in this discussion.
Older youtube vid pitching the 1P. Method works for any rectangular or square tent. Geometry in the field. Triangulate the square to find center of the opposite side. https://www.youtube.com/watch?v=5aNTuurDEFE. Apologies if this has been presented before.
That method is money!
Hi guys, have the OG Xmid, the new Xmid 1 (HUGE improvements and well worth the cost) and now the Pro, which I’ve never taken into the field. One thing about that video is that it doesn’t really work with the 2 person, read the comments in the video. I’ve gotten pretty good at the old “eyeball” trick and can usually get the square right the first time. Although it’s nice to have some extra cord on the corners in case you hit rocks etc.
But I’ll tell you, I have over 150 nights in my Xmids and it’s still a little bit of a spitball getting the head position just right due to the “clocked” inner. Does the hive mind have any tricks? Meaning: I have a fairly square site that slopes a bit. I find myself laying out the inner, which I usually keep attached, then proceeding from there. A rather sloppy method that I would like to tighten up. Any tips would be swell!
EDIT: One issues V1 vs V2 I have is that the struts to hold open the vents are shorter by a good inch or two. I’ve found the vents sag a bit. Would be nice if they were longer like the old ones. But the rest of the changes, particularly the net tie outs on the inner and slightly larger inner are really great.
For orienting the inner, I throw out the tent onto the ground while holding one end of it. Like this, I know the sleeping position angles a bit to the left, so I throw out the tent in a direction that is a bit to the right (by about 20 degrees) so that the inner inside that angles left will be about right.
Dan, thanks for the reply. Very helpful. Always learning new stuff about this amazing tent. It’s a huge resource that you’re so engaged in not only the design but the user experience of these tents.
Sorry. Didn’t mean to hijack the thread.
Hi Philip
I can’t think of a scenario when it needs to go from low to high so re-pitching done in the video isn’t necessary.
It will be easier to start off high and lower it if a storm comes in. Double staking the guy lines may work if the ground/sand/snow allows it but more than likely I’ll be laying rocks/logs across the guy lines.
Made some changes yesterday
Easier to know which is the top or bottom
Magnets holders for the bug mesh. I’m guessing this added 4g. Made with 1″ (15/16″) DCF tape cut in half then folded over. Tabs at the end are 1″ DCF tape folded over.
Couple more Velcro tabs to hold the vent close and 10′ of Lawson guy line at the peak
Longer guy lines with a longer tail to pull and bigger eyes to double wrap stakes. Orange on 2/ yellow on 2.
Prusiks on each corner using the shock cord taken off the tie outs reduces the tension on the bottom corner and add tension to the top. Makes the rods stand up so the edge of the floor across the ends is up 1/2″-1″.
Also put guy line on the other (doors included) ties out to reduce the chance of damaging the DCF when driving stakes in.
I like your mods! Clever stuff. Though, just so I’m clear…you have big eyes, so you can double wrap 1 eye over your stake. Though….why? Were you wanting more friction against the stake so it doesn’t slip, or worried about a single loop getting abraded or ?
DGoggins
Everything you mention + it’s easier on the fingers pulling stakes with the guy lines.
John W T – I like (and will shamelessly copy) everything you did. Also planning on replacing all guylines with Lawson Glowwire. I HATE the tiny linelocks that come on it so will replace all of them with linelock 3s and add 2 on the peak guylines.
Question – where did you source the magnets?
It’s UL so I understand the choice of line locks. I’ll use a tucker’s hitch for the peak.
The magnets are 1/4 from Lee Valley Tools.
The magnets MAY stuff up your compass bearings if you are not careful.
Cheers
Hi Dan,
Does this also apply for the X-Mid Solid 2p? i.e. realistic max stakes of 14, assuming there are also 2 side panel guyouts?
Waiting on mine to arrive (very excited!) and just working through potential stake configurations.
Thanks!
For a pretty robust pitch you’d put 4 in at the corners, 1 at each door, 2 peak guylines, and 2 side panel guylines = 10. From there, you could add 4 more via the stake loops near the midpoint of each side for pretty much the maximum of 14 stakes. Beyond that, you could put a stake in at the large side of each door, but then the door wouldn’t work so you’d do this at most on one side. So you could stake 16 spots but practically 15 is the maximum.
I got to minute 8 of that video and said, yuk. Way too much fiddling for me, esp at the end of a long hard day. Geometry, raising and lowering trekking poles, and messing with corner stake tension, yada yada. It’s a bit of a mismatch between the video and the review description saying it’s one of the easiest trekking pole tents to pitch! Also, with pole tips down, how do you prevent them gradually – or quickly – sinking into soft turf? Which then changes the pitch altogether.
I like the idea of a 2 person trekking pole tent, but so far I’m not seeing one I like.
That BPL video is showing a lot of depth and different options, but the basic pitch is as simple as staking out a rectangle and inserting the two poles. I have a pitching video here that shows that in about 20 seconds:
It really is pretty much as simple as it gets for a trekking pole tent, because I agree with you that fiddling with a complicated tent is the last thing you want at the end of a long day. That’s why the base is a rectangle instead of a hexagon, and why the poles are designed so you can simply extend them with no need to measure.
For pole tips down, this is a very common style for a trekking pole tent. Normally the tip will only push in slightly, but if it is soft ground then I would intentionally push it in about 2″ up to the basket and then it’ll stay there.
The myth is that trekking pole tents are hard to set and that you need a perfect pitch every time..
I have various tents, free standing and trekking pole, including an Altaplex and Xmid Pro 2.
I can’t say that any of them are hard to set up or much of a hassle. The Xmid is pretty quick and simple though, you can be inside with a “good enough” pitch very fast, the Altaplex takes a bit more fiddling with, but it’s not hard.
I say good enough, because I’m frequently not looking for more than that. 90% of the time I don’t need a perfect pitch to sleep through the night, even if it rains a bit. In a storm with wind and rain yes, but those conditions aren’t the norm in the West.
The Xmid also can be pitched to save space if needed, that’s a nice option.
I was skeptical of trekking pole tents for a while, especially after having some bad experiences with setting up tarps (user-error, mostly), and stuck to freestanding tents. I would much rather spend my time in camp fishing, looking at the clouds, reading a book, or just strolling around the campsite and admiring the scenery than moving stakes around like musical chairs and fine-tuning tensioning systems. So I was hesitant to try them out when I started looking at lighter shelters. I now have three different trekking pole tents in my line-up now (SMD Lunar Solo, REI Flash Air Two, and Durston X Mid Pro) and rarely use freestanding tens anymore. The weight savings just make sense to me and the set-up is nowhere near as fiddly as it can seem. After a bit of practice, it’s not much more difficult than making a bowl of cereal, to be honest (or setting up a freestanding tent, to use a more relevant analogy).
I’d recommend getting your hands on one of the more simple designs (most likely one that requires the fewest number of stakes) and trying it out before totally dismissing them. In some cases, they can be a really great addition. They make a lot of sense for me in the mountain West and the type of trips I do, but they might not be for everyone — I just wouldn’t want to let the perception of a difficult set up stop anyone from enjoying their real benefits.
Become a member to post in the forums.