Topic

why tents fail in the wind


Forum Posting

A Membership is required to post in the forums. Login or become a member to post in the member forums!

Home Forums Gear Forums Gear (General) why tents fail in the wind

Viewing 25 posts - 126 through 150 (of 173 total)
  • Author
    Posts
  • #3635647
    Matt Dirksen
    BPL Member

    @namelessway

    Locale: Mid Atlantic

    Ryan,

    Out of curiosity, do you have altitude, temperature, and humidity measurements  for your tests?

    While I understand that air density is affected by all of these things, I think I’ve been told that altitude can play a big role is just how much “force” is actually in the wind itself. In other words, 30mph at sea level is measurably “stronger” than 30mph at 10,000 feet.

    But by how much does air density play into this, this is beyond my architectural pay grade.  I just know it does.

    And I understand the total height of a tent will play a big role in just how much force is applied to the side of a tent.

    Any engineers/scientists care to chime in?

    (p.s. forgive me if this is too much of a thread drift)

    #3635650
    John “Jay” Menna
    BPL Member

    @jaymenna78734

    Locale: 30.3668397,-97.7399123

    We had a nice windy day here in Austin so I set up a “V” shaped elastic extension to my current ( the yellow green in the photo is elastic)  Then I simply grabbed a beer and watched as the wind hit it.

    Unfortunately I came up with no “Eureka” moments.

    I noticed that the wind loads up  the forces way faster than it unloads.  And that the elastic seems to reduce the “Wind hammer effect”.

    There are just so many damn variables to isolate here.   

    #3635687
    Nick Gatel
    BPL Member

    @ngatel

    Locale: Southern California

    Here’s an interesting “elastic” solution from Colin Fletcher’s Complete Walker III (1987). Seems nothing is new.

    #3635723
    Roger Caffin
    BPL Member

    @rcaffin

    Locale: Wollemi & Kosciusko NPs, Europe

    the total height of a tent will play a big role in just how much force is applied to the side of a tent.
    This is discussed in our articles on Tunnel Tents
    https://backpackinglight.com/tunnel_tents_part1/
    https://backpackinglight.com/tunnel_tents_part2_2012/
    https://backpackinglight.com/tunnel_tents_part3_2012/

    There is a graph of height vs windspeed in one of those. I have reproduced it here for convenience.

    Unfortunately the graph only displays up to 1 m, but you can extrapolate a bit quite easily.

    Cheers

    #3635748
    R
    Spectator

    @autox

    Matt,

    https://www.mide.com/air-pressure-at-altitude-calculator

    Atmospheric pressure at 10,000′ is ~2/3 what it is at sea level. This means the wind has to blow ~20% faster to generate the same drag force.

    For a given temperature and humidity, density is proportional to pressure.  Drag force is proportional to pressure and velocity squared.  So v-sea^2 = 2/3 v-10k^2.

    #3635753
    Jon Fong / Flat Cat Gear
    BPL Member

    @jonfong

    Locale: FLAT CAT GEAR

    Straight from the horse’s mouth (sort of).  I was curious as to what Cascade Designs had to say about their Groundhog stakes with respect to orientation.  I should have phrased the question better.  Here is their response.


    Hello Jon,

    “How should Groundhog stakes be inserted into the ground? Vertical or perpendicular to the guy line?”

    Perpendicular works best, but some situations might cause the stake to have to be in a slightly different position.


    800.245.2992 | Office

    Cascade Designs, Inc.

    Therm-a-Rest | MSR | Platypus | SealLine | PackTowl

    #3635755
    Roger Caffin
    BPL Member

    @rcaffin

    Locale: Wollemi & Kosciusko NPs, Europe

    You were expecting them to give a precise angle?
    Most unlikely.

    Still, they do recommend perpendicular to the guy rope, which is what most people do anyhow.

    Cheers

    #3635788
    Sam Farrington
    BPL Member

    @scfhome

    Locale: Chocorua NH, USA

    Geoff, re:
    “What would that look like? For a small shelter there are only so many practical structures you can create, given the properties of the poles… ”

    Hah.  Answer a question or questions with a question. Or perhaps you missed mine, or thought they were merely rhetorical.  No matter.

    Heard a lot about the movie, “Groundhog Day,” but never saw it. The longer on BPL, the greater the impression. It’s like going back to a bar and expecting to resume a conversation where it left off.  Fat chance.  So, no qualms about posting stuff again, and again.

    After thinking about tent puzzles endlessly, settled on the shape in this model of a solo:

    The wooden sticks represent just the vestibule seam lines (if they were straight – will get to that).  The music wire represents the poles.  For those interested, the concept began sometime ago with a post, at:  https://backpackinglight.com/forums/topic/45631

    The poles are from the multi-layered carbon arrow shafts I’m often harping about.  The shaft weight is .247 oz per running foot (total pole length is 25.5′), divided into 4 sections, with elbows at the two peaks.  Six pegs cover the four vestibule corners, front and back, plus two lines strung from the 2 pole crossings.  Sure, there are loops for more guy lines if preparing for a tornado.

    There were models with similar frameworks before the old post in the above link, and was pleased by the stiffness of the structures in all of them.  Not that they were too rigid, just way more so than a two pole dome with a single pole crossing at its peak.  The reasons for this have to do with the added strength of double pole crossings, and how the poles and the fabric outer skin reinforce each other.

    The vestibules are not overly different from Jerry’s half mid that he has posted about, and the issues are probably similar.  He may be concerned with how to keep the corner seams taut, and not flappy.  IMO, and even though the seams are more vertical than horizontal, it is about a correct catenary cut, not about stiffening the seams.  Pack shops used to set up many more tents in their showrooms, and almost all of them have had seams with a parabolic shape where the curve is more acute closer to the peak, and progressively less so as the seam approaches the ground.  So had to devise a way to mimic that.

    Being very weight conscious, it was a struggle to decide whether to have a ridgepole.  At the urging of Roger, who is also strong on two-peg vestibules, was convinced that a ridge pole would not only better shed precipitation; but also tie the frame together into a stronger unit.  So decided to try a ridge pole using a lighter and more flexible carbon pole; as shown in this side view drawing:

    The ridgepole is about 5′ long, and the Easton carbon shafts weigh about .224 oz per running foot.  The pole also supports the outer fly, which extends to protect the front and rear peak vents.  Note that the vestibules are attached to the inner of the main tent; hence the fly can be much smaller and easier to attach in high winds.

    The goal is to get the tent under 2 lbs.  A big issue is finding a really light but strong nylon for the fly.  The Rockywoods 7D is OK, but the PU coated side has a habit of sticking a bit to itself after storage, not good when in a hurry to get the tent up.  The RBTR 7D is Dupont 6.6; but while the gray looks light enough on the product page, it is really much darker.  Like my tents airy inside, not covered with an almost black skullcap, so haven’t sought testing of the HH, which is spec’d at only 2K, not great either.  Terra Nova has a dark green Competition Tarp that is very light and spec’d at 5K HH, but am getting a little too far into the weeds.  Will decide eventually.

    So am confident that this design will be quite wind worthy, and provide much more space and comfort with bowed out walls, rather than the slanted walls of a trekking pole tent.  Whether the limited number of stakes will make up for the pole weight remains to be seen.  May not care much if the tent weight comes to less than 2 lbs.

    #3635790
    Sam Farrington
    BPL Member

    @scfhome

    Locale: Chocorua NH, USA

    Note:  Regret any errors or omissions.  The new edit function does not allow careful editing.  A real PITA.

    #3635800
    Geoff Caplan
    BPL Member

    @geoffcaplan

    Locale: Lake District, Cumbria

    Thanks Sam

    Hope you get it made and tested – don’t think I’ve seen this design before, which either means you’re brilliant or that you’re missing some drawback that has kept it off the market. I guess we won’t know till you try it in the field.

    The alternative, for pole carriers, would be a hybrid trekking-pole/bendy-pole design like the original TrekkerTent Edge 1.

    People found it performed pretty well but was fiddly to pitch. It used a burly fabric for 4 season abuse and weighed a fair bit north of a kilo, from memory. It never really found a market, and was time-consuming to make, so it’s been discontinued. But the idea of combining the two types of pole must have some potential for anyone designing for true 4-season conditions.


    #3635874
    Franco Darioli
    Spectator

    @franco

    Locale: Gauche, CU.

    Sam’s solo tent reminds me of the Luxe Firefly tent.

    From memory i did suggest an apex strut to connect the two poles. I can’t remember what happened with that

    https://www.aliexpress.com/item/1766454130.html

    #3635943
    R
    Spectator

    @autox

    I’ve seen a symmetric version of that with out an elbow at the peak.  Roof is a bit narrower.  I think a few companies have done it, but I can’t find any examples.

    Another hybrid pole design would be a tunnel tent combining a trekking pole a-frame, and a bendy-pole hoop.


    #3635947
    Franco Darioli
    Spectator

    @franco

    Locale: Gauche, CU.

    Moss/MSR and then Sierra Designs in particular , used that cross pole configuration.

    Some examples


    #3635976
    Paul S
    BPL Member

    @pula58

    Ah…I had one of the Moss “Stardome II” tents…loved it! It was heavy though:  8+ Lbs  !

    #3636129
    Sam Farrington
    BPL Member

    @scfhome

    Locale: Chocorua NH, USA

    Geoff, re: “Hope you get it made and tested – don’t think I’ve seen this design before, which either means you’re brilliant or that you’re missing some drawback that has kept it off the market. I guess we won’t know till you try it in the field.”

    Fair enough, though no claim to brilliance.  But after thinking about it for ages, hope to see if it works.

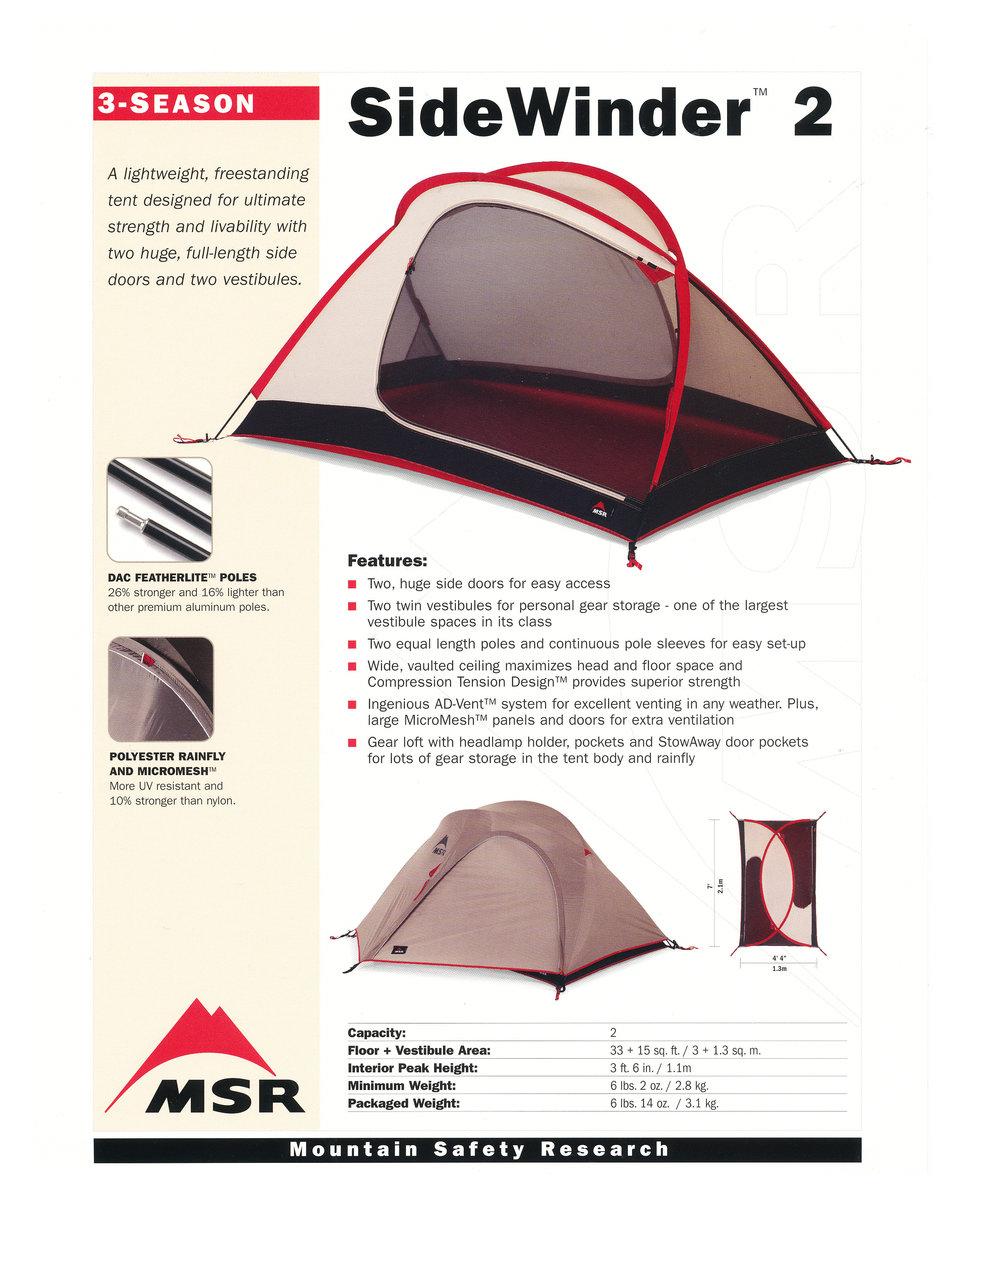
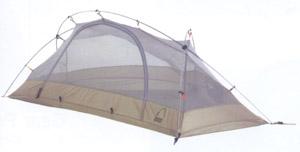
    Franco, re:  “Sam’s solo tent reminds me of the Luxe Firefly tent.”

    There is a Firefly in the original carton in the storage room here.  Was probably thinking of modding it, but never got around to it, possibly because:  1) Too heavy, 2) Roger’s pop-up phobia – they get wet inside when pitched in the rain,  and 3) Not much space for gear and pets.

    Decided to start from scratch for many reasons, including:

    1)  If the vestibules are attached to a breathable full ceiling panel, rather than part of an unwieldy fly that includes the vestibule(s), and the ceiling panel is water repellent, the tent can be pitched while kept dry inside in the rain, then a smaller fly attached.  Extrem Textil has had a couple of yellow fabrics for tent inners.  The first sold cheap due to a loose weave – around 26 gsm, and very water repellent.  The current one is 32 gms, a little heavier but still under an oz/sq/yd.  Probably better quality.  I think either one will keep rain at bay during the time it takes for pitching.

    2)  The smaller fly can be just one panel of fabric (albeit with bonded reinforcement patches), and will conform to the outwardly bowed framework by stretching on the bias.  This has 2 benefits: 1) No need to sew together a bunch of fabric panels for the canopy, and 2) Silnylon can be used because the convex frame stretches the fabric on the bias, thereby reducing nylon sag.  Please note discussion in an old post linked earlier in this thread.

    3) Lighter and much more water resistant fabrics are now available.

    4) More interior space for a solo tent.

    5)  The double pole crossings create a tent that is more rigid in the wind, as mentioned in my post before this one.  Granted, some of the ones pictured by Franco may also do so.  I did have a Moss, called the Starlet or something like that, but it was pretty cramped, and heavy of course as were most tents of that era.

    6)  Gives me a chance to try some other details, like the ridgepole that supports a fly that protects the vents as well as the inner ceiling (the vents will be adjustable with zips on the inside); and,

    7) To see if double peak vents plus front and rear doors that secure open part way will provide enough additional ventilation without having to install netting on the inner walls as is commonly done.  Sierra Designs used to make some single wall tents with netting just on the sleeping area door(s) inside the vestibules.  That was not enough, and the tents were discontinued.  Adding the breathable ceiling inside and the smaller fly will show whether the advantages of the ‘freestanding’ conventional pop-ups can be made workable.  Am leaning toward pole clips rather than sleeves to support the inner ceiling because the inner on my Goondie goes up very fast with clips; and the clips will allow air to circulate better under the fly.  Kuiu has shown that canopies with double crossing poles can be supported by  pole clips with good wind resistance:
    https://www.youtube.com/watch?v=8hEX5R761Xc

    Am a big fan of Trekkertent also, and hope someone will use and review the Saor, DCF and/or silnylon.  Have never needed more than one trekking pole, but the designs that create a pole bridge with a connector at the top (the original Nomad, and currently by Lightheart Gear)  might be combined with a flexible carbon pole or two to provide more stability and room without adding much weight.  A small hoop, or flexed elbowed triangle perhaps?

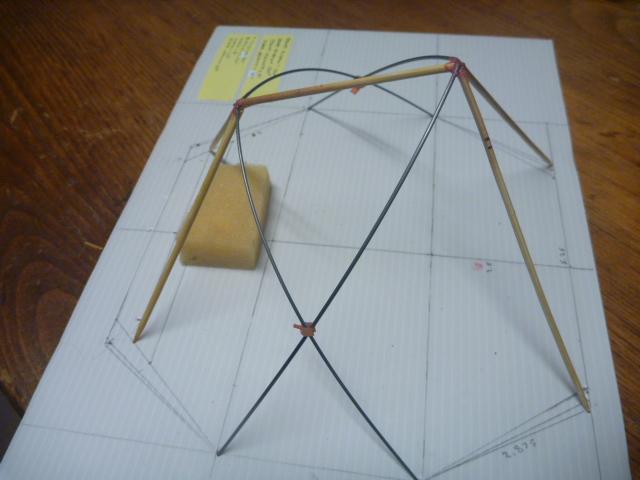
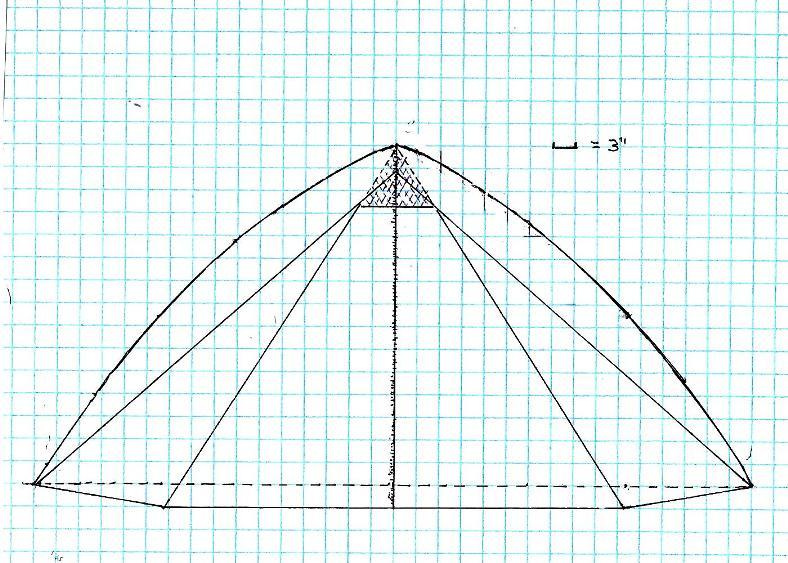
    Here is a sketch of the XX from the front, just to provide a better idea:

    The adjustable door is just one center zip, to be held open with bungee/velcro gizmos.  Will use Warmlite’s beefed up #3 YKK zips, either coil or tooth, with a shorter one on the smaller rear door for access to storing gear.  And living in New England, the sleeping area will have netting walls attached to both sides of the the floor in the usual fashion.  Am a fan of inverted T netting inner doors, because they open wide and have no curves in the zips; but to each their own.

    #3636580
    Jacob
    BPL Member

    @jakeyjohn1

    I think Exped is using that general crossing pole setup with elbows at the peaks, but level peaks with no ridge pole and a different curve to the poles. The fly setup is undoubtedly different from Sam’s idea too


    The older Tarptent Rainbow allowed trekking poles to vertically support the cross/ridge pole from the ground (not the ‘freestanding’ setup), in what seems to me to be a very strong combination trekking pole + curved pole structure.

    #3637104
    Sam Farrington
    BPL Member

    @scfhome

    Locale: Chocorua NH, USA

    The Exped tent is over 5 lbs, and the poles are bent to such a tight radius below the pole crossings that I fear it would not be very stable.

    The TT Rainbow, much like the original Phoenix design used by Chris Townsend in crossing the Yukon, is another story, and would be super if TT would make it with a full net inner.

    #3637117
    Henry Shires / Tarptent
    BPL Member

    @07100

    Locale: Upper Sierra Foothills - Gold Rush Country

    > The older Tarptent Rainbow allowed trekking poles to vertically support the cross/ridge pole from the ground (not the ‘freestanding’ setup), in what seems to me to be a very strong combination trekking pole + curved pole structure.

    Still there on the newest Rainbow and Double Rainbow.  And, yes, it makes it very strong.

    -H

    #3637119
    Franco Darioli
    Spectator

    @franco

    Locale: Gauche, CU.

    Roger , in the deleted comments, offered the suggestionj that the Exped tent might have prebent poles.

    It’s a Gemini 2 and no it does not.

    It comes with 4 poles all with straight sections.

    That end curvature I think it may appear to some to be a lot more pronounced  than it is.

    This might help

    if not take a look at this video clip

    YouTube video

    #3637132
    Roger Caffin
    BPL Member

    @rcaffin

    Locale: Wollemi & Kosciusko NPs, Europe

    Yes, I was fooled by the angle.

    I did try watching the video, but got utterly bored stiff by the endless waffle the guy was spouting. He showed very little, but did crap on and on. He could have done better with a simple audio and 1 or 2 static pictures.

    What is clear is that the poles are NOT attached to the fly, so the tent can still slide around in a high wind. It will. If you have to pitch this tent in heavy rain, bring a bucket to bail out the insides.

    If you have to pitch this tent in a storm, with both wind and rain, you will soon wish you were home. To be sure, you should not have much trouble getting the inner tent up, but getting the fly over the inner while the wind is trying to blow it away . . .

    Cheers

    #3637157
    Geoff Caplan
    BPL Member

    @geoffcaplan

    Locale: Lake District, Cumbria

    Roger is right.

    Way back when bendy pole tents were new to the market I bought an inner-first design. For use in Scotland! Bad move – never again…

    #3637159
    Eric Blumensaadt
    BPL Member

    @danepacker

    Locale: Mojave Desert

    Roger Caffin’s mention of pegs (stakes) loosening in the ground from peak gusts and eventually pulling out is just one more reason to use big rocks to hold the pegs in place.

    I’ve done the “rock-on-stake” routine many times and it (almost) always worked. The only problem on a few occasions was finding and carrying those big rocks back to the tent. On one occasion I had to use a big downed tree trunk dragged back with great effort but also holding stakes in place with great effect during that night’s howling winds. I managed to lay it on two windward stakes.

    ** On a few occasions I’ve also tied out my guy lines to adjacent trees and that proved the value of bringing extra tent cord when the trees were huge.

    #3637160
    Paul S
    BPL Member

    @pula58

    I have that Exped Gemini II tent. If it is pitched end into the wind it does great, and is way more sturdy than typical lightweight pop-up tents (Big Agnes, etc). A guy line ties directly to the end pole crossings, and, two grommet-and-ties hold the peak of the rain fly to the peak of the poles so the fly does not more much over the poles. It’s a nice tent..I just wish it weighed a bit less! :-)

    Setting it up in the rain..well obviously the inner is going to have some rain fall on it. But the inner is not all mesh, a lot of it is solid DWR’d fabric. In particular, the roof of the inner is solid DWR’d fabric.


    #3637162
    Eric Blumensaadt
    BPL Member

    @danepacker

    Locale: Mojave Desert

    Paul, I still say that EXPED Gemini II design is not one I would buy for just the reason you mentioned, the inner tent can get soaked while setting it up. Remember, the mesh walls  and the floor will get wet when lying flat while you thread the poles in place.

    EXPED needs to put the pole sleeves on the FLY so the inner tent can be left hooked to the inside of the fly and the tent be set up as ONE unit. Plus it’s faster.

    #3637163
    Craig B
    BPL Member

    @kurogane

    Wow, quite the thread drift here from the OP question, which I don’t think anyone has really hit on the answer to.

    Yes, the mechanics of this situation are extremely complex.  However, I think MORE loosening of a stake in its hole by a guy line that has LESS average tension (by quite a bit) can can be explained by static vs dynamic friction, and the differences in impulse forces between the two situations.  People have already mentioned these things on their own, but have not really put it all together yet.

    In the lower tension situation with the tent free to flap, you will have oscillations in the fabric that lead to energy being directed down the guy line in a whip like manner.  This leads to greater variation in the percentage of static load as Ryan observed, but more importantly this will result in force being applied to the stake on a very short time-scale which will have a very high impulse force.  It’s likely there were higher impulse forces experienced in the lower tension scenario vs the higher tension setup.  The higher the impulse force the better chance you have to overcome static friction.  Think about the hammer and nail example that was described previously;  you can drive a nail half way in with a 1Lb hammer, then gently place a 50Lb load on it and it will not move.

    The static vs dynamic friction part comes in with respect to the ground around the stake.  There is a certain amount of friction that holds the stake in the ground in the direction you drive it in, but that is not really the whole picture of what keeps a stake held in place when you start pulling on it sideways.  If the ground deforms and suddenly you have a loose hole, there will be much less friction on that stake.  What is keeping the ground from deforming and opening up to be a larger hole?  The friction of all the particles that make up the soil/sand with respect to each other.  If you start applying high impulse forces to the stake from the side, you can overcome the static friction of the ground itself and it will deform to a larger hole.

    So really what you want to do is minimize those impulse forces.  Clearly a tauter pitch can do this as Ryan has demonstrated, or having some sort of elasticity in the chain as many others have pointed out.  Measuring the impulse forces will probably be difficult with the equipment Ryan is using.  You will likely need a high-speed analog to digital converter and perhaps a specialized load cell/force gauge to see things on the millisecond (or faster) time scale.  I haven’t looked, but I’m sure it’s possible though.

Viewing 25 posts - 126 through 150 (of 173 total)
  • You must be logged in to reply to this topic.
Forum Posting

A Membership is required to post in the forums. Login or become a member to post in the member forums!

Get the Newsletter

Get our free Handbook and Receive our weekly newsletter to see what's new at Backpacking Light!

Gear Research & Discovery Tools


Loading...