Topic
The Joule Thief: Yet Another HX Pot
Forum Posting
A Membership is required to post in the forums. Login or become a member to post in the member forums!
Home › Forums › Gear Forums › Gear (General) › The Joule Thief: Yet Another HX Pot
- This topic has 117 replies, 21 voices, and was last updated 2 weeks, 5 days ago by
 Roger Caffin.
-
AuthorPosts
-
Jul 3, 2022 at 8:18 pm #3754313
INcreases boil time?
or
DEcreases boil time?Cheers
Jul 4, 2022 at 7:13 am #3754336My huge titanium wind screen weighs 2 ounces and increases boil time for me
Is this a typo?
Jul 4, 2022 at 9:20 am #3754340ooops, well not quite a typo. I* meant increases the speed of boil time. water boils more quickly. with the windscreen.
Jul 4, 2022 at 11:34 pm #3754412If you need to increase the radius of the BRS 3000 pot supports a little bit, they can be bent outwards – I did that in the past as a preventive measures against the possible melting of the supports. It’s documented here: https://backpackinglight.com/forums/topic/brs-3000-stove-mod-to-prevent-melting-of-the-pot-supports/
It has a downside too – the folded stove become less compact. But if you need to increase the radius of the pot supports just a little bit, you don’t have to bend them as much as I did. Bending just the end part with the grooved pot rest may be enough too.
Jul 6, 2022 at 9:21 am #3754484<p style=”text-align: left;”>Jan:</p>
What an awesome and simple solution! Thanks for sharing, I’m going to pass that thread along to the 3 people that currently have this problem with their pots and BRS stoves.Jul 6, 2022 at 10:12 am #3754489Hi Jscott:
it seems that measurements are being made without a windscreen…indoors? In little or no wind?
Yup, that’s correct. I prefer to do it this way because it acts as a stable baseline that is easy to repeat in-between experiments. Then while on the trail I know all I have to do to get close to that baseline is reduce the systems wind exposure as much as I can.
I personally never use a windscreen, I do the vast majority of my hiking in the CA eastern Sierras where wind can be a plenty, but so are large rocks and areas of natural topology that act as a safeguard from the wind. I suspect I put more time into camp selection, stove windblock making (and disassembly for LNT) than most, so I haven’t felt much of the need for a windscreen in the past.
Recently I have come to question this practice as I get better at pushing big miles. It is times when I end a 30 mile day and I desire to drop where I am and set-up camp with a hot tea that I really question the logic of saving an ounce in exchanging for the extra time I need to spend for site selection and stove windblock construction.
Does an external, large wind screen serve the same function, essentially, at a lighter weight, as this system? Not trying to be a bummer here; you guys are far more sophisticated than me with everything involved. So sorry if I’m asking a stupid question
I don’t know for certain ( I have virtually no windscreen experience to pull from) but you might get close to some kind of answer by looking at Jon’s website https://www.flatcatgear.com/ and youtube channel. To my knowledge, Jon is pretty much BPL’s resident windscreen expert and among the group of most knowledgeable stove gurus as well. This really shows on his site with tons of data collected and in one place for others to view. I suspect the answer to your question can be found in his data.
If you use his data to compare how your stove of choice performance with and without a windscreen, then you can get a good “bias factor”. You can then use this bias factor to bias the performance metrics of these pots to guesstimate how bad they may perform in the wind with your stove of choice and compare that to how your own pot + stove + windscreen performs in similar conditions. Thats how I would approach it, but I’m sure the logic is flawed… like I said, no experience on this exact subject so I’m really just guessing here ;)
Cheers!
Jul 6, 2022 at 4:31 pm #3754517My very functional windscreen (a slightly modified Trail Designs one) weighs 49 g. It can be the difference between a slow pot of luke-warm water and a fast pot of boiling water. And it saves a huge amount of fuel too.
It is worth every gram.Cheers
Jan 24, 2025 at 2:52 pm #3827026Reply to Brad’s question on the Sterno Inferno thread I hijacked off topic for a bit. Moved the reply here to avoid steering it off topic further.
I mentioned briefly over on the above thread that the verdict was still out on if this thing causes concern. It was part joke, this thing is kindly know as “The Cancer Pot” over on r/ULtralight thanks to a funny roast of the project on r/UltralightJerk
Reply to clarify what I mean:
The pot was originally intended to be used by me and me only. I came up with the idea for the project because I wanted the pot to be real (duh ;) ) and I wanted a show piece for potential future prospecting employers that highlighted my interdisciplinary skills (I was a computer engineering major student when I made these, but have some modest self taught ME talent I thought worth showing in some sort of project). Because of this, the pot was never optimized for affordability or market readiness… its best to think of them as an ongoing obsessive engineering exercise (by a non-engineer) into what is possible and what can be done, instead of an exercise into what should be done.
Health Concerns: This is the biggest issue IMO. Although the boiling water only touches NFS 61 certified silicone and the bare Aluminum HX, in addition to CF being coating in FDA title 21 compliant food contact epoxy incase the silicone were to ware through, the use of carbon fibers themselves and toxic high temperature epoxies in the core of the pot sleeve concerns people I’ve shown it to on the internet. Hence the name “Cancer Pot”.
But in all honesty, it concerns me too, which is why I enjoy the joke, because I know where they are coming from.
I have no formal training in mechanical engineering, let alone ME for food contact applications… so I’ve come to the conclusion that it would be incredibly naive of me to assume the pot is safe, despite all my best efforts to make sure its as safe as I can possibly make it with my knowledge/skill sets. I have done a lot of research, consulted with some very kind ME’s in the food appliance industry willing to donate their consultation for free, and sourced FDA and NFS compliant/certified materials for the parts in contact with water/lips/hands.
But ultimately, without a $19,000 independent extraction test done on it… I have no idea how safe it is, only a very strong hunch that it’s perfectly fine from me and the opinions of other ME’s in food contact applications.
But this is an unconventional design using unconventional ideas/materials for this use case… And when were talking about people’s lives, one needs to be certain and absolute when something so different is done. I genuinely think to do otherwise is unethical in the extreme. And this is the biggest factor stopping me from selling these openly since I started the project.
Sure legally speaking, I’m good to go and I can start selling these tomorrow if I wanted. But our food contact laws are lagging far behind knowledge/ethics on the matter IMO.
The idea of accidentally hurting people scares me, I don’t want to be that person who sold out on their beliefs/convictions for market monetary gain and community recognition, knowing full well at the start that I wasn’t 100% certain.
Possible Future of the Project:
If I am to take some future version of these to market one day, I need 100% certainty. The way I would be okay doing it, without having to get the crazy expensive extraction testing done, is by using absolutely no unconvention food contact materials in its construction, and only widely known and recognized safe materials used in high temperature food contact applications.
I have 2 prototypes I’m currently playing with, which I haven’t made them yet, but I just got the HX in the mail for one of them recently. They use a hard anodized aluminum HX (finally found someone who can print 6061 AL and have it hard anodized), but the two differ in their pot sleeve construction.
One pot uses PEEK and 6061 hard anodized aluminum for its sleeve material. PEEK is an incredible high temperature medical grade implant material recognizes as the safest possible plastic to use in high temperature food contact applications; so safe it’s what they make dental/pacemaker implants out of, and/or medical tools that need to be non conductive/magnetic but sterilizable. However PEEK is expensive, many more times that of carbon fiber. And because I can’t afford to get tooling made for a custom diameter/wall thickness in a single extrusion PEEK tube, I have to construct them a bit differently than the original and it increases the assembly complexity a fair bit.
The second version I’ve been playing with (but only exist in CAD so far until I have the money to make one) would use a 3D printed, vapor smoothed polypropylene pot sleeve. This in theory would be a lot easier to assemble because the entire top half of the pot comes out of the printer already assembled, and the latest HX designs are interchangable, so once both arrive in the mail, all I have to do is snap them together and BAM its done.
What about handles?
I’m hoping to show off something cool there when I finally get to make the next design… but I want to know it works before I do. ;)
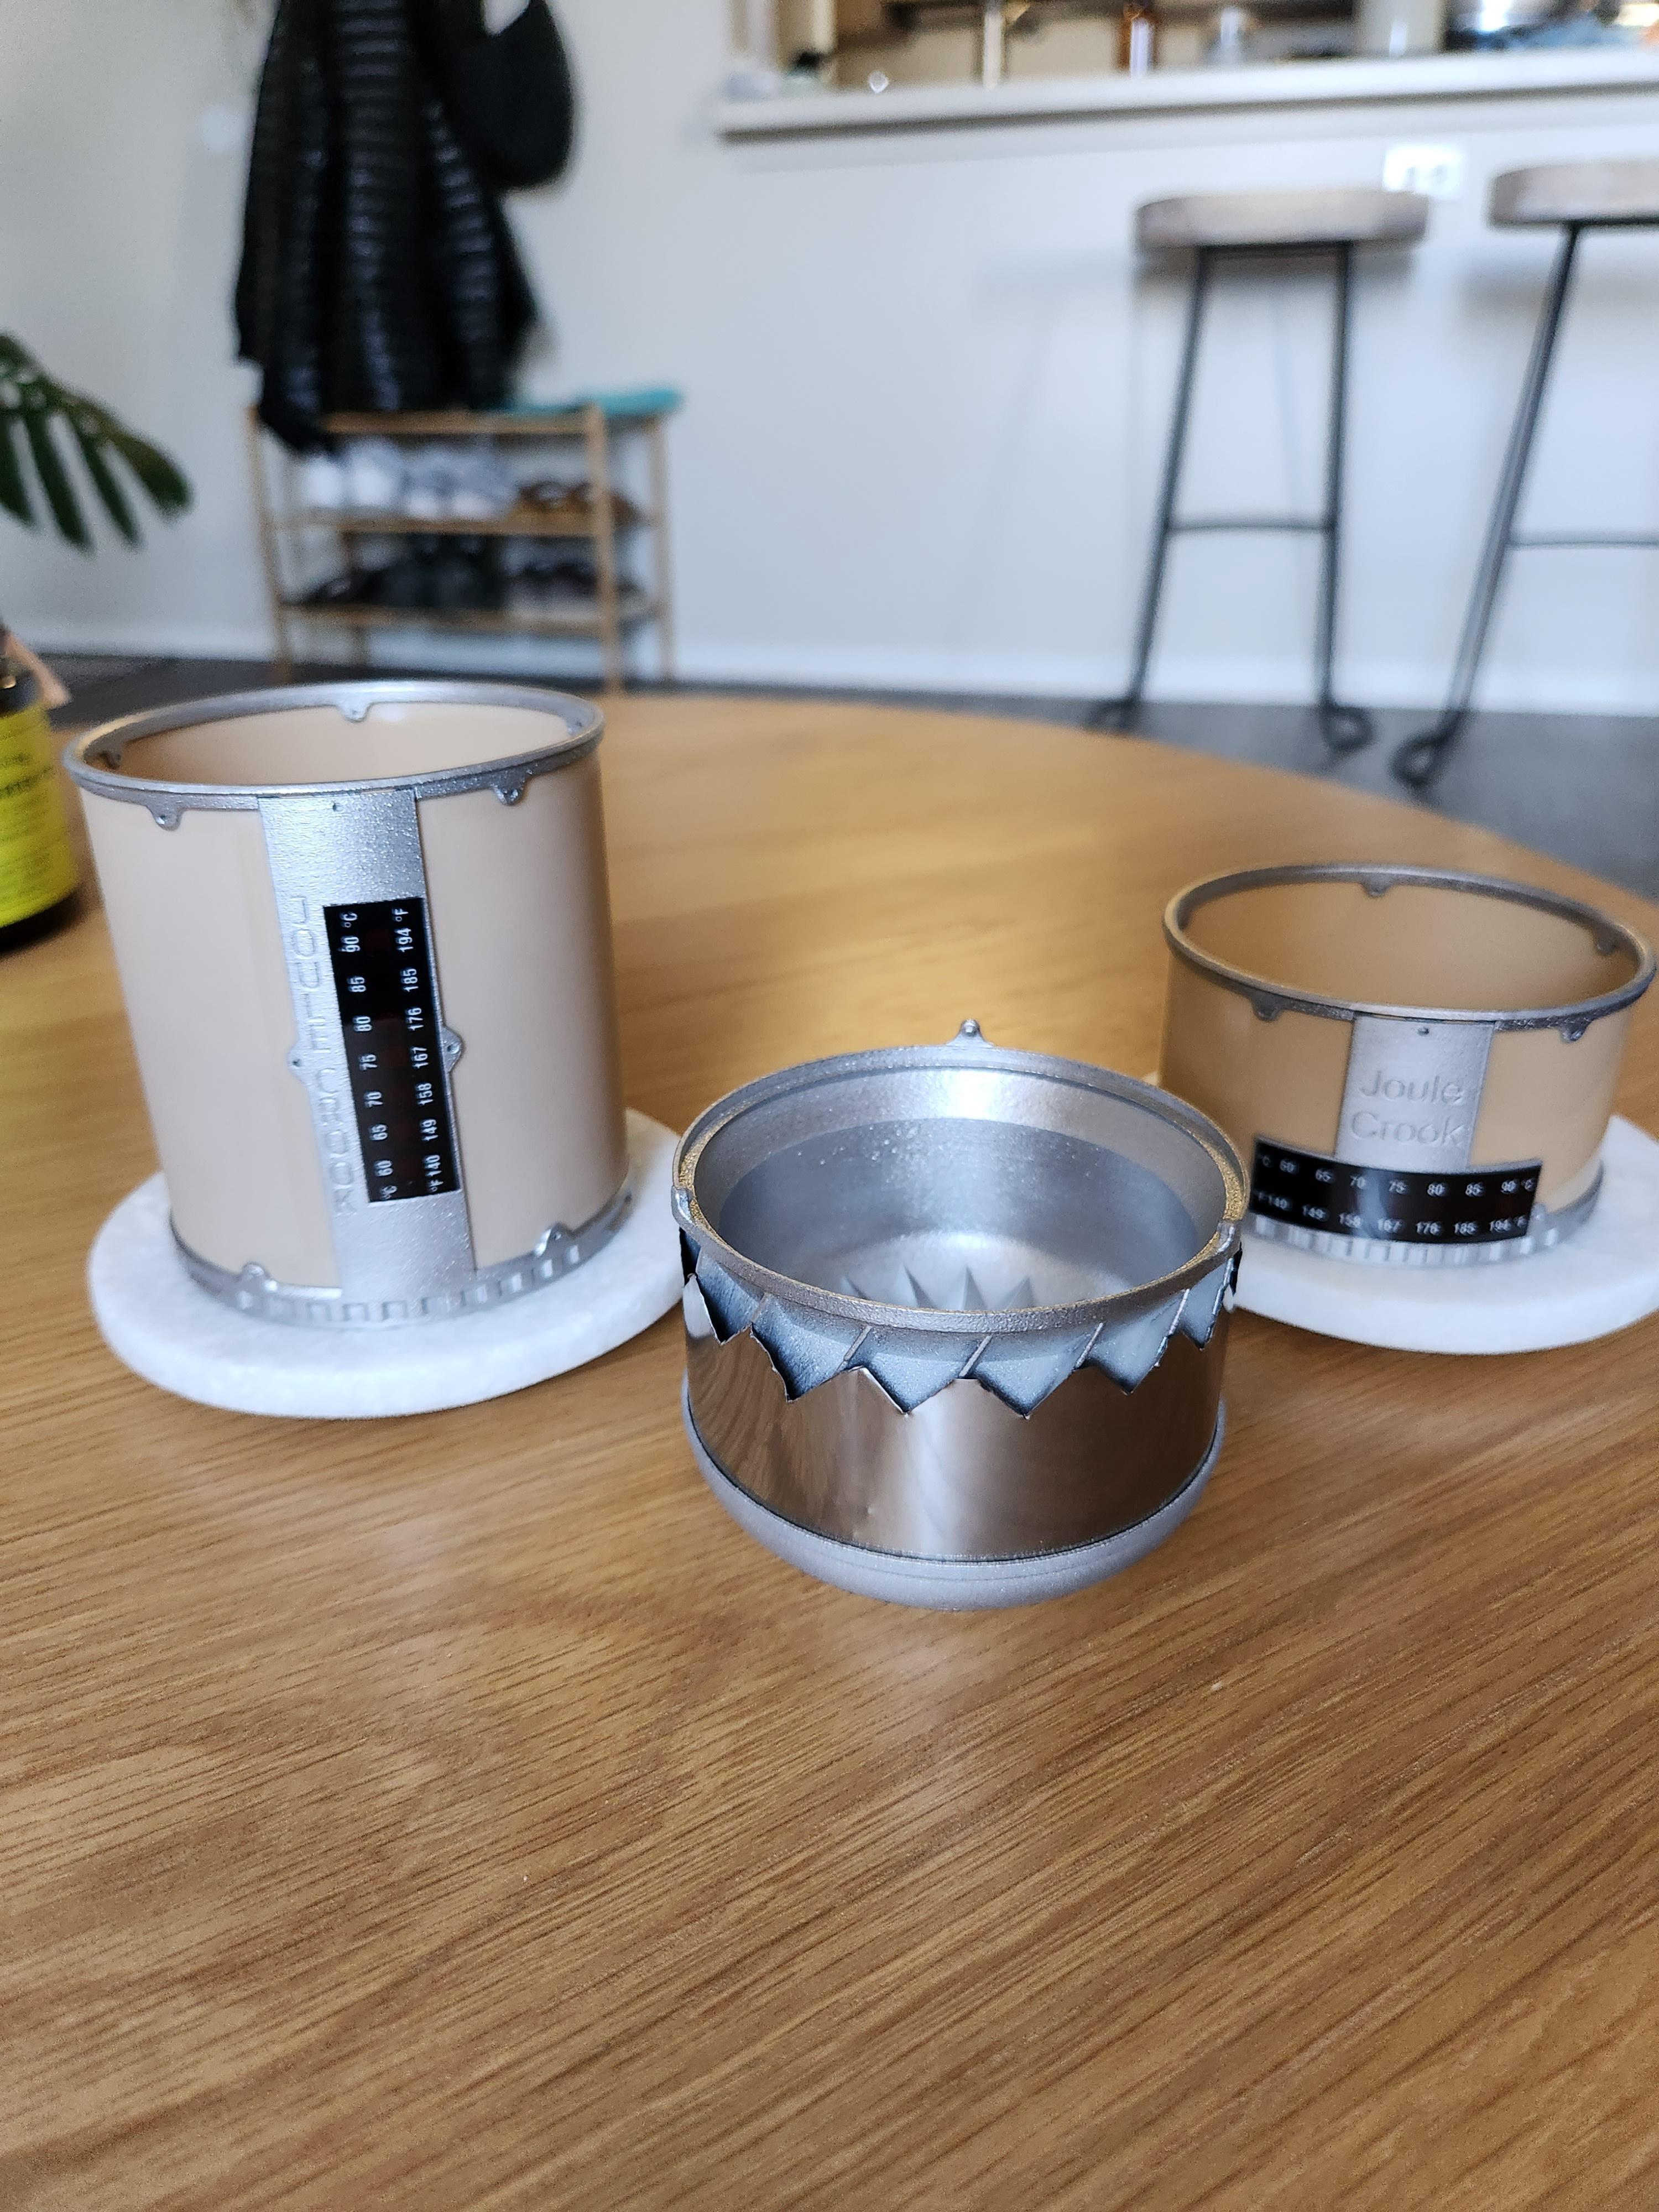
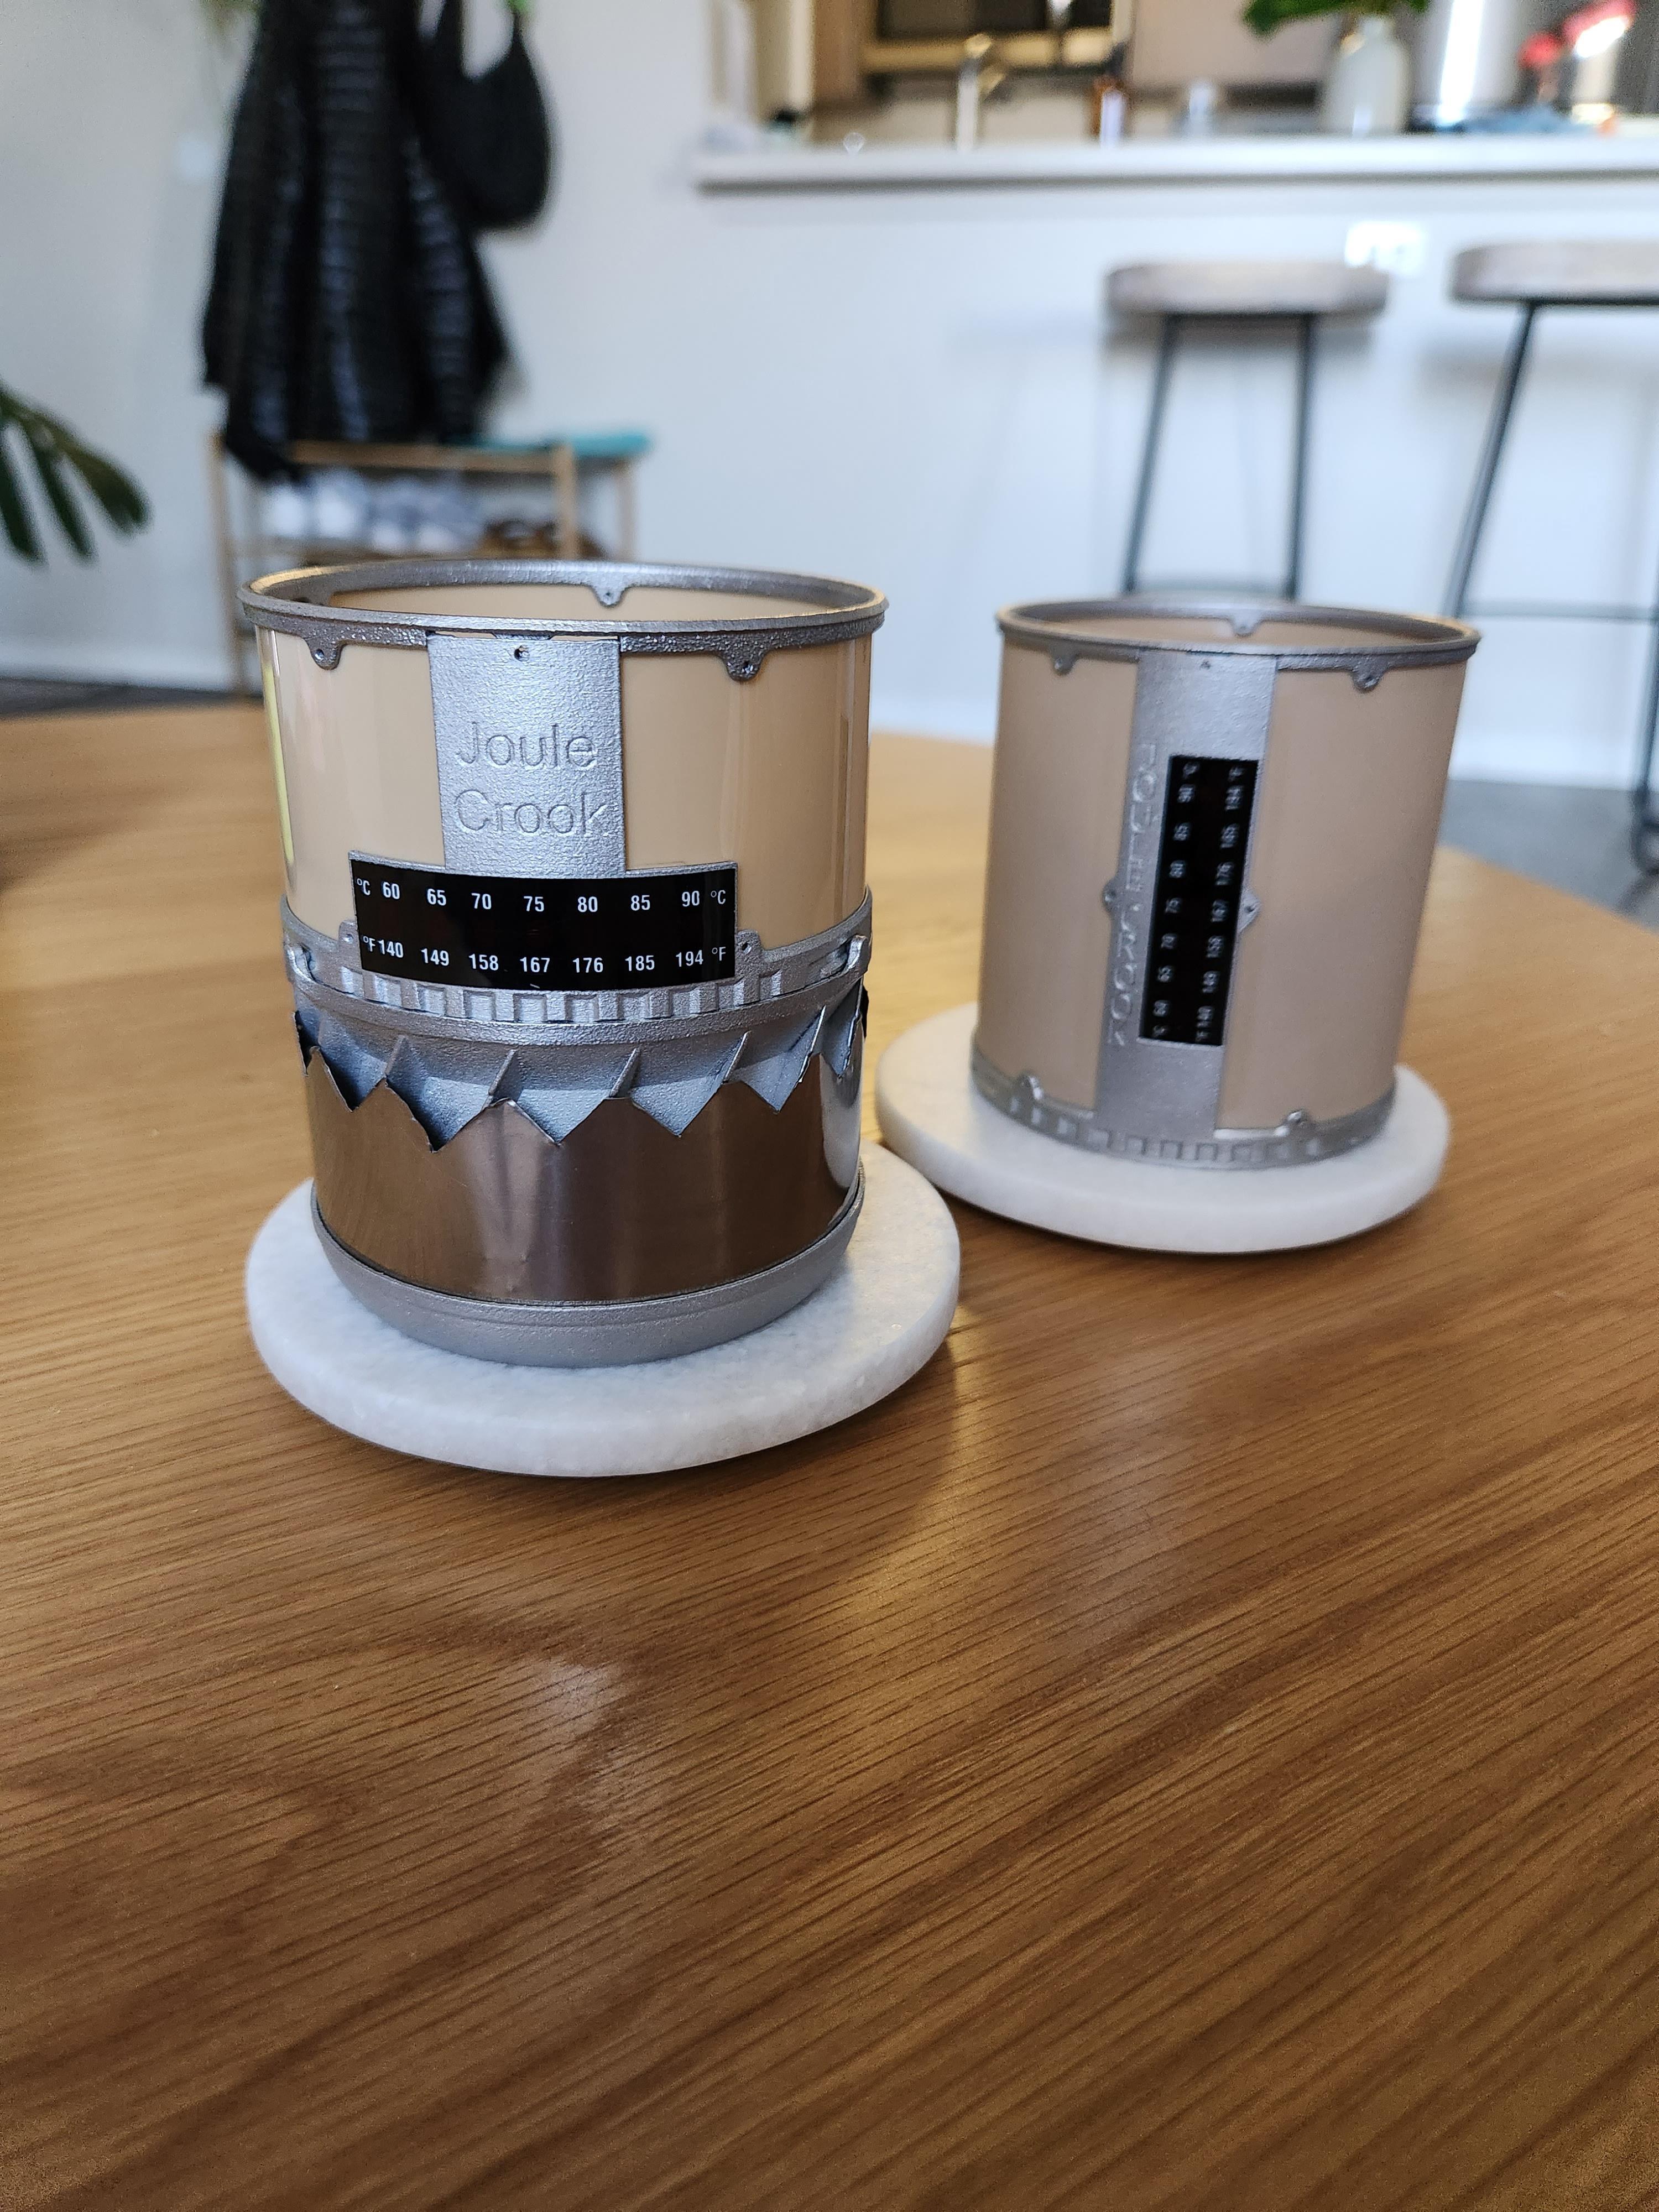
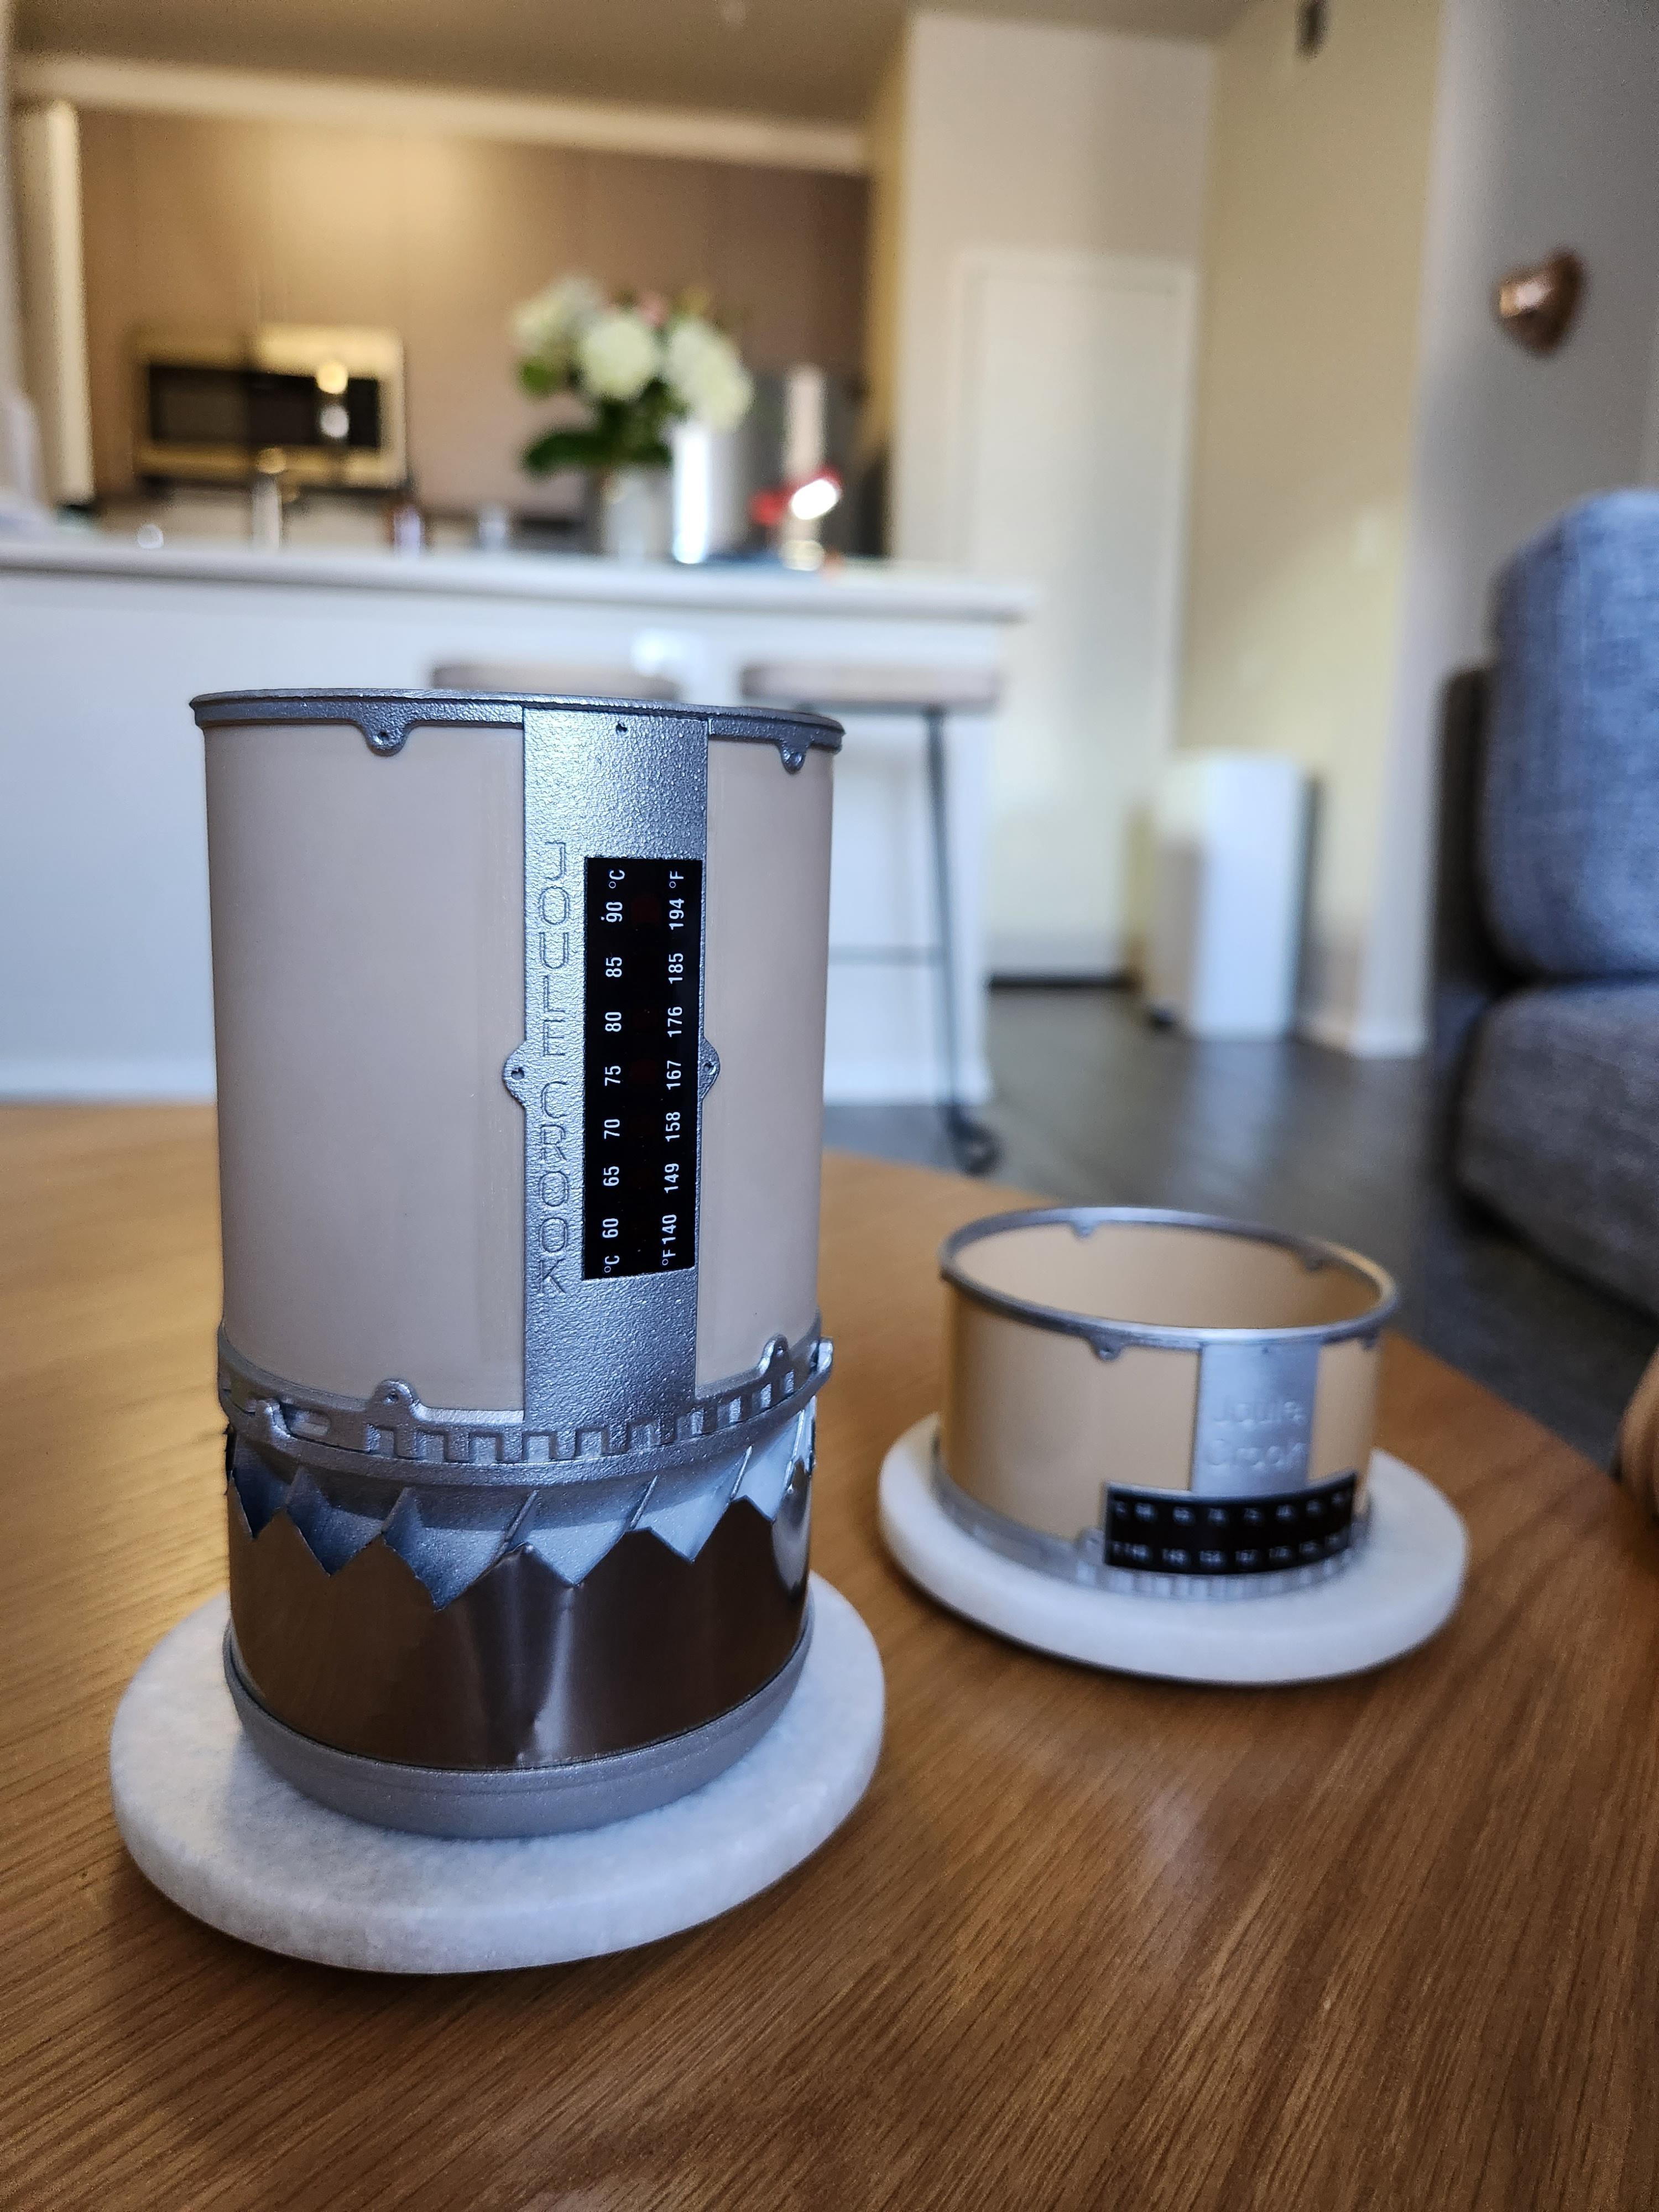
What does interchangeable mean?
It means you can snap off the HX and put it on a larger pot sleeve for a modular pot volume system. This is neat because it means the most expensive component can be used across other pot volumes. So instead of buying a seperate 550ml for your weekend trips and an entirely new pot for a 800ml version to use on your thru-hikes; a hiker would only need to buy one expensive HX and the much cheaper sleeves that matched the volumes they want.
Here’s a mini pot I made out of un-anodized aluminum and PEEK to test the feasibility of the interchangeable pot sleeve idea. Without having to pay for a full sized version. This was the last pot I made back in 2022 when I decided to bring the Pad-pals to market that year to help fund the project. But because of school, feature creep, and life responsibilities, it wasn’t until this year that I was finally able to sell more than a few hundred pad-pals a year. (bless you early Pad-Pal adopters who waited half a year in-between batches! <3 Your the reason this little pot below exist and the reason I was able to afford my last year of college to finish up that degree. I now know the interchangeable pot sleeve system works because of your generosity!)

And with the pot sleeves twisted onto the HX locking pins:

Anywho, I got carried away with this one. Originally only intended to answer your safety question but ended up blabbering about the current state of the project instead. Sorry about that Brad!
Jan 25, 2025 at 12:20 pm #3827084Great stuff – when you mentioned safety on the other thread, I thought you were talking about the aluminum Inferno pot. I see here you were referring to your most excellent creation on this thread!
Thanks for taking the time to explain!
Jan 25, 2025 at 1:22 pm #3827086Great post, Tyler. Always interesting to hear about your thoughtful approaches.
Jan 25, 2025 at 10:51 pm #3827106My favorite thread revived. I absolutely love these ideas Tyler, well done. Very interesting the idea of an interchangeable pot volume. How does it seal when you switch out the pot tubes? Is there a large O ring or is it purely mechanical? I would think it could leak at the seam where they interconnect without one. Also seems to be a bit lighter with the titanium foil exterior. The previous design had the gas guide vanes on the exterior of the HX that seemed a little complex and perhaps adding weight.
Jan 27, 2025 at 3:05 pm #3827220I am fascinated by those PEEK/Ti pots. What do they weigh please?
Cheers
Feb 1, 2025 at 4:06 pm #3827574Thanks for the encouragement guys! It really does help me keep my tweaker obsession going towards this project! XD
DirtNap:
Those versions sealed the pot sleave against the HX using a silicone gasket that I did a horrible job hand cutting. I can’t remember how many tries it took, but I do remember cutting a lot of gaskets and it taking a good amount of twisting force to get it to seal properly. This was before I started trying to educate myself on how to design gaskets, so the contact surface area was large, making the required force much greater than it needs to be had I known what I was doing.
Using the Ti foil for the windscreen was indeed an experiment to see if I could get them lighter than having the print in place AL windscreen. And at the time, because I could only print in 0.8mm thicknesses, it worked for saving weight. But I have access to a much cooler machine now, and the printed in place AL windscreen is back to being the lighter of the two options according to CAD and the pot I’ll show below.
Roger:
Those mini test version came out to about 55 grams for the HX + 350ml sleeve and 61 grams for the HX + 450ml pot sleeve. But that does not include the 2 gram polypropylene pringles lid I was using on them.
Something New:
However, I had a rare bout of freetime yesterday and got to make the new PEEK pot sooner than I thought! :D
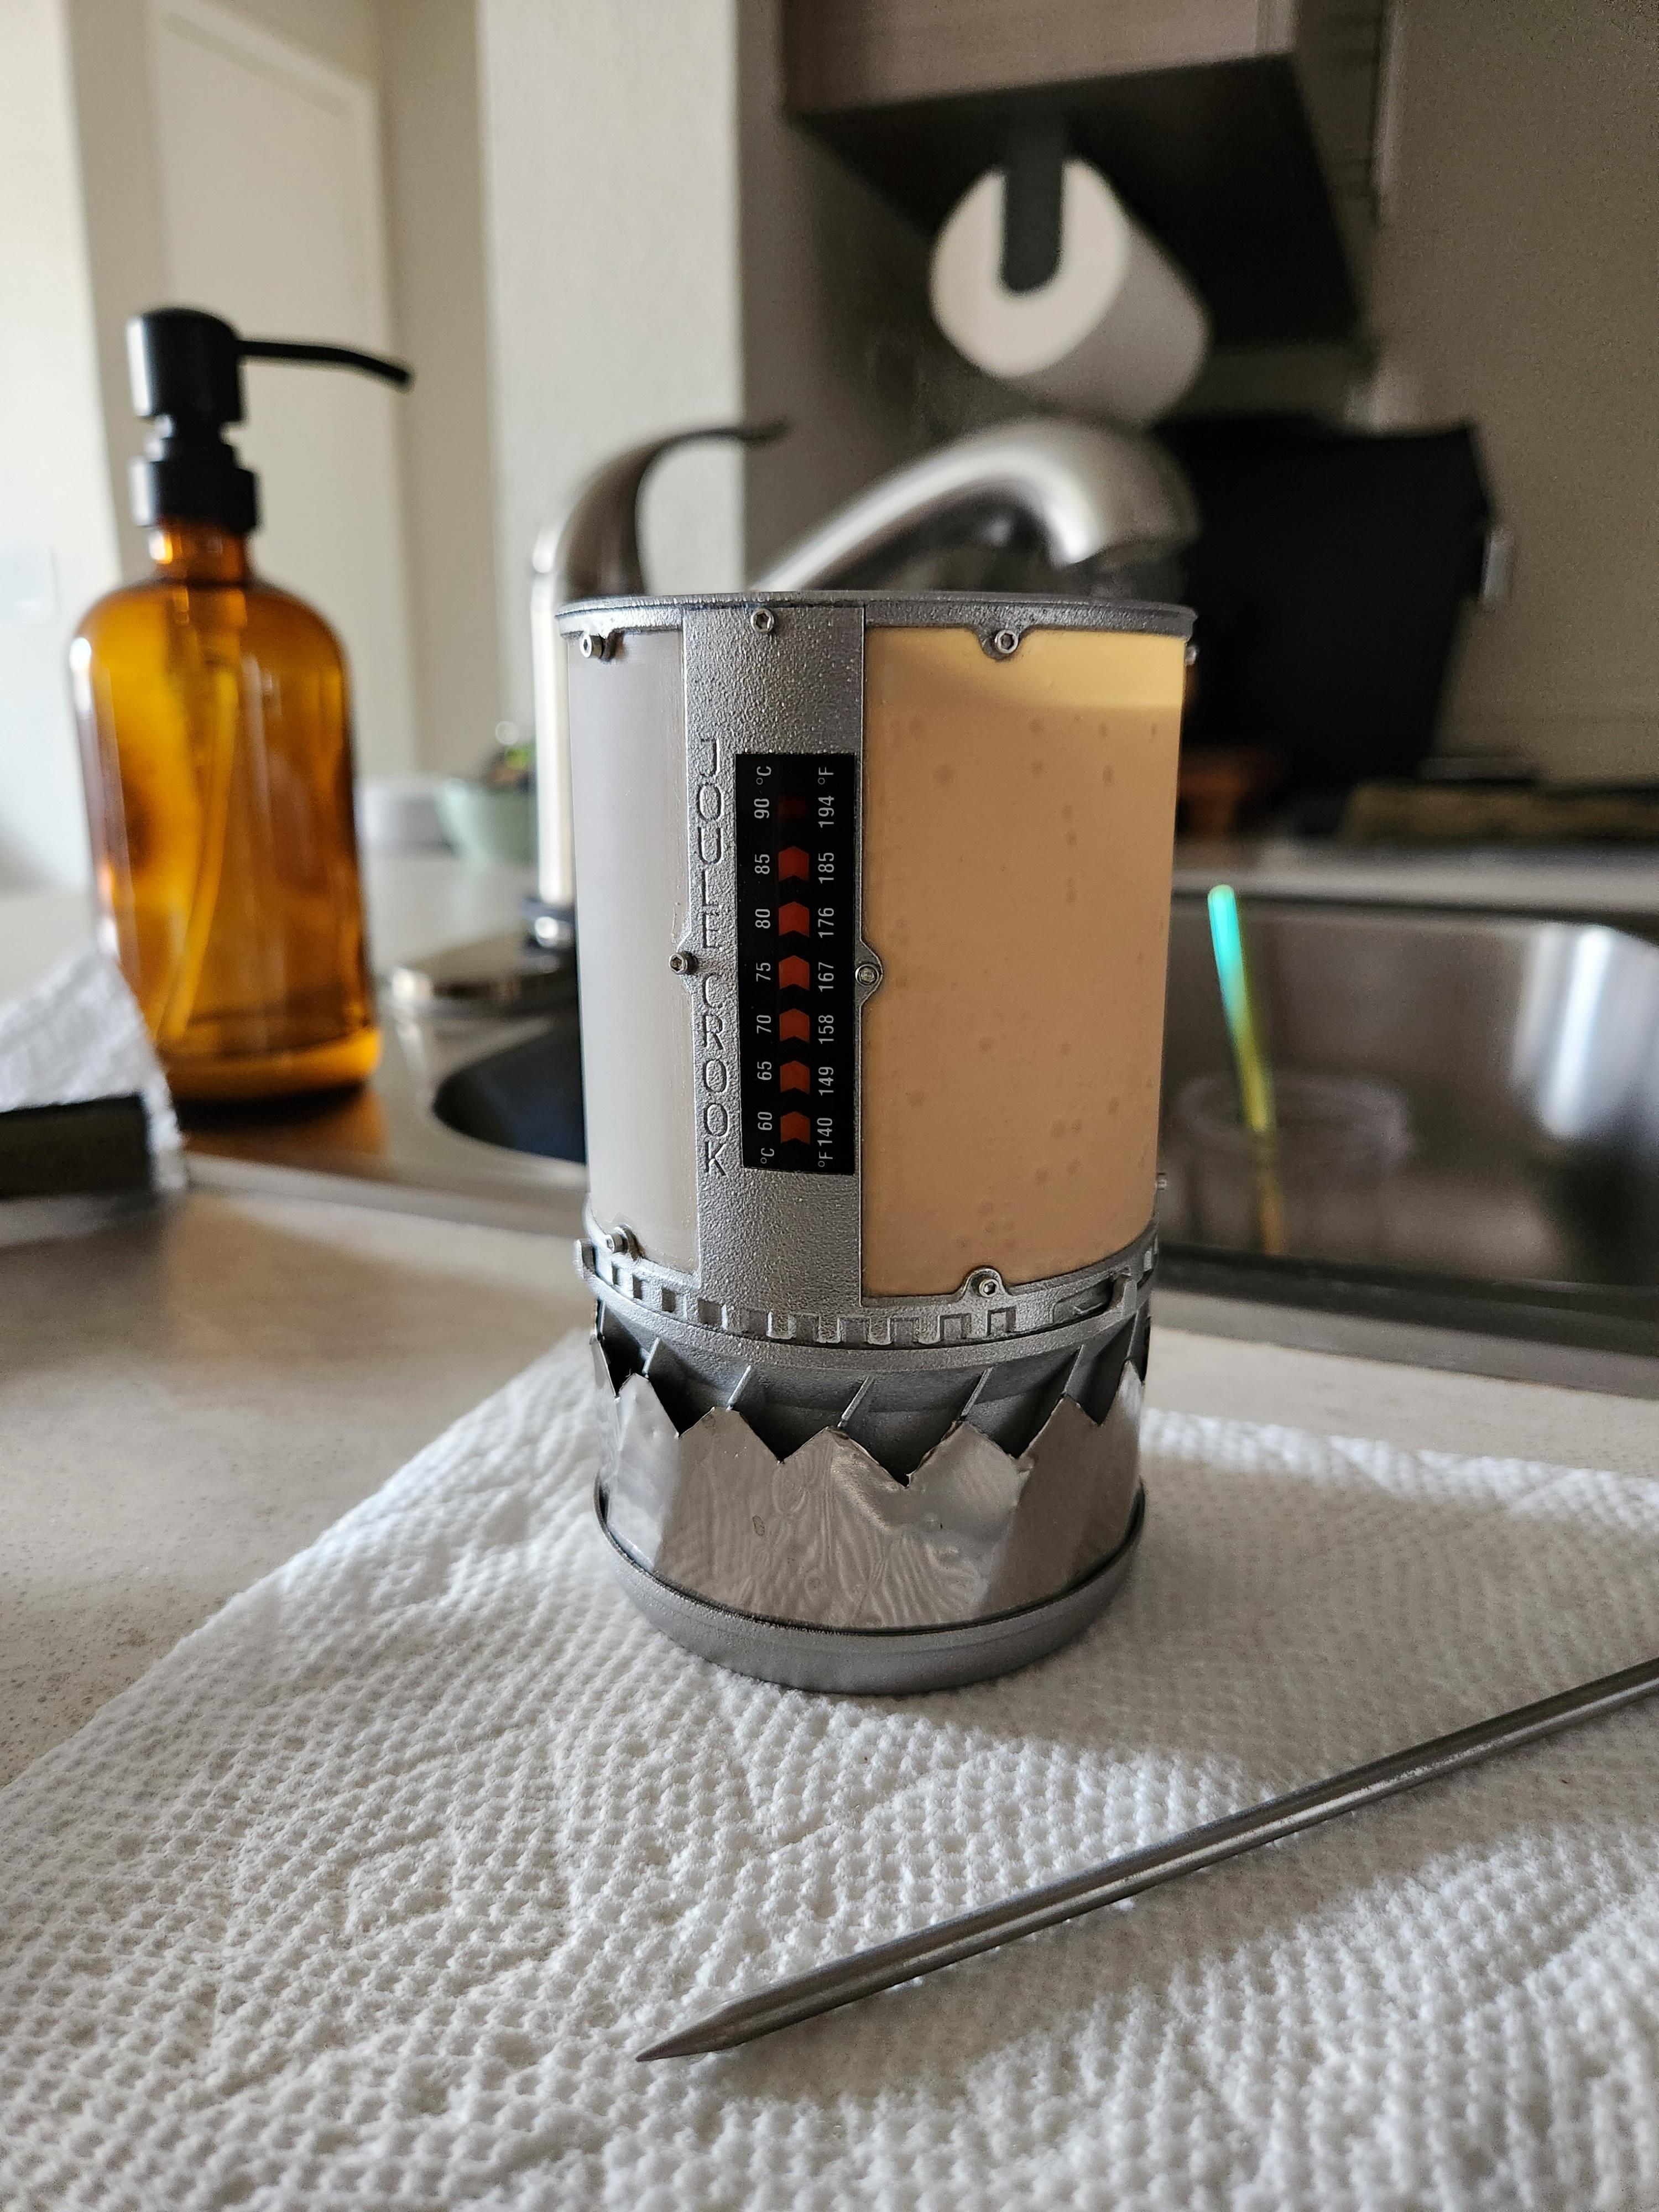
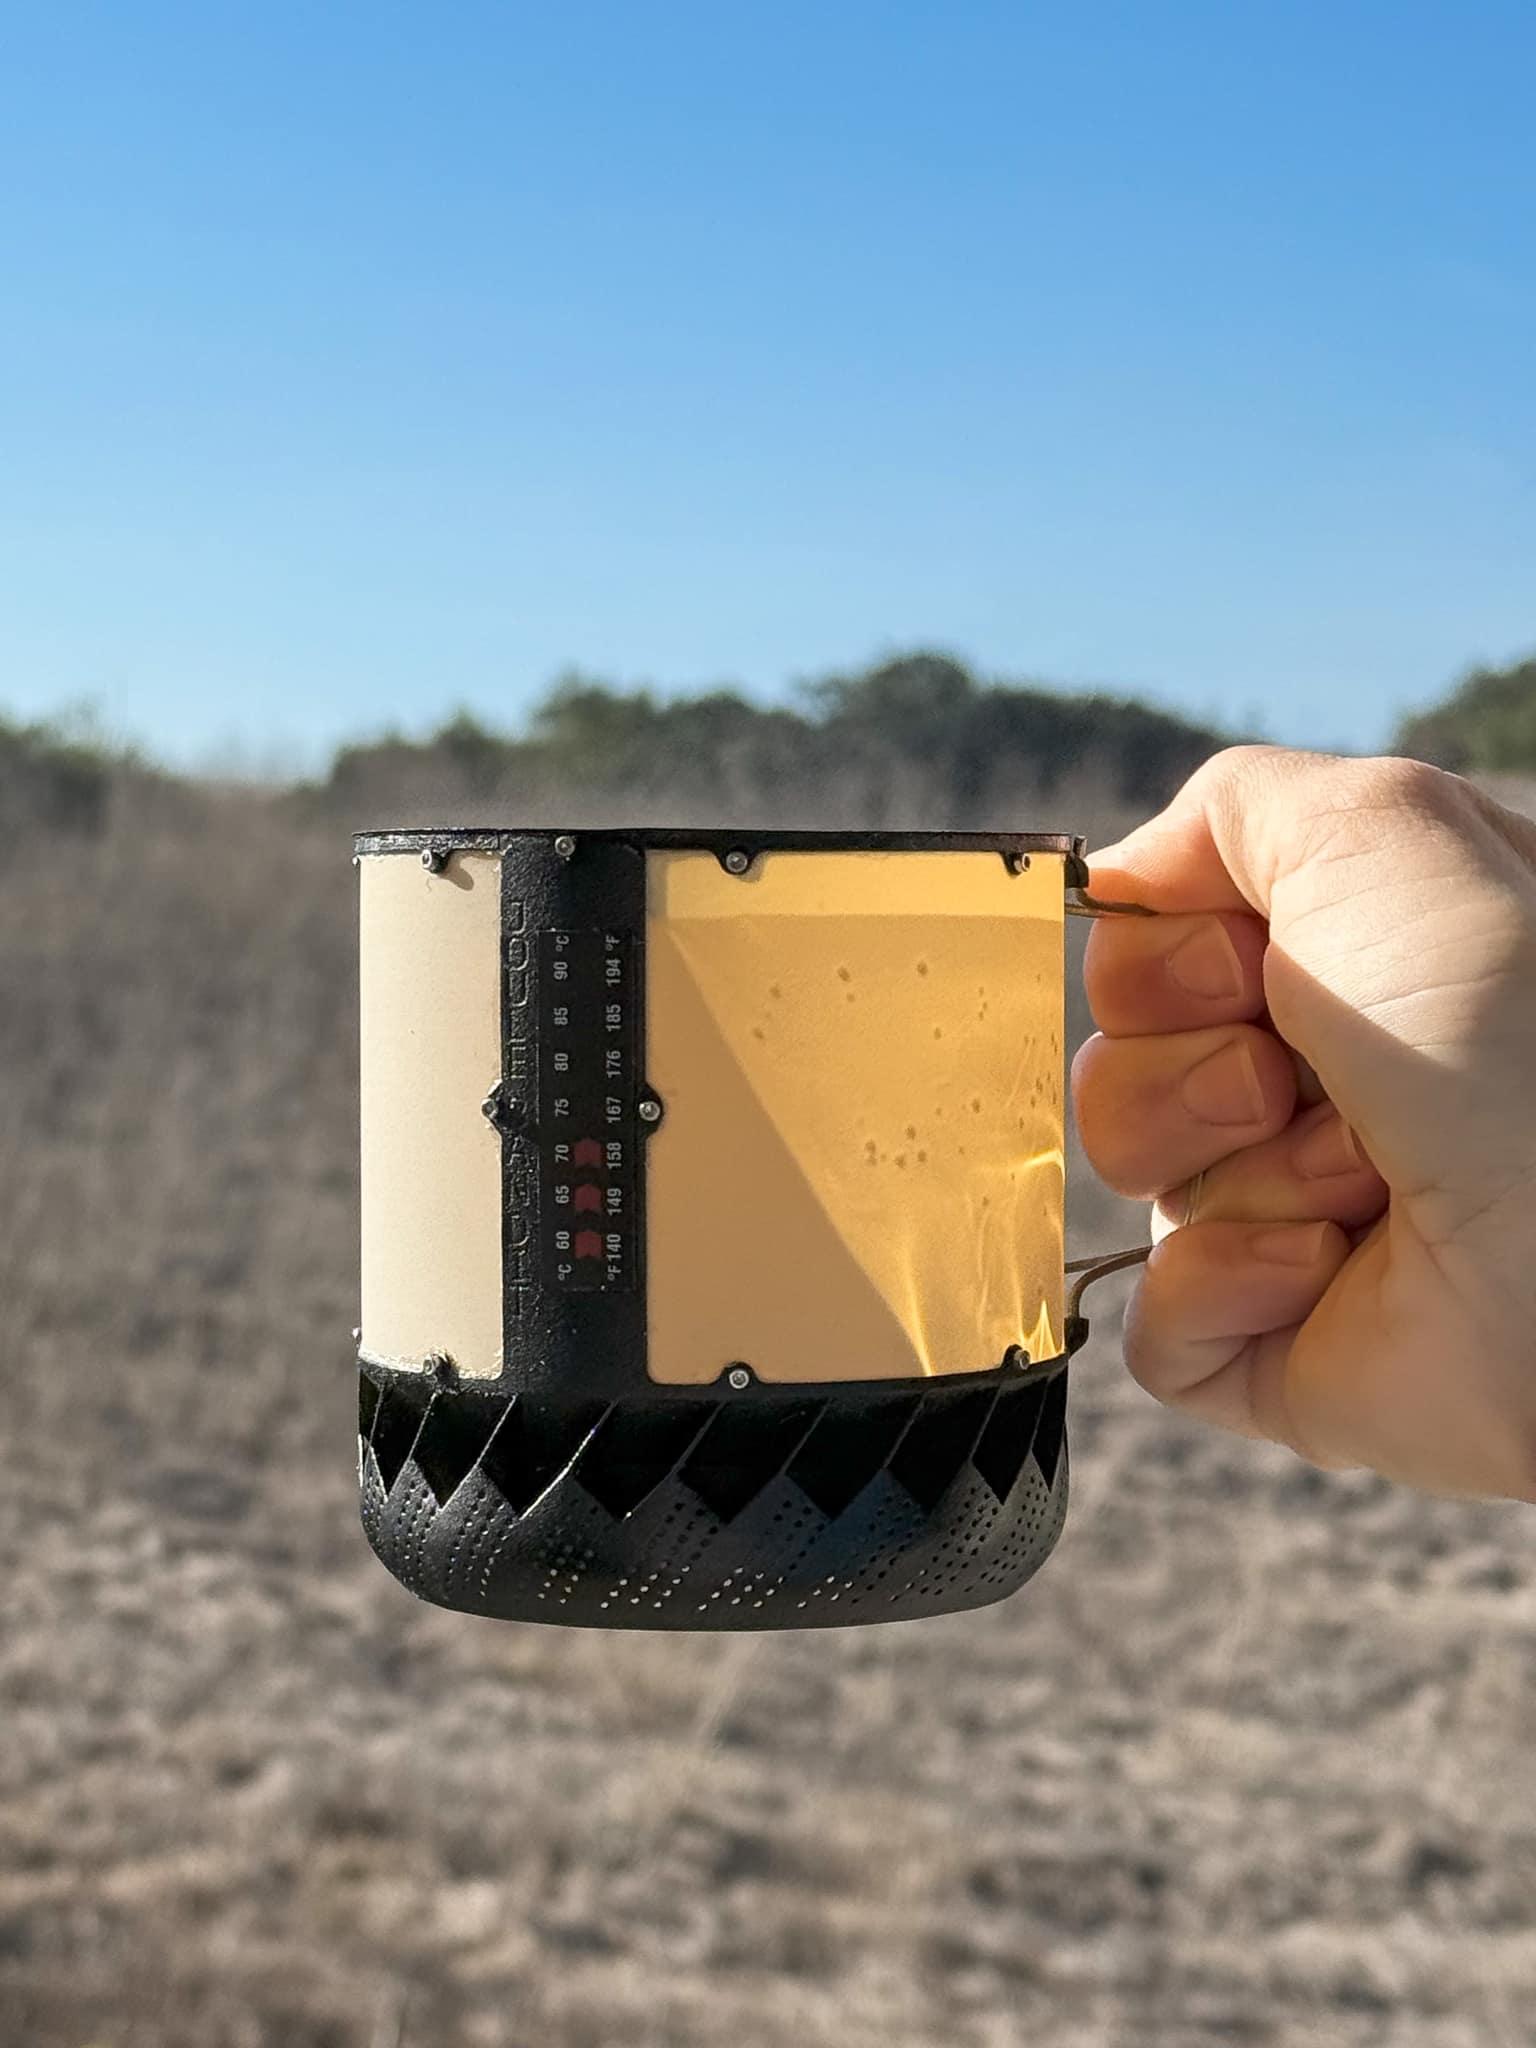
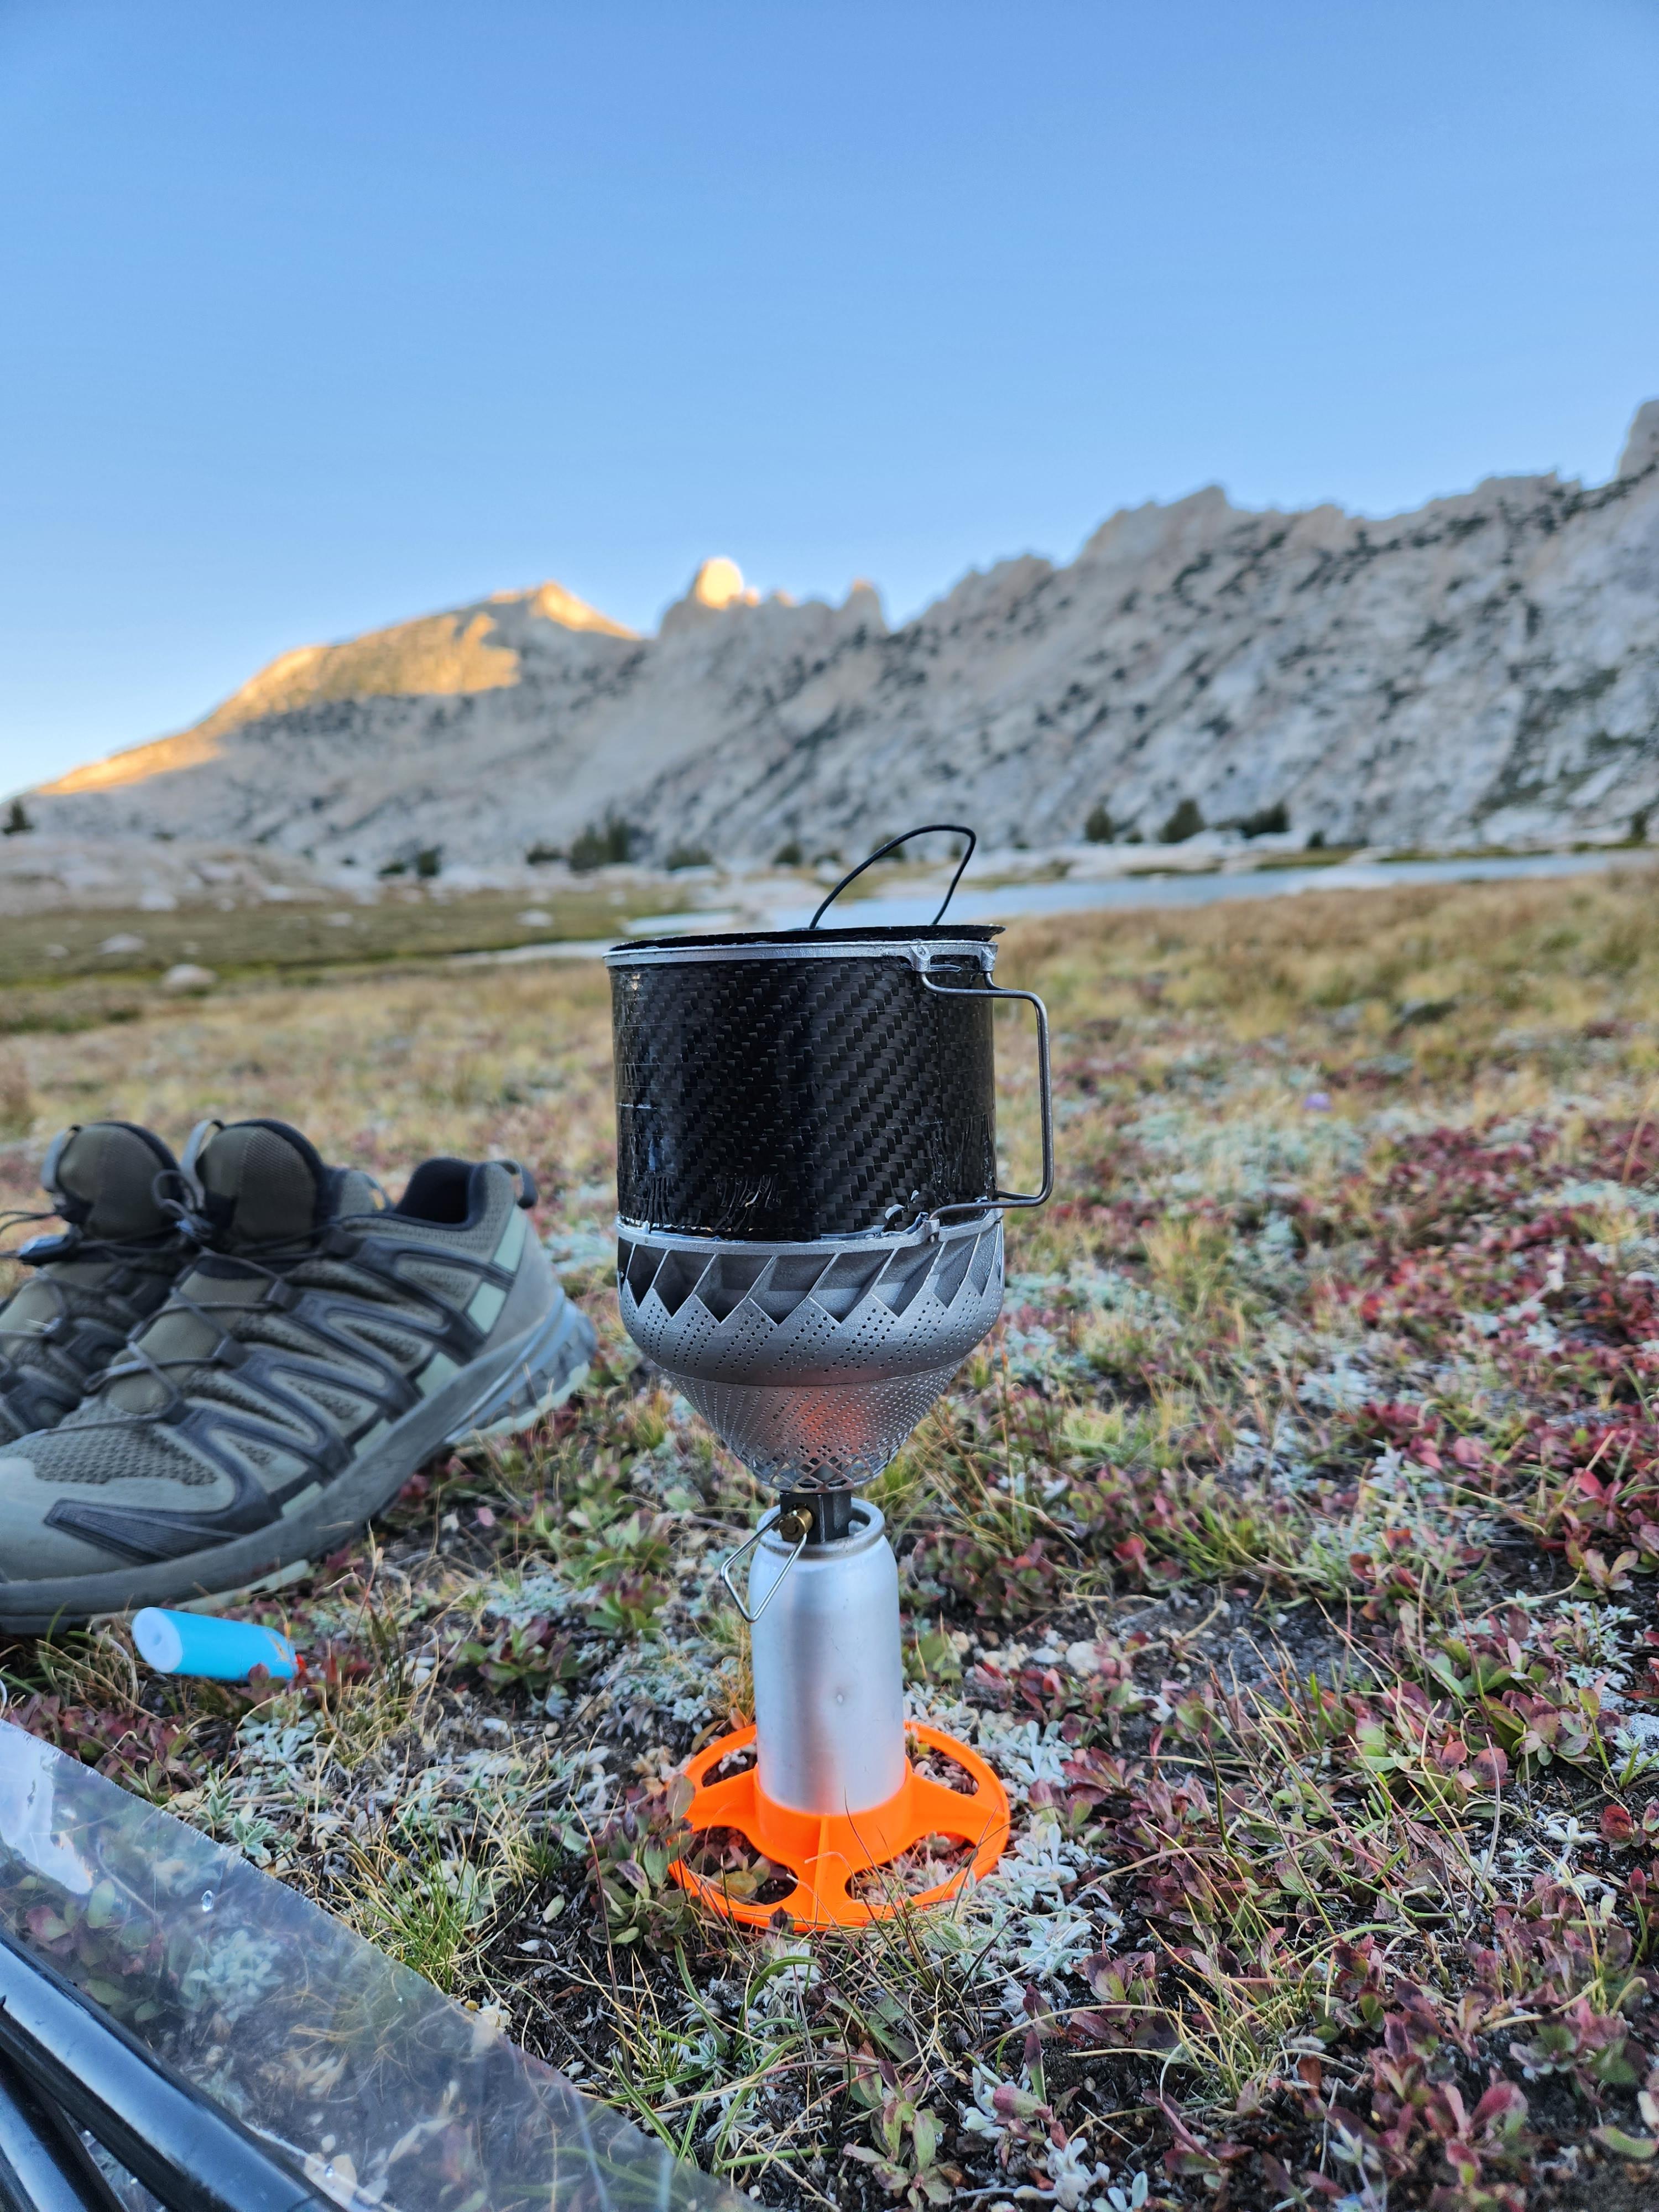
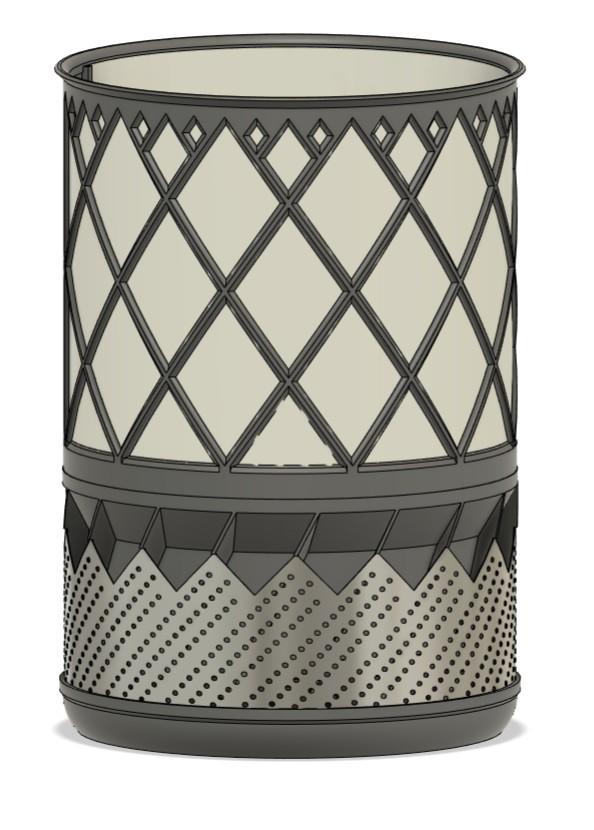
Behold my friends, I finally got to make The Joule Bandit V2 after a 2 year pause on the project.
So this doesn’t represent my final goals here. This was more of me chasing further weight reductions and seeing how far I could push it using the new printer technology I have access to and the NFS 61 certified PEEK materials; Rather than adding the new features I showed off with those mini PEEK pots.
Mostly because I’m a UL addict who relapsed into nonsensically shaving of grams rather than adding additional features/conveniences/robustness.
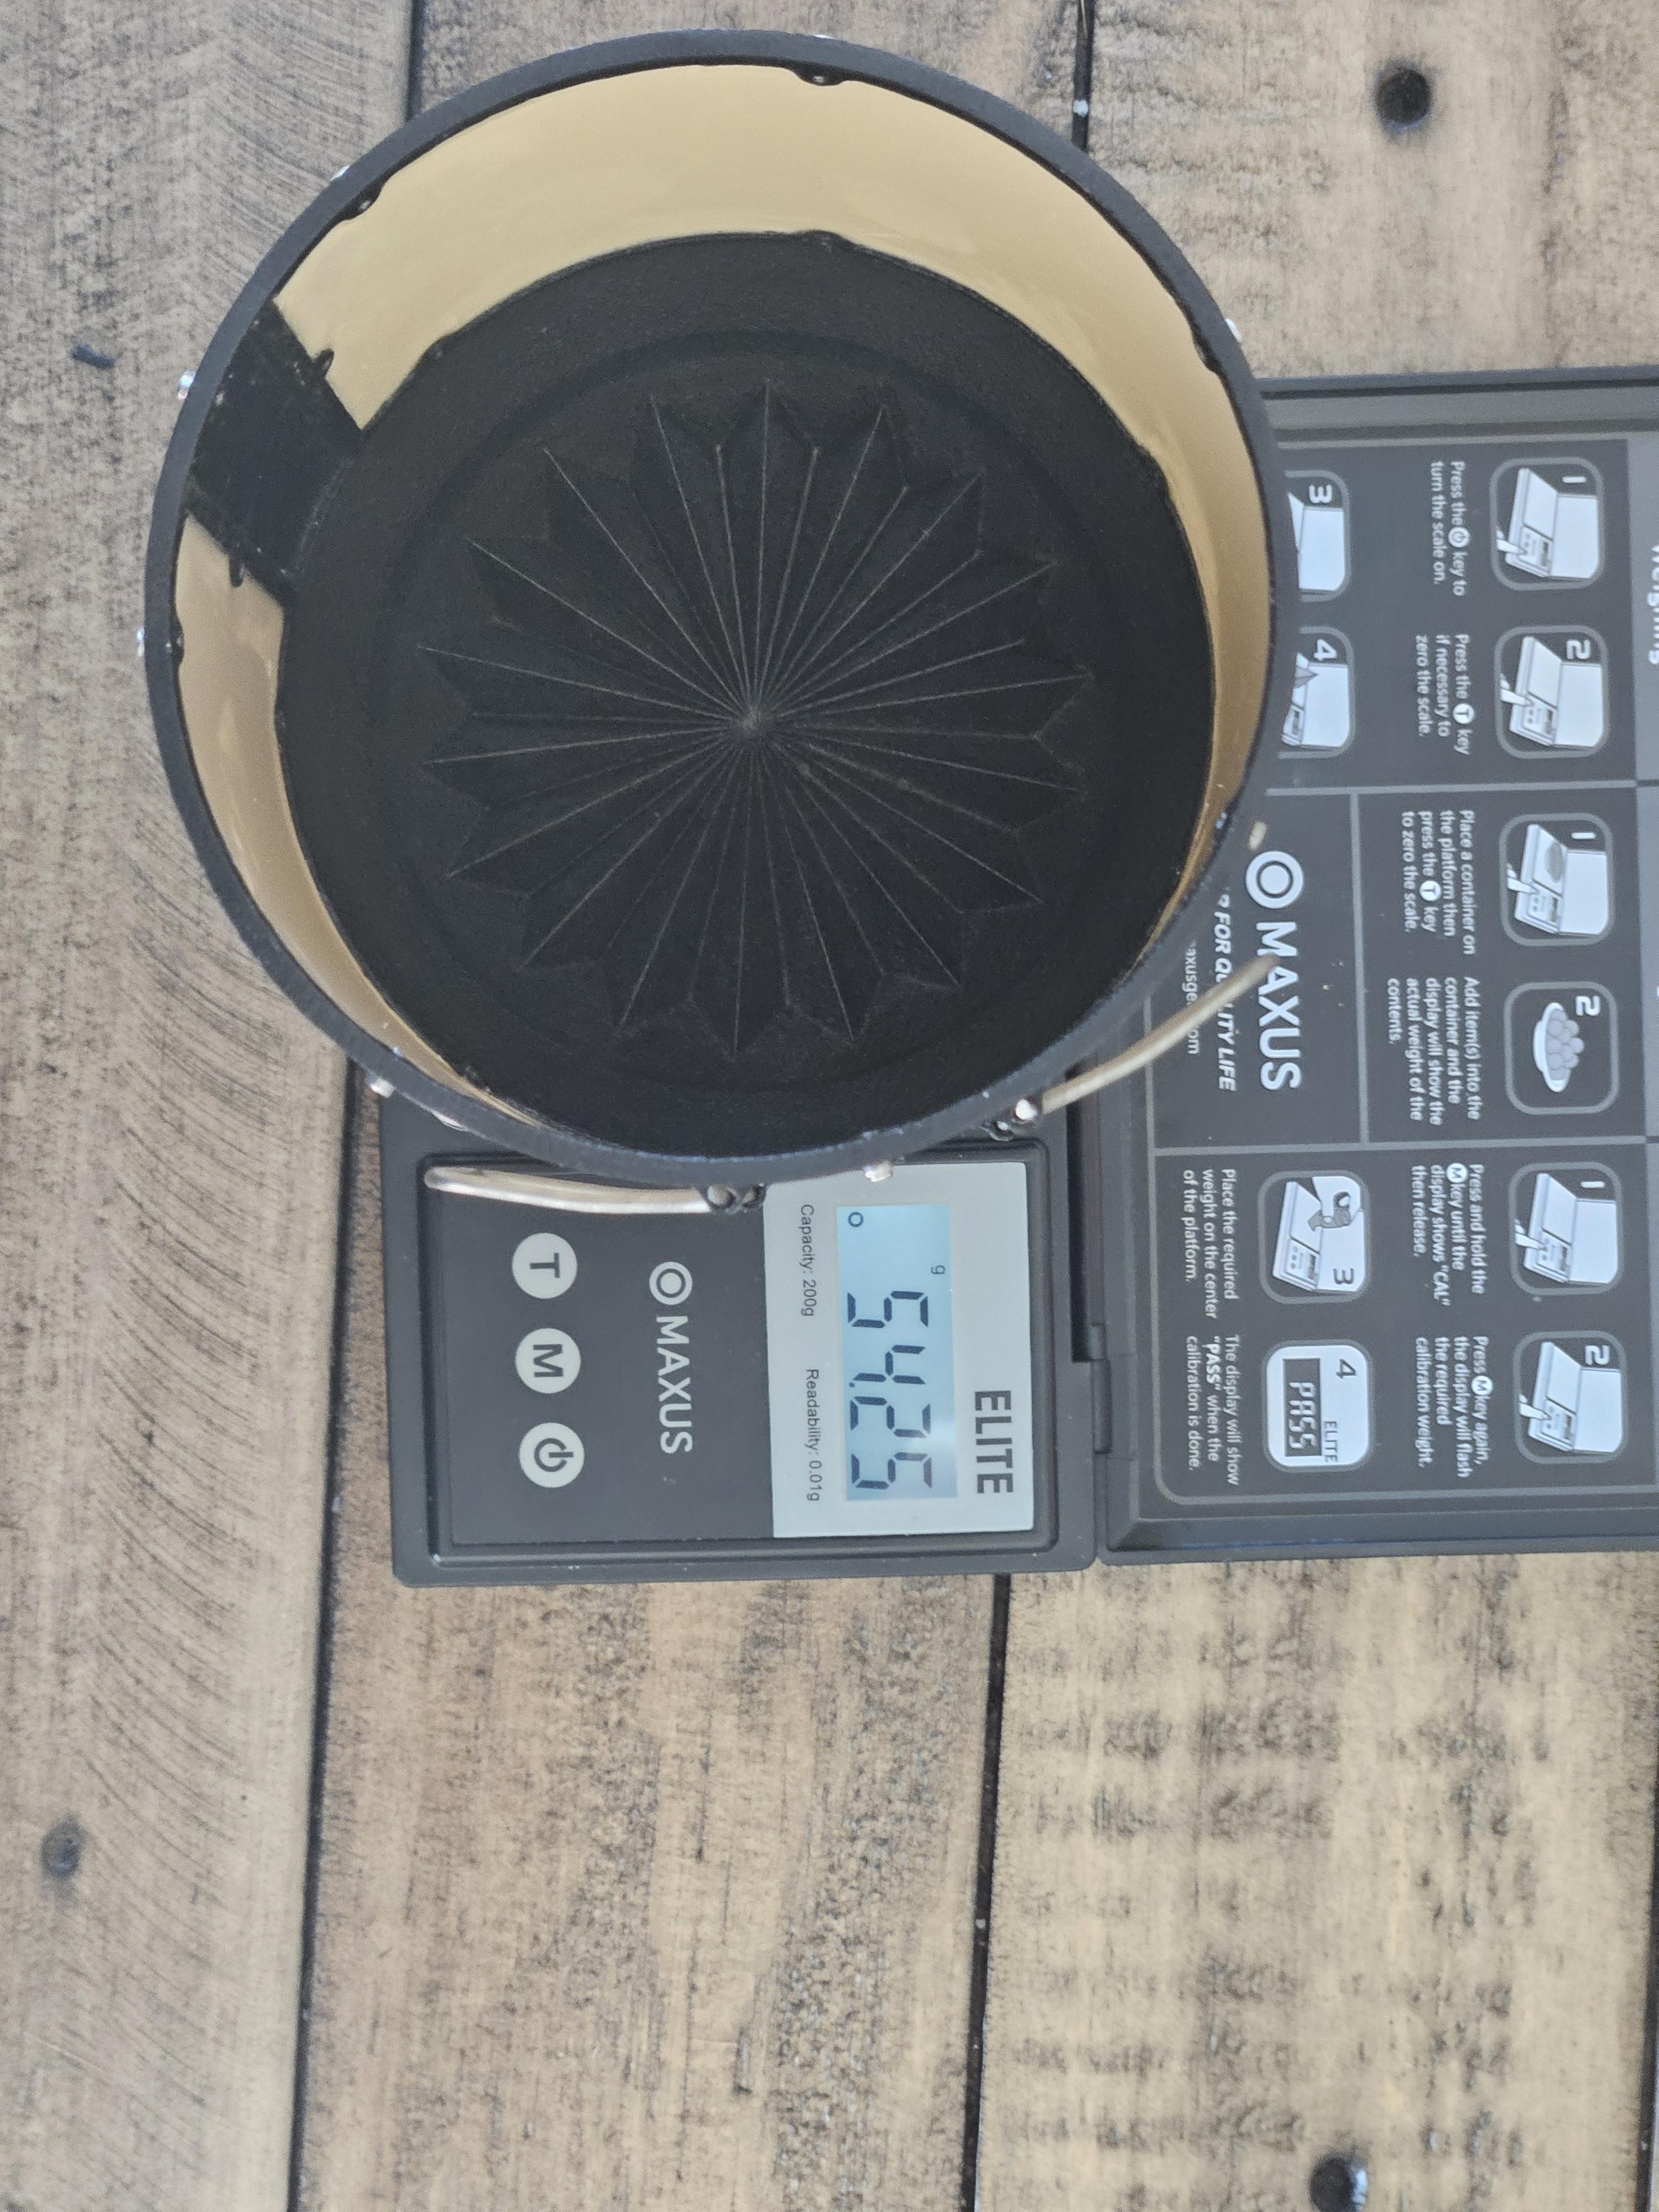
And like a true addict, boy was I gitty AF yesterday after putting it on the scale.
This is a 575 ml pot (75 ml more than Joule Bandit V1) and it’s coming in at 54.25 Grams (1.91 Oz), which is 8 grams less than the V1.
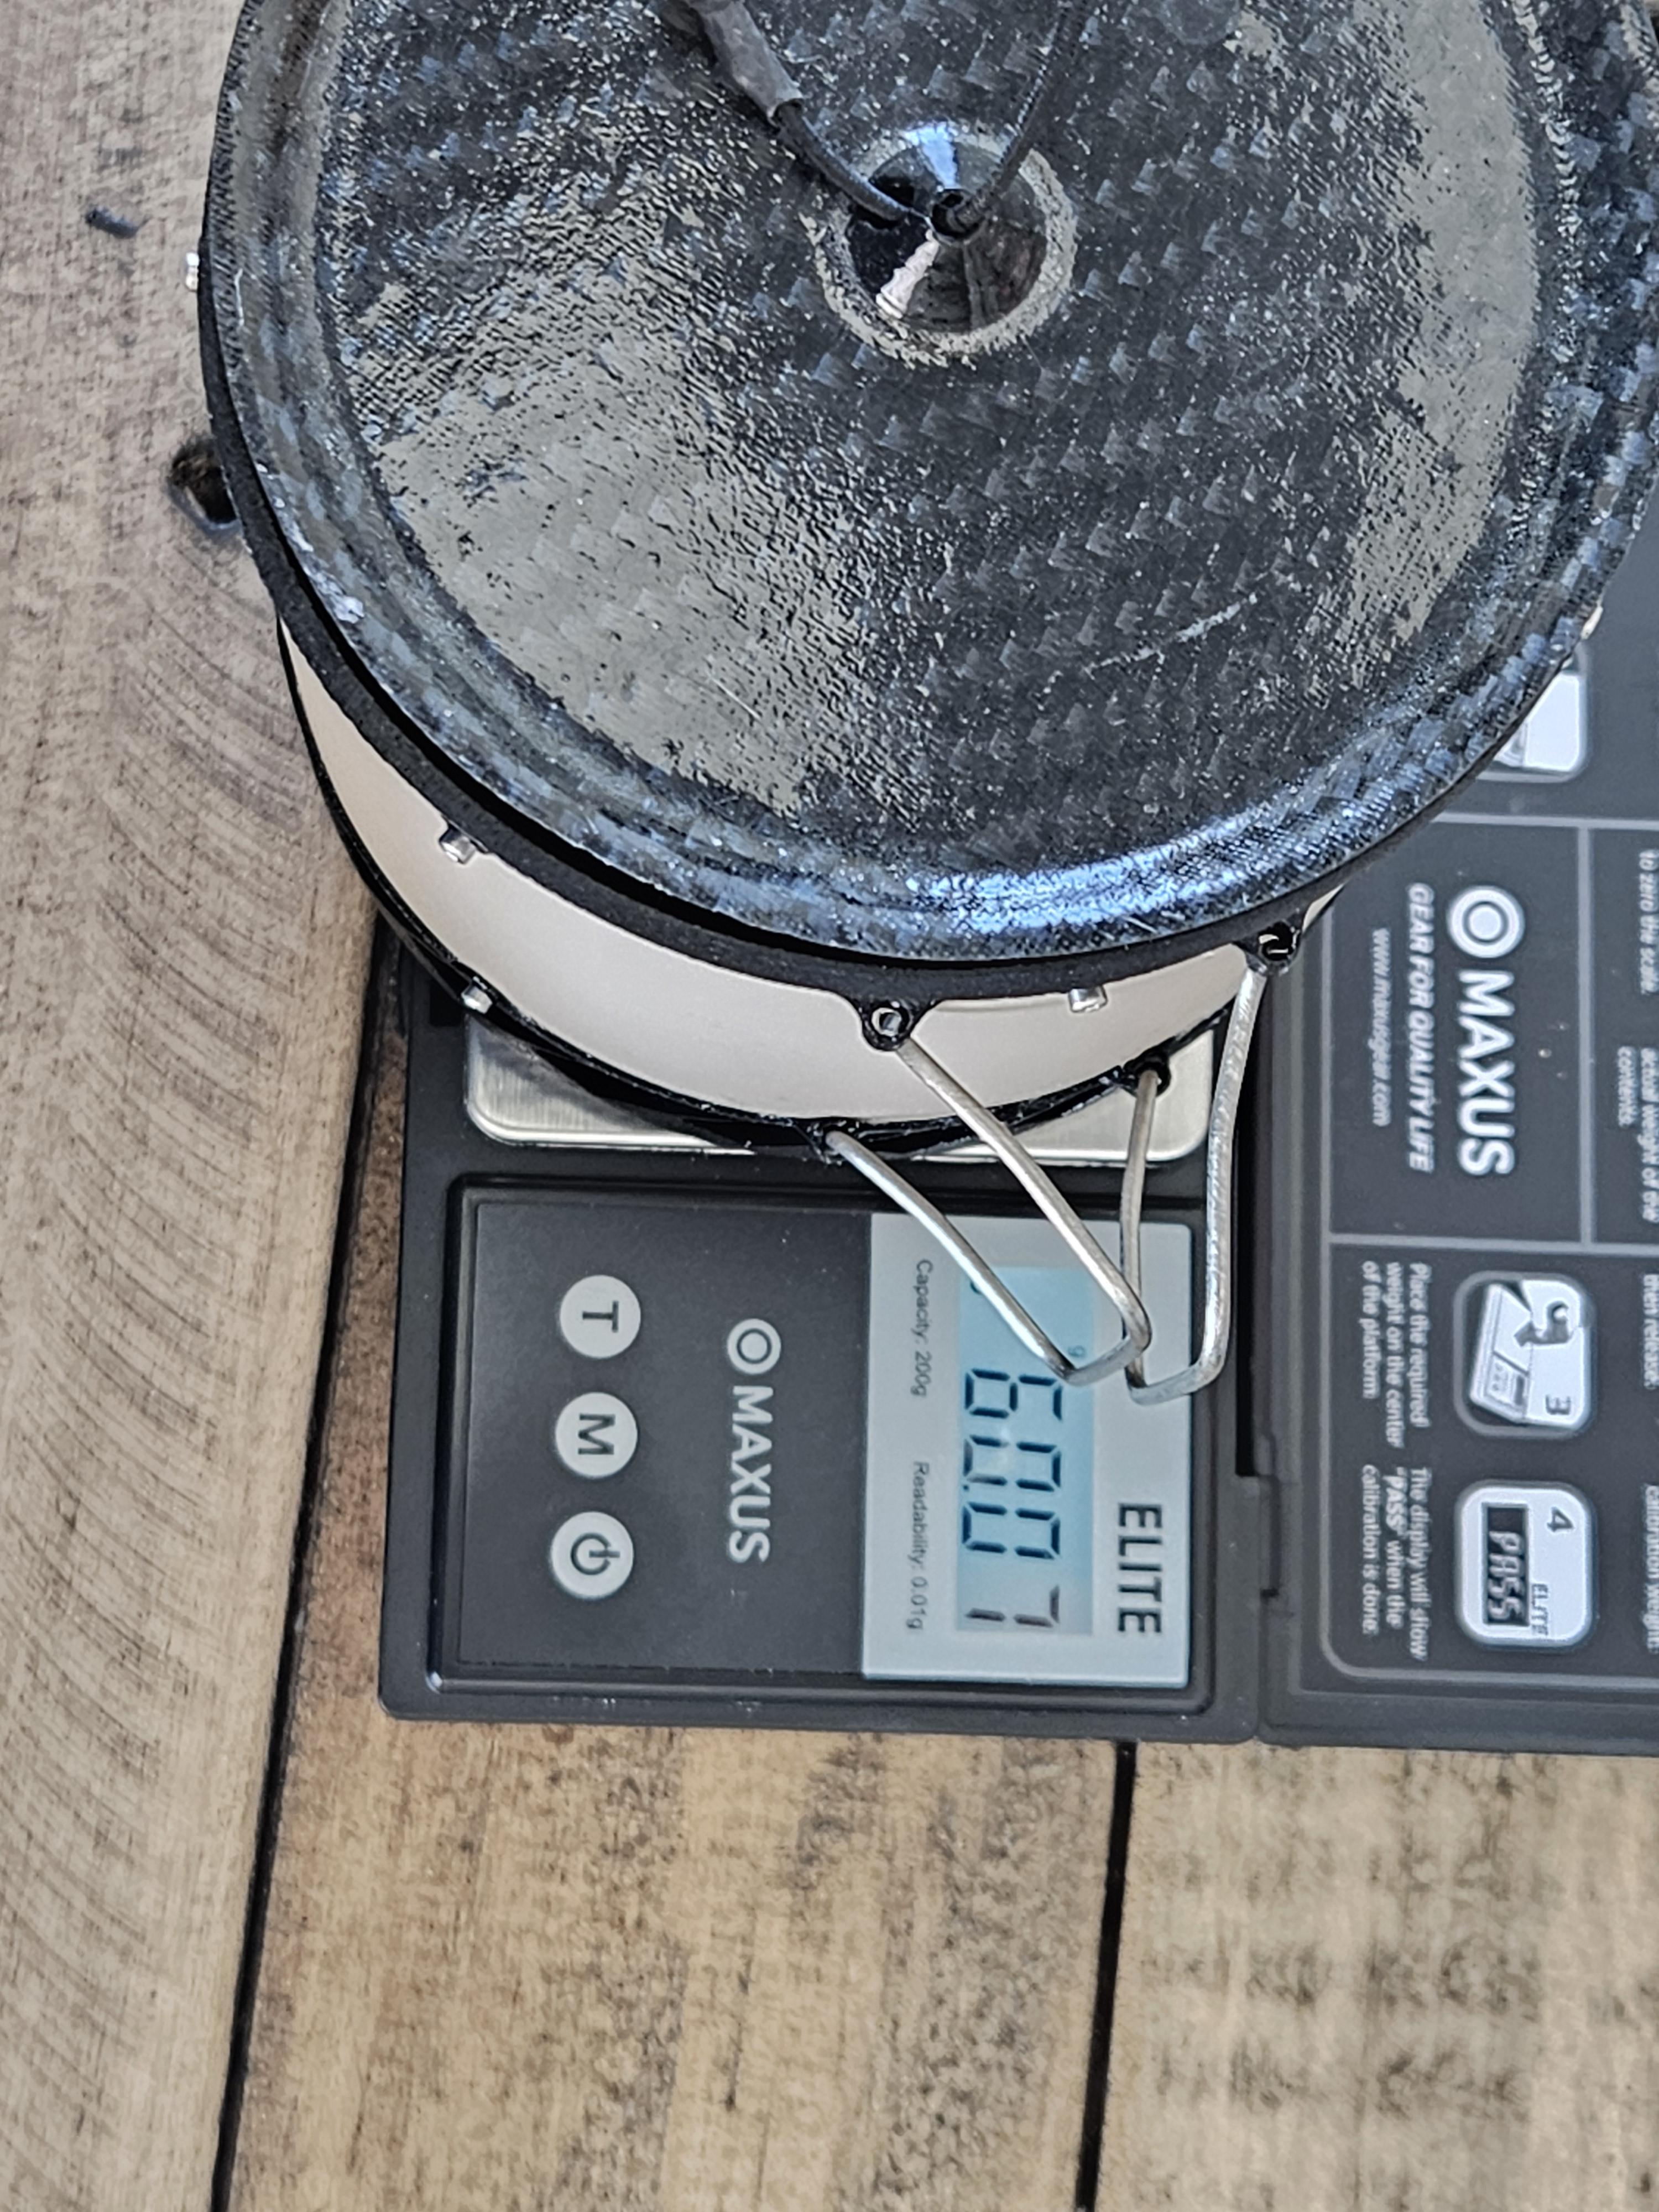
With the V1 lid, it comes in at 60 grams. However I’ll be switching the lid up here soon, not sure exactly what I’ll do, but I have a few ideas. The silicone coated carbon lids are just to much of a PITA to make with my available tools and I’d really like the lid to clip on to the pot top.
This design also has embossed graduation marks on the interior of the aluminum spine going up. But they are hard to see due to the black anodization.
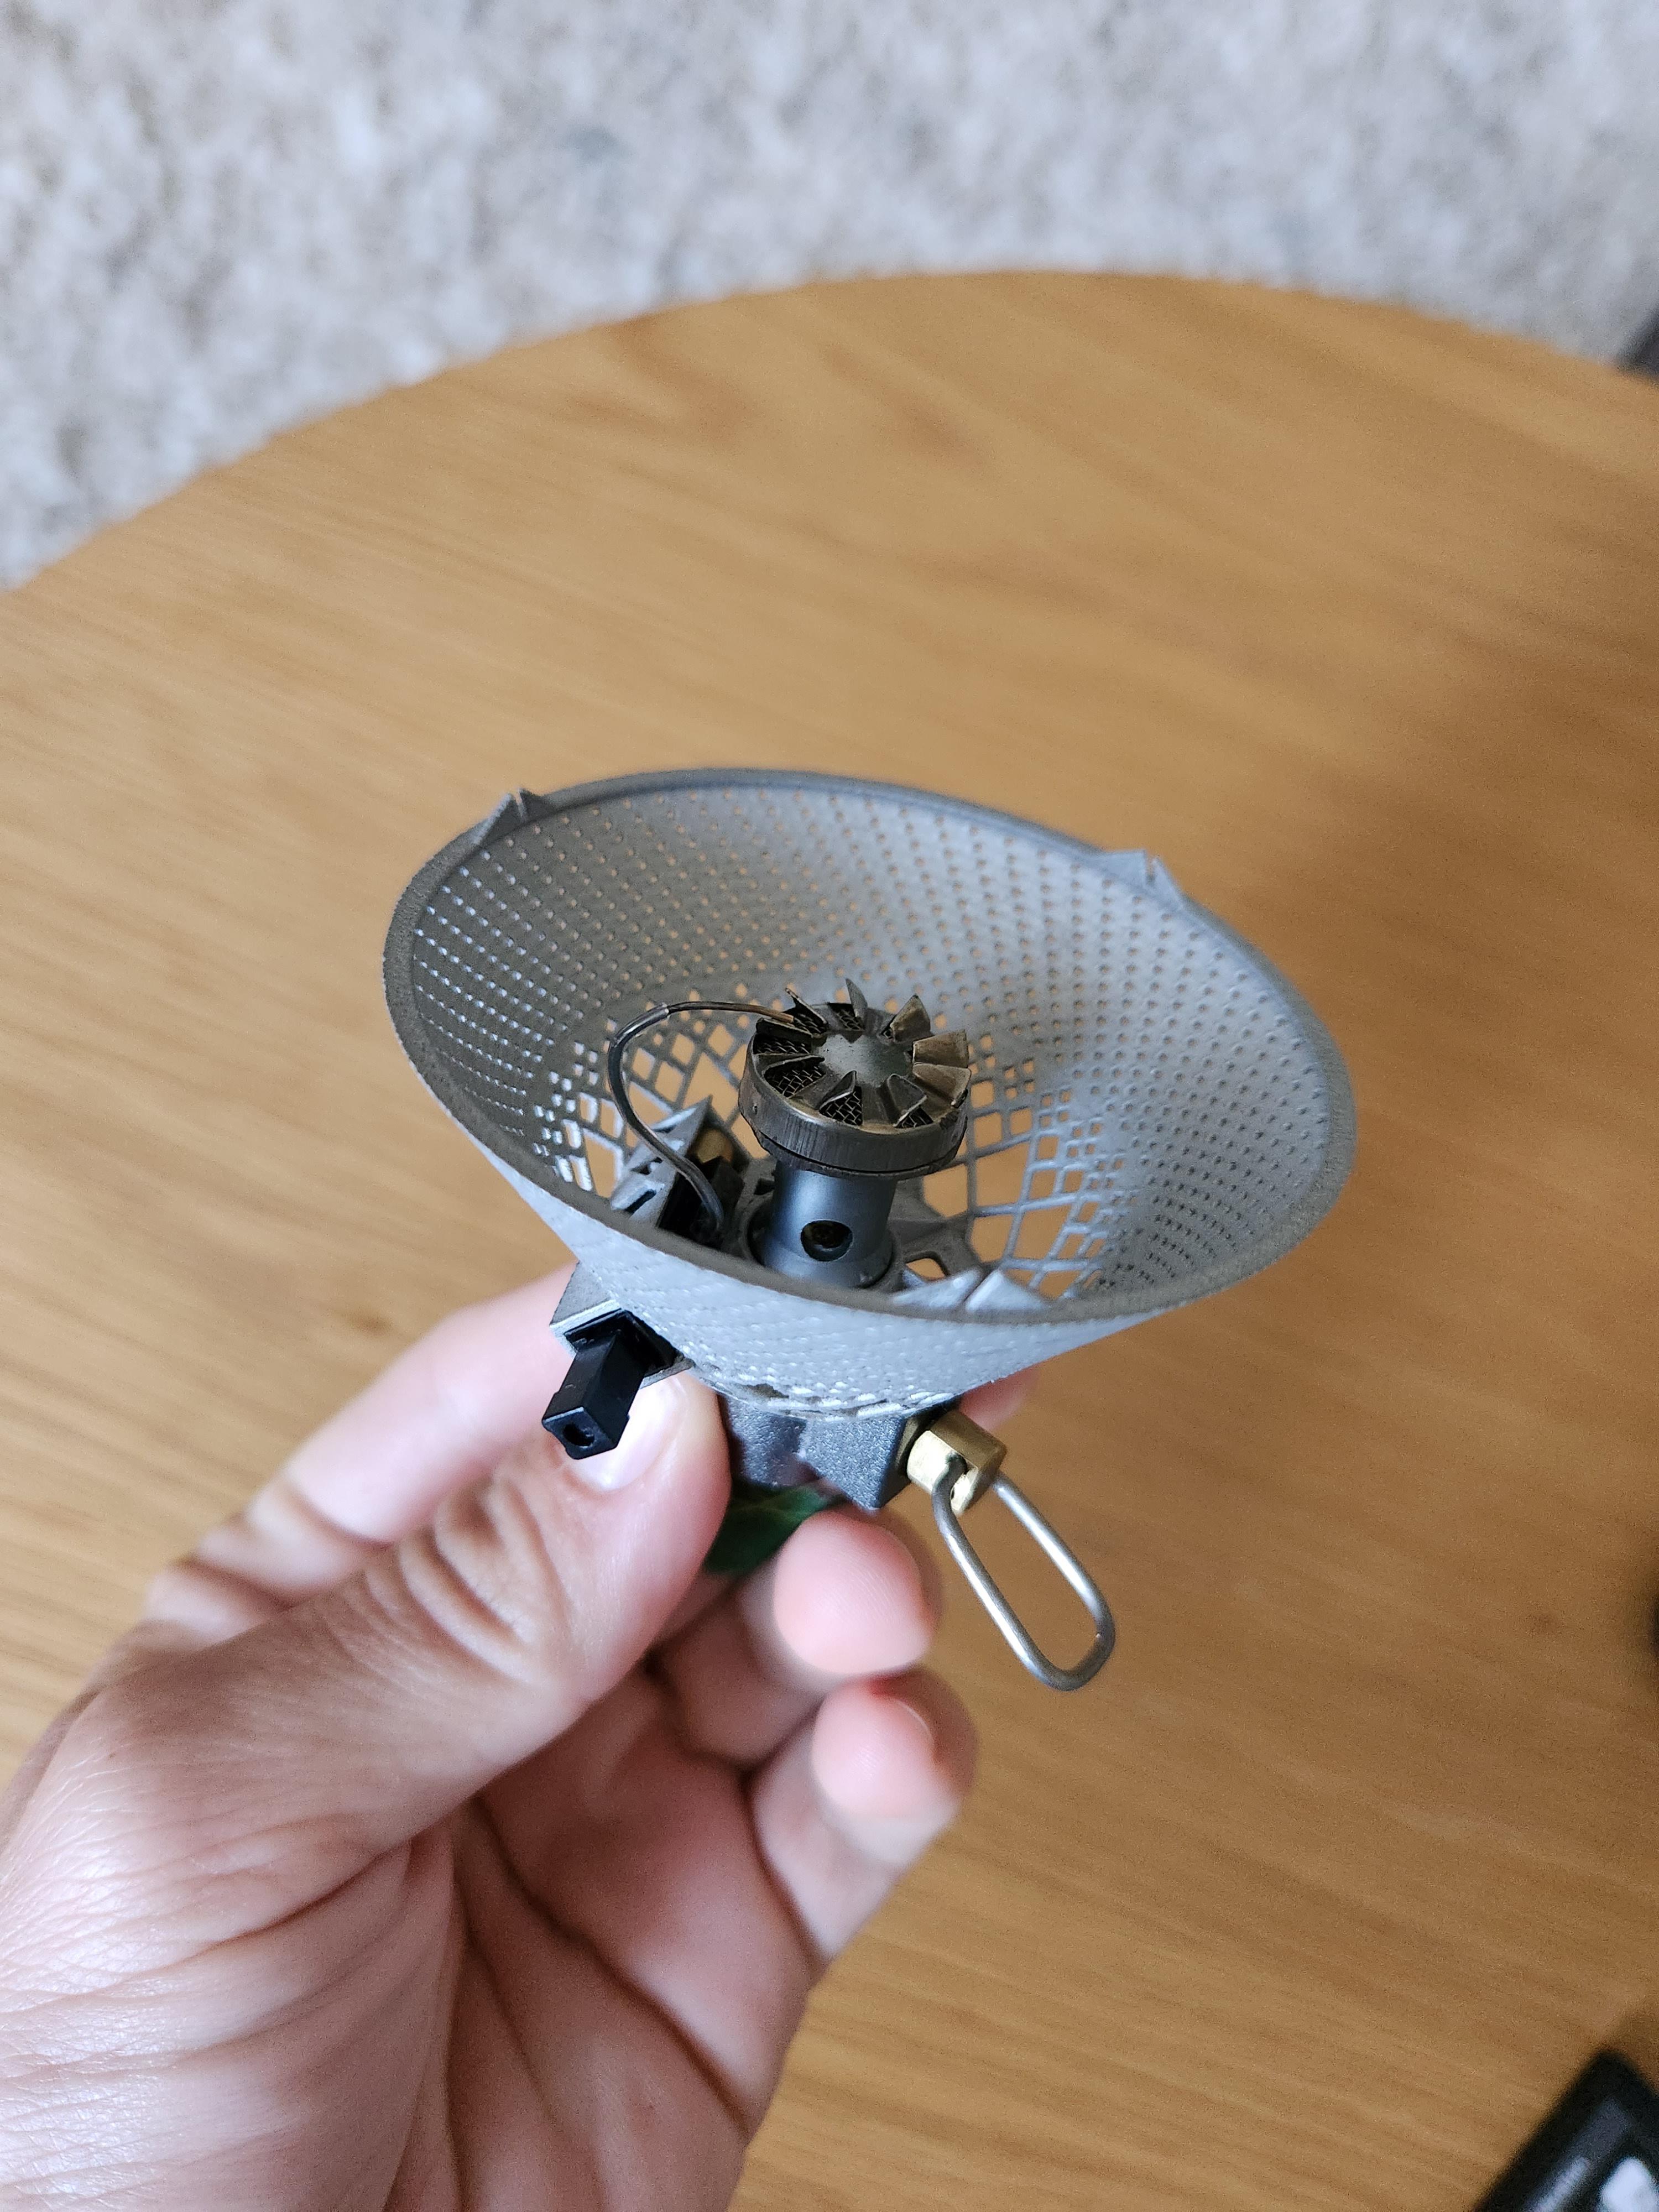
The HX on this one is nearly identical to V1, except for the modification to accept a PEEK sleeve instead of a CF one, and that the aluminum walls are now 0.5mm thick instead of 0.8mm.
The HX is still super rigid, noticeably more rigid than the base of a Toaks 550ml pot. The PEEK side walls feel slightly less rigid than Joule Bandit V1’s carbon fiber walls and Im curiouse how they will hold up.
My Joule Bandit V1 has been my primary pot since I made it and after it survived a PCT hikes worth of thermal cycle testing. I have maybe somewhere between 1,000 – 1,500 trail miles with it since then.
Efficiency:
I made some fast but not super rigouse test this morning based on the same Joules/gram metric I have been using before to quantify the performance of my heat exchangers without knowing the energy density of the camp fuel mixtures (because the exact gas mixture ratios are largely ambiguous from manufactures). I ended up getting a slight increase in efficiency…. I think, though the spread acroos the 4 test were larger than I’ve had before, so I’m not sure if its a genuine improvement or just something within the margin of some new error as a result of rushing it this morning.
JB V1 was absorbing 33.7K Joules per gram of MSR mix.
JB V2 is absorbing 35.1K Joules per gram of MSR mix.
And for reference, I’ve tested the Jetboil Stash in the past (indoor ideal conditions) at ~34.4K Joules per gram of MSR mix.
A Disappointing Mistake:
The mistake I made was with the anodization. I requested my service provider to type III hard anodize it with a black dye if possible and to use the boiling ionized water sealant method to lock the dye into the anodizing pores.
When I received these HXs, the black dye was coming off on my fingers as I touched it. At first I thought this was a result of them failing to properly do the boiling sealant method. However I have since learned it was likely part my fault and partly a communication error. I was ignorant enough to think all type III hard anodizings are food safe. And I believe my service provider used a dye designed for type II anodizing, thus it couldn’t properly enter the smaller type III pore structure.
Either way though, upon further research before I received the HX but after it had been shipped to me, I learn that most black dyes, even the rare hard to do one’s specific for type III, have cobalt in them, making this pot unsuitable for real use and probably the pot I’ve made thus far most worthy of the “Cancer-Pot” joke name. :(
I wanted the black for higher IR absorption after reading about David’s experiments here when being told about them at GGG 2024: https://backpackinglight.com/forums/topic/57444/
But unfortunately that’s not going to be possible via the anodization process like I had hoped. And I have reservations for using paint to pull it off like david did. I think this is a good lesson for me to not let so much of my excitement rush my decision making by taking shortcuts via assumptions based on bad heuristics.
So I think the next order of these will simply be the usual dark grey you see with Type III anodizing.
Plans Going Forward:
I’m in a tough spot financially at the moment, and if I’m being honest, cutting up this $320 USD sheet of PEEK with scissors yesterday was a nerve racking experience. XD
However, I’d really like to not have to halt progress here again because of my financial limitations after getting this close and having come off a 2 year pause on the project before these new pots.
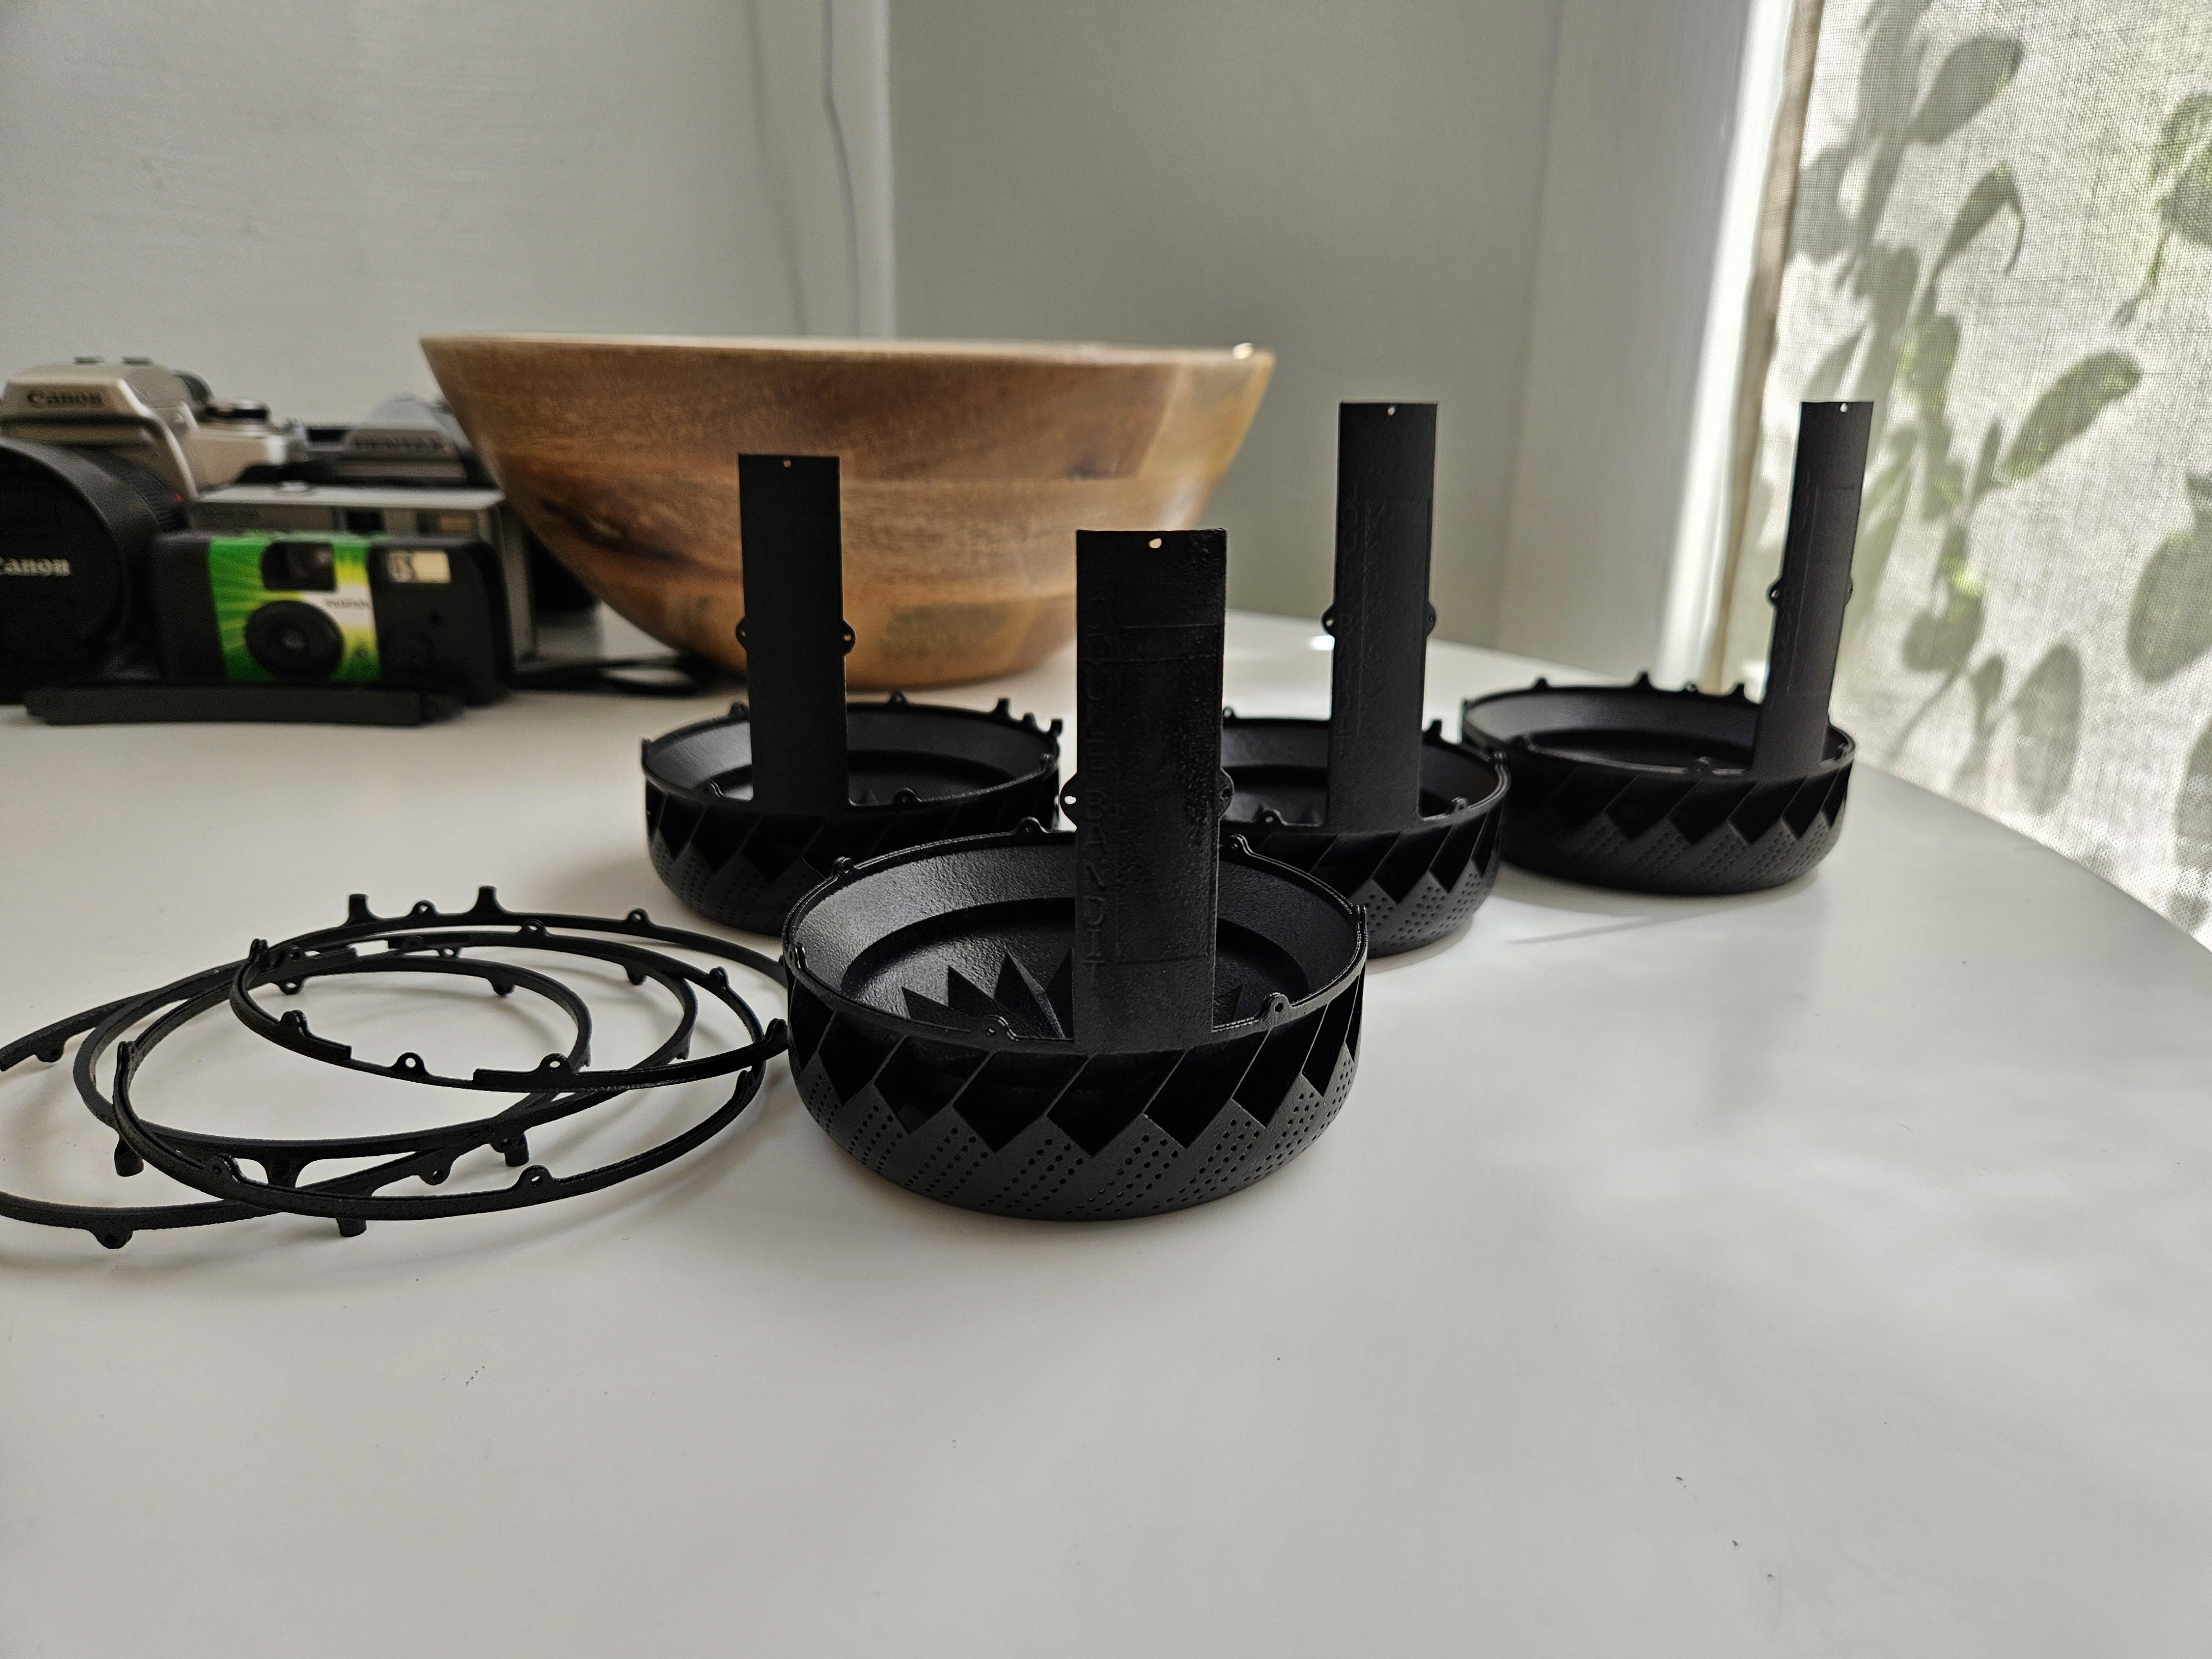
SO… I have 6 of these new (and incorrectly anodized) HX’s to be made into pots. Three 575 ml, and Three 675 ml pots (only made the one 575 ml so far). And because its only the anodizing that’s the issue here, I’m comfortable moving forward with thermal cycle testing on the ones I have on hand to confirm the design can handle a PCT’s equivalent of boils (see previous mentions on this thread to how I was doing thermal cycle testing).
If they pass thermal cycle testing with no issues, I have a few ideas I’m open to playing with, aimed at enabling me to keep the project moving forward despite uncertain times ahead for me personally.
1.) Paid Beta testers (pay me, not me pay you)
If they pass with no issues, I think I’d be willing to start getting these made for people at cost or near at cost. This would be a good way for someone interested to get their hands on one for much cheaper than what they may be if I were to ever successfully get them to market. Or a rare chance to get your hands on something that will likely never come to market. Two ways of framing it ;)This would allow me to get more of them on trail this coming season and receive all that excellent user feedback that goes into refining a design (just look at how many Pad-pal version there have been in the past 3 years thanks to user feedback).
However, because this would be a paid thing people are expecting an item out of in return. I’d only be comfortable doing it with the above Joule Bandit V2 design, because it’s the only one that both satisfies my food contact safety concern (once anodized correctly of course) and I have a good degree of confidence in my ability to repeatedly make them.
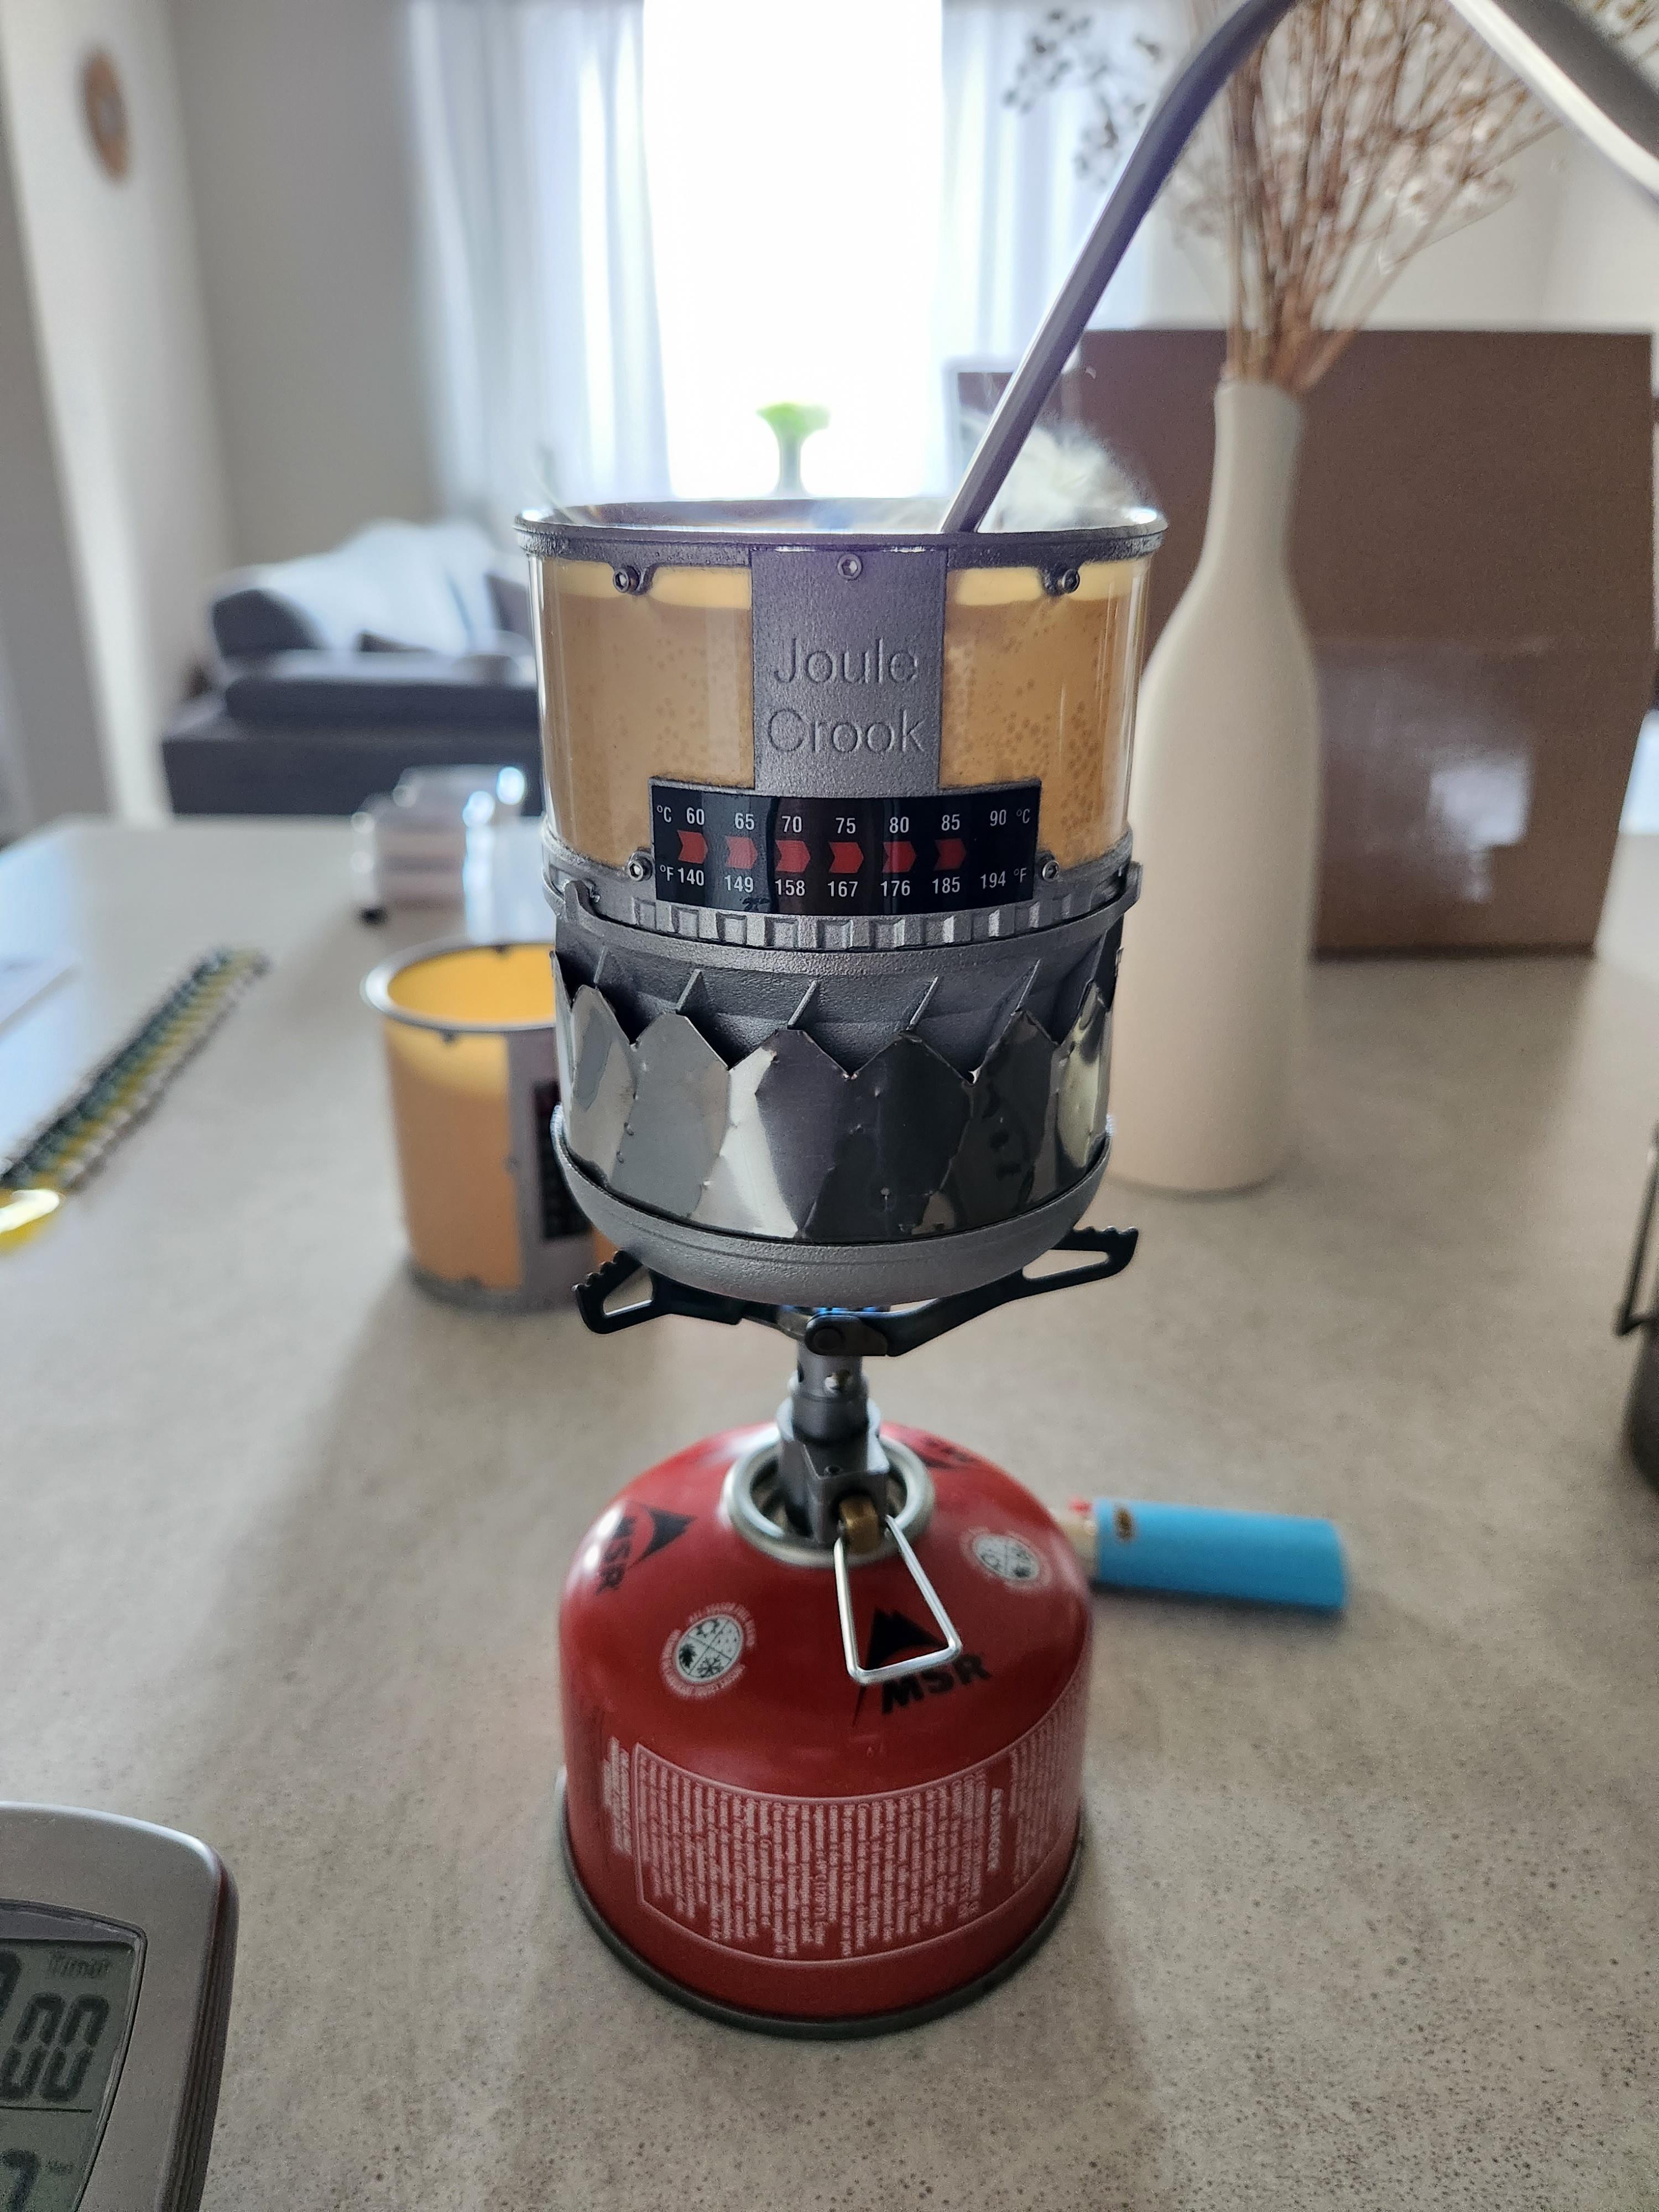
I’d give interested people the option to get just the pot (of their volume chose) made, or also include a modified BRS with the pot to make it a complete wind resistance integrated stove system (highly recommend, and the mod cost an extra $23 to make, assuming you supply the BRS3000 T). Maybe with Jan’s permission, I could also toss in one of his Air Horn canister stands too. Because this system really shines when used with that combination. It just might be the only system that can Answer Roger Caffin’s HX question poised in this article with a “Yes!”
https://backpackinglight.com/forums/topic/is-a-heat-exchanger-pot-worth-the-weight/
(Heres a short video I did a few years back showing that system with a Joule Bandit V1 )

2.) Patronage
The second option is a small group of patrons willing to donate towards the project to allow me to explore more risky (in terms of maybe not resulting in a usable pot) experiments. Such as the interchangeable volume sleeves, cold soaking water tight lid, a second attempt at adding a Piezo igniter to the BRS mod, and/or my dream of resurrecting the Joule Thief to make a Joule Thief V2 as an alpine, wind resistant, hyper efficiency snow melting optimized beast.
How would this work? I’d propose a prototype, show the patrons my plans for them, a quote, and get some initial feedback from them. Once we reach some sort of consensus on what to try, I’d place a batch order and get enough prototypes made, one for each patron plus two for my own testing. But with the understanding that these have a higher risk of not working out, resulting in the possibility of paying for fancy desk art instead of something useful.
3) Partnership:
If your a successful cottage company owner, and would like to partner on this. Let me know. Just be aware I own no patents and because of my propensity to share my ideas publicly, these are largely un-patentable due to counting toward prior art (I think, I’m no patent lawyer). So its possible we commit some resource and time to this, only to have another cottage maker, MSR, JetBoil, or the likes unleashing their version of the idea.
What do these cost to make:
I have a bad habit of sharing way to many technical details from the perspective of a business doing R&D. But this is my passion and I’d way rather have it continue to be something that’s fun for me, even if its at the cost of having to give up on running a business off my ideas; than having to hyper focus on how best I can strategizes these ideas to extract higher and higher economic value from my peers. I much rather chat about cool stuff with my peers, share ideas, and go on hikes together.
So with that said… The last order cost me roughly $195 in materials and anodizing services per pot. Which means were talking about a $200-$230 pot/stove system combo cost. The prices do go down with larger batch orders though, and that price was based on an order of materials/services for 6 pots.
Yes these systems are insanely expensive, in MSR Reactor cost territory. Which is probably why we haven’t seen any companies bring anything like this to market since I first showed off the efficiency and weight metric improvements that are possible by leveraging these ideas. I do not doubt that there are a number of copy cats sitting in different R&D departments as we speak though. Just biding their time waiting for the tech cost to come down. XD
I’d be curious to hear your guy’s thoughts on either of those project funding ideas.
Personally I think the paid beta tester thing is the most questionable ethically speaking. It’s always rubbed me the wrong way when companies essentially release a product as a way to test its feasibility instead of it being something that’s actually ready for trail life.
However the paid beta tester idea does feel more likely to be able to pull off than the other two for some reason. Call it intuition.
I’m going to be spending the next month waking up an extra hour early every morning to get the thermal cycle testing done on these. During that time, if anyone is interested in either of those options, reach out to me and let me know, I’ll collect your names and circle back if both the thermal cycle testing is successful and I decide either of those options is something I’m comfortable doing to move the project forward.
Until then I’m going to sit on the funding ideas and listen to people’s thoughts. I often get my judgements clouded by my easy excitability and today is an exciting day for me for sure.
I’ll return to report the weight of the 675ml version once I make it (hopefully next weekend) and its efficiency. And of course to keep conversing with you fine folks! :D
Feb 1, 2025 at 4:49 pm #3827577Hi Tyler
But this is my passion and I’d way rather have it continue to be something that’s fun for me, even if its at the cost of having to give up on running a business off my ideas; than having to hyper focus on how best I can strategizes these ideas to extract higher and higher economic value from my peers.
What can I say? I KNOW the feeling!
(Yes, I sell my stoves, but the income has not a chance in hell of covering the time I have spent on them. So?)It’s always rubbed me the wrong way when companies essentially release a product as a way to test its feasibility instead of it being something that’s actually ready for trail life.
I suspect many of us could name a few products and companies guilty of this. Sharing experience and knowledge here may be the only answer.I remember trying to explain to a product mgr that his company’s claims for their product X defied the laws of physics. His response was that he was just a salesman, and had no technical knowledge at all. Such is life.
Cheers
Feb 1, 2025 at 5:07 pm #3827580Tyler
Some random thoughts for you.
Just how hot does the lower part get? Since it is in contact with water, surely it cannot get much over (say) 120 C? Which makes me wonder whether you really need to use PEEK: upper temperature limit 250 C. PEEK is horribly $$$. PFA is half the price, and is rated to nearly 250 C.
Me, I would seat the plastic film in a groove in the lower part, with silicone sealant . The silicone can take the heat. How long would the connection hold? No idea. But Roof&Gutter sealant lasts for years in the sun.
Can you roll-crimp the bottom connection, for a permanent seal ( with silicon as backup)?
Cheers
Feb 3, 2025 at 5:03 pm #3827767Tyler, I remember your many cool items from GGG 2023, especially the Joule Thief. It’s a thing of beauty. Sign me up as a potential pay-to-be-a-beta-tester!
Feb 3, 2025 at 6:25 pm #3827772Hi Roger!
haha, man I love your stove articles/threads. Watching you design/testing process for each version in the open like that is such a treasure trove of knowledge, skills, and wisdom for any aspiring stove nerd!
Why PEEK:
I actually have a CAD model that uses PFA and a few that use PP. But the reason I went with PEEK was because it is a lot more rigid and doesn’t require any additional stiffening/load bearing structure.
For the PFA models, I was playing with the idea of using an aluminum lattice over the PFA sleeve so it had better axial/radial compression strength. But the lattice is very hard to print accurately. I’m pretty sure the design could work after a few iterations, but I choose to go with PEEK because I thought it would have a higher chance of success on the first try.
Here’s what the PFA model looks like… nothing rigourous, so its missing a few parts, but it let me play around before I settle on PEEK for this version.

RE Crimping:
Oh I like that idea! I dont have the equipment to do it I think, but if I ever did, I think that would be a much faster way of assembly.
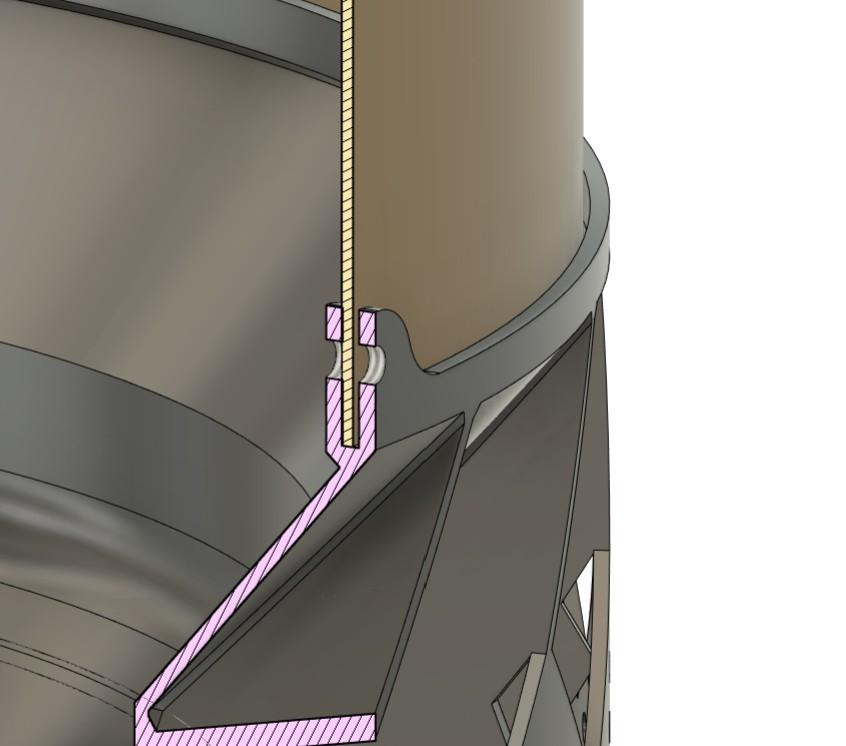
Currently the joint is constructed like this:

There is a relatively deep groove that I use a syringe to fill with NFS61 cert silicone. Then drop in the PEEK sleeve. Once everything is cured, I drill the holes and tap the threads. Before inserting the fasteners, I put a drop of silicone over each hole. The fasteners then pass through an aluminum tab, then the PEEK, then another aluminum tab on the opposing side.
The idea I had was that most of the mechanical loads would be held by the fasteners, and the silicone would do the sealing. It seems to be working great so far, but until I make more and finish up the thermal cycle testing, I’m hesitant to crush this thing as hard as I can to see what it can take. XD
David:
Hi David! Man GGG was awesome, I’m still weighing if I can go to the one being planned for this year. I’m hoping I can.
And sure thing! I’ll put your name down on the list, so far there are 4 of you interested. I’ll reach out if thermal cycle testing goes well. Were going to need at least 10 people to make it work because my service provider let me know they would like me to place minimum order quantities of 10 for these parts going forward to make it worth their time. But the fact there’s already 4 means were off to a good start.
Feb 3, 2025 at 7:15 pm #3827773Tyler
Do a search on “jenny bead roller”. They can do a crimp seal like on a tin can.
Yes, costadedollar, but you may be able to mock something up yourself. Especially if you have access to a lathe.If you have that frame (previous posting), could you use very thin (eg 0.15 mm) Al sheet instead? Or maybe very thin (0.05 mm) Ti foil? Ooh – titanium!
Cheers
Roger -
AuthorPosts


- You must be logged in to reply to this topic.
Forum Posting
A Membership is required to post in the forums. Login or become a member to post in the member forums!
LAST CALL (Sale Ends Feb 24) - Hyperlite Mountain Gear's Biggest Sale of the Year.
All DCF shelters, packs, premium quilts, and accessories are on sale.
Our Community Posts are Moderated
Backpacking Light community posts are moderated and here to foster helpful and positive discussions about lightweight backpacking. Please be mindful of our values and boundaries and review our Community Guidelines prior to posting.
Get the Newsletter
Gear Research & Discovery Tools
- Browse our curated Gear Shop
- See the latest Gear Deals and Sales
- Our Recommendations
- Search for Gear on Sale with the Gear Finder
- Used Gear Swap
- Member Gear Reviews and BPL Gear Review Articles
- Browse by Gear Type or Brand.
