Topic

Internal Frame Layout Questions/Advice Needed


Forum Posting

A Membership is required to post in the forums. Login or become a member to post in the member forums!

Home Forums Gear Forums Make Your Own Gear Internal Frame Layout Questions/Advice Needed

Viewing 25 posts - 1 through 25 (of 25 total)
  • Author
    Posts
  • #3529226
    Eliot
    Spectator

    @ejdiamond

    I’m in over my head, thinking I can build an internal frame pack. VX2, 40ish liters, simple frame and hipbelt

    Looking at this layout for a simple U-shaped frame made of aluminum stays, can anyone tell me why this wouldn’t work? Sleeves on both sides, double stitched. Velcro hold up top to apply some downward pressure when worn.  Please, tell me why. In my head, it works.

    Imagine looking at the back panel when the pack is flipped inside out. Vertical stays down the sides and a horizontal one across the top.

    Also, how would I fuse the stays together…weld them? Need some advice on that, too.

    Thanks!

    #3529235
    James Marco
    BPL Member

    @jamesdmarco

    Locale: Finger Lakes

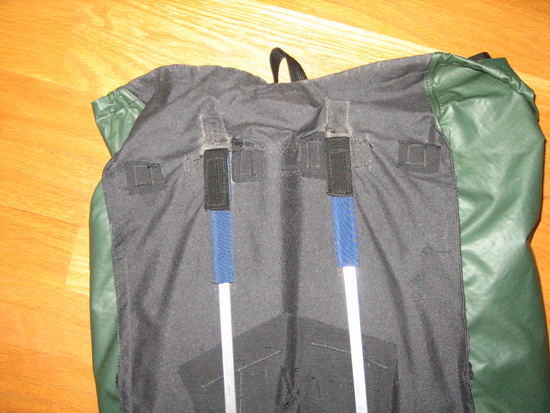
    Sure, it works. Gossamer Gear does this or very similar.

    At 20 pounds this is OK, but at heavier weights you will have problems. Think of the weight pushing down and hanging from the Velcro. Attaching the shoulder harness means all the weight is on your shoulders, now. Ouch.

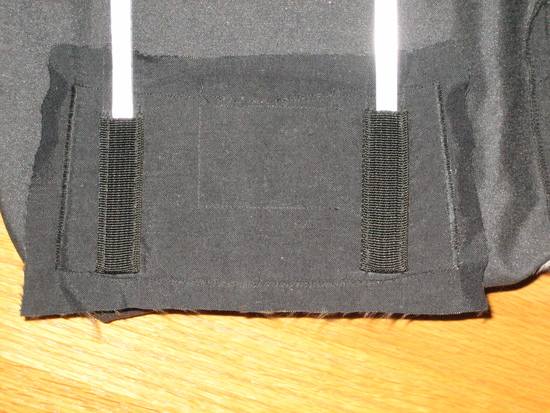
    Adding a hip-belt will mean weight is transferred down the arms to the points of the frame, then to the hipbelt. Uh oh. Weight on the pointed ends is not a good thing since it concentrates all the weight in a small area…It was not distributed. This is not good for the fabric and durability and not good for the hiker, since fabric can flex around those points as you go putting more weight on the shoulders.

    I did some testing of the older Gorilla packs for Gossamer Gear and found that no matter how tight I pulled the hip belt, fabric sag always put excess pressure on my shoulders. I actually got blisters at 27 pounds. I got one other set of blisters back when I was a kid and didn’t use a hip belt. I had a 45 pound pack then. I was hurting on the second day. Same with that model Gorilla. The shoulder harness is actually heavily padded on the Gorilla, BTW. This only adds to the problem.

    OK, you decide to ignore that. Now we have picking the pack up/setting it down. The points now take a lot of the load, again, eventually pushing through the fabric and really hurting durability and carrying.

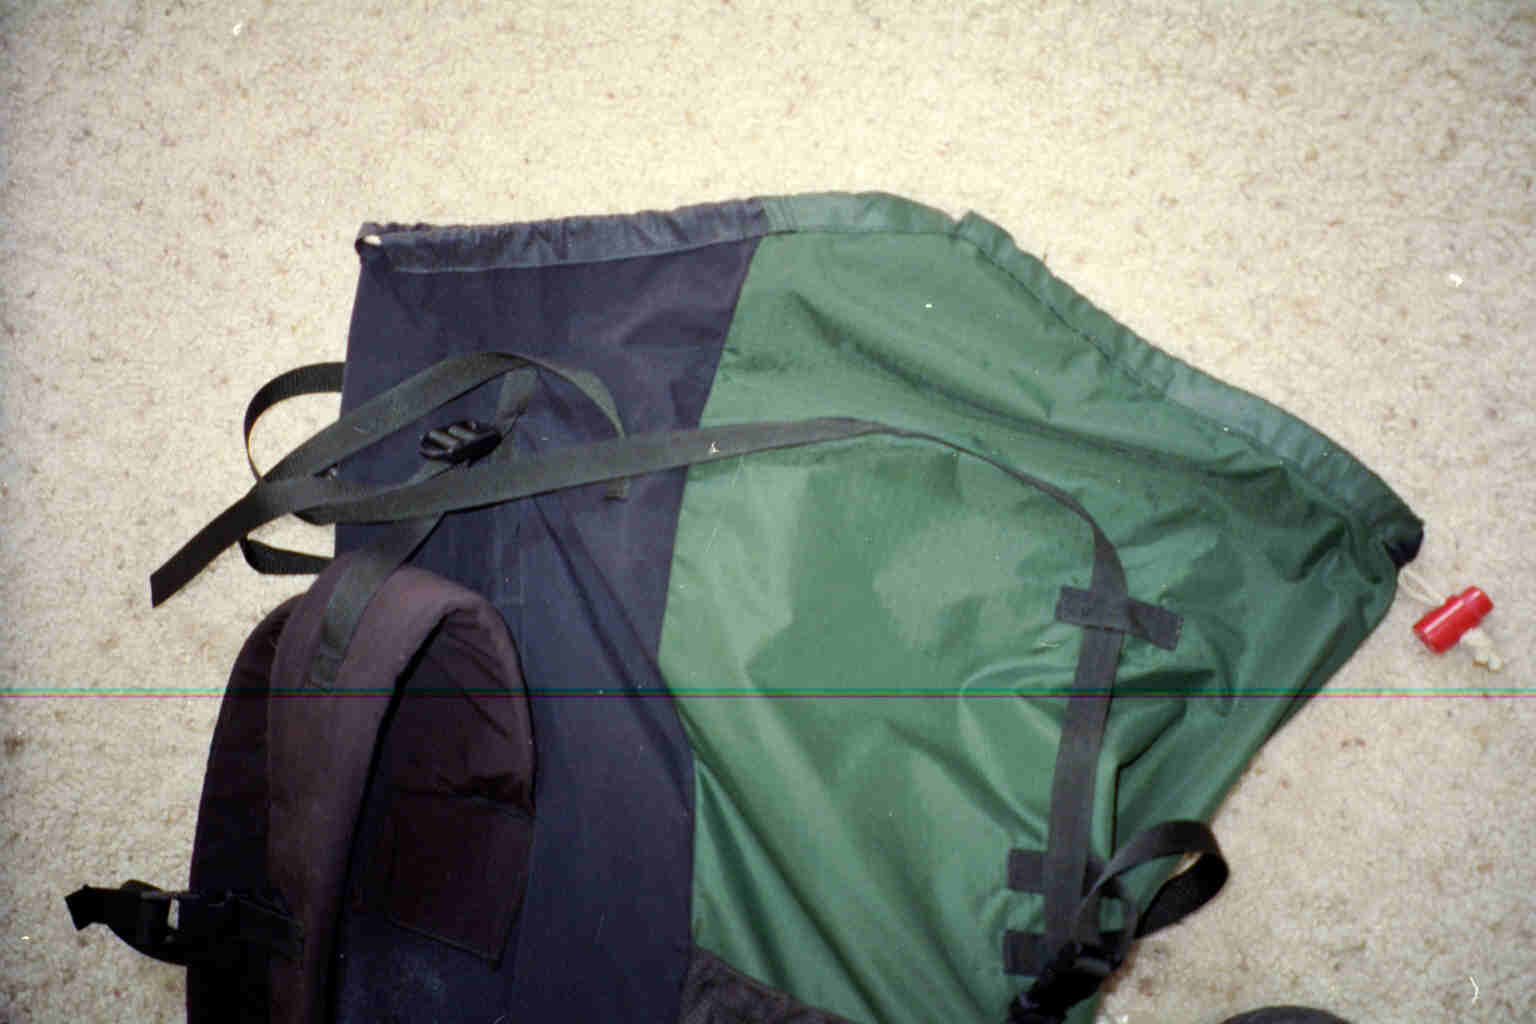
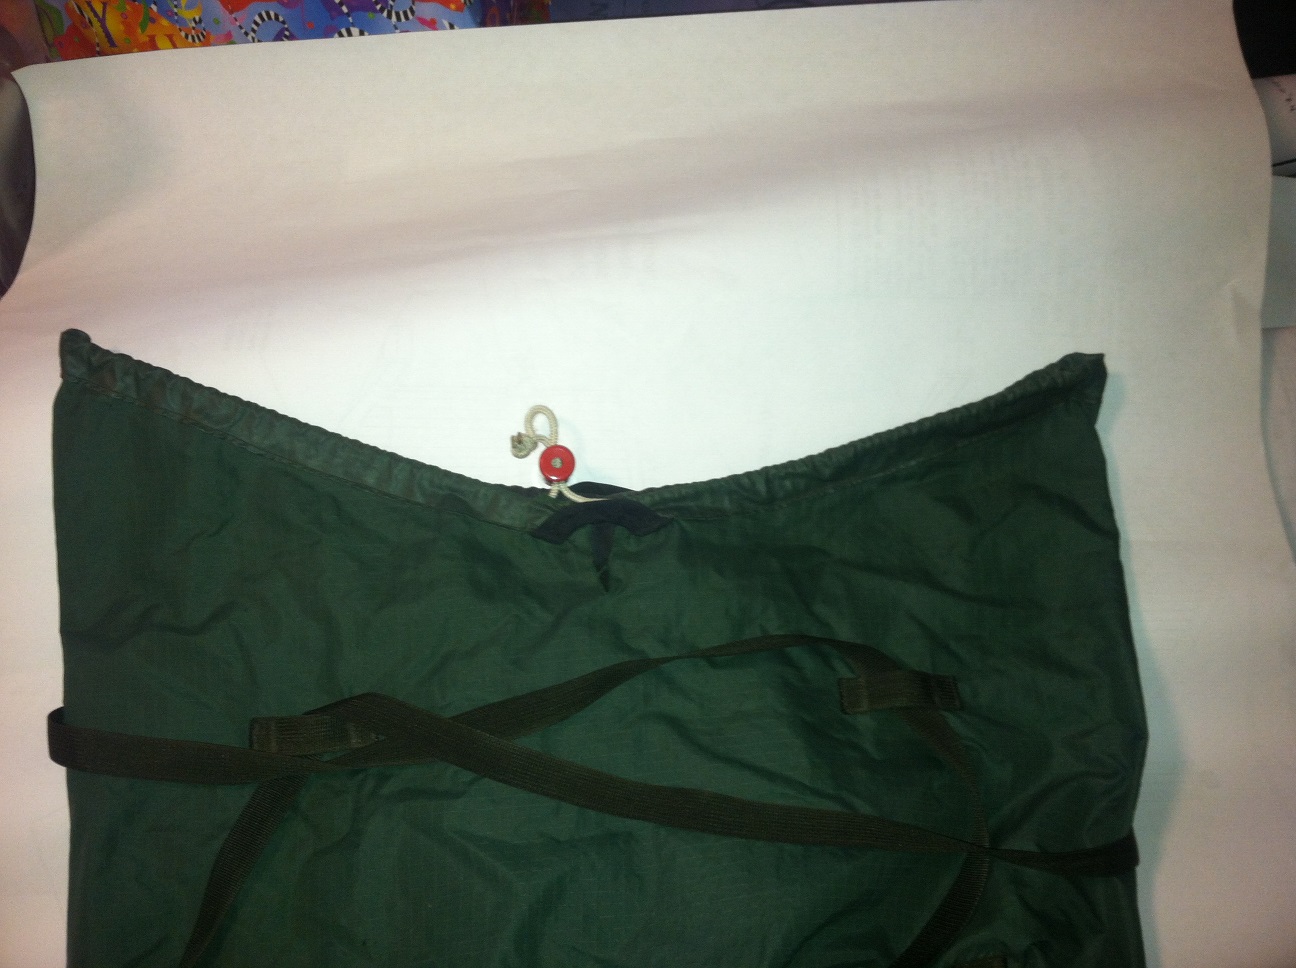
    GG redesigned their hip-belt/frame system on the Gorilla and other packs to incorporate a strong attachment at the bottom. A little heavy duty cup was added to pick up the weight at the hip belt a few years back.

    Lets look at some design points.
    The weight of a pack should be distributed. Heavy dumbbells always feel heavier than larger pack of the same weight…a couple ounces per inch feels lighter than a couple pounds per inch even at the same overall weight.
    The weight of a pack should rest on your hips. The greatest amount of muscle groups involved in carrying a pack means all parts of your body can take up loads, but the weight should be distributed to the largest muscles, proportionally. Usually this is your butt and legs.
    Keep the weight low and close for maximum comfort. You want any heavy items near your hips, not on your shoulders. Your walking balance is important and keeping it closer to your hips will make it less unbalancing.
    The weight of a pack should not ride down your spine. There are a number of muscle groups in your back and shoulders. We are taught, “Never lift with your back” for a reason. There are a lot of smaller muscles attaching your bones and cartilage (disks) in your pack and can easily be strained with small amounts of weight. Placing all the weight on your spine leads to a “bad disk.” Been there, done that…
    When hiking, all weight is eventually carried by your hips, legs, knees and feet. It doesn’t matter how it gets there. Putting weight on your shoulders means carry weight across your chest through the clavicle (constricting breathing,) down your back, and across to your hips. Putting weight on your hips short circuits that. Weight is simply placed on your hips with a good hip belt.

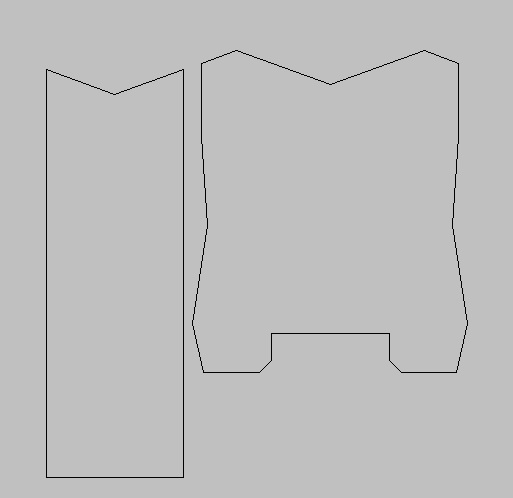
    As you can see, you want at least 50% (some, myself included say 70%) of the weight on your hips. The upside down “U” doesn’t help with that. It sort’a goes “agin’de’grain”. You can make it work, as GG did, with special attachments. I think a simple “U” shape is more efficient. Put in from the outside with a couple loops to attach the hipbelt solidly to the frame, it is naturally more durable than points. The hip-belt/frame now form a base for attaching anything else with the shoulder straps simply stabilizing the load against your back. It’s a bit more complicated that that, but the base structure is the hip belt & frame. These want to be mounted solidly together.

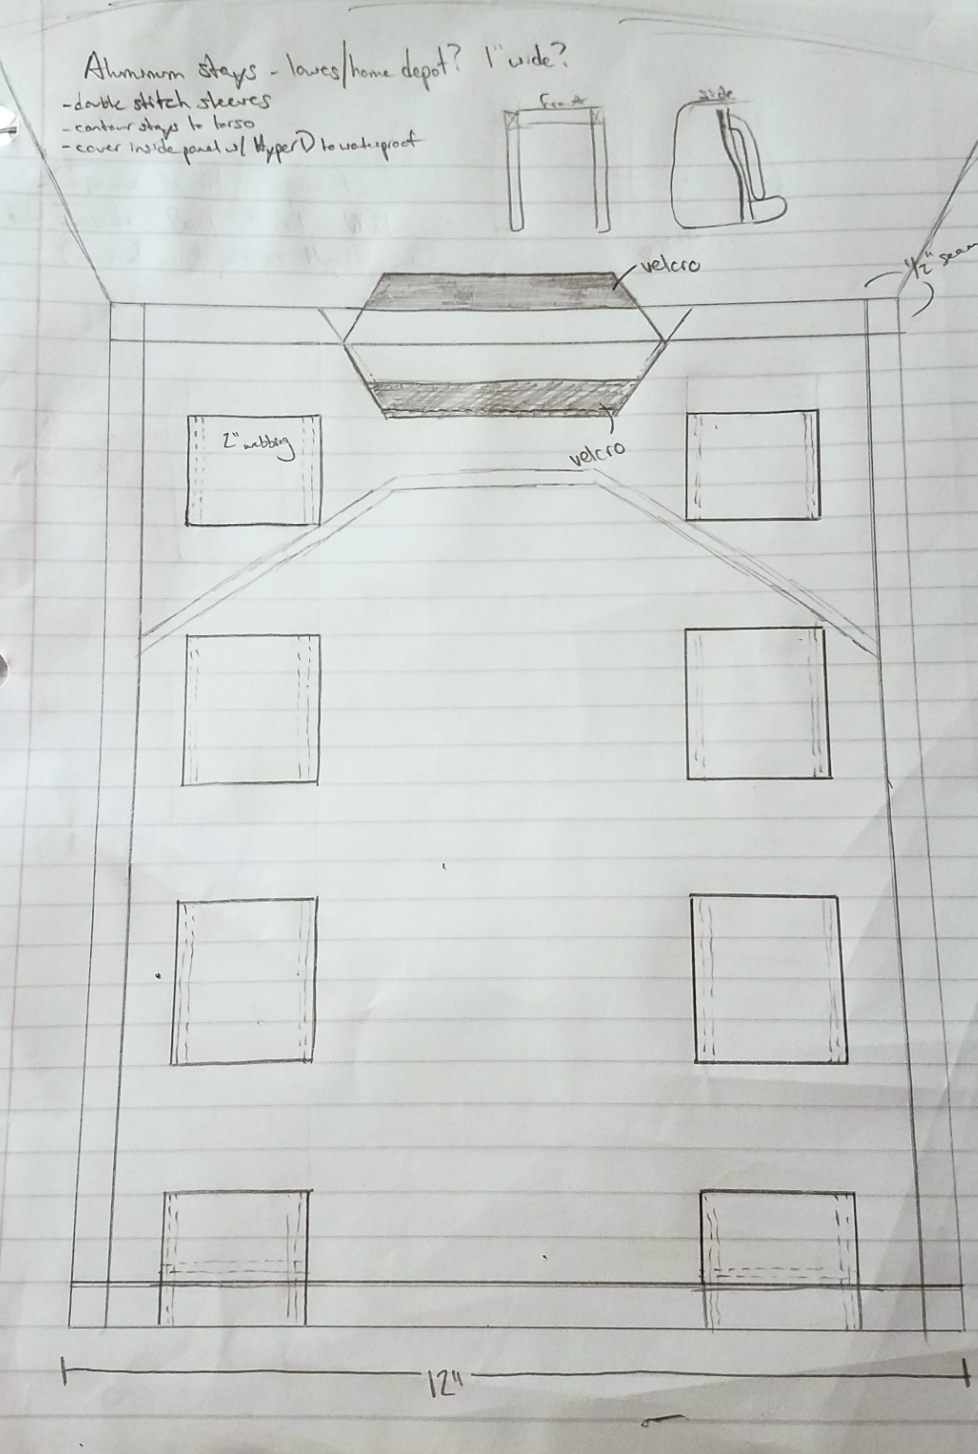
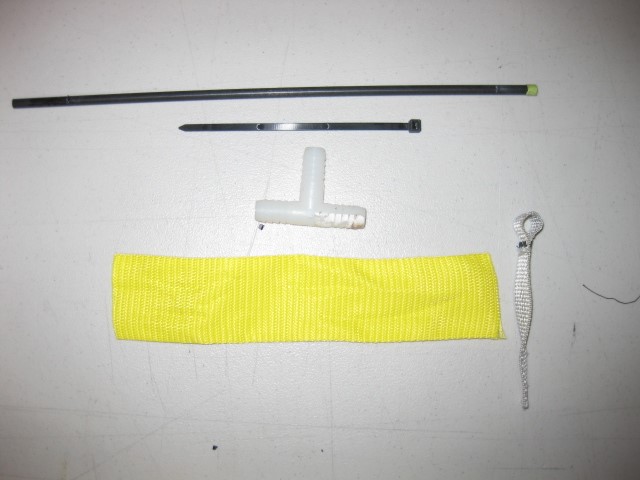
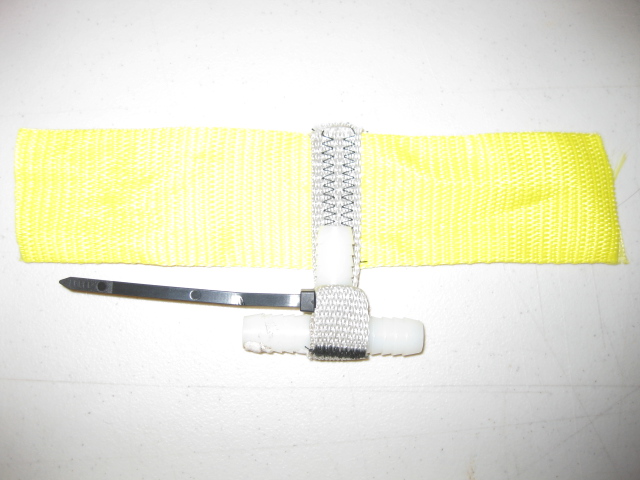
    Now turn your attention to saving weight. Aluminum wire or 1/4″ frame material can be had at McMaster & Carr…look it up. (aluminum bar stock) You can get a 6′ 3/8″ piece that you can simply bend (1″ radius minimum.) Connectors are not needed. If you are lucky, you might find magnesium and titanium, too. Call and see what they can do. They do not list a lot of stuff.

    Anyway, that is my thoughts on the subject…

    #3529244
    Daryl and Daryl
    BPL Member

    @lyrad1

    Locale: Pacific Northwest, USA, Earth

    Elliot,

    Here’s how I addressed some of your questions in a similar frame.

    https://backpackinglight.com/forums/topic/kiss-myog-5-ounce-pack-frame/

    #3529257
    Lester Moore
    BPL Member

    @satori

    Locale: Olympic Peninsula, WA

    Elliott – did you mean VX-21 fabric? What weight range is this pack intended to carry? If under 25 lbs or so, then you would likely do fine with a lighter duty frame and attachment system, as James suggested.

    For the frame channels, instead of several on both sides, you could make two long channels of 2″ webbing instead. This would be stronger and quicker to sew and should add a little bit of stiffness to the back panel too as compared to several shorter channel segments.

    Think of the weight pushing down and hanging from the Velcro. Attaching the shoulder harness means all the weight is on your shoulders, now.

    If the pack fabric is sagging under weight and dragging down onto the top of the frame, would that not mean that the pack’s weight is being directed onto that frame, not the shoulders?

    Fixing the hip belt and the shoulder straps to the frame should make all that weight transfer to the hips, provided you have a stiff enough frame and stiff enough hip belt – just as the 2016+ GG Gorilla does. If the frame is not stiff (as on the 2015 REI Flash 45), then wight transfer to the hips is less efficient, but still present, and not noticeable as a problem if carrying under 25 lbs or so.

    #3529280
    James Marco
    BPL Member

    @jamesdmarco

    Locale: Finger Lakes

    Lester,
    you write: “If the pack fabric is sagging under weight and dragging down onto the top of the frame, would that not mean that the pack’s weight is being directed onto that frame, not the shoulders?”
    Ha, hey…but isn’t that the same thing? What is the frame attached to? The Velcro. What is the Velcro attached to? The pack. Where is the pack attached? The shoulder straps. IMHO anything designed to support weight needs an analysis of how and where the weight is transferred. It makes no sense to handle loading on top *stronger* than handling loads at the bottom. Gravity always influences weight, indeed weight is only applicable in a gravity field. Weight above adds to weight below. The Roman Pantheon is much thinner on the top of the dome than the massive 20′ thick walls of the bottom.

    The cross member at the top of the inverted “U” simply transfers loads to the nearest point to relieve itself (given gravity.) So, it does nothing that couldn’t be accomplished by the backpacks fabric. There is no loading above it. Even if it is balanced, it then transfers loads down to the two open tips…the weakest points of the whole upside down “U” frame. OR, you support the frame in tension from the top. This means it will tend to float independent of the hip belt. (Again, the goal is to transfer weight of a pack to your feet in the most efficient manner possible.) Again, the upside down “U” has a greater tendency to put weight on your shoulder harness where the weight loads can be transferred to tensions by the pack/Velcro.

    The difference mainly lies between hanging a pack from your shoulders or supporting the loads from your hips. Hanging or supporting. The top does not handle most of the weight, rather the weight is always down. Hanging it from Velcro just introduces more points of fabric stretch IMHO. And the weight hanging on an inverted “U” puts pressure on two points of the frame, ie, where the load is transferred. This is inherently less strong than using a 1/4-3/8″ bar across the bottom to distribute the load across your hips. Think of a cup and weight as the water…not a truly accurate analogy, but you get the idea.

    With light packs, it really doesn’t matter. I hiked for nearly ten years without a hip-belt. Then I was involved in a car accident (not my fault) that screwed up a couple cervical attachments and cracked a cervical vertebra. I had to do things a bit differently, so I added a hip belt and loaded the pack much lower. (Though to be fair, on level ground or down hill, I still prefer a somewhat higher, more even loading.) Never looked back…

    #3529501
    Paul McLaughlin
    BPL Member

    @paul-1

    First, I would skip the horizontal bar. The vertical stays do all you need to do with a 40 liter pack. Second, I would put the stays much closer together. I usually put mine about 6″ apart; wider than that I find is more restrictive because they must attach solidly to the hipbelt to transfer weight and more than 6″ apart (for me, average size guy at 5’10” and 160 lbs) that means the attachment points of the belt (I use full circle belt sewn to the pack rather than “wings” coming from the pack corners) are far enough apart so that they restrict flexibility of the belt and thus reduce comfort.

    The bottom of the stay needs to be in a heavily reinforced pocket – I use webbing for that, stoutly sewn to the pack body. At the top, you need a closure for the sleeve so you can get them in and out; along the route they don’t have to be ina continuous sleeve, works fine in sections. The stays must fit tightly lengthwise. I always have the “lifter straps” attach right at the top of the stays. Makes for some complex sewing but puts the tension right where you want it. Though with a 40 liter pack, the pack may not be tall enough for lifter straps to work, since they need to run uphill from shoulder to pack in order to do anything.

    I use stays 1/8″ thick and about 5/16″ wide for packs that carry up to 30 lbs (can’t find aluminum that width so I have to cut down wider stock). 1/8″ x 1/2″ stays have worked up to 50 lbs for me.

    #3529518
    James Marco
    BPL Member

    @jamesdmarco

    Locale: Finger Lakes

    Paul, Yeah, I sort of agree about the stays. But, I use a pad for a frame that doubles as a sleeping pad and simply skip the stays for anything up to 30 pounds. The older pack I use for heavier trips sometimes carries more, but, I normally still only use a folded sleeping pad for anything up to about 40-45 pounds.

    I was speaking about a true pack framed pack, though. The frame and hip belt need to be locked together solidly as the primary load carriers. One problem I had with the larger stiff tubing frames with my old kelty was that it was *not* flexible enough. Every step was like being locked in to a stiff board. The “U” shaped frame allows torsional movement as it twists somewhat with each step. The result is a very comfortable carry which the Kelty lacked. But a typical stay/fabric will perform about the same. Again, as you said, it requires extra fabric to reinforce the stay points. I believe that locking the hip belt to the lower horizontal just makes the rest of the pack easy. Just the stays through the pockets and the belt through the horizontal with some sewing to keep any jumping or jiggling under control. You end up with a 30 pound pack that carries about 24 pounds on your hips and about 6 pounds on your shoulders. Gravity keeps everything together naturally. Of course, mountain climbing or other extremes may not work that well.

    anyhow…

    #3529554
    Doug Coe
    BPL Member

    @sierradoug

    Locale: Bay Area, CA, USA

    Paul,

    I appreciate your input. I’m collecting ideas for a myog pack and have saved all the comments you’ve made on the subject that I could find!

    This is probably thread hijacking, but since you’re here…a couple questions.

    Have you tried making a mulit-day pack without load lifters, and how did you like it? (I tend to like them.)

    How do you avoid barrelling of the pack–do you just make them shallow and wide?

    Thanks!

    Doug

    #3529649
    Eliot
    Spectator

    @ejdiamond

    Hi all, thanks so much to everyone for your input, this has been a super fruitful thread. In order of responses, some followups…

    I hiked a long distance with the Kylmit Motion60 pack, which features a thin aluminum upside down U shaped frame. It eventually broke, but my base weight is now 10lbs lighter. I enjoyed that system while it was intact and wanted to emulate it.

    James/Paul

    Are you both suggesting that I don’t need the crossbar, just the two vertical stays with extra reinforcement? That makes sense. The crossbar is the only internal design I’ve ever used, so that’s why I defaulted to it. But if you believe/know that just the stays will work, that’s fantastic.

    Lester:

    Yes, VX21, sorry about that! I’m hoping to never carry more than 30 pounds in this thing. It’s being designed as a thru-hiking and weekend pack, so I can take out the stays if I need to, hence the velcro strap to hold down the crossbar and allow me to remove the entire U frame. But, creating a “lid” for both vertical channels would allow me to remove the stays if I wanted.

    Can someone describe exactly how I would fix the stays to the hipbelt? Would this mean sewing the hipbelt on to the pack, with the main points being the pockets where the stays are housed?

    Thanks again everyone!

    #3529670
    James Marco
    BPL Member

    @jamesdmarco

    Locale: Finger Lakes

    Elliott, You wrote:
    “Are you both suggesting that I don’t need the crossbar, just the two vertical stays with extra reinforcement? That makes sense. The crossbar is the only internal design I’ve ever used, so that’s why I <span style=”background-color: #f6d5d9;”>defaulted </span>to it. But if you believe/know that just the stays will work, that’s fantastic.”

    Well, yes, stays work for low weight (<20pounds.) As does specific loading with no frame (<15pounds.) As do internal frames (<30pounds.) As do external frames (>30pounds.) They pretty much form a continuum of loads vs comfort while carrying them. It is not true that upside down “U” shaped frames don’t work. But when comparing the relative efficiencies of load carrying vs comfort, you examine the lightest possible arrangement which leads to the lightest possible materials for the task. A 2400ci pack (~40L) means you are planning for less than a week out, generally speaking.
    My old MiniPosa (Gossamer Gear about a dozen years ago) is quite light at 15oz with two carbon stays spaced about 6″ apart and a sitlight pad. This works really well with 20-30 pound loads though it is a bit larger than 40L. (I think closer to 50L.) I use this when I am doing more than just hiking or longer distances of around three weeks. My camera gear takes up about 10L for example. It will hold two 10L food bags/bear bags plus camera gear or three food bags. The only real mod on that pack was to add a 5 layer sleeping pad. But, I have repaired the sleeve bottoms/bottom area of the pack. The points do not do to well with overloads.

    For greater than 30pounds (I haven’t carried that much weight in many years) I like my older Tough Traveler. It has an internal magnesium frame in pouches about 7″ apart. It is “U” shaped and has the hip belt solidly mounted to the frame. This was from the early/mid 70’s and still going strong as a training pack. It is small, though at around 2700ci. But, I have carried this with the family loads of 40-50+ pounds five or six times each summer. It was small, but one of the best load carrying packs I ever used. Better than the Golite and GG packs, even though these are 20-30 years newer.

    I just never got around to building the exact pack I wanted. I have bought/used maybe 15 packs over the past 50 years. But, I know what works and what doesn’t. The inverted “U” does not work well with anything over 20 pounds. Fabric stretches, sometimes permanently. Fabrics wrinkle and collapse. Poly fabrics do not have the same strength as nylon. Some tension is needed to keep things in place, but not to carry weight. A pack needs to be designed for it. More than a simple rucksack with stays.

    For light weights a simple stay system with firm upper and lower “point” guards will work fine.

    #3529760
    Ivo Vanmontfort
    BPL Member

    @ivo

    Elliott,

    you wrote

    “Can someone describe exactly how I would fix the stays to the hipbelt? Would this mean sewing the hipbelt on to the pack, with the main points being the pockets where the stays are housed?”

    I used the ideas from Dave C.

    https://bedrockandparadox.com/2015/06/24/a-dual-stay-light-pack/

    for my own backpack. The text is in dutch but maybe the pictures can help.

    https://ivovanmontfort.blogspot.be/2015/07/prototype-van-een-rugzak-met-frame.html
    https://photos.app.goo.gl/lxokfl6uoXAsGAa62

    https://ivovanmontfort.blogspot.be/2016/06/rugzak-uit-x-pac-vx07-laminaat.html
    https://photos.app.goo.gl/uxcDNkvjRpaomNbB3

    #3529910
    Doug Coe
    BPL Member

    @sierradoug

    Locale: Bay Area, CA, USA

    I don’t know how to link to an ancient thread, so I’m copy/pasting from a thread I saved. It’s from 12/31/2011.

    Paul McLaughlin said:

    “This is what I do, which I think is fairly easy and works very well. My stays sit in webbing pockets that are sewn to the pack body right behind the hipbelt attachment, with the bottoms of the pocket right at the bottom of the hipbelt attachment. the hibelt is curved (conically cut), so that the attachment of the hipbelt is sort of a trapezoid but the top and bottom are slightly curved rather than being straight lines. I have also done the same thing using a lumbar pad. At the tops of the stays, a webbing strap with velcro comes over the top of the stay and keeps it in its sleeve. The “lifter straps” – which I consider essential – are attached right at the top of the stays.
    This arrangement gives very positive transfer from the stays to the belt. here’s a photo of the bottoms of the stays [second photo] on the inside of the pack. You can see that I put a reinforcing piece of fabric on the inside of the pack and sew the hipbelt on through that so thae stiching sandwiches the fabric of the pack body.”

    #3529938
    James Marco
    BPL Member

    @jamesdmarco

    Locale: Finger Lakes

    Here is a rough sketch of an ideal internal frame.
    “U” shaped allows solid mounting between the belt and pack.
    Loops of webbing also hold this to the belt and it is mounted to the pack in web tubing, sort’a “spearing” the pack like a hot dog. The Upper horizontal may or may not be needed. Depends on your preferences for load lifters. The straps/shoulder harness is mounted between the hip belt and upper horizontal. This means it is only holding the pack in place as it tries to pivot back. You can also sew directly to the pack, and skip the upper horizontal. The lower horizontal also holds the belt onto the frame. Again with a couple webbing loops (say 1.5″ nylon.) The whole deal is quite light if you use a length of 1/8 titanium bent to your back. Not counting the hip belt (on any pack), around 3oz for the frame and extra webbing. Note that the upper points of the spears are reinforced by the webbing rather naturally. They should be stitched closed slightly shorter than the actual frame to allow for any cloth stretching/tensioning. The shoulder harness is designed to do nothing but hold the pack securely in to your back. The weight is transferred directly to your outer hips, well away from any bones/disks/muscles in your back and away from the walking motion (figure ‘8″ twisting) of the frame. This is facilitated by the open “U”. The hip belt is sewn to the pack material directly. Note you have to plan this as you sew, otherwise you can’t get at the frame.

    It doesn’t matter about compression or having a loose pack vs a tight pack. The frame looks uncomfortable against your back, but the pivot insures that the weight never sits on your back, soo, it really isn’t. I would add pockets for a 5 layer CCF pad around 50-60″ long on the inner side, against your back. This will save space inside the pack (about 400ci) and double as padding in the pack & sleeping pad. Well worth the half ounce of extra material. Sort’a like hanging stuff off your pack without really hanging stuff off your pack.

    #3529962
    Lester Moore
    BPL Member

    @satori

    Locale: Olympic Peninsula, WA

    Thanks James for the details on the “U” frame idea. I like the pivot at the bottom – I wonder how that would feel different than the rigid upside down “U” used on the GG Gorilla? A sewn-in, one-piece “U” frame would definitely be easier to sew and would avoid having holes in the bottom of the back panel as the Gorilla has.

    How do you prefer to make the hip belt rigid enough to efficiently transfer weight to the hips? On the Gorilla, there’s a layer of plastic under the outer layer of hip belt fabric extending from the back panel several inches around toward the front of the belt. This plastic makes the hip belt rigid and prevents it from sagging or collapsing, efficiently transferring weight around the perimeter of one’s hips. Perhaps a heavier fabric (500 d or something) on the hip belt would achieve a similar result without plastic inserts? One popular pack that has a flimsy hip belt but a nice frame (2016 Osprey Exos) does a poor job of weight transfer to the hips IMHO.

    One downside of a sewn-in, one-piece, right-side-up “U” frame is that it would be non-removable. Not sure how much value there is in having a removable frame anyway, assuming one has a different pack (or two or three) for lower weight ranges.

    #3529981
    Hoosier T
    BPL Member

    @jturner140

    Locale: Midwest

    I have been very happy using a layer of this foam with a layer of 1/4″ FY20 foam. Those two sandwiched together makes for a very comfortable but rigid hipbelt. I just finished my second framed pack and used this configuration again without hesitation. COuldn’t tell you total weight rating as my pack usually never exceeds 25 lbs but it’s darn comfortable up to that weight with nearly full transfer to my hips and no collapsing of the hipbelt.

    My stays are 1/8″ x 1/2″ 7075 aluminum.

    #3530154
    James Marco
    BPL Member

    @jamesdmarco

    Locale: Finger Lakes

    Lester, Simply add some 1/4 or 1/8″ foam to the hip belt. I am not big on much more padding. While it is real nice in a store, it is terrible on the trail. It bounces and shifts with every step, eventually putting more pressure on your shoulder harness/shoulders. Not good.

    In the drawing, I noted the hip belt webbing completely around the belt. This is usually 1″, sometimes 1-1/4″ webbing. It will pull any nylon cloth fairly tight causing a slight curl in the fabric under tension. No real trick to this, the strap will stretch a bit more than the fabric anyway so just sewing them neutral works.This should grip your hips solidly. Also note that the bottom fame/belt loops are actually mounted at the center, on the strap, not up above as I show in the drawing. The pack compresses down. But, this makes a major mess of the diagramming outlining the structural components.

    “I wonder how that would feel different than the rigid upside down “U” used on the GG Gorilla?”
    Well, I don’t thing there is a lot of difference in feel.
    1) It is simpler. As an engineering tenet, simpler is better. Remove the cups from the hip belt and the Velcro above and use loops to mount things. The sleeves remain the same.
    2) As far as torsional flexibility, the upper part of the “U” is allowed to flex independently. Not so much with the GG method with the horizontal at the top.
    3) This allows load lifters if wanted. Rarely needed with light packs, though.
    4) The loads are primarily at the bottom of a pack. So, having the primary load bearing in the same place makes more sense that the upper horizontal being wasted.
    5) Keeping the load spread out at the bottom is not usually a problem, but again, a horizontal helps keep it that way.
    6) As far as load bearing goes, it is superior. Belt/frame become the primary load bearing components. They are locked together, but allowed to flex with your steps. You can easily do 40punds conservatively, depending on how the rest is put together.
    7) The frame sleeve ends can mount the shoulder harness. GOOD attachment besides the seam will insure durability.
    8) Adding pad keepers at the top/bottom will add a LOT of padding for comfort.

    Wood Frames: Well, I am a carpenter/cabinet maker. I have added wood laminates and made a couple wood laminate frames. They are light enough and in static tests strong enough, but in use they simply break. Not flexible enough to handle the dynamics of backpacking. I came back with most of my duct tape and several pine sticks wrapped around the frame. Went back to the metals. Ti is stronger for the weight. 1/8″ Ti is available in 6′ lengths. https://www.mcmaster.com/#metals/=1cdoebg You can get this in any reasonable size…3/16, 1/4″…

    Adding a web sleeve and stitching this on both sides and the top makes a nearly indestructible frame mount. It holds anything up to say 40 pounds (more, but I am guessing conservatively…40pounds per side is more like it.) The bottom horizontal actually becomes part of the frame, mounting the hip belt as was mentioned. ‘Corse, careful bending will be needed for both the uprights and the horizontal. Nothing wasted. Like I say, a second sleeve/horizontal can be added for shoulder straps but this is way overdone for <30pounds. Simply sewing the shoulder harness in place to the pack will work. But, you loose the adjustability. That’s OK in a custom pack. If you like the adjustability of load lifters, you can extend the frame a couple inches and add them to the harness by simple extending the sleeve/frame. These work well, but can constrict your chest a bit, hence your breathing. You will likely want the second horizontal since the load lifters will extend the pack height above where you would normally mount the shoulder harness.

    Like Hoosier, I never carry more than 25 pounds for a two week trip out. For three weeks it is <30pounds. Most people like a pack to be built for around double their intended use for durability reasons.

    #3530232
    Daryl and Daryl
    BPL Member

    @lyrad1

    Locale: Pacific Northwest, USA, Earth

    Elliott,

    “Can someone describe exactly how I would fix the stays to the hipbelt? Would this mean sewing the hipbelt on to the pack, with the main points being the pockets where the stays are housed?”

    Here’s a mock-up of how I attach my tubular stays/vertical frame pieces to the waist belt.  The role of waist belt is played by the yellow webbing.


    #3530272
    James Marco
    BPL Member

    @jamesdmarco

    Locale: Finger Lakes

    Looks good, Daryl and Daryl. I would suggest it is easier with a couple loops and a bent frame, though.

    #3547120
    Paul McLaughlin
    BPL Member

    @paul-1

    To all -sorry about the very delayed replay, I just hadn’t looked back at this thread for a long time. I shall try to answer everyone all in one reply here:

    Doug – I have not made a pack without lifters in a very long time. I would not make a pack with stays and without lifters, unless I went in a sort of combination Dave Chenault/Dan Mchale direction and attached my shoulder straps up high so that they effectively do what lifters do. But I do not expect to go that way as I prefer the fit and performance I get with lifters.

    Anti barrelling – I have two methods. For my lighter, summer packs, I do a saddle cut top which has the sides of the bag come up higher than the front and back. When drawn up, this encourages an oval or elliptical cross section rather than round. For my winter/ski pack, which has to handle larger/heavier loads, I added a crosspiece of aluminum tent pole tube just above the shoulders. This does not function in any way as part of the frame for suspension purposes, but it ensures that the front of the pack (and by front I mean the part that touches my back) is straight across, at least at that point, so that it cannot fully round out.


    Elliot D – as to crossbars – my light internal frame has served me well for 10 years pus with no crossbar, just stays; loads up to around 30 lbs. My winter pack, which has handled up to around 50 with skis and boots strapped on, has the above mentioned horizontal member but it has no frame function, and does not affect the suspension, just helps avoid barrelling.

    And in general: good hipbelt design is critical. Mine are conically cut; the belt is as if you took a cone and cut the pointy top off, thus the bottom edge of the belt is longer than the top edge, and that stays put on the hips much better while distributing pressure much better as well. Thick padding I think is unecessary – my summer pack belt is 1/4″ foam and my winter pack 1/2″. Width is what matters in my mind, more than thickness of padding. Somewhat grippy fabric is a must, I’ve had good luck with 160d Cordura. My stay attachments are fairly clear I think from the photo that Doug manged to unearth. I have also done a a more complex arrangement where the hipbelt is attached by way of velcro straps that are sewn to the belt and attach to looplocs right at the bottom of the stays. I think that method is slightly superior since it is truly a full circle belt and allows for simple belt replacement if damaged or worn, and a bit more movement at the belt/pack interface. But it is heavier and much more complex to sew, and the improvement is marginal, so I have only done it once. My light packs have just the belt sewn to the pack, no lumbar pad, but on my winter pack I did a lumbar pad and I think it is worth it for loads much over 30 lbs.

    #3547179
    Doug Coe
    BPL Member

    @sierradoug

    Locale: Bay Area, CA, USA

    Paul—Thanks for chiming in.

    I’m intrigued by your description of a “saddle cut top” to your summer pack. Do you have a photo(s) you wouldn’t mind posting here? I’ve never heard of this before and I like the sound of it. Thanks.

    #3547369
    Paul McLaughlin
    BPL Member

    @paul-1

    doug – hopefully these will make it clear:

    That last one shows the two pieces of the pack body pattern. So the mid-points of the sides of the pack are about 3 1/2″ taller than the mid-points of the front and back. this is based on the fact that if you have a rectangle and you measure from the middle of the long side to the center of the rectangle it is a shorter distance than the distance from the middle of the short side of the rectangle to the center of the rectangle. To do this precisely you’d end up with a fairly complex curved shape, but I just approximate by doing it this way. I think it helps along with paying attention to how you pack things in there. Not my original idea, some pack maker back in the 70’s or early 80’s did this and I picked it up back then.

    #3547401
    Doug Coe
    BPL Member

    @sierradoug

    Locale: Bay Area, CA, USA

    Paul—Wow, that’s some higher level geometry.

    I think I get it: The mouth of the top of the pack (when wide open) is the rectangle you refer to. When you pull the drawstring, the extra height on the sides is drawn in together with the low points of the front and back…and this helps the top of the pack maintain more of a rectangular shape. Vs. barrelling.

    Is that right? (I haven’t had math homework in many decades!)

    P.S. What are all those straps for?

    P.P.S. What’s going on with the shape of the edges of the sides in your pattern?

    Thanks!

    #3547767
    Paul McLaughlin
    BPL Member

    @paul-1

    Doug – not so much geometry as drafting. One of the things learned in high school drafting class was drawing patterns for sheet metal work, which has some connections to patterns for sewing. You got it right on the basic idea of how it works.

    the straps are just the top straps that run over the top from about the sholder level on the front to the top of the back pocket on the back, crossing over. Kind of a combination of a compression strap and a way to strap foam pad or tent on the top of the pack. In the photos they are just pushed out of the way so you can see the outline of the top.

    The sides of the pack body are contoured to roughly match the way my stays are bent/the shape of my spine. But not curved, just a straight line approximation for ease of patterning and sewing.

    #3547773
    Doug Coe
    BPL Member

    @sierradoug

    Locale: Bay Area, CA, USA

    Paul—Thanks for the explanations. I’m a big admirer of your packs with their balance of just enough structure where it counts (stays, conical hipbelt, and load lifters) and light weight and simplicity.

    #3547818
    Paul McLaughlin
    BPL Member

    @paul-1

    Thanks, Doug.

Viewing 25 posts - 1 through 25 (of 25 total)
  • You must be logged in to reply to this topic.
Forum Posting

A Membership is required to post in the forums. Login or become a member to post in the member forums!

Get the Newsletter

Get our free Handbook and Receive our weekly newsletter to see what's new at Backpacking Light!

Gear Research & Discovery Tools


Loading...