Topic
Half-pyramid UL tent project
Forum Posting
A Membership is required to post in the forums. Login or become a member to post in the member forums!
Home › Forums › Gear Forums › Make Your Own Gear › Half-pyramid UL tent project
- This topic has 17 replies, 6 voices, and was last updated 5 years, 9 months ago by
 Lester Moore.
-
AuthorPosts
-
Jun 28, 2018 at 5:01 pm #3544275
Hi, everyone!
I’m all new to BackpackingLight and I appreciate a lot the knowledge gathered here for DIY gear.
I love bikepacking through the south of France during the summer and I have a project of UL 1p tent specially made for this usage. I wand it to be light and very small once stored.
I’ve been pretty far in the drawing of this project and I wish you guys could give me your opinion on what I’ve made.
the tent is basically a ripoff of the Six moon designs Lunar Solo.
https://www.sixmoondesigns.com/products/lunar-solo
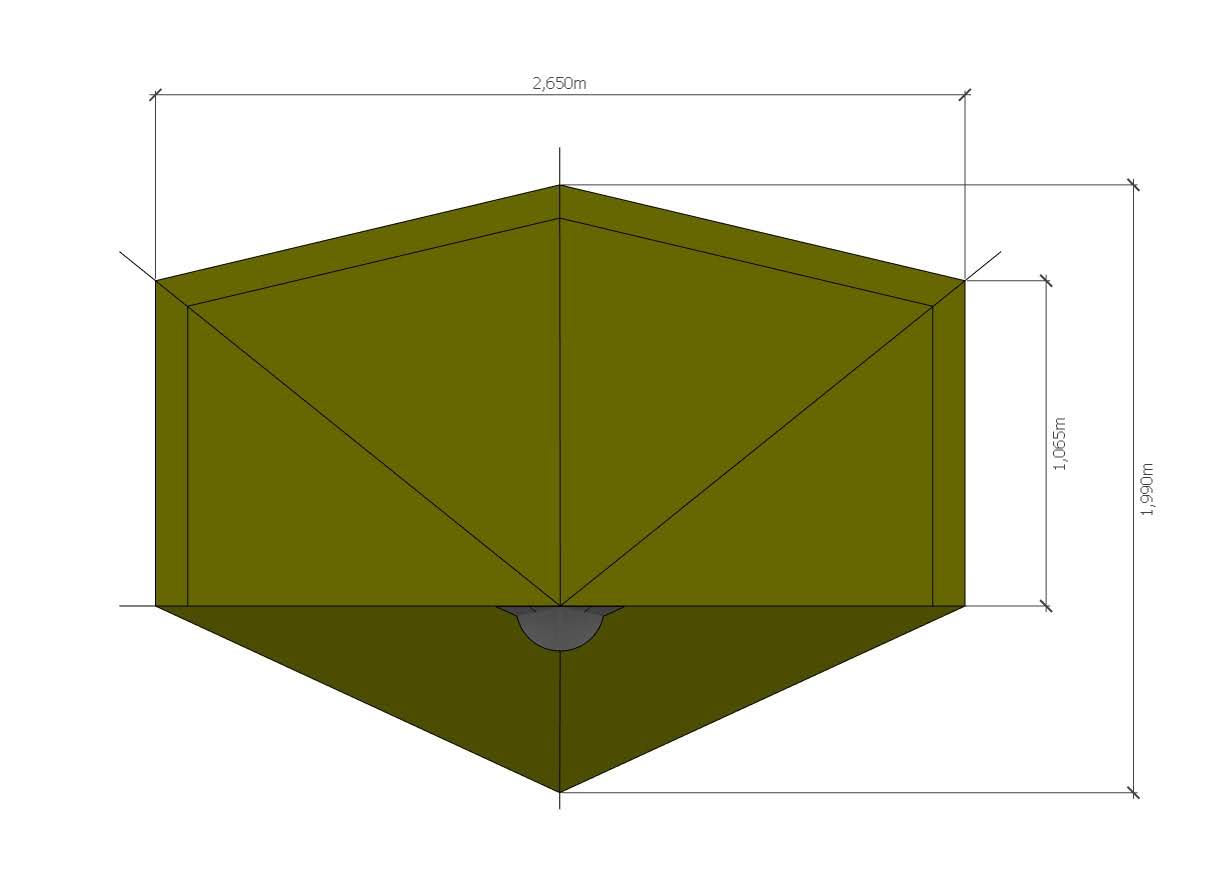
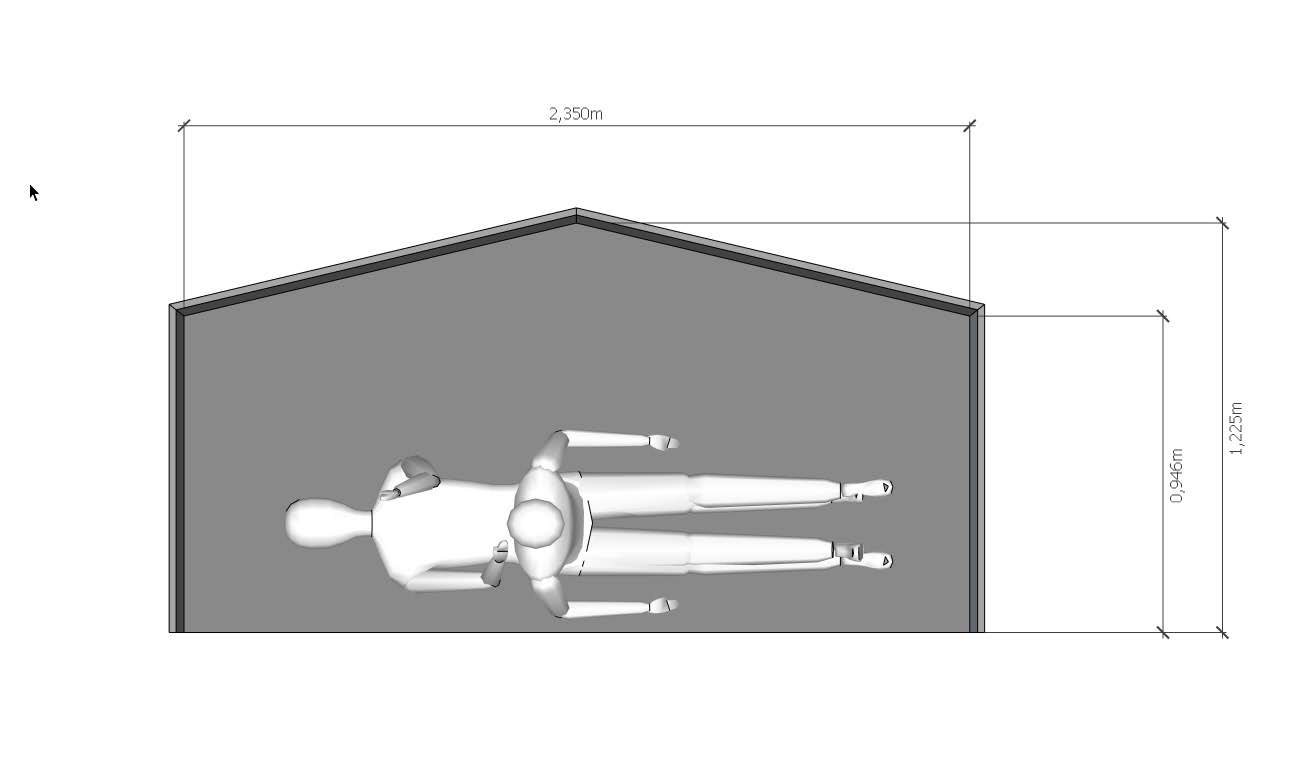
So here it is:

All the basic dimensions and materials are inspired from the Lunar Solo descriptions on the website.
30D Silnylon for the Canopy
40D Silnylon for the Bathtub floor (I know it might seem fragile but I mostly sleep on grass)
Nosseum mesh for the netting.
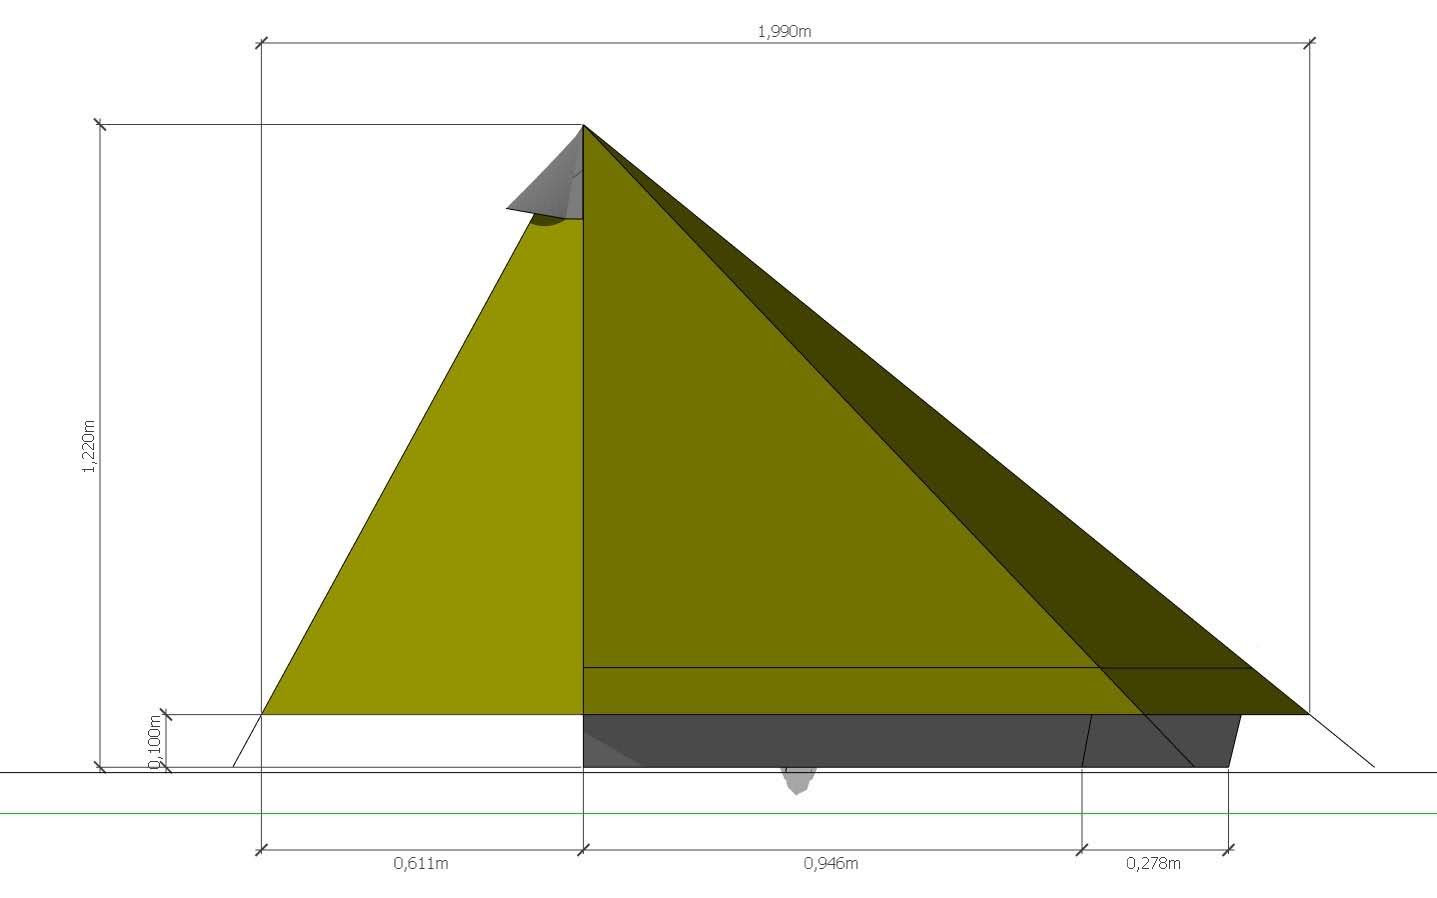
I then integrated some 1/20 catenary curves to the ridges:
and projected those curves to the final pieces:
I’ve been around this forum to read about the flat felled seam and the Silnylon sewing technique.
I’m willing to use this kind of seam:

I’m already pretty good at sewing, I made me a dress shirt last winter.
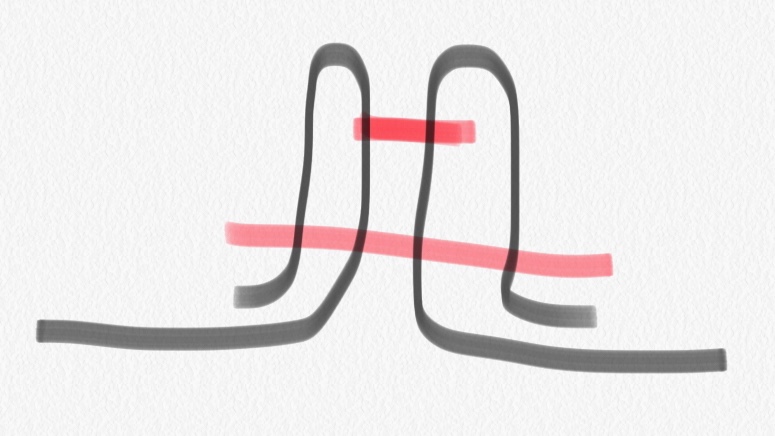
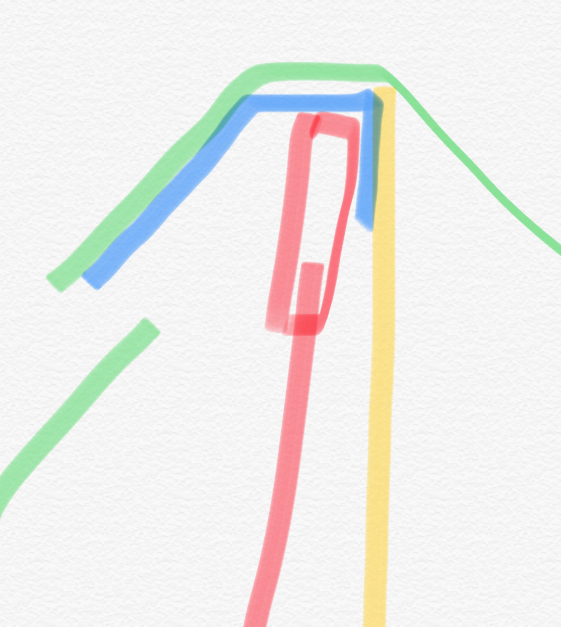
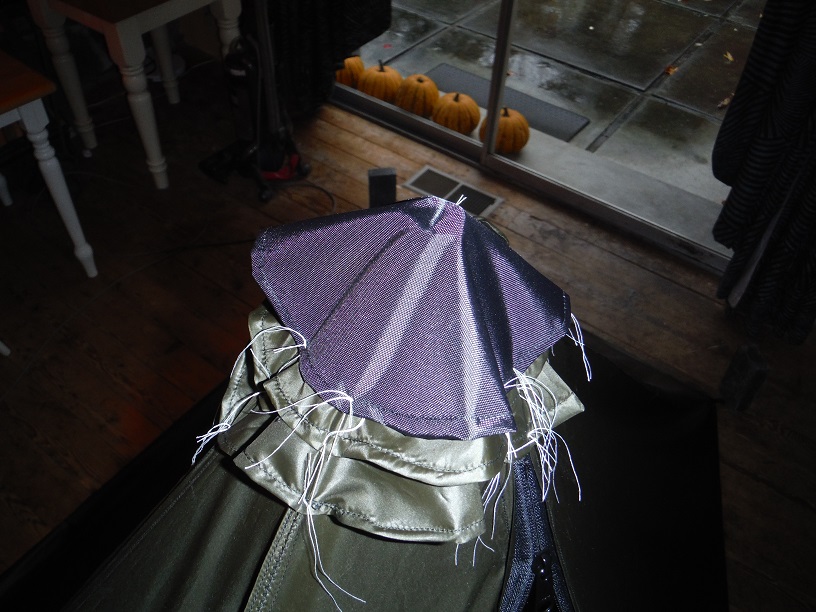
The most blurry area for me is still the top of the tent, where the stick pushed against the fabric. For the moment here’s how I see this:

in red: the stick
in green: the canopy
in yellow: the net
in blue: the reinforcement (in 40D Silnylon floor fabric)
Let me know what you think!
Jun 28, 2018 at 5:51 pm #3544288I’m out of my league commenting in the MYOG forum but I have two thoughts:
- MLD Mids and ZPacks Plex tents have a cone of heavier fabric reinforcing the inside apex where the pole goes. That seems like an inherently strong way way to distribute the force form the pole over a larger area.
- From a user perspective I strongly prefer a rectangular footprint along the back of the tent/tarp. I think it is much easier to get a good pitch when the footprint of the tent is square and the back is a straight line. I didn’t care for the ambiguity of corner placement in my SMD Deschutes or ZPacks Duplex. That said, I could pitch both of those fine but my experience with MLD Mids is that they pitch so quickly because of the rectangular footprint. So here’s my question: Why not have a straight edge along the back?
Jun 28, 2018 at 5:58 pm #3544289Looks like some excellent design work. What kind of closure are you planning (a zipper)? Depending on how much weight is a concern to you, you could go with lighter materials for the canopy and floor (like 0.93 Silpoly or a lighter silnylon) and use the 0.5 oz/sqyd nano-see-up netting from RSBTR. The tall 19 cm bathtub floor is a good idea – I’m glad I went with 8 inch walls (20 cm) on my inner net project.
Jun 28, 2018 at 7:31 pm #3544307I’ve been using a MYOG tent like that for years. I think that works pretty good.
I recently made one out of RSBTR 0.93 silpoly. That’s worked pretty good.
I like the peak to be more like 60 inches rather than your 1.22 m = 48 inches. Not enough headroom to sit up.
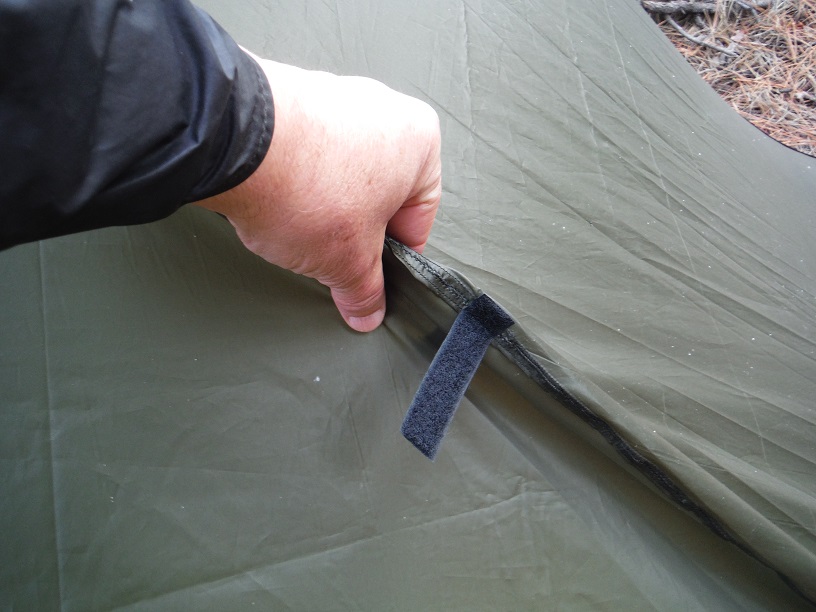
Why don’t you just use flat felled seam? Then the two (or I usually add a third) row of stitches share the load. In your seam, just one row of stitches is holding the load. The second row of stitches will take the load if the first row rips out and will prevent fraying, but would be better if flat felled.
I think that the vent at the top is not very effective. If you omit it, it makes the peak easier to reinforce. I take a circle of the same fabric as the tent, set up the tent, put the circle of fabric over the top, and do a hand stitch through it and through each of the 6 flat felled seams. There’s a dart or fold between each flat felled seam to take up the extra fabric to turn the circle into a cone. And I’ll add a second circle that’s smaller in diameter, so there are three layers of fabric. Inside, I’ll put a much thicker fabric to take any abrasion from the pole.
I have a zipper on the door. The top circle reinforcement goes over the top of the zipper to make it look nice.
Jun 28, 2018 at 7:37 pm #3544309I assume the grain of the fabric will go along the middle? The two ridges and the door zipper will be along the bias?
Then you need cat curves on the two ridges and the door zipper (the edges on the bias) but not on the other 3 seams.
https://backpackinglight.com/forums/topic/tent-on-bias/
If you have too many cat curves, it will make the tent more pointy, and take volume away from inside so you’ll have less headroom
Jun 29, 2018 at 8:25 pm #3544495@MATTHEW K
I think i will stick to the angled shape because i like to have a little extra room inside the tent to put my photography stuff and else.
But thanks for the two tent references i especially like the MLD designs i think i will take inspiration especially from the vent/doors management.
@Lester Moore
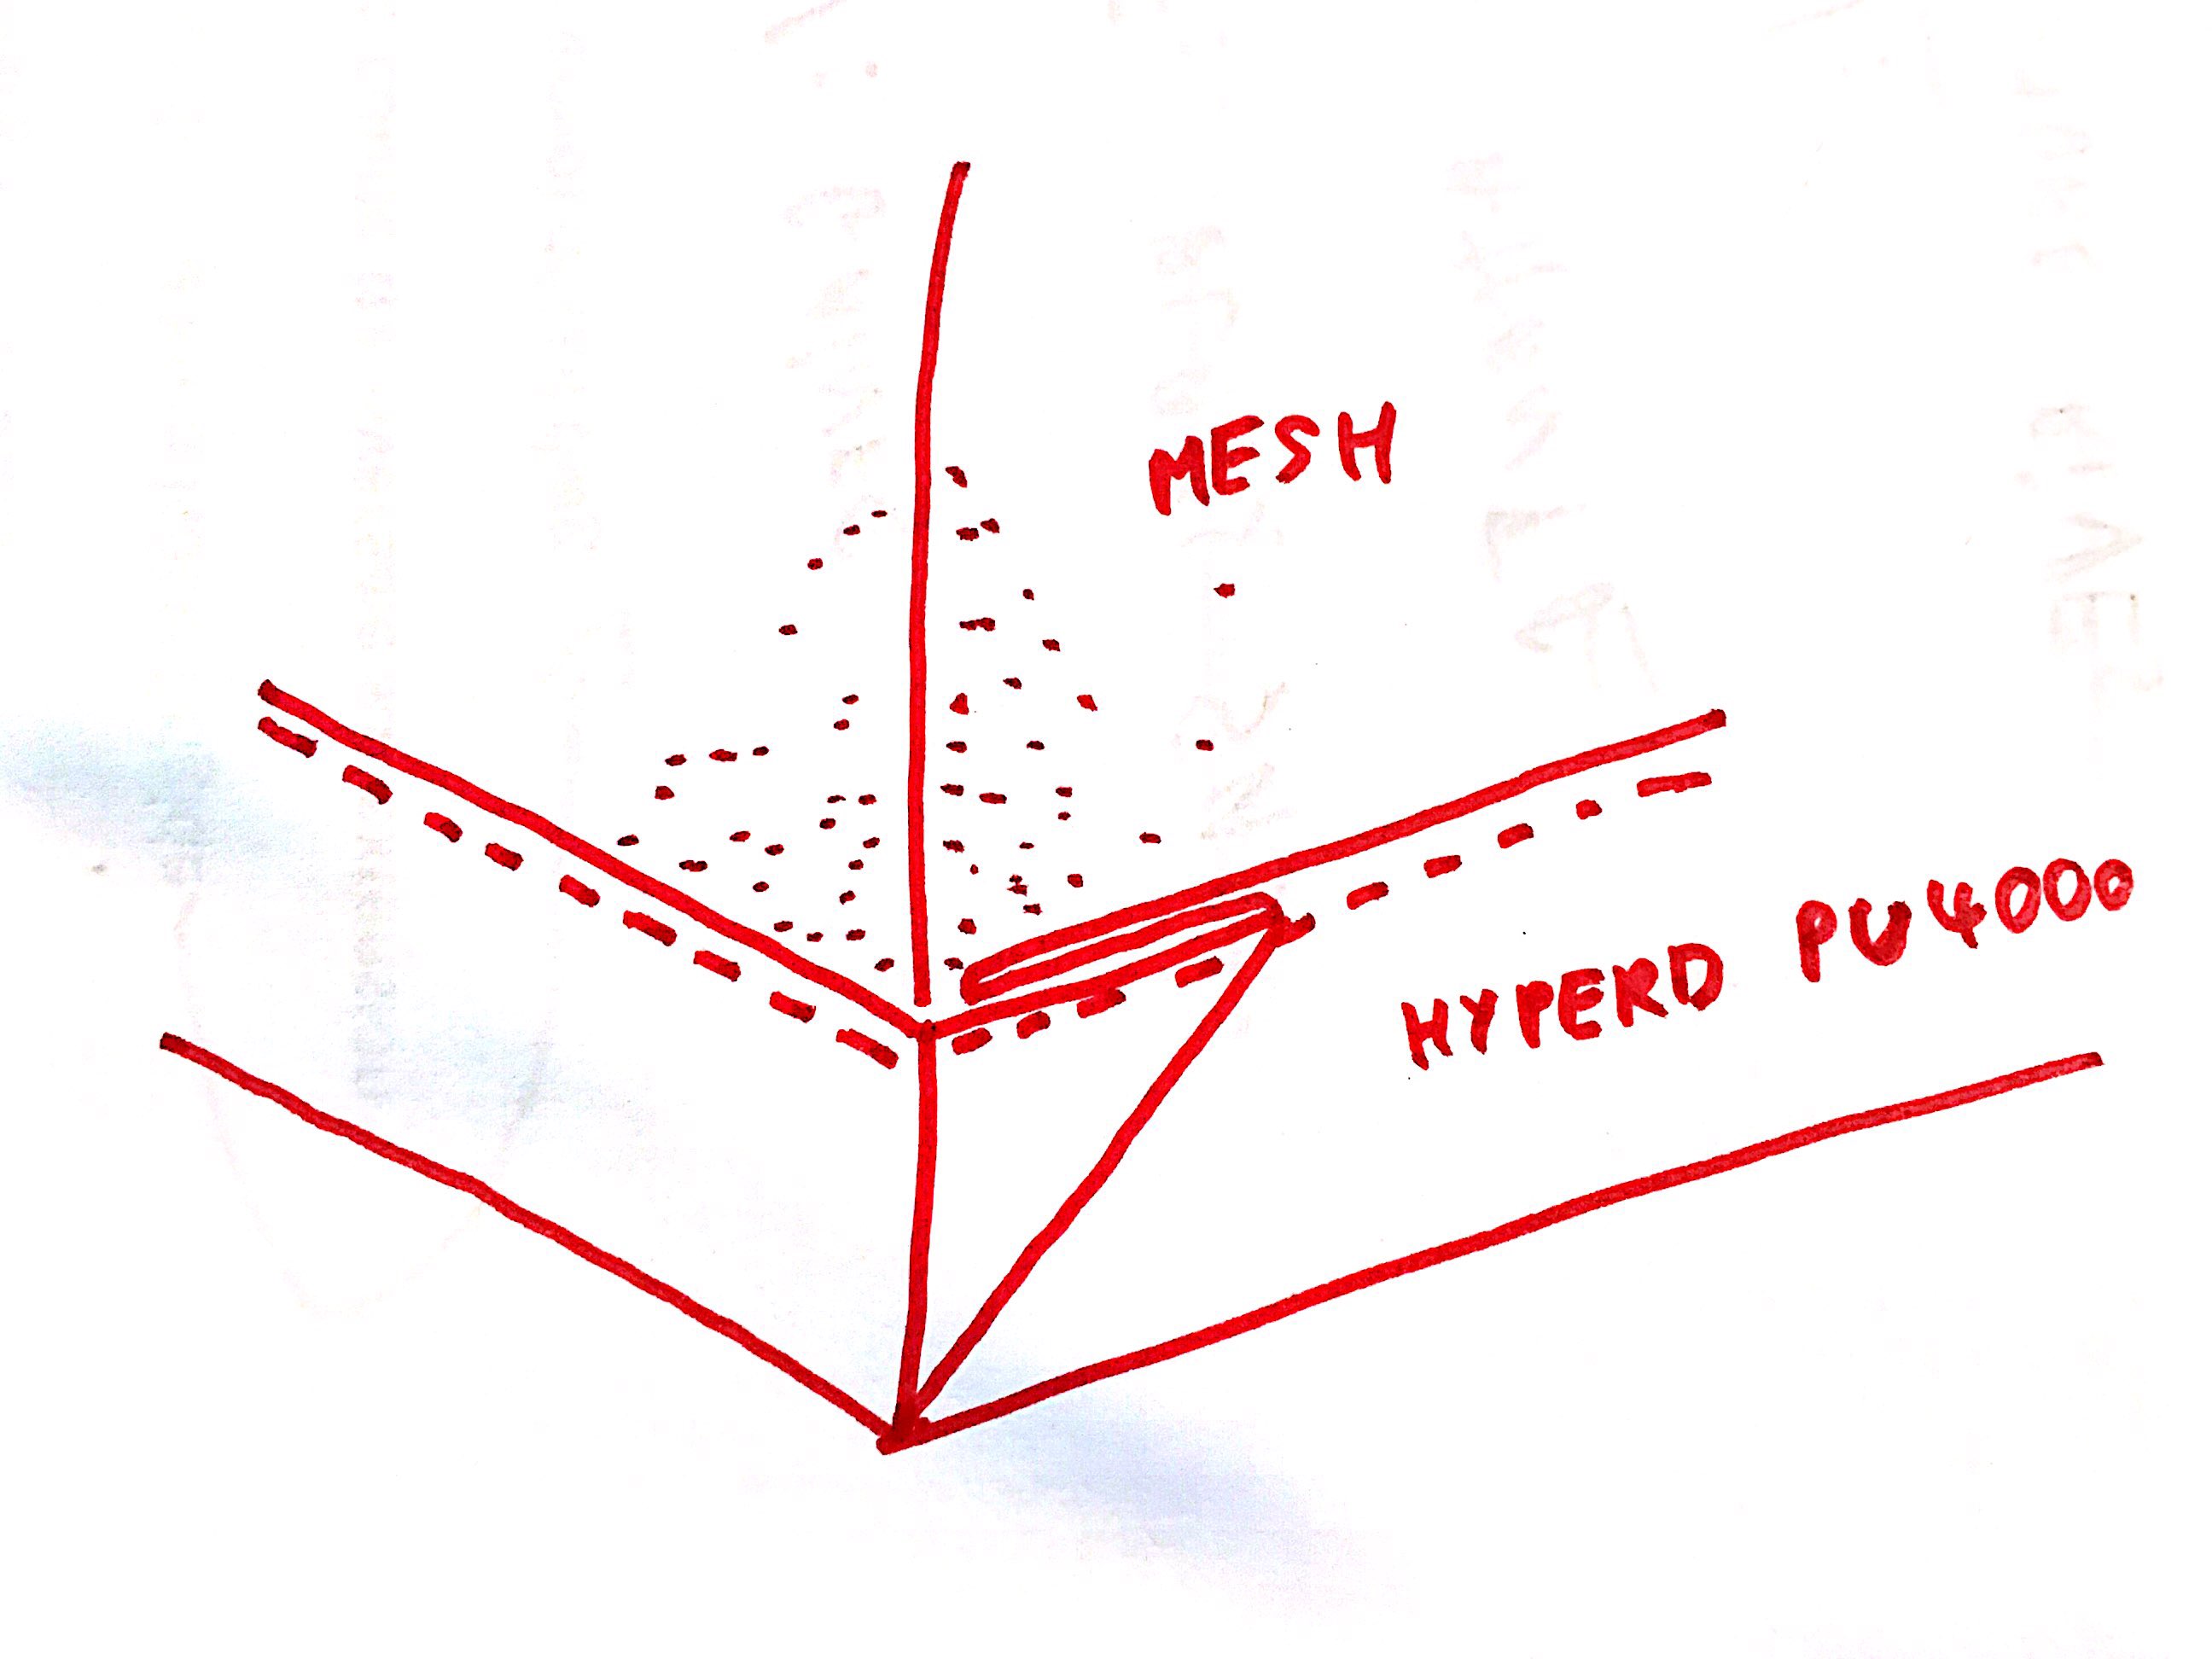
for the moment here’s my materials list from RSBTR
1.1 oz Sylnylon for canopy
1.6 oz HyperD PU4000 for Floor
0.5 oz NS50 Noseeum mesh for the nets
#3 YKK zip in the mesh and #5 coated zip on the door.
On the bathtub the HyperD is going only 10cm height, the upper 10cm are mesh for ventilation.
I have to do a weigh calculation to know what weigh i’m going for with those materials.
@Jerry Adams
Maybe i’ll push the peak up a but but not that far, people seem to be happy with tha SMD Lunar solo height.I think you’re right on the seam, the flat-felled looks stronger. I just don’t like that you have to take a diffrent margin on both side, it’s less dumbproof. but i’ll draw more precisely all my pieces.
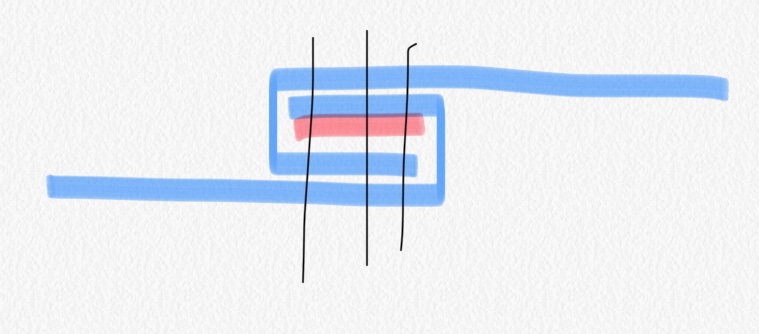
For your peak re-enforcment if i understand, you use to layers of normal fabric on top and 1 layer of stronger fabric under the peak. Okay, but where goes the mesh wall? because on my design it goes right to the peak where the stick is going to push hard. So maybe i should mowe the mesh wall a bit after the peak.
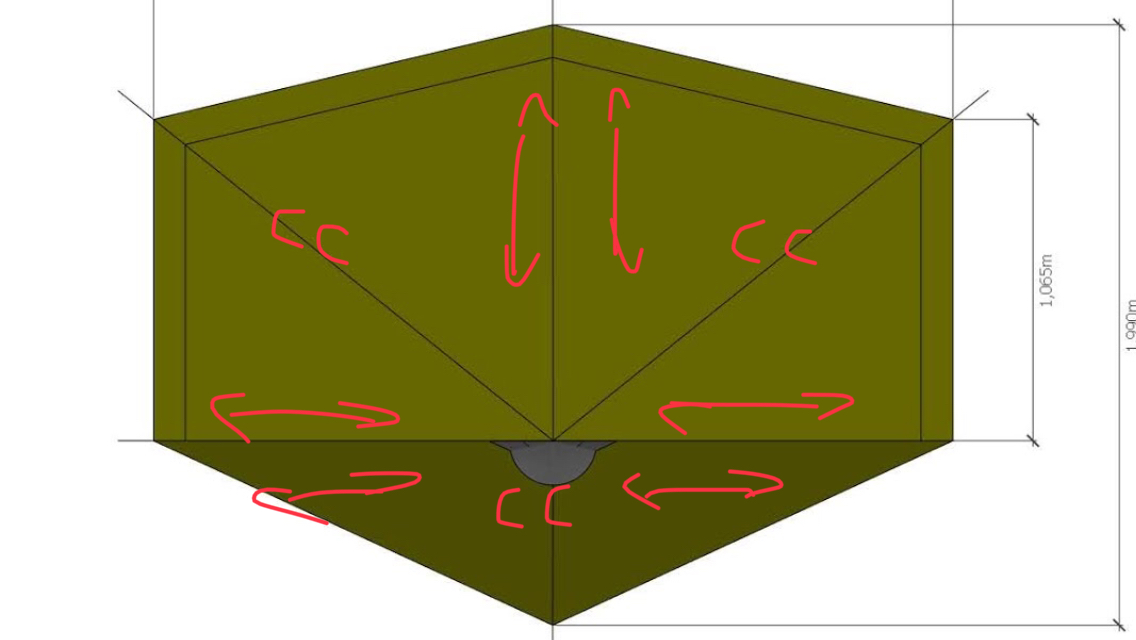
What do you think of this principle:

About the grain direction, excellent question, i didn’t think about that.
What do you think of that:
 Jun 29, 2018 at 8:45 pm #3544501
Good peak reinforcement, good grain direction and cat cut ridges.
Fabric stretches more along the bias than along the grain. If you look at pictures of mids, I think they’re normally laid out like you showed, and as a result, the middle of each side is up in the air leaving a gap. Your making the middle stick out longer will fix that.
48 inch peak height is pretty normal. My 60 inches is longer than any tent I’ve noticed. Probably just my personal preference. 48 inches should be fine. But, if you make it higher it will provide a little more headroom which can be good. I hate making something smaller, just to save a couple ounces, and then have comfort suffer. I’m 6’2″ and my torso is a little longer and legs shorter than average (White men can’t jump : ), so maybe that’s why I like a higher peak.
Jun 30, 2018 at 11:40 am #3544592I totally agree with your vison on space confort vs weight. I migth push it a bit.
For the moment the fabric weight is 13,4 oz without all the straps, zips and hardware.
Jun 30, 2018 at 1:40 pm #354459613.4 ounces, nice
You must be European since you use meters and commas
Maybe some day the U.S. will become truly exceptional and use meters, that would be so much easier : )
Jul 2, 2018 at 3:50 pm #3544879Haha, yes, working with yards and inches is complicades when you grew up in the metric system.
so here’s a little update:
I updated my pieces shape and made the layout on the diffrent materials with the good grain directions:
I also drew the diffrent reinforcment pieces.
And here’s how i’m willing to make the bathtub :

I just make a fold of the fabric in the angles so i don’t have any sealing issues…
What du you think?
Jul 2, 2018 at 4:34 pm #3544884Looks good. I’m just someone with some experience by the way, not a real tent maker. My ideas are worth what you pay for them : )
I see you have peak reinforcements that are circles with a “pie piece” removed. I have had difficulty getting everything lined up when sewn. You want uniform tension on everything.
What I have done is just cut a circle. Hem around the edges to hide the raw edge. Just fold the fabric over once – raw edge will be underneath. If you fold over twice like a normal hem, it will be thicker which isn’t so good.
Then set up tent without peak reinforcement. Don’t put a huge amount of tension so the pole doesn’t poke through. Don’t do it on windy day.
Put center of circle on the peak. Pull the side of circle down to one of the 6 flat felled seam ridges and put one hand stitch through circle and flat felled seam.
Pull the circle down on the opposite side, apply the right amount of tension, put one hand stitch through circle and flat felled seam.
Repeat for the other 4 ridges. If you have a zipper, the circle should cover the top of the zipper for a clean look.
Since the circle is not a cone shape, like the peak of the tent is, there will be a fold in the circle between each of the 6 ridges.
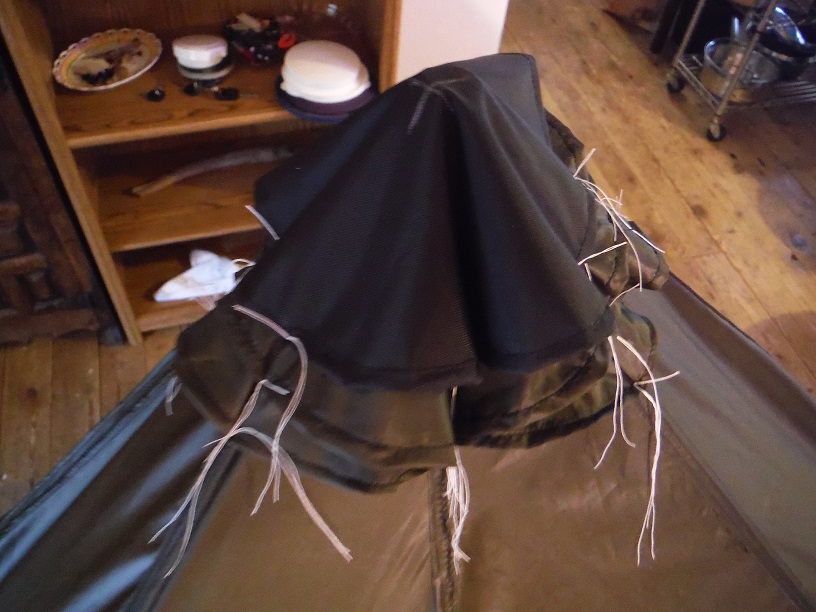
In this picture I did two circles of the same fabric as the tent, and on top of that thicker fabric, 200D. I was not perfect about lining up all the circles with their centers perfectly on the peak, but I did pretty good at having the same tension on the fabric.
Take the tent down. Sew around the perimeter of the circle. I go around the circle twice so there are two rows of stitches. You will sew over the 6 folds.
Jul 2, 2018 at 4:45 pm #3544890maybe better picture
Another thing is, some ridges didn’t have enough cat curve so I set up tent and pulled it with my hand to see how much I needed:
Then I measured how much deflection. Then I took down the tent, used Roger’s spreadsheet for cat curve deflection, and measured the desired deflection for every 2 inches and made a little dot. Then I sewed along the dots. Then I cut off the excess 3/4 inch from the row of stitches I just sewed, then I folded over twice and sewed through it making a flat felled seam. At the very top and bottom, the deflection for cat curve goes to zero, so the flat felled seam sort of disappears there.
Remember that for this tent, I laid it out on the bias, so the three ridges that need a cat curve are the opposite of yours.
Next time, I don’t think I’ll lay it out on the bias. Instead, make the middle of the side longer like you did.
Jul 3, 2018 at 2:38 am #3544974@Antonin, I think I understand your not wanting to use a flat felled seam because of the different seam allowances for each piece, but you don’t need to have that when you make the first stitch. I think many (most, all?) people sew the first stitch with equal seam allowances (15mm maybe), then go back and cut one of the seam allowances down to 6mm or so. Then you can fold the longer one around the shorter one and make the second stitch. OR, you could NOT cut off one of the seam allowances, and just fold the two together in the same manner so the raw edges are hidden. I think it’s convention to cut off one of the seam allowances because this seam is commonly used on bulky fabrics (jeans is the usual example), and you don’t want to fold all those layers together. With these fabrics, you won’t really notice it. However, a purist will point out that you’d be leaving in some extra weight as well, so you’ll need to decide for yourself if you want to take the extra effort of cutting it down. The strength will not be affected either way.
@Jerry; Here here! Let’s switch to the metric system!Jul 3, 2018 at 3:00 am #3544979For thin fabric you don’t have to cut off half the seam allowance on one side. The fabric is so thin it doesn’t matter.
For thick fabric, if you don’t cut off half the seam allowance on one side, it gets very thick. Especially if you then have the flat felled seam going at a right angle into another seam.
Jul 9, 2018 at 9:32 am #3546070Hi everyone,
thanks for all your answers.
I’v talked to my oncle this Week-end who has a huge expreience in boat and sail maiking.
He insisted on the importance of “flat-stitching”, otherwise each default during the stitching will result in imperfections in the fabric tension. (small waves)
And he strongly recomended me to use sailing double-sided tape that helps to assemble precisely the 2 pieces of fabric, then fold the fabrics around the taped seam and use 3 step zigzag stitch for better effort repartition.

Sailmaking tape will help sealing the seam and won’t gum too much the needle. Even if you have to clean the needle with alcohol every now and then.
He strongly advised me Bainbridge taped which I ordered two 6mm 50yards rolls for about 6€ each.
http://www.bainbridgeint.com/Item.aspx?Item=PRD-900187&PartNo=J310
Jul 9, 2018 at 2:19 pm #3546079That should be interesting to read how well that works, thanks
Jul 9, 2018 at 6:13 pm #3546102If you’re worried about off-setting the two pieces of fabric with a flat-felled seam, maybe consider a top-stitched french seam. Here’s a video from Yama Mountain Gear showing the seam: https://www.youtube.com/watch?v=LN5aOHmCrDM
I’m in the middle of a tarp-tent project with multiple cat cuts and I figured the french seam would make it easier to deal with curves than a flat-felled seam.
Jul 9, 2018 at 10:42 pm #3546126That’s an awesome stitch – so much easier, cleaner and faster than a flat felled seam. Seems to have all the benefits of the flat felled seam, but without the hassle of trimming off excess allowance from one layer of fabric then tucking the other layer around and under the trimmed layer.
-
AuthorPosts


- You must be logged in to reply to this topic.
Forum Posting
A Membership is required to post in the forums. Login or become a member to post in the member forums!
Our Community Posts are Moderated
Backpacking Light community posts are moderated and here to foster helpful and positive discussions about lightweight backpacking. Please be mindful of our values and boundaries and review our Community Guidelines prior to posting.
Get the Newsletter
Gear Research & Discovery Tools
- Browse our curated Gear Shop
- See the latest Gear Deals and Sales
- Our Recommendations
- Search for Gear on Sale with the Gear Finder
- Used Gear Swap
- Member Gear Reviews and BPL Gear Review Articles
- Browse by Gear Type or Brand.
