Topic

Freestanding Trekking Pole Supported Tent / Shelter


Forum Posting

A Membership is required to post in the forums. Login or become a member to post in the member forums!

Home Forums Gear Forums Make Your Own Gear Freestanding Trekking Pole Supported Tent / Shelter

Viewing 20 posts - 1 through 20 (of 20 total)
  • Author
    Posts
  • #3676875
    Craig B
    BPL Member

    @kurogane

    Introduction

    I’ve used shelters with traditional poles for most of my life, and only within the last few years discovered the whole ultralight movement.  Part of that discovery involved buying a Z-Packs hexamid solo-plus about 5 years ago.  I was stunned that a ‘tent’ could weigh close to 1 Lb vs the 5.5 Lb 2-person monstrosity I had been lugging around for the last 20 years.

    I was super excited about it.  Having used it now for 4 years, I’ve decided it’s not worth the weight savings to me as is.  There are several things about it that I don’t like, but I realized on my last trip that the deal breaker for me is the 6 minimum/10 recommended stakes required to pitch it.  It’s not the weight of the stakes, but the act of driving them into the ground that kills me.

    I backpack in the Sierras exclusively, near treeline or above, and all of my camping spots have very little dirt to drive stakes into.  It’s pretty rare to get any stake to go all the way into the ground on the first try without hitting a rock and needing to be re-positioned.  So that means squatting on the ground in an uncomfortable position for a minute or so, getting a stake to go in, standing up, moving to the next one, then repeating 10-12 times (you will probably end up repositioning one or two from the original location chosen based on how the tent pitches).  Generally when I stand up after squatting for a minute, I get a head-rush, and that’s at sea-level when I haven’t been doing anything.  When I do that at 10K feet at the end of a long day hiking with worked leg muscles, I just about pass out.  It really does a number on my head, and has become maybe the most unpleasant part of the whole trip.  So that’s the big one I can’t get past any more, followed closely by the difficulty of getting into and out of the tent;  It has a very low entry, and it’s really tricky to enter and exit.

    In the last several years, I’ve made myself a few items of clothing, trekking poles, a sleeping bag/quilt, and a backpack, so now I decided it was time to finish off my Big Three with a tent.

    Design Requirements

    The number one thing I wanted to achieve with this design was for it to be truly freestanding.  I was inspired by Tim Evans’ website http://www.cubenmaker.com/ where he designed several extremely light shelters that were freestanding with no stakes, but used traditional tent poles.  His requirement for no stakes came from needing to take the shelter on a plane, where sharp stakes are prohibited.  I’m a big fan of the idea of using trekking poles in a shelter, so I contemplated how to combine trekking poles and standard tent poles into some kind of dome structure.  If I could replace a good length of the needed tent poles for a dome with trekking poles, that would be a significant weight savings coupled with dropping the stakes.

    I also like the idea of using the lightest material possible, and that is still DCF.  I’ve been satisfied with the durability of my Z-packs hexamid which uses 0.5 Oz/yard DCF, so I figured that’s what I would use.  In terms of volume/size, I wanted it big enough to allow easy ingress/egress and for me to have a little more room inside than the Z-packs.

    So my 4 primary design requirements are:

    No stakes
    Use trekking poles in freestanding structure
    Lightest available materials (DCF)
    Roomy/livable
    The Design

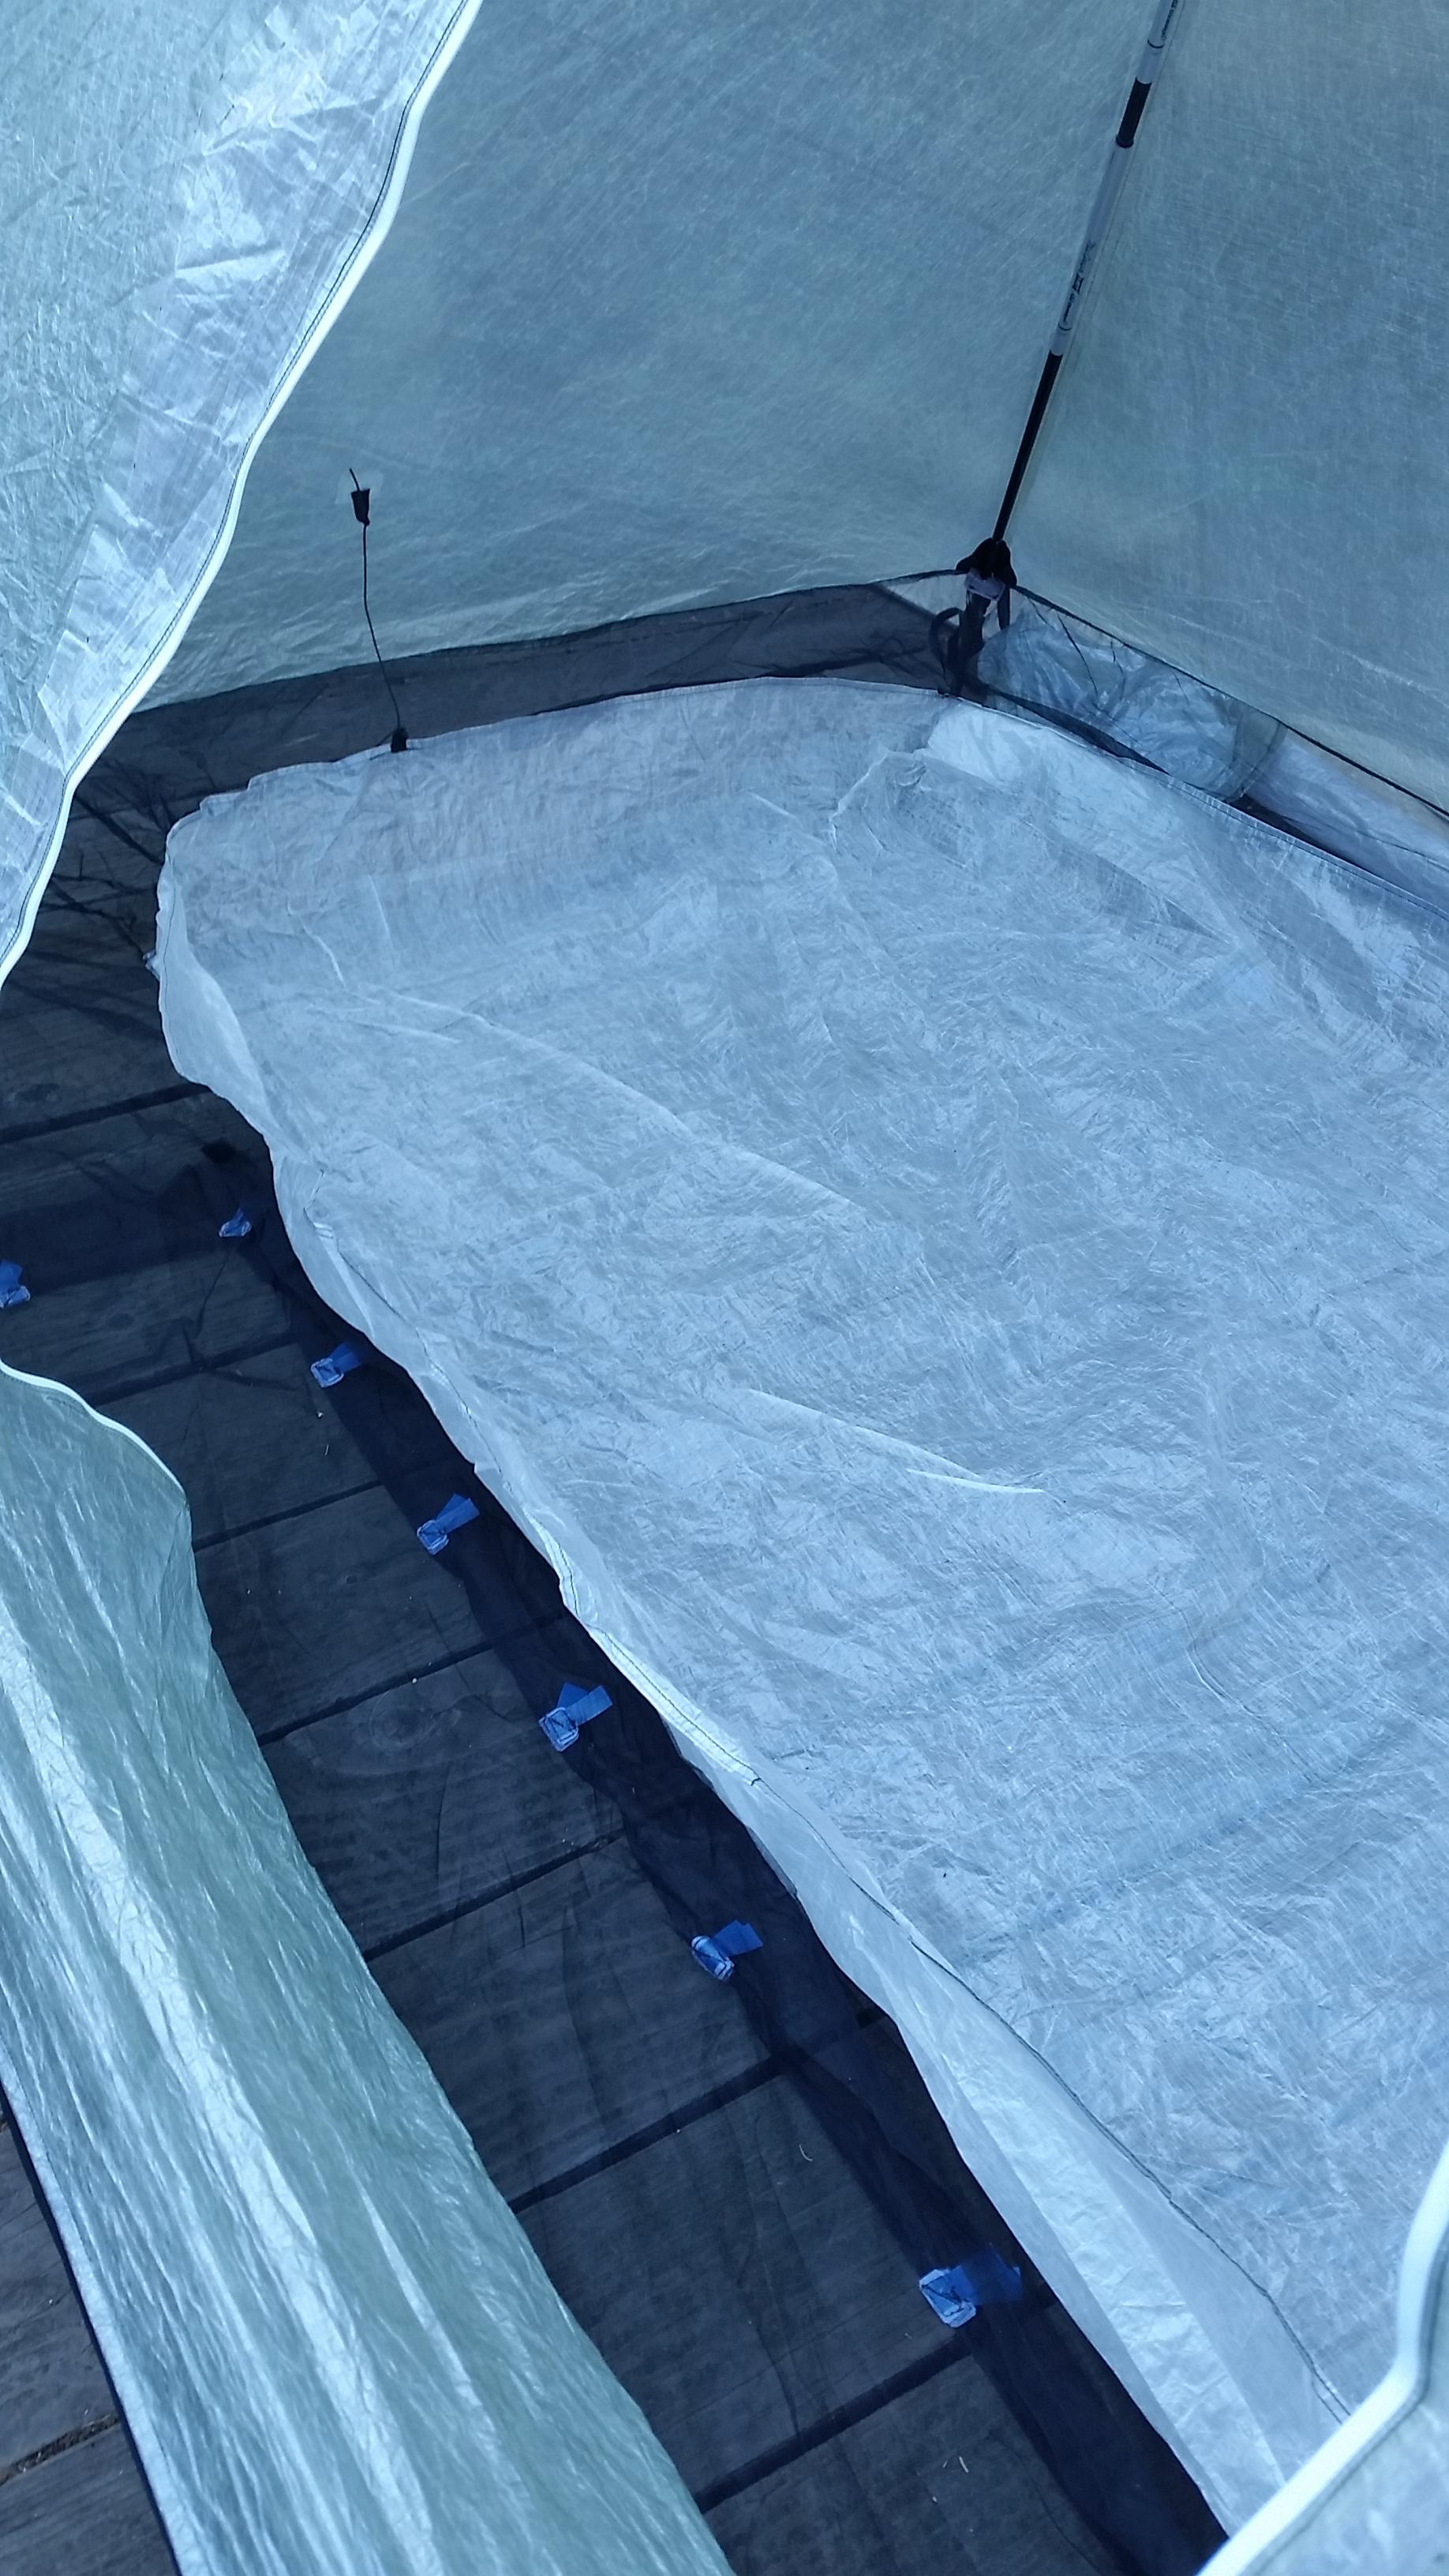
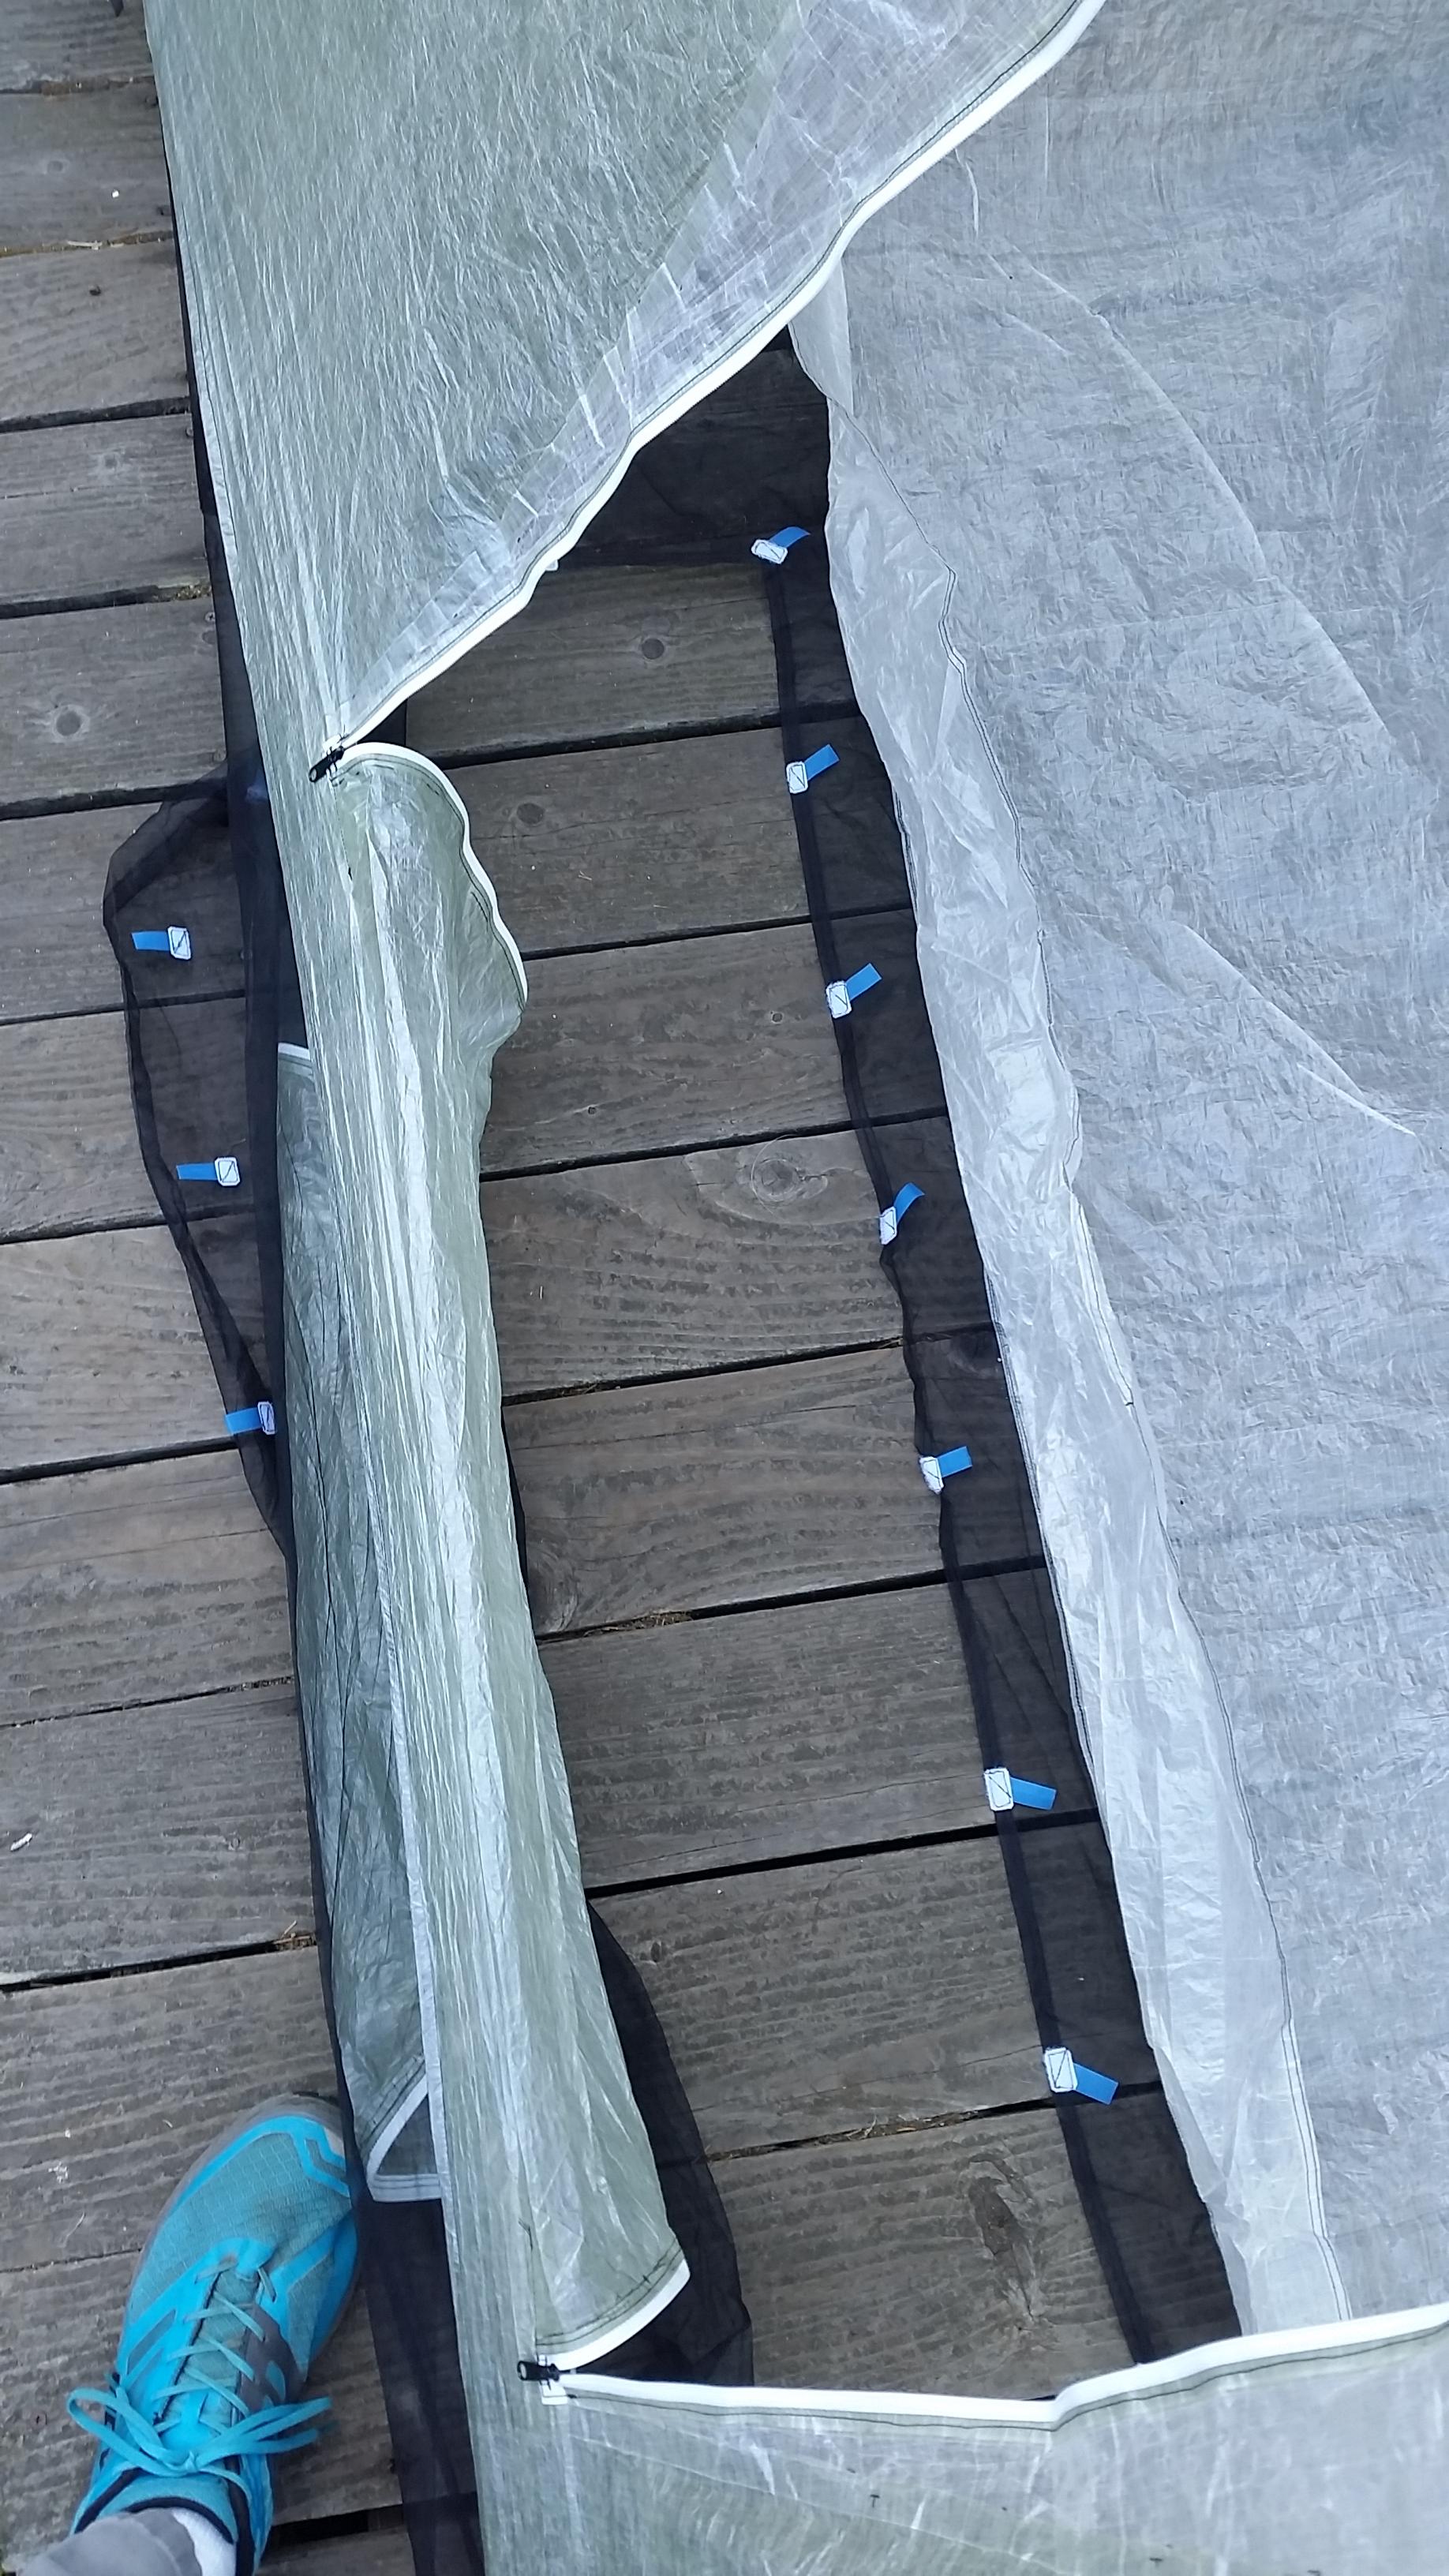
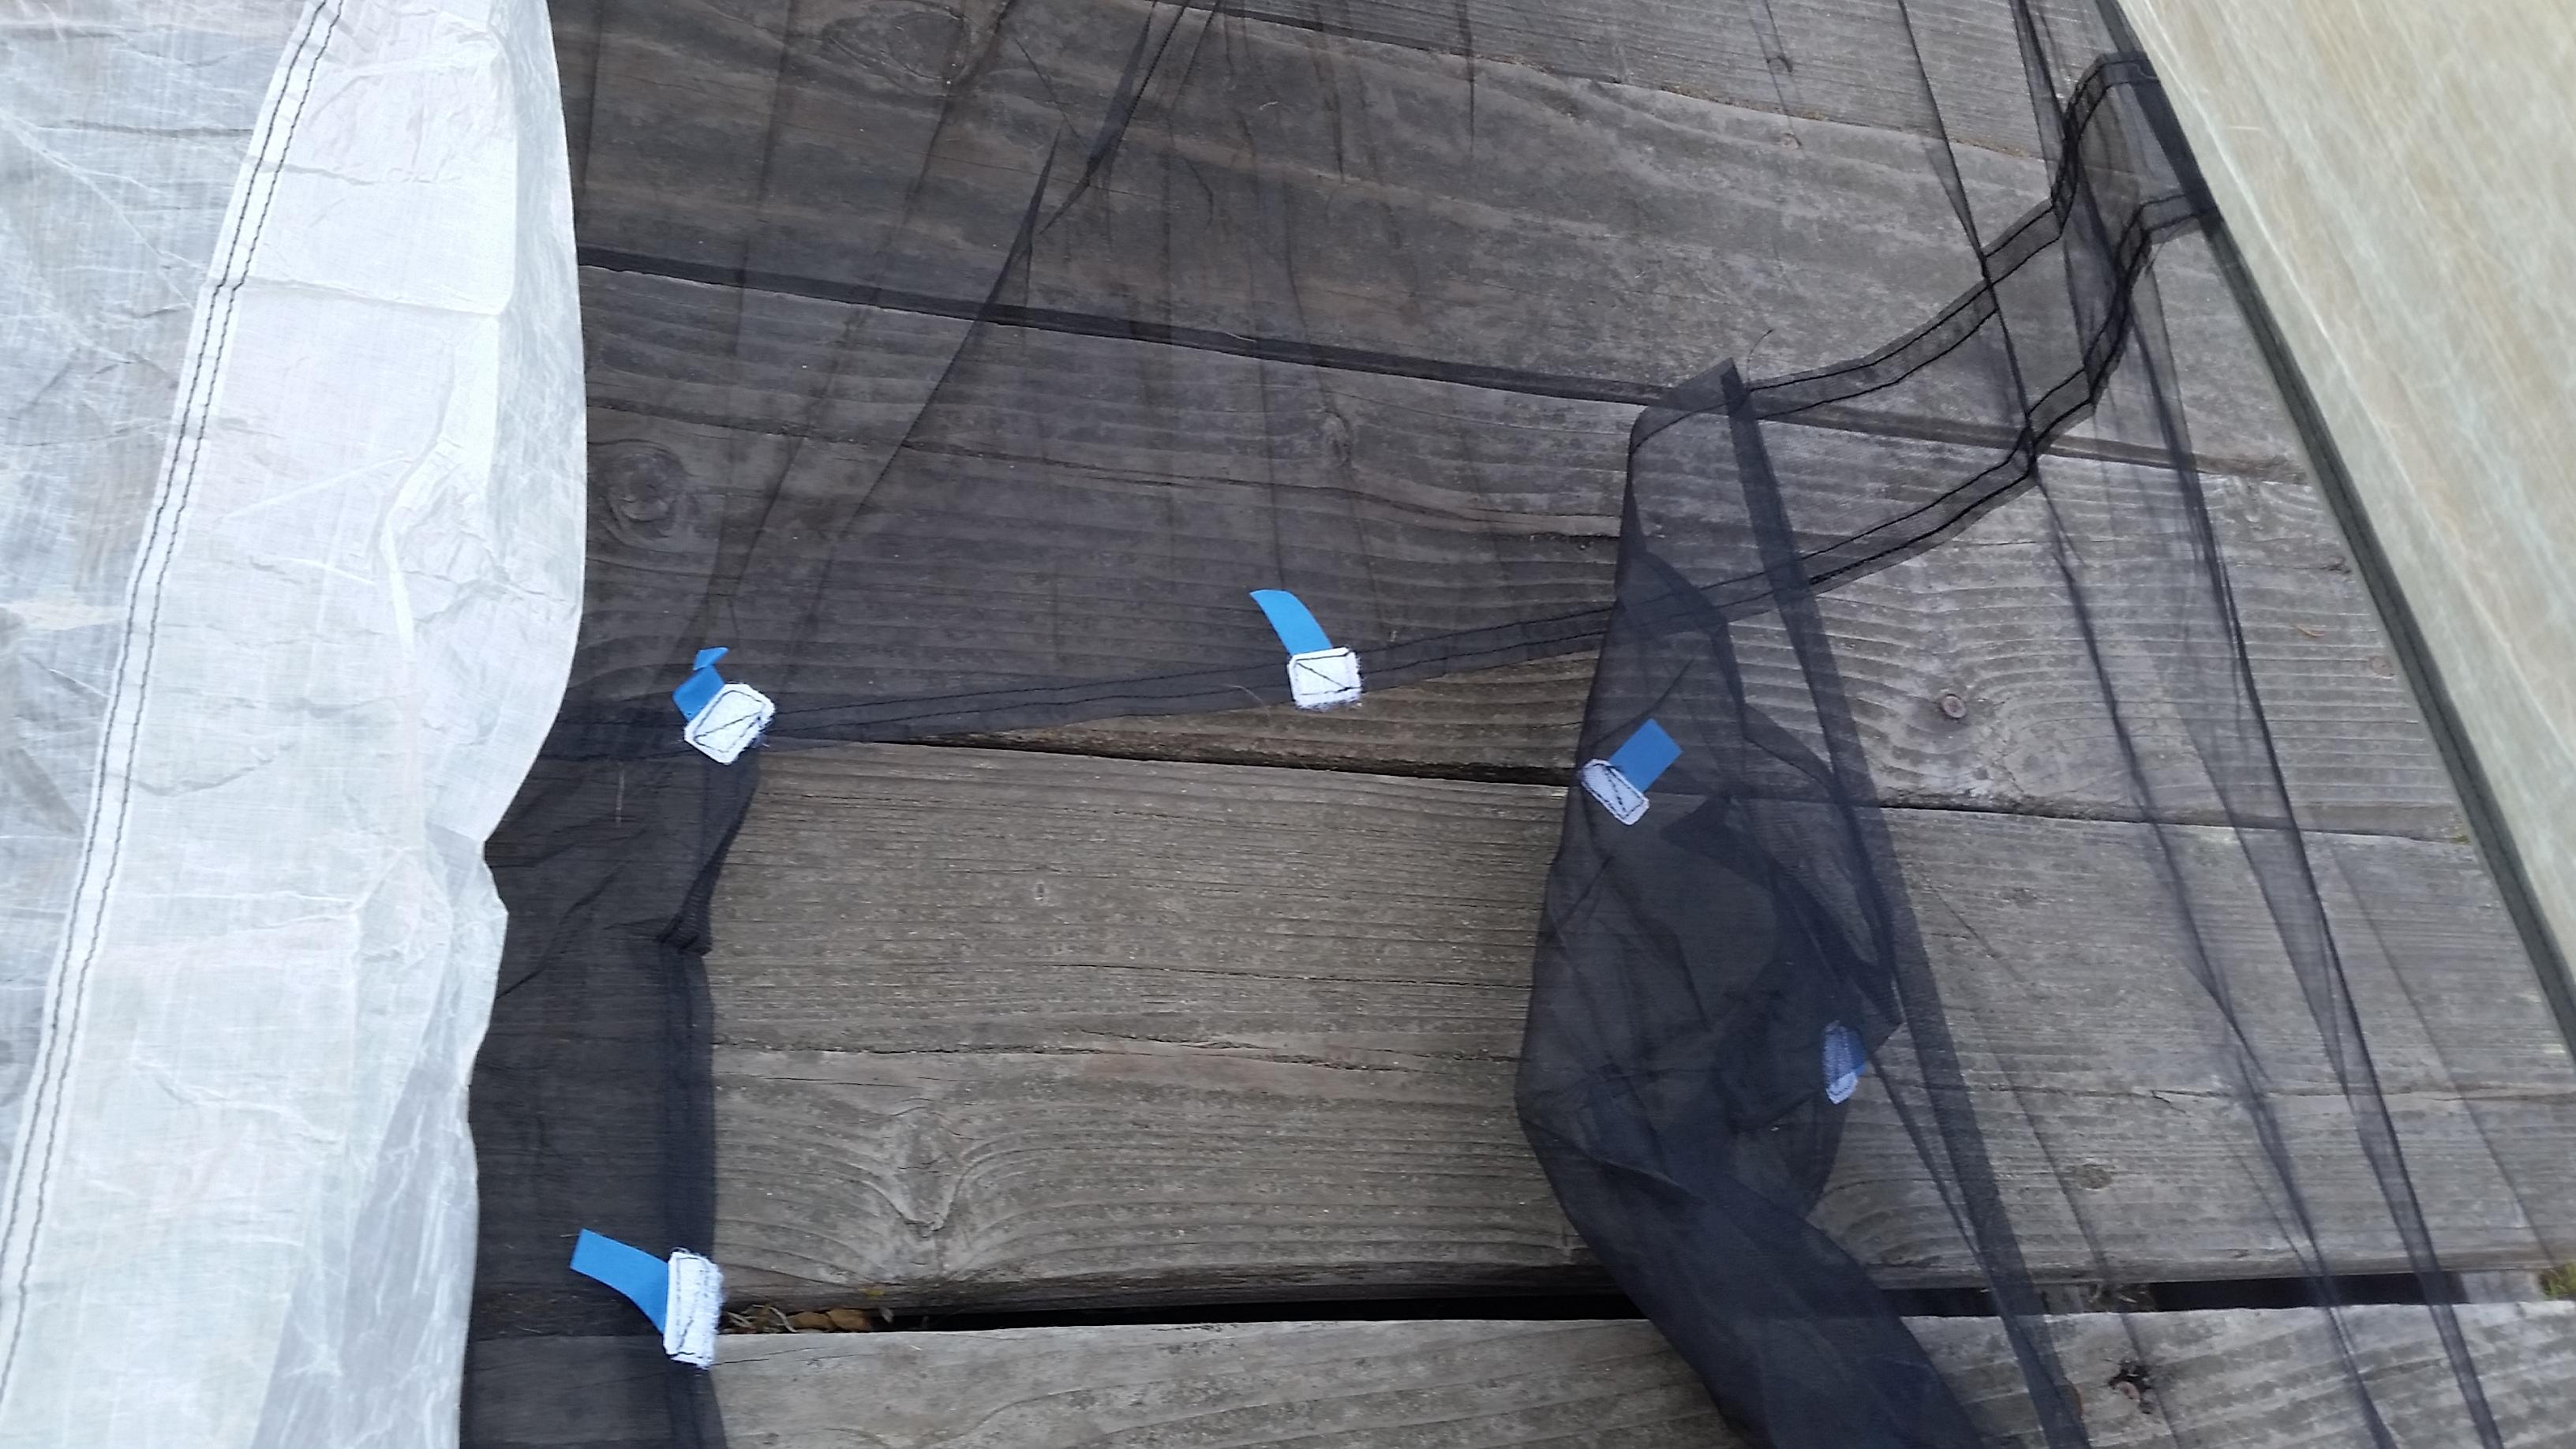
    Other than the problems noted above, I think the hexamid shelter is a good design.  I like the mesh floor and bathtub arrangement, so I figured I would just make essentially a ‘dome’ version of that.  In the interest of minimalism though, I decided not to try and put in a vestibule.  My design would be big enough to let me bring my backpack inside when necessary, and I stopped carrying a stove so I would never need to cook inside of it.  I am a bit of a neat freak however, and don’t like the idea of having dirty shoes inside my shelter, so I decided to put an opening in the bug-net floor right underneath the door opening.  Then I could roll up the bug net and step directly on the ground when entering, then close it up again after taking off my shoes which would remain under the bug net but also under the canopy.

    How to seal the door was the thing I didn’t have any clever ideas on.  Zippers are great for ease of use, but they are pretty heavy.  The door panel will also be under tension, which is not a good situation for zipper longevity.  A larger zipper would then be called for, which is even heavier.  The other issue with zippers is they do not form arcs on flat surfaces very well making it harder to form an ergonomic door opening.  DCF is especially difficult with regard to this since it won’t want to stretch to accommodate an arced zipper either.  In light of all this I decided I would try to use velcro instead.  It’s lighter, you can use just what you need, I might be able to get away with just bonding it on instead of sewing, and by its nature it has a large positional mating tolerance.  (for the prototype, I used zippers that I had on hand for convenience)

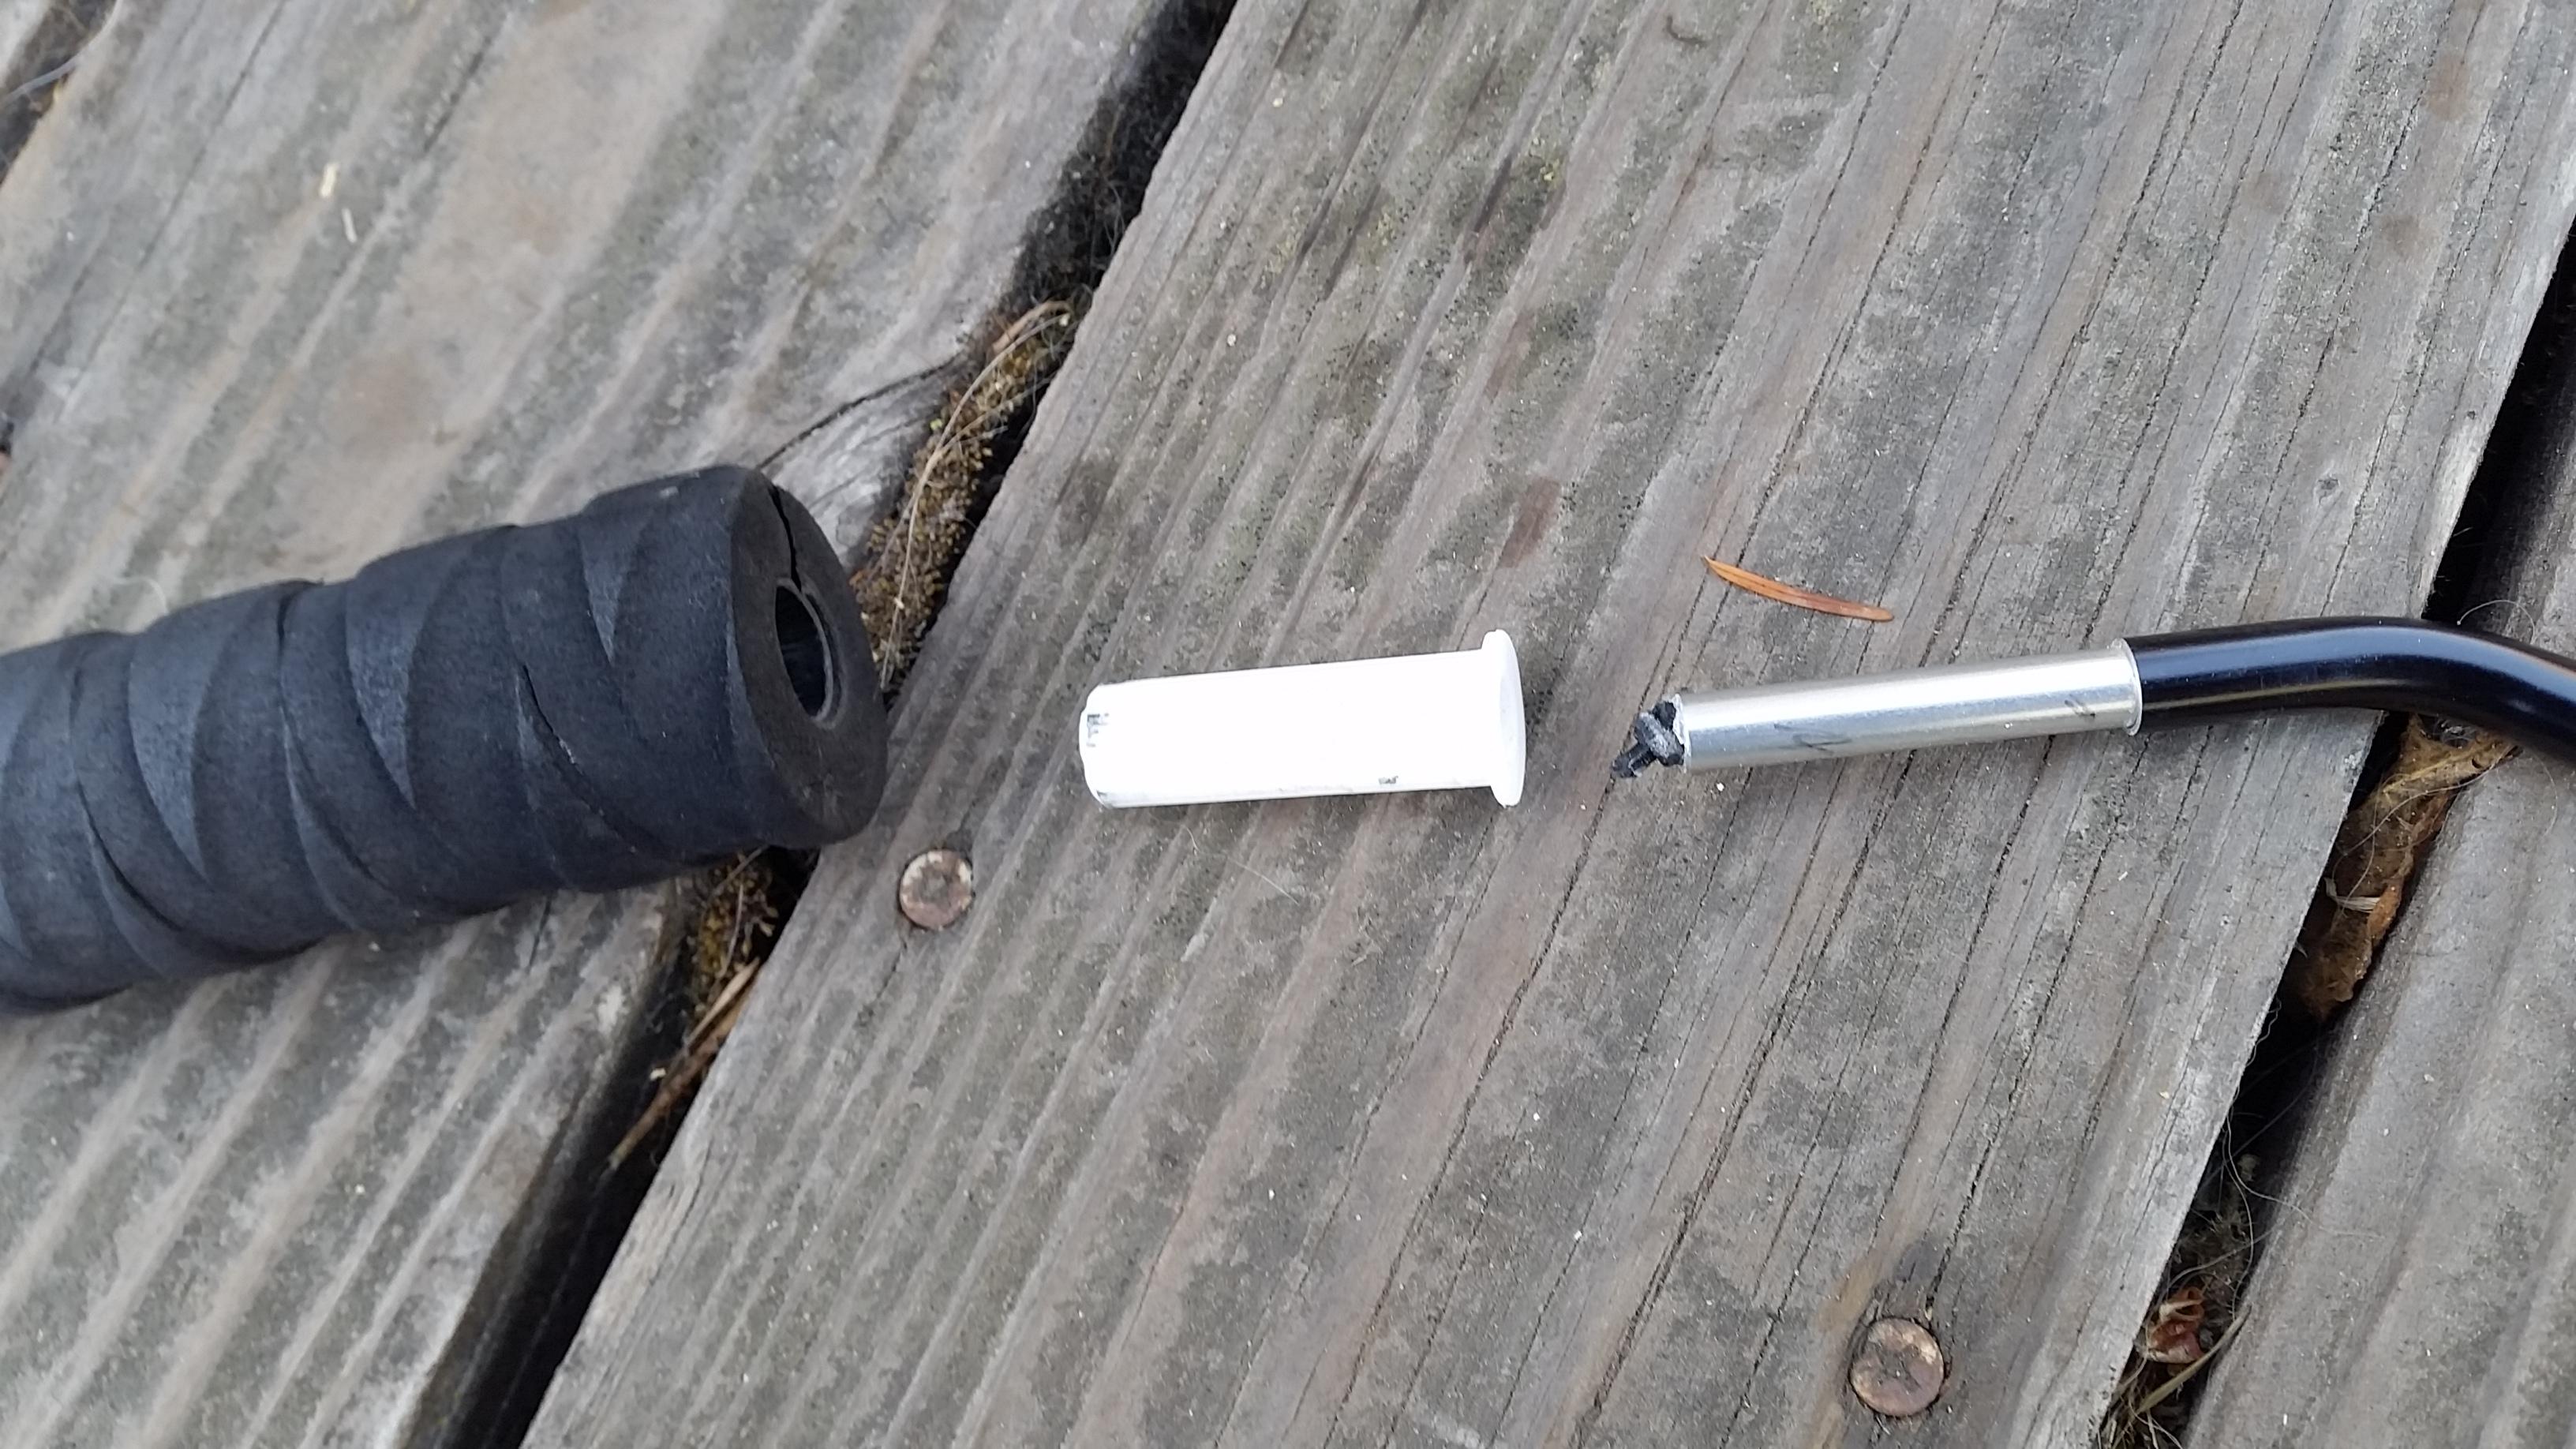
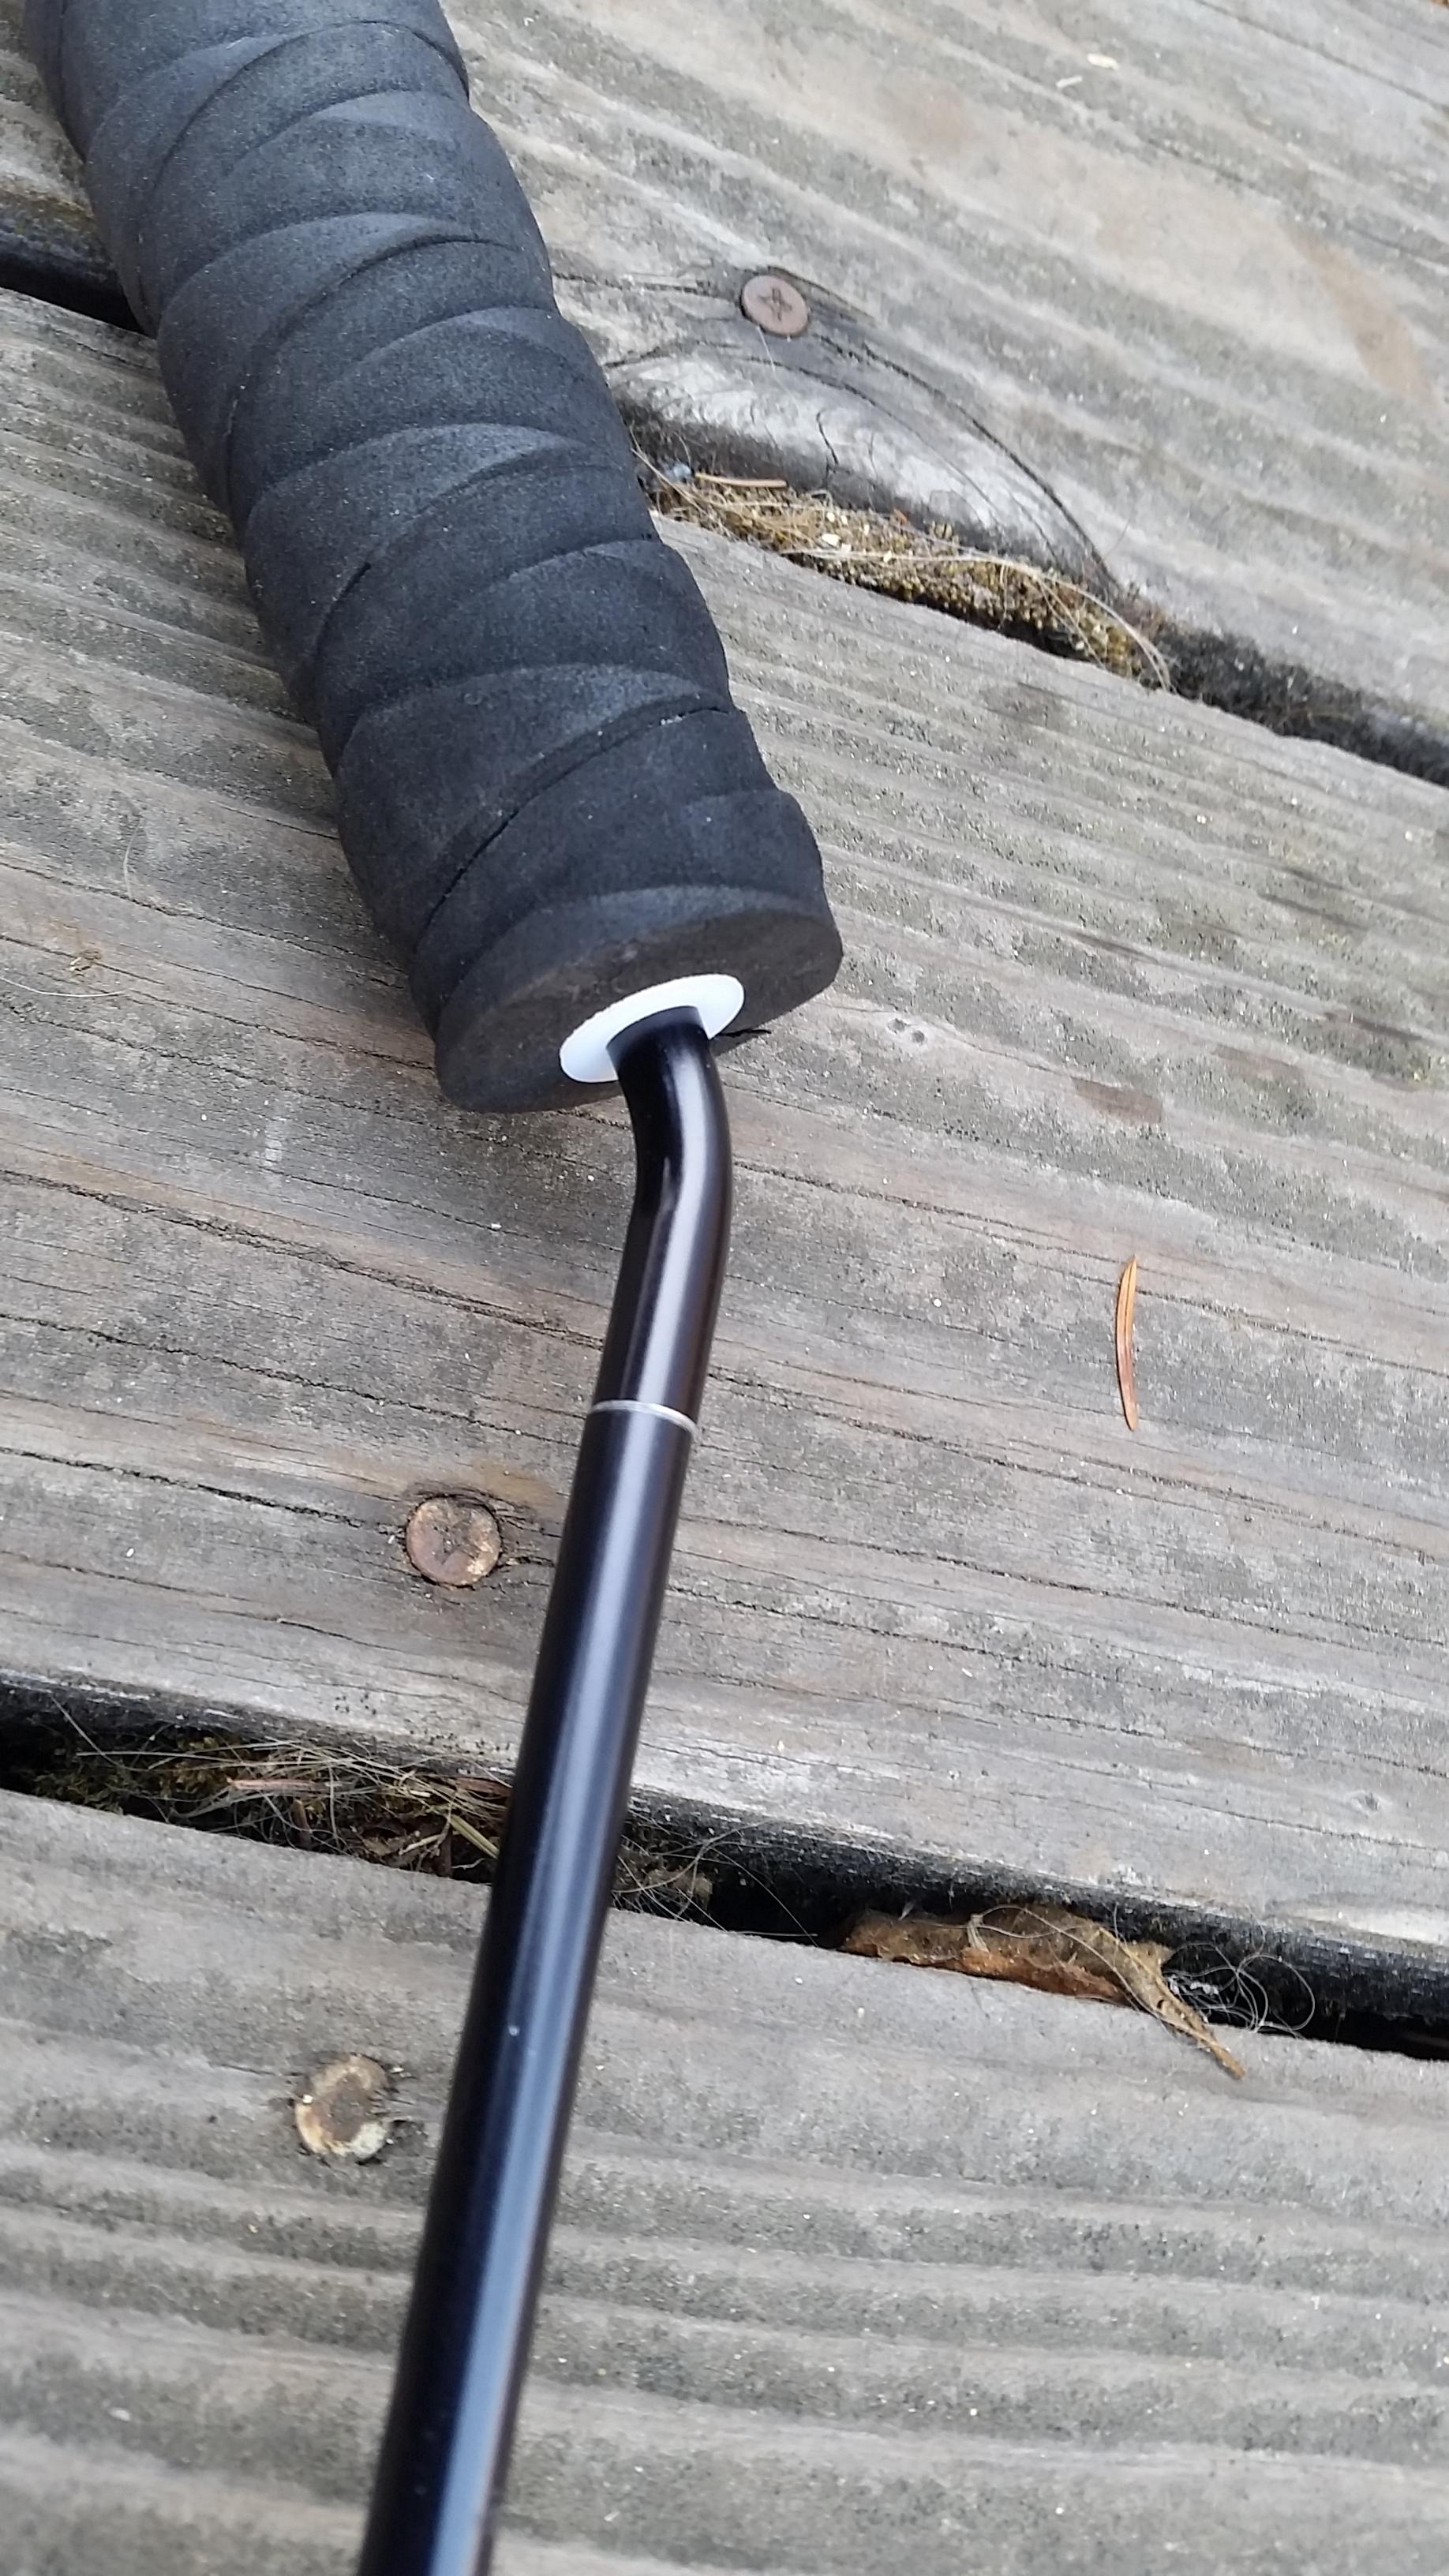
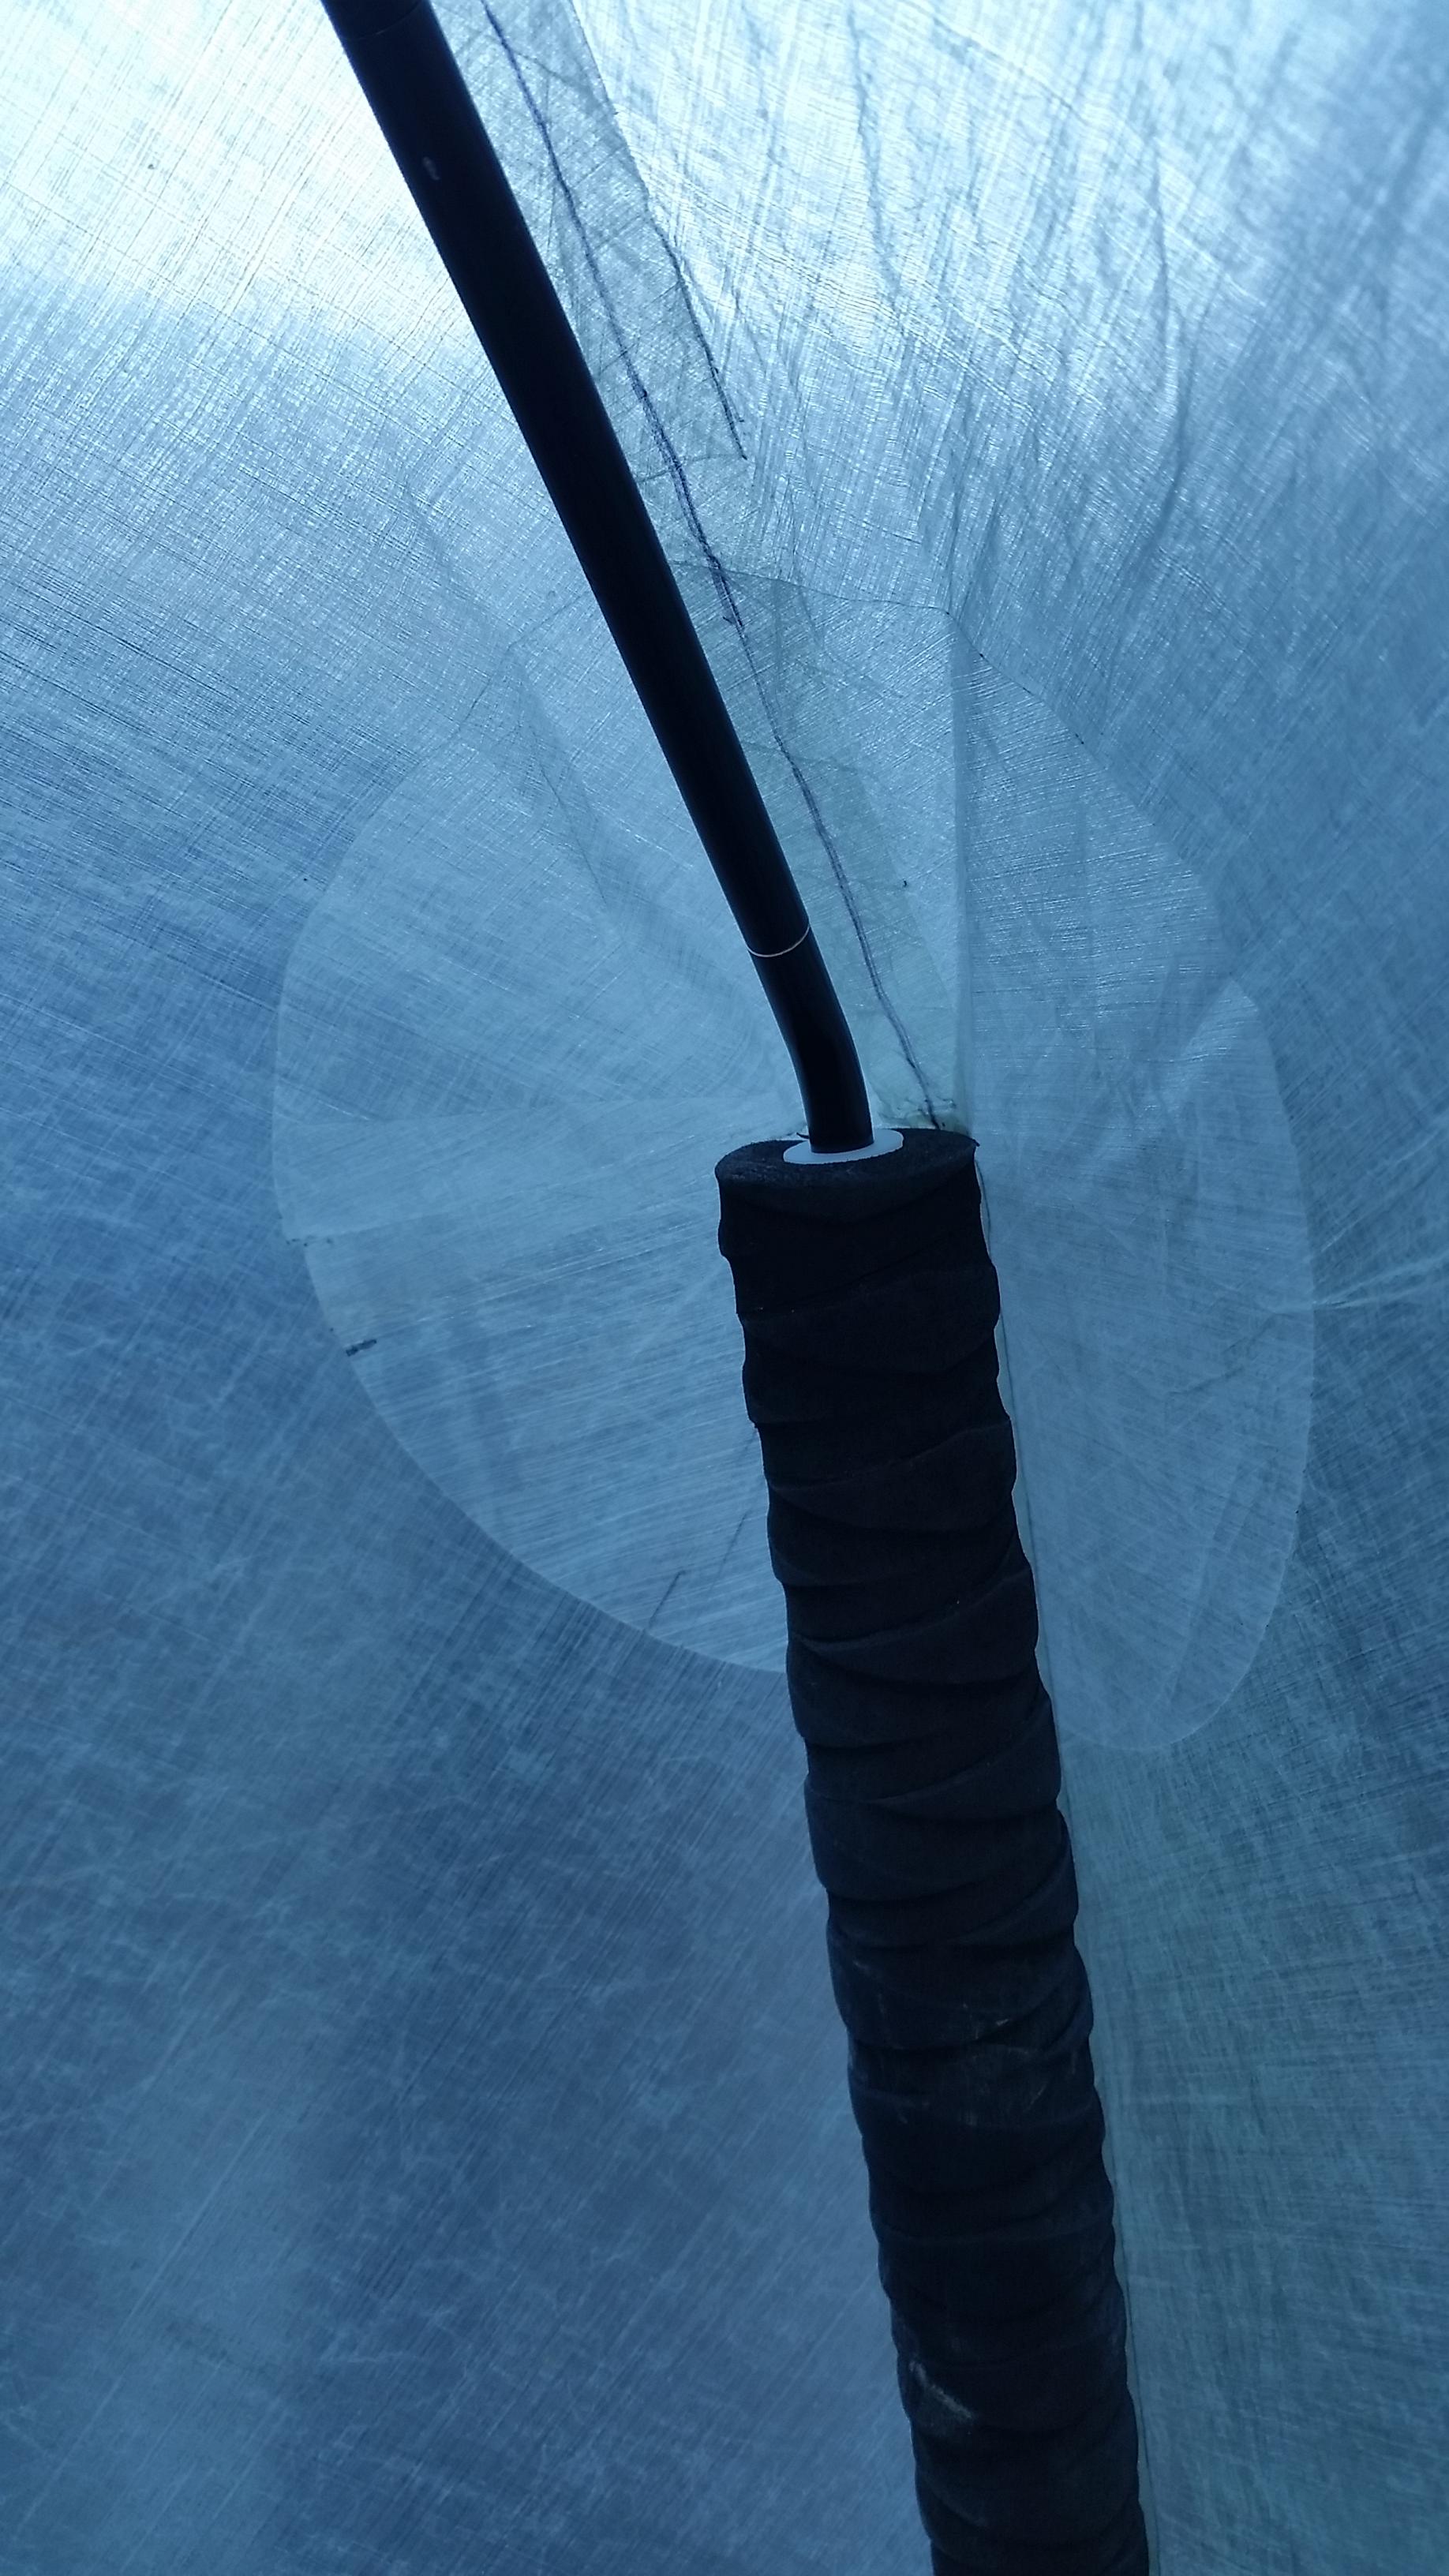
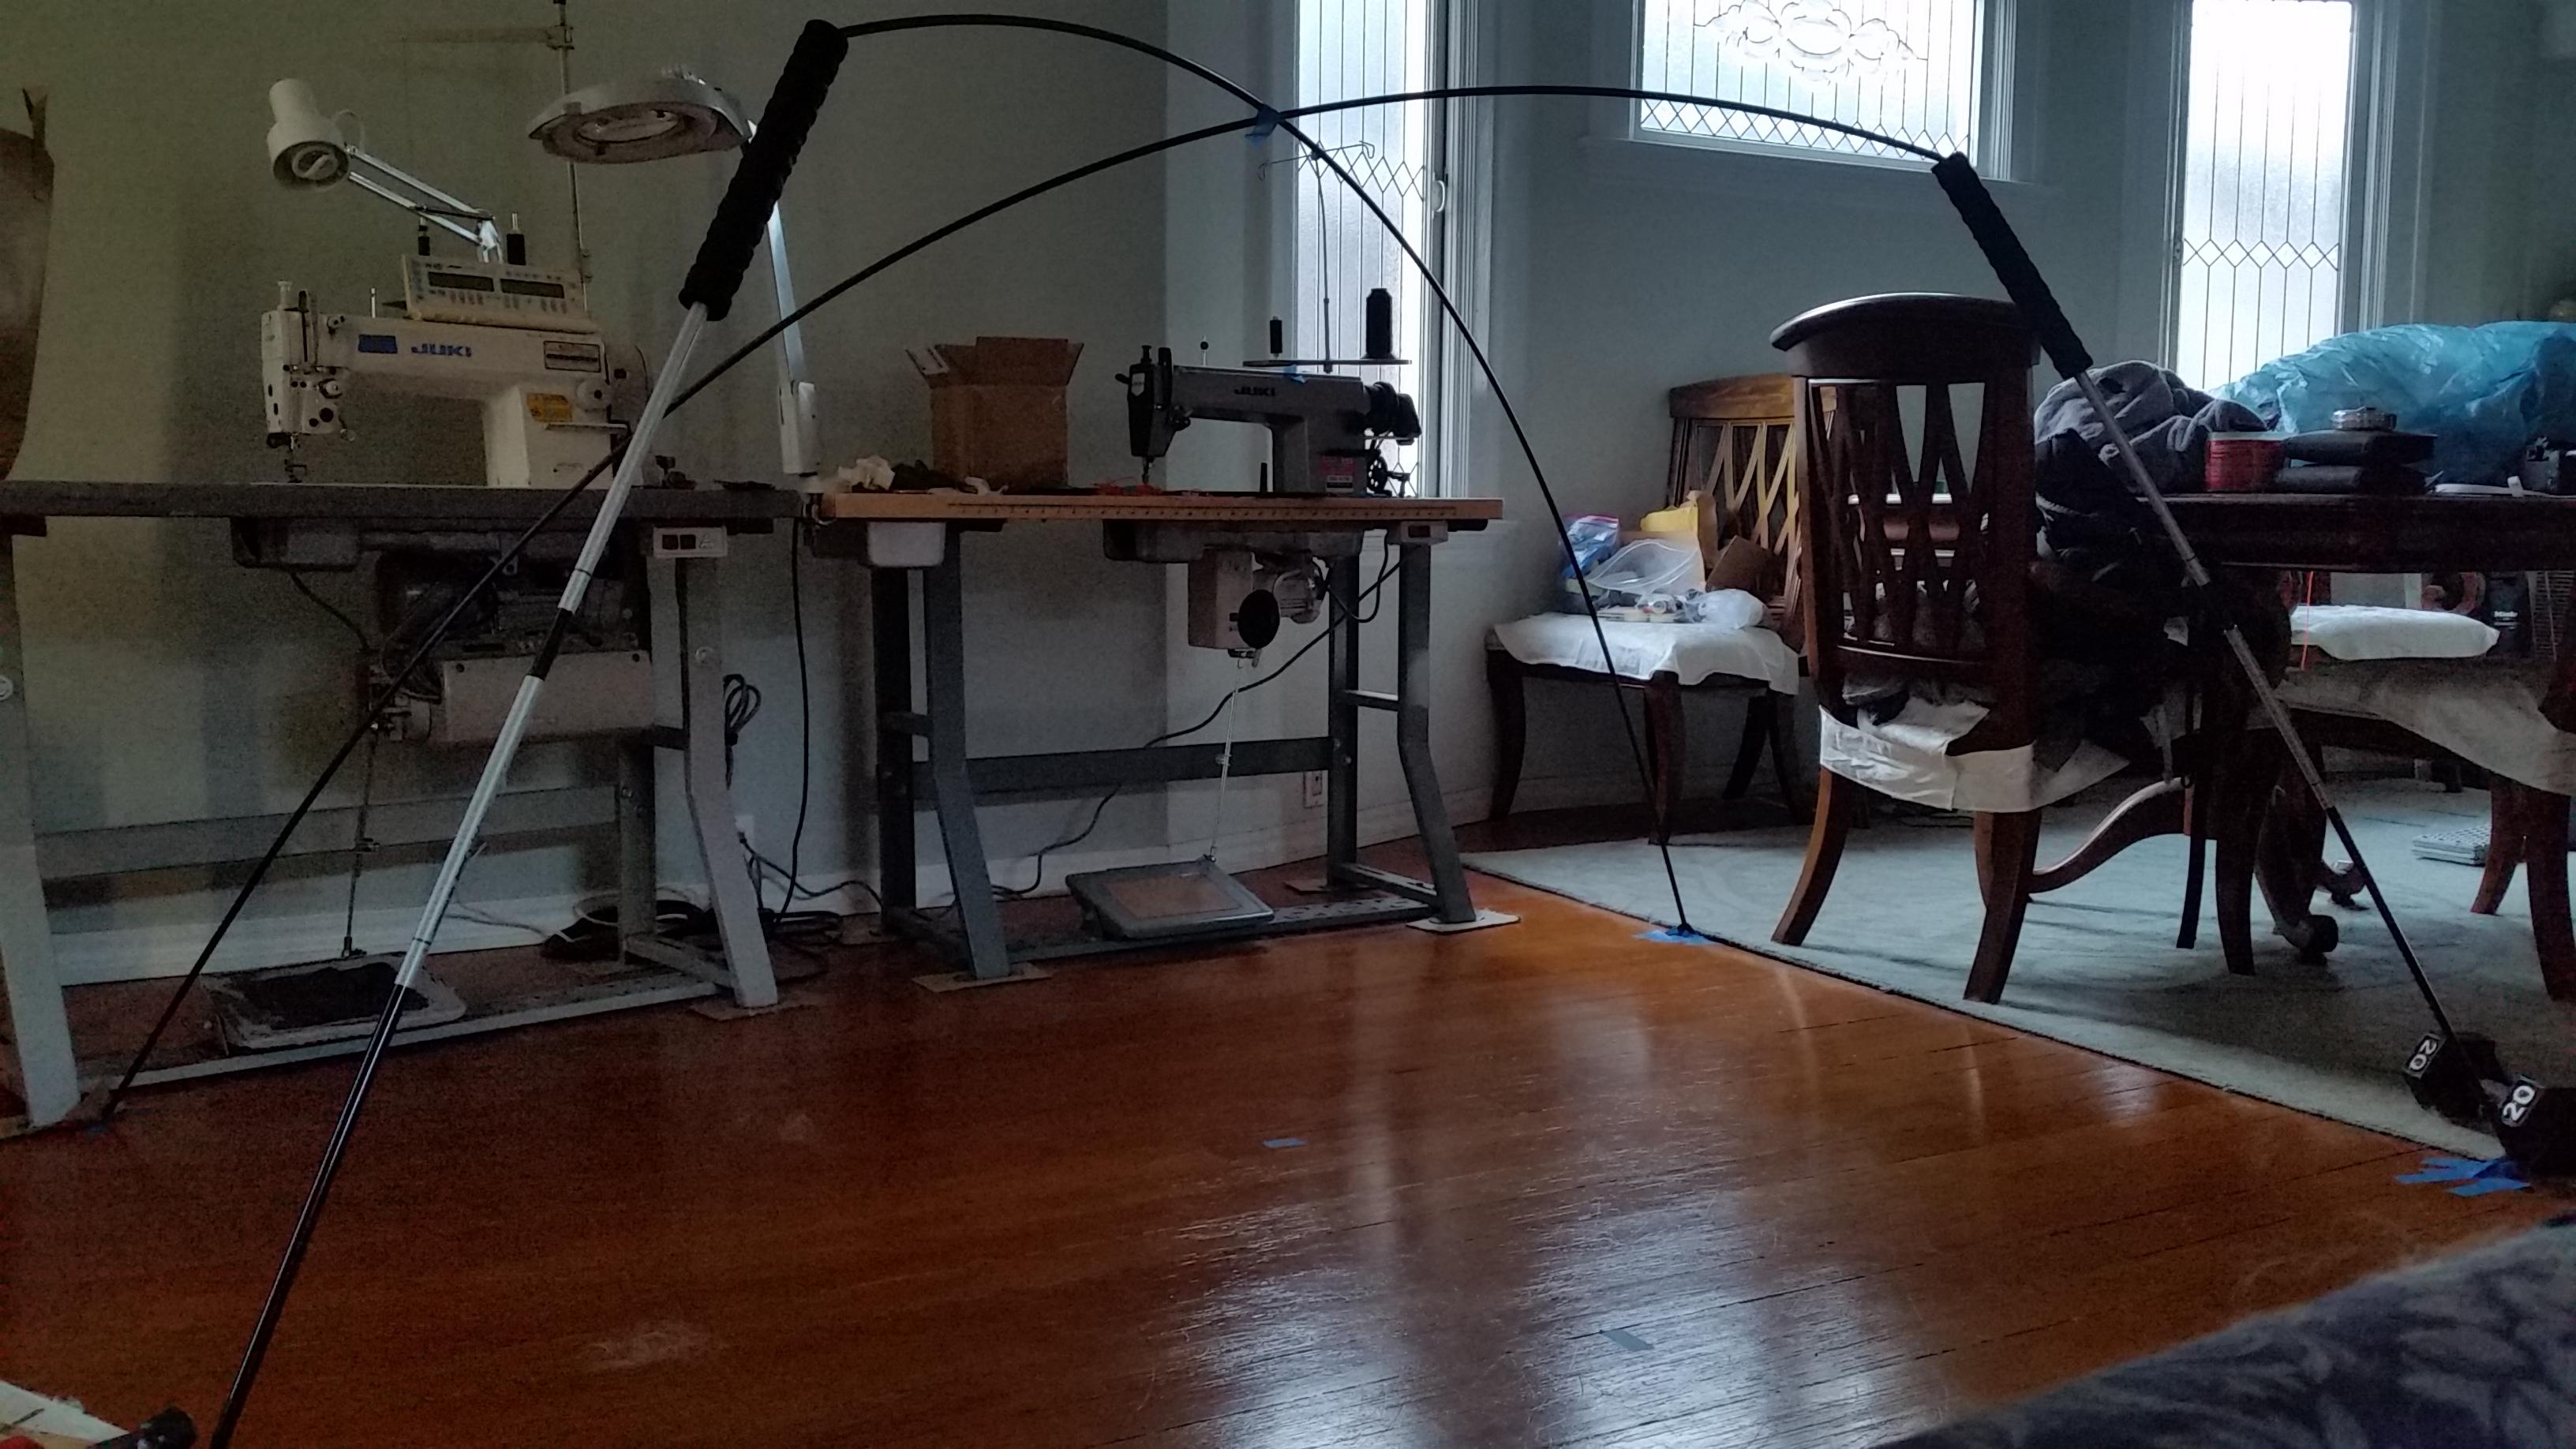
    With the strategy in place, I started with the frame structure.  My trekking poles are made out of golf club shafts, and I left the top of shaft tubes open at the grip.  I realized I could make a small fitting to go into the top of my trekking poles that would interface them with tent poles or other hardware like elbows.  This way, I could directly substitute a certain length of tent pole with trekking poles.  It will end up being a discontinuous bend at that point, but it seemed like it should work OK.  I did a quick sketch of how a frame like this would look and put some reasonable dimensions to it, then ordered some tent poles to play with.

    Here’s my sketch of the trekking pole/tent pole ‘arch’:


    Here’s the actual structure being constrained at the tips of the poles on the ground and held in place with tape where they cross:


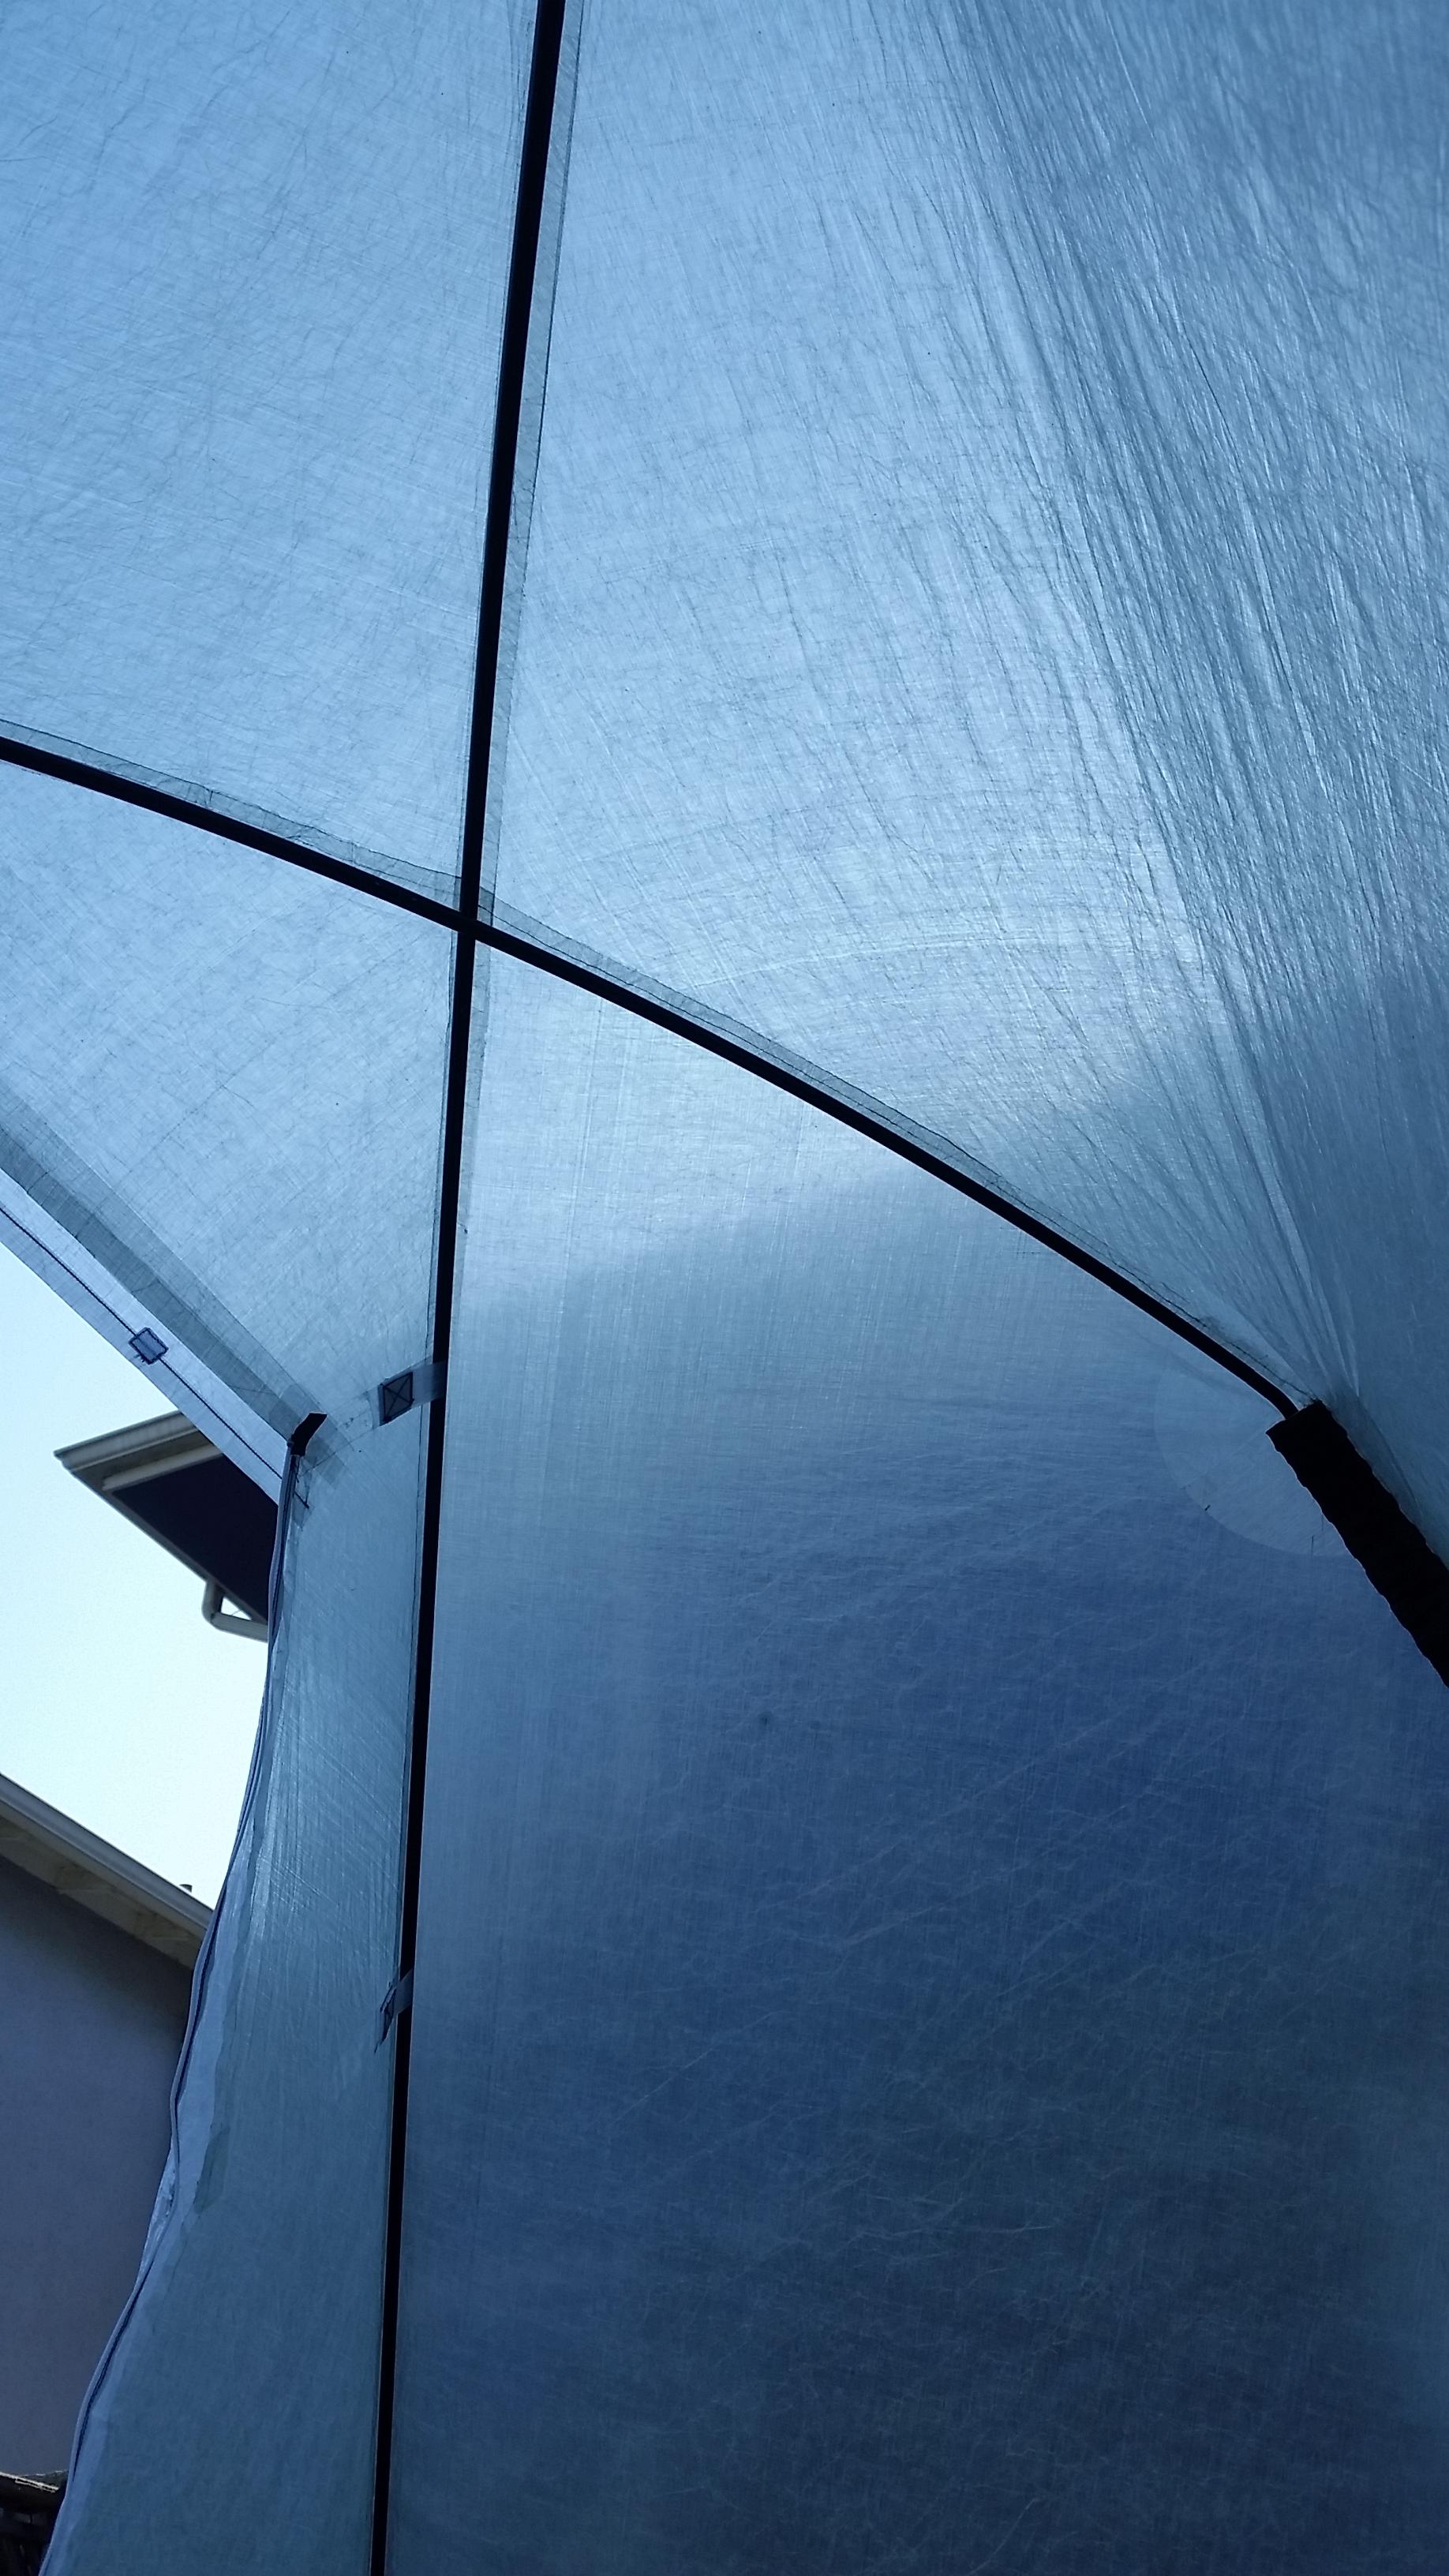
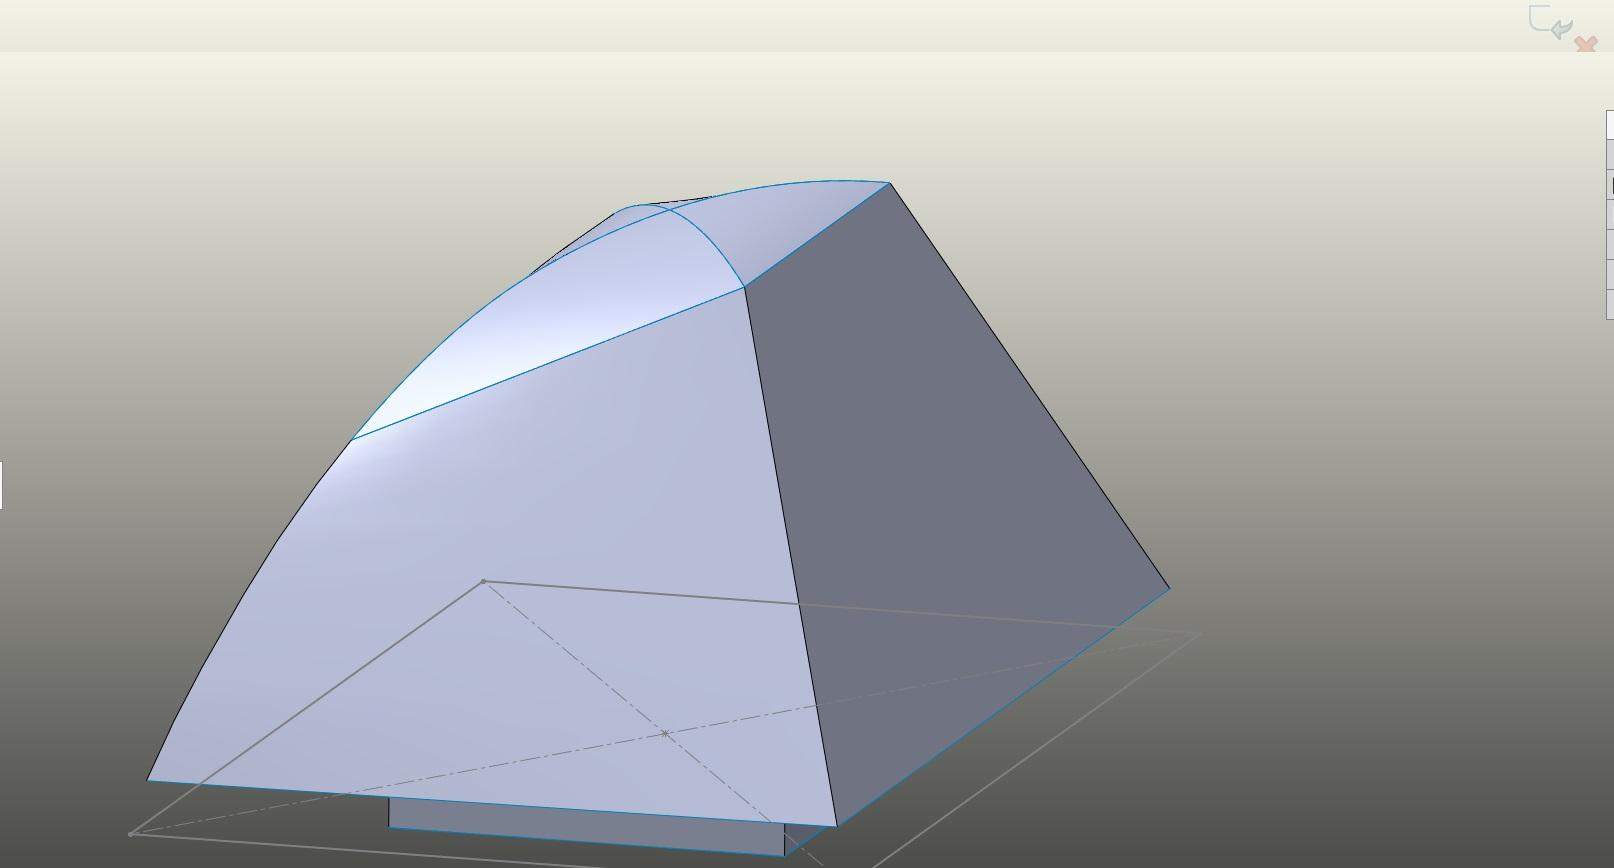
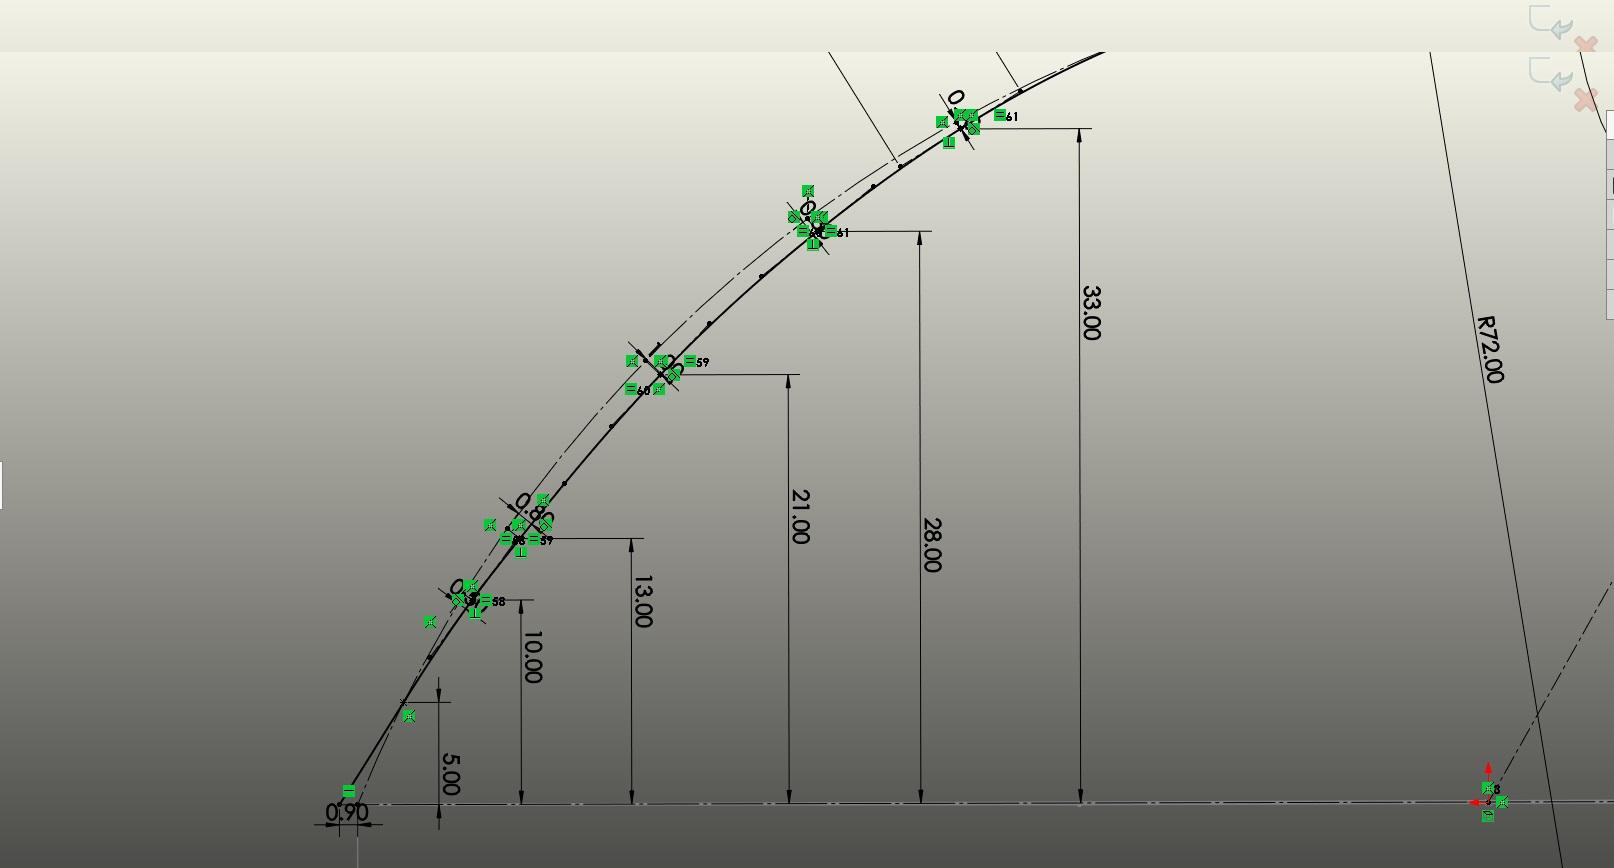
    I tried to look at the shape the bent tent poles actually made and adjust the sketch in my model to match reality.  Then I created surfaces that would span the spaces in between the frames:


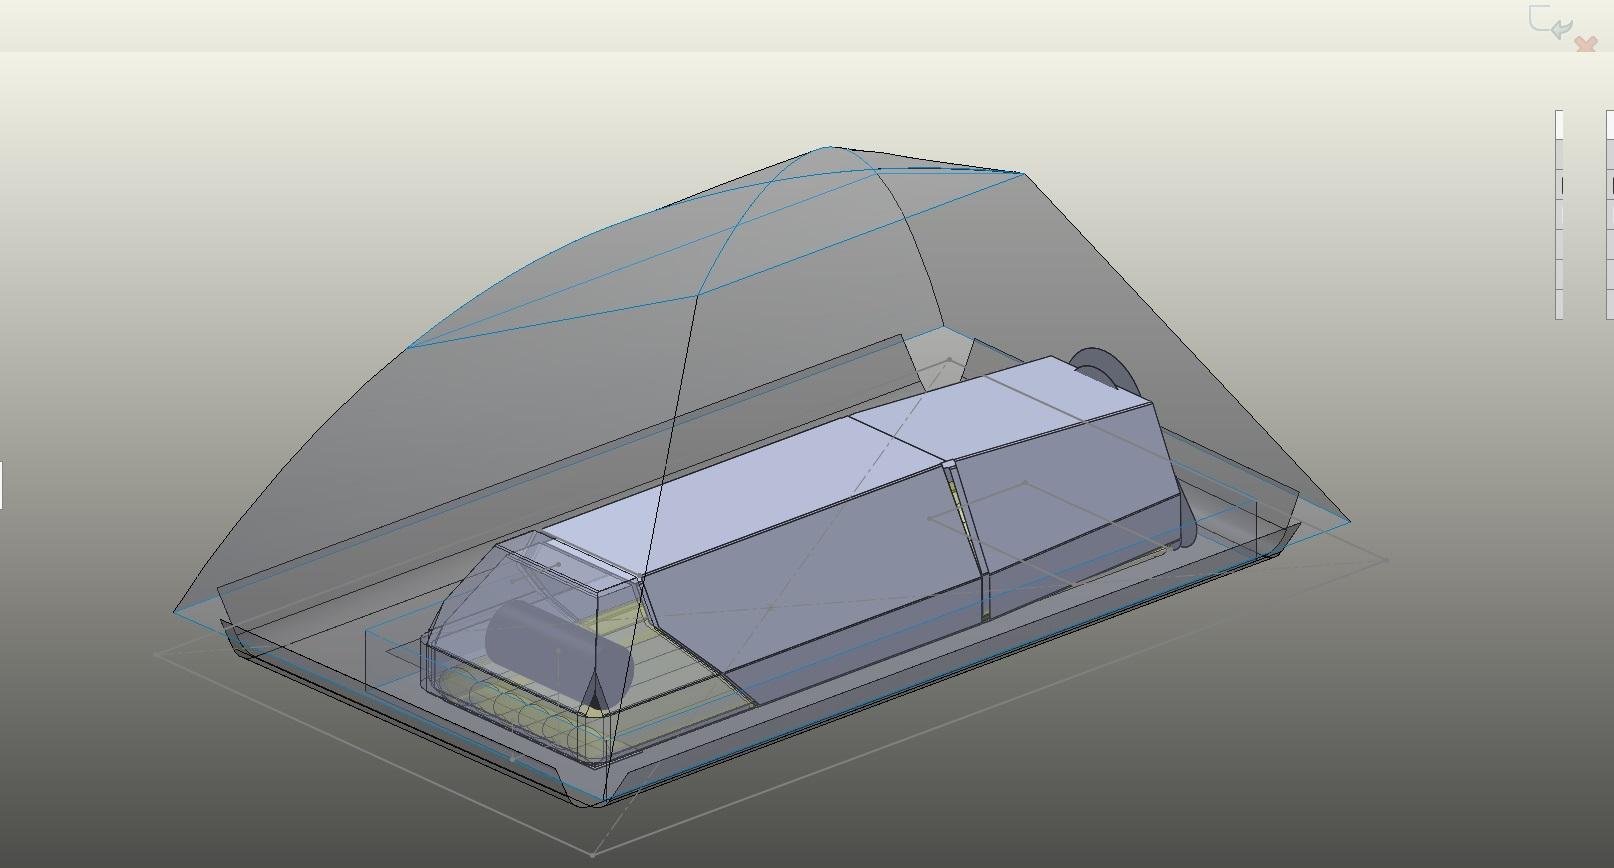
    I had previously made a model of my bag/quilt and sleeping pad, so I added that to the model of the tent along with a bathtub floor to make sure I had enough room:


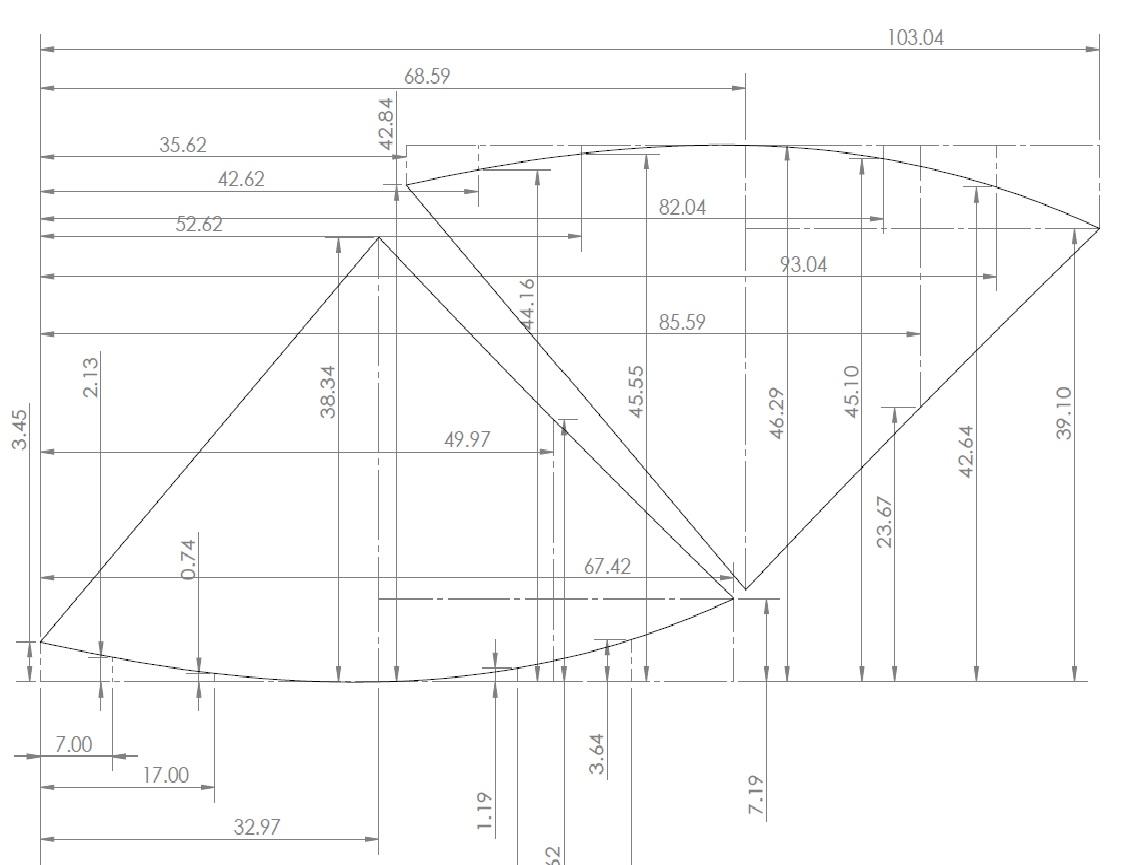
    To get the shape of the panels, I would need to flatten the surfaces that make up the walls of the shelter in the model.  Tim Evans wrote a python program to do this on his models(!).  Luckily my cad software has that capability so I don’t have to go quite that far.  Here’s a drawing of one of the long side panels that I cut in half so it would fit my material more easily:


    I decided to prototype the shell out of Tyvek Home Wrap since it does not stretch and is pretty cheap.  It’s kind of a headache to work with though, since it’s so stiff.  I used ½” wide 3M ‘glue-on-a-roll’ or transfer tape (9482PC) to stick the panels together rather than sew Tyvek Homewrap.  Here’s how the prototype looked:


    The actual shape the tent poles made when in the structure of the dome was a fair amount different than what I had modeled.  There was a lot more bend near the apex where the tent poles went into the trekking poles than near the free end near the ground.  I ‘pinched out’ extra material on the prototype along the tent poles to get an idea of how much bend I should take out of the model to match reality.  Here’s the adjustment to the model, with the dashed curve being the original;


    After making the adjustment to the panel layouts, it was time to make them out of DCF.

    I’m going to break this post into two, so I’ll follow up with the final result in the near future.

    #3676905
    dirtbag
    BPL Member

    @dirtbaghiker

    So you still will be using tent poles , along with trekking poles?


    #3676912
    Sam Farrington
    BPL Member

    @scfhome

    Locale: Chocorua NH, USA

    The only place I’ve seen anything like that is an MYOG tent from the now proprietor of Trekkertent.  He has a picture of it on his website, and when he posted it earlier on BPL, he talked about the horrendous winds it resisted in the Scottish highlands.  So it seems to work.  But not for those who use either zero or just one trekking pole.

    You listed 4 priorities:

    No stakes
    Use trekking poles in freestanding structure (but not in occupant’s way).
    Lightest available materials (DCF)
    Roomy/livable

    Had no idea that stakes were verboten on planes, even Ti shepherd’s hooks assumedly. But can’t imagine not anchoring a freestanding tent with something. It could easily turn into a kite in open, exposed terrain, especially at higher altitudes. But would agree that a maximum of stakes, say 4-6, is ideal for a self-supporting structure.

    It is interesting that your DCF tent has lasted 4 years, and knowing the number of nights used would also be helpful.

    And of course, no argument with roomy/livable. I’m not a fan of cooking in a tent; but in driving, stormy weather, am also not a fan of skipping dinner. Found that was a bad idea for too many reasons. But the Sierras I recall, are nothing like the Rockies for mean weather. And also recognize the trend in minimizing vestibules to save weight.

    Some other possible priorities to consider might be:

    Ability to pitch without exposing the inside to rain.
    Ability to go in and out without such exposure.
    Large door openings (mentioned in your post).
    Good wind shedding and resistance.
    Minimal Fiddle Factor in pitch (not in your priorities, but discussed in your post.)

    The use of DCF and non-zip closures implies minimal weight; but other components add up to significant weight, such as:

    Pole ferrules, tips and shockcord
    Acetal or Ti hardware, like pole connectors, elbows, buckles or linelocks.
    Connectors-Fabric to Frame
    And the damnable cord to add guylines in wind and rain storms. (A good design can substitute guylines for perimeter pegs-so no need to carry extra pegs).

    Then there is the KIS (sometimes with an extra S) principle, ‘Keep It Simple.’
    Not always, but usually, KIS = Less Weight
    If I did hike with two trekking poles, one consideration would be a wicket shaped front pole, but with slanted poles on the sides; and a pointy arched hoop for the rear of a tunnel.
    The wicket poles would be joined by tubing a bit stronger and longer than the nomad design used by Lightheart and others, so the top of the wicket would bow upward a little to create more space and shed rain better.

    Await your next installment.

    #3679109
    Christian K
    BPL Member

    @disciple3131

    What CAD program are you using. Seems pretty detailed. I make all my rough ideas in Sketchup, but it’s not really great at creating curved faces. I could probably do something in Civil3D, but I haven’t gotten quite as detailed as you had.

    How much weight do you anticipate saving from using the trekking poles vs. the additional tent pole sections that would be required for a typical cross arch tent? I assume 4 oz or so? Very clever idea nonetheless.

    The first thing I thought of was using two poles to make an A-frame as the entrance/head end and then using a tent pole to give you your curved ridgeline down to the foot end. In practicality, it’d be similar to the BA fly creek I guess. Maybe make it a side entrance.. idk? Although, not sure how sturdy that length of tent poles would be unless you beefed it up. And at that point it defeats the purpose of weight savings.

    #3679763
    Craig B
    BPL Member

    @kurogane

    I use Solidworks.  I’m lucky enough to have access to it through my job.  So I get to substitute 104″ of tent pole with trekking pole, and the tent poles I’m using weigh a little over 1g/inch, so yeah, almost 4 Oz of weight saved.

    Doing an A-frame with trekking poles might be OK, but it results in a pointy volume, which is not as usable as a round volume.  A single pole coming off that point would also result in a rather pointy ridge line then a triangular footprint, which would likely need stakes to pull out a bit.  It could work though, so if you like that design, go for it.

    The rest of my write up is still under way….

    #3682763
    Craig B
    BPL Member

    @kurogane

    One of the big questions I had to answer before starting this project was which construction technique to use;  sewing or bonding?  There are plenty of discussions on this site about the topic with regard to DCF, and different manufacturers use different methods as well.  To get a better feel for it myself, I did a few test seams and tried to pull them apart by hand.  I did a ½” overlap bond, a simple folded over and top-stitched seam, and a flat-felled seam.  Here’s a picture of the test pieces AFTER I tried to pull them apart as hard as I could:


    #3682765
    Craig B
    BPL Member

    @kurogane

    Even a narrow ½” bond was enough to make a seam/joint that behaved as if it was a continuous piece of material that I was nowhere near able to pull apart.  On the other hand, anything I tried that put holes in the material (sewing) significantly weakened the joint.  There are of course ways to do both, like taping over a sewn seam (like in the Hexamid) or sewing the edges of a bonded seam.  If you tape over a sewn seam, essentially you’re taking the sewing out of the equation as the bonded part of the structure dominates the strength.  Taping over a sewn seam is also not the most efficient use of material since you not only have the original seam allowances but the extra strip of DCF with adhesive on top of that.  2 mil adhesive weighs 1.5 Oz/square yard, which is not insignificant if you’re talking about 1” wide tape (2 Oz/sqy total).  In the end I decided to go with a ¾” bonded overlap to join the panels.  A sewn bottom edge where the mesh attaches is sufficient since it is not load bearing and it doesn’t matter if water leaks through the stitch holes there.

    Next, how to get the panels cut.  Originally I had planned to lasercut the DCF panels using the Ripstop By The Roll service.  Unfortunately my job was way too small because they were (are?) busy cutting PPE for the pandemic, and they were very unresponsive to my inquiry.  I really didn’t want to plot out all the panels using a ruler again, as that was extremely tedious and not terribly precise.  The cheapest option I found to have the pattern printed actual size was one of those big vinyl banners.  I got a 6’x10’ banner from Vistaprint for $115, which is not bad relative to other options.  I could only print half of the long panels and one of the side panels to get everything to fit, but that’s fine because things are symmetric.  One nice thing about using a printed pattern like this is that it was easy adding and transferring the seam allowance to the DCF since it’s transparent.  Just lay the DCF on top of the pattern and trace the lines.

    The 4 corners off the canopy need to be reinforced, so I used the 3” and 7.5” circular DCF patches available from Z-Packs that already have adhesive on them.  I believe Z-Packs uses the 3” ones at the corners of their shelters, but I went a step further and used both a 3” and (½ of) 7.5” patch at my corners.  Examining the final result, I’m not sure I needed the extra reinforcement of the 7.5” patch;  The 3” would probably have been sufficient on its own.  I also used a 7.5” patch to reinforce the sharp areas where the trekking pole handle tops rest in the canopy.  These areas are definitely under a lot of stress which, I found out from the Tyvek prototype.

    To grab onto the tips of the poles and adjust the tension/position of the canopy, I used ½” webbing with ladder locs and buckles.  I used a metal grommet to capture the tips of the tent poles, and constructed a little pocket for the trekking pole tips out of 2” seat belt webbing.  The buckles are there for quick release when breaking the tent down, since it’s a little bit tricky to loosen a ladder loc without releasing the tension on it.

    This is a truly freestanding structure that needs no stakes or anchoring to the ground to stand on its own.  As such, and given it’s lightweight nature, it is susceptible to being blown away if not artificially weighed down.  So how to weigh it down without stakes?  There are plenty of ways to do this, and I chose to use the heavy rock method at the corners.  In the past, I’ve tried to use heavy rocks on guy lines with little success;  It’s very difficult to trap enough contact area on the guy between the rock and ground.  So instead I attached a short length of ½” grossgrain to the pole-tip attachment points which will hopefully be easier to set a rock on top of.  I also put a 2” or so diameter loop at the end of the grossgrain so you can put a stick or something through it, then a rock on top of that.  Of course you could do that with a guy line as well, but grossgrain just feels like it will work better for this purpose and it only weighs 6g for all 4 corners.

    Here are some pictures of these details:


    #3682766
    Craig B
    BPL Member

    @kurogane

    My first attempt at a door was a pretty dismal failure.  I tried to make a ‘frame’ out of 3 Oz DCF that would sort of stand up on its own.  I attached roughly 1” wide strips to the door opening and door edges, and then attached patches of velcro every 6” or so.  This did not even remotely form a seal or even a shield to keep rain out, let alone bugs. The door opening was pretty stable though, so if I used zippers to close the sides of the door it would be possible to do so without putting a lot of tension across them.  However, the opening I had put in the panel was cut for the straight strips of my ‘frame’ and needed to be modified to use two straight (or slightly curved) vertical-ish zippers.  This was easy enough to accomplish using some of the extra 1 OZ DCF I had left over from the bathtub.  I was disappointed about the weight increase with zippers, so to make things as simple as possible, I decided to try and use #5 waterproof zippers.  That way I could attach the zippers and not worry about covering them with an extra flap.  I sewed the zippers in place since the adhesive would not stick very well to the zipper tape.  I did not seal the needle holes in the zipper/dcf seams, but if they leak, I will.  I did a very brief hose test in my backyard after it was all together, and I didn’t see any obvious leaking along the door zippers.  Maybe I’ll do more extensive leak tests this winter when it starts raining again.

    Here’s the door:

    Performance Evaluation

    The DCF stretches on the poles pretty well.  Tension is fairly uniform across the fabric in most places.  The lowest tension points are the centers of the edges along the bottom edge; At the centers of the catenary curves.  It gets progressively more taught as you expand away from those points toward the frame.  You can help this a bit by pulling the corners out with rocks (or stakes).  This lack of tension is most noticeable on the long sides where that area flutters a bit in the wind.  The whole thing is rather drum-like, and I imagine it would be quite loud in a rainstorm.  The two nights I spent in it were clear and had no wind so I don’t know how bad it might be.

    Here’s the tent in the wild with rocks at the corners:


    #3682767
    Craig B
    BPL Member

    @kurogane

    Operating the door zippers is not super convenient because of the low tension at the bottom of the door.  When unzipping from the top down you can operate the zipper slider with one hand as the material will resist you.  When trying to zip up from the bottom, the bottom edge will not resist on it’s own and you end up deforming and pulling up the material while the slider just gets stuck.  You must grab the material under the zipper and then pull up on the slider.  This is exacerbated by the fact that I used waterproof #5 zippers which have quite a lot of friction when operated so need a lot of force.  If I were to revise this, I think I’d try #3 regular zippers with cover flaps.  I was able to set the door with minimal tension on the zippers, so I think I’d brave the lighter weight ones.  Overall, opening and closing the door was kind of a pain.

    My original intention was to design something that you could pitch from the inside, so that’s one of the reasons I put the poles on the inside.  Other reasons are you save weight by not needing sleeves or extra hardware and reinforcements to pull up on the canopy fabric, and maximizing inner volume.  I tried pitching it from the inside and found it pretty difficult.  The way the corners needed to be set up to accomplish this was not very clean and was going to require a bit more weight/material as well.  Ultimately I decided not to try and make it work since I would so rarely (if ever) need to pitch it from inside in a storm.  So I set up the corners optimized for easy insertion and tensioning from the outside.

    Setup it reasonably easy and fast.  It’s MUCH easier than inserting all those stakes I was complaining about, so that’s a design goal satisfied.  Maybe not as easy to set up as I could have hoped for though.  Since there are no sleeves for the poles to feed into, it’s a little fiddly getting the first pole bent and into position in the canopy.  It’s then rather awkward pulling the final loose corner of the canopy toward the pole end and coaxing the poles to make the dome shape.  Both poles want to move around and not settle along their proper seams. Once it’s up though, it’s pretty easy to get even tension.  It is indeed truly freestanding; you can pick it up and move it around once it’s pitched.  Putting sticks through the tie-out loops and rocks on top of those was pretty easy as well.  Take-down and packing was quite fast and easy, especially because it’s rectangular.  It will fold and then roll into a uniform cylinder shape easily, unlike the elongated hexagon of the Z-Packs Hexamid.

    Liveability

    Overall, the amount of space inside is good, although I’m not super happy with how wide I made the bathtub floor.  After living with the fairly narrow Z-Packs bathtub in the hexamid (which was entirely adequate), I thought that a little extra width would be even better.  Unfortunately, this came at the expense of the area in front of the door that I added an opening in.  This area was a little too narrow, and I was always trying to avoid the side of the wide bathtub.  It was not super convenient to open the panel in the floor to step into the door frame before lowering myself into the tent because there just wasn’t enough room there.  I’ll change that on the next iteration (if there is one).  Ironically, making the bathtub wider added a little more weight too (1 Oz DCF vs .67 Oz mesh) so it’s doubly disappointing.

    Here are a few pictures of the inside:

    #3682769
    Craig B
    BPL Member

    @kurogane

    For the two nights I had it in the backcountry it did not get terribly cold (Maybe it got down in the 40’s), and it was incredibly dry so there was zero condensation on either morning after.  So I’m not sure how it will handle condensation yet.

    I think I made the sides of the bathtub a little bit too tall (6”), as they did not want to stay vertical even with little guy-lines attached back to the main canopy.  This was especially true of the side that was nearest the door which I could not attach a support line to.  It was a little better with stuff in the bathtub to keep the edge from folding inward, but it was also prone to folding outward toward the door, making even less room in the pseudo-vestibule area.  My solution was to put things on both sides to prop it up, which worked OK.

    Weights and Measures

    The outer corners defined by the tips of the poles make a rectangle that’s about 56”x98”, the dome height is 42”, and the bathtub floor bottom is 32”x78”.  Packed weights in stuff sacks are 396g tent, 239g poles, for a total of 635g/22.4Oz.

    There are a couple other gram-shaving ideas I thought of that I might try in the future.  First, my trekking poles are hollow and could easily fit a section of tent pole in each of the upper halves.  Second, I think I can use another couple of sections of tent pole in my backpack frame instead of the fiberglass rod that I’m using now.  However, this would mean having 4 sections of tent-pole loose without the bungee-cord to hold the pole assemblies together when trying to pitch the tent.  I worked with the tent poles this way when I first got them, and it was not very easy to do.  So I would need to devise a way to hold the extra tent-pole sections together in the assemblies without using bungee-cord, which will take some experimenting.  So in all, I might be able to reduce the tent pole set weight by up to about 70g.  Yes, it would not really be getting rid of the weight by stowing it in my trekking poles, but it would take away from my packed weight.

    #3682771
    Roger Caffin
    BPL Member

    @rcaffin

    Locale: Wollemi & Kosciusko NPs, Europe

    You need to add a small awning or verandah over the door. That would let you have the top of the door open a bit even when it is raining. I have them on my tunnels, thus:

    Cheers

    #3682781
    Jerry Adams
    BPL Member

    @retiredjerry

    Locale: Oregon and Washington

    That came out really good

    #3682794
    Christian K
    BPL Member

    @disciple3131

    This turned out awesome! +1 to what Jerry and Roger said. I know the BA Scout has regular non-waterproof zippers and an interior trim around the zipper to prevent water intrusion. But, the walls are also pretty vertical, so that probably is more efficient at repelling water than a sloped design like you have if you were to use non-waterproof zippers too. Then again, I’m pretty sure many of the pyramid tents use waterproof zippers and no flap or awning and likely have no problems with waterproofing.

    I’m quite impressed by the level of detail, creativity, and effort you have put into this thing. Sounds like you’re a mechanical engineer?? Solely an assumption based on people I knew back in college… I don’t know too many others who use Solidworks. I totally have thought about taking patterns to the ole’ work plotter, although that was usually for backpacks and would probably be frowned upon :) As you mention, it’s pricey (but probably worth the investment).

    It looks like you tweaked the design to be slightly more symmetrical than the Tyvek prototype? And I’m assuming the 22 oz doesn’t include trekking pole weight? So it’d be somewhere around 26 oz without the use of trekking poles and adding extra pole sections (hypothetically, because I believe the design is still slightly asymmetrical)? Curious to know how long it took you to construct once you had the templates?

    To “compete” with other similar DCF tents, you could probably try a lighter DCF to at least see “how low you could go”. The BA Tiger Wall Carbon is only 22 oz and is double wall, but they use 0.34 oz DCF on the fly! Even the Tarptent Li uses 0.51 oz DCF on the fly. But, I’ve never had the fortune of holding DCF in-hand or using it on gear, so I can’t attest to the strength properties. You already used the 0.67 oz mesh. Could even go to 0.50 oz, but once again I can’t speak on durability, especially if that’s constantly on the ground. Looking at the fly and pole weight though you could likely get close to a sub 1 lb tent. Pretty darn impressive.

    If you wanted, it looks like you could modify the bathtub some and squeeze two 20″ pads laying opposite using the same fly dimensions? Or seeing how this one came out, I doubt you’d have issues working this into a wider 2 person design, maybe using 4 trekking poles? Idk how difficult setup would be though. And it’s not really a savings to use trekking poles if you normally don’t carry trekking poles, so to each his own.

    It looks like you put a lot of time and effort into this thing… I would say don’t waste it! I know I personally haven’t seen anything like this tent and at this caliber as far as the use of trekking poles goes or even a freestanding type tent in a semi traditional cross-pole setup that is DCF. After you make any tweaks you were intending to and refine your design, I would seriously consider getting some form of intellectual property protection for your design (copyright, or patent – which the latter is probably a lengthy process, although I think Zpacks has a bunch of them so it’s definitely not impossible). You’ve got patterns and CAD files, you’ve got a workflow, and you’ve got a prototype. Idk how that process works or what’s the best way to go about it, but I think you could be onto something here. Unless you don’t care about that kinda stuff, then no worries and keep creating!

    #3683163
    Craig B
    BPL Member

    @kurogane

    Thanks for the encouragement guys, I appreciate it!

    Christian K, it sounds like maybe you’re a civil engineer??  Thanks for the ideas.  To answer some of your questions; no the symmetry didn’t change between initial and second prototypes.  It IS asymmetrical in the short dimension, but symmetrical in the long dimension.  With this particular design, you probably could not just add extra pole sections in place of the trekking poles.  Tent poles would flex and assume a different shape than the trekking poles, then the shape of the canopy would be wrong for the frame.  One could probably design a std dome tent this way out of these materials and get to the 26-ish Oz weight as you propose.

    I can’t give you an hour figure on the construction time.  Once I had all the materials and pattern in house, I think I was working on it over the course of about 6 weeks or so.  I have a full time job and other things going on, so it was a side project.  I also went down the dead end of velcro door closures and had to backtrack some.

    Hmm, going with even lighter weight materials.  It would be an interesting exercise.  I’m not sure if I have the courage to do so though.  The calculated yardage I have for the 3 main materials are:

    Canopy: 7.41 sq yards x 0.5 Oz = 3.71 Oz

    Bathtub: 3.23 sqyd x 1 Oz = 3.23 Oz

    Mesh: 2.87 sqyd x 0.67 Oz = 1.92 Oz

    Which only comes out to 8.86 Oz.  With the lighter materials it would be 5.57 Oz, so only a little over 3 Oz savings.  It’s amazing how much the other stuff contributes to total weight.

    Yeah, it would be cool to make a 2 person version using 4 trekking poles.  You could shorten the extra tent pole sections needed considerably without adding too much more main material.  It’s a neat concept, but I don’t really have the need for a 2 person tent.  I have thought about having one of my hiking partners use an extra set of my trekking poles though.  Most of my partners don’t use trekking pole supported shelters, so it could work.  That would be another big project though, and I’m not sure that’s what I’d want to tackle next.

    Appreciate the vote of confidence that I might get a patent on the design.  I’ve thought about that as well, but don’t think I’ll try for a couple of reasons.  Mainly, I don’t think the market for this kind of thing is big enough to make it necessary or worth it.  I’d only really be in danger if one of the big manufacturers knocked it off, but that seems unlikely.  Most big manufacturers don’t want to make anything that is not self contained or that needs something else to work (the trekking poles).  Second, in principle I like the idea of open-source things.  It IS hard for me to think in those terms and forego trying for a patent since I was raised in this capitalist society (patents are how you get rich, right?!), but in the end laziness won out!  I decided that on my backpack design too, which I think is a little more unique and certainly worthy of a patent if Z-Packs can get one for their pack.  If there’s ever a huge demand for my designs, I’d probably try to go the cottage route and rely on my craftsmanship to sell them rather than patents.

    #3683166
    Roger Caffin
    BPL Member

    @rcaffin

    Locale: Wollemi & Kosciusko NPs, Europe

    With a sufficiently expensive patent lawyer you could probably get a patent. ie, the USPatOff would take your money.

    But there are hordes of tent and tarp patents out there, and your chances of ever getting any royalties from anyone are close to zero – very close.

    Cheers

    #3683703
    Dave @ Oware
    BPL Member

    @bivysack-com

    Locale: East Washington

    Reminds me a bit of how the US developed the space pen that would write without gravity.

    The Russians used pencils.


    In the Sierra Nevada I used a tarp and rocks.

    #3684009
    Sam Farrington
    BPL Member

    @scfhome

    Locale: Chocorua NH, USA

    Craig B,
    Thanks for the eagerly awaited update about your tent.
    Sounds like the Sierras are very rocky, for backpackers as well as climbers.
    Haven’t run into that in Colorado & nearby when not far above Timberline.

    Your craftsmanship and techniques in building the tent are the best. Was impressed
    with how well the DCF walls fit together and remained taut.  You might consider a small vestibule with a triangle foot print over the door side.  The Notch Li is an example (see the photo captioned, “Fly sets up independently”).   It would only require one more rock and one zipper.

    Looked at Tim Evan’s site with your link, and am wondering if the materials sources he lists for DCF and fabric tape are the ones you refer to in your posts. I’ve had to learn the hard way that the Cuben fabric can be as variable in quality as nylon, ditto for the tapes.
    So am just looking for safe sources, and your DCF and tapes sound very good.

    Thanks.

    #3684397
    Craig B
    BPL Member

    @kurogane

    The Russians used pencils.

    Haha! Indeed.  Yes, keep it as simple as possible.  If you don’t mind tarps and rocks, I’m a bit jealous.  For some reason I feel more secure in a tent with bug protection and prefer that.

    As for where I sourced my materials, there are really only two choices now in the US for DCF; Ripstop by the roll, or Dutchwear.  I think I might have gotten different weights from each place based on availability.  The adhesive I got from McMaster Carr.  It’s listed under Glue-on-a-roll or Transfer Tape.  It’s 3M 9482PC, which is 2 mils thick.  The 9485PC is 5 mils thick of the same stuff.  The 2 mill stuff seems like a better choice.

    #3684883
    Sam Farrington
    BPL Member

    @scfhome

    Locale: Chocorua NH, USA

    Thanks, Craig.

    #3685506
    Diane “Piper” Soini
    BPL Member

    @sbhikes

    Locale: Santa Barbara

    Your skills are amazing. It is an attractive-looking tent, too.

    Perhaps you could add some small pull loops at the bottoms of the door zippers, similar to the back of your shoes, to help you pull the zippers up.

Viewing 20 posts - 1 through 20 (of 20 total)
  • You must be logged in to reply to this topic.
Forum Posting

A Membership is required to post in the forums. Login or become a member to post in the member forums!

Get the Newsletter

Get our free Handbook and Receive our weekly newsletter to see what's new at Backpacking Light!

Gear Research & Discovery Tools


Loading...