First Post
Topic
Become a member to post in the forums.
First Post
Pet Peeves
Don’t you hate it when you turn over or shift position at night and have to be careful to re-center everything on your sleeping pad and make sure you did not rotate the zipper to the wrong position? Me too! I tend to turn a lot at night because my back and neck get sore if I spend too long in one position, even in my bed at home. It’s worse in the backcountry sleeping on a thinner pad (thinner than my mattress at home at least), so I end up turning more often. Every time I do, I have to wake up enough to rearrange everything to the correct orientation. This has always been my experience with sleeping bags. I think at some point my body would just learn to do it without waking up, but not during the 4 or 5 nights I typically go packing for. I had been thinking of trying a quilt, but I imagined I would also be letting in lots of cold air each time I turned over, even with the 2 little straps attached to the pad, as well as needing to rearrange everything. So a couple of years ago I decided to try to make a design that is kind of a cross between top-bag and quilt that stays put while you shift around.
Design Considerations
I wanted to make something with a comfort rating of about 30°F. Looking at all the offerings and specifications out there, I settled on 2” baffles. I like the idea of a top-bag for it’s draft resistance, but it seems like you could be a bit more efficient with the material that goes underneath the pad. The only benefit to that material is to hold the edges of the quilt/blanket in place near the pad. So why not attach the quilt directly to the sleeping pad, then you could use a bit less material underneath? You can repair a pad with glue and patches, so why not glue a few attachment points to it? This is almost what you do with a quilt and the two straps that go around the pad, but since I’m making this myself, I don’t need to worry about adapting to any pad out there, just mine. So what’s the most efficient way of attaching a blanket to a sleeping pad, while at the same time sealing out drafts? The two things that come to mind are velcro or some sort of eyelets or loops that you could run some thin cord through and “lace” them together. It would be nice to have a zipper in there somewhere to easily get in and out if it too. A lace-up strategy seems like it would take too long to assemble each night, plus it would really lock you in. It might be worth trying if also done with a zipper though. Velcro seems like an easier more straightforward approach. It could be quick to assemble the blanket to the pad and remove it afterwards. If you get a little too rambunctious in your bed the velcro should pull away before a seam rips. It could be used in place of a zipper to seal up the side saving weight and complexity, although it won’t be quite as easy to operate as a zipper. If it’s too warm out, you can leave some of the perimeter un-velcroed like a normal blanket, whereas that might be difficult with a lace-up scheme. Ultimately I decided to try velcro that attached to the bottom of the pad near the outer edge all the way around.
The last big design element is the shape of the blanket. I mocked up a sheet by pinning it together with safety pins to test what kind of shape I would need to move around and be comfortable in my “pouch”. I settled on having parallel sides with the lower third slightly tapered. If you are to comfortably lay on your back with feet sticking up, a bottom foot panel will be needed as well. I decided to use 2” baffles that run in the vertical direction.
Material Selection
I decided to go with 0.74 Oz. Robic 7D for the outer shell, 0.9 Oz. Membrane 15 for the inner shell, and 0.5 Oz noseeum mesh for the baffles. I thought that Robic 7D with it’s low air permeability would be a good choice to cut down convective heat losses at the surface of the blanket, and that Membrane 15 would be a bit more robust than Membrane 10.
Figuring Specifications
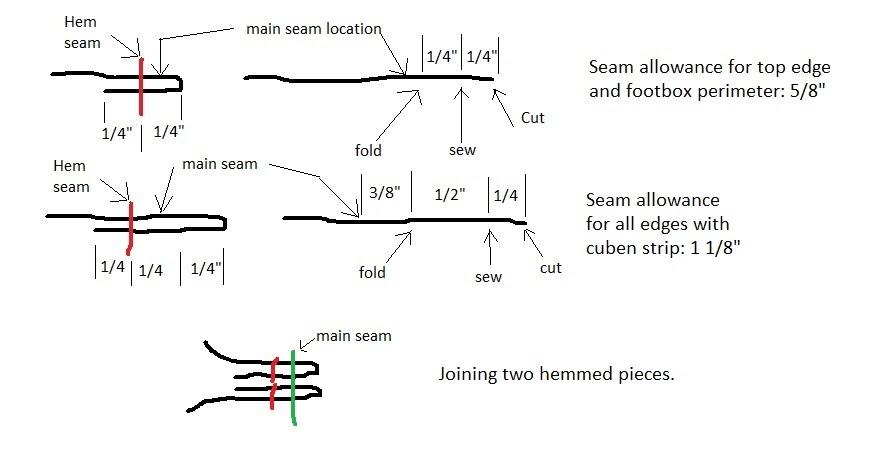
To find the width and length, I used a bed sheet as I mentioned before, pinned together to form a pouch. Then I put my sleeping pad in it and crawled inside as well. I adjusted the position of the line of pins until I felt like I had just enough room to move around on top of my pad the way I wanted. Laid flat with the pins in it, the distance from the fold in the sheet to the line of pins times two is the total girth needed to go around the pad. But since the finished blanket would anchor to the edges of the pad, I subtracted the distance between the anchor points. Since I don’t necessarily need the down to extend all the way underneath the pad to the anchor points, I could attach a strip of cloth along the edges of the blanket that would have velcro on it. DCF seemed like a good material to do this with, so that’s what I used. Here’s a cross sectional picture of the various parts:
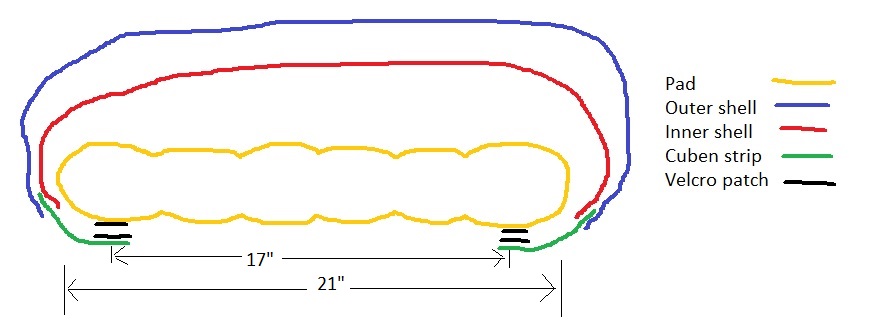
For me, a total girth of 65” was sufficient. A 2” wide cuben fiber strip should be enough, so the inner shell should be 65-17-2-2=44” wide at the seam between the inner shell and the cuben strip. For the outer shell, I wanted a differential cut (the outer shell fabric is wider than the inner shell fabric). I chose to add 4 inches to the outer shell width. This may seem like a lot, but if you have two concentric cylinders (the inner and outer shells in this case, wrapped around you) separated by 2 inches (the baffle height), the difference in their circumference is 2*pi*r=2*pi*2”= 12.6”! Even if you only imagine the shells wrapping ¾ of the way around a circle, roughly like in the diagram above, you would still have the outer shell being 9.4” wider than the inner shell. So from this standpoint, a 4 inch differential seems downright conservative to me. Additionally, I separated the 4 inch differential into two sections. The central part of the blanket will have a 2” differential while each of the small edge sections that mate to the cuben strips will have a 1” differential. With everything perfectly spaced and a uniform 2” thickness, the cross section will look something like this:

Or if you assume the blanket will puff out a little bit in between baffles, it would look more like this:

You can see in this model that a 4” differential between the inner and outer shells is pretty minor since those sharp edges still need to wrap around underneath the pad. This model also shows the lower third of the blanket taper in a couple of inches on the foot end. For the length, 70” felt about right to me. I never liked the hoods in mummy bags, preferring hats instead, so I decided not to include a head covering. Although also partly because that would have complicated the construction considerably for my first project, and I was not feeling up to that level of complexity yet.
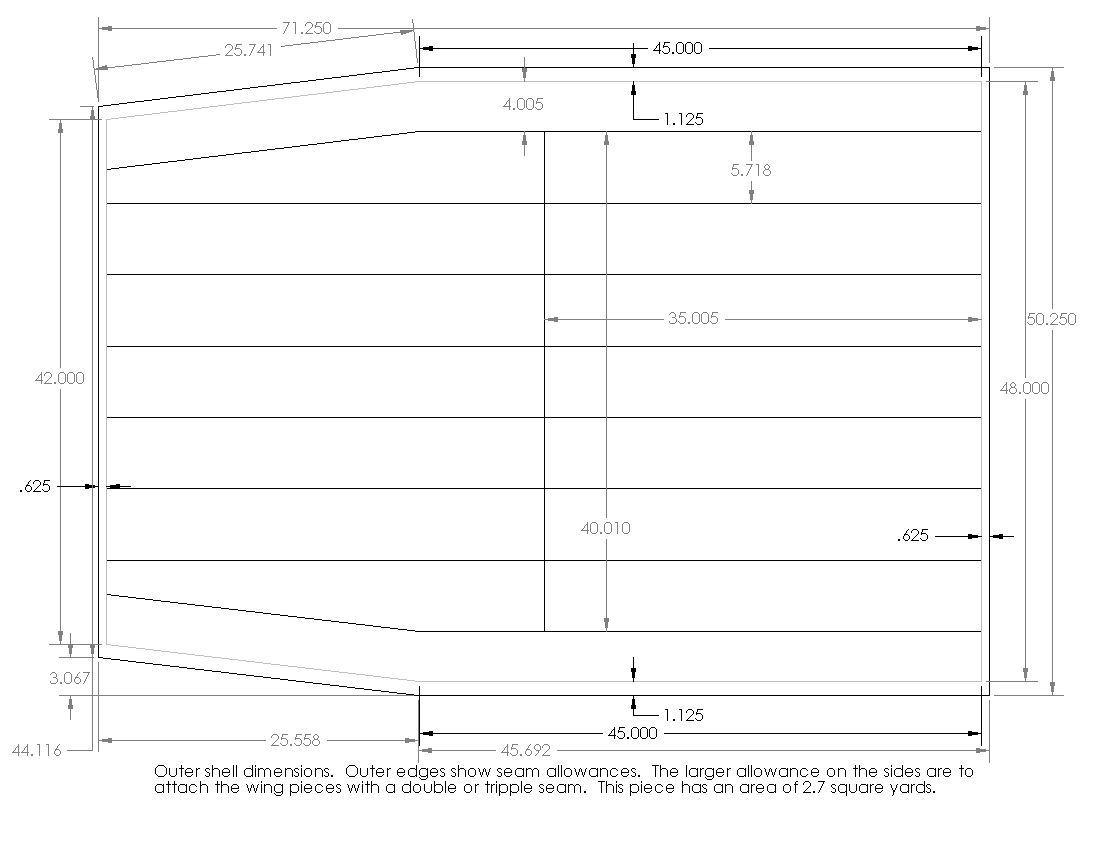
My rough numbers for the size of inner and outer shells were: 70” long x 44” wide for the inner, and 70 x 48” for the outer, minus a bit of taper toward the foot on both (without seam allowances). The foot panel was made up of two rectangular pieces with radiused corners.
Here are the final layouts of inner and outer shells:

Putting the pieces together
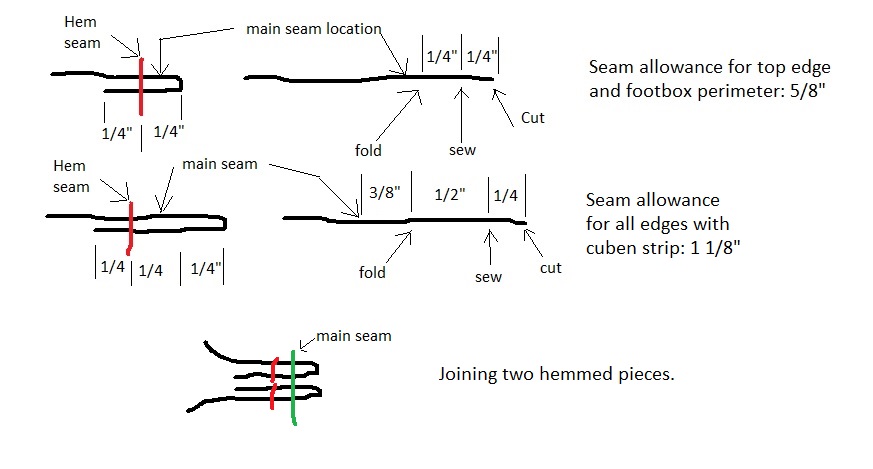
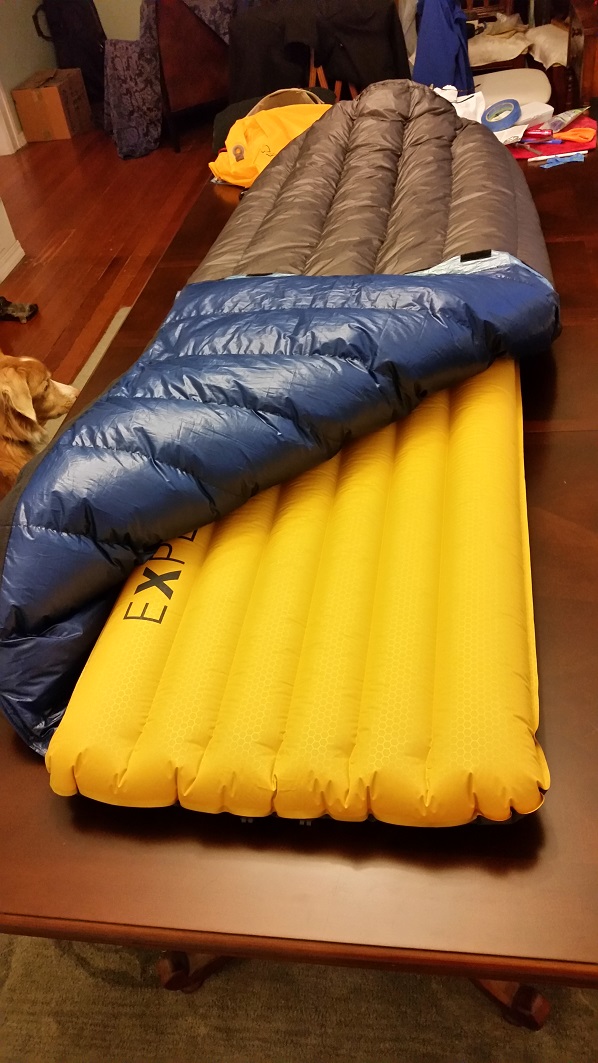
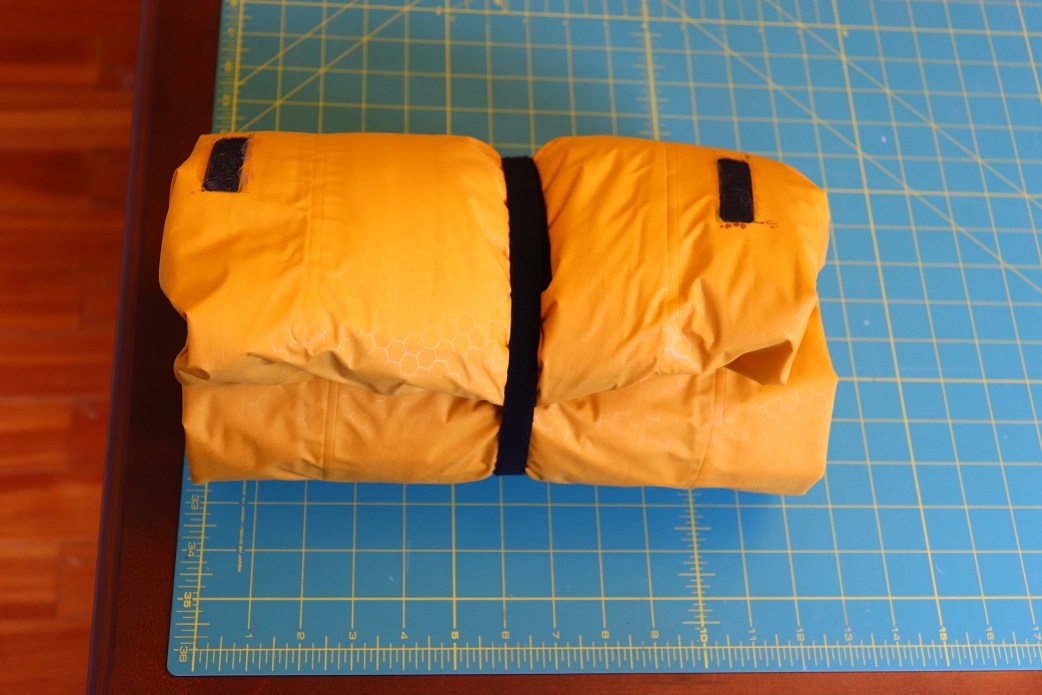
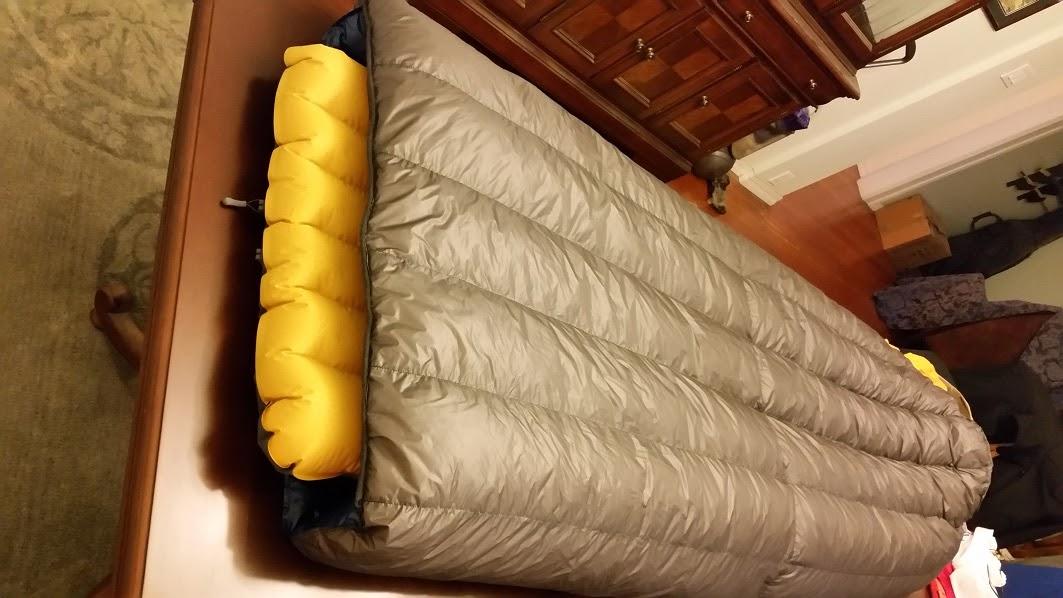
First I made single fold hems on all my shell pieces. Then I sewed all the baffles to one side of the shell, then sewed them onto the second side of the shell and left all the edges open. Then the foot box went on and I closed up most of the edges leaving spots where I could put the down into each chamber. I filled each baffle with the volume calculated from the ‘puffed up’ model above plus 20%, based on 950 fill power down. Here are the details of my crude edges and joining techniques, along with a couple of pictures of the blanket.


Weights
Shell: 178.2g / 6.29Oz
Fill (950fp down): 273.4g / 9.64Oz
Total: 451.6g / 15.93Oz
Testing
I tried sleeping in it in my backyard with temps getting down to 34°F (measured). I had sewn a couple of long thin strips of fabric onto the edge of the blanket on either side of where my head would be so I could grab them and hold the blanket down around my neck while sleeping. Unfortunately this was not sufficient, and significant drafts came in around my shoulders. I tried sleeping in my insulated jacket with a hat on, but I could still feel the drafts coming in.
Next I tried making a sort of hood, or top piece out of DCF that would reach up to the top of the pad and enclose it, like at the foot of the blanket. I made a pretty big opening where my head could stick out and put draw cords into it. Now essentially the whole pad was enclosed except for the opening for my face/head, but the hood was only a single layer of moisture barrier. Ergonomically, this configuration was pretty bad to get into or out of. There were no zippers, so it was difficult stretching the whole thing over the pad, because there was no stretch in it. You had to deform the pad to wrap the blanket into position. This configuration cut down on big convective drafts, but a lot of heat exchange still happened at the single layer barrier, as well as a huge amount of condensation. I took it on a trip in the Sierras and while camped at about 10,500 ft, a water bottle left outside was half frozen in the morning. There was a lot of condensation at the head end of my blanket that luckily did not roll down my pad and get me all wet. I was probably breathing inside my bag too much and the hood was a nice cold exposed surface. The down in my blanket was also fairly wet around my head. This did not seem like a good long term solution.
Design Revisited
At this point a couple of years have gone by and I completed a few other projects so I decided it was time to revisit the design of the blanket to fix the head area and add a couple of other design elements I had been thinking about. First, I felt like I needed to reverse the material of the shell so that the Robic 7D was on the inside and a lighter more breathable fabric (Argon 60) was on the outside. With the less breathable fabric on the inside, moisture will be a lot slower in moving into the down. The moisture that does pass will have an easier time of escaping through the more breathable outer shell, and be less prone to condense in the down (hopefully). This is the same sort of setup that is recommended for vapor barrier liners I believe, but in this case the Robic is not completely impermeable. As far as feeling clammy with the less permeable fabric against my body, well, I’m laying directly on the sleeping pad already and that is certainly impermeable to moisture! When I wear a light base layer so that my skin is not directly touching anything, I don’t feel clammy. I chose Argon 60 because I’ve used it in a couple of other projects and really like it. It’s really tough for the weight, downproof, and pretty much the most permeable light-weight fabric that IS downproof (most light-weight downproof fabrics are calendared which makes them much less permeable, as I’m sure most of you know).
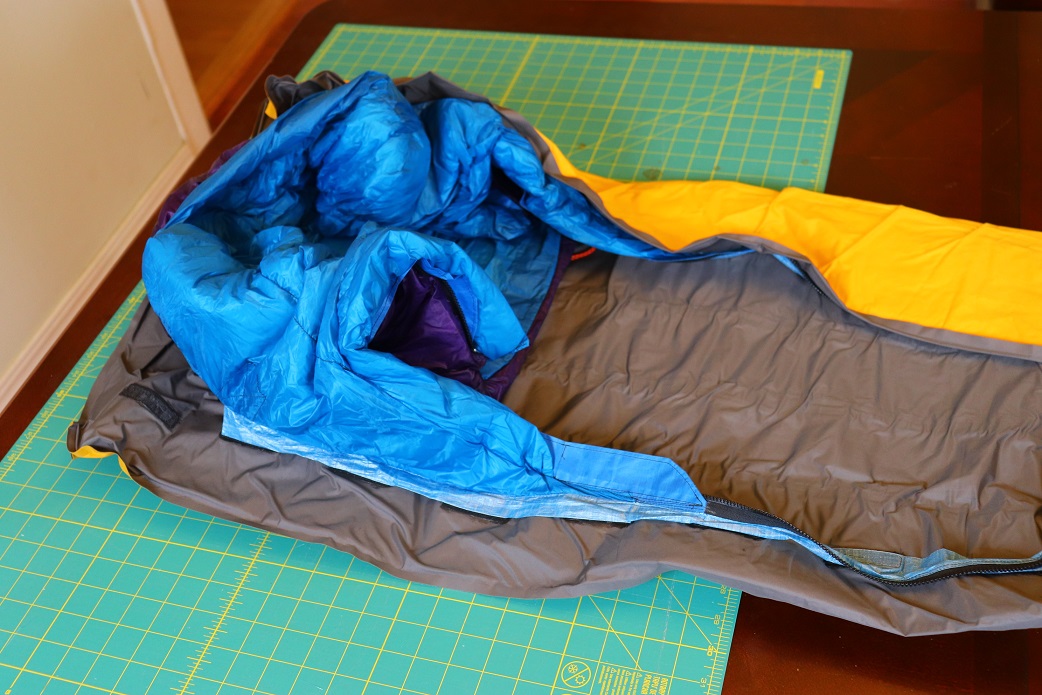
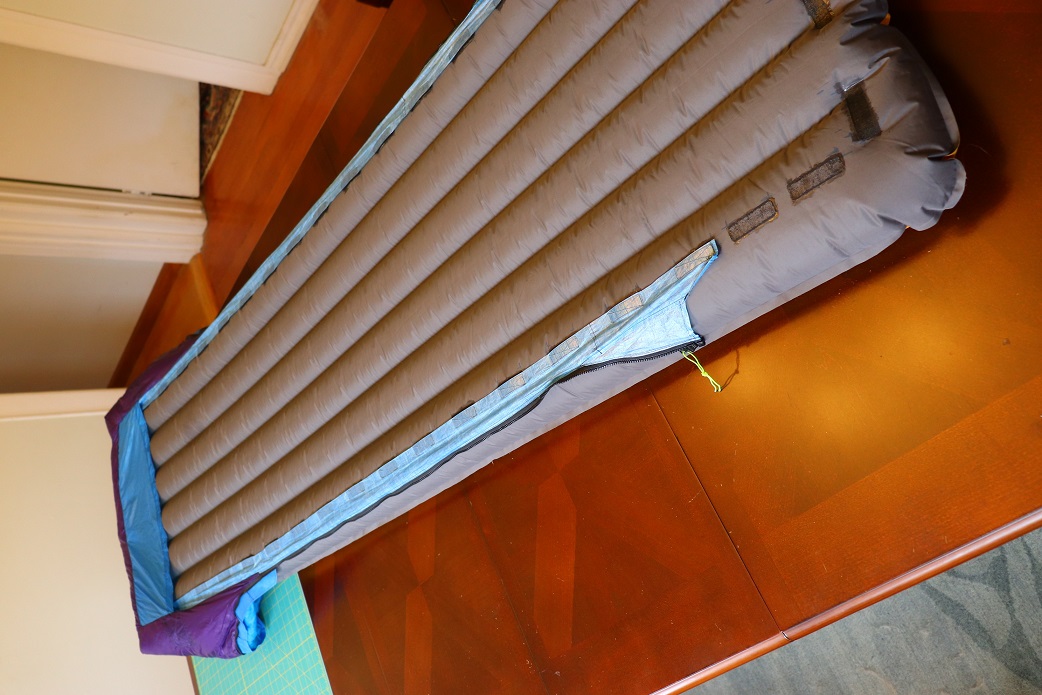
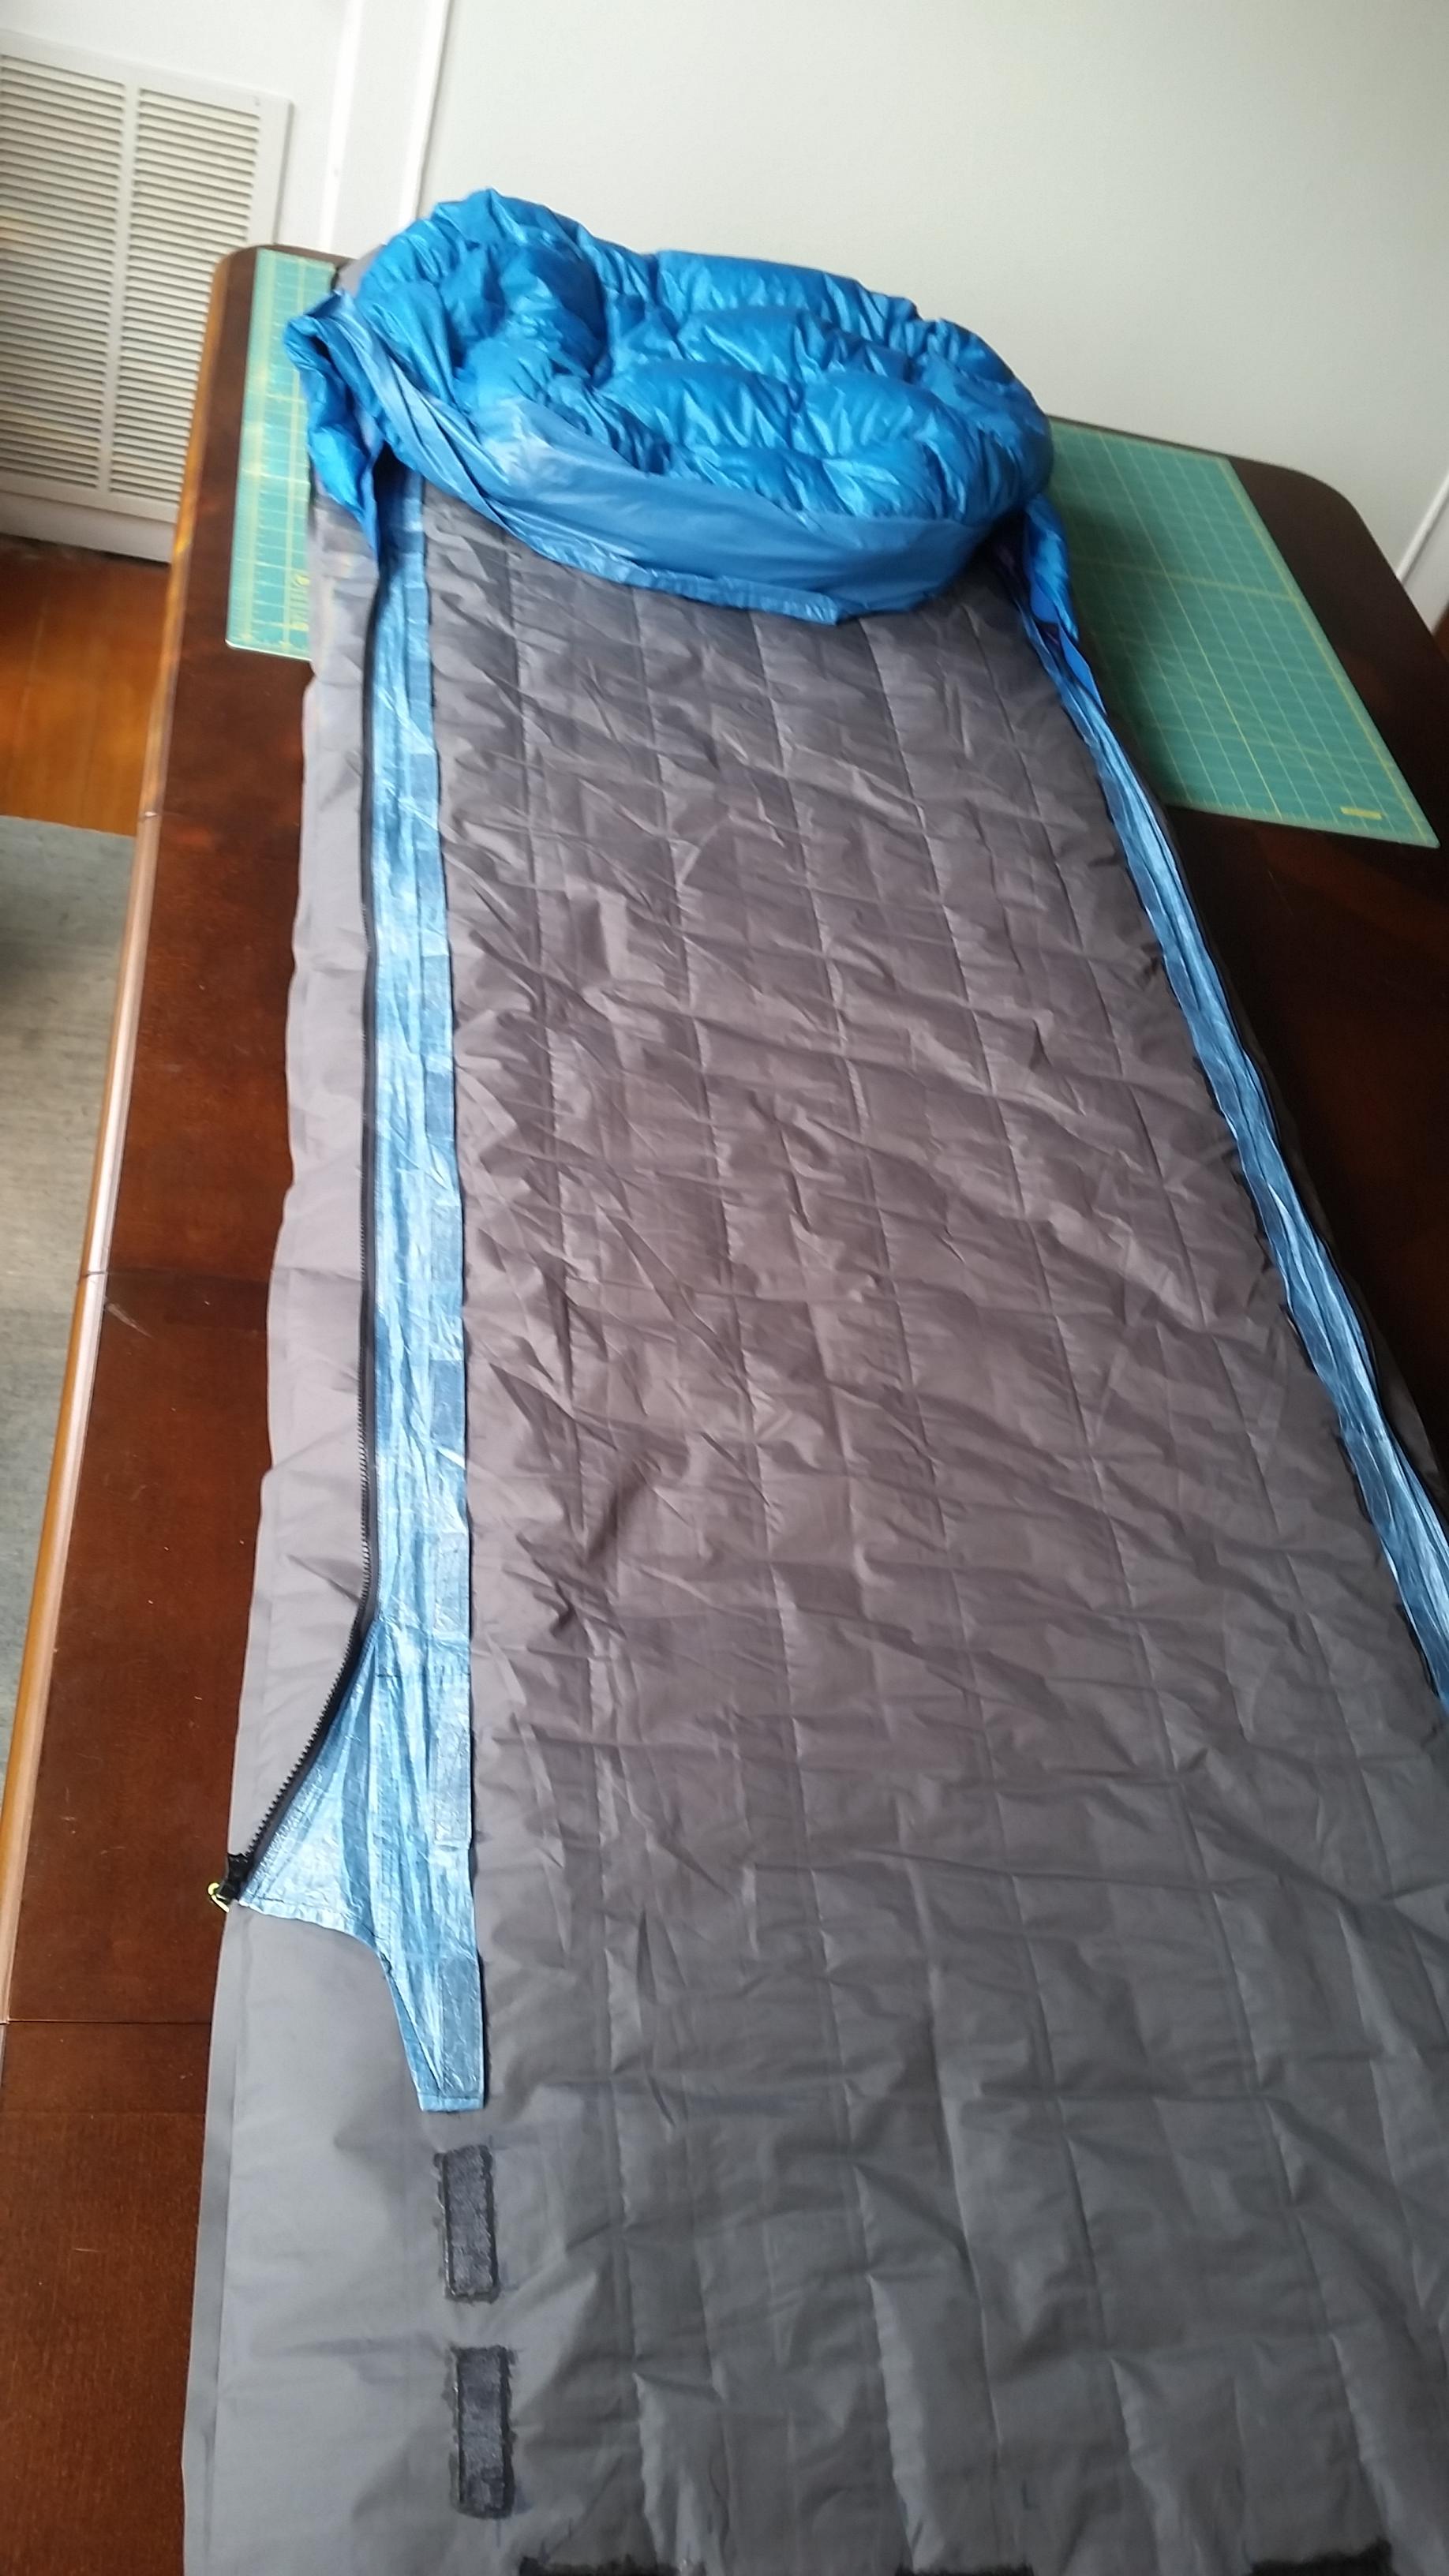
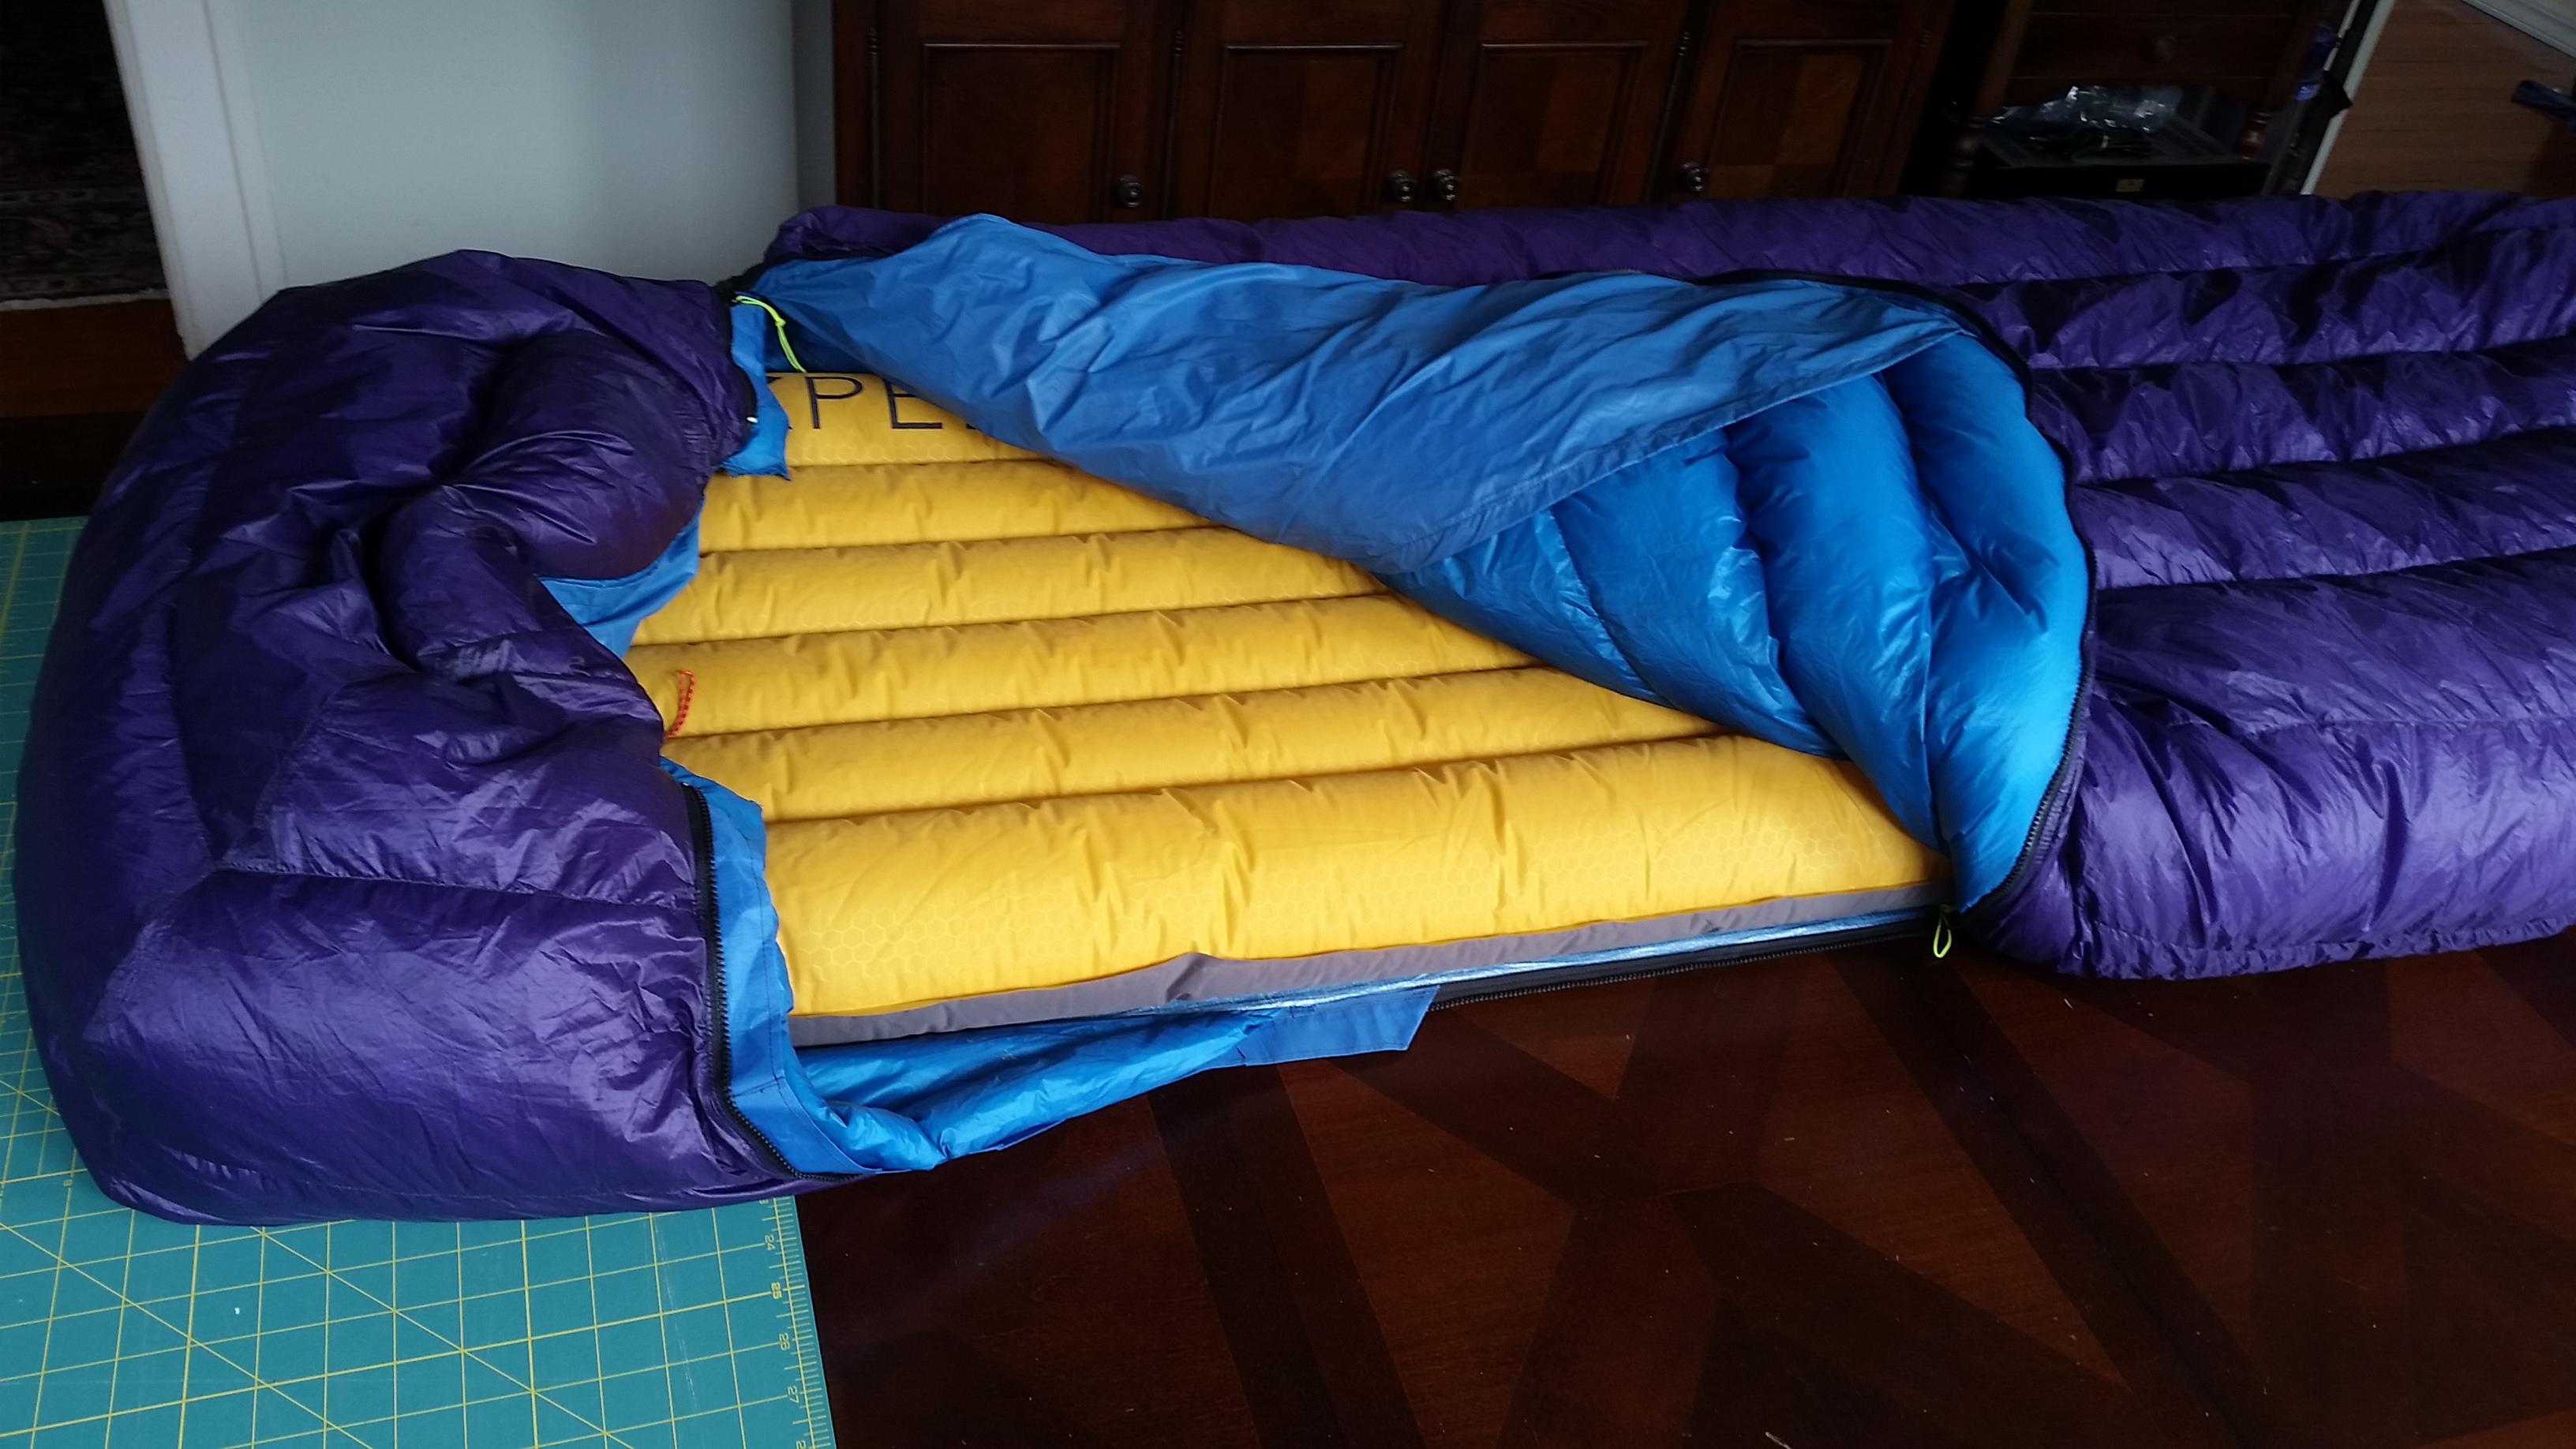
Next, I was done with the velcro closure mechanism. It’s just too fussy and time consuming getting into and out of for the weight savings. I wanted a zipper to quickly attach the blanket to the pad, so that I could use the blanket while sitting around camp in the evening after having blown up the pad earlier. With the pure velcro attachment method, it was a real pain to attach the blanket to the pad when it was dark out and you get into your tent and just want to go to sleep. For one thing, you could not sit or lay on the pad while you attached the blanket because you had to flip everything over. I wanted to be able to sit on the pad while zipping the blanket onto it, preferably without having to see what I’m doing. In the end, I used both velcro and zippers. I salvaged the velcro strips from the v1.0 blanket and sewed zippers to them so the zippers are essentially velcroed to the sleeping pad. You can remove them from the pad if you want, but you don’t need to, and can just roll up the pad and pack it with the zippers and hood piece still attached. The main blanket gets stuffed in its own sack.
The last minor change I made was to add an area of synthetic insulation in the body where the head/face area is. I like the idea of having synthetic insulation in the high-humidity environment around where you breathe. Here’s the model of the revised design:

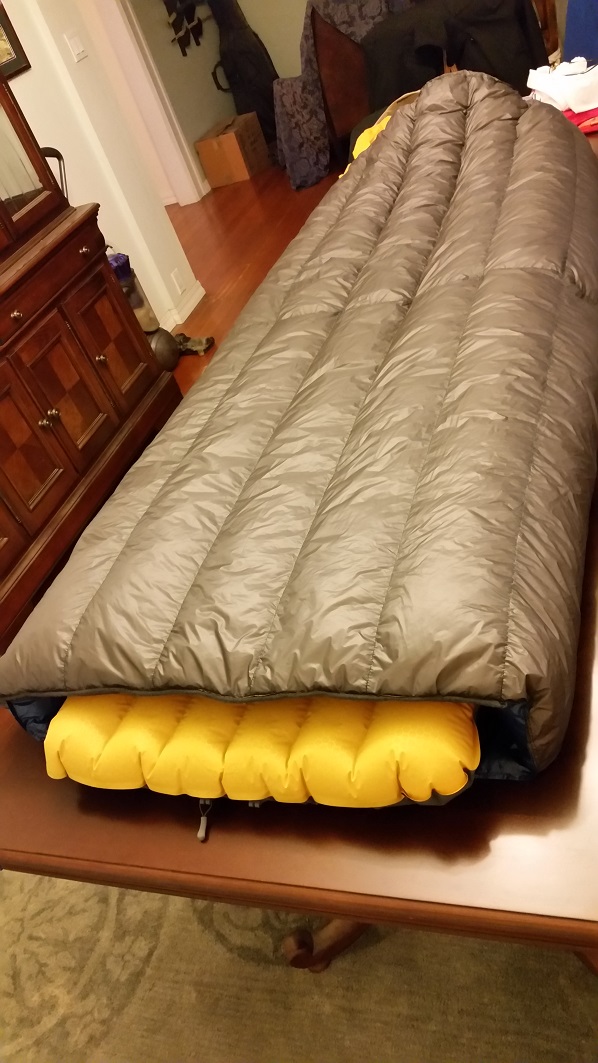
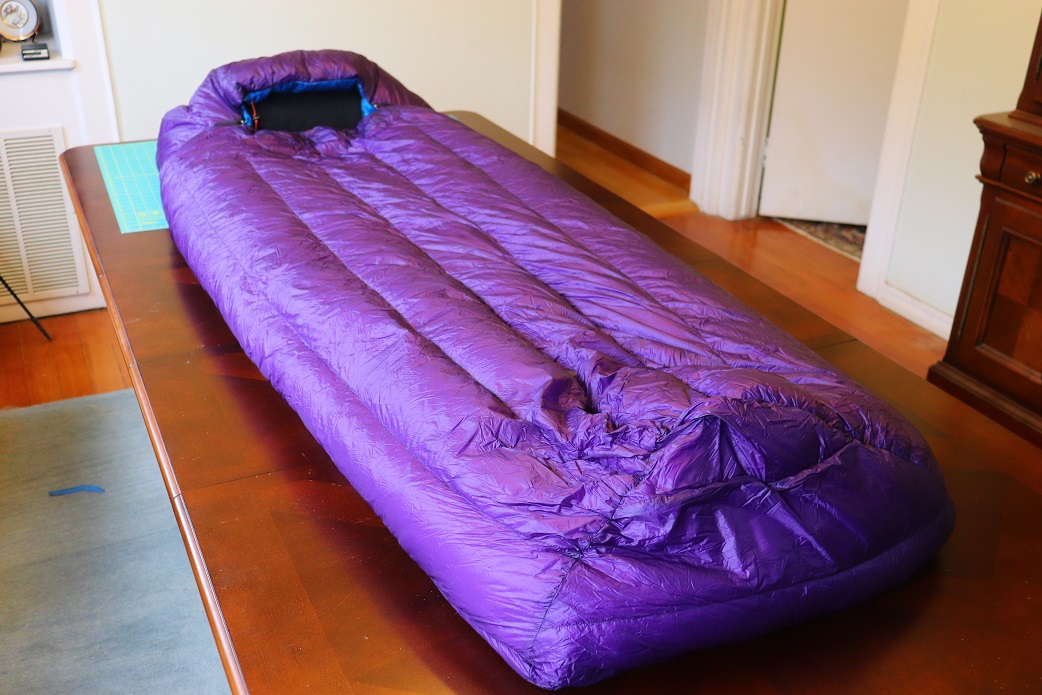
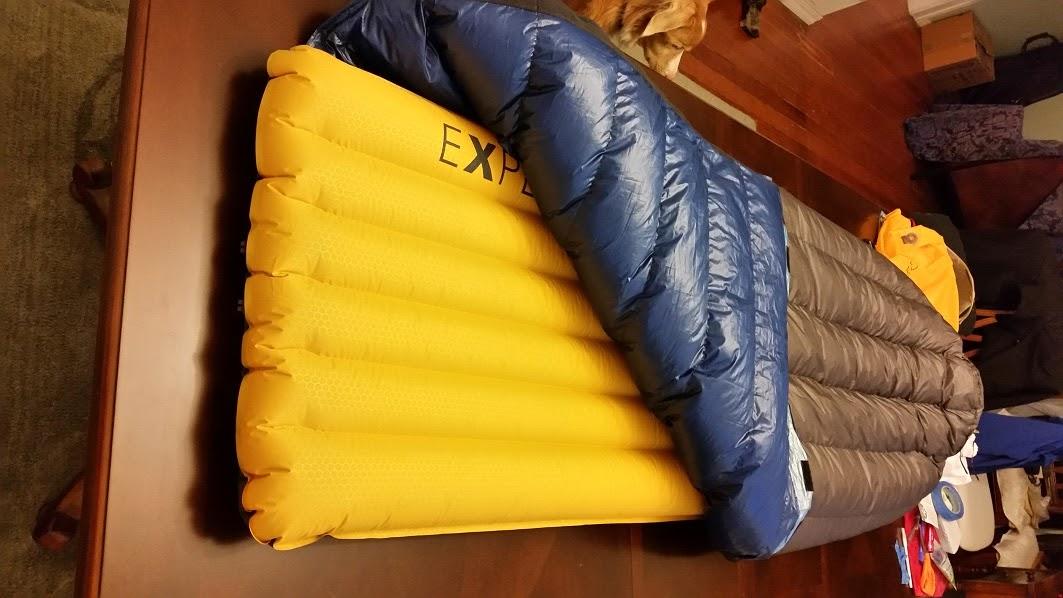
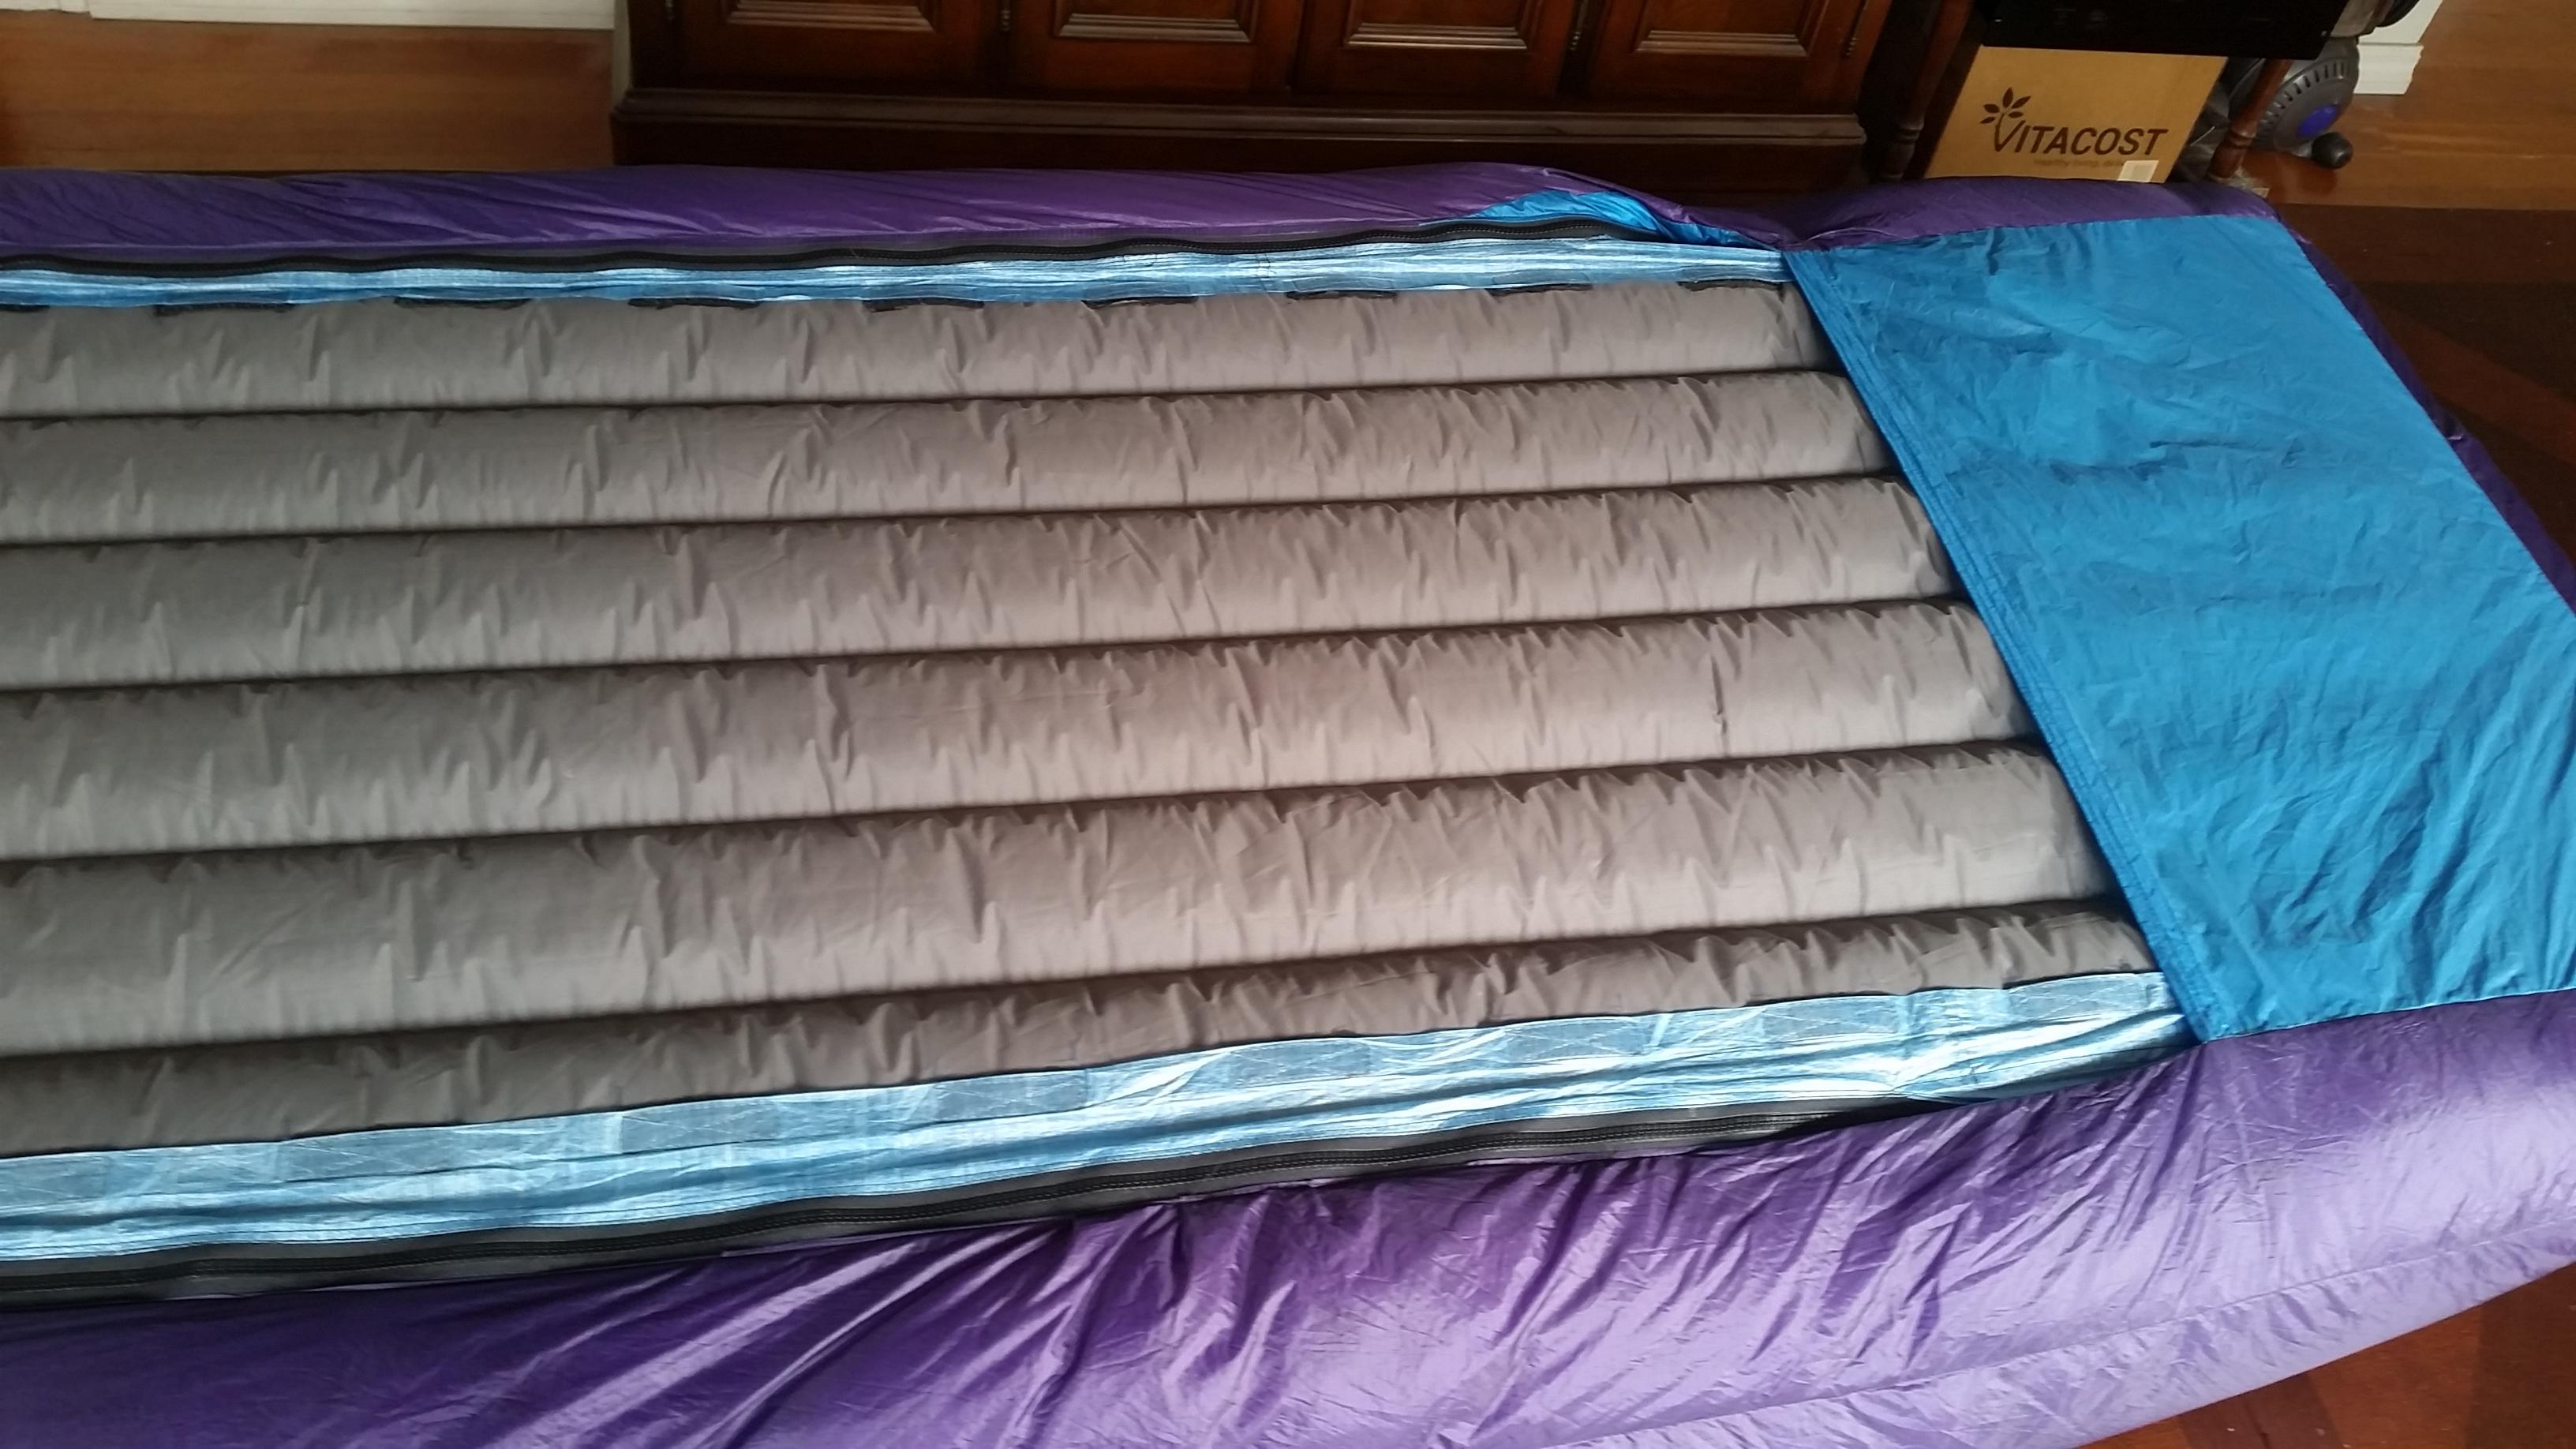
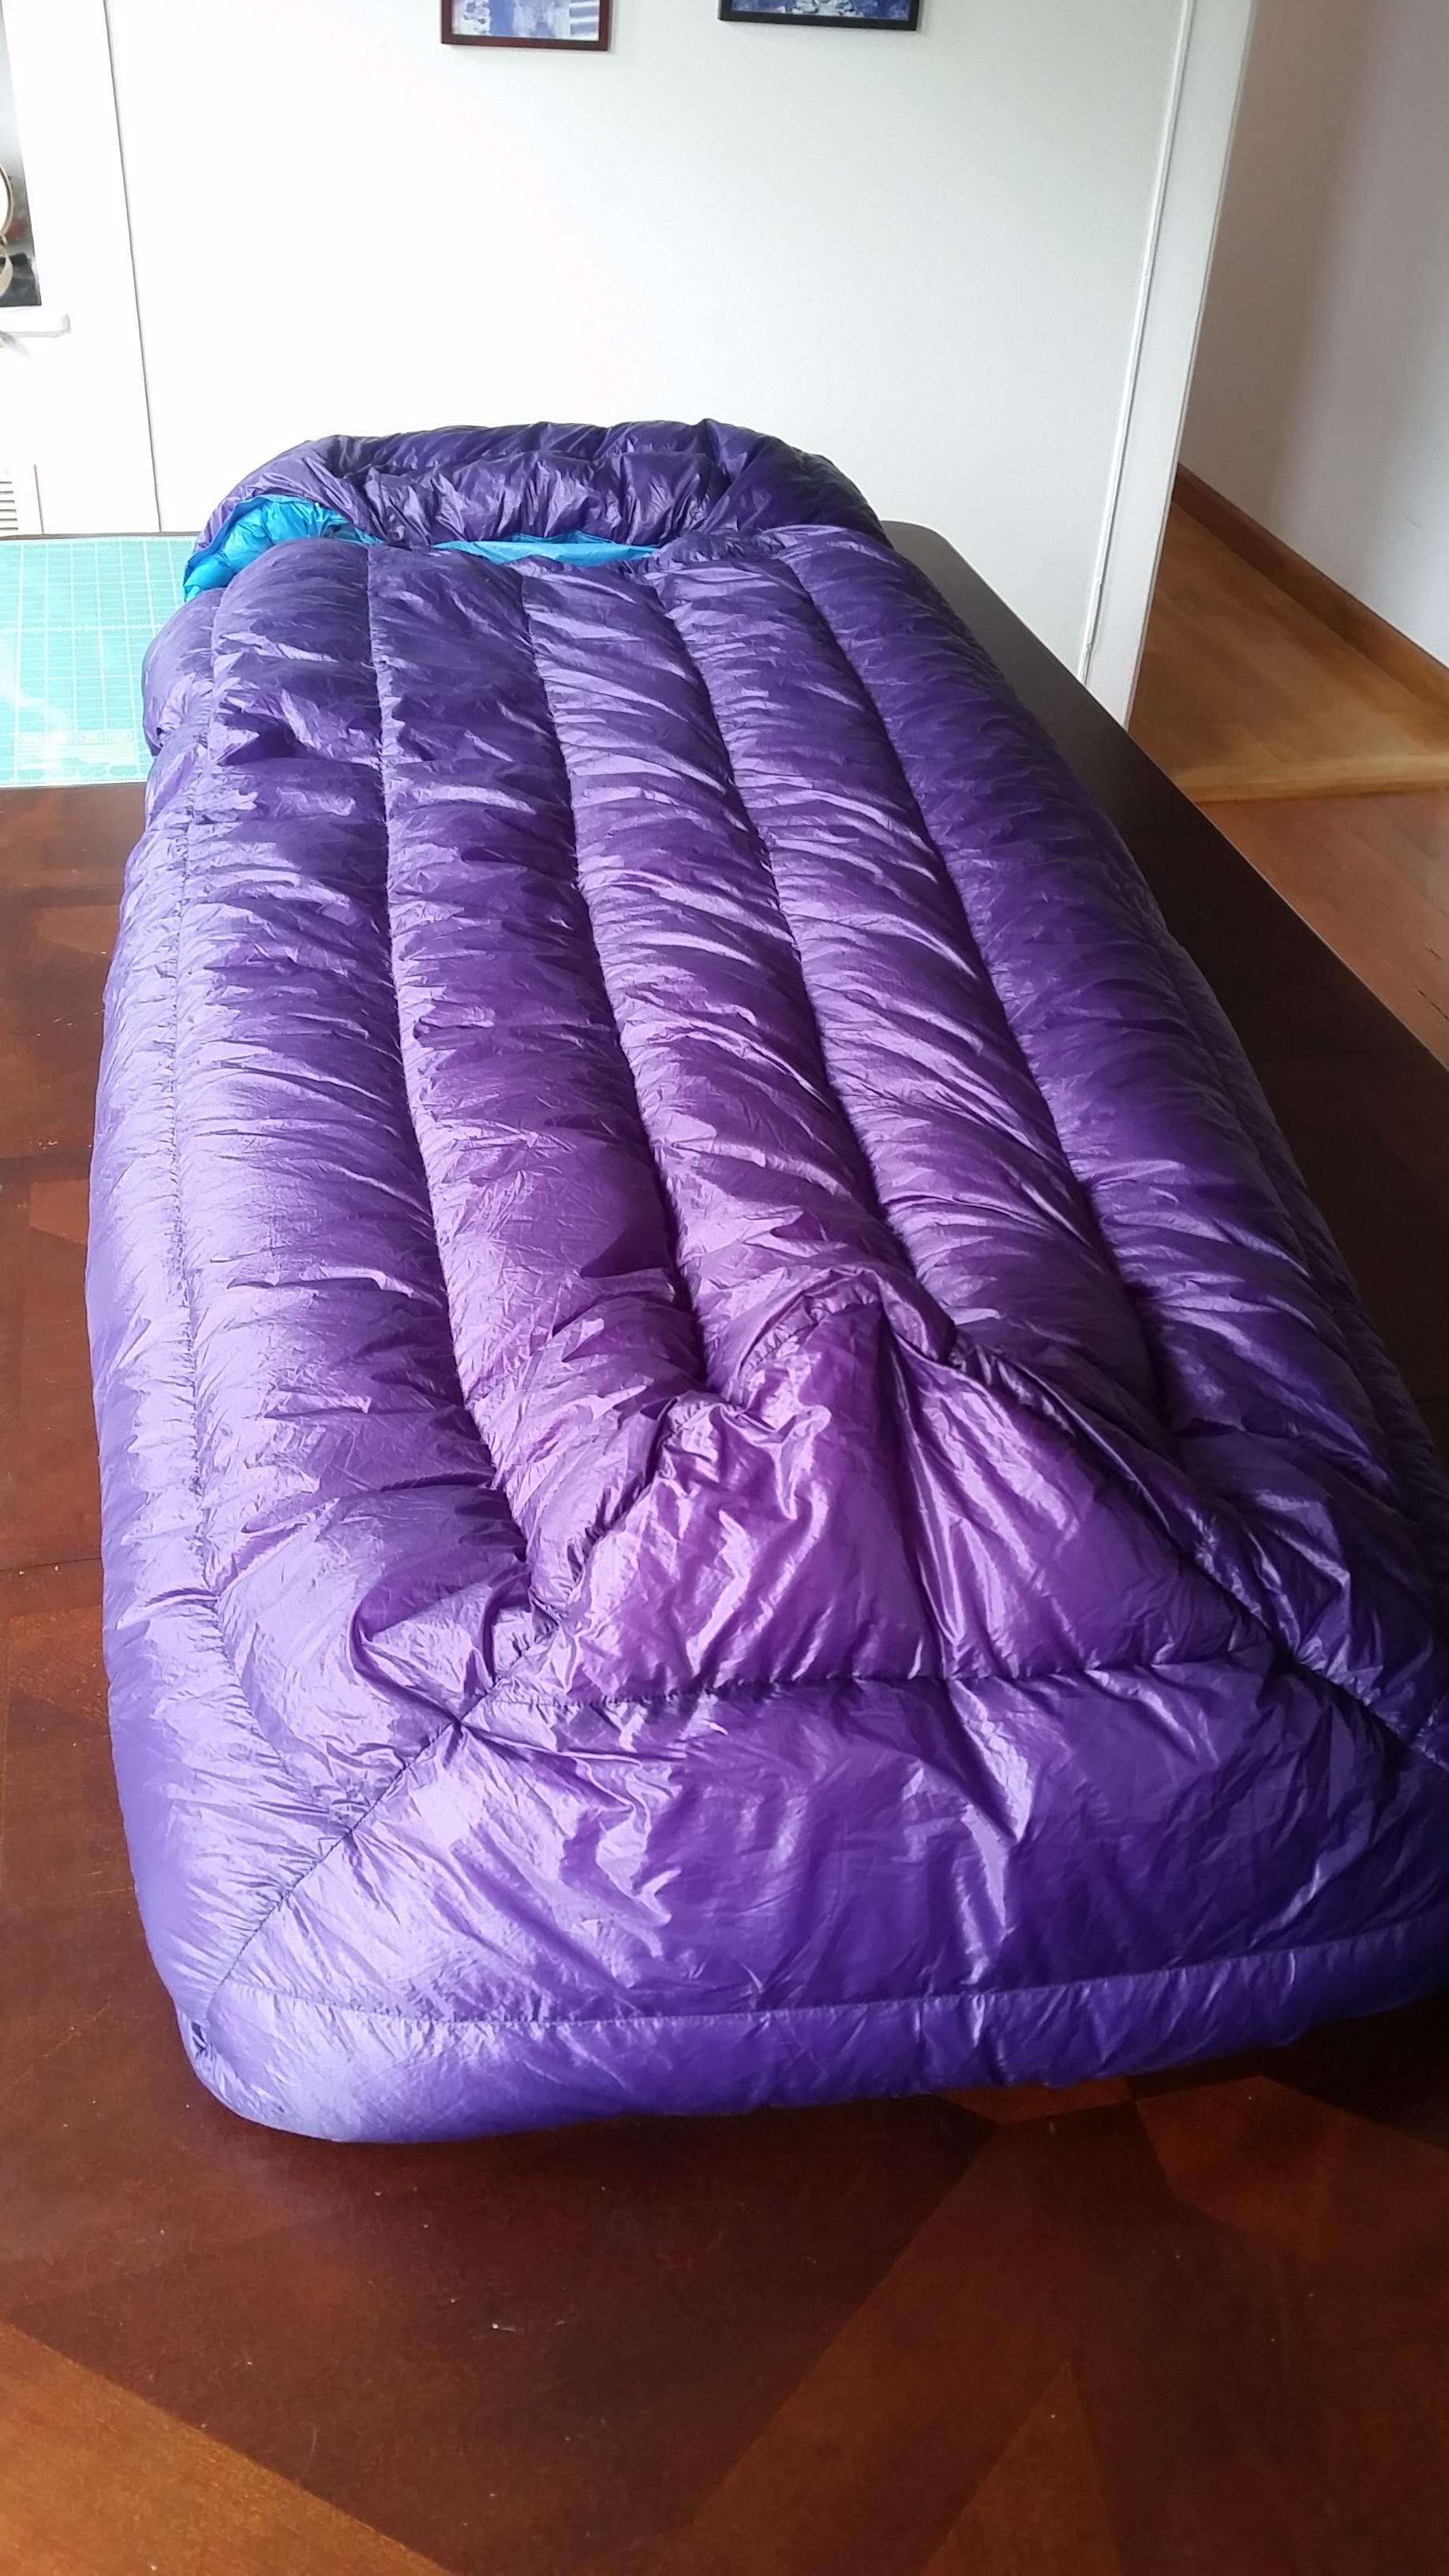
The foot panels don’t look like they match the other parts of the shell, but that’s just how I chose to model it. I made sure all the seams were the same length. There are two parts; the hood and the body. The hood can remain attached to the pad as I noted above, and there’s a zipper that runs down each side that the main body attaches to. Here are some pictures of the completed blanket:


Specifications and Features:
Blanket Body Shell: 158.6g
Blanket Body 950fp Down Fill: 292.4g
Blanket Body Total: 451g / 15.9 Oz
Hood Shell: 95g
Hood 950fp Down Fill: 65g
Hood Total: 160g / 5.64 Oz
Combined Total: 611g / 21.56 Oz
#3 YKK Molded zippers
2” Baffles of 0.5 Oz Mesh
2.5-3” Loft
Draft Tubes
Zipper Guards
Performance
I took this on a 4 night trip in Sierra National Forrest in early Sept. The first and last nights were spent at a little over 9,000 ft amongst sparse trees. The middle two nights were spent at 10,500 ft out in the open. I don’t know what the temp got down to, but I didn’t need to use the hood the first night. I don’t think it got anywhere near freezing. The two nights at the higher elevation were colder and I was expecting it to get to freezing, but I don’t think it quite did. A fairly skinny water bottle I left out in the open showed no signs of ice in the morning. It felt near freezing to me though, and I definitely had to use the hood. Once it was all zipped up with the draw cords pulled, it was very secure. I could not detect any direct convective drafts from the outside, so at least I got the sealing part right. Insulation wise, I think I basically got the coverage right too since I could not locate any specific cold spots. The same remained true when I thrashed about to turn on my side. Air came in and out of the head opening, but I never felt anything coming in from anywhere else. I expected to lose a lot of warm internal air when I turned, but I never felt cold air rushing in very much, and when I stopped, it felt the same as before I had moved. If you really worked it like a bellows though, you could get it to fill with cold air. I was comfortably warm enough with a light base layer and hat, and it probably was in the high to mid 30’s (°F).
It was not all perfect though. The design of the head opening has some serious problems. Once the drawcords are pulled, the opening which you should position over your mouth doesn’t really move around. That means you can’t just turn your head side to side on the pillow because your mouth needs to stay put while your head pivots underneath it. Then if you’re on your side your face is facing to the side, but the opening in the blanket is above you. So to avoid breathing into the blanket area, you need to grab the edge of the opening and drag it down so your mouth or nose is clear. To do this every time you turn over is fairly tedious, and not something I want to endure if I’m spending many nights at this kind of elevation, so I’ll definitely need another refinement there, which will likely add an ounce or two.
Zipping the blanket onto the pad was not quite as easy as I was hoping either. I let the ends of the zippers com out a little bit from underneath the pad so I wouldn’t have to reach underneath to zip the blanket on, but it was still kind of a pain. The small #3 zippers are also probably harder to handle than a #5, but two of them at 60” ea is already a lot more weight than I had hoped to use. The zippers are still easier to work with than just the velcro of the v1.0 blanket however.
Final Assessment
I’d say I’m about 85% satisfied with the second iteration. If I can fix the head opening I think that will come up to about 95%. I’m also pretty happy with my assembly technique; I figured out how to hide the seams in v2.0! And yes, I’m calling it the Captive Quilt.
An MYOG tour de force. Bravo!
This is so good!
Need a job?
Fantastic work! Can’t wait to see your hood improvements. I bet these would sell well…I’d buy one :)
Really good stuff. I actually prefer your first quilt. If you add a drawstring to the top, all you need is a light hat to be comfortable to about freezing. If it gets cooler, I will likely wear my hooded puffy. I also use a wide pad and think I might prefer the velcro to be on the outer-top edge instead of the bottom; all that down on the sides of the pad seems a little wasted. Again, impressive work.
Thanks for the kind words guys!
@roamer: Haha! I PM’d you.
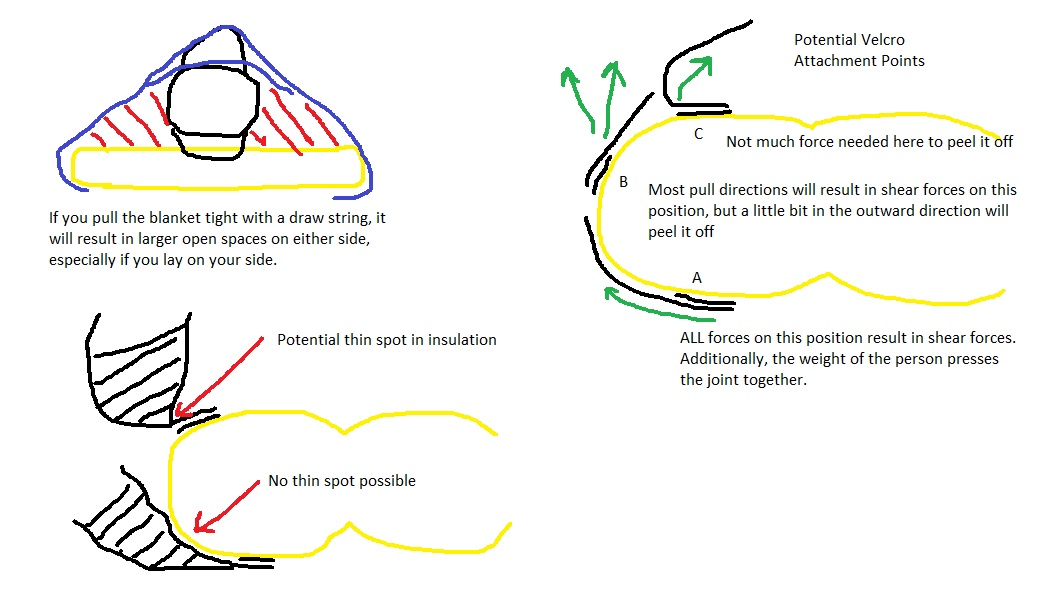
@alexdrewreed: I thought about your points when I was designing it and the picture below will hopefully show why I chose to put the joints where I did. I’d be interested to know how the B attachment point would fair though. I wanted something really secure, so I was too afraid to NOT put it underneath at point A. If you did put it on the side at point B you’d save about 3 inches per side of girth, which would take you from 44 to 38″, a savings of about 13%. A decent amount if you wanted to chance a less secure connection along the sides.
A minor drift –
Be sure the expeds were made after June 2016. Otherwise it’s only a matter of time before a baffle blows.
… end drift.
Great design and development work. Keep going.
It was brought to my attention that the pictures in my original post are no longer there so I’m going to re-post everything with the pictures for completeness. I tried doing it all at once, but I was blocked by the website for some reason, so I’ll try and break it up into several posts….
Pet Peeves
Don’t you hate it when you turn over or shift position at night and have to be careful to re-center everything on your sleeping pad and make sure you did not rotate the zipper to the wrong position? Me too! I tend to turn a lot at night because my back and neck get sore if I spend too long in one position, even in my bed at home. It’s worse in the backcountry sleeping on a thinner pad (thinner than my mattress at home at least), so I end up turning more often. Every time I do, I have to wake up enough to rearrange everything to the correct orientation. This has always been my experience with sleeping bags. I think at some point my body would just learn to do it without waking up, but not during the 4 or 5 nights I typically go packing for. I had been thinking of trying a quilt, but I imagined I would also be letting in lots of cold air each time I turned over, even with the 2 little straps attached to the pad, as well as needing to rearrange everything. So a couple of years ago I decided to try to make a design that is kind of a cross between top-bag and quilt that stays put while you shift around.
Design Considerations
I wanted to make something with a comfort rating of about 30°F. Looking at all the offerings and specifications out there, I settled on 2” baffles. I like the idea of a top-bag for it’s draft resistance, but it seems like you could be a bit more efficient with the material that goes underneath the pad. The only benefit to that material is to hold the edges of the quilt/blanket in place near the pad. So why not attach the quilt directly to the sleeping pad, then you could use a bit less material underneath? You can repair a pad with glue and patches, so why not glue a few attachment points to it? This is almost what you do with a quilt and the two straps that go around the pad, but since I’m making this myself, I don’t need to worry about adapting to any pad out there, just mine. So what’s the most efficient way of attaching a blanket to a sleeping pad, while at the same time sealing out drafts? The two things that come to mind are velcro or some sort of eyelets or loops that you could run some thin cord through and “lace” them together. It would be nice to have a zipper in there somewhere to easily get in and out if it too. A lace-up strategy seems like it would take too long to assemble each night, plus it would really lock you in. It might be worth trying if also done with a zipper though. Velcro seems like an easier more straightforward approach. It could be quick to assemble the blanket to the pad and remove it afterwards. If you get a little too rambunctious in your bed the velcro should pull away before a seam rips. It could be used in place of a zipper to seal up the side saving weight and complexity, although it won’t be quite as easy to operate as a zipper. If it’s too warm out, you can leave some of the perimeter un-velcroed like a normal blanket, whereas that might be difficult with a lace-up scheme. Ultimately I decided to try velcro that attached to the bottom of the pad near the outer edge all the way around.
The last big design element is the shape of the blanket. I mocked up a sheet by pinning it together with safety pins to test what kind of shape I would need to move around and be comfortable in my “pouch”. I settled on having parallel sides with the lower third slightly tapered. If you are to comfortably lay on your back with feet sticking up, a bottom foot panel will be needed as well. I decided to use 2” baffles that run in the vertical direction.
Material Selection
I decided to go with 0.74 Oz. Robic 7D for the outer shell, 0.9 Oz. Membrane 15 for the inner shell, and 0.5 Oz noseeum mesh for the baffles. I thought that Robic 7D with it’s low air permeability would be a good choice to cut down convective heat losses at the surface of the blanket, and that Membrane 15 would be a bit more robust than Membrane 10.
Figuring Specifications
To find the width and length, I used a bed sheet as I mentioned before, pinned together to form a pouch. Then I put my sleeping pad in it and crawled inside as well. I adjusted the position of the line of pins until I felt like I had just enough room to move around on top of my pad the way I wanted. Laid flat with the pins in it, the distance from the fold in the sheet to the line of pins times two is the total girth needed to go around the pad. But since the finished blanket would anchor to the edges of the pad, I subtracted the distance between the anchor points. Since I don’t necessarily need the down to extend all the way underneath the pad to the anchor points, I could attach a strip of cloth along the edges of the blanket that would have velcro on it. DCF seemed like a good material to do this with, so that’s what I used. Here’s a cross sectional picture of the various parts:
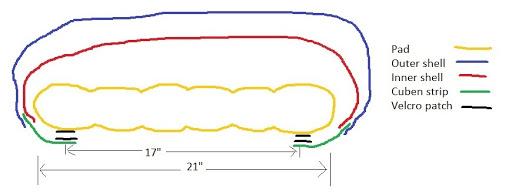
For me, a total girth of 65” was sufficient. A 2” wide cuben fiber strip should be enough, so the inner shell should be 65-17-2-2=44” wide at the seam between the inner shell and the cuben strip. For the outer shell, I wanted a differential cut (the outer shell fabric is wider than the inner shell fabric). I chose to add 4 inches to the outer shell width. This may seem like a lot, but if you have two concentric cylinders (the inner and outer shells in this case, wrapped around you) separated by 2 inches (the baffle height), the difference in their circumference is 2*pi*r=2*pi*2”= 12.6”! Even if you only imagine the shells wrapping ¾ of the way around a circle, roughly like in the diagram above, you would still have the outer shell being 9.4” wider than the inner shell. So from this standpoint, a 4 inch differential seems downright conservative to me. Additionally, I separated the 4 inch differential into two sections. The central part of the blanket will have a 2” differential while each of the small edge sections that mate to the cuben strips will have a 1” differential. With everything perfectly spaced and a uniform 2” thickness, the cross section will look something like this:

Or if you assume the blanket will puff out a little bit in between baffles, it would look more like this:

You can see in this model that a 4” differential between the inner and outer shells is pretty minor since those sharp edges still need to wrap around underneath the pad. This model also shows the lower third of the blanket taper in a couple of inches on the foot end. For the length, 70” felt about right to me. I never liked the hoods in mummy bags, preferring hats instead, so I decided not to include a head covering. Although also partly because that would have complicated the construction considerably for my first project, and I was not feeling up to that level of complexity yet.
My rough numbers for the size of inner and outer shells were: 70” long x 44” wide for the inner, and 70 x 48” for the outer, minus a bit of taper toward the foot on both (without seam allowances). The foot panel was made up of two rectangular pieces with radiused corners.
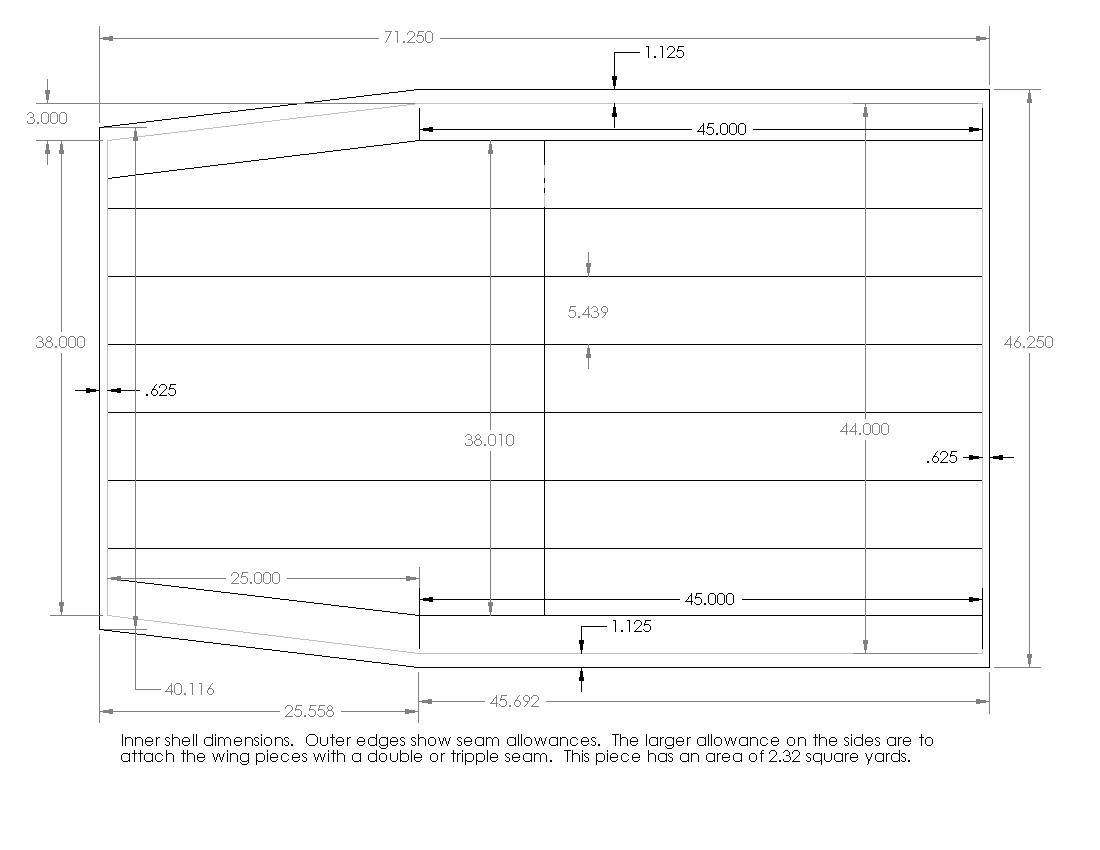
Here are the final layouts of inner and outer shells:

Putting the pieces together
First I made single fold hems on all my shell pieces. Then I sewed all the baffles to one side of the shell, then sewed them onto the second side of the shell and left all the edges open. Then the foot box went on and I closed up most of the edges leaving spots where I could put the down into each chamber. I filled each baffle with the volume calculated from the ‘puffed up’ model above plus 20%, based on 950 fill power down. Here are the details of my crude edges and joining techniques.
Weights
Shell: 178.2g / 6.29Oz
Fill (900fp down): 273.4g / 9.64Oz
Total: 451.6g / 15.93Oz


great idea, nice work, that solves the problem of drafts under edge of quilt
a slight variation is rather than velcro quilt to bottom of pad, just have fabric go underneath from side to side
Testing
I tried sleeping in it in my backyard with temps getting down to 34°F (measured). I had sewn a couple of long thin strips of fabric onto the edge of the blanket on either side of where my head would be so I could grab them and hold the blanket down around my neck while sleeping. Unfortunately this was not sufficient, and significant drafts came in around my shoulders. I tried sleeping in my insulated jacket with a hat on, but I could still feel the drafts coming in.
Next I tried making a sort of hood, or top piece out of DCF that would reach up to the top of the pad and enclose it, like at the foot of the blanket. I made a pretty big opening where my head could stick out and put draw cords into it. Now essentially the whole pad was enclosed except for the opening for my face/head, but the hood was only a single layer of moisture barrier. Ergonomically, this configuration was pretty bad to get into or out of. There were no zippers, so it was difficult stretching the whole thing over the pad, because there was no stretch in it. You had to deform the pad to wrap the blanket into position. This configuration cut down on big convective drafts, but a lot of heat exchange still happened at the single layer barrier, as well as a huge amount of condensation. I took it on a trip in the Sierras and while camped at about 10,500 ft, a water bottle left outside was half frozen in the morning. There was a lot of condensation at the head end of my blanket that luckily did not roll down my pad and get me all wet. I was probably breathing inside my bag too much and the hood was a nice cold exposed surface. The down in my blanket was also fairly wet around my head. This did not seem like a good long term solution.
Design Revisited
At this point a couple of years have gone by and I completed a few other projects so I decided it was time to revisit the design of the blanket to fix the head area and add a couple of other design elements I had been thinking about. First, I felt like I needed to reverse the material of the shell so that the Robic 7D was on the inside and a lighter more breathable fabric (Argon 60) was on the outside. With the less breathable fabric on the inside, moisture will be a lot slower in moving into the down. The moisture that does pass will have an easier time of escaping through the more breathable outer shell, and be less prone to condense in the down (hopefully). This is the same sort of setup that is recommended for vapor barrier liners I believe, but in this case the Robic is not completely impermeable. As far as feeling clammy with the less permeable fabric against my body, well, I’m laying directly on the sleeping pad already and that is certainly impermeable to moisture! When I wear a light base layer so that my skin is not directly touching anything, I don’t feel clammy. I chose Argon 60 because I’ve used it in a couple of other projects and really like it. It’s really tough for the weight, downproof, and pretty much the most permeable light-weight fabric that IS downproof (most light-weight downproof fabrics are calendared which makes them much less permeable, as I’m sure most of you know).
Next, I was done with the velcro closure mechanism. It’s just too fussy and time consuming getting into and out of for the weight savings. I wanted a zipper to quickly attach the blanket to the pad, so that I could use the blanket while sitting around camp in the evening after having blown up the pad earlier. With the pure velcro attachment method, it was a real pain to attach the blanket to the pad when it was dark out and you get into your tent and just want to go to sleep. For one thing, you could not sit or lay on the pad while you attached the blanket because you had to flip everything over. I wanted to be able to sit on the pad while zipping the blanket onto it, preferably without having to see what I’m doing. In the end, I used both velcro and zippers. I salvaged the velcro strips from the v1.0 blanket and sewed zippers to them so the zippers are essentially velcroed to the sleeping pad. You can remove them from the pad if you want, but you don’t need to, and can just roll up the pad and pack it with the zippers and hood piece still attached. The main blanket gets stuffed in its own sack.
The last minor change I made was to add an area of synthetic insulation in the body where the head/face area is. I like the idea of having synthetic insulation in the high-humidity environment around where you breathe. Here’s the model of the revised design:
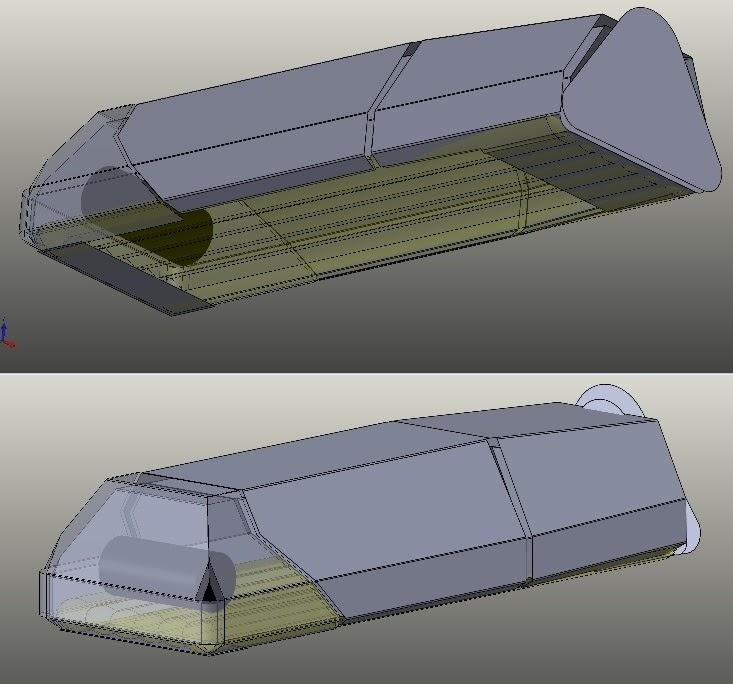
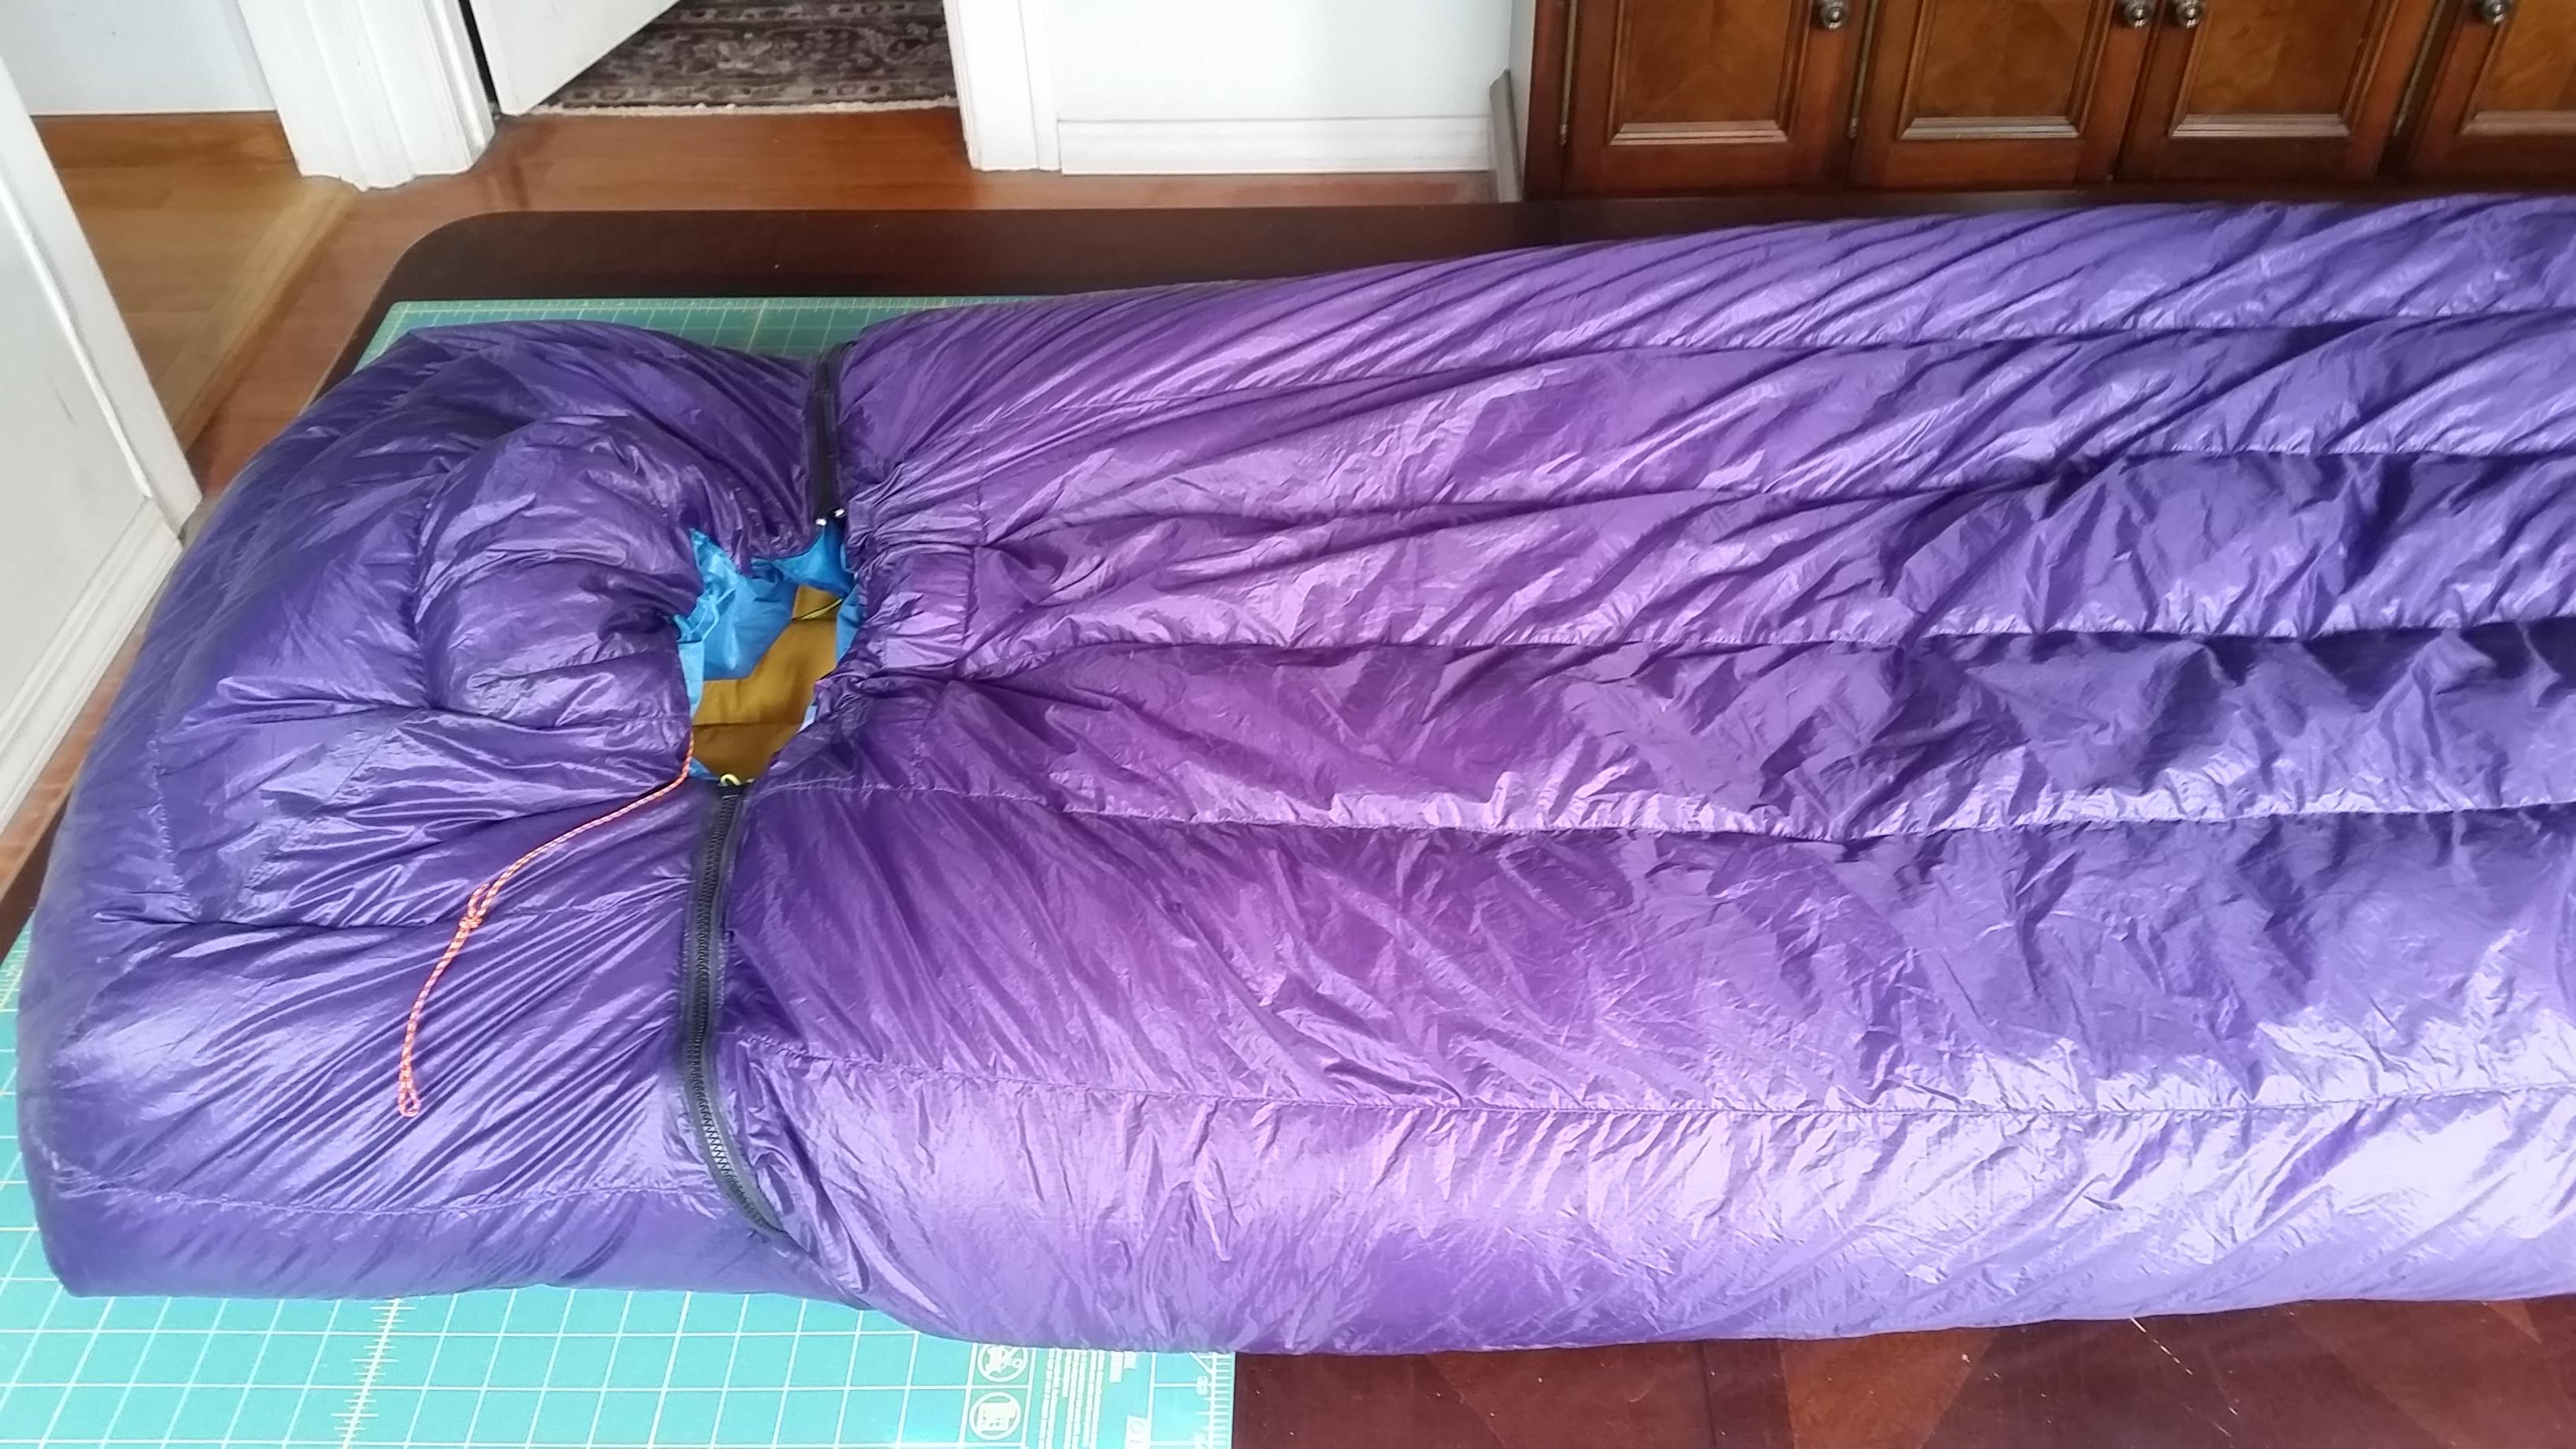
The foot panels don’t look like they match the other parts of the shell, but that’s just how I chose to model it. I made sure all the seams were the same length. There are two parts; the hood and the body. The hood can remain attached to the pad as I noted above, and there’s a zipper that runs down each side that the main body attaches to. Here are some pictures of the completed blanket:

Specifications and Features:
Blanket Body Shell: 158.6g
Blanket Body 900fp Down Fill: 292.4g
Blanket Body Total: 451g
Hood Shell: 95g
Hood 900fp Down Fill: 65g
Hood Total: 160g
Combined Total: 611g
#3 YKK Molded zippers
2” Baffles of 0.5 Oz Mesh
2.5-3” Loft
Draft Tubes
Zipper Guards
Performance
I took this on a 4 night trip in Sierra National Forest in early Sept. The first and last nights were spent at a little over 9,000 ft amongst sparse trees. The middle two nights were spent at 10,500 ft out in the open. I don’t know what the temp got down to, but I didn’t need to use the hood the first night. I don’t think it got anywhere near freezing. The two nights at the higher elevation were colder and I was expecting it to get to freezing, but I don’t think it quite did. A fairly skinny water bottle I left out in the open showed no signs of ice in the morning. It felt near freezing to me though, and I definitely had to use the hood. Once it was all zipped up with the draw cords pulled, it was very secure. I could not detect any direct convective drafts from the outside, so at least I got the sealing part right. Insulation wise, I think I basically got the coverage right too since I could not locate any specific cold spots. The same remained true when I thrashed about to turn on my side. Air came in and out of the head opening, but I never felt anything coming in from anywhere else. I expected to lose a lot of warm internal air when I turned, but I never felt cold air rushing in very much, and when I stopped, it felt the same as before I had moved. If you really worked it like a bellows though, you could get it to fill with cold air. I was comfortably warm enough with a light base layer and hat, and it probably was in the high to mid 30’s (°F).
It was not all perfect though. The design of the head opening has some serious problems. Once the drawcords are pulled, the opening which you should position over your mouth doesn’t really move around. That means you can’t just turn your head side to side on the pillow because your mouth needs to stay put while your head pivots underneath it. Then if you’re on your side your face is facing to the side, but the opening in the blanket is above you. So to avoid breathing into the blanket area, you need to grab the edge of the opening and drag it down so your mouth or nose is clear. To do this every time you turn over is fairly tedious, and not something I want to endure if I’m spending many nights at this kind of elevation, so I’ll definitely need another refinement there, which will likely add an ounce or two.
Zipping the blanket onto the pad was not quite as easy as I was hoping either. I let the ends of the zippers com out a little bit from underneath the pad so I wouldn’t have to reach underneath to zip the blanket on, but it was still kind of a pain. The small #3 zippers are also probably harder to handle than a #5, but two of them at 60” ea is already a lot more weight than I had hoped to use. The zippers are still easier to work with than just the velcro of the v1.0 blanket however.
Final Assessment
I’d say I’m about 85% satisfied with the second iteration. If I can fix the head opening I think that will come up to about 95%. I’m also pretty happy with my assembly technique; I figured out how to hide the seams in v2.0!
Craig—I love your thinking outside the box, er, bag! The weight looks to be in the ballpark of commercial quilts and yours looks like it’s less drafty and easier to get in and out of.
It just goes to show, it’s not a matter of “sleeping bag” or “quilt”—there are other ways of tackling the problem.
Become a member to post in the forums.
 Loading...