Jon, Agust arrived and I’m very impatient to know something more about the “magic” occurring in the central hole row… Please give us some more details! ;-)
Topic
Another Wax Stove
Become a member to post in the forums.
- This topic has 83 replies, 21 voices, and was last updated 8 years, 9 months ago by
 .
.
August has arrive, unfortunately I am heading off to England and Scotland for a month. You’ll have to wait until October.
Hey Jon,
I just saw this thread. Awesome looking wax stove! Any chance you could report some efficiency calculations as you develop your prototypes? The spreadsheet I developed doesn’t have wax built in, but just enter 41.5 kJ/g for the lower heating value and 0.9 g/ml in density in user defined fuel table in the fuel tab: https://backpackinglight.com/forums/topic/90329/
Someone mentioned 1/4 oz of wax to boil 2 cups which is about 53% efficiency. That is pretty darn good for something as fickle and energy dense as wax. I am amazed at how little soot you are getting with wax. Looks to be cleaner than many alcohol stoves out there.
I think that wax as a fuel will be very niche. One of the basic issues is that there is a fairly long pre-heat time. The wax in the wick needs to transition from a soild state to a liquid state and right now that takes time (this will hurt the over efficiency). I suspect with an optimal wick that can reduce the the time a bit. While the stove is pre-heating, it smells like a huge candle burning: not great but better than Esbit.
Right now, it seems like a wax stove is better suited for large pots. Wax seems to have a large flame pattern for the amount of energy delivered. The flame for a 7 minute boil was larger than an alcohol flame for a similar 7 minute boil.
There are chances that wax will do well when heating large volumes as in snow melting as the overhead of the pre-heat time is minimized. That and wax could be a good option for international travel where fuel options may be limited. Additionally, it could be a viable stove when people are concerned about fuel safety (storage). Anyway, more work when I get back in October.
Any chemists here that might have insight into possible combinations with other materials/chemicals that can act as a catalyst to speed up ignition or increase efficiency of burning?
I was able to do a few more test before my trip, the results are pretty encouraging. I was able to reduce the pre-heat time to develop a full flame down to about 75 seconds by lighting the wick at multiple places (duh!). The body of the stove requires another 75 seconds to develop a full flame front (encircling the inlet and outlet ports). It required an additional 12 1/2 minutes to bring 4 cups of water to boil. The total time to boil from first lighting the stove was 15 minutes (4 cups).
I used Ben’s values to determine energy efficiency
41.5 kJ/g for the lower heating value and 0.9 g/ml
The calculations for fuel efficiency came out to +70%. This also matches my own energy efficiency calculations. It seems like losses due to the pre-heat are not that significant. From my calculations, the stove is putting out about 400 watts which is in the same range as most alcohol stoves.
You can see more in the video below. In general, I think that the stove is running a little rich. The flames start out blue and will develop more yellow tips. The inlet and outlet ports will probably need to be tuned. I also experimented with a snuffer and that seems to work extremely well. Little smoke escaped after the flames were put out. Note that after a few minutes, it is best to remove the snuffer or the wax can harden making it stick to the stove. A windscreen was not used and this contributed to the soot generated on the pot. Interestingly enough, I was able to wipe all of the soot away with a paper towel leaving a shiny bottom on the stainless pot. While soot formed, the burn efficiency may be reducing the overall byproducts. Certainly a windscreen should help the situation.
More after I return in late September.
wow, that is really quite amazing performance for a stove (so much so, I am wondering if I gave you the wrong number for LHV). 20 grams of fuel to burn 4 cups of water is pretty amazing. Very cool stove you have developed. I love the blue flames.
Pretty cool Jon, thank you for sharing your work.
Clever design once again, finding a way to simplify the steps and loose gear pieces in order to get to blue flame and then smothered will be what can make a wax stove more widely sellable, like the popular plug and click canister stoves which require very little understanding about the fuel.
Possibly putting a reservoir below with a wick feeding the unit (a lot like that first commercial unit, which did require aluminum heat diffusers on the reservoir to prevent the wax from gassing off everywhere), and some sort of two piece, rotating cap ontop of the wick, with slits cut into them for operating when aligned and smother when rotated closed, a lot like your rotating external sleeve but directly controlling the wick. Maybe two 1/4 measuring cups, the small titanium toaks bowls that sit inside eachother, or tiny funnels. Also might be worth texting different metals like copper or brass inside the chamber for quicker warmup and titanium exterior.
I have a slough of ideas on how to create wax stoves, but most fall into impracticalities due to my fabrication limitation, huge weight gains or process complication, but I appreciate you keeping the design available, open source, because the more designs tested and presented, the more we all can cherry pick the highlights from each stove until there is a stove to good to dismiss. I personally never intend to make money when I started into this, it is more of a dynamic mental puzzle I enjoy understanding, but I hope someone masters it enough to where it is a profitable product that I can purchase with a discount.
A question about the wick, Hirum and his review of a wax stove said that original owner unknowingly let the wax run out, so Hirum had to slowly melt wax to treat it again, which is why I stuck to disposible cotton wicks infused with wax. Is that an issue for your carbon felt stove if it were to run out? can it be fixed in the field by adding a single use cotton wick and excess wax?
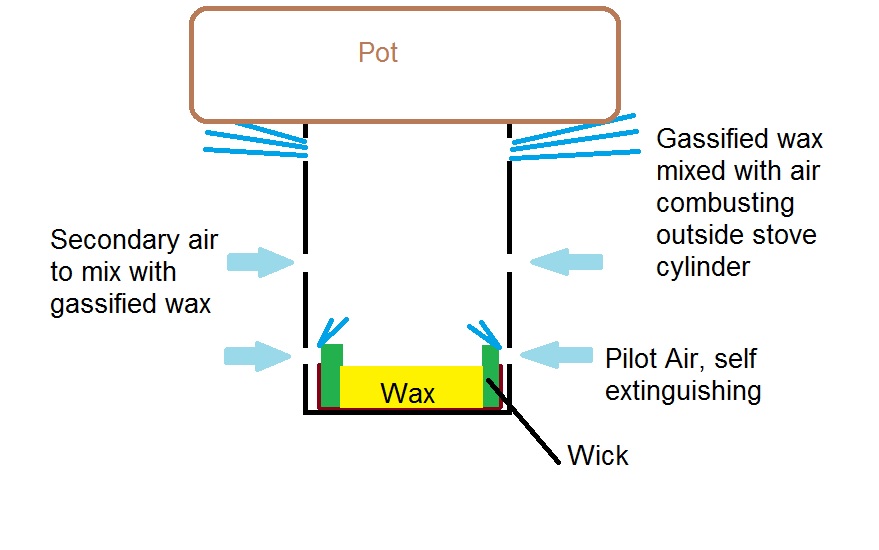
OK, so as promised, this is a sketch of how I think the stove works. The wax has to be lit and burning and then the sleeve is placed over the burner. The bottom row of inlet ports line up with the tip of the wick. The in rushing air quickly mixes with the wax vapors and burns blue. The flames are immediately starved and there is a lot of unburned wax vapors. The secondary inlets are positioned above the pilot inlet such that the flame cannot extend and re-ignite. Right now, I am using a fine wire mesh over this inlet port, but it is unclear if it is needed or not. The secondary air mixes with the gassified wax and rise to the top. Due to the high temperature (low density) the mixture is forces out of the outlet ports were is mixes with more air and burn. Of course, everything needs to be sized to work together, To me the key to success is defining the secondary inlet air port location and size to maintain a blue wax flame. That is my 2 cents.
Right now, I am using a fine wire mesh over this inlet port, but it is unclear if it is needed or not.
I very strongly suggest leaving it in place.
I remember testing a Chinese copy of a Whisperlite. They had made one or two tiny changes to make production easier. One of the changes let the flames reach down to the air inlet holes so the flame got inside the burner column. The whole top of the stove went bright red very quickly. And I turned the stove off very quickly. The mesh will prevent this.
Cheers
Jon’s wax stove
Pros: very efficient fuel, solid fuel, inexpensive fuel, no smell, equivalent burning hazard factor as esbit, less than alcohol and other liquid fuels, ultra cool factor, self contained stove and pot stand
Cons: Start up labor intensive (compared to other stoves), minor clean up work, best with wider pot
I would be curious to see if/how much build up of the wax by products accumulate on a pot over time, and if it is a significant handling problem while backpacking. I read somewhere this may be niche toward winter camping, but from what I am seeing at point I don’t see why it could not be viable / competitive with other fuels. I will be staying tuned for more details . . Would be fun to experiment with this also.
Looks like the stove burns too aggressively and “flame lift off” could easily occur.
Left over wax takes too long to solidify for stove to be stored.
I just watched the video again and have a couple of questions. The wick was lit, and allowed to heat up and also heat up the wax. When the wick was fully ignited the outer chamber was added and allowed to heat up. Here are the questions. I think that the lower holes, also referred to as the inlet holes, and also labeled as Pilot air in the above diagram, are covered with the mesh, while the other two rows of holes above are not covered with mesh, correct? Next question, you know the outer chamber is warm enough when the flames walk up the sides to the upper rows of holes, referred to in the video as the inside base, is this correct?
If you can’t tell, I am fascinated by this stove system and am just trying to understand better how it works.
thanks, Matt
Hi Matt
Your question assumes that Jon has a full complete understanding of every detail of how the stove works. This may, with all due respect to Jon, not be entirely justified just yet. :)
I know that it took me quite a while to understand what my Vortex Winter Stove was doing. I had to make many mistakes first.
Cheers
Hmm, I did not think the questions I asked required a full understanding of how and why the stove does what it does, it was more trying to understand the terminology being used as well as how it was built.
Q1. I think that the lower holes, also referred to as the inlet holes, and also labeled as Pilot air in the above diagram, are covered with the mesh, while the other two rows of holes above are not covered with mesh, correct? – this is just a question of how many of the holes are covered with the mesh, and if I got the names right.
Q2. Next question, you know the outer chamber is warm enough when the flames walk up the sides to the upper rows of holes, referred to in the video as the inside base, is this correct? This question is related to terminology used during the video. I believe Jon said, “we are waiting for the flames to reach the inside base” around 2:25 in the video. I was just trying to find out if he was referring to the middle row of holes, or something else when he made this comment.
Hope that clarifies my questions, and of course any other additional explanations or knowledge transfer will be thoroughly enjoyed.
Matt
I think you are spot on with the middle holes needing mesh. In my original design when the stove filled with vapor, the middle holes would leak it out, until it hit the flame, then burn back down. waste of fuel but fun to watch.
try changing the diameter of holes, maybe replace the pilot holes with x2 smaller holes, which will add “aggression”, and larger mesh hoes to slow it down (but not leak due to mesh) and possibly center the flame more? honestly the first stove I made was 100% estimate/luck and worked, so I never expanded upon it with much success, instead I focus went to working on making it smaller, but by knocking off the 2nd set of holes it gave me that lift off effect. Need to get some rocket scientists to start UL hiking..
Roger is correct that the the wax stove is in it’s infancy and there is a lot to learn. Burning wax does have similarities to alcohol and I have a fair amount of experience with that.
The Pilot holes are ~1/4″ in diameter and are simply punched holes, They are small enough to keep the flame lit but not create too much of a flame (not enough to reach the Secondary ports).
The secondary holes have the mesh.
The “outer” cylinder needs to warm up as cool metal will cool the air/gassifed wax mixture temperature making the flame smaller. As the body warms up, the flame stabilizes and grows larger. Adding the pot on top further reduces the primary burn rate (chokes) and controls the inlet Pilot air flowrate as well as the secondary air inlet flow rate.
My 2 cents.
thank you for the clarification Jon.
…Any news about this interesting type of stove? ;-)
Has been made some development?
I had missed this thread when it was active. As others have said, it seems that Russell and Jon might have laid the foundation for backpackers to begin considering wax as a stove fuel. This is an elegant design, and if a little more air could be entrained, I wonder if the issue of a wax deposit on the pot could be mitigated.
A key test that needs to be conducted is performance at 10,000 feet. This gives a lot of information as to how robust the stove will perform. I have tested it to about 5,000 feet with no issues.
another aspect is how to make it since it has so many holes. My hands get tired from all of the punching.
To Make all the holes, you could make up a punch and die set.
This will NOT be cheap! But it would work just fine.
Would it be worth while?
Cheers
Quick update, I have decided to name this stove the Indigo Wax Stove. I was planning on showing it at the So Cal GGG, but the meeting ended prematurely. Here is the update:

Day in and day out, I can boil 2 cups of water in about 8 minutes. But more exciting that that…

I am getting close to a soot free burn. There is a waxy residual left over, but you can wipe it away with a paper towel. Preliminary testing with crayon were positive, The stove is nearly complete. Things left to do:
- Speed up the ignition time
- Review intellectual property, in particular Gatt
- Do more testing
- Test other waxes
That’s all for now
Thanks for the update Jon!
Become a member to post in the forums.
advertisementYour privacy is protected: We do not transmit your user data to third-party ad platforms or advertisers, and we do not host third-party tracking pixels. Backpacking Light serves ads on its own custom, native, and internal platform.
 New Ultralight GearSee the latest releases in ultralight cottage-brand gear from small makers.