I'm mostly echoing James's response above. You are likely to see the biggest jump in efficiency by installing fins on the pot. Feel for heat coming off your stove. Any hot spots are an area to insulate. If the exhaust gas is hot either slow down your burn rate or increase the surface used to extract heat (fins!). Make sure your flame is getting plenty of air for as complete of combustion as possible.
Topic
More Foster’s Fun
Become a member to post in the forums.
- This topic is empty.
I think to hit supper high efficiencies, someone will need to make a radically different pot. Fins yes, but I think it would help to have a donut shaped pot ssimilar to those cake pans. More surface area to volume can be a good thing. The pot may not be very practical but the efficiency could be higher. Jon
> Efficiency = 65.2%
Not bad!! Change being a bit of reflectix UNDER the stove, if I am understanding correctly–is that what you're calling a "floaty"?
BTW, are you adjusting for altitude? What IS your altitude?
A spreadsheet that takes altitude into account is found here, scroll down:
> I've tried just about everything I can think of at this point.
…except a wide pot, of course.
Yes, best efficiency yet! Big gratz on it too! But I'd never be able to fit a water bottle in a pounder can lol
At this point I'm strictly sticking with the best efficiency I can get out of a Fosters system (hence the thread title). I've no doubt there will be efficiency improvements to come from other systems, but most involve changing the pot, which is what this system revolves around. As I mentioned in my initial post, packability is a very primary concern, to the point of sacrificing minor efficiency. Being able to essentially eliminate the cook system from a pack via the water bottle carriage position seems the way to go from what I've seen so far. Yes, you can pack your pot full of socks and what not, but relatively speaking, that just lacks style and grace, which is admittedly a highly personal opinion.
There are variations to this of course. Small cups, but then it's back to windscreen storage I had such trouble with back on page one. Not to mention they're well, small. 500ml is the bare minimum I would even consider for my practices. The MLD 850ml Ti pot keeps calling to me, as well as the newer Toaks 850ml, but compared to a Fosters, they are heavy and possibly too wide to fit a smaller water bottle pocket. The cozy could be foregone with a Ti pot however, since one could cook in the pot during heating, leaving FBC behind. This trade off is enticing in its own rite, as it opens up a wide variation of recipes, as well as open fire options.
Part of the whole construct of using a thin-walled beer can design is in its packability. They go hand in hand, and just like the rest of a UL kit, need to be incorporated into ones entire system and not be just a bolt-on addition. They are too easily damaged and need to be protected somehow, which brings about all kinds of kool-aid containers, specialty tubes, windscreen wraps and so on. But these all just make the cook kit an add-on to ones pack. Eliminating cataclysmic damage is up to the user, since little can protect it from squishing it between you and the rock you fall on, but with a water bottle inside, and now a windscreen outside, any kinking damage that might possibly occur is greatly reduced.
Another consideration is how the water bottle carries inside the pot. In a Fosters, it's a perfect fit, easy to pull out, yet not loose enough to fall out. Which is the reason I've went with the 700ml SmartWater bottle for this design. In a pot, it has a tendency to rattle around and fall out if just bending over a little, which is a big reason I don't cut down my Fosters and put a tuna can ring on it. Even though it would be much easier to clean and not leave water inside from the reverse lip of the original can lid, it doesn't hold a water bottle effectively enough. Maybe other bottles would fit more properly in these other pots, but then they'd lack the standard cap threading, which for me, is another incorporation factored into my system.
So anyway, system efficiency is great and all, and I know Delmar started a thread devoted to just such an effort, but at this time I'm not chasing efficiency just for efficiency's sake. Because after all, packing a pack has an efficiency rating too :)
Delmar: The "floaty" is actually a piece of reflectix that floats on the surface of the water. I was trying to come up with a way to minimize heat loss from the top of the water.
I have not been adjusting for altitude, though I always include barometric pressure in my parameters so it can be done. My altitude is 17 feet. When a high pressure zone comes in I sometimes don't get a boil until 212.5 – 213.5* F.
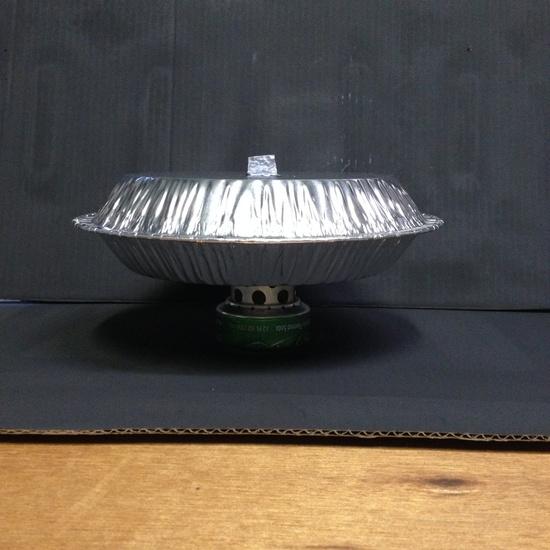
I tried a wide "pot." A VERY wide "pot," being two cheap pie tins from the local grocery store. Major PITA, very careful balancing required, spilled it three times (once when it was close to boiling), and on top of all that, so much surface area of the water radiating heat out of the top that it was actually less efficient than a Foster's pot. Never got a boil, even with 16 ml of fuel. And totally impractical for backpacking, just trying different things to see what kind of efficiency could be achieved. Sorta looks like a UFO:
I've also used an Imusa Grease Pot, but there is too much aluminum mass soaking up the heat instead of the water.
Glenn: Sorry, I missed that Delmar had started a stove efficiency thread or I wouldn't have messed up your thread with a less packable system. I will post my non-Fosters results on Delmar's thread from now on. Thanks for your insights and suggestions. Regarding the reverse lip you referred to at the can top, are you using a side-cut can opener?
No side opener, I've never even seen one. I've just been cutting around… And around, and around… The top with a utility knife. I thought about ordering one, since I've never seen them in the store, but figured that I'm not mass producing these things, so no point buying a special tool. I also figure the doubled lip adds a great deal of sturdiness to the mouth anyway, and a weak pot like this needs all the rigidity it can get.
I like the raised ridge idea for sturdiness as well, but I'm hesitant to use it because of the cozy incorporation for my FBC.
No worries about a little thread sidetrack, it's not like I've never done it lol. They all kind of run together anyway. I just won't be getting too involved with other pot styles at the moment is all. I'm just keeping my eye on streamlining good utilization from a Fosters system, and then I still want to dial in my BushBuddy setup a little better too, but I have to wait for my Nomad stove to arrive. I ordered a "seconds" and it's supposed to be done around the end of this month is what I was told.
I hear you about around and around and around. I used to use a "scratch awl". I also hear you about the added rigidity of the can mouth with the extra bit of Al there. Some slight benefits of the side cut openers is that you can use just one can to get both the pot and the lid, and the lid seems to seal tighter.
If anyone is interested, "Good Cook" side cut "safe" can openers are available at Amazon.
Side openers aren't bad. I didn't think that I needed one. But then I got one and now I wonder how I ever did without it.
–B.G.–
I’ve posted what I hope to be the first completed spreadsheet version for alcohol stove efficiency testing that makes allowances for elevation and barometric pressure and placed it at the end of this post. It’s what I’d classify as an early advanced model, but with the ease of basic user functionality. I wouldn’t mind a little peer review to check for errors, etc.
Visit Delmar’s thread on stove efficiency testing to place your results if you’d like to participate.
Glenn, Delmar & Ben: Thanks for all of your work on the spreadsheets. They are excellent and very useful.
David, I know the elevation factor won't have much impact on your test results, but perhaps the barometric pressure will bring some uniformity to your testing.
For my Fosters kit, I'm currently baking my can in the oven to burn off the lining as you demonstrated. I'm not worried about the BPA factor, but perhaps the lining could be acting as a bit of an insulator, similar to the way scaling effects a hot water heater performance.
You've set the bar pretty high at over 65%, so in the interest of friendly competition, I thought I'd try a little variation. I won't be creating any reflectix bobbers however, but it does focus on a good point of dead air space.
Edit: Well, I got my can out of the oven and by the looks of it, it did an effective job of burning off both the lining and the paint. Unfortunately the temper of the aluminum is gone and is about as malleable as aluminum flashing, only without the thickness. I'm not so sure this would hold up very well. It certainly lacks the rigidity and firmness it once had. It dents very easily and doesn't "pop" back at all like an unbaked can does. The interior also has a strong plastic odor, even after heavy scouring with a green scotch brite pad, perhaps from around the lip ring. I'll do a few boils and see what happens…
Boiling seemed to eliminate the odor, I'm guessing it steamed out the lip ring. Boil times didn't improve any, but I wasn't really expecting them too, just trying stuff. The more I handle the can though, the more dented up it gets. It just doesn't have the body or strength it once had. Feels more akin to thick aluminum foil now than a rigid beer can. Ah well, it was worth a try :)
Hey Glenn,
I like the formula incorporating barometric pressure. I have noticed the effect of barometric pressure on "boil" times. Since I'm virtually at sea level (17 feet) the barometric pressure is often over 30 inHg, and I've gotten boil temps as high as 213.5* F. Being able to correct for that would be very useful.
Now I just need to get my own barometer so I'm not relying on a "local" source on line that I have no way of checking. While I'm at I think I'll pick up a hygrometer to check humidity too.
Also want to get an anemometer to check wind speed. Planning to do some "practical" testing in 3-5 mph breezes to check out the effect of different stove and windscreen designs. Wondering if what works best in the lab doesn't work as well in the real world compared to some other design that doesn't perform as well in the perfect environment of the lab but works better in real life. I had one stove design that was a champion in the lab (5 min boil times with 15 ml fuel), but the slightest whiff of a breeze totally threw it off.
Yeah, the annealed cans are malleable. Ridges make a big difference, but making them is probably not practical for most people who want to get rid of the plastic lining. For those who don't care about the plastic, Zelph is the go-to guy for ridged cans. One thing about the annealed cans, though more easily deformed, is that they can be re-shaped easily, whereas a similar ding in an unannealed can is pretty much permanent.
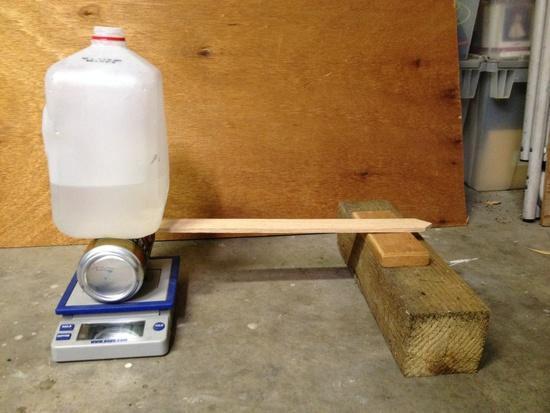
Planning to do some crush tests on annealed vs. unannealed cans, and the same with ridged annealed vs. ridged unannealed. Here is the rig I was thinking of using, but I'm open to suggestions:
The idea is to slowly add water to the jug, with the postal scale underneath weighing the load, until the can collapses. The narrow stick is so the load will be concentrated in the middle of the can, rather than on the disproportionately strong ends. A lot of cans will have to die for this one….
Hoping to get a copy of the "Open Class" spreadsheet. Did I miss it somewhere?
Not sure what is being called “open class”. All I have is the one with barometer and elevation entries. It’s “open” for anyone to add to it though. I have the formulas all listed back on page 2 of this thread.
Become a member to post in the forums.