Topic

creating holes in ccf pad

  • This topic is empty.
Viewing 25 posts - 1 through 25 (of 27 total)
victor larivee BPL Member
PostedFeb 23, 2014 at 1:06 pm

I want to create a ccf back pad for my gg gorilla pack that enhances air circulation. Thought if I was able to cut lots of holeS in a wally world ccf blue light special (wait that's Kmart) that might do it. Trying to cut circles in the ccf has proven to be more challenging than I thought. Any suggestions?

victor larivee BPL Member
PostedFeb 23, 2014 at 2:05 pm

Thanks Matt looking to also make one for your old zpacks zero. Loving it so far

PostedFeb 23, 2014 at 2:11 pm

I suppose it depends no what size holes you're shooting for and how pretty you want it… but I'd think that whatever you do, you need thin & SHARP cutting tools.

If not worries about prettiness… for small holes, I'd think a small paddle bit and a drill would do well enough to punch a bunch of holes quickly. If larger and you don't care about them being circular, a sharp utility knife should be fine.

If you want prettier, clamping the material between two pieces of wood will make the cuts cleaner.

I'm also thinking some sort of large syringe style "needle" made out of rolled aluminum flashing could be pretty sweet too. Have the leading edge beveled so it slices through. You'd probably be limited to holes bigger than ~1" though.

Gary Dunckel BPL Member
PostedFeb 23, 2014 at 2:16 pm

You could heat up a metal rod of the right diameter (like 1/2" rebar?) over your pocket rocket stove, then melt the holes where you want them. This should work, but you might have to trim the edges of the holes with small scissors. Wear gloves, as the rod would get pretty hot, right?

Tad Englund BPL Member
PostedFeb 23, 2014 at 3:33 pm

Rather than a metal rod you could use a metal/plastic/ABS/PVC pipe and cut your holes. Roughen up the end and it will cut great.

Also, if you melt the holes they may have a hard edge (uncomfortable) that the scissors might not get.

Jesse Anderson BPL Member
PostedFeb 23, 2014 at 7:18 pm

I seem to remember Roger showing a pillow he made out of an open cell foam. If I remember correctly he used a length of copper pipe that he lightly sanded the inside of to sharpen the end a bit, then with used that to punch a grid of holes through the foam. Sounds quite a bit like what you suggested and the results I remember seeing were pretty good.

Roger Caffin BPL Member
PostedFeb 23, 2014 at 7:56 pm

As Jesse said.
Basically, you make a large cork borer (Google it). A drill press helps. If you sharpen the end of the tube (I used stainless steel tubing), which makes for a much neater cut, never ever put your finger up inside the tube when it is rotating!

Cheers

Dale Wambaugh BPL Member
PostedFeb 23, 2014 at 11:27 pm

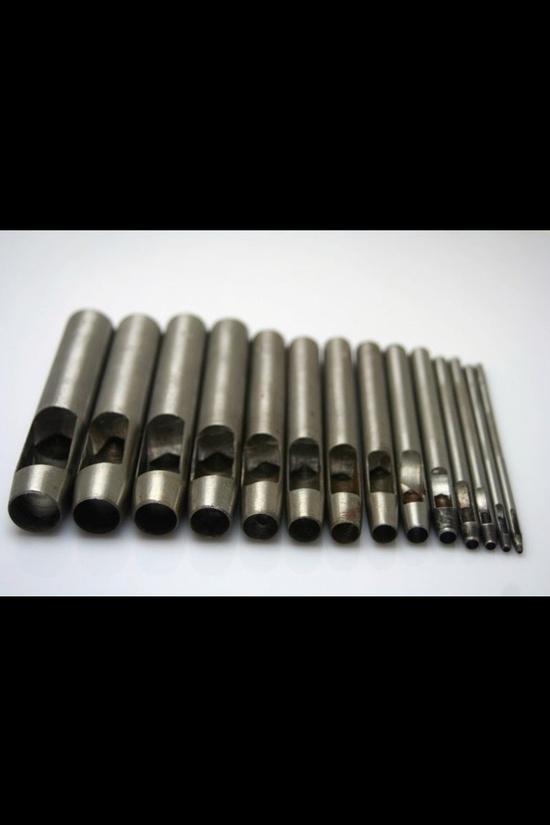
You can buy driven leather punches in a variety of sizes. Whack the end with a hammer with the pad on a solid surface. If it will cut leather, a CCF pad shouldn't be too hard.

Driven leather punches

PostedFeb 24, 2014 at 12:02 am

It's just blue foam, any thin-walled piping would probably be just fine, even without sharpening the edges up. How big do you want the holes? Cut around the edge of a small steel can and it'd be plenty sharp enough. Twist and press and bore right thru it.

PostedFeb 24, 2014 at 5:35 am

If you want larger holes, like 1.5" diameter, you could buy a little can of tomato paste. Instead of opening it up so that the lid is cut out, you can position the can opener so you cut around the side of the can. You'll have a nice sharp cylinder, plus you can myog some tasty sauce.

PostedFeb 24, 2014 at 5:41 am

Ya, that's the steel can idea I was getting at.

I just got home and was curious, so I took the bottom part of a trial size Barbasol shaving cream can, which is about 1 1/4" diameter, and tried boring a hole with it. The cut off edge is real smooth, since this is what I make my alc stoves out of. It didn't cut very well at all. So I dug out my hole punch and made 5 half- hole punches around the top to work like teeth. It bored thru it like butter. Not the smoothest cut, but man was it fast, and plenty acceptable results IMO. The less pressure I applied, the smoother the cut was.

PostedFeb 24, 2014 at 8:16 am

I think this was the basic idea I was conceptualizing, just in an odd way. If you didn't want to buy a pipe or wanted quick modification of size, you could take a wooden dowel and hose clamp a small piece of aluminum flashing around it to make the punch… then to increase size, wrap filler around the rod (tape, cardboard, etc) to get to desired diameter and then put flashing back on. Serrate the edge like glenn mentioned and it would cut great.

Art … BPL Member
PostedFeb 24, 2014 at 8:45 am

I think the more technical side of this issue is what size should the holes be.
anyone have any insight on best hole size ?

Dave @ Oware BPL Member
PostedFeb 24, 2014 at 8:47 am

Some soft metal pipe. The use one of these or a round file or a stone on a dremmel to sharpen it inside and out.

http://www.harborfreight.com/media/catalog/product/cache/1/image/9df78eab33525d08d6e5fb8d27136e95/i/m/image_7652.jpg?01AD=3C1dpNmVCQVQJIZa0XVD07TD2aOLVih4SzcqidE345tgFns-EZuWiXQ&01RI=029088F54BA9EA9&01NA=na

then use a hammer and a piece of trex or soft wood to punch the holes.

You might also try a holesaw with the foam held flat with a piece of plywood as a clamp and template.

PostedFeb 24, 2014 at 10:21 am

As far as hole size and placement, that might require a bit more trial and error. No need to make them all the same size. I guess I'd start with a full pad, then load up the pack to the max and wear it. Take note of where the biggest pressure points are, like the shoulder blade area, and make smaller holes there, then larger holes out along the mid sides where there's less pressure and padding needed. You wouldn't want your pressure points falling in and out of holes causing chaffing and such.

I also wonder if swinging your arms back and forth will be enough motion to pump the air through the holes to circulate it. Sleeping pads already incorporate holes for pockets of warm air to be trapped. Might need some horizontal channels cut in the pad too, to let it breathe

victor larivee BPL Member
PostedFeb 24, 2014 at 5:58 pm

Thanks for all the suggestions. I ended up going with the tools I had on hand, a 3/4" spade drill bit and a soldiering gun. I created grid lines on the pad 1.5" apart then drilled through the CCF into a piece of wood. I first drill one row then offset the next row. After all the holes were drilled I then used the soldiering gun tip to melt lines connecting each hole and to allow air to flow in the sides. Pretty much came out like I hope and at only 42 grams should work.

blue pad with holes

PostedFeb 24, 2014 at 6:08 pm

Sweet! Looks like the paddle bit did pretty decent holes actually! Cleaner then I would have expected. Does your solder gun have a bunch of blue goo on it now?

I guess the big question now is which SIDE will be against your back? The initial "obvious" answer to me was the side w/ the grooves melted in, BUT thought about it more and those may be kinda crunch/uncomfortable, and the clothes/skin on your back may fill in the vents negating them worthless. Might make more sense to have the grooves away against the stiffer, straighter backpack. Let us know how it works out.

victor larivee BPL Member
PostedFeb 24, 2014 at 6:18 pm

Ya after pondering the thought for a little while I think the groove side will go against the pack. I agree that my cloths would probably fill in the gaps worse than the pack would and the smoother side would probably feel better against my back.

PostedFeb 24, 2014 at 11:57 pm

I thought about that too. Should be easy enough to try both sides in the field though. Keep us posted on which way works better. Nice job!

PostedFeb 25, 2014 at 6:59 am

One other thing to note… have you thought about doing "vertical" ventilation slots as well? Again, not sure which side would make the most sense, but probably the same side as you started with. My not do anything, but could be a good way to get a little more venting w/o cannibalizing the pad too much.

Jeffrey Wong BPL Member
PostedFeb 25, 2014 at 12:16 pm

Great thinking and use of the big box store as our equipment source!

I may have missed how you plan to position the pad. Am I far off thinking you'll use mesh to make a sleeve with top access so that you can play with the design? I'm trying to think where one can get that nearly free.

Viewing 25 posts - 1 through 25 (of 27 total)
Loading...